TP-Link Deco M9 Plus – флагманская модель Mesh Wi-Fi системы от компании TP-Link. С помощью этой Mesh-системы можно не только создать быструю, стабильную, бесшовную Wi-Fi сеть с большим радиусом действия, но и использовать ее как центр для умного дома. Объединив все необходимые датчики и устройства в одном приложении. И для этого не понадобится устанавливать дополнительный хаб, его функции будет выполнять Deco M9 Plus.
Эта Mesh-система продается в двух вариантах: в комплектации из двух, или трех модулей. У меня Deco M9 Plus (2 pack), которая обеспечивает покрытие до 418 кв. м. Но мы можем добавить в сеть еще необходимое количество модулей, тем самым значительно увеличить радиус действия беспроводной сети. Это дает возможность создать единую Wi-Fi сеть в большом доме, квартире или даже офисе. При этом все подключенные устройства будут всегда в одной сети, как будто они подключены к одному маршрутизатору. Никаких разрывов, плохого сигнала и т. д. К Deco M9 Plus можно одновременно подключить более 100 устройств.
Это трехдиапазонная Mesh Wi-Fi система: до 867 Мбит/с на 5 ГГц (1), до 867 Мбит/с на 5 ГГц (2), и до 400 Мбит/с на 2,4 ГГц. Общая скорость беспроводного соединения до 2134 Мбит/с. При этом соединение между самими модулями происходит по выделенному беспроводному каналу, что позволяет максимально снизить потери скорости между устройствами. Ну и конечно же главная фишка – технология Mesh. Полностью бесшовная Wi-Fi сеть во всем радиусе покрытия беспроводной сети. Одна сеть с автоматическим, быстрым и незаметным переключением устройств между моделями TP-Link Deco M9 Plus.
Ну и наверное самая интересная особенность Deco M9 Plus – возможность работать как центр (хаб) для умного дома. Эта система поддерживает подключение разных устройств и датчиков с поддержкой протокола Zigbee, Bluetooth или Wi-Fi. Это самые разные датчики движения, приближения, утечки воды, сенсоры открытия дверей/окон, замки, умные розетки, выключатели, лампочки и т. д. Deco M9 Plus обеспечит надежное соединение для всех устройств умного дома и позволит управлять их работой через единое приложение. Список совместимых устройств есть на сайте TP-Link, можете посмотреть его по этой ссылке. Я так понимаю, что поддерживаются устройства только из этого списка. Просто разных устройств/датчиков с поддержкой того же протокола Zigbee на рынке есть огромное количество. Но на сайте TP-Link они не указаны.
Так же есть поддержка функции TP-Link HomeCare, в которую входит родительский контроль, приоритизация (QoS) и антивирус от Trend Micro. Все это позволяет создать безопасную сеть с возможностью персонализации.
Обзор комплектации и внешнего вида TP-Link Deco M9 Plus
И по традиции начинаем с упаковки 🙂

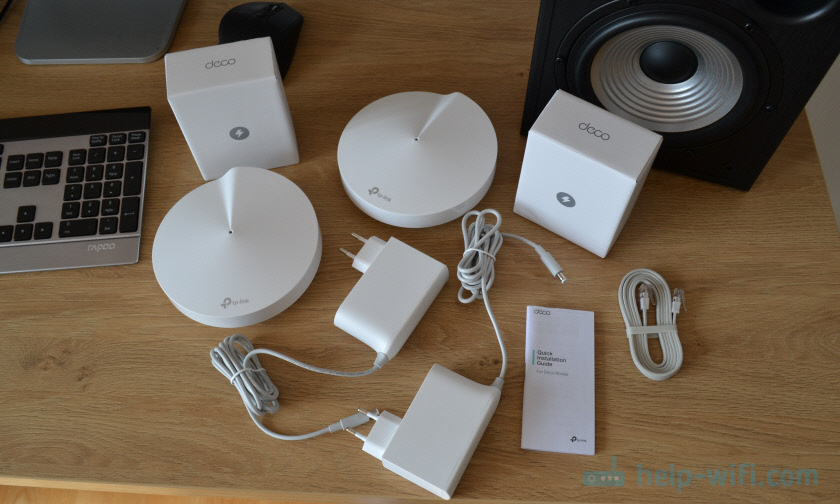
Внутри красиво упакованы два модуля Mesh Wi-Fi системы. Напомню, что есть комплекты из 3-х модулей.

Под ними находятся коробочки с блоками питания, сетевой кабель и инструкция. Это вся комплектация данной Mesh-системы.
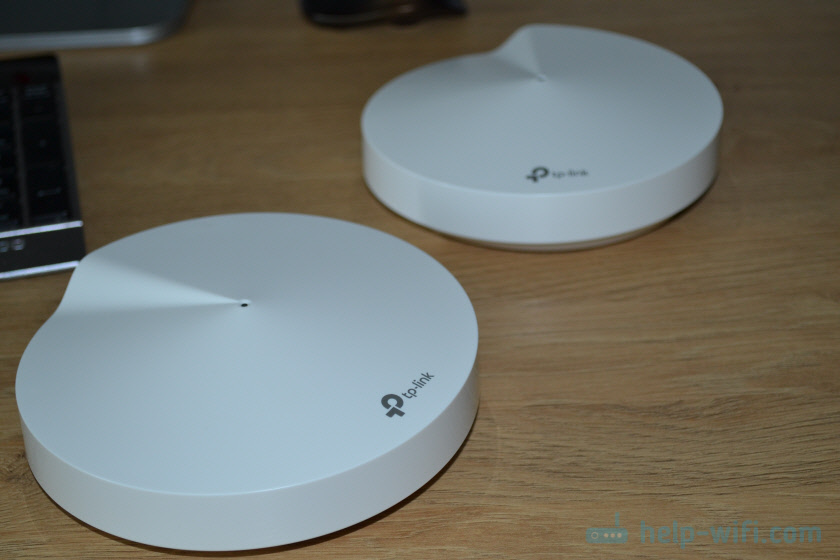
Сами модули выполнены в форме небольших дисков. Очень качественный пластик и сама сборка. Устройства выглядят стильно и дорого.

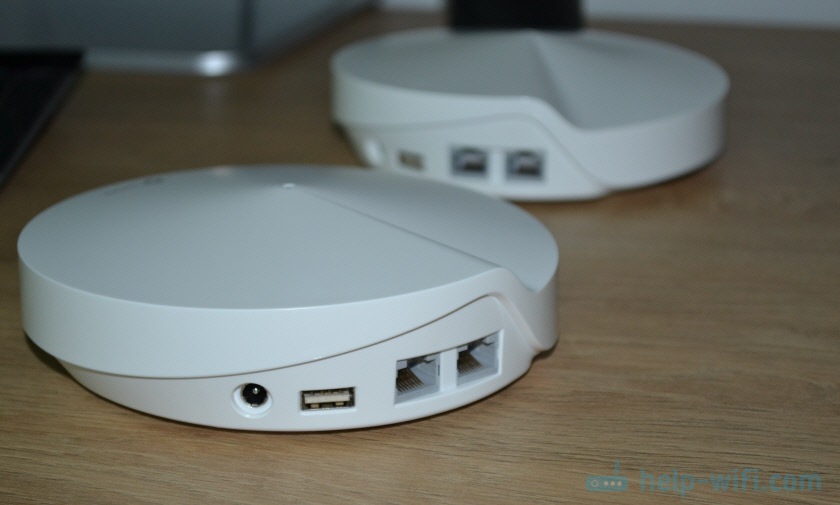
На каждом из модулей расположены два порта Ethernet, 1 USB-порт и разъем для подключения питания.
Сверху находится один светодиодный индикатор и логотип компании TP-Link.
Снизу есть большие резиновые ножки, наклейка с заводской информацией и кнопка Reset для сброса настроек Mesh Wi-Fi системы до заводских.

Классный дизайн и отличное качество всех деталей. Даже блоки питания и сетевой кабель сделаны очень круто. Флагманское устройство.
Настройка TP-Link Deco M9 Plus
Процесс настройки максимально простой и понятный. Перед настройкой необходимо:
- Установить на телефон приложение Deco из App Store или Google Play.
- Зарегистрировать учетную запись и зайти в нее (в приложении).
- Включить на телефоне Bluetooth и Wi-Fi.
Дальше подключаем интернет (кабель от модема, или напрямую от провайдера) к одному из модулей в любой LAN-порт. Подключаем модуль Mesh Wi-Fi системы к питанию. Индикатор должен мигать синим цветом. Если через минуту после включения он не мигает синим — сделайте сброс настроек.

В приложении Deco нужно нажать на кнопку «Приступим» или добавить новую систему. Дальше выбираем нашу модель Deco M9 Plus. Появится информация по подключению, поиск и подключение к модулю Deco по Блютуз. Когда соединение будет установлено, начнется процесс настройки.

Нужно выбрать тип подключения к интернет-провайдеру и задать необходимые параметры. Оставить стандартный MAC-адрес, или прописать его вручную (если провайдер делает привязку по MAC-адресу). Так же нужно задать имя Wi-Fi сети и установить пароль. После завершения настройки подключите свой телефон к этой Wi-Fi сети.

После настройки первого модуля вы можете сразу перейти к настройке второго модуля. Но перед этим подключите второй модуль Deco M9 Plus к питанию и дождитесь, когда индикатор начнет мигать синим цветом.

Для настройки второго модуля нужно просто добавить его в приложении. Ваш телефон должен быть подключен к Wi-Fi сети главного модуля Mesh Wi-Fi системы.
В процессе настройки второго модуля понадобится выбрать модель «M9 Plus» и расположение (этаж и комнату). После чего модули обнаружат друг друга и будет установлено соединение.

Таким же образом можно добавить «умные устройства». После настройки вы можете вернуться в приложение для дополнительный настройки и управления своей Mesh Wi-Fi системой. Управлять TP-Link Deco вы можете не только через приложение с телефона, но и через веб-интерфейс с компьютера.
Я настоятельно рекомендую включить в настройках функцию «Быстрый роуминг», о которой я писал в статье бесшовный Wi-Fi. Быстрый роуминг (802.11r) в настройках Wi-Fi Mesh систем. Если эта функция отключена, то у вас не будет бесшовной Wi-Fi сети. А отключена она по умолчанию по той причине, что могут быть проблемы с подключением старых устройств. Почитайте статью, там я все подробно описал.

 Smart Home Mesh Wi-Fi System
Whole Home Wi-Fi | Seamless Roaming | Parental Controls | Antivirus
User Guide
AC2200 Smart Home Mesh Wi-Fi System
Deco M9 Plus
1910012979 REV2.0.0 © 2021 TP-Link
Contents
About This Guide····················································· 1
Appearance································································ 2
Set Up Your Deco···················································· 3
Add More Decos······················································ 6
Dashboard··································································· 7
Check Deco Status················································ 8
Manage Connected Devices···························· 9
Create New Networks·········································10
Remove/Reboot Deco········································12
Shortcut······································································13
Automation·······························································14
Wi-Fi Settings··························································16
Internet Speed Test··············································17
Network Optimization·········································18
Blacklist·······································································19
Online Upgrade······················································20
WPS··············································································21
Parental Controls···················································22
Antivirus······································································23
QoS···············································································24
Monthly Report·······················································25
Managers···································································26
Advanced Features··············································27
Authentication·························································32

About This Guide
This guide provides a brief introduction to AC2200 Smart Home Mesh Wi-Fi System and the Deco app, as well as regulatory information.
Features available in Deco may vary by model and software version. Deco availability may also vary by region or ISP. All images, steps, and descriptions in this guide are only examples and may not reflect your actual Deco experience.
Conventions
In this guide, the following conventions are used:
|
Convention |
Description |
|||||
|
Deco |
Stands for AC2200 Smart Home Mesh Wi-Fi System/Unit. |
|||||
|
Underline |
Hyperlinks are in teal and underlined. You can click to |
|||||
|
redirect to a website or a specific section. |
||||||
|
Teal |
Key information appears in teal, including management |
|||||
|
page text such as menus, items, buttons and so on. |
||||||
|
Note: |
Ignoring this type of note might result in a malfunction |
|||||
|
or damage to the device. |
||||||
|
Tips: |
Indicates important information that helps you make |
|||||
|
better use of your device. |
||||||
More Info
•Specific product information can be found on the product page at https://www.tp-link.com.
•A community is provided for you to discuss our products at https://community.tp-link.com.
Speed/Coverage/Device Quantity Disclaimer
Maximum wireless transmission rates are the physical rates derived from IEEE Standard 802.11 specifications. Range, coverage, and maximum quantity of connected devices are based on test results under normal usage conditions. Actual wireless data throughput. wireless coverage, and quantity of connected devices are not guaranteed and will vary as a result of 1) environmental factors, including building materials, physical objects, and obstacles, 2) network conditions, including local interference, volume and density of traffic, product location, network complexity, and network overhead, and 3) client limitations, including rated performance, location, connection quality, and client condition.
HomeCare Disclaimer
A basic TP-Link HomeCareTM, powered by Trend MicroTM, package is included for 3 years from date of activation at no additional cost. It includes Parental Controls, Quality of Service, and Antivirus. Deactivation of HomeCareTM will disable certain controls and protections. For a complete list of HomeCareTM functions, go to https://www.tp-link.com.
IoT Compatibility Disclaimer
IoT compatibility refers only to smart devices that can be controlled via the Deco app. Other wireless devices can still connect to Deco for normal Wi-Fi use.
Seamless Roaming Disclaimer
•Our Technical Support contact information can be found at the Help center of the Deco app and the Contact Technical Support page at https://www.tp-link.com/support/.
Clients need to support 802.11k/v/r and may require additional set up. Performance may vary depending on the client device.
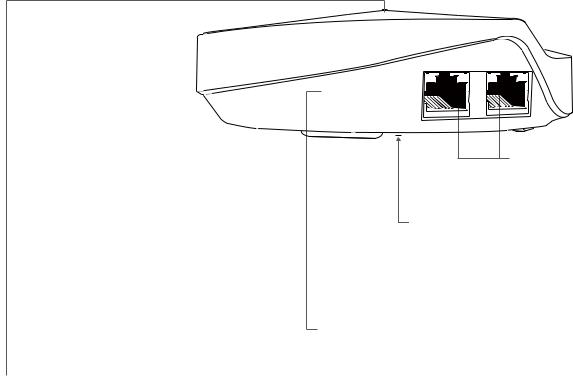
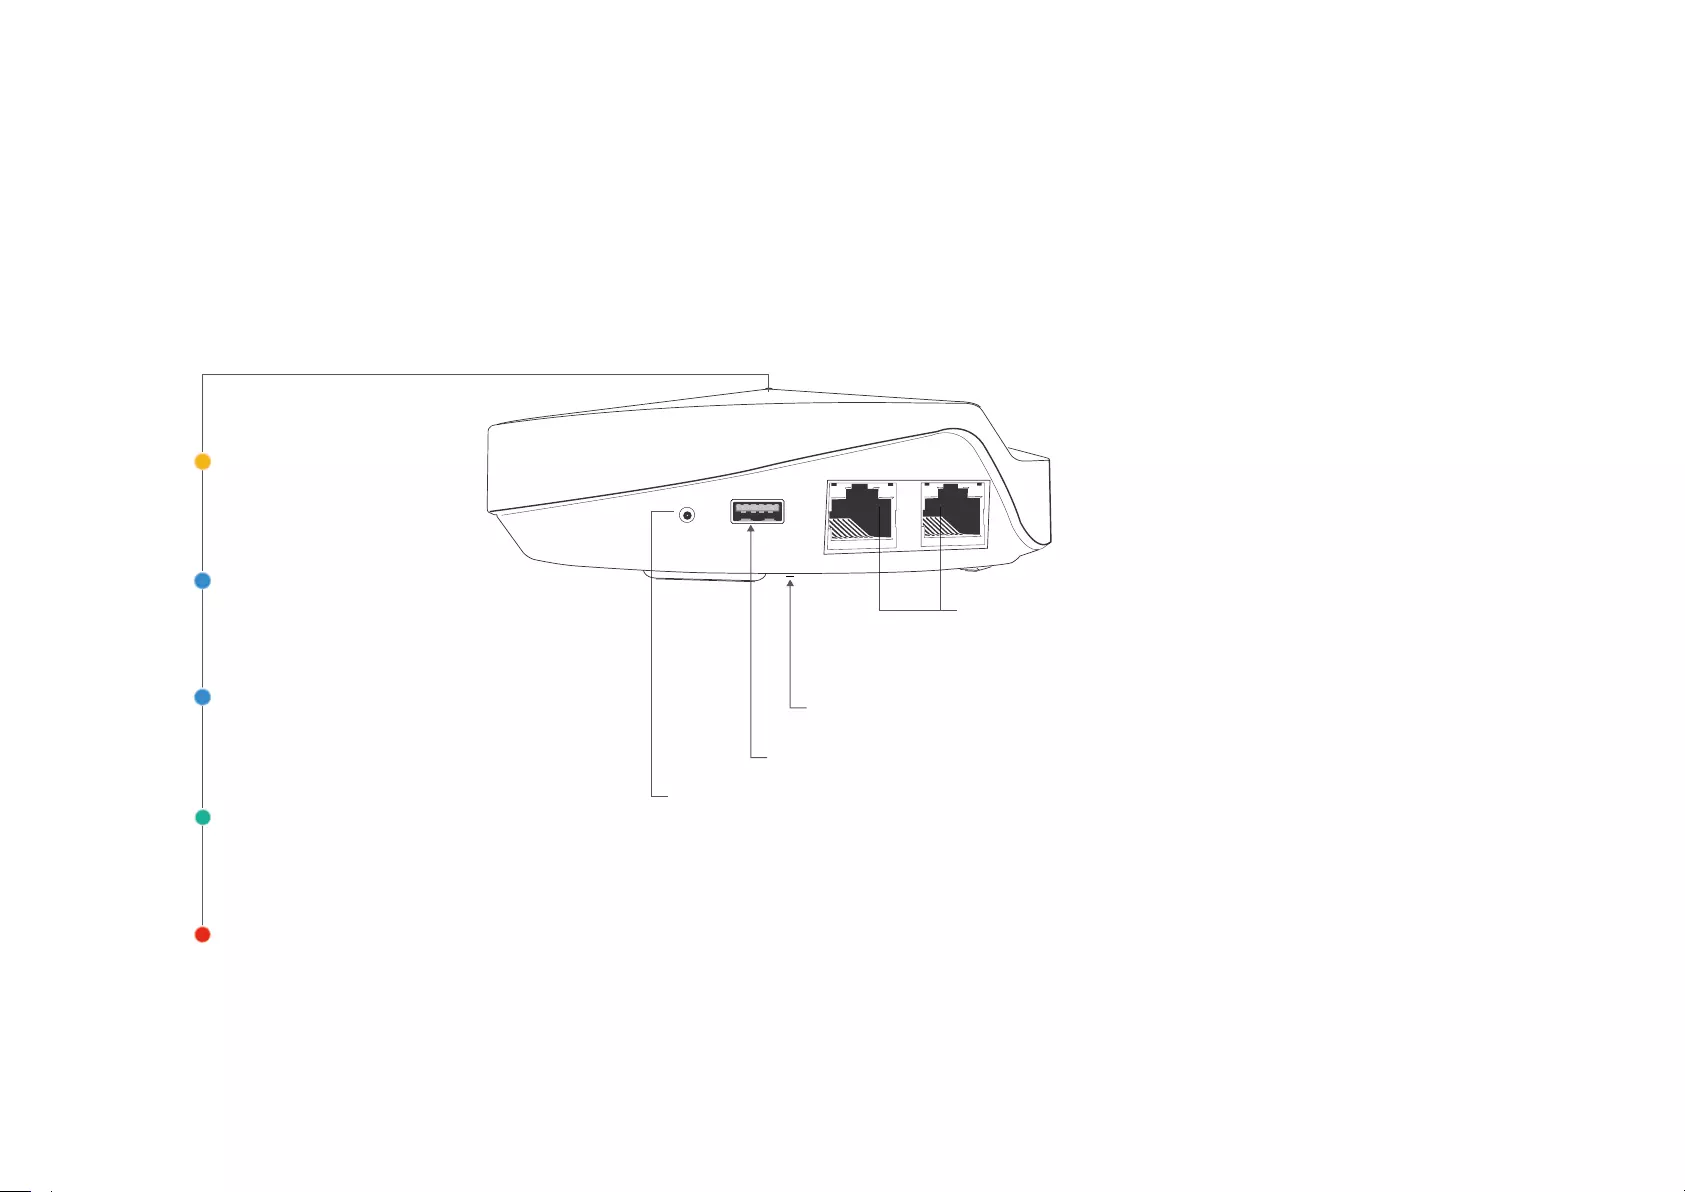
Appearance
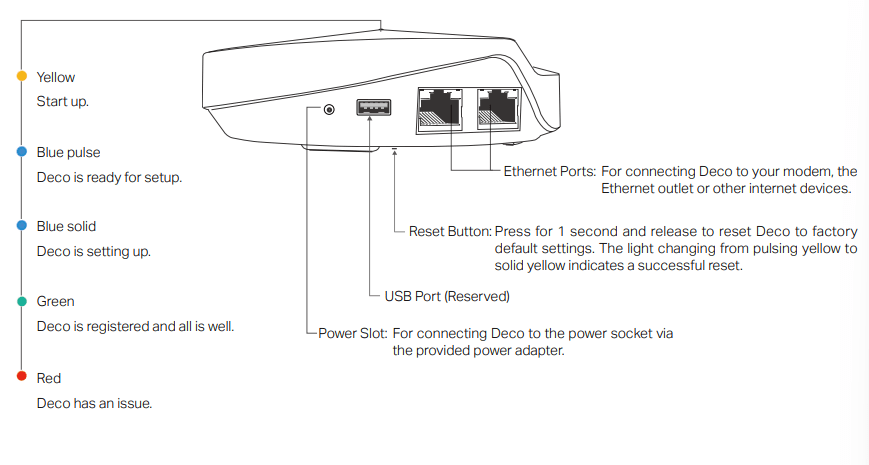
Each Deco has an LED that changes color according to its status, two RJ-45 Ethernet ports and a power slot. See the explanation below:
Yellow
Start up.
Blue pulse
Deco is ready for setup.
Blue solid
Deco is setting up.
Green
Deco is registered and all is well.
Red
Deco has an issue.
Ethernet Ports: For connecting Deco to your modem, the
Ethernet outlet or other internet devices.
Reset Button: Press for 1 second and release to reset Deco to factory default settings. The light changing from pulsing yellow to solid yellow indicates a successful reset.
USB Port (Reserved)
Power Slot: For connecting Deco to the power socket via the provided power adapter.
2
Set Up Your Deco
The intuitive Deco app guides you through an easy setup process that gets each unit up and running and all your devices connected and online. Follow the steps below to set up your Deco Whole Home Mesh Wi-Fi System.
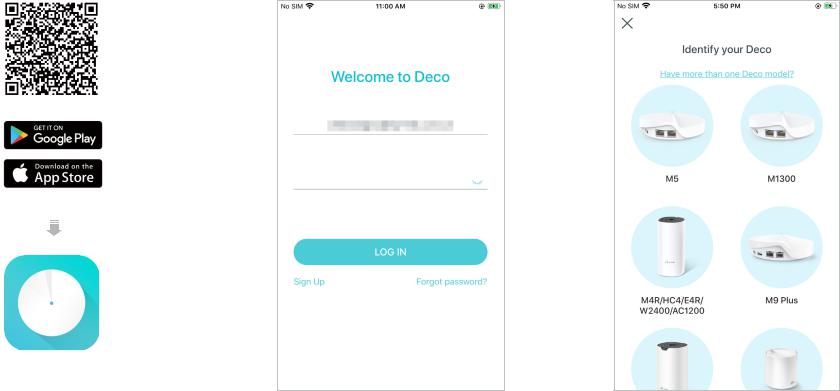
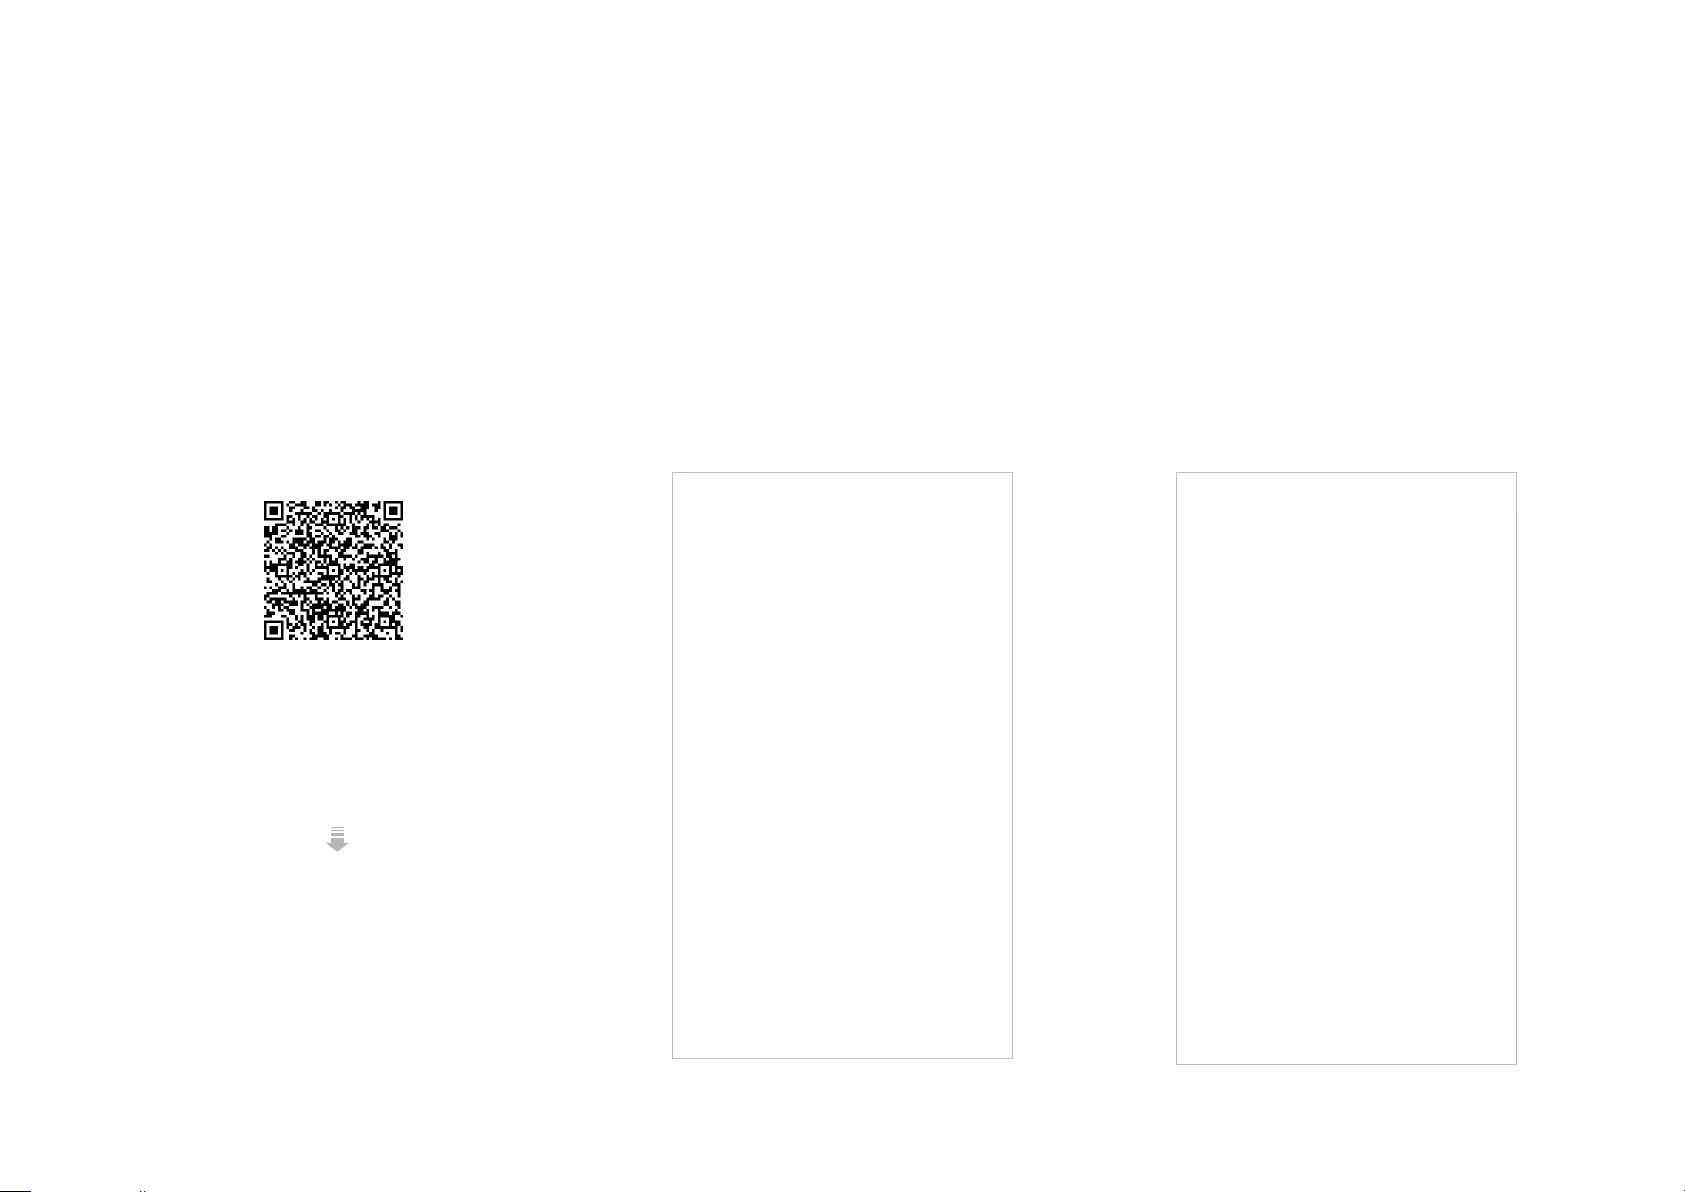
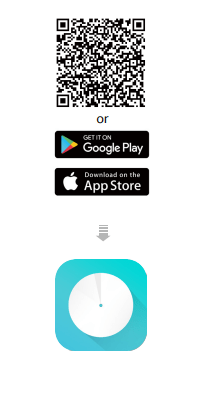
1. Download and install the Deco app
Scan the QR code below or go to Google Play or the Apple App Store to download the Deco app. Install the app on your Android or iOS smartphone or tablet.
|
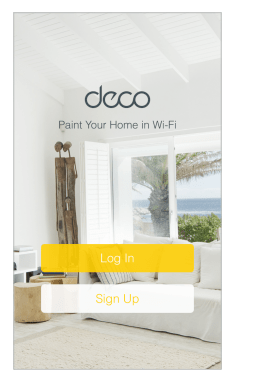
2. Log in or sign up with TP-Link ID |
3. Identify your Deco |
|
Open the app. Use your TP-Link ID to log in. If |
Choose your Deco model. |
|
you don’t have a TP-Link ID, sign up first. |
 Note: If you forgot your login password, tap Forgot password?.
The Deco app will guide you through the rest.
or
3
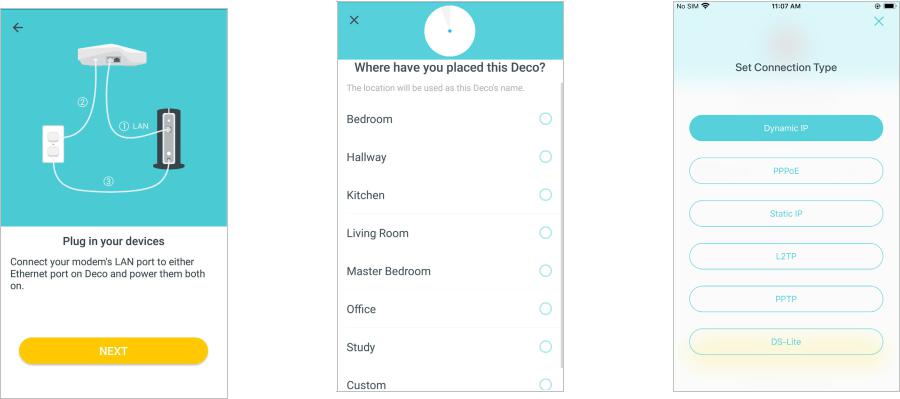
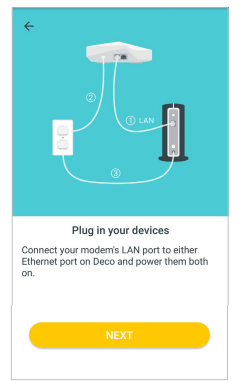
4. Connect your modem to Deco
Power off your modem. Connect your Deco to the modem and power them both on.
If you don’t have a modem, connect the Ethernet outlet directly to your Deco.
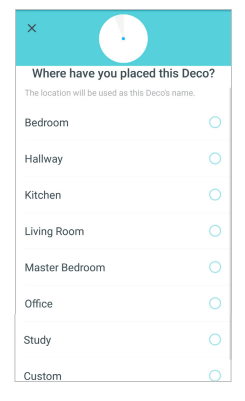
5. Select a location
Select a location for this Deco. If its location is not listed, you can create a new one by choosing Custom.
6. Set up internet connection
Select the internet connection type and enter the information. If you are not sure, contact your internet service provider.
4

7. Create your Wi-Fi network
Set a network name and a password. These will be the name and password you use to connect your devices to Wi-Fi.
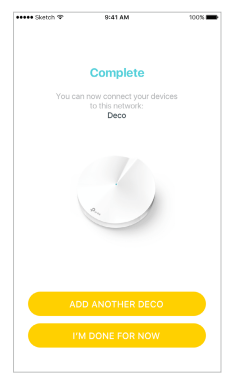
8. Setup complete
Your Deco network is now up. Add more Decos or complete the setup and connect all devices to the Deco network.
5
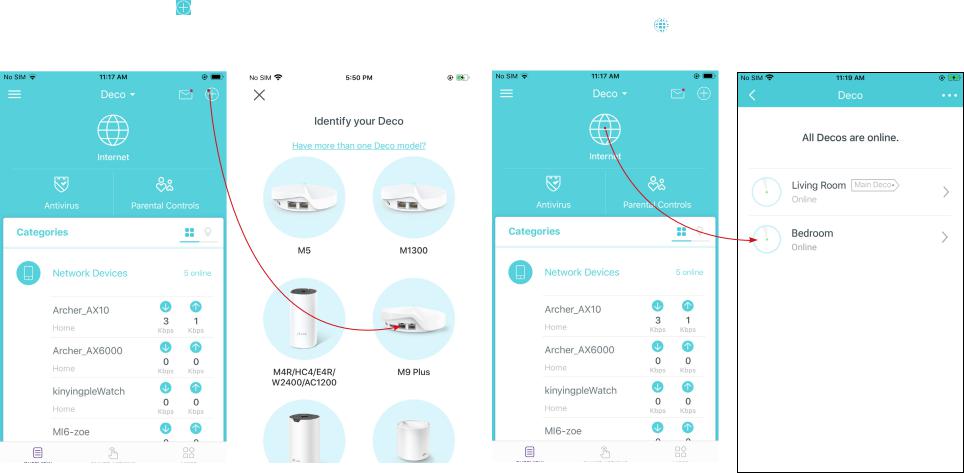
Add More Decos
After created a Deco network, you can add more Deco units into the network to expand the Wi-Fi coverage, and manage them conveniently on your Deco app.
|
On the Overview page, Tap |
Select the Deco model you want to |
After the setup, you can find the |
||
|
add, and follow app instructions to |
added Decos by tapping |
|||
|
complete the setup |
||||
6
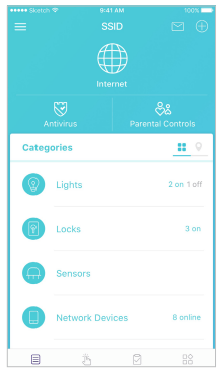
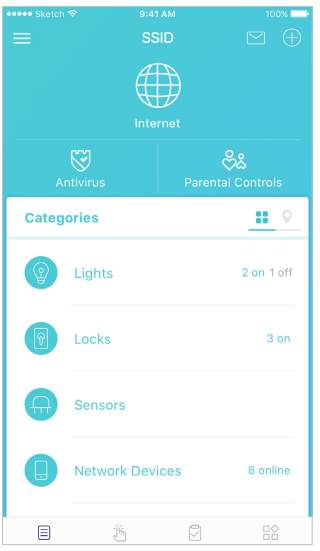
Dashboard
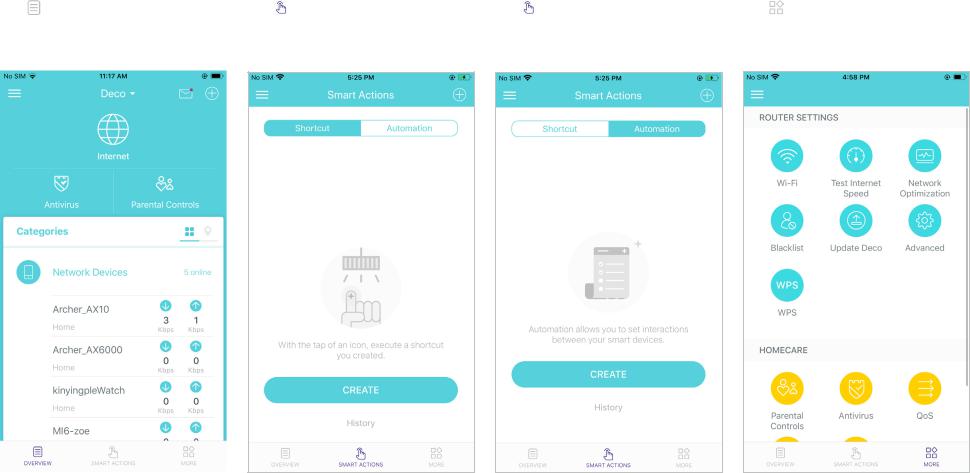
After you successfully set up your Deco network, you will see the dashboard of the Deco app. Here you can get an overview of the network status, create shortcut and automation, and set up various advanced features.
|
Tap to get an overview of the |
Tap > Shortcut to create or |
Tap > Automation to set |
Tap for more features |
|
network status |
execute shortcut |
interactions between your smart |
|
|
devices |
|||
7
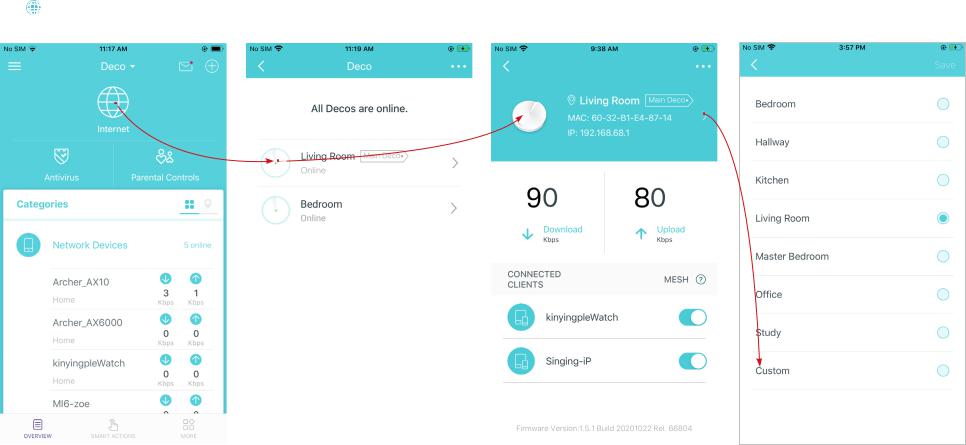
Check Deco Status
In the Overview page, you can check the working status of all the Decos, check the Deco details, change or customize the location, and more.
|
Tap to check all Decos’ status |
Tap a Deco unit to check the details Tap the Deco unit to change or |
|||
|
customize the location |
||||
8
![]()
Manage Connected Devices
In the Overview page, you can check the working status of all the connected devices, view the device details, or change the device settings.
|
Tap a client on the Network Devices |
Tap to manage the device |
Tap Belongs to to add a unique profile for |
||||
|
list to check the details |
settings |
the device and manage its online activities |
||||
9
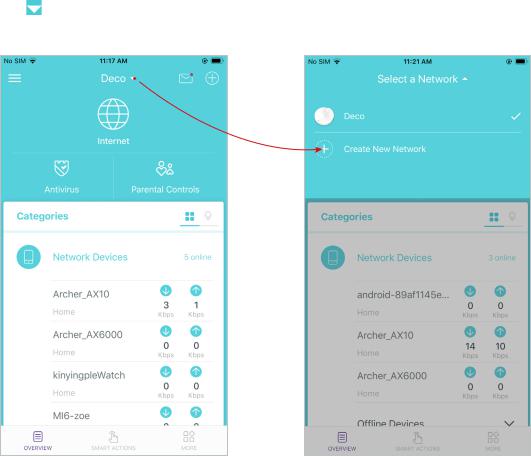
Create New Networks
On the Deco app, you can create different Deco networks bound to your TP-Link ID, and manage them conveniently from the Deco app with one account. You can also help family or friends by managing their network on your Deco app. Two methods are provided as below to create a new network:
Method 1. Create a new network from the Overview page
|
Tap > Create New Network |
Then follow the app instructions to |
complete the setup
10
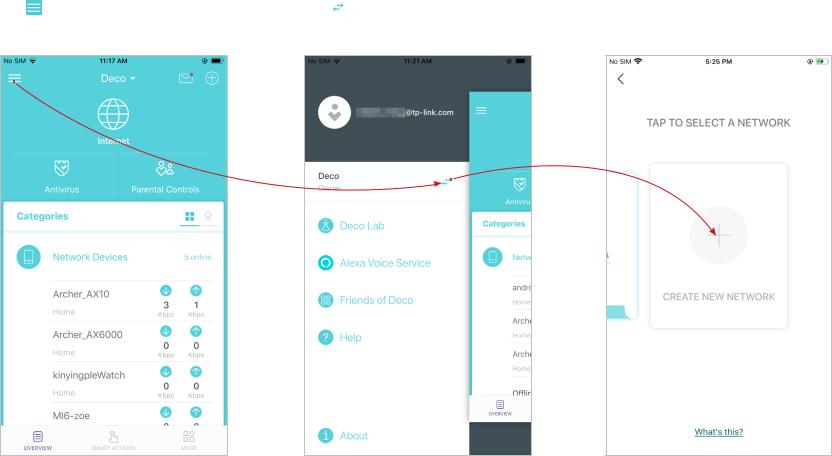
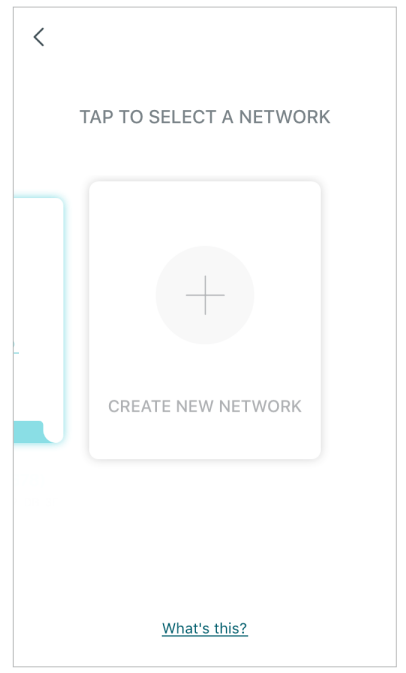
Create New Networks
On the Deco app, you can create different Deco networks bound to your TP-Link ID, and manage them conveniently from the Deco app with one account. You can also help family or friends by managing their network on your Deco app. Two methods are provided as below to create a new network:
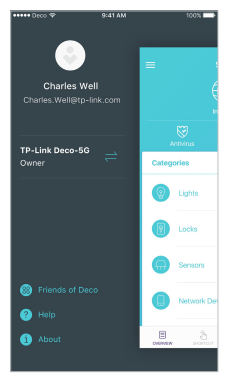
Method 2. Create a new network from the Menu page
|
Tap to open the Menu |
Tap > CREATE NEW NETWORK |
Follow app instructions to complete the |
setup
11
 Loading…
You can only view or download manuals with
Sign Up and get 5 for free
Upload your files to the site. You get 1 for each file you add
Get 1 for every time someone downloads your manual
Buy as many as you need
Displayed below is the user manual for Deco M9 Plus by TP-Link which is a product in the Mesh Wi-Fi Systems category.
This manual has pages.

Smart Home Mesh Wi-Fi System
Whole Home Wi-Fi | Seamless Roaming | Parental Controls | Antivirus
User Guide
AC2200 Smart Home Mesh Wi-Fi System
Deco M9 Plus
1910012364 REV1.1.0

Contents
About This Guide ···················································· 1
Appearance ······························································· 2
Set Up Your Deco ··················································· 3
Dashboard ·································································· 5
Wi-Fi Settings···························································· 6
Set Up Smart Home Devices ··························· 7
Automation ································································· 9
Shortcut ·····································································13
Parental Controls ··················································16
Antivirus ·····································································18
QoS···············································································19
Monthly Report ······················································20
Switch and Create Network ····························21
Friends of Deco ·····················································22
Advanced Features ·············································23
Online Upgrade ······················································26
Managers ··································································27

About This Guide
This guide provides a brief introduction to AC2200 Smart Home Mesh Wi-Fi System and the Deco app, as well as regulatory information.
Please note that features of Deco may vary slightly depending on the model and software version you have, and on your location, language and internet
service provider. All images, parameters and descriptions documented in this guide are used for demonstration only.
Conventions
In this guide, the following conventions are used:
Convention Description
Deco Stands for AC2200 Smart Home Mesh Wi-Fi System/Unit.
Underline Hyperlinks are in teal and underlined. You can click to
redirect to a website or a specic section.
Teal Key information appears in teal, including management
page text such as menus, items, buttons and so on.
Note: Ignoring this type of note might result in a malfunction
or damage to the device.
Tips: Indicates important information that helps you make
better use of your device.
More Info
• Specific product information can be found on the product page at
http://www.tp-link.com.
• A Technical Support Forum is provided for you to discuss our
products at http://forum.tp-link.com.
• Our Technical Support contact information can be found at the Help
center of the Deco app and the Contact Technical Support page at
http://www.tp-link.com/support.
2
Appearance
Each Deco has an LED that changes color according to its status, two RJ-45 Ethernet ports and a power slot. See the explanation below:
Yellow
Start up.
Blue pulse
Deco is ready for setup.
Blue solid
Deco is setting up.
Green
Deco is registered and all is well.
Red
Deco has an issue.
For connecting Deco to your modem, the
Ethernet outlet or other internet devices.
Press to reset Deco to factory default settings.
For connecting Deco to the power socket via
the provided power adapter.
Ethernet Ports:
Reset Button:
Power Slot:
USB Port (Reserved)
3
Set Up Your Deco
Follow the steps below to set up your AC2200 Smart Home Mesh Wi-Fi System.
1. Download and install the TP-Link Deco app
Scan the QR code below or go to Google Play
or the Apple App Store to download the Deco
app.
Install the app on your Android or iOS
smartphone or tablet.
or
2. Log in or sign up with TP-Link ID
Open the app. Use your TP-Link ID to log in.
If you don’t have a TP-Link ID, tap SIGN UP.
The Deco app will guide you through the rest.
3. Connect your modem to Deco
Find and power o your modem. Connect your
Deco to the modem and power them both on.
If you don‘t have a modem, connect the
Ethernet outlet directly to your Deco.

4
Set Up Your Deco
Follow the steps below to set up your AC2200 Smart Home Mesh Wi-Fi System.
4. Select a location
Select a location for this Deco. If its location
is not listed, you can create a new one by
choosing Custom.
5. Create your Wi-Fi network
Set a network name and a password. These
will be the name and password you use to
connect your devices to Wi-Fi.
6. Add more Decos
You can add more Decos to expand Wi-Fi
coverage. The app will guide you through the
process of adding more Decos one by one.

5
Dashboard
After you successfully set up your Deco network, you will see the dashboard of the Deco app. Here you can view the working status of all Decos, test
the internet speed, check the connected devices and manage your network.
Deco Status & Devices Swipe right Tap MORE

6
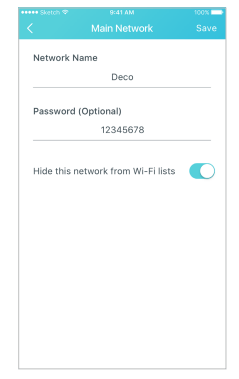
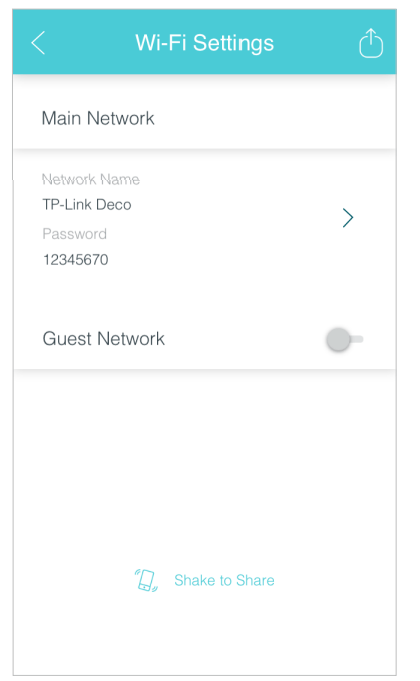
Wi-Fi Settings
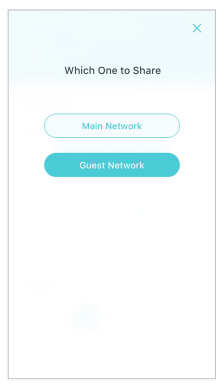
Customize the network name and password of your main network or create a separate network just for guests. You can set a guest network name and
an easy-to-remember password. You can shake your device to share the network details easily with family and friends.
Enable a guest network Create the network name and password Shake to share

7
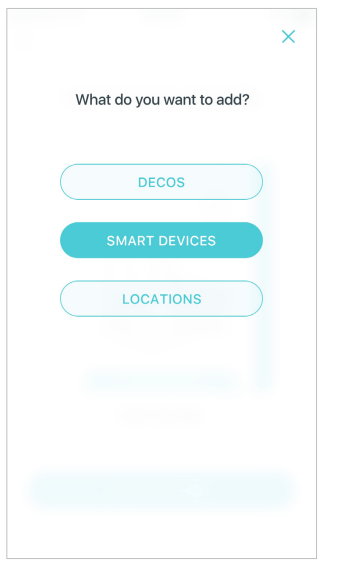
Set Up Smart Home Devices
Deco M9 Plus not only delivers seamless wireless connectivity, but also acts as a smart home control point, letting you replace your older smart hubs.
It connects Wi-Fi, ZigBee and Bluetooth devices to your network and lets you manage them from the Deco App. Whether you’re on the couch or on
the go, you’re always in reach of your lights, thermostats, switches and door locks. Follow the steps below to add smart home devices to your Deco
network.
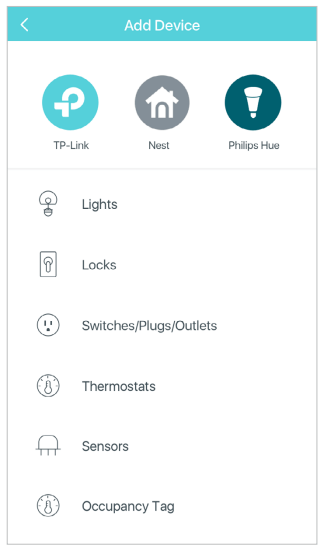
1. On the Dashboard page, tap . 2. Tap SMART DEVICES. 3. Select the smart device type.

8
Set Up Smart Home Devices
Follow the steps below to add smart home devices to your Deco network.
4. Select your smart device. If not listed,
select Other Light, for example.
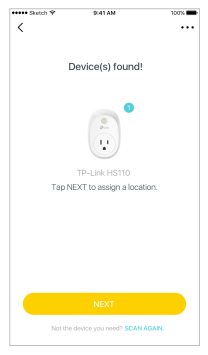
5. Follow the app’s guide to find your smart
device(s).
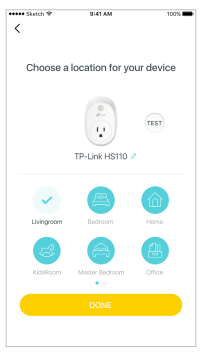
6. Assign a location for your device and tap
Done.

9
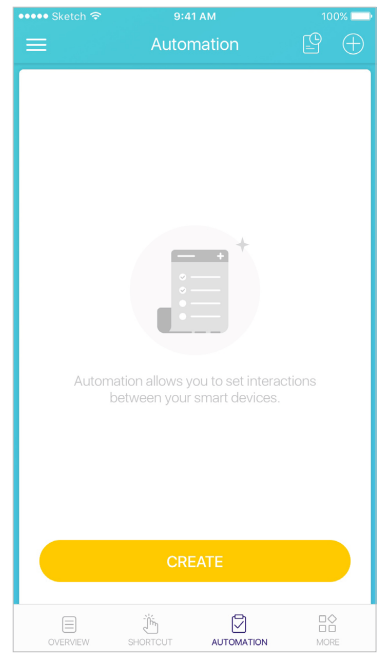
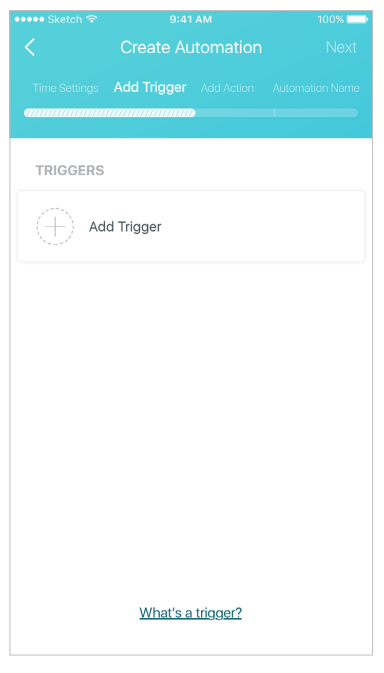
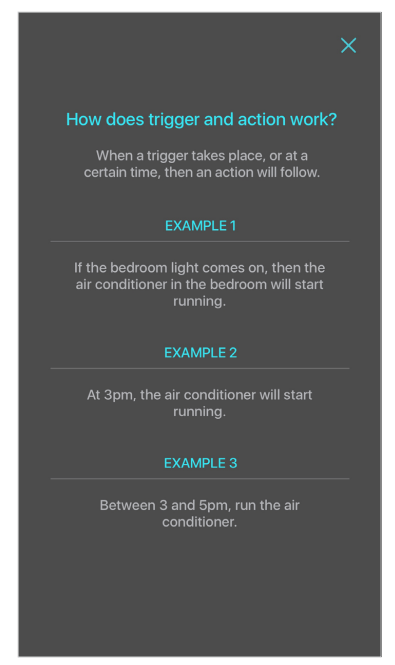
Automation
Automation allows you to set interactions between your smart devices. For example, if the bedroom light comes on (which is a trigger), then the air
conditioner in the bedroom will start running (which is an action). Follow the steps below to create an automation.
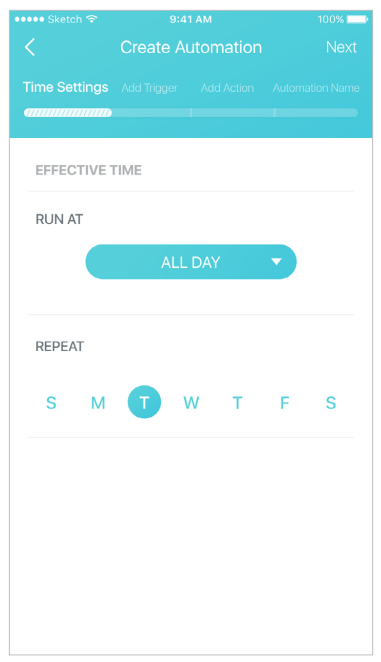
1. Tap Create or .2. Specify the time when this automation will
take eect.
3. Follow the app’s guide to add a trigger. If you
set a specic time for the automation, then
a trigger is optional.

10
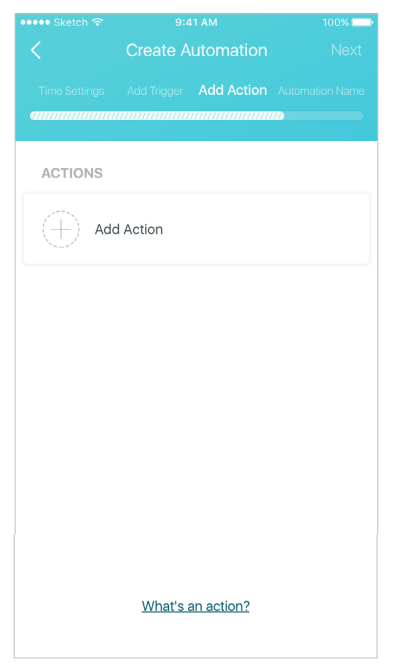
Automation
Follow the steps below to create an automation.
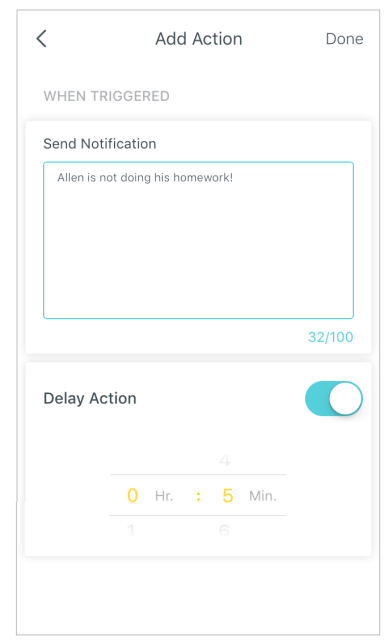
4. Follow the app’s guide to add an action. You can delay an action when triggers are red
by setting the delay action .
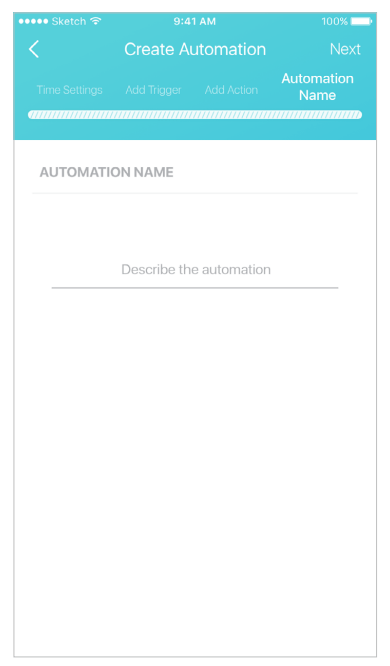
5. Describe the automation and tap Done.

11
Automation
Automation allows you to set interactions between your smart devices. For example, if the bedroom light comes on (which is a trigger), then the air
conditioner in the bedroom will start running (which is an action).
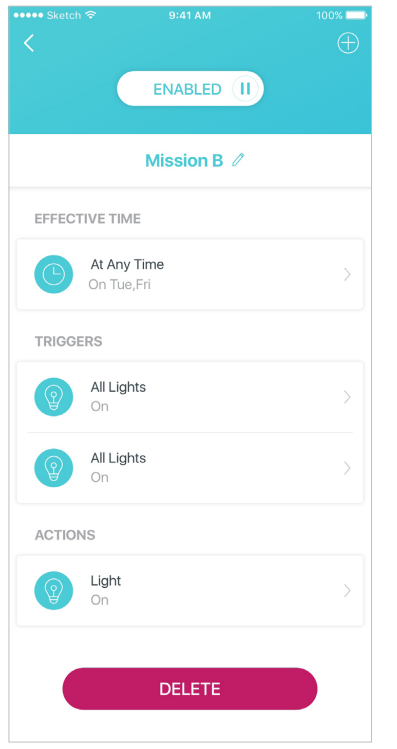
How trigger and action work The automations you created are displayed
here.
Tap an automation to delete, enable or disable
it. You can also delete, edit or tap to add
triggers and actions.

12
Automation
Automation allows you to set interactions between your smart devices. For example, if the bedroom light comes on (which is a trigger), then the air
conditioner in the bedroom will start running (which is an action).
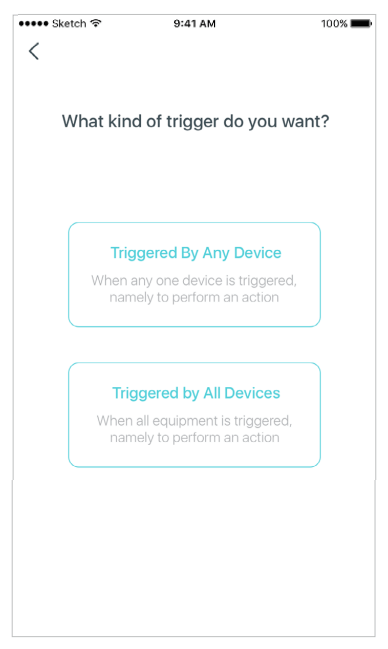
When multiple devices are selected for a
trigger, then you have to specify the trigger
type.

13
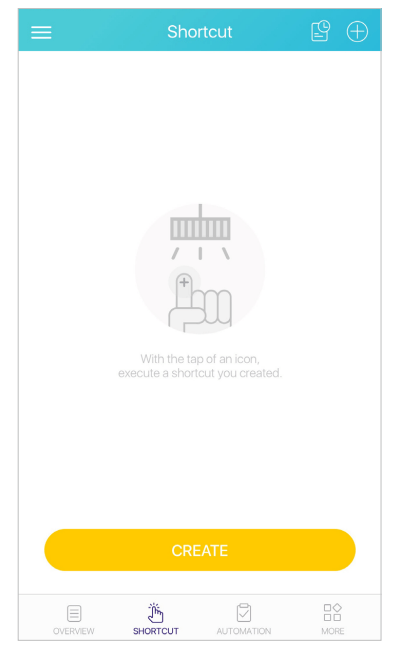
Shortcut
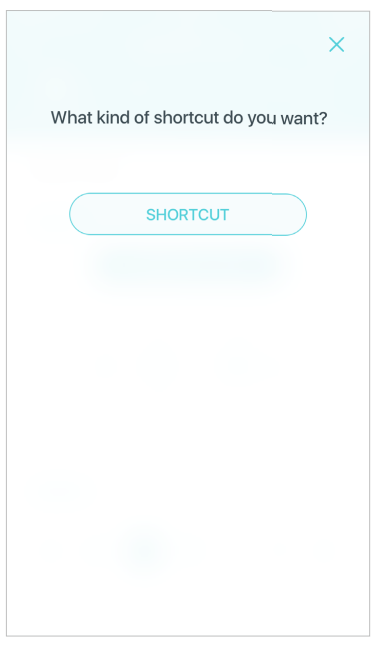
With the tap of an icon, execute a shortcut you created. Follow the steps below to create a shortcut.
1. Tap Create or . 2. Select the shortcut type.

14
Shortcut
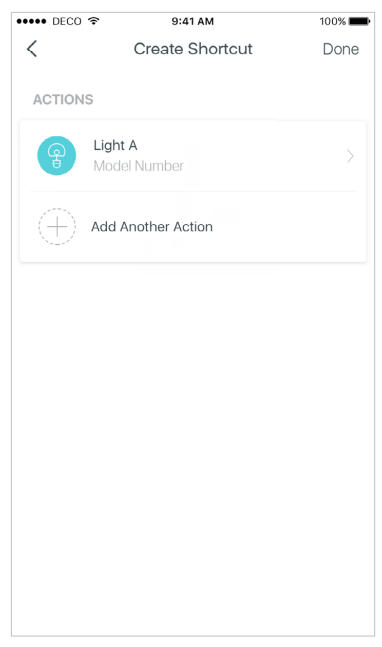
Follow the steps below to create a shortcut.
3. Follow the app’s guide to add an
action.
4. If needed, you can add more actions for one
shortcut. And tap Done.
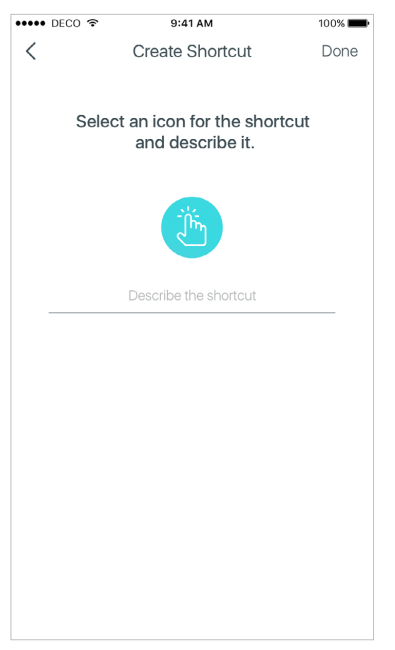
5. Select an icon for the shortcut and descirbe
it.

15
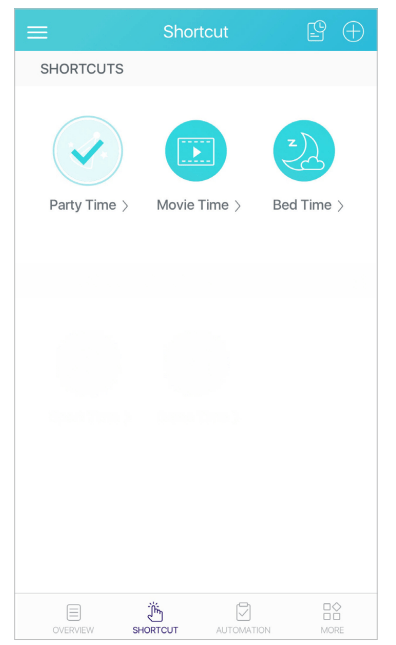
Shortcut
With the tap of an icon, execute a shortcut you created.
Shortcut executed

16
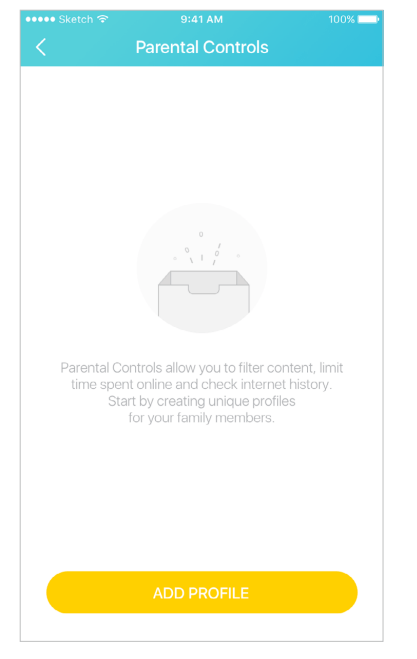
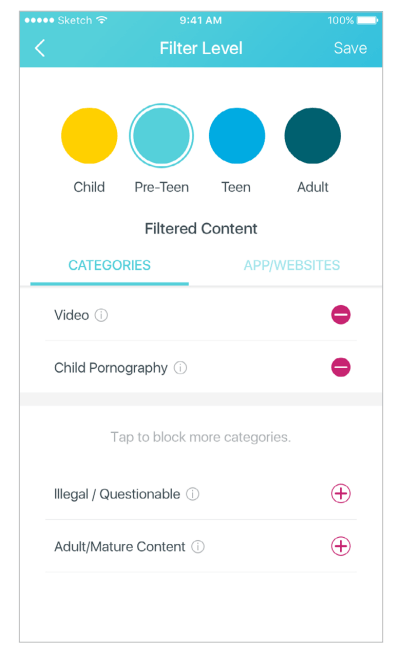
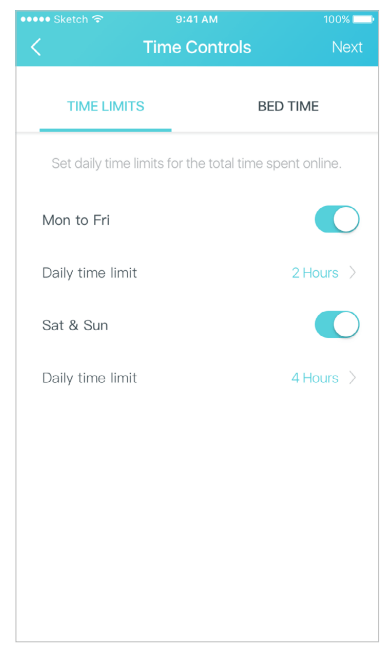
Parental Controls
Create proles for family members and specify the devices that belong to each. Set individualized parental controls including when and for how long
each person can access the internet. Block inappropriate content and pause the internet. Follow the steps below to set up parental controls.
1. Tap ADD PROFIE to create a new prole. 2. Set lter level. 3. Set time controls.

17
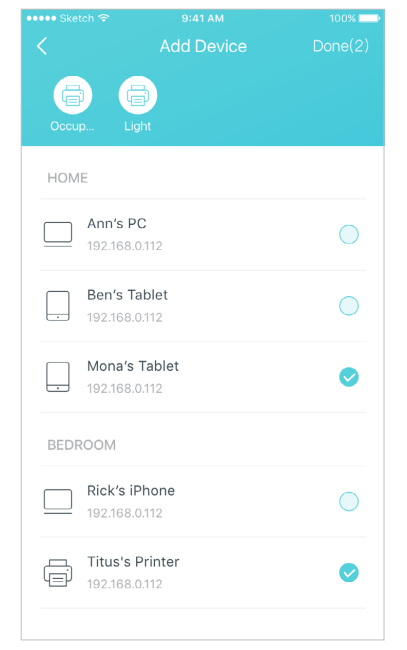
Parental Controls
Follow the steps below to set parental controls.
4. Add devices to this prole and tap Done.

18
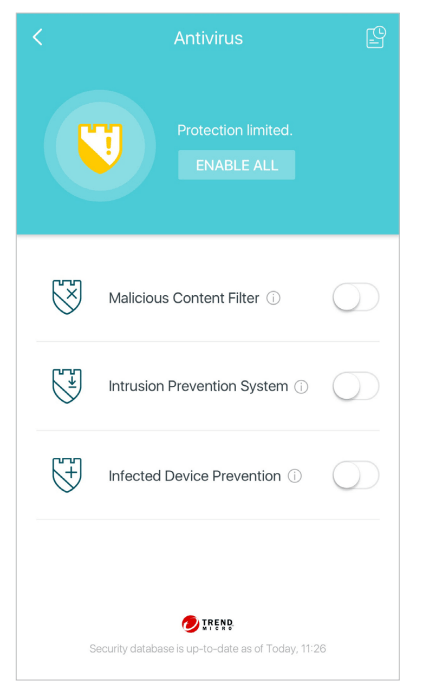
Antivirus
There are three ways Deco ensures your home network remains safe: by blocking malicious websites, by protecting the system and applications
against external attacks and eliminating vulnerabilities, and by preventing infected devices from sending sensitive information outside your network.
Protection enabled Alert history Protection disabled

19
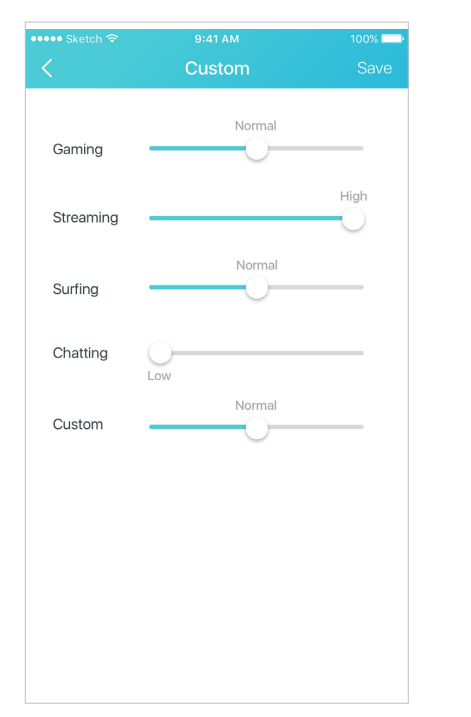
QoS
There are two ways to use the QoS (Quality of Service) function. You can prioritize the connection of a particular device for a set duration, such as a
family member’s laptop for one hour during a video call. You can also prioritize the online activity that’s most important to the whole family, such as
Streaming or Gaming.
Prioritize a device Prioritize an activity Customize

20
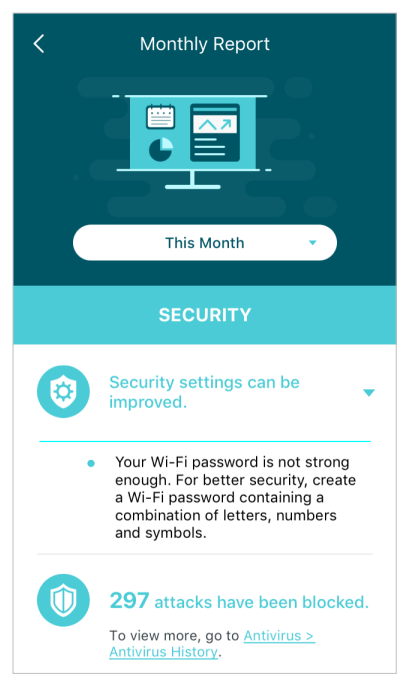
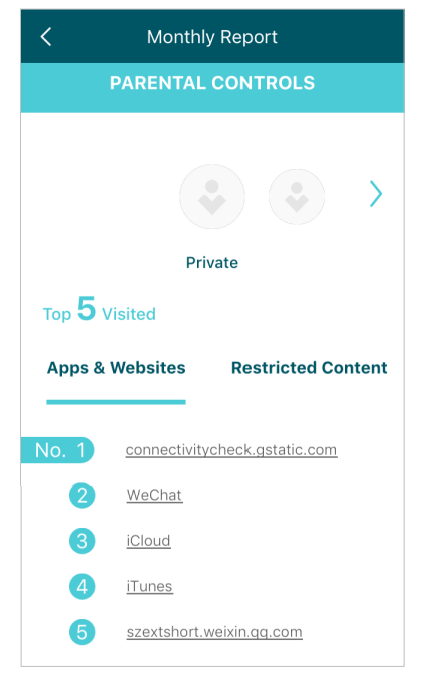
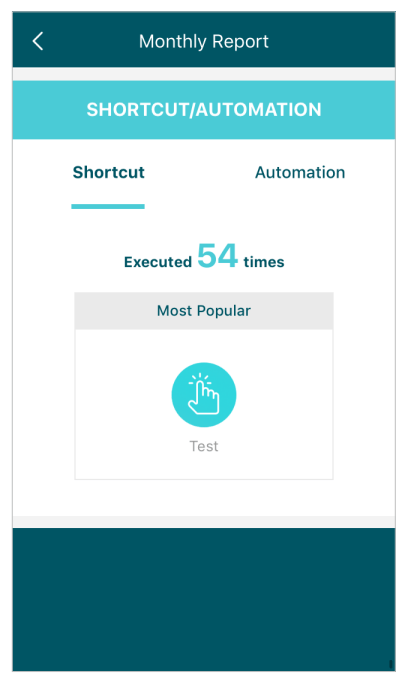
Monthly Report
Review a monthly list of usage, top 5 visited content, most frequently executed automations and shortcuts, and security threats.
Safeguard your Deco network Top 5 visited content under Parental Controls Most frequently executed Shortcut and
Automation

21
Switch and Create Network
You can create, manage and switch between dierent Deco networks bound to your TP-Link ID.
Swipe right and tap Swipe to switch a network to manage Swipe to create a new network

22
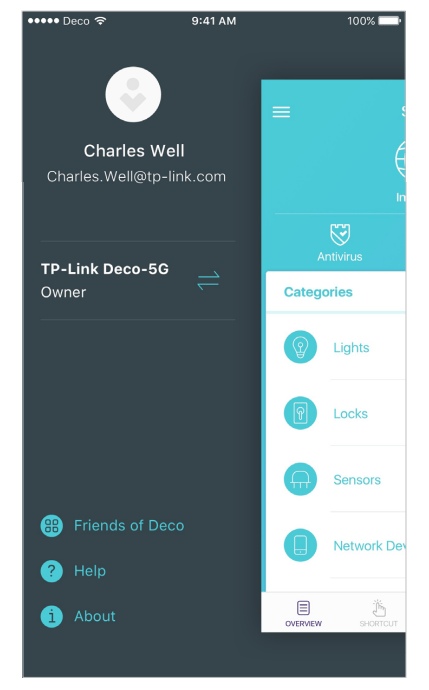
Friends of Deco
TP-Link works with Alexa and IFTTT. With Alexa, you can use your voice to control functions of the AC2200 Tri-Band Mesh Wi-Fi System. With IFTTT,
you can create useful connections between devices, apps, services and websites to make your home smarter.
Friends of Deco Alexa and IFTTT

23
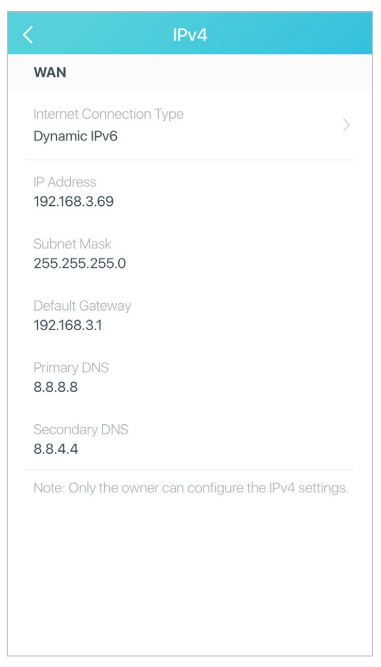
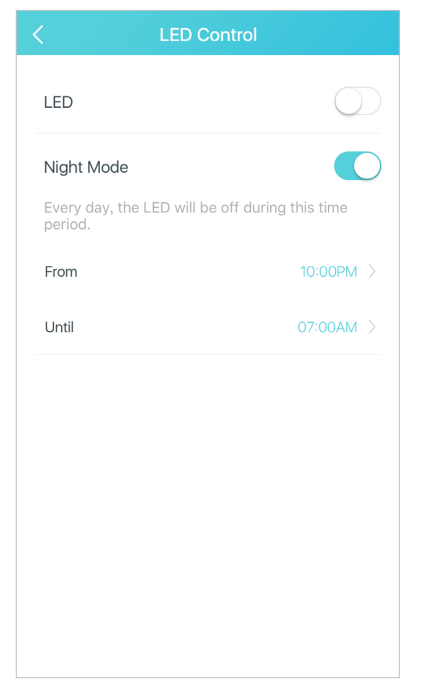
Advanced Features
Additional features are available under the Advanced menu. You can modify WAN settings (IPv4 & IPv6), control Deco’s LED, turn notications o and
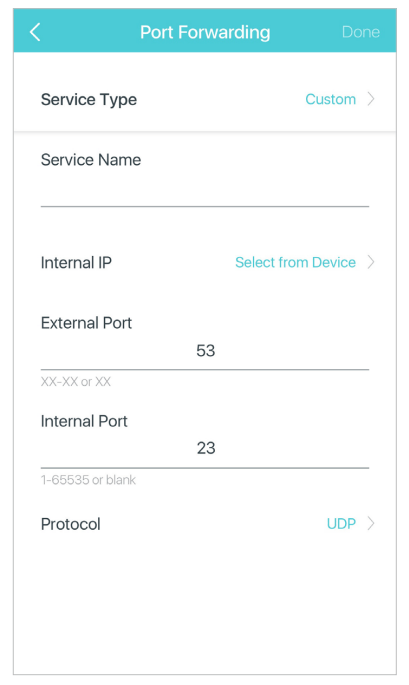
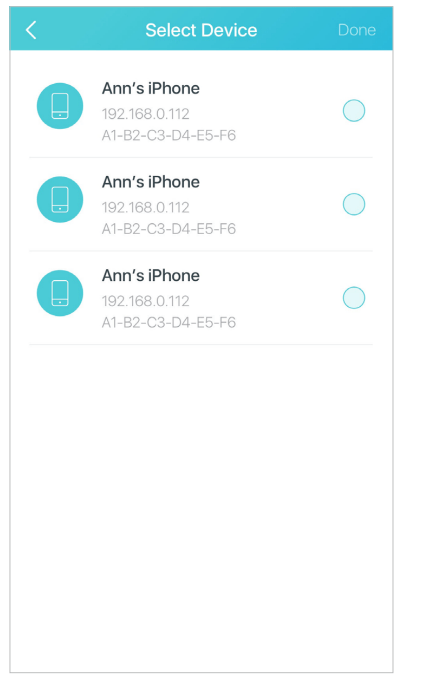
on, create a domain name for your Deco, set up port forwarding rules to make your local computers accessible to other devices over the internet,
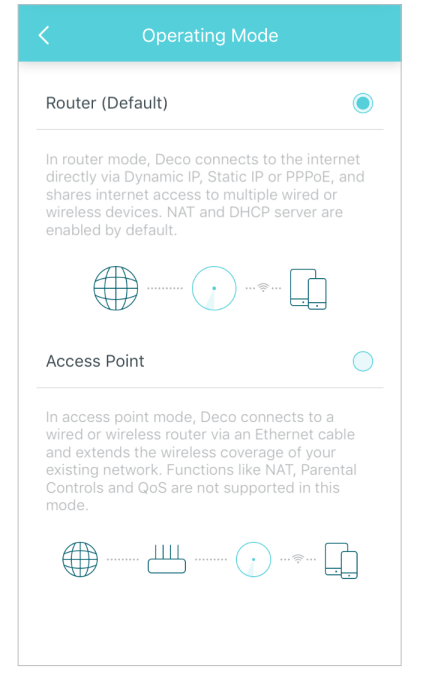
reserve an IP address for a specic device and change the operating mode.
IPv4 IPv6 LED Control

24
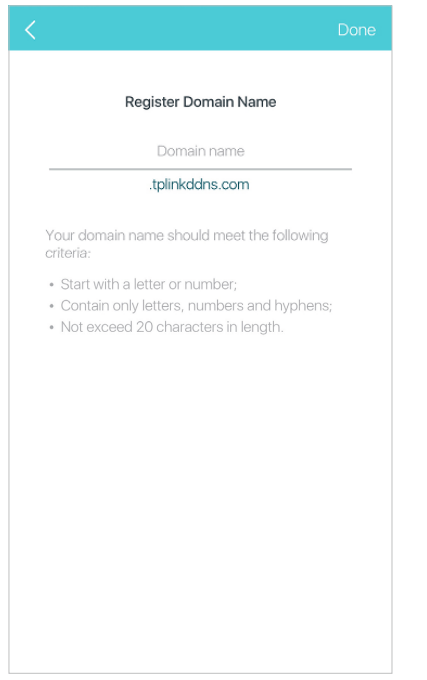
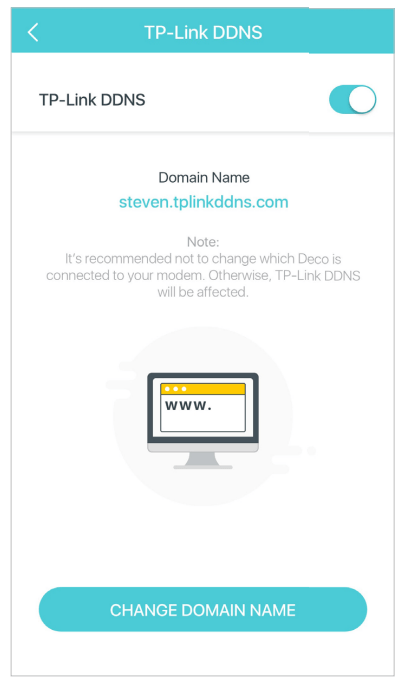
Register a TP-Link DDNS domain name Enable or disable TP-Link DDNS feature Set up port forwarding rules

25
Reserve IP addresses for specic devices Change the operating mode

26
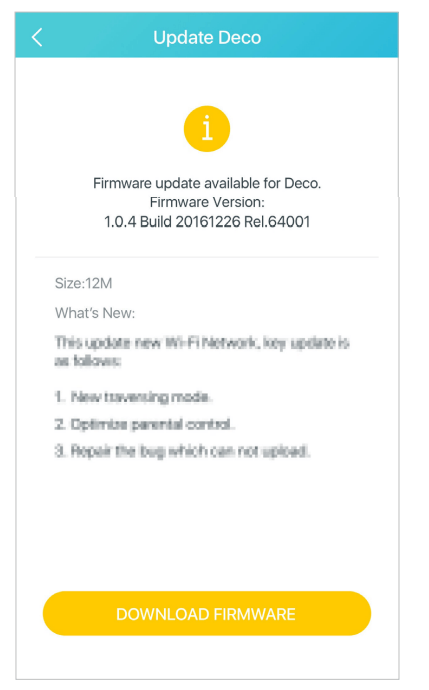
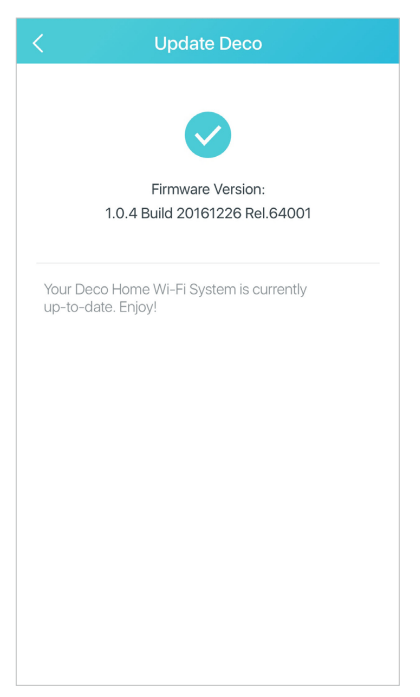
Online Upgrade
TP-Link is dedicated to improving product features and providing a better customer experience. Update Deco when prompted in the Deco app.
Download new rmware Install new rmware Up-to-date

27
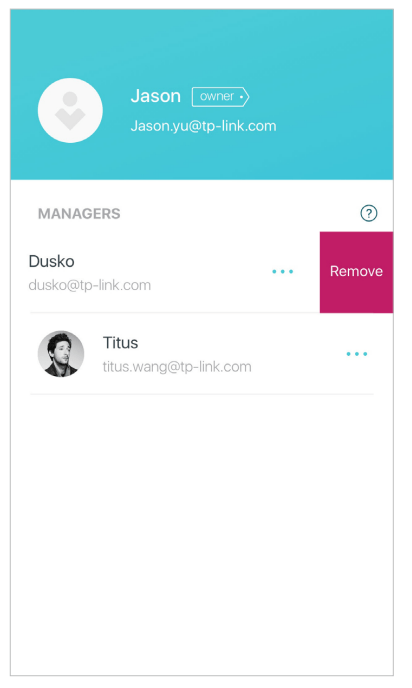
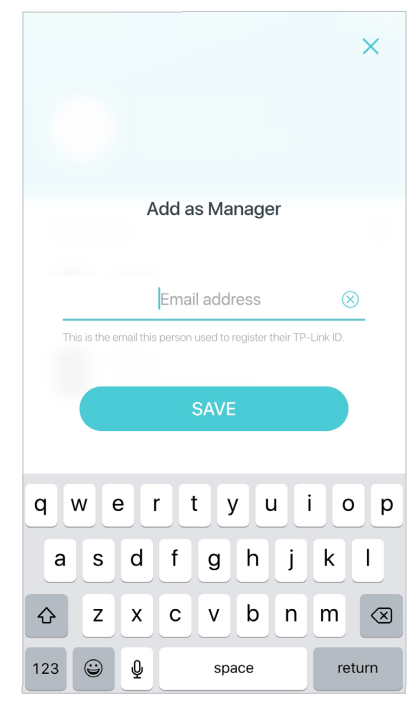
Managers
Add friends and family members to help manage your network. Each manager should have their own TP-Link ID.
Add as manager Manager list Remove a manager
28
Authentication
COPYRIGHT & TRADEMARKS
Specifications are subject to change without notice. is a registered trademark of TP-Link Technologies Co., Ltd. Other brands and product
names are trademarks or registered trademarks of their respective holders.
No part of the specifications may be reproduced in any form or by any means or used to make any derivative such as translation, transformation, or
adaptation without permission from TP-Link Technologies Co., Ltd. Copyright © 2018 TP-Link Technologies Co., Ltd. All rights reserved.

29
FCC STATEMENT
Product Name: AC2200 Smart Home Mesh Wi-Fi System
Model Number: Deco M9 Plus
Component Name Model
I.T.E POWER SUPPLY T120200-2B4
Responsible party:
TP-Link USA Corporation, d/b/a TP-Link North America, Inc.
Address: 145 South State College Blvd. Suite 400, Brea, CA 92821
Website: http://www.tp-link.com/us/
Tel: +1 626 333 0234
Fax: +1 909 527 6803
E-mail: sales.usa@tp-link.com
This equipment has been tested and found to comply with the limits for a Class B digital device, pursuant to part 15 of the FCC Rules. These limits are
designed to provide reasonable protection against harmful interference in a residential installation. This equipment generates, uses and can radiate
radio frequency energy and, if not installed and used in accordance with the instructions, may cause harmful interference to radio communications.
However, there is no guarantee that interference will not occur in a particular installation. If this equipment does cause harmful interference to radio
or television reception, which can be determined by turning the equipment off and on, the user is encouraged to try to correct the interference by
one or more of the following measures:
• Increase the separation between the equipment and receiver.
• Connect the equipment into an outlet on a circuit different from that to which the receiver is connected.
This device complies with part 15 of the FCC Rules. Operation is subject to the following two conditions:
1. This device may not cause harmful interference.
2. This device must accept any interference received, including interference that may cause undesired operation.

30
Any changes or modifications not expressly approved by the party responsible for compliance could void the user’s authority to operate the
equipment.
Note: The manufacturer is not responsible for any radio or TV interference caused by unauthorized modifications to this equipment. Such modifications
could void the user’s authority to operate the equipment.
FCC RF Radiation Exposure Statement
This equipment complies with FCC RF radiation exposure limits set forth for an uncontrolled environment. This device and its antenna must not be
co-located or operating in conjunction with any other antenna or transmitter.
“To comply with FCC RF exposure compliance requirements, this grant is applicable to only Mobile Configurations. The antennas used for this
transmitter must be installed to provide a separation distance of at least 20 cm from all persons and must not be co-located or operating in conjunction
with any other antenna or transmitter.”
We, TP-Link USA Corporation, has determined that the equipment shown as above has been shown to comply with the applicable technical standards,
FCC part 15. There is no unauthorized change is made in the equipment and the equipment is properly maintained and operated.
Issue Date: 2018-03-02
FCC compliance information statement
Product Name: I.T.E POWER SUPPLY
Model Number: T120200-2B4
Responsible party:
TP-Link USA Corporation, d/b/a TP-Link North America, Inc.
Address: 145 South State College Blvd. Suite 400, Brea, CA 92821
Website: http://www.tp-link.com/us/
Tel: +1 626 333 0234
Fax: +1 909 527 6803
E-mail: sales.usa@tp-link.com

31
This equipment has been tested and found to comply with the limits for a Class B digital device, pursuant to part 15 of the FCC Rules. These limits are
designed to provide reasonable protection against harmful interference in a residential installation. This equipment generates, uses and can radiate
radio frequency energy and, if not installed and used in accordance with the instructions, may cause harmful interference to radio communications.
However, there is no guarantee that interference will not occur in a particular installation. If this equipment does cause harmful interference to radio
or television reception, which can be determined by turning the equipment off and on, the user is encouraged to try to correct the interference by
one or more of the following measures:
• Reorient or relocate the receiving antenna.
• Increase the separation between the equipment and receiver.
• Connect the equipment into an outlet on a circuit different from that to which the receiver is connected.
• Consult the dealer or an experienced radio/ TV technician for help.
This device complies with part 15 of the FCC Rules. Operation is subject to the following two conditions:
1) This device may not cause harmful interference.
2) This device must accept any interference received, including interference that may cause undesired operation.
Any changes or modifications not expressly approved by the party responsible for compliance could void the user’s authority to operate the
equipment.
We, TP-Link USA Corporation, has determined that the equipment shown as above has been shown to comply with the applicable technical standards,
FCC part 15. There is no unauthorized change is made in the equipment and the equipment is properly maintained and operated.
Issue Date: 2018-03-02
CE Mark Warning
This is a class B product. In a domestic environment, this product may cause radio interference, in which case the user may be required to take
adequate measures.
OPERATING FREQUENCY(the maximum transmitted power)
2412MHz—2472MHz(20dBm)
5180MHz—5240MHz(23dBm)

32
EU declaration of conformity
TP-Link hereby declares that the device is in compliance with the essential requirements and other relevant provisions of directives 2014/53/EU,
2009/125/EC and 2011/65/EU.
The original EU declaration of conformity may be found at http://www.tp-link.com/en/ce
RF Exposure Information
This device meets the EU requirements (2014/53/EU Article 3.1a) on the limitation of exposure of the general public to electromagnetic fields by way
of health protection.
The device complies with RF specifications when the device used at 20 cm from your body.
Restricted to indoor use.
Canadian Compliance Statement
This device complies with Industry Canada license-exempt RSS standard(s). Operation is subject to the following two conditions:
1. This device may not cause interference, and
2. This device must accept any interference, including interference that may cause undesired operation of the device.
Le présent appareil est conforme aux CNR d’Industrie Canada applicables aux appareils radio exempts de licence. L’exploitation est autorisée aux
deux conditions suivantes :
1. l’appareil ne doit pas produire de brouillage;
2. l’utilisateur de l’appareil doit accepter tout brouillage radioélectrique subi, meme si le brouillage est susceptible d’en compromettre le fonctionnement
Caution:
1. The device for operation in the band 5150–5250 MHz is only for indoor use to reduce the potential for harmful interference to co-channel mobile
satellite systems;
2. For devices with detachable antenna(s), the maximum antenna gain permitted for devices in the band 5725-5850 MHz shall be such that the
equipment still complies with the e.i.r.p. limits specified for point-to-point and non-point-to-point operation as appropriate; and
The high-power radars are allocated as primary users (i.e. priority users) of the bands 5250-5350 MHz and 5650-5850 MHz and that these radars
could cause interference and/or damage to LE-LAN devices.

33
Avertissement:
1. Le dispositif fonctionnant dans la bande 5150-5250 MHz est réservé uniquement pour une utilisation à l’intérieur afin de réduire les risques de
brouillage préjudiciable aux systèmes de satellites mobiles utilisant les mêmes canaux;
2. Le gain maximal d’antenne permis pour les dispositifs avec antenne(s) amovible(s) utilisant la bande 5725-5850 MHz doit se conformer à la
limitation P.I.R.E spécifiée pour l’exploitation point à point et non point à point, selon le cas.
En outre, les utilisateurs devraient aussi être avisés que les utilisateurs de radars de haute puissance sont désignés utilisateurs principaux (c.-à-d.,
qu’ils ont la priorité) pour les bandes 5745-5850 MHz et que ces radars pourraient causer du brouillage et/ou des dommages aux dispositifs LAN-EL.
Radiation Exposure Statement:
This equipment complies with IC radiation exposure limits set forth for an uncontrolled environment. This equipment should be installed and operated
with minimum distance 20cm between the radiator & your body.
Déclaration d’exposition aux radiations:
Cet équipement est conforme aux limites d’exposition aux rayonnements IC établies pour un environnement non contrôlé. Cet équipement doit être
installé et utilisé avec un minimum de 20 cm de distance entre la source de rayonnement et votre corps.
Industry Canada Statement
CAN ICES-3 (B)/NMB-3(B)
Korea Warning Statements:
당해 무선설비는 운용중 전파혼신 가능성이 있음.
Продукт сертифіковано згідно с правилами системи УкрСЕПРО на відповідність вимогам нормативних документів та вимогам, що
передбачені чинними законодавчими актами України.
34
Safety Information
• Keep the device away from water, fire, humidity or hot environments.
• Do not attempt to disassemble, repair, or modify the device.
• Do not use damaged charger or USB cable to charge the device.
• Do not use any other chargers than those recommended
• Do not use the device where wireless devices are not allowed.
• Adapter shall be installed near the equipment and shall be easily accessible.
• Use only power supplies which are provided by manufacturer and in the original packing of this product. If you have any questions, please don’t
hesitate to contact us.
Please read and follow the above safety information when operating the device. We cannot guarantee that no accidents or damage will occur due to
improper use of the device. Please use this product with care and operate at your own risk.
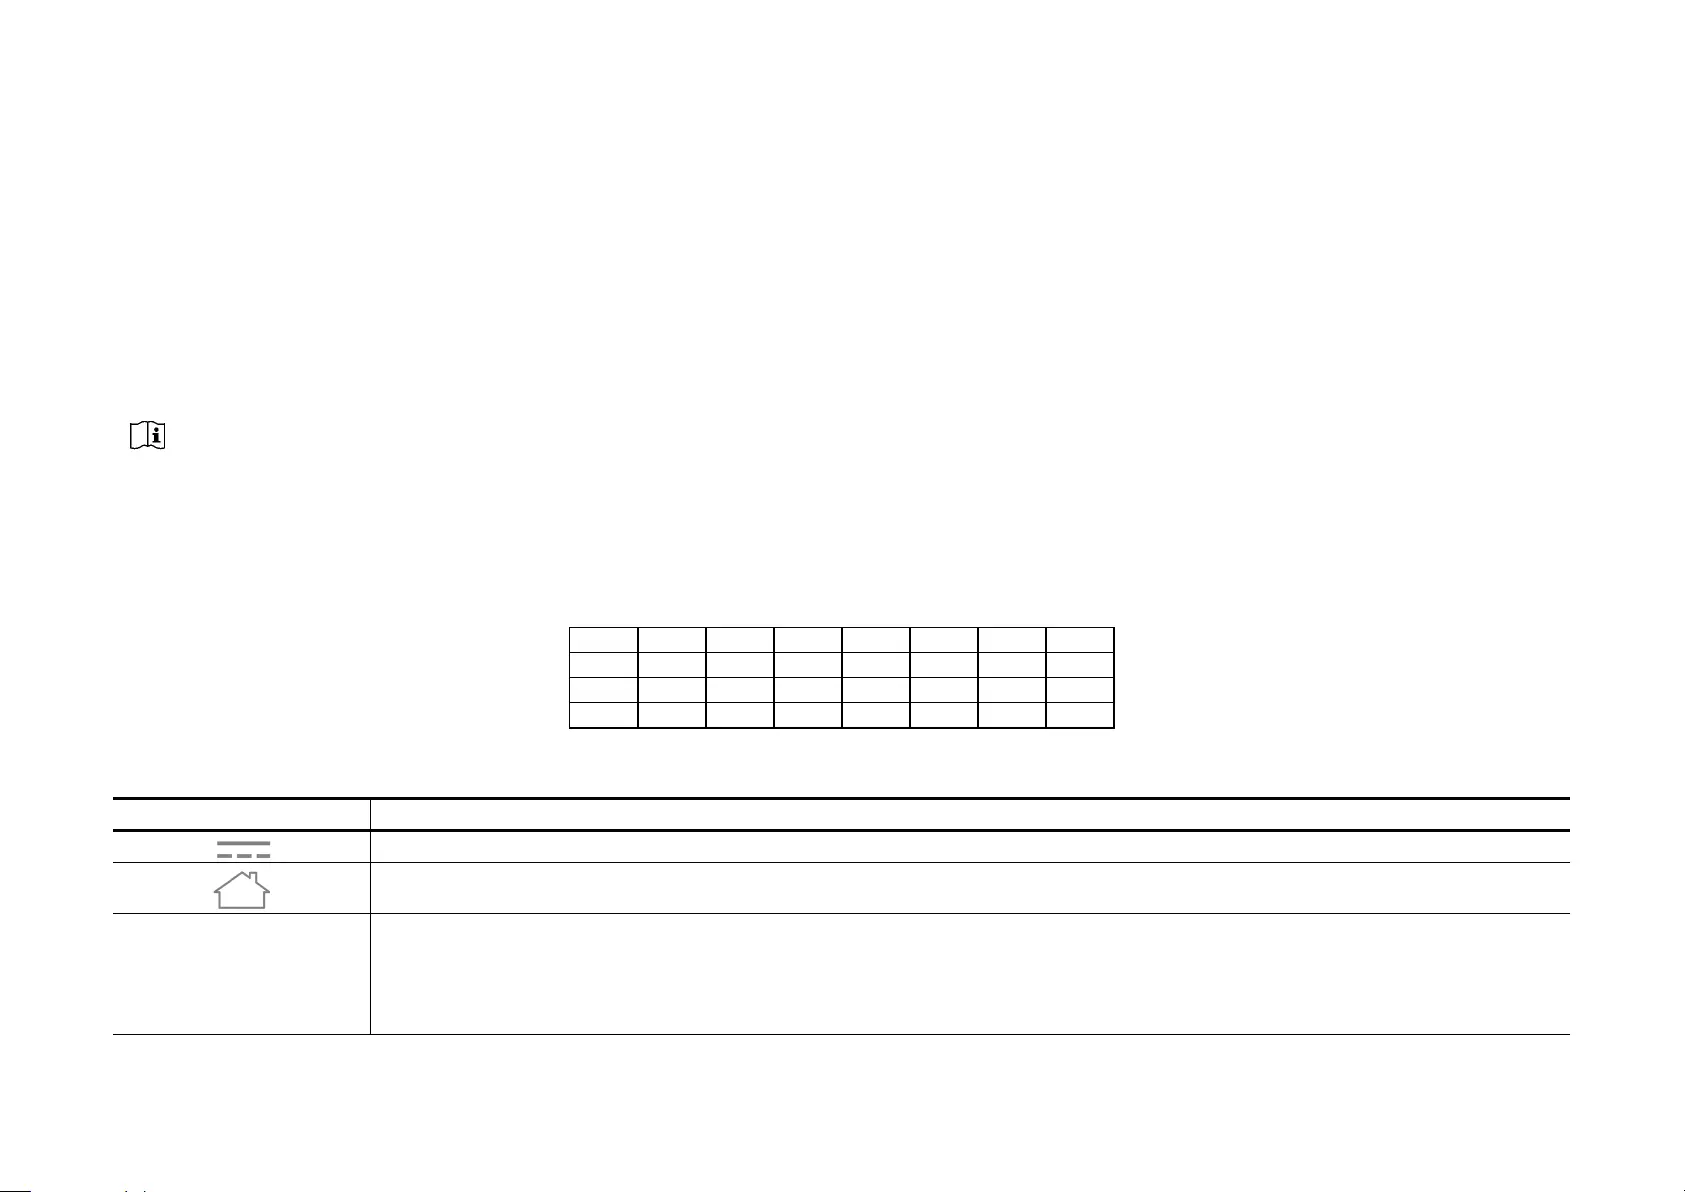
For EU/EFTA, this product can be used in the following countries:
AT BE BG CH CY CZ DE DK
EE EL EF FI FR HR HU IE
IS IT LI LT LU LV MT NL
NO PL PT RO SE SI SK UK
Explanation of the symbols on the product label
Symbol Explanation
DC voltage
Indoor use only
RECYCLING
This product bears the selective sorting symbol for Waste electrical and electronic equipment (WEEE). This means that this product must be handled pursuant to
European directive 2012/19/EU in order to be recycled or dismantled to minimize its impact on the environment.
User has the choice to give his product to a competent recycling organization or to the retailer when he buys a new electrical or electronic equipment.
На чтение 5 мин Просмотров 39.2к. Опубликовано
Обновлено
В одной из прошлых статей мы познакомились с mesh системами TP-Link на примере модели E4 из серии Deco. Сегодня хочу дать вам подробную инструкцию по подключению ее к роутеру или интернету и настройке wifi сети с бесшовным роумингом. Сразу оговорюсь, что данное руководство универсальное и подойдет для всех моделей mesh систем TP-Link Deco — m4, m5, e3, m9, m9 plus и других.
Подключение к интернету mesh системы TP-Link Deco
Для настройки mesh системы TP-Link Deco не требуется подключать ее к компьютеру по кабелю. Для того, чтобы выполнить первоначальную конфигурацию, потребуется всего лишь мобильный телефон с установленным на него фирменным приложением. Его можно скачать по QR коду, указанному на упаковке. Сканируем и устанавливаем.

После этого подключаем оба модуля Deco к электророзетке. А также в любой из них в порт «1» вставляем кабель от интернет-провайдера или соединяем проводом из комплекта с основным wifi роутером, если вы хотите расширить уже существующую сеть.

Теперь полностью погрузимся в мобильное приложение «Deco». На стартовой странице нам предлагается зарегистрировать новую учетную запись в облачном сервисе TP-Link ID. У меня она уже есть, так как я настраивал ранее удаленный доступ к одному из роутеров данной фирмы, а значит достаточно просто авторизоваться.

После входа в личный кабинет жмем на кнопку «Приступим» и выбираем свою модель mesh системы из серии Deco. У меня E4 — последняя в списке.
Далее нас просят проверить подключение устройств и их готовность к работе
Если индикатор мигает синим цветом, то система готова к настройке и начала ретранслировать свой собственный сигнал wifi
![]()
Нам необходимо в настройках телефона подключиться к этой сети, которая имеет называние «Deco_XXXX». Пароль не требуется.
Далее назначаем месторасоположение данной точки доступа, чтобы впоследствии при подключении нескольких модулей было легче среди них ориентироваться.
На следующей странице выбираем тип соединения с интернетом. Если вы подключили к mesh системе кабель от провайдера, то необходимо узнать его, а также все данные для коннекта у поставщика услуг. Также при необходимости вручную прописываем MAC адрес, если он привязан к вашему аккаунту у провайдера.
Если же вы подключаете Deco к другому маршрутизатору, на котором уже настроен интернет, то оставляем «Динамический IP»
После этого задаем имя и пароль для новой беспроводной сети
На этом настройка первой точки завершена. Теперь нужно дождаться ее перезагрузки для применения всех данных и подключиться к новой WiFi сети от нее.
На этом этапе необходимо включить на телефоне Bluetooth, так как поиск последующих модулей будет происходить именно с помощью этого вида соединения. При этом отключаться от созданной wifi сети на первом устройстве нельзя.
После чего можно установить вторую Deco из комплекта. Для этого жмем на соответствующую кнопку в приложении и ждем, пока она обнаружится. И далее выбираем то место в доме, где она будет установлена
И далее — выбор комнаты, где она будет работать
На последнем шаге жмем на «Закончим на этом»
Что, если интернет на TP-Link Deco не работает?
Иногда в процессе настройки mesh системы Deco E4 может возникнуть ошибка подключения к интернету.
В том случае, если вы соединились через дополнительный роутер, к которому идет кабель от провайдера, то рекомендуется проверить доступность для работы LAN порта, через который вы подключили mesh систему. Он не должен быть зарезервирован для IPTV или VoIP. Проверить это можно в настройках маршрутизатора, либо просто переставить кабель в другой разъем.
Настройка бесшовного wifi роуминга на mesh системе TP-Link Deco E4
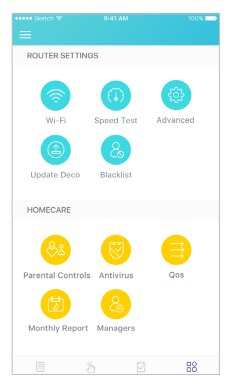
Переходим к настройке быстрого роуминга внутри wifi сети TP-Link Deco E4 (его еще называют бесшовным или fast roaming). На главном экране панели управления mesh системой отображаются подключенные в текущий момент к wifi устройства с информацией о входящем и исходящем на них трафике. Для входа в детальные настройки необходимо перейти на вкладку «Еще».
Попадаем в подробное меню. Давайте пройдемся по основным пунктам.
- WiFi — здесь можно поменять параметры для подключения, которые мы только что задали (SSID и пароль)

- Черный список — в данном разделе есть возможность добавить устройства, которым будет запрещено подключение к вашей сети. Доступно как выбрать из уже когда-либо подключавшихся девайсов, так и добавить новый по их MAC адресу

- Дополнительно — вспомогательные параметры, в которые редко кто вообще будет заглядывать, однако в некоторых случаях их наличие может быть весьма полезно. Это служба DDNS, резервирование адресов, переадресация портов VLAN, IPv4 и IPv6
- Уведомления — включение или деактивация всплывающих подсказок на смартфоне от приложения Deco. Таких как появления в сети новых устройств или обновление прошивки.
- Родительский контроль позволяет создать несколько профилей для разных групп пользователей с разным уровнем доступа к интернету.
Также для каждого предустановленного набора можно добавить или убрать стандартные компоненты
В дополнение ко всему, внести запрещенные для посещения веб-ресурсы можно вручную, указав их URL-адреса в интернете
Видео по настройке бесшовной mesh сети TP-Link Deco
Актуальные предложения:
Задать вопрос
- 10 лет занимается подключением и настройкой беспроводных систем
- Выпускник образовательного центра при МГТУ им. Баумана по специальностям «Сетевые операционные системы Wi-Fi», «Техническое обслуживание компьютеров», «IP-видеонаблюдение»
- Автор видеокурса «Все секреты Wi-Fi»
TP-Link Deco M9 Plus | AC2200 Smart Home Mesh Wi-Fi System — Use Manual — Use Guide PDF.
Documents: Go to download!
User Manual
- User Manual — (English)
Installation Instruction
- Quick Installtion Guide — (English)
- Appearance
- Set Up Your Deco
- Dashboard
- Wi-Fi Settings
- Set Up Smart Home Devices
- Automation
- Shortcut
- Parental Controls
- Antivirus
- QoS
- Monthly Report
- Switch and Create Network
- Friends of Deco
- Advanced Features
- Online Upgrade
- Managers
Table of contents
User Guide AC2200 Smart Home Mesh Wi-Fi System Deco M9 Plus
Appearance
Each Deco has an LED that changes color according to its status, two RJ-45 Ethernet ports and a power slot. See the explanation below:
Set Up Your Deco
The intuitive Deco app guides you through an easy setup process that gets each unit up and running and all your devices connected and online. Follow the steps below to set up your Deco Whole Home Mesh Wi-Fi System.
- Download and install the Deco app
Scan the QR code below or go to Google Play or the Apple App Store to download the Deco app. Install the app on your Android or iOS smartphone or tablet.

- Log in or sign up with TP-Link ID Open the app.
Open the app. Use your TP-Link ID to log in.
If you don’t have a TP-Link ID, tap SIGN UP. The Deco app will guide you through the rest.
- Connect your modem to Deco
See other models: TL-SG1016DE ARCHER-C5 T1500G-10MPS TL-WA901ND TL-POE150S
Find and power off your modem. Connect your Deco to the modem and power them both on.
If you don’t have a modem, connect the Ethernet outlet directly to your Deco
- Select a location
Select a location for this Deco. If its location is not listed, you can create a new one by choosing Custom.
- Create your Wi-Fi network
Set a network name and a password. These will be the name and password you use to connect your devices to Wi-Fi.
- Add more Decos
You can add more Decos to expand Wi-Fi coverage. The app will guide you through the process of adding more Decos one by one.

Dashboard
After you successfully set up your Deco network, you will see the dashboard of the Deco app. Here you can view the working status of all Decos, test the internet speed, check the connected devices and manage your network.
Deco Status & Devices
Swipe right
Tap MORE
Wi-Fi Settings
Customize the network name and password of your main network or create a separate network just for guests. You can set a guest network name and an easy-to-remember password. You can shake your device to share the network details easily with family and friends.
Enable a guest network
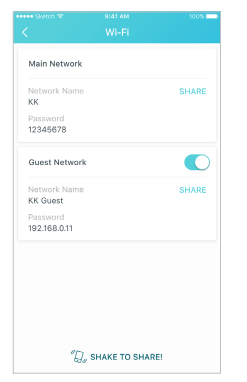
Create the network name and password
Shake to share
Set Up Smart Home Devices
Deco M9 Plus not only delivers seamless wireless connectivity, but also acts as a smart home control point, letting you replace your older smart hubs. It connects Wi-Fi, ZigBee and Bluetooth devices to your network and lets you manage them from the Deco App. Whether you’re on the couch or on the go, you’re always in reach of your lights, thermostats, switches and door locks. Follow the steps below to add smart home devices to your Deco network.
- On the Dashboard page, tap
- Tap SMART DEVICES.
- Select the smart device type
- Select your smart device. If not listed, select Other Light, for example.
- Follow the app’s guide to find your smart device(s).
- Assign a location for your device and tap Done.

Automation
Automation allows you to set interactions between your smart devices. For example, if the bedroom light comes on (which is a trigger), then the air conditioner in the bedroom will start running (which is an action). Follow the steps below to create an automation.
- Tap Create or
- Specify the time when this automation will take effect.
- Follow the app’s guide to add a trigger. If you set a specific time for the automation, then a trigger is optional.
- Follow the app’s guide to add an action.
You can delay an action when triggers are fired by setting the delay action . - Describe the automation and tap Done.

Automation allows you to set interactions between your smart devices. For example, if the bedroom light comes on (which is a trigger), then the air conditioner in the bedroom will start running (which is an action).
How trigger and action work
The automations you created are displayed here.

Tap an automation to delete, enable or disable it. You can also delete, edit or tap  to add triggers and actions.
Automation allows you to set interactions between your smart devices. For example, if the bedroom light comes on (which is a trigger), then the air conditioner in the bedroom will start running (which is an action).
When multiple devices are selected for a trigger, then you have to specify the trigger type.
Shortcut
With the tap of an icon, execute a shortcut you created. Follow the steps below to create a shortcut.
- Tap Create or .
- Select the shortcut type.
- Follow the app’s guide to add an action.
- If needed, you can add more actions for one shortcut. And tap Done.
- Select an icon for the shortcut and descirbe it.

Shortcut executed
Parental Controls
Create profiles for family members and specify the devices that belong to each. Set individualized parental controls including when and for how long each person can access the internet. Block inappropriate content and pause the internet. Follow the steps below to set up parental controls
- Tap ADD PROFIE to create a new profile.
- Set filter level.
- Set time controls.
- Add devices to this profile and tap Done.
Antivirus
There are three ways Deco ensures your home network remains safe: by blocking malicious websites, by protecting the system and applications against external attacks and eliminating vulnerabilities, and by preventing infected devices from sending sensitive information outside your network.
Protection enabled
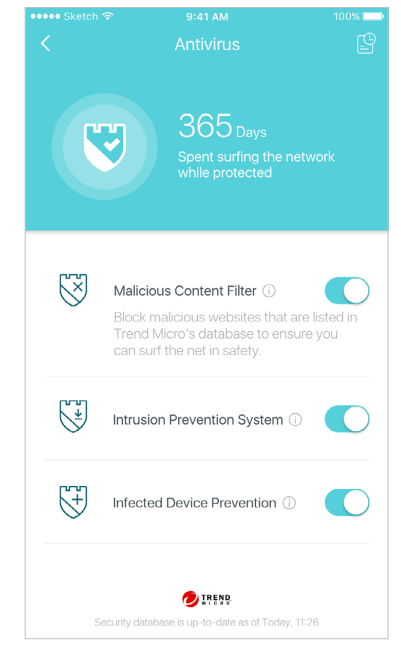
Alert history
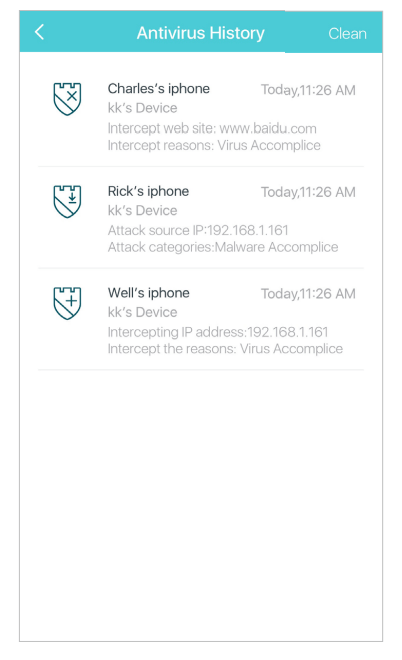
Protection disabled
QoS
There are two ways to use the QoS (Quality of Service) function. You can prioritize the connection of a particular device for a set duration, such as a family member’s laptop for one hour during a video call. You can also prioritize the online activity that’s most important to the whole family, such as Streaming or Gaming.
Prioritize a device
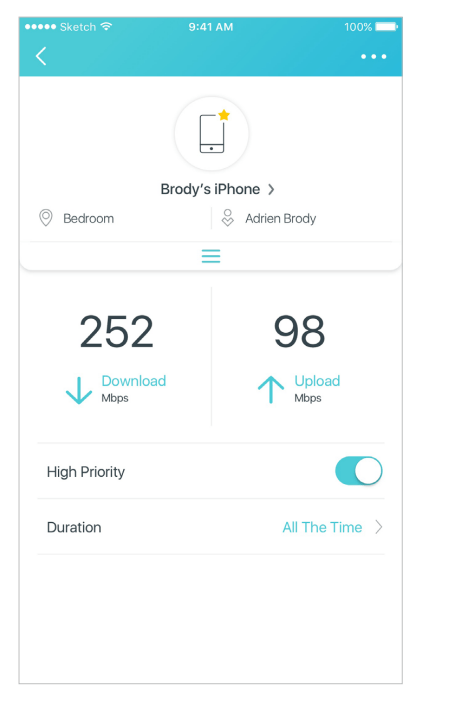
Prioritize an activity
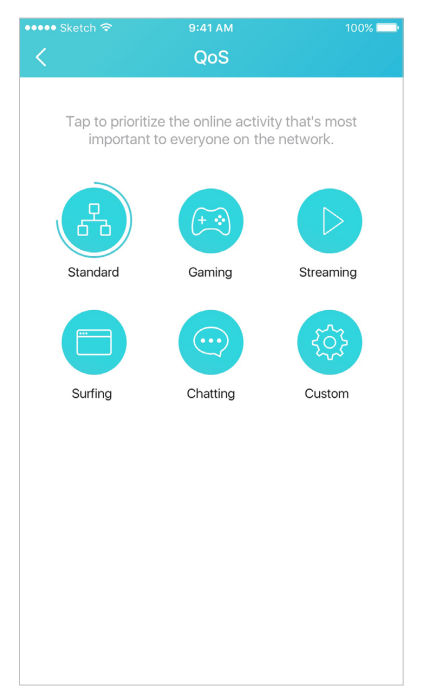
Customize
Monthly Report
Review a monthly list of usage, top 5 visited content, most frequently executed automations and shortcuts, and security threats.
Safeguard your Deco network
Top 5 visited content under Parental Controls
Most frequently executed Shortcut and Automation
Switch and Create Network
You can create, manage and switch between different Deco networks bound to your TP-Link ID
Swipe right and tap 
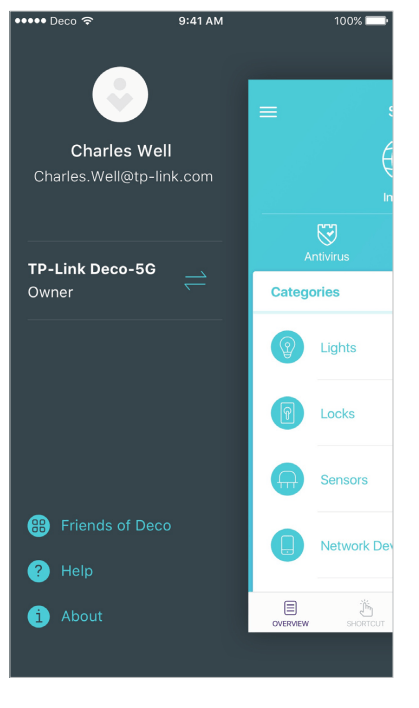
Swipe to switch a network to manage
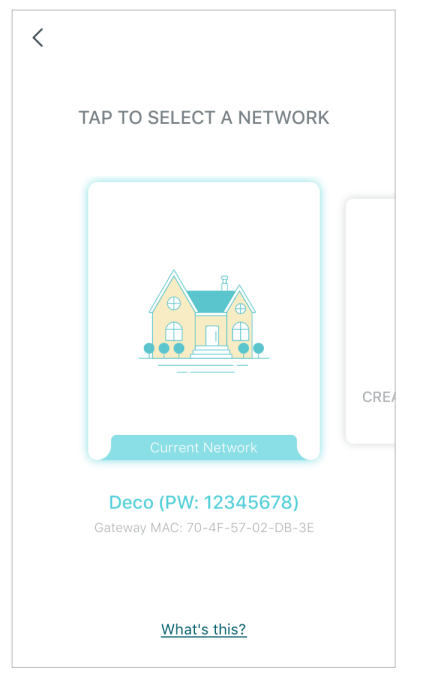
Swipe to create a new network
Friends of Deco
TP-Link works with Alexa and IFTTT. With Alexa, you can use your voice to control functions of the AC2200 Tri-Band Mesh Wi-Fi System. With IFTTT, you can create useful connections between devices, apps, services and websites to make your home smarter.
Friends of Deco
Alexa and IFTTT
Advanced Features
Additional features are available under the Advanced menu. You can modify WAN settings (IPv4 & IPv6), control Deco’s LED, turn notifications off and on, create a domain name for your Deco, set up port forwarding rules to make your local computers accessible to other devices over the internet, reserve an IP address for a specific device and change the operating mode.
IPv4
IPv6

LED Control
Register a TP-Link DDNS domain name
Enable or disable TP-Link DDNS feature
Set up port forwarding rules
Reserve IP addresses for specific devices
Change the operating mode
Online Upgrade
TP-Link is dedicated to improving product features and providing a better customer experience. Update Deco when prompted in the Deco app
Download new firmware
Install new firmware

Up-to-date
Managers
Add friends and family members to help manage your network. Each manager should have their own TP-Link ID.
Add as manager
Manager list
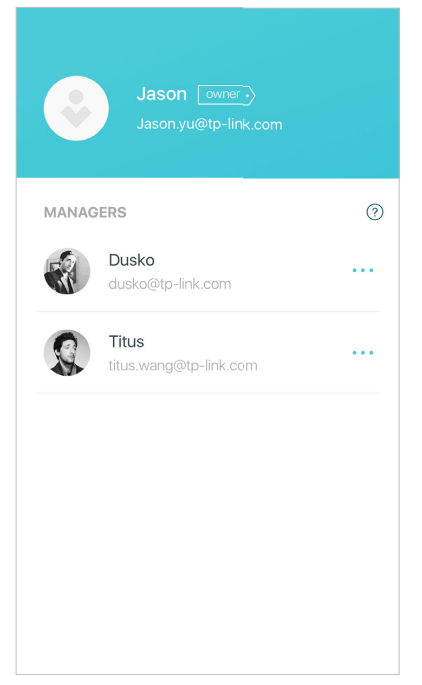
Remove a manager