
Эта инструкция поможет вам легко понять принцип работы усилителя TL-WA850RE, определять значение его индикаторов, подключить его к роутеру с кнопкой WPS или без нее и разобраться в простейших настройках, которые пригодятся при использовании устройства.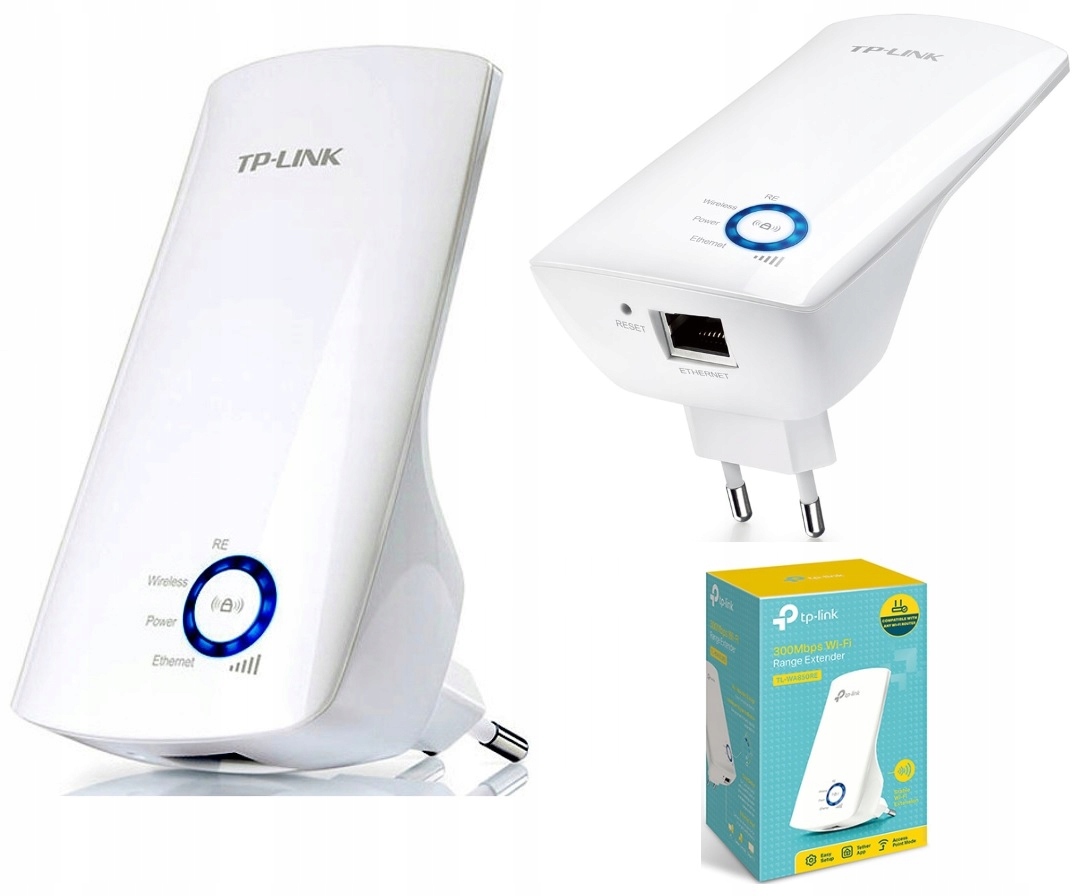
Принцип работы усилителя
В отличие от традиционных моделей роутеров TP-LINK, модель TL-WA850RE предназначена только для усиления сигнала беспроводной сети. По этой причине для ее работы требуется подключенный к интернету роутер (маршрутизатор) или точка доступа. Суть работы усилителя такова: он подсоединяется по Wi-Fi к беспроводному роутеру, получает от него все сетевые настройки и тем самым расширяет сеть Wi-Fi на большую территорию. Это позволяет усиливать сигнал в дальних от роутера помещениях, куда он не может дойти из-за большого расстояния или наличия стен. Особенностью модели TL-WA850RE является компактность и внешний вид в форме блока питания. Благодаря этому такое устройство легко брать с собой и быстро подключать его к любому маршрутизатору.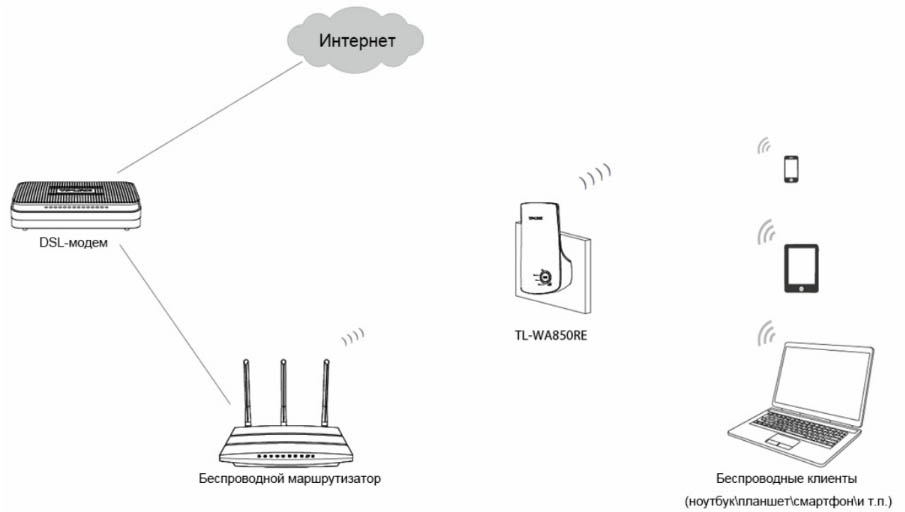
Основные элементы усилителя
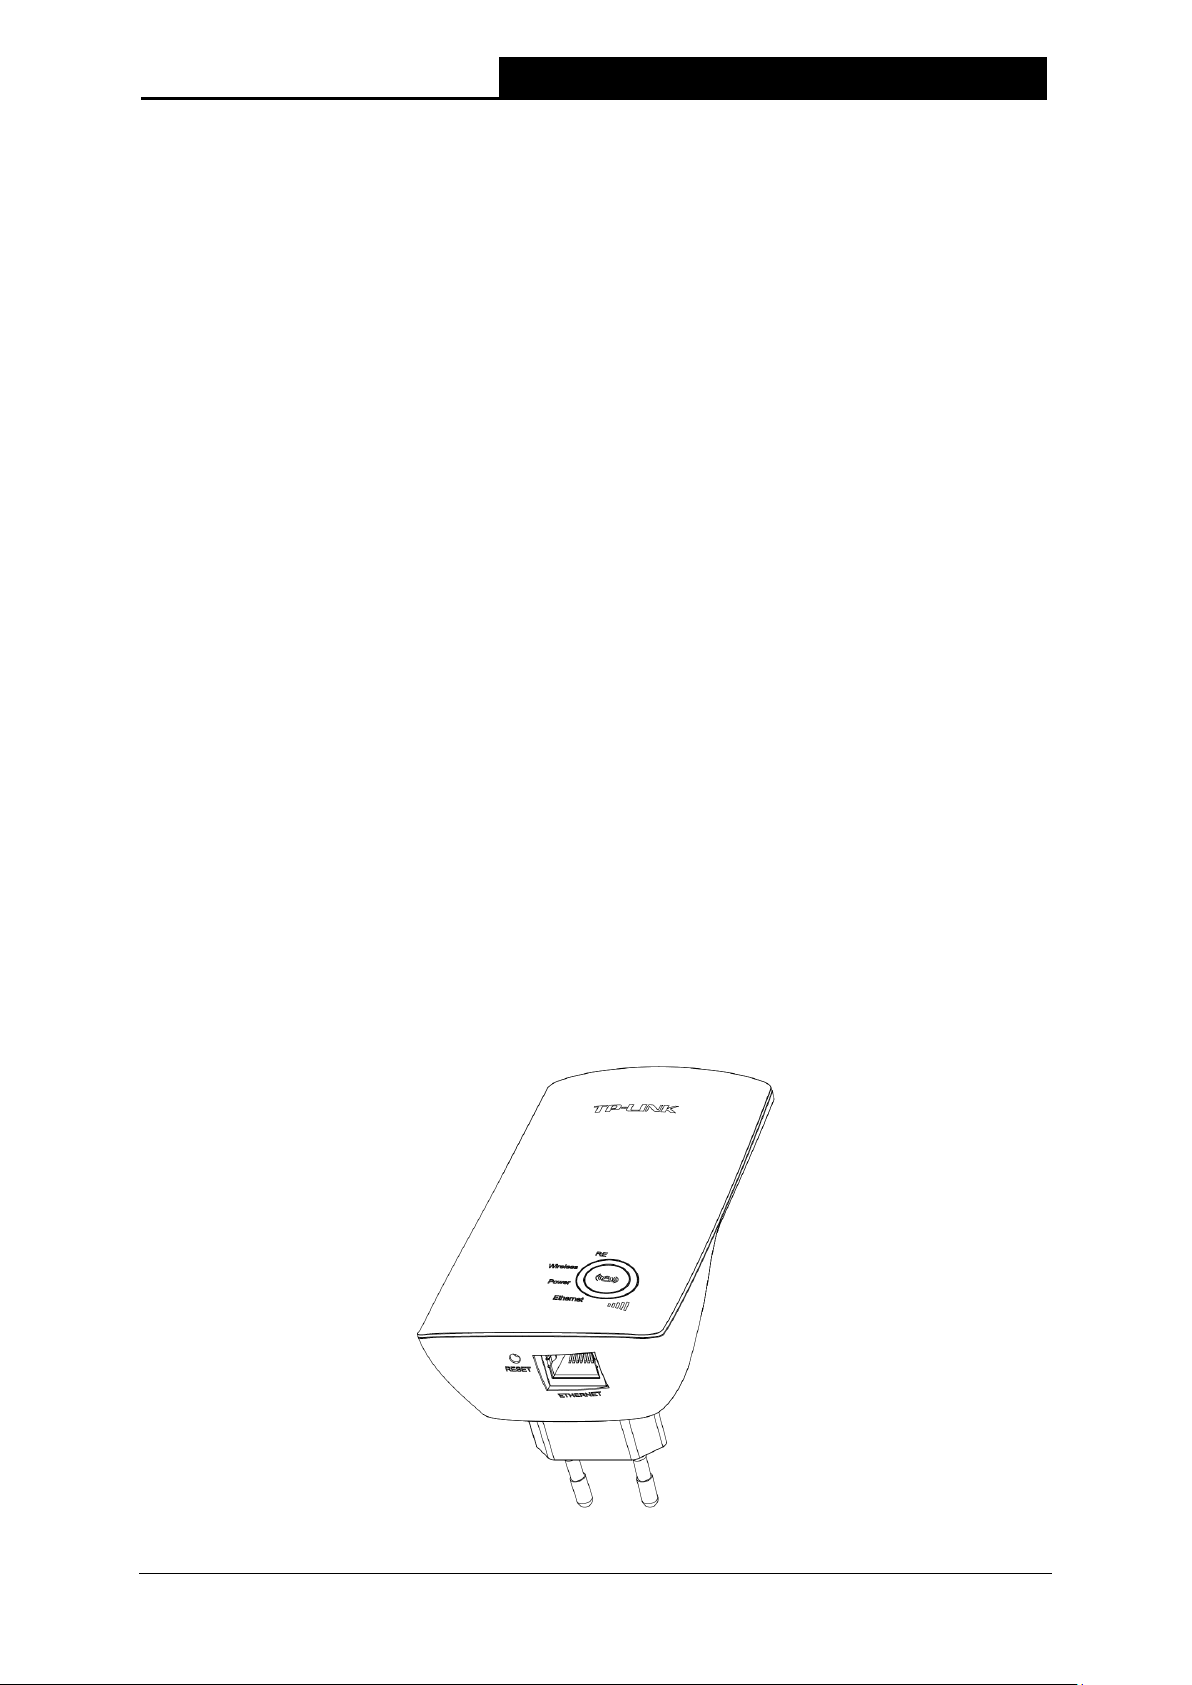
Так как усилитель заточен только под одну функцию, по сравнению с роутером у него меньше функций, которыми можно управлять, и поэтому меньше элементов на корпусе. На передней панели корпуса расположена кнопка RE (изображение замочка и сигнала). Свое название кнопка получила от английских слов RANGE EXTENDER, означающих усиление сигнала или расширение диапазона. Именно эта кнопка поможет быстро подключить усилитель к роутеру без утомительных настроек в панели управления. Вокруг кнопки RE расположился круговой индикатор с несколькими секторами, по миганию или свечению которых можно определить состояние тех или иных функций (их мы рассмотрим ниже).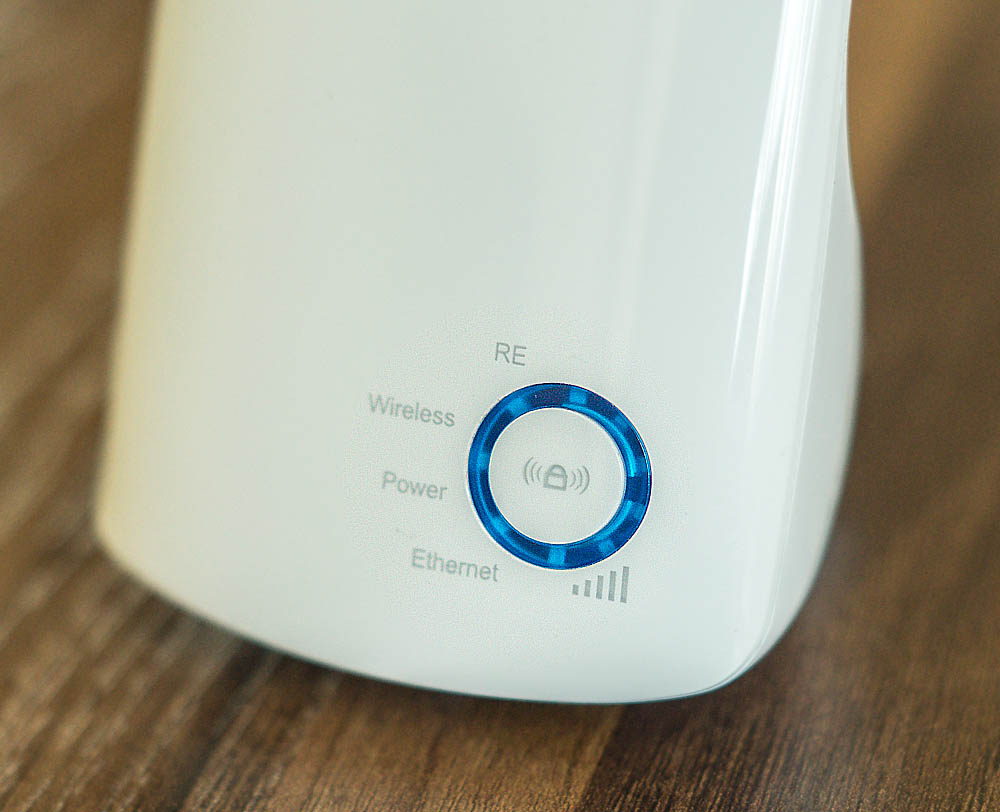
На задней панели корпуса есть вилка для подключения к сети (для разных регионов усилитель идет с вилкой разных стандартов) и этикетка с регистрационными данными.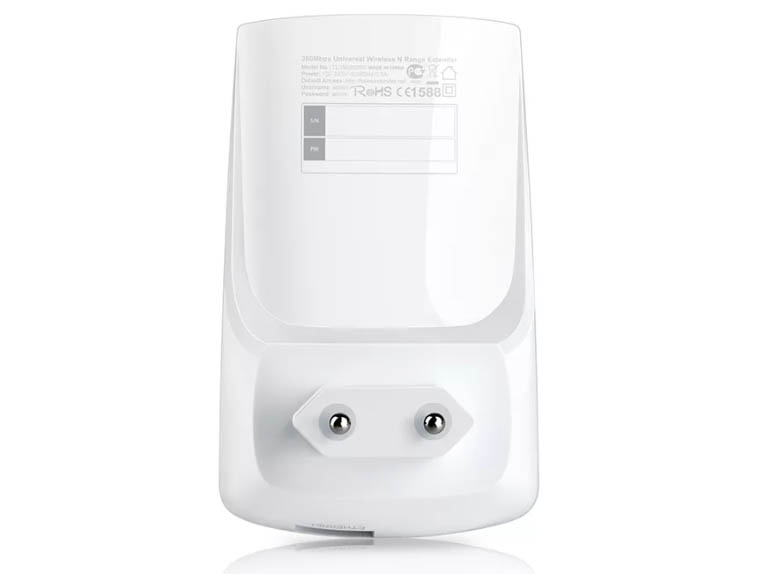
С торца усилителя есть скрытая отверстием кнопка Reset для возврата устройства к заводским настройкам. Для сброса она удерживается около 8 секунд до смены состояния индикатора с медленно мигающего до быстро мигающего. Рядом находится порт Ethernet для подключения других устройств. С помощью этого порта вы можете обеспечить интернетом устройство, которое не подключается по Wi-Fi. Это может быть умная ТВ-приставка, игровая приставка и другой девайс. Но порт не подойдет для подключения по проводу к роутеру или точке доступа.
Значение индикаторов
Круговой индикатор разбит на несколько зон, каждая из которых отвечает за конкретную функцию. Сектор возле надписи Power традиционно отвечает за питание и принимает два положения: горит (усилитель включен в сеть) и не горит (питание отсутствует). У сектора RE есть три положения: горит или не горит (соединение с роутером установлено или не установлено), мигает (усилитель пытается соединиться с роутером). Сектор возле надписи Wireless отвечает за беспроводное вещание. Если вещание происходит, сектор будет постоянно мигать, иначе он не будет гореть. Сектор возле Ethernet может принимать одно из трех положений: не горит (к порту Ethernet ничего не подключено), горит (к указанному порту подключено устройство, но оно не активно), мигает (устройство подключено и принимает или передает данные).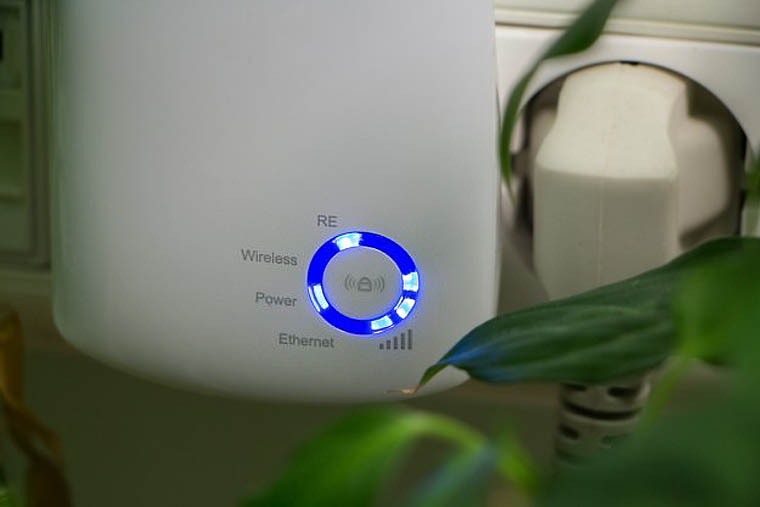
Помимо названных есть еще пять секторов, которые находятся возле значка мощности сигнала и принимают несколько значений. Чем меньше будет мощность сигнала, тем меньше секторов будет светиться (при максимальной мощности горит пять секторов). Если эта зона вообще не горит, значит, усилитель не установил соединение с роутером. Мигание говорит о том, что усилитель связался с роутером, но без доступа к интернету.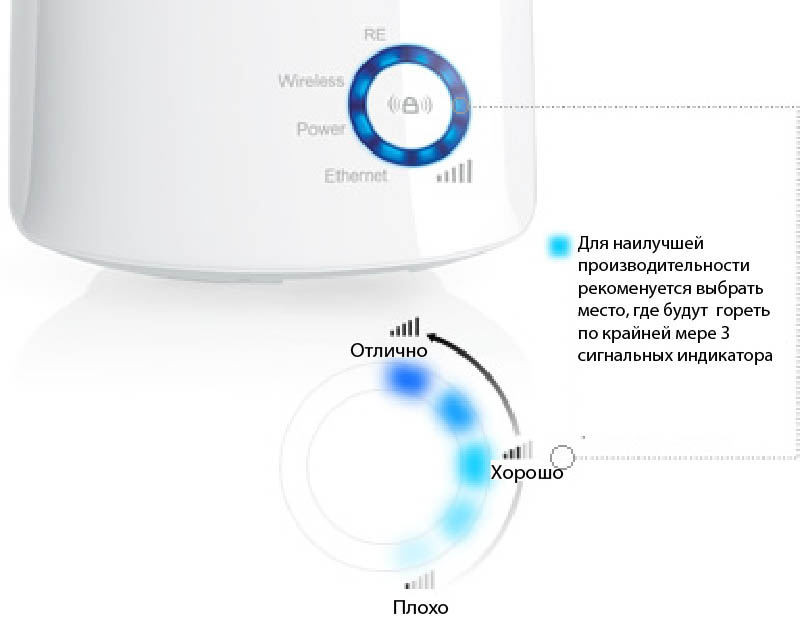
Правильное расположение усилителя
До того, как вы будете подключать усилитель к роутеру или точке доступа, выберите для него подходящее место. Лучше всего разместите его примерно посередине между роутером и устройствами, которые будут от него получать интернет. Желательно, чтобы между устройствами не было преград и приборов, которые могут создать радиопомехи из-за работы на той же частоте (микроволновки, смартфоны и пр.). Когда вы подключите устройства, как описано ниже, желательно, чтобы мощность сигнала составляла не менее трех секторов кругового индикатора. Если их меньше, расположите усилитель в другом месте (ближе к роутеру, в месте, где нет капитальных стен, и пр.).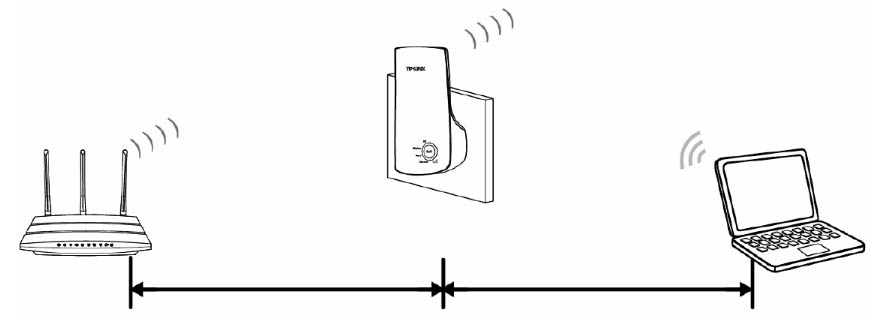
Подключение TL-WA850RE кнопкой WPS (QSS)
На многих современных роутерах есть кнопка WPS или QSS, отвечающая за быстрое подключение к нему устройств по беспроводной связи без ввода паролей. Если на роутере, к которому вы собираетесь подключить усилитель TL-WA850RE, такая кнопка есть, проделайте следующие шаги. Включите усилитель в розетку, нажмите кнопку WPS на включенном роутере и нажмите кнопку RE (кликните в центр кругового индикатора) на усилителе. После этого на круговом индикаторе замигает зона Wireless и RE, что говорит о включении беспроводного вещания и процессе соединения усилителя и роутера. Когда соединение установится (на это требуется до двух минут), зона RE будет гореть постоянно, а также загорится несколько секторов мощности сигнала. Напомним, что усилитель должен находиться в зоне действия беспроводного роутера.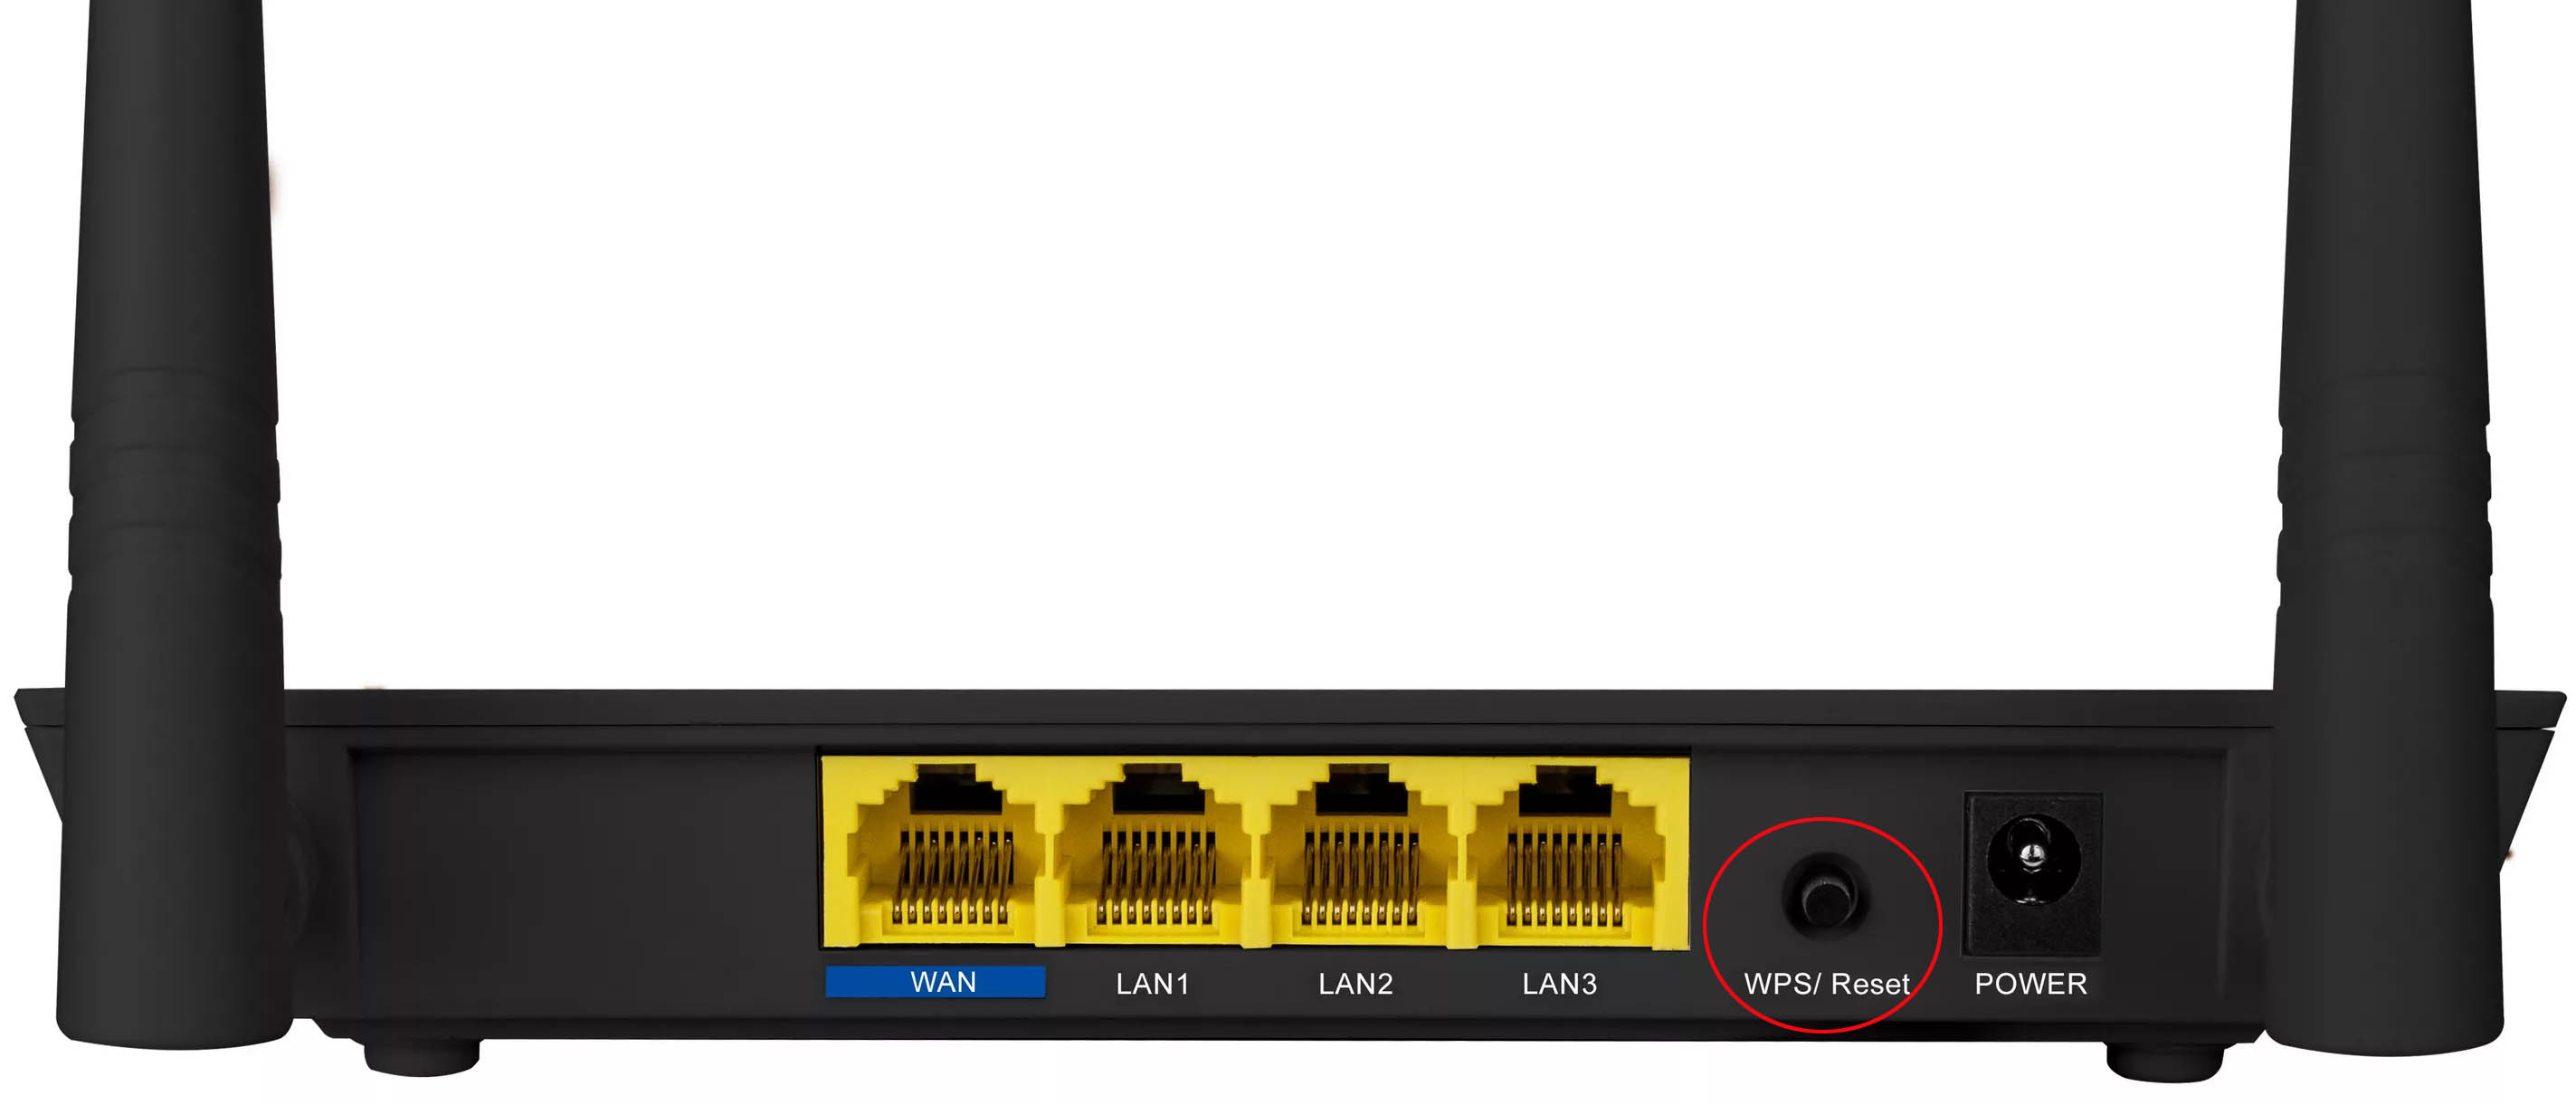
Подключение при отсутствии кнопки WPS (QSS)
Если такая кнопка на роутере не предусмотрена, тогда придется подключать усилитель к компьютеру и соединять устройства уже через панель управления. Вы можете подключить усилитель к ПК как по проводу, так и при помощи Wi-Fi, если на вашем ПК есть модуль Wi-Fi. В первом случае возьмите патч-корд (идет в комплекте с усилителем), вставьте его одним концом в порт Ethernet включенного в розетку усилителя, а другим концом в сетевой порт компьютера (ноутбука). При этом компьютер не должен быть подключен к интернету по какой-либо беспроводной сети. Во втором случае на компьютере постройте список Wi-Fi-сетей, найдите в нем сеть вашего усилителя по его названию и подключитесь к ней.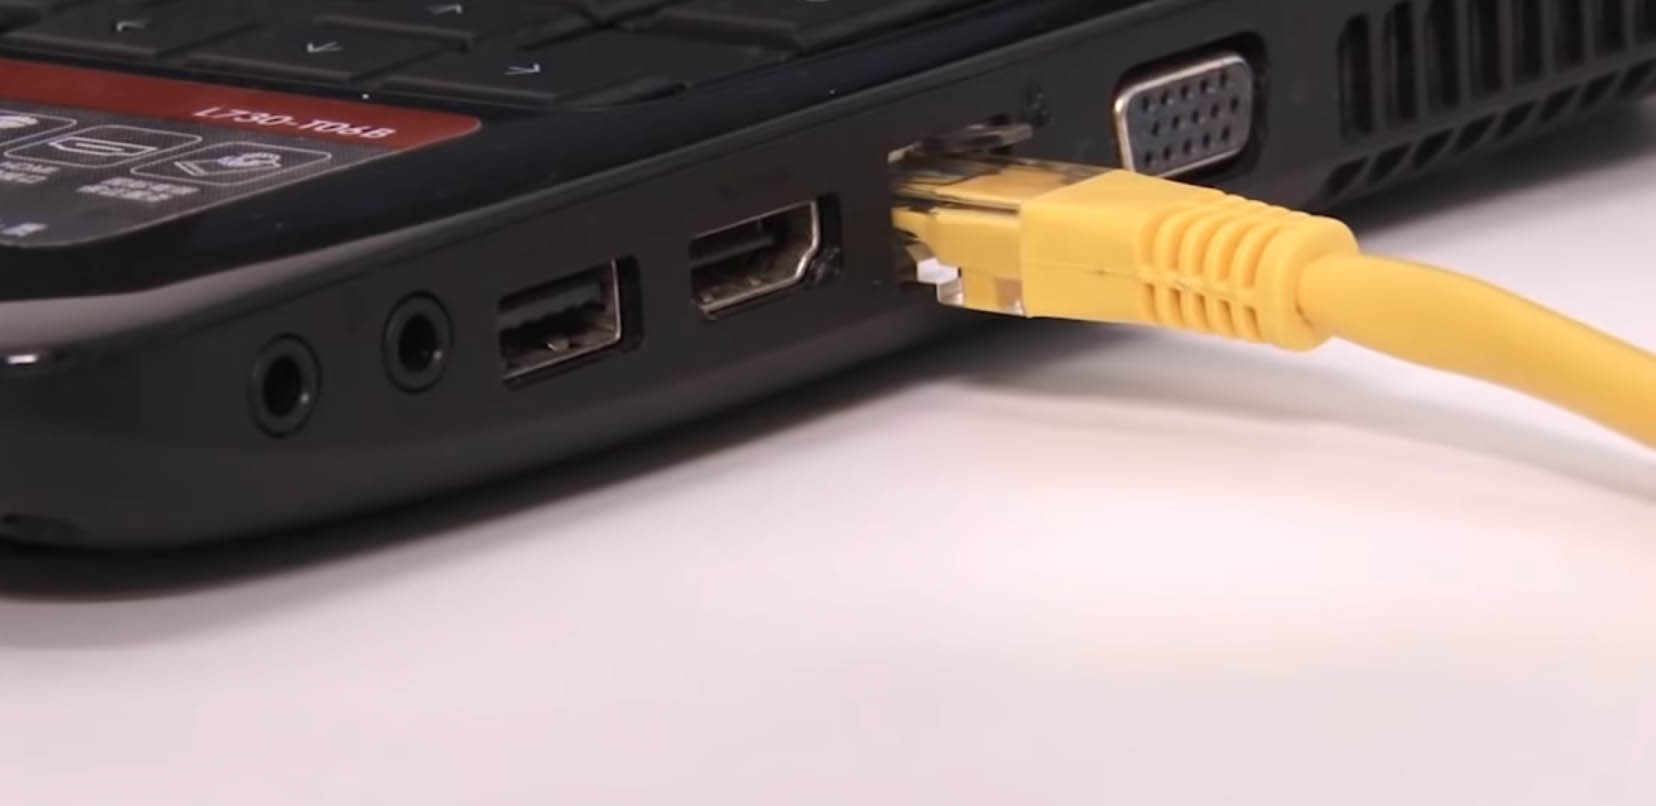
Теперь откройте браузер и перейдите по адресу: http://tplinkextender.net. Когда появится окно авторизации, введите в качестве имени и пароля слова admin и admin и нажмите ОК. После этого вы попадете на страницу быстрой настройки, где кликните по кнопке «Далее» (Next).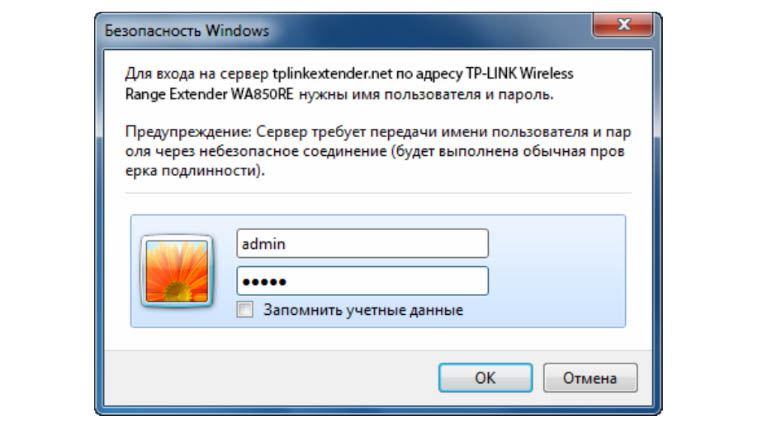
На втором шаге выберите в качестве региона Россию и опять нажмите «Далее». Некоторое время будет происходить поиск доступных сетей, после чего на экране появится их список.
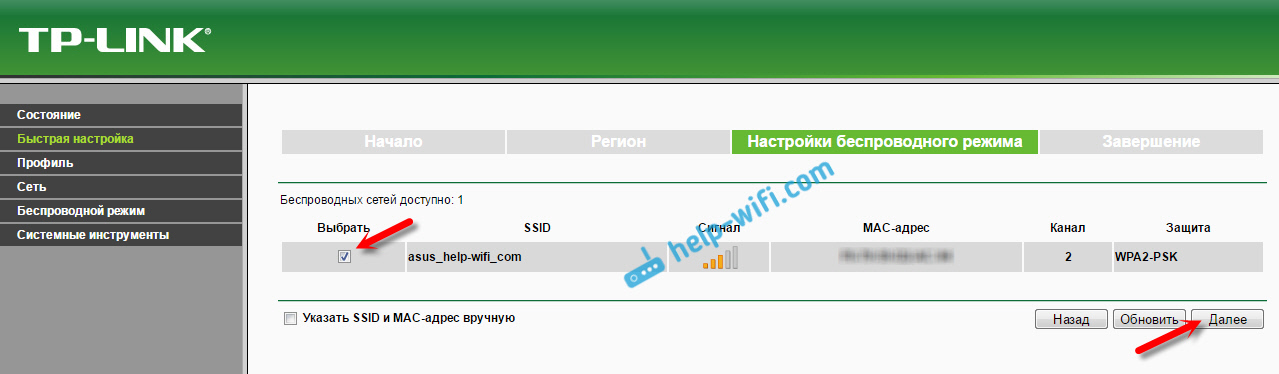
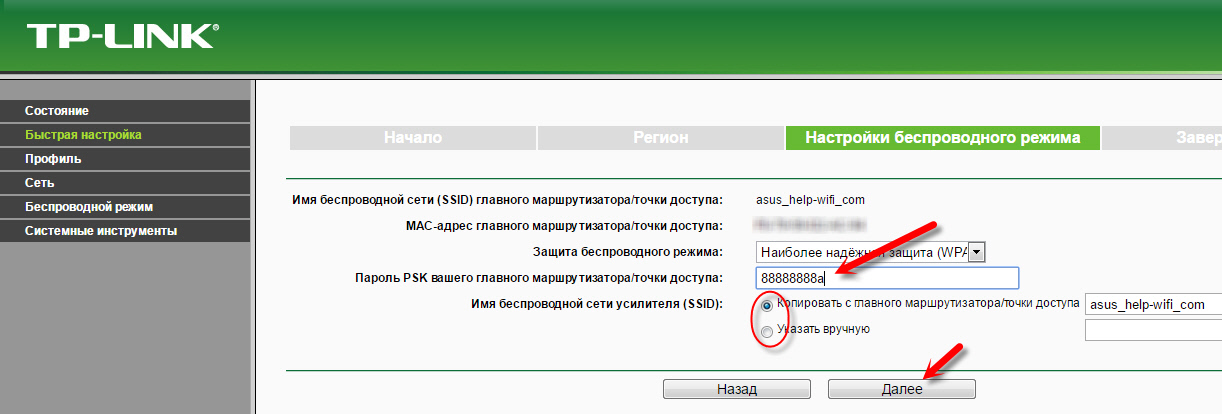
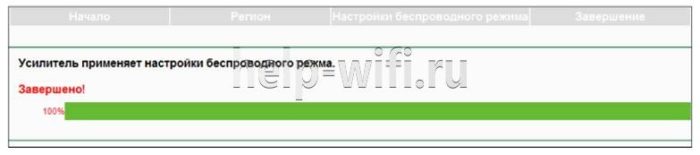
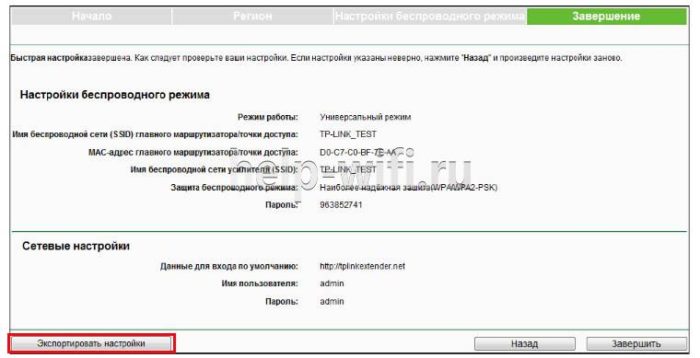
В этом списке найдите имя вашей домашней Wi-Fi-сети (сети вашего роутера), поставьте галочку рядом с именем этой сети и нажмите «Далее». Если имя обнаружить не удалось, обновите список или же введите SSID и МАС-адрес вручную, узнав их в панели управления своего роутера. На следующем шаге введите пароль от Wi-Fi-сети вашего роутера и кликните по кнопке «Завершить» (Finish). По завершению соединения появится надпись «Завершено!» (Completed). При этом усилитель запомнит настройки роутера, то есть при повторном подключении устройств вам не придется проделывать все заново.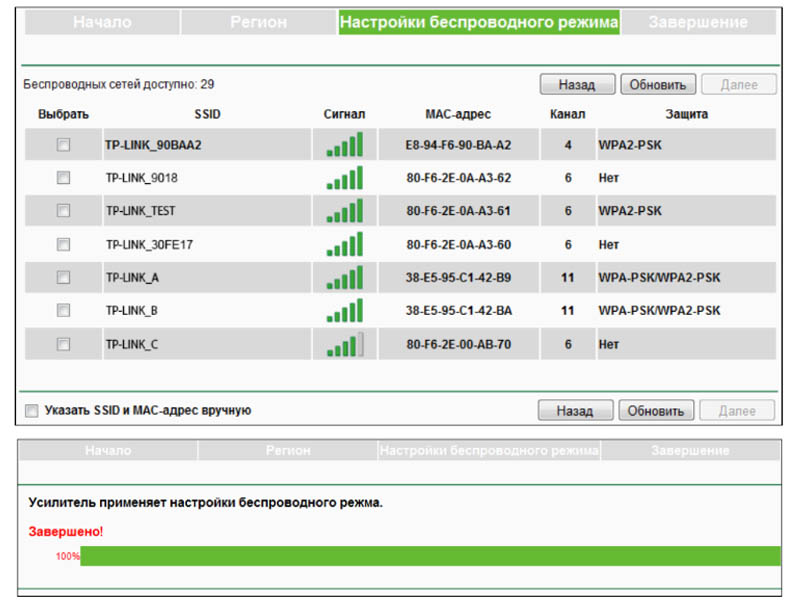
Если вы вводили какие-то данные вручную, перед нажатием кнопки «Завершить» вы можете кликнуть по кнопке «Экспортировать настройки». Они запишутся в файл, который в дальнейшем можно восстановить через раздел «Системные инструменты» (об этом подробнее поговорим ниже).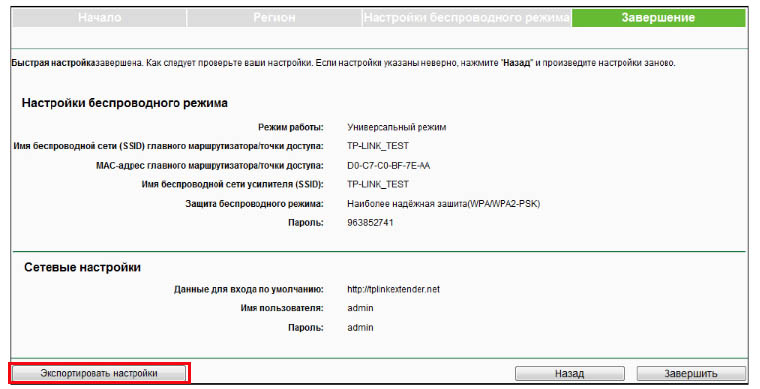
Как настроить усилитель TP-LINK TL-WA850RE
Все настройки усилителя TL-WA850RE производятся в панели управления, зайти в которую вы можете через любой браузер по адресу: http://tplinkextender.net. Для этого вам необходимо подключить к усилителю компьютер, как описано выше. Панель управления имеет обширные настройки, которые подойдут опытным пользователям и не требуются для обычной работы усилителя. Поэтому ниже мы рассмотрим лишь те разделы и настройки, которые подойдут для новичков.
Просмотр состояния и управление профилями
При заходе в панель управления вы увидите в списке меню несколько разделов. Раздел «Состояние» не предназначен для изменений, но поможет получить при необходимости основную информацию об усилителе и главном роутере, к которому он подключен.
Так как усилитель TL-WA850RE будет всякий раз запоминать настройки при подключении к каждому новому роутеру, вы можете управлять этими профилями в разделе «Профиль». Здесь есть возможность присвоить профилю имя, отличное от имени главного роутера, изменить, удалить неактуальный профиль, подключить выбранный профиль или добавить новый, вручную введя запрашиваемые сведения.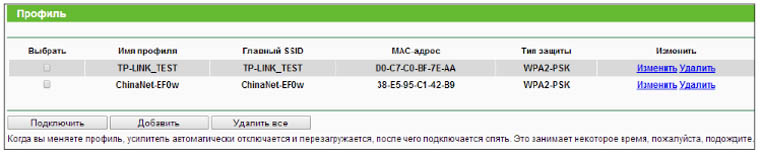
Обновление прошивки TL-WA850RE
И последний раздел, который часто пригождается при работе с усилителем, это раздел «Системные инструменты». Первый его пункт посвящен обновлению встроенного ПО. Прибегать к нему рекомендуется в том случае, если усилитель перестал корректно работать или в новой версии прошивки вышла какая-то новая функция, которую вы хотели бы использовать. Для обновления прошивки вам нужно скачать ее с официального сайта производителя и загрузить по кнопке «Обзор» (см. пример обновления прошивки в статье «Инструкция по настройке и подключению роутеров TP-LINK TL-WR841N и TL-WR841ND»).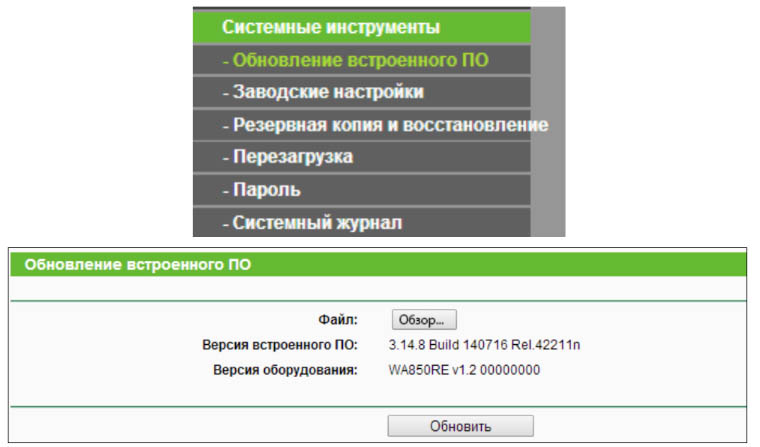
Сброс до заводских настроек, перезагрузка и резервное копирование
Раздел «Заводские настройки» поможет вам в случае неудачных настроек или проблемах с подключением к роутеру. Если вы нажмете кнопку «Восстановить», произойдет сброс всех настроек, которые сделали вы или кто-то до вас. При этом усилитель вернется к заводским настройкам, что потребует от вас повторного подключения и настроек, описанных выше.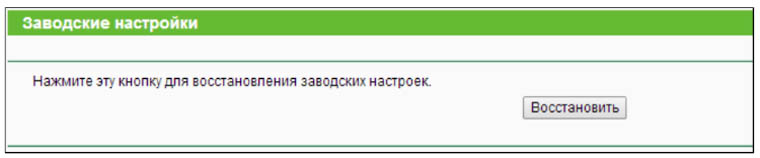
Если вы долго делали какие-либо настройки, рекомендуем сделать их резервную копию через одноименный раздел. Тогда вы сможете сохранить файл с настройками и в последующем восстановить их из этого же файла, если по какой-то причине понадобится сбросить усилитель к заводским настройкам или кто-то вмешается в ваши настройки. Во время восстановления настроек не выключайте усилитель, так как это может привести к его поломке.
Некоторые недочеты в работе усилителя можно решить перезагрузкой, которая выполняется в разделе «Перезагрузка». Она же необходима для того, чтобы изменения вступили в силу после обновления прошивки, сброса, изменения настроек беспроводного режима и других.
Смена пароля панели управления
Наконец, раздел «Пароль» нужен для того, чтобы сменить имя и пароль для входа в панель управления. Если вы оставите их без изменения, то любой человек может подключиться к вашему усилителю и поменять настройки на свое усмотрению.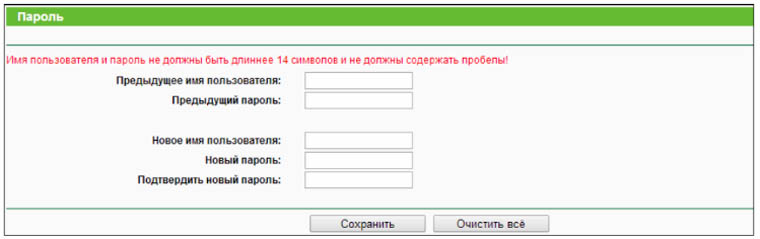
Мы рассмотрели базовые знания, которые потребуются вам для подключения и настройки усилителя TL-WA850RE. Подключив устройство к роутеру один раз, вы сможете в дальнейшем проделывать это с другими роутерами и будете всегда иметь в своем распоряжении стабильный сигнал.
Сегодня мы будем устанавливать и настраивать интересное, и полезное устройство, которое называется ретранслятор. Еще, его называют репитер, или повторитель Wi-Fi сети, все это одно устройство, задача которого расширить радиус действия уже существующей Wi-Fi сети. Рассмотрим мы процесс настройки на примере отличной модели ретранслятора TP-LINK TL-WA850RE.

Более подробно о репитерах, можете почитать в статье: что такое Wi-Fi репетир (повторитель), как он работает. Если у вас установлен роутер, и сигнал Wi-Fi «не доходит» в какие-то дальние комнаты, или, например, на второй этаж, то такое устройство как TP-LINK TL-WA850RE, может без проблем решить эту проблему. Можно конечно же попробовать усилить сигнал Wi-Fi правильной настройкой роутера, и другими способами, о которых я писал в статье как усилить сигнал Wi-Fi сети? Увеличиваем дальность Wi-Fi. Или, заменить антенны на Wi-Fi роутере, на более мощные. Но, такого эффекта расширения Wi-Fi сети, как от установки репитера, вы не получите. Это самый оптимальный вариант увеличить покрытие беспроводной сети. Стоит ретранслятор не очень дорого, а эффект от него хороший.
Несколько слов о том, как все это работает. У нас установлен роутер, который раздает интернет по Wi-Fi. Но, в какой-то комнате Wi-Fi не ловит, или очень плохой сигнал. Мы берем повторитель, в нашем случае TP-LINK TL-WA850RE, и включаем его в том месте, где сигнал от роутера еще стабильный (желательно 50-60%). Настраиваем соединение, и будет одна Wi-Fi сеть (с таким же именем и паролем, как на главном роутере), но усиленная повторителем. Все устройства, будут автоматически переключатся с роутера, на репитер, и наоборот. В зависимости от уровня сигнала. Можно настроить так, что бы репитер транслировал еще одну сеть, с другим именем и паролем.
Настройка репитера TP-LINK TL-WA850RE
Главное, правильно выбрать место для расположения нашего репитера. Нужно стараться установить устройство в таком месте, где будет максимально возможный сигнал от роутера (для минимальной потери скорости), и где репитер будет покрывать Wi-Fi сигналом необходимые нам комнаты.
Настроить ретранслятор TL-WA850RE можно за одну минуту. Включаем его в розетку. На роутере, ищем и нажимаем кнопку WPS. Выглядит она примерно вот так:

Дальше, на ретрансляторе нажимаем на большую кнопку с изображением замка. Загорится индикатор «RE», репитер подключится к маршрутизатору, и будет усиливать Wi-Fi.

Индикаторы, которые появляться с правой стороны, будут показывать уровень сигнала от роутера. У меня, на фото выше, вы можете видеть три деления. Это хороший сигнал. Для стабильной работы, и минимальной потери в скорости, нужно, что бы было минимум два деления. Лучше три.
Вот и все, репитер усиливает сигнал Wi-Fi сети. Вы даже не заметите никаких изменений, кроме как более сильного сигнала Wi-Fi, который появится в тех местах, где раньше не ловил совсем.
Вы можете выключить TP-LINK TL-WA850RE, и включить его в розетку в другой комнате. Он сразу подключится к беспроводной сети, повторная настройка не нужна. Более того, он запоминает сети, с которыми вы устанавливали соединение.
Снизу этого репитера есть один LAN-порт, для подключения устройств к интернету по сетевому кабелю. Его можно использовать для подключения стационарных компьютеров, телевизоров, и других устройств, у которых нет возможности подключится по Wi-Fi, или нужно стабильное соединение.

Как видите, все очень просто и понятно. Включили, нажали на кнопку, и все работает.
Панель управления TP-LINK TL-WA850RE. Настройка репитера без кнопки WPS
У этого маленького устройства, есть своя панель управления. Там можно настроить подключение к Wi-Fi сети, если на вашем маршрутизаторе нет кнопки WPS. Сейчас мы рассмотрим, как зайти в настройки ретранслятора TP-LINK TL-WA850RE.
Что бы зайти в панель управления TL-WA850RE, нужно сначала к нему подключится. Можно по сетевому кабелю, или по Wi-Fi. Сразу после включения ретранслятора, он будет транслировать Wi-Fi сеть без пароля, с заводским названием. Если у вас ретранслятор уже настроен, то вы так же можете зайти в его настройки при подключении по Wi-Fi.
Достаточно в браузере перейти по адресу tplinkrepeater.net. Адрес для входа в настройки, заводские имя пользователя и пароль указаны на самом устройстве:

На странице авторизации указываем имя пользователя и пароль. По умолчанию, это: admin и admin.

Подробнее об этом писал в статье: tplinkrepeater.net и tplinkextender.net – пароль admin, вход в настройки репитера.
На главной странице будет отображаться текущее состояние повторителя. Если подключение уже настроено, то вы увидите эту информацию.
Настройка повторителя Wi-Fi сети TP-LINK через панель управления (без кнопки WPS)
Есть такие маршрутизаторы, на которых нет кнопки WPS. В таких случаях, ретранслятор можно настроить вручную, лучше всего через мастер быстрой настройки. В панели управления перейдите на вкладку «Быстрая настройка», и нажмите кнопку «Далее».
В следующем окне выбираем свой регион, и нажимаем «Далее».

Ретранслятор выполнит поиск беспроводных сетей, к которым можно подключится. Выделите свою сеть, и нажмите кнопку «Далее».
Укажите пароль от Wi-Fi сети, к которой вы хотите подключится. Так же, можно выбрать название Wi-Fi сети. Можно клонировать его с маршрутизатора, или указать свое имя. Нажимаем на кнопку «Далее».
Смотрим заданные настройки, и нажимаем на кнопку «Завершить». Репитер будет перезагружен. Затем, он должен подключится к сети, которую мы настроили.
Сброс настроек репитера TP-LINK TL-WA850RE
Если вы хотите сбросить настройки ретранслятора к заводским, то это можно сделать двумя способами. Через панель управления, или кнопкой на самом устройстве. Включите репитер, возьмите что-то острое, и на пару секунд зажмите кнопку RESET (снизу). Загорятся все индикаторы, ретранслятор перезагрузится, и настройки будут сброшены к заводским.
Или, зайдите в web-интерфейс, перейдите на вкладку «Системные инструменты» – «Заводские настройки», и нажмите на кнопку «Восстановить».

После перезагрузки настройки будут сброшены.
Если после настройки ретранслятора TP-LINK не работает интернет
Судя по отзывам, в процессе настройки иногда возникают проблемы. Либо ретранслятор не может подключится к Wi-Fi сети роутера, либо подключение есть, но не работает интернет. Несколько советов по решению проблем:
- Установите ретранслятор ближе к маршрутизатору. Чаще всего, проблемы в работе усилителя Wi-Fi сети появляются из-за слабого сигнала, или помех.
- Если репитер не может подключится к маршрутизатору, или не работает интернет, то восстановите заводские настройки на TL-WA850RE (как это сделать, писал выше), затем перезагрузите роутер, и попробуйте соединить их еще раз.
- При возникновении проблем с настройкой через кнопку WPS, можете попробовать установить соединение с нужной Wi-Fi сетью через панель управления. Выше писал как это сделать.
- Можно так же попробовать обновить прошивку вашего ретранслятора.
- И еще, в настройках роутера можно сменить канал Wi-Fi сети. Как это сделать, я писал в статье: как найти свободный Wi-Fi канал, и сменить канал на роутере.
Вот такие советы. Если не получается настроить TP-LINK TL-WA850RE, и вы уже все перепробовали, то задавайте вопрос в комментариях. Постараюсь помочь. Всего хорошего!
На чтение 10 мин Просмотров 21.4к.

Специалист техподдержки, PHP-программист, разработчик WordPress
Задать вопрос
Бывали ли у вас ситуации, когда вы, пользуясь домашним Wi-Fi, отошли на большое расстояние и интернет исчез? Для решения такой проблемы знаменитый бренд Tp-Link предложил устройство TL WA850RE. Это не полноценный роутер, выходить в интернет он не сможет, но решить описанную проблему вполне способен. Tp-Link TL WA850RE относится к классу репитеров — усилителей беспроводного сигнала. Подключив его, пользователь получает мощный хороший сигнал, там, где стандартный роутер «не тянет».
Содержание
- Принцип работы усилителя
- Правильное расположение усилителя
- Значение индикаторов
- Как подключить репитер к роутеру
- Базовая настройка
- Точная настройка
- Профиль
- Возможные проблемы
- Обновление прошивки
- Пароль
- Сброс до заводских настроек
- Отзывы
Принцип работы усилителя
Wa850re можно назвать «универсальным солдатом». В случае необходимости он может выступить не только репитером, но и точкой доступа (режим выбирается в настройках).

Маленькой плюшкой модели можно назвать наличие одного разъёма RJ-45. Кроме прямых функций Wa850re способен дать интернет и устройству, подсоединённому по кабелю. Но только одному.
Несмотря на то, что repeater — встроенная функция для многих роутеров, обычный пользователь не понимает, как она действует, а иногда и не знает о её наличии.
Схема действия проста: Tp-Link Tl Wa850re — промежуточное звено между источником и потребителем. Если гаджет пользователя нормально связывается с источником, он принимает его сигнал.
Но так как с ростом расстояния мощность сигнала падает, на большом отдалении от маршрутизатора источник не сможет выдать сильный, хороший сигнал.
В таком случае гаджет воспользуется услугами Wa850re (или любым другим репитером), который ещё чувствует хороший сигнал от источника.
Смысл работы ретранслятора прост: если мощность сигнала хороша, повторитель не нужен. Если сигнал падает, то подключаем устройство.
Для лучшего понимания можно представить большой концертный зал. Чтобы на галёрке было слышно так же, как и в партере, используется усилитель сигнала.
Удобство и простота настройки
8
Правильное расположение усилителя
Чтобы Wa850re мог полноценно выполнять свои функции, его нужно правильно установить.
О настройке устройства речь пойдёт чуть ниже, здесь же отметим, что поставить его на столе рядом с роутером — не самое лучшее решение. Так как Wa850re — повторитель, его нужно использовать там, где роутер не справляется. Например, в дальней комнате. Тут стоит отметить ещё такую конструктивную особенность репитера. Это небольшая коробочка шириной 65, высотой 110 мм, по форме и внешнему виду напоминающая блок питания. И по замыслу конструкторов она так же, как блок питания, вставляется в розетку. Никаких дополнительных кабелей.
Значение индикаторов
Основным отличием Wa850re от блока питания являются индикаторы. Выложенные в форме круга, они указывают на режим работы и мощность сигнала. Следует учесть, что последняя в данном случае та, которую он чувствует от источника, а не раздаёт.
В середине круга одна кнопка — включение Wa850re в режим повторителя.

Индикаторы круга по вертикали условно разделяются на две части. Левая часть указывает на режимы работы, правая на мощность сигнала, которую улавливает Wa850re от основного устройства. В инструкции к повторителю рекомендуется устанавливать его так, чтобы мощность сигнала была не менее 3 делений (всего 5).
Если с правой частью все понятно — при 5 делениях светится половина круга, то на левой части индикаторов Wa850re остановимся чуть подробнее. Снизу вверх:
- Ethernet — подключение к разъёму RJ-45 на устройстве;
- Power — питание;
- Wireless — репитер работает точкой доступа (естественно в таком случае загорятся все индикаторы сигнала);
- RE — основная функция, активируемая центральной кнопкой. Устройство стало усилителем сигнала.
Как подключить репитер к роутеру
Для соединения репитера и роутера существует два варианта и какой из них выбрать — зависит от модели роутера. Если у него есть кнопка WPS (иногда) QSS, надо нажать её, а также кнопку между диодами повторителя. На последнем засветятся индикаторы 3 и 4 (см раздел выше). После «переговоров» с роутером (до 3 минут) ретранслятор перейдёт в рабочий режим: кнопка 3 погаснет, а также засветятся диоды мощности сигнала.
Если кнопки нет, то придётся воспользоваться веб-интефейсом и подключить устройство через панель управления.
Для настройки репитера можно тоже использовать два варианта. Через кабель — рекомендуется сначала соединить компьютер и репитер напрямую или через беспроводную сеть, если у ПК есть такая возможность.
Базовая настройка
Для настройки репитера Tp-Link TL WA850RE понадобится любой браузер, установленный у пользователя.
В отличие от обычного роутера инструкция по настройке ретраслятора состоит из двух частей. Базовая (быстрая) — чтобы ретраслятор и роутер смогли найти друг друга, а первый понял, какую сеть нужно усиливать.
Точная настройка — где можно будет выбрать режим работы устройства, настроить канал, безопасность и другие возможности.
В адресную строку браузера вводится http://192.168.0.254 или tplinkrepeater.net.
Здесь стоит обратить внимание, что даже если основной роутер тоже от Tp-Link и доменное имя и адрес другие, то ошибки не будет. Важно, чтобы компьютер находился в сети за репитером, а не перед ним. Откроется настройка репитера.
Как обычно, вводится логин и пароль. Их можно уточнить на наклейке, расположенной на нижней крышке репитера, но обычно это «admin» в оба поля.

В открывшемся окне сообщается, что устройство не усиливает никакой сети, потому что не подключено.
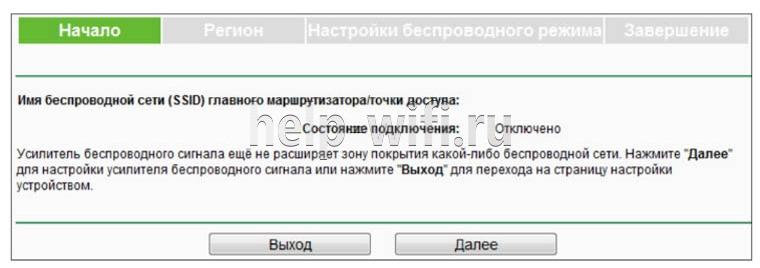
На странице две кнопки, но стоит быть внимательным. Для базовой настройки усилителя нажимается «Далее», для настройки режимов работы — «Выход».
Для базовых настроек нажимают «Далее». Следующая вкладка предложит выбрать регион проживания. По умолчанию предлагается «Россия».

Нажатием «Далее» соглашаются с предложенным. Репитер произведёт поиск всех доступных сетей, затем откроет третью вкладку, где сводной таблицей покажет результаты поиска.
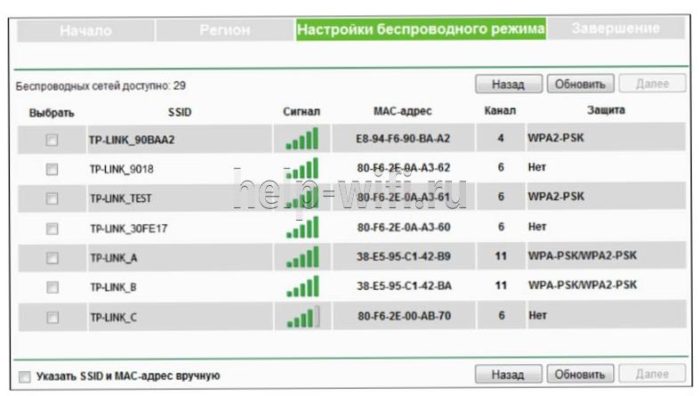
Может оказаться, что сети пользователя в списке не будет. Это недоработка интерфейса и решается нажатием «Обновить» несколько раз.
Отметив галочкой нужную сеть, снова нажимают «Далее». Репитер перейдёт к четвёртой, заключительной вкладке, где покажет процесс выполнения настройки.
А затем сводную таблицу всех настроек.
Здесь можно либо завершить настройки, либо экспортировать их в текстовый файл для последующего восстановления, если понадобится. Но базовая настройка сводится к одному действию — указанию своей сети, поэтому нажимают «Завершить».
Точная настройка
Выше описана быстрая схема установки tl wa850re. Настройку других параметров устройства можно провести в разделе «Беспроводная сеть» (иногда «беспроводной режим»).
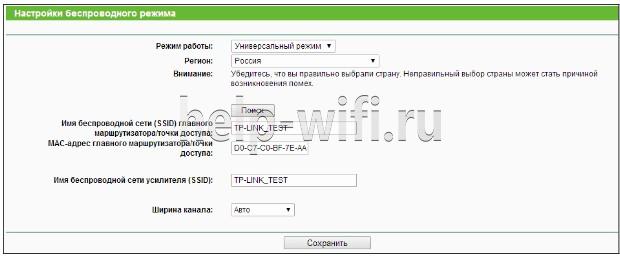
В этом окне можно:
- Выбрать режим работы (универсальный или новая точка доступа);
- Сменить регион и МАС;
- Поменять имя сети, под которой будет представляться усилитель, а также Сменить имя сети источника (произойдёт переподключение);
- Настроить ширину канала.
Как и в роутерах, репитер позволяет настроить защиту сети. Для этого существует раздел «Защита беспроводной сети»
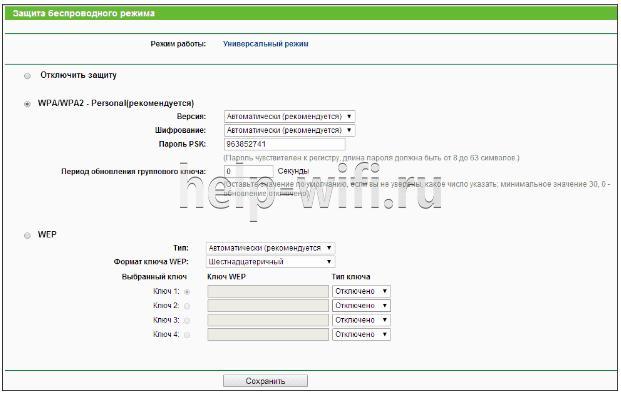
Пользователь может включить/выключить защиту или установить шифрование.
Профиль
Отдельно стоит упомянуть раздел «Профиль» в главном меню. При подключении к каждому новому роутеру репитер придётся настраивать заново. Инженеры позаботились об этом, введя в меню раздел «Профиль».
Первый создаётся автоматически — в начале настройки устройства.
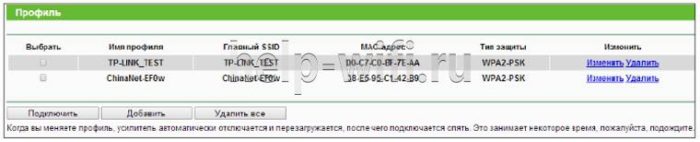
Перейдя в раздел, можно его переименовать, изменить или удалить.
Если репитер подключают к разным роутерам, связь с каждым создаёт свою запись. Впоследствии, чтобы не настраивать подключение с нуля, можно выбрать нужный профиль, и усилитель подключится сам.
Возможные проблемы
На этом основные настройки репитера закончены. Приведём решение возможных проблем.
- Усилитель нужно расположить так, чтобы сигнал показывал как минимум 3 диода (в идеале 4-5);
- Если сети нет, попробовать перегрузить физически (вытянув из розетки и вставив обратно), или программно;
- Попробовать обновить прошивку (ниже);
- Сбросить до заводских настроек (ниже).
Если ничего не помогает, придётся обратиться в сервисный центр.
Обновление прошивки
Информация о прошивке и возможность её обновления находится на отдельной странице раздела системных настроек.

Здесь все стандартно. Найти на сайте разработчика файл новой прошивки, скачать, указать, выбрать «Обновить».

Репитер перезагрузится, использовав новую версию.
Пароль
Как это принято у продукции Tp-Link, пользователь может сменить не только пароль для входа в настройки устройства, но и логин. Открыв эту страницу, он увидит соответствующие поля.
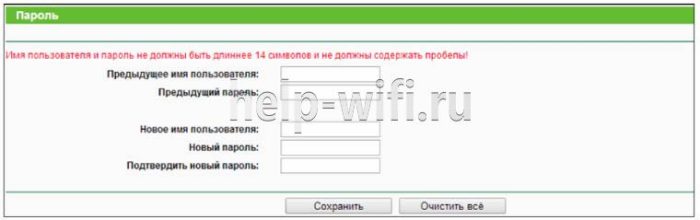
В верхней части информация о логине, в нижней о пароле. Для контроля попросят ввести текущее имя, после чего его можно будет заменить. При желании изменить пароль, новый нужно ввести дважды. Также для контроля.
Сброс до заводских настроек
Сброс всех настроек находится на следующей странице.

Нажатием кнопки нужно подтвердить желание.
В системных настройках можно также перегрузить репитер, если возникают проблемы, или сохранить/восстановить настройки. Кстати, физическая кнопка находится в нижней части, рядом с гнездом сети. По традиции её нужно зажать на 10 секунд каким-то острым предметом.
Отзывы
Пользователи о девайсе отзываются по-разному.
простая, быстрая настройка;
дизайн;
цена.
теряет родительскую сеть;
низкая скорость;
индикация сигнала — что 5 что 2, сигнал слабый.
TL-WA850RE
300Mbps Universal WiFi Range Extender
1910010898

COPYRIGHT & TRADEMARKS
Specifications are subject to change without notice. is a registered trademark
of TP—LINK TECHNOLOGIES CO . , LT D . Other brands and product names are trademarks or
registered trademarks of their respective holders.
No part of the specifications may be reproduced in any form or by any means or used to make any
derivative such as translation, transformation, or adaptation without permission from TP—LINK
TECHNOLOGIES CO . , LT D. Copyright © 2013 TP—LINK TECHNOLOGIES CO., LTD.
All rights reserved.
http://www.tp—link.com

FCC STATEMENT
This equipment has been tested and found to comply with the limits for a Class B digital device,
pursuant to part 15 of the FCC Rules. These limits are designed to provide reasonable protection
against harmful interference in a residential installation. This equipment generates, uses and can
radiate radio frequency energy and, if not installed and used in accordance with the instructions,
may cause harmful interference to radio communications. However, there is no guarantee that
interference will not occur in a particular installation. If this equipment does cause harmful
interference to radio or television reception, which can be determined by turning the equipment off
and on, the user is encouraged to try to correct the interference by one or more of the following
measures:
• Reorient or relocate the receiving antenna.
• Increase the separation between the equipment and receiver.
• Connect the equipment into an outlet on a circuit different from that to which the receiver
is connected.
• Consult the dealer or an experienced radio/ TV technician for help.
This device complies with part 15 of the FCC Rules. Operation is subject to the following two
conditions:
1) This device may not cause harmful interference.
2) This device must accept any interference received, including interference that may
cause undesired operation.
Any changes or modifications not expressly approved by the party responsible for compliance
could void the user’s authority to operate the equipment.
Note: The manufacturer is not responsible for any radio or tv interference caused by unauthorized
modifications to this equipment. Such modifications could void the user’s authority to operate the
equipment.
FCC RF Radiation Exposure Statement
This equipment complies with FCC RF radiation exposure limits set forth for an uncontrolled
environment. This device and its antenna must not be co—located or operating in conjunction with
any other antenna or transmitter.
“To comply with FCC RF exposure compliance requirements, this grant is applicable to only
Mobile Configurations. The antennas used for this transmitter must be installed to provide a
separation distance of at least 20 cm from all persons and must not be co—located or operating in
conjunction with any other antenna or transmitter.”

CE Mark Warning
This is a class B product. In a domestic environment, this product may cause radio interference, in
which case the user may be required to take adequate measures.
Canadian Compliance Statement
This device complies with Industry Canada license—exempt RSS standard(s). Operation is subject
to the following two conditions:
(1)This device may not cause interference, and
(2)This device must accept any interference, including interference that may cause undesired
operation of the device.
Cet appareil est conforme aux norms CNR exemptes de licence d’Industrie Canada. Le
fonctionnement est soumis aux deux conditions suivantes:
(1)cet appareil ne doit pas provoquer d’interférences et
(2)cet appareil doit accepter toute interférence, y compris celles susceptibles de provoquer un
fonctionnement non souhaité de l’appareil.
Industry Canada Statement
Complies with the Canadian ICES—003 Class B specifications.
Cet appareil numérique de la classe B est conforme à la norme NMB—003 du Canada.
This device complies with RSS 210 of Industry Canada. This Class B device meets all the
requirements of the Canadian interference—causing equipment regulations.
Cet appareil numérique de la Classe B respecte toutes les exigences du Règlement sur le
matériel brouilleur du Canada.
Korea Warning Statements
당해 무선설비는 운용중 전파혼신 가능성이 있음.
NCC Notice & BSMI Notice
注意!
依據 低功率電波輻射性電機管理辦法
第十二條 經型式認證合格之低功率射頻電機,非經許可,公司、商號或使用者均不得擅自變更頻
率、加大功率或變更原設計之特性或功能。
第十四條 低功率射頻電機之使用不得影響飛航安全及干擾合法通行;經發現有干擾現象時,應立
即停用,並改善至無干擾時方得繼續使用。前項合法通信,指依電信規定作業之無線電信。低功率
射頻電機需忍受合法通信或工業、科學以及醫療用電波輻射性電機設備之干擾。
安全諮詢及注意事項
●請使用原裝電源供應器或只能按照本產品注明的電源類型使用本產品。
●清潔本產品之前請先拔掉電源線。請勿使用液體、噴霧清潔劑或濕布進行清潔。

●注意防潮,請勿將水或其他液體潑灑到本產品上。
●插槽與開口供通風使用,以確保本產品的操作可靠並防止過熱,請勿堵塞或覆蓋開口。
●請勿將本產品置放於靠近熱源的地方。除非有正常的通風,否則不可放在密閉位置中。
●請不要私自打開機殼,不要嘗試自行維修本產品,請由授權的專業人士進行此項工作。
Продукт сертифіковано згідно с правилами системи УкрСЕПРО на відповідність вимогам
нормативних документів та вимогам, що передбачені чинними законодавчими актами
України.
Safety Information
When product has power button, the power button is one of the way to shut off the product;
when there is no power button, the only way to completely shut off power is to disconnect the
product or the power adapter from the power source.
Don’t disassemble the product, or make repairs yourself. You run the risk of electric shock
and voiding the limited warranty. If you need service, please contact us.
Avoid water and wet locations.
This product can be used in the following countries:

TP—LINK TECHNOLOGIES CO., LTD
TP—LINK TECHNOLOGIES CO., LTD.
Building 24 (floors 1, 3, 4, 5), and 28 (floors 1—4) Central Science and Technology Park,
Shennan Rd, Nanshan, Shenzhen, China
DECLARATION OF CONFORMITY
For the following equipment:
Product Description: 300Mbps Universal WiFi Range Extender
Model No.: TL-WA850RE
Trademark: TP—LINK
We declare under our own responsibility that the above products satisfy all the technical
regulations applicable to the product within the scope of Council Directives:
Directives 1999/5/EC, Directives 2004/108/EC, Directives 2006/95/EC, Directives 1999/519/EC,
Directives 2011/65/EU
The above product is in conformity with the following standards or other normative documents
ETSI EN 300 328 V1.7.1: 2006
ETSI EN 301 489—1 V1.9.2:2011& ETSI EN 301 489—17 V2.2.1:2012
EN 55022:2010
EN 55024:2010
EN 61000-3-2:2006+A1:2009+A2:2009
EN 61000-3-3:2008
EN 60950—1:2006+A11
2009+A1:2010+A12:2011
EN 62311:2008
The product carries the CE Mark:
Person responsible for marking this declaration:
Yang Hongliang
Product Manager of International Business
Date of issue: 2013

CONTENTS
Package Contents ………………………………………………………………………………………. 1
Chapter 1 Introduction ………………………………………………………………………………. 2
1.1 Product Overview …………………………………………………………………………………. 2
1.2 Main Features ……………………………………………………………………………………… 2
1.3 Appearance …………………………………………………………………………………………. 2
Chapter 2 Hardware Installation ………………………………………………………………… 4
2.1 Before You Begin …………………………………………………………………………………. 4
2.2 Basic Requirements ……………………………………………………………………………… 5
2.3 Connecting the Device ………………………………………………………………………….. 5
Chapter 3 Quick Installation Guide …………………………………………………………….. 6
Chapter 4 Configure the Device ……………………………………………………………….. 10
4.1 Status ……………………………………………………………………………………………….. 10
4.2 Quick Setup ………………………………………………………………………………………. 12
4.3 Profile ……………………………………………………………………………………………….. 12
4.4 Network …………………………………………………………………………………………….. 13
4.5 Wireless ……………………………………………………………………………………………. 15
4.5.1 Wireless Settings ………………………………………………………………………………… 15
4.5.2 Wireless Security ………………………………………………………………………………… 16
4.5.3 Wireless MAC Filtering ………………………………………………………………………… 18
4.5.4 Wireless Advanced ……………………………………………………………………………… 20
4.5.5 Wireless Statistics ……………………………………………………………………………….. 21
4.5.6 Throughput Monitor …………………………………………………………………………….. 22
4.6 DHCP ……………………………………………………………………………………………….. 23
4.6.1 DHCP Settings ……………………………………………………………………………………. 23
4.6.2 DHCP Client List …………………………………………………………………………………. 24
4.7 System Tools …………………………………………………………………………………….. 25
4.7.1 Firmware Upgrade ………………………………………………………………………………. 25
4.7.2 Factory Defaults ………………………………………………………………………………….. 26
4.7.3 Backup & Restore ……………………………………………………………………………….. 27
4.7.4 Reboot ………………………………………………………………………………………………. 27
4.7.5 Password …………………………………………………………………………………………… 28
4.7.6 System Log ………………………………………………………………………………………… 28
Appendix A: Factory Defaults ……………………………………………………………………. 30
Appendix B: Troubleshooting ……………………………………………………………………. 31
Appendix C: Specifications ……………………………………………………………………….. 33
Appendix D: Glossary ……………………………………………………………………………….. 34

300Mbps Universal WiFi Range Extender User Guide
1
Package Contents
The following items should be found in your package:
TL-WA850RE 300Mbps Universal WiFi Range Extender
Ethernet Cable
Quick Installation Guide
Resource CD for TL-WA850RE 300Mbps Universal WiFi Range Extender, including:
This User Guide
Note:
Make sure that the package contains the above items. If any of the listed items is damaged or
missing, please contact your distributor.
Conventions
The Range Extender, the Device or TL-WA850RE mentioned in this User guide stands for
TL-WA850RE 300Mbps Universal WiFi Range Extender without any explanations.
Parameters provided in the pictures are just references for setting up the product, which may differ
from the actual situation. You can set the parameters according to your demand.
The power plug may differ from the picture illustrated in this UG due to different regional power
specifications. As follows we just take that of EU version for example.
300Mbps Universal WiFi Range Extender User Guide
2
Chapter 1 Introduction
1.1 Product Overview
The TL-WA850RE 300Mbps Universal WiFi Range Extender is dedicated to Small Office/Home
Office (SOHO) wireless network solutions. It will enlarge your existing wireless network and
mobility within your wireless network while also allowing you to connect a wired device to a
wireless environment. Increased mobility and the absence of cabling will be beneficial for your
network.
With using IEEE 802.11n wireless technology, this device can transmit wireless data at the rate of
up to 300Mbps. With multiple protection measures, including wireless LAN 64/128/152—bit WEP
encryption, Wi—Fi protected Access (WPA2-PSK, WPA-PSK), the TL-WA850RE 300Mbps
Universal WiFi Range Extender delivers complete data privacy.
It supports an easy wireless connection to the root AP (equipped with WPS/QSS button) by
pressing the RE button on the front panel. It also supports an easy, web—based setup for
installation and management. Even though you may not be familiar with the Range Extender, you
can easily configure it with the help of this Guide. Before installing the Range Extender, please
look through this Guide to get the full information of the TL-WA850RE 300Mbps Universal WiFi
Range Extender.
1.2 Main Features
Make use of IEEE 802.11n wireless technology
Provides multiple encryption security Types including: 64/128/152—bit WEP and
WPA—PSK/WPA2—PSK
Supports Built—in DHCP server
Supports one operating modes: Range Extender
Supports Firmware Upgrade
Supports Web management
1.3 Appearance
Figure 1-1
300Mbps Universal WiFi Range Extender User Guide
3
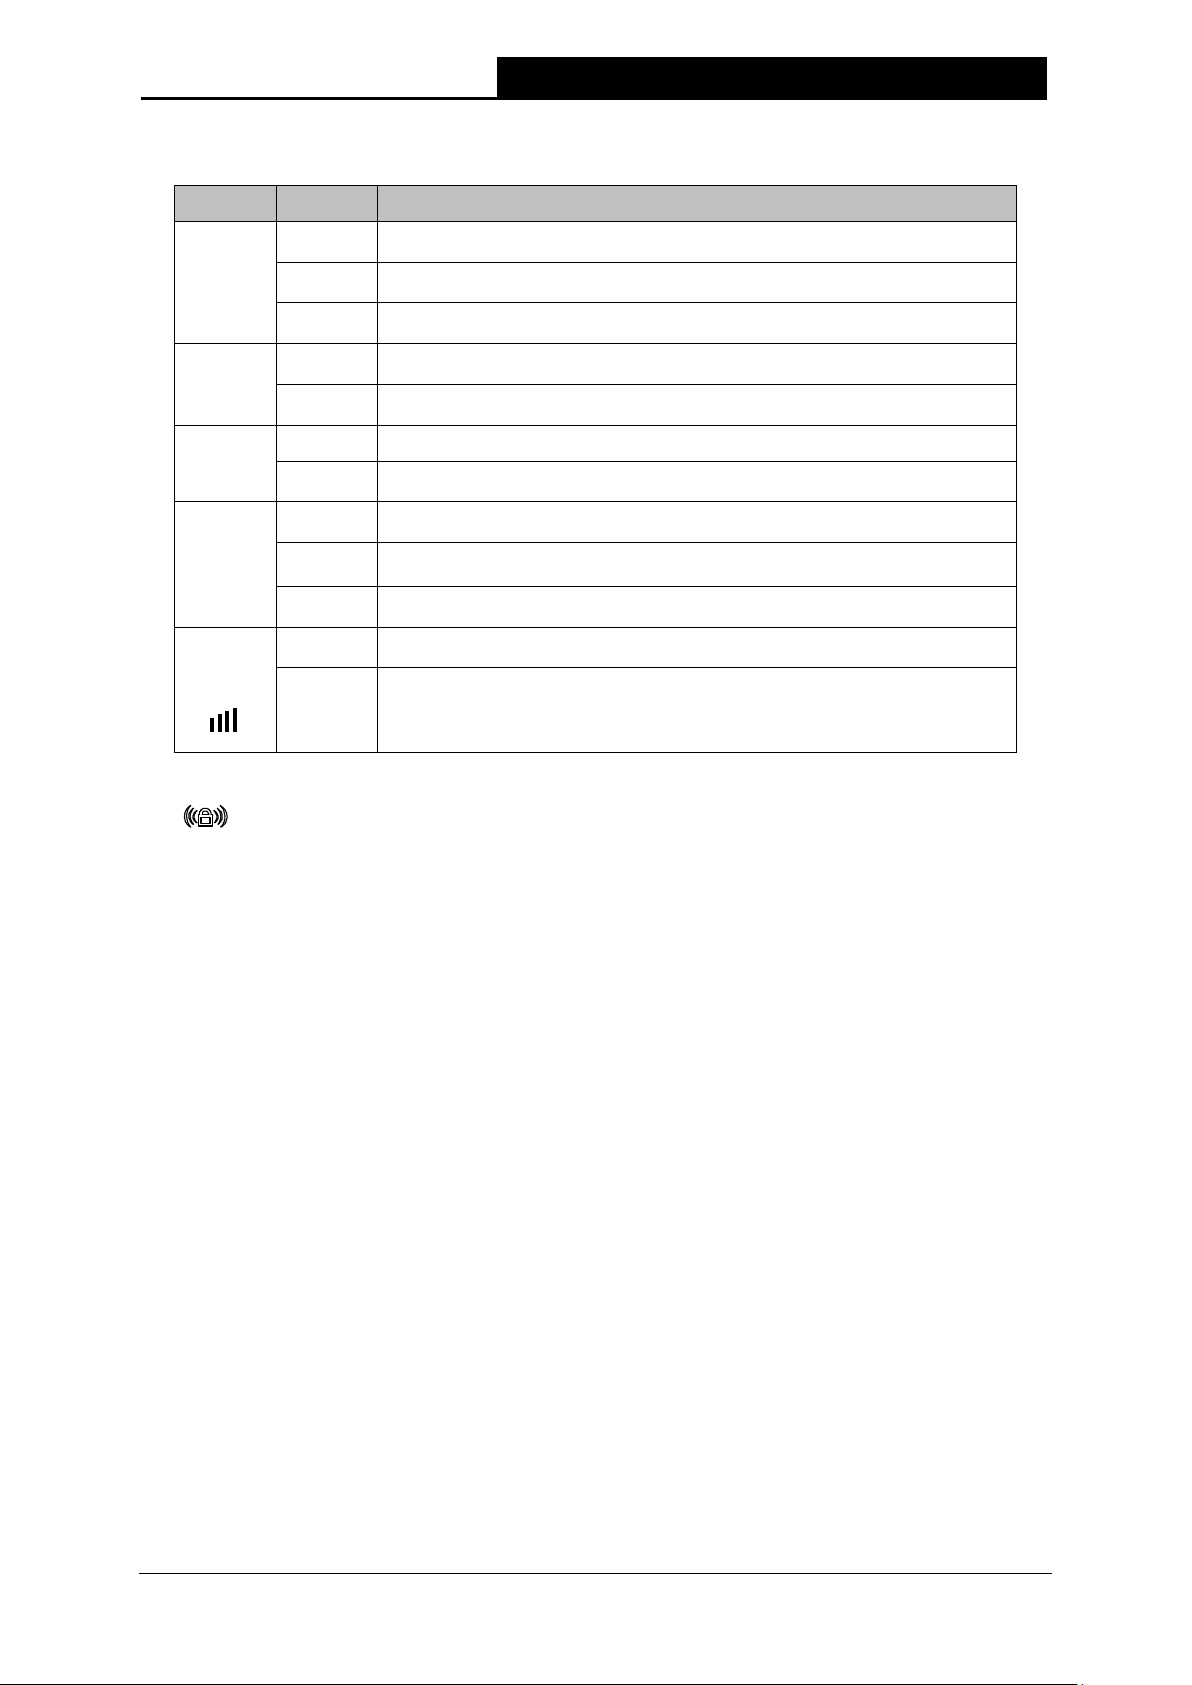
LED Explanation:
Name Status Indication
RE
On
The Range Extender is connected the router successfully.
Flashing
The Range Extender is connecting the router.
Off
The Range Extender is not connected any router yet.
Wireless
Off
The Wireless function is disabled.
Flashing
The Wireless function is enabled.
Power
Off No Power.
On
Ethernet
Off
There is no device linked to the corresponding port.
On
There is a device linked to the corresponding port but no activity.
Flashing
There is an active device linked to the corresponding port.
Signal
Strength
Off
Solid
(1~5)
Signal is transferring. And it also shows the current signal strength
the range extender received from the root AP after successful
connection.
Table 1-1
(RANGE EXTENDER/WPS): If your Wireless router or AP supports WPS or QSS
function, you can press the WPS or QSS button and then press the RANGE EXTENDER
button to establish a secure connection between the Wireless router (or AP) and the Range
Extender TL-WA850RE.
RESET: This button is used to restore the Range Extender’s factory default settings.
There are two ways to reset the Range Extender’s factory defaults:
Method One: With the Range Extender powered on, use a pin to press and hold the RESET
button (about 8 seconds) until the System LED becomes quick—flash from slow—flash. And
then release the button and wait the Range Extender to reboot to its factory default settings.
Method Two: Restore the default settings from “System Tools > Factory Defaults” of the
Range Extender’s Web—based management page.
ETHERNET: One 10/100Mbps RJ45 Ethernet port used to add wireless connectivity to an
Ethernet—enabled device such as Internet TV, DVR, Gaming console and so on. Please note
that this port is not allowed to be connected with router or AP.
300Mbps Universal WiFi Range Extender User Guide
4
Chapter 2 Hardware Installation
2.1 Before You Begin
Please read this User Guide carefully before installing and using the equipment. The operating
distance range of your wireless connection can vary significantly depending on the physical
position of the wireless devices. Factors that can weaken signals by getting in the way of your
network’s radio waves are metal appliances or obstructions, and walls. Typical ranges vary based
on the types of materials and background RF (radio frequency) noise in your home or office.
In order to optimize the performance of TL-WA850RE, please follow the instructions below to
achieve an ideal location (please make sure it is always within the wireless coverage of the
wireless router).
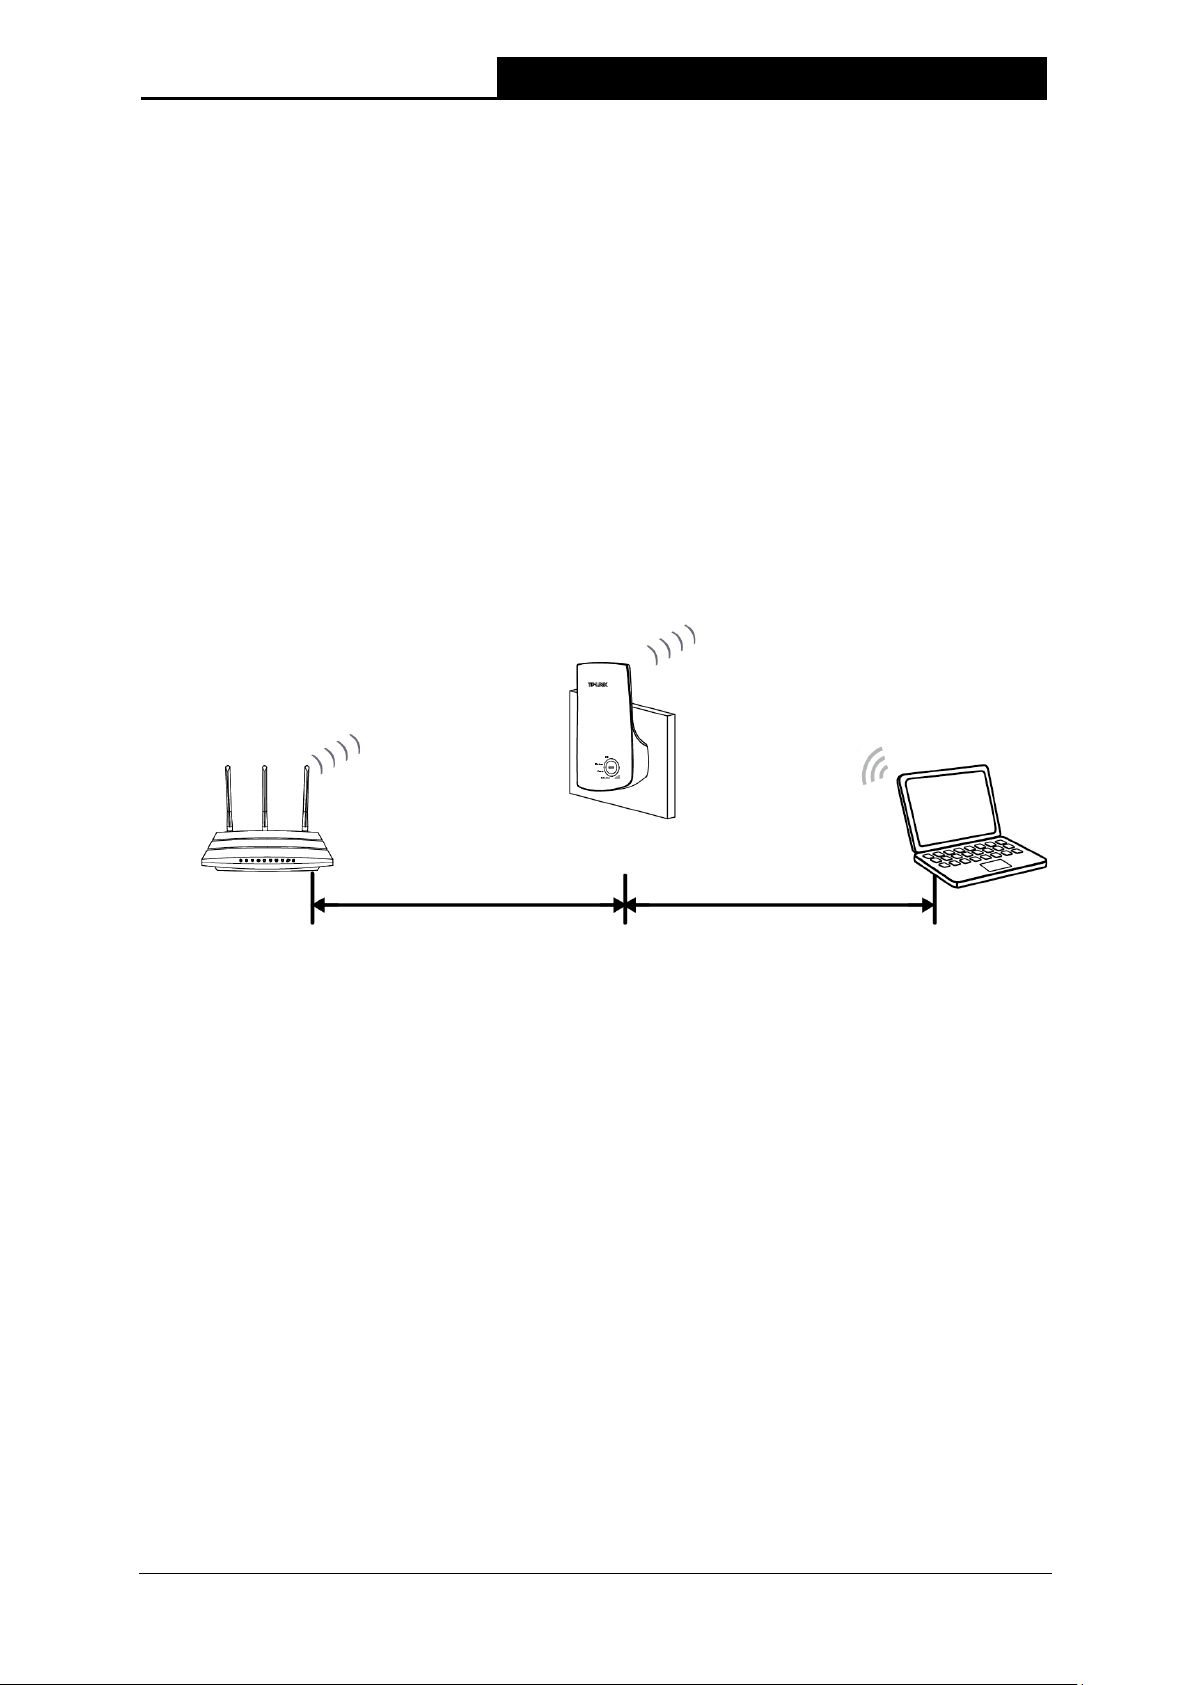
1) Half—way Between — Generally, the ideal location for TL-WA850RE is half—way between the
Wireless router and Wireless Client. If the wireless signal is not satisfactory, you may place
TL-WA850RE somewhat nearer to the Wireless router.
2) No Obstacles and Spacious — Clear obstacles in the way between TL-WA850RE and
Wireless router. It’s better to locate it in a spacious place, such as near the corridors.
3) No Interference — Keep TL-WA850RE far away from wireless interference, which may come
from electrical appliances that works in the same frequency band as TL-WA850RE, such as
Blue tooth devices, cordless phones, microwave ovens, etc.
4) 3 Signal Lights — You can also find an ideal location via the signal lights on the front panel of
TL—WA850RE. These lights show the strength of signal your range extender receives from
the root AP. It’s recommended that you choose a location where at least 3 signal lights light
blue, in order to guarantee a good performance.
Note:
TP—LINK recommends that you connect to the Range Extender when your home network
connection is poor, or when you want a larger wireless coverage to eliminate “dead zones”. As in
compliance with the wireless transmission protocol, all the Range Extender devices are set to
work in half—duplex instead of full—duplex mode. In other words, the Range Extender has to
process one—way communication between your root Wireless router (or AP) and the terminal
clients; so the transmission time will be double—increased, while the speed will be decreased.
300Mbps Universal WiFi Range Extender User Guide
5
2.2 Basic Requirements
Place your Range Extender in a well—ventilated place far from direct sunlight, any heater or
heating vent.
Leave at least 2 inches (5cm) space around the device for heat dissipation.
Turn off your Range Extender and unplug the power adapter in a lighting storm to avoid
damage.
Use Web browser, such as Microsoft Internet Explorer 5.0 or above, Netscape Navigator 6.0
or above.
Operating temperature of the Range Extender should be 0℃~40℃ (32℉~104℉).
Operating humidity of the Range Extender should be 10%~90%RH (Non—condensing).
2.3 Connecting the Device
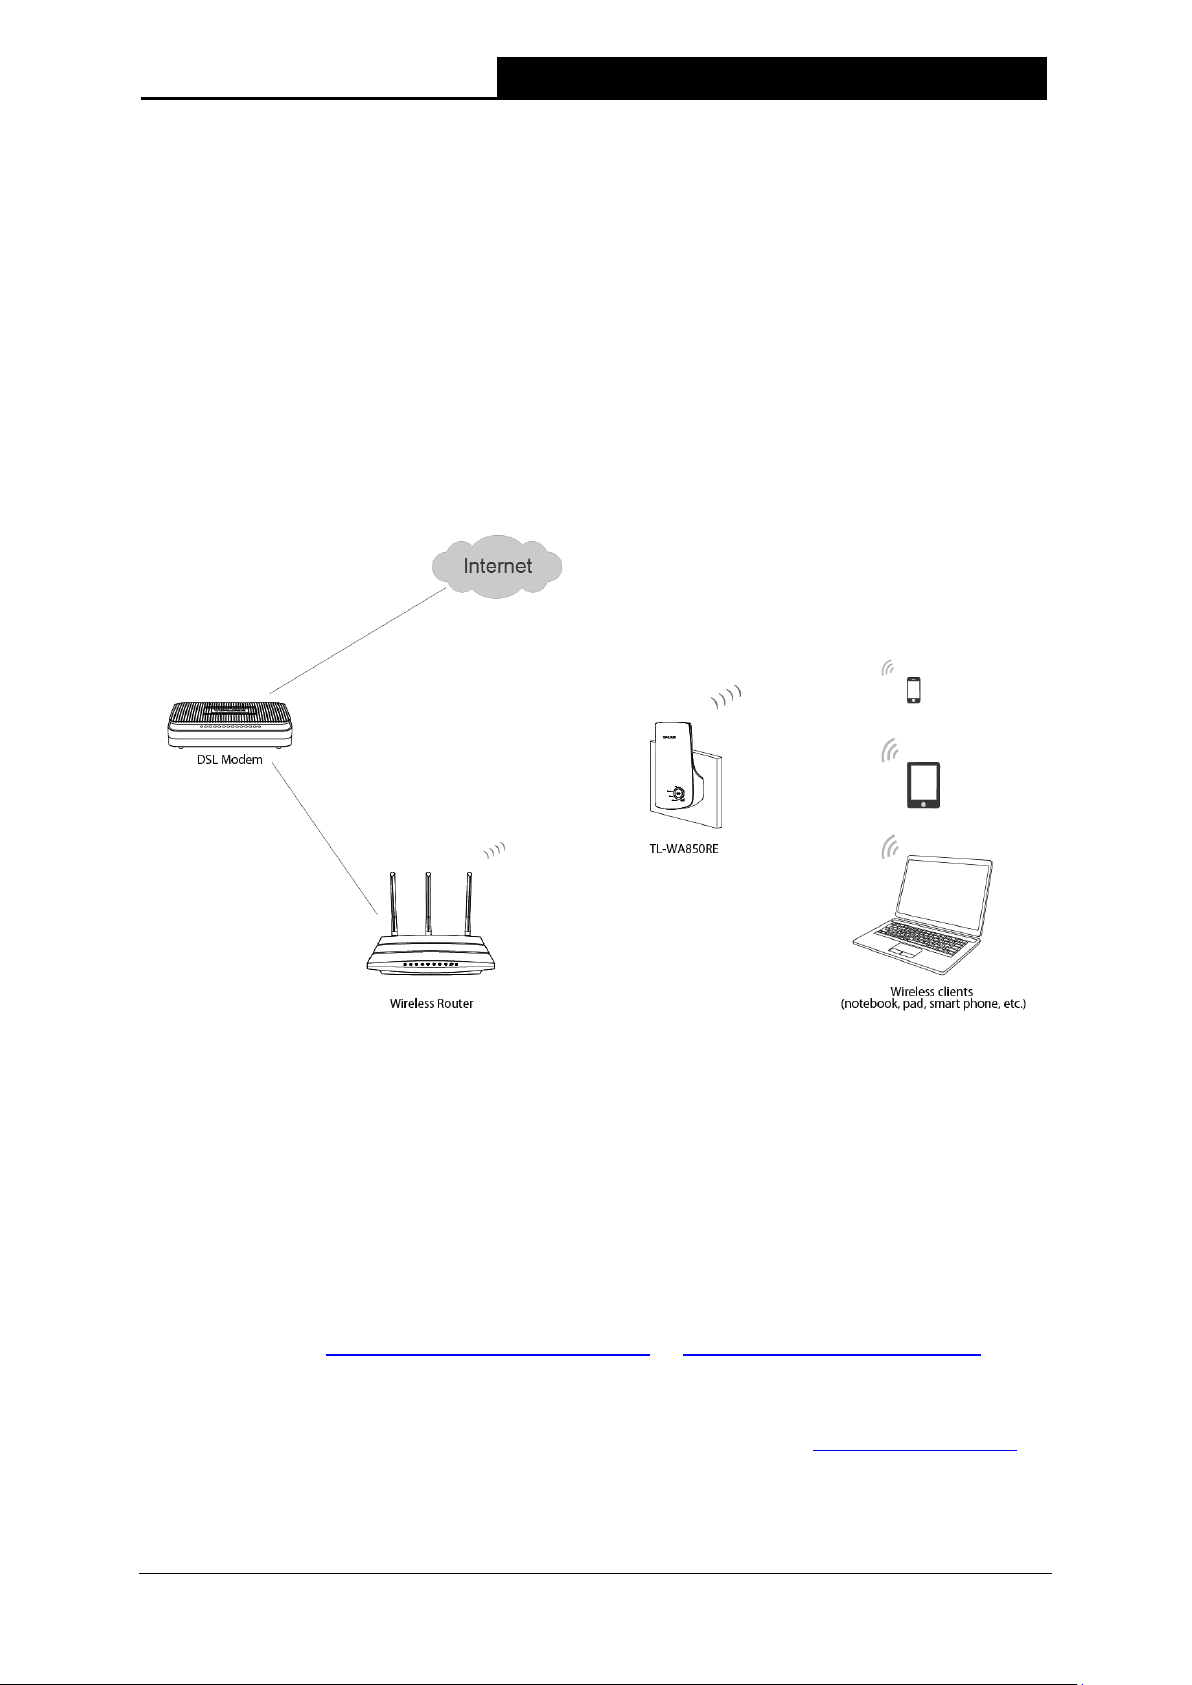
Figure 2-1 Typical connection of TL-WA850RE
To establish a typical connection of the Range Extender, please take the following steps:
1. Connect the Cable/DSL modem to a Wireless router with an Ethernet cable.
2. Plug your TL-WA850RE directly to a standard electrical wall socket, which is next to the
Wireless router.
3. Connect your Wireless Clients (such as notebook, pad, smart phone, etc.) to TL-WA850RE
wirelessly. Or you can connect your PC to the sole LAN port of Range Extender via an
Ethernet cable.
4. Log in the web—based management page of TL-WA850RE and complete the configurations.
(Please refer to Chapter 3 Quick Installation Guide or Chapter 4 Configure the Device
for the
configurations, as you need.) Through the web page configuration you can successfully
connect TL-WA850RE to the wireless router.
5. Adjust an ideal location for TL-WA850RE. (Please refer to Section 2.1 Before You Begin for
detailed information about ideal location.)
300Mbps Universal WiFi Range Extender User Guide
6
Chapter 3 Quick Installation Guide
This chapter will guide you to configure your PC to communicate with the Range Extender and to
configure and manage the TL-WA850RE 300Mbps Universal WiFi Range Extender easily with a
Web—based utility.
With a Web—based utility, it is easy to configure and manage the TL-WA850RE 300Mbps Universal
WiFi Range Extender. The Web—based utility can be used on any Windows, Macintosh or UNIX
OS with a Web browser, such as Microsoft Internet Explorer, Mozilla Firefox or Apple Safari.
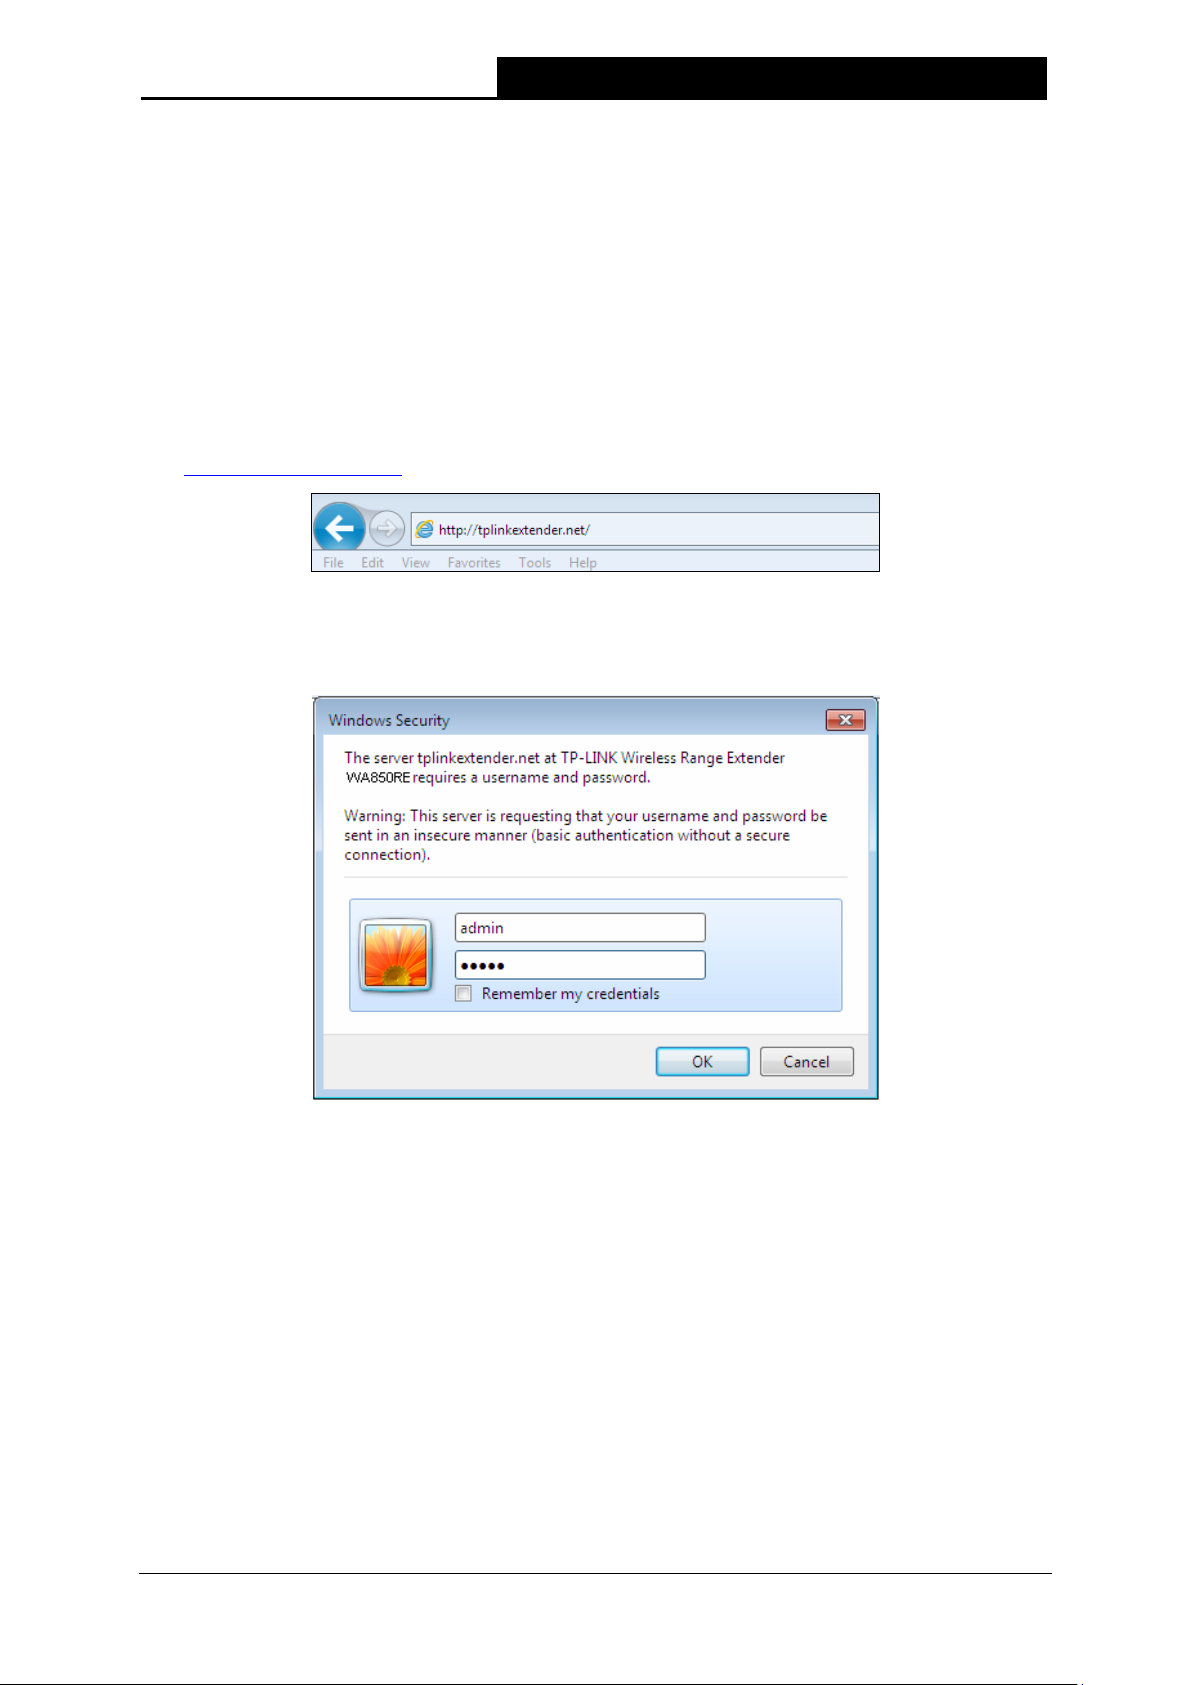
1. To access the configuration utility, open a web—browser and type in the domain name
http://tplinkextender.net in the address field of the browser.
Figure 3-1 Login to the Range Extender
After a moment, a login window will appear as shown in Figure 3-2. Enter admin for the User
Name and Password (both in lower case letters). Then click OK or press Enter.
Figure 3-2 Login Windows
Note:
If the above screen does not prompt, it means that your web—browser has been set to a proxy.
Go to Tools menu>Internet Options>Connections>LAN Settings, in the screen that
appears, cancel the Using Proxy checkbox, and click OK to finish it.
 Loading…
Displayed below is the user manual for TL-WA850RE-EU by TP-Link which is a product in the Network Extenders category.
This manual has pages.

User Guide
300Mbps Wi-Fi Range Extender
TL—WA850RE
REV4.0.0 1910011920

Contents
About This Guide ……………………………………………………………………………………………1
Chapter 1. Get to Know About Your Extender . . . . . . . . . . . . . . . . . . . . . . . . .2
1. 1. Product Overview. . . . . . . . . . . . . . . . . . . . . . . . . . . . . . . . . . . . . . . . . . . . . . . . . . . . . . . . . . . . 3
1. 2. Appearance . . . . . . . . . . . . . . . . . . . . . . . . . . . . . . . . . . . . . . . . . . . . . . . . . . . . . . . . . . . . . . . . . 3
1. 2. 1. LED Explanation. . . . . . . . . . . . . . . . . . . . . . . . . . . . . . . . . . . . . . . . . . . . . . . . . . . . . . . 4
1. 2. 2. Port and Button Description . . . . . . . . . . . . . . . . . . . . . . . . . . . . . . . . . . . . . . . . . . . 4
Chapter 2. Set Up Internet Connection . . . . . . . . . . . . . . . . . . . . . . . . . . . . . . .5
2. 1. Quick Setup . . . . . . . . . . . . . . . . . . . . . . . . . . . . . . . . . . . . . . . . . . . . . . . . . . . . . . . . . . . . . . . . . 6
2. 1. 1. Method One: Via the WPS Button . . . . . . . . . . . . . . . . . . . . . . . . . . . . . . . . . . . . . . 6
2. 1. 2. Method Two: Via a Web Browser . . . . . . . . . . . . . . . . . . . . . . . . . . . . . . . . . . . . . . 6
2. 2. Position Your Extender. . . . . . . . . . . . . . . . . . . . . . . . . . . . . . . . . . . . . . . . . . . . . . . . . . . . . . 10
Chapter 3. Customize Your Network . . . . . . . . . . . . . . . . . . . . . . . . . . . . . . . . 11
3. 1. Check Internet Status. . . . . . . . . . . . . . . . . . . . . . . . . . . . . . . . . . . . . . . . . . . . . . . . . . . . . . . 12
3. 2. Configure Wireless Network . . . . . . . . . . . . . . . . . . . . . . . . . . . . . . . . . . . . . . . . . . . . . . . . 12
3. 3. Change LAN Settings . . . . . . . . . . . . . . . . . . . . . . . . . . . . . . . . . . . . . . . . . . . . . . . . . . . . . . . 14
3. 4. Specify DHCP Server Settings . . . . . . . . . . . . . . . . . . . . . . . . . . . . . . . . . . . . . . . . . . . . . . 15
3. 5. Adjust Wi-Fi Coverage . . . . . . . . . . . . . . . . . . . . . . . . . . . . . . . . . . . . . . . . . . . . . . . . . . . . . . 16
3. 6. Set Access Control . . . . . . . . . . . . . . . . . . . . . . . . . . . . . . . . . . . . . . . . . . . . . . . . . . . . . . . . . 16
Chapter 4. More Features of Your Extender. . . . . . . . . . . . . . . . . . . . . . . . . 19
4. 1. Use Your Extender as a Wireless Adapter. . . . . . . . . . . . . . . . . . . . . . . . . . . . . . . . . . . . 20
4. 2. Transform Your Existing Wired Network to a Wireless One . . . . . . . . . . . . . . . . . . . 20
4. 2. 1. To Set Up the Extender as an Access Point . . . . . . . . . . . . . . . . . . . . . . . . . . . 20
4. 2. 2. To Connect Your Wireless Devices to the Extender via WPS. . . . . . . . . . . 21
Chapter 5. Manage Your Extender . . . . . . . . . . . . . . . . . . . . . . . . . . . . . . . . . 23
5. 1. Set Up System Time . . . . . . . . . . . . . . . . . . . . . . . . . . . . . . . . . . . . . . . . . . . . . . . . . . . . . . . . 24
5. 2. Control LEDs . . . . . . . . . . . . . . . . . . . . . . . . . . . . . . . . . . . . . . . . . . . . . . . . . . . . . . . . . . . . . . . 24
5. 3. Power Schedule . . . . . . . . . . . . . . . . . . . . . . . . . . . . . . . . . . . . . . . . . . . . . . . . . . . . . . . . . . . . 25
5. 4. Upgrade the Firmware . . . . . . . . . . . . . . . . . . . . . . . . . . . . . . . . . . . . . . . . . . . . . . . . . . . . . . 26
5. 5. Backup and Restore Configuration Settings . . . . . . . . . . . . . . . . . . . . . . . . . . . . . . . . . 26
5. 6. Change Admin Account. . . . . . . . . . . . . . . . . . . . . . . . . . . . . . . . . . . . . . . . . . . . . . . . . . . . . 27
5. 7. System Log. . . . . . . . . . . . . . . . . . . . . . . . . . . . . . . . . . . . . . . . . . . . . . . . . . . . . . . . . . . . . . . . . 28
FAQ ………………………………………………………………………………………………………………..29

1
About This Guide
This guide is a complement to Quick Installation Guide. The Quick Installation Guide
provides instructions for quick internet setup, while this guide contains details of each
function and demonstrates how to configure them.
When using this guide, please notice that features of the extender may vary slightly
depending on the model and software version you have, and on your location, language,
and internet service provider. All screenshots, images, parameters and descriptions
documented in this guide are used for demonstration only.
Conventions
In this guide the following conventions are used:
Convention Description
Underlined Underlined words or phrases are hyperlinks and You can click to redirect to a website or
a specific section.
Teal Contents to be emphasized and texts on the web page are in teal, including the menus,
items, buttons, and so on.
>
The menu structures to show the path to load the corresponding page. For example,
Advanced > Wireless > MAC Filtering means the MAC Filtering function page is under the
Wireless menu that is located in the Advanced tab.
Note: Ignoring this type of note might result in a malfunction or damage to the device.
Tips: Indicates important information that helps you make better use of your device.
symbols on the web
page
• click to edit the corresponding entry.
• click to delete the corresponding entry.
More Info
The latest software, management app and utility are available from the Download
Center at www.tp-link.com/support.
The Quick Installation Guide can be found where you find this guide or inside the
package of the range extender.
Specifications can be found on the product page at http://www.tp-link.com.
A Technical Support Forum is provided for you to discuss our products at
http://forum.tp-link.com.
Our Technical Support contact information can be found at Contact Technical Support
page at www.tp-link.com/support.

Chapter 1
Get to Know About Your
Extender
This chapter introduces what the extender can do and its appearance.
It contains the following sections:
• Product Overview
• Appearance

3
Chapter 1 Get to Know About Your Extender
1. 1. Product Overview
Bring Dead Zones Back to Life
Tired of Wi-Fi “dead zones”? The TP-Link extender is connected to your router
wirelessly, strengthening its signal and expanding its coverage into areas that could not
otherwise be reached. The device also reduces signal interference to ensure reliable
Wi-Fi coverage throughout your home or office.
Easy Installation & Quick Position
The extender works with any standard wireless router. Instantly connect the extender
to a router by pressing the router’s WPS button (if available) followed by the extender’s
WPS button. Alternatively, follow the Quick Setup instructions on the extender’s web
management page.
Once the extender is connected to a router, you can relocate it to your preferred location
with no furthure configuration required. The intelligent signal light can help to find the
best location.
Easy Management with the Tether APP
Tether provides a simple, intuitive way to access and manage your extender with your
smart devices.
1. 2. Appearance

4
Chapter 1 Get to Know About Your Extender
1. 2. 1. LED Explanation
You can check the extender’s working status by following the LED Explanation table.
Name Status Indication
RE
On/Off The extender is connected or not connected to the router.
Blinking WPS connection is in process.
Wireless
On The extender’s wireless function is on.
Off The extender’s wireless function is off.
Power
On The extender is on.
Off The extender is off.
(Signal Strength)
On Indicates the Wi-Fi connection between the extender and the
router. More lit LEDs indicate a better signal strength.
Ethernet
On A device is connected to the Ethernet port
Off No device is connected to the Ethernet port.
1. 2. 2. Port and Button Description
Ports or Buttons Description
(RANGE EXTENDER)
Press the WPS button on your host router, and immediately press the button
on the extender. The RE LED of the extender should change from blinking to
solid on, indicating successful WPS connection.
RESET Button With the extender powered on, use a pin to press the RESET button until all the
LEDs turn on momentarily. Then release the button.
ETHERNET Port Connect your Ethernet—only device to the Ethernet port of the extender to join
the Wi-Fi network.

Chapter 2
Set Up Internet Connection
This chapter informs you how to boost your host wireless coverage. Please follow the
step-by-step instructions to set up the internet connection.
It contains the following sections:
• Quick Setup
• Position Your Extender

6
Chapter 2 Set Up Internet Connection
2. 1. Quick Setup
Power on
Plug the extender into an electrical outlet next to your host router, and then wait until
the Power LED changes to solid on.
Connect to the host network
There are two ways to connect to the host network: via the WPS button or via a web
browser. Using the WPS button is an easier way to extend your host network. We
recommend you to use this way if your router has a WPS button. The button might look
like one of these: | | .
2. 1. 1. Method One: Via the WPS Button
1. Press the WPS button on your host router, and then press the button on the
extender within 2 minutes.
Tips:
• Some ISP gateways disable the WPS function by default. If the WPS connection fails, please refer to
Method Two: Via a Web Browser.
• For more information about using WPS button on your host router, please refer to the router
manufacturer’s user guide.
2. Wait until the RE LED changes from blinking to solid on, which indicates that the WPS
connection is successful. If it doesn’t, please refer to Method Two: Via a Web Browser.
3. Enjoy! Connect to the extended network and enjoy internet. The extended network
may use the same SSID as that of the host network or add _EXT to the end of the host
SSID, but the password is shared.
Tips:
Since the performance of the extended network will be affected by the distance between the extender
and host router, we recommend that you relocate your extender by referring to Position Your Extender.
2. 1. 2. Method Two: Via a Web Browser
1. Connect your computer to the extender’s wireless network.
WPS

7
Chapter 2 Set Up Internet Connection
Tips:
Before connecting, please find the SSID (network name) on the label of the extender.
• For Windows Users
1 ) Unplug the Ethernet cable from your computer (if any).
2 ) Click the Wi-Fi icon on the task bar and connect to the extender’s network:
TP-Link_Extender.
Connections are available
Wireless Network Connection
Connect automatically Connect
√
TP-LINK_Extender
MyHome
• For Mac OS X Users
1 ) Unplug the Ethernet cable from your computer (if any).
2 ) Click the Wi-Fi icon in the top right corner of the screen, and connect to the
extender’s network: TP-Link_Extender.
Wi-Fi: On
Tu rn Wi-Fi O
MyHome
Join Other Network...
Create Network…
Open Network Preferences…
TP-LINK_Extender
2. Follow the instructions of Quick Setup Wizard to connect the extender to your host
router.
1 ) Launch a web browser, enter http://tplinkrepeater.net or http://192.168.0.254
in the address field, and create a password for future login attempts, and click
Start.

8
Chapter 2 Set Up Internet Connection
Tips:
If the login window does not appear, please refer to FAQ.
2 ) Select your host router’s 2.4GHz SSID (network name), enter its password (NOT
the password you just created for logins), and click Next.
3 ) Either keep the default SSID (network name) or customize it for the extended
network, and then click Next.
9
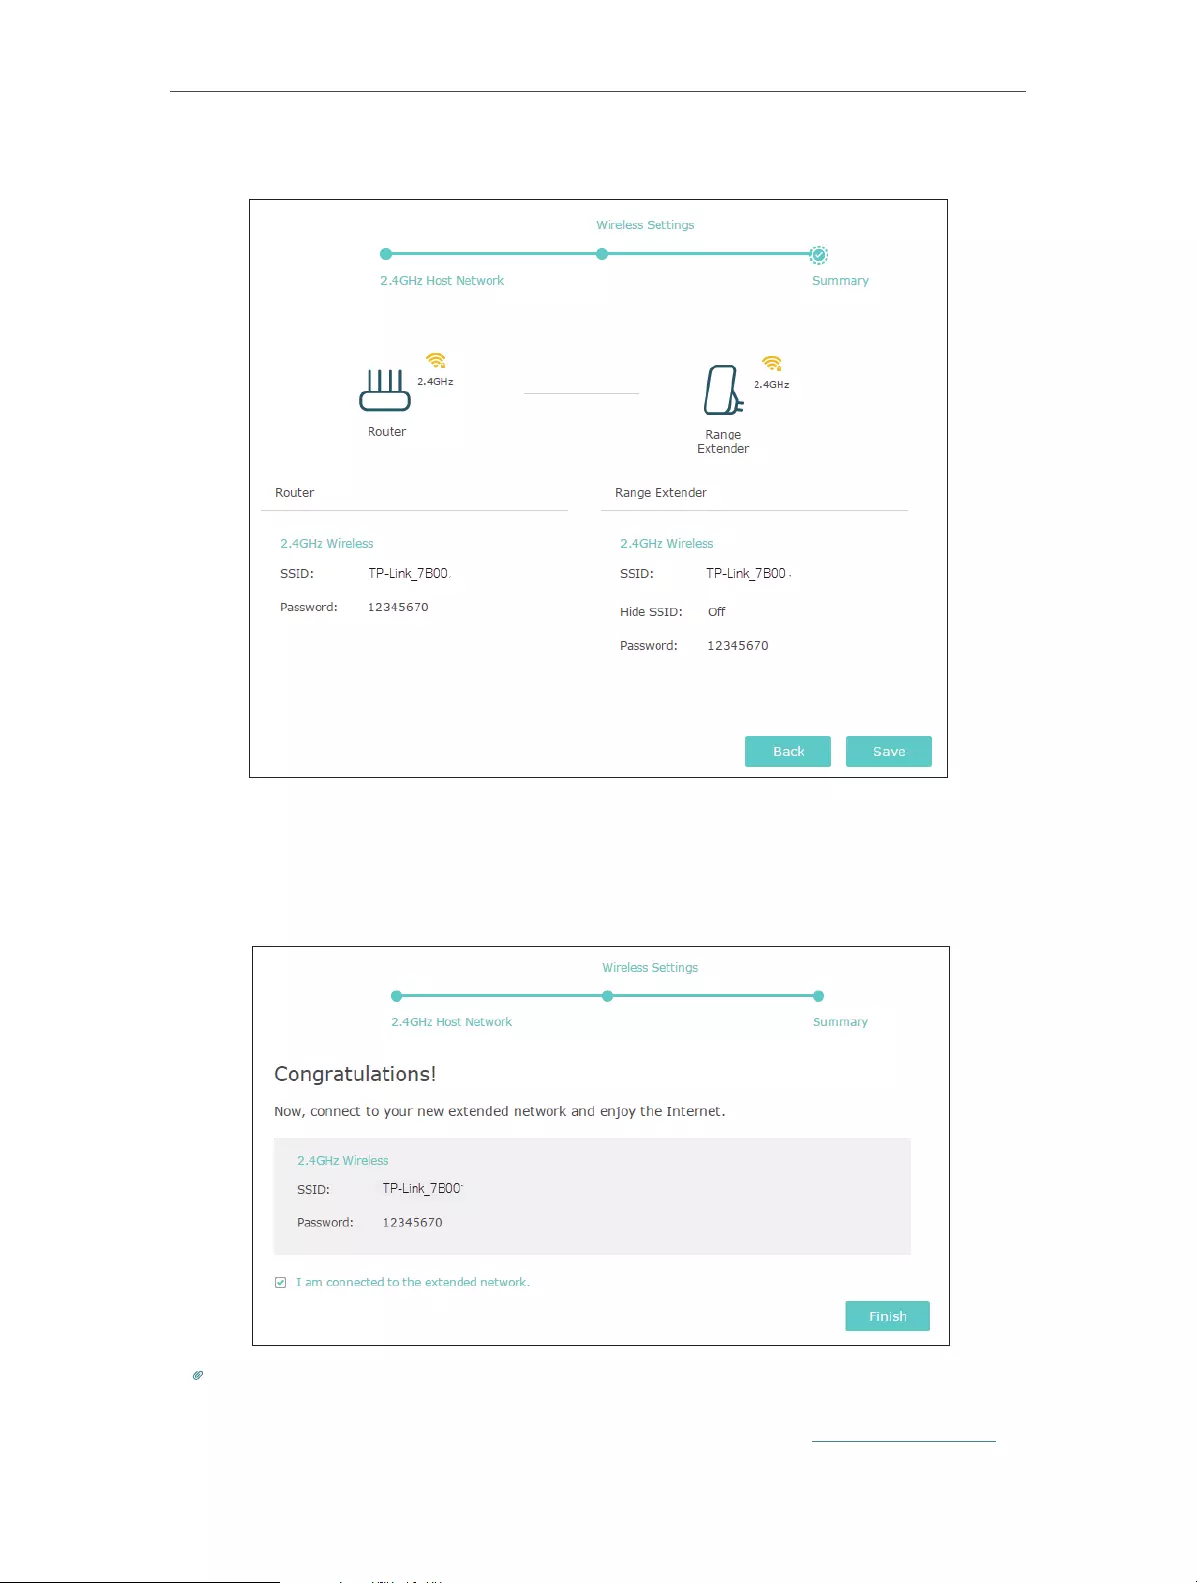
Chapter 2 Set Up Internet Connection
4 ) Verify your wireless settings and click Save.
5 ) Enjoy! Connect to the extended network and enjoy internet. The extended
network shares the same wireless password as that of your host network, but
may have different network name if you have customized the SSID during the
configuration.
Tips:
Since the performance of the extended network will be affected by the distance between extender and
host router, we highly recommend you to relocate your extender referring to Position Your Extender.
10
Chapter 2 Set Up Internet Connection
2. 2. Position Your Extender
Please follow the instructions below to achieve optimal performance of the extender.
1. Plug the extender into an electrical outlet between your host router and the Wi-Fi
“dead“ zone. The location you choose must be within the range of your existing host
network.
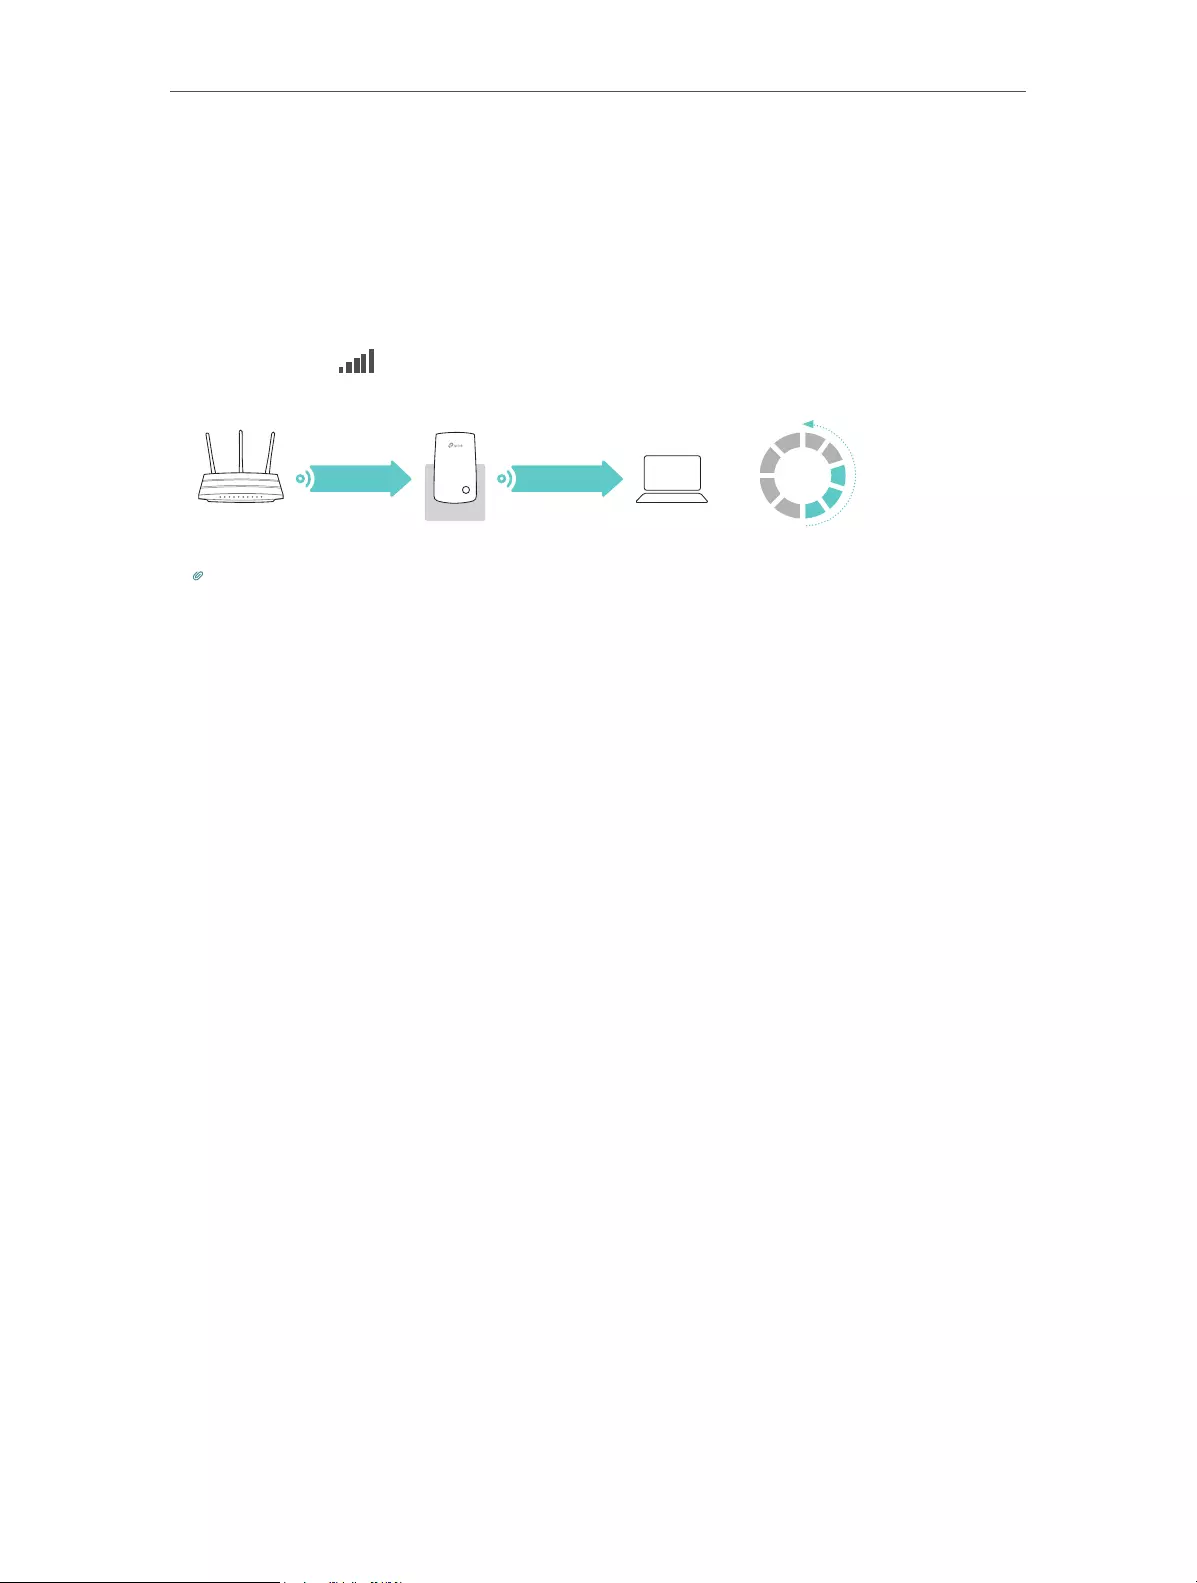
2. Wait until the LEDs are lit. Make sure the extender is in a location with 3 or
more LEDs lit. If not, relocate it closer to the router to achieve better signal quality.
≥
3LEDs lit on
1
2
3
4
5
Slow/Unstable
Good
Best
Host Network
Host Router
Clients
Extended Network
Tips:
To minimize signal interference, please choose a location which is far away from Bluetooth devices and
other household electronic devices, such as cordless phones, microwave ovens and baby monitors.

Chapter 3
Customize Your Network
This chapter guides you on how to configure network settings that are available for this
extender.
It contains the following sections:
• Check Internet Status
• Configure Wireless Network
• Change LAN Settings
• Specify DHCP Server Settings
• Adjust Wi-Fi Coverage
• Set Access Control
12
Chapter 3 Customize Your Network
3. 1. Check Internet Status
You can view the internet status of your extender to check whether you have successfully
set up the extended network(s).
1. Visit http://tplinkrepeater.net, and log in with the password you set for the extender.
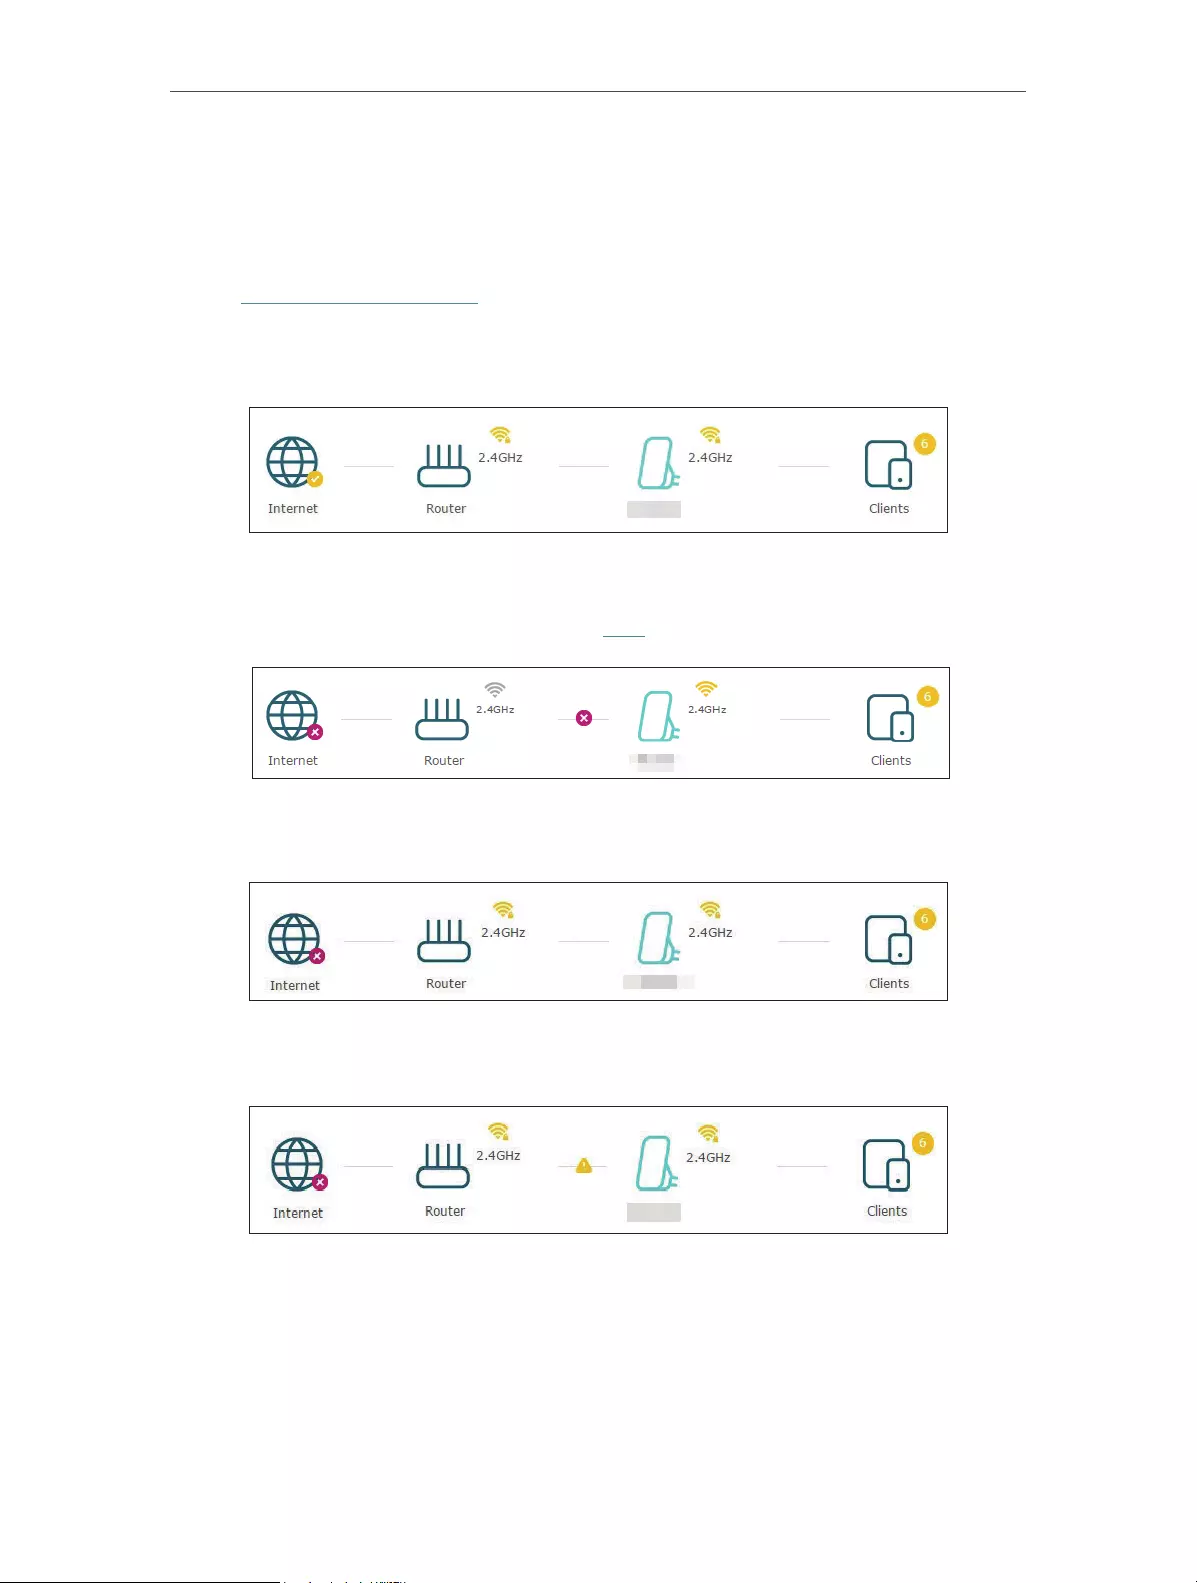
2. Go to Settings > Status to view the internet status of your extender.
• The extender is functioning normally.
• The extender is not connected to the host network. Please go to Settings >
Wireless > Connect to Network to check the password of the host network. If the
problem still exists, please refer to the FAQ section.
• The extender is connected to the host network, but is not transmitting data. Please
check your router’s internet connection.
• The extender is connected to the router abnormally. Please go to Settings >
Network and try setting your extender to obtain an IP address automatically.
Click the Internet/Router/Range Extender/Clients icon to view corresponding
information.
3. 2. Configure Wireless Network
If you want to extend another host network after Quick Setup, you can refer to this
section. Moreover, you can change the wireless settings for your extended network.

13
Chapter 3 Customize Your Network
Visit http://tplinkrepeater.net, and log in with the password you set for the extender.
¾To extend another host network:
1. Go to Settings > Wireless > Connect to Network.
2. Enable Connect to 2.4GHz Network and click Wireless Scanner to find all available
networks.
3. Select the host network you want to extend.
Note:
If the network you want to extend is on but not listed, please try the following steps.
1. Move the extender closer to your router, and click Rescan in the top-right corner of the list.
2. You can manually enter the parameters of the network you want to extend, and click Save.
4. Once a host network is selected, the SSID and security type will be automatically
filled in. If the selected network is encrypted, enter the password in the Password
field.
5. Click Save.
¾To enable or disable the extended network:
1. Go to Settings > Wireless > Extended Network.
2. The extended network is enabled by default. If you want to disable the wireless
function of a certain band, just clear the Enable checkbox. In this case, all the wireless
settings of this band will be invalid.
3. Click Save.
¾To change the wireless network name (SSID):
1. Go to Settings > Wireless > Extended Network.
2. Create a new SSID in Extended 2.4GHz SSID or click Copy Host SSID. The value is
case-sensitive.
3. Click Save.

14
Chapter 3 Customize Your Network
Note:
If you have changed the wireless settings via a wireless device, you will be disconnected after the settings
are applied. Please write down the new SSID for future use.
¾To hide the SSID of the extended network:
1. Go to Settings > Wireless > Extended Network.
2. Select Hide SSID broadcast, and the corresponding SSID will not be displayed when
wireless devices scan for local wireless networks. Devices must join the network
manually in order to connect.
3. Click Save.
3. 3. Change LAN Settings
The extender is preset with a default LAN IP 192.168.0.254, with which you can log in to
the web management page. The LAN IP address, together with the Subnet Mask, also
defines the subnet that the connected devices are on. If the IP address conflicts with
another device on your local network or your network requires a specific IP subnet, you
can change it.
1. Visit http://tplinkrepeater.net, and log in with the password you set for the extender.
2. Go to Settings > Network.
3. Select Use the following IP address.
4. Enter a new IP address as needed and leave the Subnet Mask as the default settings
and enter the gateway that is in the same subnet as the IP address. The gateway is
usually the LAN IP address of your extender.
5. Click Save.

15
Chapter 3 Customize Your Network
3. 4. Specify DHCP Server Settings
By default, the DHCP (Dynamic Host Configuration Protocol) Server is enabled and the
extender acts as a DHCP server; it dynamically assigns TCP/IP parameters to client
devices from the IP Address Pool. You can change the settings of the DHCP Server if
necessary.
1. Visit http://tplinkepeater.net, and log in with the password you set for the extender.
2. Go to Settings > Network.
¾To specify the IP address that the extender assigns:
1. Select Auto (recommended) or On to enable the DHCP Server.
2. Enter the starting and ending IP addresses in the IP Address Pool.
3. Enter other parameters if the ISP requires them. The Default Gateway is automatically
filled in and is the same as the LAN IP address of the extender.
4. Click Save.
¾To view the DHCP Client List:
You can view the information of the DHCP clients connected to the extender in the
DHCP Client List.
16
Chapter 3 Customize Your Network
3. 5. Adjust Wi-Fi Coverage
You can set the extender’s Wi-Fi coverage depending on how large you want your Wi-Fi
area to be.
1. Visit http://tplinkrepeater.net, and log in with the password you set for the extender.
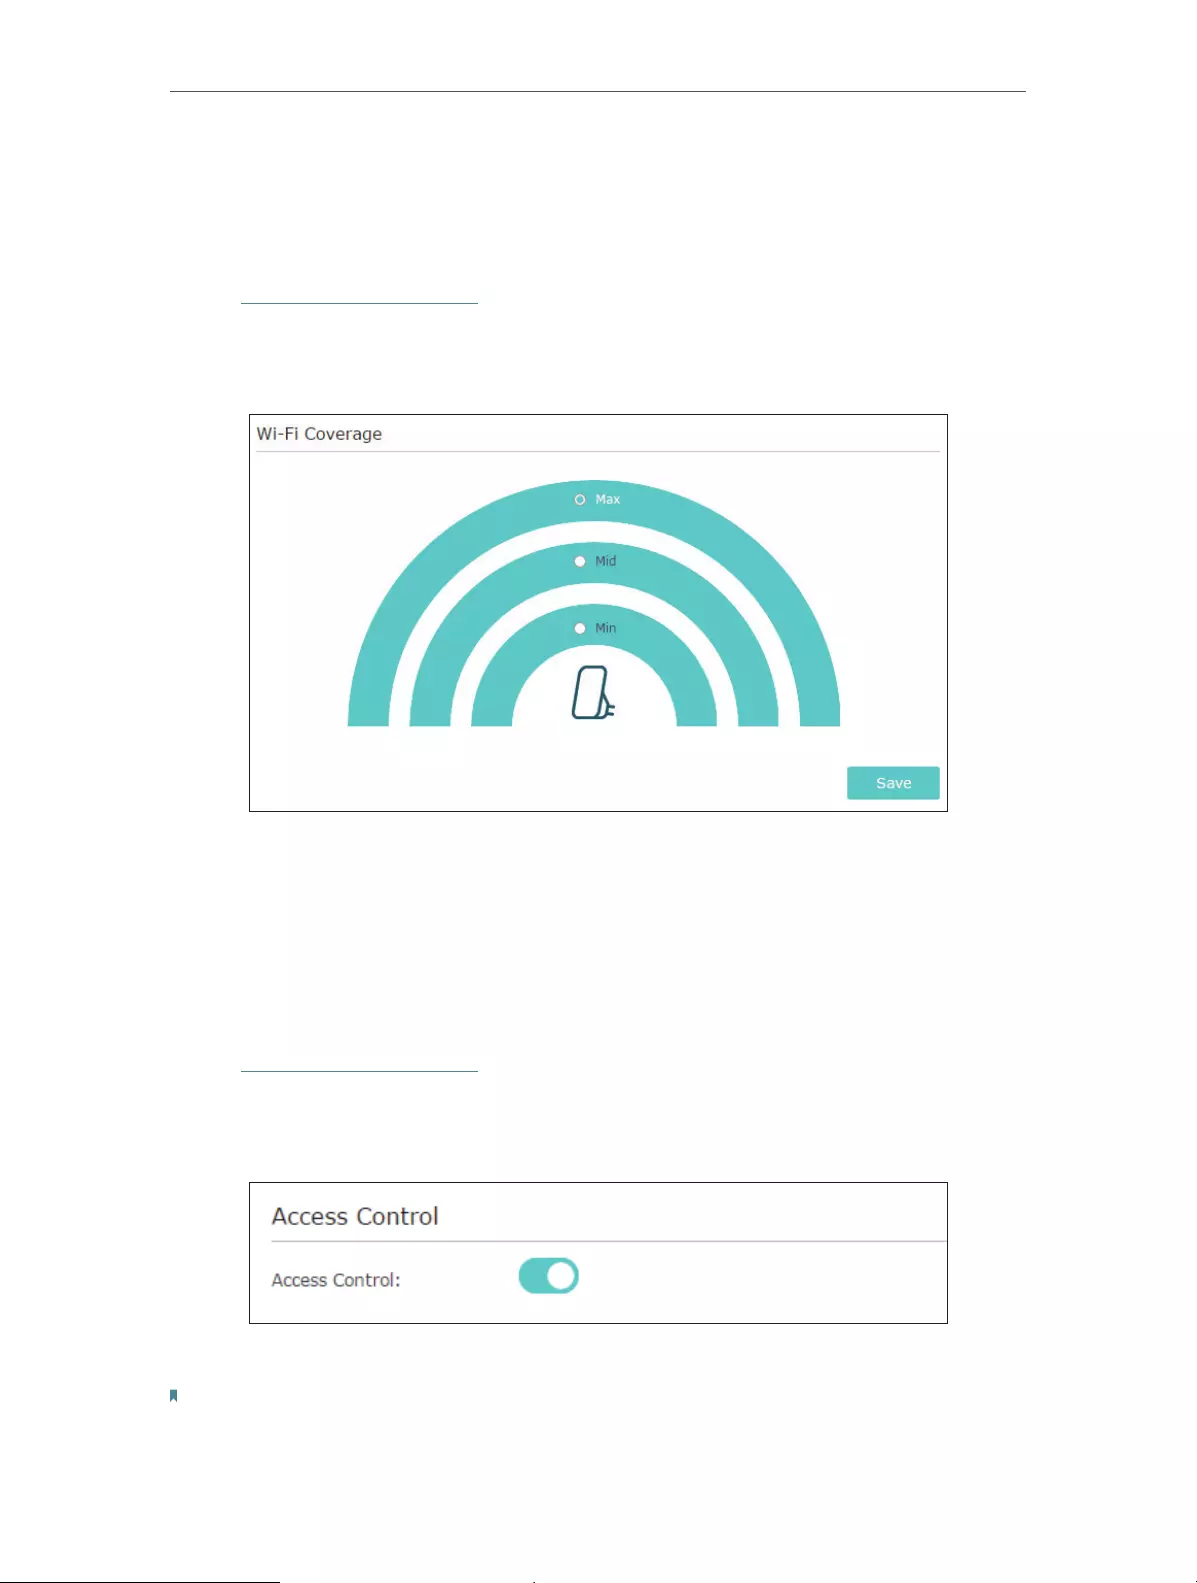
2. Go to Settings > Advanced Settings > Wi-Fi Coverage.
3. Select Min, Mid or Max to adjust your Wi-Fi coverage of the extender.
4. Click Save.
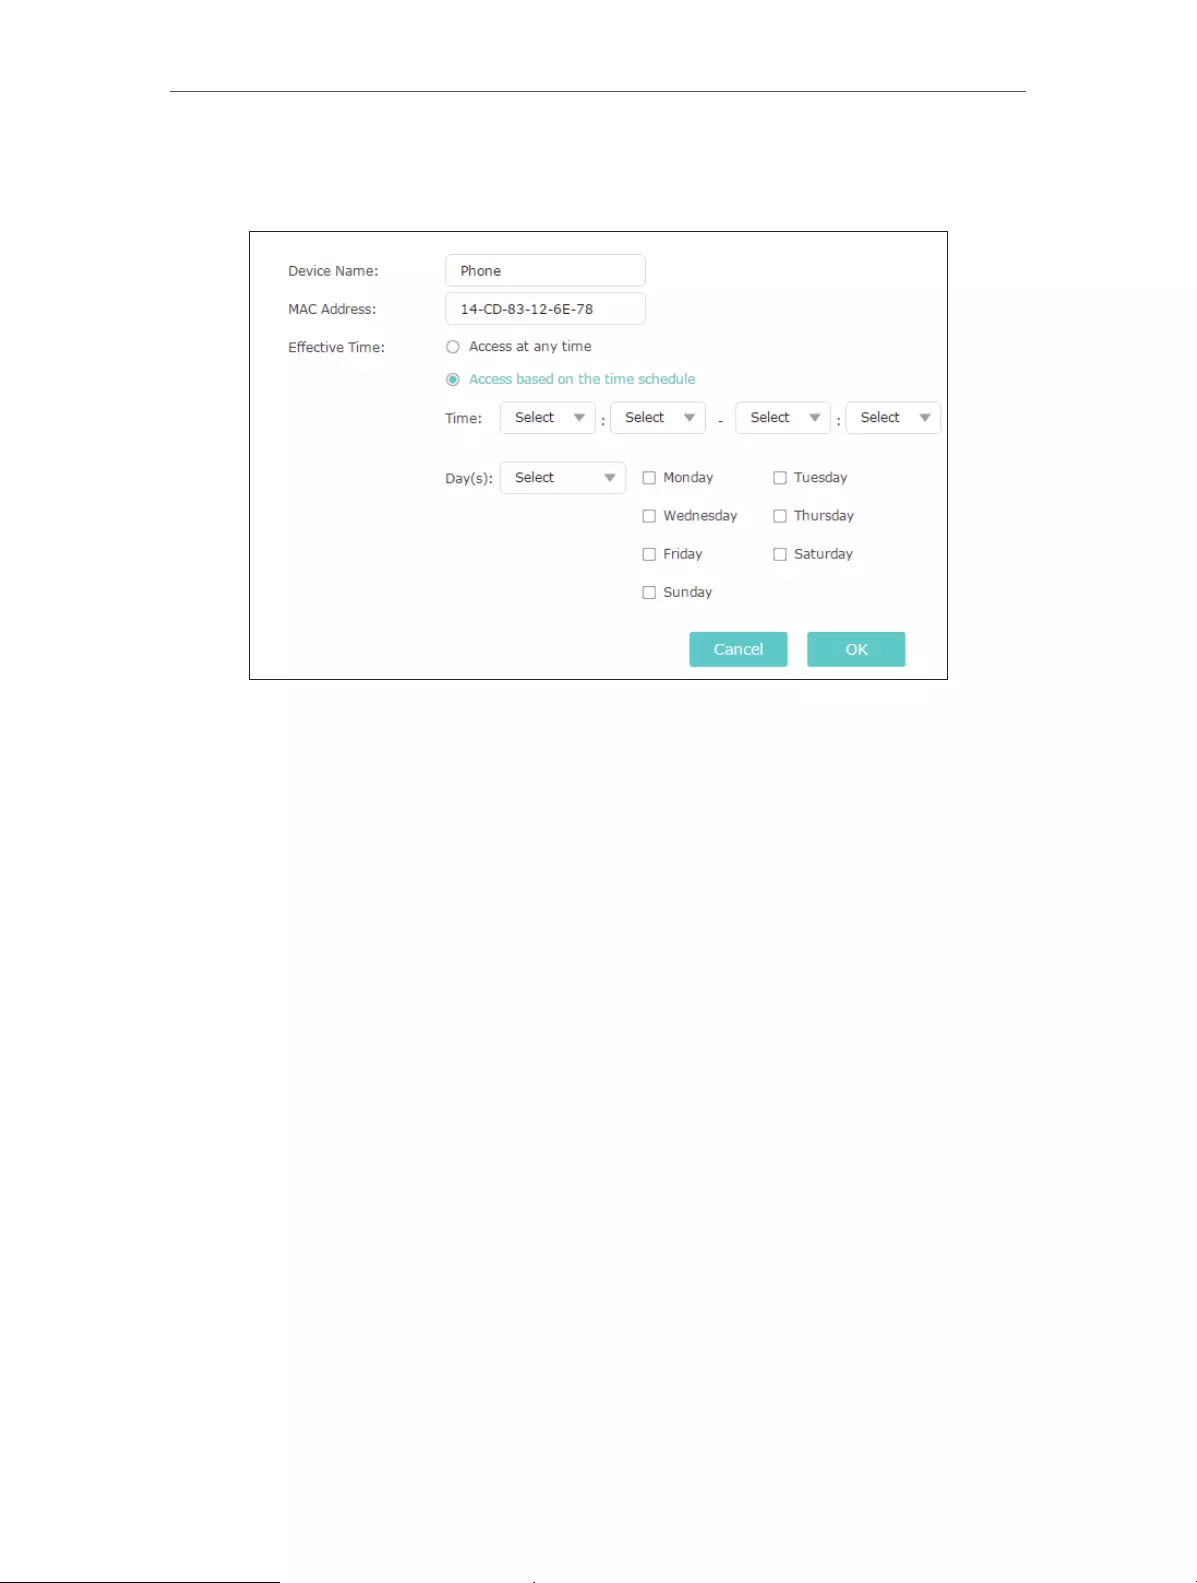
3. 6. Set Access Control
Access Control allows you to permit or block specific devices from accessing internet
for a specific period.
1. Visit http://tplinkrepeater.net, and log in with the password you set for the extender.
2. Go to Settings > Advanced Settings > Access Control.
3. Enable Access Control.
¾To block specific device(s):
Note:
Devices connected to the extender via an Ethernet cable cannot be blocked.
1. Select Blacklist and click Save.

17
Chapter 3 Customize Your Network
2. Select the device to be blocked in the Online Devices table by ticking the
corresponding checkbox.
3. Click Block and the selected device(s) will be added to the Devices in Blacklist table.
4. Click in the Devices in Blacklist table to set the Effective Time for a certain entry
as needed.
5. Click OK.
¾To permit specific device(s):
1. Select Whitelist and click Save.
18
Chapter 3 Customize Your Network
2. Click Add in the Devices in Whitelist table. Enter the Device Name and MAC Address.
And you can set the Effective Time for a certain entry as needed.
3. Click OK.

Chapter 4
More Features of Your
Extender
This chapter explains how to use the extender as a wireless adapter and as an access
point.
It contains the following sections:
• Use Your Extender as a Wireless Adapter
• Transform Your Existing Wired Network to a Wireless One

20
Chapter 4 More Features of Your Extender
4. 1. Use Your Extender as a Wireless Adapter
The extender can be used as a wireless adapter to connect any wired-only device, such
as a Blu-ray player, game console, DVR, or smart TV, to your wireless network.
After configuration, you can connect an Ethernet-enabled device to the extender via an
Ethernet cable.
Note:
Extenders that have no Ethernet port do not support this feature.
Smart TV Game Console Desktop
4. 2. Transform Your Existing Wired Network to a
Wireless One
The extender can work as an access point, transforming your existing wired network to
a wireless one.
4. 2. 1. To Set Up the Extender as an Access Point
1. Visit http://tplinkrepeater.net, and log in with the password you set for the extender.
2. Click Mode in the top right corner of the page. Select Access Point and click Save.
The extender will reboot and switch to Access Point mode.
3. After rebooting, connect the extender to your modem or wired router via an Ethernet
cable.

21
Chapter 4 More Features of Your Extender
4. Visit http://tplinkrepeater.net, and log in with the password you set for the extender.
5. Go to Quick Setup to configure your extender.
1 ) Configure your wireless settings and click Next.
2 ) Confirm the information and click Finish. Now, you can enjoy Wi-Fi.
4. 2. 2. To Connect Your Wireless Devices to the Extender via WPS
Wi-Fi Protected Setup (WPS) provides an easier way to set up a secure Wi-Fi connection.
Wireless devices that support WPS, including Android phones, tablets and most USB
network cards, can be connected to your extender through this method (not supported
by iOS devices).
1. Visit http://tplinkrepeater.net, and log in with the password you set for the extender.
2. Go to Settings > Wireless > WPS.
3. Enable WPS.

22
Chapter 4 More Features of Your Extender
4. Connect via WPS:
• AP’s PIN: Enable AP’s PIN and enter the PIN on your device. You can click Generate
to get a new PIN or click Default to restore the PIN to its factory one.
• Push Button (Recommended): Click Connect and push the WPS button on the
client device.
• PIN code: Enter the client’s PIN, and click Connect.

Chapter 5
Manage Your Extender
This chapter presents how to manage and maintain your extender.
It includes the following sections:
• Set Up System Time
• Control LEDs
• Power Schedule
• Upgrade the Firmware
• Backup and Restore Configuration Settings
• Change Admin Account
• System Log
24
Chapter 5 Manage Your Extender
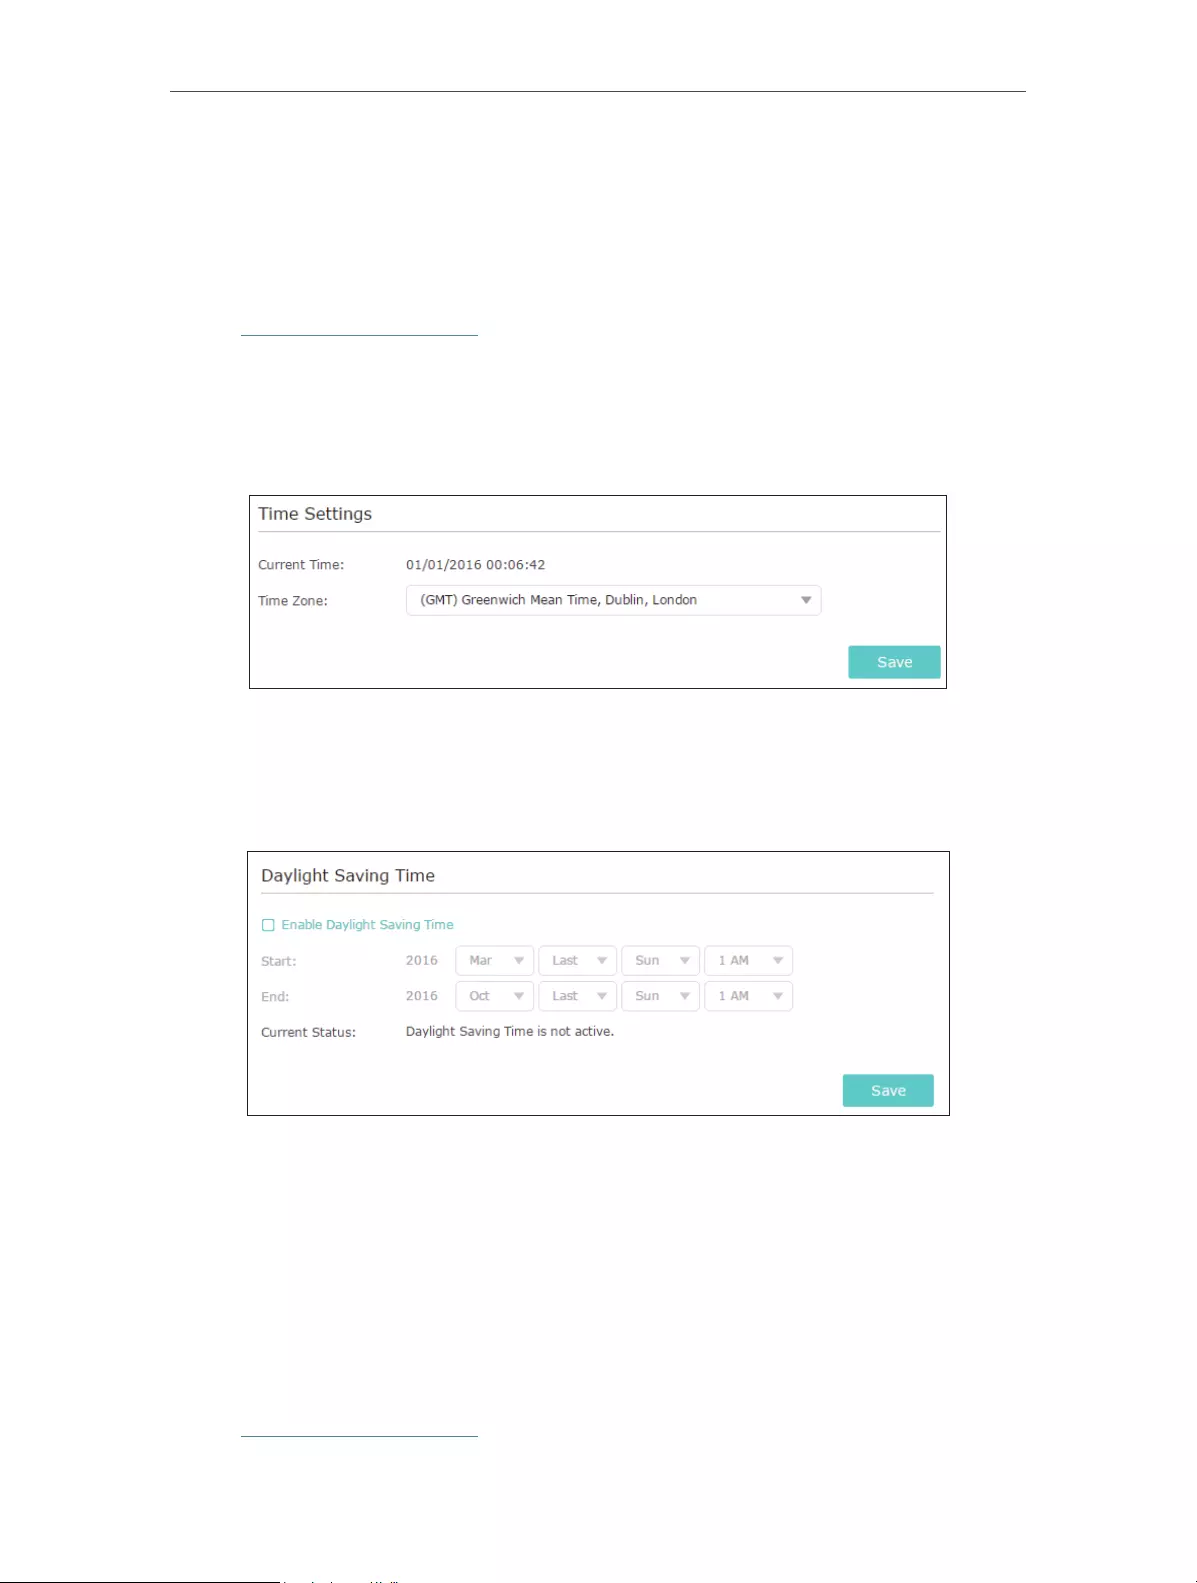
5. 1. Set Up System Time
The System Time of the extender will be used for time-based functions such as the
Power Schedule function. If you have enabled the Daylight Saving Time feature, the
system time will be sychronized with the daylight saving time you configure.
1. Visit http://tplinkrepeater.net, and log in with the password you set for the extender.
2. Go to Settings > System Tools > Time Settings.
¾To get system time:
1. Select your local Time Zone from the drop-down list.
2. Click Save.
¾To set up Daylight Saving Time:
1. Select Enable Daylight Saving Time.
2. Select the Start and End date and time of the daylight saving time at your local time
zone.
3. Click Save.
5. 2. Control LEDs
The LEDs of the extender indicate its activities and status. You can enable the Night
Mode feature to specify a time period during which the LEDs are off.
1. Visit http://tplinkrepeater.net, and log in with the password you set for the extender.

25
Chapter 5 Manage Your Extender
2. Go to Settings > System Tools > LED Control.
¾To specify a time period when LEDs are off:
1. Select Night Mode.
2. Specify a time period in the LED Off Time field, and the LEDs will be off during this
period.
3. Click Save.
5. 3. Power Schedule
The Power Schdule feature allows you to specify a time period during which the
extender is off.
1. Visit http://tplinkrepeater.net, and log in with the password you set for the extender.
2. Go to Settings > Advanced Settings > Power Schedule.
¾To specify a time period when the extender is off:
1. Select Enable Power Schedule.
2. Specify a time period in the Power—Off Time field and days in the Day(s) field, and the
extender will be off during this period.

26
Chapter 5 Manage Your Extender
3. Click Save.
5. 4. Upgrade the Firmware
TP-Link is committed to improving product features, giving you a better network
experience. You can download the latest firmware file from the Support page of our
website www.tp-link.com and upgrade the firmware to the latest version.
Note:
1. Make sure the latest firmware file is matched with the hardware version (as shown in the download
section of the Support page).
2. Make sure that you have a stable connection between the extender and your computer. It is NOT
recommended to upgrade the firmware wirelessly.
3. Backup your extender configuration.
4. Do NOT power off the extender during the firmware upgrade.
¾To upgrade the firmware:
1. Download the latest firmware file for the extender from our website
www.tp-link.com.
2. Visit http://tplinkrepeater.net, and log in with the password you set for the extender.
3. Go to Settings > System Tools > Firmware Upgrade.
4. Click Browse to locate the downloaded new firmware file, and then click Upgrade.
5. Wait a few minutes for the firmware upgrade to complete and the extender to reboot.
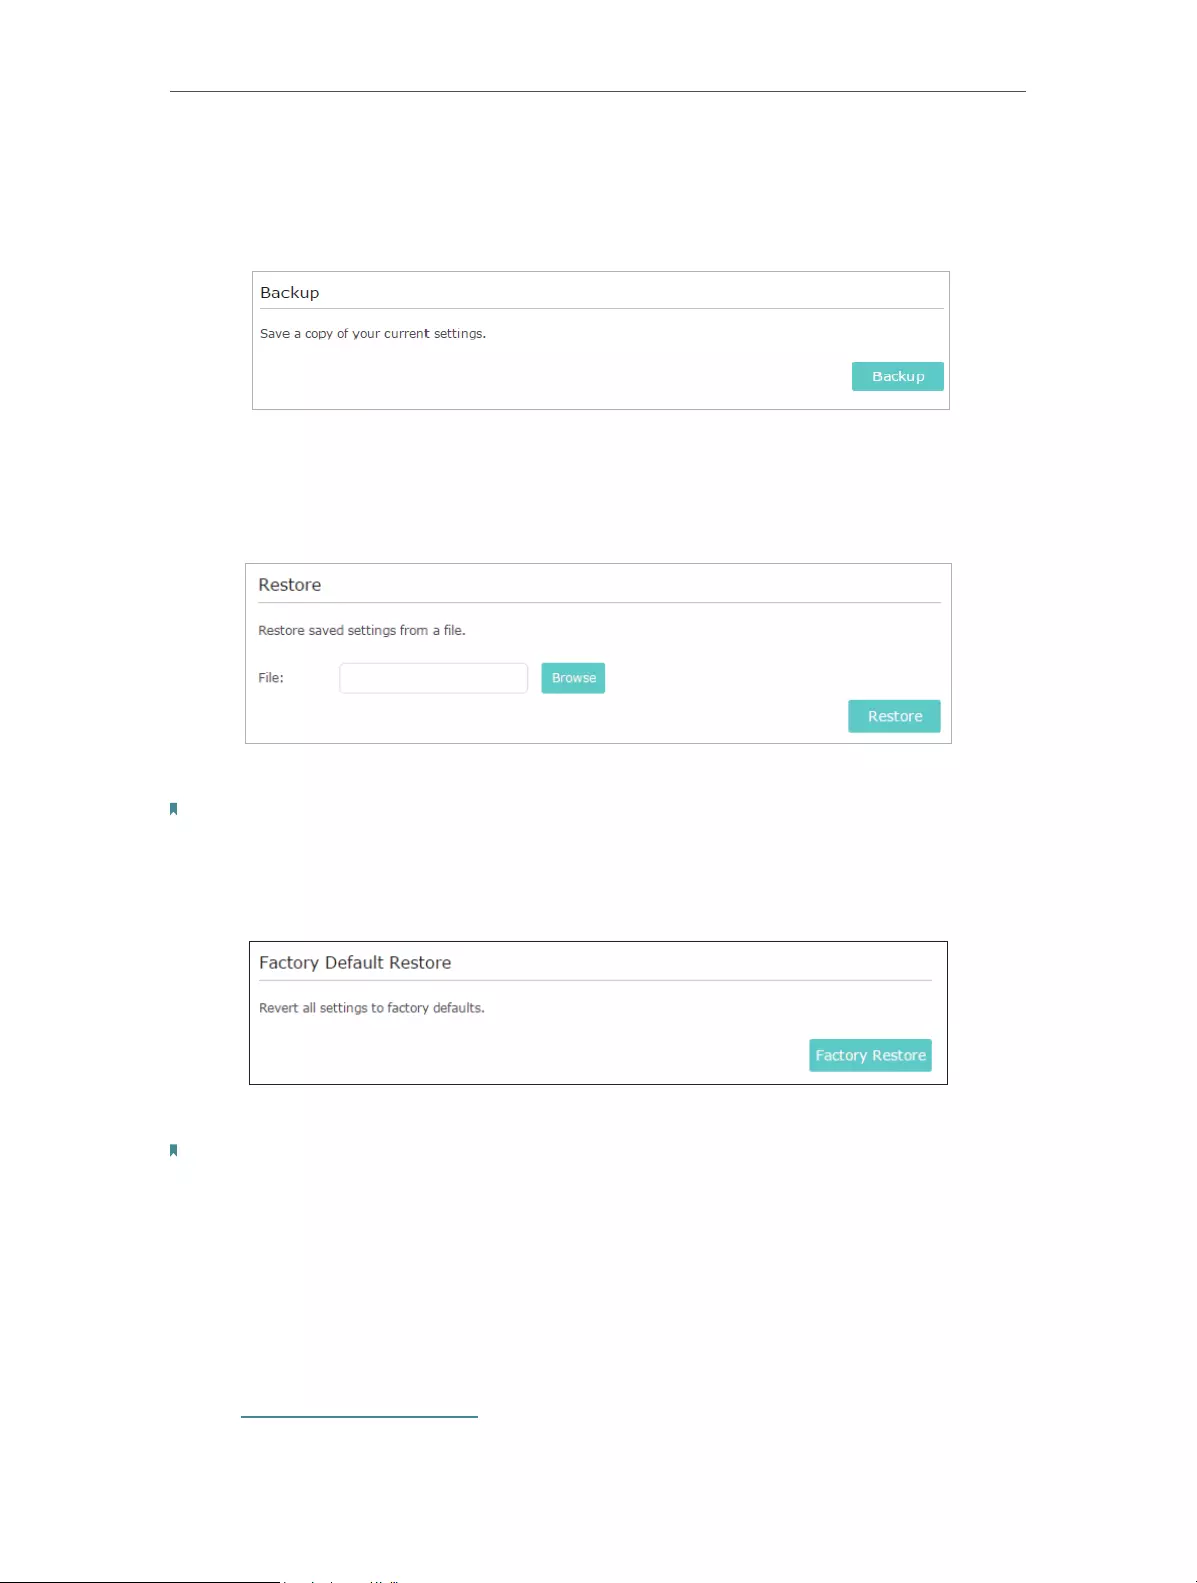
5. 5. Backup and Restore Configuration Settings
The configuration settings are stored as a configuration file in the extender. You can
backup the configuration file and restore the extender to the previous settings from the
backup file when needed. Moreover, if necessary, you can erase the current settings
and reset the extender to the default factory settings.
1. Visit http://tplinkrepeater.net, and log in with the password you set for the extender.
2. Go to Settings > System Tools > Backup & Restore.
27
Chapter 5 Manage Your Extender
¾To backup configuration settings:
Click Backup to save a copy of the current settings to your local computer. A ‘.bin’ file of
the current settings will be stored on your computer.
¾To restore configuration settings:
1. Click Browse to locate the backup configuration file stored on your computer, and
click Restore.
2. Wait a few minutes for the restore and reboot.
Note: During the restore process, do not power off or reset the extender.
¾To reset the extender to factory default settings:
1. Click Factory Restore to reset the extender.
2. Wait a few minutes for the reset and reboot.
Note:
1. During the reset process, do not power off or reset the extender.
2. We strongly recommend you backup the current configuration settings before resetting the extender.
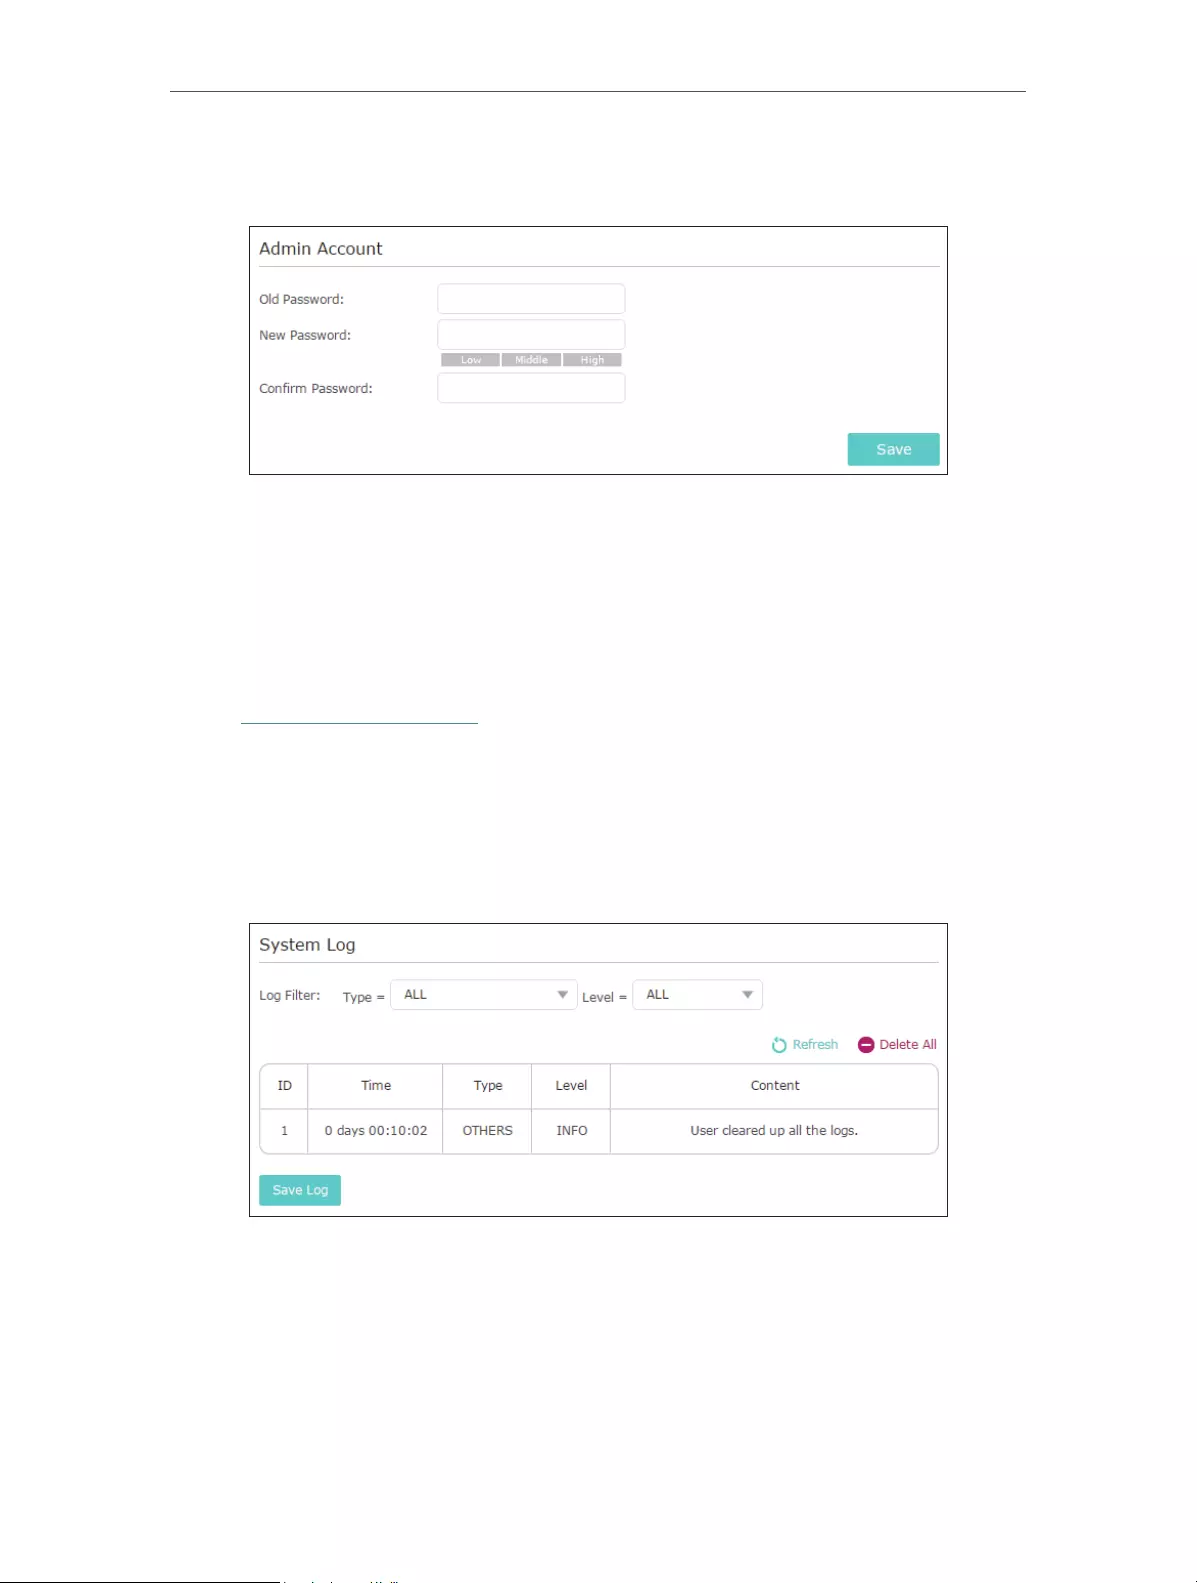
5. 6. Change Admin Account
The account management feature allows you to change your login password of the web
management page.
1. Visit http://tplinkrepeater.net, and log in with the password you set for the extender.
2. Go to Settings > System Tools > Admin Account.
28
Chapter 5 Manage Your Extender
3. Enter the old password, then the new password twice (both case-sensitive) and click
Save.
4. Use the new password for future logins.
5. 7. System Log
If the extender is not working normally, you can save the system log and send it to our
technical support team.
1. Visit http://tplinkrepeater.net, and log in with the password you set for the extender.
2. Go to Settings > System Tools > System Log.
¾To save the system log locally:
1. Choose the type and level of the system log as needed.
2. Click Save Log to save the system logs to a local disk.

29
FAQ
Q1. How to reset the extender to its factory default settings?
• With the extender powered on, use a pin to press the RESET button until all the LEDs
turn on momentarily and then release the button.
• Log in to the extender’s web management page. Go to Settings > System Tools >
Restore & Backup and click Factory Restore.
Q2. What can I do if I forgot my login password?
Refer to FAQ > Q1 to reset the extender, and create a new password for future login
attempts.
Note: The extender must be reconfigured after a reset to access internet. Please note down your new
login password for future use.
Q3. What can I do if I forgot my wireless password?
The factory default wireless password is printed on the label of the extender.
If the password has been altered, please connect your computer to the extender using
an Ethernet cable and follow the steps below:
1. Visit http://tplinkrepeater.net, and log in with the password you set for the extender.
2. Go to Settings > Wireless > Wireless Settings to retrieve or reset your wireless
password.
Q4. What can I do if I cannot access the web management page?
This can happen for a variety of reasons. Please try the methods below to log in again.
• Make sure your computer is connected to the extended network.
• Make sure your computer is configured as Obtain an IP address automatically and
Obtain DNS server address automatically.
• Use the IP address to access the extender. The default IP is 192.168.0.254. If the
extender is connected to the router, you should go to your router’s DHCP client list to
obtain the extender’s current IP address.
• Reset the extender. Then connect your computer to its wireless network, enter
http://tplinkrepeater.net or http://192.168.0.254 in a web browser and press Enter.
Q5. I enabled wireless MAC filter, wireless access control, or access
control list (ACL) on my router, what should I do to configure and use
the extender?
When a device connects through the extender to your router, the MAC address of the
device shown on the router is translated to another MAC address. If your router’s MAC

30
filter, wireless access control, or ACL is enabled, the devices connected to the extender
cannot get an IP address from the extender and cannot access internet.
To solve this problem, please follow the steps below:
1. Log in to your router and disable the MAC filter, wireless access control or ACL.
Note: For more information about how to disable your router’s MAC filter, wireless access control or
ACL, please refer to your router’s user guide.
2. Power on your extender, and run the Quick Setup to configure your extender.
3. Connect all of your devices to the extended network, and make sure the router’s Link
LED remains lit.
4. On your router, add all the Online Devices’ MAC addresses to your router’s MAC filter
table.
5. Enable the router’s MAC filter, wireless access control, or ACL to complete the
configuration.

31
COPYRIGHT & TRADEMARKS
Specifications are subject to change without notice. is a registered trademark
of TP-Link Techonologies Co., Ltd. Other brands and product names are trademarks or
registered trademarks of their respective holders.
No part of the specifications may be reproduced in any form or by any means or
used to make any derivative such as translation, transformation, or adaptation
without permission from TP-Link Techonologies Co., Ltd. Copyright © 2016 TP-Link
Techonologies Co., Ltd. All rights reserved.

32
FCC STATEMENT
This equipment has been tested and found to comply with the limits for a Class B digital
device, pursuant to part 15 of the FCC Rules. These limits are designed to provide
reasonable protection against harmful interference in a residential installation. This
equipment generates, uses and can radiate radio frequency energy and, if not installed
and used in accordance with the instructions, may cause harmful interference to radio
communications. However, there is no guarantee that interference will not occur in a
particular installation. If this equipment does cause harmful interference to radio or
television reception, which can be determined by turning the equipment off and on, the
user is encouraged to try to correct the interference by one or more of the following
measures:
• Reorient or relocate the receiving antenna.
• Increase the separation between the equipment and receiver.
• Connect the equipment into an outlet on a circuit different from that to which the
receiver is connected.
• Consult the dealer or an experienced radio/ TV technician for help.
This device complies with part 15 of the FCC Rules. Operation is subject to the following
two conditions:
1. This device may not cause harmful interference.
2. This device must accept any interference received, including interference that may
cause undesired operation.
Any changes or modifications not expressly approved by the party responsible for
compliance could void the user’s authority to operate the equipment.
Note: The manufacturer is not responsible for any radio or TV interference caused by
unauthorized modifications to this equipment. Such modifications could void the user’s
authority to operate the equipment.
FCC RF Radiation Exposure Statement:
This equipment complies with FCC RF radiation exposure limits set forth for an
uncontrolled environment. This device and its antenna must not be co-located or
operating in conjunction with any other antenna or transmitter.
“To comply with FCC RF exposure compliance requirements, this grant is applicable to
only Mobile Configurations. The antennas used for this transmitter must be installed to
provide a separation distance of at least 20 cm from all persons and must not be co-
located or operating in conjunction with any other antenna or transmitter.”
CE Mark Warning

33
This is a class B product. In a domestic environment, this product may cause radio
interference, in which case the user may be required to take adequate measures.
RF Exposure Information
This device meets the EU requirements (1999/5/EC Article 3.1a) on the limitation of
exposure of the general public to electromagnetic fields by way of health protection.
The device complies with RF specifications when the device used at 20 cm from your
body.
Canadian Compliance Statement
This device complies with Industry Canada license-exempt RSSs. Operation is subject
to the following two conditions:
1. This device may not cause interference, and
2. This device must accept any interference, including interference that may cause
undesired operation of the device.
Le présent appareil est conforme aux CNR d’Industrie Canada applicables aux appareils
radio exempts de licence. L’exploitation est autorisée aux deux conditions suivantes :
1. l’appareil ne doit pas produire de brouillage;
2. l’utilisateur de l’appareil doit accepter tout brouillage radioélectrique subi, meme si le
brouillage est susceptible d’en compromettre le fonctionnement.
Radiation Exposure Statement:
This equipment complies with IC radiation exposure limits set forth for an uncontrolled
environment. This equipment should be installed and operated with minimum distance
20cm between the radiator & your body.
Déclaration d’exposition aux radiations:
Cet équipement est conforme aux limites d’exposition aux rayonnements IC établies
pour un environnement non contrôlé. Cet équipement doit être installé et utilisé avec
un minimum de 20 cm de distance entre la source de rayonnement et votre corps.
Industry Canada Statement
CAN ICES-3 (B)/NMB-3(B)
Korea Warning Statements
당해 무선설비는 운용중 전파혼신 가능성이 있음.
NCC Notice & BSMI Notice
注意!
依據 低功率電波輻射性電機管理辦法

34
第十二條 經型式認證合格之低功率射頻電機,非經許可,公司、商號或使用者均不得擅
自變更頻率、加大功率或變更原設計之特性或功能。
第十四條 低功率射頻電機之使用不得影響飛航安全及干擾合法通行;經發現有干擾現象
時,應立即停用,並改善至無干擾時方得繼續使用。前項合法通信,指依電信規定作業
之無線電信。低功率射頻電機需忍受合法通信或工業、科學以及醫療用電波輻射性電機
設備之干擾。
安全諮詢及注意事項
• 請使用原裝電源供應器或只能按照本產品注明的電源類型使用本產品。
• 清潔本產品之前請先拔掉電源線。請勿使用液體、噴霧清潔劑或濕布進行清潔。
• 注意防潮,請勿將水或其他液體潑灑到本產品上。
• 插槽與開口供通風使用,以確保本產品的操作可靠並防止過熱,請勿堵塞或覆蓋開
口。
• 請勿將本產品置放於靠近熱源的地方。除非有正常的通風,否則不可放在密閉位置
中。
• 請不要私自打開機殼,不要嘗試自行維修本產品,請由授權的專業人士進行此項工
作。
Продукт сертифіковано згідно с правилами системи УкрСЕПРО на відповідність
вимогам нормативних документів та вимогам, що передбачені чинними
законодавчими актами України.
Safety Information
• When product has power button, the power button is one of the way to shut off the
product; when there is no power button, the only way to completely shut off power is
to disconnect the product or the power adapter from the power source.
• Don’t disassemble the product, or make repairs yourself. You run the risk of electric
shock and voiding the limited warranty. If you need service, please contact us.
• Avoid water and wet locations.
Explanations of the symbols on the product label
Symbol Explanation
Class II equipment
AC voltage
Indoor use only

35
Symbol Explanation
RECYCLING
This product bears the selective sorting symbol for Waste electrical and electronic
equipment (WEEE). This means that this product must be handled pursuant to European
directive 2012/19/EU in order to be recycled or dismantled to minimize its impact on
the environment.
User has the choice to give his product to a competent recycling organization or to the
retailer when he buys a new electrical or electronic equipment.