
NexTool Multi-purpose Headlamp SET
Налобный фонарик NexTool Multi-purpose Headlamp в водонепроницаемом корпусе, зарядкой встроенного аккумулятора емкостью 640 мАч через кабель USB Type-C. Регулировка угла наклона от 0 до 180°. Красный и белый свет с 4 режимами работы. Длина луча – до 17 метров, яркость – до 170 Лм.
Модель получила четыре режима работы: это белый яркий и тусклый свет, красный яркий и красный для подачи сигнала SOS. Переключение осуществляется с помощью кнопки на корпусе. Налобный ремешок производится из полиэстера, а корпус фонарика – из пластика ABS с уровнем водозащиты IPX4.
Информация носит исключительно справочный характер и не является публичной офертой. Также производитель оставляет за собой право изменять комплектацию и характеристики товара без предварительного уведомления.

NITECORE HA13 Multipurpose Dual Beam AAA Headlamp

Product Information
| Product Name | HA13 Multipurpose Dual Beam AAA Headlamp |
|---|---|
| Features | Multipurpose headlamp with white and red light modes, special SOS and beacon modes, adjustable headband, compact dimensions, lightweight design |
| Accessories | Headband, 3 x AAA Batteries |
| Specifications | Dimensions: 59mm x 50mm x 36mm (2.32 x 1.97 x 1.42) (Bracket Included) Weight: 67g (2.36 oz) (Bracket and Headband Included) 100g (3.53 oz) (Bracket, Headband and 3 x Batteries Included) Battery Options:
|
Product Usage Instructions
Battery Installation / Removal
As illustrated, insert / remove the AAA batteries after opening the battery compartment. Warnings:
- Ensure the batteries are inserted according to the polarity marks. The product will not work if the batteries are incorrectly inserted.
- When the product is kept in a backpack or left unused for prolonged time, please remove the batteries to prevent accidental activation or battery leakage.
Power Button / MODE Button
- On / Off: Use the power button to turn the headlamp on or off.
- White Light: When the headlamp is on, short press the MODE button to switch between white light and red light.
- Special Modes (SOS / BEACON): When the headlamp is on, long press the MODE button to activate special SOS or beacon modes.
- Lockout / Unlock: To prevent accidental activation, press and hold both the power button and MODE button simultaneously for 3 seconds to lock or unlock the headlamp.
Battery Replacement
The batteries should be replaced when the output appears to be dim or the headlamp becomes unresponsive due to low power.
Warnings
- CAUTION! Possible dangerous radiation! Don’t look into the light! May be dangerous for your eyes.
- DO NOT disassemble or modify the headlamp as doing so will cause damage to it and render the product warranty invalid. Please refer to the warranty section in the manual for complete warranty information.
- Dispose of the device/batteries in accordance with applicable local laws and regulations.
HA13
Multipurpose
Dual Beam AAA Headlamp
- Dual Power Sources
- White Light + Red Light
- 350 Lumens Max Output
Features
- Max output of 350 lumens
- Red light illumination designed for preserving night vision
- Utilizes an optical lens system with various facets
- Compatible with various AAA batteries such as alkaline, Ni-MH, and primary lithium batteries
- Designed with two buttons different in shape and touch, offering easy one-handed operation
- 3 brightness levels, 2 light sources, and 3 special modes available
- Made from special PC plastic with impact and low temperature resistance
- Compact and lightweight
- Impact resistant to 1 meter
- Waterproof rating in accordance with IPX6
Accessories
- Headband, 3 x AAA Batteries
Specifications
- Dimensions: 59mm x 50mm x 36mm (2.32″ x 1.97″ x 1.42″) (Bracket Included)
- Weight: 67g (2.36 oz) (Bracket and Headband Included) 100g (3.53 oz) (Bracket, Headband and 3 x Batteries Included)
Battery Options
| Type | Nominal Voltage | Compatibility | |
| NITECORE HLB1300 Rechargeable Li-ion Battery Pack | — | 3.7V | Y (Recommended) |
| Primary Alkaline Battery | AAA | 1.5V | Y (Recommended) |
| Primary Lithium Battery | AAA | 1.5V | Y (Recommended) |
| Rechargeable Ni-MH Battery | AAA | 1.2V | Y (Recommended) |
| Rechargeable LFP Battery | 10400 | 3.2V | N (Incompatible) |
| Rechargeable Li-ion Battery | 10400 | 3.7V | N (Incompatible) |
Technical Data
Using 3 x AAA Batteries:
| White Light | Red Light | ||||||
| HIGH | LOW | ULTRALOW | SOS | BEACON | CONSTANT- ON | SLOW FLASHING | |
| Brightness |
350 Lumens |
100 Lumens |
6 Lumens |
350 Lumens |
350 Lumens |
5 Lumens |
5 Lumens |
| Runtime | 3h | 12h | 140h | ─ | ─ | 40h | ─ |
| Beam Distance | 120m | 70m | 15m | ─ | ─ | 3m | ─ |
| Peak Beam Intensity | 3,500cd | 1,250cd | 60cd | ─ | ─ | 2cd | ─ |
| Impact Resistance | 1m | ||||||
| Water Resistance | IPX6 |
Note: The stated data is measured using 3 x 1.5V alkaline AAA batteries under laboratory conditions. The data may vary in real world use due to different battery usage or environmental conditions.
Using the HLB1300 Li-ion Battery Pack:
| White Light | Red Light | ||||||
| HIGH | LOW | ULTRALOW | SOS | BEACON | CONSTANT- ON | SLOW FLASHING | |
| Brightness |
350 Lumens |
100 Lumens |
6 Lumens |
350 Lumens |
350 Lumens |
5 Lumens |
5 Lumens |
| Runtime | 4h 30min | 15h | 160h | ─ | ─ | 60h | ─ |
| Beam Distance | 120m | 70m | 15m | ─ | ─ | 3m | ─ |
| Peak Beam Intensity | 3,500cd | 1,250cd | 60cd | ─ | ─ | 2cd | ─ |
| Impact Resistance | 1m | ||||||
| Water Resistance | IPX6 |
Note: The stated data is measured using the HLB1300 Li-ion Battery Pack (1,300mAh) under laboratory conditions. The data may vary in real world use due to different battery usage or environmental conditions.
Battery Installation / Removal

Power Button / MODE Button

As illustrated, insert / remove the AAA batteries after opening the battery compartment.
Warnings:
- Ensure the batteries are inserted according to the polarity marks. The product will not work if the batteries are incorrectly inserted.
- When the product is kept in a backpack or left unused for prolonged time, please remove the batteries to prevent accidental activation or battery leakage.
Power Button / MODE Button
- The Power Button is used for turning on / off the light and adjusting brightness levels.
- The MODE Button is designed for switching light sources.
On / Off
- When the light is off, long press the Power Button for 1 second to access LOW.
- When the light is on, long press the Power Button or MODE Button for 1 second to turn it off.
White Light
- When the light is off, long press the Power Button for 1 second to access LOW.
- When the light is off, double press the Power Button to access ULTRALOW.
- When the light is on, short press the Power Button to switch between LOW and HIGH.
Note: The HIGH Level will step down to prevent overheating and prolong battery life when it runs for a prolonged period.
Red Light
- When the light is off, long press the MODE Button for 1 second to turn on the red light.
- When the red light is on, short press the Power Button to switch between CONSTANT-ON and SLOW FLASHING.
Light Sources Switching
When the light is on, short press the MODE Button to switch between white light and red light.
Special Modes (SOS / BEACON)
- When the headlamp is in any status, double press the MODE Button to access SOS.
- When either special mode is on, short press the Power Button to switch between SOS and BEACON. Double press the MODE Button again to return to the previous status.
Lockout / Unlock
- When the headlamp is off, long press both buttons for 2 seconds until the light flashes 3 times to indicate access to the Lockout Mode. In Lockout Mode, any brightness levels or special modes are unavailable, and the light will flash once to indicate this status when pressing either button.
- When in the Lockout Mode, long press both buttons for 2 seconds again until the ULTRALOW is on to indicate the unlock status.
Battery Replacement
The batteries should be replaced when the output appears to be dim or the headlamp becomes unresponsive due to low power.
Warnings
- CAUTION! Possible dangerous radiation! Don’t look into the light! May be dangerous for your eyes.
- DO NOT disassemble or modify the headlamp as doing so will cause damage to it and render the product warranty invalid. Please refer to the warranty section in the manual for complete warranty information.
- Dispose of the device/batteries in accordance with applicable local laws and regulations.
SYSMAX Innovations Co., Ltd.
TEL: +86-20-83862000
FAX: +86-20-83882723
E-mail: [email protected]
Web: www.nitecore.com
Address: Unit 6355, 5/F,
No. 1021 Gaopu Road,
Tianhe District, Guangzhou,
510653, Guangdong, ChinaPlease find us on facebook : NITECORE Flashlight
Documents / Resources
References
Documents — nitecore – HA13
tags: AAA Headlamp, Beam AAA Headlamp, Dual Beam AAA Headlamp, HA13, HA13 Multipurpose Dual Beam AAA Headlamp, Headlamp, Multipurpose Dual Beam AAA Headlamp, Nitecore,
Описание
NexTool Multi-purpose Headlamp
Налобный фонарик NexTool Multi-purpose Headlamp в водонепроницаемом корпусе, зарядкой встроенного аккумулятора емкостью 640 мАч через кабель USB Type-C. Регулировка угла наклона от 0 до 180°. Красный и белый свет с 4 режимами работы. Длина луча – до 17 метров, яркость – до 170 Лм.
Модель получила четыре режима работы: это белый яркий и тусклый свет, красный яркий и красный для подачи сигнала SOS. Переключение осуществляется с помощью кнопки на корпусе. Налобный ремешок производится из полиэстера, а корпус фонарика – из пластика ABS с уровнем водозащиты IPX4.
Характеристики:
- Модель: NE20002
- Яркость и время работы: 170 люмен (2 часа), 20 люмен (11 часов), 5 люмен (18 часов)
- Дальность светового потока: 19 метров / 7 метров
- Влагозащита: IPX4
- Размер: 61 х 46 х 19 мм
- Материал: ABS, полиэстер
- Разъем: USB Type – C
- Время зарядки: 4 ч
- Аккумулятор: 640 мАч
- Напряжение: 5V/2A
Информация носит исключительно справочный характер и не является публичной офертой. Также производитель оставляет за собой право изменять комплектацию и характеристики товара без предварительного уведомления.
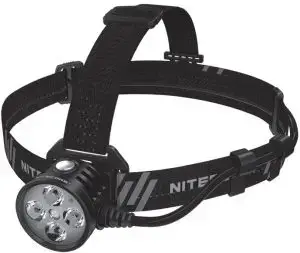
NITECORE USB Front Powerd Elite Headlamp User Guide
Features
- Spotlight/Floodlight Adjustable Dual Output USB Powered Headlamp
- The spotlight utilizes 4 x CREE XP-G3 S3 LEDs with a max output of 1,600 lumens, a max peak beam intensity of 6,570cd and a max throw of 162 meters
- The floodlight utilizes a CREE XHP35 HD E2 LED with a wide range optic system of 170° illumination angle
- 5 brightness levels available with adjustable spotlight/floodlight output ratio (Patent No. ZL201820778007.X)
- Wristband remote included for wireless control (Patent No. ZL201520717872.X)
- 100° tilt angle for different illumination needs
- Highly efficient constant current circuit provides a stable output
- Convenient USB-A plug compatible with universal USB power sources
- Incorporated Advanced Temperature Regulation (ATR) module (Patent No. ZL201510534543.6)
- Lightweight and breathable headband included
- Constructed from aero grade aluminum alloy
- HA III military grade hard-anodized finish
- Rating in accordance with IP67
- Impact resistant to 1 meter
Specifications
| Dimensions | 47.6mm×43.2mm×42.1mm (1.87″×1.7″×1.66″) |
| Head Diameter | 40mm (1.57″) |
| Weight | 117.5g (4.14oz) (Bracket Included, Headband and Power Source Not Included) 142.5g (5.03oz) (Bracket and Headband Included, Power Source Not Included) |
Accessories
2 x USB Cable Clips, Headband, Wristband Remote (Remote Control + Hook-and-loop Wristband), Spare O-ring (for the Remote Control)
Connecting a Power Source

Remote Control


Warranty Service
All NITECORE® products are warranted for quality. Any DOA / defective product can be exchanged for a replacement through a local distributor/dealer within 15 days of purchase. After that, all defective / malfunctioning NITECORE® products can be repaired free of charge within 60 months from the date of purchase. Beyond 60 months, a limited warranty applies, covering the cost of labor and maintenance, but not the cost of accessories or replacement parts.
The warranty will be nullified if
- the product(s) is/are broken down, reconstructed and/or modified by unauthorized parties;
- the product(s) is/are damaged due to improper use; (e.g. reversed polarity installation)
- the product(s) is/are damaged due to using an unofficially recommended power source.
For the latest information on NITECORE® products and services, please contact a local NITECORE® distributor or send an email to [email protected] All images, text and statements specified herein this user manual are for reference purpose only. Should any discrepancy occur between this manual and information specified on www.nitecore.com, Sysmax Innovations Co., Ltd. reserves the rights to interpret and amend the content of this document at any time without prior notice.
Technical Data
| FL1 STANDARD | 100% Spotlight | 100% Floodlight | ||||||||
| TURBO | HIGH | MID | LOW | ULTRALOW | TURBO | HIGH | MID | LOW | ULTRALOW | |
 |
*1,600 Lumens | 480 Lumens | 200 Lumens | 50 Lumens | 5 Lumens | *1,200 Lumens | 480 Lumens | 200 Lumens | 50 Lumens | 5 Lumens |
 |
1h 30min | 5h | 9h 30min | 23h | 45h | 1h | 4h 30min | 7h 30min | 21h | 45h |
 |
162m | 88m | 56m | 28m | 9m | 37m | 24m | 15m | 7m | 2m |
 |
6,570cd | 1,940cd | 790cd | 200cd | 22cd | 348cd | 149cd | 60cd | 15cd | 1cd |
 |
1m (Impact Resistance) | |||||||||
 |
IP67 |
Note: The stated data is measured in accordance with the international flashlight testing standards ANSI/PLATO FL 1-2019, using a 5,000mAh power bank under laboratory conditions. The data may vary in real world use due to different battery usage or environmental conditions. * It is recommended to use a power source available with 18W or above QC output. Otherwise the TURBO Level is not accessible.
Power Source Options
| Compatibility | |
| NITECORE NPB Series Power Bank | Y (Recommended) |
| USB Power Source (18W or Above QC Output Available) | Y (Recommended) |
| USB Power Source (5V/2A or Above Output Available) | Y (Compatible) |
Note:
- The NITECORE NPB Series Power Bank is recommended as it is available with QC2.0/3.0 output and has a cable lock on the output ports specially designed for the USB cable of the HU60 to prevent accidental disconnection from the power source.
- The TURBO Level is not accessible if the output of the USB power source is below 18W.
- Please use a USB power source made by professional manufacturers or sold by authorized dealers to avoid the risk of accidents.
Operating Instructions
Connecting a Power Source
Use the USB cable of the HU60 to connect an external power source, and the indicator beneath the Power Button on the headlamp will fade in/out constantly for notification. The NITECORE NPB Series Power Bank is recommended as it has a cable lock on the output ports specially designed for the USB cable of the HU60 as illustrated to prevent accidental disconnection from the power source.
Warnings:
- CAUTION! Possible dangerous radiation! Don’t look into the light! Maybe dangerous for your eyes.
- When the product is kept in a backpack, please disconnect it from the power source to prevent accidental activation.
- When the product is left unused for a prolonged time, please disconnect it from the power source to save power.
Remote Control
The HU60 is designed with a wristband remote for wireless control. After pairing, the buttons on the remote control have the same functions as those on the headlamp as illustrated. The pairing is already factory preset before packaging.
- The remote control is powered by a 3V CR2025 Button Cell Battery which enables approx. 10,000 presses. The standby time is approx. 12 months if the battery is inserted with full power.
- The effective remote distance is approx. 2m (6.56ft) if there are no obstructions between the headlamp and the remote control.
- When the battery of the remote control needs to be replaced, please use a screwdriver or a coin to unscrew the cover counterclockwise until one of the dots on the cover is aligned with the unlock symbol, insert the battery with the positive end outwards, and then screw the cover clockwise until one of the dots is aligned with the lock symbol.
Please follow the steps below for re-pairing if either the remote control or the headlamp is replaced:
- After the headlamp is connected to the power source, press and hold both the Power Button and the T Button on the headlamp for over 3 seconds until the indicator beneath the Power Button flashes quickly to indicate that the headlamp is in the pairing status. (This status will last for approx. 30 seconds)
- When the headlamp is in the pairing status, press and hold both the Power Button and the T Button on the remote control until the headlamp is turned on to indicate that the pairing is complete.
Note:
- When the headlamp is in the pairing status but the pairing procedure is not complete in 30 seconds, the headlamp will automatically return to the standby status.
- When the headlamp is turned on in the pairing status, it will automatically exit the pairing status.
- During the pairing procedure, please ensure that the headlamp and the remote control are kept within 30cm (11.8″).
- Please replace the battery of the remote control when its power is low. Battery replacement will not cause re-pairing of the devices.
On / Off
On: When the light is off, long press the Power Button to turn it on.
Off: When the light is on, long press the Power Button to turn it off. (The HU60 has memory function. When reactivated, it will automatically access the previous using status.)
Brightness Levels
When the light is on, short press the Power Button to cycle through the following brightness levels: ULTRA LOW LOW MID HIGH TURBO.
Spotlight/Floodlight Adjustment
The HU60 has a spotlight/floodlight adjustment function. The output ratio of the spotlight and floodlight is stepped or stepless adjustable on a certain brightness level.
- Stepped Adjustment : 5 modes of the output ratio are preset in the Stepped Adjustment.
M1 100% Floodlight M2 75% Floodlight + 25% Spotlight M3 50% Floodlight + 50% Spotlight M4 25% Floodlight + 75% Spotlight M5 100% Spotlight
When the light is on, short press the W Button each time to increase the floodlight output and decrease the spotlight output until it reaches M1; or short press the T Button each time to increase the spotlight output and decrease the floodlight output until it reaches M5.
- Stepless Adjustment : When the light is on, press and hold the W Button to increase the floodlight output and decrease the spotlight output until it reaches M1; or press and hold the T Button to increase the spotlight output and decrease the floodlight output until it reaches M5. Release to select the desired status.
Note: Only M1 and M5 are available on the ULTRALOW Level. When the output is on the ULTRALOW Level, short press the W Button to switch to M1; or short press the T Button to switch to M5.
ATR (Advanced Temperature Regulation)
The integrated ATR technology regulates the output of the HU60 according to the working condition and ambient environment to maintain the optimal performance.