
-
Page 1
USER MANUAL ShareCenter™ Pulse DNS-320 VERSION 2.10… -
Page 2: Table Of Contents
Admin.password…………..11 Adding.New.Network.Shares.Wizard……48 Network.Setup…………..12 Adding.New.ISO.Mount.Shares.Wizard…….54 Dynamic.DNS…………….13 Admin.Password…………..59 DDNS.Account.and.System.Time……..14 Network.Management…………..60 E-mail.Settings.and.Volume.Information….15 LAN.Setup…………….60 RAID.Configuration.and.Drive.Mapping…..16 Dynamic.DNS…………….62 Configuration.Summary.and.Drive.Formatting..17 Application.Management…………63 Format.Complete…………..18 FTP.Server…………….63 D-Link.Storage.Utility…………..20 UPnP.AV.Server…………..64 D-Link DNS-320 User Manual…
-
Page 3
Notifications…………….75 Logs………………79 Firmware.Upgrade……………80 Status………………..81 System.Info…………….81 Hard.Drive.Info…………..82 Applications……………….83 FTP/HTTP.Downloads…………83 Remote.Backups…………..85 Local.Backups…………….90 Local.Backups.-.Time.Machine……..91 P2P.Downloads.-.Settings……….92 P2P.Downloads.-.Downloads……….93 Web.File.Server…………..94 AjaXplorer…………….95 Amazon.S3…………….96 My.Favorites…………….101 Re-arranging.the.My.Favorites.View……101 Add.an.Icon.to.My.Favorites……… 102 D-Link DNS-320 User Manual… -
Page 4: Product Overview
Section 1 — Product Overview Product Overview Introduction The.D-Link.ShareCenter™.Pulse.DNS-320.2-Bay.Network.Storage,.when.used.with.internal.SATA.drives ,.enables.you.to.share. documents,.files,.and.digital.media.such.as.music,.photos,.and.video.with.everyone.on.the.home.or.office.network..Remotely. accessing.files.through.the.Internet.is.also.possible.with.the.built-in.FTP.server,.Web.File.server.and.WebDAV.protocol..Whether. you.are.allowing.access.locally.or.over.the.Internet,.keep.data.safe.by.only.giving.rights.to.specific.users.or.groups..When. configuring.the.ShareCenter ,.you.can.create.users.and.groups.and.assign.them.to.folders.with.either.read.or.read/write. permissions..This. is.ideal.for.an.office. environment. with.employee-specific. sensitive. data.or. for. the.home.where. you.can. ensure.your.children.will.only.have.access.to.age.appropriate.material..The.ShareCenter .will.be.available.to.any.computer. (PC,.MAC,.or.Linux-based).on.your.network,.without.the.need.to.install.any.software.on.the.computer. Back.up.your.music,.photo,.and.video.collections.to.the.ShareCenter .for.safekeeping..Then,.enjoy.the.benefits.of.the.built-in. DLNA.Certified™.media.server.as.you.stream.digital.content.to.compatible.media.players .(such.as.the.D-Link’s.Boxee.Box).. This.feature.is.highly.convenient.as.it.allows.you.to.turn.off.a.computer.that.would.normally.be.needed.for.the.same.function. The.availability.of.four.different.hard.drive.modes.(Standard,.JBOD,.RAID.0,.RAID.1).allows.you.to.choose.the.configuration. best.suited.to.your.needs..Standard.mode.creates.two.separately.accessible.hard.drives..JBOD.combines.both.drives.in.linear. fashion.for.maximum.space.efficiency..RAID.0.combines.both.drives.in.a.‘striped’.configuration,.which.provides.the.highest. performance.when.using.a.Gigabit.Ethernet.connection..RAID.1.causes.the.drives.to.mirror.each.other,.providing.maximum. protection..If.one.drive.fails.while.configured.as.RAID.1,.the.unaffected.drive.continues.to.function.as.a.single.drive.until.the. failed.drive.is.replaced..The.new.drive.will.then.be.re-mirrored,.allowing.the.ShareCenter.Pulse.to.return.to.its.full.protection. 1..Hard.Drive(s).not.included. 2..D-Link.cannot.guarantee.full.compatibility.or.proper.playback.with.all.codecs..Playback.capability.depends.on.the.codec.support.of.the.UPnP™.AV.media.player. D-Link DNS-320 User Manual…
-
Page 5: Package.contents
•. CD-ROM.with.Manual.and.Software. •. Quick.Installation.Guide •. Power.Adapter •. Power.Cord •. CAT5.Ethernet.Cable Note:.Using.a.power.supply.with.a.different.voltage.than.the.one.included.with.the.D-Link.ShareCenter™.DNS-320.2-Bay.Network.Storage.will.cause. damage.and.void.the.warranty.for.this.product. If any of the above items are missing, please contact your reseller. System Requirements For.best.results,.the.following.minimum.requirements.are.recommended.on.any.system.used.to.configure.and.use.the.D-Link. ShareCenter .DNS-320.2-Bay.Network.Storage: •. Computer.with:.1GHz.processor./.512.MB.RAM./.200.MB.available.space./.CD-ROM.drive. •. Internet.Explorer.version.7,.Mozilla.Firefox.3.or.Apple.Safari.4.and.above •. Windows®.XP.(with.Service.Pack.2.or.higher),.Vista®.or.Windows®.7 •. 3.5”.SATA.Hard.Drive(s). D-Link DNS-320 User Manual…
-
Page 6: Features
Supports.Auto.Power.Recovery. •. Disk.Management. Supports.Scheduled.power.off Four.Hard.Drive.Configurations:.Standard,.JBOD.(Linear),.. •. Media.Streaming. RAID.0,.and.RAID.1 UPnP.AV.Server.for.streaming.music,.Photos,.and.videos.. Supports.Advanced.Format.HDD to.compatible.media. Supports.RAID.Migration:.Standard.to.RAID1 iTunes.software.will.be.able.to.automatically.find.and.. Supports.HDD.S.M.A.R.T.test play..music.directly.from.the.ShareCenter Supports.FAT16/32,.NTFS.for.USB.external.Storage •. System.Management •. Account.Management. Web.Browser.configuration. .Users.and.Groups.can.be.assigned.to.Folders.with.Read-.. Supports.HTTPS.Management.Function -or..Read/Write.Permissions. Network.Recycle.Bin Quotas.for.Users.and.Groups. Supports.Yahoo!.Widget Supports.ISO.mount.Shares. Supports.System.Logging/FTP.Logging Built-in.FTP.server.for.File.Access.over.the.Internet. Automatic.E-Mail.and.SMS.Notifications Supports.FTP.over.SSL/TLS.abd.FXP •. Download.Management Scheduled.downloads.from.Web.or.FTP.sites. Supports.P2P.and.aMule.downloads D-Link DNS-320 User Manual…
-
Page 7: Hardware.overview
Front Panel HDD(R).LED HDD(L).LED Power.LED USB.LED Power.Button USB.Copy/.Unmount.Button USB.Port Front..Latch COMPONENT DESCRIPTION These.lights.will.be.solid.BLUE.when.drives.are.connected.but.inactive.The.lights.will.blink.when.the.drives.are.being HDD(L)/HDD(R) accessed,.formatted.or.synchronized..They.will.illuminate.AMBER.if.a.drive.has.failed. USB LED This.light.will.illuminate.when.a.USB.device.is.inserted.into.the.USB.Port..When.there’s.traffic.this.light.will.blink. USB Port This.is.the.USB.Port..Devices.like.a.USB.Print.Server,.UPS.or.USB.drive.can.be.inserted.here. Front Latch This.latch.can.open.and.close.by.simply.pressing.it. Power LED This.light.will.illuminate.when.this.ShareCenter.Pulse.is.powered.on. Power Button Press.once.to.power.on.the.device..To.power.down,.press.and.hold.the.button.until.it.begins.to.blink. USB Copy / Press.1~3.seconds.to.copy.data.from.a.USB.drive.to.your.ShareCenter.Pulse..Press.and.hold.5.seconds.to Unmount Button unmount.a.USB.drive. D-Link DNS-320 User Manual…
-
Page 8: Rear.panel.(Connections)
Section 1 — Product Overview Rear Panel (Connections) Cover.Lock Cooling.Fan Gigabit.Ethernet.Port Reset.Button Cable.Hook Security.Lock Power.Receptacle COMPONENT DESCRIPTION Cover.Lock This.lock.is.used.to.remove.the.cover.when.unlocked..Locking.it.will.restrict.the.removal.of.the.top.cover. The.cooling.fan.is.used.to.cool.the.hard.drives.and.features.speed.control..When.the.unit.is.first.powered.on.the. Cooling.Fan fans.rotate.at.a.low.speed.and.rotate.at.a.high.speed.when.the.temperature.rises.above.49.°C. Reset.Button. Press.this.button.for.more.than.5.seconds.to.reset.the.unit.to.factory.defaults. Power.Receptacle. Connect.the.supplied.power.cord.to.the.receptacle. Use.the.Gigabit.Ethernet.Port.to.connect.the.device.to.the.local.network..The.port.is.equipped.with.both.a.LAN. Gigabit.Ethernet.Port LINK.(R).and.Traffic.LED.(L).to.indicate.connectivity.and.traffic.respectively.to.the.local.LAN Security.Lock This.lock.can.be.used.to.tie.the.ShareCenter.Pulse..to.the.desk.to.prevent.theft..Cables.are.sold.separately. D-Link DNS-320 User Manual…
-
Page 9: Getting Started
Section 2 — Getting Started Getting Started ShareCenter Pulse Software CD To.get.started.with.the.ShareCenter.Pulse.Setup.Wizard,.insert.the.supplied.CD.into.your.CD-ROM.drive: Click.the.START.button.to.start.the.ShareCenter. Pulse.Setup.Wizard. D-Link DNS-320 User Manual…
-
Page 10: Installation
Note: The computer used to access the ShareCenter Pulse web-based configuration manager must be on the same subnet as the ShareCenter Pulse. If your network is using a DHCP server, the ShareCenter Pulse will automatically be in the same subnet. D-Link DNS-320 User Manual…
-
Page 11: Install.the.hard.drives
Section 3 — Installation Install the Hard Drives This.step.shows.you.how.to.open.your.ShareCenter.Pulse.so.that.you.can.install.one.or. two.hard.drives..Click.Next.to.continue. Slide.either.one.or.two.hard.drives.into.the.open.hard.drive.bays.of.your.device..Click. Next.to.continue. D-Link DNS-320 User Manual…
-
Page 12
Section 3 — Installation Once.the.hard.drives.are.installed,.you.can.attach.the.top.cover..Click.Next.to.continue. A. standard. CAT5E. Ethernet. cable. with. a. RJ-45. connector. is. needed. to. connect. your. ShareCenter.Pulse.to.your.network..Click.Next.to.continue. D-Link DNS-320 User Manual… -
Page 13: Power.and.device.selection
With. the. power. on. check. that. the. Power. LED. is. solid.. If. it. is. solid,. answer. Yes. to. the. confirmation. window. otherwise. select. No. and. wait. for. the. power. connection. to. the. ShareCenter.Pulse..If.the.connection.is.good.then.check.that.the.hard.drives.are.installed. correctly.and.have.no.other.issues..Click.Next.to.continue. Note:.When.you.select.your.device.from.the.list,.it.will.cause.the.LEDs.to.blink.to.confirm. the.device.selection. D-Link DNS-320 User Manual…
-
Page 14: Admin.password
Section 3 — Installation Admin password This.window.requests.the.Admin.(administrator).password..If.this.is.the.first.installation. of.this.device.then.the.password.will.be.blank..Click.Next.to.continue. In.this.step.you.can.create.a.new.password.for.the.Admin.username..It.is.recommended. you.set.a.password.however.you.may.also.leave.the.fields.blank..Click.Next.to.continue. D-Link DNS-320 User Manual…
-
Page 15: Network.setup
Section 3 — Installation Network Setup You. may. use. either. Static. IP. or. DHCP. to. configure. the. IP. network. settings. of. the. ShareCenter.Pulse..If.you.select.Static.IP.then.input.the.IP.network.settings..Click.Next. to.continue. If.you.want.your.ShareCenter.Pulse.to.be.part.of.a.Windows.Workgroup.network,.enter. the.parameters.requested.or.leave.the.default.settings.that.appear.initially.in.the.window.. The.name.will.be.used.whenever.you.map.one.of.the.ShareCenter.Pulse.volumes.as.a. Network.Drive..Click.Next.to.continue. D-Link DNS-320 User Manual…
-
Page 16: Dynamic.dns
Section 3 — Installation Dynamic DNS Click.on.the.Yes.radio.button.if.you.already.have.a.DDNS.account.to.use.for.the.ShareCenter. Pulse.DDNS.settings..If.you.do.not.have.a.DDNS.account.or.do.not.want.to.use.one,.click. on.the.No.Radio.button..Click.Next.to.continue. If.you.clicked.Yes,.enter.the.DDNS.parameters.requested.in.this.window.so.that.your. ShareCenter.Pulse.can.be.accessed.by.a.URL.over.the.Internet..Click.Next.to.continue. D-Link DNS-320 User Manual…
-
Page 17: Ddns.account.and.system.time
DDNS Account and System Time If.you.want.a.DDNS.account.to.use.with.your.ShareCenter.Pulse,.D-Link.provides.a.free. DDNS.account.by.clicking.on.the.web.link.shown..You.will.need.to.do.the.following: •. Create.an.account.with.a.username.and.password. •. Create.a.hostname.that.the.DDNS.service.will.use.to.track.your.device.no. matter.what.the.Local.Network.WAN.settings.are.(i.e..public.IP.address). •. Configure.your.device.with.the.hostname.and.DDNS.service.provider. details. •. Configure.your.router.to.forward.port.80. Follow.the.steps.listed.here.in.order.to.create.a.DDNS.account.and.configure.your.LAN. equipment.and.ShareCenter.Pulse.to.work.with.the.new.settings. Configure. the. time,. date. and. time. zone. settings. here.. Select. the. time. zone. from. the. drop-down.menu..You.can.set.the.time.and.date.manually,.from.a.NTP.server.or.from. the.computer’s.settings.. D-Link DNS-320 User Manual…
-
Page 18: E-Mail.settings.and.volume.information
Section 3 — Installation E-mail Settings and Volume Information You.can.configure.messages.to.be.sent.alerting.you.to.certain.operational.conditions. and.drive.status.conditions.to.your.e-mail.account..These.alerts.can.prove.helpful.with. the.management.and.safeguarding.of.important.data. Enter.your.e-mail.information.and.settings.and.then.click.Next.to.continue..If.you.do.not. want.to.configure.your.e-mail.settings,.click.Skip.to.continue. This.step.is.informational.and.shows.any.currently.configured.Volumes.previously.setup. on.the.ShareCenter.Pulse..Click.Next.to.continue. D-Link DNS-320 User Manual…
-
Page 19: Raid.configuration.and.drive.mapping
Section 3 — Installation RAID Configuration and Drive Mapping Select.one.of.the.Volume.File.Systems.type..Clicking.on.each.file.system.type.radio.button. will.give.a.description.below.. For.more.information.concerning.the.different.RAID.Disk.Formats.please.refer.to.“What. is.RAID?”.on.page.104 Click.Next.to.continue. This.step.allows.you.to.map.the.volume(s).created.as.network.drive(s).on.your.computer.. Click.Next.to.continue. D-Link DNS-320 User Manual…
-
Page 20: Configuration.summary.and.drive.formatting
Section 3 — Installation Configuration Summary and Drive Formatting Review.your.volume.configuration.summary.details.here.before.clicking.next.and.starting. the.drive.format..If.necessary.use.the.PREV.button.to.go.back.and.reconfigure.the.RAID. configuration.of.the.volume(s)..When.you.click.NEXT.a.warning.message.will.appear.to. confirm.you.want.to.format.the.drives.as.all.the.data.on.the.drives.will.be.deleted..Click. on.the.No.button.if.you.are.unsure. During.the.hard.drive.formatting.the.wizard.displays.percentage.complete.bars. D-Link DNS-320 User Manual…
-
Page 21: Format.complete
Section 3 — Installation Format Complete The.wizard.will.show.this.window.if.the.hard.drive.format(s).are.successful..Click.Next. to.continue. D-Link DNS-320 User Manual…
-
Page 22
Section 3 — Installation The.final.window.of.the.installation.wizard.shows.successful.completion.. Your. device. is. now. installed. and. ready. for. use..Your. drives. are. network. mapped.from.using.the.wizard.so.you.will.be.able.to.access.them.under. you.My Computer.icon.. D-Link DNS-320 User Manual… -
Page 23: D-Link.storage.utility
Section 3 — Installation D-Link Storage Utility When.first.powered.on,.during.the.initial.boot.sequence,.the.device.will.wait.to.be.assigned.an.IP.address.via.DHCP..If.it.does. not.receive.a.DHCP.assigned.IP.address.the.Auto-IP.process.will.assign.a.169.254.xxx.xxx.address.to.the.device.If.you.want.to. change.the.IP.address.before.logging.in.or.are.unable.to.connect.to.the.ShareCenter.Pulse.IP.address,.you.can.use.the.Storage. Utility.provided.on.the.product.CD.to.locate.the.device.on.your.network.and.make.any.needed.changes. Network Storage The. D-Link. Storage. Utility. displays. any. ShareCenter. Pulse. devices. it. Device: detects.on.the.network. Refresh: Click.to.refresh.the.device.list. Configuration: Click. Configuration. to. access. the.Web-based. configuration. of. the. ShareCenter.Pulse. LAN: Configure.the.LAN.Settings.for.the.ShareCenter.Pulse.here. Apply: Click.Apply.to.save.and.activate.the.changes.to.the.LAN.Settings.
-
Page 24
IP. address. listed.for.the.device..Make.sure.the.browser.is.not.configured.to.use.a.proxy. server. Note:. The. computer. used. to. access. the. ShareCenter. Pulse. web-based. configuration. manager. must. be. on. the. same. subnet. as. the. ShareCenter. Pulse..If.your.network.is.using.a.DHCP.server.and.the.computer.receives.IP. settings.from.the.DHCP.server,.the.ShareCenter.Pulse.will.automatically.be.in. the.same.subnet. D-Link DNS-320 User Manual… -
Page 25: Configuration
Note: The computer, used to access the web-based configuration, manager must be on the same subnet as the ShareCenter.Pulse . If your network is using a DHCP server and the computer receives IP settings from DHCP, the ShareCenter.Pulse will automatically be in the same subnet. D-Link DNS-320 User Manual…
-
Page 26: Web.ui.general.layout
-.Contains.the: •. Setup Wizard -. Step-through. settings. for. accounts,. time. and. date,.and.connectivity. •. Disk Management -.Configures.the.Volume.Setup.and.perform. Disk.Diagnostics. •. Account Management -.Configures.the.Admin.Password,.Users,.Groups,.Quotas.and.Network.Share.Folders. •. Network Management — Configures.the.LAN.settings.and.Dynamic.DNS. •. Application Management.-.Configures.File.Sharing.protocols.and.Add-On.management. •. System Management — Configures.the.Time.and.Date,.Device,.System.Settings,.Power.Management,.Email.Alerts,.Logs,.and.Firmware.settings. These.icons.and.their.configuration.sub-menus.will.be.discussed.in.detail.in.the.following.pages.of.this.manual. Note:.After.logging.in.to.the.ShareCenter.Pulse.for.the.first.time.it.is.recommended.to.add.a.password.to.the.admin.account. D-Link DNS-320 User Manual…
-
Page 27: Management
Section 4 — Configuration Management This.tab.contains.the.Setup.Wizard,.Disk.Management,.Account.Management,.Network.Management,.Application.Management,. System.Management.and.Status.Icons..Click.each.of.the.icons.to.see.the.submenus… D-Link DNS-320 User Manual…
-
Page 28: Setup.wizard.(Web.ui)
Section 4 — Configuration Setup Wizard (Web UI) The.ShareCenter.Pulse.has.a.System.Wizard.that.allows.you.to.quickly.configure.some.of.the.basic.device.settings..Click.the. System Wizard.icon.to.start.the.Setup.Wizard. Click.the.Run Wizard.button.to.start.the.setup.wizard. Click.Next.to.continue. D-Link DNS-320 User Manual…
-
Page 29
Section 4 — Configuration It.is.recommended.you.set.an.admin.password.here..Enter. the.new.password.and.re-enter.it.for.confirmation..Click.Next. to.continue. Set.the.appropriate.Time.Zone.for.your.location..Click.Next. to.continue. D-Link DNS-320 User Manual… -
Page 30
Section 4 — Configuration Edit.or.change.the.LAN.settings..Selecting.DHCP Client.will. cause.the.device.to.obtain.an.IP.address.from.the.local.DHCP. server.such.as.a.router..Selecting.Static IP.requires.you.to. assign.the.IP.information.manually..Click.Next.to.continue. Enter.your.workgroup,.name.and.description,.or.leave.the. default.values.and.click.Next.to.continue. D-Link DNS-320 User Manual… -
Page 31
Section 4 — Configuration Select. Account. and. enter. your. e-mail. parameters. in. the. boxes. to. send. event. alerts. from. the. device.. Click. Next. to. continue. Click.Finish.to.save.your.settings.and.complete.the.wizard.. You.may.click.the.Previous.button.to.go.back.and.edit.your. settings.or.click.Exit.to.end.the.wizard.without.saving.the. settings… D-Link DNS-320 User Manual… -
Page 32: Disk.management
Configuration: then.set.the.Auto-Rebuild.function.here.using.the. radio.buttons.. Enable Auto-Rebuild: Enabling. Auto-Rebuild. will. rebuild. a. failed. RAID. 1. drive.when.a.new.drive.has.replaced.the.degraded. one. Disable Auto-Rebuild: If. you. do. not. want. to. automatically. rebuild. drives. after.a.failure.when.using.the.RAID.1.functionality. then.you.can.check.this.option.. Note:.You.can.still.rebuild.a.drive.using.the.RAID.1. functionality.however.you.must.initiate.the.rebuild. manually. Manual Rebuild Now: If.you.have.disabled.Auto-Rebuild.then.you.can.use. the.Manual.Rebuild.option.by.clicking.this.button. D-Link DNS-320 User Manual…
-
Page 33: Hard.drive.configuration.wizard
Section 4 — Configuration Hard Drive Configuration Wizard When.you.click.the.Set RAID type and Re-Format.button.in.the.Disk.Management-Hard.Drive.Configuration.menu,.a.wizard.will.launch..allowing. you.to.format.your.drives.and.create.the.RAID.format..The.following.is.an.example.of.a.RAID1.configuration: Initially.the.steps.of.the.configuration.process.are.shown..You.must.decide. on.the.RAID.type.you.would.like.to.format.your.HDDs.with..Click.the.Next. button.to.continue.or.click.Exit.to.cancel. This. screen. displays. the. currently. installed. HDD. information.. Any. data. on.the.installed.hard.drives.will.be.lost.by.the.formatting..Click.Next.to. continue. D-Link DNS-320 User Manual…
-
Page 34
Section 4 — Configuration Select.the.format.desired.by.clicking.on.the.RAID.type.box.to.highlight. it.in.blue..In.this.example.the.maximum.data.protection.option.of.RAID. 1.is.selected..Click.Next.to.continue. If.you.have.selected.RAID.1.then.the.wizard.will.display.this.step.to. enable.or.disable.Auto-Rebuild..Auto-Rebuild.will.automatically.rebuild. a.failed.disk.drive.if.it.has.been.replaced.with.a.new.one..Set.to.disabled. if.you.prefer.to.start.this.process.manually..Click.Next.to.continue. D-Link DNS-320 User Manual… -
Page 35
Section 4 — Configuration If.you.select.a.RAID.0.or.1.option.then.you.need.to.determine.the.size.of. the.RAID.volume..Any.extra.space.will.be.formatted.as.a..JBOD.volume.. . Click.Next.to.continue. Note:.If.you.select.Leaving the remaining disk space for future,.you. can.format.the.JBOD.partition.at.a.later.time. A.Volume.Configuration.Summary.is.displayed..Check.the.table.and. click.Next.to.format.the.drives..Otherwise.click.the.Previous.button. to.make.changes.to.your.configuration.or.click.Exit.to.end.the.wizard. D-Link DNS-320 User Manual… -
Page 36
Section 4 — Configuration During.the.formatting.process.a.progress.bar.is.displayed. When. the. formatting. is. completed. the. wizard. displays. the. finished. . Volume.Configuration.table..Click.Finish.to.end.the.wizard. D-Link DNS-320 User Manual… -
Page 37: S.m.a.r.t.test..you.will.be.able.to.schedule.a.test.on.a
10. minutes..This. test. will. check. the. electrical,. mechanical,.and.read.performance.of.the.hard.drive.. The.results.are.displayed.as.Passed/Failed.on.the.web. UI.and.can.also.be.sent.as.an.e-mail.alert… Extended Test: Runs.an.extended.S.M.A.R.T.test..This.test.requires.a.lot. more.time.to.complete..However,.it.is.a.more.thorough. and.complete.test.when.compared.to.the.Quick.Test. Send result by Enable.this.function.in.order.to.have.the.results.of.the. E-mail: S.M.A.R.T.test.sent.to.you.by.e-mail. Create Schedule: Click. on. this. button. in. order. to. create. a. scheduled. S.M.A.R.T.test..You.will.be.able.to.schedule.a.test.on.a. daily,.weekly,.and.monthly.basis. D-Link DNS-320 User Manual…
-
Page 38
Click. on. the. Create. button. to. add. a. schedule. Schedule List: In. the. window. all. the. created. schedule. lists. will. be. displayed. Note: When. performing. a. S.M.A.R.T.. test,. your. hard. drives. will. not. be. available.over.the.network.until.it.has.completed.testing. D-Link DNS-320 User Manual… -
Page 39: Scan.disk
Section 4 — Configuration Scan Disk Scan.disk.provides.a.method.to.test.the.disk’s.file.system.in.your.ShareCenter.Pulse. Scan Disk: Scan.Disk.will.scan.your.disks.file.system.for.errors. and/or.corruption..After.completion,.the.test.results. will.show.Success.or.Failure..Click.on.the.Scan Disk button.to.start.the.test..If.the.test.fails.you.can.try. reformatting. the. drive. and. test. again.. Otherwise. you.will.need.3rd.party.disk.troubleshooting.tools. Volume: Use.the.drop-down.menu.to.select.the.disk.volume. that.you.want.to.run.the.Scan Disk.test.on… Scan Disk Progress If.you.have.started.a.Scan.Disk.test.then.a.window. Window: with.a.progress.bar.will.appear.to.monitor.the.test.. Click.the.Exit.button.to.abort.the.test.if.required.or. once.the.test.has.run.100.percent. D-Link DNS-320 User Manual…
-
Page 40: Account.management
User Settings: Your.hard.drives.can.be.configured.and.formatted.in.various. RAID.configurations.here. New: Click. this. button. to. launch. a. wizard. that. will. walk. you. through.adding.a.new.user.configuration. Modify: Click.on.an.existing.user.in.the.table.so.that.it.is.highlighted. in. red. and. then. click. the. Modify. button. to. change. the. configuration.of.an.existing.user. Delete: Click.on.an.existing.user.in.the.table.so.that.it.is.highlighted. in.red.and.then.click.the.Delete.button.to.remove.a.user. from.the.configuration. D-Link DNS-320 User Manual…
-
Page 41: Adding.new.users.wizard
Adding New Users Wizard The.following.section.will.describe.how.to.add.a.new.user.on.this.device..To.add.a.user.click.on.the.New.button..A.easy.to.configure.wizard.will.be. launched.and.look.like.the.following: This. window. welcomes. the. user. to. the. setup. wizard. for. adding. or. modifying.a.user..This.wizard.will.guide.the.user.through.the.steps.of.setup. In.this.wizard.the.user.will.be.able.to: 1).Create.a.new.user.account. 2).Join.a.group. 3).Configure.the.appropriate.network.shares.settings. 4).Configure.the.user.quota. 5).View.a.summary.of.the.configuration.before.completing.the.addition. Click.on.the.Next.button.to.continue. Click.on.the.Exit.button.to.discard.the.changes.made.and.return.to.the. User/Group.window. Step 1: Here.you.can.enter.the.User.Name.and.Password.for.the.new.user. account..The.password.needs.to.be.confirmed.by.re-entering.the. password.in.the.Confirm.Password.field. Click.on.the.Previous.button.to.return.to.the.previous.window. Click.on.the.Next.button.to.accept.the.change.and.continue.to. the.next.window. Click.on.the.Exit.button.to.discard.the.changes.made.and.return. to.the.User/Group.window. D-Link DNS-320 User Manual…
-
Page 42
Click.on.the.Previous.button.to.return.to.the.previous.window. Click.on.the.Next.button.to.accept.the.change.and.continue. to.the.next.window. Click. on. the. Exit. button. to. discard. the. changes. made. and. return.to.the.User/Group.window. Step Here.the.user.can.configure.the.appropriate.Network.Access. settings.for.the.user.by.simply.selecting.one.of.the.following. options:.Read Only,.Read/Write.or.Deny Access. Click.on.the.Previous.button.to.return.to.the.previous.window. Click.on.the.Next.button.to.accept.the.change.and.continue. to.the.next.window. Click. on. the. Exit. button. to. discard. the. changes. made. and. return.to.the.User/Group.window. D-Link DNS-320 User Manual… -
Page 43
Section 4 — Configuration Step 3-1: Here.the.user.can.configure.the.application.privileges.assigned. to.this.user..Select.either.FTP.or.WebDAV..CIFs.and.AFP.is.set.as. default. • CIFS.is.short.for.Common.Internet.File.System. • AFP.is.short.for.Apple.Filing.Protocol. • FTP.is.short.for.File.Transfer.Protocol. • WebDAV.is.short.for.Web-based.Distribution,.Authoring,.and. Versioning. Click.on.the.Previous.button.to.return.to.the.previous.window. Click.on.the.Next.button.to.accept.the.change.and.continue.to. the.next.window. Click.on.the.Exit.button.to.discard.the.changes.made.and.return. to.the.User/Group.window. Step 3-1-1: Here.the.user.can.configure.the.WebDAV.settings.for.the.user. account..Select.the.volumes.the.user.can.have.WebDAV.access.to. and.then.select.whether.to.give.Read Only.or.Read/Write access. Click.on.the.Previous.button.to.return.to.the.previous.window. Click.on.the.Next.button.to.accept.the.change.and.continue.to. the.next.window. Click.on.the.Exit.button.to.discard.the.changes.made.and.return. to.the.User/Group.window. D-Link DNS-320 User Manual… -
Page 44
Section 4 — Configuration Step 4: Here.you.can.configure.the.Quotas.settings.for.the.user.account..Enter. the.quota.amount.in.the.block(s).indicated.in.Megabytes..By.entering. 0Mb.the.quota.will.be.set.to.unlimited. Click.on.the.Previous.button.to.return.to.the.previous.window. Click.on.the.Next.button.to.accept.the.change.and.continue.to.the.next. window. Click.on.the.Exit.button.to.discard.the.changes.made.and.return.to.the. User/Group.window. Step 5: Here.you.can.confirm.to.create.the.new.account. Click.on.the.Previous.button.to.return.to.the.previous.window. Click.on.the.Finish.button.to.accept.the.change.and.complete.the.wizard. Click.on.the.Exit.button.to.discard.the.changes.made.and.return.to.the. User/Group.window. After.the.new.account.has.been.created,.a.window.will.appear.that.states. the.account.was.created.successfully..Click.on.the.OK.button.to.continue. Step 6: A.final.message.appears.indicating.the.user.is.successfully.added.to.the. ShareCenter.Pulse.configuration.. D-Link DNS-320 User Manual… -
Page 45: Adding.new.groups.wizard
Adding New Groups Wizard The.following.section.will.describe.how.to.add.a.new.group.on.this.device..To.add.a.group.click.on.the.New.button..A.wizard.will.be.launched: This. window. welcomes. the. user. to. the. setup. wizard. for. adding. or. modifying.a.group..This.wizard.will.guide.the.user.through.the.steps.of. setup. In.this.wizard.the.user.will.be.able.to: 1).Create.a.new.group. 2).Add.a.user.to.a.group. 3).Configure.the.appropriate.network.shares.settings. 4).Configure.the.quota.settings. 5)..View.a.summary.of.the.configuration.before.completing.the.addition. Click.on.the.Next.button.to.continue. Click.on.the.Exit.button.to.discard.the.changes.made.and.return.to.the. User/Group.window. Step 1: Enter.the.name.for.your.new.group. Click.on.the.Previous.button.to.return.to.the.previous.window. Click.on.the.Next.button.to.accept.the.change.and.continue.to. the.next.window. Click.on.the.Exit.button.to.discard.the.changes.made.and.return. to.the.User/Group.window. D-Link DNS-320 User Manual…
-
Page 46
Click. on. the. Exit. button. to. discard. the. changes. made. and. return.to.the.User/Group.window. Step 3: Assign.the.appropriate.Network.Access.settings.for.this.group. by.simply.clicking.one.of.the.following.options:.Read Only,. Read Write.or.Deny Access. Click.on.the.Previous.button.to.return.to.the.previous.window. Click.on.the.Next.button.to.accept.the.change.and.continue. to.the.next.window. Click. on. the. Exit. button. to. discard. the. changes. made. and. return.to.the.User/Group.window. D-Link DNS-320 User Manual… -
Page 47
Click.on.the.Previous.button.to.return.to.the.previous.window. Click.on.the.Next.button.to.accept.the.change.and.continue. to.the.next.window. Click. on. the. Exit. button. to. discard. the. changes. made. and. return.to.the.User/Group.window. Step 4: Configure.the.Quotas.settings.for.this.group..Enter.the.quota. amount.in.the.block.indicated.in.Megabytes..By.entering.0Mb. the.quota.will.be.set.to.unlimited. Click.on.the.Previous.button.to.return.to.the.previous.window. Click.on.the.Next.button.to.accept.the.change.and.continue. to.the.next.window. Click. on. the. Exit. button. to. discard. the. changes. made. and. return.to.the.User/Group.window. D-Link DNS-320 User Manual… -
Page 48
Section 4 — Configuration Step 5: Verify.the.settings.and.click.Finish. Click.on.the.Previous.button.to.return.to.the.previous.window. Click.on.the.Finish.button.to.accept.the.change.and.completed. the.wizard. Click. on. the. Exit. button. to. discard. the. changes. made. and. return.to.the.User/Group.window. After.the.new.group.has.been.created,.a.window.will.appear. that.states.the.group.was.created.successfully..Click.on.the. OK.button.to.continue. Success: A. final. message. appears. indicating. the. group. was. created. successfully.and.added.to.the.ShareCenter.Pulse.configuration. D-Link DNS-320 User Manual… -
Page 49: Quotas
Section 4 — Configuration Quotas The.ShareCenter.Pulse.supports.storage.quotas.for.both.groups.and.individual.users..Assigning.a.quota.to.a.group.or.user.will.limit.the.amount.of. storage.they.are.allocated..By.default,.users.and.groups.do.not.have.a.quota. Click.the.Enabled.button.to.enforce.the.quotas.that. are. set. in. the. Users. /. Groups. management. or. the. tables.below. In.the.User.Quota.Settings.table.you.can.view.the. current.user.usage.and.limit.setting..Click.on.the.blue. font.to.set.usage.limits. In.the.Group.Quota.Settings.table.you.can.view.the. current.group.usage.and.limit.setting..Click.on.the. blue.font.to.set.the.limit. D-Link DNS-320 User Manual…
-
Page 50: Network.shares
To. add. a. rule. click. on. the. New. button..To. modify. an. existing.rule.click.on.the.Modify.button..To.remove.a. rule.click.on.the.Delete.button. To.select.a.rule,.simply.click.on.the.rule.and.the.entry. should.change.to.red. At.the.bottom.of.the.table.the.user.can.navigate.through. pages. and. also. refresh. the. window. by. click. on. the. Refresh.button. If.at.any.point.the.user.wants.to.reset.the.network.access. list. to. the. default. configuration,. click. on. the. Reset Network Shares.button. D-Link DNS-320 User Manual…
-
Page 51: Adding.new.network.shares.wizard
Adding New Network Shares Wizard The.following.section.will.describe.how.to.add.a.new.Network.Share.on.the.ShareCenter.Pulse..To.add.a.Network.Share..click.on.the.Add.button.. A.easy.to.configure.wizard.will.be.launched.and.look.like.the.following: Start: This.window.welcomes.the.user.to.the.setup.wizard.for.adding.or. modifying.a.network.share.. In.this.wizard.the.user.will.be.able.to: 1).Select.share.folders. 2).Configure.shared.folder.access.rights. 3).Configure.network.access.settings. 4).View.a.summary.of.the.configuration.before.completing. Click.on.the.Next.button.to.continue. Click.on.the.Exit.button.to.discard.the.changes.made.and.return. to.the.Network.Shares.Page. Step 1: Select. the. folder. you. want. to. include. in. this. network. share. by. checking.the.box. Click.on.the.Previous.button.to.return.to.the.previous.window. Click.on.the.Next.button.to.accept.the.change.and.continue.to. the.next.window. Click.on.the.Exit.button.to.discard.the.changes.made.and.return. to.the.Network.Shares.Page. D-Link DNS-320 User Manual…
-
Page 52
Select. All Account. to. allow. all. accounts. access. to. this. folder..Select.Specific User/Group.to.only.allow.certain.users.or. groups.access.to.this.folder. Click.on.the.Previous.button.to.return.to.the.previous.window. Click.on.the.Next.button.to.accept.the.change.and.continue.to.the. next.window. Click.on.the.Exit.button.to.discard.the.changes.made.and.return.to. the.Network.Shares.Page. Select. the. appropriate. access. rights. for. the. share.. Options. to. Step 2-1: choose.from.are.Read Only,.Read Write.and.Deny Access..This. procedure.can.also.be.used.to.block.certain.users.from.accessing. certain.folders. Click.on.the.Previous.button.to.return.to.the.previous.window. Click.on.the.Next.button.to.accept.the.change.and.continue.to. the.next.window. Click.on.the.Exit.button.to.discard.the.changes.made.and.return. to.the.Network.Shares.Page. D-Link DNS-320 User Manual… -
Page 53
Section 4 — Configuration Step 2-2: If.you.select.Specific User/Group.in.Step.2,.then.this.step.allows. you.to.set.the.access.rights.for.each.User.configured.on.the.device. Click.on.the.Previous.button.to.return.to.the.previous.window.. Click.on.the.Next.button.to.accept.the.change.and.continue.to. the.next.window. Click.on.the.Exit.button.to.discard.the.changes.made.and.return. to.the.Network.Shares.Page. Step 2-2-1: If.you.select.Specific User/Group.in.Step.2.then.this.step.allows. you. to. set. the. access. rights. for. each. Group. configured. on. the. device. Click.on.the.Previous.button.to.return.to.the.previous.window.. Click.on.the.Next.button.to.accept.the.change.and.continue.to. the.next.window. Click.on.the.Exit.button.to.discard.the.changes.made.and.return. to.the.Network.Shares.Page. D-Link DNS-320 User Manual… -
Page 54
However.it.is.recommended.to.set.the.share.oplocks.to.No.(off ). when.using.file-based.database.applications..When.enabled,.the. file.attribute. “ Map.Archive”.will.be.copied.as.the.file.is.being.stored. on.the.device. Click.on.the.Previous.button.to.return.to.the.previous.window. Click.on.the.Next.button.to.accept.the.change.and.continue.to. the.next.window. .Click.on.the.Exit.button.to.discard.the.changes.made.and.return. to.the.Network.Shares.Page. Step 3-1: Assign.protocol.privileges.that.a.user.can.use.to.access.this.share.. Options.to.choose.from.are.FTP,.NFS.and.WebDAV..CIFS.and.AFP. are.set.as.default. • CIFS.is.short.for.Common.Internet.File.System.. • AFP.is.short.for.Apple.Filing.Protocol.. • FTP*.is.short.for.File.Transfer.Protocol. • NFS.is.short.for.Network.File.System.. • WebDAV*.is.short.for.Web-based.Distributed.Authoring.and. Versioning. Click.on.the.Previous.button.to.return.to.the.previous.window. Click.on.the.Next.button.to.accept.the.change.and.continue.to. the.next.window. Click.on.the.Exit.button.to.discard.the.changes.made.and.return. to.the.Network.Shares.Page. D-Link DNS-320 User Manual… -
Page 55
Select.the.FTP.settings.for.this.share..FTP.access.can.be: 1).FTP.Anonymous.None.(No.Access). 2).FTP.Anonymous.Read.Only.(Limited.Access). 3).FTP.Anonymous.Read/Write.(Full.Access). Click.on.the.Previous.button.to.return.to.the.previous.window. Click.on.the.Next.button.to.accept.the.change.and.continue.to. the.next.window. Click.on.the.Exit.button.to.discard.the.changes.made.and.return. to.the.Network.Shares.Page. Step 3-1-2: If.you.selected.NFS.as.an.access.method.to.your.network.share. then.set.the.parameters.below: • Host. -. Allowable. host. address. that. can. access. using. NFS (*.indicates.all.hosts). • Root Squash.-.Disables.writing.to.the.Root.owned.directories. and.files.on.the.system.when.the.user.has.root.access.privileges. • Write.-.provide.write.permission.to.the.file.system. Click.on.the.Previous.button.to.return.to.the.previous.window. Click.on.the.Next.button.to.accept.the.change.and.continue.to. the.next.window. Click.on.the.Exit.button.to.discard.the.changes.made.and.return. to.the.Network.Shares.Page. D-Link DNS-320 User Manual… -
Page 56
Section 4 — Configuration Step 3-1-3: If.you.selected.WebDAV.as.an.access.method.in.Step.3.then.this. step.allows.you.to.set.the.access.parameters. Click.on.the.Previous.button.to.return.to.the.previous.window. Click.on.the.Next.button.to.accept.the.change.and.continue.to. the.next.window. Click.on.the.Exit.button.to.discard.the.changes.made.and.return. to.the.Network.Shares.Page. Step 4: Click.Finish.to.save.your.settings. Click.on.the.Previous.button.to.return.to.the.previous.window. Click.on.the.Finish.button.to.accept.the.change.and.complete. the.wizard. Click.on.the.Exit.button.to.discard.the.changes.made.and.return. to.the.Network.Shares.Page. *Note:.If.you.are.going.to.use.FTP.or.WebDav.from.this. NAS.through.the.internet,.make.sure.the.ShareCenter is.connected.to.a.router,.you.will.also.need.to.configure. the.router.to.forward.port.20~21.for.FTP,.and.port.80.for. WebDAV.IP.address.of.this.ShareCenter D-Link DNS-320 User Manual… -
Page 57: Adding.new.iso.mount.shares.wizard
Section 4 — Configuration Adding New ISO Mount Shares Wizard The.following.section.will.describe.how.to.add.a.new.ISO.mount.on.the.ShareCenter.Pulse..To.add.a.ISO.Mount.click.on.the.New.button..A.easy.to. configure.wizard.will.be.launched.and.look.like.the.following: In.Account.Management,.under.Network.Shares,. the.section.ISO.Mount.Shares.Settings.allows.the. user.to.add.new.ISO.mounts. D-Link DNS-320 User Manual…
-
Page 58
Section 4 — Configuration Setup: This.window.welcomes.the.user.to.the.setup.wizard.for.creating.a new.ISO.mounted.share..This.wizard.will.guide.the.user.through the.steps.of.setup. In.this.wizard.the.user.will.be.able.to: 1).Select.an.ISO.file. 2).Share.folder.access.rights. 3).Configure.network.access.settings. 4).View.a.summary.of.the.configuration.before.completing. Click.on.the.‘Next’.button.to.continue. Click.on.the.‘Exit’.button.to.discard.the.changes.made.and.return to.the.Network.Shares.Page. Step 1: Click.on.the.Previous.button.to.return.to.the.previous.window.. Click.on.the.Next.button.to.accept.the.change.and.continue.to. the.next.window. Click.on.the.Exit.button.to.discard.the.changes.made.and.return. to.the.Network.Shares.Page. D-Link DNS-320 User Manual… -
Page 59
Section 4 — Configuration Step 2: Assign.access.privileges.to.this.ISO.Mount.share.. •. Select.All.Accounts.to.assign.the.ISO.Mount.share.read/deny. privileges.to.all.users.. •. Select. Specific. User/Group. in. order. to. assign. read/deny. privileges.to.individual.users.and.groups. Click.on.the.Previous.button.to.return.to.the.previous.window.. Click.on.the.Next.button.to.accept.the.change.and.continue.to. the.next.window. Click.on.the.Exit.button.to.discard.the.changes.made.and.return. to.the.Network.Shares.Page. Step 2-1: You.can.assign.Read Only.or.Deny Access.privileges.to.the.ISO. Mount.share.here..Click.on.the.appropriate.radio.button.for.the. privileges.you.would.like.to.assign. Click.on.the.Previous.button.to.return.to.the.previous.window. Click.on.the.Next.button.to.accept.the.change.and.continue.to. the.next.window. Click.on.the.Exit.button.to.discard.the.changes.made.and.return. to.the.Network.Shares.Page. D-Link DNS-320 User Manual… -
Page 60
Section 4 — Configuration Step 3: You.may.add.a.comment.that.describes.the.ISO.Mount.Share. Click.on.the.Previous.button.to.return.to.the.previous.window. Click.on.the.Next.button.to.accept.the.change.and.continue.to. the.next.window. Click.on.the.Exit.button.to.discard.the.changes.made.and.return. to.the.Network.Shares.Page. Step 3-1: Assign.protocol.privileges.that.a.user.can.use.to.access.this.share..Options.to.choose.from.are.FTP,.NFS.and.WebDAV..CIFS.and.AFP. are.set.as.default. • CIFS.is.short.for.Common.Internet.File.System.. • AFP.is.short.for.Apple.Filing.Protocol.. • FTP.is.short.for.File.Transfer.Protocol. • NFS.is.short.for.Network.File.System.. • WebDAV.is.short.for.Web-based.Distributed.Authoring.and. Versioning. Click.on.the.Previous.button.to.return.to.the.previous.window. Click.on.the.Next.button.to.accept.the.change.and.continue.to. the.next.window. Click.on.the.Exit.button.to.discard.the.changes.made.and.return. to.the.Network.Shares.Page. D-Link DNS-320 User Manual… -
Page 61
Section 4 — Configuration Step 4: Click.Finish.to.save.your.settings. Click.on.the.Previous.button.to.return.to.the.previous.window. Click.on.the.Finish.button.to.accept.the.change.and.complete. the.wizard. Click.on.the.Exit.button.to.discard.the.changes.made.and.return. to.the.Network.Shares.Page. Step 5: Using.the.D-Link.Storage.Utility.the.ISO.Mount.Share.can.now.be. mapped.to.your.computer.so.that.you.can.access.it. D-Link DNS-320 User Manual… -
Page 62: Admin.password
Section 4 — Configuration Admin Password Username: The. administrator.user. name. is. admin,. and. this. cannot.be.changed. Password: Enter.the.current.password..(Leave.this.blank.if.you. have.not.set.a.password.yet.) New Password: Enter.a.new.password. Confirm Password: Enter.the.new.password.again.for.confirmation. D-Link DNS-320 User Manual…
-
Page 63: Network.management
Section 4 — Configuration Network Management LAN Setup The.LAN.Settings.allows.you.to.enable.LLTD.and.to.configure.the.Link.Speed.and.the.IP.address.as.a.DHCP.client.or.Static.IP. IP Settings DHCP Client: Selecting.DHCP.Client.will.cause.the.DNS-320.to.obtain.an.IP.address. from.the.local.DHCP.server. Static IP: Selecting.Static.IP.requires.you.to.assign.the.IP.information.for.the. DNS-320.manually.. IP Address: Enter.an.IP.address.for.your.device..The.IP.address.of.each.device. on.the.local.area.network.must.be.within.the.same.IP.address.range. and.subnet.mask.. Subnet Mask: Enter.the.Subnet.Mask..The.default.subnet.mask.is.255.255.255.0. Gateway IP Enter.the.Gateway.IP.Address.for.the.device..The.Gateway.IP.Address. Address: is.almost.always.the.LAN.address.of.your.router..Most.D-Link.routers. have.a.default.LAN.IP.address.of.192.168.0.1. DNS1/ DNS2: Specify.the.first.and.second.DNS.Addresses.for.the.device..The.first. DNS.address.is.usually.the.LAN.address.of.your.router..A.DNS.Address. will.allow.the.device.to.resolve.names.into.IP.addresses..Click.Save Settings.when.finished D-Link DNS-320 User Manual…
-
Page 64: Link Speed And Lltd Settings
Section 4 — Configuration Link Speed and LLTD Settings Speed: Displays.the.current.Ethernet.bit.rate.in.Megabits.per. second.. Link Speed: Select. either. Auto. (Auto-Negotiate),. 100. Mbps,. or. 1000.Mbps.by.clicking.the.appropriate.radio.button.. Then.click.the.Save Settings.button.to.save.the.new. settings. LLTD: The. device. supports. LLTD. (Link. Layer. Topology. Discovery).and.is.used.by.the.Network.Map.application. that.is.included.in.Windows.Vista®.and.Windows®.7. Select.to.enable.or.disable.LLTD. D-Link DNS-320 User Manual…
-
Page 65: Dynamic.dns
Select. a. DDNS. Server. from. the. combo. box. on.the.right.hand-side,.or.type.in.the.server. address.manually. Host Name: Enter.your.DDNS.host.name. Username or Key: Enter.your.DDNS.username.or.key. Password or Key: Enter.your.DDNS.password.or.key. Verify Password or Re-enter.your.password.or.key. Key: Status: Displays.your.DDNS.status. When.the.user.clicks.on.the.“Sign.up.for.D-Link’s.Free.DDNS.service.at. www.DLinkDDNS.com”.link,.the.user.will.be.re-directed.to.the.D-Link. DDNS.page.. Here.the.user.can.create.or.modify.a.D-Link.DDNS.account.to.use.in. this.configuration. Note:.If.you.are.going.to.use.DDNS.from.this.NAS.make.the. ShareCenter .is.connected.to.a.router,.you.will.also.need.to.configure. the.router.to.forward.port.80.to.the.IP.address.of.this.ShareCenter D-Link DNS-320 User Manual…
-
Page 66: Application.management
Western. European. code. page. when. transferring. files.. Language: Support.has.been.added.for.non.standard.FTP.clients.that. are.capable.of.supporting.these.character.sets. Flow Control: Allow.you.to.limit.the.amount.of.bandwidth.available.for. each.user. SSL/TLS: Here.the.user.can.enable.the.SSL/TLS.connection.only. FXP: Enable.or.Disable.File.eXhange.Protocol.to.transfer.files. from.one.FTP.server.to.another. Note:. In. order. to. use. FXP. (File. Exchange. Protocol). for. server-to-server. data. transfer,. make. sure. to. change. the. port.from.21.to.some.other.port.as.listed.in.the.Port.section. of.the.Web.UI..Also,.make.sure.to.open.the.corresponding. port.on.your.router.and.forward.that.port.from.your.router. to.the.device. D-Link DNS-320 User Manual…
-
Page 67: Upnp.av.server
Click.the.Refresh All.button.to.update.all.the.shared.files.and.folder.lists. UPnP AV Server: Select.Enable.or.Disable. After. enabling. the. UPnP. AV. Server. option,. the. following.window.will.appear. In.the.window.you.will.be.able.to.add,.delete.and.view. existing.UPnP.AV.Server.shared.folders. Add, Delete: To.add. a.new. folder. to. the. shared. list,. click. on.the. Add.button..To.delete.an.existing.folder,.click.on.the. Delete.button..To.refresh.the.list,.click.on.the.Refresh. button. Refresh All: Click.the.Refresh All button.after.adding.new.files.to. be.used.by.UPnP.AV.compatible.devices. D-Link DNS-320 User Manual…
-
Page 68: Itunes.server
If.the.server.is.enabled,.the.device.will.be.automatically.detected.by.the.iTunes.program.and.the.music.and.videos.contained.in.the.specified. directory.will.be.available.to.stream.over.the.network..Click.the Refresh All button.to.update.all.the.shared.files.and.folder.lists. iTunes Server: Select.to.enable.or.disable.the.iTunes.Server. Folder: Specifies.the.folder.or.directory.that.will.be.shared. by.the.iTunes.server..Select.root.to.share.all.files. on.all.volumes,.or.click.Browse.to.select.a.specific. folders. Password: Sets.password.for.the.iTunes.server..(Optional) MP3 Tag Here. the. user. can. select. the. MP3.Tag. Codepage. Codepage: used.by.this.device..Currently.the.Codepage.is.set. to.Western.European. Auto Refresh: Here.the.user.can.select.the.Automatically.Refresh. time. After.enabling.the.iTunes.server.on.the.device,.launch.iTunes..In.your.iTunes.utility,.select.the.device..and.enter.the.iTunes.server.password.if.required. Media.stored.on.the.device..will.then.be.available.for.use.in.iTunes. Select.the.device.When.prompted,.enter.in.the.iTunes.server. password..Click.OK. D-Link DNS-320 User Manual…
-
Page 69: Afp.service
Section 4 — Configuration AFP Service The.ShareCenter.Pulse.supports.Apple.Filing.Service.for.connectivity.with.MAC.OS.based.computers..If.you.need.to.use.AFP.service.enable.it.here. otherwise.leave.it.disabled.to.reduce.CPU.resource.overhead. AFP Service: Select. enable. to. allow. MAC. OS. based. systems. connect.to.your.device.using.AFP.protocol..Select. disable. to. prevent. unnecessary. CPU. resource. depletion.when.AFP.is.not.being.used. Save Settings: Click.to.save.your.AFP.settings. Note:.Enabling.AFP.service.will.disable.oplocks. D-Link DNS-320 User Manual…
-
Page 70: Nfs.service
Section 4 — Configuration NFS Service The.device.supports.Network.File.System.(NFS).service..To.enable.this.multi-platform.file.system.on.your.device.enable.it.here..Otherwise.disable. the.option.to.prevent.unnecessary.CPU.overhead. NFS Service: Select.Enable.to.allow.systems.that.support.NFS.to. connect. to. your. device. using. NFS. protocol.. Select. Disable. to. prevent. unnecessary. CPU. resource. depletion.when.NFS.is.not.being.used. Save Settings: Click.to.save.your.NFS.settings. Note:.Applying.NFS.service.to.any.Share.will.disable.oplocks. D-Link DNS-320 User Manual…
-
Page 71: System.management
Section 4 — Configuration System Management Language This.menu.item.allows.you.to.install.language.packages.onto.your.system..In.addition,.you.can.also.install.language.packages.to.suit.your.local. language.needs. Languages: Click.on.Browse.to.search.for.the.specific.language. pack.you.want.to.install..After.selecting.the.language. pack,.then.click.Apply.to.install.the.language.pack. Language In.the.languages.window.you.will.see.a.table.where. Pack List: the. loaded. language. packs. will. be. displayed. and. can. be. enabled. at. will. by. simply. clicking. the. (>). “play”.button..More.than.one.language.pack.can.be. installed,.but.only.one.language.pack.can.be.used. at.a.time. D-Link DNS-320 User Manual…
-
Page 72: Time.and.date
Click. Save Settings. to. apply. these. settings..To. synchronize. the. device. clock. with. your. computer,. click.the.Set time from my computer.button. Time Zone: Select. your. time. zone. from. the. drop-down. menu.. Click.Save Settings.after.selecting.your.time.zone NTP Server: Network.Time.Protocol.(NTP).synchronizes.the.device. with.an.Internet.time.server.. D-Link.provides.two.time.servers.for.your.convenience.. Select.the.one.closest.to.your.location. Click.Save Settings.to.accept.these.changes. D-Link DNS-320 User Manual…
-
Page 73: Device
Section 4 — Configuration Device The.device.settings.page.allows.you.to.assign.a.workgroup,.name.and.description.to.the.device..You.can.access.this.device.by.typing.the.host.name. in.the.URL.section.of.your.web.browser..For.example:.http://dlink-d10001. Workgroup: Enter. your.Workgroup. name. here..The. workgroup. name.should.be.the.same.as.the.computers.on.the. network..Devices.using.the.same.workgroup.will.have. additional.file.sharing.methods.available. Name: Enter.your.device.name.here..This.name.is.what.the. device.will.appear.as.on.the.network..By.default,.the. device.name.is.dlink-xxxxxx,.where.xxxxxx.is.the.last. six.digits.of.the.MAC.address. Description: Assign.a.device.description.to.the.device. Click.Save Settings.to.accept.these.changes. D-Link DNS-320 User Manual…
-
Page 74: System.settings
Section 4 — Configuration System Settings Restart: Clicking.to.reboot.the.device. Default: Click. to. restore. the. device. back. to. the. factory. default.settings..All.previous.settings.that.have.been. configured.will.be.erased. Shutdown: Click.to.turn.off.the.device. D-Link DNS-320 User Manual…
-
Page 75
Idle Time: Enter. the. time. (in. minutes). that. the. administrator. and. users. will. be. allowed. to. remain.idle.while.accessing.the.web.UI. System Temperature Here. the. user. can. configure. the. system. Threshold: temperature.threshold.value..This.value.can. be.set.in.Fahrenheit.or.Celsius..The.device.will. automatically.shutdown.when.it.reaches.the. temperature.set.here. D-Link DNS-320 User Manual… -
Page 76: Power.management
Section 4 — Configuration Power Management The.device.Power.Management.feature.allows.you.to.configure.the.drives.to.shut.down.while.power.remains.constant.to.the.device..The.drives. will.power.up.again.when.data.is.accessed. HDD Hibernation: Click.Enable.or.Disable. Turn Off Hard Drive: Set.the.amount.of.idle.time.before.the.drives. go.into.hibernation. Power Recover: Click.Enable.or.Disable..The.Power.Recovery. feature.will.automatically.restart.your.device. from.a.previously.unexpected.shutdown.due. to.a.power.failure. D-Link DNS-320 User Manual…
-
Page 77
Fan Control: The. speed. of. the. fan. can. be. controlled. from. this. section. If.you.select.Auto.mode,.the.speed.of.the.fan.will. change. (Off/Low/High). depending. on. the. internal. temperature.of.the.enclosure.. Power Off Click.Enable.to.turn.on.this.function.. Scheduling: Enable.or.disable.the.power.off.days.using.the.check. box. and. configure. the. time. for. each. day. that. the. power.off.will.occur. D-Link DNS-320 User Manual… -
Page 78: Notifications
Enter. the. IP. address. or. domain. name. of. your. outgoing.mail.server..If.you.are.unsure.of.this. value,.contact.your.e-mail.provider. Sender E-mail: Enter. the.“from”. e-mail. address. (e.g.. alerts@ share.com)..This. field. does. not. require. a. valid. e-mail.address..However,.if.your.e-mail.client.is. filtering.spam,.make.sure.you.allow.this.address. to.be.received. Receiver E-mail: Enter.the.e-mail.address.you.want.to.send.the. alerts.to..This.address.must.correspond.with.the. SMTP.server.configured.above. SMTP Click.this.option.to.use.SMTP.authentication. Authentication: Click.the.Test E-Mail.button.to.send.a.test.alert. Test E-Mail: and.confirm.your.settings.are.correct. D-Link DNS-320 User Manual…
-
Page 79: Sms Settings
Automatically. populated. from. the. Add. button. function. Phone Number 2: Enter. a. second. mobile. telephone. number.. Verify.that.the.number.input.is.according.to.the. configuration. instructions. from. your. Mobile. Service.Provider. Test SMS button: Click.this.button.to.send.a.test.message.to.your. mobile. phone. to. verify. the. settings. are. correct. and.the.API.URL.is.functioning.with.your.provider. D-Link DNS-320 User Manual…
-
Page 80: Adding An Sms Service Provider
Section 4 — Configuration Adding an SMS Service Provider Once.you.have.a.SMS.Service.provide.you.with.a.HTTP.API.URL,.enter.it.into.the.Add.SMS.Service.Provider.wizard..Enter.the.URL.in.the.first.window. with.an.appropriate.Provider.Name..In.the.next.window.select.the.appropriate.HTTP.API.URL.parameter.types.definitions.from.the.drop-down. menus.next.to.the.parsed.fields.of.the.URL. Enter.your.SMS.Provider. name.here. Enter. the. HTTP. API. URL. provided.to.you. Choose. the. appropriate. type. parameter.in.the.drop-down.menu. for.the.parsed.parameters.of.the.URL. on.the.left. D-Link DNS-320 User Manual…
-
Page 81: Event Settings
Section 4 — Configuration Event Settings You.can.limit.which.events.are.sent.as.alerts.to.the.Email.or.SMS.settings.by.checking.the.events.here. Event Settings: Select. the. information. you. want. e-mailed. to. the. above. address. or. sent. over. SMS. messages. to. the. above. mobile. number..The. items. checked. will. be. sent.when.necessary. D-Link DNS-320 User Manual…
-
Page 82: Logs
Section 4 — Configuration Logs Within.the.Logs.menu.item.you.can.setup.your.device.to.receive.Log.Events.from.other.ShareCenter.Pulses.or.send.the.log.events.to.another. ShareCenter.Pulse.or.SysLog.server..You.can.also.view.the.NAS.system.logs.and.the.FTP.logs.here. Enable Syslog: Click.to.activate.the.Syslog.server.functionality.of. your.device.to.be.able.to.receive.logs.from.other. ShareCenter.Pulses. Syslog Server IP: Enter.the.IP.address.of.an.external.Syslog.server.that. you.wish.to.send.the.logs.of.this.device.to. Click.Clear Log.to.delete.all.the.existing.logs. Clear Log: Backup Log: Click.Backup Log.to.save.the.existing.logs.to.a.text. file.on.your.computer. D-Link DNS-320 User Manual…
-
Page 83: Firmware.upgrade
Displays. the. date. of. when. the. firmware. was. Firmware Date: created. When. upgrading. the. firmware,. click. Browse. Firmware Upload: to. select. the. new. firmware. file. on. your. local. computer. and. then. click. Apply. to. begin. the. firmware.upgrade.process. D-Link DNS-320 User Manual…
-
Page 84: Status
Section 4 — Configuration Status System Info Here.you.can.view.various.system.information.some.of.which.is.static.and.others.dynamic. Displays.the.local.network.settings.of.your.device. Information: Device Displays.the.workgroup,.name,.description,.current. Information: temperature,.packet.counts,.and.system.uptime. Volume Displays. the. hard. drive. information,. including. the. Information: disk.mode,.total.size,.used.and.remaining.drive.space. D-Link DNS-320 User Manual…
-
Page 85: Hard.drive.info
Section 4 — Configuration Hard Drive Info This.section.will.display.a.summary.of.the.hard.drive(s).currently.installed..The.summary.will.include.information.such.as.the.hard.drive.manufacturer,. model,.serial.number,.temperature,.total.capacity.size,.and.status..The. “ Status”.of.the.hard.drive.will.display.the.health.of.the.hard.drive..If.your.hard. drive.is.healthy,.the.status.will.display.“Normal”..If.your.hard.drive.is.not.healthy,.the.status.will.display.“Abnormal”..At.any.time,.if.you.wish.to.view. the.S.M.A.R.T.table.of.the.hard.drive,.you.can.press.the.“Normal/Abnormal”.button..After.pressing.the.button.a.table.appears.with.the.S.M.A.R.T.. data.below.the.table.of.the.Hard.Drives.installed. D-Link DNS-320 User Manual…
-
Page 86: Applications
Use.the.radio.buttons.to.select.the.type.of.server.that. the.source.files/folders.for.the.Schedule.Downloads. are.located.on..Click.the.HTTP.radio.button.to.specify. that.the.source.files.are.located.on.a.web.server..Click. the.FTP.radio.button.to.specify.that.the.source.files/ folders.are.located.on.an.FTP.server. Login Method: Enter.the.login.information.for.the.site.that.contains. the.files.that.you.want.to.schedule.for.downloading.. If.no.password.is.required,.select.Anonymous..If.a. password. is. required,. select. Account. and. provide. the.user.name.and.password. Username: Enter.the.user.name.here. Password: Enter.the.password.here. Type: Select.either.File.or.Folder.from.the.drop-down.list. depending.on.whether.you.wish.to.download.a.file.or. a.folder..Select.File.if.you.wish.to.download.a.specific. file..Select.Folder.if.you.wish.to.download.all.the.files. in.a.specific.folder. URL: Enter.the.FTP/.HTTP.site.address.for.the.scheduled. download..Click.on.Test.to.verify.access.to.the.site. address.and.file/folder..If.you.have.chosen.File.from. the.above.drop-down.list,.you.must.specify.the.exact. file.in.the.URL.path,.including.the.file.extension..(e.g.. http://example.com/test/testfile.txt). D-Link DNS-320 User Manual…
-
Page 87
In. addition,. there. is. an. option. to. delete. a. download. event. at. anytime.. Current. download. statistics,. such. as. %. completed. and. download. speed,. are. displayed. for. each. event.. A. refresh.button.is.also.provided.to.produce.updated. listings.at.any.time. Note:.If.you.are.going.to.use.FTP/HTTP.services,.i.e..scheduling.file.and.folder.backups.from.an.FTP.server,.web.server,.or.local. network.share,.from.this.NAS.through.the.internet,.you.may.need.to.configure.the.router.that.the.NAS.is.connected.to;.to.forward. port.20~21.for.FTP,.and.port.80.for.HTTP.to.the.IP.address.of.this.ShareCenterTM. D-Link DNS-320 User Manual… -
Page 88: Remote.backups
Password: Enter.a.password.that.the.remote.client.will. use. Remote Backups list: This.is.the.list.of.remote.backup.jobs.built.by. pressing.the.Create.button.above.the.list.to. configure.each.job. Create: Click. the. Create. button. to. build. a. new. remote.backup.job. Modify: Click. to. make. changes. to. your. existing. Remote.Backup.jobs.in.the.Remote.Backup. list..You.must.select.the.remote.backup.job. first.and.then.click.the.Modify.button. Delete: To.remove.a.Remote.Backup.job.select.the.job. in.the.list.and.then.click.the.Delete.button. D-Link DNS-320 User Manual…
-
Page 89
Wecome: Displays.the.steps.of.the.wizard. Service Type: NAS to NAS:.Backup.from.the.local.NAS.to.a.remote. NAS.or.vice.versa. NAS to Linux:.Backup.from.the.local.NAS.to.a.Linux. file.system.or.vice.versa. Local to Remote:.Sets.the.backup.source.as.the.local. NAS.and.the.target.destination.for.the.backup.files. as.the.remote.NAS.or.Linux.file.system. Remote To Local: Sets. the. backup. source. as. the. remote. NAS. or. Linux. file. system. and. the. target. destination.for.the.backup.files.as.the.local.NAS. D-Link DNS-320 User Manual… -
Page 90
Each. incremental. backup. builds. a. complete. snapshot. of. the. backup. source. however. only. the. initial. backup. contains. all. the. original. files. and. folders..The.subsequent.backups.in.the.incremental. series.contain.new.files.and.folders.plus.the.links.to. the.first.incremental.backup. D-Link DNS-320 User Manual… -
Page 91
Section 4 — Configuration Remote Remote Path:.Using.the.drop-down.menu,.select.the. Settings: file.system.(folder).path.to.the.remote.target.or.source. system.for.backup. Schedule Manual:.Check.either.Yes.or.No.selection.below.to. Settings: start.the.backup.(yes).immediately.on.completion.of. the.wizard.or.(no).manually.start.the.backup.from.the. Remote.Backup.list. Once.-.Select.this.option.to.run.the.Remote.Backup. once.at.a.specific.date.and.time.set. Scheduled:. Select. this. option. to. set. the. backup. to. occur.daily,.weekly,.or.monthly.per.a.specific.schedule. D-Link DNS-320 User Manual… -
Page 92
Task:.The.name.of.the.Remote.Backup.job. Backups list: Schedule:.When.the.Remote.Backup.job.will.execute. Status:.Current.status.which.can.be •. Ready.the.remote.backup.job.is.ready.to.be.executed. •. Finished. the. remote. backup. job. has. executed. completely. and. successfully. •. Failed.the.Remote.backup.job.was.unsuccessful.during.execution. Enable/Disable:.If.the.button.shows.a.red.circle.the.remote.backup.job. is.enabled..Click.the.red.button.to.disable.the.remote.backup.job.and. the.button.will.change.to.a.green.triangle..Clicking.the.green.triangle. will.enable.the.job.again. Backup now:.Click.to.execute.the.backup.job.immediately.as.long.as. the.job.is.enabled. Recovery:.Click.to.write.the.backup.files.and.folders.back.into.the.source. file.system.from.the.backup.target.system.(reverse.the.file.direction). Navigation buttons: Use.these.buttons.to.move.up.and.down.in.the.list. when.there.are.multiple.jobs.configured. Refresh Button:.Click.this.button.during.a.backup.or.recovery.process. to.monitor.the.progress.by.updating.the.progress.completed.bar. D-Link DNS-320 User Manual… -
Page 93: Local.backups
Overwrite. mode,. meaning. that. identical. files. URL: Enter.the.URL.of.the.site.or.server.you.are.initiating. in. the. destination. folder. will. be. overwritten. by. the. a. transfer. from.. E.g.. ftp://123.456.789/Test. or. source.files..Checking.Incremental.Backup.will.have. ftp://123.456.789/test.txt the.device.compare.identical.file.names.at.the.source. and.destination..Files.will.only.be.overwritten.if.the. Save To: Enter.a.valid.destination.drive.on.the.device,.or.click. source.file.is.more.recent. Browse.to.select.the.destination. Rename: Enter.the.renamed.file.name.here. D-Link DNS-320 User Manual…
-
Page 94: Local.backups.-.Time.machine
Time. Machine. Settings. list. will. appear. when. this.checkbox.is.ticked. Time Machine Settings A. list. of. destination. folders. on. the. Network. list: Shares. associated. with. the. Time. Machine. backup. New: Click.to.add.a.NAS.folder.as.a.Time.Machine. destination. Delete: Click.to.delete.a.NAS.folder.setup. Remove all Network Deletes.all.of.the.NAS.folders.in.the.list. Shares: D-Link DNS-320 User Manual…
-
Page 95: P2P.downloads.-.Settings
Port Settings: Click.Enable.to.allow.the.device.to.automatically. choose.incoming.connection.port.or.click.Custom. and. configure. the. incoming. connection. port. manually. Seeding: Select.one.of.the.three.seeding.options. Torrent Save Path: Displays. the. volume. where. the.Torrent. will. be. saved. Encryption: Select.Enable.or.Disable. Bandwidth Configure. the. maximum. download. rate. and. Control: maximum.upload.rate..Enter.-1.to.set.the.respective. field.to.unlimited. D-Link DNS-320 User Manual…
-
Page 96: P2P.downloads.-.Downloads
The.user.can.also.navigate.to.next.pages.when. Delete: Click.Delete.to.remove.a.selected.download..This. more.than.one.page.exist.. will.remove..not.only.the.torrent.file,.but.also.the. Refresh: Click.Refresh.to.refresh.the.P2P.task.list.to.display. partially.downloaded.files.too. the.most.updated.statistics. Start / Stop: The.start.and.stop.button.allows.the.user.to.start. and.stop.selected.P2P.downloads.in.the.task.list. *Note:.If.you.are.going.to.use.P2P.from.this.NAS. through.the.internet.make.sure.the.ShareCenter™. Torrent Scheduling: Click.the.Torrent Scheduling.button.to.configure. is. connected. to. a. router,. you. will. also. need. to. a.scheduling.rule.for.the.select.P2P.downloading. configure.the.router.to.forward.port.6881~6890. task. to.the.IP.address.of.this.ShareCenter™ D-Link DNS-320 User Manual…
-
Page 97: Web.file.server
Refresh: Click.the.Refresh.button.to.update.the.folder.and.file. view.of.the.Web.File.Server. Download: Downloads.the.selected.file.to.your.computer. Copy: Click.to.copy.the.file.to.the.clipboard…A.wizard.will.launch. and.allow.you.to.select.the.folder.to.paste.the.copy.of. the.file.to..Once.you.have.selected.the.folder,.click.OK. to.paste.the.file.in.that.folder. Move: Moves.the.file.to.a.new.folder. Delete: Removes.the.selected.file. *Note:.If.you.are.going.to.use.Web.File.Server.from.this.NAS.through. the.internet.make.sure.the.ShareCenter™.is.connected.to.a.router,. Rename: Allows.you.to.configure.a.new.file.name.for.the.selected. you.will.also.need.to.configure.the.router.to.forward.port.80.to.the. file. IP.address.of.this.ShareCenter™ Properties: Displays. the. file. properties. such. as. ownership,. access. rights.and.modify.time. D-Link DNS-320 User Manual…
-
Page 98: Ajaxplorer
AjaXplorer. interface..That. users. read/write. access. privileges. to. the. shares. of. the.ShareCenter.Pulse.will.be.applicable.within.the. AjaXplorer.interface.as.well. *Note:. If. you. are. going. to. use. AjaXplorer. from. this. NAS. through. the. internet. make. sure. the. ShareCenter™.is.connected.to.a.router,.you.will.also. need.to.configure.the.router.to.forward.port.80.to. the.IP.address.of.this.ShareCenter™. D-Link DNS-320 User Manual…
-
Page 99: Amazon.s3
Section 4 — Configuration AMAZON S3 Amazon.S3.(Simple.Storage.Service).is.an.online.storage.web.service.offered.by.AWS.(Amazon.Web.Services),.it.provides.a.simple.web.services. interface.that.can.be.used.to.store.and.retrieve.any.amount.of.data,.at.any.time,.from.anywhere.on.the.web..With.Amazon.S3.support,.it.is. possible.to.upload.the.data.from.your.the.DNS-320.to.Amazon.S3.or.download.the.data.from.Amazon.S3.to.your.DNS-320.. D-Link DNS-320 User Manual…
-
Page 100: Creating An Aws Account
Section 4 — Configuration Creating an AWS Account In.a.suitable.web.browser.open.the.following.link.to.Amazon.Web.Services:.http://www.aws.amazon.com/s3.Then.click.on.the.link.at.the.top. named.“Create.an.Amazon.Web.Services.Account”.Follow.the.instructions.to.create.your.AWS.account.. Click.the.“Sign.Up.for.Amazon.S3”.button.and.follow.the.instructions.to.select.the.amount.of.desired.storage.and.create.your.Amazon.S3. account. You.will.be.issued.the.following.keys.as.credentials.to.give.you.access.to.the.account: 1..Access.Key.ID 2..Secret.Access.Key. Save.these.keys.in.a.secure.location.as.your.ShareCenter.will.need.them.to.create.the.backup.and.recovery.jobs.to.and.from.the.Amazon.S3. Cloud.Storage. D-Link DNS-320 User Manual…
-
Page 101
1. A Job Name — A 16 character name identifying the backup/restore job. 2. Remote Settings — the access key id and secret access key, the remote bucket name (remote path) and the Amazon Cloud Server region to use. D-Link DNS-320 User Manual… -
Page 102
5. Schedule Settings — -Select when the backup or restore job will execute from either: manually (now or later from the job list), once (at a predetermined time and day), or scheduled (a predetermined time on a daily basis). D-Link DNS-320 User Manual… -
Page 103
Section 4 — Configuration MODIFY BUTTON Once.a.job.is.created,.the.Modify.button.is.used.to.change.any.of.the.settings.described.in.the.Create.Button.help.text.above..Click.on.a.created. job.in.the.Amazon.S3.table.so.that.its.text.turns.red..Then.click.the.Modify.button.to.edit.the.job.settings.in.a.wizard.that.appears.. Note:.The.Job.Name.cannot.be.modified.. DELETE BUTTON The.Delete.button.is.used.to.delete.any.backup.or.restore.job.listed.in.the.Amazon.S3.table..Click.on.a.created.job.in.the.Amazon.S3.table.so. that.its.text.turns.red..Then.click.the.Delete.button.to.remove.the.job.from.your.ShareCenter.configuration.. ENABLE/DISABLE COLUMN This.field.of.the.jobs.created.administratively.controls.whether.the.job.will.execute.or.not..If.the.button.shows.a.green.triangle,.clicking.it. enables.the.job.to.function..If.the.button.shows.the.red.square,.clicking.it.disables.the.job.from executing.. D-Link DNS-320 User Manual… -
Page 104: My.favorites
Section 4 — Configuration My Favorites The. My. Favorites. tab. allows. you. to. add. any. icon. you. routinely. access. from. the. Applications. or. Management.Tab. in. one. convenient.location.for.easy.and.quick.access..You.can.add.icons.to.the.My.Favorites.tab.using.two.different.methods: Re-arranging the My Favorites View Within.the.My.Favorites.tab.you.can.arrange.the.layout.of.the.icon.order.according.to.your.needs..To.move.the.position.of.an. icon,.click.and.drag.the.icon.to.a.new.position.anywhere.in.the.current.icon.locations..Once.you.have.dragged.the.icon.to.the. new.location,.release.the.mouse.button.and.the.other.icons.will.automatically.reorder.themselves. D-Link DNS-320 User Manual…
-
Page 105: Add.an.icon.to.my.favorites
Section 4 — Configuration Add an Icon to My Favorites There.are.two.methods.to.add.an.icon.alias.to.My.Favorites..You.can.either.right-click.the.icon.and.select.Add to My Favorites.or.use.the.Drag.and. Drop.method.as.per.item.2.below. 1..Right-click.on.an.icon.in.the.applications. or.management.tab.and.click.on.the.Add to My Favorite.menu.item.from.the.command. list.that.appears.. 2..While.holding.the.left.button.down.over. the.icon.drag.it.over.the.My.Favorites.tab. (drag. and. drop. method)..You. will. see. an. white. arrow. pointing. to. the. My. Favorites. tab.which.is.highlighted.when.you.start.to. drag.the.icon D-Link DNS-320 User Manual…
-
Page 106: Remove.an.icon.from.my.favorites
Section 4 — Configuration Remove an Icon from My Favorites To.remove.an.icon.alias.from.the.My.Favorites.tab.simply.right-click.on.it.and.select.Remove From My Favorite.in.the.context.selection.that.appears. Right-click.an.Icon.alias.in.the.My.Favorites. tab.and.select.Remove From My Favorite option…The.Icon.alias.should.disappear.from. the.My.Favorites.tab.view. D-Link DNS-320 User Manual…
-
Page 107: Knowledge Base
Knowledge Base What is RAID? RAID,.short.for.Redundant.Array.of.Independent.Disks,.is.a.combination.of.two.or.more.disks.with.the.aim.of.providing.fault.tolerance.and.improving. performance..There.are.several.different.levels.of.RAID,.with.each.one.providing.a.different.method.of.sharing.or.distributing.data.among.the.drives.. The.device.supports.JBOD,.RAID.0,.RAID.1,.and.Standalone. RAID 0 RAID.0.provides.data.striping,.which.spreads.out. RAID 1 RAID.1.provides.mirroring.over.multiple.disks,.with.the. blocks.of.data.over.all.drives,.but.does.not.provide. same.read/write.speed.of.a.single.disk..A.RAID.1.array.can. data.redundancy. only.be.as.large.as.it’s.smallest.member.disk. Although. performance. is. improved,. the. lack. of. Because.the.data.is.stored.on.multiple.disks, fault.tolerance.means.that.if.one.drive.fails,.all.data. RAID. 1. provides. fault. tolerance. and. protection,. in. in.the.array.will.be.lost. addition.to.performance.advantages. D-Link DNS-320 User Manual…
-
Page 108: Mapping.a.drive
Section 5 — Knowledge Base Mapping a Drive You.can.use.the.D-Link.Storage.Utility.to.map.drives.to.your.computer..Insert.the.ShareCenter.Pulse.CD.into.your.CD-ROM.drive. Click.on.the.D-Link Storage Utility The.Easy.Search.Utility.will.load.and.detect.any.ShareCenter.Pulse.devices.that.are.on.the.local.network. D-Link DNS-320 User Manual…
-
Page 109
Section 5 — Knowledge Base If.the.device.you.are.working.with.does.not.show.up.in.the.device.list,.click.Refresh.. Highlight.an.available.device. Available. volumes. will. be. displayed. under. Drive. Mapping.. Highlight. the. volume.you.want.to.map. Select.an.available.drive.letter.from.the. drop-down.menu.and.click.Connect. Once.connected,.your.mapped.drive(s).will.appear.in.My.Computer. D-Link DNS-320 User Manual… -
Page 110
Section 5 — Knowledge Base Double-click. the. My Computer icon.on.your.desktop. Double-click. the. mapped. drive. to.access.the.files.and.folders. D-Link DNS-320 User Manual… -
Page 111: Mapping.the.recycle.bin
Section 5 — Knowledge Base Mapping the Recycle Bin If.you.have.turned.on.the.Recycle.Bin.option.with.any.of.your.Network.Shares.created,.then.you.can.map.the.recycle.bin.as.a.Network.Drive.to.have. access.to.it. The. Recycle. Bin. will. appear. in. the. drive. mapping. area. of. the. Storage.Utility. Once.connected.the.Recycle.Bin. of. the. device. will. appear. as. a. Network.Drive. D-Link DNS-320 User Manual…
-
Page 112: Usb.print.server
Section 5 — Knowledge Base USB Print Server The.device.features.a.built-in.USB.print.server,.giving.users.the.ability.to.share.a.printer.on.their.local.network..Connect.a.USB.printer.to.the.USB. port.on.the.back.of.the.device..It.is.important.to.ensure.that.any.of.the.printer.manufacturer’s.drivers.are.already.installed.or.available.on.any. computer.you.want.to.print.from. Note:.Only.the.print.function.is.supported..The.device.does.not.support.the.copy.and.scan.functions.of.Multi-Function.Printers. To.add.a.printer,.connect.your.printer.via.USB.cable.to.the.USB.port.of.your.device: The.printer.should.appear.in.your.in.the.System.Info.menu.of.the.Status.icon. D-Link DNS-320 User Manual…
-
Page 113
Section 5 — Knowledge Base Connect. to. your. device. with. Samba. and.then.double-click.the.lp.icon. The.Windows .Add.Printer.Wizard.will.launch: ® Select. the. printer. driver. from. the. installed. Manufacturer.list.or.use.the.Have Disk.button.to. browse.for.the.printer.driver.file. Click.OK.to.continue. D-Link DNS-320 User Manual… -
Page 114
Section 5 — Knowledge Base Once. you. have. selected. the. proper. driver. as. shown.in.the.browse.list.then.click.OK to.install. the.printer. The. printer. is. now. installed. and. the.printer.queue.will.appear. D-Link DNS-320 User Manual… -
Page 115: Yahoo!.Widget.installation
Section 5 — Knowledge Base Yahoo! Widget Installation D-Link.provides.an.added.feature.called.a.Yahoo!.Widget. What is a Yahoo Widget? Yahoo!.Widgets.are.free.application.platforms.that.can.be.used.in.Microsoft.Windows.and.Mac.OS.X..The.engine.uses.a.JavaScript.runtime.environment. combined.with.an.XML.interpreter.to.run.small.applications.referred.to.as.widgets,.and.hence.is.part.of.a.class.of.software.applications.called.widget. engines. Step 1: Install. the.Yahoo!.Widget.. Once. the.Yahoo!.Widget. is. installed.a.D-Link.icon.will.appear.in.your.Widget.Dock.. Once.you.hover.with.your.mouse.over.the.D-Link.Widget. you’ll.be.able.to.click.the.configuration.button. Step 2: Click.the.configuration.button.to.configure.the.Widget. Enter.the.IP.Address.of.your.device.and.click.the.Save. button..Now.you.are.ready.to.use.your.new.D-Link. Y ahoo!. Widget! D-Link DNS-320 User Manual…
-
Page 116: Yahoo!.Widget.display
Section 5 — Knowledge Base Yahoo! Widget Display The.D-Link.Widget.is.mainly.used.for.monitoring.the.activities.taking.place. System: In.the.System.window.information.about.your.Computer,. DNS-320,. IP. Address,. Firmware. Version. and. Current. Operational.Temperature.are.displayed. Hard Drive: In.the.Hard.Drive.window.information.about.the.storage. space.of.your.device.is.displayed. Server: In. the. Server. window. information. about. the. USB. Device,.UPnP.Server,.ITunes.and.FTP.Server.configured. is.displayed. Download: When.the.P2P.Application.is.loaded,.you.can.monitor.your. P2P.download.status.here. D-Link DNS-320 User Manual…
-
Page 117: Usb.copy.function
USB. storage. un-mounted. successfully.and.is.ready.to.be.removed. To.check.whether.the.USB.storage.device.is.connected. successfully,.the.user.can.navigate.to.the.System Info menu.of.the.System Status icon in.the.Management. Tab. of. the.Web. GUI. of. the. device. and. view. the. USB Information section. Note: It. is. a.very.good. practice. to. un-mount.an.USB. storage.device.before.removing.it.from.a.USB.port. D-Link DNS-320 User Manual…
В первой статье данный девайс был описан только внешне. В данной статье будет описан веб-интерфейс управления.
Вход

Нажимаем Login и попадаем
в панель управления:

Обновление прошивки
Распаковываем архив.
Переходим в раздел «Firmware Upgrade», выбираем
файл с прошивкой и нажимаем Apply

Процесс прошивки:

Результат обновления прошивки после перезапуска:

Общая настройка
После обновления прошивки можно перейти к настройке. Можно использовать мастер или вручную.
Далее описаны шаги мастера настройки:


На первом шаге предлагается установить пароль для админа, но уже на этом пункте можно споткнуться — ограничение на алфавит допустимых символов:

Далее предлагается настроить временную зону:

На следующем шаге можно настроить сеть :

Настройки имени хоста:

Для работы с оповещениями потребуется почта:

Ну и завершение:

Nmap-скан системы
Ради интереса просканим свежеустановленную систему
Nmap
scan report for 172.16.0.82
Host
is up (0.00017s latency).
Not
shown: 65532 closed ports
PORT
STATE SERVICE VERSION
80/tcp
open http lighttpd
|_html-title:
Site doesn’t have a title (text/html).
139/tcp
open netbios-ssn Samba smbd 3.X (workgroup: WORKGROUP)
443/tcp
open ssl/http lighttpd
|_html-title:
Site doesn’t have a title (text/html).
445/tcp
open netbios-ssn Samba smbd 3.X (workgroup: WORKGROUP)
MAC
Address: 00:11:22:33:44:55 (Unknown)
Device
type: general purpose
Running:
Linux 2.6.X
OS
details: Linux 2.6.22 (ARM)
Network
Distance: 1 hop
Host
script results:
|_nbstat:
NetBIOS name: DLINK-841185, NetBIOS user: <unknown>, NetBIOS
MAC: <unknown>
|_smbv2-enabled:
Server doesn’t support SMBv2 protocol
|
smb-os-discovery:
|
OS: Unix (Samba 3.2.8)
|
Name: Unknown\Unknown
|_
System time: 2001-05-30 12:50:41 UTC+0
HOP
RTT ADDRESS
1
0.17 ms 172.16.0.82
OS
and Service detection performed. Please report any incorrect results
at http://nmap.org/submit/ .
Nmap
done: 1 IP address (1 host up) scanned in 15.14 seconds
Настройка диска
После начальной настройки переходим к настройке диска. Можно также пройтись с помощью мастера.

На первом шаге предлагается выбрать диск для дальнейшей его обработки:

На втором шаге можно выбрать тип конфигурации диска (если два диска, то можно подумать о выборе RAID’a)

Создание раздела:

Предупреждение о том, что после форматирования все данные на диске будут удалены:

Форматирование:

Пятый шаг проходит незаметно — в системе появляется раздел с файловой системой, об этом выдается оповещение.
Завершение:

Управление пользователями
Все основные задачи администрирования расположены в разделе «Account Management». Здесь можно создать пользователей и их группы, назначить права, размер квот и создать сетевые папки (общие или личные в зависимости от установленных прав).
Создание пользователя
Новый пользователь добавляется с помощью мастера:

Сперва задается имя с паролем (необходимо помнить про ограниченный набор символов):

Если существует группа пользователей, то на втором шаге при необходимости можно назначить группы, в которые будет входить создаваемый пользователь:

На третьем шаге можно назначить права пользователя на доступные сетевые папки

и посредством каких служб можно к ним получить доступ

Также можно назначить лимит по использованию дискового пространства (будут применен, если служба управления квотами будет включена — см. следующий пункт «Настройка квот»):

Завершение

Настройка квот
По умолчанию управление квотами отключено. Настройки квот доступны в соответствующем разделе «Quotas»:

Создание общих папок
По умолчанию весь диск расшаривается как сетевая папка с названием имени
раздела — Volume_1. Эта шара доступна всем
пользователям с правами на запись-чтение.
Это удобно для обычного пользователя, и если этот пользователь всего один. С точки зрения админа всегда в голове мелькает здравая мысль — сначала запретить все, а потом разрешать по необходимости.
Для этого необходимо Volume_1 удалить из списка шар.

Создание шары для
пользователя worker, он будет выступать
ее владельцем, и только он будет иметь
соответствующие права.

Указываем, что каталог создается для определенных пользователей:

Указываем права пользователей на создаваемую шару:

и права группы пользователей (если таковая есть)

На третьем шаге можно задать дополнительные опции. Oplocks — включена по
умолчанию, включил опцию Recycle (аналог виндовой «Корзины»):

Через какие службы будет доступна сетевая папка
(отключил включенный
по умолчанию FTP):

И завершение:

ТЕСТЫ
Субъективные тесты передачи файлов по сети.
При копировании по сети
большого числа файлов mp3 скорость была
стабильно такой:

Копирование большого
количества мелких файлов:

Копирование большого
количества больших файлов (образы, видео
и т. п.):

Одновременно несколько заданий копирования:

Настройка приложений
—>
Доступны следующие
приложения

—>
Настройка P2P
Находится в разделе
Applications->P2P Downloads.
Настраивать особо
нечего (по сравнению с тем же Transmisson):

—>
В настройках порта
указано, что можно выбирать в диапазоне
10000-65000, но на самом деле:

—>
Еще один минус — нельзя
указать путь к каталогу для сохранения
торрентов. Вместо этого указывается
доступные разделы (в случае одного диска
— Volume_1), в итоге на нем создается каталог
P2P
(!доступный с помощью
всех возможных служб) с тремя подкаталогами:
-
complete
-
incomplete
-
Torrent
Ну и вкладка Downloads, на
которой можно добавить торрент на
закачку:

—>
В целом возникает
желание поискать способ установки на
данный девайс Transmisson .
Просмотр
Доступно к просмотру 5 страниц. Рекомендуем вам скачать файл инструкции, поскольку онлайн просмотр документа может сильно отличаться от оригинала.
-
TM
SHARECENTER  PULSE 2-BAY NETWORK
STORAGE
DNS-320
QUICK
INSTALLATION
GUIDE
Руководство по быстРой установке
-
Руководство по быстрой установке
Сетевое хранилище ShareCenter  Pulse с 2 отсеками для
TM
жестких дисков
Спасибо  за  приобретение  сетевого  хранилища  ShareCenter   Pulse  с  2
TM
отсеками для жестких дисков. Следуйте простым шагам этого руководства для
корректной установки сетевого хранилища. Пожалуйста, проверьте комплект
поставки.
Комплект поставки
D-Link DNS-320 - сетевое хранилище ShareCenter  с 2 отсеками
TM
для жестких дисков
Кабель Ethernet 5 категории
Шнур питания
Адаптер питания (12В/4A)
CD-диск с руководством пользователя и программным
обеспечением
Если что-либо из перечисленного отсутствует, пожалуйста, обратитесь к продавцу.
DNS-320
-
Системные рекомендации
•   Компьютер с: процессором1 ГГц/ оперативной памятью 512 Мб/
свободным пространством 200 Мб/ приводом CD-ROM
•   Internet Explorer версии 6.0 или Mozilla Firefox 1.0 и выше
•   Жесткий диск (и) SATA 3.5”
•  Windows® 7, Vista® или XP (с Service Pack 2)
Что делает этот продукт
Сетевое хранилище D-Link DNS-320 ShareCenter  Pulse с 2 отсеками для
TM
жестких дисков предоставляет общий доступ к документам, фотографиям,
музыке и видео по сети и Интернет членам семьи или сотрудникам. Этот
ShareCenter  Pulse позволяет подключить два жестких диска SATA 3.5” и
TM
создавать сетевой центр для резервного копирования важных файлов.
Установка – только в ОС Windows
Мастер по установке на CD-диске содержит пошаговые инструкции для
подключения, установки и настройки DNS-320.
Шаг 1:
Разместите CD-диск в привод CD-ROM компьютера. Когда появится экран
автозагрузки, нажмите ShareCenter  Pulse Setup Wizard.
TM
Шаг 2:
Следуйте инструкциям на экране. После окончания установки можно
зарегистрироваться в DNS-320 для дополнительных настроек.
Установка – не в ОС Windows/ установка вручную
Для пользователей Mac или Linux или установки вручную следуйте шагам
ниже:
Шаг 1:
Для того, чтобы снять крышку корпуса, переместите замок корпуса
вправо.
Шаг 2:
Передвиньте крышку корпуса назад, удерживая замок при этом. После
этого поднимите крышку.
Шаг 3:
Установите жесткий диск SATA 3.5” в доступный отсек. Затем закрепите
крышку на корпусе.
DNS-320
- 1
- 2
- 3
- 4
- 5
SHARECENTER
TM
PULSE 2-BAY NETWORK
STORAGE
QUICK
INSTALLATION
GUIDE
Руководство по быстРой установке
Guía de InstalacIón RápIda
GuIa de Instalação RápIda
快速安裝指南 petunjuk pemasanGan cepat
Quick Install Guide
ShareCenter
TM
Pulse 2-Bay Network Storage
2
Thank you for purchasing the ShareCenter
TM
Pulse 2-Bay Network Storage. Follow the easy steps in this guide to properly set up your storage device. Please verify that all the package contents listed below are available.
Package Contents
D-Link DNS-320 ShareCenter
TM
Pulse 2-Bay Network Storage
CAT5 Ethernet Cable
Power Cord
Power Adapter (12V/4A)
CD-ROM with Manual and Software
If any of the above items are missing, please contact your reseller.
DNS-320
System Requirements
• Computer with: 1GHz processor/512 MB RAM/200 MB available disk space/CD ROM drive
• Internet Explorer version 6.0 or Mozilla Firefox 1.0 and above
• 3.5” SATA Hard Drive(s)
• Windows® 7, Vista®, or XP (with Service Pack 2)
What This Product Does
The D-Link DNS-320 ShareCenter
TM
Pulse 2-Bay Network Storage shares your documents, photos, music, and videos across the network and on the
Internet so family members, friends, or employees can access them. This
ShareCenter
TM
Pulse can hold two 3.5” SATA hard drives and is able to create a central network point for backing up valuable files.
Installation — Windows Only
The Setup Wizard on the CD-ROM will give you step-by-step instructions how to connect, install, and configure your DNS-320.
Step 1:
Insert the supplied CD-ROM into your computer. When the autorun screen appears, click ShareCenter
TM
Pulse Setup Wizard.
Step 2:
Follow the on-screen instructions. Once complete you can log into the DNS-
320 for advanced configuration.
Installation — Non-Windows/Manual Installation
For Mac or Linux users, or for manual installation, follow the steps below:
Step 1:
Remove the top cover of your device by moving the cover lock located on the back of your device and moving the cover lock to the right.
Step 2:
While holding the cover lock, slide the top cover backwards. After sliding the top cover backwards, lift the top cover up to remove it.
Step 3:
Insert a 3.5” SATA hard drive into an available drive bay. Then, re-attach the top cover.
DNS-320
3
4
Step 4:
Connect an Ethernet cable to the available Ethernet port. This cable should connect the ShareCenter TM Pulse 2-Bay Network Storage to your local network via a router or switch, or directly to a computer for configuration.
Step 5:
Connect the power adapter to the power receptor.
Step 6:
Open a web browser and enter the IP address of the DNS-320 to access the
Web UI. If you have a DHCP-enabled router or server on your network, you may need to check the DHCP table to see what IP address the DNS-320 was assigned.
Note: The computer used to access the ShareCenter
TM
Pulse web-based configuration manager must be on the same subnet as the ShareCenter matically be in the same subnet.
TM Pulse. If your network is using a DHCP server and the computer receives IP settings from the DHCP server, the ShareCenter
TM
Pulse will auto-
DNS-320
Model: DNS-320
DC IN
RESET
LAN
10/100/1000
Router
1 2 LAN 3 4 INTERNET USB
RESET
5V — — 3A
Modem
LAN
Note: Please see the manual for software installation.
DNS-320
TECHNICAL SUPPORT
You can find software updates and user documentation on the d-link website.
Tech Support for customers in
Australia:
tel: 1300-766-868
24/7 technical support
Web: http://www.dlink.com.au
e-mail: [email protected]
India:
tel: 1800-233-0000 (mtnl & Bsnl toll Free)
+91-832-2885700 (Gsm, cdma & others)
Web: www.dlink.co.in
e-mail: [email protected]
Singapore, Thailand, Indonesia,
Malaysia, Philippines, Vietnam:
singapore — www.dlink.com.sg thailand — www.dlink.co.th
Indonesia — www.dlink.co.id malaysia — www.dlink.com.my philippines — www.dlink.com.ph
Vietnam — www.dlink.com.vn
Korea:
tel : +82-2-2028-1810 monday to Friday 9:00am to 6:00pm
Web : http://d-link.co.kr
e-mail : [email protected]
New Zealand:
tel: 0800-900-900
24/7 technical support
Web: http://www.dlink.co.nz
e-mail: [email protected]
D-Link Middle East — Dubai, U.A.E.
plot no. s31102, jebel ali Free Zone south, p.o.Box 18224, dubai, u.a.e.
tel: +971-4-8809022
Fax: +971-4-8809066 / 8809069 technical support: +971-4-8809033
General Inquiries: [email protected]
tech support: [email protected]
Egypt
1, makram ebeid street — city lights Building nasrcity — cairo, egypt
Floor 6, office c2 tel.: +2 02 26718375 — +2 02 26717280 technical support: +2 02 26738470
General Inquiries: [email protected]
tech support: [email protected]
Kingdom of Saudi Arabia
office # 84 , al khaleej Building ( mujamathu al-khaleej) opp. king Fahd Road, olaya
Riyadh — saudi arabia tel: +966 1 217 0008 technical support:
+966 1 2170009 / +966 2 6522951
General Inquiries: [email protected]
tech support: [email protected]
South Africa and Sub Sahara
Region:
tel: +27-12-665-2165
08600 dlInk (for south africa only) monday to Friday 8:30am to 9:00pm south africa time
Web: http://www.d-link.co.za
e-mail: [email protected]
Pakistan
Islamabad office:
61-a, jinnah avenue, Blue area, suite # 11, eBc, saudi pak tower,
Islamabad — pakistan tel.: +92-51-2800397, 2800398
Fax: +92-51-2800399
Saudi Arabia (KSA):
tel: +966 01 217 0008
Fax: +966 01 217 0009 saturday to Wednesday 9.30am to 6.30pm
thursdays 9.30am to 2.00 pm e-mail: [email protected]
karachi office: d-147/1, kda scheme # 1, opposite mudassir park, karsaz Road, karachi – pakistan phone: +92-21-34548158, 34326649
Fax: +92-21-4375727 technical support: +92-21-34548310, 34305069
General Inquiries: [email protected]
tech support: [email protected]
DNS-320
5
6
TECHNICAL SUPPORT
Iran
unit 5, 5th Floor, no. 20, 17th alley , Bokharest st. , argentine sq. , tehran IRan postal code : 1513833817 tel: +98-21-88880918,19
+98-21-88706653,54
General Inquiries: [email protected]
tech support: [email protected]
Morocco
m.I.t.c
Route de nouaceur angle Rs et ct 1029
Bureau n° 312 et 337 casablanca , maroc phone : +212 663 72 73 24 email: [email protected]
Lebanon RMA center
dbayeh/lebanon po Box:901589 tel: +961 4 54 49 71 ext:14
Fax: +961 4 54 49 71 ext:12 email: [email protected]
Bahrain
technical support: +973 1 3332904
Kuwait:
technical support: + 965 22453939 / +965
22453949
Türkiye Merkez
İrtibat Ofisi
ayazağa maslak yolu erdebil cevahir İş merkezi no: 5/a ayazağa / maslak İstanbul tel: +90 212 2895659
Ücretsiz müşteri destek Hattı: 0 800 211 00 65
Web:www.dlink.com.tr teknik destek: [email protected]
DNS-320
Руководство по быстрой установке
Сетевое хранилище ShareCenter
TM
Pulse с 2 отсеками для жестких дисков
Спасибо за приобретение сетевого хранилища ShareCenter
TM
Pulse с 2 отсеками для жестких дисков. Следуйте простым шагам этого руководства для корректной установки сетевого хранилища. Пожалуйста, проверьте комплект поставки.
Комплект поставки
D-Link DNS-320 — сетевое хранилище ShareCenter
TM
с 2 отсеками для жестких дисков
Кабель Ethernet 5 категории
Шнур питания
Адаптер питания (12В/4A)
DNS-320
CD-диск с руководством пользователя и программным обеспечением
Если что-либо из перечисленного отсутствует, пожалуйста, обратитесь к продавцу.
7
8
Системные рекомендации
• Компьютер с: процессором1 ГГц/ оперативной памятью 512 Мб/ свободным пространством 200 Мб/ приводом CD-ROM
• Internet Explorer версии 6.0 или Mozilla Firefox 1.0 и выше
• Жесткий диск (и) SATA 3.5”
• Windows® 7, Vista® или XP (с Service Pack 2)
Что делает этот продукт
Сетевое хранилище D-Link DNS-320 ShareCenter
TM
Pulse с 2 отсеками для жестких дисков предоставляет общий доступ к документам, фотографиям, музыке и видео по сети и Интернет членам семьи или сотрудникам. Этот
ShareCenter
TM
Pulse позволяет подключить два жестких диска SATA 3.5” и создавать сетевой центр для резервного копирования важных файлов.
Установка – только в ОС Windows
Мастер по установке на CD-диске содержит пошаговые инструкции для подключения, установки и настройки DNS-320.
Шаг 1:
Разместите CD-диск в привод CD-ROM компьютера. Когда появится экран автозагрузки, нажмите ShareCenter
TM
Pulse Setup Wizard.
Шаг 2:
Следуйте инструкциям на экране. После окончания установки можно зарегистрироваться в DNS-320 для дополнительных настроек.
Установка – не в ОС Windows/ установка вручную
Для пользователей Mac или Linux или установки вручную следуйте шагам ниже:
Шаг 1:
Для того, чтобы снять крышку корпуса, переместите замок корпуса вправо.
Шаг 2:
Передвиньте крышку корпуса назад, удерживая замок при этом. После этого поднимите крышку.
Шаг 3:
Установите жесткий диск SATA 3.5” в доступный отсек. Затем закрепите крышку на корпусе.
DNS-320
Шаг 4:
Подключите Ethernet кабель к доступному порту Ethernet. Этот кабель должен соединить ShareCenter настройки.
TM Pulse с локальной сетью через маршрутизатор или коммутатор, или напрямую к компьютеру для
Шаг 5:
Подключите адаптер питания к разъему питания.
Шаг 6:
Откройте web-браузер и введите IP-адрес DNS-320 для доступа к webинтерфейсу. Если в сети есть маршрутизатор или сервер с включенным
DHCP, то можно проверить таблицу DHCP для того, чтобы посмотреть
IP-адрес, назначенный для DNS-320.
Примечание: Компьютер, используемый для доступа к базовым web настройкам
ShareCenter
TM
Pulse должен быть в той же подсети, что и ShareCenter
TM
Pulse. Если в сети используется DHCP-сервер, и компьютер получает IP настройки с сервера DHCP,
ShareCenter
TM
Pulse будет автоматически находиться в той же подсети.
DNS-320
Model: DNS-320
DC IN
RESET
LAN
10/100/1000
Router
1 2 LAN 3 4 INTERNET USB
RESET
5V — — 3A
Modem
LAN
Примечание: За инструкциями по установке программного обеспечения, пожалуйста, обратитесь к руководству пользователя.
DNS-320
9
10 техническая поддеРжка обновления программного обеспечения и документация доступны на интернет-сайте d-link.
d-link предоставляет бесплатную поддержку для клиентов в течение гарантийного срока.
клиенты могут обратиться в группу технической поддержки d-link по телефону или через интернет.
Техническая поддержка D-Link:
+7(495) 744-00-99
Техническая поддержка через Интернет
http://www.dlink.ru
e-mail: [email protected]
офисы
Украина,
04080 г. киев , ул. Межигорская, 87-а, офис 18 тел.: +38 (044) 545-64-40 e-mail: [email protected]
Беларусь
220114, г. Минск, проспект независимости,
169 , бЦ «XXI век» тел.: +375(17) 218-13-65 e-mail: [email protected]
Казахстан,
050008, г. алматы, ул. курмангазы, дом 143
(уг. Муканова) тел./факс: +7 727 378-55-90 e-mail: [email protected]
Узбекистан
100015, г.ташкент, ул. нукусская, 89 тел./факс: +998 (71) 120-3770, 150-2646 e-mail: [email protected]
Армения
0038, г. ереван, ул. абеляна, 6/1, 4 этаж тел./факс: + 374 (10) 398-667 e-mail: [email protected]
Грузия
0162, г. тбилиси, проспект чавчавадзе 74, 10 этаж тел./факс: + 995 (32) 244-563
Lietuva
09120, Vilnius, Žirmūnų 139-303 tel./faks. +370 (5) 236-3629 e-mail: [email protected]
Eesti
peterburi tee 46-205
11415, tallinn, eesti , susi Bürookeskus tel +372 613 9771 e-mail: [email protected]
Latvija
mazā nometņu 45/53 (ieeja no nāras ielas) lV-1002, Rīga tel.: +371 6 7618703 +371 6 7618703 e-pasts: [email protected]
DNS-320
Guía de Instalación Rápida
ShareCenter
TM
Pulse de 2 Bahías para Almacenamiento en red
Gracias por comprar el ShareCenter
TM
Pulse de 2 Bahías para Almacenamiento en red. Siga los pasos de esta guía para configurar correctamente el dispositivo de almacenamiento. Por favor, compruebe que todos los contenidos del empaque que se enumeran a continuación están disponibles.
Contenido del empaque
ShareCenter
TM
Pulse de 2 Bahías para Almacenamiento en red
Cable Ethernet CAT5
Cable de poder
Adaptador de energía (12V/4A)
CD-ROM con Manual y Software
DNS-320
Si alguno de estos ítems no se encuentra en el empaque, por favor contacte a su vendedor.
11
12
Requerimientos del Sistema
• Computador con: Procesador 1GHz/512 MB de RAM/200 MB de espacio disponible/Lector de CD
• Internet Explorer 6.0 o Mozilla Firefox 1.0 o superior
• Discos Duros 3.5” Sata
• Windows® 7, Vista®, o XP (Con Service Pack 2)
¿Qué hace este producto?
El D-Link DNS-320 ShareCenter
TM
Pulse de 2 Bahías para Almacenamiento en red comparte su música, documentos, fotos y vídeos a través de la red y en Internet para que los miembros de la familia, los amigos o los empleados puedan acceder a ellos. Esta unidad ShareCenter
TM
puede albergar dos unidades de disco duro
3,5” SATA y es capaz de crear un punto de red central para realizar copias de seguridad de archivos valiosos.
Instalación – Solamente Windows
El Asistente para la instalación en el CD-ROM le dará instrucciones paso a paso cómo conectar, instalar y configurar el DNS-320.
Paso 1:
Inserte el CD-ROM en el computador. Cuando aparezca la pantalla de ejecución automática, haga clic en el Asistente para la instalación ShareCenter
TM
pulse.
Paso 2:
Siga las instrucciones en pantalla. Una vez terminada, se puede iniciar sesión en el DNS-320 para la configuración avanzada.
Instalación — No-Windows/Instalación Manual
Para usuarios de Mac o Linux, o para la instalación manual, siga los siguientes pasos:
Paso 1:
Quite la cubierta superior del dispositivo al mover la tapa de cierre situado en la parte posterior de su dispositivo y moviendo el cierre de la cubierta hacia la derecha.
Paso 2:
Mientras mantiene el bloqueo de la cubierta, deslice la tapa hacia atrás. Después de deslizar la tapa hacia atrás, levante la cubierta superior para extraerla.
Paso 3:
Inserte un disco duro 3,5” SATA en una bahía de unidad disponible. A continuación, vuelva a colocar la cubierta superior.
DNS-320
Paso 4:
Conecte un cable Ethernet al puerto Ethernet disponible. Este cable se debe conectar el ShareCenter
TM
Pulse de 2 Bahías para Almacenamiento a su red local a través de un router o switch, o directamente a un computador para la configuración.
Paso 5:
Conecte el adaptador de corriente a receptor de la energía.
Paso 6:
Abra un navegador web e introduzca la dirección IP del DNS-320 para acceder a la interfaz de usuario Web. Si usted tiene un servidor DHCP habilitado o un servidor en la red, puede que tenga que ver la tabla DHCP para ver qué dirección IP se le asignó al DNS-320.
Nota: El equipo utilizado para acceder a la configuración Web de ShareCenter
TM
Pulse debe estar en la misma subred que el ShareCenter
TM
Pulse. Si la red utiliza un servidor DHCP y el ordenador recibe la configuración IP del servidor DHCP, el ShareCenter TM la misma subred.
Pulse automáticamente estará en
DNS-320
Model: DNS-320
DC IN
RESET
LAN
10/100/1000
Router
1 2 LAN 3 4 INTERNET USB
RESET
5V — — 3A
Modem
LAN
Nota: Por favor, consulte el manual de instalación del software.
DNS-320
13
14
SOPORTE TÉCNICO usted puede encontrar actualizaciones de softwares o firmwares y documentación para usuarios a través de nuestro sitio www.dlinkla.com
SOPORTE TÉCNICO PARA USUARIOS EN LATINO AMERICA
soporte técnico a través de los siguientes teléfonos de d-link
PAIS
Argentina
Chile
Colombia
Costa Rica
Ecuador
El Salvador
Guatemala
México
Panamá
Perú
Venezuela
NUMERO
0800 — 12235465
800 — 835465 ó (02) 5941520
01800 — 9525465
0800 — 0521478
1800 — 035465
800 — 6335
1800 — 8350255
01800 — 1233201
011 008000525465
0800 — 00968
0800 — 1005767
Soporte Técnico de D-Link a través de Internet
Horario de atención soporte técnico en www.dlinkla.com
e-mail: [email protected] & [email protected]
DNS-320
Guia de Instalação Rápida
ShareCenter
TM
Pulse 2-Bay Network Storage
Obrigado por adquirir o ShareCenter
TM
Pulse 2-Bay Network Storage. Siga as etapas simples nesse guia para configurar seu dispositivo de armazenamento corretamente. Favor verificar se todos os intens listados abaixo estão disponíveis na embalagem.
Conteúdo da Embalagem
D-Link DNS-320 ShareCenter
TM
Pulse 2-Bay Network Storage
Cabo Ethernet CAT5
Cabo de Alimentação
Adaptador de alimentação (12V/4A)
CD-ROM com Manual e Software
DNS-320
Se qualquer dos itens acima estiver faltando, favor contatar o seu revendedor.
15
16
Requisitos do Sistema
• Computador com: Processador de 1 GHz / 512 MB de RAM / 200 MB de espaço disponível em disco / unidade de CD-ROM
• Internet Explorer Versão 6.0 ou Mozilla Firefox 1.0 e superior
• Disco(s) rígido(s) SATA de 3,5”
• Windows® 7, Vista®, ou XP (com Service Pack 2)
O que esse produto faz
O D-Link DNS-320 ShareCenter
TM
Pulse 2-Bay Network Storage compartilha seus documentos, músicas, fotos e vídeos pela rede e via Internet, de tal maneira que membros da família, amigos ou funcionários possam acessá-los.
Esse dispositivo ShareCenter
TM
Pulse pode conter dois discos rígidos SATA de
3,5” e criar um ponto de rede central para fazer o backup de arquivos valiosos.
Instalação — Somente Windows
O Assistente de Instalação (Setup Wizard) no CD-ROM lhe dará instruções passo a passo sobre como conectar, instalar e configurar o seu DNS-320.
Etapa 1:
Insira o CD-ROM fornecido no seu Computador. Quando a tela de execução automática for exibida, clique em ShareCenter
TM
Pulse Setup Wizard.
Etapa 2:
Siga as instruções na tela. Uma vez concluído, você pode efetuar o logon no
DNS-320 para configurações avançadas.
Instalação — Não Windows/Instalação Manual
Para usuários de Mac ou Linux, ou para instalação manual, siga as etapas abaixo:
Etapa 1:
Remova a tampa superior do seu dispositivo movendo a trava localizada na parte traseira do seu dispositivo e deslocando-a para a direita.
Etapa 2:
Enquanto você segura a trava da tampa, deslize a tampa superior para trás.
Após deslizar a tampa superior para trás, levante-a e remova-a.
Etapa 3:
Insira um disco rígido SATA de 3.5” em um compartimento de drive disponível.
Em seguida, recoloque a tampa superior.
DNS-320
Etapa 4:
Conecte um cabo Ethernet à porta Ethernet disponível. Este cabo deve conectar o ShareCenter configuração.
TM Pulse 2-Bay Network Storage à sua rede local via um roteador ou switch, ou diretamente a um computador para fazer a
Etapa 5:
Conecte o adaptador de alimentação na tomada.
Etapa 6:
Abra um navegador web e insira o endereço IP do DNS-320 para acessar a
Interface do Usuário (IU) Web. Se você possui um roteador ou servidor habilitado para DHCP na sua rede, talvez precise verificar a tabela DHCP para ver a qual endereço IP o DNS-320 foi atribuído.
Observação: O computador usado para acessar o gerenciador de configuração baseado na web do ShareCenter
TM
Pulse deve estar na mesma máscara de sub-rede do ShareCenter
TM
Pulse. Se a sua rede está usando um servidor DHCP e o computador recebe configurações IP do servidor
DHCP, o ShareCenter
TM
Pulse estará automaticamente na mesma sub-rede.
DNS-320
Model: DNS-320
DC IN
RESET
LAN
10/100/1000
Router
1 2 LAN 3 4 INTERNET USB
RESET
5V — — 3A
Modem
LAN
Observação: Favor consultar o manual para a instalação do software.
DNS-320
17
18
SUPORTE TÉCNICO caso tenha dúvidas na instalação do produto, entre em contato com o suporte técnico d-link por:
Chat Online
www.dlink.com.br/suporte
[email protected]
Back Office
[email protected] *
*acionar Garantia para 4 ou mais equipamentos
Telefones
são paulo: (11) 2755-6950
*Go: 4052-1850 (ligação local)
*nordeste: 0800-7024104
*demais estados: 4062-1850 (ligação local)
*apenas modems adsl
Garantia diferenciada vendida pela internet. agilidade e tranquilidade para suas atividades!
conheça: http://garantiapremium.dlink.com.br
Atendimento disponível das 9h as 21h de segunda a sexta feira e aos sábados das 9h as 15h
DNS-320
快速安裝指南
ShareCenter
TM
Pulse 2 Bay 網路儲存伺服器
感謝您購買ShareCenter TM Pulse 2 Bay 網路儲存伺服器。
請依照本設定指南中簡單的幾個步驟,即可正確設置您的儲存設備。
請確認您的產品包裝內容符合下列:
包裝內容
D-Link DNS-320 ShareCenter
TM
Pulse 2-Bay網路儲存伺服器一台
CAT5網路線一條
電源線一條(電源供應器使用)
電源供應器一個 (輸出電壓DC +12V/4A)
注意: DNS-320 ShareCenter
320 ShareCenter TM
TM Pulse 使用不同電壓的電源供應器(非隨DNS-
Pulse 所附之電源供應器),將導致DNS-320 ShareCenter
Pulse 毀損並失去產品保固。
TM
內含手冊及應用軟體的光碟一片
DNS-320
您所購買的產品如與上述清單不符或是有缺少情況,請與您原購買經銷商聯繫。
19
系統需求
為達到最好的使用效能,建議搭配以下系統需求使用:
• 個人電腦1GHz以上的處理器/512 MB記憶體/可用200MB硬碟空間
• 光碟機
• 網頁瀏覽器Internet Explorer 7.0或Mozilla Firefox 3.0或以上版本
• 3.5” SATA I/II硬碟
• 作業系統Windows
®
XP (Service Pack 2)或Vista™或Windows 7
關於本產品
D-Link DNS-320 ShareCenter TM Pulse 2-Bay網路儲存伺服器不單單僅是儲存分享伺服器更
是數位家庭中不可缺少的數位多媒體中心,讓您可以分享文件,照片,音樂以及影音串
流;DNS-320 ShareCenter TM Pulse可安裝兩個3.5吋硬碟,給您足夠的空間,讓您備份檔案
輕鬆又簡單,多重保護您寶貴的資料!
安裝說明 – 透過安裝設定精靈
(僅Windows作業系統環境)
透過設定精靈將協助您一步一步地完成設備連接以及DNS-320 ShareCenter
TM
Pulse安裝設
定。
步驟 1:
請將安裝光碟放入光碟機中,當您的電腦螢幕自動執行光碟片內容後,請點擊ShareCenter
TM
Pulse 安裝精靈。
步驟 2:
請依照畫面指示進行設備相關安裝與設定。完成後您即可登入DNS- 320 ShareCenter
TM
Pulse
的設定頁面進行進階設定或是開始使用DNS-320 ShareCenter TM 。
20
安裝說明 – 一般安裝設定
(非Windows作業系統環境)
對於使用Mac或Linux的使用者,或是您要進行基本設定(不透過安裝設定精靈)請依照以
下步驟:
步驟 1:
請將面板鎖定開關推至Open處,以開啟上蓋。
步驟 2:
繼續請將上蓋向後滑動至上蓋取出即可。
步驟 3:
接著請將3.5”SATAI/II硬碟安裝至可用的插槽中。
最後將上蓋裝回完成硬碟安裝。
DNS-320
請確定硬碟的SATA連接介面與DNS-320 ShareCenter TM Pulse底部處的SATA連接介面已連
結。輕輕推下,直到兩者的SATA介面連結完成。當兩者的SATA介面正確連結,您會感覺
到硬碟與底部的連接介面有稍微插入的感覺。
某些硬碟的外型尺寸規格並非標準,安裝前請慎重評估是否可安裝於本設備中。若硬碟沒
有正確的安裝,當設備開啟通電後,將無法偵測到該硬碟,或導致本設備或硬碟毀損。
步驟 4:
將網路線接上網路埠。此網路線應該連接DNS-320 ShareCenter
TM
Pulse至您的區域網路或
直接連至電腦來做設定。
步驟 5:
在電源接孔插上電源供應器。
步驟 6:
接下您可以至您的電腦開啟網頁瀏覽器(例如IE瀏覽器),並於網址列輸入DNS-320 ShareCenter
TM
Pulse 的IP位址(預設為DNS-320 ShareCenter
TM
Pulse IP位址為192.168.0.32)來登入
設備WEB管理介面。
*如果您的網路環境中有DHCP 伺服器發放IP位址(如IP分享器發放IP位址),您可能需要先至
設備的DHCP相關功能中,查看DNS-320 ShareCenter TM Pulse 取得的IP位址為何之後,再使用
DNS-320 ShareCenter
TM
Pulse 當前取得的IP位址進入設備WEB管理介面。
請注意,電腦要連線至DNS-320 ShareCenter
TM
Pulse 的WEB管理介面,必須與DNS-320
ShareCenter TM Pulse 在同一網段。
如果您目前的網路環境已經有DHCP 伺服器自動發放IP位址給電腦,則DNS-320 ShareCenter
TM
Pulse 也會自動取得與電腦同一網段IP位址。
DNS-320
Model: DNS-320
DC IN
RESET
LAN
10/100/1000
Router
1 2 LAN 3 4 INTERNET USB
RESET
5V — — 3A
Modem
LAN
附註:更詳細的軟體安裝設定及設備功能說明,請參考手冊的內容。
DNS-320
21
22 d-link 友訊科技 台灣分公司 技術支援資訊
如果您還有任何本使用手冊無法協助您解決的產品相關問題,台灣地區用戶可以透過我
們的網站、電子郵件或電話等方式與 d-link台灣地區技術支援工程師聯絡。
D-Link 免付費技術諮詢專線
0800-002-615
服務時間:週一至週五,早上
9:00到晚上9:00
(不含周六、日及國定假日)
網 站: http://www.dlink.com.tw
電子郵件: [email protected]
如果您是台灣地區以外的用戶,請參考
D-Link網站,全球各地分公司
的聯絡資訊以取得相關支援服務。
產品保固期限、台灣區維修據點查詢,請參考以下網頁說明: http://www.dlink.com.tw
產品維修:
使用者可直接送至全省聯強直營維修站或請洽您的原購買經銷商。
DNS-320
Petunjuk Pemasangan Cepat
Penyimpanan Jaringan 2-slot ShareCenter
TM
Pulse
Terima kasih sudah membeli Penyimpanan Jaringan 2-slot ShareCenter
TM
Pulse.
Ikuti langkah-langkah mudahnya dalam petunjuk ini untuk mengatur perangkat penyimpanan anda secara tepat. Tolong dicek dan pastikan semua isi paket yang terdaftar dibawah tersedia.
Isi Paket
D-Link DNS-320 Penyimpanan Jaringan 2-slot ShareCenter
TM
Pulse
Kabel Ethernet CAT5
Kabel Power
Power Adapter (12V/4A)
DNS-320
CD-ROM yang berisi Petunjuk Penggunaan dan Piranti Lunak
Jika ada item-item yang hilang, silahkan hubungi penjual anda.
23
24
Kebutuhan Sistem
• Komputer dengan prosesor 1GHz/512 MB RAM/kapasitas harddisk yang tersedia 200 MB/drive CD-ROM
• Internet Explorer versi 6 atau Mozilla Firefox 1.0 dan versi diatasnya
• Harddisk SATA 3.5”
• Windows® 7, Vista®, atau XP (dengan Service Pack 2)
Apa yang Produk ini Dapat Lakukan
D-Link DNS-320 Penyimpanan Jaringan 2-slot ShareCenter
TM
Pulse membagi dokumen, foto, musik dan video anda melalui jaringan dan internet sehingga anggota keluarga, teman atau pegawai dapat mengaksesnya. ShareCenter
TM
Pulse ini dapat menyimpan 2 harddisk SATA 3.5” dan mampu berfungsi sebagai titik pusat jaringan untuk mem-backup arsip-arsip yang penting.
Pemasangan – untuk Windows saja
Bantuan Pemasangan yang ada pada CD-ROM akan memberikan petunjuk langkah demi langkah bagaimana cara menghubungkan, memasangan dan mengatur DNS-320 anda.
Langkah 1:
Masukkan CD-ROM yang disediakan ke komputer anda. Ketika layar muncul secara otomatis, klik ShareCenter
TM
Pulse Setup Wizard.
Langkah 2:
Ikuti petunjuk yang ada di layar. Ketika selesai, anda bisa masuk ke DNS-320 untuk konfigurasi tingkat lanjut.
Pemasangan – Pemasangan Selain Windows/Manual
Untuk pengguna Mac atau Linux, atau bagi pemasangan manual, ikuti langkahlangkah berikut :
Langkah 1:
Buka tutup bagian atas dari perangkat anda dengan menggeser kunci penutup yang terletak pada bagian belakang perangkat anda dan gerakan kunci penutup ke kanan.
Langkah 2:
Saat menahan kunci penutup, geser penutup atas kebelakang. Setelah menggeser penutup atas kebelakang, angkat penutup atas untuk melepaskannya.
Langkah 3:
Masukkan sebuah harddisk SATA 3.5” kedalam slot yang tersedia. Kemudian pasang kembali penutup atas.
DNS-320
Langkah 4:
Hubungkan sebuah kabel Ethernet ke port Ethernet. Kabel ini akan menghubungkan Penyimpanan Jaringan 2-slot ShareCenter langsung ke komputer untuk pengaturan.
TM Pulse ke jaringan lokal anda melalui sebuah router atau switch, atau terhubung secara
Langkah 5:
Hubungkan power adapter ke lubang power.
Langkah 6:
Buka sebuah browser web dan masukkan alamat IP dari DNS-320 untuk mengakses Web UI. Jika anda mempunyai router dengan fitur server DHCP pada jaringan anda, anda mungkin perlu memeriksa tabel DHCP untuk melihat alamat IP apa yang diberikan ke DNS-320.
Catatan: Komputer yang digunakan untuk mengakses konfigurasi berbasiskan web dari
ShareCenter
TM
Pulse harus berada dalam subnet yang dengan ShareCenter
TM
Pulse . Jika jaringan anda menggunakan sebuah server DHCP dan komputer mendapat setingan IP dari server DHCP, maka ShareCenter
TM
Pulse akan otomatis berada dalam subnet yang sama..
DNS-320
Model: DNS-320
DC IN
RESET
LAN
10/100/1000
Router
1 2 LAN 3 4 INTERNET USB
RESET
5V — — 3A
Modem
LAN
Catatan: Silahkan mengacu pada Petunjuk Penggunaan untuk pemasangan piranti lunak.
DNS-320
25
DUKUNGAN TEKNIS update perangkat lunak dan dokumentasi pengguna dapat diperoleh pada situs web d-link.
dukungan teknis untuk pelanggan:
Dukungan Teknis D-Link melalui telepon:
tel: +62-21-5731610
Dukungan Teknis D-Link melalui Internet:
email : [email protected]
Website : http://support.dlink.co.id
26
DNS-320
notes
DNS-320
27
Ver. 2.00(DI) 2011/02/16 6NS320DIQ.02G
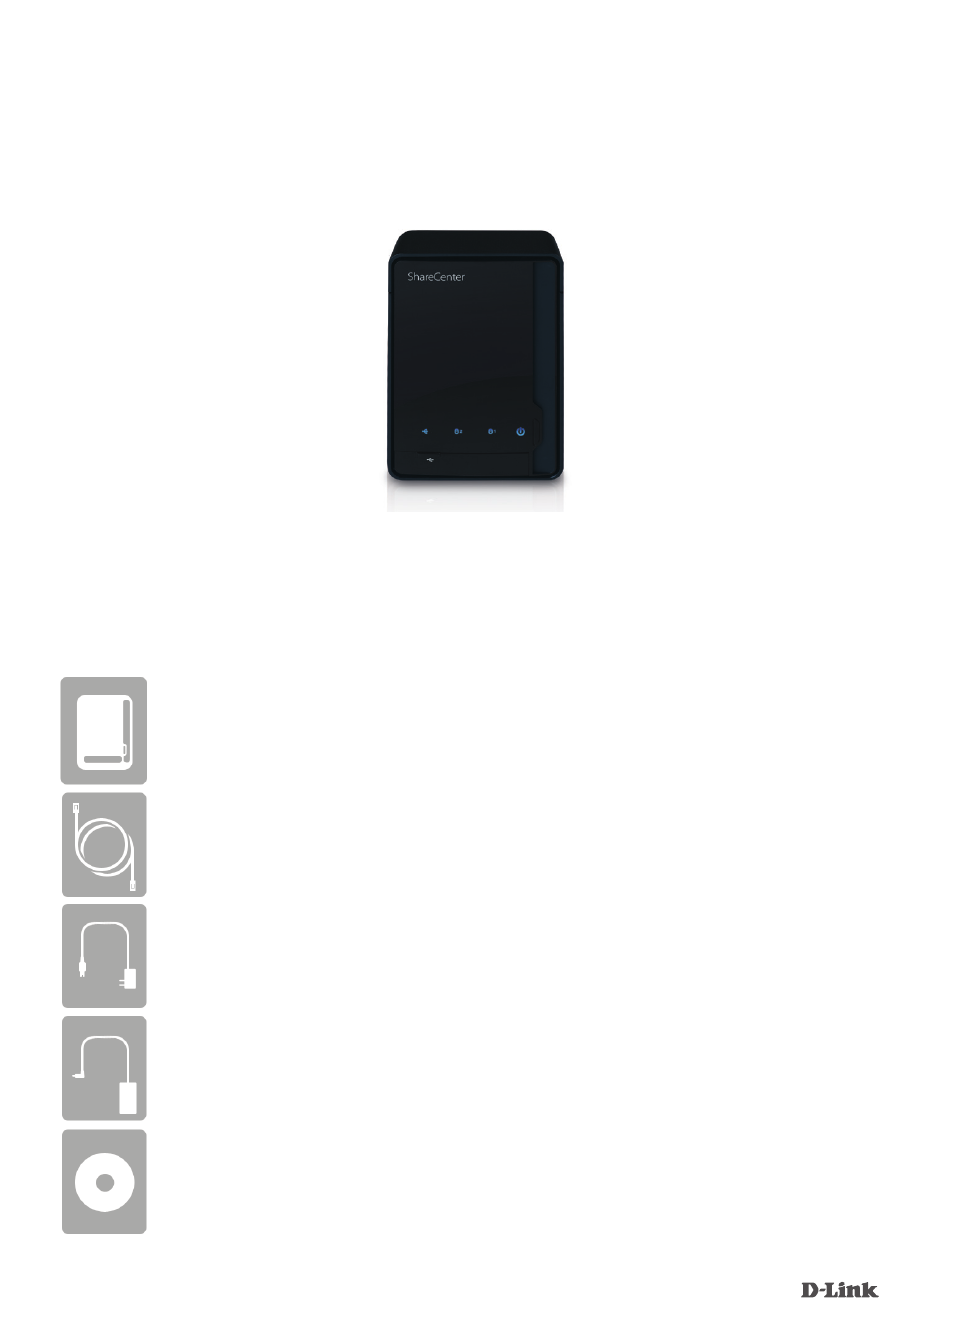
DNS-320
Руководство по быстрой установке
Сетевое хранилище ShareCenter
TM
Pulse с 2 отсеками для
жестких дисков
Спасибо за приобретение сетевого хранилища ShareCenter
TM
Pulse с 2
отсеками для жестких дисков. Следуйте простым шагам этого руководства для
корректной установки сетевого хранилища. Пожалуйста, проверьте комплект
поставки.
Если что-либо из перечисленного отсутствует, пожалуйста, обратитесь к продавцу.
Комплект поставки
D-Link DNS-320 — сетевое хранилище ShareCenter
TM
с 2 отсеками
для жестких дисков
Кабель Ethernet 5 категории
Шнур питания
Адаптер питания (12В/4A)
CD-диск с руководством пользователя и программным
обеспечением