
IMPORTANT NOTES
• Read the instructions carefully before using the co—
—
ffee maker for the first time. Safeguard them for future
reference.
• Only connect it to the voltage stated on the charac—
—
teristics plate.
• It is advisable to use an earthed electrical socket.
• This appliance has been designed exclusively for do—
—
mestic use.
• Do not use the appliance for uses other than those
stated in the this manual.
• The On/Off switch should be in the Off position
when plugging it in or when unplugging it.
• Always place the appliance on a flat, level surface.
• Try not move the appliance while it is operating.
• This appliance is not intended for use by persons
(including children) with reduced physical, sensory
or mental capabilities, or lack of experience and
knowledge, unless they have been given supervision
or instruction concerning use of the appliance by a
person responsible for their safety.
• Children should be supervised to ensure that they do
not play with the appliance.
• The apliance is not intended to be operated by
means of an external timer or separate remote-control
system.
• Do not immerse the coffee maker in water or
any other liquids.
• Do not handle the appliance with wet hands.
• Do not operate the appliance with the cable still
coiled.
• Do not touch the hot surfaces. Handle the coffee
maker by its handles or buttons.
• Do not leave the coffee maker unattended when it is
in use, nor when there are children about.
• Unplug it from the mains when it is not in use and
before cleaning it.
• Do not unplug it by tugging on the mains cable. Do
not leave the plug hanging freely.
• Do not leave the appliance close to sources of heat
nor allow the cable to come into contact with hot
surfaces.
• Do not operate the coffee maker without water.
• Make sure that the lid on the tank is closed before
switching the coffee maker on.
• Before cleaning it, make sure that the appliance is
unplugged and cold.
• Do not switch the coffee maker on if either the cable
or plug are damaged, if it can be detected that it is not
operating correcting, or if it has suffered any type of
damage.
• Cable repairs and replacements must be carried out
exclusively by an Authorised Technical Service Centre.
OPERATION
Before using it for the first time wash all of the acces-
—
sories and operate it once without coffee.
Preparing Espresso Coffee
1. Plug the appliance into the mains and check that the
switch is in the Off position.
2. Unscrew the lid on the tank and pour in the desired
amount of water. The jug shows the amounts required
for two or four cups. Screw the lid back on and tighten
it securely.
3. Place the filter into the filter holder. Use the filter’s
two or four cup level marks to gauge the amount of
coffee needed. Clean off any coffee that may be left
around the edge of the filter holder.
Important: To get the best results out of your espres-—
so coffee maker, use a coarsely ground coffee, Italian
espresso type. Do not pack the coffee down.
4. Put the filter holder into position. Place the jug so
that the opening lines up with the coffee outlet.
5. Turn the selector to the coffee position. The pilot
lamp will come on. After a few minutes the water will
boil, filter through the coffee and flow down into the
jug. When the coffee stops coming out put the switch
to the Off position.
Important:
• The tank can only be opened safely when all the
water has been used up. To release the pressure, pla—
—
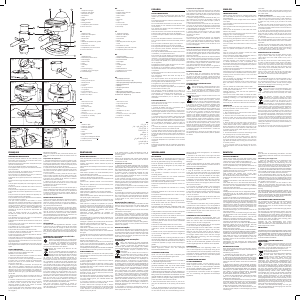
ES
1. Depósito de agua
2. Selector café-vapor
3. Tubo de vaporización
4. Portafiltros
5. Filtro
6. Bandeja de goteo
7. Jarra
8. Recogecables
9. Cuchara dosificadora
10. Boquilla de vapor
PT
1. Depósito de água
2. Selector café-vapor
3. Tubo vaporizador
4. Porta-filtros
5. Filtro
6. Bandeja para recolher as gotas
7. Jarro
8. Enrolador do cabo
9. Colher doseadora
10. Doseador
HU
1.Víztartály
2.Kávé-gŒzszabályozó
3.GŒzkieresztŒcsŒ
4.SzırŒtartó
5.SzırŒ
6.CsepegtetŒkanna
7. Üvegkanna
8.VezetékfeltekerŒ
9. Adagolókanál
10. GŒzkieresztŒ
BU
GB
1. Water tank
2. Coffee-steam selector
3. Steam pipe
4. Filter holder
5. Filter
6. Drip tray
7. Jug
8. Cable coiler
9. Measuring scoop
10. Steam nozzle
RU
RO
1. Rezervor apã
2. Selector cafea-abur
3. Tub de vaporizare
4. Portfiltru
5. Filtru
6. Tava de picurare
7. Canã
8. Loc pentru strângerea cablului
9. Lingurã pentru dozare
10 Gura aburului
AR
1
2
3
4
5
6
7
8
9
10
NOTAS IMPORTANTES
• Lea con atención las instrucciones antes de usar la
cafetera por primera vez. Guárdelas para futuras con—
—
sultas.
• Conéctese únicamente a la tensión indicada en la
placa de características.
• Es recomendable un enchufe con toma de tierra.
• Este aparato ha sido diseñado exclusivamente para
uso doméstico.
• No emplee el aparato para usos diferentes de los
descritos en este manual.
• Tanto al introducir como al sacar la clavija del enchu-
—
fe, el selector debe estar en la posición de apagado.
• Coloque siempre el aparato sobre una superficie lisa
y estable.
• Evite mover el aparato durante su funcionamiento.
• No coloque el aparato cerca de la bañera, ducha o
piscina.
• No permitir el uso del aparato a personas (incluidos
niños) con capacidades intelectuales o sensoriales
disminuidas o con insuficiente experiencia y cono-
—
cimientos, a no ser que sean vigilados o hayan sido
instruidos en el manejo del aparato por la persona
responsable de su seguridad.
• Mantenga la máquina fuera del alcance de los niños.
Asegúrese de que no juegan con ella.
• El aparato no se ha diseñado para su utilización con
un temporizador externo o un sistema de control re-—
moto separado.
• No introduzca la cafetera en agua u otros líquidos.
• No manipule el aparato con las manos mojadas.
• No haga funcionar el aparato con el cable enrollado.
• No toque las partes calientes. Manipule la cafetera
por las asas e interruptores.
• No deje la cafetera desatendida cuando esté en fun-
—
cionamiento, ni en presencia de niños.
• Desenchufe de la toma cuando no esté en uso y an-
—
tes de su limpieza.
• No desconecte tirando del cable. No deje la co-
—
nexión colgando.
• No deje el aparato cerca de una fuente de calor ni
permita que el cable toque superficies calientes.
• No haga funcionar la cafetera sin agua.
• Asegúrese de que la tapa del depósito está cerrada
antes de poner la cafetera en marcha.
• Antes de su limpieza compruebe que el aparato se
encuentra desconectado y frío.
• No ponga en marcha la cafetera con el cable o en-
—
chufe dañados, si ha observado que no funciona co——
rrectamente o si ha sufrido daños de algún tipo.
• Las reparaciones y cambios de cable deben ser
realizadas exclusivamente por un Servicio Técnico
Autorizado.
FUNCIONAMIENTO
Antes del primer uso lave todos los accesorios y hága—
—
la funcionar una vez sin café.
Preparación de Café Exprés
1. Conecte el aparato a la red y compruebe que el
selector está en la posición de apagado.
2. Desenrosque el tapón del depósito y vierta la canti-
—
dad de agua deseada. La jarra indica la cantidad nece-—
saria para dos o cuatro tazas. Gire el tapón y apriételo
con fuerza.
3. Coloque el filtro en el portafiltros. Para poner el
café guíese por las marcas de dos y cuatro tazas del
filtro. Limpie el café que pueda quedar en el borde
del portafiltros.
Importante: Para obtener un resultado óptimo con su
cafetera de hidropresión, utilice un café con un mo li do
grueso, tipo cafetera italiana. No prense el café.
4. Coloque el portafiltros. Coloque la jarra de manera
que la abertura coincida con la salida de café.
5. Gire el selector hasta la posición café. El piloto se
iluminará. Al cabo de unos minutos el agua hierve y
cae a través del café molido a la jarra. Cuando el café
termine de salir vuelva a poner el interruptor en la po-
—
sición de apagado.
Importante:
• El depósito sólo puede ser abierto con seguridad
cuando toda el agua ha sido utilizada. Para liberar la
presión, coloque una jarra con agua bajo el vapori—
—
zador y gire el selector hasta la posición de vapor.
Cuando el vapor deje de salir vuelva a poner el
selector en la posición de apagado.
• Después preparar café, el portafiltro debe dejarse
enfriar durante dos minutos antes de retirarlo de la ca-
—
fetera.
Preparación de Capuccino
1. Siga las instrucciones para hacer café. El indicador
de nivel de la jarra marca la cantidad que se precisa
para preparar dos tazas de café y la espuma de la le-
—
che. Para preparar cuatro tazas, llene la jarra hasta la
parte inferior de la banda metálica.
2. Cuando obtenga la cantidad deseada de café pon—
—
ga el selector en la posición de apagado. Ponga una
jarra con leche fría bajo la salida de vapor y sitúe el
selector en la posición vapor.
3. Para obtener espuma coloque el tubo de vapor
justo en la superficie de la leche y mueva la jarra en
sentido circular. Una vez preparada la espuma suba y
baje ligeramente la jarra para calentar la leche. Vuelva
a situar el selector en «apagado».
4. Vierta la leche con espuma en el café. Si lo desea
puede espolvorearlo con canela o chocolate molido y
decorarlo con canela en rama.
MANTENIMIENTO Y LIMPIEZA
Antes de proceder a la limpieza desconecte el apara-
—
to de la red. Lave las partes móviles con agua y jabón.
Pase un paño húmedo para limpiar el cuerpo de la
cafetera.
Es necesario realizar regularmente una limpieza del
vaporizador para asegurarse de que no se encuentra
obstruida. Para limpiar el interior del tubo del vapori—
—
zador llene el depósito con agua suficiente como para
una taza y accione el vaporizador sin leche. Cierre el
vaporizador y frote inmediatamente la boquilla con
un paño húmedo. Tenga cuidado al realizar esta ope-—
ración, pues podría estar aún muy caliente. En caso
de estar obstruido, el tubo del vaporizador se puede
desatornillar con el orificio hexagonal de la cuchara
dosificadora y limpiar con una aguja.
Después de cada uso, vacíe el depósito. No la guarde
con el portafiltros colocado. El cable puede recogerse
debajo del aparato.
DESCALCIFICACION
La cafetera debe ser regularmente descalcificada.
Vierta en el depósito dos tazas de vinagre y haga fun-
—
cionar el aparato sin café dos veces, incluído el tubo
de vapor. Para eliminar los restos de vinagre, hágalo
funcionar sólo con agua dos veces más.
ADVERTENCIAS DE DEPOSICION/
ELIMINACION
Para su transporte, nuestras mercancías cuen-—
tan con un embalaje optimizado. Este con-—
siste –por principio— en materiales no conta-—
minantes que deberían ser entregados como
materia prima secundaria al servicio local de elimina——
ción de basuras.
Este producto cumple la Directiva de la UE
2002/96/CE.
El símbolo del cubo de basura tachado sobre el
aparato indica que el producto, cuando finalice
su vida útil, deberá desecharse separado de los
residuos domésticos, llevándolo a un centro de
desecho de residuos separado para aparatos eléctricos
o electrónicos o devolviéndolo a su distribuidor cuando
compre otro aparato similar. El usuario es el responsable
de llevar el aparato a un centro de desecho de residuos
especiales al finalizar su vida útil. De lo contrario, podrá
ser sancionado en virtud de los reglamentos de desecho
de residuos vigentes. Si el aparato inutilizado es reco-
—
gido correctamente como residuo separado, podrá ser
reciclado, tratado y desechado de forma ecológica; esto
evita un impacto negativo sobre el medio ambiente y la
salud, y contribuye al reciclaje de los materiales del pro-—
ducto. Para obtener más información sobre los servicios
de desecho de residuos disponibles, contacte con su
agencia de desecho de residuos local o con la tienda
donde compró el aparato. Los fabricantes e importa-—
dores se hacen responsables del reciclaje, tratamiento y
desecho ecológico, sea directamente o a través de un
sistema público.
Su Ayuntamiento o Municipio le informará sobre posi-
—
bilidades de deposición/elimi nación para los aparatos
en desuso.
ce a jug of water under the steam sprayer and turn the
selector to the steam position. When the steam stops
coming out put the switch back to the Off position.
• After making the coffee, the filter holder should be
left to cool down for a few minutes before removing it
from the coffee maker.
Preparing Cappuccino
1. Follow the instructions for making coffee. Remember
that slightly more water will be necessary to froth up
the milk.
2. When you have made the desired amount of co—
—
ffee put the switch to the Off position. Place a jug of
cold milk under the steam outlet and then switch the
selector to the steam position.
3. To obtain froth, place the steam pipe just on the
surface of the milk and move the jug with a circular
motion. Once the froth is ready move the jug up and
down slightly to heat up the milk. Put the selector back
to the «Off» position.
4. Pour the frothed-up milk onto the coffee. If so desi-
—
red, it can be sprinkled with cinnamon or grated cho-—
colate and decorated with a stick of cinnamon.
MAINTENANCE & CLEANING
Unplug the appliance from the mains before procee-
—
ding to clean it. Remove the drip tray and filter holder.
Wash the moving parts with soapy water. Wipe down
the coffee maker’s body with a damp cloth.
It is necessary to regularly flush the steam nozzle
through to stop it from becoming blocked. To clean
the inside of the steam pipe, fill the tank with enough
water for one cup and use the steam spray without any
milk. Switch off the steam and rub the nozzle down
with a damp cloth immediately afterwards. Take care
when doing this as it may still be very hot. In the event
that it is blocked, the steam pipe can be unscrewed by
using the hexagonal hole on the measuring scoop and
then cleaned out using a needle.
Empty out any water that may be left over after each
use. Do not store it away with the filter holder fitted.
The cable can be coiled up under the appliance.
DESCALING
The coffee maker should be descaled regularly: Dilute
one cup of vinegar in one cup of water, pour the mix-
—
ture into the tank and run the appliance, including the
steam pipe, twice, but without any coffee. To flush out
any vinegar remains run it with just water, twice more.
ADVICE ON DISPOSAL:
Our goods come in optimised packaging.
This basically consists in using non-contami-—
nating materials which should be handed
over to the local waste disposal service as
secondary raw materials.
This product complies with EU Directive
2002/96/CE. The crossed wheelie bin symbol
shown on the appliance indicates that when
it comes to dispose of the product it must
not be included in with household refuse. It
must be taken to a special refuse collection
point for electric and electronic appliances or retur-—
ned to the distributor when purchasing a similar
appliance. Under current refuse disposal regulations,
users who fail to take discarded appliances to special
refuse collection points may be penalised. Correct
disposal of discarded appliances means that they can
be recycled and processed ecologically, helping the
environment and allowing materials used in the pro——
duct to be reused. For more information on available
waste disposal schemes contact your local refuse ser-—
vice or the shop where the product was purchased.
Manufacturers and importers are responsible for eco-—
logical recycling, processing and disposal of pro-—
ducts, whether directly or via a public system.
Your local town council can provide you with informa-
—
tion about how to dispose of obsolete appliances.
REMARQUES IMPORTANTES
• Avant d’utiliser la cafetière pour la première fois, lire
attentivement ces instructions. Conservez-les pour de
futures consultations.
• Brancher uniquement sur la tension indiquée sur la
plaque des caractéristiques.
• Il est conseillé d’utiliser une prise de terre.
• Cet appareil a été conçu pour une utilisation domes-
—
tique exclusivement.
• Ne pas employer cet appareil pour des utilisations
autres que celles indiquées dans ce manuel.
• Que ce soit pour introduire comme pour sortir la fi-
—
che de la prise, le sélecteur doit être éteint.
• L’appareil doit toujours être placé sur une surface
lisse et stable.
• Eviter de bouger l’appareil quand il fonctionne.
• Ne pas confier l’appareil à des enfants ou à des per-
—
sonnes aux capacités sensorielles ou intellectuelles
diminuées ou ne dispo-sant pas d’une expérience ou
d’une connaissance suffisante, sauf si elles le font sous
surveillance ou si elles ont bénéficié préalablement
d’une information à propos de la manipulation de
l’appareil de la part de la personne responsable de
leur sécurité.
• Tenir les enfants éloignés de la machine. Bien sur-
—
veiller les enfants afin de les empêcher de jouer avec
l’appareil.
• Cet appareil ne fonctionne ni avec un temporisateur
externe ni avec une télécommande.
• Ne pas introduire l’appareil dans l’eau ou autres
liquides.
• Ne manipulez jamais l’appareil, les mains mouillées.
• Ne pas faire fonctionner l’appareil avec le câble en-
—
roulé.
• Ne pas toucher les surfaces chaudes. Pour manipu—
ler la cafetière, servez-vous de l’anse et des interrup—
—
teurs.
• Ne laissez jamais fonctionner la cafetière sans survei-
—
llance, et plus particulièrement près des enfants.
• Si vous n’utilisez pas la cafetière et avant de la netto—
—
yer, débranchez-la de la prise.
• Ne débranchez jamais en tirant du câble. Ne pas lais—
—
ser pendre le cordon.
• Ne jamais laisser l’appareil près d’une source de cha-
—
leur, le cordon ne doit pas toucher les surfaces chaudes.
• Ne pas faire fonctionner la cafetière sans eau.
• Avant de mettre en marche la cafetière, assurez-vous
que le couvercle du réservoir est bien fermé.
• Avant de le nettoyer, vérifiez si l’appareil est bien
débranché et complètement froid.
• Ne pas le faire fonctionner si le câble ou la fiche sont
abîmés ou si vous remarquez que l’appareil ne fonc—
—
tionne pas correctement ou s’il a subi un dommage
quelconque.
• Les réparations et remplacements de câble doivent
être réalisés exclusivement par un Service Technique
Agréé.
FONCTIONNEMENT
Avant la première utilisation, il est conseillé de laver
tous les accessoires et de faire fonctionner une fois la
cafetière sans café.
Préparation d’un expresso
1. Connectez l’appareil au réseau et vérifiez si le sélec—
—
teur sur trouve sur la position “éteint”.
2. Dévissez le bouchon de réservoir et versez la quan-
—
tité d’eau voulue. La verseuse indique la quantité né-—
cessaire pour deux ou trois tasses. Tournez le bouchon
et serrez-le très fort.
3. Placez le filtre dans le porte-filtres. Pour mettre le
café, guidez-vous par les marques de deux et quatre
tasses du filtre. Nettoyez le café resté sur le bord du
porte-filtre.
Important: Pour que votre cafetière à hydropression
vous donne un excellent résultat, il faudra utiliser un
café moulu gros, type cafetière italienne. Ne tasser pas
le café.
4. Placez le porte-filtres. Placez ensuite la verseuse de fa —
çon à ce que l’ouverture coïncide avec la sortie du café.
5. Tournez le sélecteur jusqu’à la position café. Le
voyant lumineux s’allumera. Quelques minutes après,
l’eau bout et tombe dans la verseuse à travers le café
moulu. Quand le café ne coule plus, placez à nouveau
l’interrupteur sur la position “éteint”.
Important :
• On peut ouvrir le réservoir en toute sécurité seule-
—
ment quand toute l’eau a été utilisée. Pour lâcher la
pression, placez un récipient avec de l’eau sous le
vaporisateur et tournez le sélecteur jusqu’à la position
vapeur. Quand la vapeur cesse, placer à nouveau le
sélecteur sur la position “éteint”.
• Après la préparation du café, il faut laisser refroidir le
porte-filtre durant deux minutes avant de l’enlever de
la cafetière.
Préparation du Capuccino
Suivre les mêmes instructions données pour la prépa—
—
ration du café. N’oubliez pas que pour vaporiser du
lait, il faut une quantité d’eau légèrement supérieure.
1. Quand on aura obtenu la quantité de café voulue, il
faudra placer le sélecteur sur la position “éteint”.
Placez un récipient avec du lait froid sous la sortie de
vapeur et placez le sélecteur sur la position vapeur.
3. Pour faire la crème, placez la buse vapeur juste à la
surface du lait et faites tourner le récipient. Dès obten-
—
tion de la crème, montez et descendez légèrement
le récipient pour chauffer le lait. Placez à nouveau le
sélecteur sur la position “éteint”.
4. Versez le lait avec la crème dans le café. Si vous le
souhaitez vous pouvez saupoudrer de cannelle ou de
chocolat râpé et décorer avec une brindille de cannelle.
ENTRETIEN ET NETTOYAGE
Avant le nettoyage, débranchez l’appareil du réseau.
Démontez le réceptacle pour les gouttes de café et
le porte-filtre. Lavez les parties mobiles à l’eau et au
savon. Passez un chiffon humide pour nettoyer le
corps de la cafetière.
Le vaporisateur doit être nettoyé régulièrement pour
éviter qu’il se bouche. Pour nettoyer l’intérieur du
tuyau du vaporisateur, remplir le réservoir avec l’eau
d’une tasse environ et actionner le vaporisateur sans
lait. Fermer le vaporisateur et frotter immédiatement la
buse avec un chiffon humide. Faire très attention car la
buse pourrait encore être très chaude. Si le tuyau est
bouché, dévisser avec l’orifice hexagonal de la cuillère
à doser et nettoyer à l’aide d’une aiguille.
Après chaque utilisation, videz l’eau qu’il pourrait
encore y avoir dans le réservoir. Ne rangez pas la ca-
—
fetière avec le porte-filtre placé. Le cordon doit être
enroulé sous l’appareil.
DÉTARTRAGE
La cafetière doit être détartrée régulièrement. Diluer
une tasse de vinaigre dans une tasse d’eau, versez le
mélan ge dans le réservoir et faites fonctionner l’appa—
reil sans ca fé deux fois, y compris la buse vapeur. Pour
éliminer les restes de vinaigre, faites fonctionner deux
fois en core, la cafetière avec de l’eau seulement.
REMARQUES CONCERNANT LE DÉ PÔT / ÉLI—
MINATION DES DÉCHETS
Toutes nos marchandises sont conditionnées
dans un emballage optimisé pour le trans-—
port. En principe, ces emballages sont com-—
posés de matériaux non polluants qui de-—
vront être déposés comme matière première secon-—
daire au Service Local d’élimination des déchets.
Produit aux normes de la Directive de l’UE
2002/96/CE.
Le logo “poubelle” apposé sur l’appareil indique
que tout appareil électroménager hors d’usage
ne doit pas être jeté dans les déchets ménagers
mais être déposé dans un centre de collecte de
déchets d’appareils électriques ou électroniques ou qu’il
doit être remis à votre vendeur à l’occasion de l’achat d’un
nouvel appareil. Il incombe à l’utilisateur de déposer lui-
même l’appareil hors d’usage dans un centre de collecte
spécialement prévu à cet effet, faute de quoi, celui-ci
risque de se voir sanctionné pour manquement au règle—
—
ment en vigueur concernant les déchets. Si l’appareil hors
d’usage est correctement collecté comme déchet trié, il
pourra être recyclé, traité et éliminé écologiquement évi-—
tant ainsi tout impact négatif sur l’environnement tout en
contribuant au recyclage des matériaux qui composent
le produit. Pour toutes informations relatives aux Services
d’élimination des déchets, adressez-vous à la déchetterie
de votre ville ou à votre vendeur habituel. Les fabricants
et les importateurs réalisent le recyclage, le traitement
et l’élimination écologique, soit directement soit par
l’intermédiaire d’un système public.
Pour toute information concernant le dépôt et
l’élimination des appareils usagés, renseignez-vous
auprès de la Mairie de votre Commune ou de la
Préfecture de votre Département.
NOTAS IMPORTANTES
• Leia atentamente as instruções antes de utilizar a
máquina de café pela primeira vez. Guarde-as para
futuras consultas.
• Ligue-a unicamente à tensão indicada na placa de
características.
• Recomenda-se a utilização duma tomada com li-
—
gação á t erra.
• Este aparelho foi exclusivamente desenhado para
uso doméstico.
• Não utilize o aparelho com outras finalidades, distin-
—
tas das referidas neste manual.
• Tanto ao introduzir como ao retirar a ficha da toma-
—
da, o selector deverá estar na posição Off.
• Coloque sempre o aparelho sobre uma superfície
lisa e estável.
• Evite mover o aparelho durante o seu funcio-namento.
• Não permitir a utilização do aparelho por pessoas
(incluindo crianças) de capacidade física, sensorial ou
mental diminuída ou sem conhecimento ou experiên-
—
cia suficiente, a não ser sob supervisão ou após de——
vida instrução na utilização do aparelho pela pessoa
responsável pela sua segurança.
• Mantenha crianças afastadas do aparelho ou super-
—
visione-as para garantir que não brinquem com o apa——
relho.
• O aparelho não foi concebido para ser utilizado com
um temporizador externo ou um sistema de controlo
remoto em separado.
• Não mergulhe a máquina de café em água nem
em nenhum outro liquido.
• Não manipule o aparelho com as mãos molhadas.
• Não ponha o aparelho em funcionamento estando o
cabo enrolado.
• Não toque as superfícies quentes. Manipule a má-
—
quina de café pelas pegas e interruptores.
• Não deixe a máquina de café em funciona mento
sem estar sob vigilância, especial mente se existirem
crianças por perto.
• Desligue o aparelho da tomada quando não esti ver a
utilizá-lo e antes de efectuar a sua limpeza.
• Nunca desligue puxando pelo cabo. Não deixe o
cabo pendurado.
• Não deixe o aparelho perto de fontes de calor nem
deixe que o cabo toque superfícies quentes.
• Não ponha a máquina de café em funcionamento
sem água.
• Certifique-se de que a tampa do depósito está fe cha —
da antes de pôr a máquina de café em funcio na men to.
• Antes de efectuar a sua limpeza comprove que o
aparelho está desligado e frio.
• Não ponha a máquina de café em funciona men to
se o cabo ou a ficha estiverem estragados, se observa
que esta não funciona correctamente ou quando tiver
sofrido qualquer tipo de dano.
• As reparações e mudanças de cabo deverão ser
rea li za das exclusivamente por um Serviço Técnico
Autorizado.
FUNCIONAMENTO
Antes de utilizar a sua máquina de café pela primeira
vez lave todos os acessórios e ponha-a a funcionar
uma vez sem café.
Preparação do Café Expresso
1. Ligue o aparelho á rede e comprove que o selector
está na posição Off.
2. Abra a tampa do depósito e deite a quantidade de
água desejada. O jarro tem indicada a quantidade ne-
—
cessária para duas ou quatro chávenas. Rode a tampa
e aperte-a com força.
3. Coloque o filtro no porta-filtros. Para por o café de-
—
verá guiar-se pelas marcas para duas e quatro cháve——
nas existentes no filtro. Limpe o café que possa ter
ficado na borda do porta-filtros.
Importante: Para obter um resultado óptimo com a
sua máquina de café expresso de hidropressão, utilize
um café com uma moagem grossa, tipo cafeteira italia——
na. Não comprima o café.
Coloque o porta-filtros. Coloque o jarro de ma neira
que a abertura coincida com a saída de café.
Rode o selector até á posição de café. A lâm pada-
piloto iluminar-se-á. Depois de uns minutos a água
começará a ferver e cairá através do café moído para
o jarro. Quando o café terminar de sair volte a pôr o
interruptor na posição Off.
Importante:
• Só poderá abrir o depósito com segurança depois
de toda a água ter sido utilizada. Para libertar a pressão
coloque um jarro com água debaixo do vaporizador e
rode o selector até á posição de vapor. Quando já não
sair vapor, volte a colocar o selector na posição Off.
• Depois de ter preparado café, deverá deixar arre-
—
fecer o porta-filtros durante dois minutos, antes de
retirá-lo da máquina de café.
PREPARAÇÃO DO CAPUCCINO
1. Siga as instruções dadas para fazer café. Tenha em
conta que para vaporizar o leite será necessá ria uma
quantidade de água ligeiramente superior.
2. Quando tiver a quantidade desejada de café, pon-
—
ha o selector na posição Off. Ponha um jarro com leite
frio debaixo da saída de vapor e coloque o selector
na posição de vapor.
3. Para conseguir espuma coloque o tubo de vapor
mesmo por cima da superfície do leite e mexa o ja-
—
rro fazendo círculos. Depois de preparada a espuma,
suba e baixe ligeiramente o jarro para aquecer o leite.
Volte a colocar o selector em Off..
4. Deite o leite com espuma no café. Se desejar po-
—
derá espalhar por cima canela ou chocolate moído e
decorá-lo com canela em rama.
MANUTENÇÃO E LIMPEZA
Antes de efectuar a limpeza desligue o aparelho da
rede eléctrica. Desmonte a bandeja para recolher as
gotas e o porta-filtro. Lave as peças moveis com água
e sabão. Passe um pano húmido para limpar o corpo
da máquina de café.
É necessário realizar regularmente uma limpeza do
vaporizador para certificar-se que este não está obs-
—
truído. Para limpar o interior do tubo do vaporizador
encha o depósito com água suficiente como para uma
chávena e ponha o vaporizador em funcionamento
sem leite. Feche o vaporizador e limpe imediatamente
a boquilha com um pano húmido. Deverá ter cuidado
ao realizar esta operação, pois esta poderia estar ain——
da muito quente. No caso de estar obstruído, o tubo
do vaporizador poderá ser desaparafusado com o
orifício hexagonal da colher doseadora e poderá lim——
par-se com uma agulha.
Depois de cada uso, esvazie a água que possa ter fi-
—
cado no depósito. Não o guarde com o porta-filtros
posto. O cabo poderá ficar recolhido debaixo do
aparelho.
DESCALCIFICAÇÃO
A máquina de café deverá passar regularmente por uma
descalcificação. Dilua uma chávena de vinagre numa
chávena de água, entorne a mistura no depósito e pon-
—
ha o aparelho a funcionar duas vezes, sem café, incluin-—
do o tubo do vapor. Para eliminar os restos de vi nagre,
ponha-a a funcionar mais duas vezes, só com água.
ADVERTÊNCIAS DE DEPOSIÇÃO /
ELIMINAÇÃO
Para o seu transporte, as nossas mercadorias
contam com uma embalagem optimizada.
Esta consiste — em principio- em materiais não
contaminantes que deveriam ser entregues
como matéria prima secundaria ao serviço local de eli-—
minação de lixos.
Este produto cumpre a Directiva da UE
2002/96/CE.
O símbolo de um caixote de lixo riscado so-
—
bre o aparelho indica que o produto, quando
finalize a sua vida útil, deverá deitar-se fora se-—
parado dos resíduos domésticos, levando-o
a um centro de materiais residuais com separação de
aparelhos eléctricos e electrónicos ou devolvendo-o
ao seu fornecedor ao comprar outro aparelho similar.
É ao usuário que lhe corresponde a responsabilidade
de levar o aparelho a um centro de materiais residuais
especiais ao finalizar a sua vida útil. Caso contrário, po-—
derá ser sancionado em virtude dos regulamentos de
materiais residuais vigentes. Se o aparelho inutilizado
for recolhido correctamente como resíduo separado,
poderá ser reciclado, tratado e eliminado de forma
ecológica; isto evita um impacto negativo sobre o meio
ambiente e a saúde, e contribui á reciclagem dos ma——
teriais do produto. Para obter mais informação sobre
os serviços de materiais residuais disponíveis, contacte
com a sua agência de materiais residuais local ou com
a loja onde comprou o aparelho. Os fabricantes e os
importadores tornam-se responsáveis pela reciclagem,
tratamento e eliminação ecológica, seja directamente
ou através de um sistema público.
A sua Câmara ou Município informar-lhe-á sobre as
possibilidades de deposição/eliminação para os apa-
—
relhos que já não se usam.
BIZTONSÁGTECHNIKAI ELÃÍRÁSOK
•OlvassaelfigyelmesenezelŒírásokat,mielŒttelŒször
használatbavesziakávéfŒzŒt,tartsamegazútmutatót
késŒbbiproblémáktisztázásaérdekében
•AkészülékhasználataelŒttellenŒrizzeazadattáblán,
hogyakészülékmegadottfeszültségemegegyezik-ea
hálózatifeszültséggel.
•Ajánlatosföldeltkonnektorokhasználata.
•Ezakészülékcsakháztartásicélrakészült.
•NehasználjaakávéfŒzŒtahasználatiutasításbanle—
—
írtaktóleltérŒcélra.
• Mind az elektromos vezeték a konnektorból való
kihúzásánálmindabehelyezésénélakészüléketkap-
—
csoljaki.
• A kávéfŒzŒt állítsa mindig egyenes kiegyenlített fe-
—
lületre.
•Kerüljeakészülékmozgatásátahasználatalatt.
• Az olyan személyeknek (gyermekeket is beleértve),
vagy hiányos tapasztalattal és tudással rendelkeznek,
ne engedje használni a készüléket, kivéve, ha felügyeli
• Gyermekeket ne engedjen a készülék közelébe. A
gyermekeket ne engedje a készülékkel játszani.
—
• Ne merítse a kávéfŒzŒt vízbe vagy más egyéb
folyadékba.
•Nehasználjaakészüléketvizeskézzel.
•Nehasználjaakészüléketfeltekertkábellel.
•A készülékforrórészeit ne érintse meg.Használja a
fogantyútésagombokat.
•NehagyjaakávéfŒzŒtegyedül,akkorhahasználatban
van,vagyhagyerekekisjelenvannak.
•KapcsoljakiakávéfŒzŒtéshúzzakiacsatlakozótha
márnemkívánjahasználniilletvetisztításelŒtt.
• Ne húzza ki a kábelt rángatva. Ne hagyja hogy a
csatlakozó kábel azasztalról vagymásegyéb helyrŒl
lelógjon.
•Nehagyjaakészüléketmelegfelületekközelében,és
nehagyjahogyakábelmelegrészeketérintsen.
•Nehasználjaakészüléketvíznélkül.
• EllenŒrizze, hogy a víztartály teteje zárva van —e,
mielŒttbekapcsoljaakészüléket.
•AtisztításelŒttellenŒrizze,hogyakészüléklehılt,és
kikapcsoltállapotbanvan.
•Nehasználjaakészüléket,haacsatlakozókábelvagy
akonnektorbármilyenkárosodástszenvedett,illetveha
bármilyenmıködésirendellenességetvagykárosodást
észlelt.
•Ajavítástilletveakárosodottcsatlakozókábeltcsak
a jótállási javításokkal megbízott szerviz szakemberei
javíthatjákmeg.
HASZNÁLAT
TisztítsamegakávéfŒzŒtazelsŒhasználatelŒtt
Expres kávékészítés
1. Kapcsolja a készüléket az elektromos áramra.
EllenŒrizze,hogykivan-ekapcsolva.
2.Csavarjaleavíztartálytetejétéstöltsönvizetavíz-
—
tartályba.Akannajelziaszükségesvízmennyiségetkét
vagynégycsészerészére. Szorosancsavarjavisszaa
zárócsavart.
3.Helyezzeafiltertafiltertartóba.Akávéadagolásá-
—
hoztöltsebe a kávét a megfelelŒ jeligattólfüggŒen,
hogykétvagynégyszemélyrefŒzi.Töröljeleakávéma-—
radványokatakávétartószélérŒl.
Fontos:Egyjobbkávékészítéseérdekébenhasználjon
nagyobb szemcséjıre ŒrŒlt kávét, olasz kávéhoz ha-
—
sonlóan.Nepréseljeakávét.
4.Helyezze be a szırŒtartót.Tegye akannát a helyé-
—
re,úgyhogy a kannaszájaegyezzen a kávékifolyási
helyével.
5.Állítsaaszabályozótakávépozícióba.AzellenŒrzŒ
lámpakigyullad.PárpercmúlvaavízfelforrésazŒrŒlt
kávénátszırŒdveakannábafolyik.Amikorakávételje—
—
senlefolytkapcsoljakiakészüléket.
Fontos:
Avíztartálycsakakkornyithatóbiztonságosan,hamár
teljesenkiürült.Anyomásfelszabadításáhozhelyezzen
Внимание:
ПРИГОТОВЛЕНИЕ КАПУЧИНО
УХОД И ЧИСТКА
ДЕКАЛЬЦИНАЦИЯ
РЕКОМЕНДАЦИИ ПО СДАЧЕ/ВЫБРОСУ
УПАКОВКИ И СТАРЫХ АППАРАТОВ
FRANÇAIS PORTUGUES MAGYAR
ESPAÑOL
ENGLISH
egyvízzelteltkannát a gŒzkieresztŒ alá ésfordítsa a
szabályozótagŒzpozícióba.HaagŒzteljesenelpá-—
rolgottkapcsoljakiismételtenakészüléket.
AkávéelkészítéseutánakávészırŒthagyjakétpercig
lehılnimielŒttkivesziakészülékbŒl.
Kapucíner Készitése
1.Kövesseakávékészítésénélleírtakat.Figyeljen arra,
hogyatejgŒzöléséhezvalamivelnagyobbvízmennyi-
—
ségrevanszükség.
2. Ha akívánt kávémennyiséglefojt kapcsolja kiaké-
—
szüléket.Helyezzen egyhidegtejjelmegteltkannát a
gŒzkieresztŒaláésaszabályozókapcsolótállítsaagŒz
pozícióba.
3.AhabosításeléréseérdekébentartsaagŒzkieresztŒ
csövetatejfelszínére,és mozgassaakannát körkörö—
—
sen.AhabképzŒdéseutánmozgassale-felakannáta
tejteljesfelmelegítéséhez.Zárjaelaszabályozót.
4.Öntsea habosítotttejet a kávéba. Hakívánja meg-
—
szórhatjaegykisŒröltfahéjjal,vagykakaóval,ésdíszít-—
hetiegyágfahéjjal.
TÁROLÁS ÉS TISZTÍTÁS
AtisztításmegkezdéseelŒttbizonyosodjonmegarról,
hogyakávéfŒzŒkilegyenkapcsolva és a csatlakozót
húzzaki.SzereljeszétacsöpögtetŒtésafiltertartót.A
mozgathatórészeketmossaelvízzelésmosogatószer-
—
rel.Amıanyagházattöröljelevizesruhával.
AjánlatosagŒzkieresztŒcsŒállandótisztítása,azeldu-
—
guláselkerüléseérdekében.AcsŒ belsejénektisztítá-—
sáhoztöltsemeg a víztartályt egy csészényi kávéhoz
szükséges vízzel, és mıködtesse a gŒzkieresztŒt tej
használatanélkül.ZárjaelagŒzkieresztŒt,éstöröljele
acsövetazonnalegyvizesruhával.Járjonelóvatosan,
mivelacsŒmégnagyonmeleglehet.HaacsŒeldugult
lecsavarozhatjaazadagolókanálhatszögletıfejével,és
tisztítsamegegytıvel.
Mindenhasználatutánürítsekiavíztartót.Netároljaa
készüléketafiltertartóval.Akényelmestároláshozhasz-
—
náljaakészülékaljánbeépítettkábeltárolót.
VÍZKÃ ELTÁVOLÍTÁSA
AjánlatosakávéfŒzŒnélarendszeresvízkŒeltávolítás.
Keverjenelegypohárvízbenegypohárecetetésöntse
avíztartályba.MıködtesseakávéfŒzŒtkétszerkávénél-
—
kül,agŒzkieresztŒcsŒvelegyütt. Azeceteltávolítása
érdekébenmossaátakészüléketkétszertisztavízzel.
FIGYELMEZTETÉS A KÉSZÜLÉK
MEGSEMMISÍTÉSÉT ILLETÃEN
Az árucikkeink optimalizált csomagolásban
kerülnek kiszállításra. Ez alapjában a nem
központban másodlagos nyersanyagként.
—
szimbólum jelzi, hogy, amikor a termék hulla-—
dékrendelkezésre kerül, nem szabad a ház——
tartási hulladékok közé számítani. El kell szállí-—
tania egy különleges, elektronikai és elektro-—
vagy vissza kell küldenie a forgalmazóhoz egy hasonló
—
kiselejtezett készülékeket nem adják le egy speciális
helyes hulladékrendelkezése azt jelenti, hogy újra-—
hasznosíthatóak és ökológiailag feldolgozhatóak, vi-—
felhasznált anyagok újra használhatóságát. További in——
—
duljon a helyi hulladék központjához, vagy az üzlet-—
—
feldolgozásáért és hulladékrendelkezéséért, akár köz-—
vetlenül vagy egy nyilvános rendszeren keresztül.
A helyi városi tanácsa információkkal szolgál az elavult
ВАЖНЫЕ ПРИМЕЧАНИЯ
•
• Запрещается использовать аппарат не по
назначению.
ФУНКЦИОНИРОВАНИЕ
ПРИГОТОВЛЕНИЕ КОФЕ-ЭКСРЕСС
Внимание:
РУССКИЙ
FR
1. Réservoir eau
2. Sélecteur café/vapeur
3. Tuyau vaporisation
4. Porte-filtres
5. Filtre
6. Réceptacle pour les gouttes
7. Verseuse
8. Enrouleur de cordon
9. Cuillère à doser
10. Buse vapeur
CZ
1.NádrÏkanavodu
2.Voliãkáva-pára
3.Tryskavaporizátoru
4.Pouzdronafiltr
5.Filtr
6.Táceknaodkapávání
7. Konvice
8.Svinutí‰ÀÛry
9. Odmûrka
10. Ústív˘stupupáry
GR
1. Ntepøzito nero¥
2. Epilog™aq kaf™-atmo¥
3. Svl¸naq atmopoiht¸
4. U¸kh fºltro y
5. Fºltro
6. Dºskoq stajºmatoq
7. Kanåta
8. Perit¥lijh kalvdºoy
9. Koytåla dosologºaq
10. Stømio atmo¥
It was an obligatory reference that our readers had asked us for a long time for our manuals section. We refer to the Ufesa coffee machine user manuals, which are well ordered, so you don’t waste time looking for them.
This Spanish brand has spread worldwide, and there are already many Ufesa coffee machines in circulation, so the demand for their user manuals is always present.
Some of them are already many years old, and faults start appearing in any electrical appliance sooner or later. We are all familiar with the strange tendency for appliance user manuals to get lost or disappear when we have a problem and need them urgently.
Related: Ufesa Troubleshooting
All Ufesa coffee machine instruction manuals (PDF for download)
If you are interested in downloading any Ufesa user manuals of any model, we have compiled all the manuals we could find in this list. The Ufesa brand is not very popular outside of Spain, but some models are long-lived and discontinued, so it is difficult to find their instruction manuals.
- Ufesa CE7115 user manual
- Ufesa Eleganza CE7120 user manual
- Ufesa Futura Eleganza CE7121 user manual
- Ufesa CE7125 user manual
- Ufesa Presto CE7130 user manual
- Ufesa Dueto Creme CE7140 user manual
- Ufesa CE7141 user manual
- Ufesa Duetto Creme CE7150 user manual
- Ufesa Duetto Creme CE7165 user manual
- Ufesa Naturale CE7195 user manual
- Ufesa CE7240 user manual
- Ufesa CE7255 user manual
- Ufesa Capriccio Plus 40 CG1601-1602 user manual
- Ufesa CG7113 user manual
- Ufesa CG7123 user manual
- Ufesa CG7212 user manual
- Ufesa CG7213 user manual
- Ufesa CG7214 user manual
- Ufesa Arial 20 CG7215 user manual
- Ufesa Arial 40 CG7220 user manual
- Ufesa Arial 60 CG7221 user manual
- Ufesa CG7223 user manual
- Ufesa Allegro CG7225 user manual
- Ufesa CG7226 user manual
- Ufesa CG7230 user manual
- Ufesa CG7231 user manual
- Ufesa CG7232 user manual
- Ufesa CG7236 user manual
- Ufesa Aroma Duo CK7345 user manual
- Ufesa CK7350 user manual
- Ufesa CK7351 user manual
- Ufesa CK7355 user manual
- Ufesa Dueto Espresso CK7360 user manual
These Ufesa coffee machine manuals are PDF and can be downloaded to your computer or viewed directly online, whichever you prefer. We always recommend downloading them as long as possible so you will have them in a safe place for future occasions.
Some people print it out, which is not a bad idea either, but if you are going to do that, we advise you to check the PDF first because they usually come in many languages. You can edit the PDF and keep only the pages corresponding to your preferred language.
Remember that these files are hosted on a server outside our site, and we are not responsible for their maintenance. Of course, for professional coherence, we will try to keep the list updated whenever possible and periodically remove broken links, but we can always miss some. We ask for your understanding in this regard.
Перейти к контенту
Инструкции по эксплуатации
Укажите здесь торговую марку и тип
В настоящее время вы находитесь на странице с руководствами Ufesa кофеварка. Выберите один из продуктов, чтобы сразу перейти к руководству по этому продукту. Не можете найти Ufesa ? Тогда попробуйте вбить в поле поиска Ufesa и модель, чтобы найти нужное руководство Ufesa. На ManualsPDF.ru в настоящее время имеется 26 руководств Ufesa . Самые популярные Ufesa кофеварка:
- Ufesa CE7141
- Ufesa Dueto Espresso CK7360
- Ufesa CK7355
Последнее добавленное руководство Ufesa было добавлено 2019-06-25, и это Ufesa Naturale CE7195.
Перейти к контенту
![]()
Русские электронные инструкции по эксплуатации
Постоянно обновляемый большой каталог документации по эксплуатации и использованию современных устройств и оборудования на русском языке. Бесплатное скачивание файлов.
Главная
Просмотр инструкции в pdf


Инструкция по эксплуатации кофеварки Ufesa CE7238 Cream.
Скачать инструкцию к кофеварке Ufesa CE7238 Cream (714,47 КБ)

Инструкции кофеварок Ufesa
« Инструкция к кофеварке La Pavoni LPLPLH01EU
» Инструкция к кофеварке Carraro ИКТ: Italco Milano 4ч. + мол.кофе Brasile 250г
Вам также может быть интересно

Инструкция к кофеварке Ufesa CE8030 Milazzo

Инструкция к кофеварке Ufesa 20bar CE7255

Инструкция к кофеварке Ufesa CE8020 Capri

Инструкция к кофеварке Ufesa CE7244 Brescia

Инструкция к кофеварке Ufesa CE7240

Инструкция к холодильнику Pozis RS-405

Инструкция к пылесосу Tefal City Space TW2522RA

Инструкция к автомобильному видеорегистратору Digma FreeDrive 303 Mirror Dual Black
- Добавить инструкцию
- Заказать инструкцию
Не Включается
Вода Протекает Из-Под Рожка
Кофемашина Трещит, Гудит, А Кофе Не Варит
Не Реагирует На Нажатие Кнопок
Течёт Вода Из Под Машины
Кофемолка Вращается Но Не Молит Кофе
На Панели Управления Высвечивается Ошибка
Невзбивается Молочная Пена Бог 80323
Не Открывается Крышка После Использования
После Приготовления Кофе Невозможно Открутить Крышку Кофеварки. Раньше Это Лечилось Временем, Когда Кофеварка Остужалась То Крышка Открывалась, Теперь Все Равно Крышка Прокручивается. Есть Ли Решения Этой Проблемы? Модель Кофеварки Ufesa Ce7115 Capriccios
Течет Мало Кофе
Не Работает Помпа -Не Течет Вода
Вода Не Поступает Через Кофе
Помол
Сбились Настройки Помола.как Настроить?
Не Поступает Вода , Зерна Перемыливаются, В Сухом Виде Выбрасывается В Контейнер
Ошибку Выдает — «Неисправность В Водопровод»
Бойлер Не Греет
Нет Пара И Горячей Воды
Кофемашина Работает, Но Свистит Когда Наливает Кофе.
Кофемашина Работает, Но Свистит Когда Наливает Кофе.
Не Работает Помпа -Не Течет Вода
Не Работает Помпа -Не Течет Вода
Плохо Греет
При Включении Почти Сразу Загорается Зеленая Лампа Сигнала Что Кофевака Готова К Работе
Нет Выхода Кипятка
Мигает Красная Лампа Конечно Кино В Норме
Поддон С Контейнером
Поддон С Контейнером Для Отходов Не В Тавляется До Конца
Приготовленный Кофе Выливается В Накопитель Для Отходов
Приготовленный Кофе Выливается В Накопитель Для Отходов
Нет Кофе
Зерна Засыпаны В Отсек, Перемалываются, Однако Появляется Ошибка «Нет Кофе», Процесс Приготовления Останавливается, Отходы Выбрасываются В Накопитель.
Ошибка Номер 67
Не Запускаетья Кофемашина
Кофемашина Работает, Но Свистит Когда Наливает Кофе.
Кофемашина Работает, Но Свистит Когда Наливает Кофе.
Тусклый Экран
Потускнел Экран Кофемашины Вдвое
Не Выбрасывает Жмых
В Контейнере Набирается Вода После Польной Очистки И Очистки Молочной Системы
Wmf 1800S
Вода Не Поступает
Кофемашина Работает,Но Кофе Не Выливается
Ошибка 5
Не Включается Насос
При Подаче Сигнала На Приготовление Не Включается Насос
Звільнити Резервуар Для Відходів
Ошибка
Вентиляция
Delonghi
При Нажатии Кнопки Питания, Срабатывает Кофемолка И Не Останавливается
Заполнение Системы
Машинка Очень Гудит И Трещит, Выдает На Экране Заполнение Системы. Хотелось Бы Просто Инструкцию Как Пользоваться Машинкой
Не Включается
На Табло Пишет Open Tap
Взрывание Таблетки
Когда Открываешь Взрывается Таблетка Идёт Пар И Шипит

Кофеварка UFESA CE7238 Cream — инструкция пользователя по применению, эксплуатации и установке на русском языке. Мы надеемся, она поможет вам решить возникшие у вас вопросы при эксплуатации техники.
Вы можете скачать инструкцию к UFESA CE7238 Cream по ссылке ниже, если не хотите ждать загрузки. Если остались вопросы, задайте их в комментариях после инструкции.
«Загружаем инструкцию», означает, что нужно подождать пока файл загрузится и можно будет его читать онлайн. Некоторые инструкции очень большие и время их появления зависит от вашей скорости интернета.
Полезные видео
Характеристики
Остались вопросы?
Не нашли свой ответ в руководстве или возникли другие проблемы? Задайте свой вопрос в форме ниже с подробным описанием вашей ситуации, чтобы другие люди и специалисты смогли дать на него ответ. Если вы знаете как решить проблему другого человека, пожалуйста, подскажите ему
![:)]()
Часто задаваемые вопросы

Как посмотреть инструкцию к UFESA CE7238 Cream?
Необходимо подождать полной загрузки инструкции в сером окне на данной странице или скачать кликнув по специальной кнопке.
Руководство на русском языке?
Все наши руководства представлены на русском языке или схематично, поэтому вы без труда сможете разобраться с вашей моделью
Как можно распечатать инструкцию?
Скачайте ее по специальной кнопке над формой чтения на ваше устройства и отправьте на печать.
Требуется руководство для вашей Ufesa CE7115 Эспрессо-машина? Ниже вы можете просмотреть и загрузить бесплатно руководство в формате PDF. Кроме того, приведены часто задаваемые вопросы, рейтинг изделия и отзывы пользователей, что позволит оптимально использовать ваше изделие. Если это не то руководство, которое вы искали, – свяжитесь с нами.
Ваше устройство неисправно, и в руководстве отсутствует решение? Перейдите в Repair Café для получения бесплатных ремонтных услуг.
Руководство

Рейтинг
Сообщите нам, что вы думаете о Ufesa CE7115 Эспрессо-машина, оставив оценку продукта. Хотите поделиться вашими впечатлениями от данного изделия или задать вопрос? Вы можете оставить комментарий в нижней части страницы.
Довольны ли вы данным изделием Ufesa?
Да Нет
2 голоса
Часто задаваемые вопросы
Наша служба поддержки выполняет поиск полезной информации по изделиям и отвечает на часто задаваемые вопросы. Если вы заметили неточность в наших часто задаваемых вопросах, сообщите нам об этом с помощью нашей контактной формы.
Что помол говорит о кофе? Проверенный
Тип помола во многом определяет вкус кофе. Более тонкий помол обычно означает более сильный вкус, а более крупный помол означает более мягкий вкус. При очень мелком помоле может получиться горький кофе.
Это было полезно (431)
Как лучше всего хранить кофе? Проверенный
Кофе лучше всего хранить в чистой и герметичной банке.
Это было полезно (124)
IMPORTANT NOTES
• Read the instructions carefully before using the co—
—
ffee maker for the first time. Safeguard them for future
reference.
• Only connect it to the voltage stated on the charac—
—
teristics plate.
• It is advisable to use an earthed electrical socket.
• This appliance has been designed exclusively for do—
—
mestic use.
• Do not use the appliance for uses other than those
stated in the this manual.
• The On/Off switch should be in the Off position
when plugging it in or when unplugging it.
• Always place the appliance on a flat, level surface.
• Try not move the appliance while it is operating.
• This appliance is not intended for use by persons
(including children) with reduced physical, sensory
or mental capabilities, or lack of experience and
knowledge, unless they have been given supervision
or instruction concerning use of the appliance by a
person responsible for their safety.
• Children should be supervised to ensure that they do
not play with the appliance.
• The apliance is not intended to be operated by
means of an external timer or separate remote-control
system.
• Do not immerse the coffee maker in water or
any other liquids.
• Do not handle the appliance with wet hands.
• Do not operate the appliance with the cable still
coiled.
• Do not touch the hot surfaces. Handle the coffee
maker by its handles or buttons.
• Do not leave the coffee maker unattended when it is
in use, nor when there are children about.
• Unplug it from the mains when it is not in use and
before cleaning it.
• Do not unplug it by tugging on the mains cable. Do
not leave the plug hanging freely.
• Do not leave the appliance close to sources of heat
nor allow the cable to come into contact with hot
surfaces.
• Do not operate the coffee maker without water.
• Make sure that the lid on the tank is closed before
switching the coffee maker on.
• Before cleaning it, make sure that the appliance is
unplugged and cold.
• Do not switch the coffee maker on if either the cable
or plug are damaged, if it can be detected that it is not
operating correcting, or if it has suffered any type of
damage.
• Cable repairs and replacements must be carried out
exclusively by an Authorised Technical Service Centre.
OPERATION
Before using it for the first time wash all of the acces-
—
sories and operate it once without coffee.
Preparing Espresso Coffee
1. Plug the appliance into the mains and check that the
switch is in the Off position.
2. Unscrew the lid on the tank and pour in the desired
amount of water. The jug shows the amounts required
for two or four cups. Screw the lid back on and tighten
it securely.
3. Place the filter into the filter holder. Use the filter’s
two or four cup level marks to gauge the amount of
coffee needed. Clean off any coffee that may be left
around the edge of the filter holder.
Important: To get the best results out of your espres-—
so coffee maker, use a coarsely ground coffee, Italian
espresso type. Do not pack the coffee down.
4. Put the filter holder into position. Place the jug so
that the opening lines up with the coffee outlet.
5. Turn the selector to the coffee position. The pilot
lamp will come on. After a few minutes the water will
boil, filter through the coffee and flow down into the
jug. When the coffee stops coming out put the switch
to the Off position.
Important:
• The tank can only be opened safely when all the
water has been used up. To release the pressure, pla—
—
ES
1. Depósito de agua
2. Selector café-vapor
3. Tubo de vaporización
4. Portafiltros
5. Filtro
6. Bandeja de goteo
7. Jarra
8. Recogecables
9. Cuchara dosificadora
10. Boquilla de vapor
PT
1. Depósito de água
2. Selector café-vapor
3. Tubo vaporizador
4. Porta-filtros
5. Filtro
6. Bandeja para recolher as gotas
7. Jarro
8. Enrolador do cabo
9. Colher doseadora
10. Doseador
HU
1.Víztartály
2.Kávé-gŒzszabályozó
3.GŒzkieresztŒcsŒ
4.SzırŒtartó
5.SzırŒ
6.CsepegtetŒkanna
7. Üvegkanna
8.VezetékfeltekerŒ
9. Adagolókanál
10. GŒzkieresztŒ
BU
GB
1. Water tank
2. Coffee-steam selector
3. Steam pipe
4. Filter holder
5. Filter
6. Drip tray
7. Jug
8. Cable coiler
9. Measuring scoop
10. Steam nozzle
RU
RO
1. Rezervor apã
2. Selector cafea-abur
3. Tub de vaporizare
4. Portfiltru
5. Filtru
6. Tava de picurare
7. Canã
8. Loc pentru strângerea cablului
9. Lingurã pentru dozare
10 Gura aburului
AR
1
2
3
4
5
6
7
8
9
10
NOTAS IMPORTANTES
• Lea con atención las instrucciones antes de usar la
cafetera por primera vez. Guárdelas para futuras con—
—
sultas.
• Conéctese únicamente a la tensión indicada en la
placa de características.
• Es recomendable un enchufe con toma de tierra.
• Este aparato ha sido diseñado exclusivamente para
uso doméstico.
• No emplee el aparato para usos diferentes de los
descritos en este manual.
• Tanto al introducir como al sacar la clavija del enchu-
—
fe, el selector debe estar en la posición de apagado.
• Coloque siempre el aparato sobre una superficie lisa
y estable.
• Evite mover el aparato durante su funcionamiento.
• No coloque el aparato cerca de la bañera, ducha o
piscina.
• No permitir el uso del aparato a personas (incluidos
niños) con capacidades intelectuales o sensoriales
disminuidas o con insuficiente experiencia y cono-
—
cimientos, a no ser que sean vigilados o hayan sido
instruidos en el manejo del aparato por la persona
responsable de su seguridad.
• Mantenga la máquina fuera del alcance de los niños.
Asegúrese de que no juegan con ella.
• El aparato no se ha diseñado para su utilización con
un temporizador externo o un sistema de control re-—
moto separado.
• No introduzca la cafetera en agua u otros líquidos.
• No manipule el aparato con las manos mojadas.
• No haga funcionar el aparato con el cable enrollado.
• No toque las partes calientes. Manipule la cafetera
por las asas e interruptores.
• No deje la cafetera desatendida cuando esté en fun-
—
cionamiento, ni en presencia de niños.
• Desenchufe de la toma cuando no esté en uso y an-
—
tes de su limpieza.
• No desconecte tirando del cable. No deje la co-
—
nexión colgando.
• No deje el aparato cerca de una fuente de calor ni
permita que el cable toque superficies calientes.
• No haga funcionar la cafetera sin agua.
• Asegúrese de que la tapa del depósito está cerrada
antes de poner la cafetera en marcha.
• Antes de su limpieza compruebe que el aparato se
encuentra desconectado y frío.
• No ponga en marcha la cafetera con el cable o en-
—
chufe dañados, si ha observado que no funciona co——
rrectamente o si ha sufrido daños de algún tipo.
• Las reparaciones y cambios de cable deben ser
realizadas exclusivamente por un Servicio Técnico
Autorizado.
FUNCIONAMIENTO
Antes del primer uso lave todos los accesorios y hága—
—
la funcionar una vez sin café.
Preparación de Café Exprés
1. Conecte el aparato a la red y compruebe que el
selector está en la posición de apagado.
2. Desenrosque el tapón del depósito y vierta la canti-
—
dad de agua deseada. La jarra indica la cantidad nece-—
saria para dos o cuatro tazas. Gire el tapón y apriételo
con fuerza.
3. Coloque el filtro en el portafiltros. Para poner el
café guíese por las marcas de dos y cuatro tazas del
filtro. Limpie el café que pueda quedar en el borde
del portafiltros.
Importante: Para obtener un resultado óptimo con su
cafetera de hidropresión, utilice un café con un mo li do
grueso, tipo cafetera italiana. No prense el café.
4. Coloque el portafiltros. Coloque la jarra de manera
que la abertura coincida con la salida de café.
5. Gire el selector hasta la posición café. El piloto se
iluminará. Al cabo de unos minutos el agua hierve y
cae a través del café molido a la jarra. Cuando el café
termine de salir vuelva a poner el interruptor en la po-
—
sición de apagado.
Importante:
• El depósito sólo puede ser abierto con seguridad
cuando toda el agua ha sido utilizada. Para liberar la
presión, coloque una jarra con agua bajo el vapori—
—
zador y gire el selector hasta la posición de vapor.
Cuando el vapor deje de salir vuelva a poner el
selector en la posición de apagado.
• Después preparar café, el portafiltro debe dejarse
enfriar durante dos minutos antes de retirarlo de la ca-
—
fetera.
Preparación de Capuccino
1. Siga las instrucciones para hacer café. El indicador
de nivel de la jarra marca la cantidad que se precisa
para preparar dos tazas de café y la espuma de la le-
—
che. Para preparar cuatro tazas, llene la jarra hasta la
parte inferior de la banda metálica.
2. Cuando obtenga la cantidad deseada de café pon—
—
ga el selector en la posición de apagado. Ponga una
jarra con leche fría bajo la salida de vapor y sitúe el
selector en la posición vapor.
3. Para obtener espuma coloque el tubo de vapor
justo en la superficie de la leche y mueva la jarra en
sentido circular. Una vez preparada la espuma suba y
baje ligeramente la jarra para calentar la leche. Vuelva
a situar el selector en «apagado».
4. Vierta la leche con espuma en el café. Si lo desea
puede espolvorearlo con canela o chocolate molido y
decorarlo con canela en rama.
MANTENIMIENTO Y LIMPIEZA
Antes de proceder a la limpieza desconecte el apara-
—
to de la red. Lave las partes móviles con agua y jabón.
Pase un paño húmedo para limpiar el cuerpo de la
cafetera.
Es necesario realizar regularmente una limpieza del
vaporizador para asegurarse de que no se encuentra
obstruida. Para limpiar el interior del tubo del vapori—
—
zador llene el depósito con agua suficiente como para
una taza y accione el vaporizador sin leche. Cierre el
vaporizador y frote inmediatamente la boquilla con
un paño húmedo. Tenga cuidado al realizar esta ope-—
ración, pues podría estar aún muy caliente. En caso
de estar obstruido, el tubo del vaporizador se puede
desatornillar con el orificio hexagonal de la cuchara
dosificadora y limpiar con una aguja.
Después de cada uso, vacíe el depósito. No la guarde
con el portafiltros colocado. El cable puede recogerse
debajo del aparato.
DESCALCIFICACION
La cafetera debe ser regularmente descalcificada.
Vierta en el depósito dos tazas de vinagre y haga fun-
—
cionar el aparato sin café dos veces, incluído el tubo
de vapor. Para eliminar los restos de vinagre, hágalo
funcionar sólo con agua dos veces más.
ADVERTENCIAS DE DEPOSICION/
ELIMINACION
Para su transporte, nuestras mercancías cuen-—
tan con un embalaje optimizado. Este con-—
siste –por principio— en materiales no conta-—
minantes que deberían ser entregados como
materia prima secundaria al servicio local de elimina——
ción de basuras.
Este producto cumple la Directiva de la UE
2002/96/CE.
El símbolo del cubo de basura tachado sobre el
aparato indica que el producto, cuando finalice
su vida útil, deberá desecharse separado de los
residuos domésticos, llevándolo a un centro de
desecho de residuos separado para aparatos eléctricos
o electrónicos o devolviéndolo a su distribuidor cuando
compre otro aparato similar. El usuario es el responsable
de llevar el aparato a un centro de desecho de residuos
especiales al finalizar su vida útil. De lo contrario, podrá
ser sancionado en virtud de los reglamentos de desecho
de residuos vigentes. Si el aparato inutilizado es reco-
—
gido correctamente como residuo separado, podrá ser
reciclado, tratado y desechado de forma ecológica; esto
evita un impacto negativo sobre el medio ambiente y la
salud, y contribuye al reciclaje de los materiales del pro-—
ducto. Para obtener más información sobre los servicios
de desecho de residuos disponibles, contacte con su
agencia de desecho de residuos local o con la tienda
donde compró el aparato. Los fabricantes e importa-—
dores se hacen responsables del reciclaje, tratamiento y
desecho ecológico, sea directamente o a través de un
sistema público.
Su Ayuntamiento o Municipio le informará sobre posi-
—
bilidades de deposición/elimi nación para los aparatos
en desuso.
ce a jug of water under the steam sprayer and turn the
selector to the steam position. When the steam stops
coming out put the switch back to the Off position.
• After making the coffee, the filter holder should be
left to cool down for a few minutes before removing it
from the coffee maker.
Preparing Cappuccino
1. Follow the instructions for making coffee. Remember
that slightly more water will be necessary to froth up
the milk.
2. When you have made the desired amount of co—
—
ffee put the switch to the Off position. Place a jug of
cold milk under the steam outlet and then switch the
selector to the steam position.
3. To obtain froth, place the steam pipe just on the
surface of the milk and move the jug with a circular
motion. Once the froth is ready move the jug up and
down slightly to heat up the milk. Put the selector back
to the «Off» position.
4. Pour the frothed-up milk onto the coffee. If so desi-
—
red, it can be sprinkled with cinnamon or grated cho-—
colate and decorated with a stick of cinnamon.
MAINTENANCE & CLEANING
Unplug the appliance from the mains before procee-
—
ding to clean it. Remove the drip tray and filter holder.
Wash the moving parts with soapy water. Wipe down
the coffee maker’s body with a damp cloth.
It is necessary to regularly flush the steam nozzle
through to stop it from becoming blocked. To clean
the inside of the steam pipe, fill the tank with enough
water for one cup and use the steam spray without any
milk. Switch off the steam and rub the nozzle down
with a damp cloth immediately afterwards. Take care
when doing this as it may still be very hot. In the event
that it is blocked, the steam pipe can be unscrewed by
using the hexagonal hole on the measuring scoop and
then cleaned out using a needle.
Empty out any water that may be left over after each
use. Do not store it away with the filter holder fitted.
The cable can be coiled up under the appliance.
DESCALING
The coffee maker should be descaled regularly: Dilute
one cup of vinegar in one cup of water, pour the mix-
—
ture into the tank and run the appliance, including the
steam pipe, twice, but without any coffee. To flush out
any vinegar remains run it with just water, twice more.
ADVICE ON DISPOSAL:
Our goods come in optimised packaging.
This basically consists in using non-contami-—
nating materials which should be handed
over to the local waste disposal service as
secondary raw materials.
This product complies with EU Directive
2002/96/CE. The crossed wheelie bin symbol
shown on the appliance indicates that when
it comes to dispose of the product it must
not be included in with household refuse. It
must be taken to a special refuse collection
point for electric and electronic appliances or retur-—
ned to the distributor when purchasing a similar
appliance. Under current refuse disposal regulations,
users who fail to take discarded appliances to special
refuse collection points may be penalised. Correct
disposal of discarded appliances means that they can
be recycled and processed ecologically, helping the
environment and allowing materials used in the pro——
duct to be reused. For more information on available
waste disposal schemes contact your local refuse ser-—
vice or the shop where the product was purchased.
Manufacturers and importers are responsible for eco-—
logical recycling, processing and disposal of pro-—
ducts, whether directly or via a public system.
Your local town council can provide you with informa-
—
tion about how to dispose of obsolete appliances.
REMARQUES IMPORTANTES
• Avant d’utiliser la cafetière pour la première fois, lire
attentivement ces instructions. Conservez-les pour de
futures consultations.
• Brancher uniquement sur la tension indiquée sur la
plaque des caractéristiques.
• Il est conseillé d’utiliser une prise de terre.
• Cet appareil a été conçu pour une utilisation domes-
—
tique exclusivement.
• Ne pas employer cet appareil pour des utilisations
autres que celles indiquées dans ce manuel.
• Que ce soit pour introduire comme pour sortir la fi-
—
che de la prise, le sélecteur doit être éteint.
• L’appareil doit toujours être placé sur une surface
lisse et stable.
• Eviter de bouger l’appareil quand il fonctionne.
• Ne pas confier l’appareil à des enfants ou à des per-
—
sonnes aux capacités sensorielles ou intellectuelles
diminuées ou ne dispo-sant pas d’une expérience ou
d’une connaissance suffisante, sauf si elles le font sous
surveillance ou si elles ont bénéficié préalablement
d’une information à propos de la manipulation de
l’appareil de la part de la personne responsable de
leur sécurité.
• Tenir les enfants éloignés de la machine. Bien sur-
—
veiller les enfants afin de les empêcher de jouer avec
l’appareil.
• Cet appareil ne fonctionne ni avec un temporisateur
externe ni avec une télécommande.
• Ne pas introduire l’appareil dans l’eau ou autres
liquides.
• Ne manipulez jamais l’appareil, les mains mouillées.
• Ne pas faire fonctionner l’appareil avec le câble en-
—
roulé.
• Ne pas toucher les surfaces chaudes. Pour manipu—
ler la cafetière, servez-vous de l’anse et des interrup—
—
teurs.
• Ne laissez jamais fonctionner la cafetière sans survei-
—
llance, et plus particulièrement près des enfants.
• Si vous n’utilisez pas la cafetière et avant de la netto—
—
yer, débranchez-la de la prise.
• Ne débranchez jamais en tirant du câble. Ne pas lais—
—
ser pendre le cordon.
• Ne jamais laisser l’appareil près d’une source de cha-
—
leur, le cordon ne doit pas toucher les surfaces chaudes.
• Ne pas faire fonctionner la cafetière sans eau.
• Avant de mettre en marche la cafetière, assurez-vous
que le couvercle du réservoir est bien fermé.
• Avant de le nettoyer, vérifiez si l’appareil est bien
débranché et complètement froid.
• Ne pas le faire fonctionner si le câble ou la fiche sont
abîmés ou si vous remarquez que l’appareil ne fonc—
—
tionne pas correctement ou s’il a subi un dommage
quelconque.
• Les réparations et remplacements de câble doivent
être réalisés exclusivement par un Service Technique
Agréé.
FONCTIONNEMENT
Avant la première utilisation, il est conseillé de laver
tous les accessoires et de faire fonctionner une fois la
cafetière sans café.
Préparation d’un expresso
1. Connectez l’appareil au réseau et vérifiez si le sélec—
—
teur sur trouve sur la position “éteint”.
2. Dévissez le bouchon de réservoir et versez la quan-
—
tité d’eau voulue. La verseuse indique la quantité né-—
cessaire pour deux ou trois tasses. Tournez le bouchon
et serrez-le très fort.
3. Placez le filtre dans le porte-filtres. Pour mettre le
café, guidez-vous par les marques de deux et quatre
tasses du filtre. Nettoyez le café resté sur le bord du
porte-filtre.
Important: Pour que votre cafetière à hydropression
vous donne un excellent résultat, il faudra utiliser un
café moulu gros, type cafetière italienne. Ne tasser pas
le café.
4. Placez le porte-filtres. Placez ensuite la verseuse de fa —
çon à ce que l’ouverture coïncide avec la sortie du café.
5. Tournez le sélecteur jusqu’à la position café. Le
voyant lumineux s’allumera. Quelques minutes après,
l’eau bout et tombe dans la verseuse à travers le café
moulu. Quand le café ne coule plus, placez à nouveau
l’interrupteur sur la position “éteint”.
Important :
• On peut ouvrir le réservoir en toute sécurité seule-
—
ment quand toute l’eau a été utilisée. Pour lâcher la
pression, placez un récipient avec de l’eau sous le
vaporisateur et tournez le sélecteur jusqu’à la position
vapeur. Quand la vapeur cesse, placer à nouveau le
sélecteur sur la position “éteint”.
• Après la préparation du café, il faut laisser refroidir le
porte-filtre durant deux minutes avant de l’enlever de
la cafetière.
Préparation du Capuccino
Suivre les mêmes instructions données pour la prépa—
—
ration du café. N’oubliez pas que pour vaporiser du
lait, il faut une quantité d’eau légèrement supérieure.
1. Quand on aura obtenu la quantité de café voulue, il
faudra placer le sélecteur sur la position “éteint”.
Placez un récipient avec du lait froid sous la sortie de
vapeur et placez le sélecteur sur la position vapeur.
3. Pour faire la crème, placez la buse vapeur juste à la
surface du lait et faites tourner le récipient. Dès obten-
—
tion de la crème, montez et descendez légèrement
le récipient pour chauffer le lait. Placez à nouveau le
sélecteur sur la position “éteint”.
4. Versez le lait avec la crème dans le café. Si vous le
souhaitez vous pouvez saupoudrer de cannelle ou de
chocolat râpé et décorer avec une brindille de cannelle.
ENTRETIEN ET NETTOYAGE
Avant le nettoyage, débranchez l’appareil du réseau.
Démontez le réceptacle pour les gouttes de café et
le porte-filtre. Lavez les parties mobiles à l’eau et au
savon. Passez un chiffon humide pour nettoyer le
corps de la cafetière.
Le vaporisateur doit être nettoyé régulièrement pour
éviter qu’il se bouche. Pour nettoyer l’intérieur du
tuyau du vaporisateur, remplir le réservoir avec l’eau
d’une tasse environ et actionner le vaporisateur sans
lait. Fermer le vaporisateur et frotter immédiatement la
buse avec un chiffon humide. Faire très attention car la
buse pourrait encore être très chaude. Si le tuyau est
bouché, dévisser avec l’orifice hexagonal de la cuillère
à doser et nettoyer à l’aide d’une aiguille.
Après chaque utilisation, videz l’eau qu’il pourrait
encore y avoir dans le réservoir. Ne rangez pas la ca-
—
fetière avec le porte-filtre placé. Le cordon doit être
enroulé sous l’appareil.
DÉTARTRAGE
La cafetière doit être détartrée régulièrement. Diluer
une tasse de vinaigre dans une tasse d’eau, versez le
mélan ge dans le réservoir et faites fonctionner l’appa—
reil sans ca fé deux fois, y compris la buse vapeur. Pour
éliminer les restes de vinaigre, faites fonctionner deux
fois en core, la cafetière avec de l’eau seulement.
REMARQUES CONCERNANT LE DÉ PÔT / ÉLI—
MINATION DES DÉCHETS
Toutes nos marchandises sont conditionnées
dans un emballage optimisé pour le trans-—
port. En principe, ces emballages sont com-—
posés de matériaux non polluants qui de-—
vront être déposés comme matière première secon-—
daire au Service Local d’élimination des déchets.
Produit aux normes de la Directive de l’UE
2002/96/CE.
Le logo “poubelle” apposé sur l’appareil indique
que tout appareil électroménager hors d’usage
ne doit pas être jeté dans les déchets ménagers
mais être déposé dans un centre de collecte de
déchets d’appareils électriques ou électroniques ou qu’il
doit être remis à votre vendeur à l’occasion de l’achat d’un
nouvel appareil. Il incombe à l’utilisateur de déposer lui-
même l’appareil hors d’usage dans un centre de collecte
spécialement prévu à cet effet, faute de quoi, celui-ci
risque de se voir sanctionné pour manquement au règle—
—
ment en vigueur concernant les déchets. Si l’appareil hors
d’usage est correctement collecté comme déchet trié, il
pourra être recyclé, traité et éliminé écologiquement évi-—
tant ainsi tout impact négatif sur l’environnement tout en
contribuant au recyclage des matériaux qui composent
le produit. Pour toutes informations relatives aux Services
d’élimination des déchets, adressez-vous à la déchetterie
de votre ville ou à votre vendeur habituel. Les fabricants
et les importateurs réalisent le recyclage, le traitement
et l’élimination écologique, soit directement soit par
l’intermédiaire d’un système public.
Pour toute information concernant le dépôt et
l’élimination des appareils usagés, renseignez-vous
auprès de la Mairie de votre Commune ou de la
Préfecture de votre Département.
NOTAS IMPORTANTES
• Leia atentamente as instruções antes de utilizar a
máquina de café pela primeira vez. Guarde-as para
futuras consultas.
• Ligue-a unicamente à tensão indicada na placa de
características.
• Recomenda-se a utilização duma tomada com li-
—
gação á t erra.
• Este aparelho foi exclusivamente desenhado para
uso doméstico.
• Não utilize o aparelho com outras finalidades, distin-
—
tas das referidas neste manual.
• Tanto ao introduzir como ao retirar a ficha da toma-
—
da, o selector deverá estar na posição Off.
• Coloque sempre o aparelho sobre uma superfície
lisa e estável.
• Evite mover o aparelho durante o seu funcio-namento.
• Não permitir a utilização do aparelho por pessoas
(incluindo crianças) de capacidade física, sensorial ou
mental diminuída ou sem conhecimento ou experiên-
—
cia suficiente, a não ser sob supervisão ou após de——
vida instrução na utilização do aparelho pela pessoa
responsável pela sua segurança.
• Mantenha crianças afastadas do aparelho ou super-
—
visione-as para garantir que não brinquem com o apa——
relho.
• O aparelho não foi concebido para ser utilizado com
um temporizador externo ou um sistema de controlo
remoto em separado.
• Não mergulhe a máquina de café em água nem
em nenhum outro liquido.
• Não manipule o aparelho com as mãos molhadas.
• Não ponha o aparelho em funcionamento estando o
cabo enrolado.
• Não toque as superfícies quentes. Manipule a má-
—
quina de café pelas pegas e interruptores.
• Não deixe a máquina de café em funciona mento
sem estar sob vigilância, especial mente se existirem
crianças por perto.
• Desligue o aparelho da tomada quando não esti ver a
utilizá-lo e antes de efectuar a sua limpeza.
• Nunca desligue puxando pelo cabo. Não deixe o
cabo pendurado.
• Não deixe o aparelho perto de fontes de calor nem
deixe que o cabo toque superfícies quentes.
• Não ponha a máquina de café em funcionamento
sem água.
• Certifique-se de que a tampa do depósito está fe cha —
da antes de pôr a máquina de café em funcio na men to.
• Antes de efectuar a sua limpeza comprove que o
aparelho está desligado e frio.
• Não ponha a máquina de café em funciona men to
se o cabo ou a ficha estiverem estragados, se observa
que esta não funciona correctamente ou quando tiver
sofrido qualquer tipo de dano.
• As reparações e mudanças de cabo deverão ser
rea li za das exclusivamente por um Serviço Técnico
Autorizado.
FUNCIONAMENTO
Antes de utilizar a sua máquina de café pela primeira
vez lave todos os acessórios e ponha-a a funcionar
uma vez sem café.
Preparação do Café Expresso
1. Ligue o aparelho á rede e comprove que o selector
está na posição Off.
2. Abra a tampa do depósito e deite a quantidade de
água desejada. O jarro tem indicada a quantidade ne-
—
cessária para duas ou quatro chávenas. Rode a tampa
e aperte-a com força.
3. Coloque o filtro no porta-filtros. Para por o café de-
—
verá guiar-se pelas marcas para duas e quatro cháve——
nas existentes no filtro. Limpe o café que possa ter
ficado na borda do porta-filtros.
Importante: Para obter um resultado óptimo com a
sua máquina de café expresso de hidropressão, utilize
um café com uma moagem grossa, tipo cafeteira italia——
na. Não comprima o café.
Coloque o porta-filtros. Coloque o jarro de ma neira
que a abertura coincida com a saída de café.
Rode o selector até á posição de café. A lâm pada-
piloto iluminar-se-á. Depois de uns minutos a água
começará a ferver e cairá através do café moído para
o jarro. Quando o café terminar de sair volte a pôr o
interruptor na posição Off.
Importante:
• Só poderá abrir o depósito com segurança depois
de toda a água ter sido utilizada. Para libertar a pressão
coloque um jarro com água debaixo do vaporizador e
rode o selector até á posição de vapor. Quando já não
sair vapor, volte a colocar o selector na posição Off.
• Depois de ter preparado café, deverá deixar arre-
—
fecer o porta-filtros durante dois minutos, antes de
retirá-lo da máquina de café.
PREPARAÇÃO DO CAPUCCINO
1. Siga as instruções dadas para fazer café. Tenha em
conta que para vaporizar o leite será necessá ria uma
quantidade de água ligeiramente superior.
2. Quando tiver a quantidade desejada de café, pon-
—
ha o selector na posição Off. Ponha um jarro com leite
frio debaixo da saída de vapor e coloque o selector
na posição de vapor.
3. Para conseguir espuma coloque o tubo de vapor
mesmo por cima da superfície do leite e mexa o ja-
—
rro fazendo círculos. Depois de preparada a espuma,
suba e baixe ligeiramente o jarro para aquecer o leite.
Volte a colocar o selector em Off..
4. Deite o leite com espuma no café. Se desejar po-
—
derá espalhar por cima canela ou chocolate moído e
decorá-lo com canela em rama.
MANUTENÇÃO E LIMPEZA
Antes de efectuar a limpeza desligue o aparelho da
rede eléctrica. Desmonte a bandeja para recolher as
gotas e o porta-filtro. Lave as peças moveis com água
e sabão. Passe um pano húmido para limpar o corpo
da máquina de café.
É necessário realizar regularmente uma limpeza do
vaporizador para certificar-se que este não está obs-
—
truído. Para limpar o interior do tubo do vaporizador
encha o depósito com água suficiente como para uma
chávena e ponha o vaporizador em funcionamento
sem leite. Feche o vaporizador e limpe imediatamente
a boquilha com um pano húmido. Deverá ter cuidado
ao realizar esta operação, pois esta poderia estar ain——
da muito quente. No caso de estar obstruído, o tubo
do vaporizador poderá ser desaparafusado com o
orifício hexagonal da colher doseadora e poderá lim——
par-se com uma agulha.
Depois de cada uso, esvazie a água que possa ter fi-
—
cado no depósito. Não o guarde com o porta-filtros
posto. O cabo poderá ficar recolhido debaixo do
aparelho.
DESCALCIFICAÇÃO
A máquina de café deverá passar regularmente por uma
descalcificação. Dilua uma chávena de vinagre numa
chávena de água, entorne a mistura no depósito e pon-
—
ha o aparelho a funcionar duas vezes, sem café, incluin-—
do o tubo do vapor. Para eliminar os restos de vi nagre,
ponha-a a funcionar mais duas vezes, só com água.
ADVERTÊNCIAS DE DEPOSIÇÃO /
ELIMINAÇÃO
Para o seu transporte, as nossas mercadorias
contam com uma embalagem optimizada.
Esta consiste — em principio- em materiais não
contaminantes que deveriam ser entregues
como matéria prima secundaria ao serviço local de eli-—
minação de lixos.
Este produto cumpre a Directiva da UE
2002/96/CE.
O símbolo de um caixote de lixo riscado so-
—
bre o aparelho indica que o produto, quando
finalize a sua vida útil, deverá deitar-se fora se-—
parado dos resíduos domésticos, levando-o
a um centro de materiais residuais com separação de
aparelhos eléctricos e electrónicos ou devolvendo-o
ao seu fornecedor ao comprar outro aparelho similar.
É ao usuário que lhe corresponde a responsabilidade
de levar o aparelho a um centro de materiais residuais
especiais ao finalizar a sua vida útil. Caso contrário, po-—
derá ser sancionado em virtude dos regulamentos de
materiais residuais vigentes. Se o aparelho inutilizado
for recolhido correctamente como resíduo separado,
poderá ser reciclado, tratado e eliminado de forma
ecológica; isto evita um impacto negativo sobre o meio
ambiente e a saúde, e contribui á reciclagem dos ma——
teriais do produto. Para obter mais informação sobre
os serviços de materiais residuais disponíveis, contacte
com a sua agência de materiais residuais local ou com
a loja onde comprou o aparelho. Os fabricantes e os
importadores tornam-se responsáveis pela reciclagem,
tratamento e eliminação ecológica, seja directamente
ou através de um sistema público.
A sua Câmara ou Município informar-lhe-á sobre as
possibilidades de deposição/eliminação para os apa-
—
relhos que já não se usam.
BIZTONSÁGTECHNIKAI ELÃÍRÁSOK
•OlvassaelfigyelmesenezelŒírásokat,mielŒttelŒször
használatbavesziakávéfŒzŒt,tartsamegazútmutatót
késŒbbiproblémáktisztázásaérdekében
•AkészülékhasználataelŒttellenŒrizzeazadattáblán,
hogyakészülékmegadottfeszültségemegegyezik-ea
hálózatifeszültséggel.
•Ajánlatosföldeltkonnektorokhasználata.
•Ezakészülékcsakháztartásicélrakészült.
•NehasználjaakávéfŒzŒtahasználatiutasításbanle—
—
írtaktóleltérŒcélra.
• Mind az elektromos vezeték a konnektorból való
kihúzásánálmindabehelyezésénélakészüléketkap-
—
csoljaki.
• A kávéfŒzŒt állítsa mindig egyenes kiegyenlített fe-
—
lületre.
•Kerüljeakészülékmozgatásátahasználatalatt.
• Az olyan személyeknek (gyermekeket is beleértve),
vagy hiányos tapasztalattal és tudással rendelkeznek,
ne engedje használni a készüléket, kivéve, ha felügyeli
• Gyermekeket ne engedjen a készülék közelébe. A
gyermekeket ne engedje a készülékkel játszani.
—
• Ne merítse a kávéfŒzŒt vízbe vagy más egyéb
folyadékba.
•Nehasználjaakészüléketvizeskézzel.
•Nehasználjaakészüléketfeltekertkábellel.
•A készülékforrórészeit ne érintse meg.Használja a
fogantyútésagombokat.
•NehagyjaakávéfŒzŒtegyedül,akkorhahasználatban
van,vagyhagyerekekisjelenvannak.
•KapcsoljakiakávéfŒzŒtéshúzzakiacsatlakozótha
márnemkívánjahasználniilletvetisztításelŒtt.
• Ne húzza ki a kábelt rángatva. Ne hagyja hogy a
csatlakozó kábel azasztalról vagymásegyéb helyrŒl
lelógjon.
•Nehagyjaakészüléketmelegfelületekközelében,és
nehagyjahogyakábelmelegrészeketérintsen.
•Nehasználjaakészüléketvíznélkül.
• EllenŒrizze, hogy a víztartály teteje zárva van —e,
mielŒttbekapcsoljaakészüléket.
•AtisztításelŒttellenŒrizze,hogyakészüléklehılt,és
kikapcsoltállapotbanvan.
•Nehasználjaakészüléket,haacsatlakozókábelvagy
akonnektorbármilyenkárosodástszenvedett,illetveha
bármilyenmıködésirendellenességetvagykárosodást
észlelt.
•Ajavítástilletveakárosodottcsatlakozókábeltcsak
a jótállási javításokkal megbízott szerviz szakemberei
javíthatjákmeg.
HASZNÁLAT
TisztítsamegakávéfŒzŒtazelsŒhasználatelŒtt
Expres kávékészítés
1. Kapcsolja a készüléket az elektromos áramra.
EllenŒrizze,hogykivan-ekapcsolva.
2.Csavarjaleavíztartálytetejétéstöltsönvizetavíz-
—
tartályba.Akannajelziaszükségesvízmennyiségetkét
vagynégycsészerészére. Szorosancsavarjavisszaa
zárócsavart.
3.Helyezzeafiltertafiltertartóba.Akávéadagolásá-
—
hoztöltsebe a kávét a megfelelŒ jeligattólfüggŒen,
hogykétvagynégyszemélyrefŒzi.Töröljeleakávéma-—
radványokatakávétartószélérŒl.
Fontos:Egyjobbkávékészítéseérdekébenhasználjon
nagyobb szemcséjıre ŒrŒlt kávét, olasz kávéhoz ha-
—
sonlóan.Nepréseljeakávét.
4.Helyezze be a szırŒtartót.Tegye akannát a helyé-
—
re,úgyhogy a kannaszájaegyezzen a kávékifolyási
helyével.
5.Állítsaaszabályozótakávépozícióba.AzellenŒrzŒ
lámpakigyullad.PárpercmúlvaavízfelforrésazŒrŒlt
kávénátszırŒdveakannábafolyik.Amikorakávételje—
—
senlefolytkapcsoljakiakészüléket.
Fontos:
Avíztartálycsakakkornyithatóbiztonságosan,hamár
teljesenkiürült.Anyomásfelszabadításáhozhelyezzen
Внимание:
ПРИГОТОВЛЕНИЕ КАПУЧИНО
УХОД И ЧИСТКА
ДЕКАЛЬЦИНАЦИЯ
РЕКОМЕНДАЦИИ ПО СДАЧЕ/ВЫБРОСУ
УПАКОВКИ И СТАРЫХ АППАРАТОВ
FRANÇAIS PORTUGUES MAGYAR
ESPAÑOL
ENGLISH
egyvízzelteltkannát a gŒzkieresztŒ alá ésfordítsa a
szabályozótagŒzpozícióba.HaagŒzteljesenelpá-—
rolgottkapcsoljakiismételtenakészüléket.
AkávéelkészítéseutánakávészırŒthagyjakétpercig
lehılnimielŒttkivesziakészülékbŒl.
Kapucíner Készitése
1.Kövesseakávékészítésénélleírtakat.Figyeljen arra,
hogyatejgŒzöléséhezvalamivelnagyobbvízmennyi-
—
ségrevanszükség.
2. Ha akívánt kávémennyiséglefojt kapcsolja kiaké-
—
szüléket.Helyezzen egyhidegtejjelmegteltkannát a
gŒzkieresztŒaláésaszabályozókapcsolótállítsaagŒz
pozícióba.
3.AhabosításeléréseérdekébentartsaagŒzkieresztŒ
csövetatejfelszínére,és mozgassaakannát körkörö—
—
sen.AhabképzŒdéseutánmozgassale-felakannáta
tejteljesfelmelegítéséhez.Zárjaelaszabályozót.
4.Öntsea habosítotttejet a kávéba. Hakívánja meg-
—
szórhatjaegykisŒröltfahéjjal,vagykakaóval,ésdíszít-—
hetiegyágfahéjjal.
TÁROLÁS ÉS TISZTÍTÁS
AtisztításmegkezdéseelŒttbizonyosodjonmegarról,
hogyakávéfŒzŒkilegyenkapcsolva és a csatlakozót
húzzaki.SzereljeszétacsöpögtetŒtésafiltertartót.A
mozgathatórészeketmossaelvízzelésmosogatószer-
—
rel.Amıanyagházattöröljelevizesruhával.
AjánlatosagŒzkieresztŒcsŒállandótisztítása,azeldu-
—
guláselkerüléseérdekében.AcsŒ belsejénektisztítá-—
sáhoztöltsemeg a víztartályt egy csészényi kávéhoz
szükséges vízzel, és mıködtesse a gŒzkieresztŒt tej
használatanélkül.ZárjaelagŒzkieresztŒt,éstöröljele
acsövetazonnalegyvizesruhával.Járjonelóvatosan,
mivelacsŒmégnagyonmeleglehet.HaacsŒeldugult
lecsavarozhatjaazadagolókanálhatszögletıfejével,és
tisztítsamegegytıvel.
Mindenhasználatutánürítsekiavíztartót.Netároljaa
készüléketafiltertartóval.Akényelmestároláshozhasz-
—
náljaakészülékaljánbeépítettkábeltárolót.
VÍZKÃ ELTÁVOLÍTÁSA
AjánlatosakávéfŒzŒnélarendszeresvízkŒeltávolítás.
Keverjenelegypohárvízbenegypohárecetetésöntse
avíztartályba.MıködtesseakávéfŒzŒtkétszerkávénél-
—
kül,agŒzkieresztŒcsŒvelegyütt. Azeceteltávolítása
érdekébenmossaátakészüléketkétszertisztavízzel.
FIGYELMEZTETÉS A KÉSZÜLÉK
MEGSEMMISÍTÉSÉT ILLETÃEN
Az árucikkeink optimalizált csomagolásban
kerülnek kiszállításra. Ez alapjában a nem
központban másodlagos nyersanyagként.
—
szimbólum jelzi, hogy, amikor a termék hulla-—
dékrendelkezésre kerül, nem szabad a ház——
tartási hulladékok közé számítani. El kell szállí-—
tania egy különleges, elektronikai és elektro-—
vagy vissza kell küldenie a forgalmazóhoz egy hasonló
—
kiselejtezett készülékeket nem adják le egy speciális
helyes hulladékrendelkezése azt jelenti, hogy újra-—
hasznosíthatóak és ökológiailag feldolgozhatóak, vi-—
felhasznált anyagok újra használhatóságát. További in——
—
duljon a helyi hulladék központjához, vagy az üzlet-—
—
feldolgozásáért és hulladékrendelkezéséért, akár köz-—
vetlenül vagy egy nyilvános rendszeren keresztül.
A helyi városi tanácsa információkkal szolgál az elavult
ВАЖНЫЕ ПРИМЕЧАНИЯ
•
• Запрещается использовать аппарат не по
назначению.
ФУНКЦИОНИРОВАНИЕ
ПРИГОТОВЛЕНИЕ КОФЕ-ЭКСРЕСС
Внимание:
РУССКИЙ
FR
1. Réservoir eau
2. Sélecteur café/vapeur
3. Tuyau vaporisation
4. Porte-filtres
5. Filtre
6. Réceptacle pour les gouttes
7. Verseuse
8. Enrouleur de cordon
9. Cuillère à doser
10. Buse vapeur
CZ
1.NádrÏkanavodu
2.Voliãkáva-pára
3.Tryskavaporizátoru
4.Pouzdronafiltr
5.Filtr
6.Táceknaodkapávání
7. Konvice
8.Svinutí‰ÀÛry
9. Odmûrka
10. Ústív˘stupupáry
GR
1. Ntepøzito nero¥
2. Epilog™aq kaf™-atmo¥
3. Svl¸naq atmopoiht¸
4. U¸kh fºltro y
5. Fºltro
6. Dºskoq stajºmatoq
7. Kanåta
8. Perit¥lijh kalvdºoy
9. Koytåla dosologºaq
10. Stømio atmo¥