
Manual, Sony Alpha a7 ii, Video
full frame, Sony Alpha A7ii
The Sony Alpha Mark II was the first 5-axis sensor-based image stabilization. The Alpha series are performing pretty good as a full frame contender to Nikon and Canon.

Features
- Fast and effective, enhanced Fast Hybrid AF
- 24.3-megapixel 35mm full-frame Exmor™ CMOS sensor
- BIONZ X™ image processing engine
- Wi-Fi with NFC
- ISO 50-25600
- Up to 5 fps
Official Video Release
Official A7 Mark II Brochure
Download “Sony Alpha A7 Mark II ILCE-7M2 A7M2 Brochure” SonyAlphaInfo ILCE-7M2 A7M2 Brochure.pdf – Downloaded 2617 times – 5 MB
Download
Download “Sony Alpha A7 Mark II ILCE-7M2 A7M2 User Manual” SonyAlphaInfo ILCE-7M2 A7M2 User Manual.pdf – Downloaded 13686 times – 1 MB
*PDF Link verified working: Nov 2019
 Модель: Безеркальная фотокамера Sony Alpha ILCE-7M2
Год выпуска: 2014
Количество страниц: 252
Язык: русский
Формат: pdf
Размер: 1,4 Mb
Описание:
Sony Alpha ILCE-7M2 — системная камера со сменной оптикой, имеющая полноформатную (35,8 x 23,9 мм) матрицу разрешения 24 Мп, а также – впервые в этом классе — пятиосевую систему оптической стабилизации изображения, работающую на сдвиге матрицы. Alpha 7 II использует гибридный автофокус, имеющий 117 датчиков фазовой детекции, а также 25 зон контрастной детекции, встроенных в CMOS матрицу. Камера поддерживает кодек XAVCS, который записывает видео в формате 1080@60p с потоком 50 Мб/с.
Содержание
- Как использовать.
- Перед использованием.
- Названия частей.
- Проверка камеры и комплектации.
- Обозначение частей (Передняя сторона).
- Обозначение частей (Задняя сторона).
- Обозначение частей (Верхняя сторона/Вид сбоку).
- Обозначение частей (Вид снизу).
- Обозначение частей Объектив FE 28-70 mm F3.5-5.6 OSS (Прилагается к ILCE-7M2K).
- Значки и индикаторы.
- Список значков на мониторе.
- Список рамок искателя диапазона фокусировки.
- Использование ремня.
- Использование плечевого ремня.
- Прикрепление наглазника окуляра.
- Установка наглазника окуляра.
- Регулировка видоискателя.
- Регулировка видоискателя (регулировка диоптра).
- Встроенная справка.
- Об [Встроенная справка].
- Названия частей.
- Подготовка камеры.
- Зарядка аккумулятора.
- Зарядка аккумулятора в то время, когда он вставлен в камеру.
- Зарядка путем подключения к компьютеру.
- Вставка аккумулятора в камеру.
- Время работы аккумулятора и количество снимков, которые можно записать/воспроизвести с помощью аккумулятора.
- Подача питания с помощью сетевой розетки.
- Извлечение аккумулятора.
- Установка карты памяти (продается отдельно).
- Вставка карты памяти.
- Извлечение карты памяти.
- Присоединение объектива.
- Прикрепление объектива.
- Снятие объектива.
- Прикрепление светозащитной бленды объектива.
- Примечания по замене объектива.
- Установка даты и времени.
- Установка даты и времени.
- Зарядка аккумулятора.
- Проверка способа управления.
- Проверка способа управления.
- Использование колесика управления.
- Использование пунктов MENU.
- Использование кнопки Fn (Функция).
- Использование “Quick Navi”.
- Проверка способа управления.
- Съемка.
- Фотосъемка/видеосъемка.
- Фотосъемка.
- Видеосъемка.
- Выбор режима съемки.
- Список функций диска режимов.
- Интеллект. Авто.
- Супер авторежим.
- О распознавании сцен.
- Преимущества автоматической съемки.
- Программное авто.
- Панорамный обзор.
- Выбор сцены.
- Приор. выдержки.
- Приор. диафрагмы.
- Ручной экспозиция.
- BULB.
- Вызов памяти.
- Видео.
- Фотосъемка/видеосъемка.
- Использование функций съемки.
- Использование зума.
- Зум.
- Функции зуммирования доступны с данным изделием.
- Настр. увеличения.
- О масштабе увеличения.
- Повор. кольца зума.
- Использование вспышки.
- Использование вспышки (продается отдельно).
- Режим вспышки.
- Кор.эксп.вспыш.
- Блокировка FEL.
- Выбор режима экранной индикации.
- Переключение экранной индикации (снимка).
- Кнопка DISP (Видоискатель).
- Кнопка DISP (Монитор).
- Выбор размера фотоснимка/качества изображения.
- Размер изобр. (фотоснимок).
- Формат (фотоснимок).
- Качество (фотоснимок).
- Панорама: размер.
- Панорама: направ.
- Регулировка фокусировки.
- Режим фокусиров.
- Область фокусир.
- Центр. следящ. AF.
- Блокировка фокуса.
- Ручной фокус.
- Прямая ручная фокусировка (DMF).
- Помощь для MF (фотоснимок).
- Фокусиров. лупа.
- Время увел. фокус.
- Ур. выдел. контур.
- Цвет выдел. контур.
- Предварител. AF (фотоснимок).
- Eye-Start AF (фотоснимок).
- Управл.AF/MF.
- Подсветка AF (фотоснимок).
- Микрорегулир.AF.
- Отобр.зону непр.AF.
- Настройки фокуса.
- AF с затвором (фотоснимок).
- AF Включен.
- AF на глаз.
- Обл. фаз. детек. АФ.
- Измерение точного расстояния до объекта.
- Регулировка экспозиции.
- Коррек.экспоз.
- Диск коррекции экспозиции.
- Режим измер.
- Блокировка АЭ.
- AEL с выдержкой (фотоснимок).
- Уст.корр.эксп.
- Зебра.
- Инстр. настр. эксп.
- Шаг экспозиции.
- Коррекц. диска Ev.
- Сброс коррекц. EV.
- Выбор режима протяжки (непрерывная съемка/таймер автоспуска).
- Режим протяжки.
- Непрерыв. Съемка.
- Автоспуск.
- Автоспуск (непр.).
- Непрер. брекетинг.
- Покадр. брекетинг.
- Брекетинг WB.
- Брекетинг DRO.
- Порядок брекет.
- Выбор чувствительности ISO.
- ISO.
- Многокадровое ШП.
- Коррекция яркости или контрастности.
- Опт.Д-диап. (DRO).
- Авто HDR.
- Регулировка цветовых тонов.
- Баланс белого.
- Получение основного белого цвета в режиме [Пользоват. настр.].
- Выбор режима эффекта.
- Эффект рисунка.
- Творческ. стиль.
- Видеосъемка.
- Форматы видеозаписи.
- Формат файла (видеосъемка).
- Параметры зап. (видеосъемка).
- Двойная ЗАП видео.
- Отображ. метки.
- Настр. метки.
- Запись звука.
- Отобр. ур. звука.
- Уров. записи звука.
- Синх. Аудио выхода.
- Умен. шума ветра.
- Авто медл. затв. (видеосъемка).
- Кнопка MOVIE.
- Профиль изображ.
- Настройка функций съемки для удобства использования.
- Память.
- Настр. меню функ.
- Парам. польз. клав.
- Функция колесика управления.
- Функция кнопки блокировки фокуса.
- Функция кнопки AEL.
- Функция кнопки AF/MF.
- Функция пользовательской кнопки.
- Функция центральной кнопки.
- Функция левой кнопки.
- Функция правой кнопки.
- Функция нижней кнопки.
- Установка диска.
- Установка других функций данного изделия.
- Улыб./Распоз. Лиц.
- Эфф. мягк. кожи (фотоснимок).
- Регистрация лиц (Новая регистрация).
- Регистрация лиц (Изменение приоритета).
- Регистрация лиц (Удалить).
- Ум.эфф.кр.глаз.
- Авто кадриров. (фотоснимок).
- SteadyShot.
- Настройки SteadyS.
- ШП длит. экспоз. (фотоснимок).
- ШП высокого ISO (фотоснимок).
- Цвет. простран. (фотоснимок).
- Сетка.
- Авто.просмотр.
- Отображ. Live View.
- FINDER/MONITOR.
- Спуск б/объектива.
- Эл. пер. штор. затв.
- Изв.изоб.супер а/р.
- Съем. разм. APS-C.
- Коррекц. затенения.
- Корр. хром. аберр.
- Коррек. дисторсии.
- Блок. диска/колес.
- Выкл. ЖК-монитор.
- Предпросмотр ГР.
- Просм. готов. фото.
- Использование зума.
- Просмотр.
- Просмотр фотоснимков.
- Воспроизведение снимков.
- Воспроизведение крупным планом.
- Индекс изображ.
- Переключение экранной индикации (во время воспроизведения).
- Удаление снимков.
- Удаление отображаемого снимка.
- Удаление нескольких выбранных изображений.
- Воспроизведение видеозаписей.
- Воспроизведение видеозаписей.
- Просмотр панорамных изображений.
- Воспроизведение панорамных изображений.
- Печать.
- Укажите печать.
- Использование функций просмотра.
- Режим просмотра.
- Поворот отображ.
- Слайд-шоу.
- Повернуть.
- Защита.
- Воспр. фотосн. 4K.
- Просмотр изображений на телевизоре.
- Просмотр снимков на телевизоре высокой четкости.
- Просмотр снимков на Sync-совместимом телевизоре “BRAVIA”.
- Просмотр фотоснимков.
- Изменение установок.
- Меню установки.
- Яркость монитора.
- Яркость видоискат.
- Цвет.темп. видоиск.
- Параметры громк.
- Звуковые сигн.
- Парам. Выгрузки (Eye-Fi).
- Мозаичное меню.
- Спр. д-ка выб. реж.
- Подтвержд.удал.
- Качество отображ.
- Время нач. энергоз.
- Перекл. PAL/NTSC.
- Режим очистки.
- Демонстр. режим.
- Настройки TC/UB.
- ПДУ.
- Разрешение HDMI.
- Вывод 24p/60p (видеозапись) (Только для 1080 60i-совместимых моделей).
- КОНТР. ПО HDMI.
- Показ инф. о HDMI.
- Вывод TC (видеосъемка).
- Управление REC (видеосъемка).
- USB-соединение.
- Настройка USB LUN.
- Настр. даты/врем.
- Часовой пояс.
- Форматировать.
- Номер файла.
- Выбор папк. записи.
- Создать папку.
- Название папки.
- Восстан. БД изобр.
- Показ. инф. о носит.
- Модель.
- Логотип сертифик. (Только заграничная модель).
- Заводск. настройка.
- Меню установки.
- Использование функций Wi-Fi.
- Соединение данного изделия и смартфона.
- PlayMemories Mobile.
- Подключение Android-смартфона к данному изделию.
- Подключение изделия к iPhone или iPad.
- Вызов приложения с помощью [Одно касание(NFC)].
- Управление данным изделием с помощью смартфона
- Внедрен интелл. отдален. доступ.
- Соединение в одно касание с NFC-совместимым Android-смартфоном (NFC пульт ДУ в одно касание).
- Передача изображений на смартфон.
- Отправ. на смартф.
- Отправка снимков на Android-смартфон (Обмен в одно касание NFC).
- Передача изображений на компьютер.
- Отправить на комп.
- Передача изображений на телевизор.
- Просмотр на ТВ.
- Изменение установок функций Wi-Fi.
- Режим полета.
- Нажать WPS.
- Руч. настр. тчк дост.
- Редакт. назв. устр.
- Отобр. MAC-адрес.
- Сбр. SSID/Пароль.
- Сброс. настр. сети.
- Соединение данного изделия и смартфона.
- Добавление приложений к изделию.
- PlayMemories Camera Apps.
- PlayMemories Camera Apps.
- Рекомендуемая конфигурация компьютера.
- Установка приложений.
- Создание учетной записи службы.
- Загрузка приложений.
- Загрузка приложений непосредственно в изделие с помощью функции Wi-Fi.
- Запуск приложений.
- Запуск загруженного приложения.
- Управление приложениями.
- Удаление приложений.
- Изменение порядка приложений.
- Проверка информации об учетной записи PlayMemories Camera Apps.
- PlayMemories Camera Apps.
- Просмотр на компьютерах.
- Рекомендуемая конфигурация компьютера.
- Рекомендуемая конфигурация компьютера.
- Использование программного обеспечения.
- PlayMemories Home.
- Установка PlayMemories Home.
- Программное обеспечение для компьютеров Mac.
- Image Data Converter.
- Установка Image Data Converter.
- Доступ Руководство по Image Data Converter.
- Remote Camera Control.
- Установка Remote Camera Control.
- Вызов справки Remote Camera Control.
- Соединение данного изделия и компьютера.
- Подключение изделия к компьютеру.
- Импортирование снимков в компьютер.
- Отключение изделия от компьютера.
- Создание диска с видеозаписями.
- Тип диска.
- Выбор метода создания диска.
- Создание диска с помощью устройства, отличного от компьютера.
- Создание Blu-ray дисков.
- Рекомендуемая конфигурация компьютера.
- Меры предосторожности/Данное изделие.
- Меры предосторожности.
- Меры предосторожности.
- О внутренней перезаряжаемой батарейке.
- Примечание об аккумуляторе.
- Зарядка аккумулятора.
- Карта памяти.
- Чистка изделия.
- Об очистке.
- Список значений установок по умолчанию.
- Список значений установок по умолчанию.
- Количество доступных для записи фотоснимков и доступное время видеозаписи.
- Количество фотоснимков.
- Доступное время видеозаписи.
- Использование данного изделия за границей.
- Сетевой адаптер.
- О системах цветного телевидения.
- Прочая информация.
- Установочный адаптер.
- LA-EA1 Установочный адаптер.
- LA-EA2 Установочный адаптер.
- LA-EA3 Установочный адаптер.
- LA-EA4 Установочный адаптер.
- Вертикальная рукоятка.
- Формат AVCHD.
- Лицензия.
- Технические характеристики.
- Товарные знаки.
- Товарные знаки.
- Меры предосторожности.
- Перед использованием.
- Устранение неполадок.
- При возникновении проблем.
- При возникновении проблем.
- Поиск и устранение неисправностей.
- При возникновении проблем.
- Поиск и устранение неисправностей.
- Аккумулятор и питание.
- Не удается вставить аккумулятор в изделие.
- Не удается включить изделие.
- Питание внезапно отключается.
- Аккумулятор быстро разряжается.
- Индикатор уровня оставшегося заряда аккумулятора отображает несоответствующий уровень.
- Во время зарядки аккумулятора мигает индикатор зарядки на изделии.
- Аккумулятор, вставленный в камеру, не заряжается.
- Монитор не включается даже при включении изделия.
- Фотосъемка/видеосъемка.
- Не удается записать снимки.
- Запись занимает длительное время.
- Один и тот же снимок захвачен несколько раз.
- Изображение не сфокусировано.
- [Eye-Start AF] не функционирует.
- Не работает зум.
- Дата и время записи не отображаются на экране.
- Дата и время записываются неправильно.
- Мигает индикатор значения диафрагмы и/или скорости затвора, и/или экспозамера.
- Искаженные цвета изображения.
- При просмотре экрана в темном месте на изображении появляются помехи.
- На изображении появляются темные тени.
- Глаза человека на снимке выглядят красными.
- На экране появляются и остаются точки.
- Не удается выполнить непрерывную съемку.
- Изображение в видоискателе недостаточно четкое.
- В видоискателе нет изображения.
- Снимок имеет беловатый цвет (Засвечено)./На снимке появляется размывание света (Ореол).
- Углы снимка слишком темные.
- Размытое изображение.
- Монитор темнеет через небольшой промежуток времени.
- Передний диск, задний диск или колесико управления не работает.
- Звук не записывается надлежащим образом.
- Камера вибрирует при включенном питании.
- В случае встряхивания камеры при выключенном питании возникает вибрация или звуки.
- Просмотр изображений.
- Не удается воспроизвести снимки.
- Дата и время не отображаются.
- Не удается удалить снимок.
- Снимок был удален по ошибке.
- Не удается установить метку DPOF.
- Wi-Fi.
- Не удается найти точку беспроводного доступа для подключения.
- [Нажать WPS] не работает.
- [Отправить на комп.] отменяется на полпути.
- Не удается отправить видеозаписи в смартфон.
- [Внедрен интелл. отдален. доступ] или [Отправ. на смартф.] отменяется на полпути.
- Экран съемки для [Внедрен интелл. отдален. доступ] отображается с помехами./Соединение между изделием и смартфоном прерывается.
- Не удается использовать соединение в одно касание (NFC).
- Компьютеры.
- Компьютер не распознает данное изделие.
- Не удается импортировать снимки.
- Изображение и звук прерываются шумом при просмотре видеозаписи на компьютере.
- Экспортированные из компьютера снимки не удается просмотреть на изделии.
- Карты памяти.
- По ошибке отформатирована карта памяти.
- Печать.
- Не удается напечатать снимки.
- Цвет снимка выглядит странно.
- Снимки распечатываются с обрезанными краями.
- Не удается напечатать снимки с датой.
- Прочее.
- Объектив запотел.
- Изделие нагревается после его использования в течение длительного времени.
- При включении изделия появляется экран установки часов.
- Количество доступных для записи снимков не уменьшается или уменьшается на два снимка за один раз.
- Установки сбрасываются, несмотря на то, что операция переустановки не выполнена.
- Изделие не работает надлежащим образом.
- На экране появляется индикация “—E-”.
- Аккумулятор и питание.
- Сообщения.
- Сообщения.
- Предупреждающие сообщения.
- Сообщения.
- Ситуации, в которых работа данного изделия затруднена.
- Ситуации, в которых работа данного изделия затруднена.
- Ситуации, в которых работа данного изделия затруднена.
- Ситуации, в которых работа данного изделия затруднена.
- При возникновении проблем.
Скачать: disk.yandex.ru | mega.co.nz
/
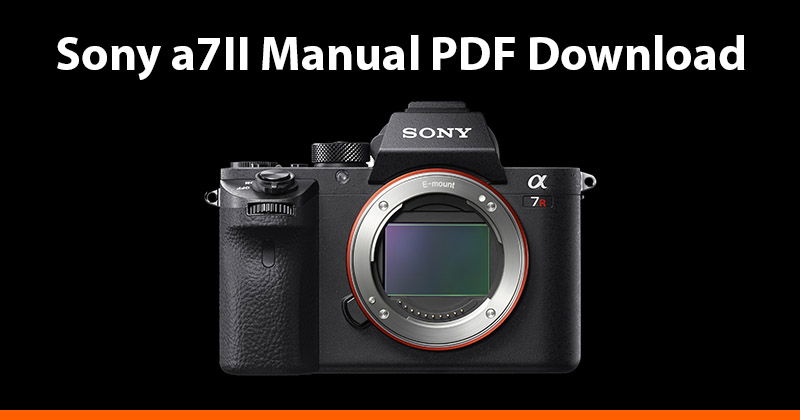
You can download the Sony a7II manual in PDF format here.
However, I’d actually recommend looking at the Sony a7ii Online Help Guide instead of the manual, since the online guide covers the camera functions in more detail.
The online help guide is also available in PDF format here, although the online version is much easier to navigate.
Sony a7II Forum & Facebook Group
If you are looking for further help and advice on the a7II or would simply like to share your photos, then please head over to our friendly Sony a7 Forum. If you prefer Facebook then I also run the Sony Alpha Shooters Group where you can ask questions or post your shots taken with the Sony a7II.
Sony a7II Guide Book
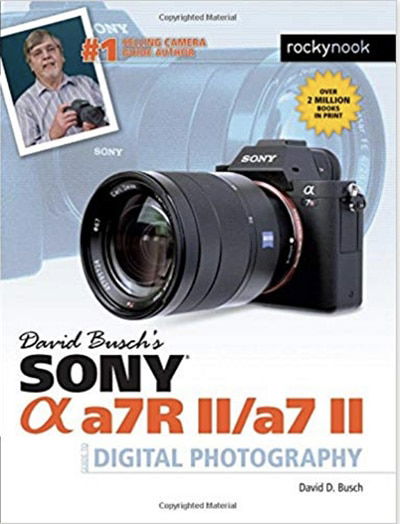
If you would prefer to hold a book in your hands than view a PDF file, then I can highly recommend David Busch’s Sony a7II Guide Book which is available at Amazon.
Sony a7II Manual Contents Overview
- Before Use
- Preparing the camera
- Confirming the operation method
- Shooting
- Using shooting functions
- Viewing
- Changing settings
- Using Wi-Fi functions
- Adding applications to the product
- Viewing on computers
- Precautions/This product
Sony a7II FAQs
Is the Sony a7II still worth buying?
Although the Sony a7II does not have the fastest autofocus, if you shoot more often with manual focus then the a7II is still a good buy. If you shoot a lot of fast action and rely more on autofocus then the Sony a7III will be the more suitable camera.
How do I view the histogram on the a7II?
You simply need to press the DISP Button on the rear of the camera. Each time you press the DISP button, the display changes as follows: Graphic Display → Display All Info. → No Disp. Info. → Histogram → Level → For viewfinder → Graphic Display.
How do I change the date and time on the a7II?
You can change the date and time in the menu here: MENU → (Setup) → [Date/Time Setup] → desired setting.


About Timothy Mayo
I started Alpha Shooters back in 2017 to share my own experiences as a photographer shooting with Sony Alpha cameras, lenses and accessories.
I enjoy wildlife photography the most but will happily point my camera at pretty much anything.
As well as this blog you’ll also find a community forum which provides members with a friendly and safe place to share images and ask questions.
You can find out more about my story here or follow me on Instagram if you wish.
I also have a YouTube Channel but haven’t published much content recently due to the demands of my one and three year old boys.
4-576-983-41(1)
|
“Help Guide” (Web manual) |
||||||||
|
Refer to “Help Guide” for in-depth |
||||||||
|
instructions on the many functions of the |
||||||||
|
camera. |
||||||||
|
« Manuel d’aide » (Manuel en ligne) |
||||||||
|
Consultez le « Manuel d’aide » pour obtenir |
||||||||
|
des instructions détaillées au sujet des |
||||||||
|
nombreuses fonctions de l’appareil. |
||||||||
|
E-mount |
||||||||
|
http://rd1.sony.net/help/ilc/1520/h_zz/ |
||||||||
|
Interchangeable Lens Digital Camera/Instruction Manual |
GB |
|||||||
|
Appareil photo à objectif interchangeable/Mode d’emploi |
FR |
|||||||
|
Digitalkamera mit Wechselobjektiv/Gebrauchsanleitung |
DE |
|||||||
|
Cámara Digital de Lentes Intercambiables/Manual de instrucciones |
ES |
|||||||
|
Fotocamera digitale con obiettivo intercambiabile/Istruzioni per l’uso |
IT |
|||||||
|
Câmara Digital de Objetivas intercambiáveis/Manual de instruções |
PT |
|||||||
|
Digitale camera met verwisselbare lens/Gebruiksaanwijzing |
NL |
|||||||
|
PL |
||||||||
|
Цифровой фотоаппарат со сменным объективом/Инструкция по эксплуатации |
RU |
|||||||
|
Цифровий фотоапарат зі змінним об’єктивом/Посібник з експлуатації |
UA |
|||||||
|
Digitalkamera med utbytbart objektiv/Handledning |
SE |
|||||||
|
Digitaalinen kamera vaihdettavalla objektiivilla/Käyttöopas |
FI |
|||||||
|
Digitalkamera med utskiftbart objektiv/Bruksanvisning |
NO |
|||||||
|
Digitalkamera med udskifteligt objektiv/Betjeningsvejledning |
DK |
|||||||
|
© 2015 Sony Corporation Printed in Thailand |
ILCE-7RM2 |
English
E-mount
Learning more about the camera (“Help Guide”)
“Help Guide” is an on-line manual. You can read the “Help Guide” on your computer or smartphone.
Refer to it for in-depth instructions on the many functions of the camera.
URL:
http://rd1.sony.net/help/ilc/1520/ h_zz/
Owner’s Record
The model and serial numbers are located on the bottom. Record the serial number in the space provided below. Refer to these numbers whenever you call your Sony dealer regarding this product.
Model No. WW325951 (ILCE-7RM2) Serial No.
Model No. AC-UD10/AC-UUD11
Serial No.
WARNING
To reduce fire or shock hazard, do not expose the unit to rain or moisture.
IMPORTANT SAFETY INSTRUCTIONS -SAVE THESE INSTRUCTIONS DANGER
TO REDUCE THE RISK OF FIRE OR ELECTRIC SHOCK, CAREFULLY FOLLOW THESE INSTRUCTIONS
If the shape of the plug does not fit the power outlet, use an attachment plug adaptor of the proper configuration for the power outlet.
GB
2

 CAUTION
Battery pack
If the battery pack is mishandled, the battery pack can burst, cause a fire or even chemical burns. Observe the following cautions.
•Do not disassemble.
•Do not crush and do not expose the battery pack to any shock or force such as hammering, dropping or stepping on it.
•Do not short circuit and do not allow metal objects to come into contact with the battery terminals.
•Do not expose to high temperature above 60°C (140°F) such as in direct sunlight or in a car parked in the sun.
•Do not incinerate or dispose of in fire.
•Do not handle damaged or leaking lithium ion batteries.
•Be sure to charge the battery pack using a genuine Sony battery charger or a device that can charge the battery pack.
•Keep the battery pack out of the reach of small children.
•Keep the battery pack dry.
•Replace only with the same or equivalent type recommended by Sony.
•Dispose of used battery packs promptly as described in the instructions.
AC Adaptor
Use the nearby wall outlet (wall socket) when using the AC Adaptor. Disconnect the AC Adaptor from the wall outlet (wall socket) immediately if any malfunction occurs while using the apparatus.
Battery charger
Use the nearby wall outlet (wall socket) when using the Charger. Disconnect the Charger from the wall outlet (wall socket) immediately if any malfunction occurs while using the apparatus.
The power cord (mains lead), if supplied, is designed specifically for use with this camera only, and should not be used with other electrical equipment.
For Customers in the U.S.A.
and Canada
RECYCLING LITHIUM-ION
BATTERIES
|
Lithium-Ion batteries are |
||
|
recyclable. |
||
|
You can help preserve |
||
|
our environment by |
||
|
returning your used |
||
|
GB |
||
|
rechargeable batteries to |
||
|
the collection and recycling location |
||
|
nearest you. |
For more information regarding recycling of rechargeable batteries, call toll free 1-800-822-8837, or visit http://www.call2recycle.org/
Caution: Do not handle damaged or leaking Lithium-Ion batteries.
For supplied accessories
This device complies with Part 15 of the FCC Rules. Operation is subject to the following two conditions:
(1) This device may not cause harmful interference, and (2) this device must accept any interference received, including interference that may cause undesired operation.
CAN ICES-3 B/NMB-3 B
GB
3

This equipment complies with FCC/IC radiation exposure limits set forth for an uncontrolled environment and meets the FCC radio frequency (RF) Exposure Guidelines and RSS-102 of the IC radio frequency (RF) Exposure rules. This equipment has very low levels of RF energy that are deemed to comply without testing of specific absorption ratio (SAR).
For Customers in the U.S.A.
If you have any questions about this product, you may call:
Sony Customer Information Center 1-800-222-SONY (7669).
The number below is for the FCC related matters only.
Regulatory Information
Declaration of Conformity
Trade Name: SONY
Model No.: WW325951
Responsible Party: Sony Electronics Inc.
Address: 16535 Via Esprillo,
San Diego, CA 92127 U.S.A.
Telephone No.: 858-942-2230
This device complies with Part15 of the FCC Rules. Operation is subject to the following two conditions: (1) This device may not cause harmful interference, and (2) this device must accept any interference received, including interference that may cause undesired operation.
This equipment must not be co-located or operated in conjunction with any other antenna or transmitter.
CAUTION
You are cautioned that any changes or modifications not expressly approved in this manual could void your authority to operate this equipment.
GB
Note:
This equipment has been tested and found to comply with the limits for a Class B digital device, pursuant to Part 15 of the FCC Rules.
These limits are designed to provide reasonable protection against harmful interference in a residential installation. This equipment generates, uses, and can radiate radio frequency energy and, if not installed and used in accordance with the instructions, may cause harmful interference to radio communications. However, there is no guarantee that interference will not occur in a particular installation. If this equipment does cause harmful interference to radio or television reception, which can be determined by turning the equipment off and on, the user is encouraged to try to correct the interference by one or more of the following measures:
–Reorient or relocate the receiving antenna.
–Increase the separation between the equipment and receiver.
–Connect the equipment into an outlet on a circuit different from that to which the receiver is connected.
–Consult the dealer or an experienced radio/TV technician for help.
The supplied interface cable must be used with the equipment in order to comply with the limits for a digital device pursuant to Subpart B of Part 15 of FCC Rules.
4
For Customers in Canada
This device complies with Industry Canada licence-exempt RSS standard(s). Operation is subject to the following two conditions: (1) this device may not cause interference, and (2) this device must accept any interference, including interference that may cause undesired operation of the device.
For Customers in Europe
Notice for the customers in the countries applying EU Directives
Manufacturer: Sony Corporation, 1-7-1 Konan Minato-ku Tokyo, 108-0075 Japan For EU product compliance: Sony Deutschland GmbH, Hedelfinger Strasse 61, 70327 Stuttgart, Germany
Hereby, Sony Corporation, declares that this equipment is in compliance with the essential requirements and other relevant provisions of Directive 1999/5/EC. For details, please access the following URL: http://www.compliance.sony.de/
Notice
If static electricity or electromagnetism causes data transfer to discontinue midway (fail), restart the application or disconnect and connect the communication cable (USB, etc.) again.
This product has been tested and found compliant with the limits set out in the EMC regulation for using connection cables shorter than 3 meters (9.8 feet).
The electromagnetic fields at the specific frequencies may influence the picture and sound of this unit.
Disposal of waste batteries and electrical and electronic equipment (applicable in the European Union and other European countries with separate collection systems)
|
This symbol on the |
||
|
product, the battery or |
||
|
on the packaging |
||
|
indicates that the |
||
|
product and the battery |
||
|
shall not be treated as |
||
|
household waste. On |
GB |
|
|
certain batteries this symbol might be used |
||
|
in combination with a chemical symbol. |
||
|
The chemical symbols for mercury (Hg) or |
||
|
lead (Pb) are added if the battery contains |
||
|
more than 0.0005% mercury or 0.004% |
||
|
lead. By ensuring these products and |
||
|
batteries are disposed of correctly, you will |
||
|
help prevent potentially negative |
||
|
consequences for the environment and |
||
|
human health which could otherwise be |
||
|
caused by inappropriate waste handling. |
||
|
The recycling of the materials will help to |
||
|
conserve natural resources. |
||
|
In case of products that for safety, |
||
|
performance or data integrity reasons |
||
|
require a permanent connection with an |
||
|
incorporated battery, this battery should be |
||
|
replaced by qualified service staff only. To |
||
|
ensure that the battery and the electrical and |
||
|
electronic equipment will be treated |
||
|
properly, hand over these products at end- |
||
|
of-life to the applicable collection point for |
||
|
the recycling of electrical and electronic |
||
|
equipment. For all other batteries, please |
||
|
view the section on how to remove the |
||
|
battery from the product safely. Hand the |
||
|
battery over to the applicable collection |
||
|
point for the recycling of waste batteries. |
||
|
GB |
5
For more detailed information about recycling of this product or battery, please contact your local Civic Office, your household waste disposal service or the shop where you purchased the product or battery.
For Customers in Singapore
For customers who purchased their camera from a store in Japan that caters to tourists
Note
Some certification marks for standards supported by the camera can be confirmed on the screen of the camera.
Select MENU t (Setup) t [Certification Logo].
If display is not possible due to problems such as camera failure, contact your Sony dealer or local authorized Sony service facility.
For Customers in U.A.E.
For Customers in Malaysia
For details on the Wi-Fi and NFC One-touch functions, refer to the attached document “Wi-Fi Connection/One-touch (NFC) Guide” or to the “Help Guide.”
GB
6

Introduction of functions
This section introduces some frequently used shooting functions and other unique functions.
See the pages in parentheses for details.
Shooting functions used frequently
Exposure Comp. (34)
You can adjust the exposure to change the brightness of the entire image. Even when the shooting mode is set to M, you can adjust the exposure if the ISO sensitivity is set to [ISO AUTO].
GB
ISO/Multi Frame NR (34)
You can adjust the luminous sensitivity.
The ISO sensitivity can be adjusted between ISO 50 and ISO 102400.
White Balance (34)
You can adjust the color tones.
You can select an option to suit a light source, or perform fine adjustments using color temperature and color filters.
Drive Mode (33)
You can select an appropriate drive mode to suit your purposes, such as single shooting, continuous shooting, or bracket shooting.
Focus Mode (78)/Focus Area (78)/Focus Settings (34)
You can adjust various settings for the focus.
You can select the focusing method or focusing area as desired to match your subject.
Focus Magnifier (35)/MF Assist (36)
Enlarge the image to make checking the focus easier when focusing manually.
GB
7
Introduction of functions
Features of this camera
Shooting still images in 42 megapixels (74)
You can shoot still images with extremely high resolution.
Electronic front curtain shutter (38)
You can shoot with a shorter release time lag.
5-axis in-body image stabilization (61)
Reduce blurring caused by vertical shift and horizontal shift, pitch and yaw, and roll.
4K movie recording (75)
You can record high-detailed movies in 4K resolution (3840×2160).
Fast and accurate auto focus (78)
Enables faster and more accurate auto focus combining contrast AF and phase detection AF that detects 399 points.
Silent Shooting (79)
You can shoot images without the shutter producing a sound.
How to operate or customize the camera
Display information (37)
When you look into the viewfinder, the viewfinder mode is activated, and when you move your face away from the viewfinder, the viewing mode reverts to monitor mode (default settings). You can change the screen display mode by pressing DISP on the control wheel.
Quick Navi (26)
In [For viewfinder] screen, you can quickly switch from the monitor to the Quick Navi screen by pressing the Fn button. You can set the items with an intuitive operation by using the front/rear dial and the control wheel.
GB
8

Introduction of functions
Customization (40)
The camera are equipped with the Custom buttons, where you can assign desired function on each button. You can also assign functions to other buttons, such as the AEL button.
GB 
GB
9

Notes on using your camera
Screen language
You can select the language displayed on the screen using the menu (page 43).
Shooting procedure
This camera has 2 modes for monitoring subjects: the monitor mode using the monitor, and the viewfinder mode using the viewfinder.
Functions built into this camera
•This camera is compatible with 1080 60p or 50p-format movies. Unlike standard recording modes up to now, which record in an interlacing method, this camera records using a progressive method. This increases the resolution, and provides a smoother, more realistic image.
•This camera is compatible with 4K 30p/ 4K 25p/4K 24p recording. Movies can be recorded in a higher resolution.
Creating an image database file
If you insert a memory card that does not contain an image database file into the camera and turn on the power, the camera automatically creates an image database file using some of the memory card’s capacity.
The process may take a long time and you cannot operate the camera until the process is completed. If a database file error occurs, export all images to your computer using PlayMemories Home™, and then format the memory card using the camera.
Notes on recording/playback
•In order to stabilize the operation of the memory card, it is recommended that you format the memory card on the camera when you use it with that camera for the first time.
Once you format the memory card, all the data recorded on the memory card will be deleted and cannot be restored. Before formatting, copy the data to a computer or other device.
•If you repeatedly record and delete images over a long period, the files on the memory card may become fragmented and movie recording may be suspended partway through. If this occurs, copy the data to a computer or other device and then perform [Format].
•Before you start recording, make a trial recording to make sure that the camera is working correctly.
•This camera is designed to be dust and moisture-resistant, but is not waterproof or splash-proof.
Back up recommendation for a memory card
If you turn the camera off, remove the battery pack or the memory card, or disconnect the USB cable while the access lamp is flashing, the data on the memory card may become damaged. To avoid data loss, always copy (back up) data to another device.
GB
10
|
Notes on using your camera |
|||||
|
No compensation for damaged |
• |
Do not use the camera in areas where |
|||
|
content or recording failure |
strong radio waves or radiation are being |
||||
|
Sony can provide no guarantees in the |
emitted. Recording and playback may not |
||||
|
event of failure to record or loss or damage |
function correctly. |
||||
|
of recorded images or audio data due to a |
• Images may trail across on the screen in a |
||||
|
malfunction of the camera or recording |
cold location. This is not a malfunction. |
||||
|
media, etc. We recommend backing up |
When turning on the camera in a cold |
||||
|
important data. |
location, the screen may become |
||||
|
Shooting with an E-mount lens |
temporarily dark. When the camera |
||||
|
warms up, the screen will function |
|||||
|
compatible APS-C size |
normally. |
||||
|
This camera is equipped with a 35 mm, |
• |
The recorded image may be different |
|||
|
full-frame CMOS image sensor. However, |
from the image you monitored before |
||||
|
the image size is automatically set to that of |
recording. |
||||
|
the APS-C size setting and the image size is |
Notes on using the lenses and |
GB |
|||
|
smaller when an E-mount lens compatible |
|||||
|
APS-C size is used (default settings). |
accessories |
||||
|
Notes on the monitor, electronic |
It is recommended that you use Sony |
||||
|
lenses/accessories designed to suit the |
|||||
|
viewfinder, lens, and image sensor |
characteristics of this camera. Using this |
||||
|
• |
The monitor and electronic viewfinder |
camera with products from other |
|||
|
are manufactured using extremely high- |
manufacturers may affect its performance, |
||||
|
precision technology, and over 99.99% |
leading to accidents or malfunction. Sony |
||||
|
of the pixels are operational for effective |
bears no responsibility for such accidents or |
||||
|
use. However, there may be some small |
malfunction. |
||||
|
black dots and/or bright dots (white, red, |
Notes on the multi interface shoe |
||||
|
blue or green in color) that constantly |
|||||
|
appear on the monitor and electronic |
• |
When attaching or detaching accessories |
|||
|
viewfinder. These dots are normal due to |
such as an external flash to the multi |
||||
|
the manufacturing process and do not |
interface shoe, first turn the power to |
||||
|
affect the images in any way. |
OFF. When attaching the accessories, |
||||
|
• |
Do not hold the camera by the monitor. |
tighten the screws all the way and |
|||
|
• |
When using the power zoom lens, be |
confirm that it is firmly fastened to the |
|||
|
careful not to get your fingers or any |
camera. |
||||
|
other objects caught in the lens. |
• |
Do not use an external flash with a high |
|||
|
• |
Do not expose the camera to a strong |
voltage flash sync terminal or inverse |
|||
|
light source such as a sunlight. The |
polarity. This may result in malfunction. |
internal components may become damaged.
•Do not look at sunlight or a strong light source through the lens when it is detached. This may result in unrecoverable damage to the eyes or cause a malfunction.
GB
11

Notes on using your camera
Notes on shooting with the viewfinder
This camera is equipped with an Organic Electro-Luminescence viewfinder with high resolution and high contrast. This viewfinder achieves a wide viewing angle and a long eye relief. This camera is designed to provide an easily viewable viewfinder by appropriately balancing various elements.
•The image may be slightly distorted near the corners of the viewfinder. This is not a malfunction. When you want to see the full composition with all its details, you can also use the monitor.
•If you pan the camera while looking into the viewfinder or move your eyes around, the image in the viewfinder may be distorted or the color of the image may change. This is a characteristic of the lens or display device and is not a malfunction. When you shoot an image, we recommend that you look at the center area of the viewfinder.
•When shooting with the viewfinder, you may experience symptoms such as eyestrain, fatigue, travel sickness, or nausea. We recommend that you take a break at regular intervals when you are shooting with the viewfinder.
The required length or frequency of the break may differ depending on the individuals, so you are advised to decide at your own discretion. In case you may feel uncomfortable, refrain from using the viewfinder until your condition recovers, and consult your doctor as necessary.
Notes on recording for long periods of time or recording 4K movies
•Depending on the camera and battery temperature, you may be unable to record movies or the power may turn off automatically to protect the camera.
A message will be displayed on the screen before the power turns off or you can no longer record movies. In this case, leave the power off and wait until the camera and battery temperature goes down. If you turn on the power without letting the camera and battery cool enough, the power may turn off again or you may be unable to record movies.
•Under high ambient temperatures, the temperature of the camera rises quickly.
•When the temperature of the camera rises, the image quality may deteriorate. It is recommended that you wait until the temperature of the camera drops before continuing to shoot.
•The surface of the camera may get warm. This is not a malfunction.
•Especially during 4K movie shooting, the recording time may be shorter under low temperature conditions. Warm up the battery pack or replace it with a new battery.
Notes on importing XAVC S movies and AVCHD movies to a computer
When importing XAVC S movies or AVCHD movies to a computer, download and use the software PlayMemories Home from the following website: http://www.sony.net/pm/
GB
12

Notes on using your camera
Notes when playing movies on other devices
On the data specifications described in this manual
•Movies recorded with this camera may not be played back correctly on other devices. Also, movies recorded with other devices may not be played back correctly on this camera.
•Discs created from AVCHD movies recorded by this camera can be played back only on AVCHD-compatible devices. DVD players or recorders cannot play back discs created from AVCHD movies, as they are incompatible with the AVCHD format. Also, DVD players or recorders may fail to eject HD discs recorded in AVCHD format.
•Movies recorded in 1080 60p/1080 50p format can be played back only on 1080 60p/1080 50p-supported devices.
•Movies recorded in XAVC S format can be played back only on XAVC S- supported devices.
Warning on copyright
•Television programs, films, videotapes, and other materials may be copyrighted. Unauthorized recording of such materials may be contrary to the provisions of the copyright laws.
•To prevent [Copyright Info] from being used illegally, leave [Set Photographer] and [Set Copyright] blank when you lend or transfer the camera.
•Sony bears no responsibility for any trouble or damage caused by unauthorized use of [Copyright Info].
The pictures used in this manual
The photographs used as examples of pictures in this manual are reproduced images, and are not actual images shot using this camera.
The data on performance and specifications are defined under the following conditions, except as described in this manual: at an ordinary ambient temperature of 25ºC (77°F), and using a battery pack that has been fully charged until the charge lamp has turned off.
How to turn off wireless network functions (Wi-Fi and NFC, etc.) temporarily
When you board an airplane, etc., you can
turn off all wireless network functions GB temporarily.
Select MENU button t  (Wireless) t [Airplane Mode] t [On].
If you set [Airplane Mode] to [On], an  (airplane) mark will be displayed on the screen.
Notes on wireless LAN
If your camera is lost or stolen, Sony bears no responsibility for the loss or damage caused by illegal access or use of the registered access point on the camera.
Notes on security when using wireless LAN products
•Always make sure that you are using a secure wireless LAN to avoid hacking, access by malicious third parties, or other vulnerabilities.
•It is important that you set the security settings when using a wireless LAN.
•If a security problem arises because no security precautions are in place or due to any inevitable circumstances when using a wireless LAN, Sony bears no responsibility for the loss or damage.
GB
13
Checking the supplied items
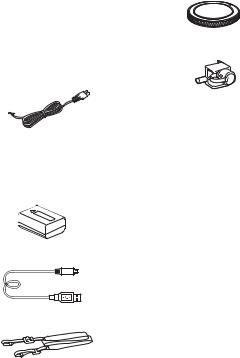
The number in parentheses indicates the number of pieces.
•Camera (1)
•AC Adaptor (1)
The shape of the AC Adaptor may differ depending on the country/ region.
•Battery charger BC-VW1 (1)
•Power cord (mains lead) (1)* (not supplied in the U.S.A. and Canada)
*Multiple power cords may be supplied with your camera. Use the appropriate one that matches your country/region.
•Rechargeable battery pack NPFW50 (2)
•Micro USB cable (1)
•Body cap (1) (Attached on the camera)
•Cable protector (1)
For how to attach the cable protector to the camera, refer to page 19.
•Shoe cap (1) (Attached on the camera)
•Eyepiece Cup (1) (Attached on the camera)
•Instruction Manual (1) (this manual)
•Wi-Fi Connection/One-touch (NFC) Guide (1)
This guide explains the functions that require a Wi-Fi connection.
• Shoulder strap (1)
For how to attach the shoulder strap to the camera, refer to page 19.
GB
14
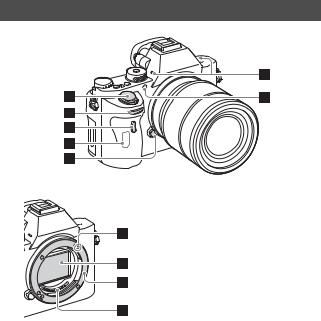
Identifying parts
See the pages in parentheses for details on operation for the parts.
Front side
When the lens is removed
A Power switch/Shutter button
B Front dial
C Remote sensor
D Wi-Fi antenna (built-in)
E Lens release button
F Built-in microphone*1
GB 
GAF illuminator (34)/Self-timer lamp
H Mount index
I Image sensor*2
J Mount
K Contacts*2
*1 Do not cover this part during movie recording.
Doing so may cause noise or lower the volume.
*2 Do not directly touch these parts.
GB
15
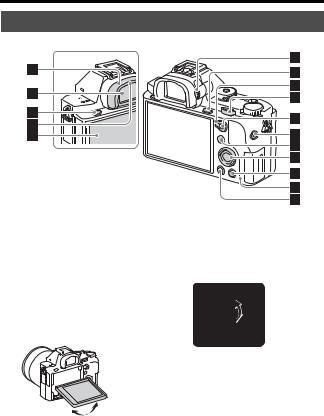
Identifying parts
Rear side
A Eyepiece cup (64)
B Viewfinder
C MENU button (32)
D Eye sensor
EMonitor (21)
•You can adjust the monitor to an easily viewable angle and shoot from any position.
FDiopter-adjustment dial
•Adjust the diopter-adjustment dial according to your eyesight until the display appears clearly in the viewfinder.
GFor shooting: C3 (Custom 3) button (25)
For viewing:  (Enlarge) button (70)
H AF/MF/AEL switch lever
I Rear dial
GB
16

Identifying parts
JFor shooting: AF/MF (Auto focus/manual focus) button/ AEL button (25)
For viewing:  (Image index) button (70)
K MOVIE button (67)
LFor shooting: Fn button (30)
For viewing:  (Send to Smartphone) button
• You can display the screen for
|
[Send to Smartphone] by |
GB |
|
pressing this button. |
M Control wheel (28)
NFor shooting: C4 (Custom 4)
button (25)
For viewing:  (Delete) button (71)
O Access lamp
P  (Playback) button (68)
GB
17
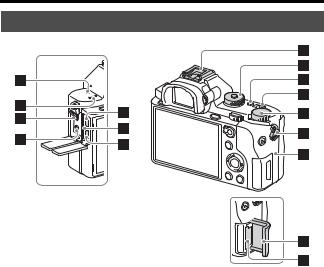
Identifying parts
Top side/Side view
A Image sensor position mark
B Speaker
Cm (Microphone) jack
•When an external microphone is connected, the microphone is turned on automatically. If the external microphone is a plug- in-power type, the power of the microphone is supplied by the camera.
D i (Headphones) jack
EMulti/Micro USB Terminal*
•Supports Micro USB compatible device.
GB
F Charge lamp (48)
G HDMI micro jack
HMulti interface shoe*
•Some of the accessories may not be inserted fully and protrude backward from the Multi interface shoe. However, when the accessory reaches the front end of the shoe, the connection is completed.
I Mode dial (72)
J C2 (Custom 2) button (25)
K C1 (Custom 1) button (25)
LExposure compensation dial (25)
18
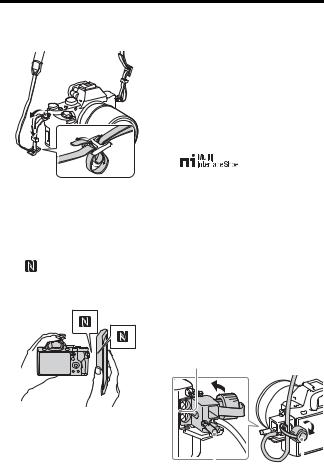
Identifying parts
|
M Hooks for shoulder strap |
P Memory card slot |
•Attach both ends of the strap onto the camera.
N  (N mark)
•This mark indicates the touch point for connecting the camera and an NFC-enabled Smartphone.
For details on the location of the (N mark) on your
Smartphone, refer to the operating instructions of the Smartphone.
•NFC (Near Field Communication) is an international standard of shortrange wireless communication technology.
O Memory card cover
*For details on compatible accessories for the multi interface shoe and the Multi/Micro USB Terminal, visit the Sony website, or consult your Sony dealer or local authorized Sony service facility.
You can also use accessories that are compatible with the accessory shoe. Operations with other manufactures’ accessories are not guaranteed.
 GB
GB 
Attaching the cable protector
Use the cable protector to prevent the HDMI cable from being disconnected when shooting images connected by the HDMI cable. Open both of the jack covers and insert an HDMI cable into the camera. Attach the cable protector as illustrated so that the edge of the cable protector fits in the slit to the left of the m (microphone) jack. Secure the cable protector with the attachment screw. Then secure the HDMI cable with the fixing dial.
Fit the edge in the slit
|
Attachment |
screw |
Fixing |
dial |
||
GB
19
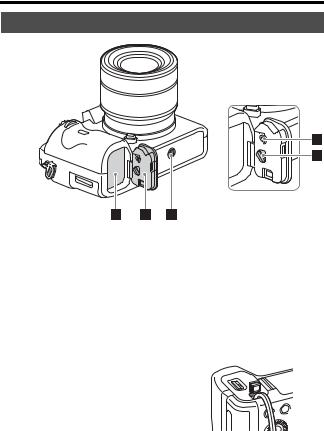
Identifying parts
Bottom view
A Battery insertion slot (46)
B Battery cover (46)
CTripod socket hole
•Use a tripod with a screw less than 5.5 mm (7/32 inches) long. Otherwise, you cannot firmly secure the camera, and damage to the camera may occur.
D Battery cover locking button
EBattery cover release lever
•When you attach a vertical grip (sold separately), remove the battery cover.
GB
Connection plate cover
Use this when using an AC-PW20 AC Adaptor (sold separately). Insert the connection plate into the battery compartment, and then pass the cord through the connection plate cover as shown below.
•Make sure that the cord is not pinched when you close the cover.
20
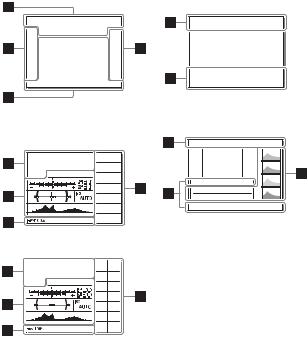
List of icons on the monitor
The status of the monitor is set to [Display All Info.] in the default settings. When you change the [DISP Button] setting, and press DISP on the control wheel, the screen status will change to the viewfinder mode. You can also display the histogram by pressing DISP. The displayed contents and their position shown below are just a guideline, and may differ from the actual display.
|
Monitor mode |
For playback |
|
Basic information display |
GB 
|
Viewfinder mode |
Histogram display |
Auto Mode or Scene Selection mode
P/A/S/M/Sweep Panorama mode
GB
21
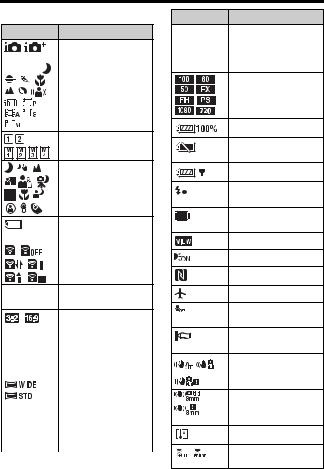
List of icons on the monitor
A
Display Indication
Shooting mode (72)
 P P* A S M

Register number (72)
Scene Recognition icons
|
Memory card (53)/ |
|
|
NO CARD |
Upload (42) |
100Remaining number of recordable images
|
Aspect ratio of still |
|||
|
images (33) |
|||
|
42M |
36M |
Image size of still |
|
|
18M |
15M |
images (33) |
|
|
11M |
8.9M |
||
|
4.5M 3.8M |
|||
|
RAW |
Image quality of still |
||
|
RAW+J |
images (33) |
||
|
X.FINE |
|||
|
FINE STD |
|||
|
GB |
Display Indication
120p 60p 60i Frame rate of movies
30p 24p
100p 50p 50i
25p
Image size of movies (76)
Remaining battery (50)
Remaining battery warning
USB power supply (51)
Flash charge in progress
APS-C/Super 35mm (39)
Setting Effect OFF (37)
AF Illuminator (34)
NFC is activated
Airplane Mode
No audio recording of movies (36)
Wind Noise Reduction (36)
SteadyShot off/on, Camera shake warning (61)
SteadyShot Focal Length/Camera shake warning (61)
Overheating warning
Database file full/
Database file error
22
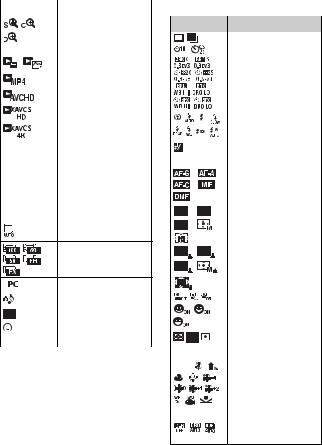
|
List of icons on the monitor |
||||||
|
B |
||||||
|
Display |
Indication |
|||||
|
Smart Zoom/Clear |
Display |
Indication |
||||
|
Image Zoom/Digital |
||||||
|
Drive mode (33) |
||||||
|
Zoom |
||||||
|
View Mode (69) |
||||||
|
Flash mode (33)/Red- |
||||||
|
eye reduction (34) |
||||||
|
±0.0 |
Flash compensation |
|||||
|
100-0003 |
Folder — file number |
|||||
|
(34) |
GB |
|||||
|
— |
Protect (41) |
|||||
|
Focus mode (34) |
||||||
|
XAVC S 4K |
Recording mode of |
|||||
|
XAVC S HD |
movies |
|||||
|
AVCHD MP4 |
||||||
|
AF area |
||||||
|
DPOF |
DPOF set |
|||||
|
Auto Object Framing |
|
PC Remote |
|||||||||||
|
Silent Shooting (79) |
Face Detection/Smile |
||||||||||
|
Shutter (35) |
|||||||||||
|
Bright Monitoring |
|||||||||||
|
Write Copyright |
|||||||||||
|
Metering mode (34) |
|||||||||||
|
Information (43) |
|||||||||||
|
35mm |
Lens focal length |
||||||||||
|
AWB |
White balance (Auto, |
||||||||||
|
Preset, Underwater |
|||||||||||
|
Auto, Custom, Color |
|||||||||||
|
temperature, Color |
|||||||||||
|
7500K A5 G5 |
filter) (34) |
||||||||||
|
D-Range Optimizer/ |
|||||||||||
|
Auto HDR (34) |
GB
23
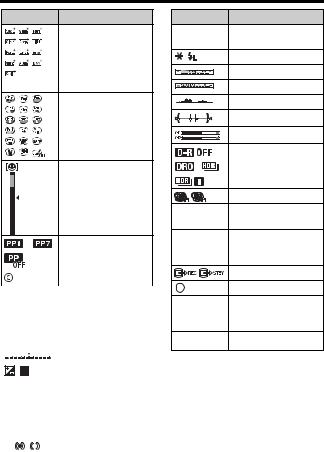
List of icons on the monitor
Display Indication
Creative Style (35)/
Contrast, Saturation,
Sharpness
+3 +3 +3
Picture Effect (35)
Smile detection sensitivity indicator
|
– |
Picture Profile (78) |
|
|
Copyright Information |
||
|
C |
||
|
Display |
Indication |
|
|
z Lock-on |
Lock-on AF guide |
|
|
AF |
||
|
Bracket indicator |
||
|
Exposure compensation |
||
|
(34)/Metered Manual |
||
|
STBY |
Movie recording |
|
|
standby |
||
|
REC 0:12 |
Recording time of the |
|
|
movie (m:s) |
||
|
z |
Focus |
|
|
1/250 |
Shutter speed |
|
|
F3.5 |
Aperture Value |
|
GB
|
Display |
Indication |
|
ISO400 |
ISO sensitivity (34) |
|
ISO AUTO |
|
|
AE lock/FEL lock |
|
|
Shutter speed indicator |
|
|
Aperture indicator |
|
|
Histogram |
|
|
Digital level gauge |
|
|
Audio level (37) |
|
|
D-Range Optimizer/ |
|
|
Auto HDR/Auto HDR |
|
|
image warning |
|
|
Picture Effect error |
|
|
2015-1-1 |
Date of recording |
|
10:37PM |
|
|
3/7 |
File number/Number of |
|
images in the view |
|
|
mode |
|
|
REC Control |
|
|
Spot metering area |
|
|
00:00:00:00 |
Time code |
|
(hour:minute:second: |
|
|
frame) (42) |
|
|
00 00 00 00 |
User bit (42) |
24
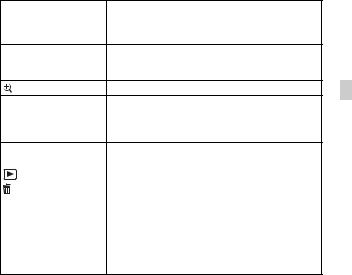
Functions that can be operated using the buttons/dials
You can set up or operate various functions using these buttons/dials. For the location of the buttons/dials, see “Identifying parts” (page 15).
|
Mode dial (72) |
Switches the shooting mode. |
|
MENU button (32) |
Displays the menu screen for setting menu items. |
|
MOVIE button (67) |
Records movies. |
AF/MF button/AEL button/ Switches the autofocus and manual focus temporarily./  button Fixes the exposure of the entire screen./Displays
multiple images on the screen simultaneously.
|
button (70) |
Scales an image up when viewing images. |
GB |
Fn button (30)/ button Displays the setup screen for functions set using the Fn button. In [For viewfinder] screen, switches to the Quick Navi screen./In playback mode, pressing
  button switches to “Send to Smartphone” screen.
|
Exposure compensation |
Sets the range for exposure adjustment. |
|
|
dial |
||
|
button (68) |
Plays back images. |
|
|
button (71) |
Deletes images. |
|
|
Custom button |
Assigns a frequently-used function to the button. |
|
|
The following function is assigned to each button in the |
||
|
default settings. |
||
|
C1 |
(Custom 1) button: White Balance |
|
|
C2 |
(Custom 2) button: Focus Settings |
|
|
C3 |
(Custom 3) button: Focus Mode |
|
|
C4 |
(Custom 4) button: Not set |
GB
25
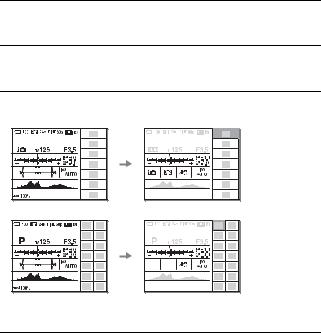
How to use the Quick Navi screen
Using the Quick Navi screen, you can change settings directly on the recording information display when the screen mode is set to [For viewfinder] (Quick Navi).
1 MENU button t  (Custom Settings) t [DISP Button] t [Monitor] t [For viewfinder] t [Enter]
2 Press the DISP on the control wheel to set the screen mode to [For viewfinder].
3 Press the Fn button to switch to the Quick Navi screen.
In Auto Mode or Scene Selection mode
In P/A/S/M/Sweep Panorama mode
•The displayed contents and their position shown are just a guideline, and may differ from the actual display.
4 Select the desired item with v/V/b/B on the control wheel.
GB
26
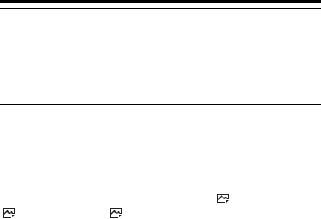
How to use the Quick Navi screen
5 Set the item with the front dial.
•Some setting values can be finely adjusted by turning the rear dial.
•Pressing the center of the control wheel turns on the designated screen used to set up the selected item (page 28).
•Pressing the Fn button again turns off the Quick Navi screen and the screen goes back to the original one.
Functions available on the Quick Navi screen
|
Drive Mode |
Flash Mode |
Flash Comp. |
||
|
Focus Mode |
Focus Area |
Exposure Comp. |
||
|
ISO |
Metering Mode |
White Balance |
GB |
|
|
DRO/Auto HDR |
Creative Style |
Picture Effect |
||
|
Picture Profile |
Smile/Face Detect. |
Image Size |
||
|
Aspect Ratio |
Quality |
SteadyShot |
||
|
Auto Mode |
Scene Selection |
Peaking Level |
||
Notes
•Gray items on the Quick Navi screen are not available.
•When using [Creative Style] (page 35) or [Picture Profile] (page 35), some of the setup tasks can be accomplished only on a designated screen.
GB
27
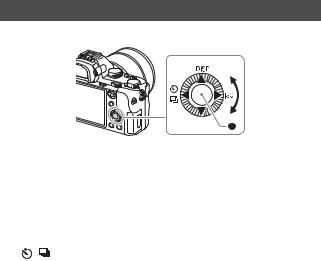
Operating the camera
How to use the control wheel
•You can turn the control wheel or press up/down/left/right on the control wheel to move the selection frame. Press z in the center of the control wheel to set the selected item. In this manual, the action of pressing the up/down/left/right side of the control wheel is indicated by v/V/b/B.
•The following functions are assigned to v/b/B on the control wheel.
|
v |
DISP |
Changes the screen display. |
|
|
B |
ISO |
ISO sensitivity |
|
|
b |
/ |
Drive Mode |
|
|
• |
Cont. Shooting/Bracket |
||
|
• |
Self-timer |
||
• You can assign a desired function to the V/b/B/z buttons and to the control wheel turning position in shooting mode.
• When you turn the control wheel or press b/B on the control wheel in playback mode, you can display the previous or next image.
GB
28
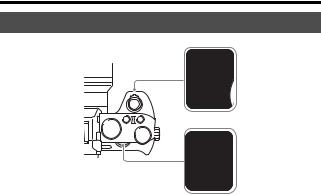
Operating the camera
How to use the front dial/rear dial
GB 
You can turn the front dial or rear dial to change the settings required for each shooting mode with immediate effect.
GB
29
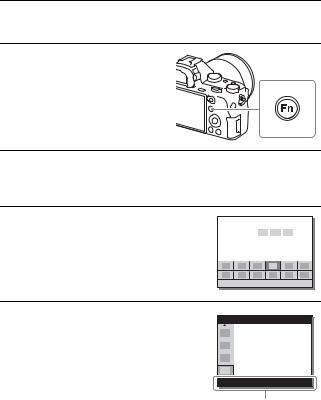
Selecting a function using the Fn (Function) button
This button is used for setting up or executing functions used frequently in shooting, except for functions from the Quick Navi screen.
1 Press the DISP on the control wheel to set the screen mode to other than [For viewfinder].
2 Press the Fn button.
3 Select the desired item using v/V/b/B on the control wheel.
For a list of functions that can be registered and how to register them, see page 31.
4 Select the desired setting by turning the front dial, then press z on the control wheel.
• Some setting values can be finely adjusted by turning the rear dial.
To set the individual settings in the dedicated screen
In step 3, select a setting item and press z on the control wheel to switch to the dedicated screen for the setting item. Set the items according to the Operation guide.
Operation guide
GB
30

Selecting a function using the Fn (Function) button
Functions that can be registered using the Fn (Function) button
You can select the functions to be displayed when you press the Fn (Function) button.
MENU button t  (Custom Settings) t [Function Menu Set.] t Assign the function to the desired location.
The functions that can be selected using the Fn button are as follows:
|
Drive Mode |
Selftimer during Brkt |
Flash Mode |
|||||||
|
Flash Comp. |
Focus Mode |
Focus Area |
GB |
||||||
|
Exposure Comp. |
ISO |
ISO AUTO Min. SS |
|||||||
|
Metering Mode |
White Balance |
DRO/Auto HDR |
|||||||
|
Creative Style |
Shoot Mode |
Picture Effect |
|||||||
|
Picture Profile |
Center Lock-on AF |
Smile/Face Detect. |
|||||||
|
Soft Skin Effect |
Auto Obj. Framing |
Image Size |
|||||||
|
Aspect Ratio |
Quality |
SteadyShot |
|||||||
|
SteadyShot Adjust. |
SteadyS. Focal Len. |
Audio Rec Level |
|||||||
|
Zebra |
Grid Line |
Marker Display |
|||||||
|
Audio Level Display |
Peaking Level |
Peaking Color |
|||||||
|
Silent Shooting |
Not set |
||||||||
GB
31

Functions that can be selected using the MENU button
You can set up the basic settings for the camera as a whole, or execute functions such as shooting, playback, or other operations.
1 Press the MENU button to display the menu screen.
2 Select the desired setting item using v/V/b/B on the control wheel or by turning the control wheel, and then press z on the center of the control wheel.
•Select an icon at the top of the screen and press the b/B on the control wheel to move to another MENU item.
3 Select the setting value, then press z to confirm.
To display the Tile Menu
Allows you to select whether to always display the first screen of the menu when you press the MENU button.
MENU button t  (Setup) t [Tile Menu] t [On]
GB
32

Functions that can be selected using the MENU button
 (Camera Settings)
 Image Size Selects the size of still images. (L: 42M/M: 18M/S: 11M (3:2) L: 36M/M: 15M/S: 8.9M (16:9)
L: 18M/M: 11M/S: 4.5M (APS-C size, 3:2) L: 15M/M: 8.9M/S: 3.8M (APS-C size, 16:9))
 Aspect Ratio Selects the aspect ratio for still images. (3:2/16:9)
|
Quality |
Sets the image quality for still images. |
||
|
(RAW/RAW & JPEG/Extra fine/Fine/Standard) |
|||
|
Panorama: Size |
Selects the size of panoramic images. |
||
|
(Standard/Wide) |
|||
|
Panorama: Direction |
Sets the shooting direction for panoramic images. |
GB |
|
|
(Right/Left/Up/Down) |
|||
|
File Format |
Selects the movie file format. |
||||
|
(XAVC S 4K/XAVC S HD/AVCHD/MP4) |
|||||
|
Record Setting |
Selects the quality and size of the recorded movie frame. |
||||
|
(XAVC S 4K: 30p 100M/25p 100M/30p 60M/25p 60M/24p |
|||||
|
100M/24p 60M |
|||||
|
XAVC S HD: 60p 50M/50p 50M/30p 50M/25p 50M/24p |
|||||
|
50M/120p 50M/100p 50M |
|||||
|
AVCHD: 60i 24M(FX)/50i 24M(FX)/60i 17M(FH)/50i |
|||||
|
17M(FH)/60p 28M(PS)/50p 28M(PS)/24p 24M(FX)/25p |
|||||
|
24M(FX)/24p 17M(FH)/25p 17M(FH) |
|||||
|
MP4: 1920×1080 60p 28M/1920×1080 50p 28M/1920×1080 |
|||||
|
30p 16M/1920×1080 25p 16M/1280×720 30p 6M/1280×720 |
|||||
|
25p 6M) |
|||||
|
Dual Video REC |
Sets whether to simultaneously record an XAVC S movie |
||||
|
and MP4 movie or an AVCHD movie and MP4 movie. |
|||||
|
(On/Off) |
|||||
|
Drive Mode |
Sets the drive mode, such as for continuous shooting. |
||||
|
(Single Shooting/Cont. Shooting/Self-timer/Self- |
|||||
|
timer(Cont)/Cont. Bracket/Single Bracket/WB bracket/DRO |
|||||
|
Bracket) |
|||||
|
Bracket Settings |
Sets self-timer shooting in bracket mode, shooting order for |
||||
|
exposure bracketing, and white balance bracketing. |
|||||
|
(Selftimer during Brkt/Bracket order) |
|||||
|
Flash Mode |
Sets the flash settings. |
||||
|
(Flash Off/Autoflash/Fill-flash/Slow Sync./Rear Sync./ |
|||||
|
Wireless) |
|||||
|
GB |
33

|
Functions that can be selected using the MENU button |
||||||
|
Flash Comp. |
Adjusts the intensity of flash output. |
|||||
|
(-3.0EV to +3.0EV) |
||||||
|
Red Eye Reduction |
Reduces the red-eye phenomenon when using flash. |
|||||
|
(On/Off) |
||||||
|
Focus Mode |
Selects the focus mode. |
|||||
|
(Single-shot AF/Automatic AF/Continuous AF/DMF/Manual |
||||||
|
Focus) |
||||||
|
Focus Area |
Selects the area of focus. |
|||||
|
(Wide/Zone/Center/Flexible Spot/Expand Flexible Spot/ |
||||||
|
Lock-on AF) |
||||||
|
Focus Settings |
Allows you to focus using the front dial, rear dial or control |
|||||
|
wheel. |
||||||
|
AF Illuminator |
Sets the AF illuminator, which provides light for a dark scene |
|||||
|
to aid focusing. |
||||||
|
(Auto/Off) |
||||||
|
AF drive speed |
Switches focusing speed when using autofocus in movie |
|||||
|
mode. |
||||||
|
(Fast/Normal/Slow) |
||||||
|
AF Track Sens |
Sets the AF tracking sensitivity in movie mode. |
|||||
|
(High/Normal) |
||||||
|
Exposure Comp. |
Compensates for the brightness of the entire image. |
|||||
|
(-5.0EV to +5.0EV) |
||||||
|
Exposure step |
Selects the size of the increment step for shutter speed, |
|||||
|
aperture, and exposure. |
||||||
|
(0.5EV/0.3EV) |
||||||
|
ISO |
Sets the ISO sensitivity. |
|||||
|
(Multi Frame NR/ISO AUTO/ISO 50 to ISO 102400) |
||||||
|
ISO AUTO Min. SS |
Sets the slowest shutter speed at which ISO sensitivity will |
|||||
|
start to change in [ISO AUTO] mode. |
||||||
|
(Faster/Fast/Standard/Slow/Slower/1/8000 — 30”) |
||||||
|
Metering Mode |
Selects the method for measuring brightness. |
|||||
|
(Multi/Center/Spot) |
||||||
|
White Balance |
Adjusts the color tone of images. |
|||||
|
(Auto/Daylight/Shade/Cloudy/Incandescent/Fluor.: Warm |
||||||
|
White/Fluor.: Cool White/Fluor.: Day White/Fluor.: |
||||||
|
Daylight/Flash/Underwater Auto/C.Temp./Filter/Custom 1- |
||||||
|
3/Custom Setup) |
||||||
|
DRO/Auto HDR |
Compensates automatically for brightness and contrast. |
|||||
|
(Off/D-Range Opt./Auto HDR) |
||||||
|
GB |
34

|
Functions that can be selected using the MENU button |
|||
|
Creative Style |
Selects the desired image processing. You can also adjust |
||
|
contrast, saturation, and sharpness. |
|||
|
(Standard/Vivid/Neutral/Clear/Deep/Light/Portrait/ |
|||
|
Landscape/Sunset/Night Scene/Autumn leaves/Black & |
|||
|
White/Sepia/Style Box1-6) |
|||
|
Picture Effect |
Shoots images with a texture unique to the selected effect. |
||
|
(Off/Toy Camera/Pop Color/Posterization/Retro Photo/Soft |
|||
|
High-key/Partial Color/High Contrast Mono./Soft Focus/ |
|||
|
HDR Painting/Rich-tone Mono./Miniature/Watercolor/ |
|||
|
Illustration) |
|||
|
Picture Profile |
Changes settings such as color and tone when recording |
||
|
movies. |
|||
|
(Off/PP1 — PP7) |
|||
|
Zoom |
Sets the zoom scale for Clear Image Zoom and Digital Zoom. |
GB |
|
|
Focus Magnifier |
Enlarges the image before shooting so that you can check the |
||
|
focus. |
|||
|
Long Exposure |
Sets noise reduction processing for shots with a shutter speed |
||
|
NR |
of 1 second or longer. |
||
|
(On/Off) |
|||
|
High ISO NR |
Sets noise reduction processing for high-sensitivity shooting. |
||
|
(Normal/Low/Off) |
|||
|
Center Lock-on AF |
Sets the function to track a subject and continue focusing |
||
|
when pressing the center button in the shooting screen. |
|||
|
(Off/On) |
|||
|
Smile/Face Detect. |
Selects to detect faces and adjust various settings |
||
|
automatically. Sets to automatically release the shutter when |
|||
|
a smile is detected. |
|||
|
(Off/On (Regist. Faces)/On/Smile Shutter) |
|||
|
Soft Skin Effect |
Sets the Soft Skin Effect and the effect level. |
||
|
(On: High/On: Mid/On: Low/Off) |
|||
|
Auto Obj. |
Analyzes the scene when capturing faces, close-ups, or |
||
|
Framing |
subjects tracked by Lock-on AF function, and automatically |
||
|
trims and saves another copy of the image with a more |
|||
|
impressive composition. |
|||
|
(Off/Auto) |
|||
|
Auto Mode |
You can shoot selecting either Intelligent Auto or Superior |
||
|
Auto. |
|||
|
(Intelligent Auto/Superior Auto) |
|||
|
GB |
35

|
Functions that can be selected using the MENU button |
|||||
|
Scene Selection |
Selects pre-set settings to match various scene conditions. |
||||
|
(Portrait/Sports Action/Macro/Landscape/Sunset/Night |
|||||
|
Scene/Hand-held Twilight/Night Portrait/Anti Motion Blur) |
|||||
|
Movie |
Selects the exposure mode to suit your subject or effect. |
||||
|
(Program Auto/Aperture Priority/Shutter Priority/Manual |
|||||
|
Exposure) |
|||||
|
SteadyShot |
Sets SteadyShot for shooting still images or movies. Reduces |
||||
|
blur from camera shake when shooting while holding the |
|||||
|
camera. |
|||||
|
(On/Off) |
|||||
|
SteadyShot Settings |
Sets SteadyShot settings. |
||||
|
(SteadyShot Adjust./SteadyS. Focal Len.) |
|||||
|
Color Space |
Changes the range of reproducible colors. |
||||
|
(sRGB/AdobeRGB) |
|||||
|
Auto Slow Shut. |
Sets the function that automatically adjusts the shutter speed |
||||
|
following the brightness of the environment in movie mode. |
|||||
|
(On/Off) |
|||||
|
Audio Recording |
Sets whether to record audio when shooting a movie. |
||||
|
(On/Off) |
|||||
|
Audio Rec Level |
Adjusts the audio recording level during movie recording. |
||||
|
(0 to 31) |
|||||
|
Audio Out Timing |
Sets the timing of audio output during the movie recording. |
||||
|
(Live/Lip Sync) |
|||||
|
Wind Noise Reduct. |
Reduces wind noise during movie recording. |
||||
|
(On/Off) |
|||||
|
Memory recall |
Calls up settings pre-registered in [Memory]. |
||||
|
(1/2/M1-M4) |
|||||
|
Memory |
Registers the desired modes or camera settings. |
||||
|
(1/2/M1-M4) |
|||||
 (Custom Settings)
|
Zebra |
Displays stripes to adjust brightness. |
|
(Off/70 to 100/100+) |
|
|
MF Assist |
Displays an enlarged image when focusing manually. |
|
(On/Off) |
|
|
Focus Magnif. Time |
Sets the length of time the image will be shown in an |
|
enlarged form. |
|
|
(2 Sec/5 Sec/No Limit) |
|
GB
36

|
Functions that can be selected using the MENU button |
||||||||
|
Grid Line |
Sets a grid line display to enable alignment to a structural |
|||||||
|
outline. |
||||||||
|
(Rule of 3rds Grid/Square Grid/Diag. + Square Grid/Off) |
||||||||
|
Marker Display |
Sets whether to display the marker on the monitor when |
|||||||
|
recording movies. |
||||||||
|
(On/Off) |
||||||||
|
Marker Settings |
Sets the marker displayed on the monitor when recording |
|||||||
|
movies. |
||||||||
|
(Center/Aspect/Safety Zone/Guideframe) |
||||||||
|
Audio Level Display |
Sets Audio Level Display. |
|||||||
|
(On/Off) |
||||||||
|
Auto Review |
Sets auto review to display the captured image after shooting. |
|||||||
|
(10 Sec/5 Sec/2 Sec/Off) |
GB |
|||||||
|
DISP Button |
Sets the type of information to be displayed on the monitor or |
|||||||
|
in the viewfinder by pressing DISP on the control wheel. |
||||||||
|
(Monitor/Finder) |
||||||||
|
Peaking Level |
Enhances the outline of in-focus ranges with a specific color |
|||||||
|
when focusing manually. |
||||||||
|
(High/Mid/Low/Off) |
||||||||
|
Peaking Color |
Sets the color used for the peaking function. |
|||||||
|
(Red/Yellow/White) |
||||||||
|
Exposure Set. Guide |
Sets the guide displayed when exposure settings are changed |
|||||||
|
in the shooting screen. |
||||||||
|
(Off/On) |
||||||||
|
Live View Display |
Sets whether to reflect settings such as exposure |
|||||||
|
compensation in screen display. |
||||||||
|
(Setting Effect ON/Setting Effect OFF) |
||||||||
|
Disp. cont. AF area |
Sets whether or not to display the focus area in [Continuous |
|||||||
|
AF] mode. |
||||||||
|
(On/Off) |
||||||||
|
Phase Detect. Area |
Sets phase detection AF area. |
|||||||
|
(On/Off) |
||||||||
|
Pre-AF |
Sets whether to perform auto focus before the shutter button |
|||||||
|
is half pressed. |
||||||||
|
(On/Off) |
||||||||
|
Zoom Setting |
Sets whether to use the Clear Image Zoom and Digital Zoom |
|||||||
|
when zooming. |
||||||||
|
(Optical zoom only/On:ClearImage Zoom/On:Digital Zoom) |
||||||||
|
GB |
37

Functions that can be selected using the MENU button
 Eye-Start AF Sets whether to use auto focus when you look through the viewfinder if an LA-EA2/LA-EA4 Mount Adaptor (sold separately) is attached.
(On/Off)
FINDER/MONITOR Sets the method for switching between the viewfinder and the monitor.
(Auto/Viewfinder(Manual)/Monitor(Manual))
Release w/o Lens Sets whether shutter can open when the lens is not attached. (Enable/Disable)
Release w/o Card Sets whether to release the shutter when a memory card is not inserted.
(Enable/Disable)
Priority Set in AF-S Sets the timing of the shutter release when [Focus Mode] is set to [Single-shot AF], [DMF] or [Automatic AF] with a still subject.
(AF/Release/Balanced Emphasis)
Priority Set in AF-C Sets the timing of the shutter release when [Focus Mode] is set to [Continuous AF] or [Automatic AF] with a moving subject.
(AF/Release/Balanced Emphasis)
 AF w/ shutter Sets whether to perform AF when the shutter button is half pressed. This is useful when you want to adjust the focus and exposure separately.
(On/Off)
 AEL w/ shutter Sets whether to adjust the exposure by pressing the shutter button halfway down. This is convenient when you want to adjust the focus and exposure separately.
(Auto/On/Off)
 Silent Shooting Shoots images without the shutter sound. (On/Off)
e-Front Curtain Shut. Sets whether to use the electronic front curtain shutter function.
(On/Off)
S. Auto Img. Extract. Sets whether to save all the images that were shot continuously in [Superior Auto].
(Auto/Off)
|
Exp.comp.set |
Sets whether to reflect exposure compensation value to flash |
|
compensation. |
|
|
(Ambient&flash/Ambient only) |
|
|
GB |
38

Functions that can be selected using the MENU button
|
Reset EV Comp. |
Sets whether to retain the exposure value set without using |
|
|
the exposure dial, or reset the exposure value to 0 when you |
||
|
turn off the camera. |
||
|
(Maintain/Reset) |
||
|
Face Registration |
Registers or changes the person to be given priority in the |
|
|
focus. |
||
|
(New Registration/Order Exchanging/Delete/Delete All) |
||
|
APS-C/Super 35mm |
Sets whether to record in APS-C-equivalent size for still |
|
|
images and Super 35 mm-equivalent size for movies. |
||
|
(On/Auto/Off) |
||
|
AF Micro Adj. |
Allows you to make fine adjustments to the position of the |
|
|
focus when an LA-EA2/LA-EA4 Mount Adaptor (sold |
||
|
separately) is attached. |
GB |
|
|
(AF Adjustment Set./amount/Clear) |
Lens Comp. Compensates for distortion on the screen caused by the lens attached.
(Shading Comp./Chro. Aber. Comp./Distortion Comp.)
|
AF System |
Sets the auto focus method when an LA-EA1/LA-EA3 |
|
Mount Adaptor (sold separately) is attached. |
|
|
(Phase Detection AF/Contrast AF) |
Video Light Mode Sets the illumination setting for the HVL-LBPC LED light (sold separately).
(Power Link/REC Link/REC Link&STBY/Auto)
Function Menu Set. Customizes the functions displayed when the Fn (Function) button is pressed.
(Drive Mode/Selftimer during Brkt/Flash Mode/Flash Comp./Focus Mode/Focus Area/Exposure Comp./ISO/ISO AUTO Min. SS/Metering Mode/White Balance/ DRO/Auto HDR/Creative Style/Shoot Mode/Picture Effect/Picture Profile/Center Lock-on AF/Smile/Face Detect./ Soft Skin Effect/
 Auto Obj. Framing/
 Image Size/
 Aspect Ratio/
 Quality/SteadyShot/SteadyShot Adjust./SteadyS. Focal Len./Audio Rec Level/Zebra/Grid Line/
 Marker Display/Audio Level Display/Peaking Level/Peaking Color/
 Silent Shooting/Not set)
GB
39

Functions that can be selected using the MENU button
Custom Key Settings Assigning functions to the various keys allows you to speed up operations by pressing the keys.
(Control Wheel/Custom Button 1/Custom Button 2/Custom Button 3/Custom Button 4/Center Button/Left Button/Right Button/Down Button/AEL Button/AF/MF Button/Focus Hold Button*)
*You can assign a function to the focus hold button on the lens.
|
Dial Setup |
Sets the functions of the front and rear control dials when the |
||||
|
exposure mode is set to M. Dials can be used for adjusting |
|||||
|
shutter speed and aperture. |
|||||
|
( |
SS |
F/no. / |
F/no. |
SS) |
|
|
Dial Ev Comp |
Compensates the exposure with the front or rear dial. |
||||
|
(Off/ |
Front dial/ |
Rear dial) |
|||
|
Zoom Ring Rotate |
Assigns the zoom in/out to the rotational direction of the |
||||
|
zoom lens. This function is only available with a power zoom |
|||||
|
lens that is compatible with this function. |
|||||
|
(Left(W)/Right(T) or Right(W)/Left(T)) |
|||||
|
MOVIE Button |
Enables or disables for the MOVIE button. |
||||
|
(Always/Movie Mode Only) |
Dial / Wheel Lock Sets whether to disable the front dial, rear dial or control wheel by pressing and holding down the Fn button. (Lock/Unlock)
 (Wireless)
|
Send to Smartphone |
Transfers images to display on a smartphone. |
|
(Select on This Device/Select on Smartphone) |
|
|
Send to Computer |
Backs up images by transferring them to a computer |
|
connected to a network. |
|
|
View on TV |
You can view images on a network-enabled TV. |
|
One-touch(NFC) |
Assigns one application to One-touch (NFC). You can call up |
|
the application when shooting by touching an NFC-enabled |
|
|
Smartphone to the camera. |
|
|
Airplane Mode |
You can set this device to not perform wireless |
|
communications. |
|
|
(On/Off) |
|
|
WPS Push |
You can register the access point to the camera easily by |
|
pushing the Wi-Fi Protected Setup™ (WPS) button. |
|
|
Access Point Set. |
You can register your access point manually. |
GB
40

|
Functions that can be selected using the MENU button |
|
|
Edit Device Name |
You can change the device name under Wi-Fi Direct, etc. |
|
Disp MAC Address |
Displays the MAC address of the camera. |
|
SSID/PW Reset |
Resets the SSID and password of smartphone connection. |
|
Reset Network Set. |
Reset all network settings. |
 (Application)
You can connect to the PlayMemories Camera Apps™ download site via the Internet to add desired functions to your camera.
• This camera is preinstalled with a built-in application called [Smart Remote Embedded] that allows you to control the camera using your smartphone. The preinstalled application [Smart Remote Embedded] will
not be deleted even if you select MENU button t  (Setup) t GB [Setting Reset] t [Initialize].
 (Playback)
|
Delete |
Deletes an image. |
|
(Multiple Img./All in this Folder/All with this date) |
|
|
View Mode |
Plays back images from a specified date or specified folder of |
|
still images and movies. |
|
|
(Date View/Folder View(Still)/Folder View(MP4)/AVCHD |
|
|
View/XAVC S HD View/XAVC S 4K View) |
|
|
Image Index |
Displays multiple images at the same time. |
|
(9 Images/25 Images) |
|
|
Display Rotation |
Sets the playback direction of the recording image. |
|
(Auto/Manual/Off) |
|
|
Slide Show |
Shows a slide show. |
|
(Repeat/Interval) |
|
|
Rotate |
Rotates the image. |
|
Enlarge Image |
Enlarges the playback images. |
|
Protect |
Protects the images. |
|
(Multiple Img./All in this Folder/All with this date/Cancel |
|
|
All in this Folder/Cancel All with this date) |
|
|
Specify Printing |
Adds a print order mark to a still image. |
|
(Multiple Img./Cancel All/Print Setting) |
|
|
GB |
41

|
Functions that can be selected using the MENU button |
|
|
(Setup) |
|
|
Monitor Brightness |
Sets the monitor brightness. |
|
(Manual/Sunny Weather) |
|
|
Viewfinder Bright. |
Sets the brightness of the electronic viewfinder. |
|
(Auto/Manual) |
|
|
Finder Color Temp. |
Sets the color temperature of the viewfinder. |
|
Volume Settings |
Sets the volume for movie playback. |
|
Audio signals |
Sets whether to sound a beep during auto focus or self-timer |
|
operations. |
|
|
(On/Off) |
|
|
Upload Settings |
Sets the upload function of the camera when using an Eye-Fi |
|
card. |
|
|
(On/Off) |
|
|
Tile Menu |
Sets whether to display the tile menu every time you press the |
|
MENU button. |
|
|
(On/Off) |
|
|
Mode Dial Guide |
Turns the mode dial guide (the explanation of each shooting |
|
mode) on or off. |
|
|
(On/Off) |
|
|
Delete confirm. |
Sets whether Delete or Cancel is preselected in the Delete |
|
confirmation screen. |
|
|
(“Delete” first /“Cancel” first) |
|
|
Display Quality |
Sets the display quality. |
|
(High/Standard) |
|
|
Pwr Save Start Time |
Sets the time intervals to automatically switch to power save |
|
mode. |
|
|
(30 Min/5 Min/2 Min/1 Min/10 Sec) |
|
|
NTSC/PAL Selector*1 |
By changing the TV format of the device, shooting in a |
|
different movie format is possible. |
|
|
Cleaning Mode |
Starts the cleaning mode to clean the image sensor. |
|
Demo Mode |
Sets demonstration playback of a movie to on or off. |
|
(On/Off) |
|
|
TC/UB Settings |
Sets the time code (TC) and user bit (UB). |
|
(TC/UB Disp. Setting/TC Preset/UB Preset/TC Format/TC |
|
|
Run/TC Make/UB Time Rec) |
|
|
Remote Ctrl |
Sets whether to use the infrared remote control. |
|
(On/Off) |
|
|
GB |
42

Functions that can be selected using the MENU button
|
HDMI Settings |
Sets the HDMI settings. |
|||||||||||||||||||
|
(HDMI Resolution/ |
24p/60p Output/HDMI Info. Display/ |
|||||||||||||||||||
|
TC Output/ |
REC Control/CTRL FOR HDMI) |
|||||||||||||||||||
|
4K Output Sel. |
Sets how to record and output 4K movies via HDMI when |
|||||||||||||||||||
|
the camera is connected to an external recorder/player that |
||||||||||||||||||||
|
supports 4K. |
||||||||||||||||||||
|
(Memory Card+HDMI/HDMI Only(30p)/HDMI Only(25p)/ |
||||||||||||||||||||
|
HDMI Only(24p)) |
||||||||||||||||||||
|
USB Connection |
Sets the USB connection method. |
|||||||||||||||||||
|
(Auto/Mass Storage/MTP/PC Remote) |
||||||||||||||||||||
|
USB LUN Setting |
Enhances compatibility by limiting the functions of USB |
|||||||||||||||||||
|
connection. Set to [Multi] in normal conditions and to |
||||||||||||||||||||
|
[Single] only when the connection between the camera and a |
GB |
|||||||||||||||||||
|
computer or AV component cannot be established. |
||||||||||||||||||||
|
(Multi/Single) |
||||||||||||||||||||
|
USB Power Supply |
Sets whether to supply power via USB connection when the |
|||||||||||||||||||
|
camera is connected to a computer or USB device using a |
||||||||||||||||||||
|
micro USB cable. |
||||||||||||||||||||
|
(On/Off) |
||||||||||||||||||||
|
Language |
Selects the language. |
|||||||||||||||||||
|
Date/Time Setup |
Sets date and time, and daylight savings. |
|||||||||||||||||||
|
Area Setting |
Sets the location of use. |
|||||||||||||||||||
|
Copyright Info |
Sets copyright information for still images. |
|||||||||||||||||||
|
(Write Copyright Info/Set Photographer/Set Copyright/Disp. |
||||||||||||||||||||
|
Copyright Info) |
||||||||||||||||||||
|
Format |
Formats the memory card. |
|||||||||||||||||||
|
File Number |
Sets the method used to assign file numbers to still images |
|||||||||||||||||||
|
and movies. |
||||||||||||||||||||
|
(Series/Reset) |
||||||||||||||||||||
|
Select REC Folder |
Changes the selected folder for storing still images and |
|||||||||||||||||||
|
movies (MP4). |
||||||||||||||||||||
|
New Folder |
Creates a new folder for storing still images and movies |
|||||||||||||||||||
|
(MP4). |
||||||||||||||||||||
|
Folder Name |
Sets the folder format for still images. |
|||||||||||||||||||
|
(Standard Form/Date Form) |
||||||||||||||||||||
|
Recover Image DB |
Recovers the image database file and enables recording and |
|||||||||||||||||||
|
playback. |
||||||||||||||||||||
|
Display Media Info. |
Displays the remaining recording time of movies and the |
|||||||||||||||||||
|
recordable number of still images on the memory card. |
||||||||||||||||||||
GB
43
|
Functions that can be selected using the MENU button |
|
|
Version |
Displays the camera software version. |
|
Certification Logo*2 |
The certification can be displayed on the camera. |
|
Setting Reset |
Restores settings to their defaults. Select [Initialize] to restore |
|
all settings to their default values. |
|
|
(Initialize/ Camera Settings Reset) |
|
*1 If you switch this item, it will be required to format the memory card in the setting compatible with the PAL or NTSC system respectively. Also, note that it may not be possible to play back movies recorded with the NTSC system on a PAL system TV.
*2 Overseas model only.
GB
44

Using the In-Camera Guide
You can use [Custom Key Settings] to assign In-Camera Guide to the desired button.
The In-Camera Guide displays explanations for the currently selected menu function or setting.
MENU button t  (Custom Settings) t [Custom Key Settings] t Select the desired button assigned to the function. t [In-
Camera Guide]
|
Press the MENU button and use the control wheel to select a MENU item whose |
|
|
explanation you want to read, and then press the button to which [In-Camera |
|
|
Guide] is assigned. |
GB |
GB
45

Charging the battery pack
When using the camera for the first time, be sure to charge the NP-FW50 battery pack (supplied).
The InfoLITHIUM™ battery pack can be charged even when it has not been fully depleted.
It can also be used when it has not been fully charged.
The charged battery pack is discharged little by little, even when you do not use it. To avoid missing an opportunity to shoot, charge the battery pack again before shooting.
Charging the battery pack using the battery charger
1 Insert the battery pack onto the battery charger.
• Push the battery pack until it clicks.
2 Connect the battery charger to the wall outlet (wall socket).
• The CHARGE lamp lights orange when charging is started.
• The CHARGE lamp turns off when charging is finished.
|
• If the CHARGE lamp lights up and |
CHARGE lamp |
|
|
then immediately turns off, the battery |
||
|
pack is fully charged. |
•For countries/regions other than the USA and Canada, connect the power cord to the battery charger, and connect the battery charger to the wall outlet (wall socket).
GB
46

Charging the battery pack
Charging the battery pack using the AC Adaptor
1 Set the ON/OFF (Power) switch to OFF.
2 Slide the lever to open the cover.
3 Insert the battery pack completely, using the tip of the battery to press the lock lever.
GB 
Lock lever
47

Charging the battery pack
5 Connect the camera to the AC Adaptor (supplied) using the micro USB cable (supplied), and connect the AC Adaptor to the wall outlet (wall socket).
The charge lamp lights orange, and charging starts.
•Turn off the camera while charging the battery.
•If the charge lamp lights up and then immediately turns off, the battery pack is fully charged.
•When the charge lamp flashes and charging is not finished, remove and re-insert the battery pack.
•For countries/regions other than the USA and Canada, connect the power cord to the AC Adaptor, and connect the AC Adaptor to the wall outlet (wall socket).
Charge lamp Lit: Charging
Off: Charging finished Flashing:
Charging error or charging paused temporarily because the camera is not within the proper temperature range
GB
48

Charging the battery pack
Notes
•If the charge lamp on the camera flashes when the AC Adaptor is connected to the wall outlet (wall socket), this indicates that charging is temporarily stopped because the temperature is outside the recommended range. When the temperature gets back within the appropriate range, the charging resumes. We recommend charging the battery pack in an ambient temperature of between 10°C to 30°C (50ºF to 86ºF).
•Connect the AC Adaptor (supplied) or the battery charger (supplied) to the nearest wall outlet (wall socket). If malfunctions occur while using the AC Adaptor or the battery charger, disconnect the plug from the wall outlet (wall socket) immediately to disconnect from the power source.
•When the camera is being used for the first time or when you use a battery pack that
|
has not been used for a long time, the charge lamp/CHARGE lamp may flash |
|
|
quickly when the battery is charged for the first time. If that happens, remove the |
|
|
battery pack from the camera and then re-insert it to recharge. |
GB |
•Do not continuously or repeatedly charge the battery without using it if it is already fully charged or close to fully charged. Doing so may cause a deterioration in battery performance.
•When charging is finished, disconnect the AC Adaptor from the wall outlet (wall socket).
•Be sure to use only genuine Sony brand battery packs, micro USB cable (supplied) and AC Adaptor (supplied).
Charging time (Full charge)
The charging time is approximately 150 min. using the AC Adaptor (supplied), and approximately 250 min. using the battery charger (supplied).
Notes
•The above charging time applies when charging a fully depleted battery pack at a temperature of 25°C (77°F). Charging may take longer depending on conditions of use and circumstances.
GB
49

Charging the battery pack
Charging by connecting to a computer
The battery pack can be charged by connecting the camera to a computer using a micro USB cable. Connect the camera to the computer with the camera turned off.
Notes
•If the camera is connected to a laptop computer that is not connected to a power source, the laptop battery level decreases. Do not charge for an extended period of time.
•Do not turn on/off or restart the computer, or wake the computer to resume from sleep mode when a USB connection has been established between the computer and the camera. The camera may cause a malfunction. Before turning on/off, or restarting the computer or waking the computer from sleep mode, disconnect the camera and the computer.
•No guarantees are made for charging using a custom-built computer or a modified computer.
Checking the remaining battery charge
A remaining charge indicator appears on the screen.
High 


 Low
Low
Notes
• The remaining charge indicator may not be correct under certain circumstances.
GB
50
 Loading…