
Скачать
SERVICE
MANUAL
REVISION 0
COPYRIGHT
1999 CANON INC.
CANON LBP-800 REV.0 AUG. 1999 PRINTED IN JAPAN (IMPRIME AU JAPON)
AUG. 1999
RY8-13A0-000
- Главная
-
Canon
-
Принтеры
-
LBP-800
-
Инструкция по эксплуатации
Вы можете бесплатно скачать Инструкция по эксплуатации для Canon LBP-800.
Также вы сможете прочесть онлайн этот документ без скачивания.
Скачать Инструкция по эксплуатации для Canon LBP-800
Тип файла
PDF
Размер
417 Kb
Кол-во страниц
22
Просмотров
1969
Вы не робот?
60
Скачать файл:
canon-lbp-800-user-s-manual.pdf
Читать онлайн Инструкция по эксплуатации для Canon LBP-800 (Страница 1)

Next →
- 1
- 2
- 3
- 4
- 5
- 6
- 7
- 8
- 9
- 10
- 11
- 12
- 13
- 14
- 15
- 16
- 17
- 18
- 19
- 20
- 21
- 22
Другие Принтеры Canon LBP-800
Топ Canon Принтеры
-
imagePROGRAF iPF760 MFP Руководство пользователя
PDF файлов
8Просмотров
21844 -
imagePROGRAF iPF765 MFP Руководство пользователя
PDF файлов
8Просмотров
22769 -
imagePROGRAF iPF6200 Руководство пользователя
PDF файлов
5Просмотров
12201 -
imagePROGRAF iPF810 PRO Руководство пользователя
PDF файлов
4Просмотров
12148 -
imageCLASS D530 Руководство пользователя
PDF файлов
3Просмотров
6451 -
imageCLASS MF3010 Руководство пользователя
PDF файлов
3Просмотров
12992
Вопросы
-
слабая батарея
Ноутбуки
Acer
1310
Alex 12.02.2016 17:26
Ранее вы смотрели
Производители
Animation Tech
Bolens
E&J
Kwikset
Madrigal Imaging
Sapphire Audio
Stearns
Sunrise Medical
Ultra Products
Velux
Типы устройств
Женские бритвенные станки
Комплекты угловых и накидных ключей
Толщиномеры
Наушники
Кухонная система Mega Kitchen System
Наборы для стрижки и уходу за лицом
Дисковые проигрыватели
MiniDV
SD-ресивер
Ультразвуковое устройство для борьбы с вредителями
Устройства
American Standard ClearTap 4665X
AT&T EL52200
Denon AVR-4520CI
Ingersoll-Rand PD07P-X-X
Land Pride RCS3596
LG 42LH255H
LG 55LA7400
MicroBoards Technology NX1-1000
Milan Technology MiLAN MIL-S1000
TP-Link TL-SL2218
freeuserguide.ru
About Us
Contacts
Disclamers
Privacy Policy
Эта страница полезна для вас? Поделитесь ссылкой:
![]()
LBP-800 Laser Printer
User’s Guide
IMPORTANT:
Read this manual carefully.
Use this manual when you need quick reference help.

Copyright
Copyright ©1999 Canon Inc. All Rights Reserved
All information in this manual is copyrighted. No part of this publication may be reproduced, transmitted, transcribed, stored in a retrieval system, or translated into any language or computer language, in any form or by any means, electronic, mechanical, magnetic, optical, chemical, manual, or otherwise, without prior written consent from Canon.
Notice
Canon makes no guarantees of any kind with regard to this manual. Canon is not liable for errors contained herein or for consequential or incidental damages incurred as a result of acting on information contained in the manual. The information contained herein shall not be reproduced in whole or in part without prior written consent from Canon.
Trademarks
LBP, Canon, and the Canon Logo are trademarks of Canon Inc. Microsoft® , Windows® , and Windows NT® are either registered trademarks or trademarks of Microsoft Corporation in the United States and/or in other countries.
Other brand and product names are trademarks or registered trademarks of their respective companies.
In this manual, Microsoft® , Microsoft® Windows® , and Microsoft® Windows NT® are referred to as Microsoft, Windows, and Windows NT respectively.
ii

About this Guide
The following lists the information included in this Guide:
Chapter 1: Introduction. Introduces you to the printer features and describes the parts.
Chapter 2: Paper Handling. Explains the types of paper and sizes you can use, how to load paper, and describes how paper moves through the printer.
Chapter 3: Using the Canon Advanced Printing Technology.
Describes the Canon Advanced Printing Technology and how to install and use the software, as well as how to check on the status of a print job.
Chapter 4: Troubleshooting. Contains helpful information on how to solve printing problems.
Chapter 5: Maintenance. Explains how to clean and handle the printer, and how to replace the EP-22 cartridge.
Appendix A. Lists the specifications for the printer.
Appendix B. Describes how to connect the printer using the optional network adapter.
Glossary. Includes definitions for terminology used in this Guide.
Conventions
This guide uses the following conventions:
CAUTION:
Indicates precautions that must be observed to prevent possible injury.
Indicates that neglecting the suggested procedure or practice could result in damage to the printer.
Indicates notes and memos containing useful tips or detailed information.
iii

Safety Information
FCC Notice (100–127 V model)
Laser Beam Printer, Model L10573A
This device complies with Part 15 of the FCC Rules. Operation is subject to the following two conditions: (1) This device may not cause harmful interference, and (2) this device must accept any interference received, including interference that may cause undesired operation.
Note: This equipment has been tested and found to comply with the limits for a Class B digital device, pursuant to Part 15 of the FCC Rules. These limits are designed to provide reasonable protection against harmful interference in a residential installation. This equipment generates, uses and can radiate radio frequency energy and, if not installed and used in accordance with the instructions, may cause harmful interference to radio communications. However, there is no guarantee that interference will not occur in a particular installation. If this equipment does cause harmful interference to radio or television reception, which can be determined by turning the equipment off and on, the user is encouraged to try to correct the interference by one or more of the following measures:
Reorient or relocate the receiving antenna.
Increase the separation between the equipment and receiver.
Connect the equipment to an outlet on a circuit different from that to which the receiver is connected.
Consult the dealer or an experienced radio/TV technician for help.
Use of shielded cable is required to comply with class B limits in Subpart B of Part 15 of FCC Rules.
Do not make any changes or modifications to the equipment unless otherwise specified in the manual. If such changes or modifications should be made, you could be required to stop operation of the equipment.
iv

FCC Notice (220–240 V model)
This equipment has been tested and found to comply with the limits for a Class A digital device, pursuant to Part 15 of the FCC Rules. These limits are designed to provide reasonable protection against harmful interference when the equipment is operated in a commercial environment. This equipment generates, uses, and can radiate radio frequency energy and if not installed and used in accordance with the instruction manual, may cause harmful interference to radio communications. Operation of this equipment in a residential area is likely to cause harmful interference, in which case the user will be required to correct the interference at his own expense.
¥Use of shielded cable is required to comply with Class A limits in Subpart B of Part 15 of FCC Rules.
Do not make any changes or modifications to the equipment unless otherwise specified in this guide. If such changes or modifications should be made, you could be required to stop operation of the equipment.
Notice for EMC Directive (220–240 V model)
“This equipment has been tested in a typical system to comply with the technical requirements of EMC Directive.”
¥Use of shielded cable is necessary to comply with the technical requirements of EMC Directive.
International ENERGY STAR Office Equipment Program
As an ENERGY STAR partner, Canon Inc. has determined that this product meets the ENERGY STAR guidelines for energy efficiency. The on-demand fusing technology of the Canon LBP-800 printer provides improved energy efficiency. Power consumption during printing is approximately 220W, and is reduced automatically to approximately 5.5W.
The International ENERGY STAR Office Equipment Program is an international program that promotes energy saving through the use of computers and other office equipment. The program backs the development and dissemination of products with functions that effectively reduce energy consumption. It is an open system in which business proprietors can participate voluntarily. The targeted products are office equipment such as computers, monitors, printers, fax machines, and copiers. Their standards and logos are uniform among the participating nations.
v
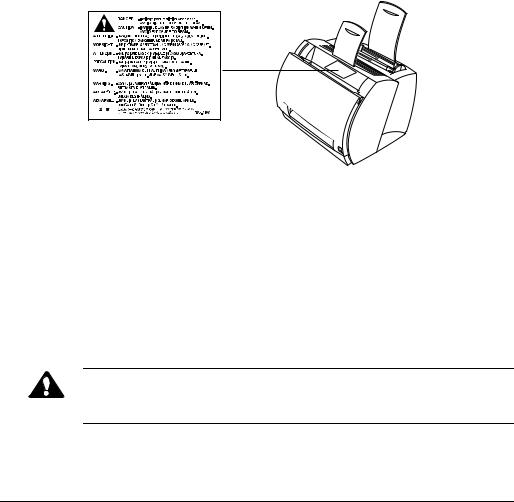
Laser Safety (100–127 V / 220–240 V models)
Laser radiation could be hazardous to the human body. For this reason, laser radiation emitted inside this printer is hermetically sealed within the protective housing and external cover. In the normal operation of the product by the user, no radiation can leak from the machine.
This printer is classified as a Class 1 laser product under EN60825- 1:1994, and in the USA, it is classified as Class 1 under the code of Federal Regulations, §1040.10 of Title 21.
The label shown below is attached to this printer. This label is attached to the laser scanner unit inside the printer. (100–127 V / 220–240 V models)
This printer has been classified under EN60825-1:1994 and conforms to the following classes:
CLASS 1 LASER PRODUCT
LASER KLASSE 1
APPAREIL A RAYONNEMENT LASER DE CLASSE 1
APPARECCHIO LASER DI CLASSE 1
PRODUCTO LASER DE CLASE 1
APARELHO A LASER DE CLASSE 1
(220-240 V model only)
CAUTION:
Performance of procedures other than those speciÞed in this manual may result in hazardous radiation exposure.
vi
Important Safety Instructions
CAUTION:
This printer is a high-precision electronic device. Before operation, be sure to read the following instructions to handle the printer properly.
Read the manual carefully before operation.
Do not dispose of these instructions. Save them for future reference.
Follow all warnings and instructions on the printer and consumables.
Do not place the printer on an unstable cart, stand, or table.
When installing the printer, carefully observe the location requirements described in this guide.
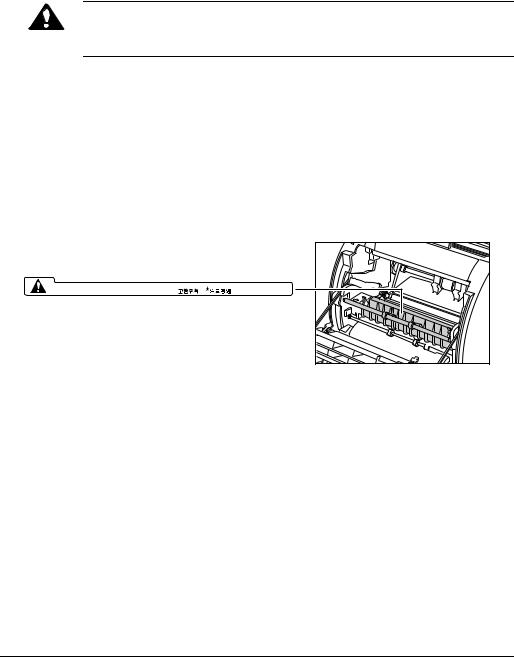
The shaded part of the face-up delivery area may be hot. Be careful not to touch it.
|
CAUTION! HOT SURFACE AVOID CONTACT |
ACHTUNG! HEISS |
ATTEMTION! TEMPERATURE ELEVEE |
|
PRECAUCION!/ATTENZIONE! ALTA TEMPERATURA |
Do not expose the printer to a wet environment.
Do not expose the printer directly to a chemical environment (experimental laboratories, etc.). The exterior of the printer is made of plastic, and the outside covering might fade, become deformed, or melt.
Do not install the printer where it will be exposed to smoke or steam.
Be sure to connect the printer to a grounded outlet.
Do not operate the printer until all packing materials (packing tape, spacers, and styrofoam molds) have been removed.
vii

100Ð127 V model only:
This product is equipped with a 3-wire grounding type plug, a plug that has a third (grounding) pin. As a safety feature, this plug Þts only into a grounding-type power outlet. If you are unable to insert the plug into the outlet, contact an electrician to replace your obsolete outlet. Do not defeat the purpose of the grounding-type plug.
220Ð240 V model only:
A certiÞed power supply cord is to be used with this equipment. For a rated current up to 6 A, a type not lighter than H05VV-F 3G 0.75 mm2 or H05VVH2-F 3G 0.75 mm2 shall be used.
Be sure to turn off the power before unplugging or plugging in the printer power cord or interface cable.
When moving the printer, be sure to turn off the power before unplugging the power cord.
Be sure to unravel the power cord prior to plugging it in; otherwise it may lead to damage, overheating, short-circuit, or result in Þre.
Be sure to plug the power cord Þrmly into the power outlet, as any ßammable material caught between an opening might result in Þre.
Avoid using an extension cord. If you must use an extension cord, be sure to take the following precautions. Failure to do this might lead to overheating, result in Þre, or cause ßickering due to a drop in voltage.
¥Be sure not to exceed the allowed rating current of the extension cord.
¥Use a short extension cord. Do not connect several extension cords together.
¥Make sure that the total ampere rating of the products plugged into the extension cord does not exceed the extension cord ampere rating.
Slots and openings in the cabinet are provided for ventilation. To ensure reliable operation of the printer and to protect it from overheating, these openings must not be blocked or covered. The openings should never be blocked by placing the printer on a bed, sofa, shag rug, or other similar surface.
viii

The printer should never be placed near or over a radiator, heat register, or ßame. It should not be placed in a built-in installation unless proper ventilation is provided.
Ventilation slots
Before connecting the printer to a power source, check the voltage rating label at the back of the printer to ensure that the printer voltage matches that of the power source. The voltage rating label is located on the rear side of the printer. If the voltage label is missing, contact your nearest authorized dealer or the place of purchase.
The power cord should be routed so that it is not likely to be walked on or pinched by items placed on or against it. Pay particular attention to the plug, the power socket, and the point where the cord exits the unit.
Keep the power cord and cables away from children.
Do not handle plugs with wet hands.
When the printer will not be used for a long period, turn the power off and unplug the power cord for safety.
Unplug the printer from the wall outlet before cleaning. Do not spray liquid cleaners or aerosol cleaners directly on the cabinet or the openings, as the spray could penetrate inside the printer and contaminate internal parts. Use a damp cloth for cleaning.
Never push objects of any kind into the printer through openings in the enclosure, as the objects might touch dangerous voltage points or short out parts. This could result in a Þre or electrical shock. Never spill liquid of any kind into the printer.
Unplug the printer and request servicing from qualiÞed service personnel in the following situations:
¥When the power cord or plug is damaged or becomes frayed.
¥If liquid is spilled into the printer.
¥If the printer is exposed to water.
ix

¥If the printer does not operate normally when the operating instructions are followed. Adjust only those controls that are covered by the operating instructions, since improper adjustment of other controls may damage the printer and may require extensive work by a qualiÞed technician to restore the product to normal operation.
¥If the printer is dropped or the cabinet is damaged.
¥If the printer exhibits a distinct change in performance, indicating a need for servicing.
¥If the printer produces smoke, odor, or excessive noise.
The outlet should always be free from any obstacles so as to allow easy access.
When unplugging the printer, always disconnect the power cord by pulling on the plug, not the cord itself.
Any misuse of electrical equipment is hazardous. Do not allow children to handle power cords or cables.
Do not attempt to service this printer yourself, except as instructed in this guide. Opening or removing covers that are intended to be removed only by qualiÞed service personnel may expose you to dangerous voltage points or other risks. Refer all servicing in those compartments to qualiÞed service personnel.
Do not attempt to modify the printer.
Do not remove the warning or instruction labels on the printer.
x
![]()
Operating Environment
When selecting a location for the printer, check the following guidelines:
¥Make sure the location is ßat and sturdy.
¥When power is on (printer plugged into an AC outlet): Temperature: 10ûC-32.5ûC (50ûF-90.5ûF)
Relative humidity: 20-80% RH with no condensation
¥Make sure the surrounding area is well ventilated.
¥The printer must not be in a direct draft.
Avoid placing the printer in the following locations:
¥ Under direct sunlight, near heaters, air conditioners, or open ßames.
Strong light entering the printer unit causes the internal cartridge drum surface to deteriorate and degrades the printing.
¥Near magnets or equipment that generates magnetic Þelds.
¥Near areas subject to vibration.
¥In dusty places or places where the air contains high concentrations of salt or corrosive gases.
¥Near water pipes and refrigerators.
If humidity is less than 30%, use a humidifier or an anti-static mat to prevent buildup of electrostatic charges.
If the room temperature rises abruptly, or the printer is moved from a cool and dry place to a warm and humid place, condensation may form inside the printer and cause problems with paper delivery or a deterioration in print quality and, in some cases, result in printer error. To prevent this, allow the printer to sit for an hour or more to adjust to the new temperature.
xi
Observe the following requirements when the power is off (printer unplugged from the AC outlet):
¥Temperature: 0ûC-35ûC (32ûF-95ûF).
¥Relative Humidity: 10-80% RH with no condensation.
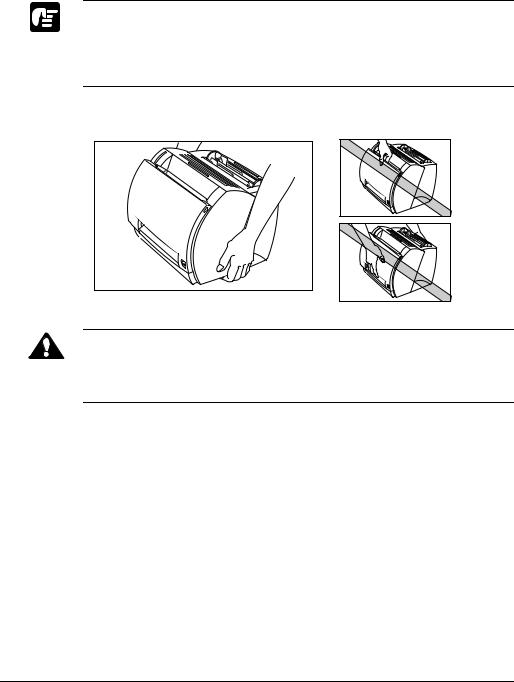
Carrying the Printer
CAUTION:
Do not carry the printer by holding the front panel, the face-up delivery slot, or by holding it at the front and rear. This could result in damage to the printer or personal injury if the printer is dropped.
Before transporting the printer, always remove the EP-22 cartridge and store it in its original protective bag or wrap it in a thick cloth to protect it from strong light.
xii

|
Contents |
||
|
Chapter 1 |
Introduction ……………………………………………………………………………… |
1 |
|
Printer Features …………………………………………………………………………… |
2 |
|
|
Parts of the Printer ………………………………………………………………………. |
4 |
|
|
Front View …………………………………………………………………………. |
4 |
|
|
Rear View ………………………………………………………………………….. |
4 |
|
|
Inside the Printer ………………………………………………………………… |
5 |
|
|
Chapter 2 |
Paper Handling …………………………………………………………………………. |
7 |
|
Paper Requirements …………………………………………………………………….. |
8 |
|
|
Plain Paper …………………………………………………………………………. |
9 |
|
|
Transparencies ……………………………………………………………………. |
9 |
|
|
Labels ……………………………………………………………………………… |
10 |
|
|
Envelopes ………………………………………………………………………… |
10 |
|
|
Postcards ………………………………………………………………………….. |
11 |
|
|
Storing Paper ……………………………………………………………………………. |
12 |
|
|
Paper Path ………………………………………………………………………………… |
13 |
|
|
Selecting Paper Delivery ……………………………………………………………. |
14 |
|
|
Face-down Delivery ………………………………………………………….. |
14 |
|
|
Face-up Delivery ………………………………………………………………. |
15 |
|
|
Loading Paper into the MP Tray …………………………………………………. |
16 |
|
|
Loading Envelopes into the MP Tray ………………………………….. |
19 |
|
|
Loading Paper Manually ……………………………………………………………. |
24 |
|
|
Chapter 3 Using the Canon Advanced Printing Technology ………………………. |
27 |
|
|
Installing the CAPT …………………………………………………………………… |
28 |
|
|
Windows 95/98 ………………………………………………………………… |
28 |
|
|
Windows NT ……………………………………………………………………. |
34 |
|
|
Connecting to an LBP-800 Already on Your Network …………… |
39 |
|
|
Printer Sharing ………………………………………………………………………….. |
42 |
|
|
Connecting the LBP-800 as a Network Printer ……………………… |
42 |
|
|
The Canon CAPT Tools …………………………………………………………….. |
45 |
|
|
Printing with the CAPT ……………………………………………………………… |
46 |
|
|
95/98 Printer Properties ……………………………………………………… |
47 |
|
|
NT 4.0 Printer Properties and Default Document Properties …… |
60 |
|
|
Checking the Status of a Print Job ……………………………………………….. |
74 |
|
|
Opening the Status Window ……………………………………………….. |
75 |
|
|
Using the LBP-800 Status Window …………………………………….. |
76 |
|
|
Network Printer Status ………………………………………………………. |
87 |
xiii

|
The Status Window Icon ……………………………………………………. |
88 |
|
|
Closing the Status Window ………………………………………………… |
89 |
|
|
Messages …………………………………………………………………………. |
89 |
|
|
Chapter 4 |
Troubleshooting ………………………………………………………………………. |
93 |
|
Finding Information …………………………………………………………………… |
93 |
|
|
Paper Jams ……………………………………………………………………………….. |
95 |
|
|
Locating Paper Jams ………………………………………………………….. |
95 |
|
|
Removing Paper Jams ……………………………………………………………… |
100 |
|
|
Print Quality Problems …………………………………………………………….. |
109 |
|
|
Printout Has Vertical White Streaks ………………………………….. |
109 |
|
|
Printout Has Black Specks ……………………………………………….. |
110 |
|
|
Printout Too Light …………………………………………………………… |
110 |
|
|
Printout Too Dark ……………………………………………………………. |
110 |
|
|
Printer Problems ……………………………………………………………………… |
111 |
|
|
CAPT Problems ………………………………………………………………………. |
114 |
|
|
CAPT Messages ……………………………………………………………………… |
116 |
|
|
Using the Trouble Shooter ………………………………………………………… |
118 |
|
|
Uninstalling the CAPT …………………………………………………………….. |
120 |
|
|
Chapter 5 |
Maintenance ………………………………………………………………………….. |
121 |
|
Handling and Cleaning the Printer …………………………………………….. |
121 |
|
|
Handling the Printer ………………………………………………………… |
121 |
|
|
Cleaning the Printer …………………………………………………………. |
122 |
|
|
EP-22 Cartridge ………………………………………………………………………. |
122 |
|
|
Storage Guidelines ………………………………………………………….. |
123 |
|
|
Handling Guidelines ………………………………………………………… |
124 |
|
|
Replacing the EP-22 Cartridge ………………………………………….. |
125 |
|
|
Cleaning ………………………………………………………………………… |
127 |
|
|
Appendix A |
Printer Specifications …………………………………………………………….. |
129 |
|
Appendix B |
Network Adapter …………………………………………………………………… |
131 |
|
Connecting Directly From Clients ……………………………………………… |
132 |
|
|
Connecting Through A Print Server …………………………………………… |
133 |
|
|
Protocols ………………………………………………………………………………… |
133 |
|
|
Using NetPilot To Configure Your Network Adapter ………………….. |
133 |
|
|
Specifications …………………………………………………………………………. |
134 |
|
|
Glossary |
………………………………………………………………………………………………. |
135 |
|
Index |
………………………………………………………………………………………………. |
147 |
xiv
Chapter 1
Introduction
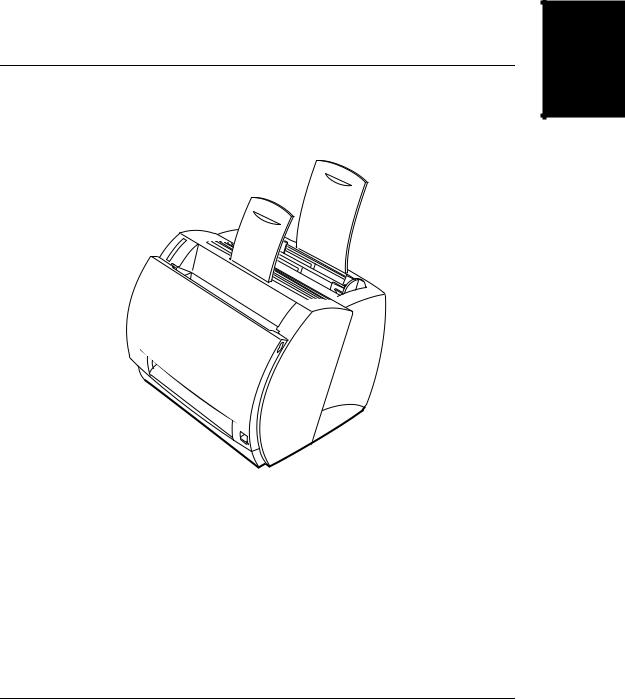
Congratulations on your purchase of the Canon LBP-800 Laser Printer. This chapter introduces you to the printer and explains its features.
Your new laser printer has many advanced features, including the CAPT (Canon Advanced Printing Technology). The CAPT gives you instant access to printer information.
The LBP-800 offers outstanding print quality, flexible paper handling, energy-efficient printing, and trouble-free operation.
Introduction

Printer Features
The LBP-800 combines the following features to form a versatile printing system:
Quick startup
The printer is ready to print in less than 8 seconds after it is turned on (start-up time), and has a first print time of less than 18 seconds. This means that you can print documents quickly and efficiently.
Impressive output
Thanks to the CAPT (Canon Advanced Printing Technology), the 600 dpi resolution gives you crisp, clean, laser-sharp output at 8 pages per minute.
Low power consumption
The printer comes with an efficient power management system. Power consumption is very low, particularly when idle.
Stylish, compact design
The printer provides compact, lightweight, easy-to-use functionality in a smooth, stylish design. The small footprint gives you more work space to help you meet your needs.
CAPT Printing Software
The CAPT is easy to install, and with it you can set custom paper sizes, overlay bitmaps on documents (for example, you can print your logo on each page), tile up to nine pages on one sheet of paper, and switch easily between complicated setups using user-defined profiles. The Status Window gives you written and spoken feedback about your print jobs, even over a network.

Quiet operation
Its quiet operation makes this printer an ideal output device, even in an open-office environment.
Flexible paper handling
Both the multi-purpose tray (MP tray) and the manual feeding slot accept plain paper of various sizes—Legal, Letter, A4, B5, or Executive—as
well as transparencies, labels, envelopes, postcards and other special paper. The MP tray handles up to 125 sheets of 75 g/m2 plain paper with a maximum stack height of 12.5 mm. For manual feeding, sheets are fed one at a time. Delivery can be face down (for plain paper) or face up (for all paper types).
Direct Network Connection
With the optional network adapter, you can connect directly to the LBP-800 over a network, without having to go through a server.
Introduction

Parts of the Printer
Front View
|
Input paper support |
||
|
Face-down output |
||
|
paper support |
Multi-purpose tray |
|
|
Face-down |
(MP tray) |
|
|
Paper guides |
||
|
delivery slot |
||
|
Front cover |
Manual feed slot |
Face-up delivery slot
Paper delivery selector
Rear View
|
Parallel port |
||
|
Power switch |
interface connector |
|
|
Power socket |
||

Inside the Printer
Introduction
Transfer roller
For more information about setting up the printer, see the Getting Started Guide.

![]()
Chapter 2
Paper Handling
This chapter describes how to select the different types of paper you can use with your printer and how to load them. It includes the following information:
Paper Requirements
Storing Paper
Paper Path
Selecting Paper Delivery
Loading Paper into the MP Tray
Loading Paper Manually
Paper Handling
|
Chapter 2 |
Paper Handling |
7 |

Paper Requirements
Make sure that the paper you use meets the following requirements.
|
Weight |
|||||
|
Loading |
Type |
Size |
(g/m 2) |
Capacity |
Delivery |
|
MP Tray |
Plain paper |
Legal, Letter, A4, |
64-135 |
Max height: |
Face-up |
|
Executive, B5. |
12.5 mm |
Face- |
|||
|
(Approx. 125 |
down (64- |
||||
|
sheets of 75 g/m2 |
105 g/m2) |
||||
|
paper) |
|||||
|
Transparencies |
Letter, A4 |
— |
Max. height: |
Face-up |
|
|
12.5 mm |
|||||
|
Labels |
Letter, A4 |
— |
Max. height: |
Face-up |
|
|
12.5 mm |
|||||
|
Envelopes |
98 x 162 mm to |
— |
Max. height: |
Face-up |
|
|
176 x 250 mm |
12.5 mm |
||||
|
(COM 10, |
|||||
|
Monarch, DL, B5, |
|||||
|
C5) |
|||||
|
Postcards |
100 x 147 mm |
— |
Max. height: |
Face-up |
|
|
12.5 mm |
|||||
|
Other |
Index card: 3″ x 5″* |
— |
Max. height: |
Face-up |
|
|
12.5 mm |
|||||
|
Manual |
Plain paper |
76.2 x 127 mm to |
64-135 |
1 sheet |
Face-up |
|
216 x 356 mm |
Face- |
||||
|
Including the |
down (64- |
||||
|
following standard |
105 g/m2) |
||||
|
paper sizes: |
|||||
|
Legal: 8-1/2″ x 14″ |
|||||
|
Letter: 8-1/2″ x 11″ |
|||||
|
A4: 210 x 297 mm |
|||||
|
Executive: 7-1/4″ x |
|||||
|
10-1/2″ |
|||||
|
B5: 182 x 257 mm |
|||||
|
A5 (Portrait |
|||||
|
orientation): 210 x |
|||||
|
148 mm |
|||||
|
Transparencies |
Letter, A4 |
— |
1 sheet |
Face-up |
|
|
8 |
Paper Handling |
Chapter 2 |

|
Weight |
|||||
|
Loading |
Type |
Size |
(g/m 2) |
Capacity |
Delivery |
|
Manual |
Labels |
Letter, A4 |
— |
1 sheet |
Face-up |
|
Envelopes |
98 x 162 to 176 x 250 |
— |
1 sheet |
Face-up |
|
|
mm (COM 10, |
|||||
|
Monarch, DL, B5, |
|||||
|
C5) |
|||||
|
Postcards |
100 x 147 mm |
— |
1 sheet |
Face-up |
|
|
Other |
Index cards: 3″ x 5″* |
— |
1 sheet |
Face-up |
|
*Only use index cards that are 0.18 mm to 0.28 mm thick.
Plain Paper
Follow these guidelines when selecting paper:
Paper that is too thick or too thin, or that has irregular shapes, cutouts, or perforations should not be used.
Never use paper that is wet, highly textured, rough, torn, wrinkled, or damaged.
Extremely smooth paper or paper with special coatings does not print well.
The laser printing process uses high temperatures to fuse toner to the paper. Use paper that will not melt, vaporize, offset, discolor, or emit dangerous fumes at about 190˚ C (374˚ F).
Do not use thermal or carbon paper, or paper with glue, staples, clips, or ribbons.
For colored paper, use colors that are not damaged by the heat of the printer’s fixing assembly (about 190˚ C or 374˚ F).
Transparencies
The acceptable sizes are Letter or A4. The transparencies must be able to withstand the heat generated by the fixing assembly (about 190˚ C or 374˚ F) without damage.
Paper Handling
|
Chapter 2 |
Paper Handling |
9 |
Labels
Labels are paper with pressure-sensitive adhesive. Acceptable sizes are Letter and A4.
Note the following conditions when choosing a label sheet:
The label print face (top, or face sheet) must be made of ordinary, matte-finish paper similar to copy paper.
The paper backing must be able to withstand the heat generated by the fixing assembly (about 190˚ C or 374˚ F). The backing must not be made of easily removable coated paper.
Do not use labels with exposed adhesive, which may stick to the EP22 cartridge or the fixing roller, causing the labels to peel off and serious paper jams to occur.
Envelopes
Follow these guidelines when printing on envelopes:
Envelopes must not have any fasteners, snaps, or windows, or be made of artificial materials.
Do not use envelopes that discolor or melt at about 190˚ C (374˚ F), envelopes which might emit dangerous fumes when heated, or envelopes that seal with pressure-sensitive adhesives.
Do not use envelopes which are damaged, curled or wrinkled, or that have an irregular shape.
Do not use oversized envelopes, or envelopes with folds.
|
10 Paper Handling |
Chapter 2 |
Poorly manufactured envelopes are not recommended.
Paper Handling
Postcards
Follow these guidelines when printing on postcards:
Postcards should not be greater than 0.28 mm in thickness.
Postcards should be free of glue, clips, and staples.
Do not use postcards that are damaged or curled, or that have special coatings or an irregular shape.
|
Chapter 2 |
Paper Handling 11 |

Storing Paper
Improper paper storage might cause a deterioration of print quality and paper performance. Therefore, note the following when storing paper:
Store unused paper in its wrapping to protect against humidity.
Do not store paper directly on the floor as the floor is usually humid.
If you must store paper in a very humid place, use a specially designed storage box.
Keep paper on a flat surface to prevent excessive in-ream paper curl.
Do not stack paper too high to prevent excessive in-ream paper curl.
Do not subject paper to direct sunlight or a humid environment.
If paper is moved to a place with a very different temperature, leave it there for about one day before using it; otherwise it could curl or develop wrinkles.
|
12 Paper Handling |
Chapter 2 |
Paper Path
Understanding how paper travels inside the printer helps you better handle paper loading and jams.
A sheet of paper enters the printer from the MP tray or the manual feed slot. It travels to the image transfer area where the printer drum has been statically charged. A laser beam changes the static charge on the drum and toner clings to those parts of the drum. As the paper rolls across the drum, the toner transfers to the paper. The toner is then fused to the paper by the fixing assembly. The paper either comes out from the face-up delivery slot or travels to the face-down delivery slot, depending on the paper delivery method selected.
Paper Handling
|
Chapter 2 |
Paper Handling 13 |
Selecting Paper Delivery
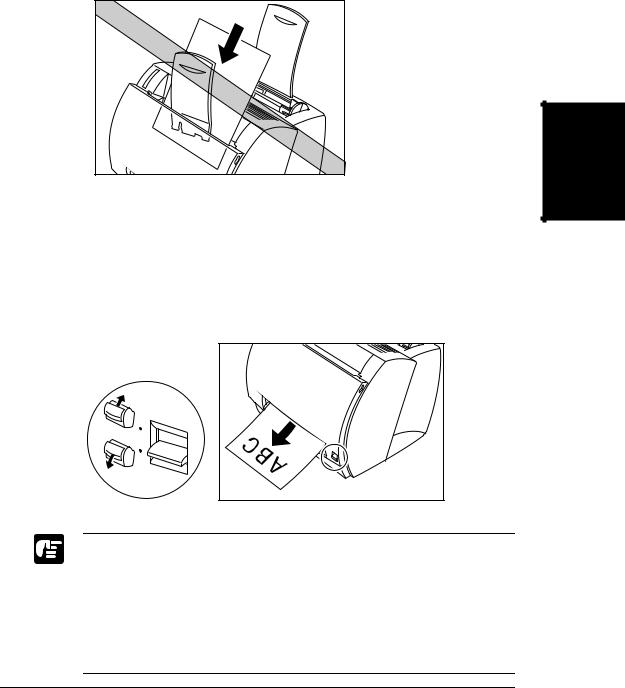
Use the paper delivery selector to choose face-up or face-down delivery. When the selector is in the lower position, face-up delivery is selected. When the selector is in the upper position, face-down delivery is selected.
Face-down
Face-up
Face-down Delivery
Use face-down delivery for plain paper only. Printouts are stacked in order in the face-down delivery slot (which can hold up to 100 sheets of 75 g/m2 paper).
To select face-down delivery, move the paper delivery selector up.
Do not replace paper in the face-down delivery slot once it is removed from the slot. This could result in damage to the flaps inside the slot.
Never insert paper or other objects into the face-down delivery slot.
|
14 Paper Handling |
Chapter 2 |
Paper Handling
Face-up Delivery
Use face-up delivery for envelopes and transparencies, as well as other special paper, including non-standard sized plain paper. Printouts come out from the face-up delivery slot face up. This helps prevent paper curl.
To select face-up delivery, push the paper delivery selector down.
Do not pull on the printout while it is still emerging from the face-up delivery slot.
Do not switch the paper delivery selector until the printout has completely come out of the delivery slot. Switching the paper delivery selector while printing could cause a paper jam.
Make sure there is enough room at the front of the printer for the paper to exit.
|
Chapter 2 |
Paper Handling 15 |
Loading Paper into the MP Tray
The multi-purpose tray can hold up to approximately 125 sheets of 75 g/m2 paper for high-volume printing. Acceptable paper sizes are Legal, Letter, A4, Executive, and B5. It also accepts transparencies, envelopes, postcards, or special paper with a maximum height of 12.5 mm.
Before loading paper on the MP tray, first select the paper delivery. For envelopes, transparencies, labels, and other special paper, face-up delivery must be used. Plain paper can use both the face-up and facedown delivery methods. Face-down delivery is limited to plain paper with weight between 64 and 105 g/m2. For more details, see “Selecting Paper Delivery” on page 14.
Follow the steps below to load a stack of paper.
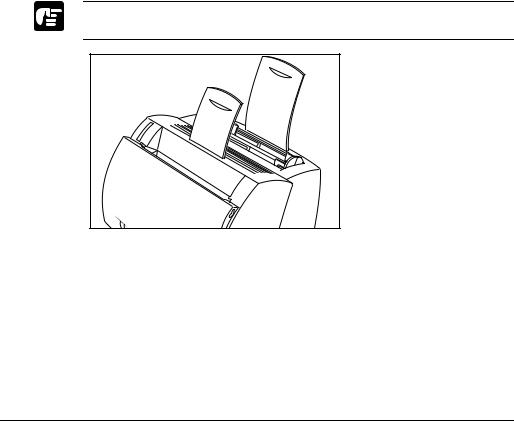
Make sure that the input paper support is inserted into its slot in the printer.
|
16 Paper Handling |
Chapter 2 |
![]()
1.Prepare a stack of paper and tap it on a flat surface to properly align the edges.
Paper Handling
Do not fan the paper, or printing problems might occur.
When using transparencies, slightly fan the stack of transparencies before loading them in the MP tray to prevent feed failures.
2.Align the stack of paper so that the side to be printed on faces the front of the printer. The top edge of the paper stack should be toward the bottom of the MP tray. Slide the stack in until it stops.
|
. |
||
|
on |
printed |
|
|
be |
will |
|
|
side |
||
|
This |
Do not force the paper into the printer.
Do not load more than 125 sheets of 75 g/m2 plain paper, or a stack of any paper higher than 12.5 mm.
|
Chapter 2 |
Paper Handling 17 |

3.Adjust the paper guides to the width of the paper stack. For A4-size or Letter/Legal-size paper, align the paper guides with the icons inside the MP tray.
Adjust the paper guides so that there is no space between the paper guide and the edge of the stack of paper.
When reloading, be sure to remove any paper remaining in the MP tray. Stack it together with the new sheets before loading.
The MP tray is now ready to supply paper. For information on paper delivery selection, see “Selecting Paper Delivery” on page 14.
|
18 Paper Handling |
Chapter 2 |

Loading Envelopes into the MP Tray
Before Loading Envelopes
Please be sure to follow these steps before loading envelopes:
1.Place the envelopes on a flat surface and press the corners down in the direction shown to flatten the envelopes.
Paper Handling
2.Flex the envelope stack, including all four edges, to remove any stiffness. Correct any bent corners on the envelopes. Check all four corners.
|
Chapter 2 |
Paper Handling 19 |

3.Align the stack of envelopes by tapping them on a flat surface.
Loading Envelopes
1.Align the stack of envelopes so that the side to be printed on faces the front of the printer. Slide the stack in until it stops.
|
20 Paper Handling |
Chapter 2 |

2.Adjust the paper guides to the width of the stack of envelopes.
Paper Handling
Most applications allow you to choose which way envelopes feed into the printer. Make sure you confirm your printer settings before you print.
When using C5-size envelopes, remove any stiffness by lightly flexing both edges of the envelope.
|
Chapter 2 |
Paper Handling 21 |

Insert the envelopes one at a time into the MP tray, in the direction shown in the illustration.
If the flap is along the long edge of the envelope, insert each envelope with the flap at the back and on the right.
If the flap is along the short edge of the envelope, insert envelopes with the flap at the bottom and at the back.
The illustrations below show acceptable and unacceptable arrangements of the flaps of envelopes in a stack.
Acceptable
The flap of each envelope should be separate, not overlapping the edges of any of the other envelopes in the stack.
|
22 Paper Handling |
Chapter 2 |

Not Acceptable
If the flap of any of the envelopes overlaps the edges of other envelopes in the stack, like those in the examples below, paper jams or misfeeds will occur.
Flaps overlapping the envelopes underneath
Flaps overlapping
Top flap overlaps the envelopes underneath
Paper Handling
|
Chapter 2 |
Paper Handling 23 |

Loading Paper Manually
The manual feed slot allows you to load paper manually, one sheet at a time. You can load transparencies, labels, envelopes, postcards, or other special paper. You can also load plain paper, which is useful when you want to use paper that is a different size from the paper in the MP tray.
Before loading paper manually, always select the paper delivery first. For transparencies, labels, envelopes, postcards, and other special paper, face-up delivery must be used. Plain paper can use both the face-up and face-down delivery methods. Face-down delivery is limited to plain paper with weight between 64 and 105 g/m2. For details, see “Selecting Paper Delivery” on page 14.
Align the sheet of paper so that the side to be printed on faces the front of the printer and the top of the paper is inserted first. Slide the sheet of paper into the manual feeding slot until it stops (see in the illustrations below). Adjust the paper guides to the sheet of paper (see in the illustrations below).
The manual feed has priority over the MP tray.
Often applications will let you change the feeding direction of envelopes. Confirm the feeding direction of envelopes before printing.
If a postcard is not fed smoothly into the printer, gently push the top of the postcard downwards until the roller inside the printer takes the card and feeds it into the printer.
|
24 Paper Handling |
Chapter 2 |

Do not force the paper into the printer or printing problems might result.
For continuous manual feed, insert a new sheet only when the previous sheet has come out completely from the delivery slot. If a new sheet is inserted before the previous sheet has been delivered, a paper jam may occur.
Paper Handling
|
Chapter 2 |
Paper Handling 25 |

|
26 Paper Handling |
Chapter 2 |
![]()
Chapter 3
Using the Canon Advanced Printing
Technology
This chapter describes the CAPT (Canon Advanced Printing
Technology). It includes the following information:
Installing the CAPT
Printing with the CAPT
Checking the Status of a Print Job
Using the Canon
|
Advanced Printing |
Technology |
|
Chapter 3 |
Using the Canon Advanced Printing Technology 27 |

Installing the CAPT
If you are using the LBP-800 as a local printer (connected directly to your computer) follow the steps below. If the LBP-800 is already on your network, and you want to start using it, follow the steps in “Connecting to an LBP-800 Already on Your Network” on page 39. If you want to install the LBP-800 as a network printer, follow the steps in “Connecting the LBP-800 as a Network Printer” on page 42.
Windows 95/98
For installation instructions using the CD-ROM menu, please see the
Getting Started Guide.
Add Printer Wizard
To install the CAPT on a local computer using Windows 95/98, you can use the Windows Add Printer Wizard.
1.From the Start menu, select Settings, then Printers. The Printers folder appears.
2.Double-click the Add Printer icon. The Add Printer Wizard dialog box appears. Click Next >.
|
28 Using the Canon Advanced Printing Technology |
Chapter 3 |

3.Select Local Printer and click Next >.
4. The Wizard displays a list of available printers. Click Have Disk… .
|
Using the Canon |
Advanced Printing |
Technology |
|
Chapter 3 |
Using the Canon Advanced Printing Technology 29 |

5. The Install From Disk dialog box appears. Use Browse… to select the directory or enter the path name that contains the printer software, then click OK.
For example, if you are using the CD-ROM to install the software, and your CD-ROM drive is drive D:, the path name would be D:\ENGLISH\WIN9X.
6.Select the printer, and click Next >.
|
30 Using the Canon Advanced Printing Technology |
Chapter 3 |

7.Select the printer’s port, and then click Next >.
8.Click Next > to accept the default printer name, or enter the name you wish to use, then click Next >.
|
Using the Canon |
Advanced Printing |
Technology |
|
Chapter 3 |
Using the Canon Advanced Printing Technology 31 |

9.Click Yes if you want to print a test page, or No if you do not want to print a test page, then click Finish.
Windows copies the files and completes installation. If you opted to print a test page, a test page prints after installation completes.
|
32 Using the Canon Advanced Printing Technology |
Chapter 3 |

Plug and Play
If you are using Windows 95 OSR2.1 or later, an error may occur while trying to install using plug and play. If you get an error, install the software using the CD-ROM. To check which version of Windows 95 you are using, open the System window in Control Panel and look at the version number in the General tab. 4.00.950 B or 4.00.950 C means you are using OSR2.1 or later.
The following procedure only applies to installation under Windows 95.
The first time you start Windows with the LBP-800 attached to your computer the New Hardware Found dialog box appears.
|
Using the Canon |
Advanced Printing |
Technology |
1.Select Driver from disk provided by hardware manufacturer in the New Hardware Found dialog box. The Install From Disk dialog box appears.
|
Chapter 3 |
Using the Canon Advanced Printing Technology 33 |

2.Click Browse… to select the driver in the language that you want to install. For example, if your CD-ROM is drive D: and you want to install the English Windows 95 driver, browse to D:\ENGLISH\WIN9X and click OK.
3.Select the printer from the Models list and click OK.
4.Follow the instructions on screen.
Windows NT
Add Printer Wizard
To install the CAPT on a local computer using Windows NT 4.0, you can use the Windows NT Add Printer Wizard.
1.From the Start menu, select Settings, then Printers. The Printers folder appears.
|
34 Using the Canon Advanced Printing Technology |
Chapter 3 |

2.Double-click the Add Printer icon. The Add Printer Wizard dialog box appears.
3.Select My Computer, then click Next >.
4.Select the printer port or ports you want to use, then click Next >.
|
Using the Canon |
Advanced Printing |
Technology |
|
Chapter 3 |
Using the Canon Advanced Printing Technology 35 |

5.Click Have Disk… in the manufacturer/model dialog box.
6. The Install From Disk dialog box appears. Use Browse… to select the directory or enter the path name that contains the CAPT, then click OK.
For example, if you are using the CD-ROM to install the CAPT, and your CD-ROM drive is drive D:, the path name would be D:\ENGLISH\WINNT40.
|
36 Using the Canon Advanced Printing Technology |
Chapter 3 |
 Loading…
Your Donation Will Be Matched 1-to-1! Can You Chip In?
Dear Patron: Please don’t scroll past this. The Internet Archive is a nonprofit fighting for universal access to quality information. We build and maintain all our own systems, but we don’t charge for access, sell user information, or run ads. Instead, we’re powered by online donations averaging about $14. We’d be deeply grateful if you’d join the one in a thousand users that support us financially.
Right now, we have a matching gift campaign that will double the impact of every donation. We understand that not everyone can donate right now, but if you can afford to contribute this Wednesday, we promise it will be put to good use. Our resources are crucial for knowledge lovers everywhere—so if you find all these bits and bytes useful, please pitch in.
Your Donation Will Be Matched! Can You Chip In?
Dear Patron: Please don’t scroll past this. Right now we have a matching gift campaign that will double the impact of every donation. We understand that not everyone can give right now, but if you can afford to contribute this Wednesday, we promise it will be put to good use. If you find all these bits and bytes useful, please pitch in.
3.0
Rated 3.0 out of 5
3.0 out of 5 stars (based on 1 review)
Your overall rating
CANON LBP-800 (01) PDF MANUAL
Click here to download CANON LBP-800 (01) PDF MANUAL
CANON LBP-800 (01) PDF MANUAL
FREE ENGLISH PDF
OPERATING INSTRUCTIONS
USER GUIDE – USER MANUAL
OWNER GUIDE – OWNER MANUAL
REFERENCE GUIDE – REFERENCE MANUAL
INSTRUCTION GUIDE – INSTRUCTION MANUAL
Your overall rating
- YouTube
CANON LBP-800 (01) PDF MANUAL
CANON LBP-800 (01) PDF MANUAL
-
Canon LBP-800 — page 1
LBP-800 Laser Printer Getting Star ted Guide IMPORT ANT : Read this manual carefully bef ore using your printer . Sav e this manual f or future ref erence. …
-
Canon LBP-800 — page 2
2 Copyright Copyright ©1999 Canon Inc. All Rights Reserved All information in this manual is copyrighted. No part of this publication may be reproduced, transmitted, transcribed, stored in a retrie val system, or translated into any language or computer language, in an y form or by any means, electronic, mechanical, magnetic, optical, chemical, ma …
-
Canon LBP-800 — page 3
English Contents 3 Contents Using Y our LBP-800 Documentation ……………………………………. 4 Using the Online Documentation ………………………………………. 5 Checking the Package Contents ……………………………………………. 6 Identifying the Parts ………………………………………………. …
-
Canon LBP-800 — page 4
4 Using Your LBP-800 Documentation Using Y our LBP-800 Documentation Congratulations on your purchase of the Canon LBP-800 Laser Printer . Y our printer comes with the follo wing documentation: ❏ The LBP-800 Getting Started Guide (This Guide) Describes ho w to set up the printer and install the printing software (CAPT). Read this manual first be …
-
Canon LBP-800 — page 5
English Using Your LBP-800 Documentation 5 Using the Online Documentation T o read the PDF files, insert the compact disc in your CD-R OM driv e. The CD-R OM menu appears automatically . T o access the CD-ROM Menu Help , click the CD-R OM Menu Help button. T o access the LBP-800 Documentation , click the Canon LBP-800 Manuals button. T o read the …
-
Canon LBP-800 — page 6
6 Checking the Package Contents Chec king the P ac kage Contents As you unpack the printer , sav e the carton and packing materials in case you want to mo ve or ship the printer in the future. Input paper suppor t LBP-800 Printer Output paper suppor t EP-22 car tridge CD-ROM disc P ower cord (Example: 120V Model) Documentation (Getting Star ted Gui …
-
Canon LBP-800 — page 7
English Identifying the Parts 7 Identifying the P ar ts Fr ont View Rear View Multi-pur pose tra y (MP tra y) P aper guides Manual f eed slot P aper delivery selector F ace-down delivery slot F ront cov er F ace-up delivery slot F ace-down output paper suppor t Input paper suppor t P ower s witch P arallel por t interf ace connector P ower soc ket …
-
Canon LBP-800 — page 8
8 Selecting the Printer Location Selecting the Printer Location When selecting a site for the printer , the location should provide ample space for ventilation and easy servicing of the printer . Use the dimensional diagrams belo w for space considerations. (Dimensions are in millimeters.) Carrying the Printer CA UTION: Do not carry the printer by …
-
Canon LBP-800 — page 9
English Installing the EP-22 Cartridge 9 Installing the EP-22 Car tridge The EP-22 cartridge contains a photosensiti ve part called the “drum, ” which has characteristics similar to photo film. It also contains black carbon po wder called “toner . ” The drum is extremely sensiti ve to light and may deteriorate if exposed to light. Poor pri …
-
Canon LBP-800 — page 10
10 Installing the EP-22 Cartridge ❏ Do not stand the cartridge on end, or turn it upside do wn. T oner could become caked in the cartridge resulting in poor print quality . ❏ K eep the cartridge away from a monitor’ s cathode ray tube (CR T), disk dri ves, and floppy disks. The magnet inside the cartridge can destroy the image data in the CR …
-
Canon LBP-800 — page 11
English Installing the EP-22 Cartridge 11 3. Place the cartridge on a sturdy surface. Snap the tab at the end of the cartridge backwards and fold it back and forth until it is loose. 4. While holding the cartridge firmly with one hand, pull the sealing tape in the direction indicated in the illustration belo w . The tape may snap if pulled in a di …
-
Canon LBP-800 — page 12
12 Installing the EP-22 Cartridge 6. Insert the cartridge into the printer along the guides. Make sure that the cartridge slides all the way inside the printer . D o not touch the drum’ s protectiv e shutter . 7. Always close the front co ver immediately after inserting a cartridge. Do not leav e the front cov er open. Exposure to light can damag …
-
Canon LBP-800 — page 13
English Inserting/Removing the Paper Supports 13 Inser ting/Remo ving the P aper Suppor ts Insert the paper supports firmly into the slots at the front and back of the printer . The slots ha ve guides to ensure the correct support is in the correct slot. Supports should curve slightly to wards the rear of the printer . Do not insert a support so t …
-
Canon LBP-800 — page 14
14 Connecting the Printer to Your Computer Connecting the Printer to Y our Computer Before connecting the printer to your computer , make sure the po wer to your computer is turned of f. 1. Connect one end of the interface cable to your printer . Secure the cable by snapping the two wire clips on the printer into the cable connector . CA UTION: Bef …
-
Canon LBP-800 — page 15
English Connecting to the Power Supply 15 Connecting to the P o wer Supply Before inserting the plug, make sure that the rating indicated on the printer matches the voltage of the A C outlet. 1. Plug the po wer cord into the power socket. 2. Connect the other end of the po wer cord to the A C outlet. 3. T urn on the printer by pressing the I mark. …
-
Canon LBP-800 — page 16
16 Selecting Paper Delivery Selecting P aper Deliver y Use the paper deli very selector to choose face-up or face-do wn delivery . F ace-down Delivery Use face-do wn deliv ery for plain paper only . F ace-up Deliver y Use face-up deli very for en velopes and transparencies, as well as other special paper , including non-standard sized plain paper . …
-
Canon LBP-800 — page 17
English Loading Paper into the MP Tray 17 Loading P aper into the MP T ra y The MP (multi-purpose) tray can hold up to approximately 125 sheets of 75 g/m 2 paper for high-volume printing. Acceptable paper sizes are Legal, Letter , A4, Executiv e, and B5. Follo w the steps belo w to load a stack of paper . Make sure that the input paper support is i …
-
Canon LBP-800 — page 18
18 Loading Paper into the MP Tray 3. Adjust the paper guides to the width of the stack of paper . For A4-size or Letter/Legal-size paper , align the paper guides with the icons inside the MP tray . Adjust the guides so that there is no space between each paper guide and the edge of the stack of paper . When reloading, be sure to remov e the paper r …
-
Canon LBP-800 — page 19
English Installing the CAPT 19 Installing the CAPT Before you can print with the LBP-800 printer , you must install the CAPT (Canon Advanced Printing T echnology). Windows 95/98 CD-R OM Installation Before you install the software, make sure you do the follo wing: ❏ Connect the printer to your computer . (For details, see page 14.) ❏ Plug in th …
-
Canon LBP-800 — page 20
20 Installing the CAPT 2. Click the Canon LBP-800 Install button. The Canon LBP-800 Install dialog appears. Click Ye s to install the CAPT in the language displayed. The W elcome screen appears. …
-
Canon LBP-800 — page 21
English Installing the CAPT 21 3. Click Next > . The Select printer connection port screen appears. 4. Select a local port, such as LPT1: , then click Next > . The Install program proceeds to copy files and creates the Canon CAPT T ools group. When installation finishes, the Setup Complete dialog box appears. 5. Click Finish . …
-
Canon LBP-800 — page 22
22 Installing the CAPT Canon CAPT T ools Gr oup After installing the CAPT you are ready to print. The Canon CAPT T ools group gives you all the tools you need to communicate with your printer . Canon LBP-800 Help provides online help for the CAPT . Canon LBP-800 Readme contains important user information. Canon LBP-800 Status Window sho ws you the …