
Страницы и текст этой инструкции
 Инструкция посудомоечной машины Electrolux ESF 2435
 Информация отображена на картинке
 Информация отображена на картинке
 Информация отображена на картинке
 Информация отображена на картинке
Как использовать наш сайт инструкций OnlineManuals.ru
Наша цель состоит в том, чтобы предоставить вам быстрый доступ к содержанию инструкции для посудомоечной машины Electrolux ESF 2435.
С помощью онлайн просмотра, Вы можете быстро просмотреть содержимое инструкции и найти решение проблемы с посудомоечной машины Electrolux ESF 2435.
Для Вашего удобства
Если листать руководство пользователя посудомоечной машины Electrolux ESF 2435 прямо на сайте, не очень удобно для Вас, есть два возможных решения:
• Просмотр в полноэкранном режиме — легко просмотреть руководство пользователя (без загрузки его на свой компьютер), Вы можете использовать режим полноэкранного просмотра.
Для просмотра инструкции пользователя посудомоечной машины Electrolux ESF 2435 на полном экране, используйте кнопку «Открыть в Pdf-viewer».
• Загрузка на компьютер — Вы можете также скачать Инструкция посудомоечной машины Electrolux ESF 2435 на свой компьютер и сохранить его в файлах.
Многие люди предпочитают читать документы не на экране, а в печатной версии.
Возможность печати руководства пользователя также была предусмотрена на нашем сайте,
и вы можете использовать ее, нажав на иконку «печать» в Pdf-viewer.
Нет необходимости печатать все руководство посудомоечной машины Electrolux ESF 2435, можно выбрать только нужные страницы инструкции.
- Инструкции и руководства
- Бренды
- Electrolux
- ESF 2435
- Инструкция С Настройками


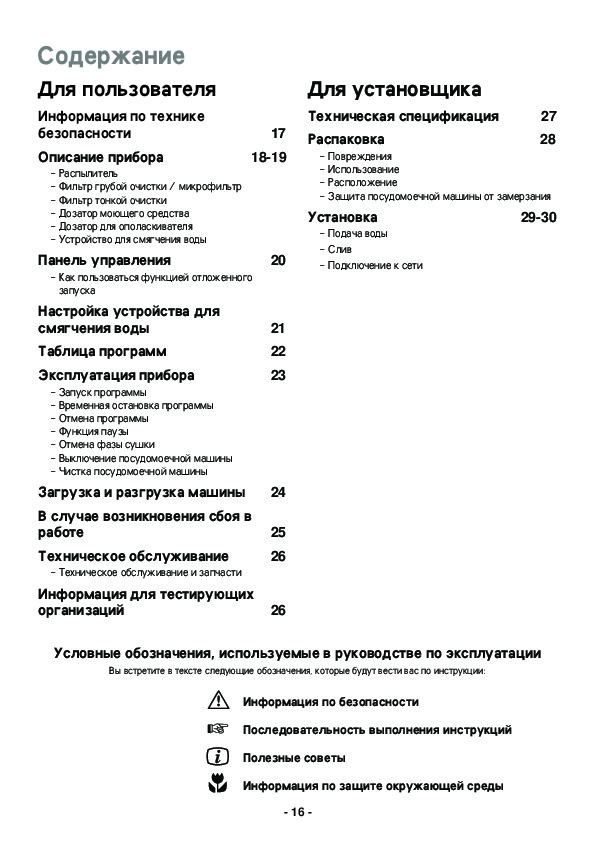
Contents
|
For the user |
For the installer |
|||
|
Safety information |
3 |
Technical specifications |
13 |
|
|
Description of the appliance |
4-5 |
Unpacking |
14 |
|
|
— Spray arm |
— Damages |
|||
|
— Coarse strainer/microfilter |
— Use |
|||
|
— Fine filter |
— Positioning |
|||
|
— Detergent dispenser |
— Protecting the dishwasher against freezing |
|||
|
— Rinse aid dispenser |
Installation |
15 |
||
|
— Water softener |
||||
|
— Water inlet |
||||
|
— Cleaning the dishwasher |
||||
|
— Water drainage |
||||
|
The control panel |
6 |
|||
|
— Electrical connection |
||||
|
— How to set the delayed start |
Gebrauchsanweisung |
16 |
||
|
Adjusting the water softener |
7 |
|||
|
Programme chart |
8 |
|||
|
Using the appliance |
9 |
—Starting the programme
—Stopping the programme temporarily
—Cancelling the programme
—Pause function
—Cancelling the drying phase
—Switching the dishwasher off
|
Loading and unloading |
10 |
|
In the event of a fault |
11 |
|
Service |
12 |
|
— Service and spare parts |
|
|
Information for test centres |
12 |
Guide to use the instruction book
The following symbols will be found in the text to guide you throughout the instructions:
Safety information
Step by step instructions
Hints and tips
Environmental information
— 2 —

 Safety information
Before installing and first using the dishwasher, read this instruction booklet carefully, including its hints and warnings. To avoid unnecessary mistakes and accidents, it is important to ensure that all people using the dishwasher are thoroughly familiar with its operation and safety features.
Save these instructions and make sure they remain with the dishwasher if it is moved or sold, so that everyone using it through its life can be properly informed on appliance use and safety.
Installation and servicing
●All installation and service work done on the product must be carried out by a qualified technician. Work performed by persons with inadequate knowledge may adversely affect the satisfactory functioning of the product and may cause personal injury or damage. Before any work is carried out on the dishwasher, it must be isolated from the electrical supply, by unplugging the power cord or removing the fuse.
●Water connection shall be made via an easily accessible stopcock.
●The power cord must be plugged into an earthed socket, which need to be easily accessible. Permanent installation must only be carried out by an authorized electrician.
●If the power cord is damaged, it must be replaced by a special cord or assembly available from the manufacturer or its service agent.
●Make sure that the power cord is not nipped or otherwise damaged and that the hoses do not get crushed or kinked when moving the dishwasher in connection with installation or cleaning etc.
●Servicing and possible repairs must be carried out by a service company authorized by the manufacturer. Use only spare parts supplied by these. Never try to repair the dishwasher yourself.
Child Safety
●The dishwasher should be used by adults only. Do not let children play with the controls or other parts of it.
●Remember that the plastic bags included in the packaging can be fatal playthings for small children.
●Keep all detergents in safe place out of children´s reach.
●Prevent children from sitting, swinging or standing on the open door.
During Use
●This dishwasher is designed solely for washing household utensils suitable for machine washing. Using it for other purposes could lead to physical injury or damage to property and invalidate the guarantee.
●Do not place sharp knives with their points upwards. It is much safer to lay them horizontally in the basket.
●Ensure that the door of the dishwasher is always closed when it is not being loaded or unloaded. In this way you will avoid anybody tripping over the open door and hurting themselves.
●If you take any dishes out of the dishwasher before the end of the dishwashing cycle, it is extremely important to rinse them thoroughly under running water to remove any remaining detergent.
●The water safety system protects against water damages. The following requirements must be fulfilled:
—The dishwasher must be electrically connected when it is shut off.
—The dishwasher must be correctly installed.
—Always shut off the water supply whenever the dishwasher is left unattended for an extended period.
●In the event of flooding or leakage, shut off the water supply immediately by closing the stopcock and disconnect the power supply by unplugging the power cord or removing the fuse. When removing the electrical plug, grip the plug, not the lead.
Disposal
— packaging:
All materials used in packaging this appliance are environmentally-friendly. The various plastics used are identified and can be recycled:
●PE stands for polyethylene, which is used for the bag around the appliance and the bag in which these instructions were supplied.
●PS stands for polystyrene (moulded), which is used for the sections of packaging needed to cushion the appliance.
The cardboard components of the packaging are made from recyclable paper and should be taken to a collection point for recycling.
The appliance contains plastic and rubber components. These have identifying marks to show what they are made from, so they can be recycled or disposed of properly at the end of the appliance’s life cycle.
The materials are identified according to international standards.
●Avoid opening the door while the dishwasher is running, since hot steam may escape.
●Only use detergent specifically designed for use in dishwashers.
— old apparatus:
At the end of the appliance’s useful life, disconnect the electrical plug from the power supply, then cut the electrical lead at the point where it enters the appliance. Make quite sure that children will not be able to play with it.
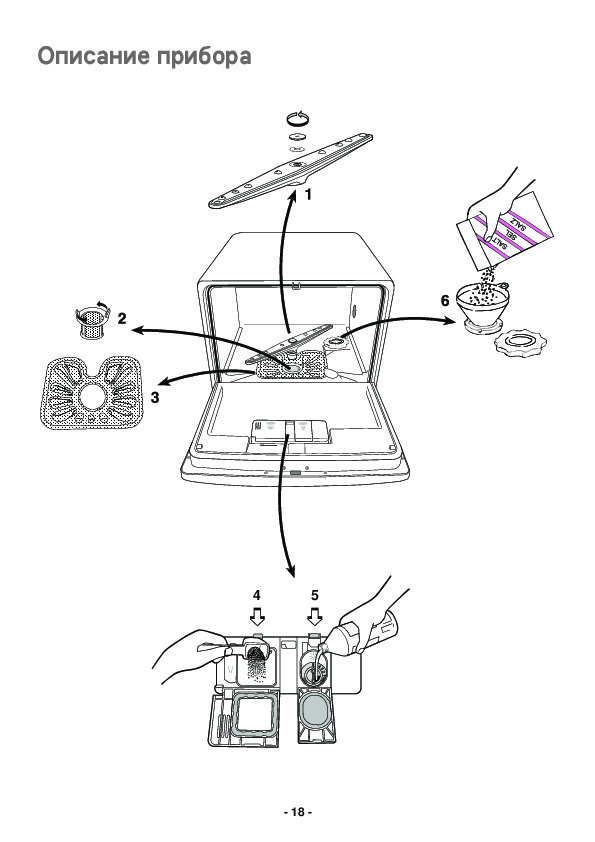
Description of the appliance
4 5
— 4 —
Description of the appliance
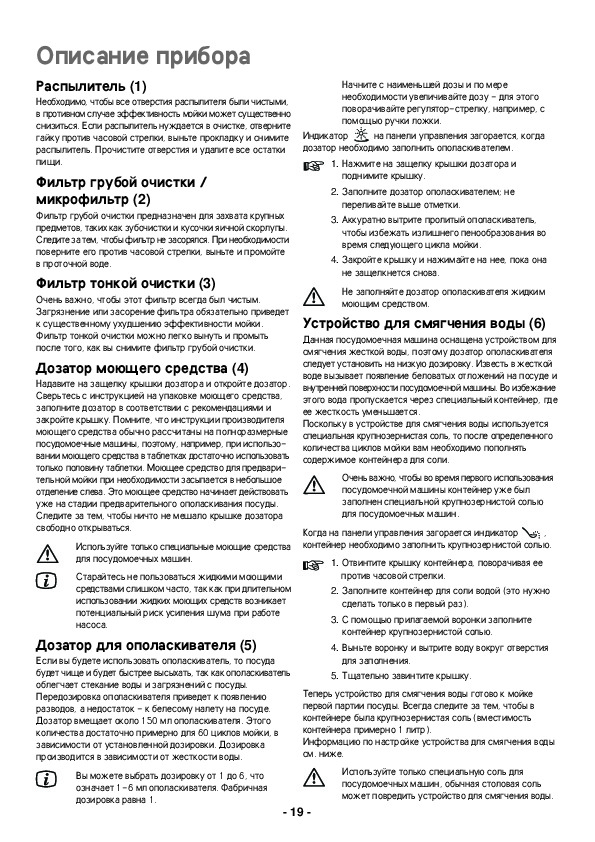
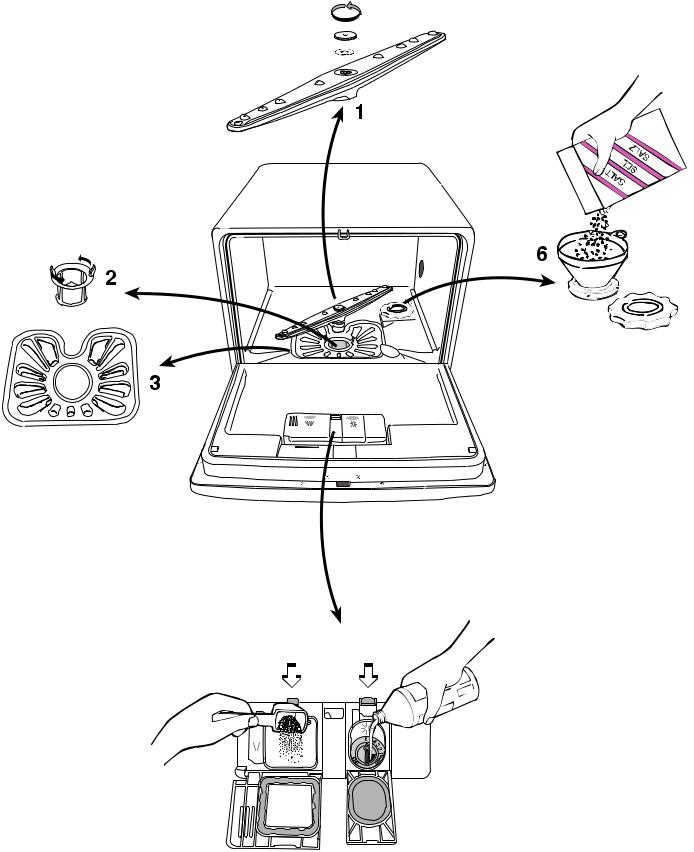
Spray arm (1)
It is important to keep all the holes in the spray arm clear. A clogged hole can seriously affect washing efficiency.
If the spray arm needs cleaning, unscrew the nut anticlockwise, remove the washer and lift off the spray arm. Clear the holes and shake out any food remnants.
Coarse strainer/microfilter (2)
The purpose of the coarse strainer is to catch large objects such as toothpicks and pieces of eggshell. Make sure that the strainer is always clean. Turn the coarse strainer anti-clockwise. Lift it out and rinse it under running water whenever necessary.
Fine filter (3)
It is just as important to keep this filter clean. A dirty or clogged filter will always impair washing efficiency. The fine filter can easily be lifted out for cleaning when you have removed the coarse strainer.
Do not fill the rinse aid dispenser with liquid detergent.
Water softener (6)
This dishwasher is equipped with a water softener for hard water, therefore shall the rinse aid dispenser be set for a low dosage. The lime in hard water causes white deposits to occur on dishes and to the interior of the dishwasher. To prevent this, the water has to pass through a special container where the hardness is removed.
Since the water softener uses coarse dishwasher salt, you will have to refill the salt container after a certain number of dishwashing cycles.
It is extremely important, that the salt container is filled up with the coarse dishwasher salt before using the dishwasher for the first time, if you live
in an area where the water is calciferous.
The indicator light  on the control panel is lit when the container requires refilling.
Detergent dispenser (4)
Open the lid to the dispenser by pressing the lid catch towards the compartment. Consult the instructions on the detergent packet, fill the compartment accordingly and close the lid. Remember that the instructions usually refer to full-size dishwashers, for example when using detergent tablets, it is sufficient to use just half a tablet. Pre-wash detergent is poured into the smaller compartment to the left when needed. This detergent is active allready at prerinsing. Make sure that there is no items that prevents the lid from opening.
Only use detergents specially designed for dishwashers.
Rinse aid dispenser (5)
Use of rinse aid will result in cleaner and faster drying of the load, since it helps water and soil to run off.
Too much rinse aid may result in streakiness, too little may cause white spots. The dispenser holds about 150 ml. This is enough for approx. 60 wash cycles, depending on the dosage setting. Adjust the dosage setting according to the hardness of the water.
You can set the dosage between 1 — 6, equivalent to 1 — 6 ml rinse aid. Factory setting is 1.
Begin at the lowest dosage setting and increase if necessary by turning the setting arrow with e.g. the handle of a spoon.
The indicator light  on the control panel is lit when the dispenser requires refilling.
1. Open the lid to the dispenser by pressing the lid catch towards the compartment and lift the lid.
2.Fill up with rinse aid; do not overfill.
3.Wipe off any spillage carefully to prevent excessive foaming during the next wash programme.
4.Close the lid and press until it locks again.
1. Unscrew the filler cap to the salt container anticlockwise.
2.Fill the salt container with water (only the first time).
3.Fill the container with coarse salt, using the funnel supplied.
4.Remove the funnel and wipe off any spillage around the filler opening.
5.Screw the filler cap back properly in place.
The water softener is now ready for the first load of dishes. Always make sure that there is coarse grained salt in the container, which holds about 1 litre.
How to adjust the water softener, see chapter ”Adjusting the water softener”.
Use only special salt for dishwashing machines, ordinary domestic salt can damage the water softener.
Cleaning the dishwasher
Clean the outside surfaces of the appliance using a mild (non-abrasive) household cleaning product. Finish by removing remaining traces of the product with a damp cloth.
Do not use cleaning products which contain alcohol (spirits), thinners and similar substances.
— 5 —
 Loading…
Sodervanie Dlq polxzowatelq Dlq ustanow]ika Informaciq po tehnike bezopasnosti Tehni^eskaq specifikaciq 27 Raspakowka 28 17 Opisanie pribora 18-19 — Raspylitelx — Filxtr gruboj o^istki / mikrofilxtr — Filxtr tonkoj o^istki — Dozator mo@]ego sredstwa — Dozator dlq opolaskiwatelq — Ustrojstwo dlq
Informaciq po tehnike bezopasnosti Prevde ^em pristupitx k ustanowke i \kspluatacii posudomoe^noj ma[iny oznakomxtesx s nastoq]im rukowodstwom, obra]aq osoboe wnimanie na rekomendacii, sowety i preduprevdeniq. Wo izbevanie o[ibo^nyh dejstwij i nes^astnyh slu^aew neobhodimo, ^toby wse lica,
Opisanie pribora 4 5 — 18 —
Opisanie pribora Raspylitelx (1) Neobhodimo, ^toby wse otwerstiq raspylitelq byli ^istymi, w protiwnom slu^ae \ffektiwnostx mojki movet su]estwenno snizitxsq. Esli raspylitelx nuvdaetsq w o^istke, otwernite gajku protiw ^asowoj strelki, wynxte prokladku i snimite raspylitelx. Pro^istite otwerstiq i
Panelx uprawleniq Indikatory stadij mojki i kontrolxnye indikatory Indikatory otlovennogo zapuska Knopka Wkl./Wykl. Knopka ustrojstwa dlq smqg^eniq wody Knopka funkcij Kontrolxnyj indikator wkl@^eniq Knopka otlovennogo zapuska Knopki wybora programm Knopka ustrojstwa dlq smqg^eniq wody i knopka
Nastrojka ustrojstwa dlq smqg^eniq wody ~toby predotwratitx obrazowanie izwestkowogo naleta na posude i wnutrennih stenkah posudomoe^noj ma[iny posudu nuvno mytx mqgkoj wodoj, t.e. wodoj s nizkim sodervaniem izwesti. Dannaq ma[ina osna]ena ustrojstwom dlq smqg^eniq wody, w kotorom s pomo]x@
Tablica programm Tip posudy Tarelki i kastr@li • Silxnoe Tip zagrqznenie zagrqzneniq: • Prisoh[ie ostatki pi]i, osobenno qi^nyj belok i krahmal Wse tipy posudy • Normalxnoe zagrqznenie • Prisoh[ie ostatki pi]i • Normalxnoe zagrqznenie • legkoe zagrqznenie Kofejnye ^a[ki, hrupkie predmety • legkoe
|kspluataciq pribora Zapusk programmy Funkciq pauzy 1. Udalite s posudy twerdye ostatki pi]i. S pomo]x@ funkcii pauzy programma movet bytx wremenno prerwana na korotkoe wremq. 2. Zagruzite posudomoe^nu@ ma[inu (sm. nive primery zagruzki korziny) 1. Navmite na knopku Wkl./Wykl. Programma
Zagruzka i razgruzka ma[iny Kak zagruvatx posudu Razgruzka posudy Na ill@stracii pokazan primer zagruzki posudy na 6 ^elowek. U was movet bytx sower[enno drugaq posuda, no esli wy budete sobl@datx prawila, to wy obqzatelxno ostanetesx dowolxny rezulxtatom. Gorq^aq posuda ^uwstwitelxna k
W slu^ae wozniknoweniq sboq w rabote Prevde ^em wyzywatx tehni^eskogo specialista, prowedite prowerku po niveizlovennym punktam, poskolxku nekotorye neisprawnosti legko ustranitx samostoqtelxno bez neobhodimosti wyzywatx specialista. Esli wy wyzowite ego dlq isprawleniq pri^iny, ukazannoj w
Tehni^eskoe obsluviwanie Tehni^eskoe obsluviwanie i zap^asti Tehni^eskoe obsluviwanie i remont dolvny osu]estwlqtxsq serwisnym centrom, awtorizowannym izgotowitelem. Ispolxzujte tolxko firmennye zap^asti, predostawlennye firmennymi serwisnymi centrami. Prevde ^em obratitxsq za tehpomo]x@, izu^ite
Instrukcii po ustanowke L@bye \lektri^eskie raboty po ustanowke dannogo pribora dolvny prowoditxsq kwalificirowannym \lektrikom ili kompetentnym licom. L@bye raboty po podkl@^eni@ pribora k wodoprowodu dolvny prowoditxsq kwalificirowannym wodoprowod^ikom ili kompetentnym licom. Tehni^eskaq
Raspakowka Powrevdeniq Esli posudomoe^naq ma[ina byla powrevdena wo wremq transportirowki, wam sleduet nemedlenno izwestitx ob \tom kompani@, otwetstwennu@ za ee dostawku. Udostowerxtesx w tom, ^to posudomoe^naq ma[ina ne imeet powrevdenij. Esli wy obnaruvili kakoe-libo powrevdenie, neisprawnostx
Ustanowka Poda^a wody Posudomoe^naq ma[ina imeet predohranitelxnye funkcii, neobhodimye dlq predotwra]eniq ute^ki ispolxzowannoj wody obratno w wodoprowod. Dannaq funkciq sootwetstwuet dejstwu@]im prawilam bezopasnosti wodnyh tehni^eskih sooruvenij. Temperatura podawaemoj w posudomoe^nu@ ma[inu
Ustanowka Podkl@^enie k seti Posudomoe^naq ma[ina osna]ena kabelem s \lektri^eskoj wilkoj dlq podkl@^eniq k zazemlennoj rozetke \lektroseti s naprqveniem 220-230 W, raspolovennoj w legkodostupnom meste i za]i]ennoj predohranitelem s nominalom 10 A. Prevde ^em pristupitx k kakim-libo manipulqciqm s