
-
Page 1
Model 2850 Service Manual IMPORTANT: Fill in Pertinent Information on Page 3 for Future Reference… -
Page 2: Table Of Contents
Table of Contents Job Specification Sheet……………………….3 General Commercial Pre-Installation Check List………………..4 3200 Timer Setting Procedure……………………..5 3210 Timer Settings…………………………. 6 3200 & 3210 Timer Series Regeneration Cycle Program Setting Procedure…………7 3200 Timer Assembly……………………….. 8 3200 Timer Assembly Parts List……………………..
-
Page 3: Job Specification Sheet
Job Specification Sheet *Job No. *Model No. *Water Test *Capacity Per Unit *Mineral Tank Size Diameter Height *Brine Tank Size & Salt Setting per Regeneration *2850 Control Valve Specifications 1. Type of Timer A. 7 Day or 12 Day B. *625 to 10,625 Gallon Meter or *3,125 to 53,125 Gallon Meter or *Other C.
-
Page 4: General Commercial Pre-Installation Check List
General Commercial Pre-Installation Check List WATER PRESSURE: A minimum of 25 pounds of water pressure is required for regeneration valve to operate effectively. ELECTRICAL FACILITIES: A continuous 115 volt, 60 Hertz current supply is required. Make certain the current supply is always hot and cannot be turned off with another switch. EXISTING PLUMBING: Condition of existing plumbing should be free from lime and iron buildup.
-
Page 5: 3200 Timer Setting Procedure
3200 Timer Setting Procedure How To Set Days On Which Water Conditioner Is To Regenerate: Rotate the skipper wheel until the number “1” is at the red pointer. Set the days that regeneration is to occur by slid- ing tabs on the skipper wheel outward to expose trip fin- gers.
-
Page 6: 3210 Timer Settings
3210 Timer Settings Typical Programming Procedure How To Manually Regenerate Your Water Condi- tioner At Any Time: Calculate the gallon capacity of the system, subtract the necessary reserve requirement and set the gallons Turn the manual regeneration knob clockwise. available opposite the small white dot on the program This slight movement of the manual regeneration wheel gear.
-
Page 7: 3200 & 3210 Timer Series Regeneration Cycle Program Setting Procedure
3200 & 3210 Timer Series Regeneration Cycle Program Setting Procedure (Brine Tank Refill Separate from Rapid Rinse) How To Set The Regeneration Cycle Program: The regeneration cycle program on your water condi- tioner has been factory preset, however, portions of the cycle or program may be lengthened or shortened in time to suit local conditions.
-
Page 8: 3200 Timer Assembly
3200 Timer Assembly Page 8…
-
Page 9: 3200 Timer Assembly Parts List
3200 Timer Assembly Parts List 1….1….. 13870….Housing, Timer, 3200 2….1….. 13011….Arm, Cycle Actuator 3….1….. 40096-24….Dial 12AM Regen Assy, Black 40096-02….Dial 2AM Regen Assy, Black 4.
-
Page 10: 3210 Timer Assembly
3210 Timer Assembly Page 10…
-
Page 11: 3210 Timer Assembly Parts List
3210 Timer Assembly Parts List Item No. Quantity Part No. Description 1….1….13870-01….Housing Assembly, Timer, 3210 2….1….13802…….Gear, Cycle Actuator 3….1….40096-24….Dial 12AM Regen Assy, Black 40096-02….Dial 2AM Regen Assy, Black 4….1….13886…….Knob, 3200 5.
-
Page 12: Control Valve With 1700 Injector Assembly
Control Valve with 1700 Injector Assembly Page 12…
-
Page 13: Control Valve With 1700 Injector Assembly Parts List
Control Valve with 1700 Injector Assembly Parts List Item No. Quantity Part No. Description 1….1….. 16250…….Valve Body, 2850 16250-01….Valve Body, 2850, Machd 2….6….. 16101…….Seal, 2850 3….5….. 16638…….Spacer, 9500/2850 4….1….. 16092…….Piston, 2850 5.
-
Page 14: Environmental Power Head Assembly
Environmental Power Head Assembly Page 14…
-
Page 15: Environmental Power Head Assembly Parts List
Environmental Power Head Assembly Parts List Item No. Quantity Part No. Description 1…..1….. 18697-15…….. Backplate, Hinged 2……….. 3200 Clock Timer Assy… 3200 Clock Timer Assy 3200 Meter Timer Assy… 3200 Meter Timer Assy 3…..1….. 41543……..Motor, Drive, 115V, 50/60 Hz 41544.
-
Page 16: Control Drive Assembly
Control Drive Assembly Page 16…
-
Page 17: Control Drive Assembly Parts List
Control Drive Assembly Parts List Item No. Quantity Part No. Description 1….1….. 40264…….Backplate, SS/SVO, w/T Screws — 3200 7 Day 2….1…………Timer — 3200 12 Day — 3210 Meter 3….1….. 40084-12….Power Cord, 12’ US, Round, 120V Sys 5, 6, 7 & 2900/3150/3900 #4 4.
-
Page 18: Manual Drive Assembly & Parts List
Manual Drive Assembly & Parts List Item No. Quantity Part No. Description 1….1….. 12593…….Backplate, Manual 2….1….. 12592…….Bracket, Lever Position 3….1….. 12596…….Screw, Spec Mach, 1/4 — 20 x 1/2 4.
-
Page 19: 1600 Brine System Assembly & Parts List
1600 Brine System Assembly & Parts List Item No. Quantity Part No. Description 1….1……10328……Fitting, Elbow, 90 Deg. 1/4 PT x 3/8T 2….1……12767……Screen, Brine 3….2……10332……Fitting, Insert, 3/8 4….
-
Page 20: 1700 Brine System Assembly
1700 Brine System Assembly Page 20…
-
Page 21: 1700 Brine System Assembly Parts List
1700 Brine System Assembly Parts List Item No. Quantity Part No. Description 1….1….. 14792…….Plug, End, Brine Valve 2….1….. 13201…….Quad Ring, -020 3….1….. 12085…….Washer, Flow, 1.2 GPM 12086…….Washer, Flow, 1.5 GPM 12087…….Washer, Flow, 2.0 GPM 12088…….Washer, Flow, 2.4 GPM 12089…….Washer, Flow, 3.0 GPM 12090…….Washer, Flow, 3.5 GPM…
-
Page 22: 1710 Brine System Assembly & Parts List
1710 Brine System Assembly & Parts List Item No. Quantity Part No. Description 1….1….. 41202…….Brine Valve, 1700, Plastic, Top 2….1….. 14785-01….Retainer, Flow Control 3….1….. 14811…….O-Ring, -210, 560CD, Brine 4….1….. 14798…….Spacer, 1700, Brine 5.
-
Page 23: 1600 Service Valve Operator Assembly & Parts List
1600 Service Valve Operator Assembly & Parts List Item No. Quantity Part No. Description 1….1….. 11749…….Guide, Brine Valve Stem 2….1….. 10250…….Ring, Retaining 3….1….. 10249…….Spring, Brine Valve 4….1….. 12550…….Quad Ring, -009 5.
-
Page 24: 2300 Safety Brine Valve Assembly & Parts List
2300 Safety Brine Valve Assembly & Parts List Item No. Quantity Part No. Description 1….1….. 60027-FFA….Safety Brine Valve Body, 2300 Fitting Facing Arm 60027-FFS….Safety Brine Valve Body Fitting Facing Stud 2….1….. 60028-30….Float Assy, 2300, 30”, Blue/White 60026-30SAN..Float Assy, 2350, 30”, HW 3.
-
Page 25: 2310 Safety Brine Valve Assembly & Parts List
2310 Safety Brine Valve Assembly & Parts List Item No. Quantity Part No. Description 1….1….. 60014…….Safety Brine Valve Assy, 2310 2….1….. 60068…….Float Assy, 2310, w/30” Rod ……….60026-30….Float Assy, 2350, 30” Red/Wht 3.
-
Page 26: 2350 Safety Brine Valve Assembly & Parts List
2350 Safety Brine Valve Assembly & Parts List Item No. Quantity Part No. Description 1….1….. 60038…….Safety Brine Valve, 2350 1A….1….. 61024…….Actuator Assy, 2350 Brine 2….1….. 60026-30….Float Assy, 2350, 30” Red/Wht ……….60026-30SAN..Float Assy, 2350, 30”, HW 3.
-
Page 27: 1″ Meter Assembly & Parts List
1” Meter Assembly & Parts List Item No. Quantity Part No. Description 1….1….. 14959…….Body, Meter, 2750 2….1….. 13882…….Post, Meter Impeller 3….1….. 13509…….Impeller, Meter 4….1….. 13847…….O-ring, -137, Std/560CD, Meter 5A….
-
Page 28: 1/2″ Meter Assembly & Parts List
1 1/2” Meter Assembly & Parts List Item No. Quantity Part No. Description 1….1….. 17569…….Body, Meter, 2850/9500 2….1….. 13882…….Post, Meter Impeller 3….1….. 13509…….Impeller, Meter 4….1….. 13847…….O-Ring, -137, Std/560CD, Meter 5A….
-
Page 29
Notes Page 29… -
Page 30: Service Assemblies
Service Assemblies 24 Hour Gear Assemblies 60034-xx… 1700 Brine Valve Assy 19205….Gear Assy, 24 Hour, Silver, 5600, (Specify flow control 1.0 — 5.0) 12 A.M. 60604-xx… Model 1710 Brine Valve Assy 60519-02 Gear Assy, 3200 24 Hour 2 Times/. (Specify flow control 1.0 — 5.0) Day, w/Silver Label 60519-03.
-
Page 31
Service Assemblies 61560-01… Meter Assy, In-Line, w/1” NPT Service Equipment Plstc Connector 16174….Silicone, 2 oz. Tube 61560-07… Meter Assy, In-Line, w/1” NPT 16586-8….. Silicone, Dow #7 8 Lb Brass Connector 16516….Stuffer Assy, 2850/9500 61560-09. -
Page 32: Service Instructions
Service Instructions Problem Cause Correction 1. Water conditioner fails to A. Electrical service to unit has A. Assure permanent electrical service regenerate. been interrupted (check fuse, plug, pull chain, or switch) B. Timer is defective. B. Replace timer. C. Power failure. C.
-
Page 33: General Service Hints For Meter Control
Service Instructions Problem Cause Correction 8. Softener fails to draw brine. A. Drain line flow control is A. Clean drain line flow control. plugged. B. Injector is plugged. B. Clean injector C. Injector screen plugged. C. Clean screen. D. Line pressure is too low. D.
-
Page 34: Water Conditioner Flow Diagrams
Water Conditioner Flow Diagrams 1 Service Position Hard water enters unit at valve inlet and flows down through the mineral in the mineral tank. Conditioned water enters center tube through the bottom distributor, then flows up through the center tube, around the piston, and out the outlet of the valve. 2 Backwash Position 3 Brine Position Hard water enters unit at valve inlet, flows through…
-
Page 35
Water Conditioner Flow Diagrams 4 Slow Rinse Position Hard water enters unit at valve inlet, flows up into injector housing and down through nozzle and throat, around the piston, down through mineral, enters center tube through bottom distributor, flows up through center tube, around piston and out through drain line. 6 Brine Tank Refill Position 5 Rapid Rinse Hard water enters unit at valve inlet, flows directly… -
Page 36: Flow Data & Injector Draw Rates
Flow Data & Injector Draw Rates Page 36…
-
Page 37: System #4 — Typical Single Tank Installation With Optional Meter
System #4 — Typical Single Tank Installation with Optional Meter Page 37…
-
Page 38: System #5 Interlock — Typical Twin Tank Installation With Optional Meter Interlock And No Hard Water Bypass
System #5 Interlock — Typical Twin Tank Installation with Optional Meter Interlock and No Hard Water Bypass Page 38…
-
Page 39: System #6 — Twin Series Regeneration Installatio Nwith A Remote Meter
System #6 — Twin Series Regeneration Installation with a Remote Meter Page 39…
-
Page 40: System #7 — Twin Alternator Installation With A Remote Meter
System #7 — Twin Alternator Installation with a Remote Meter Page 40…
-
Page 41: System #4 — Single Valve Regeneration Immediate And Delayed Valve Wiring
System #4 — Single Valve Regeneration Immediate and Delayed Valve Wiring Page 41…
-
Page 42: System #4 — With Remote Starter Valve Wiring
System #4 — with Remote Starter Valve Wiring Page 42…
-
Page 43: System #5 — Interlocked Regeneration Valve Wiring
System #5 — Interlocked Regeneration Valve Wiring 40502-01_REVB 40502-02_REVB Page 43…
-
Page 44: System #6 — Series Regeneration Valve Wiring
System #6 — Series Regeneration Valve Wiring 13632-01_REVK 13632-02_REVL Page 44…
-
Page 45: System #7 — Alternating Regeneration 230V / 3-Way Solenoid Output Valve Wiring
System #7 — Alternating Regeneration 230V / 3-Way Solenoid Output Valve Wiring 19138-01_REVD 19138-02_REVD Page 45…
-
Page 46: System #7 — Alternating Regeneration 24V / 120V / 3-Way Solenoid Output Valve Wiring
System #7 — Alternating Regeneration 24V / 120V / 3-Way Solenoid Output Valve Wiring 17727-01_REVD 17727-02_REVD Page 46…
-
Page 47
Notes Page 47… -
Page 48
P/N 16510 Rev. F 02/06…
Блок управления Fleck 9100/1600 SXT Eco 3/4″ (умягчение, счётчик)
| Допустимые диаметры баллонов | 6-16″ |
| Рабочее напряжение | 24 В |
| Производительность | 4-5,5 куб.м/ч |
| Промывка | 1,9 куб.м/ч |
| Рабочая температура | 1-50°С |
| Рабочее давление | 1,4-8,5 бар |
| Диаметры присоединений (вх/вых/дрен) | 25/25/15 мм |
| Диаметр трубки водосчётчика | 3/4 « |
| Допустимые диаметры баллонов | 6-16″ |
| Рабочее напряжение | 24 В |
| Производительность | 4-5,5 куб.м/ч |
| Промывка | 1,9 куб.м/ч |
| Рабочая температура | 1-50°С |
| Рабочее давление | 1,4-8,5 бар |
| Диаметры присоединений (вх/вых/дрен) | 25/25/15 мм |
| Диаметр трубки водосчётчика | 3/4 « |
Блок управления непрерывного действия (twin alternating) Fleck VC9100 — 9100/1600 3/4″ SXT на умягчение с водосчётчиком. Программируемый, с памятью. Является устройством для распределения потоков воды. Снабжён жёстким пластиковым соединением между баллонами.
Блок управления (управляющий клапан) Fleck VC9100 — 9100/1600 3/4″ SXT, специально создан для twin-систем, когда один клапан управляет двумя корпусами фильтров. Один корпус находится в работе, а второй — в режиме ожидания, или регенерации. Таким образом, становится возможным непрерывное потребление умягченной воды. Регенерация начинается сразу после выработки фильтроцикла баллоном фильтра. Клапан оснащен двумя поршнями (плунжерами): нижний предназначен для переключения режимов работы корпусов фильтра, а верхний для изменения потоков воды во время регенерации.
Характеристики:
- Управляющий механизм: электронный
- Корпус выполнен из пластика
- LCD дисплей с подсветкой
- Солевая система 1600 позволяет использовать клапан для работы с баками диаметром от 6 до 16 дюймов
- Регенерация по объему очищенной воды
- Посадка на бак: верхняя
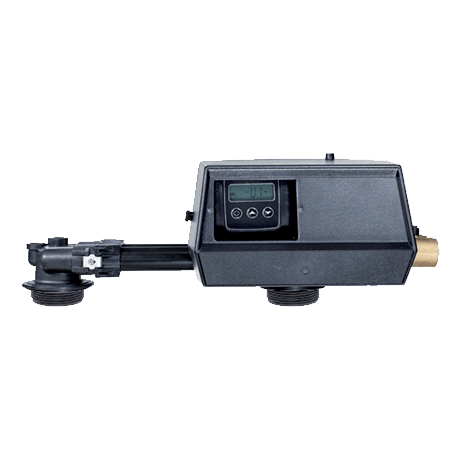
Описание
Клапан управления Fleck 9100 идеальное решение для организации непрерывной работы системы умягчения воды. Клапан имеет высокую прочность и надежность.
Преимущества
- Управление двумя фильтрами
- Не восприимчив к коррозии
- Полностью программируемые стадии регенерации
- Оптимальная цена
Цена по запросу
В наличии
Краткие технические характеристики INFO
| Материал | Пластик |
| Рабочее давление | 1,8 — 8,5 бар |
| Рабочая температура | 1 — 43 °С |
| Сервисная производительность | 4,0 м3/ч |
| Обратная промывка | 1,9 м3/ч |
| Вход/выход | 3/4″ или 1″ |
| Посадочное отверстие | 2,5″ |
| Рекомендуемые диаметры фильтров | 6 — 16″ |
| Опции | Upflow, Байпас, Подмес |
Документация PDF

FLECK® 9000/9100/9500
SERVICE MANUAL
www.pentairaqua.com

|
TABLE OF CONTENTS |
|
|
JOB SPECIFICATION SHEET………………………………………… |
2 |
|
EQUIPMENT CONFIGURATION…………………………………….. |
2 |
|
INSTALLATION & START-UP……………………………………….. |
3 |
|
9000/9100/9500 (3200 SERIES) ELECTRO MECHANICAL |
|
|
TIMER ASSEMBLY………………………………………………….. |
6 |
|
POWER HEAD ASSEMBLY……………………………………………. |
8 |
|
9000 CONTROL VALVE ASSEMBLY……………………………… |
10 |
|
9100 CONTROL VALVE ASSEMBLY……………………………… |
13 |
|
9500 CONTROL VALVE ASSEMBLY……………………………… |
16 |
|
1600 BRINE VALVE SYSTEM (FOR 9500)……………………… |
19 |
|
1700 BRINE VALVE SYSTEM (FOR 9500)……………………… |
20 |
|
1710 BRINE VALVE SYSTEM (FOR 9500)……………………… |
21 |
|
3/4-INCH METER ASSEMBLY…………………………………….. |
22 |
|
1-INCH METER ASSEMBLY………………………………………… |
23 |
|
1-INCH METER ASSEMBLY………………………………………… |
24 |
|
1-1/2 INCH METER ASSEMBLY …………………………………. |
25 |
|
9000 SECOND TANK ASSEMBLY………………………………… |
26 |
|
9100 SECOND TANK ASSEMBLY………………………………… |
27 |
|
9500 SECOND TANK ASSEMBLY………………………………… |
28 |
|
2300 SAFETY BRINE VALVE……………………………………….. |
29 |
|
2310 SAFETY BRINE VALVE……………………………………….. |
30 |
|
2310 SAFETY BRINE VALVE……………………………………….. |
31 |
|
2350 SAFETY BRINE VALVE……………………………………….. |
32 |
|
BYPASS VALVE ASSEMBLY (METAL)…………………………… |
33 |
|
BYPASS VALVE ASSEMBLY (PLASTIC)………………………… |
34 |
|
GENERAL SERVICE HINTS FOR METER CONTROL………. |
35 |
|
TROUBLESHOOTING…………………………………………………. |
36 |
|
9000/9100/9500 METER FLOW DATA………………………….. |
37 |
|
9000/9100/9500 INJECTOR FLOW DATA (1600 SERIES |
|
|
INJECTORS)………………………………………………………… |
38 |
|
9500 INJECTOR FLOW DATA (1600 &1700 SERIES |
|
|
INJECTORS)………………………………………………………… |
39 |
|
9000 CONTROL DIMENSIONS…………………………………….. |
40 |
|
9100 CONTROL DIMENSIONS…………………………………….. |
41 |
|
9500 CONTROL DIMENSIONS…………………………………….. |
42 |
|
WATER CONDITIONER FLOW DIAGRAMS……………………. |
43 |
|
9000/9500 WIRING DIGRAM……………………………………….. |
45 |
|
SERVICE ASSEMBLIES………………………………………………. |
46 |
CALIFORNIA PROPOSITION 65 WARNING
WARNING: This product contains chemicals known to the State of California to cause cancer or birth defects or other reproductive harm.
2 • FLECK® 9000/9100/9500 Service Manual
JOB SPECIFICATION SHEET
Job Number:_________________________________________
Model Number:_______________________________________
Water Test: __________________________________________
Capacity Per Unit:_____________________________________
Mineral Tank Size:_ ________ Diameter:_______Height:_ ______
Brine Tank Size and Salt Setting per Regeneration:__________
9000/9100/9500 Control Valve Specifications:
1.Type of Timer:
A.82 minute available regeneration time, 1/15 RPM
B.164 minute available regeneration time, 1/30 RPM
2.Meter Size:
A.3/4- inch Std Range (125 — 2,100 gallon setting)
B.3/4-inch Ext Range (625 — 10,625 gallon setting)
C.1-inch Std Range (310 — 5,270 gallon setting)
D.1-inch Ext Range (1,150 — 26,350 gallon setting)
E.1-1/2 inches Std Range (625 — 10,625 gallon setting)
F.1-1/2 inches Ext Range (3,125 — 53,125 gallon setting)
3.Timer Gallon Setting:_ ______________________ Gallons
4.Regeneration Program Setting:
A.Backwash:____________________________ Minutes
B.Brine and Slow Rinse:___________________ Minutes
C.Rapid Rinse:___________________________ Minutes
D.Brine Tank Refill:_______________________ Minutes
5.Drain Line Flow Control:_______________________ gpm
6.Brine Refill Rate:_____________________________ gpm
7.Injector Size: ____________________________________
EQUIPMENT CONFIGURATION
Figure 1 9000/9100 Equipment Configuration
Figure 2 9500 Equipment Configuration

INSTALLATION & START-UP
Water Pressure
A minimum of 25 pounds (1.7 bar) of water pressure is required for regeneration valve to operate effectively.
Electrical Facilities
A continuous 115 volt, 60 Hertz current supply is required. Make certain the current supply is always hot and cannot be turned off with another switch.
Existing Plumbing
Condition of existing plumbing should be free from lime and iron buildup. Piping that is built up heavily with lime and/ or iron should be replaced. If piping is clogged with iron,
a separate iron filter unit should be installed ahead of the water softener.
Location Of Softener And Drain
The softener should be located close to a drain to prevent air breaks and back flow.
Bypass Valves
Always provide for the installation of a bypass valve.
CAUTION Water pressure is not to exceed 125 psi (8.6 bar), water temperature is not to exceed 110°F (43°C), and the unit cannot be subjected to
freezing conditions. Installation Instructions
1.Place the softener tank where you want to install the unit.
NOTE: Be sure the tank is level and on a firm base.
2.During cold weather, the installer should warm the valve to room temperature before operating.
3.Perform all plumbing according to local plumbing codes.
•Use a 1/2-inch minimum pipe size for the drain.
•Use a 3/4-inch drain line for backwash flow rates that exceed 7 gpm or length that exceeds 20 feet (6 m).
4.Both tanks must be the same height and diameter and filled with equal amounts of media.
5.The distributor tube must be flush with the top of each tank. Cut if necessary. Use only non-aerosol
silicone lubricant.
6.Lubricate the distributor o-ring seal and tank o-ring seal. Place the main control valve on one tank and the tank adapter on the second tank.
NOTE: If required, solder copper tubing for tank interconnection before assembling on the main control valve and tank adapter. Maintain a minimum of 1 inch distance between tanks on final assembly.
7.Solder joints near the drain must be done before connecting the Drain Line Flow Control fitting (DLFC). Leave at least 6 inches (152 mm) between the DLFC and solder joints when soldering pipes that are connected on the DLFC. Failure to do this could cause interior damage to DLFC.
8.Use only plumber tape on the drain fitting.
9.Be sure the floor under the salt storage tank is clean and level.
10.Place approximately 1 inch (25 mm) of water above the grid plate. If a grid is not utilized, fill to the top of the air check in the salt tank. Do not add salt to the brine tank at this time.
11.On units with a bypass, place in Bypass position.
12.Turn on the main water supply.
13.Open a cold soft water tap nearby and let water run a few minutes or until the system is free of foreign material (usually solder) resulting from the installation. Close the water tap when water runs clean.
14.Place the bypass In Service position and let water flow into the mineral tank. When water flow stops, slowly open a cold water tap nearby and let water run until air is purged from the unit. Then close tap.
15.Make all electrical connections according to codes. Plug the valve into an approved power source. Do not insert meter cable into the meter yet.
16.Tank one has control valve and tank two has adapter.
17.Look on the right side of the control valve, it has indicators showing which position the control valve is in during Regeneration and which tank is In Service.
NOTE: Make sure the meter cable is not inserted in the meter dome. Swing the timer out to expose the program wheel. To swing timer out, grab onto the lower right corner of timer face and pull outward.
Figure 3 Control Valve Position Indicators
61591 Rev A
Figure 4 Timer
FLECK® 9000/9100/9500 Service Manual • 3

INSTALLATION & STARTUP CONTINUED
19210 Rev D
Figure 5 Program Wheel
18.Cycle timer into backwash position. Turn manual knob so that the micro switch rides on the first set of pins. In this position the tanks switch (lower piston) and the control valve moves to the backwash position (upper piston). Wait until the positioning of upper and lower pistons stops before advancing the timer further. If advanced too fast the control will not home into the In Service position (it will not advance to any other position). To correct this, rotate the manual knob back to In Service and start again into backwash.
NOTE: Once valve positions itself into the backwash cycle, the homing circuit locks in.
19.With all the air backwashed, slowly cycle the timer to the brine position; rapid rinse; and brine tank refill. Wait for the control drive motor to position itself in each cycle and stop, before advancing on to the next position.
20.Once back in the In Service position, cycle the control valve again into the backwash position. The tanks switch again, and air head backwashes out of the other tank. Cycle the control back to the In Service position. Leave the timer in the open position. DO NOT insert meter cable yet.
NOTE: Two motors are available.
1/15 RPM has 82 minute regeneration time. 1/30 RPM has 164 minute regeneration time.
Valve To Tank Installation
1.Spin the valve onto the tank, ensuring the threads are not cross-threaded.
NOTE: All Fleck® valves are right-hand threads, or clockwise, to install
2.Rotate the valve freely without using force until it comes to a stop (this position is considered zero).
3.Rotate the valve clockwise from zero, between 1/4-turn and 1/2-turn (see “Figure 6”).
NOTE: If lubricant is required, a silicone compound is strongly recommended. Dow Corning® Silicone Compound (available from Pentair), is recommended for best possible results. Dow Corning® 7 Release Compound is used in the
manufacture of Pentair control valves. The use of other types of lubricants may attack the control’s plastic or rubber components. Petroleum-based lubricants can cause swelling in rubber parts, including o-rings and seals.
|
Part No. |
Description |
|
16174 |
Silicone, 2 oz Tube |
|
16586-8 |
Silicone, Dow #7 |
|
8 lb |
4 • FLECK® 9000/9100/9500 Service Manual
Figure 6
Setting the Regeneration Cycle Program
The Regeneration cycle program on the water conditioner is preset at the factory. However, portions of the cycle or program time may be lengthened or shortened for local conditions or system design.
1.Expose cycle program wheel by grasping timer in lower right hand corner and pulling. This releases snap retainer and swings timer to the left
NOTE: Meter cable must be removed from meter dome before opening timer.
2.Remove the program wheel by grasping program wheel and squeezing protruding lugs towards center. Lift program wheel off timer. Switch arms may require movement to facilitate removal.
3.Return timer to closed position by engaging snap retainer in back plate. Make certain all electrical wires locate above snap retainer post.
Changing Length of the Backwash Time
Looking at the numbered side of the program wheel, the group of pins starting at zero determines the length of time the
unit backwashes.
Example: If there are six pins in this section, the time of backwash is 12 minutes (2 minutes per pin). To change the length of backwash time, add or remove pins as required.
The number of pins multiplied by two equals minutes of backwash.
Changing Length of Brine and Rinse Time
The group of holes between the last pin in the backwash section and the second group of pins determines the length of time that a unit will brine and rinse (2 minutes per hole).
To change the length of brine and rinse time, add or remove pins in the rapid rinse group of pins to increase or decrease the number of holes in the brine and rinse section.
The number of holes multiplied by two equals minutes of brine and rinse.
Changing Length Of Rapid Rinse
The second group of pins on the program wheel determines the length of time the water conditioner rapid rinses (2 minutes per pin). To change the length of rapid rinse time, add or remove pins at the higher numbered end of this section as required.
The number of pins multiplied by two equals minutes of rapid rinse.
NOTE: Program wheels with 0–82 minute cycle times, use one minute per pin or hole to set Regeneration times. The layout of pins and holes on the program wheel follow the same procedure as on this page.

INSTALLATION & STARTUP CONTINUED
Changing Length of Brine Tank Refill Time
The second group of holes on the program wheel determines the length of time the water conditioner refills the brine tank (2 minutes per hole).
To change the length of refill time, move the two pins at the end of the second group of holes as required.
The Regeneration cycle is complete when the two pin set at end of the brine tank refill section trips the outer micro-switch. The program wheel, however, continues to rotate until the inner micro-switch drops into the notch on the program wheel.
Programming
1.The control valve is set at the factory for backwash; brine and slow rinse; rapid rinse and brine tank fill times. Change any of these times by repositioning the pins and holes or adding more pins.
NOTE: Two timer motors are available.
1/15 RPM has 82 minute Regeneration Time and each pin or hole equals one minute.
1/30 RPM has 164 minute Regeneration Time and each pin or hole equals two minutes.
2.The control valve has a separate brine tank fill cycle. Calculate the desired salt setting using the brine line flow control rate of refill (in gpm) multiplied by the timer setting. Then, using one gallon of fresh water dissolving approximately 3 lbs salt, calculate the refill time.
Example: A desired 30 lbs salt setting:
The unit has a 1.0 gpm refill rate so a 10 gallon fill is required.
10 gallons x 3 lbs/gals = 30 lbs salt Set the timer refill section at 10 minutes.
10 minutes x 1.0 gpm = 10 gallon fill
NOTE: There must always be two pins at the end of a refill time to stop the fill cycle. With the Regeneration times set, place timer back to its original position, making sure the lower right hand corner snaps back into the backplate and the meter cable slides through the backplate and does not bind.
3.Setting the gallon wheel. Knowing the amount of resin in each tank and the salt setting per Regeneration, calculate the gallons available, using the following capacities as a guide:
(capacity per ft3 x ft3 of resin per tank) = gallons available compensated hardness of H2O
NOTE: Based on tank size: More resin increases capacity, less resin decreases capacity.More salt increases capacity, less salt decreases capacity.
Example:
|
Tank Diameter |
= |
16 inches |
|
|
Compensated |
= |
35 grains per gallon |
|
|
Hardness |
(tested sample) |
||
|
ft3 Resin (based on |
= |
4 |
|
|
flow rate) |
|||
|
lbs of Salt per ft3 |
= |
8 |
|
|
Capacity per ft3 |
= |
24,000 |
|
|
(24,000 x 4 ft3 of resin |
2,740 gallons available |
||
|
per tank) |
= |
||
|
before regeneration |
|||
|
35 grains |
Complete step 4 before setting gallons on the meter wheel.
4.Because the control valve regenerates with soft water from the other tank, subtract the water used for regeneration. Take each regeneration cycle and calculate the water used.
Example: Unit is set for a 16-inch diameter tank with 4 ft3 of resin and salted at 8 lbs. per ft3, 7 gpm backwash, #3 injector, 1.0 gpm brine refill, and 60 psi and timer set for 10 min. backwash, 60 min. brine and rinse, 10 min. rapid rinse, 10 min. brine tank fill.
|
Backwash |
10 min x 7.0 gpm |
= |
70.0 gal |
|
Brine and Rinse |
60 min x 1.0 gpm |
= |
60.0 gal |
|
Rapid Rinse |
10 min x 7.0 gpm |
= |
70.0 gal |
|
Brine Tank Fill |
10 min x 1.0 gpm |
= |
10.0 gal |
|
Total Regeneration Water |
= |
210.0 gal |
With the 2740 gallons available calculated in Step 3, subtract the Regeneration water used from the total water available.
2740 gallons available — 210 gallons used = 2530 gallons (in Regeneration, Step 4)
5.Set meter wheel at approximately 2530 gallons. Lift the inner dial of the meter program wheel so that you can rotate it freely. Position the white dot opposite the
2530 gallon setting.
NOTE: There is a slight delay between the time the meter zeros out and the cycle starts. Units using the:
1/15 RPM motor, 82 minute Regeneration Time has a 9 minute delay
1/30 RPM motor, 180 minute Regeneration Time has an 18 minute delay.
NOTE: This delay period is not critical on residential equipment. However, take this factor into consideration for commercial applications by subtracting continuous flows for 9 minutes or 18 minutes from water available.
6.Insert meter cable into meter.
7.Check bypass.
8.Plug in unit.
FLECK® 9000/9100/9500 Service Manual • 5

9000/9100/9500 (3200 SERIES) ELECTRO MECHANICAL TIMER ASSEMBLY
40
10A
 39
39
6 • FLECK® 9000/9100/9500 Service Manual

9000/9100/9500 (3200 SERIES) ELECTRO MECHANICAL TIMER ASSEMBLY CONTINUED
|
Item No. QTY Part No. |
Description |
1 1 13870-03 Housing, Timer, 9000
2 1 17870 Label, Indicator, 9000 Timer
3 1 15465 Label, Caution
4 1 16930 Label, Instruction
5 1 15227 Plate, Clutch, Actuator
6 1 10300 Screw, Slot Hex Washer, 18-8 x 3/8
7 1 17513 Clip, Spring
8 1 15407 Washer, Plain, #4
9 1 15228 Spring, Return
10 1 16270-10 Program Wheel Assy, 9000/9100, 3/4-inch STD, 0-2, 100
16270-30 Program Wheel Assy, 9000/9100, 1-inch STD, 0-5, 100
16270-40 Program Wheel Assy, 9000/9100, 1-inch EXT, 0-25, 500
16270-50 Program Wheel Assy, 9000/9100/9500, 3/4-inch EXT, 1.5-inch STD,
0-10, 500
16270-60 Program Wheel Assy, 9500, 1.5-inch EXT, 0-50, 000
10A 24673 Volume Label, Metric, 9000/9100, 3/4-inch STD, 0-8m3
24672 Volume Label, Metric, 9000/9100, 1-inch STD, 0-20m3
24676 Volume Label, Metric, 9000/9100, 1-inch EXT, 0-100m3
24675 Volume Label, Metric, 9000/9100/9500, 3/4-inch EXT, 1.5-inch STD 0-40m3
25027 Volume Label, Metric, 9500, 1.5-inch EXT, 1.5-inch EXT 0-200m3
11 1 13806 Retainer, Program Wheel 12 1 13748 Screw, Flt Hd St, 6-20 x 1/2 13 2 11999 Label, Button
14 1 15223 Actuator, Cycle
15 1 13886 Know, 3200
16 4 13296 Screw, Hex Washer,
6-20 x 1/2
17 1 17724 Program Wheel, Pinion Drive
18 1 17723 Clutch, Drive Pinion
19 1 14276 Spring, Meter Clutch
20 1 14253 Retainer, Clutch Spring
|
Item No. QTY Part No. |
Description |
21 3 14087 Insulator
22 1 15314 Switch, Micro, Modified
23 1 15320 Switch, Micro, Timer
24 2 11413 Screw, Pan Hd Mach, 4-40 x 1 1/8
25 1 13018 Pinion, Idler
26 1 18563 Spring, Idler Shaft
27 1 13017 Gear, Idler
28 1 13164 Gear, Drive
29 1 13887 Plate, Motor Mounting
30 1 18743-1 Motor, 120V, 60 Hz 1/30 RPM, 5600
18824-1 Motor, 230V, 50 Hz 1/30 RPM
19170 Motor, 120V 60 Hz 1/15 RPM
18825 Motor, 230V, 50 Hz 1/15 RPM Mallory
31 2 13278 Screw, Phil Hd Mach, 6-32 x 1/8 Steel Zinc
32 1 14265 Clip, Spring
33 1 15055 Timer, Main Drive Gear
34 1 19210-02 Program Wheel Assy, 9000 1/15
19210-05 Program Wheel Assy, 9000/3230
35 23 15493 Pin, Spring, 1/16 x 5/8 SS 36 1 15203 Harness, 9000/9500, Timer 37 2 40422 Nut, Wire, Tan
38 1 60320-02 Switch Kit, 3200/9000 Timer Auxiliary
39 61420-69 Program Wheel & Gear Assy, 5-30-5-10-2, 2 Min
Per Pin
61420-80 Program Wheel & Gear Assy, 5-40-5-7-2, 2 Min Per Pin
40 1 * Complete 9000 Meter Immediate Timer Assembly
*Call your distributor for Part Number
FLECK® 9000/9100/9500 Service Manual • 7

8 • FLECK® 9000/9100/9500 Service Manual

POWER HEAD ASSEMBLY CONTINUED
|
Item No. QTY Part No. |
Description |
1 2 18728 Nut, Tinnerman, U Type, 8-32
2 1 11838 Power Cord, 6′ Fleck
11839 Power Cord, 12′ Fleck
40084-12 Power Cord, 12′ U.S., Round, 120V Sys 5, 6, 7 & 2900/3150/3900 #4
19885-01 Power Cord Assy, Japanese
11545-01 Power Cord Assy, 4′ Black, Euro w/Terminals
14678 Power Cord, U.S., 220/60
19303-01 Power Cord Assy, Australian w/Terminals
40085-12 Power Cord, 12′ US, Round, 240V
19674 Transformer, 24V, 9.6VA Residential Valves
41475 Transformer, 24V, 9.6VA, European
3 1 15202 Harness, 9000/9500, Drive
14822 Harness, 2900
4 1 15134 Gear Assy, Drive, 1/2-inch Stroke 9000/9500
5 1 15135 Gear, Drive, 9000
6 1 14896 Wheel, Geneva
7 2 40422 Nut, Wire, Tan
8 2 19367 Screw, Designer Cover, Thumb 8-32 Blank UV Stable Material
9 1 15175 Label, Shaft Position
10 2 14917 Ring, Retaining
11 1 42296 Plate, Ground, 9000/9500
12 1 14430 Screw, Hex Washer St, 6 x 1/4 Type «B»
13 2 19160 Screw, Phil Pan, Thread 6-32 x 3/8 Type 23 Zinc
14 1 18737 Motor, 24V, 50/60 Hz, 1 RPM
18738 Motor, 120V, 50/60 Hz 1 RPM
18739 Motor, 220V, 50/60 Hz 1 RPM
15 1 15131 Backplate, 9000, Mechanical, SXT
17784-05 Panel, Control, 9000/9500 XT
17784-02 Panel, Control, 9000, 9500 w/Terminal Block
16 2 15172 Screw, Flt Hd Mach, 4-40 x 1 3/8 Steel Zinc Plate
|
Item No. QTY Part No. |
Description |
17 2 10340 Washer, Lock #4, Zinc 18 2 16433 Switch, Miniature
19 1 10339 Nut, Hex, 4-40 Zinc Plated
20 1 15331 Screw, Hex Washer Mach, 10-24 x 3/4 410 S.S.
21 1 15133 Gear Assy, Drive, 3/4-inch Stroke
22 1 13547 Strain Relief, Flat Cord Heyco #30-1
1 13547-01 Strain Relief, Round Cord 23 1 15810 Ring, Retaining
24 1 17331 Cam, 9000, 9100, 9500
17765 Cam Assy, Aux Switch, 9000, 9100, 9500
25 1 15368 Tube, Cable Guide, 2-Tank, 9000/9100
17337 Tube, Cable Guide, 9500 26 2 15372 Washer, Thrust, 3/8
27 1 15425 Meter Cable Assy, 13.25 inches 9000/9100 3/4-inch STD & EXT
15216 Meter Cable Assy, 15.25 inches 9000/9100 1-inch STD & EXT
17744 Meter Cable Assy, 20.75 inches 9500 1.5-inch STD & EXT
|
28 |
2 |
15692 |
Washer, Plain, 3/8-inch |
30 1 10302 Insulator, Limit Switch
31 2 15173 Screw, Slot Rd Hd Mach, 5-20 x 3/8
32 * Complete 9000/9100/9500 Powerhead Assy
Not Shown
1 60232-110 Cover, Designer, 1 Pc Black
1 60232-112 Cover, Designer, 1 Pc Black w/Left Window, Electric
1 60320-10 Switch Assy, Drive Cam, 9000, 9100, 9500
*Call your distributor for Part Number
FLECK® 9000/9100/9500 Service Manual • 9
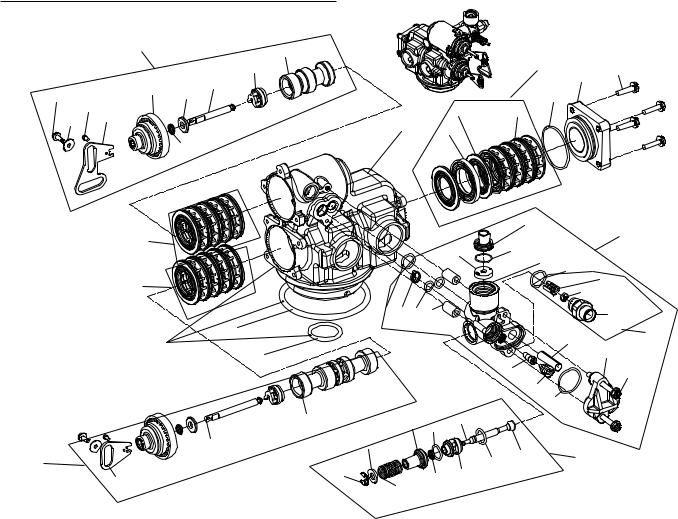
9000 CONTROL VALVE ASSEMBLY
|
50 |
12 |
||||||
|
53 |
|||||||
|
11 |
20 |
||||||
|
5 |
|||||||
|
10 |
|||||||
|
13 |
|||||||
|
7 |
15 |
19 |
|||||
|
6 |
8 |
2 |
3 |
||||
|
9 |
1 |
||||||
|
4 |
|||||||
|
14 |
|
32 |
||||||||
|
52 |
55 |
|||||||
|
31 |
||||||||
|
33 |
22 |
|||||||
|
41 |
||||||||
|
53 |
42 |
|||||||
|
43 |
||||||||
|
24 46 23 21 |
45 |
|||||||
|
14861-01 |
48 |
25 |
56 |
|||||
|
28 |
||||||||
|
VALVE BODY,9000,MACHINED |
||||||||
|
W/O-RINGS(P/Ns 11710 & 12281) |
47 |
27 |
30 |
|||||
|
26 |
29 |
|||||||
|
18 |
37 |
24 |
34 |
|||||
|
17 |
40 |
|||||||
|
51 |
35 |
54 |
||||||
|
39 |
24 |
|||||||
|
16 |
38 |
44 |
36 |
|||||
|
BR61500-9000 Rev E |
||||||||
10 • FLECK® 9000/9100/9500 Service Manual
9000 CONTROL VALVE ASSEMBLY CONTINUED
|
Item No. |
QTY |
Part No. |
Description |
|
1 |
1 |
14861 |
Valve Body, 9000 |
|
2 |
16 |
13242-02 |
Seal, 5600,9000, 9100 |
|
3 |
12 |
14241 |
Spacer, 5600,9000, 9100 |
|
4 |
1 |
16595 |
Spacer, 9000, 9100 |
|
5 |
1 |
43458 |
End Cap, Plastic, 9000/9100 |
|
6 |
2 |
13363 |
Washer, Plain |
|
7 |
2 |
17020 |
Screw, STL. Hex Washer, |
|
6-20 x 3/8 |
|||
|
8 |
2 |
11335 |
Screw, #4-40 |
|
9 |
1 |
14921 |
Link, Piston Rod |
|
10 |
1 |
14919 |
Piston, Rod, Upper |
|
11 |
2 |
14309 |
Retainer, Piston Rod |
|
12 |
1 |
14914 |
Piston, 9000, 9100 Upper |
|
13 |
2 |
13243 |
Plug, End, 5600, 9000, 9100 |
|
14 |
2 |
10209 |
Quad Ring, -010 |
|
15 |
2 |
13008 |
Retainer, End Plug Seal |
|
16 |
1 |
15019 |
Link, Piston Rod, 9000/9500, |
|
9100 |
|||
|
17 |
1 |
14920 |
Rod, Piston, Lower, 9000, |
|
9100 |
|||
|
18 |
1 |
14905 |
Pistion, 9000, 9100 Lower |
|
19 |
1 |
40952 |
O-ring, -030 |
|
20 |
4 |
15331 |
Screw, Hex Washer Head |
|
21 |
2 |
13361 |
Spacer, 4600, 9000, 9100 |
|
22 |
1 |
15215 |
Body, Injector, 9000, 9100 |
|
23 |
2 |
13301 |
O-ring, -011 |
|
24 |
3 |
13302 |
O-ring, -014 |
|
25 |
1 |
10227 |
Screen, Injector |
|
26 |
1 |
10913-000 |
Nozzle, Injector, #000, Brown |
|
10913-00 |
Nozzle, Injector, #00, Violet |
||
|
10913-0 |
Nozzle, Injector, #0, Red |
||
|
10913-1 |
Nozzle, Injector, #1, White |
||
|
10913-2 |
Nozzle, Injector, #2, Blue |
||
|
10913-3 |
Nozzle, Injector, #3, Yellow |
||
|
10913-4 |
Nozzle, Injector, #4, Green |
||
|
27 |
1 |
10914-000 |
Throat, Injector, #000, Brown |
|
10914-00 |
Throat, Injector, #00, Violet |
||
|
10914-0 |
Throat, Injector, #0, Red |
||
|
10914-1 |
Throat, Injector, #1, White |
||
|
10914-2 |
Throat, Injector, #2, Blue |
||
|
10914-3 |
Throat, Injector, #3, Yellow |
||
|
10914-4 |
Throat, Injector, #4, Green |
||
|
28 |
1 |
13166 |
Cap, Injector, 5600, 9000, |
|
9100 |
|||
|
29 |
1 |
13303 |
O-ring, -021 |
|
30 |
2 |
13387 |
Screw, Hex Washer Head |
|
31 |
1 |
15348 |
O-ring, -563 |
|
32 |
1 |
13173 |
Retainer, DLFC Button |
|
Item No. |
QTY |
Part No. |
Description |
|
33 |
1 |
19153 |
Washer, Flow, 0.6 GPM |
|
19152 |
Washer, Flow, 0.8 GPM |
||
|
12097 |
Washer, Flow, 1.0 GPM |
||
|
12085 |
Washer, Flow, 1.2 GPM |
||
|
19150 |
Washer, Flow, 1.3 GPM |
||
|
12086 |
Washer, Flow, 1.5 GPM |
||
|
19149 |
Washer, Flow, 1.7 GPM |
||
|
12087 |
Washer, Flow, 2.0 GPM |
||
|
12088 |
Washer, Flow, 2.4 GPM |
||
|
12089 |
Washer, Flow, 3.0 GPM |
||
|
12090 |
Washer, Flow, 3.5 GPM |
||
|
12091 |
Washer, Flow, 4.0 GPM |
||
|
19147 |
Washer, Flow, 4.5 GPM |
||
|
12092 |
Washer, Flow, 5.0 GPM |
||
|
17814 |
Washer, Flow, 6.0 GPM |
||
|
12408 |
Washer, Flow, 7.0 GPM |
||
|
34 |
1 |
14925 |
Brine Valve Stem, 9000, 9100 |
|
35 |
1 |
12626 |
Seat, Brine Valve |
|
36 |
1 |
13167 |
Spacer, Brine Valve |
|
37 |
1 |
13165 |
Cap, Brine Valve |
|
38 |
1 |
11973 |
Spring, Brine Valve |
|
39 |
1 |
11981-01 |
Ring, Retaining, SS |
|
40 |
1 |
16098 |
Washer, Nylon Brine |
|
41 |
1 |
12977 |
O-ring, -015 |
|
42 |
1 |
13245 |
Retainer, BLFC |
|
43 |
1 |
17307 |
Washer, Flow, 0.125 GPM |
|
12094 |
Washer, Flow, 0.25 GPM |
||
|
12095 |
Washer, Flow, 0.50 GPM |
||
|
12097 |
Washer, Flow, 1.0 GPM |
||
|
44 |
1 |
12550 |
Quad Ring, -009 |
|
45 |
1 |
13244 |
Adapter, BLFC |
|
46 |
1 |
13497 |
Air Disperser, Injector |
|
47 |
1 |
11710 |
O-ring, -215 |
|
48 |
1 |
12281 |
O-ring, -338 |
|
50 |
60400 |
Piston Assy, 9000, 9100 |
|
|
Upper |
|||
|
60400-01 |
Piston Assy, 9000 Upper, HW |
||
|
60400-001 |
Piston Assy, 9000, 9100 |
||
|
Upper, 560CD |
|||
|
51 |
60401 |
Piston Assy, 9000, 9100 |
|
|
Lower |
|||
|
60401-01 |
Piston Assy, 9000 Lower, HW |
||
|
60401-001 |
Piston Assy, 9000, 9100 |
||
|
Lower, 560CD |
|||
|
52 |
60125 |
Seal & Spacer Kit, |
|
|
5600/9000/9100 Upper |
|||
|
60125-15 |
Seal & Spacer Kit, |
||
|
5600/9000/9100 Upper Blue |
|||
|
60125HW |
Seal & Spacer Kit, 9000 |
||
|
Upper |
|||
|
FLECK® 9000/9100/9500 Service Manual • 11 |
9000 CONTROL VALVE ASSEMBLY CONTINUED
|
Item No. QTY Part No. |
Description |
53 60421 Seal & Spacer Kit, 9000/9100 Lower
60421HW Seal & Spacer Kit, 9000 Lower
60421-50 Seal & Spacer Kit, 9000/9100 Lower, 559PE
54 60350 Brine Valve Assy, 9000, 9100
60350-01 Brine Valve Assy, 9000, 560CD, Hot Water
55 60385-0011 Injector Drain, 9000, 9100, 0.25 BLFC #0 INJ,
1.2 DLFC
60385-0111 Injector Drain, 9000, 9100, 0.25 BLFC #1 INJ,
1.2 DLFC
60385-0121 Injector Drain, 9000, 9100, 0.25 BLFC #1 INJ,
1.5 DLFC
60385-0131 Injector Drain, 9000, 9100, 0.25 BLFC #1 INJ,
2.0 DLFC
60385-0141 Injector Drain, 9000, 9100, 0.25 BLFC #1 INJ,
2.4 DLFC
60385-0012 Injector Drain, 9000, 9100, 0.50 BLFC #0 INJ,
1.2 DLFC
60385-0112 Injector Drain, 9000, 9100, 0.50 BLFC #1 INJ, 1.2 DLFC
60385-0122 Injector Drain, 9000, 9100, 0.50 BLFC #1 INJ, 1.5 DLFC
60385-0132 Injector Drain, 9000, 9100, 0.50 BLFC #1 INJ, 2.0 DLFC
60385-0142 Injector Drain, 9000, 9100, 0.50 BLFC #1 INJ, 2.4 DLFC
60385-0182 Injector Drain, 9000, 9100, 0.50 BLFC #1 INJ, 5.0 DLFC
60385-0222 Injector Drain, 9000, 9100, 0.50 BLFC #2 INJ, 1.5 DLFC
60385-0242 Injector Drain, 9000, 9100, 0.50 BLFC #2 INJ, 2.4 DLFC
60385-0252 Injector Drain, 9000, 9100, 0.50 BLFC #2 INJ, 3.0 DLFC
60385-0262 Injector Drain, 9000, 9100, 0.50 BLFC #2 INJ, 3.5 DLFC
60385-0272 Injector Drain, 9000, 9100, 0.50 BLFC #2 INJ, 4.0 DLFC
60385-0282 Injector Drain, 9000, 9100, 0.50 BLFC #2 INJ, 5.0 DLFC
60385-02A2 Injector Drain, 9000, 9100, 0.50 BLFC #2 INJ, 6.0 DLFC
60385-0202 Injector Drain, 9000, 9100, 0.50 BLFC #2 INJ, Blank DLFC
60385-0372 Injector Drain, 9000, 9100, 0.50 BLFC #3 INJ, 4.0 DLFC
12 • FLECK® 9000/9100/9500 Service Manual
|
Item No. QTY Part No. |
Description |
60385-0382 Injector Drain, 9000, 9100, 0.50 BLFC #3 INJ, 5.0 DLFC
60385-0482 Injector Drain, 9000, 9100, 0.50 BLFC #4 INJ, 5.0 DLFC
60385-0133 Injector Drain, 9000, 9100, 1.0 BLFC #1 INJ, 2.0 DLFC
60385-0143 Injector Drain, 9000, 9100, 1.0 BLFC #1 INJ, 2.4 DLFC
60385-0163 Injector Drain, 9000, 9100, 1.0 BLFC #1 INJ, 3.5 DLFC
60385-0233 Injector Drain, 9000, 9100, 1.0 BLFC #2 INJ, 2.0 DLFC
60385-0243 Injector Drain, 9000, 9100, 1.0 BLFC #2 INJ, 2.4 DLFC
60385-0253 Injector Drain, 9000, 9100, 1.0 BLFC #2 INJ, 3.0 DLFC
60385-0263 Injector Drain, 9000, 9100, 1.0 BLFC #2 INJ, 3.5 DLFC
60385-0273 Injector Drain, 9000, 9100, 1.0 BLFC #2 INJ, 4.0 DLFC
60385-0353 Injector Drain, 9000, 9100, 1.0 BLFC #3 INJ, 3.0 DLFC
60385-0373 Injector Drain, 9000, 9100, 1.0 BLFC #3 INJ, 4.0 DLFC
60385-0383 Injector Drain, 9000, 9100, 1.0 BLFC #3 INJ, 5.0 DLFC
60385-0393 Injector Drain, 9000, 9100, 1.0 BLFC #3 INJ, 7.0 DLFC
60385-0120 Injector Drain, 9000, 9100, Blank BLFC #1 INJ, 1.5 DLFC
56 60022-12 BLFC, 0.125 GPM, 5000/5600/9000/9100
60022-25 BLFC, 0.25 GPM, 5000/5600/9000/9100
60022-50 BLFC, 0.50 GPM, 5000/5600/9000/9100
60022-100 BLFC, 1.0 GPM, 5000/5600/9000/9100
Not Shown
1 12128 Label, 0.25 GPM BLFC
1 13333 Label, Injector
1 10760 Label, 1 GPM, 3 lbs salt/min
10759 Label, 0.5 GPM, 1.5 lbs Salt
19654 Label, 0.125 GPM Brine Refill Flow
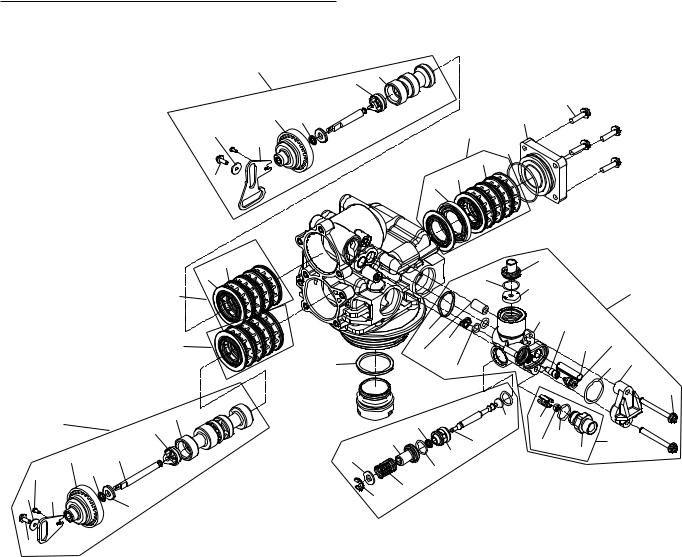
9100 CONTROL VALVE ASSEMBLY
15
17 
16
3
2
52
53
|
51 |
18 |
|
|
9 |
||
|
11 |
19 |
|
|
15 |
13 |
|
|
17 |
20 |
12 |
|
16 |
50
9
12
11 13
14  10
10
1 
48
49 
39
54 
8
7
5
53
6
3
2
4
31
|
30 |
32 |
55 |
||||
|
21 |
22 |
26 |
||||
|
46 |
24 |
25 |
||||
|
47 |
28 |
27 |
||||
|
23 |
||||||
|
29 |
||||||
|
43 |
34 |
41 |
40 |
56 |
||
|
36 |
35 |
33 |
42 |
|||
|
45 |
||||||
|
44 |
37
38
BR61500-9100 Rev E
|
Item No. |
QTY |
Part No. |
Description |
Item No. |
QTY |
Part No. |
Description |
|
|
1 |
1 |
40688 |
Valve Body Assy, 9100 |
17 |
2 |
13363 |
Washer, Hague Drive |
|
|
18 |
1 |
14905 |
Piston, 9000, 9100 Lower |
|||||
|
2 |
16 |
13242-02 |
Seal, 5600,9000, 9100 |
|||||
|
19 |
1 |
14920 |
Rod, Piston, Lower, 9000, |
|||||
|
3 |
12 |
14241 |
Spacer, 5600,9000, 9100 |
|||||
|
9100 |
||||||||
|
4 |
1 |
16595 |
Spacer, 9000, 9100 |
|||||
|
20 |
1 |
15019 |
Link, Piston, Rod, 9000/9500 |
|||||
|
5 |
1 |
43458 |
End Cap, Plastic, 9000/9100 |
|||||
|
21 |
1 |
41500 |
O-ring, 9100 Drain |
|||||
|
6 |
1 |
40952 |
O-ring, -030 |
|||||
|
22 |
1 |
15215 |
Body, Injector, 9000, 9100 |
|||||
|
7 |
4 |
15331 |
Screw, Hex Washer Head |
|||||
|
23 |
2 |
13301 |
O-ring, -011 |
|||||
|
8 |
1 |
14914 |
Piston, 9000, 9100 Upper |
|||||
|
24 |
1 |
10227 |
Screen, Injector |
|||||
|
9 |
2 |
14309 |
Retainer, Piston Rod |
|||||
|
25 |
1 |
10913-000 |
Nozzle, Injector, #000, Brown |
|||||
|
10 |
1 |
14919 |
Piston, Rod, Upper |
|||||
|
10913-00 |
Nozzle, Injector, #00, Violet |
|||||||
|
11 |
2 |
13243 |
Plug, End, 5600, 9000, 9100 |
|||||
|
10913-0 |
Nozzle, Injector, #0, Red |
|||||||
|
12 |
2 |
13008 |
Retainer, End Plug Seal |
|||||
|
10913-1 |
Nozzle, Injector, #1, White |
|||||||
|
13 |
2 |
10209 |
Quad Ring, -010 |
|||||
|
10913-2 |
Nozzle, Injector, #2, Blue |
|||||||
|
14 |
1 |
14921 |
Link, Piston Rod |
|||||
|
10913-3 |
Nozzle, Injector, #3, Yellow |
|||||||
|
15 |
2 |
11335 |
Screw, #4-40 |
|||||
|
10913-4 |
Nozzle, Injector, #4, Green |
|||||||
|
16 |
2 |
17020 |
Screw, STL. Hex Washer, |
|||||
|
6-20 x 3/8 |
FLECK® 9000/9100/9500 Service Manual • 13
9100 CONTROL VALVE ASSEMBLY CONTINUED
|
Item No. |
QTY |
Part No. |
Description |
|
26 |
1 |
10914-000 |
Throat, Injector, #000, |
|
Brown |
|||
|
10914-00 |
Throat, Injector, #00, Violet |
||
|
10914-0 |
Throat, Injector, #0, Red |
||
|
10914-1 |
Throat, Injector, #1, White |
||
|
10914-2 |
Throat, Injector, #2, Blue |
||
|
10914-3 |
Throat, Injector, #3, Yellow |
||
|
10914-4 |
Throat, Injector, #4, Green |
||
|
27 |
1 |
13166 |
Cap, Injector, 5600, 9000, |
|
9100 |
|||
|
28 |
1 |
13303 |
O-ring, -021 |
|
29 |
2 |
13387 |
Screw, Hex Washer Head |
|
30 |
1 |
15348 |
O-ring, -563 |
|
31 |
1 |
13173 |
Retainer, DLFC Button |
|
32 |
1 |
19153 |
Washer, Flow, 0.6 GPM |
|
19152 |
Washer, Flow, 0.8 GPM |
||
|
12097 |
Washer, Flow, 1.0 GPM |
||
|
12085 |
Washer, Flow, 1.2 GPM |
||
|
19150 |
Washer, Flow, 1.3 GPM |
||
|
12086 |
Washer, Flow, 1.5 GPM |
||
|
19149 |
Washer, Flow, 1.7 GPM |
||
|
12087 |
Washer, Flow, 2.0 GPM |
||
|
12088 |
Washer, Flow, 2.4 GPM |
||
|
12089 |
Washer, Flow, 3.0 GPM |
||
|
12090 |
Washer, Flow, 3.5 GPM |
||
|
12091 |
Washer, Flow, 4.0 GPM |
||
|
19147 |
Washer, Flow, 4.5 GPM |
||
|
12092 |
Washer, Flow, 5.0 GPM |
||
|
17814 |
Washer, Flow, 6.0 GPM |
||
|
12408 |
Washer, Flow, 7.0 GPM |
||
|
33 |
1 |
14925 |
Brine Valve Stem, 9000, |
|
9100 |
|||
|
34 |
1 |
12626 |
Seat, Brine Valve |
|
35 |
1 |
13167 |
Spacer, Brine Valve |
|
36 |
1 |
13165 |
Cap, Brine Valve |
|
37 |
1 |
11973 |
Spring, Brine Valve |
|
38 |
1 |
11981-01 |
Ring, Retaining, SS |
|
39 |
1 |
16098 |
Washer, Nylon Brine |
|
40 |
1 |
12977 |
O-ring, -015 |
|
41 |
1 |
13245 |
Retainer, BLFC |
|
42 |
1 |
17307 |
Washer, Flow, 0.125 GPM |
|
12094 |
Washer, Flow, 0.25 GPM |
||
|
12095 |
Washer, Flow, 0.50 GPM |
||
|
12097 |
Washer, Flow, 1.0 GPM |
||
|
43 |
1 |
12550 |
Quad Ring, -009 |
|
44 |
2 |
13302 |
O-ring, -014 |
|
45 |
1 |
13244 |
Adapter, BLFC |
|
46 |
1 |
13497 |
Air Disperser, Injector |
14 • FLECK® 9000/9100/9500 Service Manual
|
Item No. QTY Part No. |
Description |
47 1 13361 Spacer, 4600, 9100
48 1 40538 Retainer, 32 mm, O-ring DIST, 7000
49 1 61419 Kit, 1.05-inch Distributor Adapter
50 60400 Piston Assy, 9000, 9100 Upper
60400-001 Piston Assy, 9000, 9100 Upper, 560CD
51 60401 Piston Assy, 9000, 9100 Lower
60401-01 Piston Assy, 9000 Lower, HW
60401-001 Piston Assy, 9000, 9100 Lower, 560CD
52 60125 Seal & Spacer Kit, 5600/9000/9100 Upper
60125-15 Seal & Spacer Kit, 5600/9000/9100 Upper Blue Silicone
53 60421 Seal & Spacer Kit, 9000/9100 Lower
60421-50 Seal & Spacer Kit, 9000/9100 Lower, 559PE
54 60350 Brine Valve Assy, 9000,
9100
55 60385-0011 Injector Drain, 9000, 9100, 0.25 BLFC #0 INJ, 1.2 DLFC
60385-0111 Injector Drain, 9000, 9100, 0.25 BLFC #1 INJ, 1.2 DLFC
60385-0121 Injector Drain, 9000, 9100, 0.25 BLFC #1 INJ, 1.5 DLFC
60385-0131 Injector Drain, 9000, 9100, 0.25 BLFC #1 INJ, 2.0 DLFC
60385-0141 Injector Drain, 9000, 9100, 0.25 BLFC #1 INJ, 2.4 DLFC
60385-0012 Injector Drain, 9000, 9100, 0.50 BLFC #0 INJ, 1.2 DLFC
60385-0112 Injector Drain, 9000, 9100, 0.50 BLFC #1 INJ, 1.2 DLFC
60385-0122 Injector Drain, 9000, 9100, 0.50 BLFC #1 INJ, 1.5 DLFC
60385-0132 Injector Drain, 9000, 9100, 0.50 BLFC #1 INJ, 2.0 DLFC
60385-0142 Injector Drain, 9000, 9100, 0.50 BLFC #1 INJ, 2.4 DLFC
60385-0182 Injector Drain, 9000, 9100, 0.50 BLFC #1 INJ, 5.0 DLFC
60385-0222 Injector Drain, 9000, 9100, 0.50 BLFC #2 INJ, 1.5 DLFC
60385-0242 Injector Drain, 9000, 9100, 0.50 BLFC #2 INJ, 2.4 DLFC
60385-0252 Injector Drain, 9000, 9100, 0.50 BLFC #2 INJ, 3.0 DLFC
9100 CONTROL VALVE ASSEMBLY CONTINUED
|
Item No. QTY Part No. |
Description |
|
60385-0262 |
Injector Drain, 9000, 9100, |
|
0.50 BLFC #2 INJ, 3.5 |
|
|
DLFC |
60385-0272 Injector Drain, 9000, 9100, 0.50 BLFC #2 INJ, 4.0 DLFC
60385-0282 Injector Drain, 9000, 9100, 0.50 BLFC #2 INJ, 5.0 DLFC
60385-02A2 Injector Drain, 9000, 9100, 0.50 BLFC #2 INJ, 6.0 DLFC
60385-0202 Injector Drain, 9000, 9100, 0.50 BLFC #2 INJ, Blank DLFC
60385-0372 Injector Drain, 9000, 9100, 0.50 BLFC #3 INJ, 4.0 DLFC
60385-0382 Injector Drain, 9000, 9100, 0.50 BLFC #3 INJ, 5.0 DLFC
60385-0482 Injector Drain, 9000, 9100, 0.50 BLFC #4 INJ, 5.0 DLFC
60385-0133 Injector Drain, 9000, 9100, 1.0 BLFC #1 INJ, 2.0 DLFC
60385-0143 Injector Drain, 9000, 9100, 1.0 BLFC #1 INJ, 2.4 DLFC
60385-0163 Injector Drain, 9000, 9100, 1.0 BLFC #1 INJ, 3.5 DLFC
60385-0233 Injector Drain, 9000, 9100, 1.0 BLFC #2 INJ, 2.0 DLFC
60385-0243 Injector Drain, 9000, 9100, 1.0 BLFC #2 INJ, 2.4 DLFC
60385-0253 Injector Drain, 9000, 9100, 1.0 BLFC #2 INJ, 3.0 DLFC
60385-0263 Injector Drain, 9000, 9100, 1.0 BLFC #2 INJ, 3.5 DLFC
60385-0273 Injector Drain, 9000, 9100, 1.0 BLFC #2 INJ, 4.0 DLFC
60385-0353 Injector Drain, 9000, 9100, 1.0 BLFC #3 INJ, 3.0 DLFC
60385-0373 Injector Drain, 9000, 9100, 1.0 BLFC #3 INJ, 4.0 DLFC
60385-0383 Injector Drain, 9000, 9100, 1.0 BLFC #3 INJ, 5.0 DLFC
60385-0393 Injector Drain, 9000, 9100, 1.0 BLFC #3 INJ, 7.0 DLFC
|
Item No. QTY |
Part No. |
Description |
|
60385-0120 |
Injector Drain, 9000, 9100, |
|
|
Blank BLFC #1 INJ, 1.5 |
||
|
DLFC |
||
|
56 |
60022-12 |
BLFC, 0.125 GPM, |
|
5000/5600/9000/9100 |
||
|
60022-25 |
BLFC, 0.25 GPM, |
|
|
5000/5600/9000/9100 |
||
|
60022-50 |
BLFC, 0.50 GPM, |
|
|
5000/5600/9000/9100 |
||
|
60022-100 |
BLFC, 1.0 GPM, |
|
|
5000/5600/9000/9100 |
||
|
Not Shown |
||
|
1 |
13333 |
Label, Injector |
|
1 |
10759 |
Label, 0.5 GPM, 1.5 lbs salt/ |
|
min |
||
|
18569 |
Retainer, Tank Seal |
|
|
18303 |
O-ring, -336, Top of Tank |
|
|
12128 |
Label, 0.25 GPM BLFC |
|
|
10760 |
Label 1 GPM, 3 lbs Salt |
|
|
19654 |
Label, 0.125 GPM Brine Refill |
|
|
Flow |
FLECK® 9000/9100/9500 Service Manual • 15
 Loading…