
Если у вас отсутствует техническая возможность для скачивания Инструкция по эксплуатации для Citizen CALIBRE 8700
вы можете прочесть документ прямо на нашем сайте или
Скачать Citizen CALIBRE 8700 Инструкция по эксплуатации

- 1
- 2
- 3
- 4
- 5
- 6
- 7
- 8
- 9
Инструкции для прочих Citizen Измерительные рулетки
Инструкции для прочих Citizen
Your Donation Will Be Matched 1-to-1! Can You Chip In?
Dear Patron: Please don’t scroll past this. The Internet Archive is a nonprofit fighting for universal access to quality information. We build and maintain all our own systems, but we don’t charge for access, sell user information, or run ads. Instead, we’re powered by online donations averaging about $14. We’d be deeply grateful if you’d join the one in a thousand users that support us financially.
Right now, we have a matching gift campaign that will double the impact of every donation. We understand that not everyone can donate right now, but if you can afford to contribute this Tuesday, we promise it will be put to good use. Our resources are crucial for knowledge lovers everywhere—so if you find all these bits and bytes useful, please pitch in.
Your Donation Will Be Matched! Can You Chip In?
Dear Patron: Please don’t scroll past this. Right now we have a matching gift campaign that will double the impact of every donation. We understand that not everyone can give right now, but if you can afford to contribute this Tuesday, we promise it will be put to good use. If you find all these bits and bytes useful, please pitch in.
ANA-DIGI JMOXXX

Citizen ANA-DIGI JMOXXX User’s Manual,
4 pages
C720
. CITIZEN,
13 pages
Eco-Drive
Citizen Eco-Drive Instruction manual,
18 pages
C300
Citizen C300 Instruction manual,
8 pages
B51
Citizen B51 Specifications [en] ,
16 pages
CAL.6329
Citizen CAL.6329 Instruction manual,
24 pages
C460
Citizen C460 Instruction manual,
8 pages
CTZ-B8143
Citizen CTZ-B8143 Instruction manual,
1 pages
J304
Citizen J304 Specifications [en] ,
25 pages
C660
Citizen C660 Instruction manual,
32 pages
Chronograph AT0140-56A
Citizen Chronograph AT0140-56A Instruction manual [en] ,
77 pages
G43
G43 — Citizen,
10 pages
H57
Citizen H57 Specifications,
15 pages
BJ2115-07E
Citizen BJ2115-07E Instruction manual,
34 pages
AR3025-50E
WATCH CATALOGUE — Heritage Jewellers,
93 pages
EG2700-58E
Instruction manual,
4 pages
B080
B080 — Citizen,
10 pages
Eco-Drive
Citizen Eco-Drive Instruction manual,
12 pages
H460
Citizen H460 Specifications,
36 pages
6766
Citizen 6766 Specifications,
30 pages
![]()
Русский
- Bedienungsanleitung Citizen 8700
- Citizen 8700 User Manual
- Manual Usuario Citizen 8700
- Mode d’emploi Citizen 8700
- Istruzioni Citizen 8700
- инструкция Citizen 8700
- Citizen 8700の取扱説明書
- Handleiding Citizen 8700
- Manual de uso Citizen 8700
Вам нужна инструкция? Мы поможем Вам ее найти и сэкономить Ваше время.
- 8 stron
- 0.93 mb
Изделие Citizen 8700, а также другие, которыми Вы пользуетесь ежедневно, наверняка вы получили в комплекте с инструкцией обслуживания. Из опыта наших пользователей мы знаем, что большинство из Вас не уделили этому особого внимания. Большая часть инструкций, сразу же после покупки попадает в корзину для мусора вместе с коробкой — это ошибка. Ознакомьтесь с информацией, касающейся инструкции Citizen 8700, которая поможет Вам в будущем сэкономить нервы и избежать головной боли.
Важная подсказка — не забывайте хотя бы раз прочитать инструкцию Citizen 8700
Если вы не хотите каждый раз читать информационные брошюры, касающиеся, тех или Citizen 8700 иных изделий, достаточно, прочитать их раз — сразу же после покупки устройства. Вы получите основное знания, касающиеся поддержания изделия Citizen 8700 в хорошем эксплуатационном состоянии, так, чтобы без проблем достигнуть его планируемого цикла работы. Затем инструкцию можно отложить на полку и вернуться к ней только в случае, если вы не уверены, правильно ли проводится техобслуживание изделия. Правильный уход является необходимым элементом Вашего удовольствия Citizen 8700.
Раз в году пересмотрите шкафчик, в котором держите инструкции для всех устройств, — выбросите те, которыми вы уже не пользуетесься. Это поможет Вам сохранять порядок в своей домашней базе инструкций обслуживания.
Summary of Contents for Citizen 8700
Что находится в инструкции Citizen 8700? Почему стоит ее прочитать?
- Гарантия и подробности, касающиеся техобслуживания изделия
Хорошей идеей будет прикрепить чек к странице инструкции. Если что-то плохое случится во время использования Citizen 8700, у вас будет комплект документов, необходимый для гарантийного ремонта. В этой части инструкции вы найдете информацию об авторизованных сервисных центрахCitizen 8700 а также, как самостоятельно правильно ухаживать за оборудованием — так, чтобы не потерять гарантийных прав. - Указания по монтажу и Setup
Не терять нервов и времени на самостоятельную попытку установки и первого запуска изделия. Воспользуйтесь рекомендациями производителя Citizen 8700 чтобы правильно запустить изделие, без лишнего риска повреждения оборудования. - Информация, касающаяся дополнительных запчастей (входящих в комплект а также являющихся опцией)
Пересматривая эту часть документа вы сможете проверить, доставлен ли ваш Citizen 8700 с полним комплектом аксессуаров. Вы также сможете узнать, какие дополнительные запчасти или аксессуары для Citizen 8700 Вы сможете найти и докупить к своему устройству. - Troubleshooting
Самые частые проблемы, касающиеся Citizen 8700 и методы их решения. Это очень полезная часть руководства по обслуживанию — она позволит Вам сэкономить много времени на поиск решений. 90% проблем с Citizen 8700 повторяется у многих пользователей. - Требования, касающиеся питания и энергетический класс
Информация, касающаяся количества потребляемой энергии, а также рекомендации, касающиеся установки и питания Citizen 8700. Прочитайте, чтобы оптимально пользоваться Citizen 8700 и не использовать большего количества ресурсов, нежели это необходимо для правильной работы изделия. - Специальные функции Citizen 8700
Здесь вы можешь узнать, как персонализировать изделие Citizen 8700. Вы узнаете, какие дополнительные функции могут помочь Вам удобно использовать продукт Citizen 8700 а также, какие функции Вашего устройства оптимальны для выполнения конкретной деятельности.
Как видите в инструкции вы найдете информацию, которая реально поможет Вам в использовании Вашего изделия. Стоит с ней ознакомиться, чтобы избежать разочарований, возникающих из более короткого, нежели предусматривалось, периода исправности изделия Citizen 8700. Если все же вы не хотите копить инструкции в своем доме, наш сайт поможет Вам в этом — вы должны найти у нас руководство по обслуживанию большинства из своих устройств, а также Citizen 8700.
Комментарии (0)

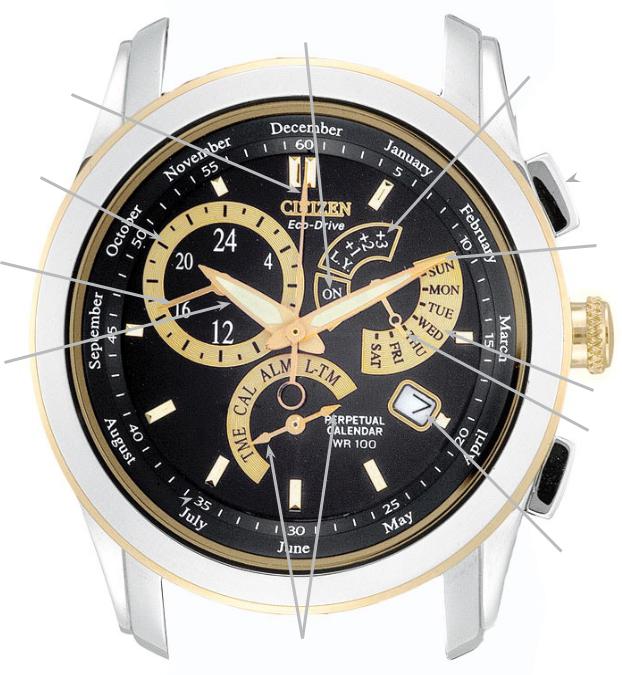
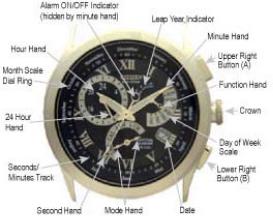
Calibre 8700 Series (mvt. cal. E870) Quick Reference
|
Alarm ON/OFF Scale |
|
|
Second Hand |
Leap Year Scale |
|
24-Hour Scale |
Upper Right |
|
Button (A) |
|
|
24-Hour Hand |
Minute Hand |
|
Crown |
|
|
Hour Hand |
|
|
Day of Week Scale |
|
|
Month Scale |
Function Hand |
|
Dial Ring |
|
|
Lower Right |
|
|
Button (B) |
|
|
Seconds/Minutes Track |
Date |
|
Mode Hand |
|
|
(either tip activates mode) |
Calibre 8700 Series (mvt. cal. E870) Quick Reference
Alarm ON/OFF Scale
Second Hand
24-Hour Scale
24-Hour Hand
Hour Hand
Month Scale
Dial Ring
Seconds/Minutes Track 
Leap Year Scale
Upper Right
 Button (A)
Minute Hand
 Crown
Crown
Day of Week Scale
Function Hand
 Lower Right
Button (B)
Date
Mode Hand (either tip activates mode)
MODELS – BL80** Calibre 8700 Series
Mvt. Cal. No. E870
FEATURES
Light Powered
Time
Perpetual Calendar
Alarm
Dual Time
IMPORTANT NOTE:
If you suspect a malfunction, first check the 0-position of the hands as outlined in the 0-positioning check procedure. If the hands and date do not move to their respective 0- positions, it will be necessary to set them for proper operation.
After a full recharge from complete power loss or if abnormal operation is noted, an ALL RESET and 0- POSITIONING CORRECTION will be needed.
The second hand on this watch moves in one-second increments to indicate that the charge level is sufficient for normal time keeping operation. If it is not moving in one-second increments, be sure to charge your watch fully as outlined in your Instruction Manual.
0-POSITIONING CHECK PROCEDURE
Pull the crown out one ‘click’.
Turn the crown so that either tip of the Mode hand is pointing to the Local Time mode (L-TM).
Push the crown back in one ‘click’ to the closed position next to the case.
Press the upper right button (A) for 10 or more seconds until the hands move to the 0-position stored in memory. Release the upper right button (A). The correct 0-position for each hand is as follows:
-Hour, Minute and Second hand pointing to ’12:00’ -24 Hour hand pointing to ‘24’
-Function hand pointing to ‘SUN’ -Date indicating ‘1’
If any of the hands do not indicate their respective 0-position, it will be necessary to perform the all reset and 0-positioning correction procedure.
Press the upper right button (A) to resume normal operation in the Local Time mode.
ALL RESET and 0-POSITIONING CORRECTION PROCEDURE
Pull the crown out one ‘click’.
Turn the crown so that either tip of the Mode hand is pointing to the Local Time mode (L-TM)
Push the crown back in one ‘click’ to the closed position next
to the case.
When the hands have stopped moving, pull the crown out two ‘clicks’.
Press the upper right (A) and lower right (B) buttons simultaneously for two to three seconds, then release. Following a confirmation tone, each of the hands performs a ‘demonstration’ in the order of the Function, Minute and Second hands to indicate that the ‘all reset’ of the movement has completed.
Press the upper right button (A). The Minute hand will move to indicate the Hour, Minute and 24 Hour hands can be set. Turn the crown clockwise or counterclockwise to set Hour, Minute hands to 12:00 and the Function hand to ‘24’ (the 24 Hour hand moves in conjunction with the Hour hand and cannot be set independently.)
BENEFITS
Environmentally Clean Energy Source
Displays 12/24 Systems
Accurate to the year 2100
Daily Alarm
Second time zone
Turning the crown rapidly (‘clicking’ continuously two or more times) causes the hands to advance continuously until the crown is again turned.
Press the upper right button (A) again. The Function hand will move indicating that is the hand that can now be set. Turn the crown clockwise or counterclockwise so that Function hand points to ‘SUN’ and the date is set for 1. Turning the crown rapidly (‘clicking’ continuously two or more times) causes the hand to advance continuously until the crown is again turned.
Press the upper right button (A). The Second hand will move indicating the Second hand can now be set.
Turn the crown clockwise to move the Second hand to the ‘12:00’ position.
Push the crown in two ‘clicks’ to the closed position next to the case. This completes the all reset and 0-positioning correction.
Continue with To Set the Time.
TO SET THE TIME
Pull the crown out one ‘click’.
Turn the crown so that either tip of the Mode hand is pointing to the Time mode (TME).
Pull the crown out an additional ‘click’ to the time setting position. The Second hand will move to the 12:00 position.
Turn the crown to change the position of the Hour, Minute and 24 Hour hands electronically. Turning the crown clockwise moves the hands forward and counterclockwise moves the hands backward. Turning the crown quickly causes the hands to move in a continuous or rapid set manner. Turning the crown one ‘click’ in either direction while the hands are in the «rapid set» mode will cause the hands to stop.
Be sure to set time to the correct AM/PM. by referring to the 24 hour hand. After setting time, push the crown in to finalize time setting.
TO SET THE CALENDAR
Pull the crown out one ‘click’.
Turn the crown so that either tip of the Mode hand is pointing to the Calendar mode (CAL).
Pull the crown out an additional ‘click’ to the Calendar setting position. The Function hand will move to indicate the leap year set in memory. The positions are as follows:
-‘LY’= indicates the current year is a leap year -‘+1’ indicates 1 year past a leap year
-‘+2’ indicates 2 years past a leap year -‘+3’ indicates 3 years past a leap year
Turn the crown clockwise or counterclockwise to set the correct leap year position.
Press the upper right button (A). The Second hand will move to indicate the month stored in memory. Turn the crown clockwise to set the current month.
Press the upper right button (A). The Function hand will move to the middle of the day indicator indicating the date can be set. Turning the crown clockwise will advance the date, while turning the crown counterclockwise will move the date backward. Turning the crown quickly causes the hands to move in a continuous or rapid set manner. Turning the crown one ‘click’ in either direction while the hands are in the «rapid set» mode will cause the hands to stop. Set the date for the current date.
Press the upper right button (A). The Function hand will move to the day of the week stored in memory. Turn the crown clockwise or counterclockwise to set the current day of the week.
Push the crown to the closed position next to the case. This completes setting the Calendar.
TO SET THE ALARM
The alarm is based on a 24-hour time period and can be set to sound at the same time each day.
Pull the crown out one ‘click’.
Turn the crown so that either tip of the Mode hand is pointing to the Alarm mode (ALM). The Hour, Minute and 24 Hour hands will move to the current alarm time set position.
Pull the crown out an additional ‘click’ to the Alarm time setting position. The alarm will automatically be activated and the Function hand will move to indicate ‘ON’.
Rotate the crown either clockwise or counterclockwise to set the desired alarm time, paying close attention to the 24 Hour hand to ensure the proper AM or PM alarm time is set.
Press the lower right button (B) to turn the alarm ON or OFF.
Push the crown to the closed position next to the case.
TO SET THE LOCAL TIME
The local time (L-TM) function allows the time to be set and displayed for a different time zone other than your own. It can be set in 1-hour increments only.
Pull the crown out one ‘click’.
Turn the crown so that either tip of the Mode hand is pointing to the Local Time mode (L-TM).
Pull the crown out an additional ‘click’ to the Local time setting position.
Turn the crown clockwise to advance the time by one hour, or counterclockwise to move the time back one hour.
Once you have the local time set, push the crown in two ‘clicks’ to the closed position next to the case.
For additional features and instructions, please refer to the full instruction manual or our web site at www.citizenwatch.com.