
Настройка роутера D-Link DIR-100 (120)
Скорости доступа в интернет постоянно увеличиваются, совершенствуется оборудование, растет его производительность, но у ранее выпущенных устройств скорость доступа может быть весьма скромной.
Информсвязью была протестирована производительность маршрутизатора D-Link Dir120 в разных режимах, в таблице приведены максимальные значения скорости (ориентировочные данные):
| Режим | Скорость, мбит/сек |
| Russia pptp (dual access) | 28,2 |
| l2tp (без dual Access) | 43.8 |
| Локальные торренты при pptp | 8,8 |
Подключите Ethernet-кабель, входящий в Вашу квартиру, в порт WAN роутера.
Проверьте настройки подключения по локальной сети (В Windows XP- Пуск, Панель управления, (классический вид) Сетевые подключения. В Windows Vista в сетевые настройки заходят через Пуск, Панель управления (классический вид), Центр управления сетями и общим доступом, Управление сетевыми подключениями, а в Windows 7 через Пуск, Панель управления, Сеть и интернет, Центр управления сетями и общим доступом, Изменение параметров адаптера ). Далее в открывшемся окне правой кнопкой мыши щелкните на значок подключения по локальной и в контекстном меню выберите пункт Свойства .
Левой кнопкой мыши один раз щелкните на пункте Протокол Интернета TCP/IP и нажмите на кнопку Свойства .
Настройки должны быть аналогичны приведенным на рисунке:

Соедините Ethernet-кабелем сетевую карту компьютера и один из LAN- портов роутера.
Для того, чтобы настроить роутер, необходимо окрыть браузер (например, Internet Explorer ). В адресной строке этой программы нужно ввести следующее: http://192.168.0.1
После нажатия клавиши Enter откроется окно авторизации, в котором имеются два поля: User Name и Password .
В поле User Name необходимо ввести admin , поле Password оставляете пустым.

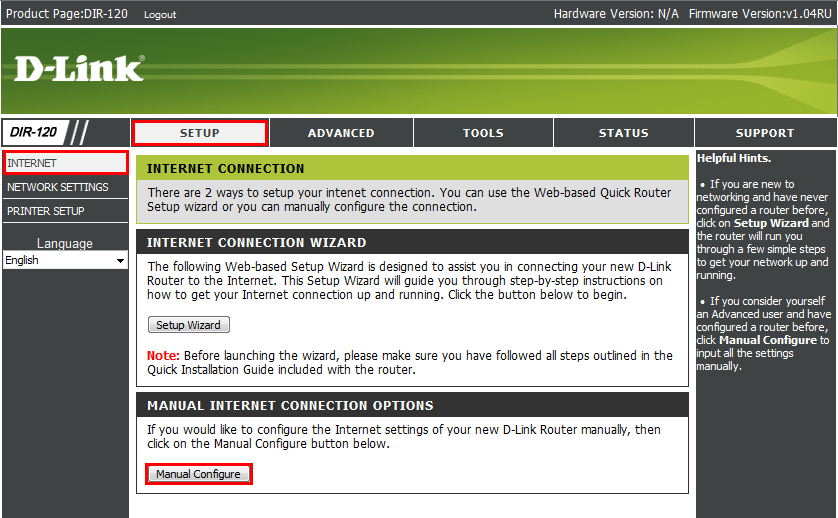
После нажатия кнопки LogIn откроется первая страница настроек. На вкладке SETUP , выбираете (слева) раздел INTERNET SETUP .
Внизу нажимаете кнопку Manual Internet Connection Setup .

Откроется страница, на которой требуется выполнить следующие настройки:

Внимание!! Для корректной работы связки IPTV+Интернет, настройку роутера необходимо проводить по протоколу PPTP.
1) В поле My Internet Connection is выбираете Russia PPTP (Dual Access) .
2) Ниже активируете пункт Static IP .
3) В поле IP-адрес вводите Ваш локальный IP-адрес.
4) В поле Subnet Mask вводите Вашу маску подсети.
5) В поле Gateway вводите адрес Вашего шлюза доступа в сеть.
6) В поле DNS вводите адрес DNS-сервера, то есть 195.98.64.65
7) В поле Server IP/Name вводите адрес PPTP-сервера, то есть pptp.freedom
 В поле PPTP Account вводите Ваше учетное имя (логин).
9) В поле PPTP Password вводите Ваш пароль доступа в сеть.
10) В поле PPTP Retype Password еще раз вводите пароль доступа в сеть.
11) Значение параметра MTU устанавливаете равным 1400 .
12) Активируете пункт Always-on напротив параметра Connection mode select .
После заполнения всех полей нажимаете кнопку Save Settings .
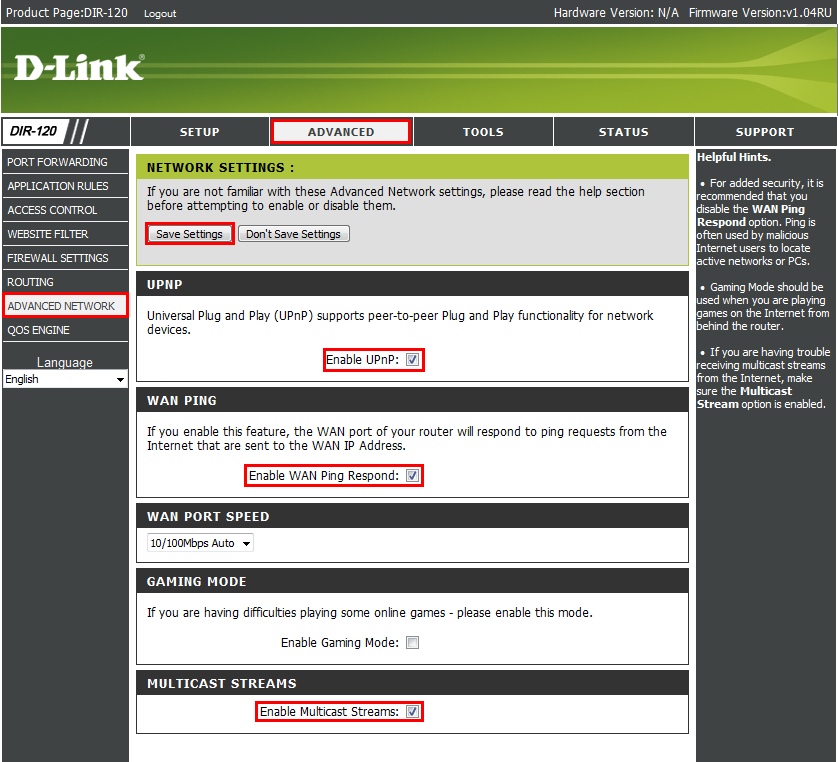
В разделе ADVANCED, ADVANCED NETWORK настраивается возможность просмотра телепередач (IPTV) при использовании маршрутизатора, установкой галочки Enable multicast streams (Если меню русское, то Расширенные настройки , Расширенные сетевые настройки , Включение многоадресных потоков .)
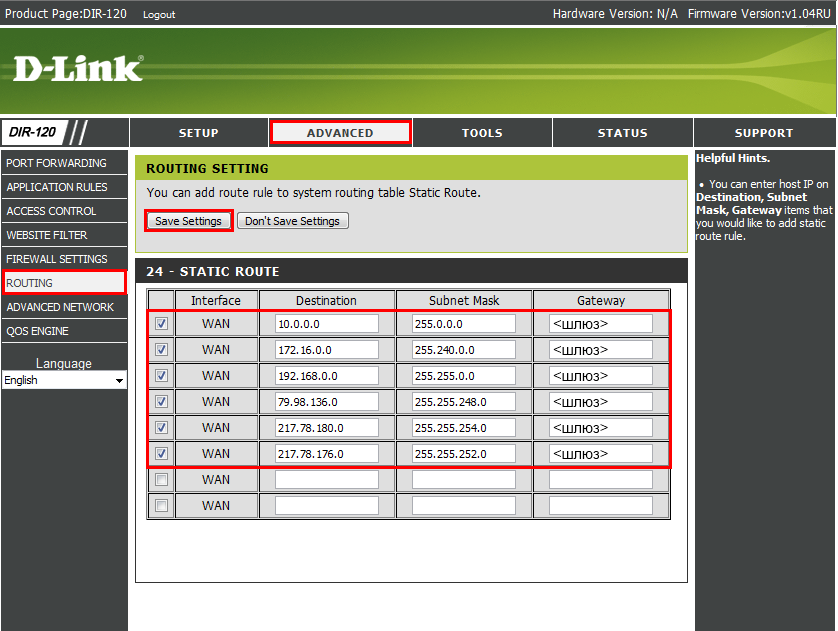
Для доступа к локальным ресурсам сети Freedom необходимо настроить статическую маршрутизацию.
Для этого нужно перейти на вкладку ADVANCED и активировать раздел ROUTING (слева).
Выполните настройки согласно следующему рисунку:

1) Нужно поставить галочки напротив строк как показано на рисунке.
2) В строках столбца Interface должно быть установлено значение WAN(Physical Port) (В старых версиях прошивки просто WAN).
3) Заполнение столбцов Destination и Subnet Mask смотрите на рисунке.
4) В строках столбца Gateway необходимо ввести адрес Вашего шлюза доступа в сеть.
После заполнения всех полей нажимаете кнопку Save Settings .
Источник
Dir 120 настройка роутера
1. Wi-Fi. Беспроводное подключение может быть “узким местом”, не позволяющим получить максимальную скорость доступа в интернет.
От чего зависит скорость Wi-Fi соединения?
1.1. Стандарт. Производители оборудования в целях рекламы указывают на коробках своих устройств максимальную теоретически возможную скорость,
которую покупатель в практической работе получить не может. В таблице приведены значения скорости в зависимости от стандарта беспроводного подключения.
| Стандарт | Теоретически возможная скорость, мбит/c | Максимальная скорость при тестировании, мбит/c |
| 802.11b/g | 54 | 22 |
| 802.11n/150 20мГц | 150 | 45 |
| 802.11n/300 40мГц | 300 | 90 |
| 802.11ac | 1300 и выше | 250 |
Стандарт 802.11ac находится в разработке. Первые версии устройств уже сейчас доступны на рынке и показывают хорошую производительность.
В будущем производители обещают еще более высокие показатели.
1.2. Совместимость роутера и оконечного устройства. Например, если ваш роутер работает по стандарту n, а Wi-Fi адаптер ноутбука – 802.11g,
то соединение между этими устройствами будет по 802.11g. Кроме того, оборудование разных производителей имея один стандарт, могут иметь хорошую или наоборот плохую совместимость.
1.3. Помехи, которые создают устройства работающие на частотах 2,4/5 ГГц. Например, бытовая техника или другие Wi-Fi роутеры, установленные неподалеку.
1.4. Препятствия (двери, стены) между роутером и абонентским устройством ослабляют сигнал, что приводит к снижению скорости работы.
2. Вредоносные программы (вирусы) часто приводят к “торможению” компьютера и снижению его производительности. При измерении скорости, нужно убедиться,
что на компьютере отсутствуют вирусы.
3. Firewall или пакетный фильтр — программа предназначенная для повышения безопасности компьютера. При передаче данных с большой скоростью данная программа может потреблять
большое количество вычислительных ресурсов компьютера. В момент измерения скорости мы рекомендуем отключать Firewall.
4. У старых и медленных процессоров типа Intel Celeron, Atom может не хватить вычислительной мощности. Производительность вашего компьютера должна быть достаточной,
для передачи данных с большой скоростью.
5. Перегрузка участков сети интернет или удаленного сервера.
Перед настройкой рекомендуется прошить роутер последней версией прошивки. Описание для прошивки роутера можно найти в соответствующей ветке форума. Для полноценной работы роутера необходимо выполнить все пункты руководства!
Измените параметры TCP/IP сетевой карты у компьютера на автоматическое получение значений (DHCP). Затем необходимо включить адаптер питания роутера в электро-розетку.
1. Подключаете устройство к компьютеру проводом, поставляющимся в комплекте. Открываете браузер и набираете в строке адреса 192.168.0.1. Возможно, при этом потребуется привести настройки TCP/IP в автоматического получения ip-адресов (DHCP). Подключение по беспроводной связи к устройству или попытка открытия настроек через любой другой Интернет-браузер не всегда могут быть успешными.
Login: admin
Password: (оставьте поле пустым)
После этого попадаем в Web-интерфейс роутера. Выберите в меню Setup -> Internet. В резделе Manual Internet Connection Options нажимаем на кнопку Manual Configure.
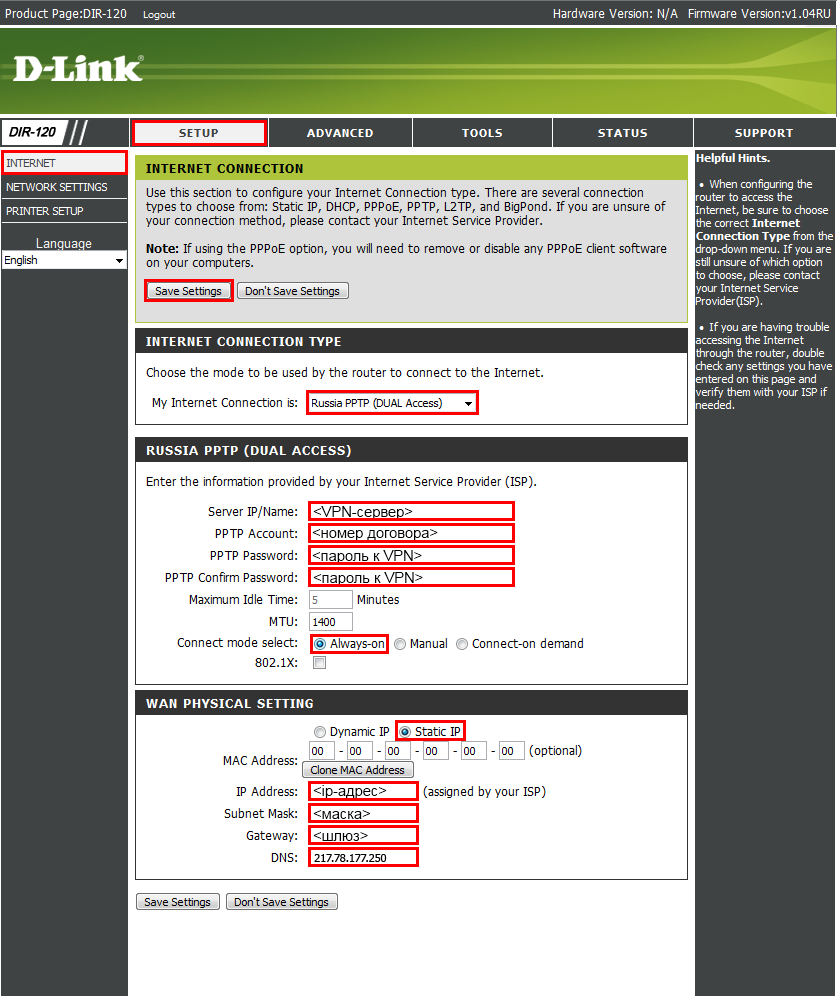
2. В разделе Internet Connection Type выставляем режим Russia PPTP (Dual Access). Затем переходим в раздел Russia PPTP (Dual Access) Internet Connection Type и заполняем поля.
PPTP Server IP or Name : vpn.koptevo.net. Для тарифов с ограничением трафика имя сервера: lvpn.koptevo.net (первая буква — английская маленькая «эль») .
PPTP Account: в формате 0/0000
PPTP Password:
PPTP Confirm Password:
Reconnect mode: выставить Always On
Вписываем PPTP IP Address, PPTP Subnet Mask и PPTP Gateway IP Address используя данные из договора, соответственно , , .
DNS: 217.78.177.250 — первичный DNS сервер (из договора)
Connect Mode Select: Always On
Подтверждаем правильность настроек нажав кнопку Save Settings
3. Выберите в меню Advanced -> Advanced Network
Enable UPnP: поставить галочку
Enable WAN Ping Responding: поставить галочку
Enable multicust streams: поставить галочку
Подтверждаем правильность настроек нажав кнопку Save Settings
4. Перейдем к настройке маршрутизации, чтобы стали доступны ресурсы локальной сети.
Выберите в меню Advanced -> Routing
Interface — Интерфейс, на котором будет работать правило WAN(Phisical Interface).
Name — задаем любое имя для маршрута (должно начинаться с буквы латинского алфавита, может содержать цифры).
Metric — Везде ставим 1.
Официальный список требуемых локальных маршрутов:
Destination IP: 10.0.0.0 Netmask: 255.0.0.0 gateway :
Destination IP : 172.16.0.0 Netmask: 255.240.0.0 gateway :
Destination IP : 192.168.0.0 Netmask: 255.255.0.0 gateway :
Destination IP : 79.98.136.0 Netmask: 255.255.248.0 gateway :
Destination IP : 217.78.180.0 Netmask: 255.255.254.0 gateway :
Destination IP : 217.78.176.0 Netmask: 255.255.252.0 gateway:
где — обязательно свериться с договором. (основной шлюз)
Подтверждаем правильность настроек нажав кнопку Save Settings
5. Подключите кабель провайдера в порт WAN (Internet) на задней панели маршрутизатора.
Источник
-
Page 1: D-Link DIR-120
[…]
-
Page 2: D-Link DIR-120
DIR-120 Ethernet Bro ad band Router D-Link DIR-120 User Manual CONTENTS About This User’s Guide ………………………………………………………………………………………………………………. ……………………………………………………………………………………………. iv Before You Sta[…]
-
Page 3: D-Link DIR-120
DIR-120 Ethernet Bro ad band Router D-Link DIR-120 User Manual CONFIGURING IP SETTINGS ON YOUR COMPUTER ……………………………………………………………………………………………………… 64 TECHNICAL SPECIFICATIONS ……………………………………………………………………………………….[…]
-
Page 4: D-Link DIR-120
DIR-120 Ethernet Broadband Router D-Link DIR-120 User Manual iv About This User’s Guide This user’s guide provides instructions on how to in stall the DIR-120 Ethernet Broadband Router and use it to connect a com pute r or Ethernet LAN to t he Internet. Before You Start Please read and make sure you understand all the prerequisites for proper i[…]
-
Page 5: D-Link DIR-120
DIR-120 Ethernet Broadband Router D-Link DIR-120 User Manual v Installation Notes In order to establish a co nnection to the Internet it will be necessary to prov ide information to the Router that will be store d in its memory. For so me users, only their account information (User Name and Password) is req uired. For others, various parameters tha[…]
-
Page 6: D-Link DIR-120
DIR-120 Ethernet Broadband Router D-Link DIR-120 User Manual vi Installation Information Print this page and record the listed i nformation here in case you have to re-configure your WAN con nection in the future or re set the device configuration settings. Information you will need from your Internet service provider: Username This is the Username[…]
-
Page 7: D-Link DIR-120
DIR-120 Ethernet Broadband Router D-Link DIR-120 User Manual 1 Introduction This section provides a brief description of the Router, its associated tec hnologies and a list of Router features. Router Description and Operation The D-Link DIR-120 Ethernet Broadband Router is designed to provide connectivity fo r your private Ethernet LAN plus one USB[…]
-
Page 8: D-Link DIR-120
DIR-120 Ethernet Broadband Router D-Link DIR-120 User Manual 2 Router Features The D-Link DIR-120 Broadband Router provides the following features: • Broadband Connection Sharing — Connects multiple computers to a Broadban d (Cable or DSL) modem to share the Internet co nnection. • Ethernet Switch — Allo ws sharing of an Internet connection wit[…]
-
Page 9: D-Link DIR-120
DIR-120 Ethernet Broadband Router D-Link DIR-120 User Manual 3 Front Panel Place the Router in a location that permits an easy view of the LED indicators on the front panel. The LED indicators on the front panel include the Power , Status, WAN , and LAN for the Ethernet ports. Power Steady green light indicates the unit is p owered on. Status This […]
-
Page 10: D-Link DIR-120
DIR-120 Ethernet Broadband Router D-Link DIR-120 User Manual 4 Rear Panel Connect the AC power adapter cord and n etwork cables on the rear panel. The power switch and reset button are also located on t he back of the device. Note : All ports (LAN and WAN) are Auto-MDIX. All por ts also automatically connect with straight-through or crossover CAT5 […]
-
Page 11: D-Link DIR-120
DIR-120 Ethernet Broadband Router D-Link DIR-120 User Manual 5 Connecting the Router The Router provides the connection betwe en two networks, a private Ethernet LAN and the public Internet (WAN). Choose a locatio n for the Router wh ere Ethernet devices can be connected to the LAN ports and the WAN port can be connected to the cable m odem or DSL […]
-
Page 12: D-Link DIR-120
DIR-120 Ethernet Broadband Router D-Link DIR-120 User Manual 6 Power On Router To power on the Router: 1. Insert the AC Power Adapter cord into the power receptacle located on the rear panel of the Router and plug the adapter into a suit able nearby power source. See the back pan el illustration above to view the power receptacle. 2. The Power LED […]
-
Page 13: D-Link DIR-120
DIR-120 Ethernet Broadband Router D-Link DIR-120 User Manual 7 Basic Router Configuration The first time you setup the Router it is recomm ended that you configure the WAN connection using a single computer making sure that b oth the computer and the Router are not connected to th e LAN. Once the WAN connection is fun ctioning properly, you may con[…]
-
Page 14: D-Link DIR-120
DIR-120 Ethernet Broadband Router D-Link DIR-120 User Manual 8 Accessing the Configuration Manager Now that your computer’s IP setti ngs allow it to communicate with the Router, you can access the configuration software. To use the web-based management software, launch a suitable web browser and direct it to the IP address of the Router. Type in […]
-
Page 15: D-Link DIR-120
DIR-120 Ethernet Broadband Router D-Link DIR-120 User Manual 9 Login Use the default user name “ admin” and no password for first tim e setup. You should change the web-based m anager access user nam e and password once you ha ve verified that a connection can be established. The user na me and password allows any PC with in the same subnet as […]
-
Page 16: D-Link DIR-120
DIR-120 Ethernet Broadband Router D-Link DIR-120 User Manual 10 Web Manager The Web Manager used f or configuration uses directories to organize the various m enus used to configure and monitor the Router. The first page that appears after logging in presents the Internet menu in the Setup menu directory. Inter net Co nnect ion menu Most users will[…]
-
Page 17: D-Link DIR-120
DIR-120 Ethernet Broadband Router D-Link DIR-120 User Manual 11 Configure Internet Connectio n with the Setup Wizard To use the Setu p Wi za rd , open the Setup menu directory (the first pag e you see after logging in), and click the SetupWizard button to go to the Wizard menu. Wizard menu Click the Launch Internet Connection Setup Wizard b utton t[…]
-
Page 18: D-Link DIR-120
DIR-120 Ethernet Broadband Router D-Link DIR-120 User Manual 12 Setup Wizard – Wel com e The initial dialog box summarizes the setup process. Click the Next button to proceed. You may stop using the Setup Wizard at any time by clicking the Cancel butto n. If yo u exit the wizard you wil l return to the Internet Connection menu page with out savin[…]
-
Page 19: D-Link DIR-120
DIR-120 Ethernet Broadband Router D-Link DIR-120 User Manual 13 Setup Wizard – Step 1 Type a new Password used for system administration in the space provided and the same password again in the Confirm Password space. This will be t he new system password used to login. Remember that this password is case sensitive so it m ust be typed exactly as[…]
-
Page 20: D-Link DIR-120
DIR-120 Ethernet Broadband Router D-Link DIR-120 User Manual 14 Setup Wizard – Step 2 Choose the time zone you are in from the pull-down menu and click Ne xt . This sets the system time used f or the Router. If you wish to return to th e previous menu during the setup process, click the Prev b utton.[…]
-
Page 21: D-Link DIR-120
DIR-120 Ethernet Broadband Router D-Link DIR-120 User Manual 15 Setup Wizard – Step 3 Choose the Internet connection type from the list of options presented in the Setup Wizard. Select the connection type appropri ate fo r your service and click the Next button.[…]
-
Page 22: D-Link DIR-120
DIR-120 Ethernet Broadband Router D-Link DIR-120 User Manual 16 PPPoE Connectio n Settings Setup Wizard – Config ure PPPoE Connection For PPPoE connections, select the Address Mode Dynamic IP or Static IP, type in the Usern ame and Passw ord used to identify and verify your account to the ISP. Retype the password again and if necessary, type a Se[…]
-
Page 23: D-Link DIR-120
DIR-120 Ethernet Broadband Router D-Link DIR-120 User Manual 17 DHCP Connection Settings Setup Wizard – Configure Dynamic IP Address Connection For Dynamic IP Address connections, you may want to copy the MAC address of your Ethernet adapter to the Router. Some ISPs use th e unique MAC address of your computer’s Ethernet adapter for id entifica[…]
-
Page 24: D-Link DIR-120
DIR-120 Ethernet Broadband Router D-Link DIR-120 User Manual 18 Static IP Connection Settings Setup Wizard – Co nfigure St atic IP Address Connection For Static IP Add ress connection types, you m ust type in the IP Address , Subnet Mask , Gateway Address , Primary DNS Address and Secondary DNS Address (optional). Your ISP should provi de this in[…]
-
Page 25: D-Link DIR-120
DIR-120 Ethernet Broadband Router D-Link DIR-120 User Manual 19 Setup Wizard – Configure PPTP Client Connection The Router supports Poin t-to-Point Tunneling Protocol (PPTP) f or the Internet co nnection. PPTP is also used for Virtual Private Netw orks (VPN). Some ISPs use PP TP to establish a client-to-server connection t o their network, and ul[…]
-
Page 26: D-Link DIR-120
DIR-120 Ethernet Broadband Router D-Link DIR-120 User Manual 20 Setup Wizard – Configure PPTP Client Connection The Router supports Point-to-Point Tunne ling Protocol (L2TP) for the Int ernet connection. L2TP is also used fo r Virtual Private Networks (VPN). Some ISPs use L2TP to establish a client-to-server connection t o their network, and ulti[…]
-
Page 27: D-Link DIR-120
DIR-120 Ethernet Broadband Router D-Link DIR-120 User Manual 21 Big Pond Connection Settings Setup Wizar d – Configur e Big Pond C onnection This selection is for users having Big Pond Cable as their ISP. Enter the account information, as provid ed to you by your ISP. Click Next to continue. Auth Server Enter the name of the Authentication Server[…]
-
Page 28: D-Link DIR-120
DIR-120 Ethernet Broadband Router D-Link DIR-120 User Manual 22 Setup Wizard – Co mplete Setup Finally you can confirm that the setup process is completed. If you are satisfied that you have ent ered all the necessary inf ormation correctly, click the Co nect button to save the new configuration settings and restart the Rou ter. If you need to ch[…]
-
Page 29: D-Link DIR-120
DIR-120 Ethernet Broadband Router D-Link DIR-120 User Manual 23 Configure Internet Connection Manually To configure the Router’s basic Internet conf iguration settings without running the Setup Wizard, click the Internet menu link in the left hand panel of the Setup menu directory, then click the Manual Configuration button under the headin g “[…]
-
Page 30: D-Link DIR-120
DIR-120 Ethernet Broadband Router D-Link DIR-120 User Manual 24 Select Internet Connection Type The default Internet Connection menu displays the Dynamic IP (DHCP) Internet Connection Type m enu. To select another connection type, use the pull-down My Internet Connectio n is: menu to select the connection type you wi sh to configure. The menu confi[…]
-
Page 31: D-Link DIR-120
DIR-120 Ethernet Broadband Router D-Link DIR-120 User Manual 25 Dynamic IP (DHCP) Internet Connection A Dynamic IP Address connection configures the Router to automatically obtain its global IP address from a DHCP server on the ISP’s network. The service p rovider assigns a global IP address from a pool of addresses available to the service provi[…]
-
Page 32: D-Link DIR-120
DIR-120 Ethernet Broadband Router D-Link DIR-120 User Manual 26 Static IP Internet Connection Your ISP should provide IP settings inform ation needed for your public IP address and other settings using the Static IP connection type. After configuration of Internet and local network IP setti ngs is complete, click the Save Settings button to save th[…]
-
Page 33: D-Link DIR-120
DIR-120 Ethernet Broadband Router D-Link DIR-120 User Manual 27 PPPo E PPP or Point-to-Point protocol is a standard method of establishing a network connection/session between networked devices. Different forms of PPP include PPPoA and PPPoE (d iscussed below) involve an authentication process that requires a username and password to gain access to[…]
-
Page 34: D-Link DIR-120
DIR-120 Ethernet Broadband Router D-Link DIR-120 User Manual 28 The table below describes the PPPoE In ternet Connection menu settings. User Name The user name supplied to you by your ISP. Password The password supplied to you by your ISP. Retype P asswo rd Retype the password entere d in the Password fe ld. Service Name Enter the service name supp[…]
-
Page 35: D-Link DIR-120
DIR-120 Ethernet Broadband Router D-Link DIR-120 User Manual 29 PPTP If your ISP is using PPTP to provide your Internet connection, the ISP will give you the necessary in formation to configure the Router. There are two ways to enable the router to become a PPTP client, one is through assigning the router an IP address dynamically, which means that[…]
-
Page 36: D-Link DIR-120
DIR-120 Ethernet Broadband Router D-Link DIR-120 User Manual 30 To configure the router to be a PPTP client, complete the followi ng fields and click the Save Settings button. IP Add ress Type the IP address supplied by your ISP. Subnet Mask Type the Subnet mask supplied by your ISP. Gateway The gateway IP address is used provide access to resource[…]
-
Page 37: D-Link DIR-120
DIR-120 Ethernet Broadband Router D-Link DIR-120 User Manual 31 L2TP If your ISP is using L2TP to provide your Internet connection, the ISP will give you the necessary in formation to configure the Router. There are two ways to enable the router to become a L2TP client, one is through assigning the router an IP address dynamically, which means that[…]
-
Page 38: D-Link DIR-120
DIR-120 Ethernet Broadband Router D-Link DIR-120 User Manual 32 To configure the router to be a L2TP client, complete the following fields and cl ick the Save Settings button. IP Add ress Type the IP address supplied by your ISP. Subnet Mask Type the Su bnet mask supplied by your ISP. Gateway The gateway IP address is used provide access to resourc[…]
-
Page 39: D-Link DIR-120
DIR-120 Ethernet Broadband Router D-Link DIR-120 User Manual 33 L2TP If your ISP is usin g L2TP to provide your Internet connection, the ISP will give you the n ecessary information to configure the Router. There are two ways to enable the router to become a L2TP client, one is through assigning the router an IP address dynamically, which means tha[…]
-
Page 40: D-Link DIR-120
DIR-120 Ethernet Broadband Router D-Link DIR-120 User Manual 34 Network (LAN IP) Settings Network Setting menu Use this window to configure Router Settings and DHCP Server Settings. When you are finished, click the Save Settings button at the top of the window. Use the Network Settings m enu to configure the LAN IP settings, DHCP server status and […]
-
Page 41: D-Link DIR-120
DIR-120 Ethernet Broadband Router D-Link DIR-120 User Manual 35 DHCP Server Settin gs Dynamic Host Configuration Protocol (DHCP) allows the gateway to automatically obtain the IP address from a DHCP server on the service provider’s network. The service provider assigns a glob al IP address from a pool of addresses available to the service provide[…]
-
Page 42: D-Link DIR-120
DIR-120 Ethernet Broadband Router D-Link DIR-120 User Manual 36 Printer Setup Use the Printer Setup Wizard to configure the Router’s USB Printer connection. To establish the connection to a USB equipp ed pr inter, click the Printer Set up link to view the Printer Setup Wizard launch m enu. Follow the instructions below to install the printer driv[…]
-
Page 43: D-Link DIR-120
DIR-120 Ethernet Broadband Router D-Link DIR-120 User Manual 37 5. The first Printer Setup Wizard menu lists the steps used for intallation. Click the Next button to detect the printer.[…]
-
Page 44: D-Link DIR-120
DIR-120 Ethernet Broadband Router D-Link DIR-120 User Manual 38 6. The printer should be detected imm ediately. The model name wi ll be displayed if detected. If no printer is detected a warning t ells y ou the printer installation cannot be completed. Check the cable connections and m ake sure the printer is powered on. Click Next if a printer is […]
-
Page 45: D-Link DIR-120
DIR-120 Ethernet Broadband Router D-Link DIR-120 User Manual 39 7. It is now necessary to install the correct printer driv er on your computer. Click th e Next button to launch the fi le.[…]
-
Page 46: D-Link DIR-120
DIR-120 Ethernet Broadband Router D-Link DIR-120 User Manual 40 8. A setup will launch or attempt to launch on your computer. Often the browser settings prevent the fi le from launching until per mission is granted. This f ile must be executed to install the printer driver. In Windows Internet Explorer permission can be granted to launch downloded […]
-
Page 47: D-Link DIR-120
DIR-120 Ethernet Broadband Router D-Link DIR-120 User Manual 41 Advanced Configuration The Advanced directory tab offers seven configuration menus, Port Forwarding , Application Rules , Access Control , Websit e Filt er , Firewall Settings, Advanced Netw ork , and QoS Engine . Click th e corresponding link in the left panel of the window. Port Forw[…]
-
Page 48: D-Link DIR-120
DIR-120 Ethernet Broadband Router D-Link DIR-120 User Manual 42 Port Forwarding Port Forwarding Rules menu To enable an already existing Port Forwarding Rule, click on its corresponding checkbox and configure the a ppropriate fields listed below. To configure other Port Forwarding Rules for the Router, configure the following fields and click the S[…]
-
Page 49: D-Link DIR-120
DIR-120 Ethernet Broadband Router D-Link DIR-120 User Manual 43 Application Rules Application Rule menu This window is used to conf igure applications that require multiple connections, such as Internet Telephony, video conferencing, and Internet gaming. The following window lists six Special Applicati ons that commonly use more than one connection[…]
-
Page 50: D-Link DIR-120
DIR-120 Ethernet Broadband Router D-Link DIR-120 User Manual 44 Access Control AC Filtering menu Access Control, or MAC filtering, is a basic security measure that should be used on any network that is exposed to a security risk. A packet filter system examines data packets and scrutinizes them in order to control network access. Fi ltering rules d[…]
-
Page 51: D-Link DIR-120
DIR-120 Ethernet Broadband Router D-Link DIR-120 User Manual 45 Website Filter The Website Filter f eature filters URLs. A URL is a specially formatted text strin g that uniquely defines an Internet w ebsite. This window w ill allow users to block com puters on the LAN from accessing certain URLs. This m ay be accomplished by simply entering the UR[…]
-
Page 52: D-Link DIR-120
DIR-120 Ethernet Broadband Router D-Link DIR-120 User Manual 46 Firewall Settings menu Firewall Rules To configure rules for the firewall, modify the following fields and click the Save Settin gs button at the top of the window to set the rule in the Routers memory. Newly configured firewall rules will be displa yed in the Firewall Rules List at th[…]
-
Page 53: D-Link DIR-120
DIR-120 Ethernet Broadband Router D-Link DIR-120 User Manual 47 Advanced Network UPNP UPnP supports zero-configuration netw orking and automatic discovery for m any types of networked devices. When enabled, it allows other devices that supp ort UPnP to dynamically join a network, obtain an IP address, convey its capabilities, and learn abou t the p[…]
-
Page 54: D-Link DIR-120
DIR-120 Ethernet Broadband Router D-Link DIR-120 User Manual 48 QOS Engine QoS (Quality of Service) menu Upstream Bandwidth Use the QoS WAN Upstream Bandwidth drop-down menu to adjust the upstream bandwidth setting. Please contact your ISP for more information before changing t his setting. QoS This feature allows you to improve your VoIP voice qua[…]
-
Page 55: D-Link DIR-120
DIR-120 Ethernet Broadband Router D-Link DIR-120 User Manual 49 Tools The Tools tab allows you to set up basic m aintenance features on the Router. The windows available under this tab include Admin , Time , System , Firmware , Dyn amic DNS , System Check , Schedules , and Log Settings . Tools directory – Aministrator Settings menu[…]
-
Page 56: D-Link DIR-120
DIR-120 Ethernet Broadband Router D-Link DIR-120 User Manual 50 Admin Administrator Settings menu This window allows you to configure a new password for the Router. There is only o ne administrator account that can access the DIR-120’s web management interface. To change the password, enter the password into the New Password field and repeat the […]
-
Page 57: D-Link DIR-120
DIR-120 Ethernet Broadband Router D-Link DIR-120 User Manual 51 Time Time menu The system time is the time used by the DIR-120 for scheduling services. You can configure, update, and m aintain the time on the internal system clock. To configure system time on the Router, d etermine the m ethod used to maintain time. If you wish to use a net work ti[…]
-
Page 58: D-Link DIR-120
DIR-120 Ethernet Broadband Router D-Link DIR-120 User Manual 52 System System Settings menu The current system settings can be saved as a file onto the local hard drive by clicking the Save button. The saved file or any other saved setting file can be loaded back on the Ro uter. To reload a system settings file, click on Browse to browse the local […]
-
Page 59: D-Link DIR-120
DIR-120 Ethernet Broadband Router D-Link DIR-120 User Manual 53 Firmware Firmware Upgrade menu You can upgrade the firmware of the Router at this page. Make sure the firmware you want to u se is on the local hard driv e of the computer. Click on Browse to browse the local hard driver and locate the firmware to be use d for the update. Please check […]
-
Page 60: D-Link DIR-120
DIR-120 Ethernet Broadband Router D-Link DIR-120 User Manual 54 Dynamic DNS Dynamic DNS menu The DIR-120 supports DDNS or Dynamic Domain Name Service. Dynamic DNS allows a dynamic public IP address to be associated with a static host name in any of the many domains, allowing access to a specific host from various locations on the Internet. With thi[…]
-
Page 61: D-Link DIR-120
DIR-120 Ethernet Broadband Router D-Link DIR-120 User Manual 55 System Check Fast Ethernet Virtua l Cable Tester (VCT) menu This window aids the user in m aintaining and enhancing the functionality of the router. It includes settings for VCT Info and Ping Test . VCT Info The Virtual Cable Tester section allows every Ethernet port on the Router to b[…]
-
Page 62: D-Link DIR-120
DIR-120 Ethernet Broadband Router D-Link DIR-120 User Manual 56 Schedules Schedules menu This window is used to create implementation schedu les for Firewall Settings rules. This is the same menu accessed using the Make New Schedule button in the Rules menu of the Firewall Setting s page. Complete the Add Sched ule Rule settings on the window above[…]
-
Page 63: D-Link DIR-120
DIR-120 Ethernet Broadband Router D-Link DIR-120 User Manual 57 Log Settings Log Settings menu The system log displays chronological event log data, including System Activity, Debug Information, Attacks, Dropped Packets, and Notice. Check the desi red category of Log Ty pe in the bottom half of the window above and then click the Save button and fo[…]
-
Page 64: D-Link DIR-120
DIR-120 Ethernet Broadband Router D-Link DIR-120 User Manual 58 Status The Status tab will allow users to check information about the Router, includ ing Device Info , Log , Stats , and Active Session . Status directory – Device Information menu[…]
-
Page 65: D-Link DIR-120
DIR-120 Ethernet Broadband Router D-Link DIR-120 User Manual 59 Device Info Device Info menu This window, located under the Status tab will allow users to view information regarding the settings of the Router, both on the LAN side and WAN side of the connection. Printer queue i nformation is displayed under Printer Server Intformaiton.[…]
-
Page 66: D-Link DIR-120
DIR-120 Ethernet Broadband Router D-Link DIR-120 User Manual 60 Log View Log menu Stats Traffic Sta tis tics me nu This window allows users to view events occurring within the router by time and date, and also view the source and destination of the event. The u ser may use the First Page , Last Page , Previous and Next but tons to scrol l through t[…]
-
Page 67: D-Link DIR-120
DIR-120 Ethernet Broadband Router D-Link DIR-120 User Manual 61 Active Session Active Session menu LAN Computer (DHCP Client) List DHCP Client list This window displays the Source and Destination packets passing through the Router. To refresh the window , click the Refresh button. Click the LAN computer link to view DHCP clients currently connected[…]
-
Page 68: D-Link DIR-120
DIR-120 Ethernet Broadband Router D-Link DIR-120 User Manual 62 Support Support Menu menu This tab will give basic inf ormation referring to various windows located in the Rout er. To view a specif ic section, click on its hy per link ed na me. A new win dow of inf or matio n will appear.[…]
-
Page 69: D-Link DIR-120
DIR-120 Ethernet Broadband Router D-Link DIR-120 User Manual 63 Appendix A Technical Specifications Standards IEEE 802.3 10Base-T Et hernet IEEE 802.3u 100Base-TX Fast Ethernet IEEE 802.3 Nway Auto-Negotiation VPN Pass Through/Multi-Sessions PPTP L2TP IPSec Device Management Web-Based – requires at least Microsoft I nternet Explorer v5 or later ,[…]
-
Page 70: D-Link DIR-120
DIR-120 Ethernet Broadband Ro uter D-Link DIR-120 User Manual 64 Appendix B Configuring IP Settings on Your Computer In order to configure your system to receive IP settings from the Router i t must first have the TCP/IP protocol installed. If y ou have an Ethernet port on your computer , it probably alrea dy has TCP/IP prot ocol instal led. If you[…]
-
Page 71: D-Link DIR-120
DIR-120 Ethernet Broadband Ro uter D-Link DIR-120 User Manual 65 Configure Windows XP for DHCP Use the follow ing steps to c onfigure a com puter running Windows XP to be a DHCP cl ient. 1. From the Start menu on your desktop , go to Settings , then click on Network Connections . 2. In the Netw ork Connections window, right-click on LAN (Local Area[…]
-
Page 72: D-Link DIR-120
DIR-120 Ethernet Broadband Ro uter D-Link DIR-120 User Manual 66 In the General t ab of the Local Area Connection Properties m enu, highli ght Internet Protocol (TCP/IP) u nder “This connection uses the fo llo wing items:” by clicking on it once. Click on th e Properties button. 1. Select “Obtain an IP address autom atically” by clicking on[…]
-
Page 73: D-Link DIR-120
DIR-120 Ethernet Broadband Ro uter D-Link DIR-120 User Manual 67 Windows 2000 First, check for the IP protocol and, if necessary, install it: 1. In the Windows task bar, click the Start button , point to Setting s , and then click Control Panel . 2. Double-click the Network and Dial-u p Connections icon. 3. In the Netw ork and Dial-up Connections w[…]
-
Page 74: D-Link DIR-120
DIR-120 Ethernet Broadband Ro uter D-Link DIR-120 User Manual 68 Windows 95 and Windows 98 First, check for the IP protocol and, if necessary, install it: 1. In the Windows task bar, click the Start button , point to Setting s , and then click Control Panel . Do uble-click the Network icon. 2. The Network dialog b ox display s with a list of curre […]
-
Page 75: D-Link DIR-120
DIR-120 Ethernet Broadband Ro uter D-Link DIR-120 User Manual 69 4. The Network Properties dial og box displa ys with a list of currently i nstalled network components. I f the list incl udes Internet Pro tocol (TCP/IP) , th en the protocol has already been enable d. Skip ahead to Co nfigure Window s ME for DHCP . 5. If Internet Pr ot ocol (TCP/IP)[…]
-
Page 76: D-Link DIR-120
DIR-120 Ethernet Broadband Ro uter D-Link DIR-120 User Manual 70 7. After all files are installed, a window displays to inform you that a TCP/IP service called DHCP can be set up to dynamically a ssign IP informati on. 8. Click Yes to conti nue, and th en click OK if prompted t o restart you r computer. Configure Windows NT 4.0 for DHCP 1. Open the[…]
-
Page 77: D-Link DIR-120
DIR-120 Ethernet Broadband Router Contacting Technical Support You can find software updates and user documentation on the D-Link websites. If you require product support, we encourage y ou to browse our FAQ section on the Web Site before contacting the Support line. We have many FAQ’s which we hope will provide you a speedy resolution for your p[…]
Перейти к содержанию
На чтение 4 мин Просмотров 6.8к.
Расскажем, как быстро настроить D-link DIR-100. Это простая, недорогая и надежная модель маршрутизатора без поддержки WI-FI.
Содержание
- Характеристики
- Настраиваем роутер
- Пробрасываем порты
- Меняем пароль для входа в настройки
- Прошивка
Характеристики
Вот что можно выделить в модели D-link DIR-100, если рассмотреть её подробнее:
- 4 LAN-порта – вполне годятся для создания небольшой локальной сети в доме или даже в офисе.
- 1 порт WAN, есть возможность использовать ADSL.
- 100 Мбит/сек – максимальная скорость соединения.
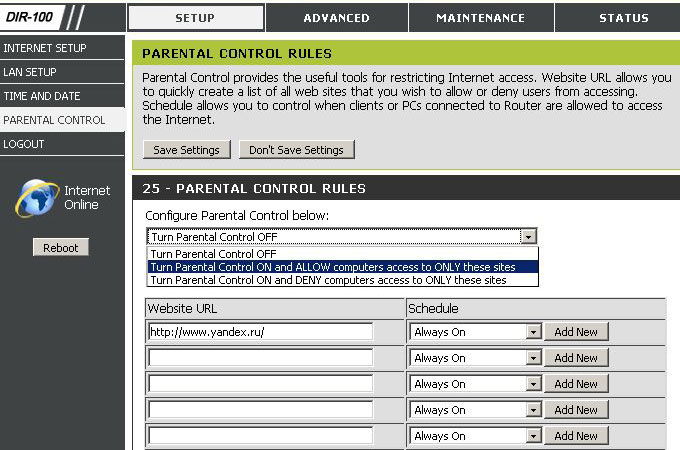
Этот роутер предусматривает два типа подключения через WAN – это динамический и статический ip. Также в нем присутствуют функции ограничения доступа, например, запрет определенных mac или ip адресов и возможность блокировки нежелательных ресурсов (родительский контроль).
Настраиваем роутер
В самом начале не забудьте подключить кабель питания к роутеру. После этого, вставляем шнур протянутый вам в дом провайдером в разъем WAN, а патч корд (ваш сетевой кабель) вставляем одной стороной в порт LAN, а другой в компьютер или ноутбук.
Входим в веб-интерфейс роутера D-link DIR-100 через браузер:
- Вводим в адресной строке данный ip-адрес 192.168.0.1., пишем в открывшемся окне в поле логин – admin и в поле пароль – admin .
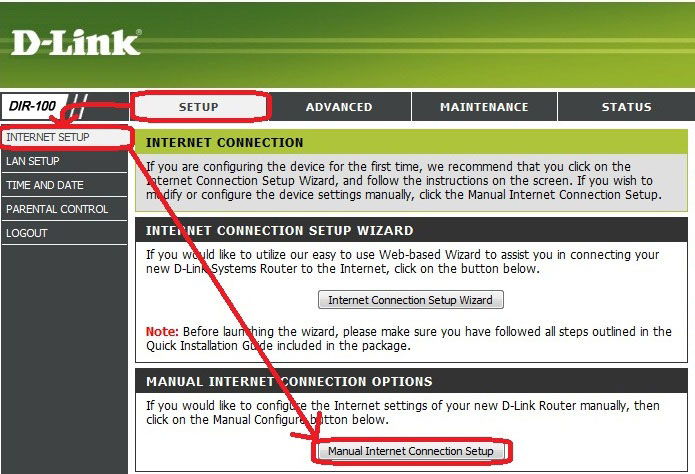
- Вот и вошли в настройки, теперь нажмите на Setup вверху.
- Слева жмём на строчку Internet Setup, теперь будем устанавливать параметры
- И жмём на кнопку Manual Internet Connection Setup внизу.
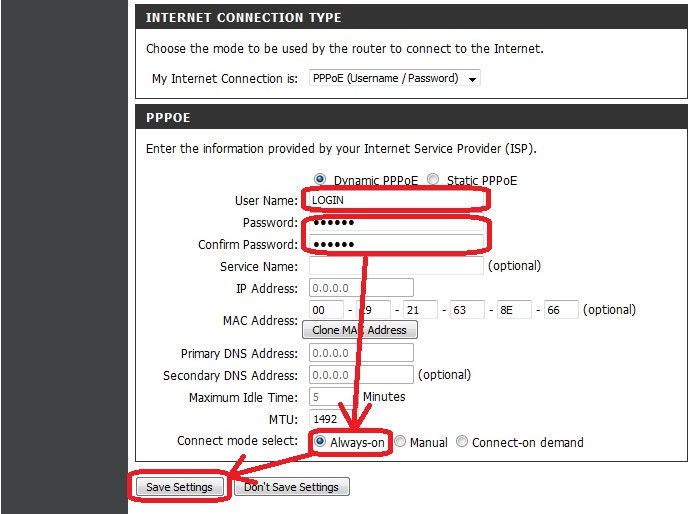
- Открылось окно – здесь выберите тип соединения установленный вашим провайдером. Скорее всего, это DHCP. Он автоматически подбирает ip-адрес.
- Далее выберем IP-адрес — статический или динамический, там где имя пользователя и пароль – введите данные из вашего договора с провайдером.
- Если у вас подключена доп. услуга или вы юридическое лицо, то введите статический ip-адрес, а так же MAC.
- Выделите пункт Always-On, это нужно для поддержания постоянного соединения с сетью.
Пробрасываем порты
Для проброса портов вам нужно:
- Выставить в настройках Статический IP. Это необходимо.
- Идём в меню Advanced, во вкладку Port Forwarding.
- Нужно заполнить одну из предоставленных форм — в строчке с именем напишите нужное вам название, после вбейте ip адрес того устройства, которому пробрасываете порт. Теперь нужно заполнить данные диапазона портов и выбрать один из типов трафика — udp, tcp (если нужен и тот и другой — выбирайте any).
- Поставьте галку рядом с заполненной вами формой, после этого она начнет работать. И сохраняем изменения.
Меняем пароль для входа в настройки
Самый важный момент при установке роутера D-link DIR-100 — это не забыть поменять пароль от сети wifi и от панели настроек. Данные действия защитят вас от проникновения злоумышленников в вашу сеть.
Для этого нужно:
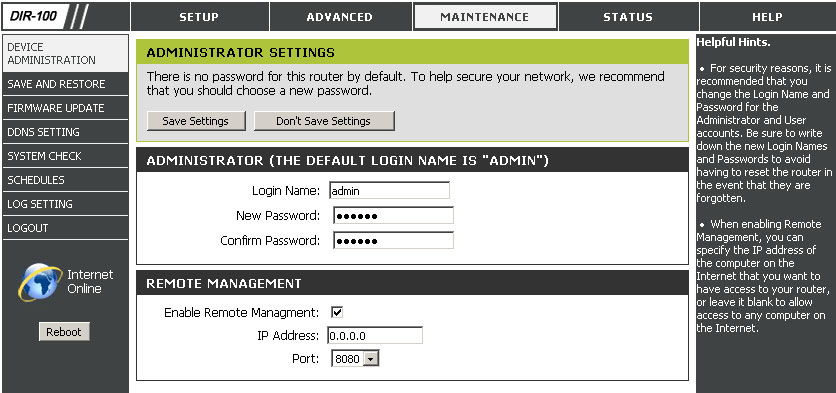
- Вверху выбрать меню Maintenance.
- В левой панели жмём на Device Administration.
- Здесь, в разделе Administrator, вы сможете изменить логин и пароль на свое усмотрение.
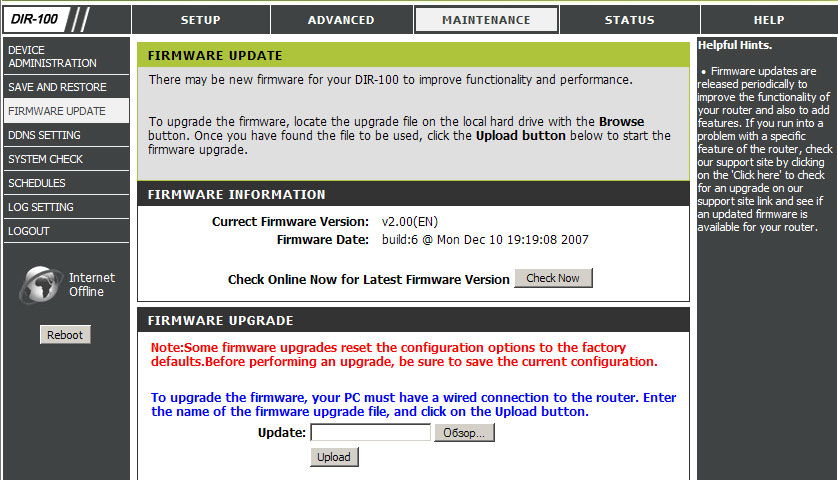
Прошивка
Неважно, по какой причине понадобилась вам перепрошивка D-link DIR-100. Нужно помнить одно – при неправильно выбранных файлах или некорректном процессе обновления ваш роутер может придти в негодность.
Чтобы обновить прошивку, следуйте данной инструкции:
- Загрузите из интернета актуальную версию прошивки. Желательно с официального сайта производителя. Для того чтобы выбрать нужный файл, вам необходимо узнать версию роутера — она должна присутствовать на обратной стороне корпуса устройства, под mac адресом.
- Как только вы скачали прошивку, войдите в настройки роутера известным вам способом — через адресную строку браузера.
- В верхнем меню выберите Maintenance.
- В списке слева выберите Firmware Update, далее появится строка для выбора пути к скаченному вами файлу прошивки.
- Указав путь к прошивке, нажмите на Upload, после выполнится установка нового ПО и роутер перезагрузится. Ни при каких обстоятельствах не выключайте устройство во время установки!
-
Страница 1
[…]
-
Страница 2
DIR-120 Ethernet Bro ad band Router D-Link DIR-120 User Manual CONTENTS About This User’s Guide ………………………………………………………………………………………………………………. ……………………………………………………………………………………………. iv Before You Sta[…]
-
Страница 3
DIR-120 Ethernet Bro ad band Router D-Link DIR-120 User Manual CONFIGURING IP SETTINGS ON YOUR COMPUTER ……………………………………………………………………………………………………… 64 TECHNICAL SPECIFICATIONS ……………………………………………………………………………………….[…]
-
Страница 4
DIR-120 Ethernet Broadband Router D-Link DIR-120 User Manual iv About This User’s Guide This user’s guide provides instructions on how to in stall the DIR-120 Ethernet Broadband Router and use it to connect a com pute r or Ethernet LAN to t he Internet. Before You Start Please read and make sure you understand all the prerequisites for proper i[…]
-
Страница 5
DIR-120 Ethernet Broadband Router D-Link DIR-120 User Manual v Installation Notes In order to establish a co nnection to the Internet it will be necessary to prov ide information to the Router that will be store d in its memory. For so me users, only their account information (User Name and Password) is req uired. For others, various parameters tha[…]
-
Страница 6
DIR-120 Ethernet Broadband Router D-Link DIR-120 User Manual vi Installation Information Print this page and record the listed i nformation here in case you have to re-configure your WAN con nection in the future or re set the device configuration settings. Information you will need from your Internet service provider: Username This is the Username[…]
-
Страница 7
DIR-120 Ethernet Broadband Router D-Link DIR-120 User Manual 1 Introduction This section provides a brief description of the Router, its associated tec hnologies and a list of Router features. Router Description and Operation The D-Link DIR-120 Ethernet Broadband Router is designed to provide connectivity fo r your private Ethernet LAN plus one USB[…]
-
Страница 8
DIR-120 Ethernet Broadband Router D-Link DIR-120 User Manual 2 Router Features The D-Link DIR-120 Broadband Router provides the following features: • Broadband Connection Sharing — Connects multiple computers to a Broadban d (Cable or DSL) modem to share the Internet co nnection. • Ethernet Switch — Allo ws sharing of an Internet connection wit[…]
-
Страница 9
DIR-120 Ethernet Broadband Router D-Link DIR-120 User Manual 3 Front Panel Place the Router in a location that permits an easy view of the LED indicators on the front panel. The LED indicators on the front panel include the Power , Status, WAN , and LAN for the Ethernet ports. Power Steady green light indicates the unit is p owered on. Status This […]
-
Страница 10
DIR-120 Ethernet Broadband Router D-Link DIR-120 User Manual 4 Rear Panel Connect the AC power adapter cord and n etwork cables on the rear panel. The power switch and reset button are also located on t he back of the device. Note : All ports (LAN and WAN) are Auto-MDIX. All por ts also automatically connect with straight-through or crossover CAT5 […]
-
Страница 11
DIR-120 Ethernet Broadband Router D-Link DIR-120 User Manual 5 Connecting the Router The Router provides the connection betwe en two networks, a private Ethernet LAN and the public Internet (WAN). Choose a locatio n for the Router wh ere Ethernet devices can be connected to the LAN ports and the WAN port can be connected to the cable m odem or DSL […]
-
Страница 12
DIR-120 Ethernet Broadband Router D-Link DIR-120 User Manual 6 Power On Router To power on the Router: 1. Insert the AC Power Adapter cord into the power receptacle located on the rear panel of the Router and plug the adapter into a suit able nearby power source. See the back pan el illustration above to view the power receptacle. 2. The Power LED […]
-
Страница 13
DIR-120 Ethernet Broadband Router D-Link DIR-120 User Manual 7 Basic Router Configuration The first time you setup the Router it is recomm ended that you configure the WAN connection using a single computer making sure that b oth the computer and the Router are not connected to th e LAN. Once the WAN connection is fun ctioning properly, you may con[…]
-
Страница 14
DIR-120 Ethernet Broadband Router D-Link DIR-120 User Manual 8 Accessing the Configuration Manager Now that your computer’s IP setti ngs allow it to communicate with the Router, you can access the configuration software. To use the web-based management software, launch a suitable web browser and direct it to the IP address of the Router. Type in […]
-
Страница 15
DIR-120 Ethernet Broadband Router D-Link DIR-120 User Manual 9 Login Use the default user name “ admin” and no password for first tim e setup. You should change the web-based m anager access user nam e and password once you ha ve verified that a connection can be established. The user na me and password allows any PC with in the same subnet as […]
-
Страница 16
DIR-120 Ethernet Broadband Router D-Link DIR-120 User Manual 10 Web Manager The Web Manager used f or configuration uses directories to organize the various m enus used to configure and monitor the Router. The first page that appears after logging in presents the Internet menu in the Setup menu directory. Inter net Co nnect ion menu Most users will[…]
-
Страница 17
DIR-120 Ethernet Broadband Router D-Link DIR-120 User Manual 11 Configure Internet Connectio n with the Setup Wizard To use the Setu p Wi za rd , open the Setup menu directory (the first pag e you see after logging in), and click the SetupWizard button to go to the Wizard menu. Wizard menu Click the Launch Internet Connection Setup Wizard b utton t[…]
-
Страница 18
DIR-120 Ethernet Broadband Router D-Link DIR-120 User Manual 12 Setup Wizard – Wel com e The initial dialog box summarizes the setup process. Click the Next button to proceed. You may stop using the Setup Wizard at any time by clicking the Cancel butto n. If yo u exit the wizard you wil l return to the Internet Connection menu page with out savin[…]
-
Страница 19
DIR-120 Ethernet Broadband Router D-Link DIR-120 User Manual 13 Setup Wizard – Step 1 Type a new Password used for system administration in the space provided and the same password again in the Confirm Password space. This will be t he new system password used to login. Remember that this password is case sensitive so it m ust be typed exactly as[…]
-
Страница 20
DIR-120 Ethernet Broadband Router D-Link DIR-120 User Manual 14 Setup Wizard – Step 2 Choose the time zone you are in from the pull-down menu and click Ne xt . This sets the system time used f or the Router. If you wish to return to th e previous menu during the setup process, click the Prev b utton.[…]
-
Страница 21
DIR-120 Ethernet Broadband Router D-Link DIR-120 User Manual 15 Setup Wizard – Step 3 Choose the Internet connection type from the list of options presented in the Setup Wizard. Select the connection type appropri ate fo r your service and click the Next button.[…]
-
Страница 22
DIR-120 Ethernet Broadband Router D-Link DIR-120 User Manual 16 PPPoE Connectio n Settings Setup Wizard – Config ure PPPoE Connection For PPPoE connections, select the Address Mode Dynamic IP or Static IP, type in the Usern ame and Passw ord used to identify and verify your account to the ISP. Retype the password again and if necessary, type a Se[…]
-
Страница 23
DIR-120 Ethernet Broadband Router D-Link DIR-120 User Manual 17 DHCP Connection Settings Setup Wizard – Configure Dynamic IP Address Connection For Dynamic IP Address connections, you may want to copy the MAC address of your Ethernet adapter to the Router. Some ISPs use th e unique MAC address of your computer’s Ethernet adapter for id entifica[…]
-
Страница 24
DIR-120 Ethernet Broadband Router D-Link DIR-120 User Manual 18 Static IP Connection Settings Setup Wizard – Co nfigure St atic IP Address Connection For Static IP Add ress connection types, you m ust type in the IP Address , Subnet Mask , Gateway Address , Primary DNS Address and Secondary DNS Address (optional). Your ISP should provi de this in[…]
-
Страница 25
DIR-120 Ethernet Broadband Router D-Link DIR-120 User Manual 19 Setup Wizard – Configure PPTP Client Connection The Router supports Poin t-to-Point Tunneling Protocol (PPTP) f or the Internet co nnection. PPTP is also used for Virtual Private Netw orks (VPN). Some ISPs use PP TP to establish a client-to-server connection t o their network, and ul[…]
-
Страница 26
DIR-120 Ethernet Broadband Router D-Link DIR-120 User Manual 20 Setup Wizard – Configure PPTP Client Connection The Router supports Point-to-Point Tunne ling Protocol (L2TP) for the Int ernet connection. L2TP is also used fo r Virtual Private Networks (VPN). Some ISPs use L2TP to establish a client-to-server connection t o their network, and ulti[…]
-
Страница 27
DIR-120 Ethernet Broadband Router D-Link DIR-120 User Manual 21 Big Pond Connection Settings Setup Wizar d – Configur e Big Pond C onnection This selection is for users having Big Pond Cable as their ISP. Enter the account information, as provid ed to you by your ISP. Click Next to continue. Auth Server Enter the name of the Authentication Server[…]
-
Страница 28
DIR-120 Ethernet Broadband Router D-Link DIR-120 User Manual 22 Setup Wizard – Co mplete Setup Finally you can confirm that the setup process is completed. If you are satisfied that you have ent ered all the necessary inf ormation correctly, click the Co nect button to save the new configuration settings and restart the Rou ter. If you need to ch[…]
-
Страница 29
DIR-120 Ethernet Broadband Router D-Link DIR-120 User Manual 23 Configure Internet Connection Manually To configure the Router’s basic Internet conf iguration settings without running the Setup Wizard, click the Internet menu link in the left hand panel of the Setup menu directory, then click the Manual Configuration button under the headin g “[…]
-
Страница 30
DIR-120 Ethernet Broadband Router D-Link DIR-120 User Manual 24 Select Internet Connection Type The default Internet Connection menu displays the Dynamic IP (DHCP) Internet Connection Type m enu. To select another connection type, use the pull-down My Internet Connectio n is: menu to select the connection type you wi sh to configure. The menu confi[…]
-
Страница 31
DIR-120 Ethernet Broadband Router D-Link DIR-120 User Manual 25 Dynamic IP (DHCP) Internet Connection A Dynamic IP Address connection configures the Router to automatically obtain its global IP address from a DHCP server on the ISP’s network. The service p rovider assigns a global IP address from a pool of addresses available to the service provi[…]
-
Страница 32
DIR-120 Ethernet Broadband Router D-Link DIR-120 User Manual 26 Static IP Internet Connection Your ISP should provide IP settings inform ation needed for your public IP address and other settings using the Static IP connection type. After configuration of Internet and local network IP setti ngs is complete, click the Save Settings button to save th[…]
-
Страница 33
DIR-120 Ethernet Broadband Router D-Link DIR-120 User Manual 27 PPPo E PPP or Point-to-Point protocol is a standard method of establishing a network connection/session between networked devices. Different forms of PPP include PPPoA and PPPoE (d iscussed below) involve an authentication process that requires a username and password to gain access to[…]
-
Страница 34
DIR-120 Ethernet Broadband Router D-Link DIR-120 User Manual 28 The table below describes the PPPoE In ternet Connection menu settings. User Name The user name supplied to you by your ISP. Password The password supplied to you by your ISP. Retype P asswo rd Retype the password entere d in the Password fe ld. Service Name Enter the service name supp[…]
-
Страница 35
DIR-120 Ethernet Broadband Router D-Link DIR-120 User Manual 29 PPTP If your ISP is using PPTP to provide your Internet connection, the ISP will give you the necessary in formation to configure the Router. There are two ways to enable the router to become a PPTP client, one is through assigning the router an IP address dynamically, which means that[…]
-
Страница 36
DIR-120 Ethernet Broadband Router D-Link DIR-120 User Manual 30 To configure the router to be a PPTP client, complete the followi ng fields and click the Save Settings button. IP Add ress Type the IP address supplied by your ISP. Subnet Mask Type the Subnet mask supplied by your ISP. Gateway The gateway IP address is used provide access to resource[…]
-
Страница 37
DIR-120 Ethernet Broadband Router D-Link DIR-120 User Manual 31 L2TP If your ISP is using L2TP to provide your Internet connection, the ISP will give you the necessary in formation to configure the Router. There are two ways to enable the router to become a L2TP client, one is through assigning the router an IP address dynamically, which means that[…]
-
Страница 38
DIR-120 Ethernet Broadband Router D-Link DIR-120 User Manual 32 To configure the router to be a L2TP client, complete the following fields and cl ick the Save Settings button. IP Add ress Type the IP address supplied by your ISP. Subnet Mask Type the Su bnet mask supplied by your ISP. Gateway The gateway IP address is used provide access to resourc[…]
-
Страница 39
DIR-120 Ethernet Broadband Router D-Link DIR-120 User Manual 33 L2TP If your ISP is usin g L2TP to provide your Internet connection, the ISP will give you the n ecessary information to configure the Router. There are two ways to enable the router to become a L2TP client, one is through assigning the router an IP address dynamically, which means tha[…]
-
Страница 40
DIR-120 Ethernet Broadband Router D-Link DIR-120 User Manual 34 Network (LAN IP) Settings Network Setting menu Use this window to configure Router Settings and DHCP Server Settings. When you are finished, click the Save Settings button at the top of the window. Use the Network Settings m enu to configure the LAN IP settings, DHCP server status and […]
-
Страница 41
DIR-120 Ethernet Broadband Router D-Link DIR-120 User Manual 35 DHCP Server Settin gs Dynamic Host Configuration Protocol (DHCP) allows the gateway to automatically obtain the IP address from a DHCP server on the service provider’s network. The service provider assigns a glob al IP address from a pool of addresses available to the service provide[…]
-
Страница 42
DIR-120 Ethernet Broadband Router D-Link DIR-120 User Manual 36 Printer Setup Use the Printer Setup Wizard to configure the Router’s USB Printer connection. To establish the connection to a USB equipp ed pr inter, click the Printer Set up link to view the Printer Setup Wizard launch m enu. Follow the instructions below to install the printer driv[…]
-
Страница 43
DIR-120 Ethernet Broadband Router D-Link DIR-120 User Manual 37 5. The first Printer Setup Wizard menu lists the steps used for intallation. Click the Next button to detect the printer.[…]
-
Страница 44
DIR-120 Ethernet Broadband Router D-Link DIR-120 User Manual 38 6. The printer should be detected imm ediately. The model name wi ll be displayed if detected. If no printer is detected a warning t ells y ou the printer installation cannot be completed. Check the cable connections and m ake sure the printer is powered on. Click Next if a printer is […]
-
Страница 45
DIR-120 Ethernet Broadband Router D-Link DIR-120 User Manual 39 7. It is now necessary to install the correct printer driv er on your computer. Click th e Next button to launch the fi le.[…]
-
Страница 46
DIR-120 Ethernet Broadband Router D-Link DIR-120 User Manual 40 8. A setup will launch or attempt to launch on your computer. Often the browser settings prevent the fi le from launching until per mission is granted. This f ile must be executed to install the printer driver. In Windows Internet Explorer permission can be granted to launch downloded […]
-
Страница 47
DIR-120 Ethernet Broadband Router D-Link DIR-120 User Manual 41 Advanced Configuration The Advanced directory tab offers seven configuration menus, Port Forwarding , Application Rules , Access Control , Websit e Filt er , Firewall Settings, Advanced Netw ork , and QoS Engine . Click th e corresponding link in the left panel of the window. Port Forw[…]
-
Страница 48
DIR-120 Ethernet Broadband Router D-Link DIR-120 User Manual 42 Port Forwarding Port Forwarding Rules menu To enable an already existing Port Forwarding Rule, click on its corresponding checkbox and configure the a ppropriate fields listed below. To configure other Port Forwarding Rules for the Router, configure the following fields and click the S[…]
-
Страница 49
DIR-120 Ethernet Broadband Router D-Link DIR-120 User Manual 43 Application Rules Application Rule menu This window is used to conf igure applications that require multiple connections, such as Internet Telephony, video conferencing, and Internet gaming. The following window lists six Special Applicati ons that commonly use more than one connection[…]
-
Страница 50
DIR-120 Ethernet Broadband Router D-Link DIR-120 User Manual 44 Access Control AC Filtering menu Access Control, or MAC filtering, is a basic security measure that should be used on any network that is exposed to a security risk. A packet filter system examines data packets and scrutinizes them in order to control network access. Fi ltering rules d[…]
-
Страница 51
DIR-120 Ethernet Broadband Router D-Link DIR-120 User Manual 45 Website Filter The Website Filter f eature filters URLs. A URL is a specially formatted text strin g that uniquely defines an Internet w ebsite. This window w ill allow users to block com puters on the LAN from accessing certain URLs. This m ay be accomplished by simply entering the UR[…]
-
Страница 52
DIR-120 Ethernet Broadband Router D-Link DIR-120 User Manual 46 Firewall Settings menu Firewall Rules To configure rules for the firewall, modify the following fields and click the Save Settin gs button at the top of the window to set the rule in the Routers memory. Newly configured firewall rules will be displa yed in the Firewall Rules List at th[…]
-
Страница 53
DIR-120 Ethernet Broadband Router D-Link DIR-120 User Manual 47 Advanced Network UPNP UPnP supports zero-configuration netw orking and automatic discovery for m any types of networked devices. When enabled, it allows other devices that supp ort UPnP to dynamically join a network, obtain an IP address, convey its capabilities, and learn abou t the p[…]
-
Страница 54
DIR-120 Ethernet Broadband Router D-Link DIR-120 User Manual 48 QOS Engine QoS (Quality of Service) menu Upstream Bandwidth Use the QoS WAN Upstream Bandwidth drop-down menu to adjust the upstream bandwidth setting. Please contact your ISP for more information before changing t his setting. QoS This feature allows you to improve your VoIP voice qua[…]
-
Страница 55
DIR-120 Ethernet Broadband Router D-Link DIR-120 User Manual 49 Tools The Tools tab allows you to set up basic m aintenance features on the Router. The windows available under this tab include Admin , Time , System , Firmware , Dyn amic DNS , System Check , Schedules , and Log Settings . Tools directory – Aministrator Settings menu[…]
-
Страница 56
DIR-120 Ethernet Broadband Router D-Link DIR-120 User Manual 50 Admin Administrator Settings menu This window allows you to configure a new password for the Router. There is only o ne administrator account that can access the DIR-120’s web management interface. To change the password, enter the password into the New Password field and repeat the […]
-
Страница 57
DIR-120 Ethernet Broadband Router D-Link DIR-120 User Manual 51 Time Time menu The system time is the time used by the DIR-120 for scheduling services. You can configure, update, and m aintain the time on the internal system clock. To configure system time on the Router, d etermine the m ethod used to maintain time. If you wish to use a net work ti[…]
-
Страница 58
DIR-120 Ethernet Broadband Router D-Link DIR-120 User Manual 52 System System Settings menu The current system settings can be saved as a file onto the local hard drive by clicking the Save button. The saved file or any other saved setting file can be loaded back on the Ro uter. To reload a system settings file, click on Browse to browse the local […]
-
Страница 59
DIR-120 Ethernet Broadband Router D-Link DIR-120 User Manual 53 Firmware Firmware Upgrade menu You can upgrade the firmware of the Router at this page. Make sure the firmware you want to u se is on the local hard driv e of the computer. Click on Browse to browse the local hard driver and locate the firmware to be use d for the update. Please check […]
-
Страница 60
DIR-120 Ethernet Broadband Router D-Link DIR-120 User Manual 54 Dynamic DNS Dynamic DNS menu The DIR-120 supports DDNS or Dynamic Domain Name Service. Dynamic DNS allows a dynamic public IP address to be associated with a static host name in any of the many domains, allowing access to a specific host from various locations on the Internet. With thi[…]
-
Страница 61
DIR-120 Ethernet Broadband Router D-Link DIR-120 User Manual 55 System Check Fast Ethernet Virtua l Cable Tester (VCT) menu This window aids the user in m aintaining and enhancing the functionality of the router. It includes settings for VCT Info and Ping Test . VCT Info The Virtual Cable Tester section allows every Ethernet port on the Router to b[…]
-
Страница 62
DIR-120 Ethernet Broadband Router D-Link DIR-120 User Manual 56 Schedules Schedules menu This window is used to create implementation schedu les for Firewall Settings rules. This is the same menu accessed using the Make New Schedule button in the Rules menu of the Firewall Setting s page. Complete the Add Sched ule Rule settings on the window above[…]
-
Страница 63
DIR-120 Ethernet Broadband Router D-Link DIR-120 User Manual 57 Log Settings Log Settings menu The system log displays chronological event log data, including System Activity, Debug Information, Attacks, Dropped Packets, and Notice. Check the desi red category of Log Ty pe in the bottom half of the window above and then click the Save button and fo[…]
-
Страница 64
DIR-120 Ethernet Broadband Router D-Link DIR-120 User Manual 58 Status The Status tab will allow users to check information about the Router, includ ing Device Info , Log , Stats , and Active Session . Status directory – Device Information menu[…]
-
Страница 65
DIR-120 Ethernet Broadband Router D-Link DIR-120 User Manual 59 Device Info Device Info menu This window, located under the Status tab will allow users to view information regarding the settings of the Router, both on the LAN side and WAN side of the connection. Printer queue i nformation is displayed under Printer Server Intformaiton.[…]
-
Страница 66
DIR-120 Ethernet Broadband Router D-Link DIR-120 User Manual 60 Log View Log menu Stats Traffic Sta tis tics me nu This window allows users to view events occurring within the router by time and date, and also view the source and destination of the event. The u ser may use the First Page , Last Page , Previous and Next but tons to scrol l through t[…]
-
Страница 67
DIR-120 Ethernet Broadband Router D-Link DIR-120 User Manual 61 Active Session Active Session menu LAN Computer (DHCP Client) List DHCP Client list This window displays the Source and Destination packets passing through the Router. To refresh the window , click the Refresh button. Click the LAN computer link to view DHCP clients currently connected[…]
-
Страница 68
DIR-120 Ethernet Broadband Router D-Link DIR-120 User Manual 62 Support Support Menu menu This tab will give basic inf ormation referring to various windows located in the Rout er. To view a specif ic section, click on its hy per link ed na me. A new win dow of inf or matio n will appear.[…]
-
Страница 69
DIR-120 Ethernet Broadband Router D-Link DIR-120 User Manual 63 Appendix A Technical Specifications Standards IEEE 802.3 10Base-T Et hernet IEEE 802.3u 100Base-TX Fast Ethernet IEEE 802.3 Nway Auto-Negotiation VPN Pass Through/Multi-Sessions PPTP L2TP IPSec Device Management Web-Based – requires at least Microsoft I nternet Explorer v5 or later ,[…]
-
Страница 70
DIR-120 Ethernet Broadband Ro uter D-Link DIR-120 User Manual 64 Appendix B Configuring IP Settings on Your Computer In order to configure your system to receive IP settings from the Router i t must first have the TCP/IP protocol installed. If y ou have an Ethernet port on your computer , it probably alrea dy has TCP/IP prot ocol instal led. If you[…]
-
Страница 71
DIR-120 Ethernet Broadband Ro uter D-Link DIR-120 User Manual 65 Configure Windows XP for DHCP Use the follow ing steps to c onfigure a com puter running Windows XP to be a DHCP cl ient. 1. From the Start menu on your desktop , go to Settings , then click on Network Connections . 2. In the Netw ork Connections window, right-click on LAN (Local Area[…]
-
Страница 72
DIR-120 Ethernet Broadband Ro uter D-Link DIR-120 User Manual 66 In the General t ab of the Local Area Connection Properties m enu, highli ght Internet Protocol (TCP/IP) u nder “This connection uses the fo llo wing items:” by clicking on it once. Click on th e Properties button. 1. Select “Obtain an IP address autom atically” by clicking on[…]
-
Страница 73
DIR-120 Ethernet Broadband Ro uter D-Link DIR-120 User Manual 67 Windows 2000 First, check for the IP protocol and, if necessary, install it: 1. In the Windows task bar, click the Start button , point to Setting s , and then click Control Panel . 2. Double-click the Network and Dial-u p Connections icon. 3. In the Netw ork and Dial-up Connections w[…]
-
Страница 74
DIR-120 Ethernet Broadband Ro uter D-Link DIR-120 User Manual 68 Windows 95 and Windows 98 First, check for the IP protocol and, if necessary, install it: 1. In the Windows task bar, click the Start button , point to Setting s , and then click Control Panel . Do uble-click the Network icon. 2. The Network dialog b ox display s with a list of curre […]
-
Страница 75
DIR-120 Ethernet Broadband Ro uter D-Link DIR-120 User Manual 69 4. The Network Properties dial og box displa ys with a list of currently i nstalled network components. I f the list incl udes Internet Pro tocol (TCP/IP) , th en the protocol has already been enable d. Skip ahead to Co nfigure Window s ME for DHCP . 5. If Internet Pr ot ocol (TCP/IP)[…]
-
Страница 76
DIR-120 Ethernet Broadband Ro uter D-Link DIR-120 User Manual 70 7. After all files are installed, a window displays to inform you that a TCP/IP service called DHCP can be set up to dynamically a ssign IP informati on. 8. Click Yes to conti nue, and th en click OK if prompted t o restart you r computer. Configure Windows NT 4.0 for DHCP 1. Open the[…]
-
Страница 77
DIR-120 Ethernet Broadband Router Contacting Technical Support You can find software updates and user documentation on the D-Link websites. If you require product support, we encourage y ou to browse our FAQ section on the Web Site before contacting the Support line. We have many FAQ’s which we hope will provide you a speedy resolution for your p[…]
Настройки роутеров для VPN-соединения D-Link DIR-120/100
Список рекомендуемых роутеров находиться здесь!
Роутер подходит для тарифов до — Мбит/сек с VPN соединением протокола PPtP, по LAN подключению
Wi-Fi скорость очень сильно зависит от посторонних помех и определяется в конкреттных случаях отдельно.
Скорость передачи данных по Wi-Fi (беспроводная) отличаеться от LAN подключения. Подробности здесь.
Перед настройкой рекомендуется прошить роутер последней версией прошивки. Описание для прошивки роутера можно найти в соответствующей ветке форума. Для полноценной работы роутера необходимо выполнить все пункты руководства!
Измените параметры TCP/IP сетевой карты у компьютера на автоматическое получение значений (DHCP). Затем необходимо включить адаптер питания роутера в электро-розетку.
1. Подключаете устройство к компьютеру проводом, поставляющимся в комплекте. Открываете браузер и набираете в строке адреса 192.168.0.1. Возможно, при этом потребуется привести настройки TCP/IP в автоматического получения ip-адресов (DHCP). Подключение по беспроводной связи к устройству или попытка открытия настроек через любой другой Интернет-браузер не всегда могут быть успешными.
Login: admin
Password: (оставьте поле пустым)
После этого попадаем в Web-интерфейс роутера. Выберите в меню Setup -> Internet. В резделе Manual Internet Connection Options нажимаем на кнопку Manual Configure.

2. В разделе Internet Connection Type выставляем режим Russia PPTP (Dual Access). Затем переходим в раздел Russia PPTP (Dual Access) Internet Connection Type и заполняем поля.
PPTP Server IP or Name : vpn.koptevo.net. Для тарифов с ограничением трафика имя сервера: lvpn.koptevo.net (первая буква — английская маленькая «эль»).
PPTP Account: <номер договора> в формате 0/0000
PPTP Password: <пароль к VPN>
PPTP Confirm Password: <пароль к VPN>
Reconnect mode: выставить Always On
Вписываем PPTP IP Address, PPTP Subnet Mask и PPTP Gateway IP Address используя данные из договора, соответственно <ip-адрес>, <маска>, <шлюз>.
DNS: 217.78.177.250 — первичный DNS сервер (из договора)
Connect Mode Select: Always On
Подтверждаем правильность настроек нажав кнопку Save Settings

3. Выберите в меню Advanced -> Advanced Network
Enable UPnP: поставить галочку
Enable WAN Ping Responding: поставить галочку
Enable multicust streams: поставить галочку
Подтверждаем правильность настроек нажав кнопку Save Settings

4. Перейдем к настройке маршрутизации, чтобы стали доступны ресурсы локальной сети.
Выберите в меню Advanced -> Routing
Interface — Интерфейс, на котором будет работать правило WAN(Phisical Interface).
Name — задаем любое имя для маршрута (должно начинаться с буквы латинского алфавита, может содержать цифры).
Metric — Везде ставим 1.
Официальный список требуемых локальных маршрутов:
Destination IP: 10.0.0.0 Netmask: 255.0.0.0 gateway : <шлюз>
Destination IP : 172.16.0.0 Netmask: 255.240.0.0 gateway : <шлюз>
Destination IP : 192.168.0.0 Netmask: 255.255.0.0 gateway : <шлюз>
Destination IP : 79.98.136.0 Netmask: 255.255.248.0 gateway : <шлюз>
Destination IP : 217.78.180.0 Netmask: 255.255.254.0 gateway : <шлюз>
Destination IP : 217.78.176.0 Netmask: 255.255.252.0 gateway: <шлюз>
где <шлюз> — обязательно свериться с договором. (основной шлюз)
Подтверждаем правильность настроек нажав кнопку Save Settings

5. Подключите кабель провайдера в порт WAN (Internet) на задней панели маршрутизатора.