
Язык
Руководство пользователя |
| Заголовок | Описание | Дата выпуска (Bерсия) |
файла (Размер) |
|---|---|---|---|
|
Руководство пользователя |
24.09.2010 (01) |
Загрузка (6.06MB) |
Краткий справочник |
| Заголовок | Описание | Дата выпуска (Bерсия) |
файла (Размер) |
|---|---|---|---|
|
Краткий справочник |
24.09.2010 (01) |
Загрузка (3.28MB) |
Приложения |
| Заголовок | Описание | Дата выпуска (Bерсия) |
файла (Размер) |
|---|---|---|---|
|
Заявление о сборе данных при доступе к URL-адресу, начинающемуся с “https://s.brother/” |
16.09.2022 (01) |
Загрузка (0.12MB) |
Другие |
| Заголовок | Описание | Дата выпуска (Bерсия) |
файла (Размер) |
|---|---|---|---|
|
Список совместимости USB-носителей |
30.09.2021 (21.09) |
Загрузка (0.13MB) |
|
|
Каталог принадлежностей |
28.03.2023 (22.10) |
Загрузка (14.55MB) |
|
|
Каталог принадлежностей (HTML) |
29.03.2023 (23.03) |
Просмотр (-) |
Загрузите и просмотрите документ в формате PDF. Для просмотра документов в формате PDF требуется программное обеспечение Adobe® Acrobat Reader DC®. Если у вас нет данного программного обеспечения, вы можете загрузить его, щёлкнув по ссылке «Adobe® Acrobat Reader DC®».
![]()
Computerized Embroidery and Sewing Machine
Operation Manual
Product Code 885-V95/V96/V97/V98
GETTING READY
 SEWING BASICS
 UTILITY STITCHES
 EMBROIDERY
 APPENDIX
Be sure to read this document before using the machine.
We recommend that you keep this document nearby for future reference.

————————————————————————————————————————————————————
Introduction
Thank you for purchasing this embroidery and sewing machine. Before using this machine, carefully read the «IMPORTANT SAFETY INSTRUCTIONS», and then study this manual for the correct operation of the various functions.
In addition, after you have finished reading this manual, store it where it can quickly be accessed for future reference.
IMPORTANT SAFETY INSTRUCTIONS
Please read these safety instructions before attempting to use the machine.
 DANGER — To reduce the risk of electric shock
1Always unplug the machine from the electrical outlet immediately after using, when cleaning,
when making any user servicing adjustments mentioned in this manual, or if you are leaving the machine unattended.
 WARNING — To reduce the risk of burns, fire, electric shock, or injury to persons.
2Always unplug the machine from the electrical outlet when making any adjustments mentioned in the instruction manual.
•To unplug the machine, switch the machine to the symbol “O” position to turn it off, then grasp the plug and pull it out of the electrical outlet. Do not pull on the cord.
•Plug the machine directly into the electrical outlet. Do not use an extension cord.
•Always unplug your machine if the power is cut.
3 Electrical Hazards:
•This machine should be connected to an AC power source within the range indicated on the rating label. Do not connect it to a DC power source or inverter. If you are not sure what kind of power source you have, contact a qualified electrician.
•This machine is approved for use in the country of purchase only.
4 Never operate this machine if it has a damaged cord or plug, if it is not working properly, if it has
been dropped or damaged, or water is spilled on the unit. Return the machine to the nearest authorized dealer or service center for examination, repair, electrical or mechanical adjustment.
•While the machine is stored or in use if you notice anything unusual, such as an odor, heat, discoloration or deformation, stop using the machine immediately and unplug the power cord.
•When transporting the sewing machine, be sure to carry it by its handle. Lifting the sewing machine by any other part may damage the machine or result in the machine falling, which could cause injuries.
1

———————————————————————————————————————————————————
•When lifting the sewing machine, be careful not to make any sudden or careless movements, otherwise you may injure your back or knees.
5 Always keep your work area clear:
•Never operate the machine with any air openings blocked. Keep ventilation openings of the sewing machine and foot control free from the build up of lint, dust, and loose cloth.
•Do not store objects on the foot controller.
•Do not use extension cords. Plug the machine directly into the electrical outlet.
•Never drop or insert any object into any opening.
•Do not operate where aerosol (spray) products are being used or where oxygen is being administered.
•Do not use the machine near a heat source, such as a stove or iron; otherwise, the machine, power cord or garment being sewn may ignite, resulting in fire or an electric shock.
•Do not place this sewing machine on an unstable surface, such as an unsteady or slanted table, otherwise the sewing machine may fall, resulting in injuries.
6 Special care is required when sewing:
•Always pay close attention to the needle. Do not use bent or damaged needles.
•Keep fingers away from all moving parts. Special care is required around the machine needle.
•Switch the sewing machine to the symbol “O” position to turn it off when making any adjustments in the needle area.
•Do not use a damaged or incorrect needle plate, as it could cause the needle to break.
•Do not push or pull the fabric when sewing, and follow careful instruction when freehand stitching so that you do not deflect the needle and cause it to break.
7 This machine is not a toy:
•Your close attention is necessary when the machine is used by or near children.
•The plastic bag that this sewing machine was supplied in should be kept out of the reach of children or disposed of. Never allow children to play with the bag due to the danger of suffocation.
•Do not use outdoors.
8 For a longer service life:
•When storing this machine, avoid direct sunlight and high humidity locations. Do not use or store the machine near a space heater, iron, halogen lamp, or other hot objects.
•Use only neutral soaps or detergents to clean the case. Benzene, thinner, and scouring powders can damage the case and machine, and should never be used.
•Always consult the operation manual when replacing or installing any assemblies, the presser feet, needle, or other parts to assure correct installation.
9 For repair or adjustment:
•If the light unit is damaged, it must be replaced by an authorized dealer.
•In the event a malfunction occurs or adjustment is required, first follow the troubleshooting table in the back of the operation manual to inspect and adjust the machine yourself. If the problem persists, please consult your local authorized Brother dealer.
2

————————————————————————————————————————————————————
Use this machine only for its intended use as described in the manual.
Use accessories recommended by the manufacturer as contained in this manual.
The contents of this manual and specifications of this product are subject to change without notice. For additional product information and updates, visit our web site at www.brother.com
SAVE THESE INSTRUCTIONS
This machine is intended for household use.
This appliance is not intended for use by persons (including children) with reduced physical, sensory or mental capabilities, or lack of experience and knowledge, unless they have been given supervision or instruction concerning use of the appliance by a person responsible for their safety. Children should be supervised to ensure that they do not play with the appliance.
This appliance can be used by children aged from 8 years and above and persons with reduced physical, sensory or mental capabilities or lack of experience and knowledge if they have been given supervision or instruction concerning use of the appliance in a safe way and understand the hazards involved. Children shall not play with the appliance. Cleaning and user maintenance shall not be made by children without supervision.
FOR USERS IN THE UK, EIRE,
MALTA AND CYPRUS ONLY
IMPORTANT
•In the event of replacing the plug fuse, use a fuse approved by ASTA to BS 1362, i.e. carrying the mark, rating as marked on plug.
•Always replace the fuse cover. Never use plugs with the fuse cover omitted.
•If the available electrical outlet is not suitable for the plug supplied with this equipment, you should contact your authorized dealer to obtain the correct lead.
3

———————————————————————————————————————————————————
|
Contents |
|
|
Introduction ………………………………………………………………………………………………………… |
1 |
|
IMPORTANT SAFETY INSTRUCTIONS ……………………………………………………………………. |
1 |
|
Machine Features …………………………………………………………………………………………………. |
8 |
|
Accessories ………………………………………………………………………………………………………….. |
9 |
|
Included accessories ……………………………………………………………………………………………………………………….. |
9 |
|
Optional accessories ……………………………………………………………………………………………………………………… |
10 |
|
Names of Machine Parts and Their Functions …………………………………………………………. |
11 |
|
Front view ……………………………………………………………………………………………………………………………………. |
11 |
|
Needle and presser foot section ………………………………………………………………………………………………………. |
12 |
|
Right-side/rear view ………………………………………………………………………………………………………………………. |
12 |
|
Operation buttons …………………………………………………………………………………………………………………………. |
13 |
|
Operation panel ……………………………………………………………………………………………………………………………. |
14 |
|
GETTING READY |
15 |
|
Turning the Machine On/Off ………………………………………………………………………………… |
16 |
|
Power supply precautions ………………………………………………………………………………………………………………. |
16 |
|
Turning on the machine …………………………………………………………………………………………………………………. |
17 |
|
Turning off the machine …………………………………………………………………………………………………………………. |
17 |
|
LCD (Liquid Crystal Display) Operation …………………………………………………………………. |
18 |
|
Viewing the LCD …………………………………………………………………………………………………………………………… |
18 |
|
Changing the machine settings ……………………………………………………………………………………………………….. |
18 |
|
Checking machine operating procedures ………………………………………………………………………………………….. |
21 |
|
Winding/Installing the Bobbin ………………………………………………………………………………. |
22 |
|
Bobbin precautions ……………………………………………………………………………………………………………………….. |
22 |
|
Winding the bobbin ………………………………………………………………………………………………………………………. |
22 |
|
Installing the bobbin ……………………………………………………………………………………………………………………… |
27 |
|
Upper Threading ………………………………………………………………………………………………… |
31 |
|
About the spool of thread ……………………………………………………………………………………………………………….. |
31 |
|
Threading the upper thread …………………………………………………………………………………………………………….. |
32 |
|
Using the twin needle ……………………………………………………………………………………………………………………. |
36 |
|
Replacing the Needle ………………………………………………………………………………………….. |
39 |
|
Needle precautions ……………………………………………………………………………………………………………………….. |
39 |
|
Selecting the needle depending on the thread and fabric types ……………………………………………………………. |
39 |
|
Checking the needle ……………………………………………………………………………………………………………………… |
40 |
|
Replacing the needle ……………………………………………………………………………………………………………………… |
41 |
|
Replacing the Presser Foot …………………………………………………………………………………… |
43 |
|
Presser foot precautions …………………………………………………………………………………………………………………. |
43 |
|
Replacing the presser foot ………………………………………………………………………………………………………………. |
43 |
|
Removing and attaching the presser foot holder …………………………………………………………………………………. |
45 |
|
Sewing Cylindrical Pieces and Large Pieces …………………………………………………………….. |
46 |
|
Free-arm sewing ……………………………………………………………………………………………………………………………. |
46 |
|
Using extension table …………………………………………………………………………………………………………………….. |
46 |
|
SEWING BASICS |
49 |
|
Sewing ………………………………………………………………………………………………………………. |
50 |
|
General sewing procedure ……………………………………………………………………………………………………………… |
50 |
|
Stitch types …………………………………………………………………………………………………………………………………… |
51 |
|
Selecting stitching …………………………………………………………………………………………………………………………. |
51 |
|
Positioning the fabric …………………………………………………………………………………………………………………….. |
54 |
|
Starting to sew ………………………………………………………………………………………………………………………………. |
55 |
|
Securing the stitching …………………………………………………………………………………………………………………….. |
57 |
|
Cutting the thread …………………………………………………………………………………………………………………………. |
59 |
|
Setting the Stitch ………………………………………………………………………………………………… |
61 |
|
Adjusting the stitch width ……………………………………………………………………………………………………………….. |
61 |
|
Adjusting the stitch length ………………………………………………………………………………………………………………. |
62 |
|
Adjusting the thread tension ……………………………………………………………………………………………………………. |
62 |
4

————————————————————————————————————————————————————
|
Useful Functions …………………………………………………………………………………………………. |
64 |
|
Automatic sewing reverse/reinforcement stitches ……………………………………………………………………………….. |
64 |
|
Automatically cutting the thread ……………………………………………………………………………………………………… |
65 |
|
Mirroring stitches ………………………………………………………………………………………………………………………….. |
66 |
|
Saving stitch settings ……………………………………………………………………………………………………………………… |
67 |
|
Useful Sewing Tips ……………………………………………………………………………………………… |
68 |
|
Trial sewing …………………………………………………………………………………………………………………………………. |
68 |
|
Changing the sewing direction ………………………………………………………………………………………………………… |
68 |
|
Sewing curves ………………………………………………………………………………………………………………………………. |
68 |
|
Sewing thick fabrics ………………………………………………………………………………………………………………………. |
68 |
|
Sewing hook-and-loop fastener ……………………………………………………………………………………………………….. |
69 |
|
Sewing thin fabrics ………………………………………………………………………………………………………………………… |
70 |
|
Sewing stretch fabrics …………………………………………………………………………………………………………………….. |
70 |
|
Sewing an even seam allowance ……………………………………………………………………………………………………… |
70 |
|
UTILITY STITCHES |
71 |
|
Stitch Setting Chart …………………………………………………………………………………………….. |
72 |
|
Utility stitches ………………………………………………………………………………………………………………………………. |
72 |
|
Other stitches ……………………………………………………………………………………………………………………………….. |
76 |
|
Overcasting Stitches ……………………………………………………………………………………………. |
78 |
|
Sewing overcasting stitches using overcasting foot «G» ………………………………………………………………………… |
78 |
|
Sewing overcasting stitches using zigzag foot «J» ………………………………………………………………………………… |
79 |
|
Sewing overcasting stitches using the optional side cutter ……………………………………………………………………. |
80 |
|
Basic Stitching ……………………………………………………………………………………………………. |
82 |
|
Basting ………………………………………………………………………………………………………………………………………… |
82 |
|
Basic stitching ………………………………………………………………………………………………………………………………. |
82 |
|
Blind Hem Stitching ……………………………………………………………………………………………. |
84 |
|
Buttonhole Stitching/Button Sewing ………………………………………………………………………. |
87 |
|
Buttonhole sewing ………………………………………………………………………………………………………………………… |
88 |
|
Button sewing ………………………………………………………………………………………………………………………………. |
92 |
|
Zipper Insertion ………………………………………………………………………………………………….. |
94 |
|
Inserting a centered zipper ……………………………………………………………………………………………………………… |
94 |
|
Inserting a side zipper ……………………………………………………………………………………………………………………. |
96 |
|
Sewing Stretch Fabrics and Elastic Tape …………………………………………………………………. |
99 |
|
Stretch stitching …………………………………………………………………………………………………………………………….. |
99 |
|
Elastic attaching ………………………………………………………………………………………………………………………….. |
100 |
|
Appliqué, Patchwork and Quilt Stitching ……………………………………………………………… |
101 |
|
Appliqué stitching ……………………………………………………………………………………………………………………….. |
102 |
|
Patchwork (crazy quilt) stitching ……………………………………………………………………………………………………. |
103 |
|
Piecing ………………………………………………………………………………………………………………………………………. |
103 |
|
Quilting …………………………………………………………………………………………………………………………………….. |
104 |
|
Free-motion quilting …………………………………………………………………………………………………………………….. |
106 |
|
Satin stitching using the sewing speed controller ………………………………………………………………………………. |
107 |
|
Reinforcement Stitching …………………………………………………………………………………….. |
108 |
|
Triple stretch stitching ………………………………………………………………………………………………………………….. |
108 |
|
Bar tack stitching …………………………………………………………………………………………………………………………. |
108 |
|
Darning ……………………………………………………………………………………………………………………………………… |
111 |
|
Eyelet Stitching …………………………………………………………………………………………………. |
113 |
|
Decorative Stitching ………………………………………………………………………………………….. |
114 |
|
Fagoting …………………………………………………………………………………………………………………………………….. |
115 |
|
Scallop stitching ………………………………………………………………………………………………………………………….. |
116 |
|
Smocking …………………………………………………………………………………………………………………………………… |
117 |
|
Shell tuck stitching ………………………………………………………………………………………………………………………. |
118 |
|
Joining ………………………………………………………………………………………………………………………………………. |
119 |
|
Heirloom stitching ………………………………………………………………………………………………………………………. |
119 |
|
Sewing the Various Built-in Decorative Patterns ……………………………………………………. |
122 |
|
Sewing beautiful patterns ……………………………………………………………………………………………………………… |
122 |
|
Sewing patterns …………………………………………………………………………………………………………………………… |
122 |
|
Changing the stitch density …………………………………………………………………………………………………………… |
123 |
|
Changing the pattern size ……………………………………………………………………………………………………………… |
123 |
|
Changing the length for satin stitches ……………………………………………………………………………………………… |
124 |
5

———————————————————————————————————————————————————
|
Adjusting the character spacing ……………………………………………………………………………………………………… |
124 |
|
Realigning the pattern ………………………………………………………………………………………………………………….. |
125 |
|
Combining patterns ……………………………………………………………………………………………………………………… |
126 |
|
Saving patterns ……………………………………………………………………………………………………………………………. |
129 |
|
Designing a Pattern (My Custom Stitch) ……………………………………………………………….. |
131 |
|
Drawing a sketch of the pattern ……………………………………………………………………………………………………… |
131 |
|
Entering the pattern data ………………………………………………………………………………………………………………. |
132 |
|
Editing the pattern data ………………………………………………………………………………………………………………… |
133 |
|
Examples of designs …………………………………………………………………………………………………………………….. |
134 |
|
EMBROIDERY |
135 |
|
Embroidering Neatly …………………………………………………………………………………………. |
136 |
|
What to prepare ………………………………………………………………………………………………………………………….. |
136 |
|
Embroidery step by step ……………………………………………………………………………………………………………….. |
137 |
|
Attaching the Embroidery Foot …………………………………………………………………………… |
138 |
|
Attaching the embroidery foot ………………………………………………………………………………………………………. |
138 |
|
Removing the embroidery foot ……………………………………………………………………………………………………… |
140 |
|
Attaching the Embroidery Unit ……………………………………………………………………………. |
141 |
|
Embroidery unit precautions …………………………………………………………………………………………………………. |
141 |
|
Attaching the embroidery unit ……………………………………………………………………………………………………….. |
141 |
|
Removing the embroidery unit ………………………………………………………………………………………………………. |
143 |
|
Preparing the Fabric ………………………………………………………………………………………….. |
144 |
|
Attaching a stabilizer material to the fabric ……………………………………………………………………………………… |
144 |
|
Setting the fabric in the embroidery frame ……………………………………………………………………………………….. |
145 |
|
Attaching the Embroidery Frame …………………………………………………………………………. |
148 |
|
Attaching the embroidery frame …………………………………………………………………………………………………….. |
148 |
|
Removing the embroidery frame ……………………………………………………………………………………………………. |
149 |
|
Selecting Embroidery Patterns …………………………………………………………………………….. |
150 |
|
Copyright information ………………………………………………………………………………………………………………….. |
150 |
|
Embroidery pattern types ………………………………………………………………………………………………………………. |
150 |
|
LCD (liquid crystal display) operation …………………………………………………………………………………………….. |
151 |
|
Selecting alphanumeric characters …………………………………………………………………………………………………. |
154 |
|
Selecting an embroidery pattern …………………………………………………………………………………………………….. |
155 |
|
Selecting a frame pattern ………………………………………………………………………………………………………………. |
155 |
|
Using an embroidery card …………………………………………………………………………………………………………….. |
156 |
|
Embroidering ……………………………………………………………………………………………………. |
157 |
|
Checking the pattern before embroidering ………………………………………………………………………………………. |
157 |
|
Embroidering a pattern …………………………………………………………………………………………………………………. |
158 |
|
Appliquéing ………………………………………………………………………………………………………………………………. |
160 |
|
Editing and Saving Patterns ………………………………………………………………………………… |
162 |
|
Adjusting the layout and the size ……………………………………………………………………………………………………. |
162 |
|
Adjusting the thread tension ………………………………………………………………………………………………………….. |
164 |
|
Connecting character patterns ……………………………………………………………………………………………………….. |
165 |
|
Resewing …………………………………………………………………………………………………………………………………… |
166 |
|
Thread runs out partway through a design ……………………………………………………………………………………….. |
167 |
|
Stopping while embroidering ………………………………………………………………………………………………………… |
167 |
|
Using the Memory Function ……………………………………………………………………………….. |
169 |
|
Embroidery data precautions …………………………………………………………………………………………………………. |
169 |
|
Transferring embroidery patterns from the computer to machine …………………………………………………………. |
171 |
|
Saving patterns ……………………………………………………………………………………………………………………………. |
174 |
|
APPENDIX |
175 |
|
Care and Maintenance ………………………………………………………………………………………. |
176 |
|
Restrictions on oiling…………………………………………………………………………………………………………………….. |
176 |
|
Cleaning the machine surface ……………………………………………………………………………………………………….. |
176 |
|
Precautions on storing the machine…………………………………………………………………………………………………. |
176 |
|
Cleaning the race ………………………………………………………………………………………………………………………… |
176 |
|
Troubleshooting ……………………………………………………………………………………………….. |
178 |
|
Frequent troubleshooting topics ……………………………………………………………………………………………………… |
178 |
|
Upper thread tightened up …………………………………………………………………………………………………………….. |
178 |
|
Tangled thread on wrong side of fabric ……………………………………………………………………………………………. |
179 |
6

————————————————————————————————————————————————————
|
Incorrect thread tension ………………………………………………………………………………………………………………… |
182 |
|
Fabric is caught in the machine and cannot be removed…………………………………………………………………….. |
183 |
|
When the thread became tangled under the bobbin winder seat ………………………………………………………….. |
186 |
|
List of symptoms ………………………………………………………………………………………………………………………….. |
188 |
|
Error messages ……………………………………………………………………………………………………………………………. |
193 |
|
Adjusting the LCD ……………………………………………………………………………………………………………………….. |
197 |
|
Operation beep …………………………………………………………………………………………………………………………… |
197 |
|
Upgrading Your Machine’s Software Using USB Media ………………………………………….. |
198 |
|
Index ………………………………………………………………………………………………………………. |
199 |
7

———————————————————————————————————————————————————
Machine Features
aAutomatic thread cutting
The thread can be cut automatically after sewing (page 59, 65).
b Fast bobbin winding system
With the fast and simple bobbin winder, you can wind bobbins with one press of a button (page 22).
cBuilt-in stitches
You can select from the built-in stitches available, including utility stitches and decorative stitches (page 72).
dUSB port
Embroidery patterns saved in a USB flash drive (USB flash memory) can be imported to the machine by plugging the USB flash drive directly into the USB port (page 172).
eAccessory case
You can store the accessory case inside the arm of the machine as shown in the figure. Presser foot, bobbins, a seam ripper, etc. can be stored in this case.
fBobbin clip
You can use the bobbin clip to prevent the end of the thread wound onto the bobbin from loosening. Bobbin clips can be stored inside of the accessory case cover.
gBright light
The convenient LED lamp makes it easy to work on dark fabrics.
hSeven-point feed dogs
Ensure smooth, even feeding of multiple fabric layers and a variety of fabric weights (page 12).
iQuick-set bobbin
You can start sewing without pulling up the bobbin thread (page 27).
jEasy-to-use needle threader
You can thread the needle easily by one press of a lever (page 32).
kLighting Start/Stop button
When the green light is on, the machine is ready to sew. A red or orange light indicates an error or that the machine is warming up (page 13).
lEmbroidery
You can embroider built-in embroidery patterns, alphanumeric characters, framed decorations, and designs from optional embroidery cards (page 135).
mExtension table (Cover of the embroidery unit)
You can use the cover of the embroidery unit as the extension table when you sew a large material (page 46).
8
![]()
————————————————————————————————————————————————————
Accessories
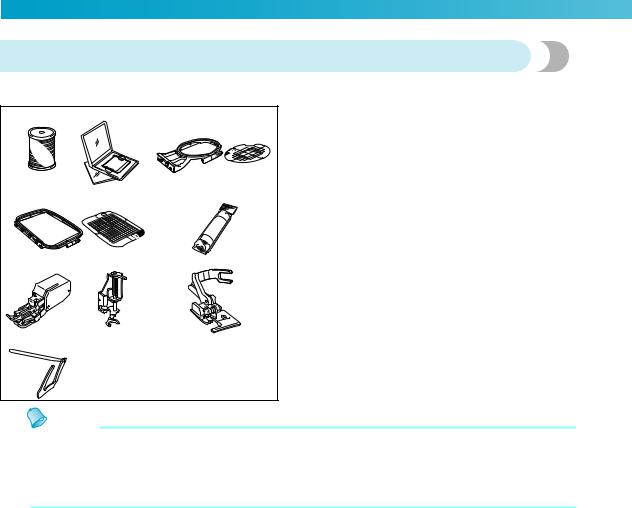
After opening the box, check that the following accessories are included. If any item is missing or damaged, contact your dealer.
Included accessories
Note
zFoot controller: Model T
This foot controller can be used on the machine with product code 885-V95/V96/V97/V98. The product code is mentioned on the machine rating plate.
zThe securing screw on the side of the presser foot holder is available through your authorized dealer. (Part code: 132730-122)
|
1 |
2. |
3. |
4. |
5. |
6. |
7. |
8. |
9. |
10.*1 |
|
11. |
12. |
13. |
14. |
15. |
16. |
17. |
18. |
19. |
|
|
20. |
21. |
22. |
23. |
24. |
25. |
26. |
27. |
||
|
28. |
29. |
30. |
31. |
32. |
|
*1 |
75/11 2 needles, 90/14 2 needles , 90/14 2 needles: Ball point needle (gold colored) |
|||||||
|
No. |
Part Name |
Part Code |
No. |
Part Name |
Part Code |
|||
|
Americas |
Others |
Americas |
Others |
|||||
|
1 |
Buttonhole foot «A» |
XC2691-023 |
17 |
Spool cap (medium) (on |
XE1372-001 |
|||
|
machine) |
||||||||
|
2 |
Overcasting foot «G» |
XE6305-101 |
18 |
Spool cap (small) |
130013-124 |
|||
|
3 |
Monogramming foot «N» |
XD0810-031 |
19 |
Extra spool pin |
XE2241-001 |
|||
|
4 |
Zipper foot «I» |
X59370-021 |
20 |
Spool net |
XA5523-020 |
|||
|
5 |
Zigzag foot «J» (on machine) |
XZ5134-001 |
21 |
Foot controller |
XD0501-021 (EU area) |
|||
|
XC8816-071 (other areas) |
||||||||
|
6 |
Blind stitch foot «R» |
XE2650-001 |
22 |
Scissors |
XC1807-121 |
|||
|
7 |
Button fitting foot «M» |
XE2137-001 |
23 |
Disc-shaped screwdriver |
XC1074-051 |
|||
|
8 |
Seam ripper |
XZ5082-001 |
24 |
Embroidery foot «Q» |
XD0474-151 |
|||
|
Embroidery set (medium) |
||||||||
|
Bobbin (4) |
SA156 |
SFB |
25 |
H 10 cm X W 10 cm |
SA432 |
EF62 |
||
|
9 |
(H 4 inches X W 4 inches) |
|||||||
|
SABOBCLIP |
||||||||
|
Bobbin clip (4) |
(U.S.A.) |
BCL |
26 |
Embroidery bobbin thread |
SAEBT |
EBT-CEN |
||
|
SABOBCLIPC |
(white) |
|||||||
|
(Canada) |
||||||||
|
10 |
Needle set |
X58358- |
021 |
27 |
Accessory case |
XE3062-003 |
||
|
11 |
Twin needle |
X59296-121 |
XE3862-001 |
|||||
|
28 |
Hard case |
(885-V95/V96/V97) |
||||||
|
12 |
Cleaning brush |
X59476-021 |
||||||
|
XF7617-001 (885-V98) |
||||||||
|
13 |
Eyelet punch |
XZ5051-001 |
29 |
Operation manual |
XE7929-101 |
|||
|
14 |
Screwdriver |
XC4237-021 |
30 |
Quick reference guide |
XE7930-001 |
|||
|
15 |
Touch pen |
XE3069-001 |
31 |
Grid sheet set |
SA527 |
GS4 |
||
|
16 |
Spool cap (large) |
130012-024 |
32 |
Felt with stabilizer |
182986- |
024 |
9
———————————————————————————————————————————————————
Optional accessories
The following are available as optional accessories.
|
1. |
2. |
3. |
|
4. |
5. |
|
|
6. |
7. |
8. |
|
9. |
||
|
Memo |
|
No. |
Part Name |
Part Code |
||
|
Americas |
Others |
|||
|
1 |
Embroidery bobbin |
SAEBT999 |
EBT-CEBN |
|
|
thread (black) |
||||
|
2 |
Embroidery card |
|||
|
Embroidery set (small) |
||||
|
3 |
H 2 cm × W 6 cm |
SA431 |
EF61 |
|
|
(H 1 inch × W 2-1/2 inches) |
||||
|
Embroidery set (large) |
||||
|
4 |
H 17 cm × W 10 cm |
SA434 |
EF71 |
|
|
(H 6-7/10 inches × W 4 |
||||
|
inches) |
||||
|
5 |
Water soluble stabilizer |
SA520 |
BM5 |
|
|
Stabilizer material for |
SA519 |
BM3 |
||
|
embroidery |
||||
|
6 |
Walking foot |
SA140 |
F033N |
|
|
7 |
Open toe quilting foot |
SA187 |
F061 |
|
|
8 |
Side cutter «S» |
SA177 |
F054 |
|
|
9 |
Quilting guide |
SA132 |
F016N |
|
zTo obtain optional accessories or parts, contact your sales representative, the nearest authorized service center or visit the website at “ http://www.brother.com/ ”.
zAll specifications are correct at the time of printing. The part codes are subject to change without notice.
zVisit your nearest authorized dealer for a complete listing of optional accessories available for your machine.
10
————————————————————————————————————————————————————
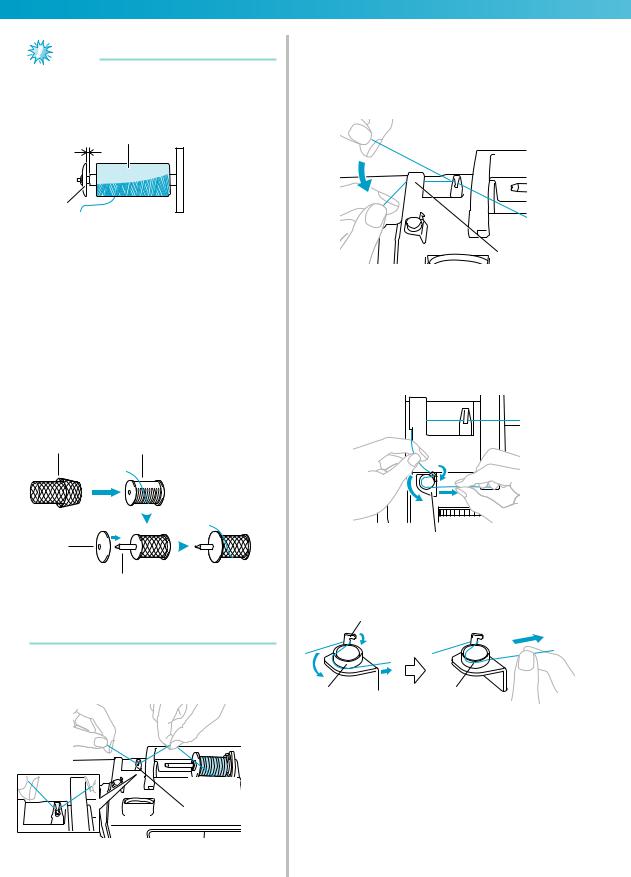
Names of Machine Parts and Their Functions
The names of the various parts of the sewing machine and their functions are described below. Before using the sewing machine, carefully read these descriptions to learn the names of the machine parts.
Front view
aThread guide cover (page 24, 33)
Pass the thread under this thread guide cover when winding the bobbin thread and threading the machine.
bThread guide (page 24, 33)
Pass the thread under this thread guide when winding the bobbin thread and threading the machine.
cSpool pin (page 23, 32)
Place a spool of thread on the spool pin.
dBobbin winder (page 22)
Use the bobbin winder when winding the bobbin.
eLCD (liquid crystal display) (touch panel) (page 18) Setting for the selected stitch or pattern and error messages appear in the LCD.
fOperation panel (page 14)
Use the keys on this panel to select stitches or embroidery patterns, or check how to use the sewing machine, etc.
gEmbroidery unit connector slot (page 141) Plug in the connector for the embroidery unit.
hPresser foot lever (page 54)
Raise and lower the presser foot lever to raise and lower the presser foot .
iOperation buttons (page 13)
Use these buttons to operate the machine.
jFlat bed attachment (page 46)
Remove the flat bed attachment when sewing cylindrical pieces such as sleeve cuffs.
kThread cutter (page 60)
Pass the threads through the thread cutter to cut them.
lNeedle threader lever (page 35)
Use the needle threader lever to thread the needle.
mThread tension dial (page 62, 164)
Adjust the upper thread tension with this dial.
n Thread take-up lever (page 34)
oBobbin-winding thread guide and pretension disc (page 24)
Pass the thread under this thread guide and around the pretension disc when winding the bobbin thread.
11
———————————————————————————————————————————————————
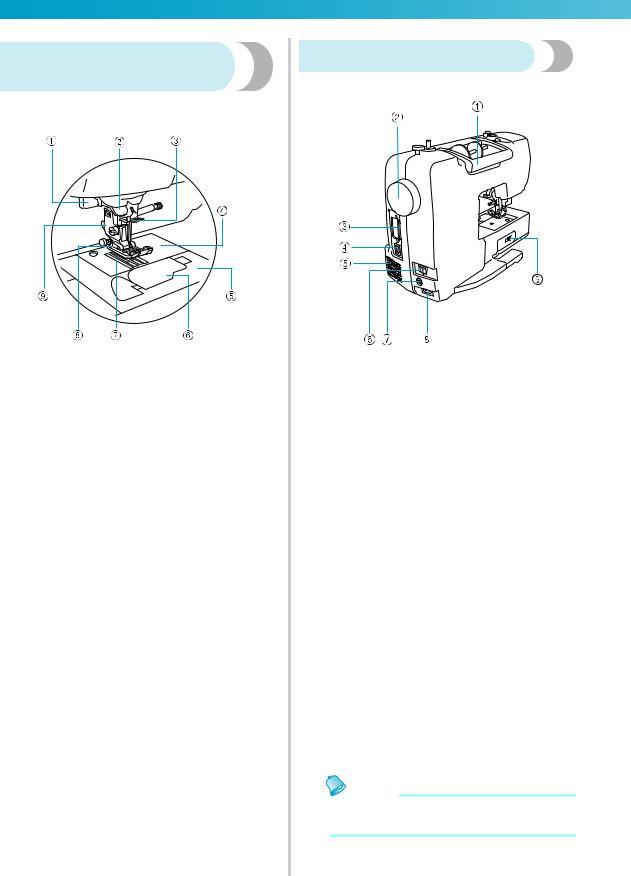
Needle and presser foot section
aButtonhole lever (page 90)
Lower the buttonhole lever when sewing buttonholes and bar tacks.
bThread guide disk (page 34)
Pass the thread through the thread guide disk when using the needle threader to thread the needle.
cNeedle bar thread guide (page 34)
Pass the upper thread through the needle bar thread guide.
dNeedle plate (page 70)
The needle plate is marked with guides for sewing straight seams.
eNeedle plate cover (page 177)
Remove the needle plate cover to clean the bobbin case and race.
fBobbin cover/bobbin case (page 28)
Remove the bobbin cover, and then insert the bobbin into the bobbin case.
gFeed dogs (page 92)
The feed dogs feed the fabric in the sewing direction.
hPresser foot (page 43, 54)
The presser foot applies pressure consistently on the fabric as the sewing takes place. Attach the appropriate presser foot for the selected stitching.
iPresser foot holder (page 45)
The presser foot is installed onto the presser foot holder.
Right-side/rear view
aHandle
Carry the sewing machine by its handle when transporting the machine.
bHandwheel (page 54)
Turn the handwheel toward you (counterclockwise) to raise and lower the needle to sew one stitch.
cEmbroidery card slot (page 156)
Insert the embroidery card.
dUSB port (for a USB flash drive (USB flash memory))
In order to import patterns from a USB flash drive (USB flash memory), plug the USB media directly into the USB port.
eAir vent
The air vent allows the air surrounding the motor to be exchanged. Do not cover the air vent while the sewing machine is being used.
fMain power switch (page 17)
Use the main power switch to turn the sewing machine on and off.
gFoot controller jack (page 56)
Insert the plug on the end of the foot controller cable into the foot controller jack.
hPower supply jack (page 17)
Insert the plug on the power supply cord into the power supply jack.
iDrop feed lever (page 92)
Use the drop feed lever to lower the feed dogs.
Memo
zRefer to pages 11 through 14 while you are learning to use your machine.
12
————————————————————————————————————————————————————
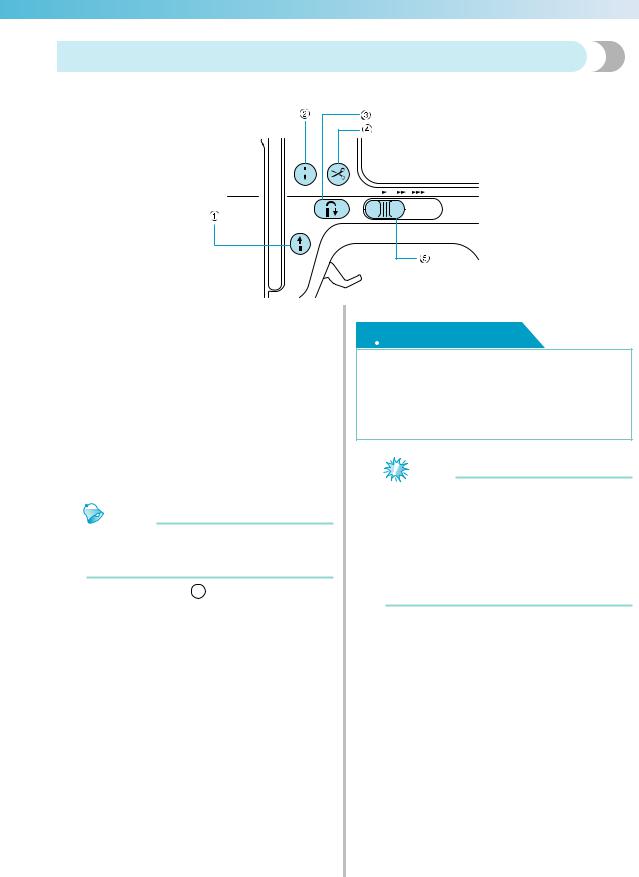
Operation buttons
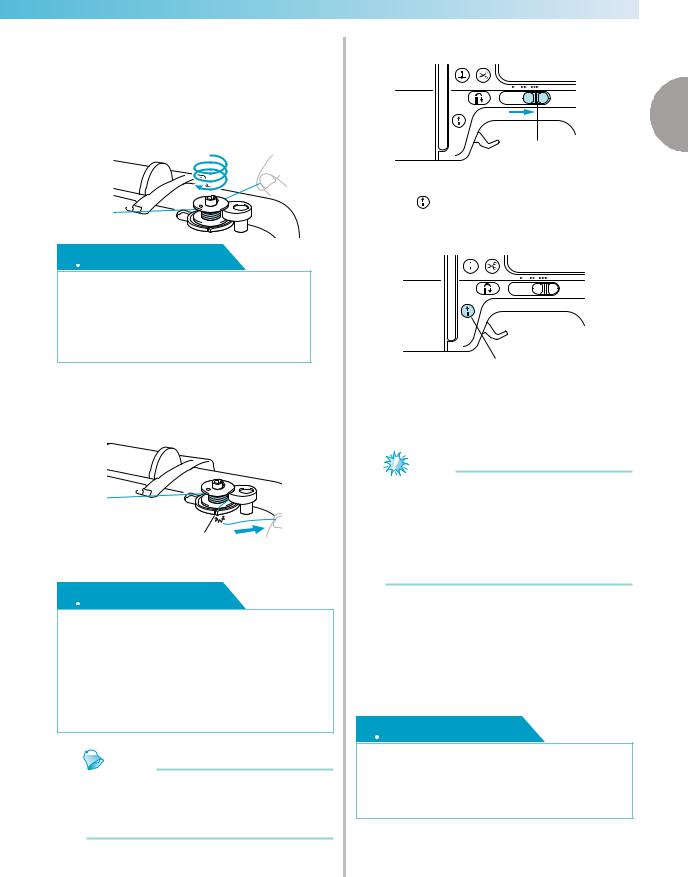
The operation buttons help you to easily perform various basic sewing machine operations.
aStart/stop button 
Press the start/stop button to start or stop sewing. The machine sews at a slow speed at the beginning of sewing while the button is pressed. When sewing is stopped, the needle is lowered in the fabric. For details, refer to «Starting to sew» (page 55).
The button changes color according to the machine’s operation mode.
|
Green: |
The machine is ready to sew or is |
|
sewing. |
|
|
Red: |
The machine can not sew. |
|
Orange: |
The machine is winding the bobbin |
|
thread, or the bobbin winder shaft is |
|
|
moved to the right side. |
Memo
When the foot controller is plugged in,  (Start/stop button) cannot be used to
start sewing.
bNeedle position button 
Press the needle position button to raise or lower the needle. Be sure to raise the needle before threading the needle. Use this button to change the sewing direction or for detailed sewing in small areas. Pressing the button twice sews one stitch.
cReverse/reinforcement stitch button 
Press the reverse/reinforcement stitch button to sew reverse stitches or reinforcement stitches. Reverse stitches are sewn by keeping the button pressed down to sew in the opposite direction. Reinforcement stitches are sewn by sewing 3 to 5 stitches on top of each other. For details, refer to «Securing the stitching» (page 57).
dThread cutter button 
Press the thread cutter button after sewing is stopped to cut both the upper thread and the bobbin threads. For details, refer to «Cutting the thread» (page 59).
 CAUTION
●Do not press the thread cutter button after the threads have already been cut, otherwise the needle may break, the threads may become tangled or damage to the machine may occur.
Note
Do not press the thread cutter button if there is no fabric under the presser foot or while the machine is sewing, otherwise damage to the machine may occur.
When cutting nylon thread or other special threads, use the thread cutter on the side of the machine. For details, refer to «Using the thread cutter» (page 60).
eSewing speed controller 
Slide the sewing speed controller to adjust the sewing speed.
13
———————————————————————————————————————————————————
Operation panel
The front operation panel has an LCD (liquid crystal display) and operation keys.
aLCD (liquid crystal display) (touch panel)
Setting for the selected stitch or pattern and error messages appear in the LCD.
Touch the keys displayed on the LCD with your finger or the touch pen to perform operations.
For details, refer to «LCD (Liquid Crystal Display) Operation» (page 18).
bBack key 
Press to return to the previous screen.
cPrevious page key 
Displays the previous page when there are items that are not displayed on the LCD.
dNext page key 
Displays the next page when there are items that are not displayed on the LCD.
eMemory key 
Press to save character embroidery, combined stitch patterns, My Custom Stitch patterns, etc. in the sewing machine’s memory.
fUtility stitch key 
Press this key to select a utility stitch or decorative stitch or to design a stitch pattern using the My Custom Stitch function.
gEmbroidery key 
Press this key to sew embroidery.
h Settings key
Press to set the needle stop position, the buzzer sound, and more.
iSewing machine help key 
Press to get help on using the sewing machine. Displays simple explanations of setting upper thread / bobbin winding / setting bobbin thread / needle replacement / embroidery unit attachment / embroidery frame attachment / embroidery foot attachment / presser foot replacement.
14

1GETTING READY
The various preparations required before starting to sew are described in this chapter.
|
Turning the Machine On/Off ………………………………………………………………………. |
16 |
|
LCD (Liquid Crystal Display) Operation………………………………………………………… |
18 |
|
Winding/Installing the Bobbin……………………………………………………………………… |
22 |
|
Upper Threading ……………………………………………………………………………………….. |
31 |
|
Replacing the Needle …………………………………………………………………………………. |
39 |
|
Replacing the Presser Foot ………………………………………………………………………….. |
43 |
|
Sewing Cylindrical Pieces and Large Pieces……………………………………………………. |
46 |

GETTING READY ————————————————————————————————————————————
Turning the Machine On/Off
This section explains how to turn the sewing machine on and off.
Power supply precautions
Be sure to observe the following precautions concerning the power supply.
 WARNING
●Use only regular household electricity for the power source. Using other power sources may result in fire, electric shock, or damage to the machine.
●Make sure that the plugs on the power cord are firmly inserted into the electrical outlet and the power supply jack on the machine. Otherwise, a fire or electric shock may result.
●Do not insert the plug on the power cord into an electrical outlet that is in poor condition.
●Turn off the main power and remove the plug in the following circumstances:
•When you are away from the machine
•After using the machine
•When the power fails during use
•When the machine does not operate correctly due to a bad connection or a disconnection
•During electrical storms
 CAUTION
●Use only the power cord included with this machine.
●Do not use extension cords or multi-plug adapters with many other appliances plugged in to them. Fire or electric shock may result.
●Do not touch the plug with wet hands. Electric shock may result.
●When unplugging the machine, always turn off the main power first. Always grasp the plug to remove it from the outlet. Pulling on the cord may damage the cord, or lead to fire or electric shock.
●Do not allow the power cord to be cut, damaged, modified, forcefully bent, pulled, twisted, or bundled. Do not place heavy objects on the cord. Do not subject the cord to heat. These things may damage the cord and cause fire or electric shock. If the cord or plug is damaged, take the machine to your authorized dealer for repairs before continuing use.
●Unplug the power cord if the machine is not to be used for a long period of time. Otherwise a fire may result.
16
————————————————————————————————————————————————————
Turning on the machine
Prepare the included power cord.
a Make sure that the sewing machine is turned off (the main power switch is set to »  «), and then plug the power supply cord into the power supply jack on the right side of the machine.
b Insert the plug of the power supply cord into a household electrical outlet.
1
a Power supply jack
c Press the right side of the main power switch on the right side of the machine to turn the machine on (set it to «|»).
The light, LCD and  (Start/stop button) light up when the machine is turned on.
Memo
When the machine is turned on, the needle and the feed dogs will make sound when they move; this is not a malfunction.
Turning off the machine
|
When you have finished using the sewing machine, |
||
|
turn it off. In addition, before transporting the sewing |
1 |
|
|
machine to another location, be sure to turn it off. |
||
a Make sure that the machine is not sewing.
b Press the left side of the main power switch on the right side of the machine to turn the machine off (set it to »  «).
«).
The light, LCD and  (Start/stop button) go off when the machine is turned off.
c Unplug the power supply cord from the electrical outlet.
Grasp the plug when unplugging the power supply cord.
d Unplugjack. the power cord from the power supply
Note
If a power outage occurs while the sewing machine is being operated, turn off the sewing machine and unplug the power supply cord. When restarting the sewing machine, follow the necessary procedure to
correctly operate the machine. (For U.S.A. only)
This appliance has a polarized plug (one blade wider than the other). To reduce the risk of electrical shock, this plug is intended to fit in a polarized outlet only one way. If the plug does not fit fully in the outlet, reverse the plug. If it still does not fit, contact a qualified electrician to install the proper outlet. Do not modify the plug in any way.
Turning the Machine On/Off 17
GETTING READY ————————————————————————————————————————————
LCD (Liquid Crystal Display) Operation
Selected stitch, pattern settings and messages are displayed on the LCD (liquid crystal display) on the front of the sewing machine. Change the screen on the LCD using the keys on the right side of the LCD, and make operations by directly touching the icons with your finger or a touch pen. For details, refer to «Operation panel» (page 14).
Viewing the LCD
When the power is turned on, the LCD comes on. When you touch the LCD screen according to the message displayed on the screen with your finger or a touch pen, the following utility stitch selection screen is displayed.
|
1 |
l |
|
|
k |
||
|
2 |
0 |
|
|
3 |
9 |
|
|
8 |
||
|
4 |
7 |
|
|
5 |
6 |
a Selected stitch
b Presser foot to be used c Stitches
d Stitch settings and twin needle sewing e Stitch width
f Stitch length
g Number of the selected stitch h Number of stitches contained
i Horizontal mirror image j Automatic thread cutting
k Automatic reverse/reinforcement
lSingle/twin needle sewing and needle stop position
Memo
Press 

 (Utility stitch key) to display the screen for selecting the stitch type. The details are explained in «Stitch types» (page 51).
A different screen is displayed when the embroidery unit is attached. The details are explained in «Selecting an embroidery pattern» (page 155).
Refer to «Error messages» (page 193) for messages displayed on the LCD.
Depending on the model of sewing machine, an animation may be displayed when the power is turned on. When an animation is displayed, the screen above will be displayed if you touch the LCD with your finger.
Changing the machine settings
Various sewing machine operations and sewing settings can be changed.
The stitch or machine attributes that can be set are listed below. For details on operation, refer to page 20.
|
Attribute |
Icon |
Details |
Settings |
|
|
Needle position |
Specifies where the needle is positioned when |
Down |
Up |
|
|
the sewing machine is stopped. |
||||
|
Stitch width |
Allows the stitch width to be adjusted with the |
|||
|
control |
sewing speed controller (page 107). |
|||
|
Vertical pattern |
Adjusts the up and down position of the pattern |
-9 to +9 |
||
|
adjustment |
(page 125 ). |
|||
18
![]()
————————————————————————————————————————————————————
|
Attribute |
Icon |
Details |
Settings |
||
|
Character |
Adjusts the space between characters when |
0 to 10 |
|||
|
spacing |
sewing alphanumeric characters. (page 124) |
||||
|
1 |
|||||
|
Changes the thread color display on the |
Thread color/Time to |
||||
|
embroidery screen (page 151). |
embroider/Needle count/ |
||||
|
Thread color |
Thread number (#123) |
||||
|
display |
Embroidery/Country/Madeira |
||||
|
(When «Thread No.#123» is selected) |
poly/Madeira rayon/Sulky/ |
||||
|
Robison Anton |
|||||
|
Display unit |
Selects the measurement units that are |
mm/INCH |
|||
|
displayed (only for embroidering) (page 152). |
|||||
|
Buzzer |
Specifies whether or not a beep is sounded with |
||||
|
each operation (page 197). |
|||||
|
Sets whether or not to display the opening |
|||||
|
Opening screen |
screen when the power is turned on. |
||||
|
(There are models where this cannot be |
|||||
|
changed.) |
|||||
|
Selects whether «1 Straight stitch (left)» or |
|||||
|
Initial needle |
«3 Straight stitch (middle)» that is |
||||
|
position |
|||||
|
automatically selected when the machine is |
|||||
|
turned on. |
|||||
|
English/German/French/ |
|||||
|
Allows the language used in the screens to be |
Italian/Dutch/Spanish/ |
||||
|
Language |
Japanese/Danish/Norwegian/ |
||||
|
changed. |
|||||
|
Finnish/Swedish/Portuguese/ |
|||||
|
Russian/Korean/Thai/others |
|||||
|
LCD brightness |
Adjust the brightness of the LCD (page 197). |
Lighter |
Darker |
||
|
Displays the service count and the total number |
|||||
|
of embroidery stitches. The service count is a |
|||||
|
Stitch counter |
reminder to take your machine in for regular |
— |
|||
|
servicing. (Contact your authorized dealer for |
|||||
|
details.) |
|||||
|
Product number |
NO.: |
The «NO.» is the number for the embroidery and |
— |
||
|
sewing machine. |
|||||
|
Program version |
Version: |
Displays the program version. |
— |
||
Memo
z The item shown in reverse highlighting are the settings at the time of purchase.
LCD (Liquid Crystal Display) Operation 19

GETTING READY ————————————————————————————————————————————
aTurn on the sewing machine.
X The LCD comes on.
bPresspanel. (Settings key) on the display
|
X The setting screen appears. |
||
|
cPress the item to be set. |
(Previous page |
|
|
Switch the screen using |
||
|
key) and |
(Next page key). |
•The following screens show their default settings.
Example: Changing the needle stop position
dWhen settings are complete, press  (Back key).
X The initial stitch screen appears again.
Memo
z«NO.» is the individual number for the sewing machine.
z«VERSION» is the program version which is installed in the sewing machine.
zSettings that are changed are saved even if the power is turned off.
20

————————————————————————————————————————————————————
Checking machine operating procedures
Simple explanations can be referred on the LCD display for the following items.
Displays simple explanations of setting upper thread / bobbin winding / setting bobbin thread / needle replacement / embroidery unit attachment / embroidery frame attachment / embroidery foot attachment / presser foot replacement on the LCD.
a Turn on the sewing machine.
The LCD comes on.
b Press  (Sewing machine help key) on the display panel.
The sewing machine help screen appears.
c Press the item to be displayed.
ab c d
hg f e
a Upper threading b Bobbin winding c Bobbin installation
d Needle replacement
e Presser foot replacement
f Embroidery foot attachment g Embroidery frame attachment
hEmbroidery unit attachment
The first screen describing the procedure for the selected topic appears.
d Press  (Next page key) to switch to the next page.
If you press  (Previous page key), you return to the previous page.
|
Press |
(Back key) to return to the item |
1 |
|
selection screen. |
Example: Upper threading
e After you finish viewing, press  (Back key) two times.
The initial stitch screen appears again.
Memo
For details on each topic, refer to the corresponding page in this Operation Manual.
LCD (Liquid Crystal Display) Operation 21
GETTING READY ————————————————————————————————————————————
Winding/Installing the Bobbin
This section describes how to wind the thread onto the bobbin, and then insert the bobbin thread.
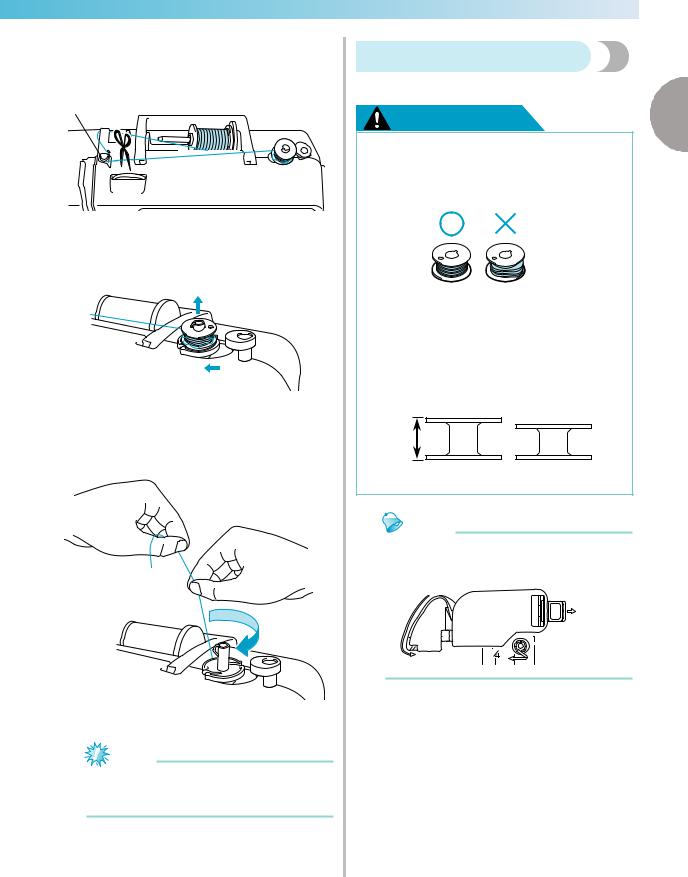
Bobbin precautions
Be sure to observe the following precautions concerning the bobbin.
 CAUTION
●Only use the Bobbin (part code: SA156, SFB) designed specifically for this sewing machine. Use of any other bobbin may result in injuries or damage to the machine.
●The included bobbin was designed specifically for this sewing machine. If bobbins from other models are used, the machine will not operate correctly. Use only the included bobbin or bobbins of the same type (part code: SA156, SFB).
Actual size
11.5 mm (7/16 inch)
Winding the bobbin
Wind the thread around the bobbin to prepare the bobbin thread.


 b a
b a
c
a Bobbin-winding thread guide b Bobbin winder shaft
c Bobbin
22

————————————————————————————————————————————————————
a Turn on the sewing machine.
bPlace the bobbin on the bobbin winder shaft so that the spring on the shaft fits into the notch in the bobbin.
Press down on the bobbin until it snaps into place.
a
b
a Notch
b Bobbin winder shaft spring
c Slide the bobbin winder in the direction of the arrow until it snaps into place.
 (Start/stop button) lights up in orange.
d Pick up the spool pin and remove the spool cap that is inserted onto the spool pin.
a Spool cap b Spool pin
|
Place the spool of thread for the bobbin onto |
|
|
e the spool pin. |
|
|
Slide the spool onto the pin so that the spool is |
|
|
horizontal and the thread unwinds to the front |
|
|
at the bottom. |
1 |
Memo
For embroidering, use the embroidery bobbin thread.
Note
If the spool is not positioned so that the thread unwinds correctly, the thread may become tangled around the spool pin.
f Slide the spool cap onto the spool pin and return the spool pin to its original position.
Slide the spool cap as far as possible to the right as shown, with the rounded side on the left.
 CAUTION
●If the spool or the spool cap is not positioned correctly, the thread may become tangled around the spool pin or the machine may be damaged.
●Three spool cap sizes are available, allowing you to choose a spool cap that best fits the size of spool being used. If the spool cap is too small for the spool being used, the thread may catch on the slit in the spool or the machine may be damaged.
●
Winding/Installing the Bobbin 23
GETTING READY ————————————————————————————————————————————
Note
When sewing with fine, cross-wound thread, use the small spool cap, and leave a small space between the cap and the spool.
cb
a
a Spool cap (small)
b Spool (cross-wound thread) c Space
When using thread that winds off quickly, such as transparent nylon thread or metallic thread, place the spool net over the spool before placing the spool of thread onto the spool pin. If the spool net is too long, fold it to fit the size of the spool.
When the spool net is used, the upper thread tension may become tighter. Before sewing, refer to «Adjusting the thread tension» (page 62).
ab
c
d
a Spool net b Spool
c Spool cap d Spool pin
g Pull the thread from the spool and pass the thread under the hook of thread guide.
h Pass the thread behind the thread guide cover and to the front.
While holding the thread near the spool with your right hand, pull the thread with your left hand as shown below.
a
a Thread guide cover
i Pull the thread to the right, pass it under the hook of the bobbin-winding thread guide, and then wind the thread counterclockwise under the pretension disc, pulling it in as far as possible.
a
a Bobbin-winding thread guide
Make sure that the thread passes under the pretension disk.
b
c  d
d
b Hook
c Pretension disk
d Pull it in as far as possible.
24
————————————————————————————————————————————————————
j Wind the end of the thread clockwise around the bobbin five or six times.
While using your left hand to hold the thread that was passed through the bobbin-winding thread guide, use your right hand to wind the end of the thread.
Wind five or six times.
 CAUTION
●Be sure to pull the thread tightly and wind it clockwise. If the thread is wound counterclockwise, the thread may wind around the bobbin winder shaft.
k Pass the end of the thread through the guide slit in the bobbin winder seat, and then pull the thread to the right to cut it.
a
aGuide slit in bobbin winder seat (with built-in cutter)
 CAUTION
●Be sure to cut the thread as described. If the bobbin is wound without cutting the thread using the cutter built into the slit in the bobbin winder seat, the thread may become tangled in the bobbin or the needle may bend or break when the bobbin thread starts to run out.
Memo
Make sure that the thread is correctly set before starting the bobbin winding. Otherwise the thread may become tangled and fail to wind the thread.
l Slide the sewing speed controller to the right.
1
|
a |
|
|
a Speed controller |
|
|
Press |
(Start/stop button) once. |
m When the foot controller is plugged in, press down on the foot controller.
a
a Start/stop button
The bobbin starts winding and «Winding bobbin thread…» is displayed on the LCD screen.
Note
Do not get away from the machine while winding the bobbin. Make sure the bobbin thread is being wound correctly. If the bobbin thread is wound incorrectly, press
 (Start/stop button) or operate the foot controller immediately to stop the bobbin winding.
n When the bobbin winding stops or becomes slow, press  (Start/stop button) once to stop the machine.
When the foot controller is plugged in, remove your foot from the foot controller.
The bobbin winding will stop.
 CAUTION
●When the bobbin winding stops or becomes slow, stop the machine. Otherwise, the sewing machine may be damaged.
Winding/Installing the Bobbin 25
GETTING READY ————————————————————————————————————————————
o Cut the thread with scissors, slide the bobbin winder shaft to the left, and then remove the bobbin from the shaft.
Memo
If the bobbin winder shaft is set to the right side, the needle will not move. (Sewing is impossible.)
p Slide the sewing speed controller back to its original position.
Memo
When the sewing machine is started or the handwheel is turned after winding the bobbin, the machine will make a clicking sound; this is not a malfunction.
■When the thread became tangled under the bobbin winder seat.
If the bobbin winding starts when the thread is not passed under the pretension disk of the bobbinwinding thread guide correctly, the thread may become tangled under the bobbin winder seat.
In such a case, wind off the thread according to the following procedure.
b
a
a Thread
b Bobbin winder seat
 CAUTION
●Do not remove the bobbin winder seat even if the thread become tangled under the bobbin winder seat. It may result in injuries.
●Do not remove the screw of the bobbin winder presser, otherwise the machine may be damaged; you cannot wind off the thread by removing the screw.
a
a Screw of the bobbin winder presser
aIf the thread become tangled under the bobbin winder seat, press  (Start/stop button) once to stop the bobbin winding.
When the foot controller is plugged in, remove your foot from the foot controller.
26
————————————————————————————————————————————————————
bCut the thread with scissors beside the bobbinwinding thread guide.
a
a Bobbin-winding thread guide
cSlide the bobbin winder shaft to the left, and then remove the bobbin from the shaft.
dHold the thread end with your left hand, and wind off the thread clockwise near the bobbin with your right hand as shown below.
eWind the bobbin again.
Note
Make sure that the thread passes under the pretension disk of the bobbin-winding thread guide correctly (page 24).
Installing the bobbin
|
Install the bobbin wound with thread. |
|
|
CAUTION |
1 |
●Use a bobbin that has been correctly wound with thread, otherwise the needle may break or the thread tension will be incorrect.
●The included bobbin was designed specifically for this sewing machine. If bobbins from other models are used, the machine will not operate correctly. Use only the included bobbin or bobbins of the same type (part code: SA156, SFB).
Actual size
11.5 mm (7/16 inch)
Memo
The order that the bobbin thread should be passed through the bobbin case is indicated by marks that surround the bobbin case.
Winding/Installing the Bobbin 27
GETTING READY ————————————————————————————————————————————
a Press  (Needle position button) once or twice to raise the needle, and then raise the presser foot lever.
a
 b
b
a Needle position button b Presser foot lever
b Turn off the sewing machine.
c Slide the bobbin cover latch to the right.
ab
a Bobbin cover b Latch
The bobbin cover opens.
d Remove the bobbin cover.
eHold the bobbin with your right hand and hold the end of the thread with your left hand.
• Be careful not to drop the bobbin.
f Insert the bobbin into the bobbin case with your right hand.
• Be sure to insert the bobbin correctly.
 CAUTION
●Be sure to insert the bobbin and depress it to the bottom with your finger. Otherwise, the thread may break or the thread tension will be incorrect.
●Be sure to thread the machine as indicated. Otherwise, the thread may break or the thread tension will be incorrect.
g Lightly hold down the bobbin with your right hand, and then guide the thread as shown with your left hand.
h Pass the thread through the slot as shown, and then pull the thread out toward the front.
a
a Cutter
The cutter cuts the thread.
28
![]()
————————————————————————————————————————————————————
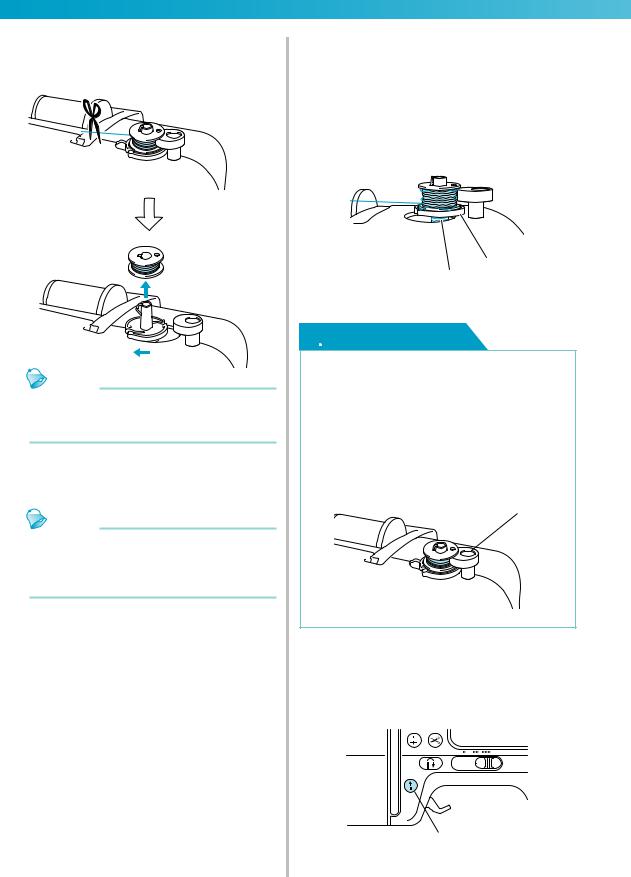
Note
If the thread is not correctly inserted through the tension-adjusting spring of the bobbin case, it may cause incorrect thread tension (page 62).
a
a Tension-adjusting spring
i Reattach the bobbin cover.
Insert the tab in the lower-left corner of the bobbin cover, and then lightly press down on the right side.
|
a |
b |
2 |
||||
 1
1
a Tab
b Lower-left corner
The bobbin threading is finished. You can begin sewing without pulling up the bobbin thread.
Next, thread the upper thread. Continue with the procedure in «Upper Threading» (page 31).
Memo
When making gathers or before free-motion quilting, pull up the bobbin thread by following the procedure in «When pulling up the bobbin thread may be necessary».
■When pulling up the bobbin thread may be necessary
When making gathers or before free-motion quilting, first pull up the bobbin thread as described below.
|
aThread the upper thread. |
1 |
• Refer to «Upper Threading» (page 31).
bInsert the bobbin into the bobbin case.
•Refer to steps c through f of «Installing the bobbin» (page 28).
cPass the bobbin thread through the slot.
Note
Do not cut the thread with the cutter.
Remove the bobbin cover.
dWhile lightly holding the upper thread with your left hand, press  (Needle position button) once or twice to raise the needle.
a
a Needle position button
The bobbin thread is looped around the upper thread and can be pulled up.
Winding/Installing the Bobbin 29

GETTING READY ————————————————————————————————————————————
eCarefully pull the upper thread upward to pull out the end of the bobbin thread.
fPull out about 10-15 cm (4-5 inches) of the bobbin thread under the presser foot toward the rear of the machine.
gReattach the bobbin cover.
Insert the tab in the lower-left corner of the bobbin cover, and then lightly press down on the right side.
|
a |
b |
2 |
||||
 1
1
a Tab
b Lower-left corner
30

————————————————————————————————————————————————————
Upper Threading
This section describes how to position the spool for the upper thread, and then thread the needle.
1
a
a Mark on handwheel
 CAUTION
●When threading the upper thread, carefully follow the instructions. If the upper threading is not correct, the thread may become tangled or the needle may bend or break.
●The needle threader can be used with a 75/11 through 100/16 home sewing machine needle. When using special thread such as transparent nylon thread or metallic thread, the needle threader cannot be used.
●Thread with a thickness of 130/20 or thicker cannot be used with the needle threader.
●The needle threader cannot be used with the wing needle or the twin needle.
●If the needle threader cannot be used, refer to «Threading the needle manually (without using the needle threader)» (page 36).
●Never use a thread weight of 130/20 or lower.
●Use the needle and the thread in the correct combination. For details on the correct combination of needles and threads, refer to «Selecting the needle depending on the thread and fabric types» (page 39).
About the spool of thread
Information about the spools of thread is described below.
 CAUTION
●If the spool or the spool cap is not positioned correctly, the thread may become tangled around the spool pin or the needle may break.
●Three spool cap sizes are available, allowing you to choose a spool cap that best fits the size of spool being used. If the spool cap is too small for the spool being used, the thread may catch on the slit in the spool or the needle may break.
Upper Threading 31

GETTING READY ————————————————————————————————————————————
Threading the upper thread
Set the spool of thread on the spool pin, and then thread the machine.
 CAUTION
●When threading the upper thread, carefully follow the instructions. If the upper threading is not correct, the thread may become tangled or the needle may bend or break.
aTurn on the machine.
bRaise the presser foot lever.
 a
a
a Presser foot lever
X The presser foot is raised.
Memo
zIf the presser foot is not raised, the sewing machine cannot be threaded.
cPress  (Needle position button) once or twice to raise the needle.
a
a Needle position button
Note
zThe needle is correctly raised when the mark on the handwheel is at the top, as shown below. Check the handwheel and, if this
mark is not at this position, press  (Needle position button) until it is.
a
a Mark on handwheel
dPick up the spool pin and remove the spool cap that is inserted onto the spool pin.
b a
aSpool pin
bSpool cap
ePlace the spool of thread onto the spool pin.
Slide the spool onto the pin so that the spool is horizontal and the thread unwinds to the front at the bottom.
32

————————————————————————————————————————————————————
f Slide the spool cap onto the spool pin and return the spool pin to its original position.
Slide the spool cap as far as possible to the right as shown, with the rounded side on the left.
 CAUTION
●If the spool or the spool cap is not positioned correctly, the thread may become tangled around the spool pin or the needle may break.
g Pull the thread from the spool and pass the thread under the hook of the thread guide.
a
a Thread guide
h Pass the thread behind the thread guide cover and to the front.
While holding the thread near the spool with your right hand, pull the thread with your left
a
|
b |
d |
|
c |
|
|
a Thread guide cover |
|
|
b Thread guide spring |
c Thread
d When the presser foot lever is lowered
Note
When passing the thread behind the thread guide cover, be sure to use both hands. If you do not hold the thread with your right hand, the thread will be loose and you will not be able to secure the thread in the thread spring guide. It may cause incorrect thread tension.
Make sure that the presser foot lever is raised before passing the thread behind the thread guide cover. If the presser foot lever is lowered, the thread guide spring is shut and you cannot hang the thread on the thread guide spring correctly.
i Pass the thread through the guides in the order shown below.
3
 1
1
Upper Threading 33

GETTING READY ————————————————————————————————————————————
jMake sure that the thread is passed into the thread take-up lever as shown below.
a
a Thread take-up lever
Memo
zIf the needle is not raised, you cannot pass the thread into the thread take-up lever. Be sure to press the needle position button to raise the needle before passing the thread into the thread take-up lever.
kPassguide.the thread behind the needle bar thread
The thread can easily be passed behind the needle bar thread guide by holding the thread in your left hand, then feeding the thread with your right hand, as shown.
a
a Needle bar thread guide
lLower the presser foot lever to lower the presser foot.
mTurn off the machine.
nPull the end of the thread, which has been passed through the needle bar thread guide, to the left, then pass the thread through the notch of the thread guide (1), and then firmly pull the thread from the front and insert it into the slit of the thread guide disk marked «7» all the way (2).
Make sure that the thread passes the notch of the thread guide.
b
Ta
aNotch of the thread guide
bThread guide disk
oCut the thread with the cutter on the left side of the machine.
Ta
a Thread cutter
34

————————————————————————————————————————————————————
pLower the needle threader lever on the left side of the machine as much as possible to make the hook turn.
a
a Needle threader lever
Ta
Tb
aNeedle
bHook
Note
zIf the needle threader lever is not lowered as much as possible, the hook will not turn fully as shown below and the thread will not pass through the eye of the needle.
In such a case, start from n again.
zIf the needle is not raised, the needle threader cannot thread the needle. Be sure
to press  (Needle position button) to raise the needle before using the needle threader. For details, refer to step c of «Threading the upper thread» (page 32).
qRaise the needle threader lever slowly.
Ta
1
a Needle threader lever
rRaise the presser foot lever, and carefully pull the loop of the thread through the eye of the needle to pull out the end of the thread.
 CAUTION
●Do not touch a button. Do not touch the start/stop button, needle position button or reverse/reinforcement stitch button. If one of the buttons is accidentally pressed, the machine will begin sewing and your finger may be pricked with the needle or the needle may break.
●When pulling out the thread, do not pull it with extreme force, otherwise the needle may bend or break.
sPass the end of the thread through the presser foot, and then pull out about 5 cm (2 inches) of thread toward the rear of the machine.
a
a 5cm (2 inches)
X The upper threading is finished.
Upper Threading 35

GETTING READY ————————————————————————————————————————————
■Threading the needle manually (without using the needle threader)
When using specialty thread, such as transparent nylon thread or metallic thread, a wing needle or a twin needle which cannot be used with the needle threader, thread the needle as described below.
aThread the machine to the needle bar thread guide according to steps a through k on
«Threading the upper thread» (page 32).
bLower the presser foot lever.
a
a Presser foot lever
cPass the thread through the eye of the needle from front to back.
 CAUTION
●Do not touch the start/stop button, needle position button or reverse/ reinforcement stitch button. If one of the buttons is accidentally pressed, the machine will begin sewing and your finger may be pricked with the needle or the needle may break.
dRaise the presser foot lever, pass the end of the thread through the opening in the presser foot, and pull out about 5 cm (2 inches) of thread toward the rear of the machine.
Using the twin needle
With the twin needle, you can sew two parallel lines of the same stitch with two different threads. Both upper threads should have the same thickness and quality. Be sure to use the twin needle and the extra spool pin.
For details on the stitches that can be sewn with the twin needle, refer to «Stitch Setting Chart» (page 72).
a
 b
b
a Twin needle b Extra spool pin
 CAUTION
●The twin needle (part code: X59296-121) is recommended. Use of any other needle may bend the needle or damage the machine.
●Never use bent needles. Bent needles can easily break, possibly resulting in injuries.
a Install the twin needle.
• For details on installing a needle, refer to «Replacing the needle» (page 41).
b Threadeye. the upper thread for the left needle
For details, refer to steps a through k of «Threading the upper thread» (page 32).
c Manuallythread. thread the left needle with the upper
Pass the thread through the eye of the needle from the front.
 CAUTION
●The needle threader cannot be used with the twin needle. If the needle threader is used with the twin needle, the sewing machine may be damaged.
36

————————————————————————————————————————————————————
d Insert the extra spool pin into the end of the bobbin winder shaft, and install the thread spool on it. Then, thread the upper thread.
a Bobbin winder shaft b Extra spool pin
c Thread spool
Memo
When setting the thread spool, set it so that the thread winds off from the front of the spool.
e Thread the upper thread for the right side in the same way that the upper thread for the left side was threaded.
•For details, refer to steps g through j of «Threading the upper thread» (page 32).
fWithout passing the thread through the needle bar thread guide, manually thread the right
|
needle. |
|
|
Pass the thread through the eye of the needle |
|
|
from the front. |
1 |
 CAUTION
●The needle threader cannot be used with the twin needle. If the needle threader is used with the twin needle, the sewing machine may be damaged.
g Attach zigzag foot «J».
For details on changing the presser foot, refer to «Replacing the Presser Foot» (page 43).
 CAUTION
●When using the twin needle, be sure to attach zigzag foot «J». If bunched stitches occur, use presser foot «N» or use a lightweight tear-away stabilizer.
h Turn on the sewing machine and select a stitch.
•For stitch selection see «Selecting stitching» (page 51).
•See «Stitch Setting Chart» (page 72) for stitches that use a twin needle.
 CAUTION
●When using the twin needle, be sure to select an appropriate stitch, otherwise the needle may break or the machine may be damaged.
Upper Threading 37

GETTING READY ————————————————————————————————————————————
|
i Press |
. |
l Start sewing. |
|
• For details on starting to sew, refer to |
||
|
«Starting to sew» (page 55). |
||
|
Two lines of stitching are sewn parallel to |
||
|
each other. |
The screen for setting the twin needle appears.
j Press  .
.
|
Note |
|||||||||||||
|
When changing the sewing direction, press |
|||||||||||||
|
displays in reverse highlight. |
(Needle position button) to raise the |
||||||||||||
|
needle from the fabric, and then raise the |
|||||||||||||
|
The twin needle can now be used. |
presser foot lever and turn the fabric. |
||||||||||||
|
Memo |
CAUTION |
||||||||||||
|
If |
is pressed again, it returns to |
. |
|||||||||||
|
● Do not try turning the fabric with twin |
|||||||||||||
|
k Press |
(Back key). |
needle in the down position, otherwise |
|||||||||||
|
the needle may break or the machine may |
|||||||||||||
|
The initial screen appears again, and |
be damaged. |
||||||||||||
|
appears. |
|||||||||||||
 CAUTION
● When using the twin needle, be sure to select the twin needle setting, otherwise the needle may break or the machine may be damaged.
38
![]()
————————————————————————————————————————————————————
Replacing the Needle
|
This section describes how to replace the needle. |
1 |
|
Needle precautions |
 CAUTION
Only use home sewing machine needles. Use of any other needle may bend the needle or damage the machine.
Never use bent needles. Bent needles can easily break, possibly resulting in injuries.
Selecting the needle depending on the thread and fabric types
The sewing machine needle that should be used depends on the fabric and thread thickness. Refer to the following table when choosing the thread and needle appropriate for the fabric that you wish to sew.
|
Fabric Type/Application |
Thread |
Size of Needle |
|||
|
Type |
Size |
||||
|
Broadcloth |
Cotton thread |
60–90 |
|||
|
Medium weight |
|||||
|
Taffeta |
Synthetic thread |
75/11–90/14 |
|||
|
fabrics |
|||||
|
Flannel, Gabardine |
Silk thread |
50 |
|||
|
Lawn |
Cotton thread |
60–90 |
|||
|
Thin fabrics |
Georgette |
Synthetic thread |
65/9–75/11 |
||
|
Challis, Satin |
Silk thread |
50 |
|||
|
Denim |
Cotton thread |
30 |
100/16 |
||
|
Thick fabrics |
50 |
||||
|
Corduroy |
Synthetic thread |
50–60 |
90/14–100/16 |
||
|
Tweed |
Silk thread |
||||
|
Stretch fabrics |
Jersey |
Ball point needle |
|||
|
Thread for knits |
50–60 |
(gold colored) |
|||
|
Tricot |
|||||
|
75/11–90/14 |
|||||
|
Cotton thread |
50–90 |
||||
|
Easily frayed fabrics |
|||||
|
Synthetic thread |
65/9–90/14 |
||||
|
Silk thread |
50 |
||||
|
For top-stitching |
Synthetic thread |
30 |
100/16 |
||
|
Silk thread |
50–60 |
75/11–90/14 |
|||
Note
Never use a thread of weight 130/20 or lower. It may cause malfunctions.
Replacing the Needle 39

GETTING READY ————————————————————————————————————————————
Memo
The lower the thread number is, the thicker the thread, and the higher the needle number, the thicker the needle.
A 75/11 needle is already installed when the sewing machine is purchased.
■Ball point needle (gold colored)
To avoid skipped stitches use ball point needles with stretch fabrics.
■ Transparent nylon thread
Use a 90/14 to 100/16 needle, regardless of the fabric or thread.
■ Embroidery needles
Use a 75/11 home sewing machine needle. When embroidering on thick fabrics such as denim, use a 90/14 or 100/16 home sewing machine needle.
 CAUTION
The appropriate fabric, thread and needle combinations are shown in the table (page 39). If the combination of the fabric, thread and needle is not correct, particularly when sewing thick fabrics (such as denim) with thin needles (such as 65/9 to 75/11), the needle may bend or break. In addition, the stitching may be uneven or puckered or there may be skipped stitches.
Checking the needle
Sewing with a bent needle is extremely dangerous since the needle may break while the machine is being operated.
Before using the needle, place the flat side of the needle on a flat surface and check that the distance between the needle and the flat surface is even.
a
b
a Flat side
b Needle type marking
 CAUTION
If the distance between the needle and the flat surface is not even, the needle is bent. Do not use a bent needle.
40

————————————————————————————————————————————————————
Replacing the needle
Use the screwdriver and a needle that has been determined to be straight according to the instructions in «Checking the needle» (page 40).
a Press  (Needle position button) once or twice to raise the needle.
a
a Needle position button
b Turn off the sewing machine.
 CAUTION
Before replacing the needle, be sure to turn off the sewing machine. Otherwise, injuries may occur if one of the operation buttons is accidentally pressed and the machine starts sewing.
c Place fabric or paper under the presser foot and cover the holes on the needle plate.
Note
Before replacing the needle, place fabric or paper under the presser foot to prevent the needle from falling into the holes in the needle plate.
d Lower the presser foot lever.
1
a
a Presser foot lever
e Hold the needle with your left hand, and then use a screwdriver to turn the needle clamp screw toward you (counterclockwise) to remove the needle.
a
b
a Screwdriver
b Needle clamp screw
•Do not apply a strong force when loosening or tightening the needle clamp screw, otherwise certain parts of the sewing machine may be damaged.
fWith the flat side of the needle toward the rear of the machine, insert the needle until it touches the needle stopper.
a
a Needle stopper
Replacing the Needle 41

GETTING READY ————————————————————————————————————————————
g While holding the needle with your left hand, use the screwdriver to tighten the needle clamp screw.
Install the twin needle in the same way.
 CAUTION
Be sure to insert the needle until it touches the needle stopper and securely tighten the needle clamp screw with the screwdriver. Otherwise, the needle may break or damage may result.
42

————————————————————————————————————————————————————
Replacing the Presser Foot
|
This section describes how to replace the presser foot. |
1 |
|
Presser foot precautions |
Be sure to observe the following precautions concerning the presser foot.
 CAUTION
●Use the presser foot appropriate for the type of stitch that you wish to sew, otherwise the needle may hit the presser foot, causing the needle to bend or break.
●Only use presser feet designed specifically for this sewing machine. Use of any other presser foot may result in injuries or damage to the machine.
Replacing the presser foot
Replace the presser foot as described below.
Memo
zFor details on attaching the embroidery foot «Q», refer to «Attaching the Embroidery Foot» (page 138).
zZigzag foot «J» is already installed when the sewing machine is purchased.
aPress  (Needle position button) once or twice to raise the needle.
a
a Needle position button
bTurn off the sewing machine.
 CAUTION
zBefore replacing the presser foot, be sure to turn off the sewing machine. Otherwise, injuries may occur if one of the operation buttons is accidentally pressed and the machine starts sewing.
cRaise the presser foot lever.
 a
a
a Presser foot lever
X The presser foot is raised.
dPress the black button at the back of the presser foot holder.
a
b
a Black button
b Presser foot holder
XThe presser foot holder releases the presser foot.
Replacing the Presser Foot 43

GETTING READY ————————————————————————————————————————————
|
Place a different presser foot below the holder |
||
|
e so that the presser foot pin is aligned with the |
Note |
|
|
notch in the holder. |
When a stitch is selected, the icon for the |
|
|
Position the presser foot so the letter indicating |
presser foot that should be used appears in |
|
|
the presser foot type (A, G, I, J, M, N or R) is |
the screen. Check that the correct presser |
|
|
positioned to be read. |
foot is attached before starting to sew. If the |
|
|
wrong presser foot is installed, turn off the |
||
|
a |
sewing machine, attach the correct presser |
|
|
foot, and then select the desired stitch again. |
||
|
b |
c |
|
|
a Presser foot holder |
||
|
b Notch |
||
|
c Pin |
Buttonhole foot «A» |
|
|
f Slowly lower the presser foot lever so that the |
||
|
presser foot pin snaps into the notch in the |
Overcasting foot «G» |
|
|
presser foot holder. |
Zigzag foot «J»
Button fitting foot «M»
Monogramming foot «N»
|
a |
|
|
Blind stitch foot «R» |
|
|
b |
Side cutter «S» (option) |
|
For details on the presser foot that should be |
|
|
used with the selected stitch, refer to «Stitch |
|
|
Setting Chart» (page 72). |
|
|
c |
d |
a Presser foot lever b Presser foot holder c Notch
d Pin
The presser foot is attached.
g Raise the presser foot lever to check that the presser foot is securely attached.
44

————————————————————————————————————————————————————
Removing and attaching the presser foot holder
Remove the presser foot holder when cleaning the sewing machine or when installing a presser foot that does not use the presser foot holder, such as the embroidery foot, optional free-motion open toe quilting foot «O» and optional walking foot. Use the screwdriver to remove the presser foot holder.
 CAUTION
Before attaching/removing the presser foot, be sure to turn off the sewing machine. Otherwise, injuries may occur if one of the operation buttons is accidentally pressed and the machine starts sewing.
a Remove the presser foot.
•For details, refer to «Replacing the presser foot» (page 43).
b Use the screwdriver to loosen the presser foot holder screw.
c
|
a |
d |
|
b |
|
|
a Screwdriver |
|
|
b Presser foot holder |
|
|
c Presser foot holder screw |
|
|
d Presser bar |
The presser foot is removed from the presser bar.
|
■ Attaching the presser foot holder |
|
|
aRaise the presser foot lever. |
|
|
The presser foot is raised. |
1 |
|
Align the presser foot holder with the lower- |
|
|
bleft side of the presser bar. |
a
b
a Presser bar
b Presser foot holder
cHold the presser foot holder in place with your right hand, and then tighten the screw using the screwdriver in your left hand.
ab

a Screwdriver
b Presser foot holder
 CAUTION
Do not hit the needle with your finger or the presser foot when attaching/removing it. The needle may break or cause injury.
Be sure to tighten the screw with the included screwdriver. If the screw is loose, the needle may hit the presser foot and break or bend.
Replacing the Presser Foot 45

GETTING READY ————————————————————————————————————————————
Sewing Cylindrical Pieces and Large Pieces
Free-arm sewing and using an extension table make sewing cylindrical pieces or large pieces easy.
Free-arm sewing
Removing the flat bed attachment allows for free-arm sewing, making it easier to sew cylindrical pieces such as sleeve cuffs and pant legs.
a Remove the flat bed attachment.
 a a Flat bed attachment
With the flat bed attachment removed, freearm sewing is possible.
b Slide the part that you wish to sew onto the arm, and then sew from the top.
a
a Arm
cWhen you have finished free-arm sewing, reconnect the flat bed attachment.
Using extension table
The cover of the embroidery unit can be used as the extension table. This is useful for sewing large pieces.
a
a Cover of embroidery unit (extension table)
 CAUTION
●Do not move the sewing machine with the extension table attached.
●Do not use the extension table in any other way than how it is intended.
a Remove the flat bed attachment.
 a a Flat bed attachment
46

————————————————————————————————————————————————————
b Raise up the two legs on the reverse side of the extension table until they click.
c Attach the extension table to the sewing machine arm.
Keep the extension table horizontal and push it in slowly until it stops.
e Turn back the extension table, and then store the two legs in their original positions.
1
Memo
●When you do not use the extension table, use it as the cover of the embroidery unit.
Memo
●If the extension table is not stable or its height is improper, adjust its height by turning the rubber ends of legs.
d When you have finished sewing, remove the extension table by pulling it to the left. Then reinstall the flat bed attachment to its original position.
Sewing Cylindrical Pieces and Large Pieces 47

GETTING READY ————————————————————————————————————————————
48
 Loading…
ОСНОВНЫЕ ОПЕ Р АЦИ И ОСНОВНЫЕ СТРОЧКИ ВЫШИВАНИЕ ПРИЛОЖЕ…
Руководство пользователя, Т оварный код, Product code ( ) Чат поддержки
- Изображение
- Текст
ОСНОВНЫЕ
ОПЕ Р АЦИ И
ОСНОВНЫЕ
СТРОЧКИ
ВЫШИВАНИЕ
ПРИЛОЖЕНИЕ
ПОДГОТОВКА
К РАБОТЕ
Компьютеризованная швейновышивальная машина
Т оварный код
Product Code (
)
885-V95/V97
Посетите наш сайт по адресу
» http://solutions.b r othe r .com «, г де вы
сможете получить консул ь тацию службы
технической поддержки и ответы на
часто задаваемые вопросы ( F AQs) .
Руководство пользователя

1
— — — — — — — — — — — — — — — — — — — — — — — — — — — — — — — — — — — — — — — — — — — — — — — — — — — —
Введение
Благодарим за покупку швейно-вышивальной машины. Перед эксплуатацией машины внимательно
изучите «ИНСТРУКЦИИ ПО ТЕХНИКЕ БЕЗОПАСНОСТИ» и руководство по применению различных
функций.
Храните руководство в легкодоступном месте, чтобы при необходимости получить всю необходимую
информацию.
ИНСТРУКЦИИ ПО ТЕХНИКЕ БЕЗОПАСНОСТИ
Обязательно прочитайте эти инструкции по технике безопасности перед
использованием швейной машины.
ОПАСНО!
Во избежание поражения электрическим током
1
Всегда отключайте машину от электрической сети сразу после использования, при
чистке, при выполнении любых регулировок, разрешенных пользователю и описанных в
данном руководстве, или перед тем как оставить машину без присмотра.
ВНИМАНИЕ!
Во избежание возгорания, поражения электрическим током, ожогов или травм:
2
Всегда отсоединяйте машину от электросети при выполнении любых регулировок,
описанных в данном руководстве.
• Для отключения машины от электрической сети установите сетевой выключатель в
положение «O», соответствующее выключению, и затем выньте вилку кабеля питания из
розетки. При отключении машины от сети не вытягивайте вилку за кабель питания.
• Включайте вилку кабеля питания прямо в розетку электросети. Не пользуйтесь
удлинителями.
• Всегда отключайте машину от сети при отключении электропитания.
3
Никогда не используйте швейную машину, если у нее поврежден кабель питания или
вилка, если машина плохо работает, если ее уронили или повредили, или если в
машину попала вода. В этих случаях машину следует сдать дилеру или в
авторизованный сервисный центр для проверки, ремонта и наладки ее электрической
или механической части.
• Если во время хранения или непосредственной эксплуатации машины, были замечены
необычные признаки: появление запаха, нагревание, изменение цвета или деформация,
немедленно прекратите использование машины и выньте силовой кабель из розетки.
• При переноске машины используйте ручку. Подъем машины с помощью посторонних
предметов может повредить машину или привести к неисправностям, опасным для
здоровья.
•
При подъеме машины не делайте резких или неожиданных движений. В противном
случае вы можете травмировать спину или колени.

2
— — — — — — — — — — — — — — — — — — — — — — — — — — — — — — — — — — — — — — — — — — — — — — — — — — —
4
Всегда содержите рабочее место в чистоте:
• Запрещается работать на машине при закрытых вентиляционных отверстиях. Следите
за чистотой вентиляционных отверстий машины и педали, своевременно очищайте их от
пыли, грязи, обрывков ткани и ворса.
• Не кладите на педаль никаких предметов.
• Не используйте удлинители. Включайте вилку кабеля питания прямо в розетку
электросети.
• Не роняйте в отверстия машины и не вставляйте в них никакие посторонние
предметы.
• Не используйте машину в помещениях, в которых распыляются какие-либо аэрозоли
или применяется чистый кислород.
• Не используйте машину вблизи источников тепла (таких как плита или утюг); в
противном случае машина, кабель питания или швейное изделие могут загореться, что
приведет к пожару или поражению электрическим током.
• Не устанавливайте машину на неустойчивые поверхности, например, на наклонные
столы. В противном случае машина может упасть и причинить травмы.
5
Особая осторожность требуется при шитье:
• Всегда обращайте особое внимание на иглу. Не используйте погнутые или
поврежденные иглы.
• Держите пальцы на расстоянии от всех движущихся частей машины. Будьте особенно
осторожны при работе в непосредственной близости к игле.
• При выполнении любых операций в зоне иглы выключите машину, установив
выключатель питания в положение “O”.
• Не используйте поврежденную или ненадлежащую игольную пластину, поскольку это
может привести к поломке иглы.
• Не тяните и не толкайте материал во время шитья. Прострачивая материал в ручном
режиме, строго следуйте инструкциям, чтобы не погнуть и не сломать иглу.
6
Не допускается использование машины в качестве игрушки:
• Необходимо быть особенно внимательным, когда машина используется детьми или
когда во время работы на машине рядом находятся дети.
• Полиэтиленовый пакет, в котором поставляется машина, должна храниться вдали от
детей, либо должна быть уничтожена. Не позволяйте детям играть с ним; это может
привести к удушью детей.
• Не используйте машину для работы вне помещений.
7
Для обеспечения длительного срока эксплуатации машины:
• Не храните машину под прямыми солнечными лучами или в условиях высокой
влажности. Не используйте и не храните машину вблизи электрообогревателя,
включенного утюга, галогенной лампы или других источников тепла.

3
— — — — — — — — — — — — — — — — — — — — — — — — — — — — — — — — — — — — — — — — — — — — — — — — — — — —
• Для чистки корпуса используйте только нейтральные мыльные растворы и моющие
средства. Категорически запрещается использование бензина, растворителя и
абразивных чистящих порошков, поскольку это может привести к повреждению корпуса
машины.
• Перед заменой или установкой прижимной лапки, иглы или любых других частей следует
обязательно просмотреть руководство по эксплуатации, чтобы правильно выполнять все
необходимые операции.
8
Для ремонта или наладки машины:
• При поломке осветительного устройства оно должно быть заменено авторизованным
дилером.
• При поломке машины или необходимости ее наладки следует перед самостоятельным
выполнением осмотра и регулировки машины сначала просмотреть таблицу поиска
неисправностей в Приложении данного руководства по эксплуатации. Если
самостоятельно устранить неисправность не удается, обратитесь к авторизованному
дилеру Brother.
Используйте машину только в целях, указанных в данном руководстве.
Используйте только те принадлежности, которые рекомендованы изготовителем и
указаны в данном руководстве.
Содержание настоящего руководства и эксплуатационные характеристики могут
быть изменены без предварительного уведомления.
Дополнительную информацию о продукции и обновленные данные можно найти на
нашем сайте www.brother.com.
СОХРАНИТЕ ДАННЫЕ ИНСТРУКЦИИ
Эта машина предназначена для домашнего использования.
ТОЛЬКО ДЛЯ ВЕЛИКОБРИТАНИИ,
ИРЛАНДИИ, МАЛЬТЫ И КИПРА
ВНИМАНИЕ!
• В случае замены пробкового предохранителя, используйте предохранитель,
соответствующий стандартам ASTA и BS 1362, т.е. имеющий маркировку
и
характеристики, указанные на вилке.
• Обязательно установите крышку предохранителя. Запрещается использовать вилку, если
не установлена крышка предохранителя.
• Если имеющаяся розетка электросети не подходит к вилке кабеля питания машины,
обратитесь к дилеру для получения соответствующего кабеля питания.

4
— — — — — — — — — — — — — — — — — — — — — — — — — — — — — — — — — — — — — — — — — — — — — — — — — — —
ДЛЯ МЕКСИКИ И СТРАН, ГДЕ НАПРЯЖЕНИЕ В
СЕТИ ПЕРЕМЕННОГО ТОКА 220-240 В
Данное устройство не предназначено для использования детьми; людям с ограниченной
трудоспособностью, а также не имеющим навыков работы с машиной, может потребоваться
посторонняя помощь. Не оставляйте детей без присмотра, не разрешайте им играть с
машиной.

5
— — — — — — — — — — — — — — — — — — — — — — — — — — — — — — — — — — — — — — — — — — — — — — — — — — — —
Содержание
Введение ……………………………………………………………………………………………………………1
ИНСТРУКЦИИ ПО ТЕХНИКЕ БЕЗОПАСНОСТИ ……………………………………………………1
Характеристики швейной машины ……………………………………………………………………8
Принадлежности ……………………………………………………………………………………………….9
Принадлежности в комплекте поставки …………………………………………………………………………………………. 9
Дополнительные принадлежности ……………………………………………………………………………………………….. 10
Узлы и детали машины и их функции ……………………………………………………………..11
Вид спереди ……………………………………………………………………………………………………………………………….. 11
Зона иглы и прижимной лапки ……………………………………………………………………………………………………… 12
Вид справа/сзади ………………………………………………………………………………………………………………………… 12
Кнопки управления ……………………………………………………………………………………………………………………… 13
Панель управления …………………………………………………………………………………………………………………….. 14
ПОДГОТОВКА К РАБОТЕ
15
Включение и выключение машины …………………………………………………………………16
Меры предосторожности, относящиеся к электропитанию ……………………………………………………………. 16
Включение машины …………………………………………………………………………………………………………………….. 17
Выключение машины ………………………………………………………………………………………………………………….. 17
Эксплуатация ЖК-дисплея (жидкокристаллического дисплея) ………………………18
Просмотр ЖК-дисплея ………………………………………………………………………………………………………………… 18
Изменение настроек машины ………………………………………………………………………………………………………. 18
Проверка рабочих процедур машины …………………………………………………………………………………………… 21
Намотка и установка шпульки …………………………………………………………………………22
Меры предосторожности …………………………………………………………………………………………………………….. 22
Намотка шпульки ………………………………………………………………………………………………………………………… 22
Установка шпульки ……………………………………………………………………………………………………………………… 27
Заправка верхней нити ……………………………………………………………………………………31
Информация о катушках с нитью …………………………………………………………………………………………………. 31
Заправка верхней нити ……………………………………………………………………………………………………………….. 32
Использование двойной иглы ……………………………………………………………………………………………………… 36
Замена иглы …………………………………………………………………………………………………….39
Меры предосторожности при обращении с иглами ……………………………………………………………………….. 39
Выбор иглы зависит от нити и типа материала …………………………………………………………………………….. 39
Проверка иглы ……………………………………………………………………………………………………………………………. 40
Замена иглы ……………………………………………………………………………………………………………………………….. 41
Замена прижимной лапки ………………………………………………………………………………..43
Меры предосторожности при работе с прижимной лапкой ……………………………………………………………. 43
Замена прижимной лапки ……………………………………………………………………………………………………………. 43
Удаление и установка держателя прижимной лапки …………………………………………………………………….. 45
Шитье цилиндрических и больших изделий ………………………………………………….46
«Свободный рукав» ……………………………………………………………………………………………………………………… 46
Использование удлиненного стола ………………………………………………………………………………………………. 46
ОСНОВНЫЕ ОПЕРАЦИИ
49
Шитье ………………………………………………………………………………………………………………50
Общий порядок действий ……………………………………………………………………………………………………………. 50
Типы строчек ………………………………………………………………………………………………………………………………. 51
Выбор строчки ……………………………………………………………………………………………………………………………. 51
Размещение материала ………………………………………………………………………………………………………………. 54
Начало шитья …………………………………………………………………………………………………………………………….. 55
Закрепление строчки …………………………………………………………………………………………………………………… 57
Обрезание нитей ………………………………………………………………………………………………………………………… 59
Настройка строчек …………………………………………………………………………………………..61
Настройка ширины строчки …………………………………………………………………………………………………………. 61
Настройка длины стежка …………………………………………………………………………………………………………….. 62
Регулировка натяжения нити ……………………………………………………………………………………………………….. 62

— — — — — — — — — — — — — — — — — — — — — — — — — — — — — — — — — — — — — — — — — — — — — — — — — — —
6
Полезные функции ………………………………………………………………………………………….64
Автоматическое выполнение обратных и закрепляющих стежков …………………………………………………. 64
Автоматическое обрезание нитей ………………………………………………………………………………………………… 65
Зеркальное отображение строчек ………………………………………………………………………………………………… 66
Сохранение настроек строчек ……………………………………………………………………………………………………… 67
Полезные советы …………………………………………………………………………………………….68
Пробное шитье …………………………………………………………………………………………………………………………… 68
Изменение направления шитья …………………………………………………………………………………………………… 68
Шитье по кривой линии ……………………………………………………………………………………………………………….. 68
Работа с толстым материалом ……………………………………………………………………………………………………. 68
Пришивание застежки типа «крючок и петля» ……………………………………………………………………………….. 69
Работа с тонким материалом ………………………………………………………………………………………………………. 70
Работа с эластичным материалом ………………………………………………………………………………………………. 70
Шитье с одинаковым припуском на шов ……………………………………………………………………………………….. 70
ОСНОВНЫЕ СТРОЧКИ
71
Схема настройки строчек ………………………………………………………………………………..72
Основные строчки ………………………………………………………………………………………………………………………. 72
Другие виды строчек …………………………………………………………………………………………………………………… 76
Краеобметочные строчки ………………………………………………………………………………..78
Обметывание краев с краеобметочной лапкой «G» ……………………………………………………………………….. 78
Обметывание краев с лапкой для строчки «зигзаг» «J» …………………………………………………………………… 79
Обметывание краев с помощью бокового ножа (дополнительный узел) ………………………………………… 80
Простые строчки ……………………………………………………………………………………………..82
Наметывание ……………………………………………………………………………………………………………………………… 82
Простые строчки …………………………………………………………………………………………………………………………. 82
Потайные подшивочные строчки ……………………………………………………………………84
Обметывание петель/пришивание пуговиц …………………………………………………….87
Обметывание петель ………………………………………………………………………………………………………………….. 88
Пришивание пуговиц …………………………………………………………………………………………………………………… 92
Вшивание молнии ……………………………………………………………………………………………94
Вшивание центральной молнии …………………………………………………………………………………………………… 94
Вшивание боковой молнии ………………………………………………………………………………………………………….. 96
Работа с эластичным материалом и эластичной тесьмой ……………………………..99
Эластичная строчка ……………………………………………………………………………………………………………………. 99
Пришивание эластичной тесьмы ……………………………………………………………………………………………….. 100
Выполнение аппликаций, лоскутного шитья и выстегивания ………………………101
Пришивание аппликаций …………………………………………………………………………………………………………… 102
Лоскутное шитье ……………………………………………………………………………………………………………………….. 103
Стачивание ………………………………………………………………………………………………………………………………. 103
Выстегивание ……………………………………………………………………………………………………………………………. 104
Выстегивание со свободной подачей материала ………………………………………………………………………… 106
Атласное шитье с использованием регулятора скорости …………………………………………………………….. 107
Закрепление …………………………………………………………………………………………………..108
Тройная эластичная строчка ……………………………………………………………………………………………………… 108
Закрепки …………………………………………………………………………………………………………………………………… 108
Штопка ……………………………………………………………………………………………………………………………………… 111
Обметывание глазков ……………………………………………………………………………………113
Декоративная строчка ……………………………………………………………………………………114
Строчка-мережка ………………………………………………………………………………………………………………………. 115
Фестонная строчка ……………………………………………………………………………………………………………………. 116
Украшение сборками или буфами ……………………………………………………………………………………………… 117
Строчка-ракушка ……………………………………………………………………………………………………………………….. 118
Декоративное стачивание …………………………………………………………………………………………………………. 119
Мережки …………………………………………………………………………………………………………………………………… 119
Выполнение различных встроенных декоративных рисунков …………………….122
Выполнение красивых декоративных строчек …………………………………………………………………………….. 122
Вышивание рисунков ………………………………………………………………………………………………………………… 122
Изменение плотности строчки ……………………………………………………………………………………………………. 123
Изменение размера рисунка ……………………………………………………………………………………………………… 123
Изменение длины атласных строчек ………………………………………………………………………………………….. 124

7
— — — — — — — — — — — — — — — — — — — — — — — — — — — — — — — — — — — — — — — — — — — — — — — — — — — —
Настройка пробела между символами ……………………………………………………………………………………….. 124
Калибровка рисунка ………………………………………………………………………………………………………………….. 125
Комбинирование рисунков …………………………………………………………………………………………………………. 126
Сохранение рисунков ………………………………………………………………………………………………………………… 129
Разработка рисунка (My Custom Stitch) …………………………………………………………131
Создание эскиза рисунка …………………………………………………………………………………………………………… 131
Ввод данных рисунка ………………………………………………………………………………………………………………… 132
Изменение данных рисунка ……………………………………………………………………………………………………….. 133
Примеры создаваемых рисунков ……………………………………………………………………………………………….. 134
ВЫШИВАНИЕ
135
Аккуратное вышивание …………………………………………………………………………………136
Что подготовить ………………………………………………………………………………………………………………………… 136
Вышивание шаг за шагом ………………………………………………………………………………………………………….. 137
Установка лапки для вышивания ………………………………………………………………….138
Установка лапки для вышивания ……………………………………………………………………………………………….. 138
Удаление лапки для вышивания ……………………………………………………………………………………………….. 140
Установка модуля вышивания ………………………………………………………………………141
Соблюдайте осторожность при установке модуля вышивания …………………………………………………….. 141
Установка модуля вышивания …………………………………………………………………………………………………… 141
Удаление модуля вышивания ……………………………………………………………………………………………………. 143
Подготовка ткани …………………………………………………………………………………………..144
Крепление стабилизирующего материала к ткани ………………………………………………………………………. 144
Установка ткани в пяльцы …………………………………………………………………………………………………………. 145
Установка пялец …………………………………………………………………………………………….148
Установка пялец ……………………………………………………………………………………………………………………….. 148
Удаление модуля вышивания ……………………………………………………………………………………………………. 149
Выбор рисунков вышивания …………………………………………………………………………150
Авторское право ……………………………………………………………………………………………………………………….. 150
Типы рисунков вышивания ………………………………………………………………………………………………………… 150
Эксплуатация ЖК-дисплея (жидкокристаллического дисплея) …………………………………………………….. 151
Выберите буквенно-цифровые символы …………………………………………………………………………………….. 154
Выбор рисунка вышивания ………………………………………………………………………………………………………… 155
Выбор рисунка обрамления ………………………………………………………………………………………………………. 155
Использование карты вышивания ……………………………………………………………………………………………… 156
Вышивание …………………………………………………………………………………………………….157
Проверка рисунков перед вышиванием ……………………………………………………………………………………… 157
Вышивание рисунка ………………………………………………………………………………………………………………….. 158
Выполнение аппликаций …………………………………………………………………………………………………………… 160
Редактирование и сохранение рисунков ……………………………………………………….162
Изменение расположения и размера …………………………………………………………………………………………. 162
Регулировка натяжения нити ……………………………………………………………………………………………………… 164
Соединение рисунков с символами ……………………………………………………………………………………………. 165
Повторное шитье ………………………………………………………………………………………………………………………. 166
Нить закончилась в процессе вышивания рисунка ……………………………………………………………………… 167
Остановка во время вышивания ………………………………………………………………………………………………… 167
Использование функции запоминания ………………………………………………………….169
Меры предосторожности при работе с данными вышивания ………………………………………………………. 169
Пересылка рисунков вышивания с компьютера на машину …………………………………………………………. 171
Сохранение рисунков ………………………………………………………………………………………………………………… 174
ПРИЛОЖЕНИЕ
175
Уход и техническое обслуживание ………………………………………………………………..176
Наружная очистка машины ………………………………………………………………………………………………………… 176
Очистка челночного устройства …………………………………………………………………………………………………. 176
Поиск и устранение неисправностей …………………………………………………………….178
Сообщения об ошибках …………………………………………………………………………………………………………….. 183
Настройка ЖК-дисплея ……………………………………………………………………………………………………………… 187
Звуковая сигнализация ……………………………………………………………………………………………………………… 187
Обновление программного обеспечения машины при помощи USB с медиа данными …. 188
Указатель ……………………………………………………………………………………………………….189

8
— — — — — — — — — — — — — — — — — — — — — — — — — — — — — — — — — — — — — — — — — — — — — — — — — — —
Характеристики швейной машины
a
Автоматическое обрезание нитей
После шитья нити могут обрезаться автоматически (с. 59, 65).
b
Система быстрой намотки шпульки
Система быстрой и простой намотки шпульки позволяет наматывать шпульки с помощью одного нажатия кнопки (с. 22).
c
Встроенные строчки
Можно выбрать встроенные строчки из имеющихся, в том числе из основных и декоративных (с. 72).
d
USB-порт
Образцы рисунков вышивания, сохраненные на флеш-накопителе USB (флэш-памяти USB), можно
импортировать на машину, подключив флэш-накопитель USB прямо к USB-порту
(с. 172).
e
Комплект принадлежностей
Комплект принадлежностей можно хранить внутри рукавной платформы машины, как показано на рисунке.
В
этом отсеке можно хранить прижимные лапки, шпульки, вспарыватель и т.д.
f
Зажим для шпульки
Зажим для катушки можно использовать для предотвращения наматывания слабо натянутой нити на шпульку.
Зажимы для шпулек могут храниться внутри отсека для принадлежностей.
g
Яркая подсветка
Удобная светодиодная лампа упрощает шитье на темных тканях.
h
Семиточечные гребенки транспортера
Обеспечивает плавную и равномерную подачу многослойных материалов и материалов различного веса (с. 12).
i
Шпулька быстрой установки
Приступать к шитью можно без предварительного вытягивания нижней нити (с. 27).
j
Простой в использовании нитенаправитель иглы
Одно нажатие на рычаг позволяет легко заправить нить в иглу (с. 32).
k
Подсветка кнопки Пуск/Стоп
Если горит зеленая подсветка, машина готова к шитью. Красная или оранжевая подсветка указывает на
ошибку или на процесс нагревания машины (с. 13).
l
Вышивание
Машина позволяет вышивать установленные рисунки вышивания, буквенно-цифровые символы,
декоративные обрамления и рисунки с дополнительных карт вышивания (с. 135).
m
Удлиненный стол (Крышка модуля вышивания)
Крышку модуля вышивания можно использовать в качестве удлиненного стола при обработке больших
отрезов материала (с. 46).

 27:44
27:44
Brother Innov-is 950. Основные швейный операции.
 10:31
10:31
Новая швейная машинка Brother Innovis 950
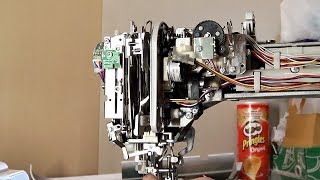 26:07
26:07
Brother Innov-is 4000. Разборка, устройство, назначение узлов и датчиков
 06:43
06:43
ТОП ЛУЧШИХ КОМПЬЮТЕРНЫХ ШВЕЙНЫХ МАШИН
 27:27
27:27
Как шить и вышивать? Швейно вышивальная машина Brother Innov-is F480.
 10:23
10:23
Вышивка на машинке Brother Innovis 950
 05:24
05:24
Швейно-вышивальная машина Brother innov-is 950 и пяльца EF71
 06:52
06:52
Швейно-вышивальная машина Brother Innov-is 950 (NV 950)
Нажмите на кнопку для помощи


Комментарии
More products and manuals for Sewing machines Brother
| Models | Document Type |
|---|---|
|
Innov-is 900 |
User Manual
192 pages |
|
PR-1000 |
User Manual
38 pages |
|
PR-650 |
User Manual
280 pages |
|
Innov-is V7 |
User Manual
332 pages |
|
Innov-is I |
User Manual
29 pages |
|
Elite 95E |
User Manual
152 pages |
|
Innov-is Ie |
User Manual
50 pages |
|
Innov-is V3 |
User Manual
180 pages |
|
LS-3125 |
User Manual
68 pages |
|
Innov-is 2200 |
User Manual
24 pages |
|
Universal 27S |
User Manual
48 pages |
|
FS-20 |
User Manual
100 pages |
|
Innov-is 2200 |
User Manual
220 pages |
|
PR1000e |
User Manual
336 pages |
|
BQ25 |
User Manual
2 pages |
|
PR650e |
User Manual
2 pages |
|
Innov-is I |
User Manual
21 pages |
|
Universal 17 |
User Manual
44 pages |
|
Innov-is Ie |
User Manual
37 pages |
|
STAR 55X |
User Manual
52 pages |


| Recognized languages: |
English Deutsch Español Français Italiano |
|---|---|
| Pages: | 32 |
| Size | 2.23 MB |
Type the characters you see in the picture below.