

01
10
18
04
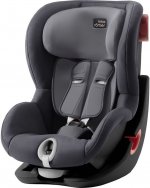
Adjustment leverHeadrest adjuster (KING II ATS/LS)Lower belt guide Release buttons Seat shellUpper belt guideSeat base
01
02
03
04
05
06
07
Indicator light (KING II LS)Shoulder pads HeadrestHeadrest adjuster (KING II)Adjusting button
08
09
10
Shoulder straps
11
Harness buckle
12
13
14
Adjustment strapIndicator light (KING II ATS)
15
16
Adjustment handle
17
User guide compartment
18
02
03
05
06
07
08
09
11
12
13
14
15
17
16
User instructions
www.britax.com
2000021398 02/17
GB
9 kg — 18 kg
9 M
~
4 Y
2. INTRODUCTION
We are delighted that our
KING II / ATS / LS
can safely accompany your child
through a new stage in its life.
In order to protect your child correctly, the
KING II / ATS / LS
must al-
ways be used and installed as described in these instructions.
If you have any further questions regarding its use, please feel free to contact us:
BRITAX RÖMER
Kindersicherheit GmbH
Theodor-Heuss-Straße 9
D-89340 Leipheim
Germany
T.: +49 (0) 8221 3670 -199
F.: +49 (0) 8221 3670 -210
E.: service.de@britax.com
www.britax.com
BRITAX EXCELSIOR
LIMITED
1 Churchill Way West
Andover
Hampshire SP10 3UW
United Kingdom
T.: +44 (0) 1264 333343
F.: +44 (0) 1264 334146
E.: service.uk@britax.com
www.britax.com
These instructions use the following symbols stated below:
Symbol Keyword Explanation
DANGER! Risk of severe personal injury
WARNING! Risk of minor personal injury
CAUTION! Risk of material damage
TIP: Useful notes
Instructions that follow a set sequence are numbered.
Example:
1. Press the button…
21
22
Belt guide colours
For better differentiation, the two vehicle seat
belts are highlighted in different colours. The di-
agonal seat belt
21
in dark red and the lap belt
22
in bright red. The colour of the belt guides
on the child safety seat follows the same colour
scheme.
4. CARE AND MAINTENANCE
3. CERTIFICATION
/ USAGE
PAGE I
5. DISASSEMBLY AND DISPOSAL
1. PRODUCT OVERVIEW
DISPOSAL:Please observe the waste disposal regulations in your country..
Disposal of packaging Container for cardboard boxes
Seat cover Residual waste, thermal utilisation
Plastic parts According to the labelling in the
corresponding container
Metal parts Container for metals
Belt straps Container for polyester
Buckle and tongue Residual waste
Batteries Container for batteries
REMOVAL:UNFASTENING YOUR CHILD:
1. To unfasten your child, press the red release button of the 5-Point harness
buckle
12
.
1. Unbuckle the vehicle belt buckle
20
and loosen the harness straps.
2. Unhook the diagonal belt section
21
from the upper belt guide
01
.
3. To open the shell: push one of the grey release buttons
03
and at the
same time pull the seat shell
02
as far forward as possible.
4. Remove the diagonal
21
and the lap belt sections
22
from the light red
lower belt guides
04
.
5. Hold the seat shell
02
with one hand while pulling the grey adjustment
lever
05
forward with the other hand.
6. To close the shell: tip the seat shell
02
against the seat base
06
over both
engagement positions.
WARNING! To avoid injuries take your hand away from the grey adjust-
ment lever
05
, as soon as getting over the two engagement positions.
7. Push the seat shell
02
with both hands against the seat base
06
until it is
fully engaged.
BRITAX RÖMER Child safety seat
Testing and certication
In accordance with ECE* R 44/04
*ECE = European Standard for Child Safety Equipment
Group Body weight
KING II / ATS / LS
I 9 to 18 kg
The child safety seat has been designed, tested and certied according to the re—
quirements of the European Standard for Child Safety Equipment (ECE R 44/04).
The seal of approval E (in a circle) and the approval number are located on the
orange approval label (sticker on the child safety seat)
.
DANGER! This approval will be invalidated if you make any modications to
the child safety seat. Only the manufacturer is permitted to make
modications to the child safety seat.
DANGER! Never secure your child or the child safety seat with a 2-point belt.
If you secure your child in the child seat with only a 2-point belt,
then in the event of an accident this may cause serious injuries to
your child, possibly resulting in death.
Please observe the instructions for using children’s restraining systems in the operating
instructions of your vehicle. The seat can only be used in vehicles with 3-point retractor safety-
belts
2)
.
Please nd the information on the seats approved for child safety seats of the weight classes 9 to
18 kg in the operating instructions of your vehicle.
You can use your child safety seat as follows:
In the direction of travel yes
Against the direction of travel no
1)
with 2-point belt no
with 3-point reractor safety belt
2)
yes
on front passenger seat yes
3)
on outer rear seat yes
on centre rear seat (with 3-point
belt
2)
)
yes
4)
1) Use is permitted on a rearward-facing vehicle seat (e.g. in a van or minibus) only
if the vehicle seat is also approved for use by adults. The seat may not be in the area of effect
of an airbag.
2) The seat is only compatible with 3-point retractor type safety-belts, approved to ECE Reg
No. 16 or other equivalent standards.
3) If there is a front airbag: Slide the vehicle seat a long way back and refer to any instructions
in vehicle owner’s manual.
4) Cannot be used if the vehicle seat is equipped with only a 2-point belt.
9 — 18 kg
Removing the cover
Loosen the harness straps as far as possible.
1. Open the harness buckle
12
(press red button).
2. Remove the cover of the headrest
09
.
3. Open the poppers
29
on the left and right side of the
rear part of the cover.
4. Unhook the elastic seam of the cover under the edge of
the seat shell.
TIP: Start at the sides of the seat shell.
5. Pull the cover up and over the bezel of the strap adjuster.
6. Feed out the harness buckle
12
and the end of the strap
from the cover.
7. Pull the cover upwards and remove it over the headrest
09
.
The cover can now be washed. Please observe the
instructions on the washing label of the cover:
Re-tting the cover
Proceed in reverse order to put on the cover.
09
29
12
Please ensure that you only use the original BRITAX RÖMER replacement seat
covers, as the seat cover is an integral part of the child safety seat and fulls im—
portant functions to ensure the smooth operation of the system. Replacement seat
covers are available from your dealer.
• The cover can be removed and washed using the delicates programme of the
washing machine (30°C). Please observe the instructions on the washing label
of the cover.
• The plastic parts can be cleaned with a damp cloth. Do not use any caustic
cleaning agents (such as solvents).
DANGER! The child seat must not be used without the seat cover.
Care for the harness buckle
It is vital for the safety of your child that the harness buckle works correctly. Malfunctions
of the harness buckle are usually caused by accumulations of dirt or foreign bodies.
Malfunctions include the following:
• The buckle latches are ejected only slowly when the red release button is pressed.
• The buckle latches will no longer lock home (i.e. they are ejected again if you try to push
them in).
• The buckle latches engage without an audible “click“.
• The buckle latches are difcult to insert (you feel resistance).
• The buckle only opens if extreme force is applied.
Remedy:
wash out the harness buckle so that it functions properly once again.
25
12
12
27
26
Cleaning the harness buckle
1. Open the harness buckle
12
(press the red button).
2. Adjust the seat shell
02
to the upright seating
position.
3. Open the Velcro fastener on the crotch pad
25
and
remove it and retain it.
4. Grasp below the seating area the metal plate
26
which keeps the buckle
12
at the seat base and
turn it into a vertical position.
5. Slide the metal plate
26
through the slot
27
.
6. Soak the harness buckle
12
in warm water with
dishwashing liquid for at least an hour.
7. Rinse and dry the harness buckle
12
thoroughly.
8. Slide the metal plate
26
edgewise through the slot
27
in the cover and the seat base.
9. Rotate the metal plate
26
90°
DANGER! Pull the harness buckle
12
rmly to ensure
that it is securely fastened.
10. Insert the crotch pad
25
through the slot
27
and
secure the Velcro fastener.
Cleaning the occupant sensor
1.
Fold the lower part of the cover updwards.
2. Remove dirt and dust in the area of the occupant sensor
28
with a vacuum cleaner.
DANGER! The occupant sensor
28
must not come in
contact with water.
28

01
10
18
04
Adjustment lever
Headrest adjuster (KING II ATS/LS)
Lower belt guide
Release buttons
Seat shell
Upper belt guide Seat base
01
02
03
04
05
06
07
Indicator light (KING II LS)
Shoulder pads
Headrest
Headrest adjuster (KING II) Adjusting button
08
09
10
Shoulder straps
11
Harness buckle
12
13
14
Adjustment strap
Indicator light (KING II ATS)
15
16
Adjustment handle
17
User guide compartment
18
02
03
05
06
07
08
09
11
12
13
14
15
17 16
KING II / ATS / LS
User instructions
www.britax.com
2000021398 02/17
GB
9 kg — 18 kg
9 M ~ 4 Y
2. INTRODUCTION
We are delighted that our
KING II / ATS / LS
can safely accompany your child
through a new stage in its life.
In order to protect your child correctly, the
KING II / ATS / LS
must al-
ways be used and installed as described in these instructions.
If you have any further questions regarding its use, please feel free to contact us:
BRITAX RÖMER
Kindersicherheit GmbH
Theodor-Heuss-Straße 9
D-89340 Leipheim
Germany
T.: +49 (0) 8221 3670 -199
F.: +49 (0) 8221 3670 -210
E.: service.de@britax.com
www.britax.com
BRITAX EXCELSIOR
LIMITED
1 Churchill Way West
Andover
Hampshire SP10 3UW
United Kingdom
T.: +44 (0) 1264 333343
F.: +44 (0) 1264 334146
E.: service.uk@britax.com
www.britax.com
These instructions use the following symbols stated below:
Symbol Keyword Explanation
DANGER! Risk of severe personal injury
WARNING! Risk of minor personal injury
CAUTION! Risk of material damage
TIP: Useful notes
Instructions that follow a set sequence are numbered.
Example:
1. Press the button…
21
22
Belt guide colours
For better differentiation, the two vehicle seat
belts are highlighted in different colours. The di-
agonal seat belt 21 in dark red and the lap belt
22 in bright red. The colour of the belt guides
on the child safety seat follows the same colour
scheme.
4. CARE AND MAINTENANCE
3. CERTIFICATION
/ USAGE
PAGE I
5. DISASSEMBLY AND DISPOSAL
1. PRODUCT OVERVIEW
DISPOSAL:
Please observe the waste disposal regulations in your country..
Disposal of packaging Container for cardboard boxes
Seat cover Residual waste, thermal utilisation
Plastic parts According to the labelling in the
corresponding container
Metal parts Container for metals
Belt straps Container for polyester
Buckle and tongue Residual waste
Batteries Container for batteries
REMOVAL:
UNFASTENING YOUR CHILD:
1. To unfasten your child, press the red release button of the 5-Point harness
buckle 12 .
1. Unbuckle the vehicle belt buckle 20 and loosen the harness straps.
2. Unhook the diagonal belt section 21 from the upper belt guide 01 .
3. To open the shell: push one of the grey release buttons 03 and at the
same time pull the seat shell 02 as far forward as possible.
4. Remove the diagonal 21 and the lap belt sections 22 from the light red
lower belt guides 04 .
5. Hold the seat shell 02 with one hand while pulling the grey adjustment
lever 05 forward with the other hand.
6. To close the shell: tip the seat shell 02 against the seat base 06 over both
engagement positions.
WARNING! To avoid injuries take your hand away from the grey adjust-
ment lever 05 , as soon as getting over the two engagement positions.
7. Push the seat shell 02 with both hands against the seat base 06 until it is
fully engaged.
BRITAX RÖMER
Child safety seat
Testing and certication
In accordance with ECE* R 44/04
*ECE = European Standard for Child Safety Equipment
Group Body weight
KING II / ATS / LS
I 9 to 18 kg
The child safety seat has been designed, tested and certied according to the re—
quirements of the European Standard for Child Safety Equipment (ECE R 44/04).
The seal of approval E (in a circle) and the approval number are located on the
orange approval label (sticker on the child safety seat).
DANGER! This approval will be invalidated if you make any modications to
the child safety seat. Only the manufacturer is permitted to make
modications to the child safety seat.
DANGER! Never secure your child or the child safety seat with a 2-point belt.
If you secure your child in the child seat with only a 2-point belt,
then in the event of an accident this may cause serious injuries to
your child, possibly resulting in death.
Please observe the instructions for using children’s restraining systems in the operating
instructions of your vehicle. The seat can only be used in vehicles with 3-point retractor safety-
belts
2)
.
Please nd the information on the seats approved for child safety seats of the weight classes 9 to
18 kg in the operating instructions of your vehicle.
You can use your child safety seat as follows:
In the direction of travel yes
Against the direction of travel no 1)
with 2-point belt no
with 3-point reractor safety belt2) yes
on front passenger seat yes 3)
on outer rear seat yes
on centre rear seat (with 3-point
belt2))
yes 4)
1) Use is permitted on a rearward-facing vehicle seat (e.g. in a van or minibus) only
if the vehicle seat is also approved for use by adults. The seat may not be in the area of effect
of an airbag.
2) The seat is only compatible with 3-point retractor type safety-belts, approved to ECE Reg
No. 16 or other equivalent standards.
3) If there is a front airbag: Slide the vehicle seat a long way back and refer to any instructions
in vehicle owner’s manual.
4) Cannot be used if the vehicle seat is equipped with only a 2-point belt.
9 — 18 kg
Removing the cover
Loosen the harness straps as far as possible.
1. Open the harness buckle 12 (press red button).
2. Remove the cover of the headrest 09 .
3. Open the poppers 29 on the left and right side of the
rear part of the cover.
4. Unhook the elastic seam of the cover under the edge of
the seat shell.
TIP: Start at the sides of the seat shell.
5. Pull the cover up and over the bezel of the strap adjuster.
6. Feed out the harness buckle 12 and the end of the strap
from the cover.
7. Pull the cover upwards and remove it over the headrest
09 .
The cover can now be washed. Please observe the
instructions on the washing label of the cover:
Re-tting the cover
Proceed in reverse order to put on the cover.
09
29
12
Please ensure that you only use the original BRITAX RÖMER replacement seat
covers, as the seat cover is an integral part of the child safety seat and fulls im—
portant functions to ensure the smooth operation of the system. Replacement seat
covers are available from your dealer.
• The cover can be removed and washed using the delicates programme of the
washing machine (30°C). Please observe the instructions on the washing label
of the cover.
• The plastic parts can be cleaned with a damp cloth. Do not use any caustic
cleaning agents (such as solvents).
DANGER! The child seat must not be used without the seat cover.
Care for the harness buckle
It is vital for the safety of your child that the harness buckle works correctly. Malfunctions
of the harness buckle are usually caused by accumulations of dirt or foreign bodies.
Malfunctions include the following:
• The buckle latches are ejected only slowly when the red release button is pressed.
• The buckle latches will no longer lock home (i.e. they are ejected again if you try to push
them in).
• The buckle latches engage without an audible “click“.
• The buckle latches are difcult to insert (you feel resistance).
• The buckle only opens if extreme force is applied.
Remedy: wash out the harness buckle so that it functions properly once again.
25
12
12
27
26
Cleaning the harness buckle
1. Open the harness buckle 12 (press the red button).
2. Adjust the seat shell 02 to the upright seating
position.
3. Open the Velcro fastener on the crotch pad 25 and
remove it and retain it.
4. Grasp below the seating area the metal plate 26
which keeps the buckle 12 at the seat base and
turn it into a vertical position.
5. Slide the metal plate 26 through the slot 27 .
6. Soak the harness buckle 12 in warm water with
dishwashing liquid for at least an hour.
7. Rinse and dry the harness buckle 12 thoroughly.
8. Slide the metal plate 26 edgewise through the slot
27 in the cover and the seat base.
9. Rotate the metal plate 26 90°
DANGER! Pull the harness buckle 12 rmly to ensure
that it is securely fastened.
10. Insert the crotch pad 25 through the slot 27 and
secure the Velcro fastener.
Cleaning the occupant sensor
1. Fold the lower part of the cover updwards.
2. Remove dirt and dust in the area of the occupant sensor
28 with a vacuum cleaner.
DANGER! The occupant sensor 28 must not come in
contact with water.
28
|
Код: 130576 Извините, товара сейчас нет в наличии
Бесплатная доставка
Извините, товара сейчас нет в наличии Сравнить Новости интернет-магазина «Лаукар»:28.03.2023 22.02.2023 13.02.2023 Дополнительная информация в категории Автомобильное кресло:Таблица Авторизованных сервисных центров по брендам. Описание Инструкция Отзывы (0) В интернет-магазине бытовой техники «Лаукар» Вы можете скачать инструкцию к товару Автомобильное кресло Britax Romer King II 1 (9-18 кг) Gray совершенно бесплатно. Все инструкции, представленные на сайте интернет-магазина бытовой техники «Лаукар», предоставляются производителем товара. Для того чтобы скачать инструкцию, Вам необходимо нажать на ссылку «скачать инструкцию», расположенную ниже, а в случае, если ссылки нет, Скачать инструкцию Смотреть инструкцию
Фирма-производитель оставляет за собой право на внесение изменений в конструкцию, дизайн и комплектацию товара: Автомобильное кресло Britax Romer King II 1 (9-18 кг) Gray. Пожалуйста, сверяйте информацию о товаре с информацией на |


01
10
18
04
Регулировочный рычаг
Устройство для регулировки
подголовника (KING II ATS/LS)
Нижняя направляющая ремня
Кнопки разблокировки ремня
Корпус сиденья
Верхняя направляющая ремня
Основание сиденья
01
02
03
04
05
06
07
Световой индикатор (KING II LS)
Нагрудные накладки
Подголовник
Устройство для регулировки
подголовника (KING II)
Фиксатор натяжения
08
09
10
Плечевые лямки
11
Замок ремня
12
13
14
Регулировочная лямка
Световой индикатор (KING II ATS)
15
16
Ручка для регулировки
спинки сиденья
17
Отсек для инструкции
по эксплуатации
18
02
03
05
06
07
08
09
11
12
13
14
15
17 16
2. ВВЕДЕНИЕ
Мы очень рады, что наше сиденье
KING II/ATS/LS
сможет стать надеж-
ным спутником вашего ребенка на новом этапе его жизни.
Чтобы обеспечить безопасность ребенка, используйте и устанавли-
вайте сиденье
KING II/ATS/LS
в соответствии с данной инструкцией.
При возникновении вопросов об эксплуатации сиденья свяжитесь с нами:
BRITAX RÖMER
Kindersicherheit GmbH
Theodor-Heuss-Straße 9
89340 Leipheim
Германия
Тел.: +49 (0) 8221 3670 -199
Факс: +49 (0) 8221 3670 -210
Эл. почта: service.de@britax.com
www.britax.com
BRITAX EXCELSIOR
LIMITED
1 Churchill Way West
Andover
Hampshire SP10 3UW
Великобритания
Тел.: +44 (0) 1264 333343
Факс: +44 (0) 1264 334146
Эл. почта: service.uk@britax.com
www.britax.com
В данной инструкции используются следующие символы:
Символ
Ключевое
слово
Пояснение
ОПАСНО!
Риск получения тяжелых травм
ОСТОРОЖНО!
Риск получения легких травм
ВНИМАНИЕ!
Риск материального ущерба
СОВЕТ:
Полезные замечания
Инструкции, перечисляющие последовательность действий, пронумерованы.
Например:
1. Нажмите кнопку…
21
22
Цвета направляющих для ремней
Для удобства различения ремни безопасно-
сти автомобиля выделены разными цве-
тами. Диагональный ремень обозначен
21
темно-красным цветом, а поясной ремень —
22
ярко-красным. Цвета направляющих
для ремней на детском сиденье следуют
той же схеме.
4. УХОД И СОДЕРЖАНИЕ В ИСПРАВНОМ
СОСТОЯНИИ
3. СЕРТИФИКАЦИЯ/ЭКСПЛУАТАЦИЯ
СТРАНИЦА I
5. ДЕМОНТАЖ И УТИЛИЗАЦИЯ
1. ОБЗОР ИЗДЕЛИЯ
УТИЛИЗАЦИЯ:
Соблюдайте предписания по утилизации отходов, действующие
в вашей стране.
Утилизация упаковки
Контейнер для картонных коробок
Чехол сиденья
Прочий мусор, термическая
утилизация
Пластмассовые детали
Контейнер согласно маркировке
Металлические детали
Контейнер для металлолома
Лямки ремней
Контейнер для полиэстера
Замок и язычок
Прочий мусор
Батарейки
Контейнер для батареек
СНЯТИЕ СИДЕНЬЯ:
ОТСТЕГИВАНИЕ РЕМНЕЙ БЕЗОПАСНОСТИ:
1. Чтобы отстегнуть ремни безопасности сиденья, нажмите красную
кнопку разблокировки пятиточечного замка
12
.
1. Расстегните замок ремня безопасности
20
и ослабьте лямки ремня.
2. Отцепите диагональный ремень
21
от верхней направляющей
01
.
3. Чтобы разложить корпус: нажмите одну из серых кнопок
разблокировки
03
и одновременно потяните корпус сиденья
02
вперед до упора.
4. Извлеките диагональную
21
и поясную секции
22
из светло-красных
нижних направляющих
04
.
5. Удерживая корпус сиденья
02
одной рукой, другой рукой потяните
вперед серый регулировочный рычаг
05
.
6. Чтобы сложить корпус сиденья: прижимайте корпус сиденья
02
к его
основанию
06
через оба положения фиксации.
ОСТОРОЖНО! Во избежание травмирования уберите руку с серого
регулировочного рычага
05
как только пройдете два положения
фиксации.
7. Прижмите корпус сиденья
02
обеими руками к основанию
06
до полной фиксации.
BRITAX RÖMER
Детское сиденье
Тестирование и сертификация
Согласно ECE * R 44/04
*ECE = Европейский стандарт на оборудование
для безопасной перевозки детей
Группа
Вес тела
KING II/ATS/LS
I
9–18 кг
Детское сиденье сконструировано, протестировано и сертифицировано согласно тре-
бованиям Европейского стандарта на оборудование для безопасной перевозки детей
(ECE R 44/04). Знак проверки E (в кружке) и номер разрешения на эксплуатацию рас-
положены на оранжевой сертификационной табличке (наклейка на детском сиденье).
ОПАСНО
!
При внесении любых изменений в конструкцию детского сиденья дан-
ное разрешение становится недействительным. Только производитель
имеет право вносить изменения в конструкцию детского сиденья.
ОПАСНО
!
Никогда не фиксируйте ребенка или детское сиденье при помощи двухто-
чечного ремня безопасности. Используя для фиксации ребенка в детском
сиденье один только двухточечный ремень, вы подвергаете ребенка
опасности получения тяжелых травм или даже смерти в случае аварии.
Следуйте инструкциям по применению системы безопасной фиксации ребен-
ка в руководстве по эксплуатации вашего автомобиля. Данное сиденье можно
использовать в автомобилях с
трехточечными ремнями безопасности.
Информацию об автомобильных сиденьях, допущенных для использования с детскими сиденьями
для детей весом
от 9 до 18 кг, см. в руководстве по эксплуатации вашего автомобиля.
Детское сиденье можно использовать следующим образом:
В положении по направлению
движения
да
В положении против
направления движения
нет 1)
С двухточечным ремнем
безопасности
нет
С трехточечным ремнем
безопасности 2)
да
На переднем пассажирском
сиденье
да 3)
На боковом заднем сиденье
да
На центральном заднем сиденье
(с трехточечным ремнем
безопасности)
да 4)
1) Использование детского сиденья на автомобильном сиденье, установленном против направления
движения (например, в фургоне или микроавтобусе), разрешается только в том случае, если это си-
денье также допущено к перевозке взрослого человека. Данное сиденье не должно быть оснащено
подушкой безопасности.
2) Ремень безопасности должен соответствовать ECE R 16 или аналогичному стандарту (см. сертифи-
кационную табличку со знаком «E» или «e» в кружке).
3) Если перед сиденьем есть фронтальная подушка безопасности: сдвиньте автомобильное сиденье
назад до упора и следуйте указаниям в руководстве по эксплуатации автомобиля.
4) Запрещается использовать детское сиденье, если автомобильное сиденье оснащено только двух-
точечным ремнем безопасности.
9–18 кг
Снятие чехла
Ослабьте лямки ремней, насколько это возможно.
1. Откройте замок ремня
12
(нажмите красную кнопку).
2. Снимите чехол подголовника
09
.
3. Откройте кнопки
29
на левой и правой частях задней
стороны чехла.
4. Отсоедините эластичную кайму чехла под краем
корпуса сиденья.
СОВЕТ: Начните с боков корпуса сиденья.
5. Потяните чехол вверх через гнездо регулятора лямок.
6. Вытащите замок ремня
12
и конец лямки из чехла.
7. Потяните чехол вверх и снимите его
с подголовника
09
.
Теперь чехол можно постирать. Соблюдайте инструкции
по стирке на ярлыке чехла:
Надевание чехла
Чтобы надеть чехол, следуйте приведенным выше
указаниям в обратном порядке.
09
29
12
Используйте только оригинальные сменные чехлы BRITAX RÖMER, так как
чехол является неотъемлемой частью детского сиденья и играет важную
роль в обеспечении надежной эксплуатации системы. Сменные чехлы для
сидений можно приобрести у вашего дилера.
• Чехол можно снимать и стирать в машине в режиме деликатной стирки
(30 °C). Ознакомьтесь с инструкциями по стирке на ярлыке чехла.
• Пластмассовые детали можно протирать влажной тряпкой. Не применяйте
щелочные чистящие средства (например, растворители).
ОПАСНО!
Запрещается использовать детское сиденье без чехла.
Уход за замком ремня
Для безопасности вашего ребенка крайне важно, чтобы замок ремня работал
исправно. Причиной неисправности замка ремня обычно являются загрязнения
или посторонние объекты. Возможны следующие неисправности:
• При нажатии красной кнопки разблокировки язычки замка извлекаются очень
медленно.
• Язычки замка не фиксируются (т. е. при попытке защелкнуть замок язычки
извлекаются обратно).
• Язычки замка защелкиваются без характерного звука.
• Язычки замка очень трудно вставлять (чувствуется сопротивление).
• Замок открывается только при нажатии с силой.
Устранение неисправностей: промойте замок ремня безопасности, чтобы он снова
мог нормально функционировать.
25
12
12
27
26
Очистка замка ремня
1.
Откройте замок ремня
12
(нажмите красную кнопку).
2.
Переместите корпус сиденья
02
в вертикальное
положение для сидения.
3.
Откройте застежку-липучку на накладке для паховой
области
25
, снимите и отложите ее.
4.
Возьмитесь за металлическую пластинку
26
под
сиденьем, которая удерживает замок
12
на основании
сиденья, и поверните ее в вертикальное положение.
5.
Протяните металлическую пластинку
26
через
отверстие
27
.
6.
Замочите замок ремня
12
в теплой воде с жидкостью
для мытья посуды не менее чем на час.
7.
Тщательно промойте и высушите замок ремня
12
.
8.
Протяните металлическую пластинку
26
боковой
стороной через отверстие
27
в чехле и основании
сиденья.
9.
Поверните металлическую пластинку
26
на 90°
ОПАСНО! Аккуратно задвиньте замок ремня
12
до полной фиксации.
10.
Вставьте накладку для паховой области
25
через
отверстие
27
и застегните застежку-липучку.
Очистка датчика присутствия пассажира
1.
Загните нижнюю сторону чехла вверх.
2.
Удалите грязь и пыль в зоне датчика присутствия
пассажира
28
при помощи пылесоса.
ОПАСНО! Не допускайте попадания воды на датчик
присутствия пассажира
28
.
28
KING II / ATS / LS
Инструкция по эксплуатации
www.britax.com
2000021398 02/17
RU
9 кг — 18 кг
от ~9 месяцев до 4 лет

01
10
18
04
Adjustment leverHeadrest adjuster (KING II ATS/LS)Lower belt guide Release buttons Seat shellUpper belt guideSeat base
01
02
03
04
05
06
07
Indicator light (KING II LS)Shoulder pads HeadrestHeadrest adjuster (KING II)Adjusting button
08
09
10
Shoulder straps
11
Harness buckle
12
13
14
Adjustment strapIndicator light (KING II ATS)
15
16
Adjustment handle
17
User guide compartment
18
02
03
05
06
07
08
09
11
12
13
14
15
17
16
KING II / ATS / LS
User instructions
www.britax.com
2000021398 02/17
GB
9 kg — 18 kg
9 M
~
4 Y
2. INTRODUCTION
We are delighted that our
KING II / ATS / LS
can safely accompany your child
through a new stage in its life.
In order to protect your child correctly, the
KING II / ATS / LS
must al-
ways be used and installed as described in these instructions.
If you have any further questions regarding its use, please feel free to contact us:
BRITAX RÖMER
Kindersicherheit GmbH
Theodor-Heuss-Straße 9
D-89340 Leipheim
Germany
T.: +49 (0) 8221 3670 -199
F.: +49 (0) 8221 3670 -210
E.: service.de@britax.com
www.britax.com
BRITAX EXCELSIOR
LIMITED
1 Churchill Way West
Andover
Hampshire SP10 3UW
United Kingdom
T.: +44 (0) 1264 333343
F.: +44 (0) 1264 334146
E.: service.uk@britax.com
www.britax.com
These instructions use the following symbols stated below:
Symbol Keyword Explanation
DANGER! Risk of severe personal injury
WARNING! Risk of minor personal injury
CAUTION! Risk of material damage
TIP: Useful notes
Instructions that follow a set sequence are numbered.
Example:
1. Press the button…
21
22
Belt guide colours
For better differentiation, the two vehicle seat
belts are highlighted in different colours. The di-
agonal seat belt
21
in dark red and the lap belt
22
in bright red. The colour of the belt guides
on the child safety seat follows the same colour
scheme.
4. CARE AND MAINTENANCE
3. CERTIFICATION
/ USAGE
PAGE I
5. DISASSEMBLY AND DISPOSAL
1. PRODUCT OVERVIEW
DISPOSAL:Please observe the waste disposal regulations in your country..
Disposal of packaging Container for cardboard boxes
Seat cover Residual waste, thermal utilisation
Plastic parts According to the labelling in the
corresponding container
Metal parts Container for metals
Belt straps Container for polyester
Buckle and tongue Residual waste
Batteries Container for batteries
REMOVAL:UNFASTENING YOUR CHILD:
1. To unfasten your child, press the red release button of the 5-Point harness
buckle
12
.
1. Unbuckle the vehicle belt buckle
20
and loosen the harness straps.
2. Unhook the diagonal belt section
21
from the upper belt guide
01
.
3. To open the shell: push one of the grey release buttons
03
and at the
same time pull the seat shell
02
as far forward as possible.
4. Remove the diagonal
21
and the lap belt sections
22
from the light red
lower belt guides
04
.
5. Hold the seat shell
02
with one hand while pulling the grey adjustment
lever
05
forward with the other hand.
6. To close the shell: tip the seat shell
02
against the seat base
06
over both
engagement positions.
WARNING! To avoid injuries take your hand away from the grey adjust-
ment lever
05
, as soon as getting over the two engagement positions.
7. Push the seat shell
02
with both hands against the seat base
06
until it is
fully engaged.
BRITAX RÖMER Child safety seat
Testing and certication
In accordance with ECE* R 44/04
*ECE = European Standard for Child Safety Equipment
Group Body weight
KING II / ATS / LS
I 9 to 18 kg
The child safety seat has been designed, tested and certied according to the re—
quirements of the European Standard for Child Safety Equipment (ECE R 44/04).
The seal of approval E (in a circle) and the approval number are located on the
orange approval label (sticker on the child safety seat)
.
DANGER! This approval will be invalidated if you make any modications to
the child safety seat. Only the manufacturer is permitted to make
modications to the child safety seat.
DANGER! Never secure your child or the child safety seat with a 2-point belt.
If you secure your child in the child seat with only a 2-point belt,
then in the event of an accident this may cause serious injuries to
your child, possibly resulting in death.
Please observe the instructions for using children’s restraining systems in the operating
instructions of your vehicle. The seat can only be used in vehicles with 3-point retractor safety-
belts
2)
.
Please nd the information on the seats approved for child safety seats of the weight classes 9 to
18 kg in the operating instructions of your vehicle.
You can use your child safety seat as follows:
In the direction of travel yes
Against the direction of travel no
1)
with 2-point belt no
with 3-point reractor safety belt
2)
yes
on front passenger seat yes
3)
on outer rear seat yes
on centre rear seat (with 3-point
belt
2)
)
yes
4)
1) Use is permitted on a rearward-facing vehicle seat (e.g. in a van or minibus) only
if the vehicle seat is also approved for use by adults. The seat may not be in the area of effect
of an airbag.
2) The seat is only compatible with 3-point retractor type safety-belts, approved to ECE Reg
No. 16 or other equivalent standards.
3) If there is a front airbag: Slide the vehicle seat a long way back and refer to any instructions
in vehicle owner’s manual.
4) Cannot be used if the vehicle seat is equipped with only a 2-point belt.
9 — 18 kg
Removing the cover
Loosen the harness straps as far as possible.
1. Open the harness buckle
12
(press red button).
2. Remove the cover of the headrest
09
.
3. Open the poppers
29
on the left and right side of the
rear part of the cover.
4. Unhook the elastic seam of the cover under the edge of
the seat shell.
TIP: Start at the sides of the seat shell.
5. Pull the cover up and over the bezel of the strap adjuster.
6. Feed out the harness buckle
12
and the end of the strap
from the cover.
7. Pull the cover upwards and remove it over the headrest
09
.
The cover can now be washed. Please observe the
instructions on the washing label of the cover:
Re-tting the cover
Proceed in reverse order to put on the cover.
09
29
12
Please ensure that you only use the original BRITAX RÖMER replacement seat
covers, as the seat cover is an integral part of the child safety seat and fulls im—
portant functions to ensure the smooth operation of the system. Replacement seat
covers are available from your dealer.
• The cover can be removed and washed using the delicates programme of the
washing machine (30°C). Please observe the instructions on the washing label
of the cover.
• The plastic parts can be cleaned with a damp cloth. Do not use any caustic
cleaning agents (such as solvents).
DANGER! The child seat must not be used without the seat cover.
Care for the harness buckle
It is vital for the safety of your child that the harness buckle works correctly. Malfunctions
of the harness buckle are usually caused by accumulations of dirt or foreign bodies.
Malfunctions include the following:
• The buckle latches are ejected only slowly when the red release button is pressed.
• The buckle latches will no longer lock home (i.e. they are ejected again if you try to push
them in).
• The buckle latches engage without an audible “click“.
• The buckle latches are difcult to insert (you feel resistance).
• The buckle only opens if extreme force is applied.
Remedy:
wash out the harness buckle so that it functions properly once again.
25
12
12
27
26
Cleaning the harness buckle
1. Open the harness buckle
12
(press the red button).
2. Adjust the seat shell
02
to the upright seating
position.
3. Open the Velcro fastener on the crotch pad
25
and
remove it and retain it.
4. Grasp below the seating area the metal plate
26
which keeps the buckle
12
at the seat base and
turn it into a vertical position.
5. Slide the metal plate
26
through the slot
27
.
6. Soak the harness buckle
12
in warm water with
dishwashing liquid for at least an hour.
7. Rinse and dry the harness buckle
12
thoroughly.
8. Slide the metal plate
26
edgewise through the slot
27
in the cover and the seat base.
9. Rotate the metal plate
26
90°
DANGER! Pull the harness buckle
12
rmly to ensure
that it is securely fastened.
10. Insert the crotch pad
25
through the slot
27
and
secure the Velcro fastener.
Cleaning the occupant sensor
1.
Fold the lower part of the cover updwards.
2. Remove dirt and dust in the area of the occupant sensor
28
with a vacuum cleaner.
DANGER! The occupant sensor
28
must not come in
contact with water.
28
Смотреть руководство для Britax-Römer King II ниже. Все руководства на ManualsCat.com могут просматриваться абсолютно бесплатно. Нажав кнопку «Выбор языка» вы можете изменить язык руководства, которое хотите просмотреть.

MANUALSCAT | RU
Вопросы и ответы
У вас есть вопрос о Britax-Römer King II, но вы не можете найти ответ в пользовательском руководстве? Возможно, пользователи ManualsCat.com смогут помочь вам и ответят на ваш вопрос. Заполните форму ниже — и ваш вопрос будет отображаться под руководством для Britax-Römer King II. Пожалуйста, убедитесь, что вы опишите свои трудности с Britax-Römer King II как можно более детально. Чем более детальным является ваш вопрос, тем более высоки шансы, что другой пользователь быстро ответит на него. Вам будет автоматически отправлено электронное письмо, чтобы проинформировать вас, когда кто-то из пользователей ответит на ваш вопрос.
Задать вопрос о Britax-Römer King II
- Бренд:
- Britax-Römer
- Продукт:
- автокресла
- Модель/название:
- King II
- Тип файла:
- Доступные языки:
- английский