
Wi-Fi сети становятся все более популярными, поскольку предоставляют возможность беспроводного подключения к Интернету в любом месте. Однако, чтобы иметь эффективную и безопасную сеть, необходимо правильно настроить беспроводной маршрутизатор. В данной статье рассмотрим инструкцию по использованию Zyxel NWA3560-N – одного из наиболее распространенных моделей маршрутизаторов.
Zyxel NWA3560-N – это мощный и надежный маршрутизатор, который позволяет создать стабильную и быструю беспроводную сеть. Он обладает множеством функций и возможностей, которые позволяют настроить и управлять Wi-Fi сетью в соответствии с индивидуальными потребностями пользователя.
Преимущества использования Zyxel NWA3560-N:
- Высокая скорость и стабильность подключения;
- Возможность установки разных уровней безопасности;
- Простота настройки и управления сетью;
- Поддержка различных типов прошивок;
- Возможность создания гостевой сети;
- Поддержка множественных операционных систем.
В данной статье мы рассмотрим основные этапы настройки маршрутизатора Zyxel NWA3560-N, а также расскажем о его особенностях и возможностях.
Содержание
- Использование Zyxel NWA3560-N: полное руководство с настройками и особенностями
- Установка и подключение устройства
- Настройка сетевого соединения и интернет-подключения
- Создание и настройка беспроводной сети
- Работа с функциями безопасности и контроля доступа
- Дополнительные возможности и рекомендации по использованию
Использование Zyxel NWA3560-N: полное руководство с настройками и особенностями
1. Подключение и настройка устройства
Перед началом использования необходимо подключить Zyxel NWA3560-N к сети электропитания и подключить его к сетевому коммутатору или маршрутизатору с помощью Ethernet-кабеля. После подключения устройство будет автоматически получать IP-адрес.
Для начала настройки устройства откройте веб-браузер и введите IP-адрес устройства в адресной строке. По умолчанию IP-адрес Zyxel NWA3560-N — 192.168.1.1. Вы будете перенаправлены на страницу входа в систему.
Введите логин и пароль администратора для доступа к настройкам устройства. По умолчанию логин — admin, пароль — 1234. Если вы впервые заходите на страницу настроек, рекомендуется сменить пароль администратора для повышения безопасности.
2. Основные настройки
На странице настроек вы найдете различные вкладки и опции для настройки устройства. На вкладке «Беспроводной интерфейс» вы можете настроить основные параметры Wi-Fi сети, включая SSID (имя сети), режим работы (например, 802.11n), каналы и безопасность.
Вкладка «Сетевой интерфейс» позволяет настроить IP-адрес устройства, подсеть и шлюз по умолчанию. Вы можете изменить эти параметры в соответствии с требованиями вашей сети.
Другие вкладки содержат дополнительные настройки, такие как управление беспроводными клиентами, управление мультимедиа и управление сетью.
3. Особенности и возможности
Zyxel NWA3560-N обладает рядом особенностей и возможностей, которые делают его отличным выбором для создания большой и надежной Wi-Fi сети.
Одна из особенностей устройства — поддержка технологии Beamforming, которая позволяет автоматически оптимизировать направление и качество сигнала в зависимости от расположения беспроводных клиентов. Это позволяет улучшить производительность и стабильность сети.
За счет поддержки стандарта 802.11n с множественными MIMO антеннами, устройство обеспечивает высокую скорость передачи данных и стабильное соединение даже при большом количестве подключенных устройств.
Также стоит отметить поддержку технологии WPA3 для повышения безопасности Wi-Fi сети, а также наличие гостевой Wi-Fi сети для разделения доступа и обеспечения безопасности основной сети.
В целом, Zyxel NWA3560-N — это мощное и простое в использовании устройство для создания качественной и надежной Wi-Fi сети. Следуя данному руководству, вы сможете быстро и легко настроить устройство и насладиться высокой скоростью и стабильностью сети.
Установка и подключение устройства
Для установки и настройки устройства Zyxel NWA3560-N следуйте инструкциям ниже:
- Распакуйте устройство и проверьте наличие всех комплектующих.
- Подключите устройство к источнику питания.
- Подключите Ethernet-кабель к порту WAN устройства и другой конец к подключенному Интернет-устройству.
- Включите устройство и дождитесь завершения процесса загрузки.
- Подключите компьютер к устройству с помощью Ethernet-кабеля.
- Откройте веб-браузер и введите IP-адрес устройства (по умолчанию 192.168.1.1), затем нажмите Enter.
- Введите логин и пароль для входа в настройки устройства (по умолчанию логин admin, пароль 1234) и нажмите Войти.
- На странице настроек устройства выполните необходимые настройки, включая настройку беспроводной сети, безопасности, VLAN и других параметров.
- Сохраните настройки и перезагрузите устройство для их применения.
После завершения этих шагов у вас будет полностью установлено и настроено устройство Zyxel NWA3560-N, готовое к использованию.
Настройка сетевого соединения и интернет-подключения
При использовании Zyxel NWA3560-N для доступа к сети интернет необходимо выполнить следующие шаги:
1. Подключите один конец Ethernet-кабеля к порту WAN на устройстве Zyxel NWA3560-N и другой конец к порту LAN вашего интернет-провайдера.
2. Убедитесь, что устройство Zyxel NWA3560-N включено и работает.
3. Откройте веб-браузер на компьютере и введите IP-адрес устройства (например, 192.168.1.1) в адресной строке.
4. Введите имя пользователя и пароль для доступа к панели управления устройства (по умолчанию они оба равны «admin»).
5. Перейдите в раздел «Настройки сети» или «Network Settings» в зависимости от языка интерфейса.
6. Настройте тип подключения к интернету, выбрав соответствующий раздел и указав необходимые параметры (например, DHCP или PPPoE).
7. Сохраните изменения и перезагрузите устройство Zyxel NWA3560-N.
Теперь ваш Zyxel NWA3560-N должен быть подключен к сети интернет. Вы можете проверить подключение, открыв веб-браузер и перейдя на любой веб-сайт.
Примечание:
Если у вас возникли проблемы с подключением к интернету, проверьте корректность настроек сети и правильность подключения кабеля. Вы также можете обратиться к документации или технической поддержке устройства Zyxel NWA3560-N для получения дополнительной помощи.
Создание и настройка беспроводной сети
Для создания и настройки беспроводной сети с помощью Zyxel NWA3560-N следуйте данным инструкциям:
1. Подключите устройство NWA3560-N к источнику питания и к вашему компьютеру с помощью Ethernet-кабеля.
2. Зайдите в веб-интерфейс устройства, введя IP-адрес NWA3560-N в адресную строку вашего браузера.
3. Войдите в систему, введя ваш логин и пароль.
4. Перейдите в раздел «Настройки беспроводной сети» или «Wireless Network Settings».
5. Создайте новое беспроводное соединение, нажав на кнопку «Добавить» или «Add».
6. Задайте SSID (Service Set Identifier) — это имя вашей беспроводной сети. Рекомендуется использовать уникальное и непривязанное к личным данным название.
7. Выберите безопасность для вашей беспроводной сети. Рекомендуется использовать WPA2 для обеспечения наивысшего уровня безопасности.
8. Введите пароль для доступа к сети. Пароль должен быть надежным и отличаться от других паролей.
9. Выберите канал для вашей сети или оставьте автоматическое назначение канала.
10. Нажмите «Применить» или «Apply», чтобы сохранить настройки.
11. Подключите ваше устройство к беспроводной сети, используя SSID и пароль, которые вы указали.
12. Проверьте работоспособность вашей беспроводной сети, открыв веб-страницу или выполните другую проверку подключения.
Примечание: Важно помнить, что настройки беспроводной сети могут различаться в зависимости от конкретной модели устройства и используемой версии программного обеспечения.
Работа с функциями безопасности и контроля доступа
Маршрутизатор Zyxel NWA3560-N предлагает ряд функций безопасности и контроля доступа, которые могут быть полезны для обеспечения безопасности и ограничения доступа к сети. В этом разделе рассмотрим основные возможности и настройки этих функций.
Одной из основных функций безопасности является механизм аутентификации, который позволяет контролировать доступ к сети. Для этого вы можете настроить список авторизованных пользователей, используя разные способы аутентификации, такие как WPA2, RADIUS или предоставление временного гостевого доступа.
Дополнительно вы можете настроить контроль доступа на основе MAC-адресов устройств. Это позволяет разрешить или запретить доступ конкретным устройствам, исключая возможность подключения нежелательных устройств к сети.
Еще одной возможностью является создание виртуальных локальных сетей (VLAN), которые позволяют разделять сеть на различные группы с разными уровнями доступа. Например, вы можете создать отдельную VLAN для гостевого доступа, чтобы изолировать гостей от основной сети.
Кроме того, маршрутизатор поддерживает механизмы защиты от атак и вторжений, такие как брандмауэр и DHCP-фильтрация. Это помогает предотвратить несанкционированный доступ к сети и защитить ее от вредоносных программ.
Для настройки функций безопасности и контроля доступа вам понадобится административный доступ к веб-интерфейсу маршрутизатора. Подробная информация по настройке каждой функции содержится в руководстве пользователя, предоставляемом производителем.
<
| Функция | Описание |
|---|---|
| Аутентификация | Контроль доступа на основе списка авторизованных пользователей |
| Контроль доступа по MAC-адресам | Разрешение или запрет доступа устройствам на основе их MAC-адресов |
| Виртуальные локальные сети (VLAN) | Разделение сети на группы с разными уровнями доступа |
| Защита от атак и вторжений | Механизмы брандмауэра и DHCP-фильтрации для защиты от несанкционированного доступа и вредоносных программ |
Дополнительные возможности и рекомендации по использованию
Помимо основных функций, Zyxel NWA3560-N также предлагает несколько дополнительных возможностей, которые могут быть полезны при настройке и использовании точки доступа.
1. Гостевая сеть: Эта функция позволяет создать отдельную сеть для гостей, отделенную от основной сети. Гостевая сеть может иметь отдельные правила доступа и ограничения, что обеспечивает безопасность в основной сети. Рекомендуется использовать гостевую сеть для посетителей и временных пользователей.
2. Балансировка нагрузки: Zyxel NWA3560-N поддерживает функцию балансировки нагрузки, которая позволяет равномерно распределить трафик между несколькими точками доступа. Это особенно полезно в сетях с высоким трафиком, где одна точка доступа может быть перегружена. Рекомендуется использовать балансировку нагрузки для обеспечения стабильного и быстрого подключения к сети.
3. Беспроводной мост: Эта функция позволяет соединить две или более точки доступа в беспроводную сеть. В результате создается мост между точками доступа, который позволяет передавать сигналы и данные между различными зонами сети. Рекомендуется использовать беспроводной мост для расширения беспроводной сети на большие расстояния или через преграды.
4. Управление беспроводными клиентами: Zyxel NWA3560-N обеспечивает возможность управления беспроводными клиентами, подключенными к точке доступа. Это позволяет контролировать и ограничивать доступ отдельных устройств или групп устройств к сети, что повышает безопасность и эффективность использования сетевых ресурсов. Рекомендуется использовать управление беспроводными клиентами для настройки качества обслуживания (QoS) и ограничения доступа.
Примечание: Для использования дополнительных возможностей и функций Zyxel NWA3560-N рекомендуется обратиться к документации и руководству по настройке точки доступа. Будьте осторожны при внесении изменений в настройки, чтобы избежать некорректной работы сети.
На чтение 3 мин Опубликовано Обновлено
В настоящее время Wi-Fi является неотъемлемой частью нашей повседневной жизни. Он предоставляет нам возможность быть всегда на связи и получать доступ к интернету в любой точке помещения. И одним из лучших роутеров, обеспечивающих стабильное и быстрое соединение, является Zyxel NWA3560-N.
Zyxel NWA3560-N является мощным и надежным роутером, который предлагает широкий функционал и простоту использования. Он обладает высокой пропускной способностью и поддерживает стандарт 802.11n, что обеспечивает стабильную и быструю передачу данных. Кроме того, этот роутер имеет множество дополнительных функций, таких как улучшение сигнала, возможность создания гостевых сетей и защита от несанкционированного доступа.
В этой статье мы предлагаем вам подробную инструкцию и руководство по настройке Zyxel NWA3560-N. Вы узнаете, как подключить роутер к Интернету, настроить настройки безопасности, создать гостевые сети и многое другое. Следуя нашим рекомендациям, вы сможете настроить роутер так, чтобы получить максимальное удовлетворение от его использования и обеспечить безопасность вашей сети.
Не теряйте времени! Прочтите нашу подробную инструкцию и руководство по настройке Zyxel NWA3560-N прямо сейчас и наслаждайтесь стабильным и быстрым интернетом!
Описание устройства Zyxel NWA3560-N
Zyxel NWA3560-N представляет собой беспроводной точку доступа, разработанный для использования в средних и больших офисах или предприятиях. Он обеспечивает быстрое и надежное беспроводное подключение для множества устройств, таких как ноутбуки, телефоны, планшеты и т. д.
Устройство оснащено стандартом 802.11n, который предоставляет высокую пропускную способность и широкий охват. С помощью множества антенн и технологии MIMO (Multiple-Input Multiple-Output), Zyxel NWA3560-N достигает скорости передачи данных до 300 Мбит/с.
Беспроводной точка доступа поддерживает различные режимы работы, включая точку доступа, клиентский режим и режим повторителя. Это позволяет гибко настраивать устройство для разных сценариев использования.
Управление и настройка Zyxel NWA3560-N осуществляется через веб-интерфейс. Пользователь может настроить параметры беспроводной сети, включая SSID, безопасность, каналы и другие. Также доступны возможности мониторинга и диагностики подключенных устройств для обеспечения стабильной работы сети.
Зyxel NWA3560-N предлагает надежное и безопасное беспроводное подключение, обеспечивая высокую производительность и расширенный функционал в средах с высокой плотностью устройств. Это надежное решение для создания эффективной и современной сети.
Основные функции и характеристики Zyxel NWA3560-N
Сетевая точка доступа Zyxel NWA3560-N обладает широким спектром функций и характеристик, которые позволяют создать стабильную и безопасную беспроводную сеть. Ниже приведены основные функции и характеристики устройства:
| Характеристики | Описание |
| Стандарт беспроводной связи | 802.11n |
| Скорость передачи данных | До 300 Мбит/с |
| Частотный диапазон | 2.4 ГГц |
| Количество внешних антенн | 2 |
| Мощность передатчика | До 20 дБм |
| Режимы работы | Access Point, Bridge, Repeater, WDS, Universal Repeater |
| Защита сети | WEP, WPA/WPA2-PSK, WPA/WPA2-Enterprise, IEEE 802.1X |
| Управление | Web-интерфейс, SNMP, Telnet, SSH |
| Функции безопасности | Фильтрация MAC-адресов, скрытие SSID, контроль доступа |
| Количество поддерживаемых пользователей | До 128 |
| Возможность настройки гостевой сети | Да |
| Питание | 12 В, 1 А |
Эти функции и характеристики делают Zyxel NWA3560-N идеальным выбором для организации беспроводной сети в малом и среднем офисе или домашней сети. С помощью данного устройства вы сможете создать стабильное и высокоскоростное подключение к интернету и обеспечить безопасность вашей сети.
![]()
NWA3000-N Series
Wireless N Business WLAN 3000 Series Access Point
Default Login Details
|
IP Address |
https://192.168.1.2 |
|
User Name |
admin |
|
Password |
1234 |
Version 2.23
Edition 1, 1/2011
www.zyxel.com
Copyright © 2011
ZyXEL Communications Corporation

About This User’s Guide
About This User’s Guide
Intended Audience
This manual is intended for people who want to configure a NWA3000-N series AP using the web configurator. You should have at least a basic knowledge of TCP/IP networking concepts and topology.
Related Documentation
•Quick Start Guide
The Quick Start Guide is designed to help you get up and running right away. It contains information on setting up your network and configuring for Internet access.
•Support Disc
Refer to the included CD for support documents.
•ZyXEL Web Site
Please refer to www.zyxel.com for additional support documentation and product certifications.
User Guide Feedback
Help us help you. Send all User Guide-related comments, questions or suggestions for improvement to the following address, or use e-mail instead. Thank you!
The Technical Writing Team,
ZyXEL Communications Corp.,
6 Innovation Road II,
Science-Based Industrial Park,
Hsinchu, 300, Taiwan.
E-mail: techwriters@zyxel.com.tw
|
3 |
|
|
NWA3000-N Series User’s Guide |
|

Document Conventions
Document Conventions
Warnings and Notes
These are how warnings and notes are shown in this User’s Guide.
Warnings tell you about things that could harm you or your device.
Note: Notes tell you other important information (for example, other things you may need to configure or helpful tips) or recommendations.
Syntax Conventions
•The product in this book may be referred to as the “NWA3000-N series AP”, the “device”, the “AP”, or the “system” in this User’s Guide.
•Product labels, screen names, field labels and field choices are all in bold font.
•A key stroke is denoted by square brackets and uppercase text, for example, [ENTER] means the “enter” or “return” key on your keyboard.
•“Enter” means for you to type one or more characters and then press the [ENTER] key. “Select” or “choose” means for you to use one of the predefined choices.
•A right angle bracket ( > ) within a screen name denotes a mouse click. For example, Maintenance > Status > Show Statistics means you first click
Maintenance in the navigation panel, then the Status sub menu and finally the Show Statistics button to get to that screen.
•Units of measurement may denote the “metric” value or the “scientific” value. For example, “k” for kilo may denote “1000” or “1024”, “M” for mega may denote “1000000” or “1048576” and so on.
•“e.g.,” is a shorthand for “for instance”, and “i.e.,” means “that is” or “in other words”.
•Screens reproduced here for demonstration purposes may not exactly match the screens on your device.
|
4 |
||
|
NWA3000-N Series User’s Guide |
||

Document Conventions
Icons Used in Figures
Figures in this User’s Guide may use the following generic icons. The NWA3000-N series AP icon is not an exact representation of your device.
|
NWA3000-N series AP |
Computer |
Notebook computer |
|
Server |
Printer |
Firewall |
|
Telephone |
Switch |
Router |
|
5 |
|
|
NWA3000-N Series User’s Guide |
|

Safety Warnings
Safety Warnings
•Do NOT use this product near water, for example, in a wet basement or near a swimming pool.
•Do NOT expose your device to dampness, dust or corrosive liquids.
•Do NOT store things on the device.
•Do NOT install, use, or service this device during a thunderstorm. There is a remote risk of electric shock from lightning.
•Connect ONLY suitable accessories to the device.
•ONLY qualified service personnel should service or disassemble this device.
•Make sure to connect the cables to the correct ports.
•Place connecting cables carefully so that no one will step on them or stumble over them.
•Always disconnect all cables from this device before servicing or disassembling.
•Use ONLY an appropriate power adaptor or cord for your device.
•Connect the power adaptor or cord to the right supply voltage (for example, 110V AC in North America or 230V AC in Europe).
•Do NOT allow anything to rest on the power adaptor or cord and do NOT place the product where anyone can walk on the power adaptor or cord.
•Do NOT use the device if the power adaptor or cord is damaged as it might cause electrocution.
•If the power adaptor or cord is damaged, remove it from the power outlet.
•Do NOT attempt to repair the power adaptor or cord. Contact your local vendor to order a new one.
•Do not use the device outside, and make sure all the connections are indoors. There is a remote risk of electric shock from lightning.
•“Not to remove the plug and plug into a wall outlet by itself; always attach the plug to the power supply first before insert into the wall.”
•(In other words, do NOT remove the plug and connect it to a power outlet by itself; always attach the plug to the power adaptor first before connecting it to a power outlet.)
•Antenna Warning! This device meets ETSI and FCC certification requirements when using the included antenna(s). Only use the included antenna(s).
•If you wall mount your device, make sure that no electrical lines, gas or water pipes will be damaged.
•The PoE (Power over Ethernet) devices that supply or receive power and their connected Ethernet cables must all be completely indoors.
•The indoors versions of this product are for indoor use only (utilisation intérieure exclusivement).
This product is recyclable. Dispose of it properly.
|
6 |
||
|
NWA3000-N Series User’s Guide |
||

Table of Contents
Table of Contents
|
About This User’s Guide ……………………………………………………………………………………………. |
3 |
|
|
Document Conventions……………………………………………………………………………………………… |
4 |
|
|
Safety Warnings………………………………………………………………………………………………………… |
6 |
|
|
Table of Contents………………………………………………………………………………………………………. |
7 |
|
|
Part I: User’s Guide…………………………………………………………………….. |
15 |
|
|
Chapter 1 |
||
|
Introduction …………………………………………………………………………………………………………….. |
17 |
|
|
1.1 |
Overview …………………………………………………………………………………………………………….. |
17 |
|
1.2 |
Applications for the NWA3000-N series AP ………………………………………………………………. |
18 |
|
1.2.1 Bridge / Repeater …………………………………………………………………………………………. |
18 |
|
|
1.2.2 AP + Bridge …………………………………………………………………………………………………. |
22 |
|
|
1.2.3 MBSSID ……………………………………………………………………………………………………… |
22 |
|
|
1.3 Management Mode ……………………………………………………………………………………………….. |
23 |
|
|
1.4 |
Ways to Manage the NWA3000-N series AP ……………………………………………………………. |
24 |
|
1.5 |
Good Habits for Managing the NWA3000-N series AP ………………………………………………. |
25 |
|
1.6 |
Hardware Connections ………………………………………………………………………………………….. |
26 |
|
1.7 |
LEDs …………………………………………………………………………………………………………………… |
27 |
|
1.8 |
Starting and Stopping the NWA3000-N series AP ……………………………………………………… |
29 |
|
Chapter 2 |
||
|
The Web Configurator ……………………………………………………………………………………………… |
31 |
|
|
2.1 |
Overview ……………………………………………………………………………………………………………… |
31 |
|
2.2 |
Access ………………………………………………………………………………………………………………… |
32 |
|
2.3 |
The Main Screen ………………………………………………………………………………………………….. |
33 |
|
2.3.1 Title Bar ………………………………………………………………………………………………………. |
34 |
|
|
2.3.2 Navigation Panel ………………………………………………………………………………………….. |
34 |
|
|
2.3.3 Warning Messages ……………………………………………………………………………………….. |
38 |
|
|
2.3.4 Site Map ……………………………………………………………………………………………………… |
38 |
|
|
2.3.5 Object Reference …………………………………………………………………………………………. |
38 |
|
|
2.3.6 Tables and Lists …………………………………………………………………………………………… |
44 |
|
|
Chapter 3 |
||
|
Configuration Basics……………………………………………………………………………………………….. |
49 |
|
7 |
|
|
NWA3000-N Series User’s Guide |
|

Table of Contents
|
3.1 |
Overview ……………………………………………………………………………………………………………… |
49 |
|
3.2 |
Object — based Configuration ……………………………………………………………………………………. |
49 |
|
3.3 |
Feature Configuration Overview ……………………………………………………………………………… |
49 |
|
3.3.1 Feature ……………………………………………………………………………………………………….. |
50 |
|
|
3.3.2 MGNT Mode ………………………………………………………………………………………………… |
50 |
|
|
3.3.3 LAN Setting …………………………………………………………………………………………………. |
50 |
|
|
3.3.4 Wireless ……………………………………………………………………………………………………… |
50 |
|
|
3.3.5 Device HA …………………………………………………………………………………………………… |
51 |
|
|
3.4 |
Objects ……………………………………………………………………………………………………………….. |
51 |
|
3.4.1 User ……………………………………………………………………………………………………………. |
51 |
|
|
3.4.2 AP Profile ……………………………………………………………………………………………………. |
52 |
|
|
3.4.3 MON Profile …………………………………………………………………………………………………. |
52 |
|
|
3.5 |
System ………………………………………………………………………………………………………………… |
52 |
|
3.5.1 WWW, SSH, TELNET, FTP, SNMP, and Auth. Server ……………………………………….. |
52 |
|
|
3.5.2 Logs and Reports …………………………………………………………………………………………. |
53 |
|
|
3.5.3 File Manager ……………………………………………………………………………………………….. |
53 |
|
|
3.5.4 Diagnostics ………………………………………………………………………………………………….. |
53 |
|
|
3.5.5 Shutdown ……………………………………………………………………………………………………. |
53 |
|
|
Chapter 4 |
||
|
Tutorials |
…………………………………………………………………………………………………………………. |
55 |
|
4.1 |
Sample Network Setup ………………………………………………………………………………………….. |
55 |
|
………………………………………………………………………….. |
4.1.1 Set the Management Modes |
56 |
|
…………………………………. |
4.1.2 Set the LAN IP Address and Management VLAN (vlan99) |
57 |
|
………………………………………………………………. |
4.1.3 Set Up Wireless User Authentication |
58 |
|
………………………………………………………………… |
4.1.4 Create the AP Profiles (staff, guest) |
60 |
|
4.2 ……………………………………………………………………………………………… |
Rogue AP Detection |
63 |
|
………………………………………………………………………………… |
4.2.1 Rogue AP Containment |
67 |
|
4.3 …………………………………………………………………………………………………….. |
Load Balancing |
69 |
|
4.4 …………………………………………………………………………………… |
Dynamic Channel Selection |
70 |
|
Part II: Technical …………………………………………………………Reference |
73 |
|
|
Chapter 5 |
||
|
Dashboard ……………………………………………………………………………………………………………. |
75 |
|
|
5.1 ……………………………………………………………………………………………………………… |
Overview |
75 |
|
…………………………………………………………………… |
5.1.1 What You Can Do in this Chapter |
75 |
|
5.2 …………………………………………………………………………………………………………… |
Dashboard |
76 |
|
…………………………………………………………………………………………………. |
5.2.1 CPU Usage |
80 |
|
…………………………………………………………………………………………….. |
5.2.2 Memory Usage |
81 |
|
8 |
||
|
NWA3000-N Series User’s Guide |
||

|
Table of Contents |
||
|
Chapter 6 |
||
|
Monitor |
………………………………………………………………………………………………………………… |
83 |
|
6.1 |
Overview ……………………………………………………………………………………………………………… |
83 |
|
6.1.1 What You Can Do in this Chapter …………………………………………………………………… |
83 |
|
|
6.2 |
What You Need to Know ………………………………………………………………………………………… |
83 |
|
6.3 |
LAN Status …………………………………………………………………………………………………………… |
84 |
|
6.3.1 LAN Status Graph ……………………………………………………………………………………….. |
86 |
|
|
6.4 |
AP List ……………………………………………………………………………………………………………….. |
87 |
|
6.4.1 Station Count of AP …………………………………………………………………………………….. |
89 |
|
|
6.5 |
Radio List ……………………………………………………………………………………………………………. |
89 |
|
6.5.1 AP Mode Radio Information …………………………………………………………………………… |
91 |
|
|
6.6 |
Station List ………………………………………………………………………………………………………….. |
93 |
|
6.7 |
Rogue AP ……………………………………………………………………………………………………………. |
94 |
|
6.8 |
Legacy Device Info ……………………………………………………………………………………………….. |
95 |
|
6.8.1 Legacy Device Info Add or Edit ………………………………………………………………………. |
96 |
|
|
6.9 |
View Log ……………………………………………………………………………………………………………… |
96 |
|
6.10 View AP Log ……………………………………………………………………………………………………. |
100 |
|
|
Chapter 7 |
||
|
Management Mode…………………………………………………………………………………………………. |
103 |
|
|
7.1 |
Overview ……………………………………………………………………………………………………………. |
103 |
|
7.2 About CAPWAP ………………………………………………………………………………………………….. |
103 |
|
|
7.2.1 CAPWAP Discovery and Management ………………………………………………………….. |
104 |
|
|
7.2.2 Managed AP Finds the Controller …………………………………………………………………. |
104 |
|
|
7.2.3 CAPWAP and IP Subnets ……………………………………………………………………………. |
104 |
|
|
7.2.4 Notes on CAPWAP …………………………………………………………………………………….. |
105 |
|
|
7.3 |
The Management Mode Screen ……………………………………………………………………………. |
105 |
|
Chapter 8 |
||
|
LAN Setting …………………………………………………………………………………………………………… |
107 |
|
|
8.1 |
LAN Setting Overview …………………………………………………………………………………………. |
107 |
|
8.1.1 What You Can Do in this Chapter …………………………………………………………………. |
107 |
|
|
8.1.2 What You Need to Know ……………………………………………………………………………… |
107 |
|
|
8.2 |
LAN Setting ……………………………………………………………………………………………………….. |
108 |
|
8.2.1 Add or Edit a DNS Setting ……………………………………………………………………………. |
110 |
|
|
Chapter 9 |
||
|
Wireless ………………………………………………………………………………………………………………… |
111 |
|
|
9.1 |
Overview …………………………………………………………………………………………………………….. |
111 |
|
9.1.1 What You Can Do in this Chapter ………………………………………………………………….. |
111 |
|
|
9.1.2 What You Need to Know ………………………………………………………………………………. |
111 |
|
|
9.2 |
Controller ……………………………………………………………………………………………………………. |
112 |
|
9.3 |
AP Management ………………………………………………………………………………………………….. |
113 |
|
NWA3000-N Series User’s Guide |
9 |

Table of Contents
|
9.3.1 Edit AP List ………………………………………………………………………………………………… |
115 |
|
9.4 MON Mode …………………………………………………………………………………………………………. |
116 |
|
9.4.1 Add/Edit Rogue/Friendly List …………………………………………………………………………. |
118 |
|
9.5 Load Balancing ……………………………………………………………………………………………………. |
119 |
|
9.5.1 Disassociating and Delaying Connections ……………………………………………………… |
120 |
|
9.6 DCS …………………………………………………………………………………………………………………. |
122 |
|
9.7 Technical Reference ……………………………………………………………………………………………. |
124 |
|
Chapter 10 |
|
|
Device HA …………………………………………………………………………………………………………….. |
127 |
|
10.1 Overview ………………………………………………………………………………………………………….. |
127 |
|
10.1.1 What You Can Do in this Chapter ……………………………………………………………….. |
127 |
|
10.1.2 What You Need to Know ……………………………………………………………………………. |
128 |
|
10.1.3 Before You Begin ……………………………………………………………………………………… |
128 |
|
10.2 Device HA General ……………………………………………………………………………………………. |
129 |
|
10.3 Active-Passive Mode …………………………………………………………………………………………. |
131 |
|
10.3.1 Edit Monitored Interface …………………………………………………………………………….. |
134 |
|
10.4 Technical Reference ………………………………………………………………………………………….. |
135 |
|
Chapter 11 |
|
|
User…………………………………………………………………………………………………………………….. |
137 |
|
11.1 Overview ………………………………………………………………………………………………………….. |
137 |
|
11.1.1 What You Can Do in this Chapter ………………………………………………………………… |
137 |
|
11.1.2 What You Need To Know ……………………………………………………………………………. |
137 |
|
11.2 User Summary ………………………………………………………………………………………………….. |
138 |
|
11.2.1 Add/Edit User …………………………………………………………………………………………… |
139 |
|
11.3 Setting …………………………………………………………………………………………………………….. |
141 |
|
11.3.1 Edit User Authentication Timeout Settings ……………………………………………………. |
144 |
|
Chapter 12 |
|
|
AP Profile……………………………………………………………………………………………………………. |
147 |
|
12.1 Overview ………………………………………………………………………………………………………….. |
147 |
|
12.1.1 What You Can Do in this Chapter ……………………………………………………………….. |
147 |
|
12.1.2 What You Need To Know …………………………………………………………………………… |
147 |
|
12.2 Radio ………………………………………………………………………………………………………………. |
149 |
|
12.2.1 Add/Edit Radio Profile ……………………………………………………………………………….. |
150 |
|
12.3 SSID ………………………………………………………………………………………………………………. |
154 |
|
12.3.1 SSID List …………………………………………………………………………………………………. |
154 |
|
12.3.2 Security List ……………………………………………………………………………………………… |
158 |
|
12.3.3 MAC Filter List ………………………………………………………………………………………….. |
161 |
|
Chapter 13 |
|
|
MON Profile ………………………………………………………………………………………………………… |
165 |
|
10 |
||
|
NWA3000-N Series User’s Guide |
||
![]()
|
Table of Contents |
|
|
13.1 Overview ………………………………………………………………………………………………………….. |
165 |
|
13.1.1 What You Can Do in this Chapter ……………………………………………………………….. |
165 |
|
13.1.2 What You Need To Know …………………………………………………………………………… |
165 |
|
13.2 MON Profile ……………………………………………………………………………………………………… |
166 |
|
13.2.1 Add/Edit MON Profile ………………………………………………………………………………… |
167 |
|
13.3 Technical Reference ………………………………………………………………………………………….. |
168 |
|
Chapter 14 |
|
|
Certificates …………………………………………………………………………………………………………. |
171 |
|
14.1 Overview ………………………………………………………………………………………………………….. |
171 |
|
14.1.1 What You Can Do in this Chapter ……………………………………………………………….. |
171 |
|
14.1.2 What You Need to Know ……………………………………………………………………………. |
171 |
|
14.1.3 Verifying a Certificate ………………………………………………………………………………… |
173 |
|
14.2 My Certificates …………………………………………………………………………………………………. |
175 |
|
14.2.1 Add My Certificates …………………………………………………………………………………… |
177 |
|
14.2.2 Edit My Certificates …………………………………………………………………………………… |
181 |
|
14.2.3 Import Certificates ……………………………………………………………………………………. |
184 |
|
14.3 Trusted Certificates ……………………………………………………………………………………………. |
185 |
|
14.3.1 Edit Trusted Certificates …………………………………………………………………………….. |
187 |
|
14.3.2 Import Trusted Certificates …………………………………………………………………………. |
190 |
|
14.4 Technical Reference ………………………………………………………………………………………….. |
191 |
|
Chapter 15 |
|
|
System …………………………………………………………………………………………………………………. |
193 |
|
15.1 Overview ………………………………………………………………………………………………………….. |
193 |
|
15.1.1 What You Can Do in this Chapter ……………………………………………………………….. |
193 |
|
15.2 Host Name ……………………………………………………………………………………………………….. |
194 |
|
15.3 Date and Time …………………………………………………………………………………………………. |
194 |
|
15.3.1 Pre-defined NTP Time Servers List ……………………………………………………………… |
197 |
|
15.3.2 Time Server Synchronization ……………………………………………………………………… |
198 |
|
15.4 Console Speed …………………………………………………………………………………………………. |
199 |
|
15.5 WWW Overview ……………………………………………………………………………………………….. |
200 |
|
15.5.1 Service Access Limitations ………………………………………………………………………… |
200 |
|
15.5.2 System Timeout ……………………………………………………………………………………….. |
200 |
|
15.5.3 HTTPS ……………………………………………………………………………………………………. |
200 |
|
15.5.4 Configuring WWW Service Control ……………………………………………………………… |
201 |
|
15.5.5 HTTPS Example ………………………………………………………………………………………. |
203 |
|
15.6 SSH ……………………………………………………………………………………………………………… |
209 |
|
15.6.1 How SSH Works ………………………………………………………………………………………. |
210 |
|
15.6.2 SSH Implementation on the NWA3000-N series AP ……………………………………….. |
211 |
|
15.6.3 Requirements for Using SSH ………………………………………………………………………. |
211 |
|
15.6.4 Configuring SSH ………………………………………………………………………………………. |
212 |
|
15.6.5 Examples of Secure Telnet Using SSH ………………………………………………………… |
213 |
|
NWA3000-N Series User’s Guide |
11 |

Table of Contents
|
15.7 |
Telnet ……………………………………………………………………………………………………………… |
214 |
|
15.8 |
FTP ………………………………………………………………………………………………………………… |
215 |
|
15.9 SNMP …………………………………………………………………………………………………………….. |
217 |
|
|
15.9.1 Supported MIBs ……………………………………………………………………………………….. |
218 |
|
|
15.9.2 SNMP Traps …………………………………………………………………………………………….. |
218 |
|
|
15.9.3 Configuring SNMP ……………………………………………………………………………………. |
219 |
|
|
15.9.4 Adding or Editing an SNMPv3 User Profile …………………………………………………… |
220 |
|
|
15.10 Internal RADIUS Server …………………………………………………………………………………… |
221 |
|
|
15.10.1 Configuring the Internal RADIUS Server …………………………………………………….. |
222 |
|
|
15.10.2 Adding or Editing a Trusted AP Profile ……………………………………………………….. |
224 |
|
|
15.11 Technical Reference ………………………………………………………………………………………… |
225 |
|
|
Chapter 16 |
||
|
Log and Report …………………………………………………………………………………………………….. |
227 |
|
|
16.1 |
Overview ………………………………………………………………………………………………………….. |
227 |
|
16.1.1 What You Can Do In this Chapter ……………………………………………………………….. |
227 |
|
|
16.2 |
Email Daily Report …………………………………………………………………………………………….. |
227 |
|
16.3 |
Log Setting ……………………………………………………………………………………………………… |
229 |
|
16.3.1 Log Setting Summary ………………………………………………………………………………… |
230 |
|
|
16.3.2 Edit Log Settings ……………………………………………………………………………………… |
232 |
|
|
16.3.3 Edit Remote Server ………………………………………………………………………………….. |
236 |
|
|
16.3.4 Active Log Summary ………………………………………………………………………………… |
238 |
|
|
Chapter 17 |
||
|
File Manager………………………………………………………………………………………………………… |
241 |
|
|
17.1 |
Overview ………………………………………………………………………………………………………….. |
241 |
|
17.1.1 What You Can Do in this Chapter ……………………………………………………………….. |
241 |
|
|
17.1.2 What you Need to Know ……………………………………………………………………………. |
241 |
|
|
17.2 |
Configuration File ……………………………………………………………………………………………… |
243 |
|
17.3 |
Firmware Package ……………………………………………………………………………………………. |
248 |
|
17.4 |
Shell Script ……………………………………………………………………………………………………… |
249 |
|
Chapter 18 |
||
|
Diagnostics………………………………………………………………………………………………………….. |
253 |
|
|
18.1 |
Overview ………………………………………………………………………………………………………….. |
253 |
|
18.1.1 What You Can Do in this Chapter ……………………………………………………………….. |
253 |
|
|
18.2 |
Diagnostics ……………………………………………………………………………………………………… |
253 |
|
18.3 |
Packet Capture ………………………………………………………………………………………………… |
254 |
|
18.3.1 Packet Capture Files ………………………………………………………………………………… |
256 |
|
|
18.3.2 Example of Viewing a Packet Capture File …………………………………………………… |
257 |
|
|
18.4 |
Wireless Frame Capture ……………………………………………………………………………………. |
258 |
|
18.4.1 Wireless Frame Capture Files ……………………………………………………………………. |
261 |
|
12 |
||
|
NWA3000-N Series User’s Guide |
||
|
Table of Contents |
|||||
|
Chapter 19 |
|||||
|
Reboot…………………………………………………………………………………………………………………… |
263 |
||||
|
19.1 |
Overview ………………………………………………………………………………………………………….. |
263 |
|||
|
19.1.1 What You Need To Know …………………………………………………………………………… |
263 |
||||
|
19.2 |
Reboot …………………………………………………………………………………………………………….. |
263 |
|||
|
Chapter 20 |
|||||
|
Shutdown………………………………………………………………………………………………………… |
265 |
||||
|
20.1 |
Overview ………………………………………………………………………………………………………….. |
265 |
|||
|
20.1.1 What You Need To Know …………………………………………………………………………… |
265 |
||||
|
20.2 |
Shutdown …………………………………………………………………………………………………………. |
265 |
|||
|
Chapter 21 |
|||||
|
Troubleshooting…………………………………………………………………………………………………….. |
267 |
||||
|
21.1 |
Overview ………………………………………………………………………………………………………….. |
267 |
|||
|
21.2 |
Power, Hardware Connections, and LEDs ……………………………………………………………. |
267 |
|||
|
21.3 |
NWA3000-N series AP Access and Login …………………………………………………………….. |
268 |
|||
|
21.4 |
Internet Access …………………………………………………………………………………………………. |
270 |
|||
|
21.5 |
Wireless AP Troubleshooting ……………………………………………………………………………… |
272 |
|||
|
21.6 |
Resetting the NWA3000-N series AP …………………………………………………………………… |
277 |
|||
|
21.7 |
Getting More Troubleshooting Help ……………………………………………………………………… |
278 |
|||
|
Chapter 22 |
|||||
|
Product Specifications …………………………………………………………………………………………… |
279 |
||||
|
22.1 |
Wall-Mounting Instructions …………………………………………………………………………………. |
282 |
|||
|
Appendix |
A |
Log Descriptions ………………………………………………………………………………….. |
285 |
||
|
Appendix |
B |
Importing Certificates ……………………………………………………………………………. |
305 |
||
|
Appendix |
C Wireless LANs …………………………………………………………………………………….. |
319 |
|||
|
Appendix |
D Open Software Announcements …………………………………………………………….. |
333 |
|||
|
Appendix |
E |
Legal Information …………………………………………………………………………………. |
373 |
||
|
Index……………………………………………………………………………………………………………………… |
379 |
|
13 |
|
|
NWA3000-N Series User’s Guide |
|

Table of Contents
|
14 |
||
|
NWA3000-N Series User’s Guide |
||

15

16

1
Introduction
1.1 Overview
Your NWA3000-N series AP’s business-class reliability, SMB features, and centralized wireless management make it ideally suited for advanced service delivery in mission-critical networks. The NWA3000-N series AP provides secure mobility across the 2.4GHz and 5GHz spectrums and the IEEE 802.11n standard’s high bandwidth to support high-performance applications. It uses Multiple BSSID and VLAN to provide up to eight simultaneous independent virtual APs. Additionally, innovations in roaming technology and QoS features eliminate voice call disruptions. It can serve as an AP, Bridge, Repeater or even as an RF monitor to search for rouge APs to help eliminate network threats.
The NWA3000-N series AP controls network access with Media Access Control (MAC) address filtering, rogue Access Point (AP) detection and containment, and an internal authentication server. It also provides a high level of network traffic security, supporting IEEE 802.1x, Wi-Fi Protected Access (WPA), WPA2 and Wired Equivalent Privacy (WEP) data encryption.
A NWA3000-N series AP can manage up to 24 other NWA3000-N series APs on your network. Configuration profiles let you easily use different WLAN and security settings for various virtual and managed APs.
Your NWA3000-N series AP is easy to install, configure and use. The embedded Web-based configurator enables simple, straightforward management and maintenance. See the Quick Start Guide for how to make hardware connections.
|
17 |
|
|
NWA3000-N Series User’s Guide |
|

Chapter 1 Introduction
1.2 Applications for the NWA3000-N series AP
The NWA3000-N series AP can be configured to use the following operating modes
•Bridge / Repeater
•AP + Bridge
•MBSSID
Applications for each operating mode are shown below.
Note: A different channel should be configured for each WLAN interface to reduce the effects of radio interference.
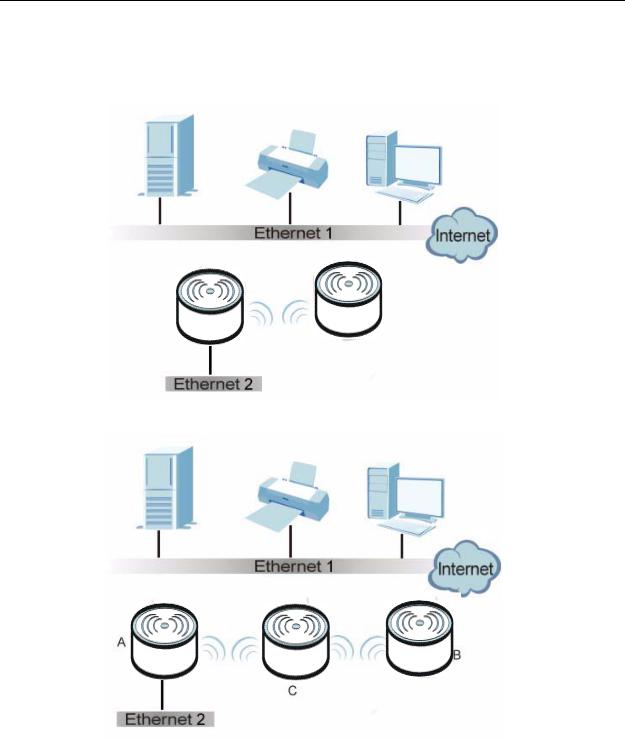
1.2.1 Bridge / Repeater
The NWA3000-N series AP can act as a wireless network bridge and establish wireless links with other APs. In the figure below, the two NWA3000-N series APs (A and B) are connected to independent wired networks and have a bridge connection (A can communicate with B) at the same time. A NWA3000-N series AP in repeater mode (C) has no Ethernet connection. When the NWA3000-N series AP is in bridge mode, you should enable Spanning Tree Protocol (STP) to prevent bridge loops.
When the NWA3000-N series AP is in Bridge / Repeater mode, security between APs (the Wireless Distribution System or WDS) is independent of the security between the wireless stations and the AP. If you do not enable WDS security, traffic between APs is not encrypted. When WDS security is enabled, both APs must use the same pre-shared key.
Once the security settings of peer sides match one another, the connection between devices is made.
|
18 |
||
|
NWA3000-N Series User’s Guide |
||
Chapter 1 Introduction
At the time of writing, WDS security is compatible with other ZyXEL access points only. Refer to your other access point’s documentation for details.
Figure 1 Bridge Application
Figure 2 Repeater Application
|
19 |
|||||||
|
NWA3000-N Series User’s Guide |
|||||||
Chapter 1 Introduction
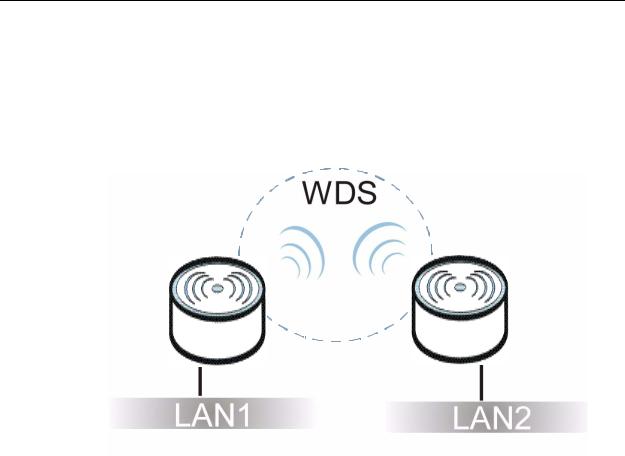
1.2.1.1 Bridge / Repeater Mode Example
In the example below, when both NWA3000-N series APs are in Bridge/Repeater mode, they form a WDS (Wireless Distribution System) allowing the computers in LAN 1 to connect to the computers in LAN 2.
Figure 3 Bridging Example
Be careful to avoid bridge loops when you enable bridging in the NWA3000-N series AP. Bridge loops cause broadcast traffic to circle the network endlessly, resulting in possible throughput degradation and disruption of communications. The following examples show two network topologies that can lead to this problem:
|
20 |
||
|
NWA3000-N Series User’s Guide |
||
![]()
Chapter 1 Introduction
•If two or more NWA3000-N series APs (in bridge mode) are connected to the same hub.
Figure 4 Bridge Loop: Two Bridges Connected to Hub
•If your NWA3000-N series AP (in bridge mode) is connected to a wired LAN while communicating with another wireless bridge that is also connected to the same wired LAN.
Figure 5 Bridge Loop: Bridge Connected to Wired LAN
To prevent bridge loops, ensure that you enable Spanning Tree Protocol (STP) in the Wireless screen or your NWA3000-N series AP is not set to bridge mode while connected to both wired and wireless segments of the same LAN.
|
21 |
|
|
NWA3000-N Series User’s Guide |
|
Chapter 1 Introduction
1.2.2 AP + Bridge
In AP + Bridge mode, the NWA3000-N series AP supports both AP and bridge connection at the same time.
In the figure below, A and B use X as an AP to access the wired network, while X and Y communicate in bridge mode.
When the NWA3000-N series AP is in AP + Bridge mode, security between APs (WDS) is independent of the security between the wireless stations and the AP. If you do not enable WDS security, traffic between APs is not encrypted. When WDS security is enabled, both APs must use the same pre-shared key.
Unless specified, the term “security settings” refers to the traffic between the wireless stations and the NWA3000-N series AP.
Figure 6 AP + Bridge Application
Y
A
B
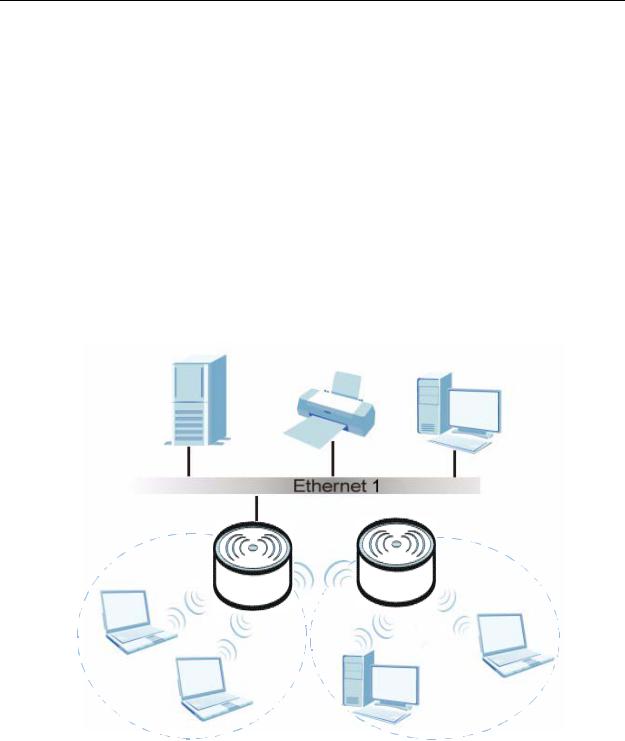
1.2.3 MBSSID
A Basic Service Set (BSS) is the set of devices forming a single wireless network (usually an access point and one or more wireless clients). The Service Set IDentifier (SSID) is the name of a BSS. In Multiple BSS (MBSSID) mode, the
|
22 |
||
|
NWA3000-N Series User’s Guide |
||

Chapter 1 Introduction
NWA3000-N series AP provides multiple virtual APs, each forming its own BSS and using its own individual SSID profile.
You can assign different wireless and security settings to each SSID profile. This allows you to compartmentalize groups of users, set varying access privileges, and prioritize network traffic to and from certain BSSs.
To the wireless clients in the network, each SSID appears to be a different access point. As in any wireless network, clients can associate only with the SSIDs for which they have the correct security settings.
See Section 4.1 on page 55 for an example of using MBSS.
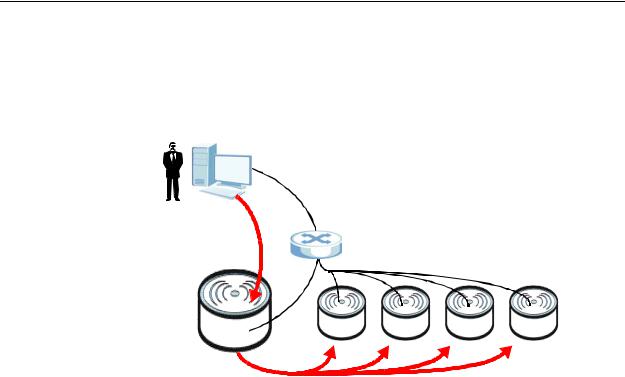
1.3 Management Mode
One NWA3000-N series AP uses Control And Provisioning of Wireless Access Points (CAPWAP, see RFC 5415) to allow one AP to configure and manage up to 24 others. This centralized management can greatly reduce the effort of setting up and maintaining multiple devices.
An NWA3000-N series AP in this group (ZLD-based models) can manage other APs in this group1.
•NWA3160-N
•NWA3550-N
•NWA3560-N
It can also use legacy device information hyper-links to connect to the Web Configurators of the following ZyNOS-based NWA-3000 series APs:
•NWA-3160
•NWA-3163
•NWA-3500
•NWA-3550
•NWA-3166
1.Not all of these models were available at the time of writing.
|
23 |
|
|
NWA3000-N Series User’s Guide |
|
Chapter 1 Introduction
The following figure illustrates a CAPWAP wireless network. The user (U) configures the controller AP (C), which then automatically updates the configurations of the managed APs (M1 ~ M4).
Figure 7 CAPWAP Network Example
U
|
C |
|||||||||||
|
M1 |
M2 |
M3 |
M4 |
||||||||
1.4 Ways to Manage the NWA3000-N series AP
You can use the following ways to manage the NWA3000-N series AP.
Web Configurator
The Web Configurator allows easy NWA3000-N series AP setup and management using an Internet browser. This User’s Guide provides information about the Web Configurator.
Command-Line Interface (CLI)
The CLI allows you to use text-based commands to configure the NWA3000-N series AP. You can access it using remote management (for example, SSH or Telnet) or via the console port. See the Command Reference Guide for more information.
|
24 |
||
|
NWA3000-N Series User’s Guide |
||

Chapter 1 Introduction
Console Port
You can use the console port to manage the NWA3000-N series AP using CLI commands. See the Command Reference Guide for more information about the CLI. The default settings for the console port are as follows.
Table 1 Console Port Default Settings
|
SETTING |
VALUE |
|
Speed |
115200 bps |
|
Data Bits |
8 |
|
Parity |
None |
|
Stop Bit |
1 |
|
Flow Control |
Off |
File Transfer Protocol (FTP)
This protocol can be used for firmware upgrades and configuration backup and restore.
Simple Network Management Protocol (SNMP)
The NWA3000-N series AP can be monitored by an SNMP manager. See the SNMP chapter in this User’s Guide.
Controller
Set one NWA3000-N series AP to be a controller and set other NWA3000-N series APs to be managed by it.
1.5 Good Habits for Managing the NWA3000-N series AP
Do the following things regularly to make the NWA3000-N series AP more secure and to manage it more effectively.
•Change the password often. Use a password that’s not easy to guess and that consists of different types of characters, such as numbers and letters.
•Write down the password and put it in a safe place.
|
25 |
|
|
NWA3000-N Series User’s Guide |
|

Chapter 1 Introduction
•Back up the configuration (and make sure you know how to restore it). Restoring an earlier working configuration may be useful if the device becomes unstable or even crashes. If you forget your password, you will have to reset the NWA3000-N series AP to its factory default settings. If you backed up an earlier configuration file, you won’t have to totally re-configure the NWA3000-N series AP; you can simply restore your last configuration.
1.6Hardware Connections
See your Quick Start Guide for information on making hardware connections.
|
26 |
||
|
NWA3000-N Series User’s Guide |
||

Chapter 1 Introduction
1.7 LEDs
The following are the LED descriptions for your NWA3000-N series AP.
Figure 8 LEDs
|
Table 2 |
LEDs |
||||||
|
LABEL |
COLOR |
STATUS |
DESCRIPTION |
||||
|
WLAN |
Green |
On |
The wireless LAN is active. |
||||
|
Blinking |
The wireless LAN is active, and transmitting or |
||||||
|
receiving data. |
|||||||
|
Off |
The wireless LAN is not active. |
||||||
|
27 |
|
|
NWA3000-N Series User’s Guide |
|

Chapter 1 Introduction
Table 2 LEDs (continued)
|
LABEL |
COLOR |
STATUS |
DESCRIPTION |
|
ETHERNET |
Green |
On |
The NWA3000-N series AP has a 10/100 Mbps |
|
Ethernet connection. |
|||
|
Blinking |
The NWA3000-N series AP has a 10/100 Mbps |
||
|
Ethernet connection and is sending or receiving |
|||
|
data. |
|||
|
Yellow |
On |
The NWA3000-N series AP has a 1000 Mbps |
|
|
Ethernet connection. |
|||
|
Blinking |
The NWA3000-N series AP has a 1000 Mbps |
||
|
Ethernet connection and is sending/receiving |
|||
|
data. |
|||
|
Off |
The NWA3000-N series AP does not have an |
||
|
Ethernet connection. |
|||
|
POWER/SYS |
Green |
On |
The NWA3000-N series AP is receiving power |
|
and functioning properly. |
|||
|
Off |
The NWA3000-N series AP is not receiving |
||
|
power. |
|||
|
Red |
Blinking |
Either |
|
|
• If the LED blinks during the boot up process, |
|||
|
the system is starting up. |
|||
|
or |
|||
|
• If the LED blinks after the boot up process, |
|||
|
the system has failed. |
|||
|
Off |
The NWA3000-N series AP successfully boots |
||
|
up. |
|||
|
28 |
||
|
NWA3000-N Series User’s Guide |
||

Chapter 1 Introduction
1.8 Starting and Stopping the NWA3000-N series AP
Here are some of the ways to start and stop the NWA3000-N series AP.
Always use Maintenance > Shutdown or the shutdown command before you turn off the NWA3000-N series AP or remove the power. Not doing so can cause the firmware to become corrupt.
Table 3 Starting and Stopping the NWA3000-N series AP
|
METHOD |
DESCRIPTION |
|
Turning on the |
A cold start occurs when you turn on the power to the NWA3000-N |
|
power |
series AP. The NWA3000-N series AP powers up, checks the |
|
hardware, and starts the system processes. |
|
|
Rebooting the |
A warm start (without powering down and powering up again) |
|
NWA3000-N series |
occurs when you use the Reboot button in the Reboot screen or |
|
AP |
when you use the reboot command. The NWA3000-N series AP |
|
writes all cached data to the local storage, stops the system |
|
|
processes, and then does a warm start. |
|
|
Using the RESET |
If you press the RESET button, the NWA3000-N series AP sets the |
|
button |
configuration to its default values and then reboots. |
|
Clicking |
Clicking Maintenance > Shutdown > Shutdown or using the |
|
Maintenance > |
shutdown command writes all cached data to the local storage and |
|
Shutdown > |
stops the system processes. Wait for the device to shut down and |
|
Shutdown or |
then manually turn off or remove the power. It does not turn off the |
|
using the shutdown |
power. |
|
command |
|
|
Disconnecting the |
Power off occurs when you turn off the power to the NWA3000-N |
|
power |
series AP. The NWA3000-N series AP simply turns off. It does not |
|
stop the system processes or write cached data to local storage. |
|
The NWA3000-N series AP does not stop or start the system processes when you apply configuration files or run shell scripts although you may temporarily lose access to network resources.
|
29 |
|
|
NWA3000-N Series User’s Guide |
|

Chapter 1 Introduction
|
30 |
||
|
NWA3000-N Series User’s Guide |
||
![]()
2
The Web Configurator
2.1 Overview
The NWA3000-N series AP Web Configurator allows easy management using an Internet browser.
In order to use the Web Configurator, you must:
•Use Internet Explorer 7.0 and later or Firefox 1.5 and later
•Allow pop-up windows
•Enable JavaScript (enabled by default)
•Enable Java permissions (enabled by default)
•Enable cookies
The recommended screen resolution is 1024 x 768 pixels and higher.
|
31 |
|
|
NWA3000-N Series User’s Guide |
|

Chapter 2 The Web Configurator
2.2Access
1Make sure your NWA3000-N series AP hardware is properly connected. See the Quick Start Guide.
2Browse to https://192.168.1.2. The Login screen appears.
3Enter the user name (default: “admin”) and password (default: “1234”).
4Click Login. If you logged in using the default user name and password, the Update Admin Info screen appears. Otherwise, the dashboard appears.
This screen appears every time you log in using the default user name and default password. If you change the password for the default user account, this screen does not appear anymore.
|
32 |
||
|
NWA3000-N Series User’s Guide |
||

Chapter 2 The Web Configurator
2.3 The Main Screen
The Web Configurator’s main screen is divided into these parts:
Figure 9 The Web Configurator’s Main Screen
A
B 
 C
C
•A — Title Bar
•B — Navigation Panel
•C — Main Window
|
33 |
|
|
NWA3000-N Series User’s Guide |
|

Chapter 2 The Web Configurator
2.3.1 Title Bar
The title bar provides some useful links that always appear over the screens below, regardless of how deep into the Web Configurator you navigate.
Figure 10 Title Bar
The icons provide the following functions.
Table 4 Title Bar: Web Configurator Icons
|
LABEL |
DESCRIPTION |
|
Logout |
Click this to log out of the Web Configurator. |
|
Help |
Click this to open the help page for the current screen. |
|
About |
Click this to display basic information about the NWA3000-N series AP. |
|
Site Map |
Click this to see an overview of links to the Web Configurator screens. |
|
Object |
Click this to open a screen where you can check which configuration |
|
Reference |
items reference an object. |
|
Console |
Click this to open the console in which you can use the command line |
|
interface (CLI). See the NWA3000-N series AP CLI Reference Guide for |
|
|
details. |
|
|
CLI |
Click this to open a popup window that displays the CLI commands sent |
|
by the Web Configurator. |
|
2.3.2 Navigation Panel
Use the menu items on the navigation panel to open screens to configure NWA3000-N series AP features. Click the arrow in the middle of the right edge of the navigation panel to hide the navigation panel menus or drag it to resize them. The following sections introduce the NWA3000-N series AP’s navigation panel menus and their screens.
Figure 11 Navigation Panel
|
34 |
||
|
NWA3000-N Series User’s Guide |
||

Chapter 2 The Web Configurator
2.3.2.1 Dashboard
The dashboard displays general device information, system status, system resource usage, and interface status in widgets that you can re-arrange to suit your needs.
For details on the Dashboard’s features, see Chapter 5 on page 75.
2.3.2.2 Monitor Menu
The monitor menu screens display status and statistics information.
Table 5 Monitor Menu Screens Summary
|
FOLDER OR LINK |
TAB |
FUNCTION |
|
LAN Status |
Displays general LAN interface information and packet |
|
|
statistics. |
||
|
Wireless |
||
|
AP Info |
Radio List |
Displays information about the radios of the connected |
|
APs. |
||
|
AP List |
Displays which APs are currently connected to the |
|
|
NWA3000-N series AP. This is available when the |
||
|
NWA3000-N series AP is in controller mode. |
||
|
Station Info |
Displays information about the connected stations. |
|
|
Rogue AP |
Displays information about suspected rogue APs. |
|
|
Legacy Device |
Use these screens to connect to legacy NWA3000-N |
|
|
Info |
series AP 3000 APs. This is available when the |
|
|
NWA3000-N series AP is in controller mode. |
||
|
Log |
View Log |
Displays log entries for the NWA3000-N series AP. |
|
View AP |
Displays logs for connected APs. |
|
|
Log |
||
2.3.2.3 Configuration Menu
Use the configuration menu screens to configure the NWA3000-N series AP’s features.
Table 6 Configuration Menu Screens Summary
|
FOLDER OR |
TAB |
FUNCTION |
|
|
LINK |
|||
|
MGNT Mode |
Set whether the NWA3000-N series AP is |
||
|
controlling other NWA3000-N series APs, working |
|||
|
as a standalone AP, or being managed by another |
|||
|
NWA3000-N series AP. |
|||
|
LAN Setting |
Manage the LAN Ethernet interface including VLAN |
||
|
settings. |
|||
|
Wireless |
|||
|
35 |
|
|
NWA3000-N Series User’s Guide |
|

Chapter 2 The Web Configurator
Table 6 Configuration Menu Screens Summary (continued)
|
FOLDER OR |
TAB |
FUNCTION |
|
|
LINK |
|||
|
Controller |
Configure how the NWA3000-N series AP handles |
||
|
APs that newly connect to the network. This is |
|||
|
available when the NWA3000-N series AP is in |
|||
|
controller mode. |
|||
|
AP |
Edit wireless AP information, remove APs, and |
||
|
Management |
reboot them. |
||
|
MON Mode |
Configure how the NWA3000-N series AP monitors |
||
|
for rogue APs. |
|||
|
Load |
Configure load balancing for traffic moving to and |
||
|
Balancing |
from wireless clients. |
||
|
DCS |
Configure dynamic wireless channel selection. |
||
|
Device HA |
General |
Configure device HA global settings, and see the |
|
|
status of each interface monitored by device HA. |
|||
|
Device HA is available when the NWA3000-N series |
|||
|
AP is in controller mode. |
|||
|
Active-Passive |
Configure active-passive mode device HA. |
||
|
Mode |
|||
|
Object |
|||
|
Users |
User |
Create and manage users. |
|
|
Setting |
Manage default settings for all users, general |
||
|
settings for user sessions, and rules to force user |
|||
|
authentication. |
|||
|
AP Profile |
Radio |
Create and manage wireless radio settings files |
|
|
that can be associated with different APs. |
|||
|
SSID |
Create and manage wireless SSID, security, and |
||
|
MAC filtering settings files that can be associated |
|||
|
with different APs. |
|||
|
MON Profile |
Create and manage rogue AP monitoring files that |
||
|
can be associated with different APs. |
|||
|
Certificate |
My Certificates |
Create and manage the NWA3000-N series AP’s |
|
|
certificates. |
|||
|
Trusted |
Import and manage certificates from trusted |
||
|
Certificates |
sources. |
||
|
System |
|||
|
Host Name |
Configure the system and domain name for the |
||
|
NWA3000-N series AP. |
|||
|
Date/Time |
Configure the current date, time, and time zone in |
||
|
the NWA3000-N series AP. |
|||
|
Console |
Set the console speed. |
||
|
Speed |
|||
|
WWW |
Configure HTTP, HTTPS, and general |
||
|
authentication. |
|||
|
SSH |
Configure SSH server and SSH service settings. |
||
|
TELNET |
Configure telnet server settings for the NWA3000- |
||
|
N series AP. |
|||
|
36 |
||
|
NWA3000-N Series User’s Guide |
||
|
Chapter 2 The Web Configurator |
|||
|
Table 6 Configuration Menu Screens Summary (continued) |
|||
|
FOLDER OR |
TAB |
FUNCTION |
|
|
LINK |
|||
|
FTP |
Configure FTP server settings. |
||
|
SNMP |
Configure SNMP communities and services. |
||
|
Auth. Server |
Configure settings for the NWA3000-N series AP’s |
||
|
built-in authentication server. |
|||
|
Log & Report |
|||
|
Email Daily |
Configure where and how to send daily reports and |
||
|
Report |
what reports to send. |
||
|
Log Setting |
Configure the system log, e-mail logs, and remote |
||
|
syslog servers. |
|||
2.3.2.4 Maintenance Menu
Use the maintenance menu screens to manage configuration and firmware files, run diagnostics, and reboot or shut down the NWA3000-N series AP.
Table 7 Maintenance Menu Screens Summary
|
FOLDER OR |
TAB |
FUNCTION |
|
|
LINK |
|||
|
File Manager |
Configuration |
Manage and upload configuration files for the |
|
|
File |
NWA3000-N series AP. |
||
|
Firmware |
View the current firmware version and to upload |
||
|
Package |
firmware. |
||
|
Shell Script |
Manage and run shell script files for the NWA3000- |
||
|
N series AP. |
|||
|
Diagnostics |
Diagnostic |
Collect diagnostic information. |
|
|
Packet Capture |
Capture packets for analysis. |
||
|
Wireless Frame |
Capture wireless frames from APs for analysis. |
||
|
Capture |
|||
|
Reboot |
Restart the NWA3000-N series AP. |
||
|
Shutdown |
Turn off the NWA3000-N series AP. |
||
|
37 |
|
|
NWA3000-N Series User’s Guide |
|

Chapter 2 The Web Configurator
2.3.3 Warning Messages
Warning messages, such as those resulting from misconfiguration, display in a popup window.
Figure 12 Warning Message
2.3.4 Site Map
Click Site MAP to see an overview of links to the Web Configurator screens. Click a screen’s link to go to that screen.
Figure 13 Site Map
2.3.5 Object Reference
Click Object Reference to open the Object Reference screen. Select the type of object and the individual object and click Refresh to show which configuration
|
38 |
||
|
NWA3000-N Series User’s Guide |
||

Chapter 2 The Web Configurator
settings reference the object. The following example shows which configuration settings reference the ldap-users user object (in this case the first firewall rule).
Figure 14 Object Reference
The fields vary with the type of object. The following table describes labels that can appear in this screen.
Table 8 Object References
|
LABEL |
DESCRIPTION |
|
Object Name |
This identifies the object for which the configuration settings that use it |
|
are displayed. Click the object’s name to display the object’s |
|
|
configuration screen in the main window. |
|
|
# |
This field is a sequential value, and it is not associated with any entry. |
|
Service |
This is the type of setting that references the selected object. Click a |
|
service’s name to display the service’s configuration screen in the main |
|
|
window. |
|
|
Priority |
If it is applicable, this field lists the referencing configuration item’s |
|
position in its list, otherwise N/A displays. |
|
|
Name |
This field identifies the configuration item that references the object. |
|
Description |
If the referencing configuration item has a description configured, it |
|
displays here. |
|
|
Refresh |
Click this to update the information in this screen. |
|
Cancel |
Click Cancel to close the screen. |
|
39 |
|
|
NWA3000-N Series User’s Guide |
|

Chapter 2 The Web Configurator
2.3.5.1 CLI Messages
Click CLI to look at the CLI commands sent by the Web Configurator. These commands appear in a popup window, such as the following.
Figure 15 CLI Messages
Click Clear to remove the currently displayed information.
Note: See the Command Reference Guide for information about the commands.
2.3.5.2 Console
The Console allows you to use CLI commands from directly within the Web Configurator rather than having to use a separate terminal program. In addition to logging in directly to the NWA3000-N series AP’s CLI, you can also log into other devices on the network through this Console. It uses SSH to establish a connection.
|
40 |
||
|
NWA3000-N Series User’s Guide |
||
![]()
Chapter 2 The Web Configurator
Note: To view the functions in the Web Configurator user interface that correspond directly to specific NWA3000-N series AP CLI commands, use the CLI Messages window (see Section 2.3.5.1 on page 40) in tandem with this one.
Figure 16 Console
The following table describes the elements in this screen.
Table 9 Console
LABEL DESCRIPTION
Command Line
Enter commands for the device that you are currently logged into here. If you are logged into the NWA3000-N series AP, see the CLI Reference Guide for details on using the command line to configure it.
Device IP
Address
This is the IP address of the device that you are currently logged into.
Logged-In User
This displays the username of the account currently logged into the
NWA3000-N series AP through the Console Window.
Note: You can log into the Web Configurator with a different account than used to log into the NWA3000-N series AP through the Console.
|
41 |
|
|
NWA3000-N Series User’s Guide |
|

Chapter 2 The Web Configurator
Table 9 Console (continued)
LABEL DESCRIPTION
Connection
Status
This displays the connection status of the account currently logged in.
If you are logged in and connected, then this displays ‘Connected’.
If you lose the connection, get disconnected, or logout, then this displays ‘Not Connected’.
Tx/RX Activity
Monitor
This displays the current upload / download activity. The faster and more frequently an LED flashes, the faster the data connection.
Before you use the Console, ensure that:
•Your web browser of choice allows pop-up windows from the IP address assigned to your NWA3000-N series AP.
•Your web browser allows Java programs.
•You are using the latest version of the Java program (http://www.java.com).
To login in through the Console:
1Click the Console button on the Web Configurator title bar.
2Enter the IP address of the NWA3000-N series AP and click OK.
|
42 |
||
|
NWA3000-N Series User’s Guide |
||

Chapter 2 The Web Configurator
3Next, enter the User Name of the account being used to log into your target device and then click OK.
4You may be prompted to authenticate your account password, depending on the type of device that you are logging into. Enter the password and click OK.
5If your login is successful, the command line appears and the status bar at the bottom of the Console updates to reflect your connection state.
|
43 |
|
|
NWA3000-N Series User’s Guide |
|

Chapter 2 The Web Configurator
2.3.6 Tables and Lists
The Web Configurator tables and lists are quite flexible and provide several options for how to display their entries.
2.3.6.1 Manipulating Table Display
Here are some of the ways you can manipulate the Web Configurator tables.
1Click a column heading to sort the table’s entries according to that column’s criteria.
2Click the down arrow next to a column heading for more options about how to display the entries. The options available vary depending on the type of fields in the column. Here are some examples of what you can do:
•Sort in ascending alphabetical order
•Sort in descending (reverse) alphabetical order
•Select which columns to display
•Group entries by field
•Show entries in groups
•Filter by mathematical operators (<, >, or =) or searching for text.
|
44 |
||
|
NWA3000-N Series User’s Guide |
||

Chapter 2 The Web Configurator
3 Select a column heading cell’s right border and drag to re-size the column.
4Select a column heading and drag and drop it to change the column order. A green check mark displays next to the column’s title when you drag the column to a valid new location.
5Use the icons and fields at the bottom of the table to navigate to different pages of entries and control how many entries display at a time.
|
45 |
|
|
NWA3000-N Series User’s Guide |
|

Chapter 2 The Web Configurator
2.3.6.2 Working with Table Entries
The tables have icons for working with table entries. A sample is shown next. You can often use the [Shift] or [Ctrl] key to select multiple entries to remove, activate, or deactivate.
Table 10 Common Table Icons
Here are descriptions for the most common table icons.
Table 11 Common Table Icons
|
LABEL |
DESCRIPTION |
|
Add |
Click this to create a new entry. For features where the entry’s |
|
position in the numbered list is important (features where the |
|
|
NWA3000-N series AP applies the table’s entries in order like the |
|
|
firewall for example), you can select an entry and click Add to create |
|
|
a new entry after the selected entry. |
|
|
Edit |
Double-click an entry or select it and click Edit to open a screen |
|
where you can modify the entry’s settings. In some tables you can |
|
|
just click a table entry and edit it directly in the table. For those types |
|
|
of tables small red triangles display for table entries with changes |
|
|
that you have not yet applied. |
|
|
Remove |
To remove an entry, select it and click Remove. The NWA3000-N |
|
series AP confirms you want to remove it before doing so. |
|
|
Activate |
To turn on an entry, select it and click Activate. |
|
Inactivate |
To turn off an entry, select it and click Inactivate. |
|
Object Reference |
Select an entry and click Object Reference to open a screen that |
|
shows which settings use the entry. |
|
|
Move |
To change an entry’s position in a numbered list, select it and click |
|
Move to display a field to type a number for where you want to put |
|
|
that entry and press [ENTER] to move the entry to the number that |
|
|
you typed. For example, if you type 6, the entry you are moving |
|
|
becomes number 6 and the previous entry 6 (if there is one) gets |
|
|
pushed up (or down) one. |
|
|
46 |
||
|
NWA3000-N Series User’s Guide |
||

Chapter 2 The Web Configurator
2.3.6.3 Working with Lists
When a list of available entries displays next to a list of selected entries, you can often just double-click an entry to move it from one list to the other. In some lists you can also use the [Shift] or [Ctrl] key to select multiple entries, and then use the arrow button to move them to the other list.
Figure 17 Working with Lists
|
47 |
|
|
NWA3000-N Series User’s Guide |
|

Chapter 2 The Web Configurator
|
48 |
||
|
NWA3000-N Series User’s Guide |
||

3
Configuration Basics
3.1 Overview
This section provides information to help you configure the NWA3000-N series AP effectively. Some of it is helpful when you are just getting started. Some of it is provided for your reference when you configure various features in the NWA3000- N series AP.
3.2 Object-based Configuration
The NWA3000-N series AP stores information or settings as objects. You use these objects to configure many of the NWA3000-N series AP’s features and settings. Once you configure an object, you can reuse it in configuring other features.
When you change an object’s settings, the NWA3000-N series AP automatically updates all the settings or rules that use the object. For example, if you create a local certificate object, you can have HTTPS, FTP, SSH, and other settings use it. If you modify the local certificate object, all the HTTPS, FTP, SSH, and other settings that are linked to that object automatically apply the updated settings.
You can use the Configuration > Objects screens to create objects before you configure features that use them. If you are in a screen that uses objects, you can also usually select Create new Object to be able to configure a new object.
Use the Object Reference screen to see what objects are configured and which configuration settings reference specific objects.
3.3 Feature Configuration Overview
This section provides information about configuring the main features in the NWA3000-N series AP. The features are listed in the same sequence as the menu item(s) in the Web Configurator. Each feature description is organized as shown below.
|
49 |
|
|
NWA3000-N Series User’s Guide |
|

Chapter 3 Configuration Basics
3.3.1 Feature
This provides a brief description. See the appropriate chapter(s) in this User’s Guide for more information about any feature.
|
This shows you the sequence of menu items and tabs you should click |
|
|
MENU ITEM(S) |
to find the main screen(s) for this feature. See the web help or the |
|
related User’s Guide chapter for information about each screen. |
|
|
These are other features you should configure before you configure |
|
|
the main screen(s) for this feature. |
|
|
If you did not configure one of the prerequisites first, you can often |
|
|
PREREQUISITES |
select an option to create a new object. After you create the object |
|
you return to the main screen to finish configuring the feature. |
|
|
You may not have to configure everything in the list of prerequisites. |
|
|
For example, you do not have to create a schedule for a policy route |
|
|
unless time is one of the criterion. |
|
|
There are two uses for this. |
|
|
These are other features you should usually configure or check right |
|
|
WHERE USED |
after you configure the main screen(s) for this feature. |
|
You have to delete the references to this feature before you can delete |
|
|
any settings. |
|
Note: PREQUISITES or WHERE USED does not appear if there are no prerequisites or references in other features to this one. For example, no other features reference AP management entries, so there is no WHERE USED entry.
3.3.2 MGNT Mode
Use this screen to set the NWA3000-N series AP to control other NWA3000-N series APs, work as a standalone AP, or be managed by another NWA3000-N series AP.
MENU ITEM(S) Configuration > MGNT Mode.
3.3.3 LAN Setting
Use this screen to configure the LAN Ethernet interface including VLAN settings.
MENU ITEM(S) Configuration > LAN Setting.
3.3.4 Wireless
Use these screens to manage your wireless Access Points.
|
MENU ITEM(S) |
Configuration > Wireless. |
|||
|
50 |
||||
|
NWA3000-N Series User’s Guide |
||||
 Loading…
- Home
- ZyXEL
- NWA3560-N
ZyXEL NWA3560-N router setup & security
- To login to your ZyXEL NWA3560-N Router, Open the web browser and type-in the default IP Address 192.168.1.2 in the address bar
- You should now see the router login page with 2 text fields where you can type a username and a password
- The default username for your ZyXEL NWA3560-N router is admin and the default password is 1234
- Hit «Login» and you should see the ZyXEL NWA3560-N router control panel

(Remember, you must be at home and connected to home WiFi to do this)
And no need to get your breathing rates high in case you have changed the username / password of ZyXEL NWA3560-N and forgot them, as you can just reset the ZyXEL NWA3560-N router by press-and-hold the reset button with a clip for about 15 seconds.
ZyXEL NWA3560-N Quick links:
| Default username for ZyXEL NWA3560-N: | admin | COPY |
| Default password for ZyXEL NWA3560-N: | 1234 | COPY |
2.Change ZyXEL NWA3560-N Default Login and Password
Since security of a network is vital, the first and foremost task is to change the ZyXEL NWA3560-N router Default Login and Password to something more personal and secure.
ZyXEL NWA3560-N Router Password Tips:
Choose a complex and hard-to-guess password for your ZyXEL which only you can remember
It should be something personal, like &ilostmyvirginity@30, so that you’ll never forget it. Ever
Protect it
The amount of protection directly depends on the password complexity, and the effort taken to protect that password on your ZyXEL NWA3560-N router.
Usability first
Give Password for your ZyXEL NWA3560-N router that you can remember (usability first). Of course, you can build a strong hash password with special characters, numbers, Greek, and Latin. But ultimately you’ll end up writing it on a sticky and putting it on the router, which defeats the purpose. Here is an example $lasttriptovegas0916
You did good so far. Now consider ⭐ Bookmarking this page. It always helps.
3.Change ZyXEL NWA3560-N Default WiFi name (SSID) and WiFi Password and enable Network Encryption
Another small suggestion (as it has no impact on security), is to change the ZyXEL NWA3560-N Default WiFi name (SSID) as it will make it more obvious for others to know which network they are connecting to.
Look for Network Name (SSID), this is the WiFi name of your ZyXEL NWA3560-N Router. Do not use your name, home address, or other personal information (since this isn’t a Facebook status!) in the SSID name. (No Mr.Paul&Princy) A few funny WiFi name suggestions: I’m cheating on my WiFi!, FBI Surveillance Van #594 (scares away stupid criminals), Lord of the Pings …
Once you enter the name for your network, you have to enable WPA2-PSK encryption on your ZyXEL NWA3560-N router. That’s the strongest encryption standard available for home networks.
Enter a new WPA Pre-Shared Key / WiFi Password – this is the password that you will use to connect to your home WiFi. Keep it to 16-20 characters (please!) don’t use the same password that you used for ZyXEL NWA3560-N router login!
🤓 Geek out your guests. Print a Free WiFi QR Code Sticker for your fridge now
4.Update router firmware in ZyXEL NWA3560-N and turn on Automatic Updates
Router software often contains critical bugs and security vulnerabilities; Check if your router has known vulnerabilities
Check — ZyXEL NWA3560-N
Its important that you turn on Automatic Firmware updates and always keep your ZyXEL NWA3560-N router up-to-date. To turn on Automatic updates, Login to your ZyXEL NWA3560-N router and look for the section which contains Automatic updates and turn it «ON»
And even if the router has auto-update, check every now and then to make sure it is actually working, and the router firmware is up-to-date. If your router manufacturer hasn’t released any updates to the firmware in the past 3-5 years, consider upgrading to a «newer» router
5.Security is a continuous process
Just keep in mind to change the passwords often or at least once in every 6 months! on your ZyXEL NWA3560-N You don’t want the safety you have worked so hard for to fail just because of ignorance, negligence, or casual laziness! Time for a bulletin on the fridge, folks! We can remind you though? Enter your email below! Nope, we are not spammers!
ZyXEL NWA3560-N Router Reset instructions
How to Reset the ZyXEL NWA3560-N Router To Factory Default
To reset ZyXEL NWA3560-N router,
- Turn on the ZyXEL NWA3560-N router
- Look for the reset button. Few routers have a tiny hole and few others have a reset button.
- Press the Factory reset button with a straightened paperclip pin or something that gets through the tiny hole, and hold it for about 15 seconds! (till you see all the lights flashing)
- The ZyXEL NWA3560-N router will reboot automatically. the unit has been reset and is ready to use. You can start from Step 1 in this guide to set it up.
ZyXEL NWA3560-N Password Does not Work
Passwords find a way to not work! Or, in most cases, users find a way to forget them! In either case, look up the How to Reset the ZyXEL NWA3560-N Router To Default Settings section
Forgot Password for ZyXEL NWA3560-N Router
Incase if you have changed the default username and password of ZyXEL NWA3560-N and forgot it, please see How to Reset the ZyXEL NWA3560-N Router To Default Settings section
How to boost ZyXEL NWA3560-N WiFi and fix connectivity issues
1.Place the ZyXEL NWA3560-N in a perfect spot
The perfect spot does it all; be it romance or your router! To avail the best signal and network connectivity, make sure you keep your ZyXEL NWA3560-N router visible and not facing the wall or behind the curtains
2.Find a Good Wireless Channel Instead of Auto on your ZyXEL NWA3560-N router
Auto-channels might fail you once in a while; believe that you’re smarter than the ZyXEL router! Find a seamless wireless channel instead of what the router finds automatically. This would ensure that your signal doesn’t interfere with that of your neighbors.
If you’re running a Windows-based PC, you can see what channels neighboring Wi-Fi networks are using.
- Press Start > type “cmd”. Open Command prompt
- In command prompt type netsh wlan show all
You will see a list of all wireless networks and the channels being used in your vicinity. instead of using “Auto” for the control channel, Pick the channel that has the lowest interference
3.Check the frequency of ZyXEL NWA3560-N
Check if ZyXEL NWA3560-N has dual-band, the most commonly used band would be 2.4GHz; however, switching to 5GHz would bring out better results! It depends on your device though; if you’re running an old lad, you might have to switch back to the conventional
4.Hardwire gaming consoles / media streamers into your ZyXEL NWA3560-N instead of WiFi
Gaming consoles/media streamers work better when connected through Ethernet cable of ZyXEL NWA3560-N; in fact, as you might not be moving your TV all over the house, why connect it to the Wi-Fi at all? The Gaming consoles / video streaming devices flood the network with data. This means that if possible, you should consider hardwire (using Ethernet cable) the devices that tend to consume a lot of bandwidth. Although this can sort of defeat the purpose of having wireless networks, it can actually help your overall network speed of ZyXEL NWA3560-N if you can hardwire the bandwidth hogs.
5. Reboot ZyXEL NWA3560-N on schedule
Here’s something important to note! On schedule, folks, reboot your ZyXEL NWA3560-N router! Though routers are built to constantly be running at all times, simple tweaks like regular power cycling (a fancy way of saying, unplugging the power cord and shoving it back up) helps with most issues. Rebooting your ZyXEL NWA3560-N can fix Internet connection problems, improve slow moving connections, and resolve wireless issues altogether. Try unplugging your ZyXEL modem on a quarterly basis to stay proactive (Never reset; always reboot router)