
Представленная ниже информация для ознакомления, а не для коммерческого использования.
Если что-то не открывается, пишите в личку. При репосте не забывайте ссылки на этот БЖ.
+++++++++++++++++++++++++++++++++++++++++++++++
+++++++++++++++++++++++++++++++++++++++++++++++
Руководство владельца Subaru Forester I (SF) — файл pdf
disk.yandex.ru/i/DtLIPRMqvXHX4g
Руководство по сервисному обслуживанию Subaru Forester I (SF) 1997-2001 MY — zip-архив
(Мультимедийная книга Subaru Forester с 1997 г.)
disk.yandex.ru/d/2LtfvY0NzRmzww
Subaru Forester с 1997 г. выпуска. Устройство Обслуживание Ремонт (Переработанное издание) — файл pdf
drive.google.com/file/d/0…4WWNjQzg/view?usp=sharing
+++++++++++++++++++++++++++++++++++++++++++++++
Руководство по техническому обслуживанию Subaru Forester II (SG) 2004 MY — файл pdf
yadi.sk/i/NKxH1DR4m68Wzg
Руководство по эксплуатации Subaru Forester II (SG) 2005 MY — файл pdf
drive.google.com/file/d/0…5MHJmYlk/view?usp=sharing
Руководство по эксплуатации Subaru Forester II (SG) 2007 MY — файл pdf
drive.google.com/file/d/0…zdi1Cb0E/view?usp=sharing
Руководство по обслуживанию Subaru Forester II (SG) 2008 MY — файл pdf
drive.google.com/file/d/0…5ell0MDg/view?usp=sharing
+++++++++++++++++++++++++++++++++++++++++++++++
Руководство по ремонту и эксплуатации Subaru Forester III (SH) 2009 MY — файл pdf
drive.google.com/file/d/0…SUkVMT2M/view?usp=sharing
Руководство по сервисному обслуживанию Subaru Forester III (SH) 2009 MY — сжатый архив
disk.yandex.ru/d/B96-Gk7pODUIYQ
drive.google.com/file/d/0…PR21RT2c/view?usp=sharing
Руководство по сервисному обслуживанию Subaru Forester III (SH) 2012 MY — zip-архив
yadi.sk/d/WyoA6UE8prtNW
+++++++++++++++++++++++++++++++++++++++++++++++
Руководство по сервисному обслуживанию Subaru Forester IV (SJ) 2014 MY — zip-архив
drive.google.com/file/d/0…ydE1vTEk/view?usp=sharing
или
disk.yandex.ru/d/ZmJB58ifGLEsRg
Руководство по эксплуатации Subaru Forester IV (SJ) 2014 MY — файл pdf
drive.google.com/file/d/0…kM1dnS00/view?usp=sharing
+++++++++++++++++++++++++++++++++++++++++++++++
Руководство по обслуживанию и ремонту Subaru Forester SK (SM G8240GR FORESTER 19MY, версия 002) — файл ISO в rar-архиве.
yadi.sk/d/nnaihovx9Le_dQ или drive.google.com/file/d/1…_mFo-IS9/view?usp=sharing
Взято здесь cloud.mail.ru/public/HRZT/mfMRZ48dH
Руководство по эксплуатации Subaru Forester V (SK) 2019 MY — файл pdf
yadi.sk/i/H3Eh8Lm1IYQYgA
Краткое руководство по эксплуатации Subaru Forester V (SK) 2019 MY — файл pdf
yadi.sk/i/Fe1V-7hYZE59pA
Eyesight Руководство SK — файл pdf
yadi.sk/i/hZXPw5enDtoTqw
Starlink Руководство SK — файл pdf
yadi.sk/i/yDhy1Qx86FDbbg
+++++++++++++++++++++++++++++++++++++++++++++++
+++++++++++++++++++++++++++++++++++++++++++++++
Инструкция по эксплуатации автомобиля Subaru Forester 2005 модельного года (SG) — файл pdf
drive.google.com/file/d/0…BZkhGTEU/view?usp=sharing
Инструкция по эксплуатации автомобиля Subaru Forester 2007 модельного года (SG) — файл pdf
drive.google.com/file/d/0…SMzFxSHc/view?usp=sharing
Инструкция по эксплуатации автомобиля Subaru Forester 2011 модельного года (SH) — файл pdf drive.google.com/file/d/0…Ib0lEbm8/view?usp=sharing
Инструкция по эксплуатации автомобиля Subaru Forester 2012 модельного года (SH) — файл pdf drive.google.com/file/d/0…0cEE1bDg/view?usp=sharing
Инструкция по эксплуатации автомобиля Subaru Forester 2013 модельного года (SJ) — файл pdf drive.google.com/file/d/0…LZEgxbGM/view?usp=sharing
Инструкция по эксплуатации автомобиля Subaru Forester 2014 модельного года (SJ) — файл pdf drive.google.com/file/d/0…tOWt4elk/view?usp=sharing
Инструкция по эксплуатации автомобиля Subaru Forester 2015 модельного года (SJ) — файл pdf
drive.google.com/file/d/0…WZkI5SWs/view?usp=sharing
Инструкция по эксплуатации автомобиля Subaru Forester 2016 модельного года (SJ) — файл pdf
drive.google.com/file/d/0…kS3FSQVU/view?usp=sharing
+++++++++++++++++++++++++++++++++++++++++++++++
Subaru Forester Owner’s Manuals (ENG) — руководства по эксплуатации Subaru Forester на английском языке
Subaru Forester I (SF) 1998 Owner’s Manual ENG yadi.sk/d/OApC-oKBFMhGo
Subaru Forester I (SF) 1999 Owner’s Manual ENG yadi.sk/d/V6d3vPaGFMi5X
Subaru Forester I (SF) 2000 Owner’s Manual ENG yadi.sk/d/1Kb7E0RLFMiAS
Subaru Forester I (SF) 2001 Owner’s Manual ENG yadi.sk/d/OeuIrbH-FMiE2
Subaru Forester I (SF) 2002 Owner’s Manual ENG yadi.sk/d/7dlwPQT5FMiHm
Subaru Forester II (SG) 2003 Owner’s Manual ENG yadi.sk/d/8B5M3PEuFMiNv
Subaru Forester II (SG) 2004 Owner’s Manual ENG yadi.sk/d/DTiMBz4WFMiTP
Subaru Forester II (SG) 2005 Owner’s Manual ENG yadi.sk/d/tG-w1PzAFMiYG
Subaru Forester II (SG) 2006 Owner’s Manual ENG yadi.sk/d/h8RcBfgFFMic2
Subaru Forester II (SG) 2007 Owner’s Manual ENG yadi.sk/d/5heDeXV3FMifh
Subaru Forester II (SG) 2008 Owner’s Manual ENG yadi.sk/d/KTL_5eO7FMikE
Subaru Forester III (SH) 2009 Owner’s Manual ENG yadi.sk/d/CEPVhIngFMipG
Subaru Forester III (SH) 2010 Owner’s Manual ENG yadi.sk/d/Ee_eL7omFMiti
Subaru Forester III (SH) 2011 Owner’s Manual ENG yadi.sk/d/1Jacl7TMFMizz
Subaru Forester III (SH) 2012 Owner’s Manual ENG yadi.sk/d/44rqNMDzFMj7A
Subaru Forester IV (SJ) 2013 Owner’s Manual ENG yadi.sk/d/k40hjMB8FMjAd
Subaru Forester IV (SJ) 2014 Owner’s Manual ENG yadi.sk/d/mTlbnLRoFMjEX
Subaru Forester V (SK) 2019 Owner’s Manual ENG yadi.sk/d/8BgNvdXr5ryIxg
+++++++++++++++++++++++++++++++++++++++++++++++
Subaru Forester 2001 Service Manual ENG yadi.sk/d/PQ4ylgUpFNzot взято здесь manualov.net/Subaru.php
Subaru Forester 2003 Service Manual ENG — файл pdf yadi.sk/i/Yd-Gbfua3E38PH взято здесь
www.drive2.ru/l/466065937657758129/
Subaru Forester 2004 Service Manual ENG yadi.sk/d/_BMMdFxqFP28v взято здесь manualov.net/Subaru.php
Subaru Forester 2007 Service Manual (ENG) yadi.sk/d/B6rTskG3cxMbq взято здесь manualov.net/Subaru.php
Subaru Forester 2007 Service Manual ENG yadi.sk/d/X4CZKXSDcxMGW взято здесь auto-b.ru/blog/Subaru/2065.html
Subaru Forester IV (SJ) 2014 MY Service Manual (ENG) yadi.sk/d/zl1LmYEebjUsr + дополнение по ремонту кузова yadi.sk/d/hcob_9VJBQkDZ
пароль к архивам: forestermoscowclub взято здесь forester-moscowclub.ru/showthread.php?p=694911
+++++++++++++++++++++++++++++++++++++++++++++++
Схемы электропроводки:
Subaru Forester I (SF) 1998 Wires Diagram Section (EN) Электросхемы дорестайл SF — файлы pdf в архиве
yadi.sk/d/aCZSAQ2GqQQxT или
drive.google.com/file/d/1…ziEs-HcU/view?usp=sharing
Subaru Forester I (SF) 2001 Wires Diagram Section (EN) Электросхемы рестайл SF — файлы pdf в архиве
yadi.sk/d/f7GjJ6MIqQR3m
Схема электропроводки Subaru Forester SG 02-05 дорестайл Русский мануал — файл pdf
yadi.sk/i/daoWHmQ_qQQW7 или
drive.google.com/file/d/0…d1jolSTlJMVlJZFMwMW8/view
Схема электропроводки Subaru Forester SG 06-08 рестайл Русский мануал — файл pdf
yadi.sk/i/LfAHumyGqQQWD
+++++++++++++++++++++++++++++++++++++++++++++++
Мануалы и аксессуары для других Subaru (cпасибо tarasusNN): здесь.
+++++++++++++++++++++++++++++++++++++++++++++++


2012
Forester
Quick Reference Guide

Complete U.S. specications and illustrations may
not have been available at time of publication.
Specications are based on the latest product
information available at time of publication. Some
images shown are for illustration purposes only.
Some equipment shown may be optional at
extra cost. Specic options may be available
only in combination with other options. Specic
combinations of equipment or features may vary
from time to time and by geographic area. Certain
accessories and equipment may not be available at
the time of publication.
This Quick Reference Guide applies to all Forester
models. Therefore, some explanations may be for
equipment not installed on your vehicle. Subaru
of America, Inc., reserves the right to change or
discontinue at any time, without notice, prices,
colors, materials, equipment, accessories,
specications, models and packages without
incurring any obligation to make the same or
similar changes on vehicles previously sold. Colors
shown may vary due to reproduction process.
For detailed operating and safety information,
please consult the Owner’s Manual.
Subaru, Outback, Legacy, Forester, Impreza,
WRX, WRX/STI, BOXER, SI-DRIVE, Lineartronic,
Alcantara, Circle Surround, HD Radio, XM and Sirius
are registered trademarks.
All rights reserved. Contents may not be reprinted or
electronically reproduced in whole or in part without
prior written approval of Subaru of America, Inc.
© 2011 Subaru of America, Inc.
Table of Contents
Getting Started
Instrument Panel
Gauges
Personalize
Controls
While Operating
Safety/In Case of Emergency
Additional Information
2 — 3
4 — 5
6 — 9
10 — 11
12 — 27
28 — 29
30 — 31
32 — 33

2
Remote Keyless Entry
Lock/Arm
t1SFTTUPMPDLBMMEPPSTBOE
rear gate.
t*GBOZPGUIFEPPSTPSUIFSFBS
gate are not fully closed, an
electronic chirp will sound ve
times and the hazard lights will
ash ve times to alert you that
the doors or the rear gate are
not properly closed.
t5PBDUJWBUFUIFWFIJDMFýOEFS
function, press three times
(within ve seconds). If you are
within 30 feet of the vehicle,
the horn will sound one time
and the hazard lights will ash
three times.
Unlock/Disarm
t1SFTTPODFUPVOMPDLUIF
driver’s door.
t1SFTTUXJDFXJUIJOýWF
seconds) to unlock all doors.
t8IFOUIFi6OMPDL%JTBSNw
button is pressed, the dome
and map lights will illuminate
if the dome light switch is in
the middle position.
Unlocking the
Rear Gate
Press the button to unlock
the rear gate.

3
Getting
Started
Instrument
Panel
Gauges
Personalize Controls While
Operating
Safety / In Case
of Emergency
Additional
Information
3
Getting
Started
Seating
10-Way Power Driver’s Seat
(if equipped)
1. Forward/Backward, Angle and Height
Move the switch toward the front or rear to move
the seat forward or backward. Pull the switch up
or push down on the front of the switch to adjust
the angle of the seat cushion. Pulling the switch
straight up or pushing the switch straight down
will adjust the height of the entire seat cushion.
2. Seatback
Move the switch in the corresponding direction
to adjust the angle of the seatback.
3. Lumbar Support
Press the front part of the switch to increase
lumbar support; press the rear part of the switch
to decrease lumbar support.
Heated Seats
(if equipped)
Press the switch in the
corresponding direction for
the desired seat temperature.
To turn off the seat heater,
slightly press in the opposite
direction of the current position.
Folding the
Rear Seat
Lower the headrests. Pull up on
the release knob on the seat side
that you want to fold down. To
return the seatback to its original
position, raise the seatback until
it locks into place making sure
that it is securely locked.
1
2
3
m
n
Panel
ges
son
z
Operating
e
of Emergency
n
Information
tin
tarte
v
t
ch
n
n.
n
itc
Getting
Started
4
Instrument Panel
pg. 12 pg. 6-9 pg. 27pg. 28pg. 10 pg. 26pg. 12

5
Getting
Started
Instrument
Panel
Gauges
Personalize Controls While
Operating
Safety / In Case
of Emergency
Additional
Information
5
tarte
m
n
Panel
ges
son
z
Operating
e
of Emergency
n
Information
pg. 14-19 pg. 20-25pg. 13
Clock
1S
FTTUIFiwCVUUPOUPBEWBODFUJNFPSUIF
iowCVUUPOUPSFWFSTFUIFUJNF7FIJDMFTXJUIB
navigation system please refer to the separate
i0QFSBUJOH*OTUSVDUJPOTGPS/BWJHBUJPO4ZTUFNw
Instrument
Panel
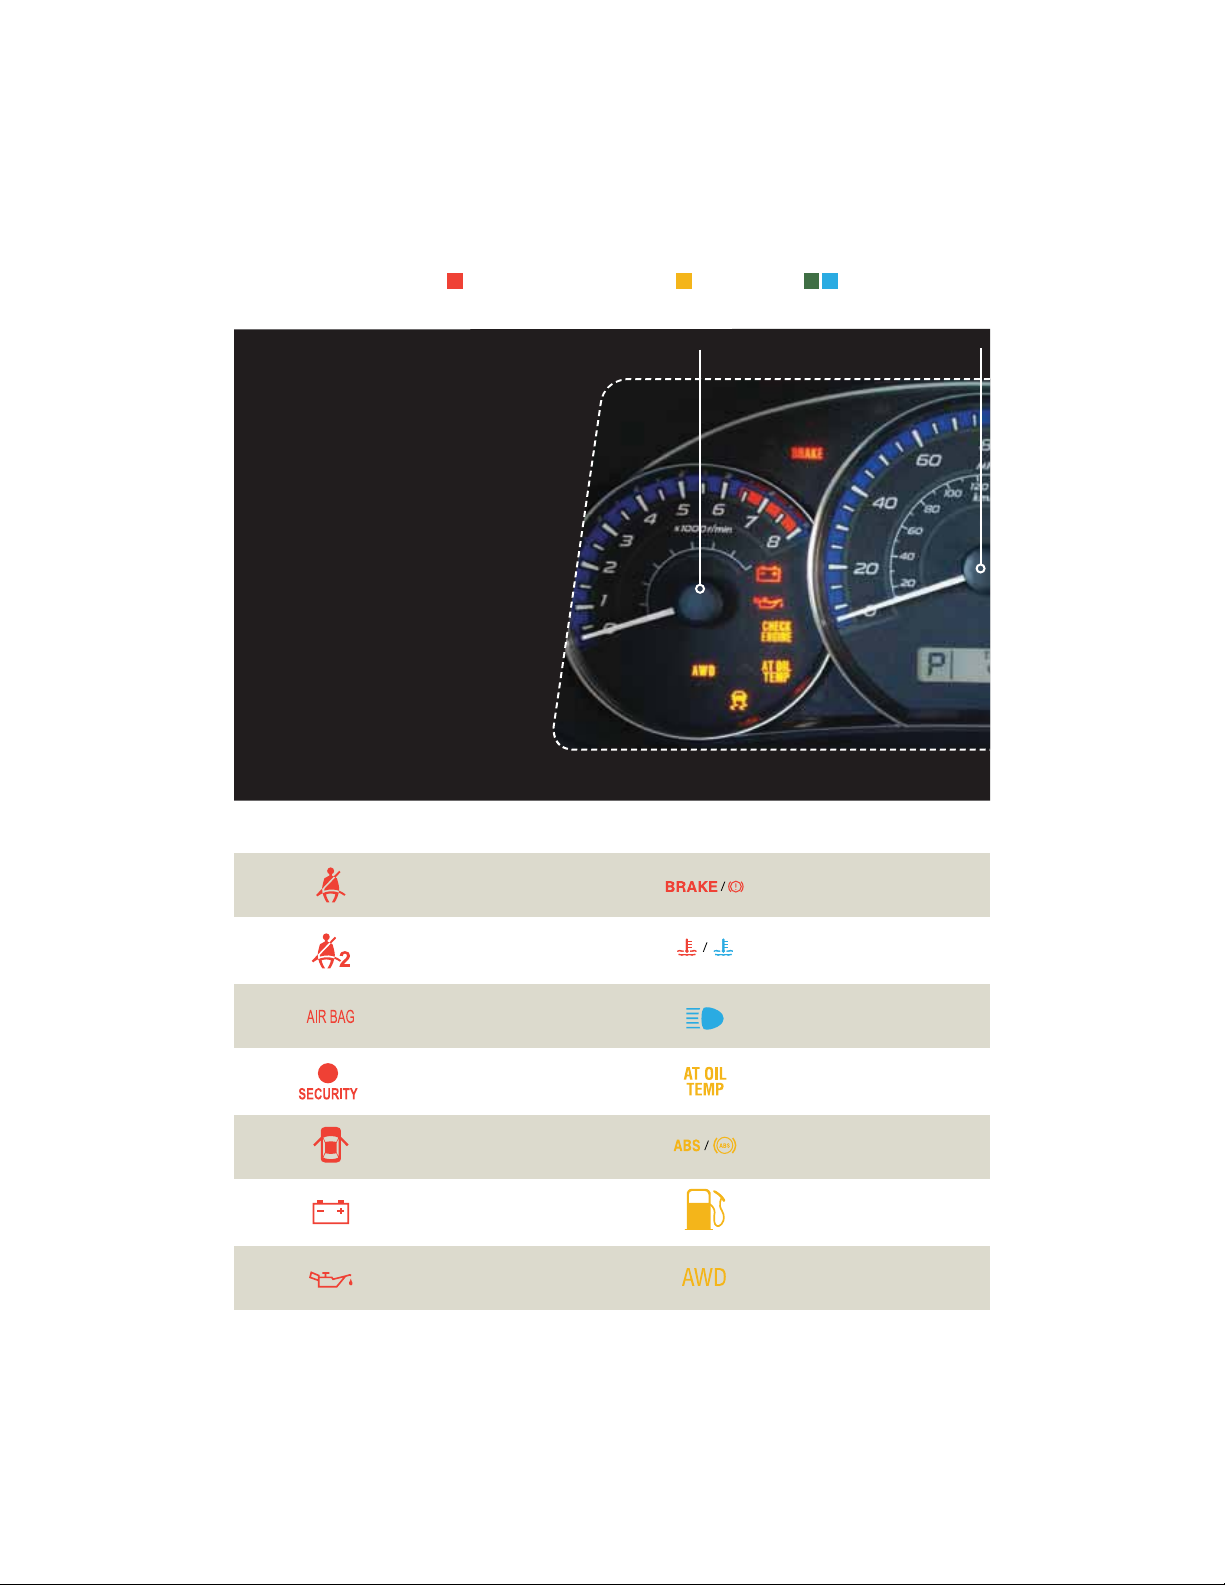
Speedometer
Forester 2.5X
Forester 2.5X Premium
Forester 2.5X Limited
Tachometer
6
Gauges
Immediate Attention
Caution Informational
Seatbelt warning
Front passenger
seatbelt warning
SRS airbag system
Security indicator light
Door open
Charge warning
Oil pressure warning
Brake system
Hot coolant temperature /
Cold coolant temperature
High beam indicator light
AT OIL TEMP
(Automatic Transmission)
ABS warning
Low fuel
All-Wheel Drive
(Automatic Transmission)

Trip meter A/B selection and trip meter reset knob
Trip meter and odometer
Fuel Gauge
7
Getting
Started
Instrument
Panel
Gauges
Personalize Controls While
Operating
Safety / In Case
of Emergency
Additional
Information
tarte
m
n
Panel
Gauges
son
z
Operating
e
of Emergency
n
Information
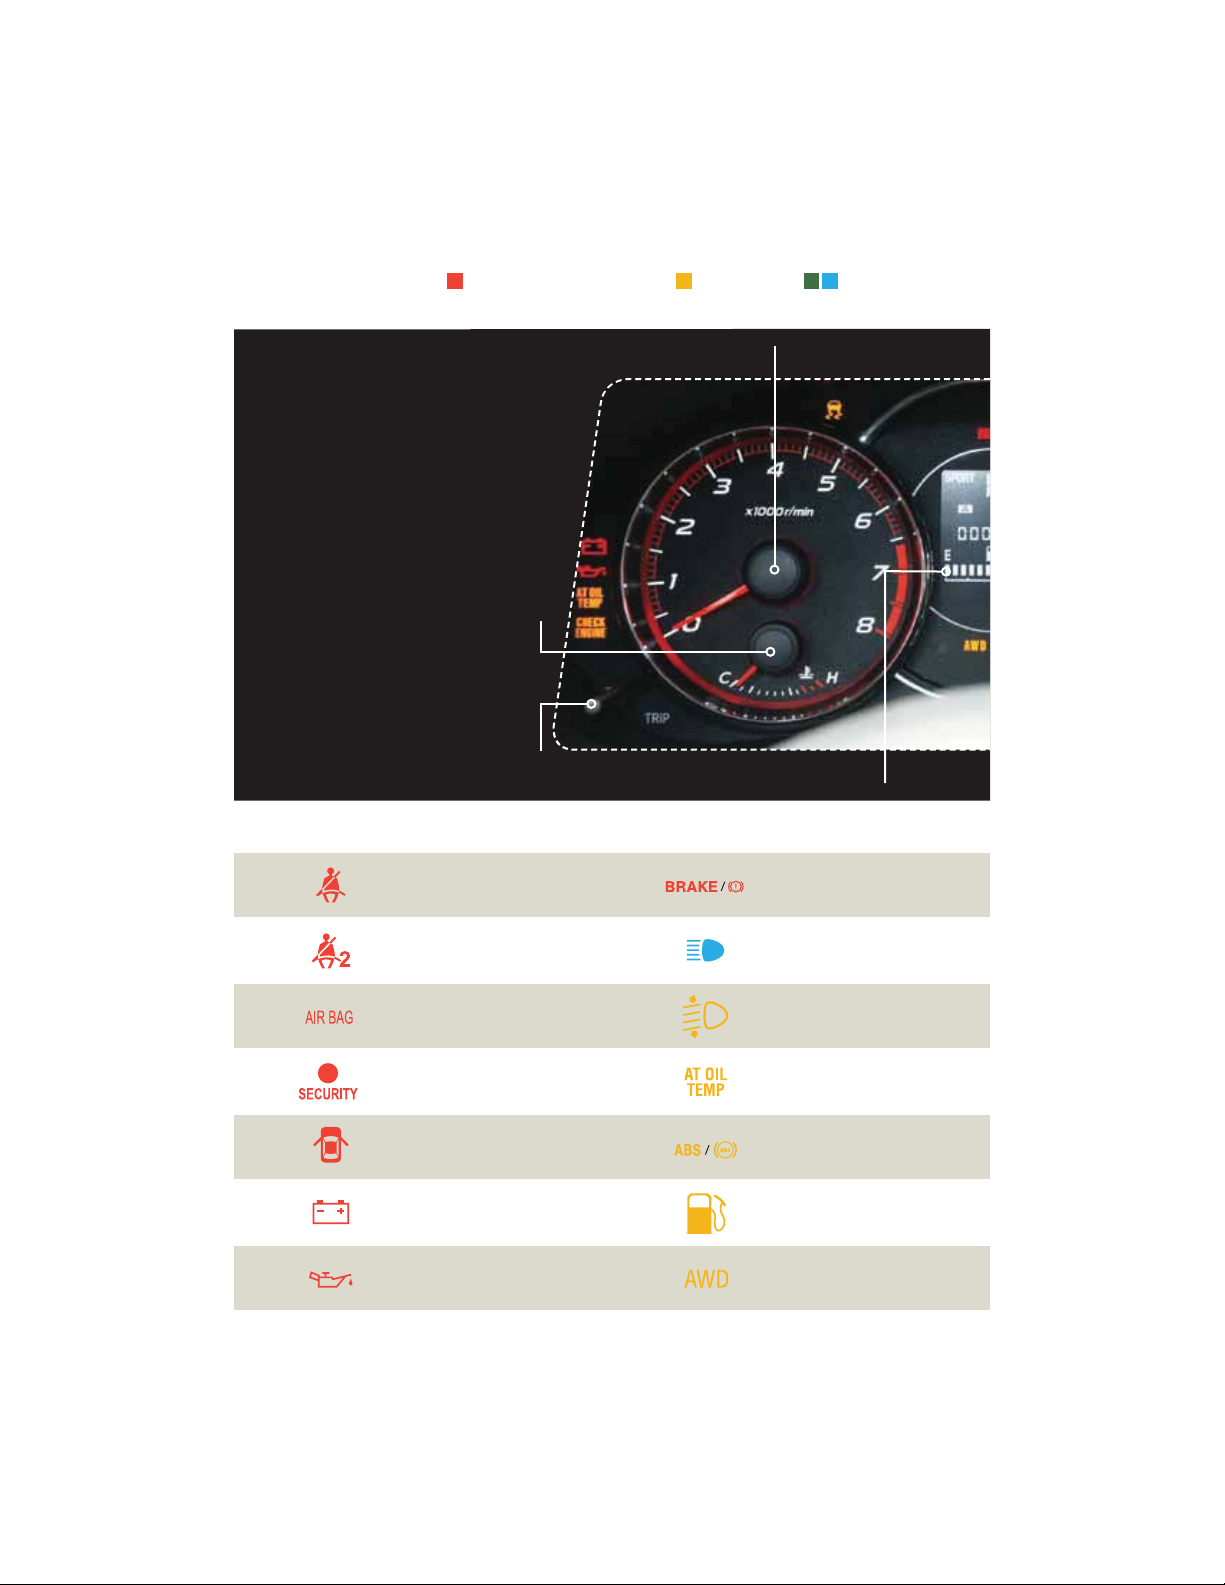
Gauges
Vehicle Dynamics
Control/Vehicle Dynamics
Control operation
Vehicle Dynamics Control OFF
$)&$,&/(*/&
Malfunction indicator
Tire pressure warning light
‘SPOUQBTTFOHFSBJSCBH0/
Front passenger airbag OFF
Incline Start Assist warning
(Manual Transmission)
Turn signals
Front fog light indicator
light (if equipped)
Headlight indicator light
SPORT mode
(Automatic Transmission)
Cruise control
indicator light
Cruise control set
indicator light
8
Gauges
Immediate Attention
Trip meter A/B selection and trip
meter reset knob
Temperature Gauge
Tachometer
Fuel Gauge
Caution Informational
Seatbelt warning
Front passenger
seatbelt warning
SRS airbag system
Security indicator light
Door open
Charge warning
Oil pressure warning
Brake system
High beam indicator light
Automatic headlight beam
leveler warning
AT OIL TEMP
(Automatic Transmission)
ABS warning
Low fuel
All-Wheel Drive
(Automatic Transmission)
Forester 2.5X Touring
Forester 2.5XT Touring
9
Getting
Started
Instrument
Panel
Gauges
Personalize Controls While
Operating
Safety / In Case
of Emergency
Additional
Information
tarte
m
n
Panel
Gauges
son
z
Operating
e
of Emergency
n
Information
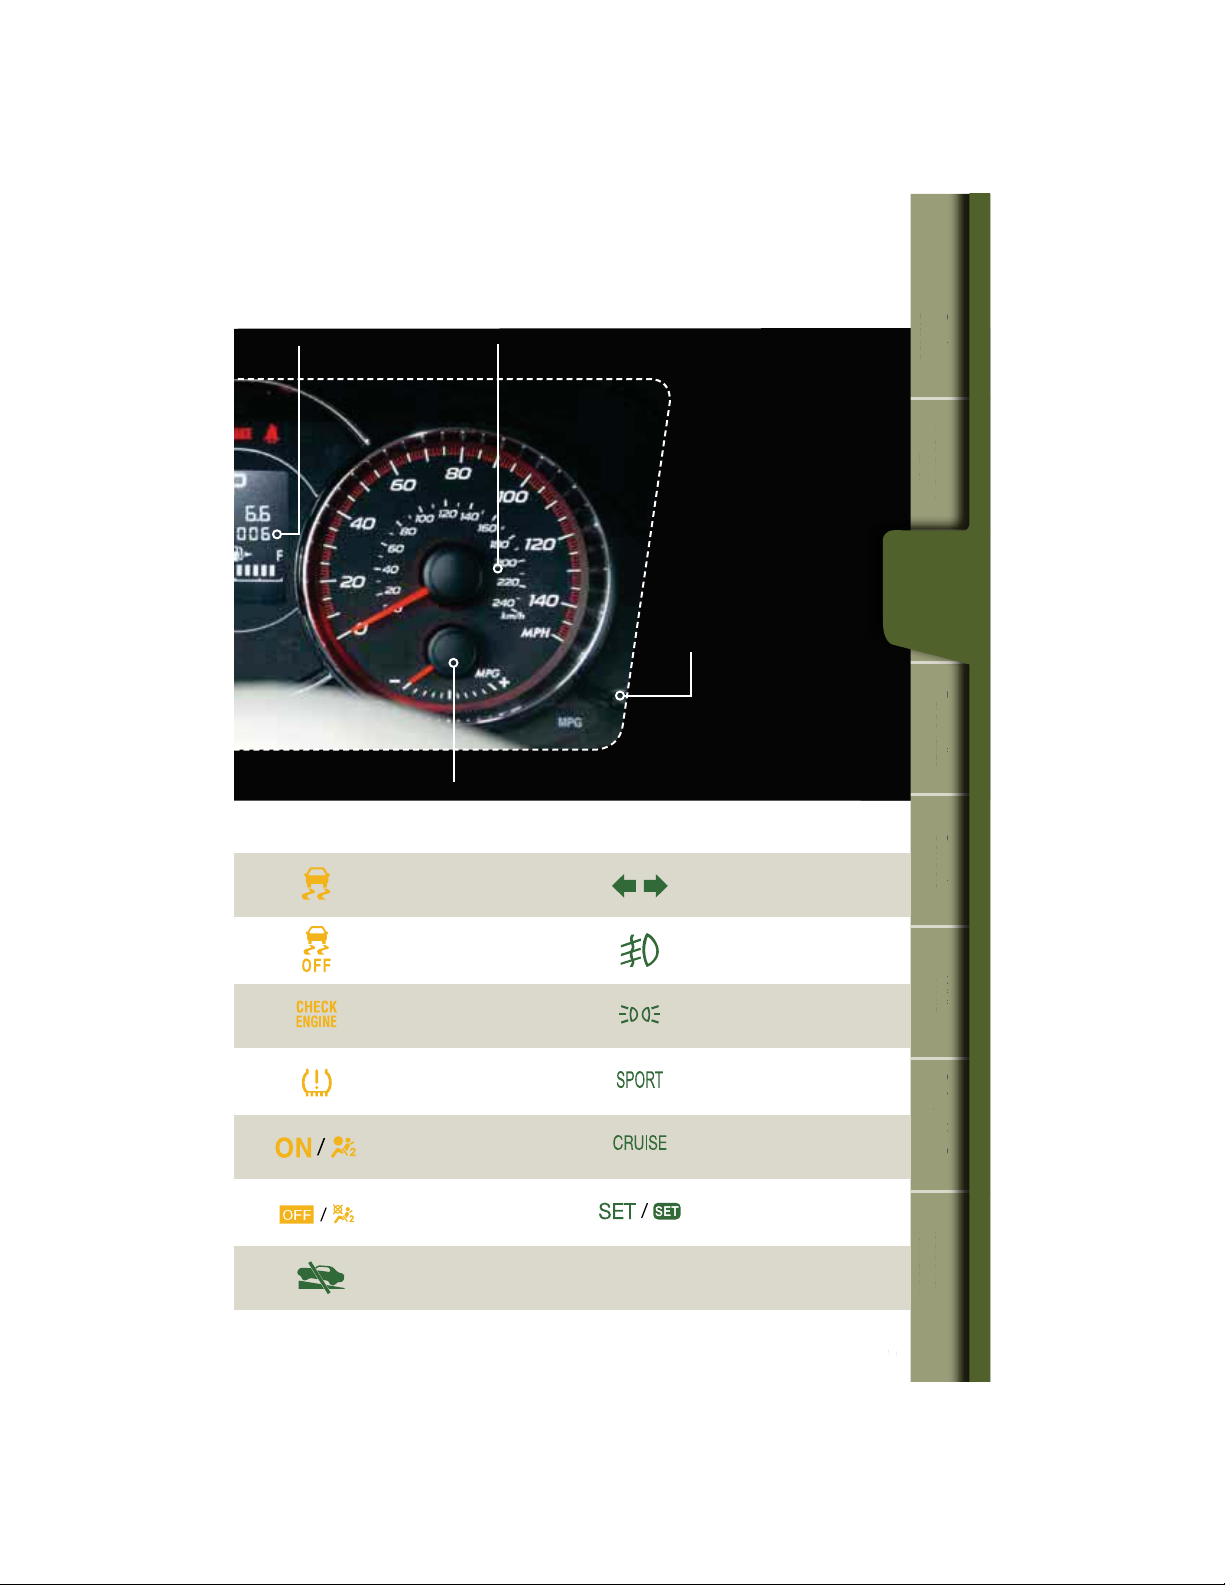
Gauges
Trip meter and odometer
Speedometer
ECO Gauge
Information display
switching knob
Vehicle Dynamics
Control/Vehicle Dynamics
Control operation
Vehicle Dynamics Control OFF
$)&$,&/(*/&
Malfunction indicator
Tire pressure warning light
‘SPOUQBTTFOHFSBJSCBH0/
Front passenger airbag OFF
Incline Start Assist warning
(Manual Transmission)
Turn signals
Front fog light indicator
light (if equipped)
Headlight indicator light
SPORT mode
(Automatic Transmission)
Cruise control
indicator light
Cruise control set
indicator light
10
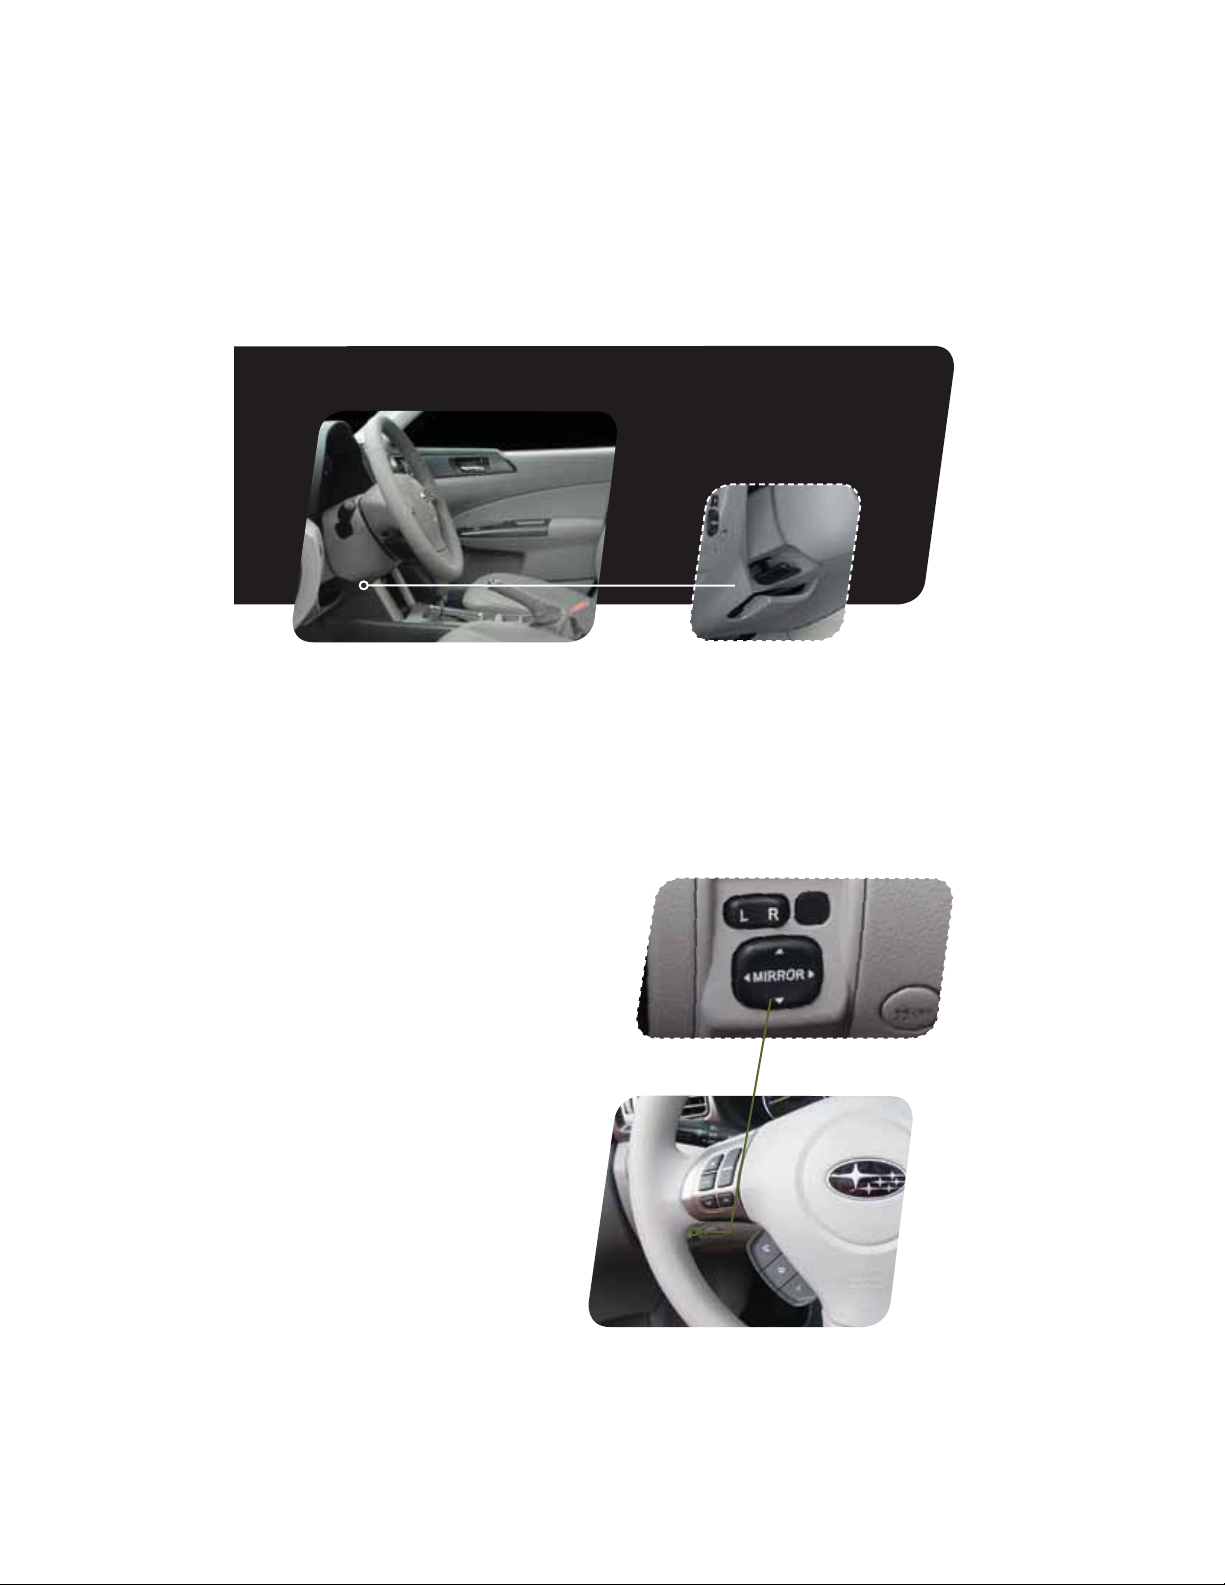
Personalize
Tilt and Telescopic
Steering Column
Push the lever down rmly to adjust the height
and lengthwise position of the column; rmly
push the lever back up to lock the column in
place. Do not adjust while driving.
Power Exterior Mirrors
1VTIUIFNJSSPSTFMFDUJPOTXJUDIUPUIFi-w
TJEFUPBEKVTUUIFMFGUIBOENJSSPSPSUPUIFi3w
side to adjust the right-hand mirror. Push and
hold the direction mirror control switch in the
direction you want to move the mirror. Push
the mirror selection switch back to the middle
to prevent unintended operation.

11
Getting
Started
Instrument
Panel
Gauges
Personalize Controls While
Operating
Safety / In Case
of Emergency
Additional
Information
tarte
m
n
Panel
ges
ersonaliz
Operating
e
of Emergency
n
Information
Personalize
Power Moonroof (if equipped)
With the moonroof in the fully closed
position, press the switch
1
to fully open the
moonroof. Press the switch
2
to close the
moonroof. To stop the moonroof in a midway
position while opening or closing, momentarily
press the switch to the
1
side or
2
side.
1
2
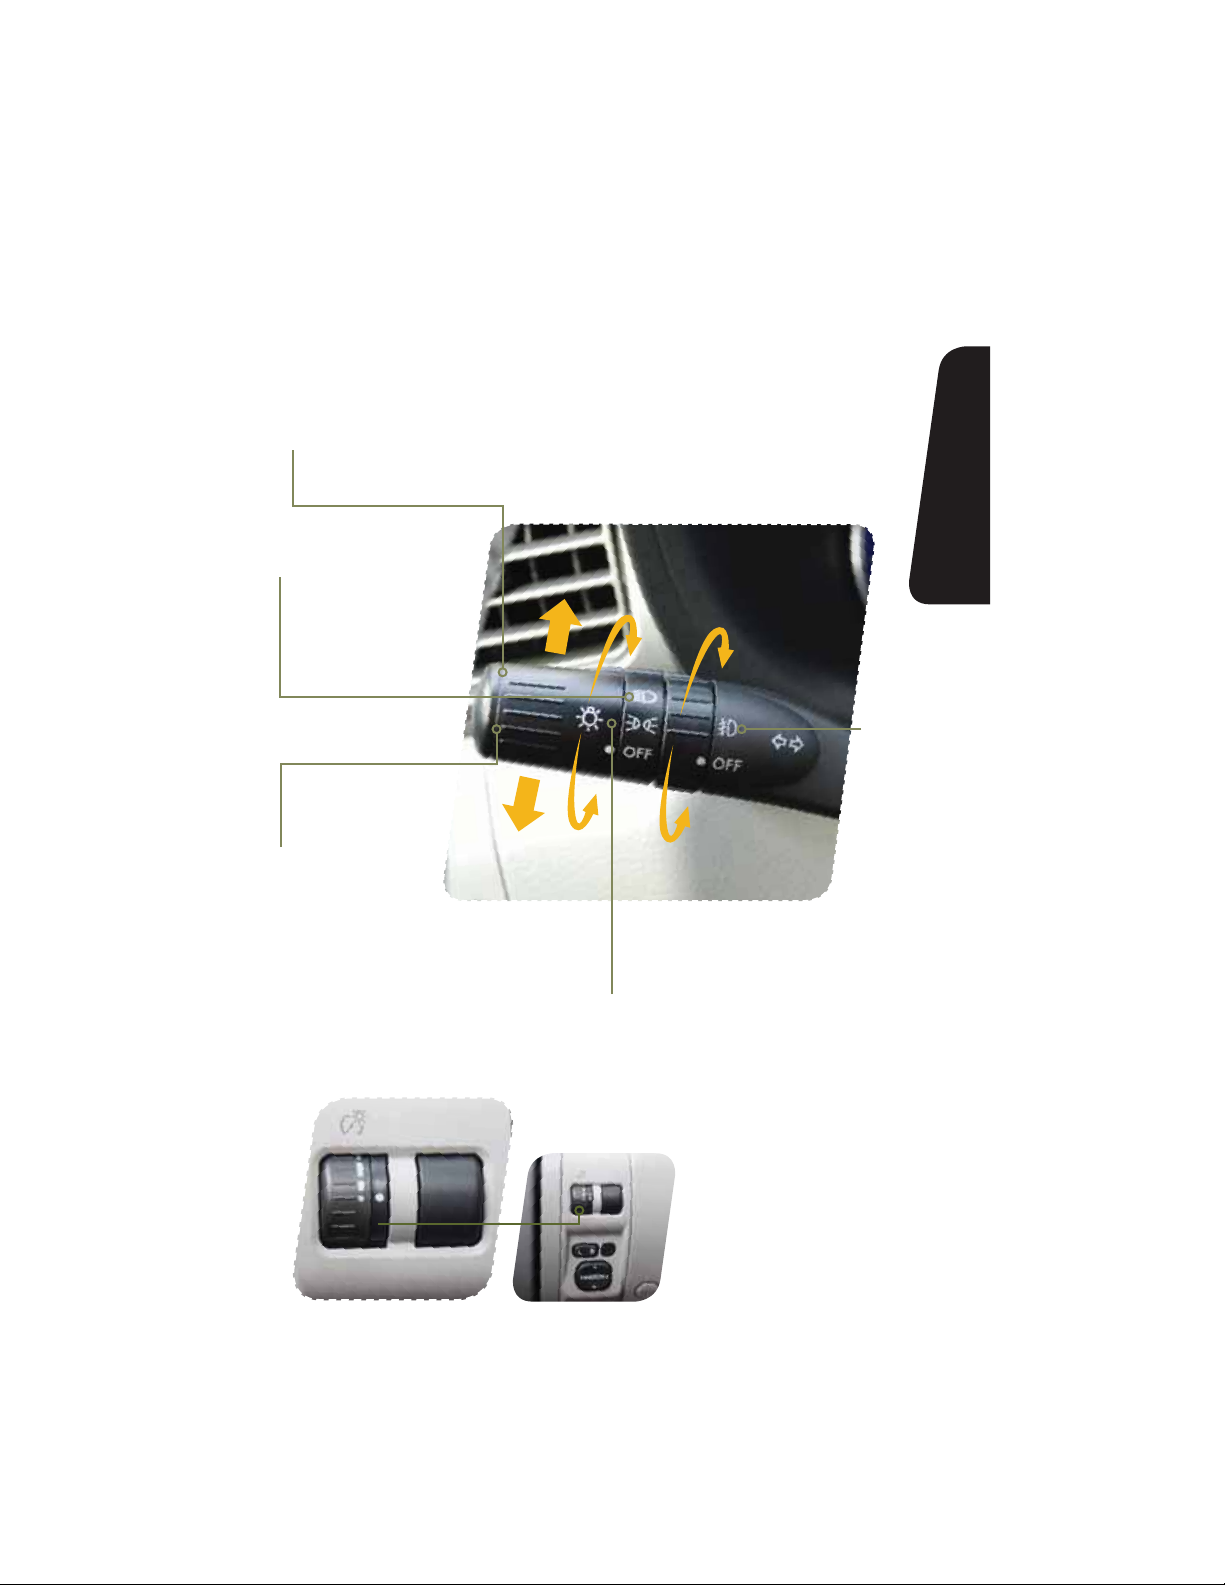
12
Controls
While the light switch is
on, rotate the dial downward
to dim the instrument panel
illumination. Rotate the
dial upward to make the
illumination brighter. When the
dial is fully rotated upward, the
instrument panel illumination
becomes full bright.
Light Controls
Turns on instrument panel lights,
tail lights, parking lights and license
plate lights.
Turns on headlights,
instrument panel
illumination, parking
lights, taillights and
license plate lights.
Turns on
fog lights
(if equipped).
Push up for right
turn signal.
Push down for
left turn signal.

13
Getting
Started
Instrument
Panel
Gauges
Personalize Controls While
Operating
Safety / In Case
of Emergency
Additional
Information
tarte
m
n
Panel
ges
son
z
trols
Operating
e
of Emergency
n
Information
Controls
Windshield Wipers
To turn on the wipers, press the wiper control lever down
one level for intermittent, two levels for low, or three levels for
IJHITQFFE3FUVSOUIFMFWFSUPUIFi0»wQPTJUJPOUPTUPQ
the wipers. For a single wipe move the lever up. To spray
washer uid, pull and hold the lever toward you.
To operate the rear wiper, rotate the end of the knob upward
to the intermittent, continuous, or wash position. When the
rear wiper is off, rotate the knob downward to wash and
wipe the rear window.
Daytime Running Lights
Daytime running lights are standard on your vehicle. Only a
reduced brightness high beam will be automatically turned
on when the engine has started and the parking brake is
GVMMZSFMFBTFEBOEUIFMJHIUTXJUDIJTJOUIFi0»wPSi w
position. The brightness of the illumination of the high beam
headlights is reduced by the daytime running light system.
You must always switch on your headlights when it’s dark
outside by turning the light switch to the
position.
1
2
3
INT.
LOW
HIGH
OFF

14
Controls
Manual Climate Control
(if equipped)
1. Temperature Control Dial
Rotate the temperature control dial from
blue for cool, to red for warm.
2. Air Conditioning Button
1SFTTUIFi»$wCVUUPOUPBDUJWBUFUIF
air conditioning. Press it again to turn off
the air conditioning.
3. Recirculated / Outside Air Button
Press the air inlet selection button to
prevent outside air from being drawn into
the passenger compartment. If the button
is pushed in, press it again to draw outside
BJSJOUPUIFDPNQBSUNFOU5013&7&/5
8*/%4)*&-%’0((*/(%0/05
3&.»*/*/5)&3&$*3$6-«5&%.0%&
’03»/&95&/%&%1&3*0%0’5*.&
4. Fan Speed Control Dial
Rotate the fan speed control dial to select
one of four fan speeds.
5
6

15
Getting
Started
Instrument
Panel
Gauges
Personalize Controls While
Operating
Safety / In Case
of Emergency
Additional
Information
tarte
m
n
Panel
ges
son
z
trols
Operating
e
of Emergency
n
Information
Controls
5. Rear Window Defogger Button
Press the rear window defogger button
to turn on the defogger. The defogger
will automatically shut off after about
15 minutes. If the window clears
before that time, you can press the
button again to turn it off.
6. Air Flow Control Dial
The air ow control dial allows you to
choose the direction of air ow. Rotate
the dial for the desired air ow position.
Defrost / Defog
To clear the windshield and front door
windows of fog or frost, rotate the air
ow control dial to the defrost position,
set the temperature control to the red
position, and set the fan speed control
to the fastest speed.
1
2
3
4

16
Controls
1
2
3
5
Automatic Climate Control
(if equipped)
1. Air Flow Control Dial
On the automatic setting, the system
determines the air ow location to achieve
the desired temperature or you can manually
choose the direction of air ow. Rotate the
dial for the desired air ow position.
Defrost / Defog
To clear the windshield and front door
windows of fog or frost, rotate the air ow
control dial to the defrost position, set the
temperature control to the red position,
and set the fan speed control of the
fastest speed.
2. Rear Window Defogger Button
Press the rear window defogger button
to turn on the defogger. The defogger
will automatically shut off after about 15
minutes. If the window clears before that
time, you can press the button again to
turn it off.
3. Fan Speed Control Dial
On the automatic setting, the system
determines the fan speed to achieve the
desired temperature or you can manually
rotate the fan speed control dial to select
one of seven fan speeds.

17
Getting
Started
Instrument
Panel
Gauges
Personalize Controls While
Operating
Safety / In Case
of Emergency
Additional
Information
tarte
m
n
Panel
ges
son
z
trols
Operating
e
of Emergency
n
Information
Controls
8
4. Air Conditioning Button
1SFTTUIFi»$wCVUUPOUPBDUJWBUFUIF
air conditioning. Press it again to turn
off the air conditioning.
5. Recirculated / Outside Air Button
In the automatic mode, the system
will determine if recirculated air
is needed to achieve a desired
temperature. In manual mode,
press the air inlet selection button to
prevent outside air from being drawn
into the passenger compartment.
If the button is pushed in, press
it again to draw outside air into
UIFDPNQBSUNFOU5013&7&/5
8*/%4)*&-%’0((*/(%0/05
3&.»*/*/5)&3&$*3$6-«5&%
.0%&’03»/&95&/%&%1&3*0%
OF TIME.
6. Temperature Control Dial
Rotate the temperature control dial
from 65 for cool to 85 for warm.
6

Automatic Climate Control
(if equipped)
1. Automatic On and Off
This system automatically controls
outlet air temperature, fan speed, air
ow distribution, air inlet control, and air
conditioner compressor operation. Press
i»650wUPBDUJWBUF1SFTTi0»wUPUVSO
off the system.
2. Temperature Control Dial
Rotate the dial clockwise to increase the
temperature or rotate the dial clockwise
to decrease the temperature and maintain
a comfortable climate within the driver
and passenger compartment. The
temperature is displayed digitally on
the screen. Separate temperature
settings can be adjusted for the driver’s
side and passenger’s side.
Operation in Manual Mode
3. Recirculated / Outside Air Button
Press the air inlet selection button to
prevent outside air from being drawn
into the passenger compartment. Press
the button again to allow outside air
JOUPUIFDPNQBSUNFOU5013&7&/5
8*/%4)*&-%’0((*/(%0/05
3&.»*/*/5)&3&$*3$6-«5&%.0%&
’03»/&95&/%&%1&3*0%0’5*.&
18
Controls
1
2
3
4
6

4. Fan Speed Control Buttons
Press the fan speed control buttons
to select seven different fan
speed positions.
5. Air Flow Mode Selection Button
Press the button to select the desired
air ow mode. The selected air ow
NPEFoFJUIFSWFOUJMBUJPOCJMFWFM
IFBUPSIFBUEFGSPTUoJTTIPXOPO
the display.
6. Dual Mode Button
1SFTTUIFi%6″-wCVUUPOUPBDUJWBUF
or deactivate the dual mode. Dual
mode makes it possible to have
separate temperature settings for the
driver’s side and passenger’s side.
7. Air Conditioner Button
1SFTTUIFi»$wCVUUPOUPBDUJWBUFUIF
air conditioning. Press it again to turn
off the air conditioning.
8. Defroster Button
Press the button to defrost or
dehumidify the windshield and front
door windows.
9. Rear Window Defogger Button
Press the button to turn on the
defogger. It will automatically shut off
after about 15 minutes. If the window
clears before that time, you can
press the button again to turn it off.
19
Getting
Started
Instrument
Panel
Gauges
Personalize Controls While
Operating
Safety / In Case
of Emergency
Additional
Information
tarte
m
n
Panel
ges
son
z
trols
Operating
e
of Emergency
n
Information
Controls
8
9
7
5
2

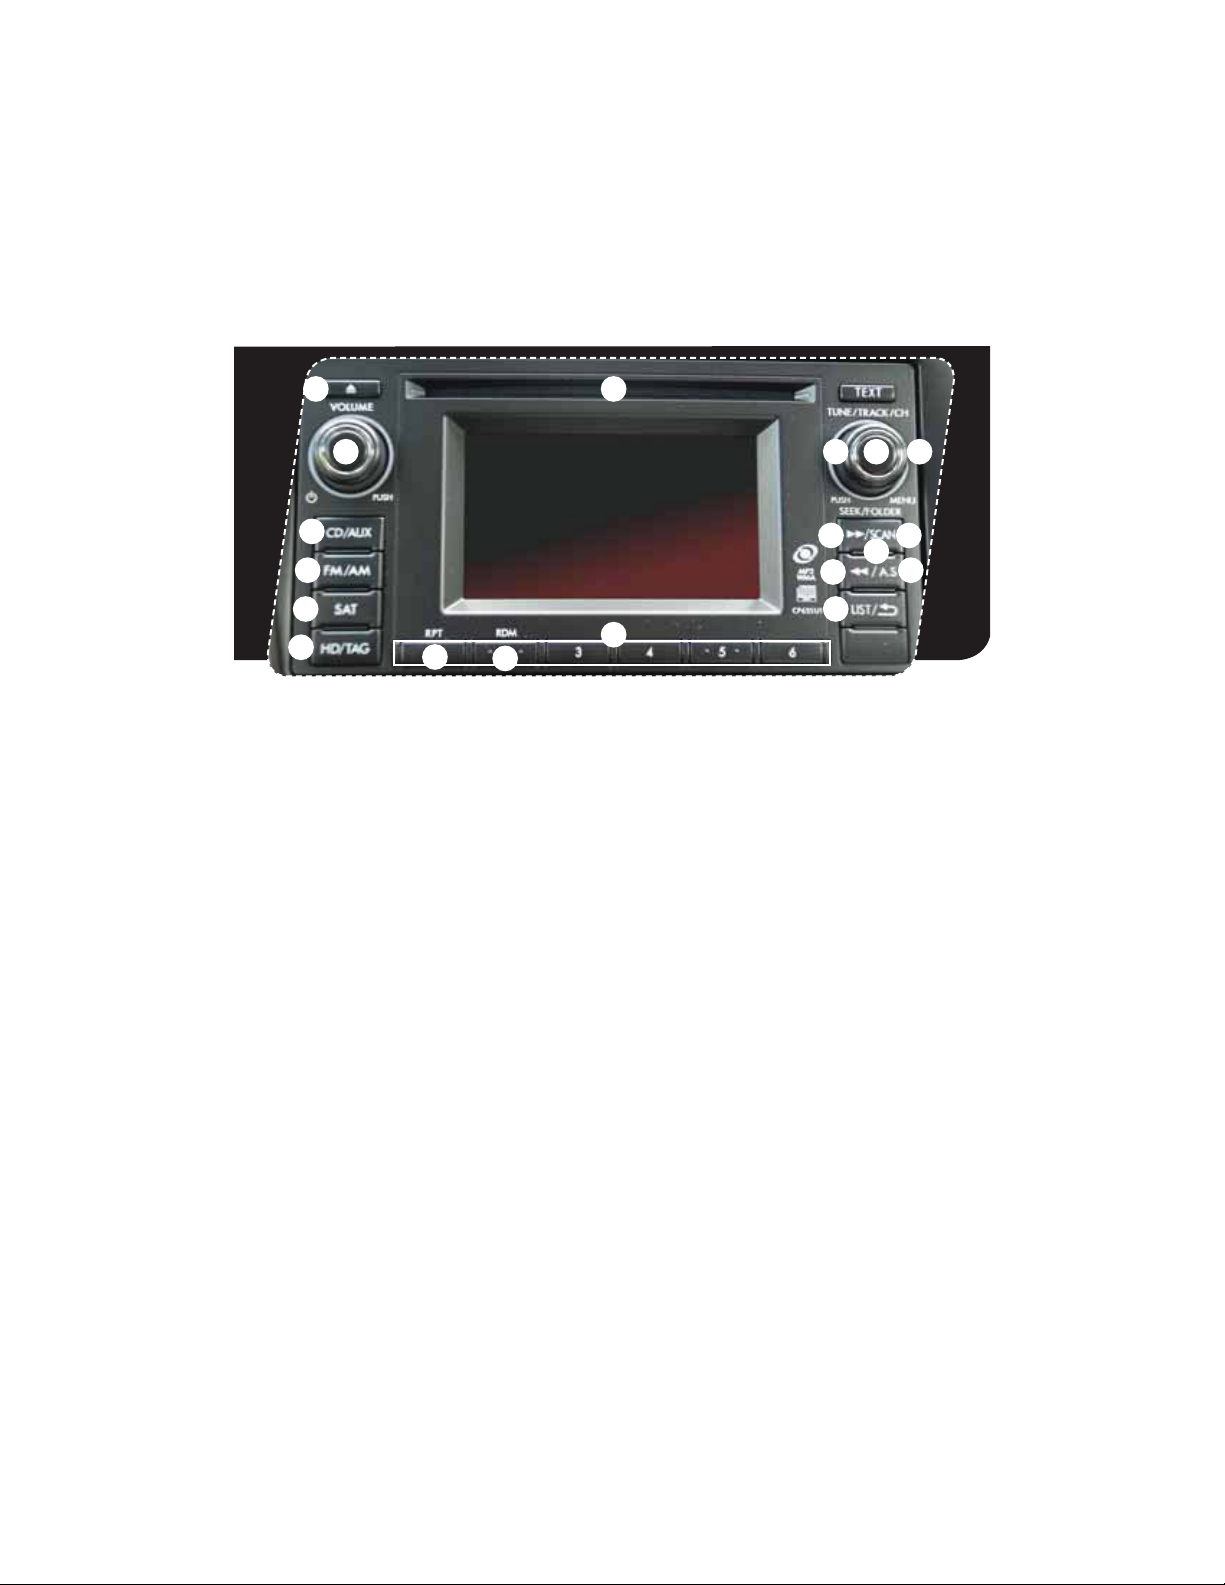
20
Controls
1
AM/FM Stereo with Single
Disc CD/MP3/WMA Player
(if equipped)
Radio Functions
1. Power / Volume Control
Press the power / volume control knob
for on or off; rotate the knob to control
the volume.
2. Bass, Middle, Treble, Fader and Balance
&BDIQSFTTPGUIFi56/&53″$,$)w
button will cycle you through Bass,
Midrange, Treble, Fade or Balance. Rotate
UIFi56/&53″$,$)wLOPCUPBEKVTU
the desired level.
3. FM / AM
1SFTTUIFi’.».wCVUUPOUPDIPPTF
FM1, FM2, FM3 or AM reception.
4. Tune / Track
3PUBUFUIFi56/&53″$,$)w
knob clockwise to increase the
tuning frequency; rotate the knob
counter-clockwise to decrease it.
5. Seek
1SFTTUIFSJHIUPSMFGUBSSPXPGUIFi4&&,w
button to pick up the next highest or
lowest frequency.
6. Presets
You can save up to six favorite stations
GPSFBDICBOEo’.’.’.BOE».
Select a frequency and press one of the
preset buttons until a conrmation beep
is heard.
7. Satellite Radio
An optional satellite radio tuner and
antenna can be connected to this audio
unit. You can hear satellite radio programs
CZQSFTTJOHUIFi4″5wCVUUPOBGUFS
connecting optional equipment. To receive
satellite radio service, it is necessary to
enter into a separate contract with a
satellite radio provider.
11
9
3
8
15
15
13
5 5
13
7
1617
14
10
42
6
12

21
Getting
Started
Instrument
Panel
Gauges
Personalize Controls While
Operating
Safety / In Case
of Emergency
Additional
Information
1
tarte
m
n
Panel
ges
son
z
trols
Operating
e
of Emergency
n
Information
Controls
CD Player Functions
8. Load
Insert a disc into the slot. The CD
will automatically be drawn in and
will begin play at the rst track.
9. Play CD
1SFTTUIFi$%»69wCVUUPOBOE
playback will begin.
10. Repeat / Random
1SFTTUIFi3153%.wCVUUPOPODF
to repeat the current track; press
twice to repeat the current folder.
1SFTTBOEIPMEUIFi3153%.w
button once to randomize tracks
on a CD; press twice to randomize
all tracks in a folder; press a third
time to randomize the entire disc.
11. Eject
Press the button to eject the disc.
12. Forward / Reverse
3PUBUFUIFi56/&53″$,$)w
knob clockwise to skip to the
beginning of the next track; rotate
the knob counter-clockwise to
skip to the beginning of the
current track. Rotate the knob
counter-clockwise again to go to
the previous selection.
13. Fast Forward / Fast Reverse
Press and hold the right arrow
PGUIFi4&&,wCVUUPOGPSNPSF
than one second to fast forward.
Release the button to stop. To fast
reverse, press and hold the left
arrow for more than one second
and release the button to stop.
14. Scan
1SFTTUIFi4$»/wCVUUPOUP
begin previewing the rst 10
seconds of each track on the
EJTD/PSNBMQMBZCBDLXJMM
resume after all tracks have
been scanned. Press the
i4$»/wCVUUPOBHBJOUPTUPQ
scanning and listen to the track
being previewed.
MP3/WMA Formatted CD
Player Functions
15. Folder Selection
Press the up arrow of the
i’0-%&3wCVUUPOUPTFMFDUUIF
next folder. Press the down arrow
to go back to the rst music le.
Quickly press the down arrow
again to go back to the previous
folder.
16. Page Scroll
1SFTTUIFi5&95wCVUUPOUPTFMFDU
title display. Press and hold again
to scroll through the title, 8
characters at a time. Up to a
maximum of 64 characters.
17. Display
1SFTTBOEIPMEUIFi5&95wCVUUPO
during playback to change the
display to show the play time, disc
title, artist name and track title. If
the disc is formatted with MP3/
8.»TQSFTTUIFi5&95wCVUUPOUP
change the display to show play
time, folder name and le name.

22
Controls
1
AM/FM Stereo with Single
Disc CD/MP3/WMA Player
(if equipped)
Radio Functions
1. Power / Volume Control
Press the power / volume control knob
for on or off; rotate the knob to control
the volume.
2. Bass, Middle, Treble, Fader and Balance
&BDIQSFTTPGUIFi56/&53″$,$)w
button will cycle you through Bass,
Midrange, Treble, Fade or Balance. Rotate
UIFi56/&53″$,$)wLOPCUPBEKVTU
the desired level.
3. FM / AM
1SFTTUIFi’.».wCVUUPOUPDIPPTF
FM1, FM2, FM3 or AM reception.
4. Tune / Track
3PUBUFUIFi56/&53″$,$)w
knob clockwise to increase the
tuning frequency; rotate the knob
counterclockwise to decrease it.
5. Seek
1SFTTUIFSJHIUPSMFGUBSSPXPGUIFi4&&,w
button to pick up the next highest or
lowest frequency.
6. Presets
You can save up to six favorite stations
GPSFBDICBOEo’.’.’.BOE».
Select a frequency and press one of the
preset buttons until a conrmation beep
is heard.
7. Satellite Radio
An optional satellite radio tuner and
antenna can be connected to this audio
unit. You can hear satellite radio programs
CZQSFTTJOHUIFi4″5wCVUUPOBGUFS
connecting optional equipment. To receive
satellite radio service, it is necessary to
enter into a separate contract with a
satellite radio provider.
11
9
8
15
13
5 5
3
7
16
1817
14 14
10
42
6
12

23
Getting
Started
Instrument
Panel
Gauges
Personalize Controls While
Operating
Safety / In Case
of Emergency
Additional
Information
tarte
m
n
Panel
ges
son
z
trols
Operating
e
of Emergency
n
Information
Controls
8. PTY / CAT
1SFTTUIFi15:$»5wCVUUPOUP
change to program type selection
mode. The PTY group that you are
currently listening to is displayed
for 10 seconds.
CD Player Functions
9. Load
Insert a disc into the slot. The CD
will automatically be drawn in and
will begin play at the rst track.
10. Play CD
1SFTTUIFi$%»69wCVUUPOBOE
playback will begin.
11. Repeat / Random
1SFTTUIFi3153%.wCVUUPOPODF
to repeat the current track; press
twice to repeat the current folder.
1SFTTBOEIPMEUIFi3153%.w
button once to randomize tracks
on a CD; press twice to randomize
the entire disc.
12. Eject
Press the button to eject the disc.
13. Forward / Reverse
3PUBUFUIFi56/&53″$,
$)wLOPCDMPDLXJTFUPTLJQUP
the beginning of the next track;
rotate the knob counterclockwise
to skip to the beginning of the
current track. Rotate the knob
counterclockwise again to go to
the previous selection.
14. Fast Forward / Fast Reverse
Press and hold the right arrow
PGUIFi4&&,wCVUUPOGPSNPSF
than one second to fast forward.
Release the button to stop. To fast
reverse, press and hold the left
arrow for more than one second
and release the button to stop.
15. Scan
1SFTTUIFi4$»/wCVUUPOUPCFHJO
previewing the rst 10 seconds
PGFBDIUSBDLPOUIFEJTD/PSNBM
playback will resume after all
tracks have been scanned. Press
UIFi4$»/wCVUUPOBHBJOUPTUPQ
scanning and listen to the track
being previewed.
MP3/WMA Formatted CD
Player Functions
16. Folder Selection
Press the up arrow of the
i’0-%&3wCVUUPOUPTFMFDUUIF
next folder. Press the down arrow
to go back to the rst music le.
Quickly press the down arrow
again to go back to the previous
folder.
17. Page Scroll
1SFTTUIFi5&95wCVUUPOUPTFMFDU
title display. Press and hold again
to scroll through the title,
8 characters at a time up to a
maximum of 64 characters.
18. Display
1SFTTBOEIPMEUIFi5&95wCVUUPO
during playback to change the
display to show the play time, disc
title, artist name and track title. If
the disc is formatted with MP3/
8.»TQSFTTUIFi5&95wCVUUPOUP
change the display to show play
time, folder name and le name.
24
Controls
1
AM/FM Stereo, HD Radio™
with Single Disc CD/MP3/
WMA Player (if equipped)
Radio Functions
1. Power / Volume Control
Press the power / volume control knob
for on or off; rotate the knob to control
the volume.
2. Bass, Mid, Treble, Fader and Balance
1SFTTUIFi56/&53″$,$)wCVUUPO
to display the setting menu. Using the
i56/&53″$,$)wEJBMZPVDBOBEKVTU
the settings on the Bass, Mid, Treble,
Balance and Fader.
3. FM / AM
1SFTTUIFi’.».wCVUUPOUP
choose FM1, FM2, FM-AS, AM or
AM-AS reception.
4. Tune / Track
3PUBUFUIFi56/&53″$,$)w
knob clockwise to increase the
tuning frequency; rotate the knob
counterclockwise to decrease it.
5. Seek
1SFTTUIFSJHIUPSMFGUBSSPXPGUIFi4&&,w
button to pick up the next highest or
lowest frequency.
6. Presets
You can save up to six favorite stations for
FBDICBOEo’.’.’.BOE».
Select a frequency and press one of the
preset buttons until a conrmation beep
is heard.
7. Satellite Radio
An optional satellite radio tuner and
antenna can be connected to this audio
unit. You can hear satellite radio programs
CZQSFTTJOHUIFi4″5wCVUUPOBGUFS
connecting optional equipment. To receive
satellite radio service, it is necessary to
enter into a separate contract with a
satellite radio provider.
11
9
8
15
13
5
5
3
7
16
17
14 10
4 2
6
12
16

25
Getting
Started
Instrument
Panel
Gauges
Personalize Controls While
Operating
Safety / In Case
of Emergency
Additional
Information
tarte
m
n
Panel
ges
son
z
trols
Operating
e
of Emergency
n
Information
Controls
8. PTY / CAT
1SFTTUIFi-*45wCVUUPOUPDIBOHF
to program type selection mode.
The PTY group that you are
currently listening to is displayed
for 10 seconds.
9. HD/TAG
1SFTTUIFi)%5«(wCVUUPOXIJMF
receiving FM radio (except analog
broadcasts) to hear the
stations digitally.
CD Player Functions
10. Load
Insert a disc into the slot. The CD
will automatically be drawn in and
will begin play at the rst track.
11. Play CD
1SFTTUIFi$%»69wCVUUPOBOE
playback will begin.
12. Repeat
1SFTTUIFi315wCVUUPOPODFUP
repeat the current track; press
twice to repeat the
current folder.
13. Random
1SFTTBOEIPMEUIFi3%.wCVUUPO
once to randomize the entire
disc; press twice to randomize all
tracks in a folder.
14. Eject
Press the button to eject the disc.
15. Forward / Reverse
3PUBUFUIFi56/&53″$,
$)wLOPCDMPDLXJTFUPTLJQUP
the beginning of the next track;
rotate the knob counterclockwise
to skip to the beginning of the
current track. Rotate the knob
counterclockwise again to go to
the previous selection.
16. Fast Forward / Fast Reverse
Press and hold the right arrow of
UIFi4&&,wCVUUPOUPGBTUGPSXBSE
Release the button to stop. To fast
reverse, press and hold the left
arrow; release the button to stop.
MP3/WMA Formatted CD
Player Functions
17. Folder Selection
Press the right arrow of the
i’0-%&3wCVUUPOUPTFMFDUUIF
next folder. Press the left arrow
to go back to the rst music le.
Quickly press the left arrow again
to go back to the previous folder.

26
Controls
Auxiliary Input Jack
The aux jack is located in the center
console. You can connect a portable
music player to the auxiliary jack and
hear the music stored on it through
UIFWFIJDMFTQFBLFST1SFTTUIFi$%
«69wCVUUPOMPDBUFEPOUIFBVEJP
system; to select the auxiliary mode.
USB Storage Device /
iPod
®
(if equipped)
You can connect a USB equipped
portable music player to the USB
connector and hear the music stored
on it through the vehicle speakers.
1SFTTUIFi$%»69wCVUUPOMPDBUFEPO
the audio system repeatedly until the
USB / iPod® mode is selected.
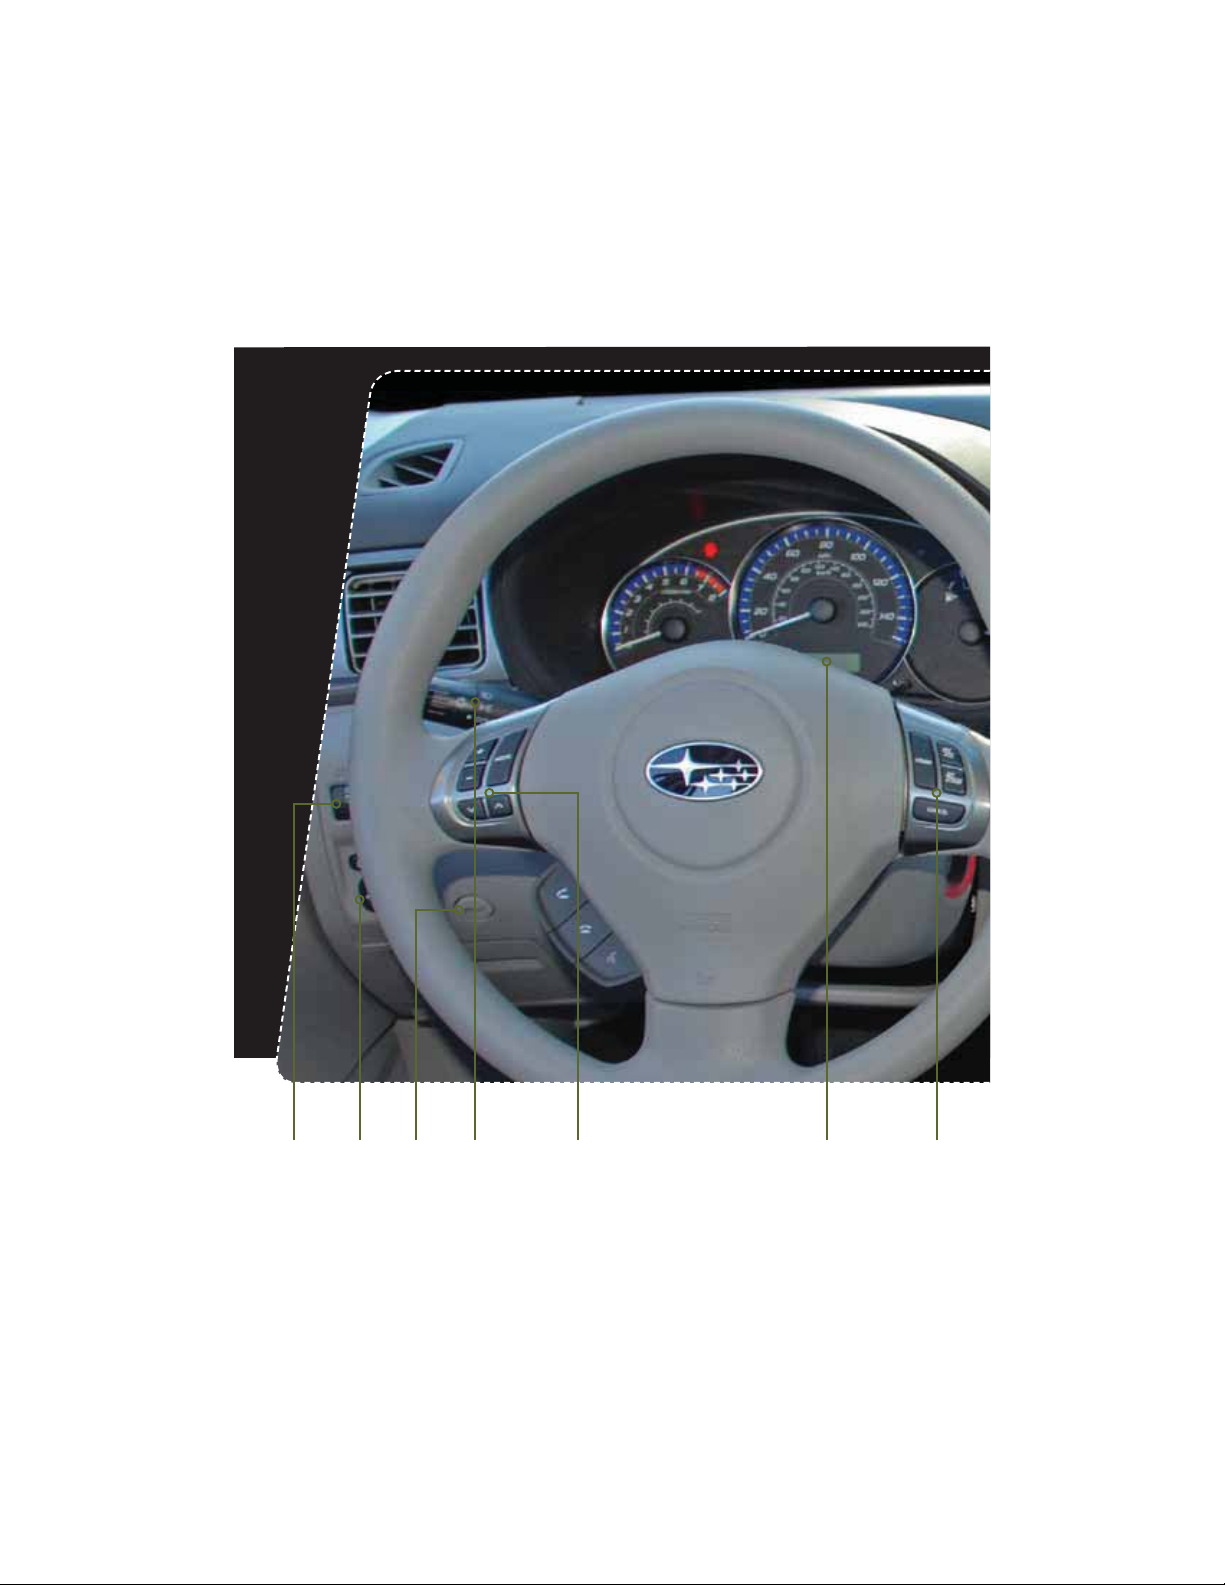
Steering Wheel Audio Controls (if equipped)
t1SFTTUIFCVUUPOUPTFMFDUUIF
EFTJSFEBVEJPNPEFo’.
AM, SAT, CD, AUX, MEDIA.
t8JUIBOZPGUIFSBEJPNPEFTTFMFDUFEQVTIUIFVQ
button or the down button to nd the desired frequency.
In CD mode, push the up button or the down button to
skip forward or back a track.
t1SFTTUIFiwCVUUPOUP
increase the volume.
1SFTTUIFiwCVUUPOUP
reduce the volume.
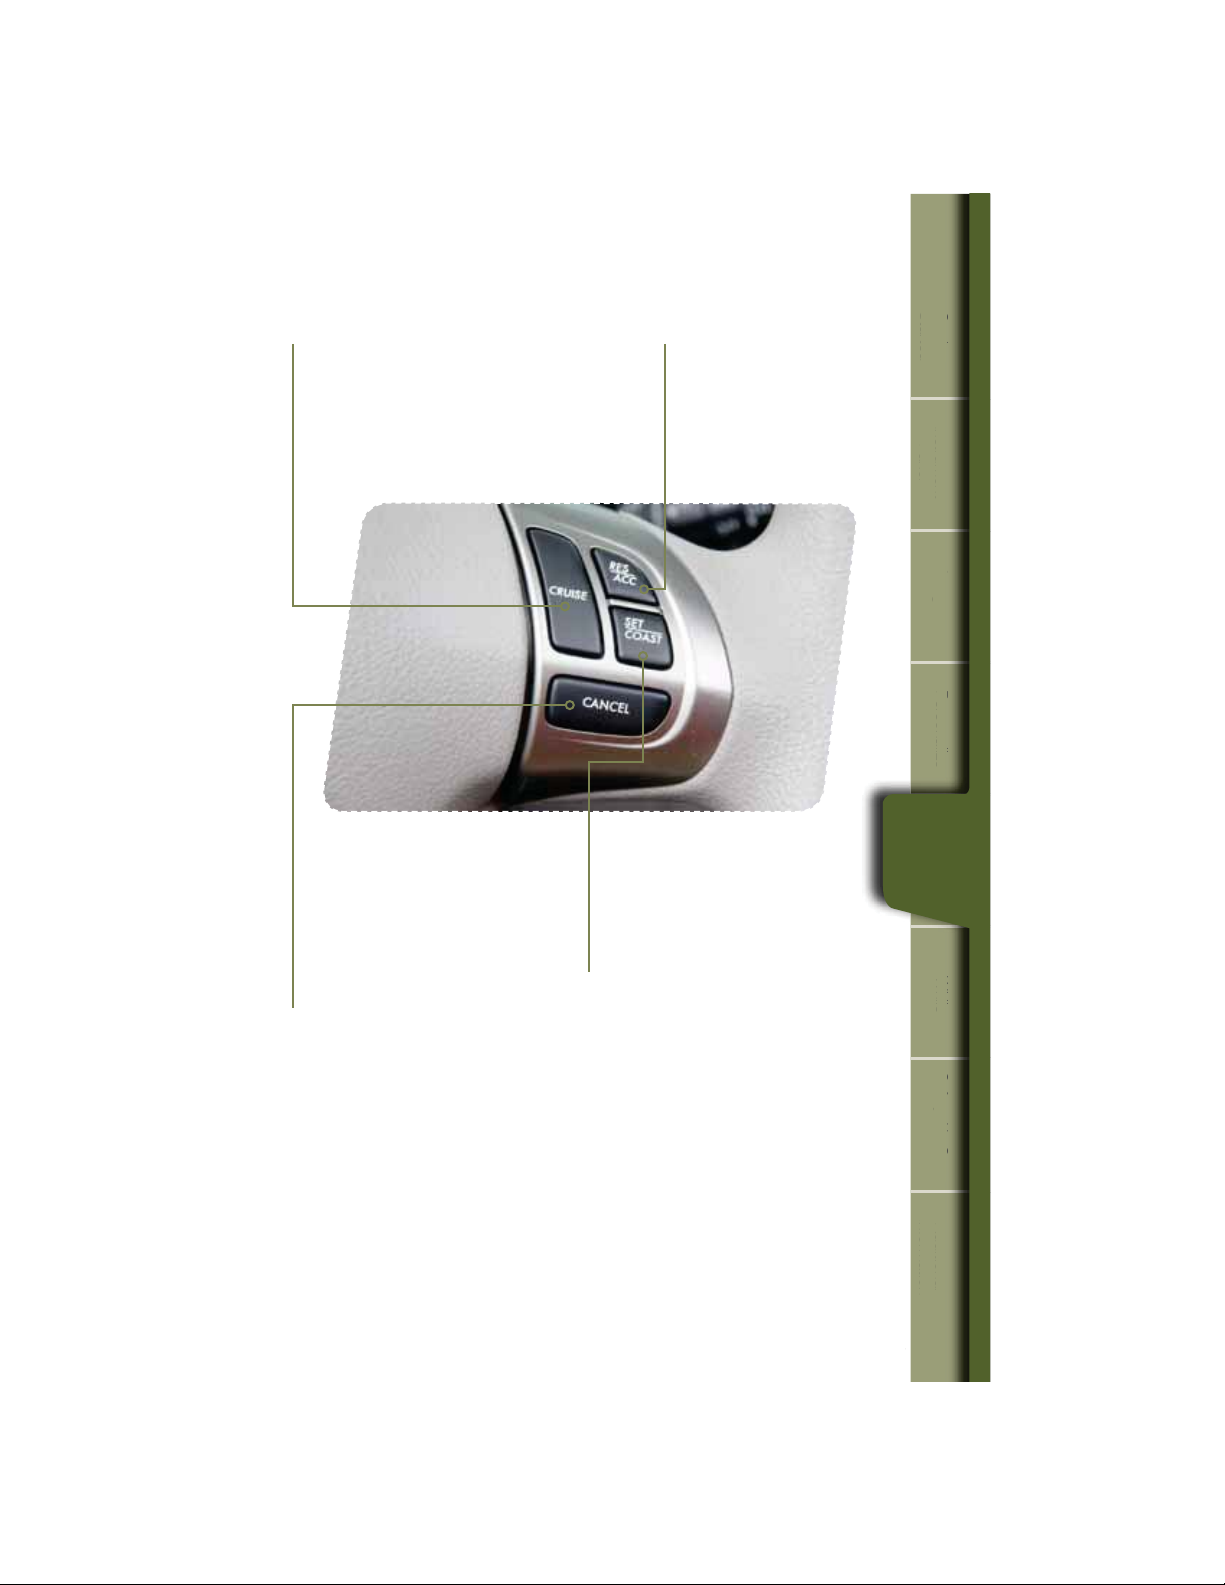
Decrease speed
1SFTTUIFi4&5$0″45wCVUUPO
hold until your vehicle slows to the
desired speed, and release. To
decrease the speed using the brake
pedal, press the pedal to release
cruise control temporarily. When
the speed decreases to the desired
TQFFEQSFTTUIFi4&5$0″45w
button to set the speed.
27
Getting
Started
Instrument
Panel
Gauges
Personalize Controls While
Operating
Safety / In Case
of Emergency
Additional
Information
tarte
m
n
Panel
ges
son
z
trols
Operating
e
of Emergency
n
Information
Controls
Cruise Control
t5PBDUJWBUFUIFDSVJTFDPOUSPMQSFTTUIF
i$36*4&wCVUUPO5IFi$36*4&wJOEJDBUPS
light on the instrument panel will turn on.
To deactivate cruise control, press the
i$36*4&wCVUUPOBHBJO
t1SFTTUIFBDDFMFSBUPSQFEBMVOUJM
your vehicle reaches the desired
TQFFE1SFTTUIFi4&5$0″45w
button. Ease off the accelerator
pedal. Your vehicle will maintain
the desired speed.
t5PDBODFMUIFDSVJTFDPOUSPM
push the brake pedal or press
UIFi$»/$&-wCVUUPO*GZPVIBWF
a manual transmission, you can
push in the clutch pedal.
t5PSFTVNFZPVSTQFFEBGUFS
DBODFMJOHQSFTTUIFi3&4
«$$wCVUUPO
Increase speed
1SFTTUIFi3&4»$$wCVUUPO
hold until your vehicle reaches
the desired speed, and release.
To increase speed using the
accelerator pedal, press the
pedal until you reach the desired
TQFFE1SFTTUIFi4&5$0″45w
button to set the speed.
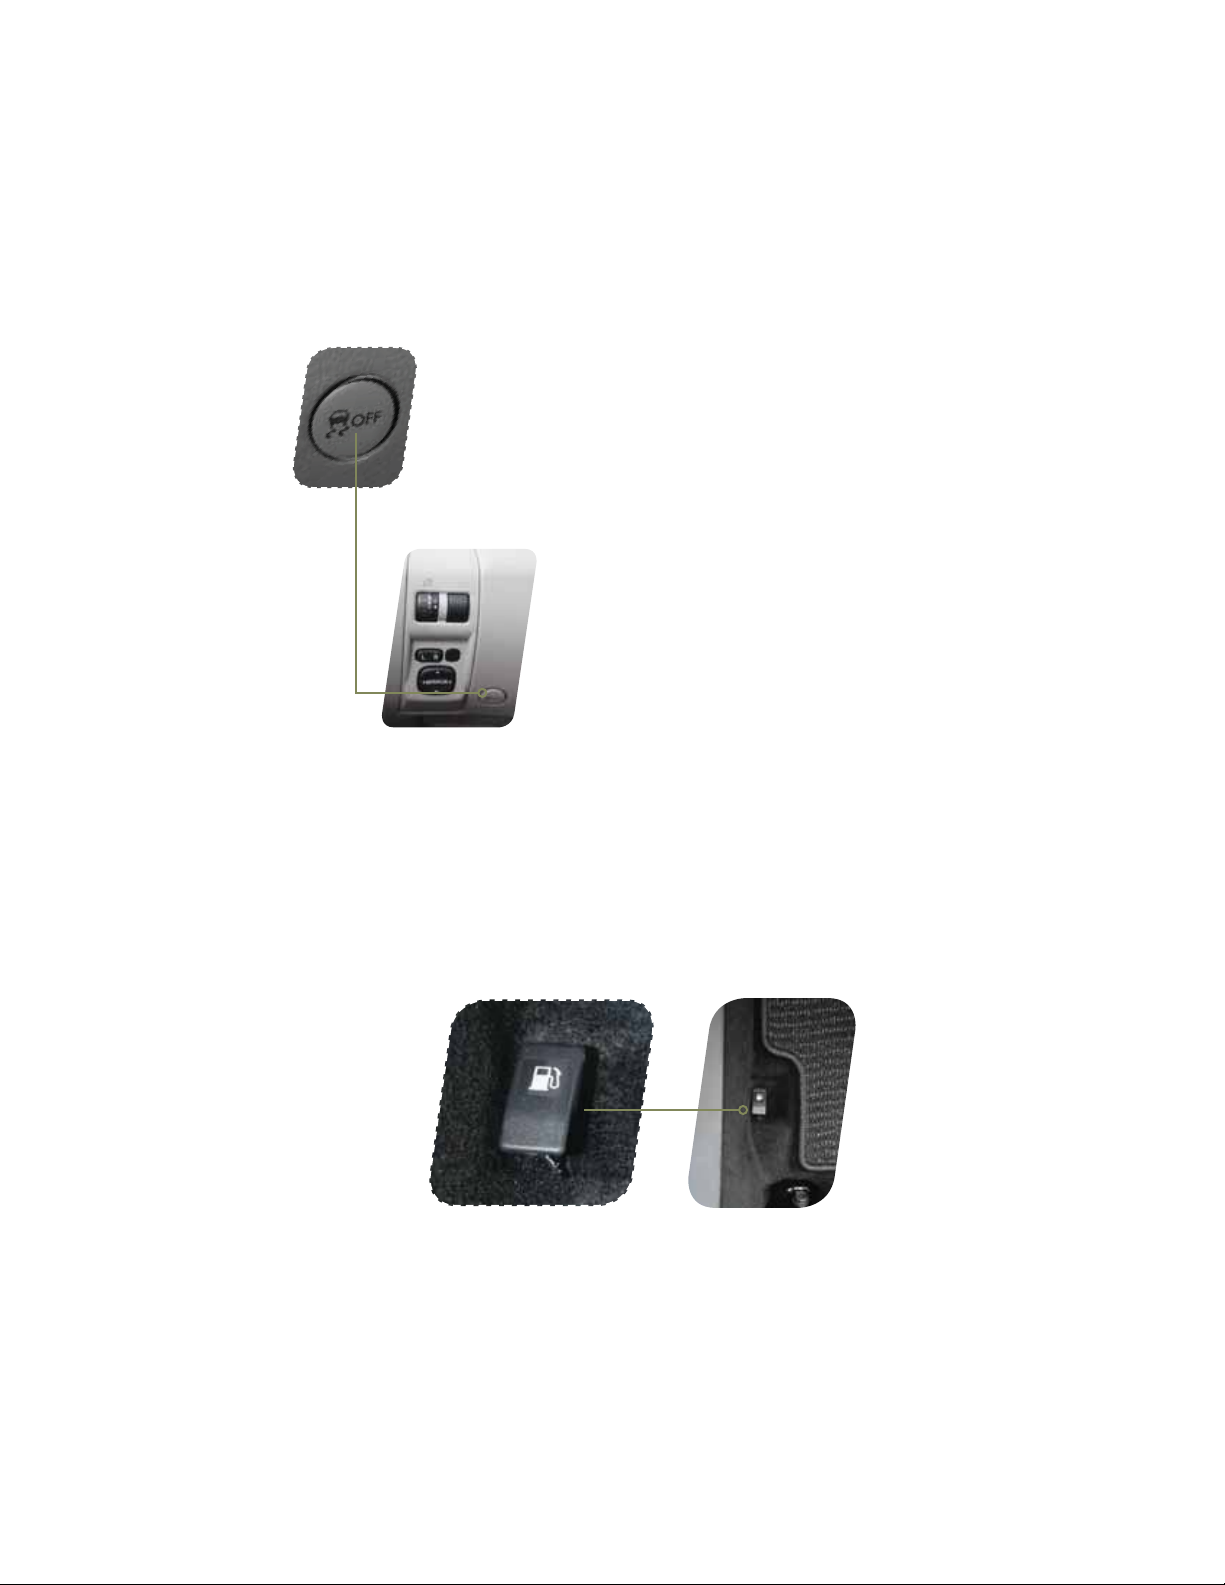
28
While Operating
Vehicle Dynamics Control OFF Switch
Pressing the switch to deactivate the Vehicle Dynamics Control
system can help in the following situations:
t«TUBOEJOHTUBSUPOBTUFFQMZTMPQJOHSPBEXJUIBTOPXZ
gravel-covered, or otherwise slippery surface.
t8IFOUIFWFIJDMFTXIFFMTBSFTUVDLJONVEPSEFFQTOPX
Fuel Filler Lid Release
The vehicle is equipped with a fuel ller lid release.
To open the fuel ller lid, pull the fuel ller lever up and release.
28

29
Getting
Started
Instrument
Panel
Gauges
Personalize Controls While
Operating
Safety / In Case
of Emergency
Additional
Information
Automatic Transmission Shift Mode
The 4-Speed automatic transmission gives you ultimate control with three
EJGGFSFOUESJWJOHNPEFT/PSNBM.PEF4QPSU.PEFBOE.BOVBM.PEF
Normal Mode
8IFOUIFTFMFDUPSMFWFSJTJOUIFi%w%SJWFQPTJUJPOUIFUSBOTNJTTJPOJTJO
/PSNBMTIJGUNPEF5IFTIJGUQPTJUJPOJOEJDBUPSPOUIFJOTUSVNFOUQBOFMTIPXT
i%wBOEUIFUSBOTNJTTJPOBVUPNBUJDBMMZTIJGUTJOUPBTVJUBCMFGPSXBSEHFBS
Sport Mode
SPORT mode is used when power is needed for rapid acceleration or for uphill
driving. Moving the selector lever left into the manual gate
1
GSPNi%w%SJWF
position causes the transmission to change into Sport Mode.
Manual Mode
In Manual Mode, you select the desired gear position to obtain necessary
acceleration and engine braking. While in SPORT Mode, move the selector lever
up
2
or down
3
to select Manual Mode. The shift position indicator shows the
selected gear position.
When Manual Shifting Operation is Possible
t«SSPXTIBQFEMJHIUTJOUIFDFOUFSPGUIFJOTUSVNFOUQBOFMTIPXXIFUIFSBO
upshift is possible and whether a downshift is possible.
t#PUIBSSPXTBSFPO6QTIJGUJOHBOEEPXOTIJGUJOHBSFCPUIQPTTJCMF
t6QBSSPXPOMZJTPO0OMZVQTIJGUJOHJTQPTTJCMF
t%PXOBSSPXPOMZJTPO0OMZEPXOTIJGUJOHJTQPTTJCMF
1
2
3
tarte
m
n
Panel
ges
son
z
While
Operating
e
of Emergency
n
Information
While
Operating

3030
Safety / In Case of Emergency
Child Restraint System
For maximum safety, rst carefully read the LATCH system instructions from the device
manufacturer, as well as the installation instructions in your Owner’s Manual, to properly
install the LATCH compatible restraint system. Use the appropriate seatbelts or anchorages
provided in your vehicle. Children age 12 and under must properly occupy the rear seat at
all times.
Child Safety Locks
The child safety locks are located on the inside edges of the rear doors. In the locked
position, the rear doors can only be opened from the outside.

31
Getting
Started
Instrument
Panel
Gauges
Personalize Controls While
Operating
Safety / In Case
of Emergency
Additional
Information
1
tarte
m
n
Panel
ges
son
z
Operating
ety
In
of Emerge
n
Information
Safety /
In Case of
Emergency
Location of Spare Tire and Jack
A jack and other maintenance tools are stored in the tool bucket in the center of the
spare tire, located in the trunk or cargo area. Raise the center lid and remove the bucket
from the center of the spare tire. Take the jack out of the bucket. The jack handle is
stowed on the back of the center lid of the cargo area.
Towing Your All-Wheel Drive Vehicle
Since all-wheel drive distributes engine power to all four wheels, improper
towing will severely damage your AWD system. A atbed truck is the only
recommended way to properly transport your AWD vehicle. If towing is
necessary, it is best done by your Subaru dealer or a commercial towing service.
Subaru Roadside Assistance
Subaru Roadside Assistance is free and standard on every 2011 Subaru vehicle.
Coverage is automatic; there are no forms to complete. Subaru Roadside
Assistance is available anytime during the 3-year/36,000-mile Subaru Limited
Warranty, whichever comes rst.* A Subaru Roadside Assistance decal has
been afxed to the driver’s door window.
Subaru Roadside Assistance: 1-800-261-2155
Exclusions
Specically excluded from Subaru Roadside Assistance coverage are service
requests or claims resulting from: accidents, vandalism, acts of God, violation of
any laws, or vehicle modications not recommended by the manufacturer.
*See your dealer for details

32
Additional Information
MY.SUBARU.COM
Your Subaru vehicle comes with a unique online resource that helps make your ownership
experience more convenient and enjoyable. My.Subaru.com is a website that you can
personalize and offers useful features and content that makes it easy for you to manage your
vehicle care and enjoy all the benets of Subaru ownership. Log on to My.Subaru.com to
access features such as: automated service history, e-mail maintenance reminders, online
Owner’s Manual, warranty information, maintenance schedules and much more…
Access your site today @ My.Subaru.com

33
Getting
Started
Instrument
Panel
Gauges
Personalize Controls While
Operating
Safety / In Case
of Emergency
Additional
Information
tarte
m
n
Panel
ges
son
z
Operating
of Emergency
n
Information
Additional
Information
Fuel
t-%0)$/POUVSCPNPEFMTVTFSFHVMBSVOMFBEFEHBTPMJOF
with an octane rating of 87 AKI or higher.
t-%0)$5VSCPNPEFMTVTFQSFNJVNVOMFBEFEHBTPMJOF
with an octane rating of 91 AKI or higher.
Fuel Capacity
t64HBMMJUFSTMNQHBM
t8IFOUIFMPXGVFMJOEJDBUPSMJHIUJTEJTQMBZFEPOUIF
instrument panel approximately 2.6 U.S. gallons of fuel remain.
t*GZPVIBWFSFDFOUMZGVFMFEZPVSWFIJDMFUIF$IFDL
Engine light on the instrument panel may stay on due
to a missing or loose fuel ller cap (the cap should be
tightened until a click is heard).
Engine Oil
Use only the following oils:
t*-4″$(‘PS(‘XIJDIDBOCFJEFOUJýFEXJUIUIF
ILSAC certication mark (Starburst mark).
t0S»1*DMBTTJýDBUJPO4/PS4.XJUIUIFXPSET
i&/&3(:$0/4&37*/(w
-%0)$/POUVSCPNPEFMTVTF8TZOUIFUJD
replacement interval 7,500 miles; no requirement at
the rst 3,000 miles.
— 2.5 L DOHC Turbo models use 5W 30 synthetic,
replacement interval 7,500 miles; no requirement at
the rst 3,000 miles.
Engine Oil Capacity
t-%0)$/POUVSCPNPEFMT64RUMJUFSTMNQRU
t-%0)$5VSCPNPEFMT64RUMJUFSTMNQRU

Notes
34

Notes
35

Notes
36

Subaru Delivery Checklist
NEW OWNER SIGNATURE
SALES
CONSULTANT SIGNATURE
SALES
MANAGER SIGNATURE
Fold back and remove this
checklist from the QRG. Place
this completed checklist in the
deal jacket for future reference.
Additional copies of this checklist
can be made by photocopying.
Owner Information
VEHICLE ID #
DELIVERY DATE
OWNER NAME
OWNER NAME
Owner Resources & Warranty
Present the Subaru Owner’s Manual & Quick Reference Guide (detailed review in
“Operation & Controls” section)
Review Subaru Roadside Assistance, Owner Cards & Provide
Toll-Free Number 1-800-261-2155
Explain 3/36 BASIC Warranty / 5/60 Powertrain Warranty / Explain Wear Items &
Adjustments / PZEV (if applicable) / Review Rust Perforation Warranty / Tire Warranty
Review Service & Maintenance Schedules & Terms
Explain Normal vs. Extreme Schedules (if applicable)
Review New Owner’s MY.SUBARU.
COM Website
Review The Subaru Mastercard Program from CHASE & Explain The Card Benefits
Explain Dealership’s New Owner Follow Up Procedure
Customer Signature
Review Dealership Service Department Location, Payment Options & Hours of Operation
Introduce The Subaru Service Advisor & Provide Their Business Card
Explain Dealership Service Appointment Scheduling & Early Morning Service
Drop Off Procedures
Review Dealership Parts Department Location & Hours
Vehicle Condition
Exterior Condition Approval (New Owner indicates exterior of vehicle is clean & undamaged)
Interior Condition Approval (New Owner indicates interior of vehicle is clean & undamaged)
Operational Condition Approval (New Owner has driven vehicle & approves it is ready
for delivery)

Explain Operation of Manual Transmission
& Incline Start Assist (if equipped)
Explain Operation of Automatic
Transmission & Review Manual
Mode (if equipped)
Show All Weather Package — Heated Front
Seats, Windshield Wiper De-Icer & Heated
Side Mirrors (if equipped)
Show Seatbelt & Head Restraint Functions
Show Tilt Steering Column & Telescopic
Feature (if equipped)
Explain the Subaru Advanced Frontal
Airbag System (SRS), Front Seat Side
Pelvis/Torso Airbags (SRS) &
Side-Curtain Airbags (SRS)
Review Master & Valet Keys
Show Keyless Entry, Alarm System
& Remote Start (if equipped)
Show Hood & Gas Door Releases
Show Yellow Caps & Explain Checking
& Filling of Vehicle Fluids
Show Fuel Filler Door & Gas
Cap Operation
Show Location of Both Fuse Boxes
Show Trunk Release & Valet Feature
(sedans only)
Show Spare Tire, Tools & Jack Location
Explain Temporary Spare Tire
Usage & Limitations
Explain AWD Towing
Requirements & Limitations
Show LATCH System & Tethers
Show Child Safety Lock Operation
Operation & Controls
Please use & reference the SUBARU OWNER’S MANUAL
& QUICK REFERENCE GUIDE
OPERATION & CONTROLS
REAR & SIDE
INTERIOR
DRIVER CONTROLS & OPERA
TION
Show Power Windows, Door Locks
& Side-View Mirror Operation
Explain Cruise Control & Power
Moonroof Operation (if equipped)
Show Headlights, Daytime Running
Lights, Parking Lights, Hazard Lights &
Fog Lights (if equipped)
Show Interior Lighting, Map Light
& Clock
Show Front & Rear Wiper
& Washer Controls
Show Climate Control System Including
Front & Rear Defrosters
Show & Explain Operation of VDC
Control Switch
Review Instrument Panel Gauges
& Warning Lights
Explain Tire Pressure Monitoring
System Light
Show Audio System, Station Presets,
Tone, Balance & Fade Controls
Activate Satellite Radio System
(if equipped)
Show GPS Navigation System
(if equipped)
Explain Operation of Other Vehicle
Options, Equipment, or Genuine
Subaru Accessories Not Referenced
Above Where Applicable

Subaru of America, Inc., Subaru Plaza,
P.O. Box 6000, Cherry Hill, NJ 08034-6000
MSA5B1204A
Issued July 2011
Printed in USA 10/11

2012
Consumer Electronics/
Bluetooth
®
& Audio Technology
Quick Reference Guide

Table of Contents
Bluetooth Basics
Bluetooth without Navigation System
Impreza 2.0i / WRX / WRX/STI /
Forester 2.5X
Legacy and Outback
BlueConnect
®
Tribeca
Bluetooth with Navigation System
Impreza 2.0i / WRX / WRX/STI /
Forester 2.5X
Legacy and Outback
Bluetooth with TomTom
®
Navigation
Select Forester 2.5X Premium
2 — 3
8 — 11
12 — 13
14 — 17
18 — 21
22 — 23
4 — 7

2
Bluetooth Basics
t5IF)BOETGSFFTZTUFNNBZOPUPQFSBUFQSPQFSMZVOEFSUIFGPMMPXJOHDPOEJUJPOT
o The cell phone is turned off.
P5IFDFMMQIPOFJTOPUDPOOFDUFEUPUIF)BOETGSFFTZTUFN
o The cell phone is not in the phone call area.
o The battery of the cell phone has run down.
o The cell phone is behind the seat or in the glove box.
o A metal material covers or touches the cell phone.
t%FQFOEJOHPOUIFUZQFPGDFMMQIPOFUIBUJTVTFEUIFTDSFFOPOUIFDFMMQIPOFNBZSFNBJO
illuminated while the ignition switch is in the “ON” position. If this occurs, consult your cell
phone manual to adjust the cell phone settings.
t%FQFOEJOHPOUIFTFUUJOHPGUIFDFMMQIPOFUIFEJBMMPDLGVODUJPONBZCFBDUJWBUFEBGUFS
NBLJOHBDBMM%FBDUJWBUFUIFBVUPNBUJDEJBMMPDLGVODUJPOPGUIFDFMMQIPOFCFGPSFVTJOHUIF
)BOETGSFFTZTUFN%POPUQFSGPSNUIJTPQFSBUJPOXIJMFESJWJOH
t%FQFOEJOHPOUIFUZQFPGDFMMQIPOFUIBUJTVTFEPQFSBUJPOBOEUIFTPVOEWPMVNF
may vary.
t%FQFOEJOHPOUIFUZQFPGDFMMQIPOFUIBUJTVTFEOPUBMMQIPOFGVODUJPOTNBZCF
compatible with your vehicle.
t8IFOUIFJHOJUJPOTXJUDIJTUVSOFEUPUIFi-0$,0»wQPTJUJPOEVSJOHBDBMMUIFDBMMNBZ
be disconnected or continued on the cell phone depending on the type of cell phone that is
used. Note that operation of the cell phone may be necessary if the call is continued on the
cell phone.

3
Bluetooth Basics
Bluetooth without
Navigation System
BlueConnect
®
Bluetooth with
Navigation System
Bluetooth with
TomTom
®
Navigation
t%POPUTQFBLBUUIFTBNFUJNFBTUIFPUIFSQBSUZEVSJOHBDBMM*GZPVBOE
the other party speak at the same time, it may be difcult for the other party
to hear your voice and vice versa. This is normal.
t5IFSFDFJWFSTPVOEWPMVNFTIPVMECFTFUBTMPXBTQPTTJCMF0UIFSXJTF
the party you are calling may notice an undesirable echo sound.
t4QFBLDMFBSMZBOEMPVEMZ
t:PVSWPJDFNBZCFEJGýDVMUUPCFIFBSECZUIFSFDFJWJOHQBSUZVOEFSUIF
GPMMPXJOHDPOEJUJPOT
P%SJWJOHPOBSPVHISPBE
P%SJWJOHBUBIJHITQFFE
P%SJWJOHXJUIBXJOEPXPQFO
o When air from the ventilator blows directly towards the microphone.
o When the sound coming from the ventilator is loud.
o When the cell phone is positioned too closely to the microphone.
t5IFTPVOERVBMJUZNBZEFHSBEFEVFUPUIFJOþVFODFPGUIFDFMMQIPOFUIBUJT
connected to the system or the circumstances of the Bluetooth network.
t8IFOBOPUIFS#MVFUPPUIEFWJDFJTTJNVMUBOFPVTMZDPOOFDUFEOPJTFNBZCFIFBSE
in the voice coming from the hands-free phone.
eto
Navigation System
nne
avigation System
TomTo
Navigation
Bluetooth
Basics

4
Bluetooth for AM/FM Stereo
and Single Disc CD Player
(Impreza 2.0i/WRX/WRX STI, Forester 2.5X)
Pairing Your Cell Phone
Press the phone off hook button and listen to phone prompts.
Press the talk button and name your phone.
Phone off
hook button
Forester 2.5X/WRX/WRX STI Impreza 2.0i
Phone off
hook button
Phone on
hook button
Phone on
hook button
Talk button Talk button

5
Bluetooth Basics
Bluetooth without
Navigation System
BlueConnect
®
Bluetooth with
Navigation System
Bluetooth with
TomTom
®
Navigation
Press the talk button and say “conrm.”
Put your phone into Bluetooth pairing mode and pair your phone to the system using
the pass-key provided. When phone is successfully paired you will hear “The phone is
paired and ready for use.”
Pass-key for pairing will be given audibly as well as be displayed on the radio display.
Bluetooth witho
Navigation Syst
nne
avigation System
To m
Navigatio
is
y.
Bluetooth
without
Nav. System

6
Press the talk button again and say the number.
Making a Call
1SFTTQIPOFPGGIPPLCVUUPO1SFTTUIFUBMLCVUUPOUIFOTBZi%JBMCZOVNCFSw

7
Bluetooth Basics
Bluetooth without
Navigation System
BlueConnect
®
Bluetooth with
Navigation System
Bluetooth with
TomTom
®
Navigation
To end the call, press the phone on hook button.
Receiving a Call
When a call comes in you will be notied. If the audio system is on, the audio
system will mute and a voice prompt will inform you. Press the phone off hook
button to accept the call.
Press the phone off hook button to dial or press the talk button to add more
numbers. The phone will start dialing.
t*GZPVXBOUUPQVUUIFDBMMPOIPMEQSFTTUIFQIPOFPOIPPLCVUUPO
t*GZPVXBOUUPEFDMJOFUIFJODPNJOHDBMMQSFTTBOEIPMEUIFQIPOFPO
hook button.
t*GZPVXBOUUPBEKVTUUIFWPMVNFPGUIFDBMMVTFUIFQMVTPSNJOVTTXJUDIPOUIF
steering wheel.
Bluetooth witho
Navigation Syst
nne
avigation System
To m
Navigation
Bluetooth
without
Nav. System

8
Bluetooth for AM/FM Stereo with
Display Type Radio (Legacy and Outback)
Pairing Your Cell Phone
Press the phone off hook button.
Rotate the tune knob, to select “Pair Phone”.
Phone off
hook button
Phone on
hook button
Talk button
 Loading…
Данный раздел нашего сайта содержит ссылки на руководства по эксплуатации, сервисному обслуживанию автомобилей Subaru Impreza, Forester, Legacy, Outback и Tribeca, другие важные справочные материалы. Информация, приведенная в этих документах может оказаться интересной как владельцам Субару — для грамотной эксплуатации, так и техперсоналу автосервисов для грамотного обслуживания и ремонта автомобилей.
Всех владельцев Subaru, у которых возникли какие-либо вопросы связанные с автомобилем, мы приглашаем посетить наш форум.
Отдельная благодарность Константину (Konsigr) за большой вклад в поиск и подбор мануалов
Содержание
- 1 Subaru Impreza
- 1.1 Subaru Impreza I (1992–2000)
- 1.2 Subaru Impreza II (2000–2007)
- 1.3 Subaru Impreza III (2007–2011)
- 2 Subaru Forester
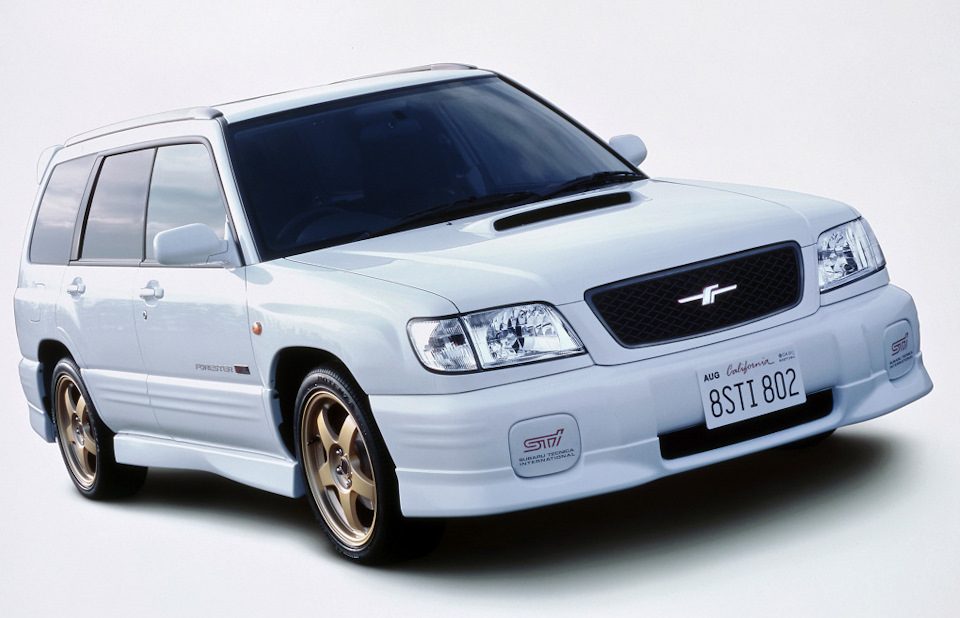
- 2.1 Subaru Forester I (SF)
- 2.2 Subaru Forester II (SG)
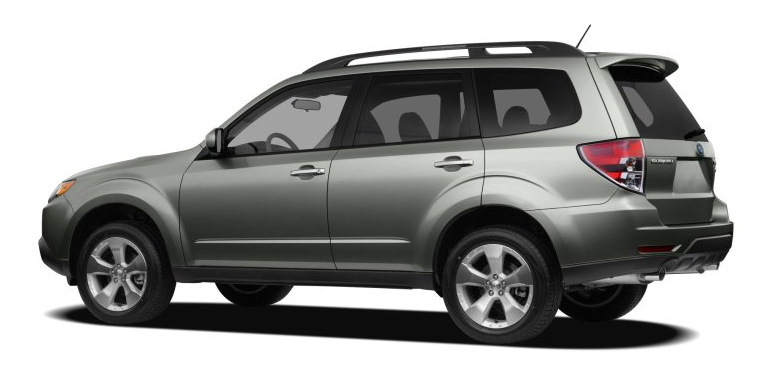
- 2.3 Subaru Forester III (SH)
- 2.4 Subaru Forester IV (SJ)
- 3 Subaru Tribeca
- 4 Прочее
Subaru Impreza
Subaru Impreza I (1992–2000)
Subaru Impreza II (2000–2007)
- Руководство по техническому обслуживанию Subaru Impreza 2004 мг — файл pdf
Subaru Impreza III (2007–2011)
- Руководство по обслуживанию Subaru Impreza 2008 мг — файл pdf
Subaru Forester
Subaru Forester I (SF)
- Руководство владельца файл pdf тут
- Руководство по сервисному обслуживанию Subaru Forester I (SF) 1997-2001 MY —скачать
- Руководство по эксплуатации и ремонту Subaru Forester I (SF) 1997-2001 MY (online) тут
- Subaru Forester (с 1997 года выпуска) РЕМОНТ ОБСЛУЖИВАНИЕ ЭКСПЛУАТАЦИЯ (online) autoprospect.ru/subaru/forester/
- Subaru Forester с 1997 г. выпуска. Устройство Обслуживание Ремонт (Переработанное издание) — файл pdf
- Референсные точки кузова (Привязочные размеры) Forester SF — (ENG) Посмотреть
Subaru Forester II (SG)
- Руководство по техническому обслуживанию Subaru Forester II (SG) 2004 MY — файл pdf
- Руководство по эксплуатации Subaru Forester II (SG) 2005 MY — файл pdf
- Инструкция по эксплуатации автомобиля Subaru Forester 2005 модельного года (SG) — файл pdf
- Электрика Subaru Forester SG5 2004 г.в. Электрика — файл pdf
- Инструкция по эксплуатации автомобиля Subaru Forester 2007 модельного года (SG) — файл pdf
- Руководство по эксплуатации Subaru Forester II (SG) 2007 MY — файл pdf
- Руководство по обслуживанию Subaru Forester II (SG) 2008 MY — файл pdf
- Референсные точки кузова (Привязочные размеры) Forester SG — Посмотреть
Subaru Forester III (SH)
- Руководство по сервисному обслуживанию Subaru Forester III (SH) 2009 MY — сжатый архив
- Руководство по сервисному обслуживанию Subaru Forester III (SH) 2012 MY — сжатый архив
- Руководство по ремонту и эксплуатации Subaru Forester III (SH) 2009 MY — файл pdf
- Краткое руководство по эксплуатации Subaru Forester III (SH) 2011 MY — файл pdf файл pdf
- Инструкция по эксплуатации автомобиля Subaru Forester 2011 модельного года (SH) — файл pdf
Subaru Forester IV (SJ)
- Краткое руководство по эксплуатации Subaru Forester IV (SJ) 2013 MY — файл pdf
- Руководство по эксплуатации Subaru Forester IV (SJ) 2014 MY — файл pdf
- Инструкция по эксплуатации автомобиля Subaru Forester 2012 модельного года (SH) — файл pdf
- Инструкция по эксплуатации автомобиля Subaru Forester 2013 модельного года (SJ) — файл pdf
- Инструкция по эксплуатации автомобиля Subaru Forester 2014 модельного года (SJ) — файл pdf
Subaru Tribeca
- Руководство по обслуживанию Subaru Tribeca 2007 мг — файл pdf
Прочее
- Subaru colors — коды кисточек для подкраски (ENG) файл pdf
The Subaru Forester 2012 Owner’s Manual is an essential document for every Forester owner. It provides the necessary information and guidance on how to operate and maintain your vehicle. Whether you are a seasoned Subaru owner or a new owner, this manual is a must-have.
The Forester 2012 Owner’s Manual offers comprehensive information on all aspects of your vehicle. It covers topics ranging from general information about the car to specific instructions on how to operate and maintain it. You can find detailed information on the vehicle’s features, safety systems, and maintenance schedules. The manual also provides troubleshooting tips and helpful hints on how to keep your Forester running smoothly.
One of the most important sections in the manual is the maintenance schedule. Regular maintenance is critical to keep your Forester running at peak performance. The manual outlines all the necessary maintenance tasks, including oil changes, tire rotations, and brake inspections. Following the maintenance schedule will help you avoid costly repairs and ensure that your Forester lasts for years to come.
Another helpful section in the manual is the troubleshooting guide. If you experience any issues with your Forester, the troubleshooting guide can help you identify the problem and provide step-by-step instructions on how to fix it. From simple problems like a dead battery to more complex issues like engine problems, the manual has you covered.
In conclusion, the Subaru Forester 2012 Owner’s Manual is an indispensable resource for every Forester owner. It provides comprehensive information and guidance on how to operate and maintain your vehicle. By following the instructions outlined in the manual, you can keep your Forester running smoothly and avoid costly repairs. So, make sure to keep your copy of the manual handy and refer to it often.
Language: English
Format: PDF
Subaru Forester 2012 Owner’s Manual