
Краткое описание гарантии производителя
Срок покрытия
- Работа : 12 месяцев
- Запчасти : 12 месяцев
Точные условия гарантии доступны в гарантийном талоне, входящем в обязательный пакет документов, прилагаемых при покупке техники.
Если вам необходим ремонт, воспользуйтесь онлайн заявкой на ремонт или свяжитесь с нами.Пожалуйста, заранее подготовьте серийный номер вашего изделия и документы, подтверждающие покупку (чек). В негарантийных случаях может взиматься плата за диагностику, ремонтные работы и запчасти.

website : http://biz.lgservice.com
e-mail : http://LGEservice.com/techsup.html
WASHING MACHINE
SERVICE MANUAL
CAUTION
READ THIS MANUAL CAREFULLY TO DIAGNOSE TROUBLE
CORRECTLY BEFORE OFFERING SERVICE.
MODEL : F1*20TD(1~9) / F1*22TD(1~9)/F1*56*D/WD-*0690TDK

|
FEB. 2007 PRINTED IN KOREA |
P/No.: MFL30574749 |

|
CONTENTS |
||
|
1. |
SPECIFICATIONS …………………………………………………………………………………………………………….. |
3 |
|
2. |
FEATURES & TECHNICAL EXPLANATION …………………………………………………………………………. |
4 |
|
3. |
PARTS IDENTIFICATION ………………………………………………………………………………………………….. |
6 |
|
4. |
INSTALLATION …………………………………………………………………………………………………………………. |
7 |
|
5. |
OPERATION ………………………………………………………………………………………………………………….. |
12 |
|
5-1. F1*22TD(1~9) ………………………………………………………………………………………………………….. |
12 |
|
|
5-2. F1*20TD(1~9) ………………………………………………………………………………………………………….. |
14 |
|
|
6. |
WIRING DIAGRAM / PCB LAYOUT / PROGRAM CHART …………………………………………………… |
16 |
|
7. |
TROUBLESHOOTING ………………………………………………………………………………………………………. |
19 |
|
7-1.BEFORE PREFORMING SERVICE …………………………………………………………………………….. |
19 |
|
|
7-2.LOAD TEST MODE …………………………………………………………………………………………………… |
19 |
|
|
7-3.HOW TO KNOW THE WATER LEVEL FREQUENCY ……………………………………………………. |
19 |
|
|
7-4.ERROR DISPLAY ……………………………………………………………………………………………………… |
20 |
|
|
7-5.TROUBLESHOOTING WITH ERROR …………………………………………………………………………. |
21 |
|
|
• IE (Water Inlet Error) ……………………………………………………………………………………………….. |
21 |
|
|
• UE (Unbalanced Error) …………………………………………………………………………………………….. |
22 |
|
|
• OE (Water Outlet Error) ……………………………………………………………………………………………. |
23 |
|
|
• FE (Flow over Error) ………………………………………………………………………………………………… |
25 |
|
|
• PE (Pressure Sensor S/W Error) ……………………………………………………………………………….. |
26 |
|
|
• DE (Door open Error) ………………………………………………………………………………………………. |
27 |
|
|
• tE (Thermistor (Heating) Error) ………………………………………………………………………………….. |
28 |
|
|
• LE (Motor Lock Error) ………………………………………………………………………………………………. |
29 |
|
|
8. |
TROUBLESHOOTING WITHOUT ERROR CODES ……………………………………………………………. |
31 |
|
• PF (Power Failure or no power) ………………………………………………………………………………… |
31 |
|
|
• Vibation & Noise in spin …………………………………………………………………………………………… |
32 |
|
|
• Detergent & Softener does not flow in ………………………………………………………………………… |
33 |
|
|
• Water Leak …………………………………………………………………………………………………………….. |
34 |
|
|
9. |
DISASSEMBLY INSTRUCTIONS ……………………………………………………………………………………… |
36 |
|
10. EXPLODED VIEW …………………………………………………………………………………………………………. |
43 |
2
1.SPECIFICATION
|
ITEM |
F1*20TD(1~9) / F1*22TD(1~9)/F1*56*D/WD-*690TDK |
|||
|
POWER SUPPLY |
220-240V~, 50Hz |
|||
|
PRODUCT WEIGHT |
64kg |
|||
|
WASHING |
135W |
|||
|
ELECTRICITY |
SPIN (1400rpm) |
530W |
||
|
DRAIN MOTOR |
||||
|
CONSUMPTION |
30W |
|||
|
WASH HEATER |
||||
|
2000W |
||||
|
REVOLUTION |
WASH |
50rpm |
||
|
SPEED |
SPIN |
F10**TD |
No Spin~1000 rpm |
|
|
F12**TD |
No Spin~1200 rpm |
|||
|
F14**TD |
No Spin~1400 rpm |
|||
|
OPERATION WATER PRESSURE |
||||
|
0.3-10kgf/cm(30-1000kPa) |
||||
|
2 |
||||
|
CONTROL TYPE |
Electronic |
|||
|
WASH CAPACITY |
Cotton 8kg (Max.) |
|||
|
DIMENSION |
600mm(W)x550mm(D)x850mm(H) |
|||
|
DOOR SWITCH TYPE |
Bi-Metal type |
|||
|
WATER LEVEL |
9 steps (by sensor) |
|||
|
DELAY FINISH TIME |
From 3 hours to 19 hours |
|||
|
SENSING OF THE LAUNDRY AMOUNT |
Available |
|||
|
FUZZY LOGIC |
Available |
|||
|
DISPLAY OF THE REMAINING TIME |
Available |
|||
|
ERROR DIAGNOSIS |
10 items |
|||
|
POWER AUTO OFF |
Available |
|||
|
CHILD LOCK |
Available |
|||
|
AUTO RESTART |
Available |
|||
3
2. FEATURES & TECHNICAL EXPLANATION
2-1. FEATURES
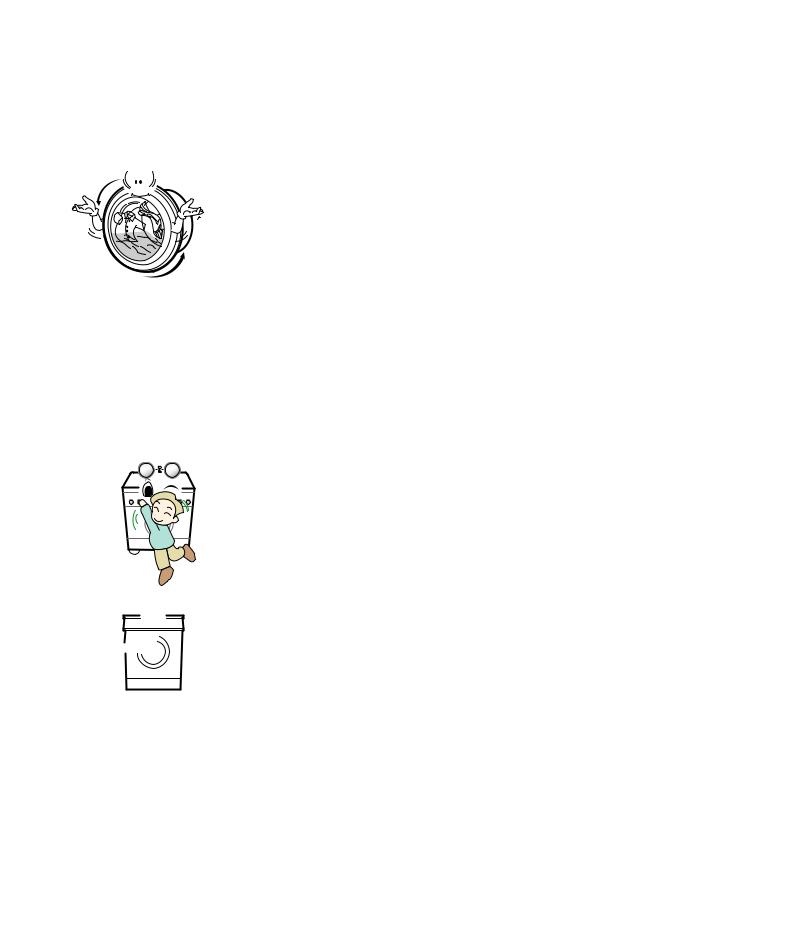
 Anti Crease function
With the alternate rotation of the drum, creasing in the laundry is minimized.
 More economical by Fuzzy Logic System
FUZZY Logic System detects the amount of load and water temperature, and then determines the optimum water level and washing time to minimize energy and water consumption.
 Child-Lock
The Child-Lock system has been developed to prevent children from pressing any button (except Power button) to change the programme during operation.
 Low noise speed control system
By sensing the amount of load and balance, this system automatically distributes load evenly to minimize the spinning noise level.
 Direct Drive System
The advanced Brushless DC motor rotates the drum directly without a belt and a pulley.
 Built-in heater
Internal heater automatically heats the water to the best temperature on selected cycles.
4
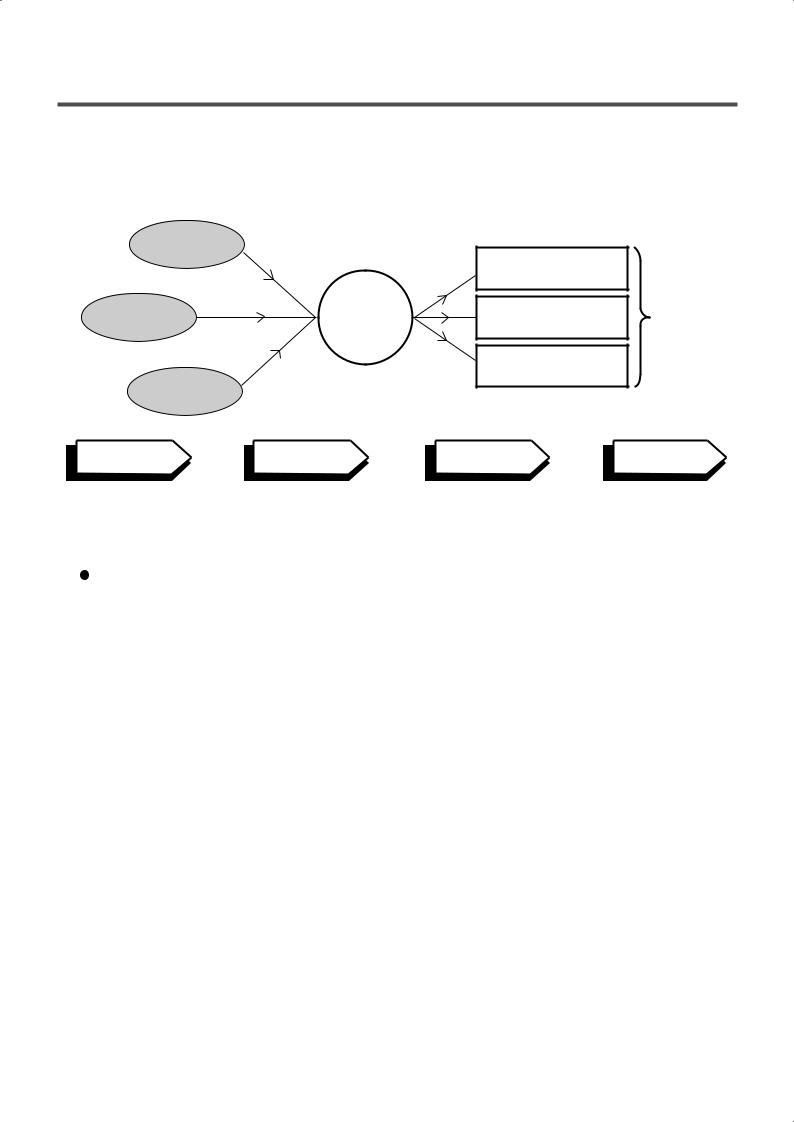
2-2. DETERMINE WASHING TIME BY FUZZY LOGIC
To get the best washing performance optimal time is determined by sensing of water temperature, selected washing temperature and laundry amount.
water temperature
washing time
|
selected |
FUZZY |
the best |
||
|
washing |
rinse time |
washing |
||
|
LOGIC |
||||
|
temperature |
performance |
|||
|
spin rhythm, time |
||||
|
laundry |
||||
|
amount |
||||
|
SENSING |
PROCESSING |
DETERMINATION |
EFFECT |
2- WATER LEVEL CONTROL
tub.
 When the preset water level reached, water supply is stopped and the program proceeds.
 Water needs to be below a preset level before spining will proceed.
2-4. THE DOOR CAN NOT BE OPENED
 While program is operating.
 While Door Lock light turns on.
5
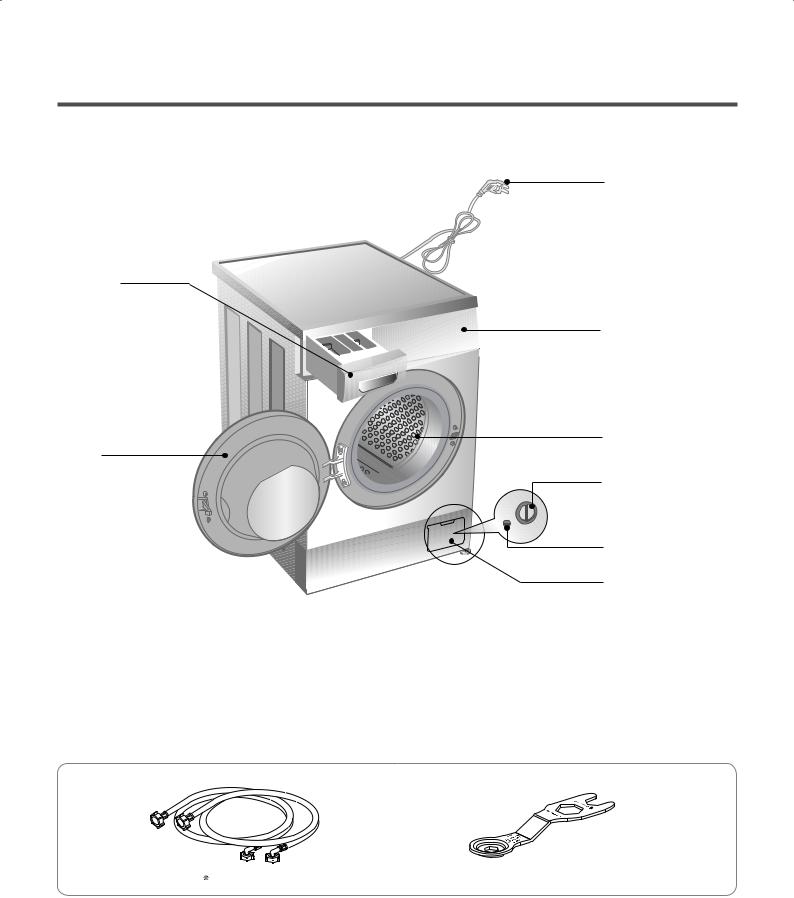
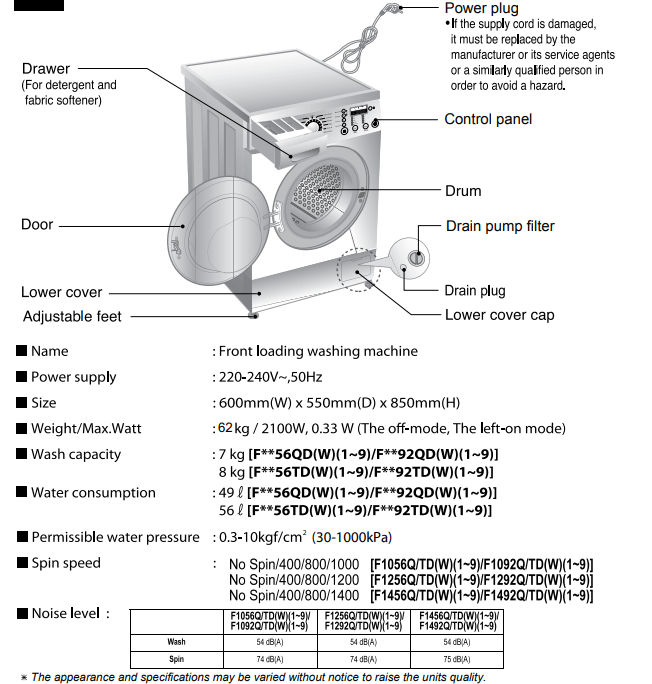
3. PARTS IDENTIFICATION
Drawer
(For datergent and fabric softener)
Door
Lower cover  Adjustable Feet


 ACCESSORIES
|
Inlet hose(1EA) |
Option : Hot / Cold(2EA) |
Power Plug
 If the supply cord is damaged, it must be replaced by the manufacturer or its service agents or a similarly qualified person in order to avoid a hazard.
Control Panel
Drum
Drain Pump Filter
Drain Plug
Lower cover cap
Spanner
6
4. INSTALLATION
 INSTALLATION
The appliance should be installed as follows.
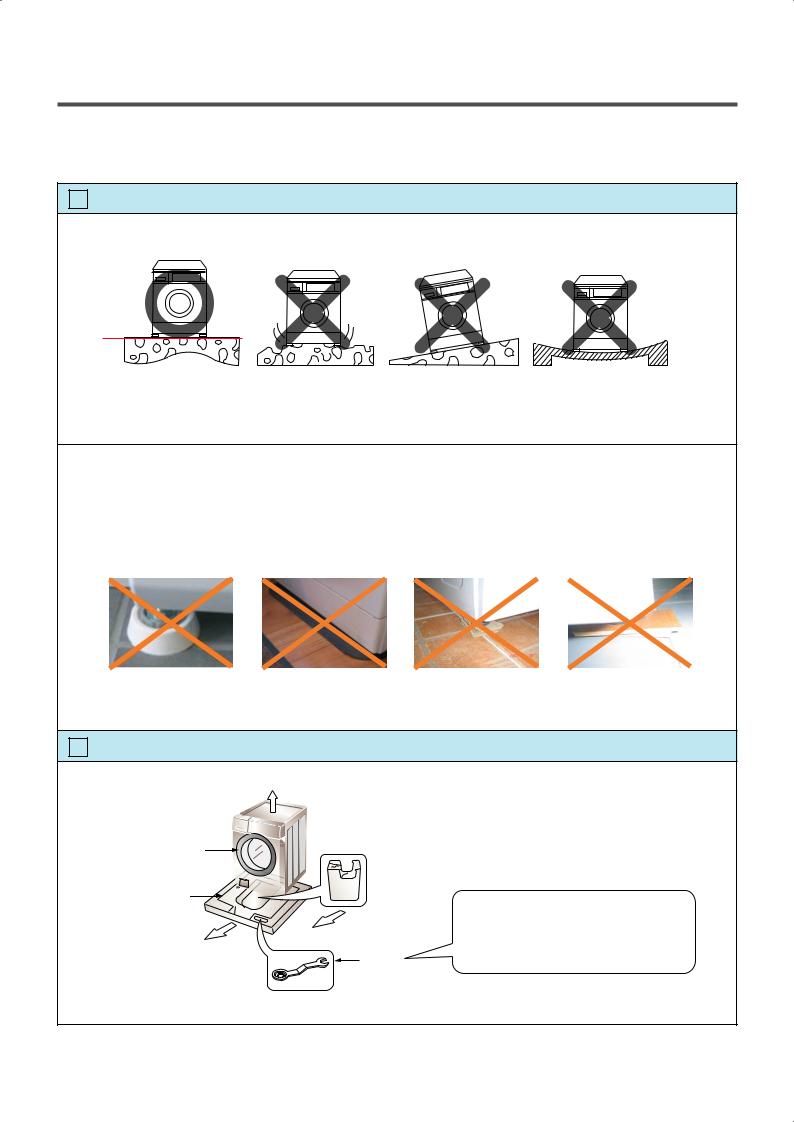
1Check the conditions of installation area.
1. Check level ground.
horizontal
On raised foundations or upper level homes, the vibrations can be caused by the type of flooring. It may be necessary to move the machine to a different area in the home or have the floor reinforced to properly support the operation of the unit.
2. Check humidity or any foreign objects under the feet.
Clean the floor, and there should not be any foreign objects under the feet.
If the unit has foreign objects underneath the feet, this will prevent the unit from being leveled properly and will cause vibrations and slipping.
Remove any foreign objects, if any from underneath the machine and level unit properly. See below for examples of foreign objects.
|
Purchased |
Capet |
Paper |
Laminated |
|||
|
stopper |
paper |
|||||
2 Open the box and check appliance condition.
Washer
 Base Packing
Packing Support
|
This leveling (or spanner) wrench must |
||
|
be used to remove the shipping bolts |
||
|
and level the unit. This should be kept |
||
|
for future use. |
||
|
Wrench |
||
7
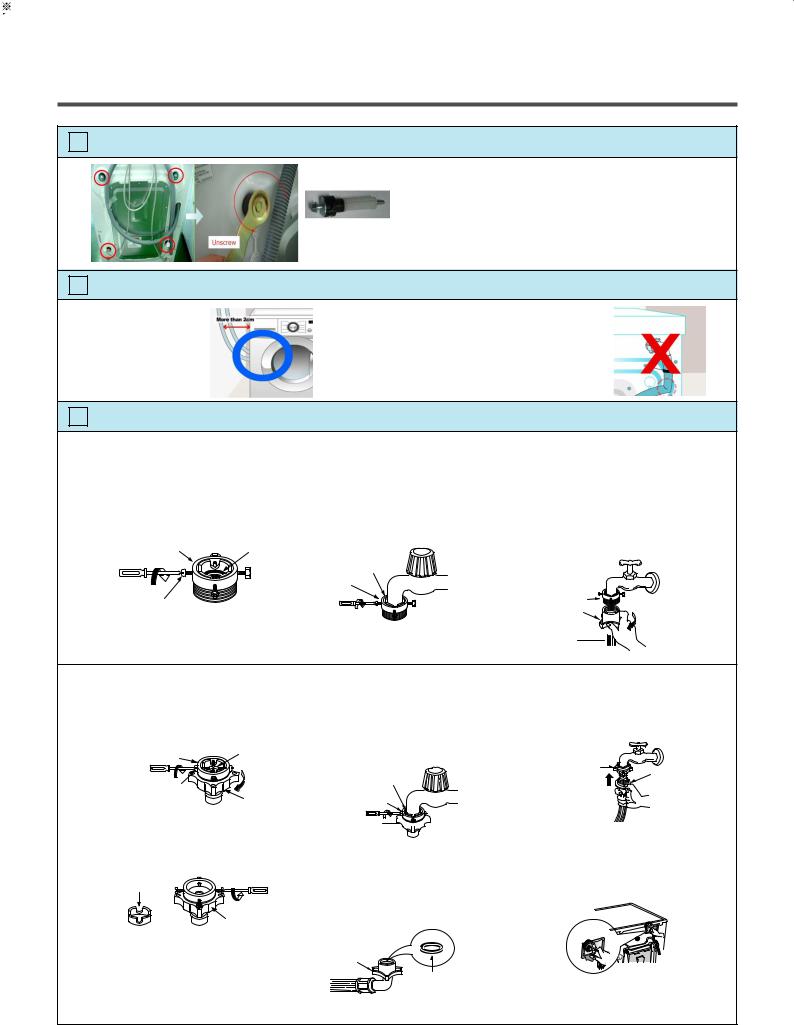
3 Use spanner to remove transit bolts.
 Without removal of transit bolts
Spin noise and shaking.
X 4 EA
Transit bolts
4 Confirm the distance between the appliance and the wall.
|
More than 2cm |
If the distance is less than 2cm, |
|
|
the water supply hose will |
||
|
kink or fold. |
5 The tap connection and hose connection must be parallel.
1. Normal Tap without thread & screw type inlet hose.
|
1. Unscrew the fixing screw to |
2. Push the connector up till the |
|
attach the tap. |
rubber packing is in tight contact |
|
with the tap. Then tighten the 4 |
|
|
screws. |
|
Upper |
Rubber |
|
|
packing |
||
|
Connector |
||
|
Rubber packing |
||
|
Upper |
||
|
Connector |
||
|
Fixing screw |
3.Push the water supply hose vertically upwards so that the rubber packing within in the hose can adhere completely to the tap and then tighten it by screwing it to the right.
Upper
Connector
Plate
Water supply  hose
hose 
2. Normal Tap without thread & one touch type inlet hose (Single inlet models)
1.Untighten the upper connector screw.
|
Upper |
Rubber |
|
Connector |
packing |
Fixing screw
Middle connector
•In case the diameter of the tap is large remove the guide plate.
Guide plate
Connector
2.Push the upper connector up till the rubber packing is in tight contact with the tap. Then tighten the 4 screws.
Rubber packing
Upper Connector
Middle 


 connector
•Turn the middle connector not to have water leaked.
•Make sure that the rubber seal is inside the hose connector.
Hose connector
Rubber seal
3.Connect the water supply hose to the middle connector, pushing the plate down.
Water supply  hose
hose 
•To separate the water supply hose from the middle connector shut off the tap.
Then pull the inlet hose down, pushing the plate down.
•Make sure that there are no kinks in the hose and that it is not crushed.
8
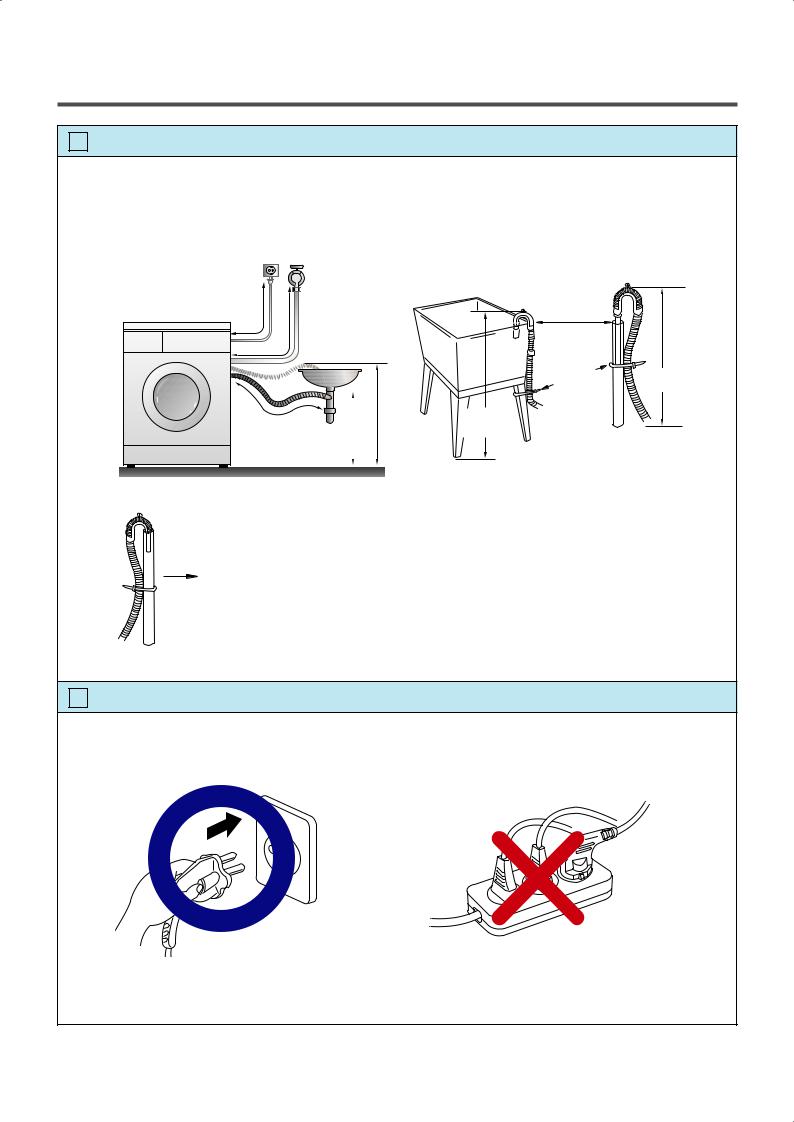
6 Connect Drain Hose.
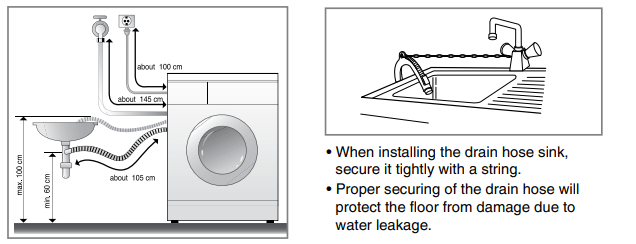
If the drain hose is not installed properly, the unit will not drain properly. This allows water to back flow into the unit which can cause odors. Refer to Owner Manual for proper drain hose installation.
The odor could also be coming from the home’s drain to which the drain hose is attached.
about 100 cm
about 145 cm
about 105 cm
Laundry tub
Hose
Retainer
|
Tie |
Max. 100cm |
|
strap |
min. 60cm |
Max. 100cm
min. 60cm
In this type of drain hose installation, the odor could be coming from the standpipe. This odor can come up the drain hose and into the unit.
Pour a cup or two of bleach or vinegar down the home drain and let it sit for 24 hours before running another cycle.
This will help eliminate odor from the home drain.
If a cycle is started too soon after doing this, it will not help the issue.
7 Connect power plug.
Connect the power plug to the wall outlet.
Avoid connecting several electric devices, it may be the cause of a fire.
9
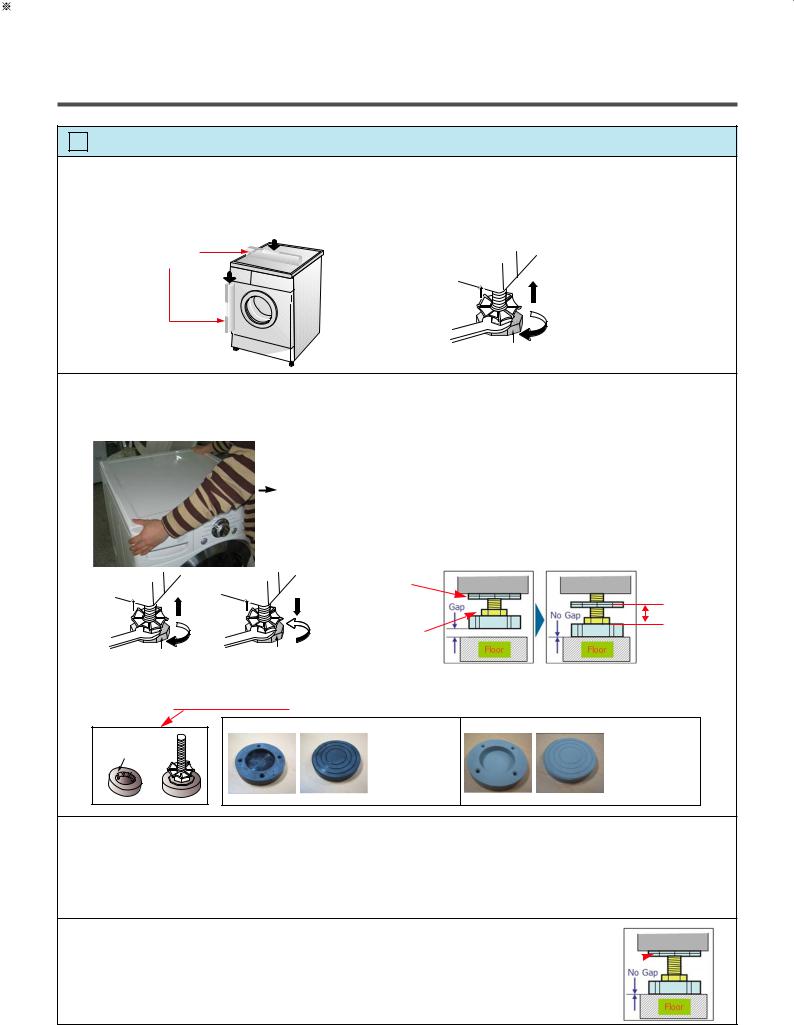
8Check the horizontality with a level (Gage).
1Step
If washing machine legs are loose or not screwed, then screw up with the spanner wrench. Using the level, level the washing machine from front to back and side to side.
A level
Higher
Tighten
Adjustable feet
2Step
Using the spanner wrench to adjust leg for horizontality and try for Diagonal test.
|
Diagonal test |
How to perform a diagonal test: |
||
|
Place your right hand on the back, right corner and your left hand on the front, |
|||
|
left corner of the unit, then attempt to rock the unit from corner to corner. |
|||
|
Then, move your right hand to the front, right side and your left hand to the |
|||
|
back, left corner and attempt to rock the unit from corner to corner. |
|||
|
If the unit is level, it will not rock. However, if the unit is not level, it will rock. |
|||
|
If the unit rocks, it will be necessary to adjust the leveling feet of the unit. |
|||
|
Adjust the foot under the hand that is on the front of the machine. |
|||
|
Higher |
Lower |
Lock nut |
|
|
Tighten |
Tighten |
10mm |
|
|
Adjustable bolt |
|||
|
Adjustable feet |
Adjustable feet |
Lower the foot until there is no gap between floor and foot.
And only use adjustment rubber when difference at the leg adjustment is more than 10mm.
|
Rubber Cup |
4620ER3001A |
4620ER3001B |
|
(Black) |
(Gray) |
|
|
for Tile floors |
for Wooden floors |
3Step
Perform a Rinse and Spin with some clothing in the machine.
To do this, put 2~3kg of clothing in the unit, power on the unit, press the Rinse and Spin button, and then start. When the unit reaches the spin cycle, watch for vibrations.
If the unit is vibrating, make small adjustments to the leg until they subside. (Try 2Step again)
4Step
Tighten the lock nut against the base of the machine to lock the position leg.
Tighen the lock nut 
10
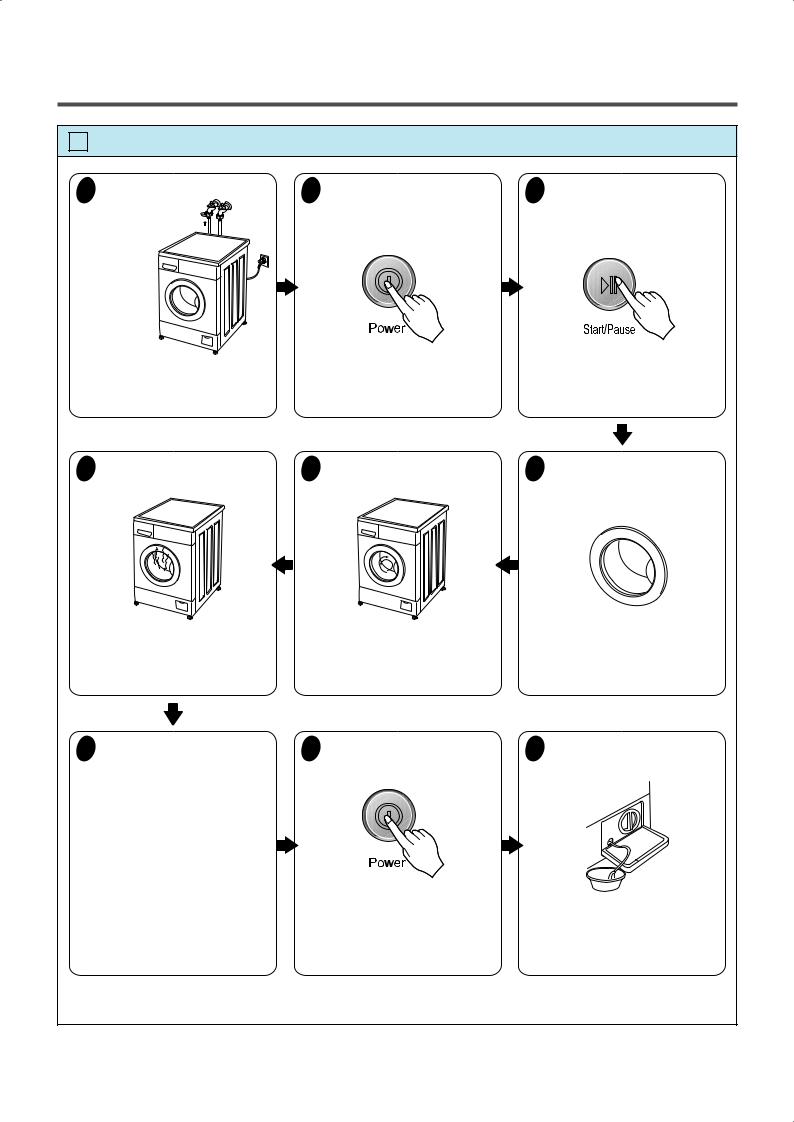
9 Test operation
1 Preparation
for washing.
·Connect the power plug to the outlet.
·Connect the inlet hose.
6 Check the water heating.
·Press “Temp.” button,
the present temperature will be displayed.
2 Press the power button.
· In case of cotton program.
5 Check automatic reverse turn.
·Check if the drum rotates clockwise and counterclockwise.
3 Press the START/PAUSE
button.
4 Check the water supply.
·Check if water is supplied through the detergent dispenser.
|
7 Check drain and spin. |
8 Power off and open the door. |
9 Water removal. |
· Power off and then power on. Turn on Spin lamps after pressing the Start/Pause button and Start the machine again.
· Check drain and spin.
· Power off and then power on.
· Check if the door can be opened after Door Lock lamp turns off.
·If SVC is needed during check, remove the remaining water by pulling out the hose cap.
11
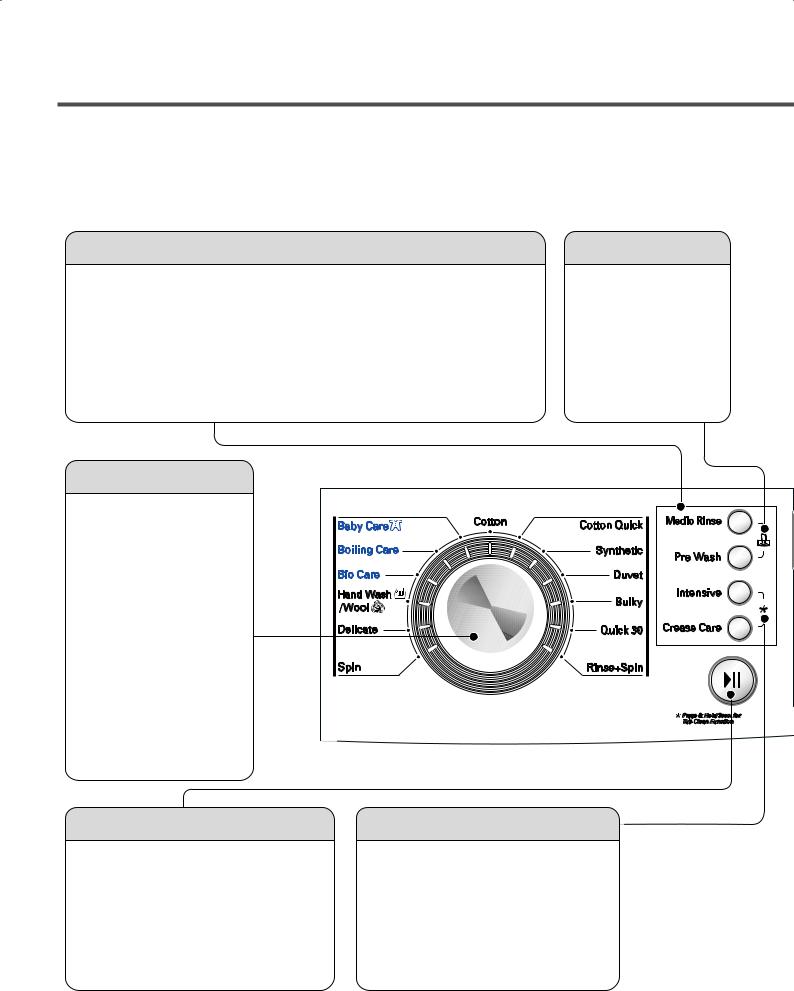
5. OPERATION
5-1. F1*22TD(1~9)
Option
• Medic Rinse : Function that offers more purity in rinse operation by maintaining the optimum temperature for elimination of remnant detergent. It can be selected in all courses with the exception of Quick 30. Hand Wash/Wool, Delicate course.
•Intensive : • If the laundry is heavily soiled “Intensive” option is effective.
•By selecting the Intensive option, the wash time may be extended, depending on the program selected.
•Pre Wash : If the laundry is heavily soiled, “Pre Wash” course is effective.
Pre Wash is available in Cotton and Synthetic Program.
• Crease Care : If you want to prevent crease, select this button with spin
Wash program selector
• 13 programs can be set depending on the type of the laundry.
• If the power button is pressed, all lamps are on
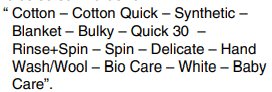
• By turning the dial, [Cotton — Cotton Quick — Synthetic — Duvet — Bulky — Quick 30 — Rinse+Spin — Spin — Delicate — Hand Wash/Wool — Bio Care — Boiling Care — Baby Care] can be selected.
This is a bi-directional selector.
Child -Lock
•Child Lock system can be set and canceled by pressing and holding both Medic Rinse button and Pre Wash button simultaneously more than 3 seconds.
|
Start/Pause button |
Tub Clean |
|
• Use the button to start or pause wash |
• Tub Clean course can be set by |
|
cycle. |
pressing and holding Intensive and |
|
• The power turns off automatically 4 |
Crease Care button simultaneously. |
|
minutes after the pause button is |
• Tub Clean is special cycle to clean the |
|
pressed. |
inside of the washer. |
12
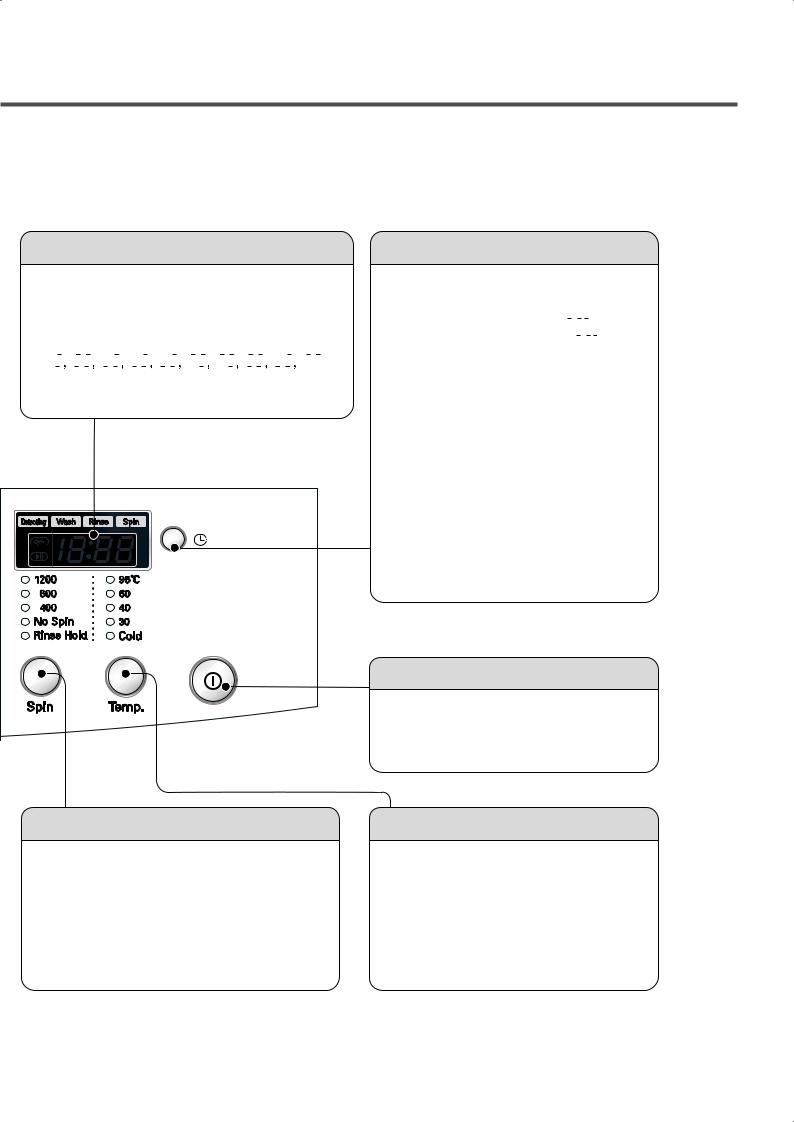
F1*22TD(1~9)
 LOAD TEST MODE
  Page 19
— Press and Hold ‘Temp.’ & ‘Spin’ buttons and then press ‘Power’ button.
 Water level frequency
— Press and Hold ‘Temp.’ & ‘Medic Rinse’ buttons simultaneously.
Time Delay & Beep ON/OFF
•Press the button when reservation washing is needed.
•When the button is pressed, [ 


 ] is displayed, maximum delay of [


 ] hours can be set.
•Each press advances time delay by the hour.
•Use [Power] button to cancel [Time Delay]
•[Time Delay] means the time required from the present to the completion of washing.
•The Beep on/off function can be set by pressing and holding the Time Delay button (About 3 seconds).
The Beep on/off function can be set at any time and it is automatically cancelled in the event of a power cut.
The Beep on/off function also works when power is off.
Power button
•Press the button to turn power on and off.
•Press the button to cancel the time delay.
Water temperature selector
•Press the button to select water temperature.
•95°C is selected for Cotton and Baby Care only.
•By pressing the button while operating the washer, the present temperature is displayed.
13
 Loading…
You can only view or download manuals with
Sign Up and get 5 for free
Upload your files to the site. You get 1 for each file you add
Get 1 for every time someone downloads your manual
Buy as many as you need
LG F1256QD Washing Machine 7kg Direct Drive — Use Manual — Use Guide PDF.
Documents: Go to download!
- User Manual — (English)
- Product Features
- Specifications
- Installation
- Care before washing
- How to use
- Maintainance
- Troubleshooting
Table of contents
User Manual Washing Machine
Product Features
 Protection against creases
With the alternate rotation of the drum. creasing in the laundry is. minimized.
 Built-in heater
Internal heater automatically heats the water to the best temperature on selected cycles.
 More economical by Intelligent Wash System
Intelligent Wash System detects the amount of load and water temperature. and then determines the optimum water level and washing time to minimize energy and water consumption.
 Child Lock
The Child lock prevents children from pressing any button to change the settings during operation.
 Low noise speed control system
By sensing the amount of load and balance. it evenly distributes load to minimize the spinning noise level.
 Direct Drive System
The advanced Brushless DC motor directly drives the drum without belt and pulley.
Specifications
Accessories

Installation
Install or store where it will not be exposed to temperatures below freezing or exposed to the weather.
Properly ground washer to conform with all governing codes and ordinances.
The base opening must not be obstructed by carpeting when the washing machine is installed on a carpeted floor.
In countries where there are areas which may be subject to infestation by cockroaches or other vermin, pay particular attention to keeping the appliance and its surroundings in clean condition at all times.
Any damage which may be cause by cockroaches or other vermin will not be covered by the appliance guarantee.
Transit bolts
The appliance is fitted with transit bolts to prevent internal damage during transport.
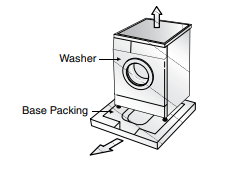
- Packing and all transit bolts must be removed before using the washer.
- When unpacking the base. be sure to remove the additional packing support in the middle of the base packing.
Removing transit bolts
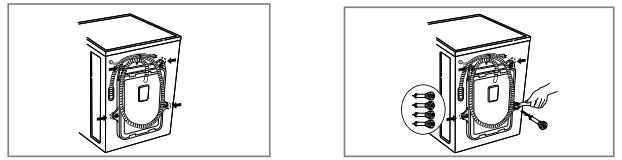
1. To prevent internal damage during transport, the special 4 bolts are locked. Before operating the washer. remove the bolts along with the rubber bungs.
- If they are not removed. it may cause heavy vibration. noise and malfunction.
2. Unscrew the 4 bolts with the spanner supplied.
3. Take out the 4 bolts along with the rubber bungs by slightly twisting the bung. Keep the 4 bolts and the spanner for future use.
- Whenever the appliance is transported. the transit bolts must be refitted.
4. Close the holes with the caps supplied.
Installation place requirement
Level floor :
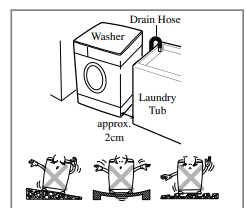
Allowable slope under entire washer is 1°
Power outlet :
Must be within 1.5 meters of either side of location of washer. Do not overload the outlet with more than one appliance.
Additional Clearance :
For wall. door and floor modeling is required. (10cm : rear /2cm:right & left side)
Do not place or store laundry products on top of washer at any times.
They can damage the finish or controls.
Positioning
Install the washer on a flat hard floor.
Make sure that air circulation around the washer is not impeded by carpets, rug etc.
- Never try to correct any unevenness in the floor with pieces of wood. cardboard or similar materials under the washer
- If it is impossible to avoid positioning the washer next to a gas cooker or coal burning stove. n insulating(85x60cm) covered with aluminum foil on the side facing the cooker or stove, must be inserted between the two appliance.
- The washer must not be installed in rooms where the temperature can drop below 0°C.
- Please ensure that when the washer is installed. it is easily accessible for the engineer in the event of a breakdown.
- With the washer installed adjust all four feet using the transit bolt spanner provided ensuring the appliance is stable. and a clearance of approximately 20mm is left between the top of the washer and the underside of the work-top.
Electrical Connection
1. Do not use an extension cord or double adapter.
2. If the supply cord is damaged. it must be replaced by the manufacturer or its service agents or similarly. Qualified person in order to avoid a hazard.
3. Always unplug the machine and turn off the water supply after use.
4. Connect the machine to an earthed socket in accordance with current wiring regulations.
5. The appliance must be positioned so that the plug is easily accessible.
- Repairs to the washing machine must only be carried out by qualified personnel. Repairs carried out by inexperienced persons may cause injury or serious malfunctioning. Contact your local service center
- Do not install your washing machine in rooms where temperature below freezing may occur. Frozen hoses may burst. Under pressure. The reliability of the electronic control unit may be impaired at temperatures below freezing point.
- If the application is delivered in the winter months and temperatures are below freezing: Place the washing machine at room temperature for a few hours before putting it into operation.
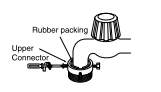
Normal Tap without thread & crew type inlet hose
1. Unscrew the fixing screw to attach the tap.
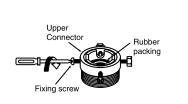
2. Push the connector up til the rubber packing is in tight contact with the tap. Then tighten the 4 screws.
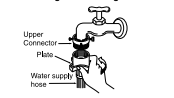
3. Push the water supply hose vertically upwards so that the rubber packing within in the hose can adhere completely to the tap and then tighten it by screwing it to the right.
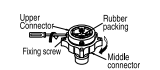
Normal Tap without thread & one touch type inlet hose (Single inlet models)
1. Untighten the upper connector screw.
In case the diameter of the tap is large remove the guide plate.
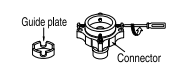
2. Push the upper connector up till the rubber packing is in tight contact with the tap. Then tighten the 4 screws.
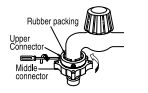
- Tum the middle connector not to have water leaked.
- Make sure that the rubber seal is inside the hose connector.
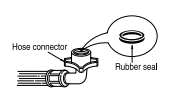
3. Connect the water supply hose to the middle connector. pushing the plate down.
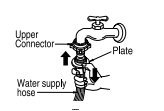
- To separate the water supply hose from the middle connector shut off the tap. Then pull the inlet hose down. pushing the plate down.
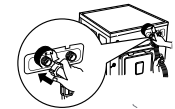
- Make sure that there are no kinks in the hose and that itis not crushed.
Installation of drain hose
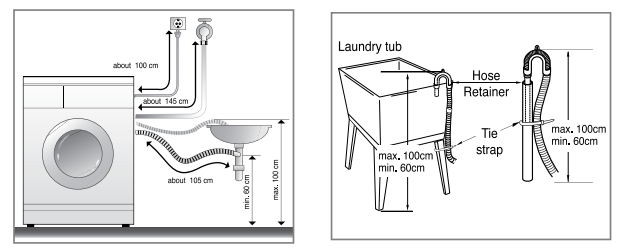
Care before washing
Before the first washing
Select a cycle (COTTON 60°C. add a hal load of detergent) allow the unit to wash without clothing. This will remove residues and water from the drum that may have been left during manufacturing.
Caring before washing
1. Care Labels
Look for a care label on your clothes. This will tell you about the fabric content of your garment and how it should be washed.
2. Sorting
To get the best results. Sort clothes into loads that can be washed with the same wash cycle.
See other models: 65UJ634V GB7138A2VZ1 OLED88ZXPUA LMQ620QM VS880
Water temperature and spin speed and different fabrics need to be washed in different ways.
Always sort dark colors from pale colors and whites. Wash separately as dye and lint transfer can occur causing discoloration of white etc. If possible. do not wash heavily soiled items with lightly soiled one.
Soil (Heavy. Normal. Light) Separate clothes according to amount of soil.
Color (White. Lights. Darks) Separate white fabrics from colored fabrics.
Lint (Lint producers. Collectors) Wash lint producers and lint collectors separately.
3. Caring before loading
Combine large and small items in a load. Load large items first. Large items should not be more than half the total wash load.
Do not wash single items. This may cause an out-of-balance load. Add one or two similar items.
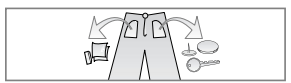
Check all pockets to make sure that they are empty. Items such as nails. hair olp. matches. pens. coins and keys can damage both your washer and your clothes.
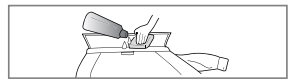
Pre treat dirt and stains by brushing a litle detergent dissolved in water onto stains Bke collars and cuffs to help shift dirt.
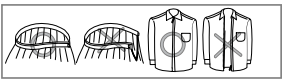
Close zippers. hooks and strings to make sure that these items dont snag on other clothes.
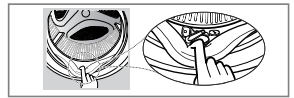
Check the folds of the flexible gasket (gray) and. remove any small articls. f any.
Check inside of the drum and remove any left items in it for next wash cycle.
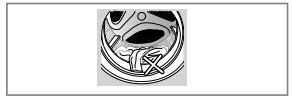
Remove any clothing or items on the flexible gasket to prevent clothing and the gasket damages.
How to use
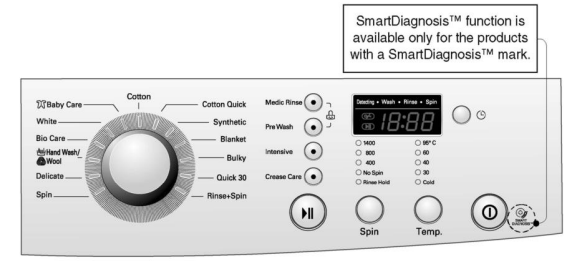
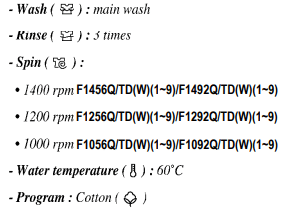
1. Cotton automatically selected upon power on.
- Press the Power button to start.
- Press the Start/Pause button.
- Initial conditions.
2. Manual Selecting
- Press the Power button to start
- Select the conditions which you want to use, turning the program dial and pressing each button.
- Press the Start/Pause button.
3. Beep on/off
- The beep on/off function can be set by pressing Time Delay button.
- The Beep on/off function works when the power is off.
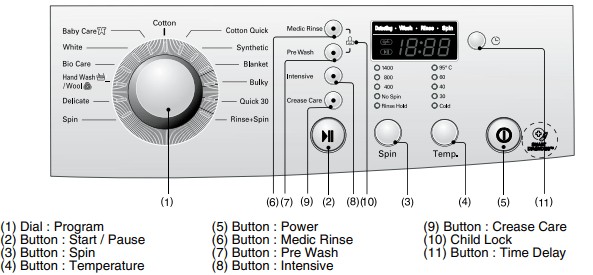
Power
1. Power

- Press the Power button to tum power on and off
- To cancel the Time Delay function. the power button should be pressed.
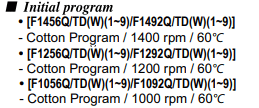
2. Initial Program
- When the Power button is pressed. the washer is ready for Cotton program. And the other initial conditions as follows.
- So. if you want to advance into the ashing ycle without changing the program. just press the Start/Pause button and then the washer will proceed.
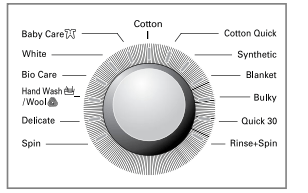
- 13 programs are available according to the laundry type.
- Lamp will light up to indicate selected program.
- When Start/Pause button is pressed, the Cotton program is automatically selected.
- By turning the Program dial, the program is selected in order of
Start/pause
1. Start
- This Start/Pause button is used to start wash cycle or pause the wash cycle.
2. Pause
- If temporary stop of wash cycle is needed. press the Start/Pause button.
- When in Pause. the power is turned off automatically after 4 minutes.
- NB. The door will not open before 1 to 2 minutes when Pause is selected, or at the end of the wash cycle.
Door Lock

- Lights whenever the door of the washer is locked.
- The door can be unlocked by pressing the Start/Pause button to stop the washer.
- The door can be opened after a short delay.
Detecting
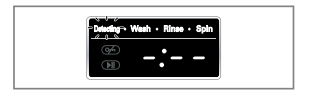
- While the «Detecting» is shown in the display the machine rotates slowly and detects how many laundries are loaded in the drum. It will take a few seconds.
- Available in Cotton and Synthetic.
Option
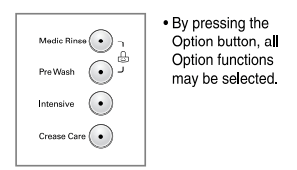
1. Medic Rinse
- For high effectiveness or more purity in rinse operation you can choose Medic
Rinse option.
2. Pre Wash
- If the laundry is heavily soiled. “PreWash» course is effective.
3. Intensive
- If the laundry is heavily soiled “Intensive” option is effective
- By selecting the Intensive option. the wash time may be extended. depending on the program selected.
4. Crease Care
- If you want to prevent crease. select this button with spin speed.
The required lamp will light up for identification.
Child Lock

If you choose to lock the buttons on the control assembly to prevent tampering this function may be selected.
- Child Lock can be set by pressing the Medic Rinse button and Pre Wash button simultaneously. (About three seconds)
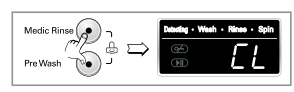
- To deactivate Child Lock system. press Medic Rinse and Pre Wash buttons simultaneously again. (About three seconds)
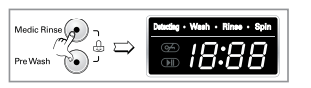
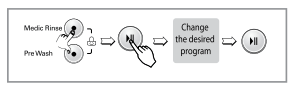
- To change to the desired program. whilst in child lock mode.
1. Press both Medic Rinse and Pre Wash together once again. (About three seconds)
2. Press the Start/Pause button.
3: Select the desired program and press the
Start/Pause button again.
- The child lock can be set at any time and it can be deactivated only by using child lock cancel process. Turning the power off and operational errors will not affect child lock.
Water Temp
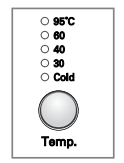
- By pressing the Temp button, the water temperature can be selected.
— Cold
— 30°C 40°C 160°C 195°C
- Water temperature can be selected according to the program.
The required temperature lamp will light up for identification.
Time delay
Preparing washing before starting “Time Delay”
- Turn on the water tap.
- Load laundry and close the door.
- Place the detergent and fabric softener in the drawer.
How to set “Time Delay”
- Press Power button.
- Tum the Program dial to select the program you require.
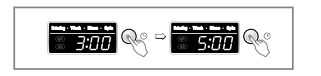
- Press Time Delay button and set the desired time.
- Press the Start/Pause button. («:» blinks.)
If Time Delay button is pressed. “3:00″ is displayed. The maximum delayed time is
19 hours and the minimum time is 3 hours.
Each pressing of the button advances on time delay by one hour.
To cancel the time delay. press the Power button.
Time Delay is expected time’ from the present to the completion of washing cycle or selected process (Wash. Rinse. Spin).
According to the condition of water supply and temperature. the delayed time and the actual washing time may vary.
Display
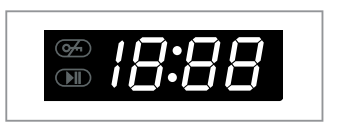
1. Special function display
- When child lock is selected. the “Fis displayed
- When time delay is selected. it shows the remaining time to finish the selected program.
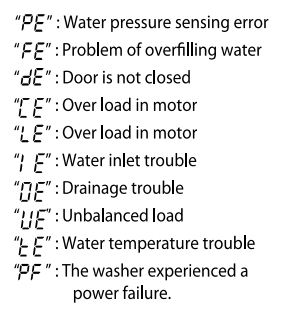
2. Self diagnosis display
If the machine encounters a fault during operation. the associated fault will be displayed.
3. Completion of washing
When washing cycle is completed.  is displayed on the “Multi display”.
4. Time left
- During washing cycle. the remaining washing time is displayed.
- Recommended program by manufacturer.
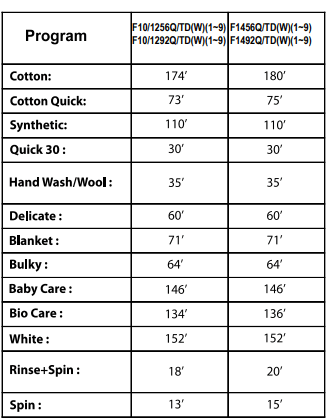
- The washing time may vary by the amount of laundry. water pressure. water temperature and other washing conditions.
- If an unbalanced load is detected or if the suds removing program operates. the wash time may be extended. (Max. increasing time is 45 minutes)
Maintainance
The water inlet filter
-
 message will blink on the control panel when water does not enter the detergent drawer.
 - If water is very hard or contains traces of lime deposit. the water inlet filter may become clogged. It is therefore a good idea to clean it from time to time.
 message will blink on the control panel when water does not enter the detergent drawer.
1. Turn off the water tap. 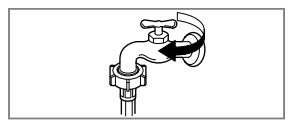
2. Unscrew the water inlet hose. 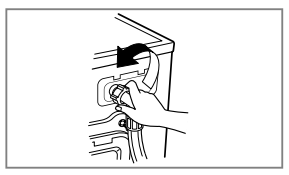
3. Clean the filter using a hard bristle brush.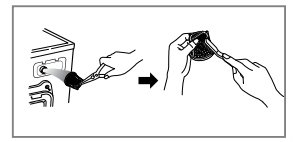
4. Tighten up the inlet hose.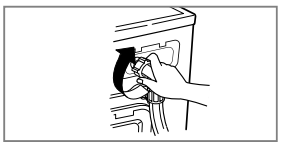
The drain pump filter
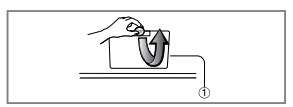
1. Open the lower cover cap  by using acoin. Drain plug ( ) to pull out the hose.
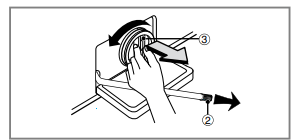
2. Unplug the drain plug  . allowing the water to flow out. At this time use a vessel to prevent water flowing on to the floor. When water does not flow any more, turn the pump filter ( ) open to the left.
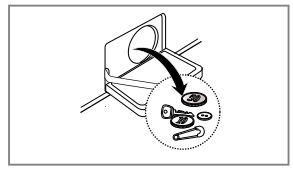
3. Remove out any foreign material from the pump filter 
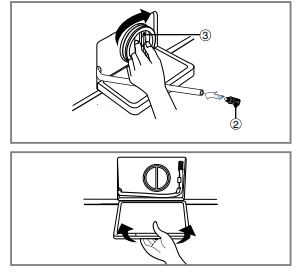
4. After cleaning. turn the pump filter ( ) clockwise and insert the drain plug  to the original place. close the lower cover on
Dispenser drawer
After a while detergents and fabric softeners leave a deposit in the drawer.
- It should be cleaned from time to time with a jet of running water.
- If necessary it can be removed completely from the machine by pressing the catch downwards and by pulling it out.
- To facilitate cleaning. the upper part of the fabric softener compartment can be removed.
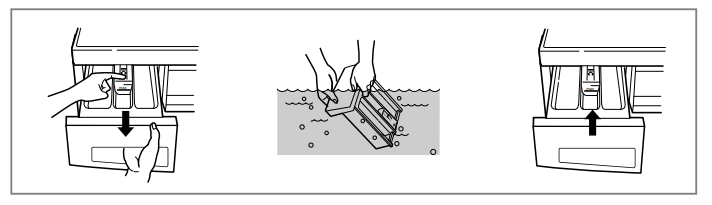
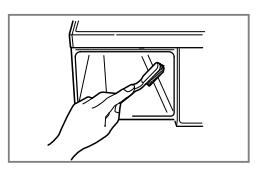
The drawer recess
Detergent can also accumulate inside the recess which should be cleaned occasionally with an old toothbrush.
- Once you have finished cleaning. replace the drawer and run a rinse cycle without laundry.
Cleaning your washer
1. Exterior
Proper care of your washer can extend its life.
The outside of the machine can be cleaned with warm water and a neutral nonabrasive household detergent.
Immediately wipe off any spills. Wipe with damp cloth.
Try not to hit surface with sharp objects.
IMPORTANT: Do not use methylated spirits. diluents or similar products.
2. Interior
Dry around the washer door opening. flexible gasket and door glass.
Run washer through a complete cycle using hot water.
Repeat process if necessary.
Remove hard water deposits using only cleaners labeled as washer safe.
Troubleshooting
| Symptom | Possible Cause | Solution |
|
Rattling and clanking noise Thumping sound Vibrating noise |
|
Stop washer and check drum and drain filter. I noise continues after washer is restarted. call your authorised service centre. I sound continues. washer is probably out of balance. Stop and redistribute wash load. I not removed during installation. Refer to Installation guide for removing transit bolts. Wash load may be unevenly distributed in drum. Stop washer and rearranae wash load. |
|
Water leaks. Oversudsing Water does not enter washer or it enters slowly Water in the washer does not drain or drains slowly. |
|
Check and tighten hose connections. Unclog drain pipe. Contact plumber if necessary. Too much detergent or unsuitable detergent may cause excessive foaming which may result in water leaks. Check another tap in the house. Fully open tap. Straighten hose. Clean and straighten the drain hose. |
|
Washer does not start Washer will not spin |
|
Make sure plug fits tightly in wall outlet. Reset circuit breaker or replace fuse. If problem is a circuit overload. have it corrected by a qualified electrician. Close the door and press the |
| Door does not open |
Once started. the door can not be opened for safety reasons. Wait one or two minutes before opening the door to give the electric locking mechanism time to release. |
|
| Wash cycle time delayed |
The washing time may vary by the amount of laundry. water pressure. water temperature and other usage conditions. If the imbalance is detected or if the suds removing program works. the wash time shall be increased. |
|
 |
|
Check another tap in the house. Straighten hose(s). Check the filter of the inlet hose. |
 |
|
Clean and straighten the drain hose. Clean the drain filter. |
 |
|
Add 1 or 2 similar items to help balance the load. Rearrange load to allow proper spinning |
 |
|
Close the door. If |
 |
Unplug the power plug and call the service |
 Is the door opened?
 is not released, call for service.
More products and manuals for Washers LG
| Models | Document Type |
|---|---|
|
F1281ND |
User Manual
36 pages |
|
F1480TDS |
User Manual
28 pages |
|
F1048ND1 |
User Manual
29 pages |
|
FH695BDH6N |
User Manual
92 pages |
|
FH2G6TD2 |
User Manual
56 pages |
|
FH0H3NDS1 |
User Manual
44 pages |
|
WD-12342TD |
User Manual
28 pages |
|
WP-610NP |
User Manual
16 pages |
|
WD-80192S |
User Manual
27 pages |
|
WD-12270BD |
User Manual
27 pages |
|
WP-900 |
User Manual
2 pages |
|
WP-750 |
User Manual
2 pages |
|
WD-80250N |
User Manual
27 pages |
|
F1256MD |
User Manual
32 pages |
|
WD-10180N |
User Manual
27 pages |
|
F8092MD |
User Manual
40 pages |
|
F1268SD |
User Manual
24 pages |
|
WD-10150S |
User Manual
27 pages |
|
F1220SD |
User Manual
32 pages |
|
F1403TD |
User Manual
2 pages |


Характеристики, спецификации
Максимальная загрузка белья:
7 кг
Расположение:
отдельностоящая
Размеры (ШxВxГ):
600x850x550 мм
Температура стирки:
5 уровней
Режимы стирки:
13 реж. в т.ч.: деликатные ткани, предотвращение сминания, хлопок, ручная стирка, шерсть, предварительная стирка, экономичная стирка, синтетика, детское белье, интенсивная, одеяло, пух, кипячение
Расход воды за стирку:
49 л
Дополнительное полоскание:
есть
Максимальная скорость отжима:
1200 об/мин
Выбор скорости отжима:
есть
Тип управления:
электронное
Класс электропотребления:
A+
Потребление энергии за стирку:
1.19 кВтч
Люк загрузки:
диаметр 30 см c возможностью открытия на 180°
Функция «Защита от детей»:
есть
ÐÓÊÎÂÎÄÑÒÂÎ ÏÎ ÝÊÑÏËÓÀÒÀÖÈÈ
CÒÈÐÀËÜÍÀß ÌÀØÈÍÀ
Ïîæàëóéñòà, âíèìàòåëüíî ïðî÷èòàéòå äàííîå ðóêîâîäñòâî.
Îíî ïîìîæåò ïðàâèëüíî è áåçîïàñíî óñòàíîâèòü ñòèðàëüíóþ
ìàøèíó. Ñîõðàíèòå åãî äëÿ äàëüíåéøåãî èñïîëüçîâàíèÿ.
F1256LD(0~9)
F1258LD(0~9)
F1056LD(0~9)
F1058LD(0~9)
F8056LD(0~9)
F8058LD(0~9)
F1256ND(0~9)
F1258ND(0~9)
F1056ND(0~9)
F1058ND(0 ~9)
F8056ND(0~9)
F8058N D(0~9)
P/NO : MFL67243902
www.lg.com
Cодержание
Содержание……..……….……………….…..2
Áëàãîäàðèì Âàñ çà ïîêóïêó àâòîìàòè÷åñêîé
Основные достоинства……………….3
ñòèðàëüíîé ìàøèíû LG.
Ïîæàëóéñòà, âíèìàòåëüíî ïðî÷èòàéòå
Предупреждения
äàííîå ðóêîâîäñòâî ïîëüçîâàòåëÿ, òàê êàê â
Важные сведения по безопасности…..4
íåì ñîäåðæàòñÿ èíñòðóêöèè ïî áåçîïàñíîé
óñòàíîâêå, ýêñïëóàòàöèè è îáñëóæèâàíèþ
Спецификация..…..………..………..…….6
ñòèðàëüíîé ìàøèíû.
Ñîõðàíèòå åãî äëÿ äàëüíåéøåãî èñïîëüçîâàíèÿ.
Установка
Çàïèøèòå ìîäåëü è ñåðèéíûé íîìåð Âàøåé
Распаковка………….………….………….……7
ñòèðàëüíîé ìàøèíû.
Удаление транспортировочных болтов
..7
Требования к месту установки…………..8
Подключение к электросети………….9
Ìîäåëü:
Подсоединение к водопроводу………..10
Ñåðèéíûé íîìåð:
Подсоединение дренажного шланга..11
Горизонтальное выравнивание……….12
Äàòà ïîêóïêè:
Использование стиральной машины
Подготовка и запуск режима стирки…13
Перед стиркой………………………..……...14
Значения основных пиктограмм,
Обслуживание
указанных на бирках одежды…………..16
Фильтр поступающей воды…………….27
Рекомендации по выведению пятен…17
Фильтр дренажного насоса……………..28
Приблизительный расчет веса сухого
Выдвижной ящик…………………………….29
белья…..………….…………...…………..…..17
Уход за машиной зимой…………………..30
Рекомендуемые режимы стирки
Барабан стиральной машины………….30
в зависимости от типа ткани.…………..18
Чистка стиральной машины…………….30
Использование стиральной машины
F12/10/8068S/LD(0~9)
Устранение неполадок
Е12/10/8069S/LD(0~9)…….……….……..19
Диагностика проблемы……………………31
Сообщение об ошибке…………………….34
Загрузка порошка
Загрузка порошка и смягчителя
ткани…..………….………….………….………25
Условия гарантии……………………..35
2
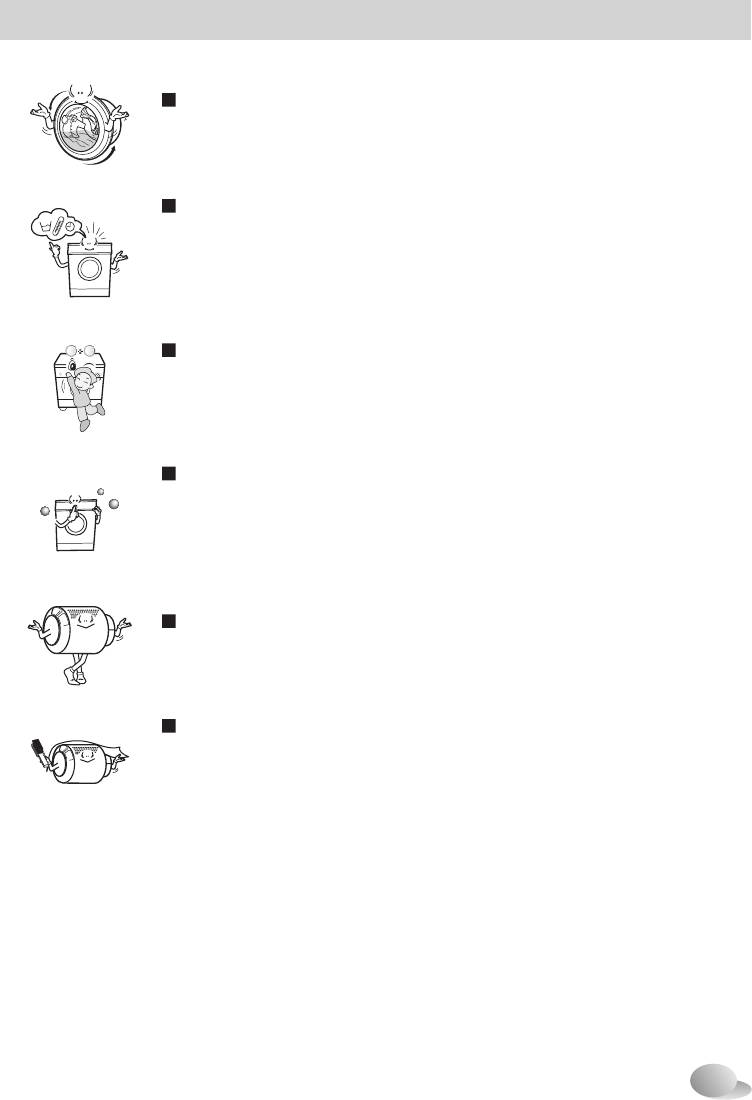
Основные достоинства
Защита от складок
При использовании данной опции Вы можете избежать глубоких
складок на белье после завершения процесса стирки.
Экономичная система интеллектуальной стирки
Система интеллектуальной стирки автоматически определяет
оптимальный уровень воды и время стирки в зависимости от
количества загруженной одежды и температуры поступающей
воды с целью минимизации потребления воды и электроэнергии.
Блокировка от детей
Функция блокировки от детей предназначена для блокирования
всех кнопок во избежание случайного изменения программы
стирки детьми.
Система регулировки скорости, снижающая
уровень шума
Система автоматически перераспределяет бельё в машине и
устанавливает скорость вращения барабана таким образом,
чтобы понизить уровень шума.
Система прямого привода
Двигатель постоянного тока вращает барабан напрямую, без
использования ремня и шкива.
Режим очистки барабана
При данном режиме используется большое количество воды, а
также устанавливается высокая скорость вращения для очистки
барабана и бака стиральной машины.
3