
conga 1090 Robot Vacuum Cleaner Instruction Manual
SAFETY INSTRUCTIONS
- Read these instructions thoroughly before using the appliance.
- Keep this instruction manual for future reference or new users.
- This product must be used in accordance with the directions in this instruction manual. Cecotec cannot be held liable or responsible for any damages or injuries caused by improper use.
- Make sure that the mains voltage matches the voltage stated on the rating label of the appliance and that the wall outlet is grounded.
- This product can only be disassembled by qualified personnel.
- Do not touch wires, power supplies or power adapters with wet hands.
- Keep the robot away from clothing, curtains and any other similar materials.
- Do not expose the robot to direct sun, open fire or wet environments.
- Do not sit or place heavy or sharp objects on top of the appliance.
- This product is designed for indoor use only, do not use outdoors.
- Before operating the robot, remove all objects and wires that could affect its operating.
- Always place the device on a flat and stable surface. Avoid placing it in unstable places where there is risk of falling, such as tables or chairs.
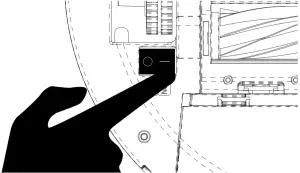
- Turn off the power switch, located on the bottom part of the robot, when it is not going to be used for a long time.
- Before operating it, make sure all the robot’s and charging base’s connections are in good conditions.
- Avoid operating the product under extremely high or low temperatures.
- Remove the battery from the product’s inside before scrapping the robot.
- Disconnect the appliance from the power supply before removing the battery.
- The appliance is not intended to be used by children under the age of 8. It can be used by children over the age of 8, as long as they are given continuous supervision.
- This appliance can be used by children aged 8 and above, and persons with reduced physical, sensory or mental capabilities or lack of experience and knowledge, as long as they have been given supervision or instruction concerning the use of the appliance in a safe way and understand the hazards involved. Supervise young children to make sure that they do not play with the appliance. Close supervision is necessary when the appliance is being used by or near children.
PARTS AND COMPONENTS
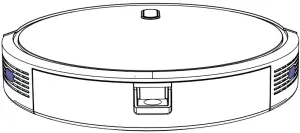
Wi-Fi connection light indicator (only in 1090 Connected, 1099 Connected and 1090 Connected Force)
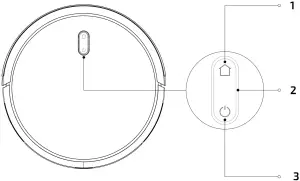
Fig. 1
- Back-home button
- Light indicator
- Power/operation button
- Back-home button
The robot will automatically go to the charging base when this button is pressed on the robot or on the remote control. - Light indicator
- Steady orange light: low battery.
- Blinking orange light: charging.
- Steady blue light: fully charged/standby mode/cleaning.
- Blinking red light: error
- Power/operation button
Long press this button for a few seconds to turn the robot on or off Press it to start cleaning too.
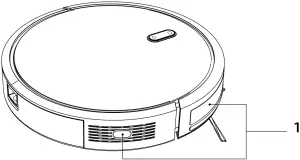
Fig. 2
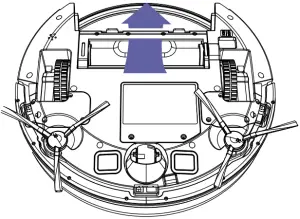
- Anti-collision sensors
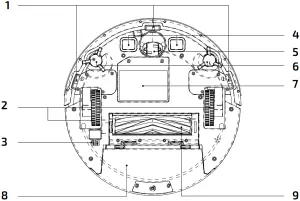
Fig. 3
- Free-fall sensors
- Driving wheels
- Power switch
- Charging terminals
- Omnidirectional wheel
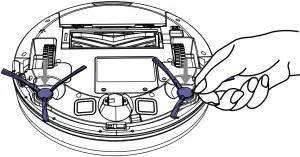
- Side brushes
- Battery
- Dust tank
- Main brush
- Charging base

Fig. 4
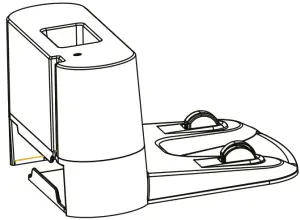
- Charging base
Fig. 5
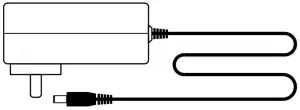

Fig. 10
- Side brushes
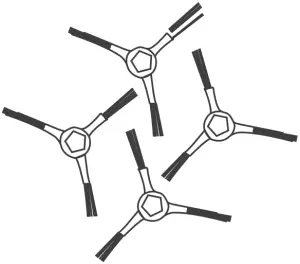
Fig. 11
- Silicone main brush
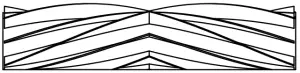
Fig. 12
- 2 mops
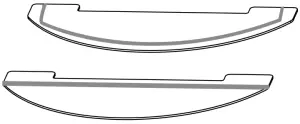
Fig. 13
- Main bristles brush
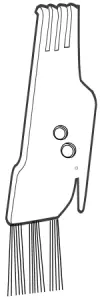
Fig. 14
- Magnetic strips (only included with Conga 1099 Connected)
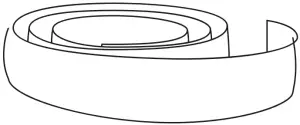
Fig. 15
Note: Conga 1090 Connected Force includes Velcro spare parts.
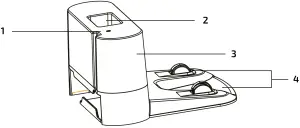
Fig. 16
- Charging indicator
- Remote control holder
- Signal transmitter
- Charging terminals
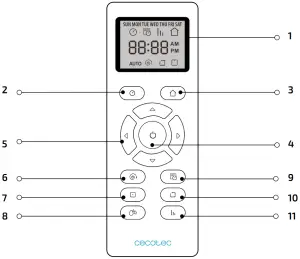
Fig. 17
- Mode and time display
- Clock settings
- Automatic charge/back home
- Auto cleaning/pause
- Direction buttons
- Spot cleaning
- Room cleaning
- Scrubbing levels
- Schedule
- Edge cleaning
- Power levels
BEFORE USE
Warning: Remove all objects around the robot such as clothing, papers, cables, curtains or other fragile objects.
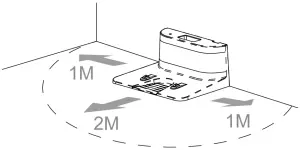
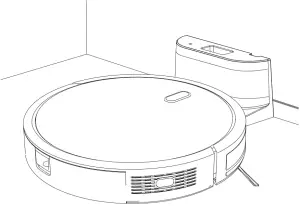
- Place the charging base against the wall and leave a minimum free space of:
- 2 metres to the front.
- 1 metre to each side.
Fig. 20
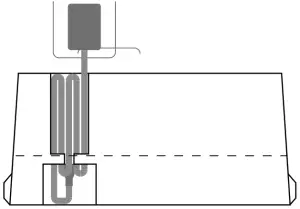
- Connect the charging base to a power supply. Wind and store the remaining cord in the lower part of the charging base to avoid accidents.
Fig. 21 - Install both side brushes in their corresponding slots, located on the robot’s bottom part. Press until it clicks to make sure they are properly fixed.
Fig. 22 - Press the power switch located on the bottom part of the robot. Make sure the power switch in ON.
Fig. 23 - Place the robot on the charging base and make sure the charging terminals on the robot match with those of the charging base. Once the robot is properly placed, it will beep once and the power button will light up. If the light blinks orange, the battery is not completely charged. To ensure maximum cleaning time, wait until the light switches to steady blue. This will indicate the battery is fully charged and that the robot is ready to clean.
Fig. 24
OPERATION
- Start cleaning
- Long press the power button on the robot to start the robot up.
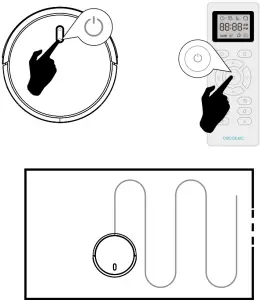
- Press the power button on the robot or on the remote control to start cleaning.
Note: if the robot runs out of battery during cleaning, it will automatically return to the charging base. Once the battery is fully charged, the robot can start a new cleaning cycle.
WARNING: if there is no good access to the charging, the robot will not be able to return to its charging position. In that case, once the robot has stopped, take it manually to the charging base.
- Pause
- Press the power button on the robot or on the remote control to pause the cleaning process.
- Press the power button on the robot or on the remote control to resume the cleaning process.
Fig. 25
- Return to the charging base
Press back-home button on the robot or on the remote control for the robot to return to the charging base. - Turn off
Long press the power button to turn the robot off.
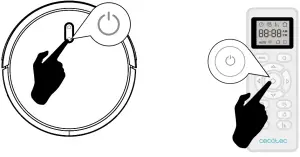
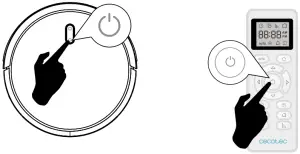
Fig. 26
WARNING: the robot vacuum cleaner has a power switch located on its main body. If the robot is not going to be used for long periods of time, it is suggested to switch it off. If the robot is switched off, it will restore factory default settings as a safety measure. The robot will only carry out scheduled cleaning if it has been scheduled while the switch is ON, otherwise, it will have to be scheduled again from the remote control or the App.
- Cleaning modes
- This robot includes different modes and different functions that can be activated from the remote control or the App.
- The App is only compatible with Conga 1090 Connected, Conga 1090 Connected Force and Conga 1099 Connected.
- Auto cleaning mode
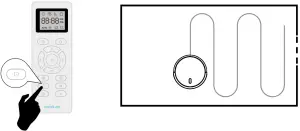
Press button for the robot to start auto cleaning mode.The robot will clean the whole surface, edges, around objects such as tables, chairs etc. until it starts running out of battery and therefore returns to the charging base.
Fig. 27 - Scrubbing mode
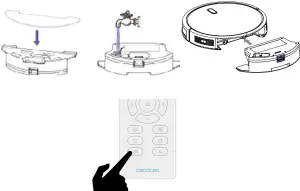
- Attach the mop cloth to the water tank and fill the tank with water.
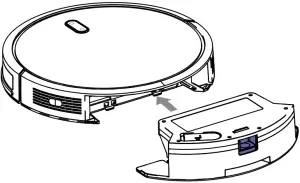
- Remove the dust tank.
- Install the water tank in the robot and turn it on.
Fig. 28
Use the remote control to select the desired scrubbing power level: high, medium or low. Once the scrubbing mode is selected from the remote control or the app, the device will perform the function “All in One” to vacuum, mop and scrub at the same time thanks to its mixed tank.
Note: if you want to sweep the floor, skip the water-filling step.
To ensure perfect scrubbing from the start, it is suggested to dampen the mop cloth evenly with water before use.
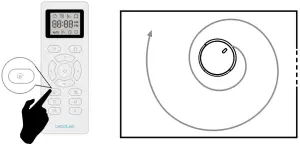
- Spot cleaning mode
The robot will carry out an intense cleaning of a specific area when this mode is activated. The robot will start cleaning at a specific point and will move outwards performing spiral movements (1 meter). Then, it will return to the starting point in spiral movements again. Before operating the robot with spot cleaning mode, place it on the spot to be cleaned. Press the spot cleaning button on the remote control or on the App.
Fig. 29 - Edge cleaning mode
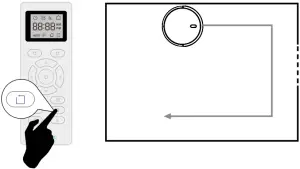
When this mode is selected, the robot will clean along walls and around furniture (table or chair legs, for example).
Press the edge cleaning button on the remote control or on the App.
Fig. 30 - Room cleaning mode
The robot will carry out a 30-minute cleaning cycle when this mode is activated.
Press the room cleaning button on the remote control or on the App.
Fig. 31
To ensure an efficient cleaning of the room, close the door or use the magnetic strip (only included with Conga 1099 Connected) to delimit the cleaning area. - Power level function
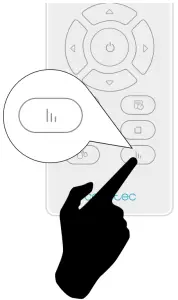
Press the power level button on the remote control in order to control the robot’s suction power during the cleaning process. There are 3 suction power levels: Turbo , Normal and Eco.
Fig. 32 - Scrubbing power level function
Press the scrubbing levels button on the remote control to adjust the water level during the scrubbing process. There are 3 water levels: High , Medium or Low. - Magnetic strip
Use the magnetic strip included with Conga 1099 to delimit the cleaning area so the robot is not able to access to certain areas. - Cleaning schedule
This robot includes schedule settings in order for you to customize the cleaning cycles. The robot can only be scheduled through the remote control or through the App (only models that feature App).
Note: make sure the remote control is near the robot when setting the clock or scheduling cleaning cycles. - Setting the remote control’s clock
- Setting cleaning schedule
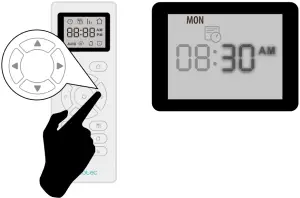
For a better and more comfortable cleaning, the robot includes a schedule function to set daily schedules through the remote control or the App in those Conga models that include app. In accordance with the configuration, the robot will automatically start cleaning the selected days at the desired time. The time options on the remote control are: 12:00 a. m. – 11:59 p.m. and 12:00 p.m. – 11:59 p.m. Before setting the time and the robot configuration, make sure the robot’s power switch is on and that the power button on the robot is lit up. - Configuration with the remote control
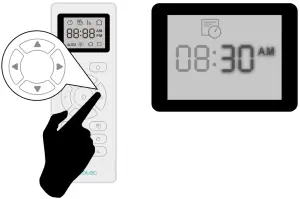
Press the schedule button on the remote control. Digits will start blinking.
Fig. 36
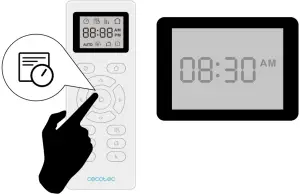
Use direction buttons to select the day. Once selected, use right and left buttons to select minutes and hours. Use direction buttons when digits are blinking to configure the desired minutes and hours. Press the power button to save settings. Enter the desired days and follow the same steps to schedule them.
Fig. 37
Finally, press schedule button to exit scheduling mode. The robot will beep once indicating the scheduled cleaning settings have been confirmed.
The user may schedule as many days per week as desired. The home screen will display when the robot is scheduled. - Cancelling scheduled cleaning:
Press the schedule button on the remote control, select the day you wish to delete and change the set time to 00:00 am., this is the time to be set to cancel the cleaning program.
Fig. 38
CLEANING AND MAINTENANCE
In order to lengthen your robot’s shelf life and to allow your robot to operate at peak performance, carry out the following procedures periodically.
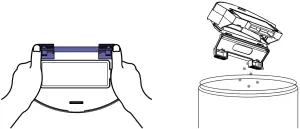
- Empty the robot’s dust tank:
Press the dust tank’s release button.
Fig. 39 - Open the dust tank and empty it.
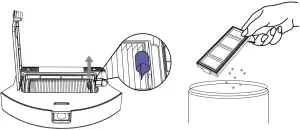
Fig. 40 - Clean the robot’s filter
- Remove the filter.
Carefully shake off all dust from the filter.
Fig. 41 - Clean the free-fall sensors:
Use a clean, dry and soft cloth to wipe off any dust from the free-fall sensor located on the right side of the robot’s bottom part.
WARNING: do not spray cleaning products directly on the sensor.
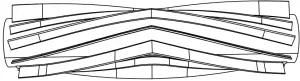
Fig. 42 - Clean the main brush:
Slightly press the main brush frame’s tabs in order to open the main brush storage gap and to remove it.
Fig. 43 - Remove any hair, fluffs or dust collected in the brush and around the axles.
Fig. 44 - Clear and clean the robot’s suction channel.
Fig. 45 - Reinstall the main brush and its frame.
Fig. 46 - High-efficiency FILTER:
The high-efficiency filter is designed with fibres that help trapping dust particles, dust mites, pollen… It is very important to clean periodically the filter, to avoid this particles from building up in the filter, causing efficiency loss. It is convenient to carry out this maintenance once a week. It is suggested to replace the filter by a new one after a maximum of 160 hours of use. - Recommendations:
Dirt can be removed with a small brush or by shaking it carefully against a hard surface for dust to fall off. The high-efficiency filter cannot be washed. - Mesh primary filter and sponge filter:
The filtering system is featured with a mesh primary filter and a sponge filter. It is suggested to replace them either after a maximum of 160 hours of use or when they are worn out due to operation. - Recommendations:
Dirt can be removed with a small brush or by shaking it carefully against a hard surface for dust to fall off. You can also use warm water without detergents to obtain better results. Always make sure they are completely dry before installing them again. - Side brushes:
Side brushes are designed with multiple bristles and are used to push dirt towards the suction nozzle and to clean thoroughly edges and corners. These brushes can wear out over time, affecting negatively to the cleaning efficiency. In this way, it is suggested to replace each side brush after a maximum of 220 hours. - Recommendations:
It is recommended to clean the side brushes once a week with the help of the cleaning brush. - Main brush:
The main brush is designed with bristles and silicone, spins at top speed and helps introducing dirt into the suction nozzle. This brush is in contact with the floor, and therefore with dirt, so it can be worn out over time, affecting negatively to the cleaning efficiency. In this way, it is suggested to replace each side brush after a maximum of 320 hours. - Recommendations: It is recommended to clean the main brush once a week with the help of the cleaning brush.
- Sensors:
Cleaning robot vacuum cleaners have different types of sensors, for example, proximity sensors that allow the robot to move around while detecting obstacles or free-fall sensors that help the robot to detect slopes or possible gaps/unevenness such as stairs. These sensors are always in contact with dust particles, and therefore can be blocked over time, causing possible navigation errors. It is suggested to clean all the robot’s sensors with the cleaning brush or with a dry cloth after a maximum of 35 hours of operation. - Battery charge and replacement:
To lengthen the battery’s service life, keep the robot charging on the charging base when not in use.
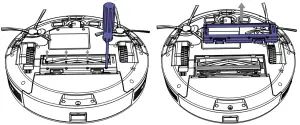
If the robot is not going to be used for a long period of time, remove the battery and store the product and the battery in a safe and dry place. - To replace the battery, follow the instructions below:
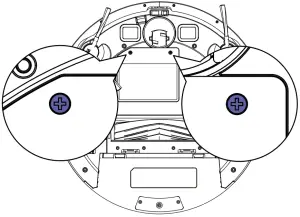
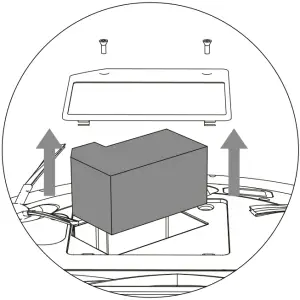
Unscrew the 2 screws on the battery compartment, remove the battery cover and the battery.
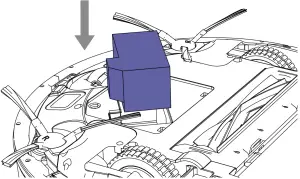
Fig. 47 - Insert the new battery with the battery label facing up.
Fig. 48
Place the battery and the battery cover in its place and fix properly de screws back again.
TROUBLESHOOTING
| Robot signal | Cause | Solution | |
| Red light on. | 1 beep. | Omnidirectional wheel error. | Clean the omnidirectional wheel and press the power button to restart the robot. |
| 2 beeps. | Robot’s side brush error | Clean the side brushes and press the power button to restart the robot. | |
| 3 beeps. | Motor fan or filter error | Remove and empty the dust tank.
Remove the robot’s filter and shake off any dust rests. |
|
| 4 beeps. | Main brush error. | Remove and clean the robot’s main brush. | |
| Blinking red light. | 2 beeps. | Bumper error | Check if the bumper is blocked and press on both sides and center to unblock it. |
| 3 beeps. | Free-fall sensor error | Check if the robot is placed on an uneven surface, if its wheels are off the ground or if it is stuck in a dark place and move it to a new location. If not,
clean the free-fall sensor. |
|
| Red light on. | 4 beeps. | The robot cannot return to its charging base or starting position. | Make sure there are no obstacles in front of the charging base. Clean the charging terminals on both the charging base and the robot with a clean, soft and dry cloth. |
TECHNICAL SPECIFICATIONS
- Product: Conga 1090 Connected/ Conga 1090 Connected Force/ Conga 1099 Connected
- Product reference: 05410/ 05413/ 05411
- Voltage: 100-240 V ~, 50/60 Hz
- Battery: 14.4 V, 2600 mAh
- Frequency Band: 2.4 GHz
- Maximum Transmission Power: 17.5 dBm
- Made in China | Designed in Spain
DISPOSAL OF OLD ELECTRICAL APPLIANCES
 The European directive 2012/19/EU on Waste Electrical and Electronic Equipment (WEEE), specifies that old household electrical appliances must not be disposed of with the normal unsorted municipal waste. Old appliances must be collected separately, in order to optimize the recovery and recycling of the materials they contain and reduce the impact on human health and the environment.
The crossed out “wheeled bin” symbol on the product reminds you of your obligation to dispose of the appliance correctly. If the product has a built-in battery or uses batteries, they should be removed from the appliance and disposed of appropriately. Consumers must contact their local authorities or retailer for information concerning the correct disposal of old appliances and/or their batteries.
TECHNICAL SUPPORT SERVICE AND WARRANTY
This product is under warranty for 2 years from the date of purchase, as long as the proof of purchase is submitted, the product is in perfect physical condition, and it has been given proper use, as explained in this instruction manual.
The warranty will not cover the following situations:
The product has been used for purposes other than those intended for it, misused, beaten, exposed to moisture, immersed in liquid or corrosive substances, as well as any other fault attributable to the customer.
The product has been disassembled, modified, or repaired by persons, not authorized by the official Technical Support Service of Cecotec. Faults deriving from the normal wear and tear of its parts, due to use. The warranty service covers every manufacturing defects of your appliance for 2 years, based on current legislation, except consumable parts. In the event of misuse, the warranty will not apply.
If at any moment you detect any problem with your product or have any doubt, do not hesitate to contact Cecotec Technical Support Service at +34 963 210 728.
Web: WWW.CECOTEC.ES

-
cecotec CONGA 1090 CONGA 1090 CONNECTED/ 1090 CONNECTED FORCE/ 1099 CONNECTED 121120 POLSKI POLSKI Usuń włosy, kłaczki i inne zabrudzenia uwięzione w szczotce i wokół wałków. Rys. 44 Wyczyść i wyczyść kanał ssący robota. Rys. 45 Ponownie zainstaluj środkową szczotkę i ramę. Rys. 46 Filtr o wysokiej wydajności: Filtr o wysokiej wydajności został zaprojektowany z siecią włókien, które pomagają wychwytywać cząsteczki kurzu, roztocza, pyłki … Dlatego należy je okresowo czyścić, aby zapobiec gromadzeniu się tych cząstek w filtrze, a to traci wydajnoś�
-
cecotec CONGA 1090 CONGA 1090 CONNECTED/ 1090 CONNECTED FORCE/ 1099 CONNECTED 5756 DEUTSCH DEUTSCH 1. SICHERHEITSHINWEISE Lesen Sie die folgenden Hinweise aufmerksam durch, bevor Sie das Gerät verwenden. Bewahren Sie die Bedienungsanleitung für künftige Benutzer oder zum Nachschlagen gut auf. Befolgen Sie diese Anweisungen, um das Gerät zu betreiben. Cecotec übernimmt keine Haftung für Schäden bzw. Unfälle, die durch unsachgemäße Handhabung entstehen. Vergewissern Sie sich, dass die Netzspannung mit der auf dem Typenschild des Gerätes angegebenen Spannung übereinstimmt und dass die Steckdose geerdet ist. Das P
-
cecotec CONGA 1090 CONGA 1090 CONNECTED/ 1090 CONNECTED FORCE/ 1099 CONNECTED 1918 ESPAÑOL ESPAÑOL 3. ANTES DE USAR Saque el producto de la caja. Retire todo el material de embalaje. Guarde la caja original. Asegúrese de que todos los componentes están incluidos, y si faltara alguno o no estuvieran en buen estado, contacte con el Servicio de Atención Técnica oficial de Cecotec inmediatamente. Advertencia: Retire todos los objetos alrededor del robot, como prendas de ropa, papeles, cables, cortinas u otros objetos frágiles. Fig. 18 Si la habitación a limpiar se encuentra cerca de un balcón o unas escaleras, coloque una barr
-
CONGA 1090 CONNECTED/ 1090 CONNECTED FORCE/ 1099 CONNECTED 4746 FRANÇAIS FRANÇAIS Assurez-vous que tous les composants soient bien présents. S’il en manque un ou s’ils ne sont pas en bon état, veuillez contacter le Service Après-Vente Officiel de Cecotec immédiatement. Avertissement : retirez tous les objets qui se trouvent autour du robot, comme les vêtements, les papiers, les câbles ou autres objets fragiles. Img. 18 Si la pièce à nettoyer se trouv
-
CONGA 1090 CONNECTED/ 1090 CONNECTED FORCE/ 1099 CONNECTED 2120 ESPAÑOL ESPAÑOL hasta que el porcentaje de batería sea bajo y vuelva a la base de carga. Fig. 27 2. Fregado Acople la mopa al depósito de agua y llene el depósito de agua. Extraiga el depósito de suciedad. Introduzca el depósito de agua en el robot y seleccione el modo. Fig. 28 Puede seleccionar el nivel de fregado mediante el mando a distancia: alto, medio o bajo. Una vez seleccionado
-
cecotec CONGA 1090 CONGA 1090 CONNECTED/ 1090 CONNECTED FORCE/ 1099 CONNECTED 131130 ČEŠTINA ČEŠTINA Pokud se robot k ní robot nemohl dostat a zastavil se, vraťte ho do nabíjecí základny manuálně. Přerušení Stiskněte na robotovi nebo na dálkovém ovládání tlačítko zapnutí, abyste přerušili proces úklidu. Stiskněte na robotovi nebo na dálkovém ovládání tlačítko zapnutí, abyste pokračovali v procesu úklidu. Obr. 25 Návrat na nabíjecí základnu Stiskněte tlačítko návratu domů na robotovi nebo na dálkovém ovládání, abyste robota poslali na nabíjecí základnu. Vypnutí Podržte stisknuté tlačítko zap
-
CONGA 1090 CONNECTED/ 1090 CONNECTED FORCE/ 1099 CONNECTED 5958 DEUTSCH DEUTSCH Oranges Licht: Niedriger Akku. Oranges blikendes Licht: wird aufgeladen. Festes blaues Licht: aufgeladen/ Standby-Modus/ reinigen. Rotes blikendes Licht: Fehler. Start-Taste/ Betrieb Halten Sie diese Taste wenigen Sekunden gedrückt, um den Roboter ein- oder auszuschalten. Drücken Sie diese Taste, um die Reinigung zu starten. Abb. 2 1. Aufprallsensor Abb. 3 2. Absturzsensoren 3. Laufrollen 4. Einschalter 5. Ladekontakte
-
CONGA 1090 CONNECTED/ 1090 CONNECTED FORCE/ 1099 CONNECTED 7372 ITALIANO ITALIANO Indicatore luminoso Luce arancione fissa: batteria scarica. Luce arancione lampeggiante: in carica. Luce blu fissa: caricato/modalità standby/pulizia in corso. Luce rossa lampeggiante: errore. Tasto di accensione/funzionamento Mantenere premuto questo tasto per alcuni secondi per accendere o spegnere il robot. Premerlo anche per cominciare la pulizia. Fig. 2 1. Sensore anticollisione Fig. 3 2. Sensori anticaduta 3. Ruote motrici
-
Fig./Img./Abb./Afb./ Rys./Obr. 10 Fig./Img./Abb./Afb./ Rys./Obr. 12 Fig./Img./Abb./Afb./ Rys./Obr. 14 Fig./Img./Abb./Afb./ Rys./Obr. 11 Fig./Img./Abb./Afb./ Rys./Obr. 13 Fig./Img./Abb./Afb./ Rys./Obr. 15 Fig./Img./Abb./Afb./ Rys./Obr. 16 Fig./Img./Abb./Afb./ Rys./Obr. 17 1 1 2 2 3 3 4 4 9 10 11 5 6 7 8
-
cecotec CONGA 1090 CONGA 1090 CONNECTED/ 1090 CONNECTED FORCE/ 1099 CONNECTED 3130 ENGLISH ENGLISH Press it to start cleaning too. Fig. 2 1. Anti-collision sensors Fig. 3 1. Free-fall sensors 2. Driving wheels 3. Power switch 4. Charging terminals 5. Omnidirectional wheel 6. Side brushes 7. Battery 8. Dust tank 9. Main brush Fig. 4 Charging base Fig. 5 Power adapter Fig. 6 Remote control (Not included with Conga 1090 Connected) Fig. 7 Dust tank (Not included with Conga 1090 Connected Force) Fig. 8 Wet and dry tank Fig. 9 Primary filter and high-efficiency filte
-
cecotec CONGA 1090 Fig./Img./Abb./Afb./ Rys./Obr. 3 Fig./Img./Abb./Afb./ Rys./Obr. 2 Fig./Img./Abb./Afb./ Rys./Obr. 1 1 1 1 2 2 3 3 4 5 6 7 8 9 Fig./Img./Abb./Afb./ Rys./Obr. 4 Fig./Img./Abb./Afb./ Rys./Obr. 6 Fig./Img./Abb./Afb./ Rys./Obr. 8 Fig./Img./Abb./Afb./ Rys./Obr. 5 Fig./Img./Abb./Afb./ Rys./Obr. 7 Fig./Img./Abb./Afb./ Rys./Obr. 9
-
cecotec CONGA 1090 CONGA 1090 CONNECTED/ 1090 CONNECTED FORCE/ 1099 CONNECTED 8180 ITALIANO ITALIANO spazzole si possono usurare con il passare del tempo, con conseguenze negative sull’efficienza della pulizia. Per questo motivo, si consiglia di cambiare ogni spazzola centrale al massimo ogni 220 ore o meno. Suggerimento: si consiglia di pulire le spazzole laterali una volta a settimana con l’aiuto della spazzola per la pulizia. Spazzola centrale La spazzola centrale è progettata con setole e silicone, gira ad alta velocità e aiuta a introdurr
-
www.cecotec.es Grupo Cecotec Innovaciones S.L. C/ de la Pinadeta s/n, 46930 Quart de Poblet, Valencia (Spain) YV01200109
-
CONGA 1090 CONNECTED/ 1090 CONNECTED FORCE/ 1099 CONNECTED 9796 PORTUGUÊS PORTUGUÊS 7. ESPECIFICAÇÕES TÉCNICAS Product: Conga 1090 Connected/ Conga 1090 Connected Force/ Conga 1099 Connected Referência: 05410/ 05413/ 05411 Voltagem: 100-240 V ~ 50/60 Hz Bateria: 14.4 V, 2600 mAh Bandas de frequência: 2.4 GHz Máxima transmissão de potência: 17.5 dBm Made in China | Desenhado em Espanha 8. RECICLAGEM DE ELETRODOMÉSTICOS A diretiva europeia 2012/19/UE sobre Resíduos de Aparelhos Elétricos e Eletrónicos (RAEE) especifica que os eletrodomés
-
cecotec CONGA 1090 CONGA 1090 CONNECTED/ 1090 CONNECTED FORCE/ 1099 CONNECTED 2322 ESPAÑOL ESPAÑOL Configuración con el mando a distancia Pulse el botón de programación de limpieza del mando. Los dígitos comenzarán a parpadear. Fig. 36 Utilice los botones de dirección y para seleccionar el día. Una vez seleccionado el día, utilice las flechas hacia derecha e izquierda para seleccionar minutos u horas. Para poder cambiar los minutos u horas, utilice los botones de dirección cuando empiecen a parpadear los dígitos. Pulse el bot�
-
cecotec CONGA 1090 CONGA 1090 CONNECTED/ 1090 CONNECTED FORCE/ 1099 CONNECTED 2928 ENGLISH ENGLISH 1. SAFETY INSTRUCTIONS Read these instructions thoroughly before using the appliance. Keep this instruction manual for future reference or new users. This product must be used in accordance with the directions in this instruction manual. Cecotec cannot be held liable or responsible for any damages or injuries caused by improper use. Make sure that the mains voltage matches the voltage stated on the rating label of the appliance and that the wall outlet is grounded. This product can only be disassembled by qualified personnel. Do not
-
CONGA 1090 CONNECTED/ 1090 CONNECTED FORCE/ 1099 CONNECTED 8988 PORTUGUÊS PORTUGUÊS 3. ANTES DE USAR Tire o produto da caixa. Retire todo o material da embalagem. Guarde a caixa original. Certifique-se de que todos os componentes estão incluídos, se faltar alguma peça ou não estiverem em bom estado, entre em contacto com o Serviço de Assistência Técnica oficial de Cecotec. Advertência: Retire os objetos que tenha ao redor do robot, como peças de roupa, papéis, cabos, cortinas ou outros objetos frágeis. Fig. 18 Se o espaço a limpar se encontra perto
-
cecotec CONGA 1090 CONGA 1090 CONNECTED/ 1090 CONNECTED FORCE/ 1099 CONNECTED 119118 POLSKI POLSKI Naciśnij przycisk poziomu szorowania na pilocie lub wybierz moc w aplikacji, aby kontrolować poziom wody podczas szorowania. Istnieją trzy poziomy wody: wysoki, średni lub niski. 8. Pasek magnetyczny Użyj paska magnetycznego zawierającego Conga 1099 Connected, aby wyznaczyć obszary, w których robot ma nie mieć dostępu. Harmonogram czyszczenia Robot zawiera ustawienia programowania, które pozwalają dostosować cykle sprzątania. Programowa
-
CONGA 1090 CONNECTED/ 1090 CONNECTED FORCE/ 1099 CONNECTED 135134 ČEŠTINA ČEŠTINA Vysoce účinný filtr: Vysoce účinný filtr je navržen jako síť vláken, které pomáhají zachytit prachové částice, roztoče, pyl… Proto je nutné periodicky ho čistit, abyste zabránili nahromadění částic a ztrátě účinnosti filtru. Doporučujeme provádět tuto údržbu jednou týdně. Pokud budete filtr měnit za nový, doporučuje se tak učinit po maximálně 160ti hodinách provozu. Doporučení: nečistoty se dají odstranit malým kartáčkem nebo je lehce vytře
-
CONGA 1090 CONNECTED/ 1090 CONNECTED FORCE/ 1099 CONNECTED 8786 PORTUGUÊS PORTUGUÊS Luz laranja a piscar: a carregar. Luz fixa: carregado/modo standby/limpando. Luz vermelha a piscar: erro. Botão de ligar/funcionamento Mantenha pressionado este botão uns segundos para ligar ou desligar o robot. Pressione também para começar a limpeza. Fig. 2 1. Sensores anti colisão Fig. 3 1. Sensores anti queda 2. Rodas motrizes 3. Interruptor de alimentação 4. 8 Bornos de carga 5. Rodízios multi-direcionais 6. Escovas laterais 7. Bateria 8. Depósito de sujidade 9. Escova central
-
cecotec CONGA 1090 CONGA 1090 CONNECTED/ 1090 CONNECTED FORCE/ 1099 CONNECTED 133132 ČEŠTINA ČEŠTINA Naprogramování úklidu Robot disponuje přizpůsobením naprogramování, které umožňují upravit cyklus úklidu. Naprogramování je možné provést pouze přes dálkové ovládání nebo aplikaci u kompatibilních modelů. UPOZORNĚNÍ: ujistěte se, že dálkové ovládání je blízko robota, pokud budete jak nastavovat hodiny, tak cykly úklidu. Nastavení hodin dálkového ovládání Stiskněte tlačítko hodin na dálkovém ovládání. Číslice začnou blikat. Vyberte den v týdnu stisknutím tlačítek směru nahoru a dolů. Obr. 33 Použijte
-
cecotec CONGA 1090 Índice 14 1. Instrucciones de seguridad 14 2. Piezas y componentes 15 3. Antes de usar 18 4. Funcionamiento 19 5. Limpieza y mantenimiento 22 6. Resolución de problemas 25 7. Especificaciones técnicas 26 8. Reciclaje de electrodomésticos 26 9. Garantía y SAT 26 INDEX 1. Safety instructions 28 2. Parts and components 29 3. Before use 31 4. Operation 32 5. Cleaning and maintenance 36 6. Troubleshooting 39 7. Technical specifications 40 8. Disposal of old electrical appliances 40 9. Technical support service and warranty 40 SOMMAIRE 1. Instructions de sécurité 42 2. Pièces et composants 43
-
cecotec CONGA 1090 CONGA 1090 CONNECTED/ 1090 CONNECTED FORCE/ 1099 CONNECTED 5150 FRANÇAIS FRANÇAIS Configurer la programmation du nettoyage Pour faciliter le nettoyage, le robot possède une fonction qui permet de le programmer quotidiennement depuis la télécommande ou depuis l’App pour les modèles compatibles. Conformément à la configuration, le robot commencera le nettoyage automatiquement les jours sélectionnés, aux heures indiquées. Les options de temps sur la télécommande sans fil sont : 12:00 am — 11:59 pm et 12:00 pm — 11:59 pm. Avant d’ajuster l’heure et la configuration du robot, assurez-vous que l’inte
-
cecotec CONGA 1090 CONGA 1090 CONNECTED/ 1090 CONNECTED FORCE/ 1099 CONNECTED 9998 NEDERLANDS NEDERLANDS 1. VEILIGHEIDSVOORSCHRIFTEN Lees zorgvuldig de voorschriften voor het gebruik van het product. Bewaar deze handleiding voor toekomstig(e) gebruik(ers). Gebruik dit product overeenkomstig de handleiding. Cecotec is niet verantwoordelijk voor schade of ongevallen die het gevolg zijn van een ongepast gebruik van het product. Controleer of de netspanning overeenkomt met de spanning die op het etiket van het product staat vermeld en of het stopcontact geaard is. Het p
-
CONGA 1090 CONNECTED/ 1090 CONNECTED FORCE/ 1099 CONNECTED 127126 ČEŠTINA ČEŠTINA baterii. Přístroj by neměl být používán dětmi do 8mi let. Tento přístroj může být používán dětmi od 8ti let, pokud jsou pod neustálým dozorem. Tento produkt může být používán osobami s mentálním, fyzickým nebo senzorickým omezením, nebo osobami, kterým chybí zkušenost nebo znalost, pokud jsou pod dohledem nebo jim bylo vysvětleno bezpečné fungování přístro
-
CONGA 1090 CONNECTED/ 1090 CONNECTED FORCE/ 1099 CONNECTED 115114 POLSKI POLSKI Szczotki boczne Rys. 12 Silikonowa szczotka centralna Rys. 13 2 mopy Rys. 14 Pędzelek do czyszczenia Rys. 15 Pasek magnetyczny (tylko w modelu 1099 Connected). Uwaga: model Conga 1090 Connected Force zawiera części rzepowe. Rys. 16 1. Kontrolka ładowania 2. Obsługa zdalnego sterowania 3. Nadajnik sygnału 4. Złącza ładowania Rys. 17 1. Ekran wyświetlania trybu i godziny 2. Ustawi
-
cecotec CONGA 1090 CONGA 1090 CONNECTED/ 1090 CONNECTED FORCE/ 1099 CONNECTED 3736 ENGLISH ENGLISH The user may schedule as many days per week as desired. The home screen will display when the robot is scheduled. Cancelling scheduled cleaning Press the schedule button on the remote control, select the day you wish to delete and change the set time to 00:00 am., this is the time to be set to cancel the cleaning program. Fig. 38 5. CLEANING AND MAINTENANCE In order to lengthen your robot’s shelf life and to allow your robot to operate at peak performance, carry out the following procedures periodically. Empty the robot’s dust tank: Press the du
-
CONGA 1090 CONNECTED/ 1090 CONNECTED FORCE/ 1099 CONNECTED 2524 ESPAÑOL ESPAÑOL cada 220 horas o menos. Recomendaciones: se recomienda limpiar los cepillos laterales una vez por semana con la ayuda del cepillo de limpieza. Cepillo central El cepillo central está diseñado con cerdas y silicona, gira a alta velocidad y ayuda a introducir la suciedad en la boca de succión. Este cepillo está en contacto con el suelo y por tanto con la suciedad, por lo q
-
CONGA 1090 CONNECTED/ 1090 CONNECTED FORCE/ 1099 CONNECTED 9392 PORTUGUÊS PORTUGUÊS As opções de tempo do comando a distância são: 12:00 a. m. – 11:59 p.m. e 12:00 p.m. – 11:59 p.m. Antes de ajustar a hora e a configuração do robot, certifique-se de que o robot está com o interruptor ligado (On) e de que o botão de ligar/desligar do robot também esteja aceso. Configuração com o comando a distância. Pressione o botão de programação de limpeza do comando. Os dígitos começarão a piscar. Fig. 36 Utilize os botões de direção e para selecionar o dia. Depois de
-
CONGA 1090 CONNECTED/ 1090 CONNECTED FORCE/ 1099 CONNECTED 2726 ESPAÑOL ESPAÑOL Luz roja fija 4 pitidos. El robot no puede volver a la base de carga o a suposición inicial. Asegúrese de que no hay obstáculos delante de la base de carga. Limpie los bornes de carga tanto del robot como de la base de carga con un paño limpio, suave y seco. 7. ESPECIFICACIONES TÉCNICAS Producto: Conga 1090 Connected/ Conga 1090 Connected Force/ Conga 1099 Connected Referencia del producto: 05410/ 05413/ 05411 Voltaje: 100-240 V ~, 50/60
-
cecotec CONGA 1090 Robots aspiradores/ Robot vacuum cleaners Manual de instrucciones Instruction manual Manuel d’instructions Bedienungsanleitung Manuale di istruzioni Manual de instruções Instructiehandleiding Instrukcja obsługi Návod k použití
-
CONGA 1090 CONNECTED/ 1090 CONNECTED FORCE/ 1099 CONNECTED 5352 FRANÇAIS FRANÇAIS Filtre primaire en maille et filtre éponge Le système de filtrage est complété par un filtre primaire en maille et un filtre éponge. Si vous souhaitez les remplacer, il est recommandé de le faire avant les 160 heures d’utilisation ou lorsque vous observez qu’ils sont usés. Vous pouvez retirer la saleté avec une petite brosse ou donner de petits coups doucement sur une surface dure pour qu
-
CONGA 1090 CONNECTED/ 1090 CONNECTED FORCE/ 1099 CONNECTED 125124 ČEŠTINAPOLSKI był używany niezgodnie ze swoim przeznaczeniem, wystawiony na działanie wody lub wilgoci, mechanicznie uszkodzony przez użytkownika, wystawiony na działanie substancji żrących czy nosi jakiekolwiek inne znamiona uszkodzeń wynikających z winy użytkownika. urządzenie było naprawiane lub modyfikowane przez osoby nieautoryzowane przez firmę Cecotec. odnosi się do przypadków
-
cecotec CONGA 1090 Fig./Img./Abb./Afb./ Rys./Obr. 40 Fig./Img./Abb./Afb./ Rys./Obr. 42 Fig./Img./Abb./Afb./ Rys./Obr. 44 Fig./Img./Abb./Afb./ Rys./Obr. 41 Fig./Img./Abb./Afb./ Rys./Obr. 43 Fig./Img./Abb./Afb./ Rys./Obr. 46 Fig./Img./Abb./Afb./ Rys./Obr. 45 Fig./Img./Abb./Afb./ Rys./Obr. 47 Fig./Img./Abb./Afb./ Rys./Obr. 48
-
cecotec CONGA 1090 CONGA 1090 CONNECTED/ 1090 CONNECTED FORCE/ 1099 CONNECTED 4140 ENGLISH ENGLISH Red light on. 4 beeps. The robot cannot return to its charging base or starting position. Make sure there are no obstacles in front of the charging base. Clean the charging terminals on both the charging base and the robot with a clean, soft and dry cloth. 7. TECHNICAL SPECIFICATIONS Product: Conga 1090 Connected/ Conga 1090 Connected Force/ Conga 1099 Connected Product reference: 05410/ 05413/ 05411 Voltage: 100-240 V ~, 50/60 Hz Battery: 14.4 V, 2600 mAh Frequency
-
cecotec CONGA 1090 CONGA 1090 CONNECTED/ 1090 CONNECTED FORCE/ 1099 CONNECTED 7170 ITALIANO ITALIANO 1. ISTRUZIONI DI SICUREZZA Leggere attentamente le seguenti istruzioni prima di usare il prodotto.Conservare questo manuale per riferimenti futuri o nuovi utenti. Questo prodotto deve essere utilizzato secondo le istruzioni di questo manuale. Cecotec non si farà responsabile di nessun danno o incidente che sia la conseguenza dell’uso inappropriato del prodotto. Verificare che la tensione di rete coincida con la tensione specificata
-
CONGA 1090 CONNECTED/ 1090 CONNECTED FORCE/ 1099 CONNECTED 7574 ITALIANO ITALIANO 3. PRIMA DELL’USO Rimuovere il prodotto dalla scatola. Ritirare tutto il materiale dall’imballaggio. Conservare la scatola originale. Verificare che tutte le componenti siano incluse, nel caso mancasse qualcuno o non fossero in buono stato, contattare immediatamente il Servizio di Assistenza Tecnica ufficiale di Cecotec. Avvertenza: ritirare tutti gli oggetti atto
-
CONGA 1090 CONNECTED/ 1090 CONNECTED FORCE/ 1099 CONNECTED 3938 ENGLISH ENGLISH Sensors Cleaning robot vacuum cleaners have different types of sensors, for example, proximity sensors that allow the robot to move around while detecting obstacles or free-fall sensors that help the robot to detect slopes or possible gaps/unevenness such as stairs. These sensors are always in contact with dust particles, and therefore can be blocked over time, causing possible navigat
-
cecotec CONGA 1090 CONGA 1090 CONNECTED/ 1090 CONNECTED FORCE/ 1099 CONNECTED 6564 DEUTSCH DEUTSCH er kompatibel ist. Entsprechend der Konfiguration wird der Roboter mit der automatischen Reinigung der angezeigten Tage auf die angezeigten Uhrzeiten starten. Die Fernbedienungsoptionen sind: 12:00 — 11:59 und 12:00 — 23:59 Vergewissern Sie sich vor dem Anpassen der Uhrzeit und der Einstellungen des Roboters, dass der Schalter eingeschaltet und der Ein- / Ausschalter des Roboters eingeschaltet ist. Einstellung der Fernbedienung Drücken Sie die Taste zum Reinigen des Controllers. Die Ziffern werden blinken. Abb. 36 Verwenden Sie die Rich
-
cecotec CONGA 1090 CONGA 1090 CONNECTED/ 1090 CONNECTED FORCE/ 1099 CONNECTED 111110 POLSKINEDERLANDS 8. RECYCLAGE VAN HUISHOUDTOESTELLEN De Europese richtlijn 2012/19 betreffende afgedankte elektrische en elektronische apparatuur bepaalt dat deze apparatuur gescheiden van het regulier afval verwerkt moet worden. Elektrische toestellen worden gescheiden verwerkt voor doeleinden van recyclage en hergebruik om hun impact op mens en milieu te beperken. Het symbool van de doorstreepte container herinnert u aan uw verplichting om dit product op de wettelijk verplichte wijze af te voeren. Voor meer informatie over de meest geschikte wijze om elekt
-
CONGA 1090 CONNECTED/ 1090 CONNECTED FORCE/ 1099 CONNECTED 6968 DEUTSCH DEUTSCH Blinkendes rotes Licht 2 Signaltöne. Stoßstange- Fehler. Überprüfen Sie, ob die Stoßstange blockiert ist und drücken Sie auf jeder Seite und in der Mitte, um sie freizumachen. 3 Signaltöne. Absturzsensor- Fehler Überprüfen Sie, ob sich der Roboter auf einer unebenen Oberfläche befindet, ob die Räder den Boden nicht berühren oder ob er in einem dunklen Bereich steckt, und bringen Sie ihn in eine neue Position. Wenn
-
cecotec CONGA 1090 CONGA 1090 CONNECTED/ 1090 CONNECTED FORCE/ 1099 CONNECTED 4948 FRANÇAIS FRANÇAIS Connected Force/ Conga 1099 Connected. 1. Nettoyage automatique Lorsque vous appuyez sur le bouton de connexion, le robot commence le nettoyage automatique. Le robot nettoie toute la surface, les bords, autour des objets comme les tables, chaises, etc., jusqu’à ce que le pourcentage de la batterie soit faible et qu’il retourne à sa base de charge. Img. 27 2. Nettoyage du sol Ajustez le tissu au réservoir d’eau et remp
-
cecotec CONGA 1090 CONGA 1090 CONNECTED/ 1090 CONNECTED FORCE/ 1099 CONNECTED 3534 ENGLISH ENGLISH Once the scrubbing mode is selected from the remote control or the app, the device will perform the function “All in One” to vacuum, mop and scrub at the same time thanks to its mixed tank. Note: if you want to sweep the floor, skip the water-filling step. To ensure perfect scrubbing from the start, it is suggested to dampen the mop cloth evenly with water before use. 3. Spot cleaning mode The robot will carry out an intense cleaning of a specific area when this mode is activated. The robot will start cleaning at a specific point and will move outwards perform
-
CONGA 1090 CONNECTED/ 1090 CONNECTED FORCE/ 1099 CONNECTED 7978 ITALIANO ITALIANO (ON) e che il tasto di accensione/spegnimento del robot sia anch’esso acceso. Configurazione con il telecomando a distanza Premere il tasto di programmazione di pulizia del telecomando. Le cifre cominceranno a lampeggiare. Fig. 36 Utilizzare i tasti direzionali e per selezionare il giorno. Una volta selezionato il giorno, utilizzare le frecce verso destra e sinistra per selezionare i minuti oppure le ore. Per poter cambiare i minuti oppure le ore, utilizzare i tasti direzionali quando le cifre comi
-
CONGA 1090 CONNECTED/ 1090 CONNECTED FORCE/ 1099 CONNECTED 1514 ESPAÑOL ESPAÑOL 1. INSTRUCCIONES DE SEGURIDAD Lea las siguientes instrucciones atentamente antes de usar el producto. Guarde este manual para referencias futuras o nuevos usuarios. Este producto debe utilizarse conforme a lo indicado en este manual de instrucciones. Cecotec no se hará responsable de ningún daño o accidente que sea consecuencia del uso inapropiado del producto. Asegúrese de que el voltaje de red coincida con el voltaje especificado en la etiqueta de clas
-
cecotec CONGA 1090 CONGA 1090 CONNECTED/ 1090 CONNECTED FORCE/ 1099 CONNECTED 6362 DEUTSCH DEUTSCH 1. Automatische Reinigung Wenn Sie den Netzschalter drücken, startet der Roboter die automatische Reinigung. Der Roboter reinigt die ganze Bondenfläche, die Ecken, um Gegestände wie Tische, Stühlen, u.a. herum, bis der Akkustand der Conga geringer wird und er zur Ladestation zurückkehrt. Abb. 27 2. Wischen Setzen Sie den Mopp auf den Wassertank ein und füllen Sie den Wassertank. Entnehmen Sie den Staubbehälter. Setzen Sie den Wassertank in
-
cecotec CONGA 1090 CONGA 1090 CONNECTED/ 1090 CONNECTED FORCE/ 1099 CONNECTED 6766 DEUTSCH DEUTSCH abgenutzt werden und die Reinigungsvorgang negativ beeinflüssen. Es wird dann empfohlen, jede seitliche Bürste max nach 220 Std. oder weniger zu ersetzen. Empfehlungen: Die Seitenbürsten einmal wöchentlich mit Hilfe der Reinigungsbürste zu reinigen. Hauptbürste Die Hauptbürste ist mit Borsten und Silikon ausgestattet, dreht mit der maximalen Geschwindigket. Diese Bürste ist in Kontakt mit dem Boden und den Staub und kann im Laufe der Zeit abgenutzt werden und den Reinigungsvorgang negativ beeinfl
-
cecotec CONGA 1090 CONGA 1090 CONNECTED/ 1090 CONNECTED FORCE/ 1099 CONNECTED 107106 NEDERLANDS NEDERLANDS Het schoonmaakprogramma annuleren. Druk op de toets op de afstandsbediening, selecteer de dag die u wilt wissen en wijzig de tijd naar 00:00 uur, dit is de tijd om het programma te annuleren. Fig. 38 5. SCHOONMAAK EN ONDERHOUD Om de levensduur van de robot te verlengen en een optimaal rendement te waarborgen voert u periodiek volgende stappen uit: Leeg het het vuilreservoir Druk op de knop om het vuilreservoir te openen. Fig. 39 Open het vuilreservoir en leeg het. Fig. 40 De filter sch
-
CONGA 1090 CONNECTED/ 1090 CONNECTED FORCE/ 1099 CONNECTED 5554 FRANÇAIS FRANÇAIS Lumière rouge clignotante 2 « bips ». Erreur au niveau du pare-chocs. Vérifiez que le pare- chocs ne soit pas bloqué et appuyez sur les deux côtés et au centre pour le débloquer. 3 « bips ». Erreur au niveau du capteur antichute Vérifiez que le robot ne soit pas placé sur une surface irrégulière, que les roues touchent bien le sol et que le robot ne soit pas coincé da
-
CONGA 1090 CONNECTED/ 1090 CONNECTED FORCE/ 1099 CONNECTED 3332 ENGLISH ENGLISH Fig. 18 If the area to be cleaned has a balcony or stairs, a physical barrier must be placed in order to prevent product damage and ensure safe operation. Fig. 19 Direct exposure to sun light or great light constrasts may affect to the correct operating of the sensors. If this happens and the robot stops, change it to a new location for it to start operating again. 1. Place the cha
-
cecotec CONGA 1090 CONGA 1090 CONNECTED/ 1090 CONNECTED FORCE/ 1099 CONNECTED 9594 PORTUGUÊS PORTUGUÊS podem ser desgastadas com o passar do tempo, o que terá como consequência negativa na eficiência da limpeza. Para isso, é recomendável trocar cada escova central a cada 220 horas ou menos. É recomendável limpar as escovas laterais uma vez por semana com a ajuda de uma escova de limpeza. Escova central A escova central está desenhada com cerdas e silicone, gira a alta velocidade e ajuda a introduzir a sujidade na boca de sucção. Esta escova está em contacto com o chão e com a sujidade, pelo que se pode desgastar
-
CONGA 1090 CONNECTED/ 1090 CONNECTED FORCE/ 1099 CONNECTED 4342 FRANÇAIS FRANÇAIS 1. INSTRUCTIONS DE SÉCURITÉ Veuillez lire les instructions suivantes avec attention avant d’utiliser l’appareil. Gardez bien ce manuel pour de futures références ou pour tout nouvel utilisateur. Cet appareil doit être utilisé conformément aux instructions de ce manuel. Cecotec ne se fera pas responsable d’aucun dommage ni accident qui soit dû à une utilisation inappropriée de l’appareil. Assurez-vous que le voltage du rése
-
cecotec CONGA 1090 CONGA 1090 CONNECTED/ 1090 CONNECTED FORCE/ 1099 CONNECTED 137136 ČEŠTINA ČEŠTINA 6. ŘEŠENÍ PROBLÉMŮ Signál robota Příčina Řešení Červené nepřerušované světlo 1 pípnutí. Problém centrálního kola. Vyčistěte centrální kolo a stiskněte tlačítko zapnutí pro restartování robota. 2 pípnutí. Chyba bočních kartáčů Vyčistěte boční kartáče a stiskněte tlačítko zapnutí pro restartování robota. 3 pípnutí. Chyba ventilátoru, motoru nebo filtru. Otevřete nádobu na nečistoty a vyprázdněte ji. Vyjměte z robota filtr a vytřepejte nečistoty. 4 pípnut�
-
cecotec CONGA 1090 CONGA 1090 CONNECTED/ 1090 CONNECTED FORCE/ 1099 CONNECTED 1716 ESPAÑOL ESPAÑOL Luz naranja fija: batería baja. Luz naranja parpadeante: cargando. Luz azul fija: cargado/modo standby/limpiando. Luz roja parpadeante: error. Botón de encendido/funcionamiento Mantenga pulsado este botón unos segundos para encender o apagar el robot. Púlselo también para empezar la limpieza. Fig. 2 1. Sensor anticolisión Fig. 3 1. Sensores anticaída 2. Ruedas motrices 3. Interruptor de alimentación 4. Bornes de ca
-
CONGA 1090 CONNECTED/ 1090 CONNECTED FORCE/ 1099 CONNECTED 129128 ČEŠTINA ČEŠTINA Obr. 13 2 mopy Obr. 14 Kartáč na čištění Obr. 15 Magnetický proužek (má ho jen model 1099 Connected). Upozornění: model Conga 1090 Connected Force má náhradní suché zipy. Obr. 16 1. Indikátor nabití 2. Držák dálkového ovládání 3. Přenašeč signálu 4. Nabíjecí terminál Obr. 17 1. Obrazovka zobrazení programu a hodin 2. Nastavení h
-
CONGA 1090 CONNECTED/ 1090 CONNECTED FORCE/ 1099 CONNECTED 4544 FRANÇAIS FRANÇAIS Lumière bleue fixe : en charge/mode Standby/en cours de nettoyage. Lumière rouge clignotante : erreur. Bouton de connexion/fonctionnement Maintenez appuyé ce bouton quelques secondes pour allumer ou éteindre le robot. Appuyez sur ce même bouton pour commencer le nettoyage. Img. 2 1. Capteur antichoc Img. 3 2. Capteurs antichute 3. Roues motrices 4. Témoin Alimentation 5. Bornes de charge 6. Roues omnidirectionnelles 7. Bro
-
cecotec CONGA 1090 CONGA 1090 CONNECTED/ 1090 CONNECTED FORCE/ 1099 CONNECTED 8584 PORTUGUÊS PORTUGUÊS 1. INSTRUÇÕES DE SEGURANÇA Leia as seguintes instruções atentamente antes de usar o produto. Guarde este manual para referências futuras ou novos usuários. Este produto deve ser usado conforme indicam as instruções deste manual. Cecotec não se responsabiliza de nenhum dano ou acidente que seja consequência do uso inapropriado do produto. Certifique-se de que a voltagem de rede coincide com a voltagem especificada na etiqueta de classificação do
-
cecotec CONGA 1090 Fig./Img./Abb./Afb./ Rys./Obr. 18 Fig./Img./Abb./Afb./ Rys./Obr. 19 Fig./Img./Abb./Afb./ Rys./Obr. 20 Fig./Img./Abb./Afb./ Rys./Obr. 21 Fig./Img./Abb./Afb./ Rys./Obr. 22 Fig./Img./Abb./Afb./ Rys./Obr. 24 Fig./Img./Abb./Afb./ Rys./Obr. 26 Fig./Img./Abb./Afb./ Rys./Obr. 23 Fig./Img./Abb./Afb./ Rys./Obr. 25 Fig./Img./Abb./Afb./ Rys./Obr. 27
-
cecotec CONGA 1090 Fig./Img./Abb./Afb./ Rys./Obr. 28 Fig./Img./Abb./Afb./ Rys./Obr. 30 Fig./Img./Abb./Afb./ Rys./Obr. 32 Fig./Img./Abb./Afb./ Rys./Obr. 29 Fig./Img./Abb./Afb./ Rys./Obr. 31 Fig./Img./Abb./Afb./ Rys./Obr. 33 Fig./Img./Abb./Afb./ Rys./Obr. 34 Fig./Img./Abb./Afb./ Rys./Obr. 36 Fig./Img./Abb./Afb./ Rys./Obr. 38 Fig./Img./Abb./Afb./ Rys./Obr. 35 Fig./Img./Abb./Afb./ Rys./Obr. 37 Fig./Img./Abb./Afb./ Rys./Obr. 39
-
cecotec CONGA 1090 CONGA 1090 CONNECTED/ 1090 CONNECTED FORCE/ 1099 CONNECTED 123122 POLSKI POLSKI Umieść baterię i pokrywę baterii na miejscu i ponownie wkręć śruby. 6. ROZWIĄZYWANIE PROBLEMÓW Sygnał robota Przyczyna Rozwiązanie Ciągłe czerwone światło 1 sygnał dźwiękowy Błąd koła dookólnego. Wyczyść koło dookólne i naciśnij przycisk zasilania, aby ponownie uruchomić robota. 2 sygnały dźwiękowe Błąd szczotki bocznej Wyczyść boczne szczotki i naciśnij przycisk zasilania, aby ponownie uruchomić robota. 3 sygnały dźwiękowe Błąd wentylatora silnika lub filtra. Otwórz pojemnik na brud i opróżnij go. Zdejmij p
-
cecotec CONGA 1090 CONGA 1090 CONNECTED/ 1090 CONNECTED FORCE/ 1099 CONNECTED 105104 NEDERLANDS NEDERLANDS Eens het schrobniveau ingesteld is start de robot met het All in One-programma en gaat hij tegelijk stofzuigen, schrobben en vegen dankzij het gemengd reservoir. Waarschuwing: vul het waterreservoir niet als u wil dweilen. Om van bij aanvang perfect te dweilen bevelen we aan om de mop gelijkmatig te bevochtigen voor gebruik. 3. Punctuele schoonmaak In deze stand gaat de robot een welbepaalde plek grondig schoonmaken. Hij begint op 1 bepaald punt en gaat dan
-
cecotec CONGA 1090 CONGA 1090 CONNECTED/ 1090 CONNECTED FORCE/ 1099 CONNECTED 9190 PORTUGUÊS PORTUGUÊS 1. Limpeza automática Ao pressionar este botão, o robot começará a limpeza automática. O robot limpará toda a superfície, o rodapé, ao redor de objetos como mesas, cadeiras, etc., até que a percentagem de bateria e regresse à base de carga. Fig. 27 2. Lavagem do chão Encaixe a mopa ao depósito de água e encha o depósito de água. Extraia o depósito de sujidade. Introduza o depósito de água no robot e selecione o modo. Fig. 28 Pode selecionar o nível de esfregado mediante o comando a distância: alto, médi
-
cecotec CONGA 1090 CONGA 1090 CONNECTED/ 1090 CONNECTED FORCE/ 1099 CONNECTED 8382 ITALIANO ITALIANO Luce rossa fissa 4 bip. Il robot non può tornare alla base di ricarica o in posizione iniziale. Verificare che non ci siano ostacoli davanti alla base di ricarica. Pulire i poli di ricarica sia del robot che della base di ricarica con un panno pulito, morbido e asciutto. 7. SPECIFICHE TECNICHE Prodotto: Conga 1090 Connected/ Conga 1090 Connected Force/ Conga 1099 Connected Riferimento del prodotto: 05410/ 05413/ 05411 Voltaggio: 100-240V ~ 50/60Hz Batteria: 14.4 V, 2600 mAh Bande di f
-
cecotec CONGA 1090 138 ČEŠTINA oficiálním servisem Cecotec. Pokud byl problém zaviněn normálním používáním a opotřebením součástek. Záruční servis kryje veškeré defekty zaviněné během výroby po dobu 2 let na základě platné legislativy, s výjimkou spotřebních dílů. V případě špatného zacházení ze strany spotřebitele není záruční servis odpovědný za opravu. Pokud se stane, že na výrobku najdete závadu nebo budete mít dotaz, spojte se s oficiálním zákaznickým servisem Cecotec na telefonním čísle +34 96 321 07 28.
-
cecotec CONGA 1090 CONGA 1090 CONNECTED/ 1090 CONNECTED FORCE/ 1099 CONNECTED 103102 NEDERLANDS NEDERLANDS Als er trappen of balkons in of bij de schoon te maken kamer zijn, plaats een fysieke barriere om te vermijden dat de robot beschadigd raakt en om een correcte werking te verzekeren. Fig. 19 Directe blootstelling aan zonlicht of grote contrasten in licht kunnen een invloed hebben op de perfecte werking van de sensoren. Als dit gebeurt stopt de robot, verander hem van plaats om hem terug te doen werken. 1. Zet het laadstation t
-
cecotec CONGA 1090 CONGA 1090 CONNECTED/ 1090 CONNECTED FORCE/ 1099 CONNECTED 113112 POLSKI POLSKI Wyjmij akumulator z produktu przed wyrzuceniem robota. Przed wyjęciem baterii odłącz urządzenie od gniazdka elektrycznego. Z urządzenia nie mogą korzystać dzieci w wieku od 0 do 8 lat. Urządzenie nie powinno być używane przez dzieci w wieku od lat 0-8. Z urządzenia nie mogą korzystać dzieci w wieku od 0 do 8 lat. Ten produkt może być stosowany przez osoby o ograniczonych zdolnościach fizycznych, sensorycznych lub umysłowych lub bez doświa
-
cecotec CONGA 1090 CONGA 1090 CONNECTED/ 1090 CONNECTED FORCE/ 1099 CONNECTED 7776 ITALIANO ITALIANO Premendo questo tasto, il robot comincerà la pulizia automatica. Il robot pulirà tutta la superficie, i bordi, attorno a oggetti come tavoli, sedie, ecc, fino a quando la batteria si scaricherà e il robot tornerà alla base di ricarica. Fig. 27 2. Lavaggio Sistemare il panno nel serbatoio dell’acqua e riempire quest’ultimo. Rimuovere il serbatoio dello sporco. Introdurre il serbatoio dell’acqua nel robot e selezionare la modalità. Fig. 28 Può selezionare il livello di lavaggio mediante il telecomando a dista
-
cecotec CONGA 1090 CONGA 1090 CONNECTED/ 1090 CONNECTED FORCE/ 1099 CONNECTED 101100 NEDERLANDS NEDERLANDS Ook om te starten met schoonmaken drukt u op deze knop. Fig. 2 1. Anti-botsingssensor Fig. 3 4. Anti-valsensoren 5. Aandrijfwieltjes 6. Stroomschakelaar 7. Oplaadpoorten 8. Wendbare wielen 9. Zijdelingse borstels 10. Batterij 11. Vuilreservoir 12. Centrale borstel Fig. 4 Laadstation Fig. 5 Stroomadapter Fig. 6 Afstandsbediening (niet inbegrepen bij Conga 1090 en Conga 1090 Connected Force) Fig. 7 Stofreservoir (niet inbegrepen bij de Conga 1090 Connected Force) Fig. 8 Reservoir voor water en vuil Fig. 9 Hoofdfilter en fil
-
cecotec CONGA 1090 CONGA 1090 CONNECTED/ 1090 CONNECTED FORCE/ 1099 CONNECTED 117116 POLSKI POLSKI Naciśnij przycisk zasilania na robocie lub pilocie, aby rozpocząć czyszczenie. Ostrzeżenie: jeśli robotowi wyczerpie się akumulator podczas czyszczenia, automatycznie wróci do stacji ładującej. Po całkowitym naładowaniu akumulatora można rozpocząć nowy cykl czyszczenia. Ostrzeżenie: robot nie będzie mógł wrócić do bazy ładującej, jeśli nie będzie miał do niej dobrego dostępu. Jeśli robot nie był w stanie uzyskać dostępu i zatrzymał się, umieść go ręcznie na stacji ładującej. Pauza Naciśnij przycisk zasila
-
cecotec CONGA 1090 CONGA 1090 CONNECTED/ 1090 CONNECTED FORCE/ 1099 CONNECTED 6160 DEUTSCH DEUTSCH 3. VOR DEM GEBRAUCH Nehmen Sie das Gerät aus der Verpackung. Entfernen Sie alle Verpackungsmaterialien. Bewahren Sie die originelle Verpackung auf. Vergewissern Sie sich, dass die Lieferung vollständig und unbeschädigt ist und, wenn Komponenten fehlen oder sich nicht in einem guten Zustand befinden, kontaktieren Sie umgehend den technischen Kundendienst von Cecotec. HINWEIS: Entfernen Sie alle Gegenstände um den Roboter herum,
 |
[Page 1] cecotec CONGA 1090 1090 / 1099 Robotstøvsuger/ Robot vacuum cleaner Brugermanual Instruction manual |
 |
[Page 2] cecotec CONGA 1090 2 | CONGA 1090 DANSK |
 |
[Page 3] cecotec CONGA 1090 CONGA 1090 | 3 DANSK Indhold 1. Sikkerhedsinstruktioner 14 2. Dele og komponenter 15 3. Før brug 17 4. Betjening 18 5. Rengøring og vedligeholdelse 22 6. Fejlnding 24 7. Tekniske specikationer 25 8. Bortskaels… |
 |
[Page 4] cecotec CONGA 1090 4 | CONGA 1090 DANSK Fig. 3 Fig. 2 Fig. 1 1 1 1 2 2 3 3 4 5 6 7 8 9 |
 |
[Page 5] cecotec CONGA 1090 CONGA 1090 | 5 DANSK Fig. 3 Fig. 2 Fig. 1 1 1 1 2 2 3 3 4 5 6 7 8 9 Fig. 4 Fig. 6 Fig. 8 Fig. 5 Fig. 7 Fig. 9 |
 |
[Page 6] cecotec CONGA 1090 6 | CONGA 1090 DANSK Fig. 10 Fig. 12 Fig. 14 Fig. 11 Fig. 13 Fig. 15 Fig. 16 Fig. 17 1 1 2 2 3 3 4 4 9 10 11 5 6 7 8 |
 |
[Page 7] cecotec CONGA 1090 CONGA 1090 | 7 DANSK Fig. 10 Fig. 12 Fig. 14 Fig. 11 Fig. 13 Fig. 15 Fig. 16 Fig. 17 1 1 2 2 3 3 4 4 9 10 11 5 6 7 8 |
 |
[Page 8] cecotec CONGA 1090 8 | CONGA 1090 DANSK Fig. 18 Fig. 19 Fig. 20 Fig. 21 Fig. 22 Fig. 24 Fig. 26 Fig. 23 Fig. 25 Fig. 27 |
 |
[Page 9] cecotec CONGA 1090 CONGA 1090 | 9 DANSK Fig. 18 Fig. 19 Fig. 20 Fig. 21 Fig. 22 Fig. 24 Fig. 26 Fig. 23 Fig. 25 Fig. 27 |
 |
[Page 10] cecotec CONGA 1090 10 | CONGA 1090 DANSK Fig. 28 Fig. 30 Fig. 32 Fig. 29 Fig. 31 Fig. 33 Fig. 34 Fig. 36 Fig. 38 Fig. 35 Fig. 37 Fig. 39 |
 |
[Page 11] cecotec CONGA 1090 CONGA 1090 | 11 DANSK Fig. 28 Fig. 30 Fig. 32 Fig. 29 Fig. 31 Fig. 33 Fig. 34 Fig. 36 Fig. 38 Fig. 35 Fig. 37 Fig. 39 |
 |
[Page 12] cecotec CONGA 1090 12 | CONGA 1090 DANSK Fig. 40 Fig. 42 Fig. 44 Fig. 41 Fig. 43 Fig. 46 Fig. 45 Fig. 47 Fig. 48 |
 |
[Page 13] cecotec CONGA 1090 CONGA 1090 | 13 DANSK Fig. 40 Fig. 42 Fig. 44 Fig. 41 Fig. 43 Fig. 46 Fig. 45 Fig. 47 Fig. 48 |
 |
[Page 14] cecotec CONGA 1090 14 | CONGA 1090 DANSK 1. Sikkerhedsinstruktioner Læs disse instruktioner grundigt, inden du tager aparatet i brug. Opbevar denne brugsanvisning til fremtidig reference eller nye brugere. Dette produkt skal bruges i overensstem- melse med anvi… |
 |
[Page 15] cecotec CONGA 1090 CONGA 1090 | 15 DANSK Apparatet er ikke beregnet til brug af børn under 8 år. Det kan bruges af børn over 8 år, så længe de er givet løbende tilsyn af en voksen. Dette apparat kan bruges af børn fra 8 år og derover og per- soner med ne… |
 |
[Page 16] cecotec CONGA 1090 16 | CONGA 1090 DANSK 5. Drejehjul 6. Sidebørster 7. Batteri 8. Støvtank 9. Hovedbørste Fig. 4 Opladningsbase Fig. 5 Strømforsyning Fig.6 Fjernbetjening (medfølger ikke med Conga 1090 Connected og Conga 1090 Connected Force) Fig. 7 St… |
 |
[Page 17] cecotec CONGA 1090 CONGA 1090 | 17 DANSK Bemærk: Conga 1090 Connected Force inkluderer velcro-reservedele. Fig. 16 1. Opladningsindikator 2. Fjernbetjeningsholder 3. Signal sender 4. Opladningsterminaler Fig. 17 1. Program- og tid visning 2. Tidsindstilling… |
 |
[Page 18] cecotec CONGA 1090 18 | CONGA 1090 DANSK 2 meter til fronten. 1 meter til hver side. Fig. 20 2. Tilslut opladningsbasen til en strømforsyning. Opbevar den resterende ledning i den nedre del af opladningsbasen. Fig. 21 3. Installer begge sidebørster i deres t… |
 |
[Page 19] cecotec CONGA 1090 CONGA 1090 | 19 DANSK Tryk på tænd / sluk-knappen på robotten eller på fjernbetjeningen for at genoptage rengøringsprocessen. Fig. 25 Tilbage til opladningsbasen Tryk på hjemknappen på robotten eller på fjernbetjeningen for at sende r… |
 |
[Page 20] cecotec CONGA 1090 20 | CONGA 1090 DANSK du springe vandpåfyldningstrinnet over. For at sikre perfekt skrubning fra starten anbefales det at fugte moppekluden med vand inden brug. Spot-indstilling Robotten udfører en grundig rengøring af et bestemt område, n�… |
 |
[Page 21] cecotec CONGA 1090 CONGA 1090 | 21 DANSK Planlægning af rengøring Denne robot inkluderer tidsplanindstillinger, så du kan tilpasse rengø- ringsrutiner. Robotten kan kun planlægges via fjernbetjeningen eller via appen (kun modeller, der har App). Bemærk: Sø… |
 |
[Page 22] cecotec CONGA 1090 22 | CONGA 1090 DANSK Startskærmen vises, når robotten er programmeret. Annullering af planlagt rengøring Tryk på planlægningsknappen på fjernbetjeningen, vælg den dag, du vil slette, og skift den indstillede tid til 00:00. Dette er tid… |
 |
[Page 23] cecotec CONGA 1090 CONGA 1090 | 23 DANSK Det højeektive lter er designet med bre, der hjælper med at fange støv- partikler, støvmider, pollen … Det er meget vigtigt at rengøre lteret med jævne mellemrum for at undgå, at disse partikler samler… |
 |
[Page 24] cecotec CONGA 1090 24 | CONGA 1090 DANSK og forårsage mulige navigationsfejl. Det anbefales at rengøre alle robo- tens sensorer med rengøringsbørsten eller med en tør klud efter maksi- malt 35 timers drift. Batteriopladning og udskiftning For at forlænge bat… |
 |
[Page 25] cecotec CONGA 1090 CONGA 1090 | 25 DANSK 3 bip Fritfald sensor fejl Kontroller, om robotten er placeret på en ujævn over- ade, om hjulene rører jorden, eller om den sidder fast et mørkt sted, yt den til et nyt sted. Rengør fritfaldssen- soren. Kon… |
 |
[Page 26] cecotec CONGA 1090 26 | CONGA 1090 DANSK 9. Teknisk support og garanti Dette produkt er under garanti i to år fra købsdatoen, så længe beviset for købet er fremlagt, produktet i perfekt fysisk tilstand, og det er blevet brugt korrekt, som forklaret i denne … |
 |
[Page 27] cecotec CONGA 1090 CONGA 1090 | 27 ENGLESK 1. Safety instructions Read these instructions thoroughly before using the appli- ance. Keep this instruction manual for future reference or new users. This product must be used in accordance with the directions in th… |
 |
[Page 28] cecotec CONGA 1090 28 | CONGA 1090 ENGELSK Disconnect the appliance from the power supply before re- moving the battery. The appliance is not intended to be used by children under the age of 8. It can be used by children over the age of 8, as long as they are g… |
 |
[Page 29] cecotec CONGA 1090 CONGA 1090 | 29 ENGLESK Fig. 2 Anti-collision sensor Fig. 3 Free-fall sensors Driving wheels Power switch Charging terminals Omnidirectional Wheels Side brushes Battery Dust tank Main brush Fig. 4 Charging base Fig. 5 Power adapter Fig. 6 Re… |
 |
[Page 30] cecotec CONGA 1090 30 | CONGA 1090 ENGELSK Fig. 13 2 mops Fig. 14 Cleaning brush. Fig. 15 Magnetic strips (Only included with Conga 1099 Connected) Note: Conga 1090 Connected Force includes Velcro spare parts. Fig. 16 Charge indicator Remote control holder Sig… |
 |
[Page 31] cecotec CONGA 1090 CONGA 1090 | 31 ENGLESK placed in order to prevent product damage and ensure safe operation. Fig. 19 Direct exposure to sun light or great light contrasts may aect to the cor- rect operating of the sensors. If this happens and the robot st… |
 |
[Page 32] cecotec CONGA 1090 32 | CONGA 1090 ENGELSK return to the charging base. Once the battery is fully charged, the robot can start a new cleaning cycle. Warning: If there is no good access to the charging base, the robot will not be able to return to its charging po… |
 |
[Page 33] cecotec CONGA 1090 CONGA 1090 | 33 ENGLESK Scrubbing mode Attach the mop cloth to the water tank and ll the tank with water. Take the dust tank out. Install the water tank in the robot and turn it on. Fig. 28 Use the remote control to select the desired scrubb… |
 |
[Page 34] cecotec CONGA 1090 34 | CONGA 1090 ENGELSK power levels: Turbo, Normal and Eco. Fig. 32 Scrubbing intensity levels function Press the scrubbing levels button on the remote control to adjust the wa- ter level during the scrubbing process. There are 3 water level… |
 |
[Page 35] cecotec CONGA 1090 CONGA 1090 | 35 ENGLESK Conguration with the remote control Press the schedule button on the remote control. Digits will start blinking. Fig. 36 Use direction buttons to select the day. Once selected, use right and left buttons to select mi… |
 |
[Page 36] cecotec CONGA 1090 36 | CONGA 1090 ENGELSK Clean the main brush Slightly press the main brush frame’s tabs in order to open the main brush storage gap and to remove it. Fig. 43 Remove any hair, us or dust collected in the brush and around the axes. Fig…. |
 |
[Page 37] cecotec CONGA 1090 CONGA 1090 | 37 ENGLESK and helps introducing dirt into the suction nozzle. This brush is in contact with the oor, and therefore with dirt, so it can be worn out over time, af- fecting negatively to the cleaning eciency. For this reason, … |
 |
[Page 38] cecotec CONGA 1090 38 | CONGA 1090 ENGELSK 6. Troubleshooting Robot signal Cause Solution Red light steady on 1 beep Omnidirectional wheel error Clean the omnidirectional wheel and press the power button to restart. 2 beeps Robot’s side brush error Clean… |
 |
[Page 39] cecotec CONGA 1090 CONGA 1090 | 39 ENGLESK 7. Technical specifications Producto: Conga 1090 Connected/ Conga 1090 Connected Force/ Conga 1099 Connected Product reference: 05410/ 05413/ 05411 Voltage: 100-240 V ~, 50/60 Hz Battery: 14.4 V, 2600 mAh Frequency ba… |
 |
[Page 40] cecotec CONGA 1090 www.cecotecnordic.com cecotecnordic . [email protected] |
Report abuse
Libble takes abuse of its services very seriously. We’re committed to dealing with such abuse according to the laws in your country of residence. When you submit a report, we’ll investigate it and take the appropriate action. We’ll get back to you only if we require additional details or have more information to share.
Product:
Get your user manual by e-mail
Enter your email address to receive the manual of Cecotec Conga 1090 in the language / languages: English, German, French, Italian, Portuguese, Spanish as an attachment in your email.
The manual is 13,58 mb in size.
You will receive the manual in your email within minutes. If you have not received an email, then probably have entered the wrong email address or your mailbox is too full. In addition, it may be that your ISP may have a maximum size for emails to receive.
The manual is sent by email. Check your email
If you have not received an email with the manual within fifteen minutes, it may be that you have a entered a wrong email address or that your ISP has set a maximum size to receive email that is smaller than the size of the manual.
Your question is posted on this page
Would you like to receive an email when new answers and questions are posted? Please enter your email address.
Similar Devices: 13759, 3093, Rapide Ultra HW90-RU-ZA
-
107418274 – 2017-02-06OriginalbetriebsanleitungOriginal Operating InstructionsNotice d’utilisation d‘origineOorspronkelijke GebruiksaanwijzingIstruzioni originaliOriginal driftsinstruksBruksanvisning i originalOriginal brugsanvisningAlkuperäiset ohjeetManual originalInstruções de operação originalΠρωτότυπο οδηγιών χρήσης Orij …
VC4210L, 21
-
Käyttöohje • SuomiBruksanvisning • SvenskaBruksanvisning • NorskBruksanvisning • DanskOperation instructions • EnglishGebrauchsanweisung • DeutschGebruiksaanwijzing • NederlandsManuel d’utilisation • FrançaisManual de instrucciones • EspañolИнструкции по эксплуатации • По-русски19101900615MinarcTig™ …
MinarcTig 180, 18
-
DependaVac 12 (Part # 135-1350-20)Thank you for choosing Sterling’s DependaVac 12 upright vacuum. This commercial appliance is well constructed and should provide you with years of professional service if you take the time to read this manual. For your information, this vacuum was pro-tectively packed to prevent possible damage in transit. Should damage o …
DependaVac 12, 5
-
Before operating your vacuum cleaner,please read these instructions completely.Avant d’utiliser l’appareil, il est recommandéde lire attentivement ce manuel.Antes de usar su aspiradora, leacompletamente estas instrucciones por favor.VACUUM CLEANERAspirateurAspiradoraMC-V5239Operating InstructionsManuel d’utilisationInstrucciones de operaciónPANASONIC …
MC-V5239, 44
-
imagine the possibilitiesThank you for purchasing a Samsung product.To receive a more complete service, please register your product atwww.samsung.com/registerRobotic Vacuum CleanerUser Manual✻ Before operating this unit, please read the instructions carefully.✻ For indoor use only.EnglishSR8845DJ68-00518G(SR8845)(EN)-0.0.indd 1 2010.2.9 2:50:44 PM …
SR8845, 48
-
18 Volt Hand Vacwww.portercable.comINSTRUCTIVO DE OPERACIÓN, CENTROS DESERVICIO Y PÓLIZA DE GARANTÍA. ADVERTENCIA: LÉASE ESTE INSTRUCTIVOANTES DE USAR EL PRODUCTO.CATALOG NUMBERPC1800HVAspirateur portatif 18 voltsAspiradora manual de 18 vInstruction manualManuel d’instructionsManual de’instruccionesBatteries and chargers sold separately9055009 …
90550095, 36
-
READ MANUAL BEFORE OPERATING SYSTEM Read the owner’s manual thoroughly before operating to ensure the most efficient use of the system. P/N 8788 • 09/11ATTENTION INSTALLER: Please be sure this manual and warranty information are left with the power unit or customer when installation is complete.512 West Gorgas Street • P.O. Box 3912 • Louisvi …
390, 12
-
Safety Instructions3Product View Product FeaturesOperationsMaintenance and careTroubleshootingConsumer ServicesReplacement Parts456-88-99-1012Warranty9-101112USER’S GUIDESpot Lifter®111718/1719 SERIESug603-5410_1719_806.indd 1ug603-5410_1719_806.indd 1 9/25/06 1:07:33 PM9/25/06 1:07:33 PM …
1718, 12
Робот-пылесос 4-в-1: пылесосит, подметает, чистит и моет.
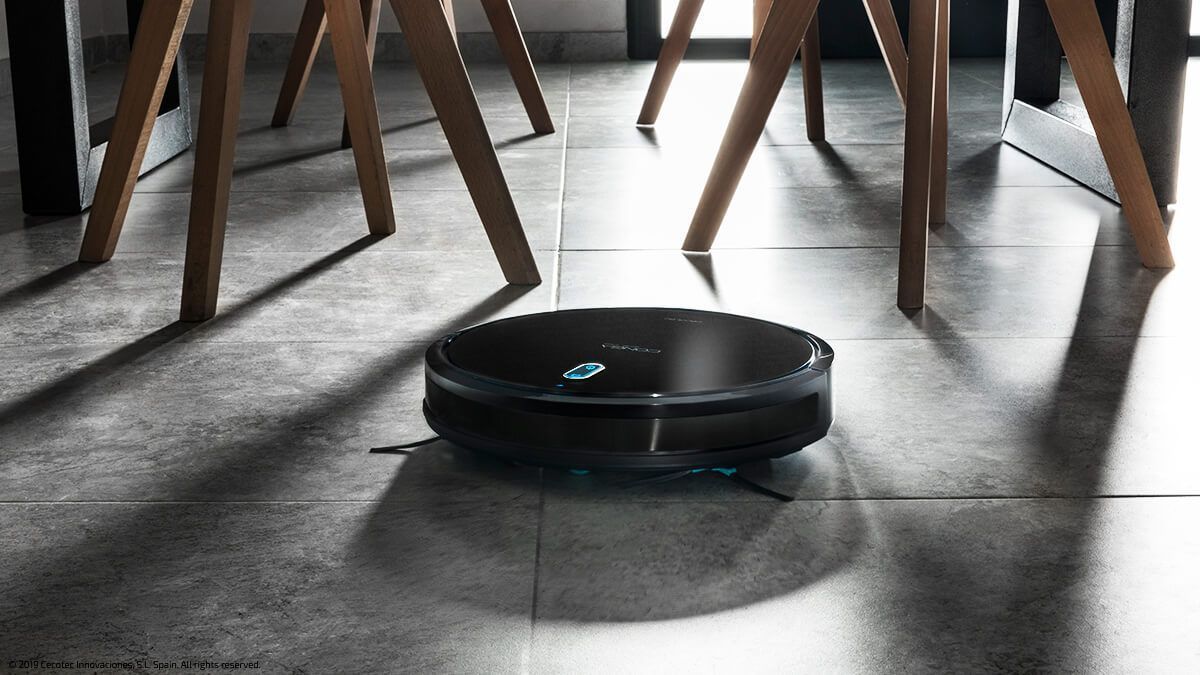
С инновационной технологией 4-в-1 Conga 1090 Connected обеспечит абсолютную чистоту вашего пола. Две боковые вращающиеся щетки выметают сор из углов и вдоль стен, направляя весь мусор к моторизированной центральной щетке. Она тем временем чистит пол, собирая шерсть и волосы, а пылесос всасывает весь мусор в специальный контейнер. Одновременно с этим робот протирает пол и дозированно распределяет жидкость по салфетке из микрофибры.
Conga 1090 Connected имеет два контейнера. Один контейнер 500 мл для сухой уборки, если мытье полов не требуется. Второй для влажной уборки состоит из двух секций: объемом 300 мл для воды и 200 мл для сбора мусора.
Управляйте роботом со своего смартфона.
Приложение для смартфона позволяет вам запускать робота и планировать уборку в любое время, даже если вы не находить дома. После завершения работы робот-пылесос самостоятельно вернется на зарядную базу. Например, запланируйте ежедневную уборку за час до вашего возвращения домой, и когда вы вернетесь дом уже будет чистым. Управляя роботом с телефона, вы можете: выбирать режим и просматривать историю уборки, устанавливать уровень подачи воды, проверять уровень заряда устройства.

Специальная насадка для владельцев домашних питомцев.
Система BestFriend Care разработана специально для уборки шерсти домашних животных. Моторизированная силиконовая щетка собирает всю шерсть и волосы, предотвращая их спутывание. В комплекте также есть щетка для ежедневной очистки пола.

Высокая мощность и отличная проходимость.
Вам не придется переносить пылесос из комнаты в комнату, робот самостоятельно преодолевает пороги и заезжает на ковры высотой до 20 мм. В зависимости от загрязненности пола, вы можете выбрать один из трех режимов всасывания: турбо-режим для тщательной уборки с технологией ForceClean, которая обеспечивает мощность до 1400 Па, нормальный режим 1200 Па для ежедневной очистки и экономичный мощностью 800 Па для слабо загрязненного пола с минимальным потреблением энергии.

Влажная уборка с технологией IWATER.
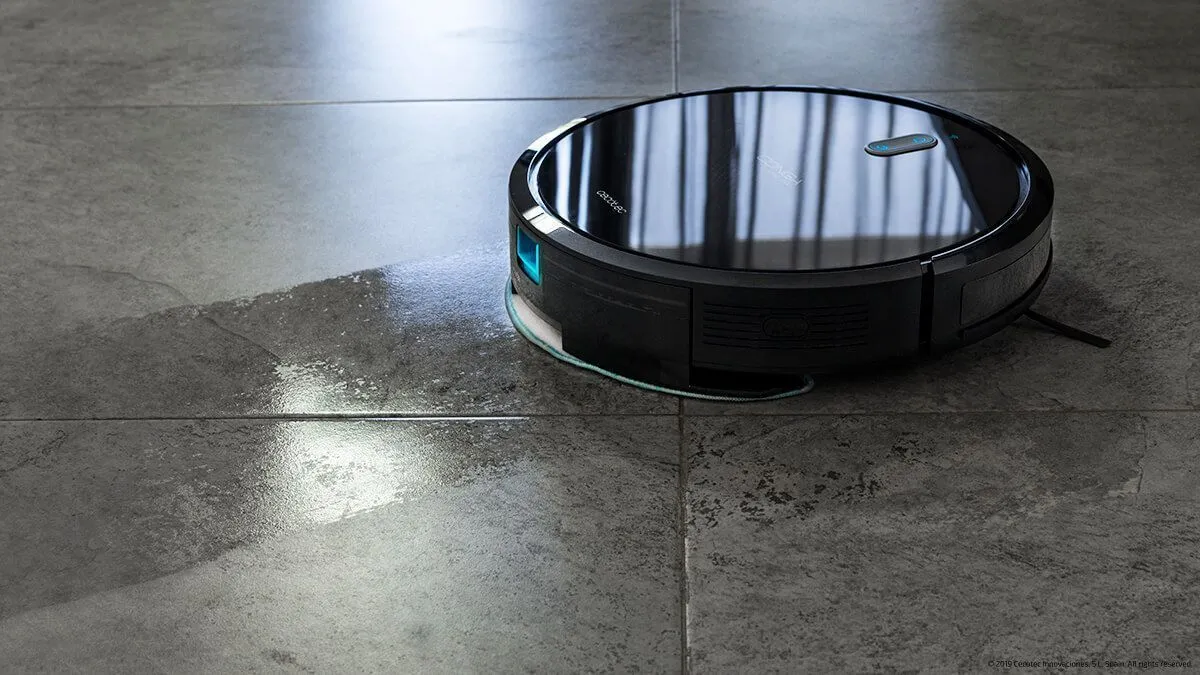
Conga 1090 Connected протрёт полы, не оставляя разводов и луж. Технология умной подачи воды iWater обеспечивает дозированное увлажнение салфетки и включает в себя 3 режима очистки для любого типа поверхности. Выбирайте сильное увлажнение, если необходима тщательная уборка, требующая большого количества воды, например, кухонный пол, средний режим для ежедневной уборки и слабое увлажнение для поверхностной очистки и деликатных полов.
6 программ уборки под любую задачу.
-
Автоматический режим: робот убирает весь дом, а в сильно загрязненных местах проходит повторно.
-
По периметру: режим для сбора мусора, скопившегося вдоль стен и мебели.
-
Режим “Комната”: для уборки одной комнаты, после завершения работы пылесос вернется на зарядную базу.
-
Спиральный режим: когда нужно убрать мусор в конкретном месте, например, если вы рассыпали крупу или муку.
-
Возвращение домой: активируется вручную или автоматически после завершения уборки и когда батарея разряжается.
-
Ручной режим: если хотите управлять роботом самостоятельно.

Умная навигация ITECH SMART 2.0.
ITech Smart 2.0 — интеллектуальная навигация с датчиками приближения, столкновения и падения. С их помощью робот самостоятельно перемещается и ориентируется в квартире. Например, если на пути встречается диван, то пылесос притормаживает и касается его бампером, затем меняет свою траекторию и начинает убирать вдоль дивана. Умная навигация обеспечивает уборку всего пола, не пропуская ни одного участка.

Комплектация:
-
Робот-пылесос;
-
Салфетки для влажной уборки — 2 шт;
-
Боковые щетки — 2 дополнительные;
-
Щетка для чистки робота;
-
Силиконовая щетка для шерсти;
-
HEPA фильтр — 1 дополнительный;
-
Резервуар для влажной уборки;
-
Резервуар для сухой уборки;
-
База для зарядки;
-
Руководство.