
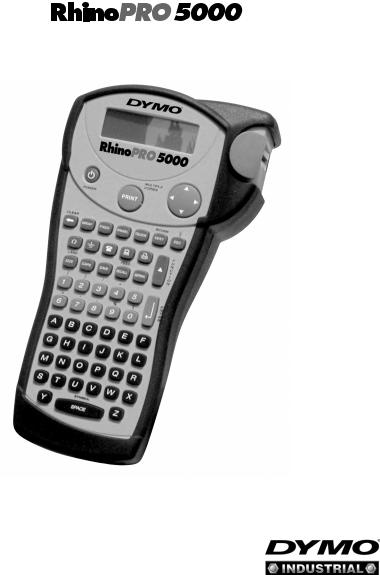
User Guide
www.dymo.com/industrial
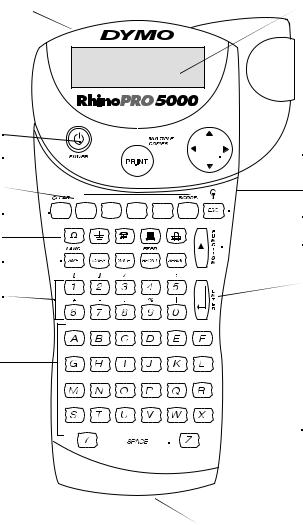
AC Power Connector
Power Button
Print Button
Hot Keys
Backspace/Clear All 


Symbol Keys
Function Keys 
Numeric Keys
Alpha Keys
Tape Exit
LCD Display
 Cutter Lever
 Navigation Key
Thumb Latch for Tape Compartment
 Escape/Backlight
 Function/Shift
Enter/OK
Space Bar/
 Symbol Key
Thumb Latch for
Battery Compartment
Figure 1 RhinoPRO 5000 Printer
2
About Your New Printer
With your new DYMO RhinoPRO™ 5000 printer, you can create a wide variety of high-quality, selfadhesive labels. You can choose to print your labels in many different sizes and styles. The printer uses RhinoPRO Industrial label cassettes in widths of 1/4” (6 mm), 3/8” (9 mm), 1/2” (12 mm), or 3/4” (19 mm). RhinoPRO label cassettes are also available in a wide range of materials.
Visit www.dymo.com/industrial for information on obtaining tapes and accessories for your printer.
Warranty Registration
Please complete the warranty registration card and return it to the appropriate customer service address within seven days. Visit www.dymo.com/ industrial for details.
Getting Started
Follow the instructions in this section to get started by printing your first label.
Power Supply
The printer can operate on AC or battery power. To save power, the printer will automatically turn off after five minutes of inactivity.
Inserting the Batteries
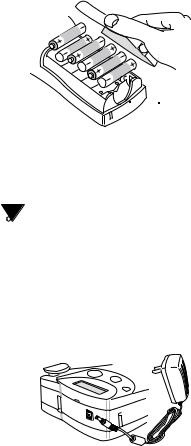
The printer uses six AA batteries.
To insert the batteries
1.Press the thumb latch on the bottom of the labelmaker to open the battery compartment door. See Figure 2.
Press thumb latch
Figure 2
2.Insert the batteries following the polarity markings (+ and –).
3.Close the compartment door.
 Remove the batteries if the printer will not be used for a long period of time.
Connecting the AC Adapter
Connecting the AC adapter to the printer disconnects the batteries as a power source.
To connect the AC adapter
1.Plug the power adapter into the power connector on the top, left side of the printer.
Figure 3
2.Plug the other end of the power adapter into a power outlet.
Inserting the Tape Cassette
Your printer comes with one label tape cassette. Visit www.dymo.com/industrial for information about purchasing additional label cassettes.
3
To insert the tape cassette
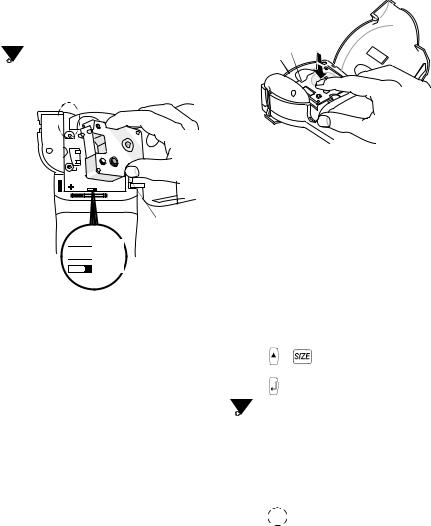
1.Press the thumb catch on the right side of the printer to open the tape cassette door.
 The first time you use the printer, remove the protective cardboard insert from between the print head and pinch roller. See Figure 4.
Remove cardboard 
 insert
Tighten tape
 = 6 mm


 = 9/12 mm
= 19 mm
Set cassette switch
Figure 4
2.Set the cassette switch for the size of the tape cassette that you are inserting. See Figure 4.
A notch in the cassette fits over the switch when the cassette is in the correct position.
3.Make sure the tape and ribbon are taut across the mouth of the cassette and that the tape passes between the guideposts. If necessary, turn the spool clockwise to tighten the ribbon.
4.Insert the cassette with the tape and ribbon positioned between the print head and pinch roller. See Figure 5.
Push down gently
Print Head
Pinch Roller
Figure 5
5.Press firmly until cassette clicks into place. Make sure tape and ribbon are positioned correctly.
6.Close the tape cassette door and press  to turn on the power.
Selecting a Language
Several language-related features on the printer are determined by the language setting, such as availability of special characters, units of measure, menu text, and so on.
By default the language is set to English.
To select a language
|
1. |
Press |
+ |
. |
|
|
SIZE |
||||
|
2. |
Use |
and |
to select the language. |
|
|
3. |
Press |
to set the language. |
 Select Universal as the language for the units of measure to be in millimeters.
Printing Your First Label
You are now ready to print your first label.
To print a label
1.Enter text to create a simple label.
2.Press Print .
4
 Loading…
Quick Reference
This Quick Reference gives you an overview of the features and functions of the DYMO RhinoPRO 5000
printer. For more detailed information on using your printer, refer to the DYMO RhinoPRO 5000 User Guide.
Function Keys
Hot Keys
Function Key Description
Toggle power on and off.
Navigate the label and menus.
Add new line to label; select a
menu option.
Print label.
Toggle CAPS on or off.
Exit current activity.
Select alternate function on keys.
+
Toggle display backlight on and off.
Delete character to left of cursor.
+
Clear current label text & format.
Add one space in label text.
+
Select symbol characters.
Select font size.
+
Select language.
+
Advance label tape 0.25” (6 mm).
+
Adjust print quality.
CAPS
ESC
ESC
SIZE
SIZE
RECALL
SAVE
Hot Key
Steps
Wrap-around label
1. Enter starting text.
2. Press .
3. Select label type; then .
4. Press .
Fixed-length label
1. Enter text and press
.
2. Press
S
or
T
, and then .
3. Press .
Patch panel label
1. Enter starting text.
2. Press .
3. Enter distance; then .
4. Press .
5. Enter # increments.
6. Press
or .
Terminal block label
1. Enter starting text.
2. Press .
3. Enter distance; then .
4. Press .
5. Enter # increments.
6. Press
or .
Vertical label
1. Enter label text.
2. Press ;
then .
+
Barcode
1. Press +
.
2. Choose type, and press .
3. Enter text for barcode ( ),
and then press .
4. Press .
WRAP
WRAP
FIXED
FIXED
PPANEL
PPANEL
SERIAL
TBLOCK
TBLOCK
SERIAL
VERT
VERT
VERT
VERT
Хорошее руководство по эксплуатации
Законодательство обязывает продавца передать покупателю, вместе с товаром, руководство по эксплуатации Dymo RhinoPRO 5000. Отсутствие инструкции либо неправильная информация, переданная потребителю, составляют основание для рекламации в связи с несоответствием устройства с договором. В законодательстве допускается предоставлении руководства в другой, чем бумажная форме, что, в последнее время, часто используется, предоставляя графическую или электронную форму инструкции Dymo RhinoPRO 5000 или обучающее видео для пользователей. Условием остается четкая и понятная форма.
Что такое руководство?
Слово происходит от латинского «instructio», тоесть привести в порядок. Следовательно в инструкции Dymo RhinoPRO 5000 можно найти описание этапов поведения. Цель инструкции заключается в облегчении запуска, использования оборудования либо выполнения определенной деятельности. Инструкция является набором информации о предмете/услуге, подсказкой.
К сожалению немного пользователей находит время для чтения инструкций Dymo RhinoPRO 5000, и хорошая инструкция позволяет не только узнать ряд дополнительных функций приобретенного устройства, но и позволяет избежать возникновения большинства поломок.
Из чего должно состоять идеальное руководство по эксплуатации?
Прежде всего в инструкции Dymo RhinoPRO 5000 должна находится:
— информация относительно технических данных устройства Dymo RhinoPRO 5000
— название производителя и год производства оборудования Dymo RhinoPRO 5000
— правила обслуживания, настройки и ухода за оборудованием Dymo RhinoPRO 5000
— знаки безопасности и сертификаты, подтверждающие соответствие стандартам
Почему мы не читаем инструкций?
Как правило из-за нехватки времени и уверенности в отдельных функциональностях приобретенных устройств. К сожалению само подсоединение и запуск Dymo RhinoPRO 5000 это слишком мало. Инструкция заключает ряд отдельных указаний, касающихся функциональности, принципов безопасности, способов ухода (даже то, какие средства стоит использовать), возможных поломок Dymo RhinoPRO 5000 и способов решения проблем, возникающих во время использования. И наконец то, в инструкции можно найти адресные данные сайта Dymo, в случае отсутствия эффективности предлагаемых решений. Сейчас очень большой популярностью пользуются инструкции в форме интересных анимаций или видео материалов, которое лучше, чем брошюра воспринимаются пользователем. Такой вид инструкции позволяет пользователю просмотреть весь фильм, не пропуская спецификацию и сложные технические описания Dymo RhinoPRO 5000, как это часто бывает в случае бумажной версии.
Почему стоит читать инструкции?
Прежде всего здесь мы найдем ответы касательно конструкции, возможностей устройства Dymo RhinoPRO 5000, использования отдельных аксессуаров и ряд информации, позволяющей вполне использовать все функции и упрощения.
После удачной покупки оборудования/устройства стоит посвятить несколько минут для ознакомления с каждой частью инструкции Dymo RhinoPRO 5000. Сейчас их старательно готовят или переводят, чтобы они были не только понятными для пользователя, но и чтобы выполняли свою основную информационно-поддерживающую функцию.
More products and manuals for Print & Scan Dymo
| Models | Document Type |
|---|---|
|
LetraTag XR |
User Manual
30 pages |
|
LabelManager 400 |
User Manual
13 pages |
|
LabelManager Wireless PnP |
User’s Guide
16 pages |
|
LetraTag XR |
User Manual
29 pages |
|
Rhino 1000 Industrial Label Printer |
User Manual
2 pages |
|
18949 |
User Manual
2 pages |
|
Label Manager PC |
User Manual
2 pages |
|
LabelManager 400 |
User Manual
2 pages |
|
Label Manager PC |
User Manual
2 pages |
|
ExecuLabel LM450 |
User Manual
4 pages |
|
LabelWriter 300 |
User’s Guide
38 pages |
|
LabelWriter 400 Duo Guide |
User Manual
15 pages |
|
RHINO 6000 |
User Manual
2 pages |
|
RHINO 6000 |
User Manual
2 pages |
|
LetraTag XR |
User Manual
30 pages |
|
LabelWriter 450 Duo Label Printer |
User Manual
4 pages |
|
DiscPainter |
User’s Guide
56 pages |
|
LabelManager Series |
User’s Guide
12 pages |
|
LabelWriter 400 Duo Guide |
User Manual
30 pages |
|
LabelManager 100 |
User Manual
26 pages |


Your Donation Will Be Matched 1-to-1! Can You Chip In?
Dear Patron: Please don’t scroll past this. The Internet Archive is a nonprofit fighting for universal access to quality information. We build and maintain all our own systems, but we don’t charge for access, sell user information, or run ads. Instead, we’re powered by online donations averaging about $14. We’d be deeply grateful if you’d join the one in a thousand users that support us financially.
Right now, we have a matching gift campaign that will double the impact of every donation. We understand that not everyone can donate right now, but if you can afford to contribute this Tuesday, we promise it will be put to good use. Our resources are crucial for knowledge lovers everywhere—so if you find all these bits and bytes useful, please pitch in.
Your Donation Will Be Matched! Can You Chip In?
Dear Patron: Please don’t scroll past this. Right now we have a matching gift campaign that will double the impact of every donation. We understand that not everyone can give right now, but if you can afford to contribute this Tuesday, we promise it will be put to good use. If you find all these bits and bytes useful, please pitch in.