
More products and manuals for Receiver Yamaha
| Models | Document Type |
|---|---|
|
htr-5890 |
Owner’s Manual
104 pages |
|
RX-V861 |
User Manual
2 pages |
|
RX-V730RDS |
User Manual
68 pages |
|
Aventage RX-A1020 |
User Manual
3 pages |
|
R-V1105 |
User Manual
32 pages |
|
RX-V2300 |
User Manual
5 pages |
|
HTR-5940BL |
Service Manual
99 pages |
|
RX-V465BL |
User Manual
3 pages |
|
CRX-332 |
User Manual
1 pages |
|
MCR-B142 |
Manual
219 pages |
|
MCR-042 |
Manual
200 pages |
|
RX-A3050 |
Setup Guide
2 pages |
|
ISX-803 |
Manual
228 pages |
|
RX-A1050 |
Setup Guide
2 pages |
|
RX-V1600 |
Manual
132 pages |
|
YSP-4100 |
Owner’s Manual
54 pages |
|
RX-A3050 |
Setup Guide
2 pages |
|
CRX-E300 |
Owner’s Manual
192 pages |
|
YHT-1196AU |
User Manual
2 pages |
|
YSP-900 |
Owner’s Manual
272 pages |


Инструкция по эксплуатации
АВ ресивер Русский для Европы

СОДЕРЖАНИЕ
Изменение установок входного сигнала с помощью
Установка функций HDMI………….………………….… 47
ВВЕДЕНИЕ
одной клавиши (функция SCENE)……….……………… 26
Настройка ресивера в режим,
Функции и возможности ……………………………..………….3
Сохранение источников входного сигнала/
более удобный для пользования……………………….. 49
О данном руководстве………….…………………..………….4
программы звукового поля…………………….…………. 26
Установка параметров программы
Поставляемые принадлежности………………………….4
звукового поля ……………..……………..………………….… 50
Использование программ звукового поля……..……. 26
Запрет на изменение установок ……………………….. 50
Названия компонентов и их функции…………………….5
Выбор программ звукового поля
Установка параметров программы
Передняя панель…………………..……………..……………….5
и звуковых декодеров …………………………….…………. 26
звукового поля………………………………..………………….… 51
Задняя панель………..…………………..……………..………….6
Программы звукового поля…….…………………..……. 28
Установка параметров звукового поля ……..…….. 51
Дисплей передней панели..………………….……………....7
Настройка FM/AM-приема ………..……………..…………. 30
Пульт ДУ……………….……………..…………………..………….8
Выбор частоты для приема
Настройка расширенных функций по мере
(Нормальная установка) ……………………………..……. 30
надобности (меню Advanced Setup)…………………….. 53
ПОДКЛЮЧЕНИЯ
Сохранение и вызов частоты (Предустановка) ….. 31
Отображение/установка меню Advanced Setup.…. 53
Очистка предустановленных станций………………. 32
Предотвращение перекрытия сигналов ДУ при
Подключение колонок …………………………………………... 9
Настройка системы радиоданных ………….…………. 32
использовании нескольких ресиверов Yamaha……. 53
Каналы и функции колонок …………..…………………...9
Инициализация различных установок для
Воспроизведение мелодий с iPod™/iPhone™………. 35
Расположение колонок ………..…………………..………..10
данного аппарата …………………………………..………….. 53
Подключение универсальной док-станции
Подключение колонок ……………..………………….……10
Yamaha для iPod…………………..………………….…………. 35
Использование функции управления HDMI ..…….. 54
Подключение внешних устройств …….………………….12
Управление iPod/iPhone ……………….…………………... 35
Штекеры кабелей и гнезда …………….…………….……12
ПРИЛОЖЕНИЕ
Воспроизведение мелодий с компонентов
Подключение ТВ-монитора ..…………………..………..13
Bluetooth™……………………………..………………….…………. 37
Подключение BD/DVD-проигрывателей
Поиск и устранение неисправностей …………………… 57
Подключение беспроводного Bluetooth-
и других устройств …………..………………….……………..15
Неисправности общего характера………..………….. 57
приемника аудиосигнала Yamaha ……………………... 37
Подключение видеокамер и портативных
HDMI™………….……………..………………….……………….. 60
Спаривание компонентов Bluetooth™ ………..……. 37
аудиоплееров…….………………….…………………..………..19
Тюнер (FM/AM)……………………..……………..………….. 60
Передача входного аудио/видеосигнала на
Использование компонентов Bluetooth™………... 38
Пульт ДУ….…………………..………………….……………..… 61
внешние устройства……………..……………..……………..19
iPod™/iPhone™……………..………………….……………….. 62
УСТАНОВКА
Подключение FM/AM-антенн ……..………………….……20
Bluetooth™ .…………………..………………….……………….. 62
Автоматическая установка параметров колонок
Глоссарий ………….………………….……………..……………….. 63
Настройка установок, относящихся к каждому
(YPAO)…………………………..…………………..………………….21
источнику входного сигнала (меню Option)………… 39
Информация об аудиосигнале ………………………….. 63
Отображение и установка меню Option…………... 39
Информация о программах звукового поля…….. 64
ВОСПРОИЗВЕДЕНИЕ
Пункты меню Option …….…………………..……………... 39
Информация о видеосигналах .…………………..…….. 64
Установка различных функций (меню Setup) …….. 42
Информация о HDMI™ ………………………………..…….. 65
Основная процедура воспроизведения …………………25
Отображение и установка меню Setup …………….. 42
Регулировка звука высокой/низкой частоты
О товарных знаках……………….…………………..………….. 65
(контроль тональности)…………….………………….……25
Пункты меню Setup……….……………..…………………... 42
Технические характеристики……………………………….. 66
Управление установками для колонок ……….……. 43
Индекс .………………….…………………..……………..………….. 67
Настройка функции вывода аудиосигнала
данного аппарата………………………………..……………… 46
Ru 2
ВВЕДЕНИЕ
Функции и возможности
■ Встроенный высококачественный 5-канальный усилитель высокой
■ FM/AM-тюнер
мощности
– Прослушивание FM/AM-трансляции…………..………….………..………….…………..…………..…………...30
– Простая предустановка……….…………..…………..………….…………..…………..……….…………..…………...31
■ Переключение входа/программы звукового поля с помощью 1-й кнопки
– Настройка системы радиоданных…………………..…………..………….…………..…………..………….……...32
(функция SCENE) ……………………………………………………………………………………….26
– Автоматический прием информации о дорожном движении ……..…………..…………..……….…..33
■ Подключение колонок для конфигураций, предусматривающих
■ Воспроизведение многоканального, многоформатного сигнала
от 2 до 5.1 каналов
– Выбор эффекта звукового поля……..…………..………….…………..…………..……….…………..……………26
– Каналы и функции колонок…………..………….…………..…………..………….…………..……….…………..……9
– Воспроизведение без использования эффектов звукового поля ……………….………..…………...27
– Расположение колонок ………..…………..…………..………….…………..…………..………….………..…………..10
– Стереофоническое воспроизведение…………..………….…………..…………..………….………..…………...27
– Подключение кабеля колонки ………………………..……….…………..…………..………….…………..………..10
– Настройка эффектов звукового поля………….……….…………..………….…………..…………..…………...51
– Подключение кабеля сабвуфера .…………..…………..……….………….…………..…………..………….……..11
– Воспроизведение сжатых музыкальных файлов ……………..………….………..………….…………..…..26
■ Регулировка акустических параметров в зависимости от используемых
■ Отображение информации на передней панели
колонок и среды для прослушивания
– Переключение информации на дисплее передней панели…….………..………….…………..…………..7
– Автоматические настройки для акустических параметров колонок
– Регулировка яркости дисплея передней панели <Dimmer>..…………..………….…………..…………50
(YPAO — Yamaha Parametric Room Acoustic Optimizer).………….…………..……….…………..………..21
– Отображение информации о цифровом видео/аудиосигнале <Signal Info> ………..……….…..40
– Выбор настроек для каждой колонки……….…………..…………..………….…………..…………..…………..43
– Регулировка громкости для каждой колонки …….……….………….…………..…………..………….……..44
■ Функции регулировки громкости/качества звука
– Установки расстояния до колонки ……..…………..…………..………….………..………….…………..………..44
– Облегчение прослушивания при низкой громкости <Adaptive DRC> ………….……….…………46
– Управление качеством звука с помощью эквалайзера <Graphic Equalizer>…….…………..….45
– Установки максимальной громкости……….…………..…………..………….………..………….…………..…..47
– Регулировка колонок с помощью тестовых тональных сигналов…………………..………….……..45
– Установки начальной громкости….………….…………..……….…………..…………..………….………….......47
– Настройка уровня басов и высоких частот <контроль тональности> ……..…………..…………..25
– Регулировка громкости различных источников входного сигнала <Volume Trim> ………….40
■ Подключение внешних устройств и воспроизведение с них
■ Управление с помощью пульта ДУ
– Кабели и входные/выходные гнезда данного аппарата ……………..………….…………..……….……..12
– Названия и функции элементов пульта ДУ………….……….…………..…………..………….…………..…….8
– Подключение телевизора………..………….…………..…………..……….…………..………….…………..………..13
– Установка батареек в пульт ДУ……………………..….………….……….…………..…………..………….………..4
– Воспроизведение аудиосигнала телевизора через данный ресивер…………………..…………..….14
– Управление несколькими ресиверами Yamaha без помех для сигналов
– Подключения для BD/DVD-проигрывателей (рекордеров) и других устройств…………..….15
<Переключение идентификационного кода ДУ>………………….…………..…………..………….………53
– Вывод аудиосигнала на телевизор, подключенный через гнездо HDMI ………….…………..….48
■ Другие функции
– Коррекция задержки между аудио и видеосигналом <Lipsync> ..………….…………..…………..….46
– Режим ожидания после длительного перерыва в работе <функция Auto Power Down>.…50
– Подключение внешнего аудио и видеомагнитофона….………….………..………….…………..………..19
– Режим ожидания после заданного интервала времени <Sleep timer> .…………..………….………..8
– Объединение видеовхода HDMI/AV с другим аудиовходом ….……………..…………..……………...40
– Для выполнения зарядки iPod/iPhone, когда данный аппарат находится в режиме
– Подключения внешних устройств к передней панели (для видеокамер, портативных
ожидания <зарядка iPod в режиме ожидания > …………………..…………..………….…………..…………36
музыкальных плееров и т.п.)………….………….………..………….…………..………….…………..…………..….19
– Инициализация различных установок для данного аппарата …………………….…………..…………53
– Защитная крышка для гнезд передней панели……..…………..………….……….…………..…………..……4
– Запрет на изменение установки <Memory Guard>…….………….…………..…………..……….…………50
– Изменение названий источников входного сигнала <Input Rename> …..…………..…………..….49
– Настройка установок, относящихся к каждому источнику входного сигнала
(меню <Option>)……………..……….………….…………..…………..………….…………..…………..……….………..39
– Воспроизведение с внешних устройств …….…………..…………..………….…………..…………..…………..25
– Воспроизведение с iPod/iPhone (iPod/iPhone и продаваемых отдельно компонентов)……..35
– Воспроизведение с компонента Bluetooth (Bluetooth и продаваемых
отдельно компонентов)………..…………..…………..………….…………..……….…………..…………....…………37
Ru 3
ВВЕДЕНИЕ
Функции и возможности
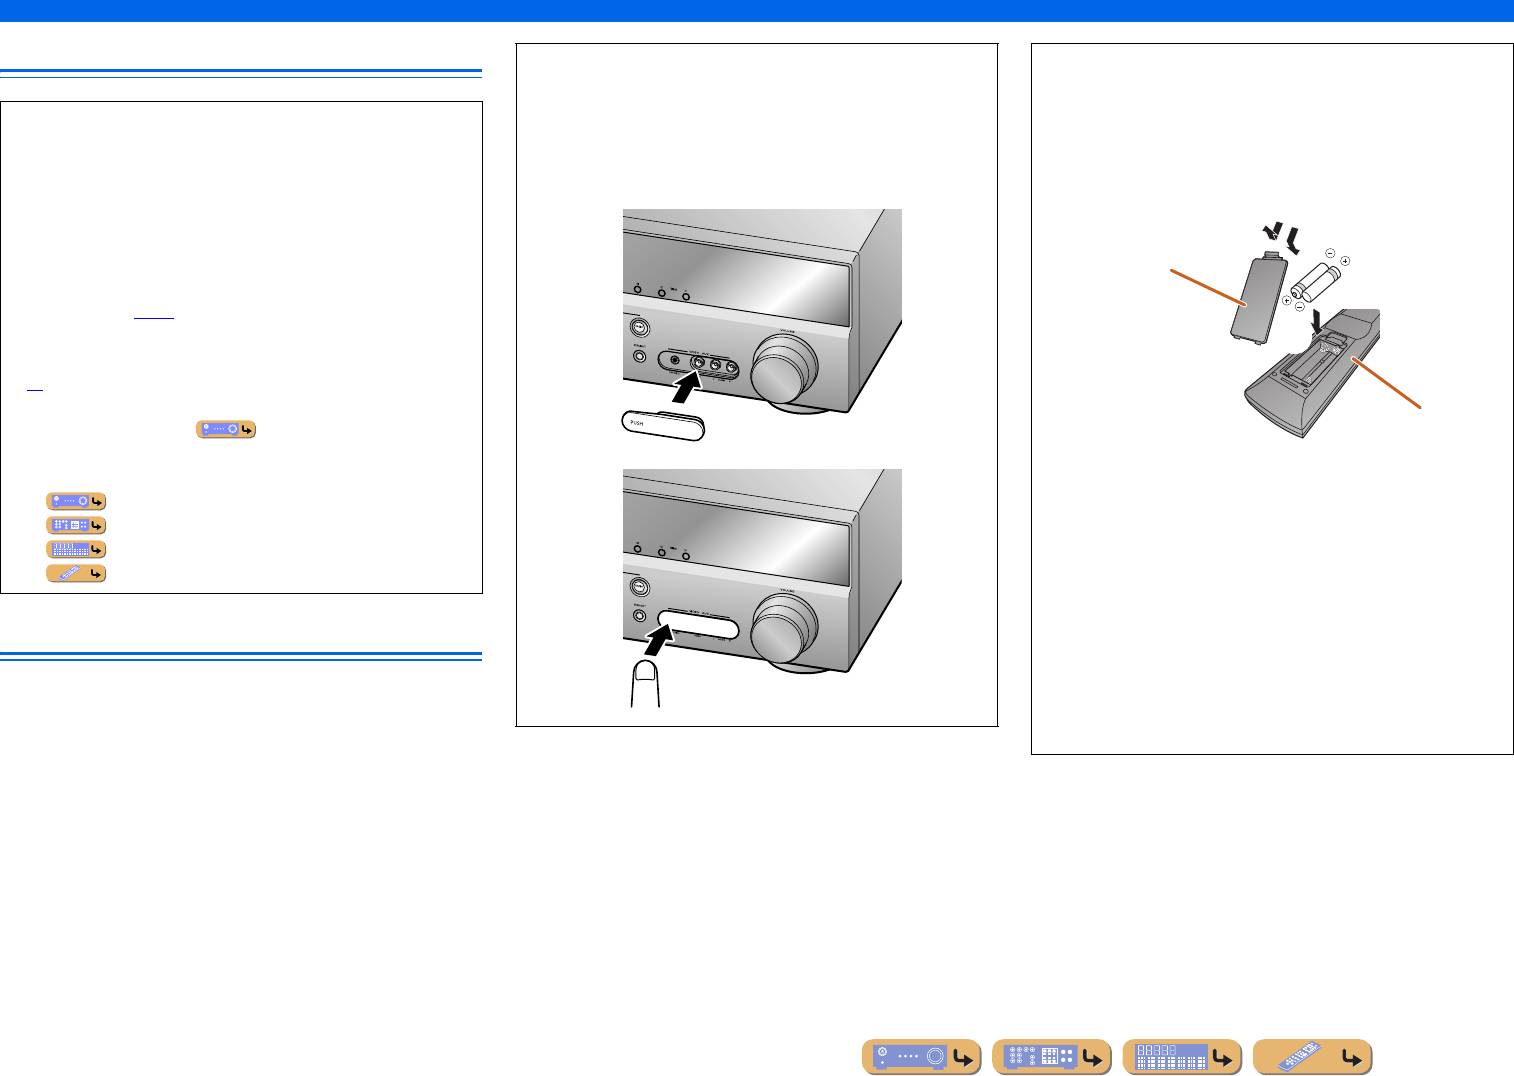
О данном руководстве
■ Установка крышки входа VIDEO AUX
■ Установка батареек в пульт ДУ
(прилагается)
При установке батареек в пульт ДУ снимите крышку
Для защиты от пыли установите поставляемую
отделения для батареек с обратной стороны пульта
• Данное руководство отпечатано до начала производства.
крышку входа VIDEO AUX на гнезда VIDEO AUX,
ДУ и вставьте две батарейки AAA в отделение для
Дизайн и технические характеристики могут частично
если они не используются. Для снятия крышки
батареек таким образом, чтобы они совпадали
измениться в результате усовершенствования и т.д.
нажмите на ее левую сторону.
с обозначениями полярности (+ и -).
В случае расхождений между руководством и аппаратом,
приоритет отдается аппарату.
• “
cHDMI1” (пример) используется для обозначения
a
c
Крышка отсека для
названий элементов на пульте ДУ. Информация
батареек
о расположении элементов приведена в разделе
“Пульт ДУ” (☞
c. 8).
•
J1 указывает на то, что справка размещена в сноске.
b
См. соответствующие номера внизу страницы.
• ☞
используется для обозначения страницы, на которой
приведена относящаяся к данному пункту информация.
Отсек для батареек
• Нажмите на значок “ ” внизу страницы для
Установка крышки
отображения соответствующей страницы в разделе
Замените батарейки новыми при возникновении
“Названия компонентов и их функции.”
следующих симптомов:
Передняя панель
• Пульт ДУ работает только в узком диапазоне.
Задняя панель
•
bTRANSMIT не загорается или горит очень тускло.
Дисплей передней панели
Пульт ДУ
ПРИМЕЧАНИЕ
PUSH
Если для пульта ДУ сохранены коды ДУ для внешних
Поставляемые принадлежности
компонентов, извлечение батареек более чем на две
минуты или оставление в пульте ДУ разряженных
Убедитесь в наличии всех перечисленных ниже деталей.
батареек может привести к очистке кодов ДУ. Если это
Снятие крышки
• Пульт ДУ
произойдет, замените батарейки новыми и установите
• Батарейки (AAA, R03, UM-4) x 2
коды ДУ.
• Микрофон YPAO
• Рамочная AM-антенна
• Комнатная FM-антенна
• Крышка входа VIDEO AUX
Ru 4
ВВЕДЕНИЕ
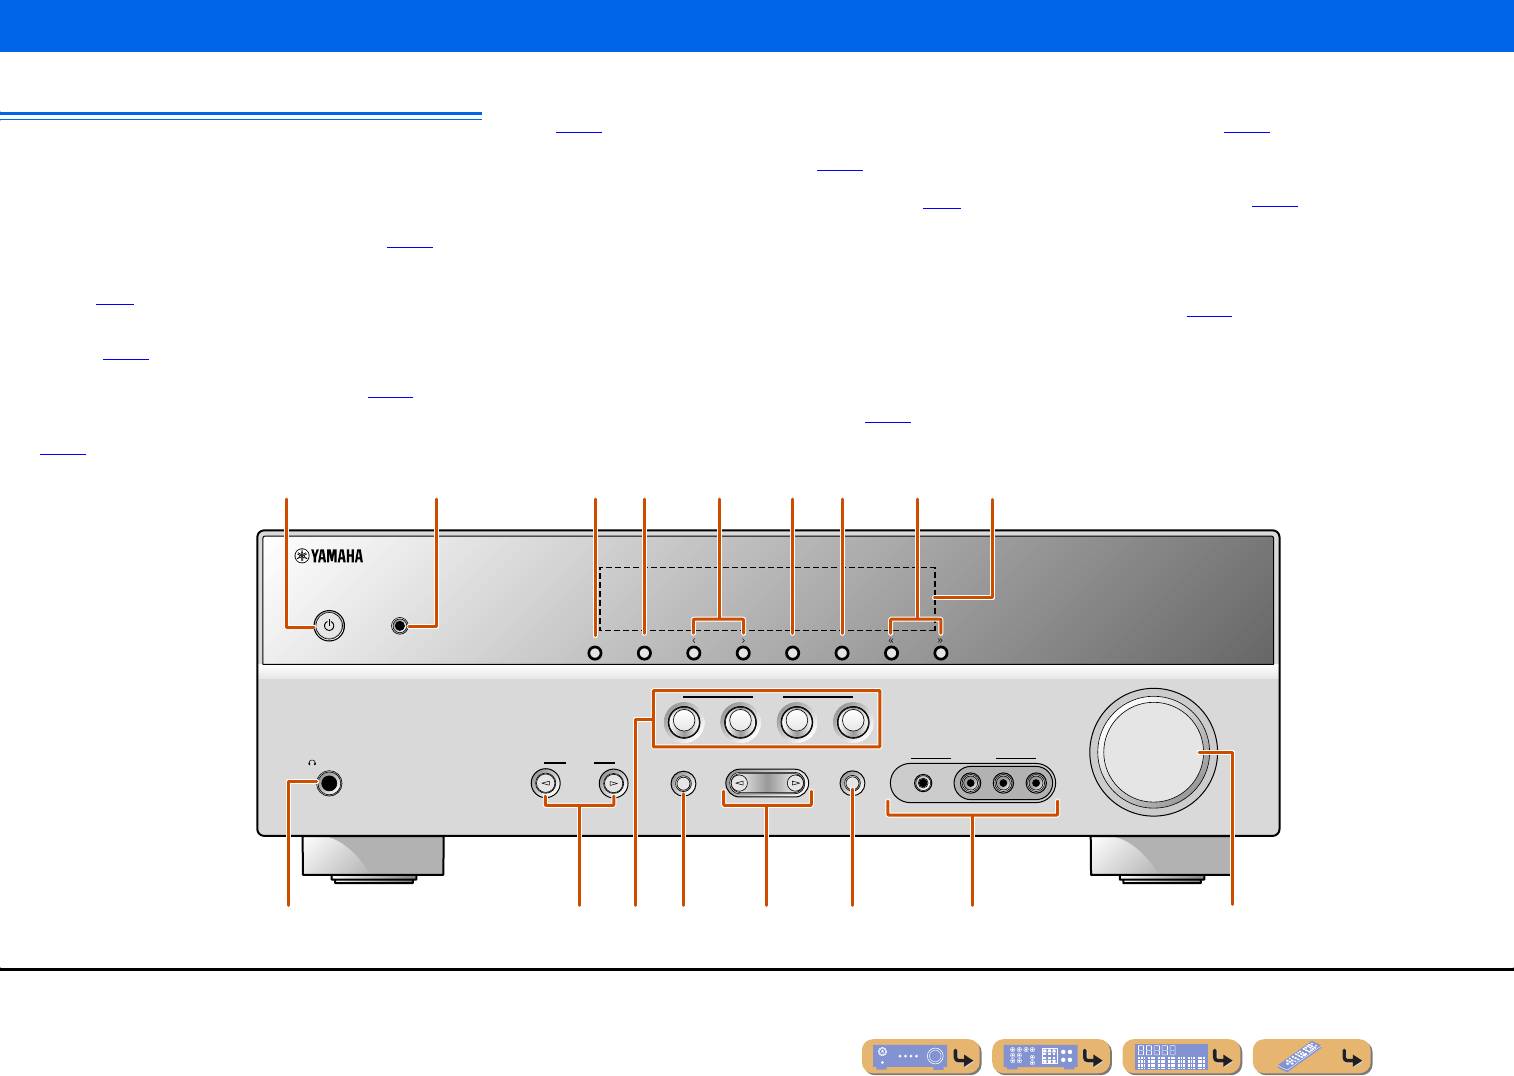
Названия компонентов и их функции
g AM
m TONE CONTROL
Передняя панель
Установка диапазона FM/AM-тюнера в положение AM
Регулировка выходной мощности высоких/низких частот
(☞
c. 30). J1
колонок/наушников (☞
c. 25).
a A (Питание)
h TUNING jj / ii
n PROGRAM l / h
Переключение данного аппарата между режимами
Изменение частот FM/AM-тюнера (☞
c. 30). J1
Переключение между используемыми эффектами
включения и ожидания.
i Дисплей передней панели
звукового поля (программами звукового поля) и декодерами
b Гнездо YPAO MIC
Отображение информации на данном устройстве (☞
c. 7).
окружающего звучания (☞
c. 26). Нажимайте повторно
j Гнездо PHONES
левую или правую кнопку для циклического
Подключите поставляемый микрофон YPAO и
последовательного переключения между источниками
автоматически отрегулируйте баланс колонок (☞
c. 21).
Подключение наушников. Звуковые эффекты,
c INFO
применяемые во время воспроизведения, также будут
входного сигнала.
o STRAIGHT
Изменение информации, отображаемой на дисплее передней
слышны через наушники.
k INPUT l / h
Переключение программы звукового поля в режим прямого
панели (☞
c. 7).
Выбор источника входного сигнала для воспроизведения.
декодирования (☞
c. 27).
d MEMORY
Нажимайте повторно левую или правую кнопку для
p Гнезда VIDEO AUX
Сохранение FM/AM-станций в качестве предустановленных
циклического последовательного переключения между
Для временного подключения к данному аппарату
станций (☞
c. 31). J1
источниками входного сигнала.
видеокамер, игровых приставок и портативных
e PRESET j / i
l SCENE
музыкальных плееров.
Выбор предустановленной FM/AM-станции (☞
c. 32). J1
Переключение источника входного сигнала и программы
Установите поставляемую крышку входа VIDEO AUX,
f FM
звукового поля с помощью одной кнопки (☞
c. 26). Для
когда это гнездо не используется.
Установка диапазона FM/AM-тюнера в положение FM
включения данного аппарата нажмите эту кнопку, когда
q VOLUME
(☞
c. 30). J1
аппарат находится в режиме ожидания.
Регулировка уровня громкости.
a
b
c fe gd h
i
YPAO MIC
INFO
MEMORY
PRESET
FM AM
TUNING
VOLUME
SCENE
BD
DVD
TV
CD
RADIO
PHONES
INPUT
TONE
CONTROL
PROGRAM
STRAIGHT
VIDEO
AUX
SILENT
CINEMA
PORTABLE
VIDEO
LR
AUDI O
lj q
m ok n
p
J
1 : Используется в случае выбора входного сигнала тюнера.
Ru 5
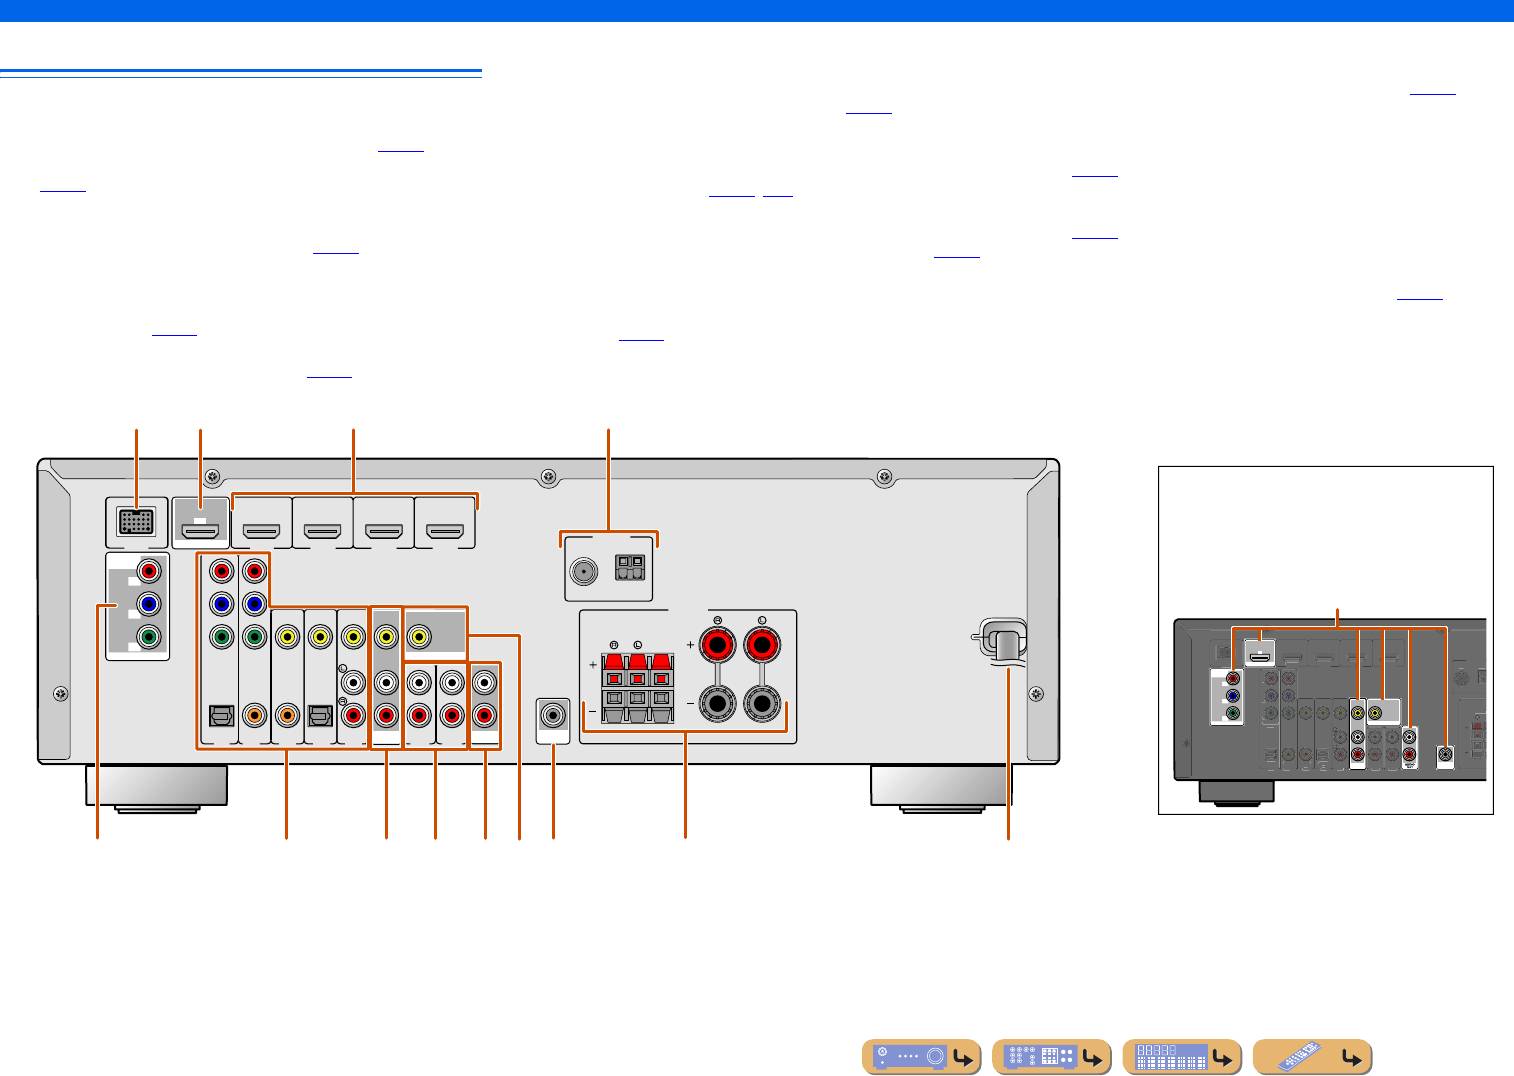
ВВЕДЕНИЕ
Названия компонентов и их функции
e Гнезда COMPONENT VIDEO
i Гнездо MONITOR OUT
Задняя панель
Для подключения телевизоров, совместимых
Для подключения телевизора, способного принимать
с компонентными видеосигналами, для вывода
видеосигнал, и вывода на него видеосигналов (☞
c. 14).
a Гнездо DOCK
видеосигнала с помощью трех кабелей (☞
c. 13).
j Гнезда AUDIO OUT
Для подключения дополнительной универсальной док-
f Гнезда AV1-5
Для вывода аудиосигналов, полученных в случае выбора
станции Yamaha для iPod (например, YDS-12) (☞
c. 35) или
Для подключения к внешним устройствам, оснащенным
таких аналоговых входов, как гнезда AV5 или AUDIO1-2
беспроводного Bluetooth-приемника аудиосигнала (YBA-10)
аудио/видеовыходами, чтобы этот аппарат мог принимать
(☞
c. 19).
(☞
c. 37).
аудио/видеосигналы (☞
c. 16, c. 17).
k Гнездо SUBWOOFER
b Гнездо HDMI OUT
g Гнезда AV OUT
Для подключения сабвуфера со встроенным усилителем
Для подключения HDMI-совместимого телевизора для
Для вывода аудио/видеосигналов, полученных в случае
(☞
c. 11).
вывода на него аудио/видеосигналов (☞
c. 13).
выбора аналоговых входов (AV3-5 или AUDIO1-2) (☞
c. 19).
l Разъемы SPEAKER
c Гнезда HDMI1-4
h Гнезда AUDIO1-2
Для подключения фронтальных колонок, центральной
Для подключения внешних компонентов, оснащенных
Для подключения к внешним компонентам, оснащенным
колонки и колонок окружающего звучания (☞
c. 11).
HDMI-совместимыми выходами для приема от них аудио/
аналоговыми аудиовыходами, для подачи звука на данный
m Шнур питания
видеосигналов (☞
c. 15).
аппарат (☞
c. 18).
Для подключения данного аппарата к настенной розетке
d Гнезда ANTENNA
переменного тока.
Для подключения AM и FM-антенн (☞
c. 20).
HDMI
OUT
(
BD/DVD
)
ANTENNA
HDMI 1
HDMI 2 HDMI 3
HDMI 4
FM
GND
AM
COMPONENT
VIDEO
P
R
P
R
P
B
P
B
FRONT
SURROUND
CENTER
Y
Y
MONITOR OUT
COMPONENT
VIDEO
MONITOR OUT
VIDEO
HDMI
OUT
COMPONENT
VIDEO
P
R
P
B
MONITOR OUT
Y
MONITOR OUT
OPTICAL
COAXIAL
COAXIAL
OPTICAL
(
CD
)
TV
(
)
AV
AV 1
AV 2
AV 3
AV 4
OUT
AUDIO
AV 5
AUDIO 1
OUT
SUBWOOFER
AUDIO 2
OUT
AV
SUBWOOFER
Ru 6
ANTENNA
FM
G
ND
C
OMPONENT
VIDEO
P
R
P
B
Y
O
PTI
C
A
L
(
TV
)
AV 1
AV 2
AV 3
AV 4
AV 5
AUDIO 1
AUDIO 2
CO
AXIA
L
(
CD
)
CO
AXIA
L
O
PTI
C
VIDE
AL
O
SURRO
U
H
DMI 1
(
BD
/
DVD
)
H
DMI
2
H
DMI
3
HDMI 4
DOC
ac
b
d
Выбор входных и выходных гнезд
Область вокруг выходных аудио/видеогнезд
обозначена белым цветом, чтобы
ARC
предотвратить ошибочное подключение.
DOCK
Используйте эти гнезда для вывода аудио/
видеосигналов на телевизор или другие
внешние компоненты.
Выходные гнезда
SPEAKERS
ARC
K
e i
fg khj l
m
ВВЕДЕНИЕ
Названия компонентов и их функции
g Индикатор VOLUME
Дисплей передней панели
Используется для отображения текущего уровня громкости.
■ Переключение дисплея на передней панели
h Индикаторы курсора
На передней панели могут отображаться программы
a Индикатор HDMI
Загораются, если соответствующие курсоры на пульте ДУ
звукового поля и названия декодеров окружающего
Загораются при вводе сигналов HDMI на выбранном
доступны для управления.
звучания, а также активный источник входного
источнике входного сигнала HDMI.
i Многофункциональный информационный дисплей
сигнала.
b Индикатор CINEMA DSP
Используется для отображения различной информации
Загорается в случае выбора эффекта звукового поля,
Нажимайте повторно кнопку eINFO для циклического
о пунктах меню и установках.
использующего технологию CINEMA DSP.
j Индикаторы колонок
последовательного переключения между источником
c Индикатор тюнера
Используются для обозначения разъемов колонок,
входного сигнала → программой звукового поля →
Загорается во время приема FM/AM-трансляции.
через которые выводятся сигналы.
декодером окружающего звучания.
J1
d Индикатор вывода через iPod CHARGE
Загорается при подключении iPod/iPhone через
Название источника входных сигналов
дополнительную универсальную док-станцию Yamaha iPod
Сабвуфер
SW
Центральная
колонка
(например, YDS-12), когда активна функция зарядки iPod
Фронтальная
C
Фронтальная
VOL.
в режиме ожидания (☞
c. 36).
левая колонка
LR
правая колонка
HDMI1
SW
Левая колонка
e Индикатор SLEEP
SL SR
Правая колонка
L
C
R
окружающего
окружающего
SL SR
STRAIGHT
Загорается при включенном таймере сна (☞
c. 8).
звучания
звучания
f Индикатор MUTE
Программа звукового поля (программа DSP)
Мигает во время приглушения аудиосигнала.
abcedgf
iPod
CHARGE
SLEEP
VOL.
STEREO
TUNED
MUTE
SW
C
LR
SL SR
hi jh
J
1 : Во время выбора входа тюнера вместо источника входного сигнала будет отображаться FM/AM-частота.
Ru 7
ВВЕДЕНИЕ
Названия компонентов и их функции
a Передатчик сигнала ДУ
i Курсор B / C / D / E, ENTER, RETURN
Пульт ДУ
Передача инфракрасных сигналов.
Курс ор B / C / D / E Выбор пунктов меню и изменение
b TRANSMIT
установок во время отображения меню
Загорается во время передачи сигнала с пульта ДУ.
установок и т.п.
a
c Переключатель входных сигналов
ENTER Подтверждение выбранного пункта.
Выбор источника входного сигнала для воспроизведения на
RETURN Возврат к предыдущему экрану во время
TRANSMIT
b
данном аппарате.
отображения меню установки или
RECEIVER
завершение экрана меню.
SLEEP
k
HDMI1-4 Гнезда HDMI1-4
HDMI
l
AV 1— 5 Гнезда AV1-5
j Клавиши управления iPod/iPhone
1234
AUDIO 1-2 Гнезда AUDIO1—2
Используются для управления операциями воспроизведения,
AV
V-AUX Гнезда VIDEO AUX на передней панели
остановки и т.п. для iPod или iPhone.
1234
DOCK Универсальная док-станция Yamaha для
AUDIO
k RECEIVER A (Питание RECEIVER)
c
125
iPod или беспроводной Bluetooth-приемник
Переключение данного аппарата между режимами
аудиосигнала подключен к гнезду DOCK.
включения и ожидания.
V-AU X
DOCK
TUNER FM/AM-тюнер
l SLEEP
TUNER
d Клавиши тюнера
Настройка данного аппарата на автоматический переход
Управление FM/AM-тюнером. Эти клавиши используются
в режим ожидания через заданный период времени (таймер
d
FM
AM
во время работы с входом тюнера.
PRESET
TUNING
сна). Нажимайте повторно данную клавишу для установки
e
INFO
MEMORY
времени включения функции таймера сна. При включении
FM Установка диапазона FM/AM-тюнера
ENHANCER
SUR. DECODE
таймера сна загорится индикатор на дисплее передней
в положение FM.
MOVIE MUSIC
STEREO
панели.
AM Установка диапазона FM/AM-тюнера
f
STRAIGHT
в положение AM.
SCENE
MEMORY Предустановка радиостанций.
Sleep 120min. Sleep 90min.
BD
g
DVD
TV
CD
RADIO
PRESET F / G Выбор предустановленной станции.
TUNING H / I Изменение частот настройки.
SETUP
Sleep 60min.Sleep 30min.Sleep Off
OPTION
m
h
e INFO
Циклическое переключение информации, отображаемой на
m OPTION
ENTER
VOLUME
n
дисплее передней панели (название выбранного в данный
Отображение меню Option для каждого источника входного
i
момент источника входного сигнала, программы звукового
сигнала (☞
c. 39).
RETURN
поля, декодера окружающего звучания, частоты FM/AM-
n VOLUME +/—
MUTE
тюнера и т.п.) (☞
c. 7).
Регулировка уровня громкости (☞
c. 25).
o
f Клавиши выбора звука
o MUTE
Переключение между используемыми эффектами
j
Включение и выключение функции приглушения
звукового поля (программами звукового поля) и декодерами
выводимого звука (☞
c. 25).
окружающего звучания (☞
c. 26).
g SCENE
Переключение источника входного сигнала и программы
звукового поля с помощью одной кнопки (☞
c. 26). Для
включения данного аппарата нажмите эту кнопку, когда
аппарат находится в режиме ожидания.
h УСТАНОВКА
Отображение подробного меню Setup для данного аппарата
(☞
c. 42).
Ru 8
Страницы и текст этой инструкции
 Инструкция ресивера и усилителя Yamaha RX-V371
 Информация отображена на картинке
 Информация отображена на картинке
 Информация отображена на картинке
 Информация отображена на картинке
Как использовать наш сайт инструкций OnlineManuals.ru
Наша цель состоит в том, чтобы предоставить вам быстрый доступ к содержанию инструкции для ресивера и усилителя Yamaha RX-V371.
С помощью онлайн просмотра, Вы можете быстро просмотреть содержимое инструкции и найти решение проблемы с ресивера и усилителя Yamaha RX-V371.
Для Вашего удобства
Если листать руководство пользователя ресивера и усилителя Yamaha RX-V371 прямо на сайте, не очень удобно для Вас, есть два возможных решения:
• Просмотр в полноэкранном режиме — легко просмотреть руководство пользователя (без загрузки его на свой компьютер), Вы можете использовать режим полноэкранного просмотра.
Для просмотра инструкции пользователя ресивера и усилителя Yamaha RX-V371 на полном экране, используйте кнопку «Открыть в Pdf-viewer».
• Загрузка на компьютер — Вы можете также скачать Инструкция ресивера и усилителя Yamaha RX-V371 на свой компьютер и сохранить его в файлах.
Многие люди предпочитают читать документы не на экране, а в печатной версии.
Возможность печати руководства пользователя также была предусмотрена на нашем сайте,
и вы можете использовать ее, нажав на иконку «печать» в Pdf-viewer.
Нет необходимости печатать все руководство ресивера и усилителя Yamaha RX-V371, можно выбрать только нужные страницы инструкции.
-
Инструкции по эксплуатации
1

Yamaha RX-V371 инструкция по эксплуатации
(68 страниц)
- Языки:Русский
-
Тип:
PDF -
Размер:
5.71 MB -
Описание:
Ресивер
Просмотр
На NoDevice можно скачать инструкцию по эксплуатации для Yamaha RX-V371. Руководство пользователя необходимо для ознакомления с правилами установки и эксплуатации Yamaha RX-V371. Инструкции по использованию помогут правильно настроить Yamaha RX-V371, исправить ошибки и выявить неполадки.
-
— 4 — Yoko 0161, 0277, 0282, 0320, 0323, 0337, 0340, 0342, 0343, 0349, 0350 Yorx 0340 Zanussi 0282, 0346 Zenith 0008, 0028, 0029, 0030, 0031, 0054, 0061, 0062 VCR ABS 1016 Adventura 1069 Adyson 1008 Aiwa 1024, 1026, 1027, 1069 Akai 1021, 1027 Akiba 1008, 1029 Akura 1008, 1027, 1029 Alba 1008, 1009, 1024, 1025, 1029, 1030 Alienware 1016 Ambassador 1030 American High 1068 Amstrad 1008, 1009, 1026 Anitech 1008, 1029 Apex 1088 ASA 1028, 1031 Asha 1070 Asuka 1008, 1026, 1028, 1029, 1031 Audio Dynamics 1064
-
Yamaha RX-V371 En 34 PLAYBACK Once you have connected a Yamaha iPod universal dock (such as the YDS-12, sold separately) to this unit, you can enjoy playback of your iPod/iPhone using the remote control supplied with this unit. When playing back from an iPod/iPhone, you can also use the compressed music enhancer sound field programs (☞ p. 29) to give compressed audio formats such as MP3 a sharper, more dynamic sound. Connecting the Yamaha iPod universal dock Use the dedicated cable to connect the dock to the DOCK jack on the rear panel of this unit. Refer to the operating instr
-
En 40 SETUP Configuring the settings specific for each input source (Option menu) ■ Changing FM mode (Stereo/Monaural) Input source: TUNER Sets this unit to automatically match FM broadcast frequencies in stereo, or to convert the frequency to monaural (☞ p. 31). ■ Automatically presetting FM radio stations Input source: TUNER Automatically detects radio stations in the FM frequency and registers them as preset stations (☞ p. 31). ■ Clearing preset FM stations Input source: TUNER Clears the preset stations (
-
En 8 INTRODUCTION Part names and functions Remote control a Remote control signal transmitter Transmits infrared signals. b TRANSMIT Lights up when a signal is output from the remote control. c SOURCE A (SOURCE Power) Switches an external component on and off. d Input selector Select an input source on this unit from which to playback. e Tuner keys Operates the FM/AM tuner. These keys are used when using the tuner input. f INFO Cycles the information displayed on the front panel display (the name of the currently selected input source, the sound field program, the surround decoder, th
-
© 2011 Yamaha Corporation YD282A0/OMEN1
-
Yamaha RX-V371 — 6 — 5 5 Set up speaker parameters When you nish connecting, adjust the status, size, and volume of each speaker so that the output is normal. STEP 1: Display the setting menu 1 Press RECEIVER A on the remote control to switch this unit on. 2 Press SETUP on the remote control. 3 Check that “Speaker Setup” appears and press ENTER. This completes step 1. STEP 2: Set the speaker status and size The settings in step 2 are not necessary with the following speaker con guration: • Front speaker: woofer diameter is 16 c
-
Yamaha RX-V371 En 14 CONNECTIONS Connecting external devices Connecting a TV monitor This unit is equipped with the following three types of output jack for connection to a TV. HDMI OUT, COMPONENT VIDEO or VIDEO. Select the proper connection according to the input signal format supported by your TV. Video signals input from a particular type of jack(s) are output from the same type of jack(s). For example, these three output devices must be connected to the monitor by matching input/output jacks and cables, and then you must change the TV’s input mode to the proper setting. ■ Connecting an HDMI video
-
En 28 PLAYBACK Enjoying sound field programs Sound field programs ■ Category: MOVIE Sound field programs optimized for viewing video sources such as movies, TV programs, and games. ■ Category: MUSIC This sound field is suitable when listening to music sources such as CDs. in the table indicates the sound field program for CINEMA DSP. Standard This program creates a sound field emphasizing the surround feeling without disturbing the original acoustic positioning of m
-
Yamaha RX-V371 En 23 CONNECTIONS Setting up speaker parameters 5 Use jCursor B / C to select the speaker (subwoofer) you want to configure, and then use jCursor D / E to select speaker status and size. When you have completed the settings for one speaker, repeat the same procedure for all speakers to complete settings. 6 Press jRETURN when setting is complete. Return to the previous menu. This completes step 2. STEP 3: Set the distance from the listening point 7 Press jCursor C to display “Distance” and press jENTER. 8 Press jCursor B / C to select the speaker that
-
En 10 CONNECTIONS Connecting speakers Speaker layout 5.1-channel speaker layout (5 speakers + subwoofer) Connecting speakers ■ Changing speaker impedance This unit is configured for 8Ω speakers when it is dispatched from the factory. When connecting to 6Ω speakers, carry out the following procedure to switch to 6Ω. 1 Set this unit to the standby mode. 2 Press A while pressing and holding STRAIGHT on the front panel. Release the keys when “ADVANCED SETUP” is displayed on the front panel display. After approximately 3 seconds, the top
-
Yamaha RX-V371 En 27 PLAYBACK Enjoying sound field programs ■ Enjoying unprocessed playback (Straight decoding mode) Use straight decoding mode when you want to playback sound without sound field processing. You can playback as follows in straight decoding mode. 2-channel sources such as CD Stereo sound plays through the front left and right speakers. Multi-channel playback sources such as BD/ DVD Plays back audio from a playback source without applying sound field effects, using an appropriate decoder to split the signal into multiple channels. 1 Press gSTRAIGHT to activate the straight decoding mode. 2 Press gSTRAIGHT a
-
Yamaha RX-V371 En 24 CONNECTIONS Setting up speaker parameters STEP 4: Playback a test tone 10 Press jCursor C repeatedly to display “Test Tone” and press jENTER. 11 Use jCursor D / E to select “On.” A test tone plays back as soon as you select “On.” The test tone plays back in a clockwise fashion, as follows. 12 Check that the test tone is playing back and press jRETURN. Return to the previous menu. This completes step 4. STEP 5: Adjust the volume 13 Press jCursor B repeatedly to display “Level” and press jENTER. 14 Use jCursor
-
En 30 PLAYBACK The FM/AM tuner of this unit provides the following two modes for tuning. Normal tuning You can tune in to a desired FM/AM station by searching or specifying its frequency. Preset tuning (☞p. 31) You can preset the frequencies of FM/AM stations by registering them to specific numbers, and later just select those numbers to tune in. Selecting a frequency for reception (Normal tuning) 1 Press dTUNER to switch to the tuner input. 2 Press eFM or eAM to select a band to receive. 3 Use eTUNING H / I to set a frequency to receive. eTUNING H Incre
-
— 5 — 3 3 Connect playback device such as BD/DVD players and recorders 4 4 Connect the AC power cord, and turn the power on • When playback, select the corresponding input source the jack is connected. • Connecting to HDMI1 allows you to select the HDMI input just by pressing the “BD/DVD” under “SCENE” key. • Connecting to AV3 allows you to select the AV3 input just by pressing the “CD” under “SCENE” key. • If necessary, you can connect components
-
Yamaha RX-V371 En 69 APPENDIX ■ INPUT/OUTPUT Input jacks • HDMI input x 4 • AV input x 5 [Audio] Digital input (optical) x 2, digital input (coaxial) x 2, analog input x 1 [Video] Component video jacks x 2, video jacks x 3 • AUDIO input x 2 [Audio] Analog jack x 2 • VIDEO AUX input x 1 [Audio] Analog x 1, stereo mini jack x 1 [Video] Video jack x 1 • DOCK input x 1 Output jacks • TV output (monitor output) x 3 [Audio/Video] HDMI x 1 [Video] Component video jack x 1, video jack x 1 • AV output x 2 [Audio] Analog jack x 1 [Video] Video jack x 1 �
-
— 7 — 8 Press Cursor B / C to select the speaker (subwoofer) that you want to con gure, and press Cursor D / E to set the distance. If necessary, you can change the setting units under “Unit.” Information Description Setting Unit Switches between setting units (feet / meters). feet (ft) / meters (m) Front L Front speaker L 1.0 ft to 80.0 ft (0.30 m to 24.0 m) Front R Front speaker R 1.0 ft to 80.0 ft (0.30 m to 24.0 m) Center Center speaker 1.0 ft
-
Yamaha RX-V371 En 21 CONNECTIONS An indoor FM antenna and an AM loop antenna are included with this receiver. Connect these antennas properly to their respective jacks. Connecting the FM/AM antennas ■ Improving FM reception We recommend using an outdoor antenna. For more information, consult the nearest authorized dealer. ■ Improving AM reception Connect this unit to an outdoor antenna with a 5-10 m vinyl-coated wire. Make sure the AM loop antenna is still connected. Connecting the GND jack can reduce noise. Connect the jack to a store-bought ground bar or copper plate with a vinyl-covered wire and bury this new attachment in moist ground. The G
-
En 59 SETUP Using the HDMI Control function ■ Single HDMI cable input to TV audio with Audio Return Channel function When using a TV that supports HDMI functions and Audio Return Channel function, audio/video output from this unit to the TV or audio output from the TV to this unit can be transmitted through a single HDMI cable (Audio Return Channel function). Audio signals transmitted from the TV to this unit can be assigned to any input source. 1 Connect this unit and the TV with an HDMI cable.
-
Yamaha RX-V371 En 22 CONNECTIONS When you have finished connecting your speakers, configure this unit so that they output sound normally. Carry out the following steps to configure this unit. STEP 1: Display the setting menu Display the Setup menu from which you can configure all settings for this unit, and then display the menu for speaker settings. STEP 2: Set the speaker status and size Set the size and connection status of speakers and subwoofers, and whether to designate a specific speaker (or subwoofer) for low-frequency sound. STEP 3: Set the distance from the listening point Set the dista
-
Yamaha RX-V371 — 2 — Gibralter 0008, 0030, 0050, 0062 GoldHand 0277 Goldline 0320 GoldStar 0007, 0008, 0012, 0026, 0031, 0050, 0053, 0161, 0277, 0282, 0320, 0323, 0342, 0343, 0346, 0349, 0350 Goodmans 0246, 0272, 0282, 0320, 0323, 0337, 0343, 0344, 0349, 0350, 0462, 0473, 0477 Gorenje 0161, 0351 GPM 0340 GPX 0129 Gradiente 0240 Graetz 0347 Granada 0171, 0282, 0320, 0321, 0342, 0344, 0346, 0349, 0350 Grandin 0340, 0343, 0348, 0349 Gronic 0282 Grundig 0160, 0161, 0171, 0310, 0320 Grunpy 0058, 0059, 0179 Haier 0157, 0233 Halifax 0277, 0282, 0337, 0342
-
Yamaha RX-V371 En 61 APPENDIX Troubleshooting No sound. Incorrect input or output cable connections. Connect the cables properly. If the problem persists, the cables may be defective. 16 If a DVI-HDMI cable is used to connect the unit with an external component, then it is necessary to use an audio input jack for a different input to output audio. Display the HDMI Input Option menu for the connected cable, select “Audio In,” and select the jack to use for audio input. 39 Speaker connections are not secure. Secure the connections. 12 The HDMI components connected to the unit do not support the HDCP copy protection stand
-
Yamaha RX-V371 En 31 PLAYBACK FM/AM tuning Registering and recalling a frequency (Preset tuning) You can register up to 40 FM/AM stations as preset stations. There are two methods of presetting stations, “Auto Preset” and “Manual Preset.” Use one of these methods to register stations. ■ Presetting FM stations automatically (Auto Preset) The tuner detects FM stations with strong signals and registers up to 40 automatically. 1 Press dTUNER to switch to the tuner input. 2 Press qOPTION to display the Option menu. J1 3 Use jCursor B / C to select “Auto Preset.” 4 Pre
-
En 41 SETUP You can configure various function settings of this unit using the Setup menu. Setup menu display and settings 1 Press iSETUP on the remote control. 2 Use the jCursor B / C to select the desired menu and press jENTER. Setup menu categories Ex: Sound Setup menu 3 Use jCursor B / C to navigate the submenus to find the desired setting and press jENTER. 4 When multiple items appear, use jCursor B / C to select the desired item. 5 Press jCursor D / E to change the setting. You ca
-
Yamaha RX-V371 — 8 — © 2010 Yamaha Corporation YC434C0/RC Rainbow 4004 RCA 4093, 4066, 4112, 4113, 4118, 4119, 4116, 4122, 4197, 4207 Realistic 4078 Redpoint 4009 Redstar 4024, 4008 RFT 4005, 4055, 4053 Roadstar 4217 Roch 4031 Rover 4024, 4217 Saba 4010, 4215, 4219, 4216 Sabre 4006 Sagem 4023, 4052 Sakura 4050 Samsung 4064, 4071, 4069, 4123, 4120, 4003, 4000, 4001, 4032, 4196, 4200 SAT 4007, 4218 Sat Cruiser 4223 Sat Partner 4001, 4004, 4010, 4013, 4049, 4218 Sat Team 4217 Satcom 4012, 4219 Satec 4217 Satelco 4024 Satford 4012 Satmaster 4012 Satplus 4212 Schneider 4008, 4212, 4216 Sch
-
Yamaha RX-V371 En 19 CONNECTIONS Connecting external devices ■ Connecting CD players and other audio devices Using analog stereo output sources Select the audio input (AUDIO1-2) that the external device is connected to for playback. Using optical digital output sources Select the AV input (AV1 or AV4) that the external device is connected to for playback. Using coaxial digital output sources Select the AV input (AV2 or AV3) that the external device is connected to for playback. AUDI O 1 AUDI O 2 C OMPONEN T VIDE O P R P B Y OPTICAL ( TV ) AV 1 AV 2 AV 3 AV 4 AV 5 CO AXIAL ( CD ) CO AXIA L O PTI C A L VIDE O HDMI 1 ( B D/D
-
Yamaha RX-V371 En 5 INTRODUCTION Front panel a A (Power) Switches this unit between on and standby modes. b INFO Changes the information shown on the front panel display (☞ p. 7). c MEMORY Registers FM/AM stations as preset stations (☞ p. 32). J1 d PRESET j / i Selects an FM/AM preset station (☞ p. 32). J1 e FM Sets the FM/AM tuner band to FM (☞ p. 30). J1 f AM Sets the FM/AM tuner band to AM (☞ p. 30). J1 g TUNING jj / ii Changes FM/AM tuner frequencies (☞ p. 30). J1 h Front panel display Displays information on this unit (☞ p. 7). i PHONES jack For plugging headphones in. Sound effects appli
-
Yamaha RX-V371 En 42 SETUP Setting various functions (Setup menu) Manages settings for speakers Speaker Setup submenu ■ Manual speaker setup Adjusts the output characteristics of the speakers based on manually set parameters. Subwoofer Confirms the subwoofer. Front Selects the size (sound reproduction capacity) of the front speakers. J2 Center Selects the size of the center speakers. Sur. LR Selects the size of the surround speakers. Config Manually manages speaker configuration, such as speaker size (sound production capacity), and bass
-
En 3 INTRODUCTION ■ Built-in high-quality, high-power 5-channel amplifier ■ 1-button input/sound field program switching (SCENE function) …………………..26 ■ Speaker connections for 2- to 5.1-channel configurations – Speaker channels and functions …………………………………………………………………………………………………..9 – Speaker layout…………………………………………………………………………………………………………………………10 – Speaker cable connection……
-
En 39 SETUP Configuring the settings specific for each input source (Option menu) ■ Adjusting volume between input sources Input source: All Reduces any change in volume when switching between input sources by correcting volume differences in each input source. You can adjust this parameter for each input source. ■ Combining HDMI/AV1-2 input source video and audio Input source: HDMI1-4, AV1-2 Combines video from HDMI or AV input sources with analog/ digital audio inputs in situations such as: – an external device is connected with a
-
Yamaha RX-V371 En 13 CONNECTIONS Cable plugs and jacks The main unit is equipped with the following input/output jacks. Use jacks and cables appropriate for components that you are going to connect. ■ Audio/Video jacks HDMI jacks Digital video and digital sound are transmitted through a single jack. Only use an HDMI cable. ■ Analog video jacks ■ Audio jacks Connecting external devices • Use a 19-pin HDMI cable with the HDMI logo. • We recommend using a cable less than 5.0 m long to prevent signal quality degradation. COMPONENT VIDEO jacks The signal is separated into three com
-
Yamaha RX-V371 En 15 CONNECTIONS Connecting external devices ■ Connecting a video monitor Connect the video pin cable to the VIDEO (MONITOR OUT) jack. ■ Listening to TV audio To transmit sound from the TV to this unit, connect as followings according to the TV: When using a TV that supports the Audio Return Channel function and HDMI Control function When your TV supports both HDMI Control (Ex. Panasonic VIERA Link) and Audio Return Channel functions, audio/video output from the unit to the TV and audio output from the TV to the unit are possible using a single HDMI cable. The input source is switched automatically to match ope
-
En 43 SETUP Setting various functions (Setup menu) Crossover Sets the lower limit of low-frequency component output from speakers set to “Small.” Audio with a frequency below that limit will be produced from the subwoofer or the front speakers. J1 SWFR Phase Sets the phase of the subwoofer if the bass audio is lacking or unclear. Extra Bass Allows the front channel low-frequency components to be produced exclusively by the subwoofer, or by both the subwoofer and the front speakers. ■ Controlling the volume of each speaker Separately adjusts the vo
-
Yamaha RX-V371 En 50 SETUP Although the sound field programs would satisfy you as they are with the default parameters, you can arrange the effect by setting the sound field elements (parameters). To adjust the sound effects suitable for acoustical conditions of audio/video sources or rooms, perform the following operations. Setting sound field parameters 1 Press iSETUP to display the Setup menu. 2 Use jCursor B / C to select “DSP Parameter” and press jENTER. 3 Use jCursor D / E to choose the sound field program you want to edit. 4 Press jCursor B /
-
En 6 INTRODUCTION Part names and functions Rear panel a DOCK jack For connecting an optional Yamaha iPod universal dock (such as YDS-12) (☞ p. 34) or Bluetooth wireless audio receiver (YBA-10) (☞ p. 36). b HDMI OUT jack For connecting an HDMI — compatible TV to output audio/video signals to (☞ p. 14). c HDMI1-4 jacks For connecting external components equipped with HDMI- compatible outputs to receive audio/video signals from (☞ p. 16). d ANTENNA jacks For co
-
Yamaha RX-V371 En 4 INTRODUCTION Features and capabilities About this manual Supplied accessories Check that you received all of the following parts. • Remote control • Batteries (AAA, R03, UM-4) x 2 • AM loop antenna • Indoor FM antenna • VIDEO AUX input cover • This manual is printed prior to production. Design and specifications are subject to change in part as a result of improvements, etc. In case of differences between the manual and product, the product has priority. • “ dHDMI1” (example) indicates the name of the parts on the remote control. Refer to the “Remote control” (☞ p.
 for the information about each position of th
 -
En 46 SETUP Setting various functions (Setup menu) ■ Auto-adjusting Dolby Digital and DTS dynamic range Selects the dynamic range adjustment method for audio bitstream (Dolby Digital and DTS) playback. ■ Setting the maximum volume Sets a maximum volume level so that the audio is not played too loudly. The default setting of +16.5 dB produces the highest volume. ■ Setting the startup volume Sets the initial volume for when this receiver is turned on. When this parameter is set to “Off,” the volume is set at the level when the r
-
Yamaha RX-V371 — 8 — RECEIVER SCENE OPTION SETUP RETURN VOLUME ENHANCER SUR. DECODE STRAIGHT HDMI AV AUDIO TRANSMIT SLEEP 1234 1234 125 V-AU X TUNER FM INFO MEMORY AM PRESET TUNING MOVIE MUSIC STEREO BD DVD TV CD RADIO MUTE ENTER 7856 90 10 1234 REC ENT TV TV VOL TV CH TOP MENU POP-UP MENU DISPLAY SOURCE CODE SET INPUT MUTE [ A ] [ B ] DOCK Operation guide A Switches this unit between on and standby modes This unit switches between on and standby mode every time you press this key. B Choose an input source to listen to The name of the selected input source appears on the front panel display. SW C L SL SR R HDMI1 VOL. C Select sound
-
En 63 APPENDIX Troubleshooting HDMI™ Tuner (FM/AM) FM Problem Cause Remedy See page The front panel display HDMI indicator is flashing. An error with the HDMI connection has occurred. Try re-inserting the HDMI cable. — Confirm that HDMI video that is not supported by the unit is not being input (HDMI Input → Option menu → “Signal Info”). 39 No picture or sound. The number of components is over the limit. Disconnect some of the HDMI components. — The connected HDMI component does not support high-bandwidth digital co
-
— 4 — 2 2 Connect a TV Video input to this unit is output to a TV using output jacks of the same kind. When you have made connections using different types of video such as HDMI and component video, make the same connection with your TV. When viewing, be sure to switch the input source on your TV to match the playback device. COMPONENT VIDEO HDMI VIDEO COMPONENT VIDEO HDMI VIDEO Input Output HDMI input Component video input Video input If your TV has multiple inputs, connect with the following priority (A to C). COMPONENT VIDEO P R P B Y OPTICAL ( TV ) AV 1 AV 2 AV 3 AV 4 AV 5 A U
-
Yamaha RX-V371 En 54 SETUP Controlling other components with the remote control Resetting all remote control codes Resetting all remote control codes for external components to the initial factory settings. 1 Press nCODE SET on the remote control using a pointed object such as the tip of a ballpoint pen. 2 Press iSETUP on the remote control. 3 Enter “9981” using lNumeric keys. i SETUP lNumeric keys nCODE SET SETUP 7856 90 1234 CODE SET 10 R E C ENT TV TV V O L TV C H I NPUT M U T E RECEIVER SC ENE O PTI O N RETURN VO L U ME ENHAN C E R SU R. DE CO DE S TRAI G HT H DMI AV A UDI O TRAN S MI T S LEE
-
En 25 PLAYBACK 1 Turn on external components (TV, DVD player, etc.) connected to this unit. 2 Turn on this unit and select the input source using dInput selector. The name of the selected input source is displayed for a few seconds. J1 3 Play the external component that you have selected as the source input, or select a radio station on the tuner. Refer to the instruction manuals provided with the external component for details on playback. For details on the following operations, refer to the corresponding pa
-
Yamaha RX-V371 — 2 — When connection and installation is nished, set up the speaker parameters 5 5 . Connect and install as follows the rst time you use this unit. See the following explanations for the connections for each number. 1 1 Connect the speakers 2 2 Connect a TV 3 3 Connect playback device such as BD/DVD players and recorders 4 4 Connect the AC power cord, and turn the power on This unit TV Subwoofer 1 1 1 1 2 2 3 3 4 4 BD/DVD player (recorder) Center speaker Surround speaker R Surround speaker L Front speaker R Front speak
-
Yamaha RX-V371 En 32 PLAYBACK FM/AM tuning ■ Registering stations manually (Manual Preset) Select stations by hand and register them as presets individually. 1 Tune in to the station you wish to register, referring to “Selecting a frequency for reception (Normal tuning)” (☞ p. 30). 2 Use one of the following methods to register the station you are currently receiving. ■ Registering to a preset number to which no station is registered Press eMEMORY for 2 seconds or longer. The station will be registered automa
-
Yamaha RX-V371 En 33 PLAYBACK FM/AM tuning ■ Combining the video signals and radio audio signals Select the video signal to be output from the video output jack on this unit when TUNER is selected as the input source. For example, when watching the sports relay on the TV, only audio can be switched to the radio audio. 1 Press dTUNER to switch to the tuner input. 2 Press qOPTION to display the Option menu. J1 3 Use jCursor B / C to display “Video Out” and press jENTER. 4 Use jCursor D / E to select the video source you want to watch, and pre
-
En 38 SETUP This receiver has a unique option menu specific for each type of input source, such as volume trim for compatible input sources, audio/video data display for signals from external devices, and other frequently used menu items. Option menu display and setup 1 Use the dInput selector on the remote control to select the Option menu you wish to display. 2 Press qOPTION. The Option menu appears for the desired input source. 3 Select the desired con
-
Yamaha RX-V371 En 16 CONNECTIONS Connecting external devices Connecting BD/DVD players and other devices This unit has the following input jacks. Connect them to the appropriate output jacks on the external components. ■ Connecting BD/DVD players and other devices with HDMI Connect the device with an HDMI cable to one of the HDMI1-4 jacks. Select the HDMI input (HDMI1-4) that the external device is connected to for playback. OPTION HDMI 1234 ENTER 7 8 5 6 9 0 10 1 2 3 4 R E C ENT TV TV V O L TV C H I NPUT M U T E RECEIVER SC ENE S ET UP RETURN VO L U ME ENHAN C E R SU R. DE CO DE S TRAI G HT AV A UDI O TRAN S
-
En 20 CONNECTIONS Connecting external devices Connecting video cameras and portable audio players Use the VIDEO AUX jacks on the front panel to temporarily connect video cameras, game consoles, or portable audio devices to the receiver. Select the V-AUX input to use these connected devices. Transmitting input A/V to external devices This receiver can transmit selected incoming analog audio/video signals to external devices through the AV OUT and AUDIO OUT jacks. You can record these input audio and video signals to VCRs or similar devices, or send them to other TVs
-
Yamaha RX-V371 En 58 SETUP Using the HDMI Control function ■ Switching the input source on this unit automatically when listening to TV audio When the HDMI Control (☞p. 57) is operating properly, the input source of this unit is automatically changed to match operations carried out on the TV. The default input jack is AV4. If the AV4 optical digital jack is connected to the TV’s audio output jack, then you can enjoy TV sound through this unit right away. To use other jacks to input audio signals from TV, carry out the following procedure. 1 Connect this unit and the TV with an HDMI cable. 2 Connect TV’s audio o
-
En 68 APPENDIX ■ HDMI signal compatibility Audio signals • If the input source component can decode the bitstream audio signals of audio commentaries, you can play back the audio sources with the audio commentaries mixed down by using the digital audio input (optical or coaxial) connections. • Refer to the supplied instruction manuals of the input source component, and set the component appropriately. Video signals This unit is compatible with the video signals of the following resolutions: Manufactured under license from Dolby Laboratories. Dolby, Pro Logic and the double-D symbol ar
-
Yamaha RX-V371 — 1 — List of remote control codes Liste des codes de commande Lista de códigos de mando a distancia TV A.R. Systems 0320 Acme 0342 Acura 0323, 0343 ADC 0337 Admiral 0054, 0178, 0336, 0337, 0339, 0346, 0347 Advent 0158 Adventura 0057 Adyson 0277, 0282, 0342 Agashi 0277, 0282 Agazi 0337 Aiko 0277, 0282, 0320, 0323, 0342, 0343 Aim 0320 Aiwa 0078, 0379 Akai 0050, 0055, 0109, 0159, 0181, 0277, 0282, 0320, 0323, 0340, 0343, 0349, 0350 Akiba 0320, 0340 Akura 0320, 0323, 0337, 0340 Alaron 0277 Alba 0161, 0277, 0320, 0323, 0340, 0342, 0343, 0344, 0349, 0351, 0372, 0382 Albatron 0140 Alcyon 0171 Alleron 0059 Allorgan 0282 Allstar 0320
-
Yamaha RX-V371 — 7 — TV86 3077 Unika 3065, 3070 United Cable 3018, 3119 Universal 3065, 3070 Universum 3097, 3099 V2 3127 Videoway 3019 View Star 3074, 3077, 3079 Viewmaster 3127 Vision 3127 Visiopass 3097, 3100, 3101 Vortex View 3127 Wittenberg 3098 Zenith 3113, 3122, 3124 Zentek 3126 Satellite AB Sat 4216, 4217 AccessHD 4104 ADB 4220 AGS 4216 Akai 4053, 4055 Alba 4001, 4004, 4006, 4007, 4062, 4217 Aldes 4005, 4007, 4010 Allsat 4048, 4053, 4055 Allsonic 4005, 4008, 4024 Alltech 4217 Alpha 4053 Alpha Digital 4104 Alphastar 4077 Amitronica 4217 Amstrad 4011, 4035, 4217, 4218 Anglo 4217 Ankaro 4005, 4008, 4024, 4217 Anttron 4001, 4004 Apollo 400
-
Yamaha RX-V371 — 3 — 0342, 0349, 0350, 0353, 0357, 0360, 0380, 0383, 0452, 0459, 0460 Philips Magnavox 0011, 0032, 0033 Phoenix 0161, 0277, 0320, 0339, 0349, 0350 Phonola 0277, 0320, 0339, 0349, 0350 Pilot 0007, 0008, 0050 Pioneer 0008, 0026, 0094, 0095, 0161, 0320, 0345, 0347, 0349, 0350, 0458 Plantron 0320, 0323, 0337, 0350 Playsonic 0282 Polaroid 0039, 0142, 0202, 0234 Poppy 0323, 0343 Portland 0007, 0008, 0026, 0053 Prandoni-Prince 0171, 0346 Precision 0282, 0342 Prima 0157, 0243, 0323, 0343, 0347 Princeton 0140 Prism 0023, 0056 Profex 0323, 0343 Profi-Tronic
-
Yamaha RX-V371 En 67 APPENDIX Glossary LFE 0.1 channel This channel reproduces low-frequency bass signals, and has a frequency range from 20 Hz to 120 Hz. This channel is counted as 0.1, because it only enforces a low-frequency range compared to the full-range reproduced by the other 5 channels in Dolby Digital or DTS 5.1-channel systems. Neo:6 Neo:6 decodes the conventional 2-channel sources for 6-channel playback by the specific decoder. It enables playback with the full-range channels with higher separation just like digital discrete signal playback. There are two modes available: “Music mode” for music sources and �
-
Yamaha RX-V371 En 66 APPENDIX Audio information Audio and video synchronization (lip sync) Lip sync, an abbreviation for lip synchronization, is a technical term that involves both a problem, and the capability of maintaining audio and video signals synchronized during post-production and transmission. Whereas the audio and video latency requires complex end-user adjustment, HDMI version 1.3 incorporates an automatic audio and video syncing capability that allows devices to perform this synchronization automatically and accurately
-
Yamaha RX-V371 En 36 PLAYBACK Playing back tunes from Bluetooth™ components You can connect a Yamaha Bluetooth wireless audio receiver (such as the YBA-10, sold separately) to this unit and enjoy wireless playback from Bluetooth-compatible portable music players. J1 Connecting a Yamaha Bluetooth wireless audio receiver Use the dedicated cable to connect the dock to the DOCK jack on the rear panel of this unit. The Bluetooth wireless audio receiver connection will be complete when this unit is turned on. Pairing Bluetooth™ c
-
Yamaha RX-V371 — 6 — Prima 2252 Proceed 2130 Proscan 2156 Prosonic 2360, 2377 Protron 2202 Provision 2358 Pye 2144 Qwestar 2148 Raite 2380 RCA 2021, 2029, 2104, 2105, 2131, 2149, 2156, 2157, 2229 RedStar 2356, 2360, 2362 Regent 2153 Reoc 2355 Rimax 2361 Rio 2133 Roadstar 2331, 2358 Ronin 2363 Rotel 2203 Rowa 2154, 2383 Rownsonic 2353 Saba 2148, 2188 Sabaki 2355 Saivod 2362 Sampo 2141 Samsung 2000, 2045, 2077, 2112, 2113, 2114, 2115, 2151, 2200, 2216, 2219, 2228, 2264, 2265, 2271, 2279, 2294, 2303, 2329, 2365 Sansui 2073, 2145, 2354, 2355, 2362 Sanyo 2134, 2145, 2217, 2292 ScanMagic 2186 Schaub Lorenz 2362 Schneider 2176 Scientific Labs 2355 Sco
-
En 29 PLAYBACK Enjoying sound field programs ■ Category: STEREO Suitable for listening to stereo sources. ■ Category: ENHNCR (Compressed music enhancer) Suitable for listening to compressed audio, such as MP3. ■ Category: SUR.DEC (Surround decode mode) Select this program to playback sources with selected decoders. You can playback 2-channel sound sources in up to 5-channels using a surround decoder. 2ch Stereo Use this program to mix down multi-channel
-
En 7 INTRODUCTION Part names and functions Front panel display a HDMI indicator Lights up when HDMI signals are input at the selected HDMI input source. b CINEMA DSP indicator Lights up when a sound field effect that uses CINEMA DSP technology is selected. c Tuner indicator Lights up when receiving an FM/AM broadcast. d iPod CHARGE indicator Lights up when an iPod/iPhone is connected through an optional Yamaha iPod universal dock (such as YDS-12), and the iP
-
Yamaha RX-V371 En 55 SETUP The Advanced Setup menu can be used for unit initialization and other useful extended functions. The Advanced Setup menu can be operated as follows. Displaying/Setting the Advanced Setup menu 1 Set this unit to the standby mode. 2 Press A while pressing and holding STRAIGHT on the front panel. Release the keys when “ADVANCED SETUP” is displayed on the front panel display. After approximately 3 seconds, the top menu items are displayed. 3 Use PROGRAM to select the item to be set from the following items. In the Advanced Setup menu, you can set the following
-
En 52 SETUP You can operate an external component such as TV and DVD player with the remote control of this unit by setting the code for external component (remote control code). The remote control code can be set for each input source. Individual setting allows you to switch external components seamlessly depending on the selected input source. Selecting input source connected to DVD player Selecting input source connected to CD player Keys connecting external co
-
Yamaha RX-V371 En 37 PLAYBACK Playing back tunes from Bluetooth™ components Using Bluetooth™ components When pairing is complete, carry out the following procedure to achieve a wireless connection between this unit and the Bluetooth component. When the wireless connection is complete, you playback from Bluetooth components. 1 Press dDOCK to switch to the DOCK input. 2 Press qOPTION to display the Option menu. 3 Use jCursor B / C to select “Connect” and press jENTER. J1 4 Operate the Bluetooth component for playback. d DOCK jCursor B / C jENTER qOPTION OPTION ENTER DOCK 7 8 5 6 9 0 10 1 2 3
-
Yamaha RX-V371 Printed in China WY69390© 2011 Yamaha Corporation U The following specification is added for U.S.A. model as well as “Specifications” in the Owner’s Manual. • Rated Output Power for Front, Center, Surround (1 kHz, 0.9% THD, 8Ω, 2 channels driven simultaneously) FRONT L/R……………………………………………………….. 80 W + 80 W CENTER……………………………………………………………………….. 80 W SURROUND L/R ……………………………………………….. 80 W + 80 W Additional information on s
-
Yamaha RX-V371 En 11 CONNECTIONS Connecting speakers Connect your speakers to their respective terminals on the rear panel. CAUTION • Remove the AC power cord of this unit from the power outlet before connecting the speakers. • Generally speaker cables consist of two parallel insulated cables. One of these cables is a different color, or has a line running along it, to indicate different polarity. Insert the different colored (or lined) cable into the “+” (positive, red) terminal on this unit and the speakers, and the other cable into the “-” (minus, black) ter
-
Yamaha RX-V371 En 64 APPENDIX Troubleshooting AM Remote control Problem Cause Remedy See page The desired station cannot be tuned into with the automatic tuning method. The signal is weak, or the antenna connections are loose. Adjust the AM loop antenna orientation. 21 Use the manual tuning method. 30 Automatic station preset does not work. Automatic station preset is not available for AM stations. Use manual station preset. 32 Continuous crackling and hissing noises are heard. The supplied AM loop antenna is not connected. Connect the AM loop antenna correctly even if you us
-
Yamaha RX-V371 En 17 CONNECTIONS Connecting external devices ■ Connecting BD/DVD players and other devices with component cables Connect the device with a component video cable to one of the AV1-2 input jacks. Using optical digital audio output sources Select the AV1 input that the external device is connected to for playback. Using coaxial digital audio output sources Select the AV2 input that the external device is connected to for playback. COMPONENT VIDEO P R P B Y OPTICAL AV 1 ( TV ) AV 2 AV 3 AV 4 AV 5 AUDI O 1 AUDI O 2 CO AXIAL ( CD ) CO AXIA L O PTI C A L VIDE O HDMI 1 ( B
-
Yamaha RX-V371 En 57 SETUP This unit supports the HDMI Control function, which allows you to operate external components via HDMI. If you connect devices that support HDMI Control (ex. Panasonic VIERA Link- compatible TVs, DVD/Blu-ray Disc recorders, etc.) J1, you can use the following operations with the remote control of any of those devices: – Power synchronization (on/standby) – Volume control, including Mute – Changing the volume of the audio output signal device (either the TV or this unit) 1 Connect the TV, DVD recorder supporting HDMI Control to this unit’s HDMI output jack. 2 Turn on the TV and this uni
-
Yamaha RX-V371 En 70 APPENDIX ■ VIDEO SECTION • Video Signal Type [U.S.A., Canada, Korea and General models] …………………….NTSC [Other models]………………………………………………………………….PAL • Signal Level Composite…………………………………………………………….1 Vp-p/75 Ω Component …………………. 1 Vp-p/75 Ω (Y), 0.7 Vp-p/75 Ω (P B/PR) • Maximum Input Level (Video Conversion Off)……. 1.5 Vp-p or more • Signal to Noise Ratio …………………………………………….50 dB or more • Frequency Response [MONITOR OUT] Component (Video Co
-
En 49 SETUP Setting various functions (Setup menu) ■ Goes enter standby mode automatically when you leave it without operating If you do not operate this unit or use the remote control for an extended period of time, it will automatically go into standby mode (Auto Power Down function). This function’s default setting is “Off.” When you wish to activate this function, set the amount of time to pass before this unit will enter standby. ■ Setting the brightness of the front panel display Sets the brightness of the front panel display. Lowering the setting dims the displ
-
En 44 SETUP Setting various functions (Setup menu) ■ Adjusting sound quality with the equalizer Adjusts sound quality and tune with a graphic equalizer. EQ Select Turns the graphic equalizer on or off. By selecting GEQ and pressing jENTER, you can adjust the characteristics of the graphic equalizer. ■ Generating test tones Turns the test tone generator on or off. Equalizer GEQ (Default) Uses the graphic equalizer to adjust sound quality. Off Does not activate the equalizer. ■ Adjusting the graphic equalizer 1 When “EQ S
-
Yamaha RX-V371 Owner’s Manual AV Receiver English for North America
-
Yamaha RX-V371 En 12 CONNECTIONS Connecting speakers ■ Connecting front speakers 1 Remove approximately 10mm of insulation from the ends of the speaker cables, and twist the bare wires of the cables together firmly so that they will not cause short circuits. 2 Loosen the speaker terminals. 3 Insert the bare wire of the speaker cable into the gap on the side of the terminal. 4 Tighten the terminal. ■ Connecting center speakers / surround speakers 1 Press the tab on the speaker terminal down. 2 Insert the speaker cable end into the terminal. 3 Lift the
-
Yamaha RX-V371 En 53 SETUP Controlling other components with the remote control Registering remote control codes for external component operations The following section describes how to register remote control code using an example of the registration of the remote control codes of a Yamaha BD player connected to HDMI2 jack. 1 Use “Remote Control Code Search” in the CD- ROM to search the available remote control codes from the category or manufacturer of external components. “2064” can be used for a Yamaha BD pl
-
En 62 APPENDIX Troubleshooting No sound is heard from the surround speakers. This unit is in straight decoding mode and a monaural source is being played back. Press gSTRAIGHT (on the remote control) to exit straight decoding mode. 27 Sound may not be output from certain channels depending on input sources or sound field programs. Try another sound field program. 26 No sound is heard from the subwoofer. A subwoofer is not connected, or it is disabled. Check that a subwoofer is connected correctly, and from the Setup menu “Subwoofer” (“Speaker Setup” → “Config�
-
En 47 SETUP Setting various functions (Setup menu) ■ Receiver operation via TV (HDMI Control) Set the HDMI Control function to “On” to operate devices connected via HDMI. If the TV or other external components support HDMI Control (ex. Panasonic VIERA Link), you can use the remote controls of those devices to operate some of this unit’s functions, and to synchronize this unit with the operation of those devices. Please refer to “Switching the input source on this unit automatically when listening to TV audio” (☞ p. 58) for instructions. ■ Selecting an input
-
ANTENNA FM GND AM CENTER SURROUND FRONT SUBWOOFER SPEAKERS — 3 — Connecting front speakers FRONT KERS 2 3 1 4 1 Remove approximately 10mm of insulation from the ends of the speaker cables, and twist the bare wires of the cables together rmly so that they will not cause short circuits. 2 Loosen the speaker terminals. 3 Insert the bare wire of the speaker cable into the gap on the side of the terminal. 4 Tighten the terminal. Connecting the banana plug (Except U.K., Europe, Asia and Korea models) Tighten the knob, and then insert the banana plug into the e
-
— 5 — Sonneclair 1008 Sonoko 1009, 1025 Sontec 1031 Sony 1001, 1016, 1048, 1053, 1073, 1074, 1080, 1081, 1082, 1083, 1108, 1118, 1216 Stack 1016 Stack 9 1016 Standard 1009, 1025 Stern 1009 STS 1068 Sunkai 1024 Sunstar 1026 Suntronic 1026 Sunwood 1008, 1029 Superscan 1020 Sylvania 1020, 1068, 1069, 1102, 1126 Symphonic 1008, 1069, 1126 Systemax 1016 Tagar Systems 1016 Taisho 1024 Tandberg 1009 Tandy 1065 Tashiko 1026, 1071 Tatung 1026, 1027, 1028 TCM 1015, 1024, 1042 Teac 1009, 1069 Tec 1008, 1009, 1030 Techni
-
Yamaha RX-V371 En 65 APPENDIX Troubleshooting iPod™/iPhone™ Bluetooth™ Display Cause Remedy See page Loading… The unit is in the process of recognizing the connection with your iPod/iPhone. — The unit is in the middle of acquiring song lists from your iPod/iPhone. — Connect error There is a problem with the signal path from your iPod/iPhone to the unit. Turn off the unit and reconnect the Yamaha iPod universal dock to the DOCK jack of the unit. 34 Remove your iPod/iPhone from the Yamaha iPod universal dock and then place it back in the dock. 34 Unknown iPod The iPod/iPhone being u
-
En 26 PLAYBACK This unit has a SCENE function that allows you to turn the power on and change input sources and sound field programs with one key. Four scenes are available for different uses, such as playing movies or music. The following input sources and sound field programs are provided as the initial factory settings. Registering input sources/sound field program 1 Use dInput selector to select the input source you want to register. 2 Use the gSound selection keys to select the sound field program you want to register. Pre
-
Yamaha RX-V371 En 56 SETUP Extended functionality that can be configured as needed (Advanced Setup menu) Avoiding crossing remote control signals when using multiple Yamaha receivers The remote control of the unit can only receive signals from a receiver which has an identical ID (remote control ID). When using multiple Yamaha AV receivers, you can set each remote control with a unique remote control ID for its corresponding receiver. On the contrary, if you are setting the same remote control ID for all receivers, you can use one remote control to operate 2 receivers.
-
Yamaha RX-V371 En 2 CONTENTS INTRODUCTION Features and capabilities ……………………………………………3 About this manual……………………………………………………. 4 Supplied accessories………………………………………………… 4 Part names and functions………………………………………….. 5 Front panel………………………………………………………………5 Rear panel……………………………………………………………….6 Front panel display ………………………………………………….. 7 Remote control
-
Yamaha RX-V371 En 35 PLAYBACK Playing back tunes from your iPod™/iPhone™ dDOCK jCursor B / C / D / E jENTER qOPTION OPTION ENTER DOCK 7 8 5 6 9 0 10 1 2 3 4 R E C ENT TV TV V O L TV C H I NPUT M U T E RECEIVER SC ENE S ET UP RETURN VO L U ME ENHAN C E R SU R. DE CO DE S TRAI G HT H DMI AV A UDI O TRAN S MI T S LEE P 1 2 3 4 1 2 3 4 1 2 5 V-A U X TUNER FM I NF O M EM O RY AM P RE S ET T U NIN G MO VIE M US I C S TERE O B D D VD TV CD RADI O MU T E TO P MENU PO P- UP MENU D I S PLA Y SOU R
-
En 48 SETUP Setting various functions (Setup menu) Making the receiver easier to use Func. Setup submenu ■ Changing input source names Changes the input source names to be shown on the front panel display. You can change an input source name by choosing from a list of templates, or make one of your own. SETUP RETURN ENTER 7 8 5 6 9 0 10 1 2 3 4 R EC ENT TV TV V O L TV CH I NPUT M U TE RECEIVER SC ENE O PTI ON VO L U ME ENHAN C E R SU R. DE CO DE S TRAI G HT H DMI AV A UDI O TRAN S MIT S LEE P 1
-
Yamaha RX-V371 En 60 APPENDIX Refer to the table below when this unit does not function properly. If the problem you are experiencing is not listed below, or if the instructions below do not help, turn off this unit, disconnect the power cable, and contact the nearest authorized Yamaha dealer or service center. General Troubleshooting Problem Cause Remedy See page The power will not turn on. The protection circuitry operated three times consecutively. As a safety precaution, when the protection circuitry operates three times consecutively, the capability t
-
Yamaha RX-V371 En 18 CONNECTIONS Connecting external devices ■ Connecting BD/DVD players and other devices with video cables Connect the external device with a video pin cable to one of the AV3-5 input jacks. Using optical digital audio output sources Select the AV4 input that the external device is connected to for playback. Using coaxial digital audio output sources Select the AV3 input that the external device is connected to for playback. Using analog stereo audio output sources Select the AV5 input that the external device is connected to for playback. TV OPTICAL C OMPONEN T VIDE O P R P B Y OPTICAL AV 1 AV 2 AV 3 AV 5 AUDI O 1 AUDI
 for the information about each position of th
 Просмотр
Доступно к просмотру 68 страниц. Рекомендуем вам скачать файл инструкции, поскольку онлайн просмотр документа может сильно отличаться от оригинала.
-
Инструкция по эксплуатации АВ ресивер Русский для Европы
-
47  49   50  50  51  51 ................  53  53  при   53 amaha.......  53  54  57  57  60  60  61  62  62  63  63  64  64  65  65  66  67   Ru 2
Установка функций HDMI......................................
пользования.............................  ...........................................................  ........................  ................................  ..............................................
режим,    Запрет на изменение установок ............................. звукового поля............................................................... Установка параметров звукового поля Настройка расширенных функций по мере  надобности (меню Advanced Setup).......................... Отображение/установка меню Advanced Setup..... Предотвращение перекрытия сигналов ДУ использовании нескольких ресиверов Y Инициализация различных установок для  данного аппарата
Настройка ресивера в  более удобный для Установка параметров программы   звукового поля  Установка параметров программы   ПРИЛОЖЕНИЕ Поиск и устранение неисправностей  Глоссарий  Информация о видеосигналах  Информация о HDMI™  Индекс
Использование программ звукового поля............... 26
............................................... 26  .......................................... 30  ..... 31  ........................................... 35  ........................... 37  ................. 42  ................. 43
программы звукового поля...................................... 26
одной клавиши (функция SCENE)............................ 26
Изменение установок входного сигнала с помощью
Сохранение источников входного сигнала/
Выбор программ звукового поля  и звуковых декодеров Программы звукового поля..................................... 28 Настройка FM/AM-приема ......................................... 30 Выбор частоты для приема  (Нормальная установка) Сохранение и вызов частоты (Предустановка) Очистка предустановленных станций................... 32 Настройка системы радиоданных .......................... 32 Воспроизведение мелодий с iPod™/iPhone™.......... 35 По
СОДЕРЖАНИЕ
......................................9 Расположение колонок.............................................10 .............................................10  .............................12 ......................................12 ....................................13  .....................................................15 аудиоплееров...............................................................19 внешние устройства....
Поставляемые принадлежности...............................4
Дисплей передней панели...........................................7
Задняя панель................................................................6
Подключение колонок...................................................9
Пульт ДУ........................................................................8
Названия компонентов и их функции.........................5
Функции и возможности ................................................3
Передняя панель...........................................................5
О данном руководстве.................................................4
ВВЕДЕНИЕ                    ПОДКЛЮЧЕНИЯ  Каналы и функции колонок  Подключение колонок Подключение внешних устройств Штекеры кабелей и гнезда Подключение ТВ-монитора Подключение BD/DVD-проигрывателей   и других устройств Подключение видеокамер и портативных  Передача входного аудио/видеосигнала на   Автоматическая установка параметров колонок   ВОСПРОИЗВЕДЕНИЕ  Регулировка звука высокой/низкой частоты
-
Настройка эффектов звукового поля.............................................................................................51
Воспроизведение сжатых музыкальных файлов .........................................................................26
Стереофоническое воспроизведение..............................................................................................27
...................................................33  .............................................27  ...................................46   Ru 3
Выбор эффекта звукового поля ......................................................................................................26
Переключение информации на дисплее передней панели...........................................................7
Установки начальной громкости.....................................................................................................47
Регулировка громкости различных источников входного сигнала  .............40
Установки максимальной громкости..............................................................................................47
Регулировка яркости дисплея передней панели .......................................................50
Отображение информации о цифровом видео/аудиосигнале  ..........................40
Простая предустановка......................................................................................................................31
Настройка системы радиоданных....................................................................................................32
Прослушивание FM/AM-трансляции..............................................................................................30
Воспроизведение многоканального, многоформатного сигнала
Облегчение прослушивания при низкой громкости
Воспроизведение без использования эффектов звукового поля
Автоматический прием информации о дорожном движении
Функции регулировки громкости/качества звука
Отображение информации на передней панели
Управление с помощью пульта ДУ Названия и функции элементов пульта ДУ.....................................................................................8 Установка батареек в пульт ДУ.........................................................................................................4 Управление несколькими ресиверами Y amaha без помех для сигналов  <Переключение идентификационного кода ДУ>.........
FM/AM-тюнер                                                 Другие функции
¦  –  –  –  –  ¦  –  –  –  –  –  ¦  –  –  –  ¦  –  –  –  –  ¦  –  –  –  ¦  –  –  –  –  –
(функция SCENE)....................................................................................................26
Регулировка громкости для каждой колонки ...............................................................................44
..................................................................................................44
.....................................................40 Подключения внешних устройств к передней панели (для видеокамер, портативных  музыкальных плееров и т.п.).............................................................................................................19 Защитная крышка для гнезд передней панели ...........................................................................
Настройка уровня басов и высоких частот <контроль тональности> ....................................25
Кабели и входные/выходные гнезда данного аппарата ..............................................................12
Управление качеством звука с помощью эквалайзера .........................45
Подключение внешнего аудио и видеомагнитофона..................................................................19
Регулировка колонок с помощью тестовых тональных сигналов............................................45
Подключение кабеля колонки .........................................................................................................10
Подключения для BD/DVD-проигрывателей (рекордеров) и других устройств..................15
Расположение колонок ......................................................................................................................10
Воспроизведение аудиосигнала телевизора через данный ресивер.........................................14
Каналы и функции колонок................................................................................................................9
.....................................................................................................11
(YPAO - Y amaha Parametric Room Acoustic Optimizer)...............................................................21
Выбор настроек для каждой колонки.............................................................................................43
Коррекция задержки между аудио и видеосигналом  ...............................................46
Подключение телевизора..................................................................................................................13
Вывод аудиосигнала на телевизор, подключенный через гнездо HDMI ...............................48
Переключение входа/программы звукового поля с помощью 1-й кнопки
Регулировка акустических параметров в зависимости от используемых
Встроенный высококачественный 5-канальный усилитель высокой
Функции и возможности
ВВЕДЕНИЕ
мощности Подключение колонок для конфигураций, предусматривающих  от 2 до 5.1 каналов  Подключение кабеля сабвуфера колонок и среды для прослушивания Автоматические настройки для акустических параметров колонок   Установки расстояния до колонки Подключение внешних устройств и воспроизведение с них  Объединение видеовхода HDMI/AV с другим аудиовходом  Настройка установок, относящихся к каждому источнику входного сигнала  Воспроизведение с внешних устр
¦    ¦     ¦   –  –  –  –  ¦  –   –  –  –  –  –  –  ¦  –  –  –  –  –  –  –  –  –  –  –  –  –  –  –
- 1
- 2
- 3
- 4
- 68