

Operating instructions
DISHWASHER
Contents
Product Fiche, 2
Precautions and advice, 3-4
General safety Disposal
Saving energy and respecting the environment
Installation, 5-6
Positioning and levelling
Connecting the water and electricity supplies Advice regarding the first wash cycle Technical data
|
Electrical Connection, 7 |
|
|
Description of the appliance, 8 |
|
|
DIF 04B1 |
Overall view |
|
Control panel |
|
|
Loading the racks, 9-10 |
|
|
Lower rack |
|
|
Cutlery basket |
|
|
Upper rack |
|
|
Adjusting the upper rack |
|
|
Start-up and use, 11 |
|
|
Starting the dishwasher |
|
|
Measuring out the detergent |
|
|
Wash cycles, 12 |
|
|
Table of wash cycles |
|
|
Rinse aid and refined salt, 14 |
|
|
Measuring out the rinse aid |
|
|
Measuring out the refined salt |
|
|
Care and maintenance, 15 |
|
|
Shutting off the water and electricity supplies |
|
|
Cleaning the dishwasher |
|
|
Preventing unpleasant odours |
|
|
Cleaning the sprayer arms |
|
|
Cleaning the water inlet filter |
|
|
Cleaning the filters |
|
|
Leaving the machine unused for extended periods |
|
|
Troubleshooting, 16 |
|
|
After-Sales Service, 17 |
|
|
Guarantee, 18 |

Product fiche
|
GB |
Product Fiche |
|||
|
Brand |
INDESIT |
|||
|
Model |
DIF 04B1 |
|||
|
Rated capacity in standard place settings (1) |
13 |
|||
|
Energy efficiency class on a scale from A+++ (low consumption) to D |
(high consumption) |
A+ |
||
|
Energy consumption per year in kWh (2) |
295.0 |
|||
|
Energy consumption of the standard cleaning cycle in kWh |
1.04 |
|||
|
Power consumption of the off-mode in W |
0.5 |
|||
|
Power consumption of the left-on mode in W |
5.0 |
|||
|
Water consumption per year in litres (3) |
3080.0 |
|||
|
Drying efficacy class on a scale from G (low efficacy) to A (high efficacy) |
A |
|||
|
Programme time for standard cleaning cycle in minutes |
190 |
|||
|
The duration of the left-on mode in minutes |
10 |
|||
|
Noise in dB(A) Re 1pW |
49 |
|||
|
Built-in model |
Yes |
|||
|
NOTES |
||||
|
1) The information on the label and fiche relates to the standard cleaning cycle, this programme is suitable to clean normally |
||||
|
soiled tableware and it is the most efficient programme in terms of combined energy and water consumption. The standard |
||||
|
cleaning cycle corresponds to the Eco cycle. |
||||
|
2) Based on 280 standard cleaning cycles using cold water fill and the consumption of the low power modes. Actual energy |
||||
|
consumption depends on how the appliance is used. |
||||
|
3) Based on 280 standard cleaning cycles. Actual water consumption |
depends on how the appliance is used. |
|||
2

Precautions and advice
 This appliance was designed and manufactured in compliance with international safety standards The following information has been provided for safety reasons and should
therefore be read carefully.
Keep this instruction manual in a safe place for future reference. If the appliance is sold, given away or moved, please ensure the manual is kept with the machine.
Please read these instructions carefully: they contain important information on installation, use and safety.
This appliance is designed for domestic use or similar applications, for example:
—staff kitchen areas in shops, offices and other work environments;
—farmhouses;
—use by guests in hotels, motels and other residential settings;
—bed & breakfasts.
General safety
•The appliance should not be operated by people (including children) with reduced physical, sensory or mental capacities, or by inexperienced people who are not familiar with the product, unless supervision or instructions on how to use it are provided by someone who assumes responsibility for their safety.
•An adult must supervise children at all times to prevent them from playing with the appliance.
•The appliance was designed for domestic use inside the home and is not intended for commercial or industrial use.
•The appliance must be used by adults only to wash domestic crockery in accordance with the instructions in this manual.
•The appliance must not be installed outdoors, even in covered areas. It is extremely dangerous to leave the machine exposed to rain and storms.
•Do not touch the appliance when barefoot.
•When unplugging the appliance always pull the plug from the mains socket. Do not pull on the cable.
•The water supply tap must be shut off and the plug should be removed from the electrical socket before cleaning or maintaining the appliance.
•If the appliance breaks down, do not under any circumstances touch the internal parts in an attempt to perform the repair work yourself.
•Do not lean or sit on the open door of the appliance: this may cause the appliance to overturn.
•The door should not be left open as it may create
a dangerous obstacle.
• Keep detergent and rinse aid out of reach of GB children.
•The packaging material should not be used as a toy for children.
Disposal
•Disposal of packaging material: observe local legislation so that the packaging may be reused.
•The European Directive 2012/19/EU relating to Waste Electrical and Electronic Equipment
(WEEE) states that household appliances should not be disposed of using the normal solid urban waste cycle. Exhausted appliances should be collected separately in order to optimise the re-using and recycling rate of the materials inside the machine, while preventing potential damage to the environment and public health. The crossed-out dustbin symbol is marked on all products to remind the owners of their obligations regarding separated waste collection.
For further information relating to the correct disposal of household appliances, owners may contact the relevant public authority or the local appliance dealer.
Saving energy and respecting the environment
Saving water and energy
•Only begin a wash cycle when the dishwasher is full. While waiting for the dishwasher to be filled, prevent unpleasant odours using the Soak cycle (see Wash cycles).
•Select a wash cycle that is suited to the type of crockery and to the soil level of the crockery using the Table of wash cycles:
—for dishes with a normal soil level use the Eco wash cycle, which ensures low energy/water consumption levels.
—If the load is smaller than usual activate the Half Load option* (see Start-up and use).
•If your electricity supply contract gives details of electricity-saving time bands, run wash cycles when electricity prices are lower. The Delayed Start button * (see Start-up and use) helps you organise the wash cycles accordingly.
* Only available in selected models.
3

|
Phosphate-free and chlorine-free detergents |
|||
|
GB |
|||
|
containing enzymes |
|||
|
• Westronglyrecommendthatyouusedetergents |
|||
|
that do not contain phosphates or chlorine, as |
|||
|
these products are harmful to the environment. |
|||
|
• Enzymes provide a particularly effective action |
|||
|
at temperatures around 50°C. As a result |
|||
|
detergents containing enzymes can be used in |
|||
|
conjunction with low-temperature wash cycles |
|||
|
in order to achieve the same results as a normal |
|||
|
65°C wash cycle. |
|||
|
• To avoid wasting detergent, use the product |
|||
|
in appropriate quantities based on the |
|||
|
manufacturer’s recommendations, the hardness |
|||
|
of the water, the soil level and the quantity |
|||
|
of crockery to be washed. Even if they are |
|||
|
biodegradable, detergents contain substances |
|||
|
which may alter the balance of nature. |
4
Installation
 If the appliance must be moved at any time, keep it in an upright position; if absolutely necessary, it may be tilted onto its back.
Positioning and levelling
1.Remove the appliance from all packaging and check that it has not been damaged during transportation. If it has been damaged, contact the retailer and do not proceed any further with the installation process.
2.Arrange the dishwasher so that its sides or back panel are in contact with the adjacent cabinets or the wall. This appliance
can also be recessed under a single worktop* (see the Assembly Instruction sheet.)
3. Position the dishwasher on a level sturdy floor. If the floor is uneven, the front feet of the appliance should be adjusted until it reaches a horizontal position. If the appliance is levelled correctly, it will be more stable and much less likely to move or cause vibrations and noise while it is operating.
4*. To adjust the height of the rear foot, turn the red hexagonal bushing on the lower central part at the front of the dishwasher using a hexagonal spanner with an opening of 8 mm. Turn the spanner in a clockwise direction to increase the height and in an anticlockwise direction to decrease it (see Building-in Instruction sheet attached to the documentation.)
Connecting the water and electricity supplies
 Connection to the water and electricity supplies should only be performed by a qualified technician.
 The dishwasher should not stand on the water hoses or electricity supply cable.
 The appliance must be connected to the water supply network using new hoses.
Never use old or second hand hose sets. Do not reuse hose sets from any previously installed dishwasher.
The water inlet and outlet hoses and the electricity supply cable may be positioned towards the right or the left in order to achieve the best possible installation.
Connecting the water inlet hose
•To a suitable cold water connection point: before attaching the hose, run the water until it is perfectly clear so that any impurities that may be present in the water do not clog the appliance; after performing this operation, screw the inlet hose tightly onto a tap with a ¾ gas threaded connection.
•To a suitable hot water connection point: your dishwasher may be supplied with hot water from the mains supply (if you
have a central heating system with radiators) provided that it does not exceed a temperature of 60°C.
 Screw the hose to the tap as described for connection to a cold water supply.
 If the inlet hose is not long enough, contact a specialist store or an authorised technician (see Assistance.)
 The water pressure must be within the values indicated in the Technical Data table (see adjacent information.)
The hose should not be bent or compressed.
GB
Connecting the water outlet hose
Connect the outlet hose (without bending it) to a drain duct with a minimum diameter of 4 cm.
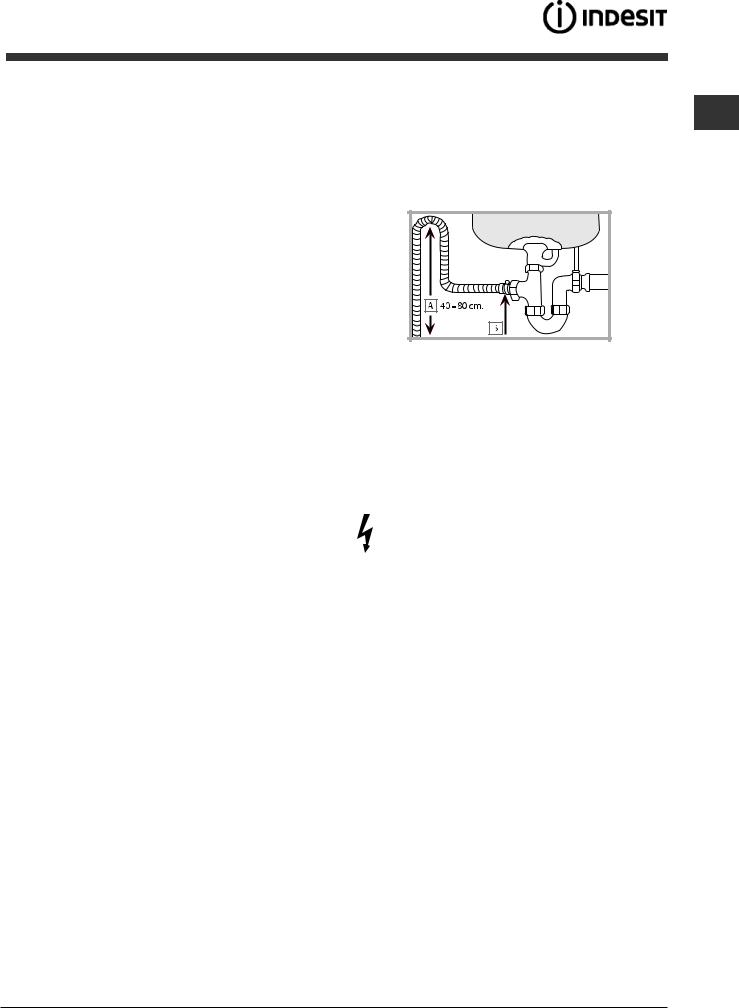
The outlet hose must be at a height ranging from 40 to 80 cm from the floor / surface where the dishwasher rests (A).
Before connecting the water outlet hose to the sink drain, remove the plastic plug (B).
Anti-flooding protection
To ensure floods do not occur, the dishwasher:
— is provided with a special system which blocks the water supply in the event of anomalies or leaks from inside the appliance.
Some models are also equipped with the supplementary safety device New Acqua Stop*, which guarantees anti-flooding protection even in the event of a supply hose rupture.
WARNING: HAZARDOUS VOLTAGE!
Under no circumstances should the water inlet hose be cut, as it contains live electrical parts.
Electrical connection
Before inserting the plug into the electrical socket, make sure that:
•The socket is earthed and complies with current regulations.
•the socket can withstand the maximum load of the appliance, which is indicated on the data plate located on the inside of the door
(see Description of the appliance);
•The power supply voltage falls within the values indicated on the data plate on the inside of the door.
•The socket is compatible with the plug of the appliance. If this is not the case, ask an authorised technician to replace the plug (see Assistance); do not use extension cables or multiple sockets.
 Once the appliance has been installed, the power supply cable and the electrical socket should be easily accessible.
 The cable should not be bent or compressed.
 If the power supply cable is damaged, it must be replaced by the manufacturer or its Technical Assistance Service in order to prevent all potential hazards (see Assistance.)
* Only available in selected models.
5
|
Anti-condensation strip* |
||
|
GB |
||
|
After installing the dishwasher, open the door and stick the |
||
|
adhesive transparent strip under the wooden shelf in order |
||
|
to protect it from any condensation which may form. |
Advice regarding the first wash cycle
After the installation, remove the stoppers from the racks and the retaining elastic elements from the upper rack, if any. Immediately before the fist washing, completely fill the salt dispenser with water and add only then approximately 1 kg of salt (see chapter entitled Rinse aid and refined salt). The water may overflow: this is normal and is not a cause for concern. Select the water hardness value (see chapter entitled Rinse aid and refined salt). — After the salt has been poured into the machine, the LOW SALT indicator light* switches off.
 If the salt container is not filled, the water softener and the heating element may be damaged as a result.
The machine has a buzzer/set of tones (depending on the dishwasher model) to inform the user that a command has been implemented: power on, cycle end etc. *
The symbols/indicator lights/LEDs on the control panel/ display may vary in colour and may have a flashing or fixed light (depending on the dishwasher model).
The display provides useful information concerning the type of wash cycle, drying/wash-cycle phase, remaining time, temperature etc etc.
Technical data
|
Dimensions |
width 59,5 cm |
||
|
height 82 cm |
|||
|
depth 57 cm |
|||
|
Capacity |
13 standard place-settings |
||
|
Water supply pressure |
0,05 ÷ 1MPa (0.5 ÷ 10 bar) |
||
|
7,25 – 145 psi |
|||
|
Power supply voltage |
See appliance data plate |
||
|
Total absorbed power |
See appliance data plate |
||
|
Fuse |
See appliance data plate |
||
|
This dishwasher conforms to the |
|||
|
following European Community |
|||
|
Directives: |
|||
|
-2006/95/EC (Low Voltage) |
|||
|
-2004/108/EC (Electromagnetic |
|||
|
Compatibility) |
|||
|
-2009/125/EC (Comm. Reg. |
|||
|
1016/2010) (Ecodesign) |
|||
|
-97/17/EC (Labelling) |
|||
|
-2012/19/EU Waste Electrical |
|||
|
and Electronic Equipment |
|||
|
(WEEE) |
|||
* Only available in selected models.
6
 Loading…
Перейти к контенту
Посудомоечные машины Indesit

- Размер инструкции: 2.95 Мб
- Формат файла: pdf
Если вы потеряли инструкцию от посудомоечной машины Indesit DIF 04B1, можете скачать файл для просмотра на компьютере или печати.
Инструкция для посудомоечной машины Indesit DIF 04B1 на русском языке. В руководстве описаны возможности и полезные функции, а также правила эксплуатации. Перед использованием внимательно ознакомьтесь с инструкцией.
Чтобы не читать всю инструкцию вы можете выполнить поиск по содержимому внутри инструкции и быстро найти необходимую информацию. Рекомендации по использованию помогут увеличить срок службы посудомоечной машины Indesit DIF 04B1. Если у вас появилась проблема, то найдите раздел с описанием неисправностей и способами их решения. В нем указаны типичные поломки и способы их решения.
More products and manuals for Dishwashers Indesit
| Models | Document Type |
|---|---|
|
DFP 27T94 A |
Operations Instructions
20 pages |
|
IDP 148 |
Operations Instructions
16 pages |
|
DFG 252 S |
Operations Instructions
24 pages |
|
LFTA+ 3214 HX.R |
Instruction for Use
84 pages |
|
DFP 2727 |
Instruction for Use
40 pages |
|
DIS 16 A |
Instruction for Use
80 pages |
|
LI 470 A.C |
Instruction for Use
80 pages |
|
PFT 834X |
Instruction for Use
84 pages |
|
DFP 585 NX FR |
Instruction for Use
24 pages |
|
DFP 27T96 Z UK |
Instruction for Use
16 pages |
|
LSF 825 FR/HA |
Instruction for Use
24 pages |
|
DIS 16 |
Instruction for Use
80 pages |
|
DSG 051 EU |
Instruction for Use
84 pages |
|
IDP 148 UK |
Instruction for Use
16 pages |
|
LFTA+ 2164 A |
Instruction for Use
84 pages |
|
DIS 14 |
Instruction for Use
80 pages |
|
LST 116 HA |
Instruction for Use
84 pages |
|
DFP 2727 |
Instruction for Use
28 pages |
|
DIS 16 A |
Instruction for Use
80 pages |
|
LSF 9357 X |
Instruction for Use
28 pages |


Хорошее руководство по эксплуатации
Законодательство обязывает продавца передать покупателю, вместе с товаром, руководство по эксплуатации Indesit DIF 04B1. Отсутствие инструкции либо неправильная информация, переданная потребителю, составляют основание для рекламации в связи с несоответствием устройства с договором. В законодательстве допускается предоставлении руководства в другой, чем бумажная форме, что, в последнее время, часто используется, предоставляя графическую или электронную форму инструкции Indesit DIF 04B1 или обучающее видео для пользователей. Условием остается четкая и понятная форма.
Что такое руководство?
Слово происходит от латинского «instructio», тоесть привести в порядок. Следовательно в инструкции Indesit DIF 04B1 можно найти описание этапов поведения. Цель инструкции заключается в облегчении запуска, использования оборудования либо выполнения определенной деятельности. Инструкция является набором информации о предмете/услуге, подсказкой.
К сожалению немного пользователей находит время для чтения инструкций Indesit DIF 04B1, и хорошая инструкция позволяет не только узнать ряд дополнительных функций приобретенного устройства, но и позволяет избежать возникновения большинства поломок.
Из чего должно состоять идеальное руководство по эксплуатации?
Прежде всего в инструкции Indesit DIF 04B1 должна находится:
— информация относительно технических данных устройства Indesit DIF 04B1
— название производителя и год производства оборудования Indesit DIF 04B1
— правила обслуживания, настройки и ухода за оборудованием Indesit DIF 04B1
— знаки безопасности и сертификаты, подтверждающие соответствие стандартам
Почему мы не читаем инструкций?
Как правило из-за нехватки времени и уверенности в отдельных функциональностях приобретенных устройств. К сожалению само подсоединение и запуск Indesit DIF 04B1 это слишком мало. Инструкция заключает ряд отдельных указаний, касающихся функциональности, принципов безопасности, способов ухода (даже то, какие средства стоит использовать), возможных поломок Indesit DIF 04B1 и способов решения проблем, возникающих во время использования. И наконец то, в инструкции можно найти адресные данные сайта Indesit, в случае отсутствия эффективности предлагаемых решений. Сейчас очень большой популярностью пользуются инструкции в форме интересных анимаций или видео материалов, которое лучше, чем брошюра воспринимаются пользователем. Такой вид инструкции позволяет пользователю просмотреть весь фильм, не пропуская спецификацию и сложные технические описания Indesit DIF 04B1, как это часто бывает в случае бумажной версии.
Почему стоит читать инструкции?
Прежде всего здесь мы найдем ответы касательно конструкции, возможностей устройства Indesit DIF 04B1, использования отдельных аксессуаров и ряд информации, позволяющей вполне использовать все функции и упрощения.
После удачной покупки оборудования/устройства стоит посвятить несколько минут для ознакомления с каждой частью инструкции Indesit DIF 04B1. Сейчас их старательно готовят или переводят, чтобы они были не только понятными для пользователя, но и чтобы выполняли свою основную информационно-поддерживающую функцию.