
Характеристики, спецификации
Схемотехника:
полупроводниковый
Мощность фронтальных каналов:
210 Вт (4 Ом, 1 кГц, 1% КГИ), 170 Вт (6 Ом, 1 кГц, 1% КГИ), 130 Вт (8 Ом, 1 кГц, 0.08% КГИ)
Мощность фронтальных каналов (многоканальный режим):
170 Вт
Мощность центрального канала:
170 Вт
Мощность тыловых каналов:
170 Вт
Мощность центральных тыловых каналов:
170 Вт
Рекомендуемое сопротивление нагрузки:
4 — 16 Ом
Соотношение сигнал/шум:
101 дБ
Входное сопротивление:
47 кОм
Выходное напряжение:
380 мВ
Выходное сопротивление:
2.2 кОм
Цифровой сигнальный процессор:
есть, Texas Instruments Aureus TMS320DA808
Частота дискретизации аудио ЦАП:
192 кГц
Разрядность аудио ЦАП:
24 бит
Входы:
композитный x4, компонентный x2, HDMI x6, коаксиальный x2, оптический x2, линейный x5
Выходы:
сабвуфер x2, композитный x3, компонентный x1, HDMI x1, наушники x1, 7.1CH x1, линейный x3, триггер x2, PreAmp
Интерфейсы:
RS-232, USB Type A, Ethernet RJ-45, внешний ИК-датчик
Разъемы на передней панели:
наушники, композитный вход, HDMI-вход, USB Type A
Поддержка 1080p (HDMI):
есть
Разъем для подключения наушников:
6.3 мм
Разъемы для акустической системой:
винтовые
Увеличение разрешения видеосигнала:
есть
Увеличение разрешения до 1080p (HDMI):
есть
Технология «Dolby Digital»:
есть
Технология «Dolby Digital Plus»:
есть
Технология «Dolby TrueHD»:
есть
Технология «Dolby Pro Logic II»:
есть
Технология «Dolby Pro Logic IIx»:
есть
Технология «Dolby Pro Logic IIz»:
есть
Технология «Dolby Digital EX»:
есть
Технология «DTS Express»:
есть
Технология «DTS 96/24»:
есть
Технология «DTS-HD High Resolution Audio»:
есть
Технология «DTS-HD Master Audio»:
есть
Технология «DTS ES Matrix 6.1»:
есть
Технология «DTS ES Discrete 6.1»:
есть
Технология «DTS Neo6»:
есть
Количество станций:
общее: 63
Диапазон частот AM:
531 — 1602 кГц
Диапазон частот FM:
87.5 — 108.0 МГц
Функции:
автоматическая настройка, ручная настройка, RDS
Размеры (ШхВхГ):
435x185x441 мм
Пульт дистанционного управления:
есть, управление другими компонентами, с режимом обучения
Инструкция к Ресиверу Pioneer SC-2022-K
Quick Start Guide
Guide rapide
AV Receiver
Kurzanleitung
Amplificateur AV
AV Receiver
Guida di avvio rapido
Sintoamplificatore AV
SC-2022-K
Snelstartgids
AV Receiver
Guía de inicio rápido
Receptor AV
AV-ресивер
Краткое руководство пользователя
Thank you for buying this Pioneer product. This Quick Start Guide
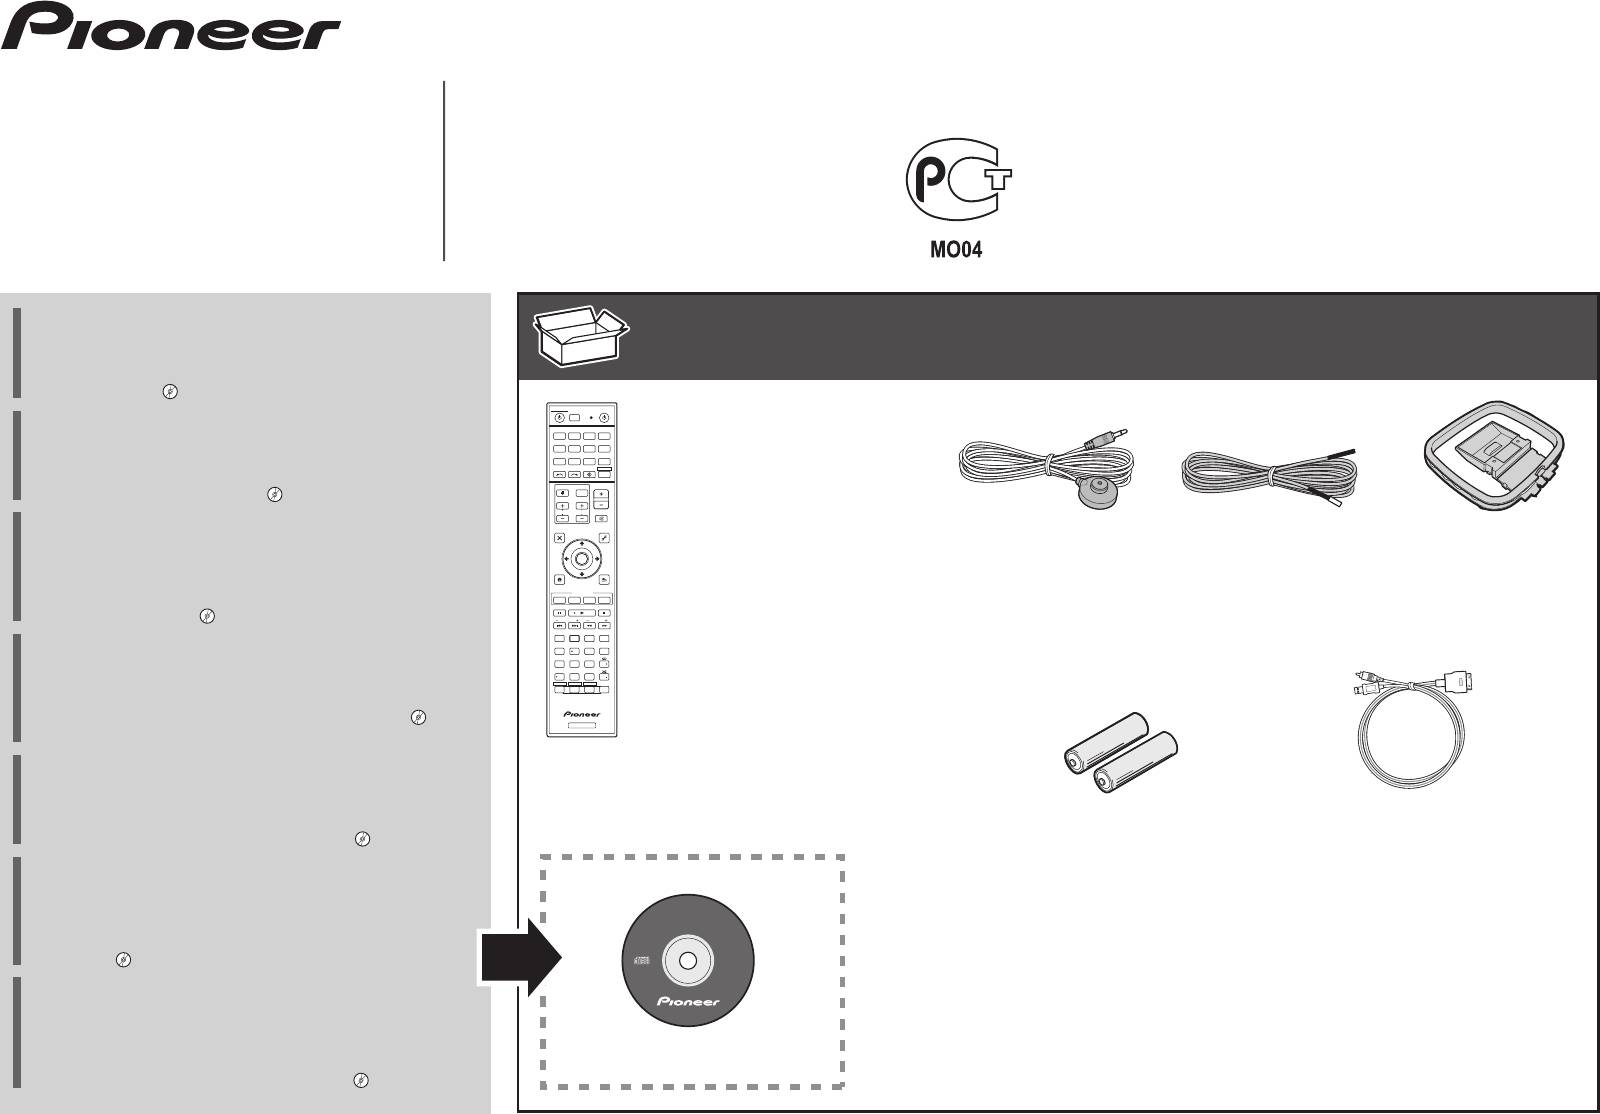
What’s in the box
Contenuto della confezione
Contenido de la caja
includes instructions for basic connections and operations to
Contenu du carton d’emballage
Inhoud van de doos
Комплект поставки
allow simple use of the receiver. For detailed descriptions of the
Lieferumfang
receiver, see the “Operating Instructions” provided on the
included CD-ROM ( ).
DISCRETE ON
ALL ZONE STBY
SOURCERECEIVER
Merci pour l’achat de ce produit Pioneer. Ce guide rapide
RCU SETUP
Remote Control
BDR
contient les instructions relatives aux raccordements et opérations
BD DVDDVR
HDMI
Télécommande
CDTV
NET
ADPT
de base permettant une utilisation simple de ce récepteur. Pour
iPod
USB CBL OPTION 1
SATTUNER
Fernbedienung
INPUT
SELECT
STATUS
RECEIVER
des descriptions plus détaillées du récepteur, référez-vous au
Telecomando
INPUT
VOLUME
“Mode d’emploi” sur le CD-ROM ( ) fourni.
TV CONTROL
Afstandsbediening
CH
VOL
MUTE
Mando a distancia
Vielen Dank, dass Sie sich für dieses Pioneer-Produkt entschieden
PARAMETER
AUDIO
PARAMETER
VIDEO
Пульт дистанционного управления
Setup microphone
FM wire antenna
AM loop antenna
haben. Die Kurzanleitung enthält Anweisungen für grundlegende
TOP MENU
TOOLS
MENU
Microphone de configuration
Antenne filaire FM
Antenne cadre AM
Verbindungen und Bedienvorgänge, um eine einfache Bedienung
ENTER
HOME
MENU
RETURN
Mikrofon für die Einstellung
UKW-Drahtantenne
MW-Rahmenantenne
des Receivers zu ermöglichen. Detaillierte Beschreibungen des
iPod CTRL
Impostazione microfono
Antenna FM a filo
Antenna AM a telaio
Receivers finden Sie in der „Bedienungsanleitung“ auf der
PHASE
PQLS
FEATURES
Hi-Bit
D.FILT
MPX
BAND
PTY
Microfoon voor instellen
FM-draadantenne
AM-raamantenne
mitgelieferten CD-ROM ( ).
PRESET TUNE
AUTO/ALC/
Micrófono de configuración
Antena de hilos de FM
Antena de cuadro de AM
DIRECT
Vi ringraziamo per avere acquistato questo prodotto Pioneer.
SIGNAL SELMCACC
13
STANDARD ADV SURR
222
+Favorite
AUTO
AUDIO
CH LEVEL
Установочный микрофон
Проволочная антенна FM
Рамочная антенна АМ
DISP
S.RTRV
Questa Guida di avvio rapido comprende istruzioni per i
SPEAKERS
79
DIMMER
546
SLEEP
CH
D.ACCESS
/
CLR
HDMI OUT
8
collegamenti fondamentali e per le operazioni essenziali di
ZONE 2ZONE 3ZONE 4
0
CLASS
ENTER
Z2 Z3 Z4
OPTION 2
CH
questo ricevitore. Per una descrizione dettagliata del ricevitore,
These quick start guide
vedere le “Istruzioni per l’uso” contenute nel CD-ROM ( )
Le présent Guide de démarrage
RECEIVER
accluso.
Diese Kurzanleitung
Guida per l’avvio rapido
Hartelijk dank voor de aanschaf van dit Pioneer product. In deze
Deze Quick Start-gids
snelstartgids vindt u de instructies voor de basisaansluitingen en
Esta guía de inicio rápido
de basisbediening voor een eenvoudig gebruik van de receiver.
Это краткое руководство пользователя
AAA size IEC R03 dry cell batteries x2
iPod cable
Voor meer gedetailleerde informatie wordt u verwezen naar de
Piles à anode sèche AAA IEC R03 x 2
Câble iPod
“Handleiding” die op de bijgeleverde CD-ROM ( ) staat.
AAA/IEC/R03 Trockenbatterien x2
iPod-Kabel
Muchas gracias por haber adquirido este producto de Pioneer.
Pile a secco AAA IEC R03 x2
Cavo per iPod
Esta Guía de inicio rápido incluye instrucciones para hacer las
AAA/IEC/R03 drogecelbatterijen x2
iPod-kabel
conexiones y operaciones básicas que le permitirán hacer un uso
Pilas secas AAA, IEC R03 x 2
Cable de iPod
sencillo del receptor. Para conocer una descripción detallada del
AVNavigator
Сухие батарейки размера AAA IEC R03, 2 шт.
Кабель iPod
receptor, consulte el “Manual de instrucciones” suministrado con
el CD-ROM ( ) incluido.
Safety Brochure
Power cord
Warranty card
Благодарим вас за приобретение данного изделия Pioneer.
Brochure sur la Sécurité
Cordon d’alimentation
Carte de garantie
В данном Кратком руководстве пользователя содержатся
Sicherheritsbroshüre
Netzkabel
Garantiekarte
инструкции по основным подключениям и операциям для
Volantino sulla sicurezza
Cavo di alimentazione
Tarjeta de garantía
упрощенного использования ресивера. Подробное
CD-ROM (AVNavigator)
Veiligheidsbrochure
Netsnoer
Documento di garanzia
описание ресивера см. в «Инструкции по эксплуатации»,
Folleto de Seguridad
Cable de alimentación
Garantiebewijs
содержащихся на поставляемом CD-ROM ( ).
Брошюра по безопасноти
Кабель питания
Гарантийный сертификат
English
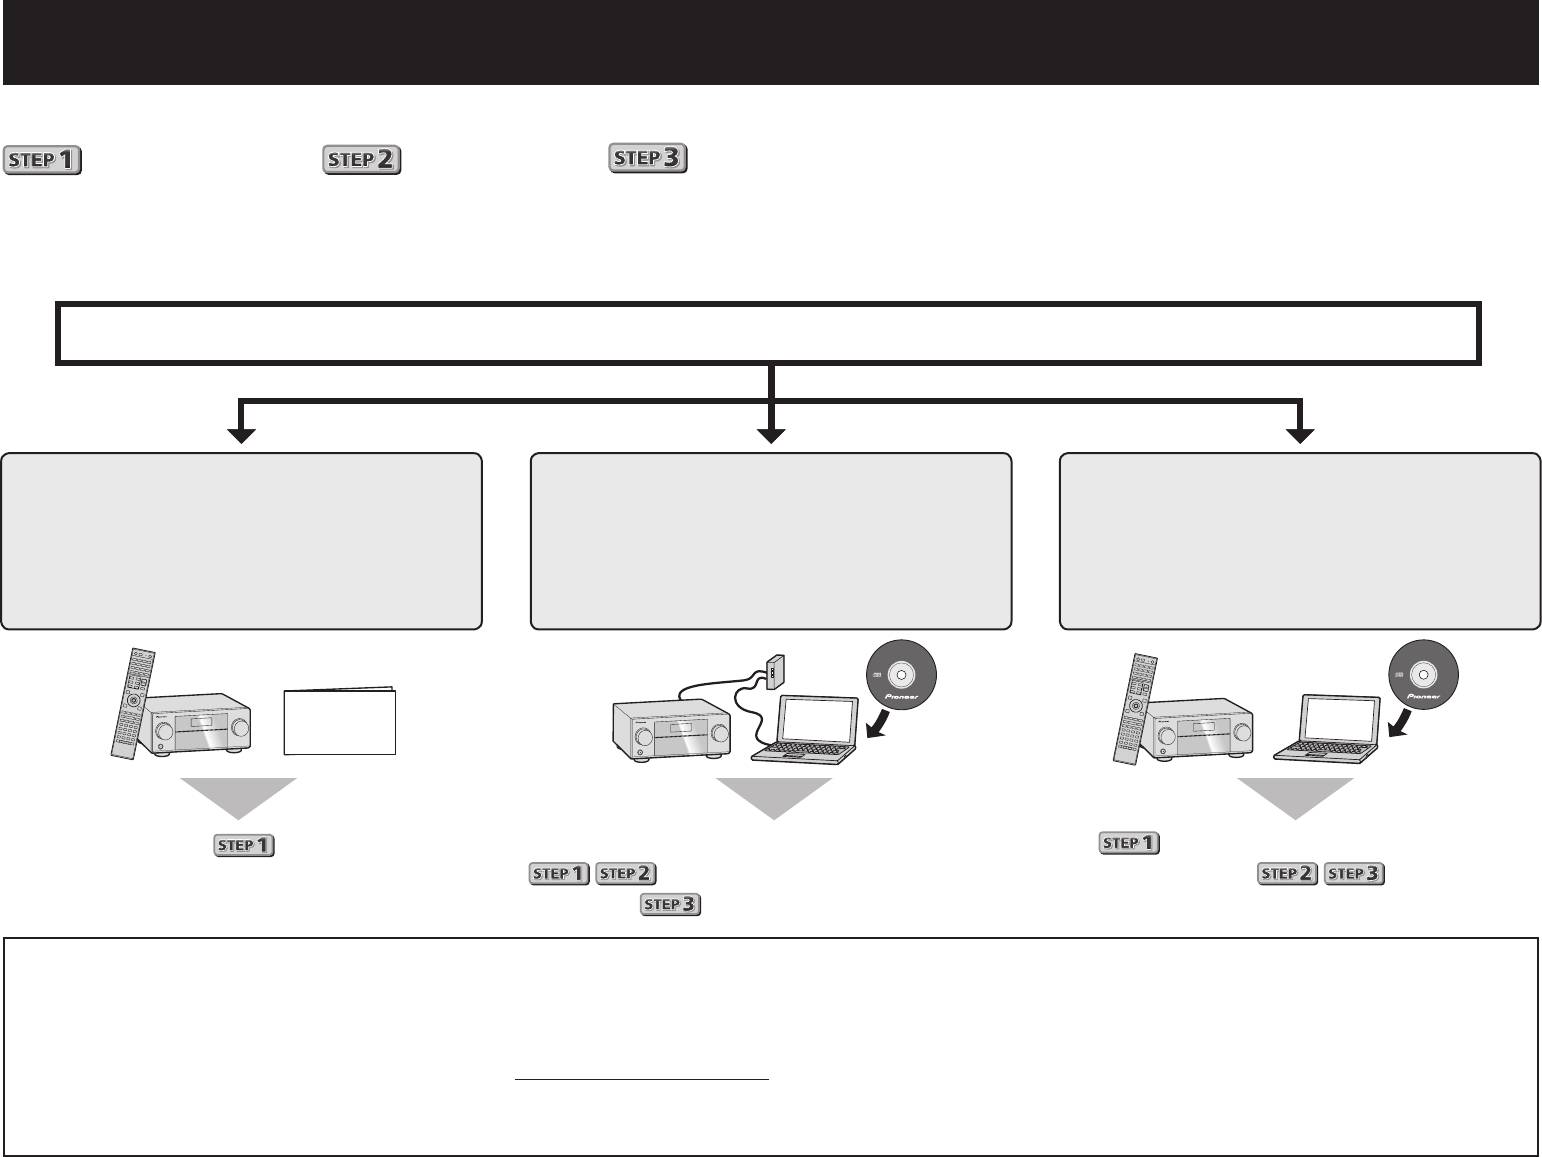
Enjoy easy multichannel playback with this unit in 3 steps:
Connecting up
→
Initial setup
→
Basic playback
.
Convenient with easy connection and initial setup upon following the instructions displayed on-screen by installing
AVNavigator (in the included CD-ROM). Start connecting by choosing one method from among the following in accordance
with your play environment.
Connection and initial setup
Connection and initial setup
Connect by following the
following the instructions in the
instructions in the “Wiring Navi”
Connection and initial setup by
“Wiring Navi” in AVNavigator
in AVNavigator
referring to this Quick Start Guide
(Connection to the nework is required for
(For when the receiver is not to be
the initial setup.)
connected to a network.)
AVNavigator
Move on to
in this guide.
It is unnecessary to read this guide for explanations;
will be conducted in the “Wiring Navi”,
will be explained in the “Wiring Navi”
so move on to
in this guide’
and
in the “Operation Guide”.
after “Wiring Navi” is completed.
2
AVNavigator
Quick Start
Guide
Using AVNavigator
1
Load the included CD-ROM into your computer’s CD drive.
3
Follow the instructions on the screen to install.
• The CD-ROM’s top menu screen appears.
When “Finish” is selected, installation is completed.
• AVNavigator can be used with Microsoft
®
Windows
®
XP/Vista/7.
4
Remove the included CD-ROM from the computer’s CD drive.
• The supported browser is Microsoft Internet Explorer 8 or 9.
• Adobe
®
Flash
®
Player 10 must be installed to use some of the functions in
5
Click [AVNavigator] on the desktop to launch AVNavigator.
AVNavigator. For detail, see http://www.adobe.com/downloads/.
• AVNavigator is launched and Wiring Navi starts up.
2
Click ‘Install AVNavigator’ from the CD-ROM top menu.
• Depending on the network or security settings on the computer on which
AVNavigator is to be installed, AVNavigator’s functions may not work
properly.
FRONT
12
SUBWOOFER
SURROUND SURR BACK
(Single)
FH / FW
PRE OUT
FRONT
12
SUBWOOFER
SURROUNDSURR BACK
PRE OUT
R
L
FH / FW
(Single)
A A
RL
FRONT CENTER
FRONT HEIGHT / FRONT WIDE /
RL
CENTER
B
RL
SURROUND BACK
(Single)
RL
SURROUND
L
SPEAKERS
R
CENTER
A A
FRONT CENTER
SURROUND
RL
(Single)
SPEAKERS
3
RL
Connecting up
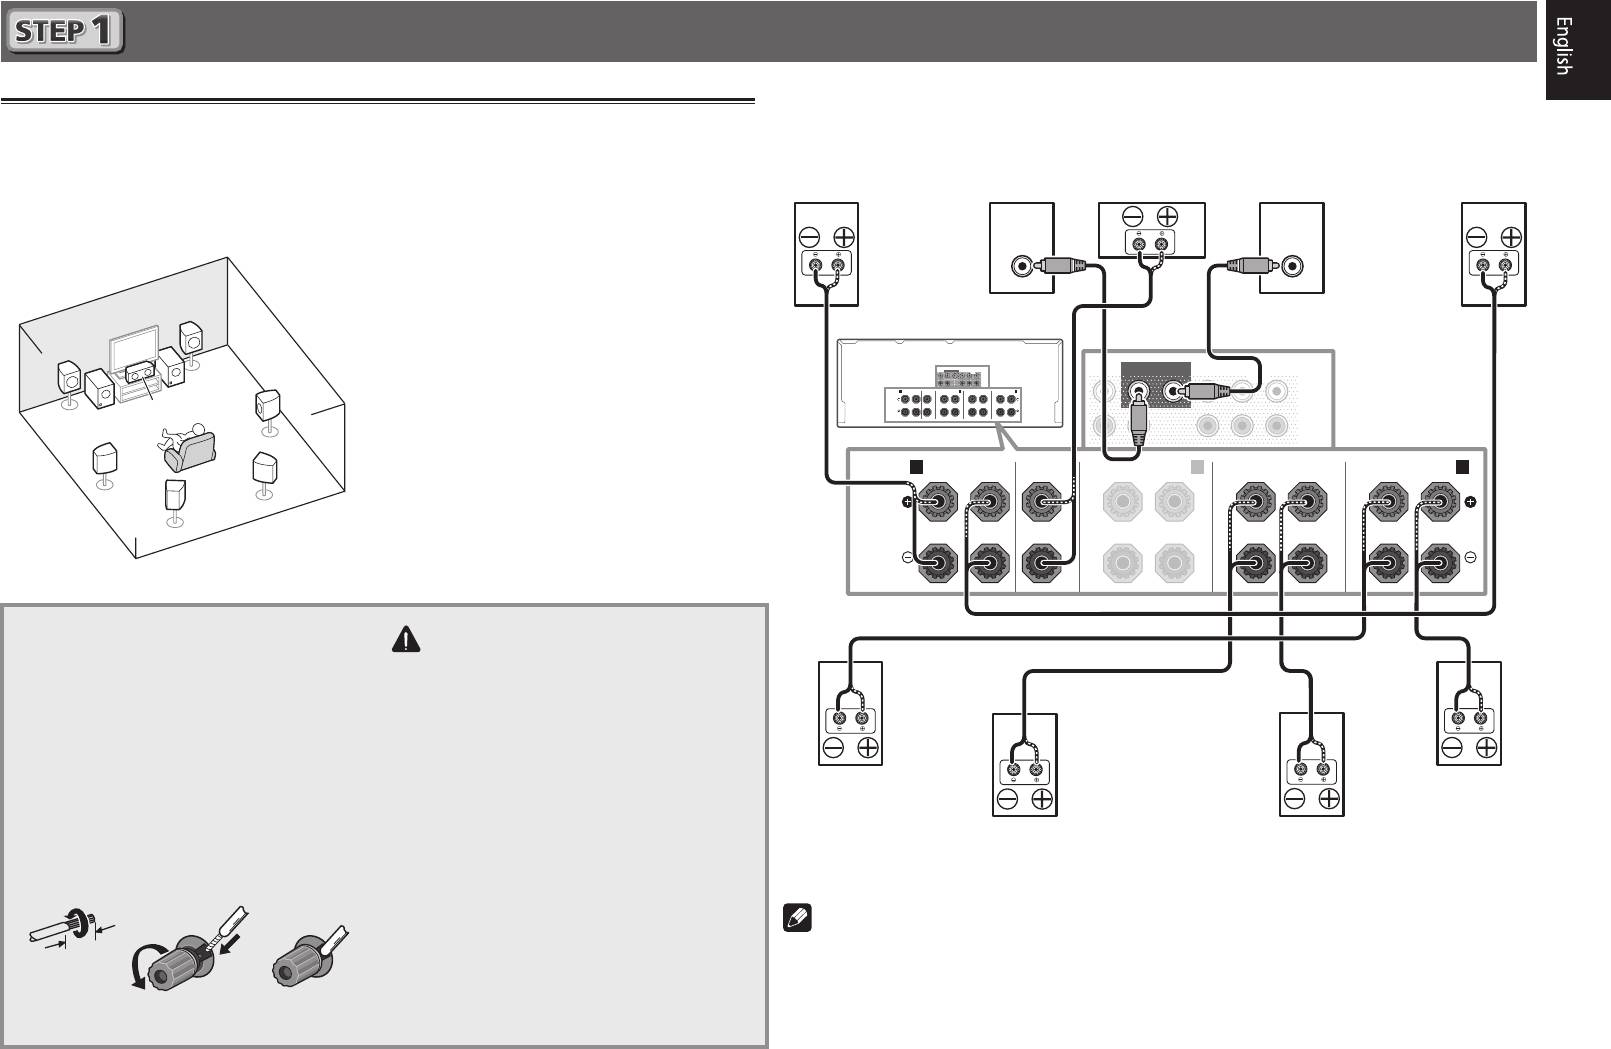
After installing the speakers, connect them as shown below.
Connecting the speakers
The receiver will work with just two stereo speakers (the front speakers in the diagram) but using
at least five speakers is recommended, and a complete setup is best for surround sound.
To achieve the comfortable surround sound, install your speakers as shown below.
7.2 channel surorund system:
LINE LEVEL
LINE LEVEL
INPUT
INPUT
L
– Front Left
C
– Center
R
– Front Right
SL
– Surround Left
SR
– Surround Right
SBL
– Surround back Left
SBR
– Surround back Right
SW
– Subwoofer
FRONT HEIGHT / FRONT WIDE /
B
SURROUND BACK
RL
RL
Connecting the speaker cables
Make sure you connect the speaker on
the right to the right (
R
) terminal and the
speaker on the left to the left (
L
) terminal.
Also make sure the positive and negative
(
+/–
) terminals on the receiver match those
on the speakers.
1
Twist exposed wire strands together.
2
Loosen terminal and insert exposed
wire.
3
Tighten terminal.
12 3
Front Right
Subwoofer 1
Center
Subwoofer 2
Front Left
(
R
)
(
SW
)
(
C
)
(
SW
)
(
L
)
R
L
SW
1
SR
C
SW
2
SBR
SL
SBL
CAUTION
• Before making or changing connections,
switch off the
power and disconnect the
power cord from the AC outlet.
• These speaker terminals carry
HAZARDOUS LIVE
voltage. To prevent the
risk of electric shock when connecting
Surround Right
Surround Left
or disconnecting the speaker cables,
(
SR
)
(
SL
)
disconnect the power cord before
Surround back Right
Surround back Left
touching any uninsulated parts.
(
SBR
)
(
SBL
)
Note
10 mm
• If you have two subwoofers, the second subwoofer can be connected to the
SUBWOOFER 2
terminal. Connecting two subwoofers increases the bass sound to achieve more powerful
sound reproduction. In this case, the same sound is output from the two subwoofers.
• This unit supports speakers with a nominal impedance of 4
W
to 16
W
.
Connecting up
(continued)
Note
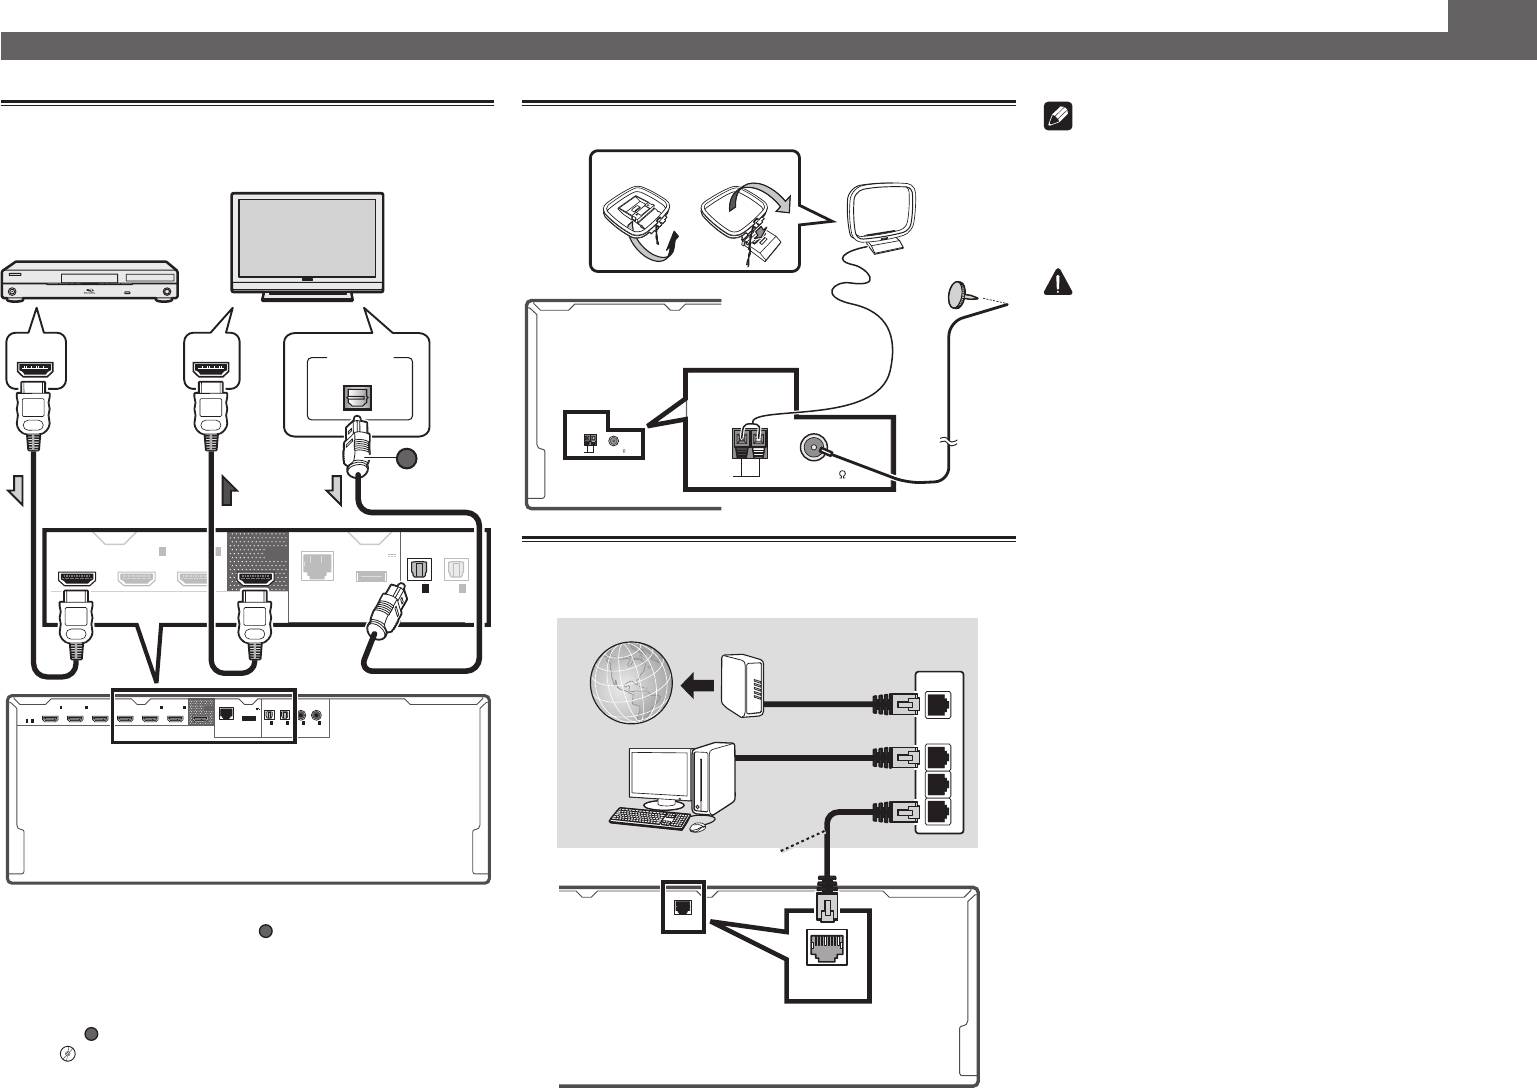
Connecting a TV and playback
Connecting antennas
components
• Refer to the operating instructions in the included CD-
21
ROM if you wish to connect a TV or playback component
in a method other than an HDMI connection.
• Refer to the operating instructions in the included CD-
ROM for other device connections.
CAUTION
• Handle the power cord by the plug part. Do not pull out
HDMI INHDMI OUT
the plug by tugging the cord, and never touch the power
DIGITAL OUT
OPTICAL
cord when your hands are wet, as this could cause a short
circuit or electric shock. Do not place the unit, a piece of
ANTENNA
furniture, or other object on the power cord or pinch the
ANTENNA
cord in any other way. Never make a knot in the cord or tie
AM LOOP FM UNBAL 75
A
it with other cables. The power cords should be routed so
AM LOOP FM UNBAL 75
that they are not likely to be stepped on. A damaged power
cord can cause a fire or give you an electric shock. Check
the power cord once in a while. If you find it damaged,
BD IN
IN
4
IN
6
OUT
ask your nearest Pioneer authorized independent service
(
(
VIDEO
)
OUTPUT 5 V
0.6 A MAX
)
Connecting to the network through
company for a replacement.
IN
1
IN
2
LAN
(
10/100
)
DC OUTPUT
(
TV
)
(
DVR/BDR
)
LAN interface
for WIRELESS LAN
OPTICAL
ASSIGN—
ABLE
WAN
HDMI
DVD
IN
(
1
)
(
IN
SAT/CBL
2
)
DVR/BDR
(
IN
3
)
BD IN
(
IN
VIDEO
4
)
IN
6
OUT
0.6 A MAX
OUTPUT 5 V
(
ASSIGNABLE
)
1
—
6
LAN
10/100
(
)
DC OUTPUT
TV
(
IN
)
1
DVR/BDR
(
IN
2
for WIRELESS LAN
)
DVD
(
IN
)
1
SAT/CBL
(
IN
2
OPTICAL COAXIAL
ABLE
ASSIGN-
ASSIGNABLE
)
LAN
1
2
3
LAN
(
10/100
)
LAN
(
10/100
)
4
VENTILATION CAUTION
AM loop antenna
HDMI/DVI-
HDMI/DVI-compatible
compatible TV
Blu-ray DIsc player
FM wire antenna
Internet
Modem
Router
When installing this unit, make sure to leave space
around the unit for ventilation to improve heat radiation
(at least 20 cm at top, 10 cm at rear, and 20 cm at each
side).
PC
WARNING
Slots and openings in the cabinet are provided for
ventilation to ensure reliable operation of the product,
and to protect it from overheating. To prevent fire
hazard, the openings should never be blocked or
LAN cable (sold separately)
covered with items (such as newspapers, table-cloths,
curtains) or by operating the equipment on thick carpet
or a bed.
• If the TV does not support the HDMI Audio Return Channel
D3-4-2-1-7b*_A1_En
function, optical digital cable (
A
) connection is required to
listen to the TV sound over the receiver.
• If the TV supports the HDMI Audio Return Channel function,
the sound of the TV is input to the receiver via the HDMI
terminal, so there is no need to connect an optical digital
cable (
A
). In this case, set
ARC
at
HDMI Setup
to
ON
l
“
HDMI Setup
”
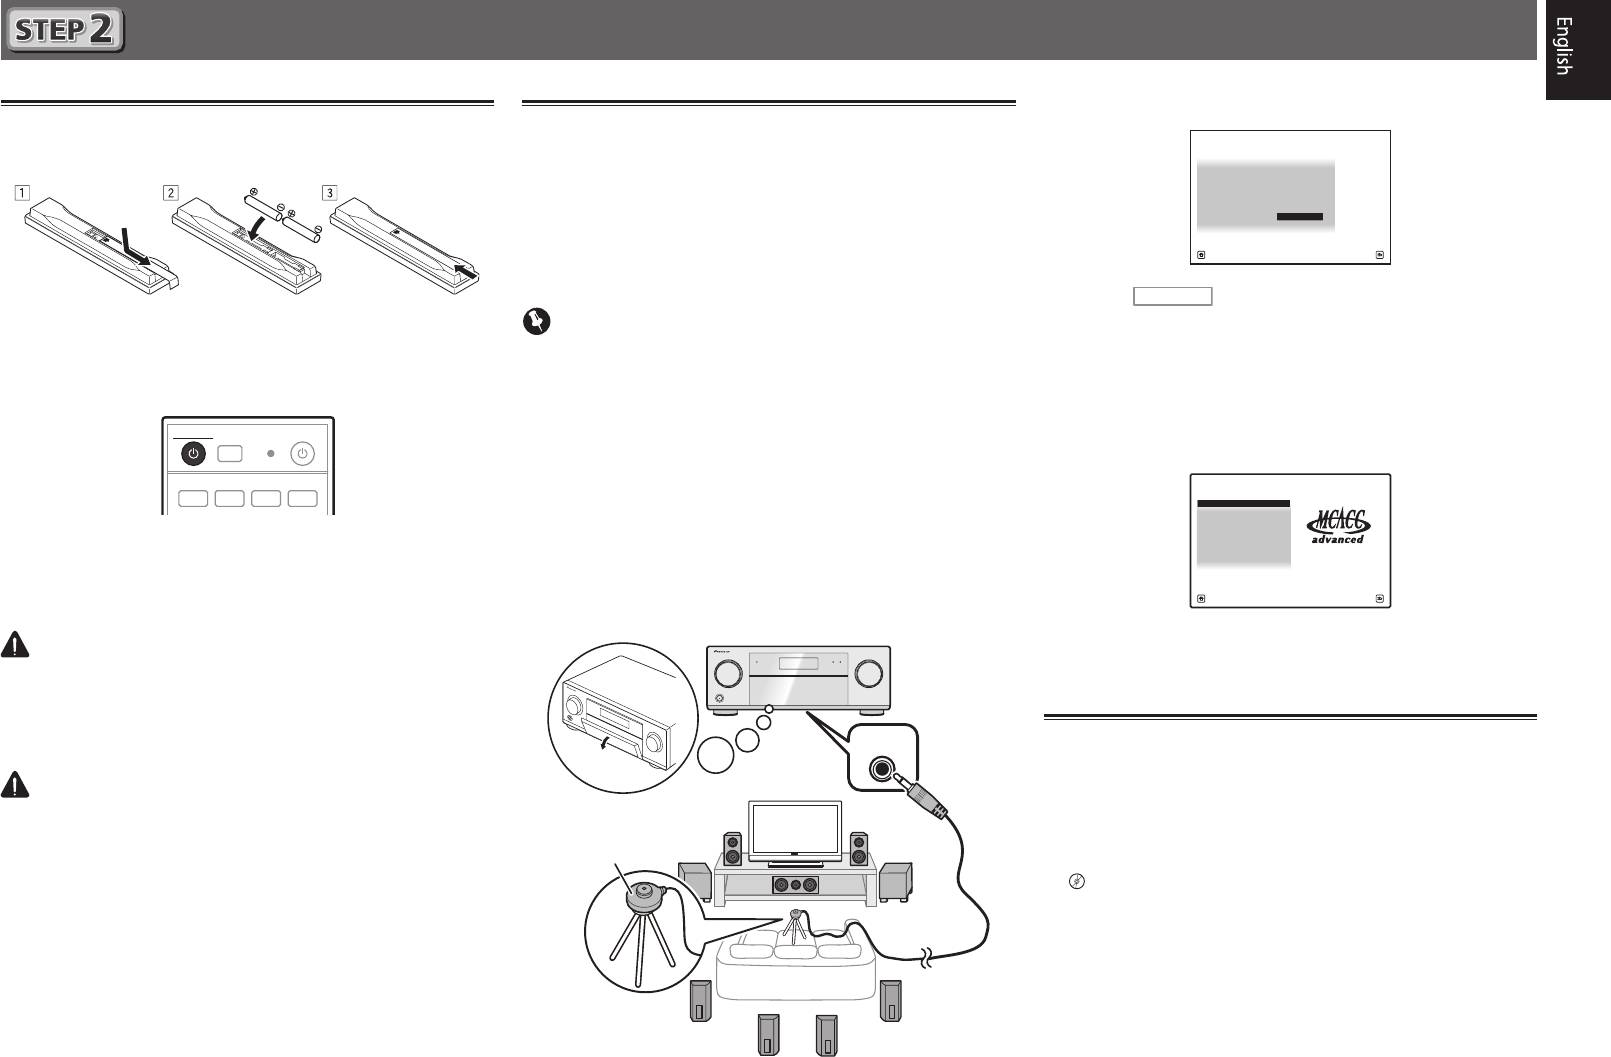
Initial Setup
The
Full Auto MCACC
screen appears on your TV.
Before you start
Automatically setting up for
1a.Full Auto MCACC
A/V RECEIVER
surround sound (MCACC)
Speaker System : Normal
(
SB/FH
)
1
Put the batteries in the remote control.
EQ Type : SYMMETRY
MCACC : M1.MEMORY 1
THX Speaker : NO
The Auto Multi-Channel Acoustic Calibration (MCACC) setup
START
uses the supplied setup microphone to measure and analyze
the test tone that is outputted by the speakers. This setup
Exit Return
enables automatic high precision measuring and settings;
utilizing it will create an optimum user listening environment.
2
Press
RECEIVER
on the remote control, then
The batteries included with the unit are to check initial
Important
press the ENTER button.
operations; they may not last over a long period. We
• Automatic measuring will start.
recommend using alkaline batteries that have a longer life.
• Measure in a quiet environment.
• Measuring will take about 3 to 12 minutes.
• If you have a tripod, use it to place the microphone so
2
Switch on the receiver and your TV.
that it’s about ear level at your normal listening position.
3
Follow the instructions on-screen.
ALL ZONE STBY
Otherwise, place the microphone at ear level using a table
DISCRETE ON
SOURCERECEIVER
• Automatic setting is complete when the Home Menu
or a chair.
screen appears.
RCU SETUP
• Accurate measurements may not be possible if there are
BDR
BD DVDDVR HDMI
obstacles between the speakers and the listening position
(microphone).
3
Switch the TV input so that it connects to the
• When measuring, step away from the listening position,
receiver.
and operate using the remote control from the external
side of all the speakers.
4
Turn the subwoofer on and turn up the volume.
1
Connect the supplied setup microphone.
WARNING
• Do not use or store batteries in direct sunlight or other
excessively hot place, such as inside a car or near a heater.
This can cause batteries to leak, overheat, explode or catch
MCACC
fire. It can also reduce the life or performance of batteries.
SETUP
MIC
CAUTION
• When disposing of used batteries, please comply with
governmental regulations or environmental public institu-
tion’s rules that apply in your country/area.
5
HOME MENU
A/V RECEIVER
1. Advanced MCACC
2. MCACC Data Check
3. Data Management
4. System Setup
5. Network Information
6. Operation Mode Setup
Exit Return
4
Make sure the setup microphone is
disconnected.
Canceling the Auto Power Down
If no operation is performed for a certain amount of time with
no audio or video signal being input, the receiver’s power turns
off automatically. The automatic power-off timer is set to 30
minutes under factory settings, and the timing can be changed
Microphone
or the power-off function switched off altogether.
l
“Auto Power Down”
Tripod
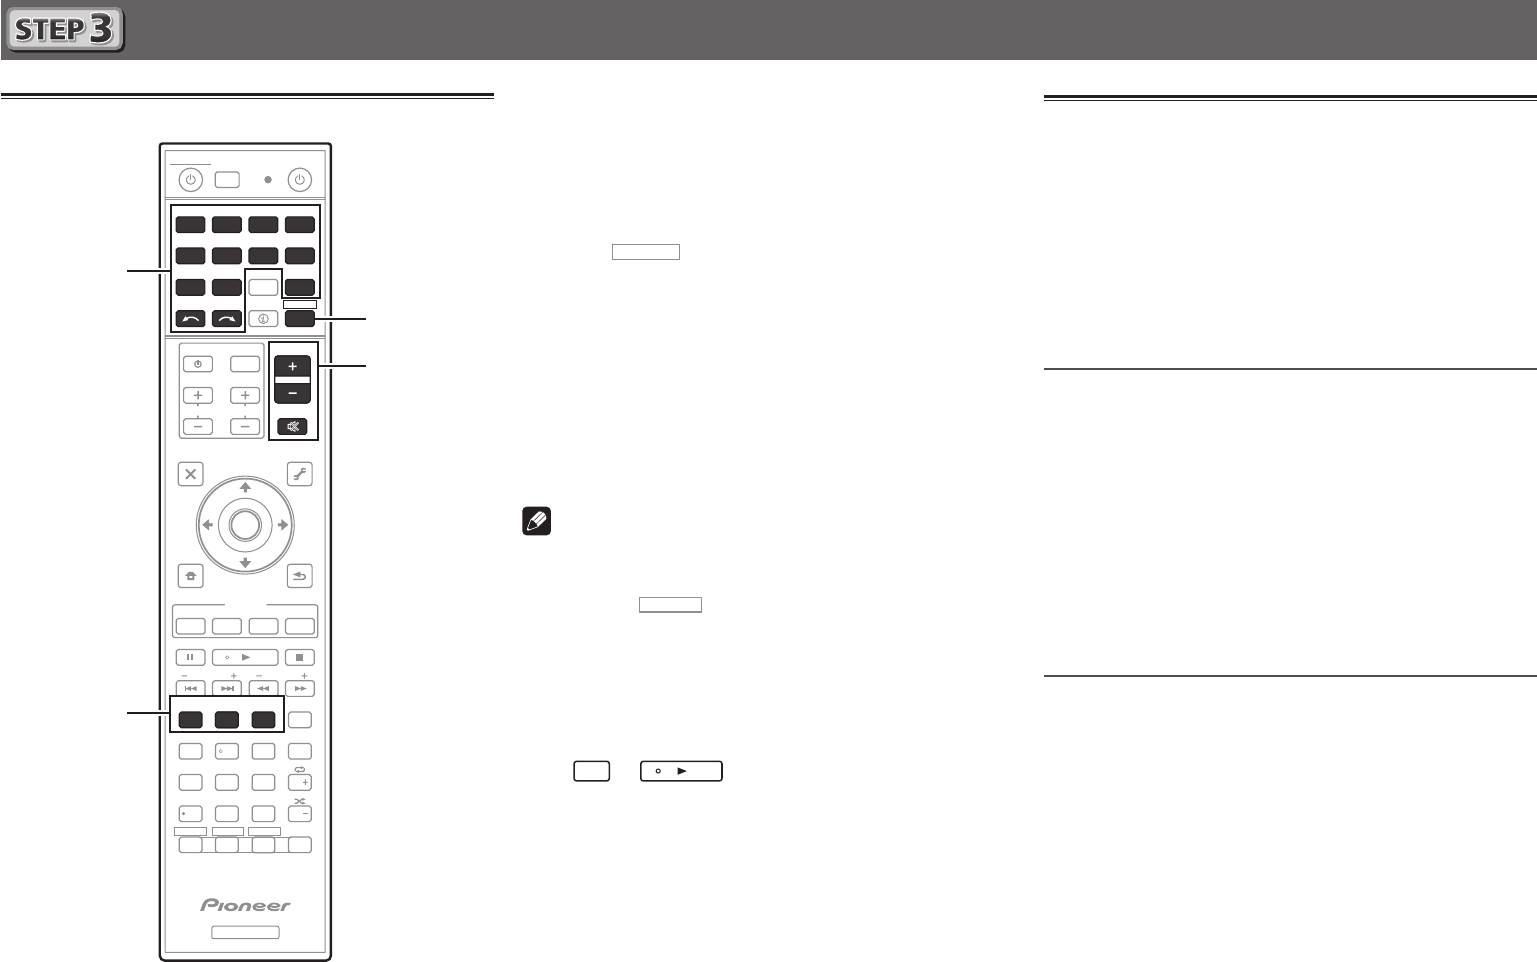
Basic playback
1
Switch on the playback component.
Multichannel playback
E.g.) Turn the Blu-ray Disc player connected to the
HDMI
ALL ZONE STBY
BD IN
terminal on.
DISCRETE ON
SOURCERECEIVER
RCU SETUP
2
Switch the input of the receiver.
BDR
BD DVDDVR
HDMI
E.g.) Press
BD
to select the
BD
input.
CDTV
NET
ADPT
3
Press
2
USBCBL OPTION 1
iPod
SATTUNER
INPUT
SELECT
STATUS
RECEIVER
3
INPUT
VOLUME
6
TV CONTROL
CH
VOL
MUTE
PARAMETER
AUDIO
PARAMETER
VIDEO
TOP MENU
MENU
TOOLS
ENTER
HOME
MENU
RETURN
iPod CTRL
FEATURES
PHASE
PQLS
Hi-Bit
D.FILT
MPX
BAND
PTY
PRESETTUNE
AUTO/ALC/
DIRECT
STANDARD ADV SURR
+Favorite
4
13
222
AUDIO
SIGNAL SEL
MCACC
CH LEVEL
S.RTRV
AUTO
546
DISP
SPEAKERS
DIMMER SLEEP
79
8
CH
D.ACCESS
HDMI OUT
CLASS
/
CLR
0
ENTER
CH
ZONE 2
ZONE 3ZONE 4
OPTION 2
Z2
Z3 Z4
RECEIVER
6
RECEIVER
Listening to the radio
1
Press TUNER to select the tuner.
If necessary, press
BAND
to change the band (FM or AM).
2
Press TUNE +/– to tune to a station.
to the receiver operation mode.
• Press and hold
TUNE +/–
for about a second. The receiver
will start searching for the next station.
4
Press AUTO/ALC/DIRECT to select ’AUTO
• If you’re listening to an FM station but the reception is
SURROUND’.
weak, press
MPX
to select FM MONO and set the receiver
Also press
STANDARD
or
ADV SURR
for multichannel
to the mono reception mode.
playback. Select your preferred listening mode.
5
Start the playback component’s playback.
Saving station presets
If you often listen to a particular radio station, it’s convenient to
E.g.) Start playback of the Blu-ray Disc player.
have the receiver store the frequency for easy recall whenever
6
Use VOLUME +/– to adjust the volume level.
you want to listen to that station.
Sound can be switched off by pressing
MUTE
button.
1
Press TOOLS while receiving a signal from the
Note
station you want to store.
The preset number is blinking.
• Switch to one of the underlined devices to use the remote
control to operate that device. To operate the receiver,
2
Press PRESET +/– to select the station preset
first press
RECEIVER
, then press the appropriate button to
you want, then press ENTER.
operate.
The preset number stop blinking and the receiver stores
• The receiver’s remote control can be used to operate
the station.
not only the receiver but also a variety of other devices,
including an iPod/USB device, a Blu-ray Disc player, a TV,
Listening to station presets
etc.
You will need to have some presets stored to do this.
Ex.: Playing a Blu-ray Disc player
Press PRESET +/– to select the station preset
BD
→
you want.
• It will take about 1 minute to be able to use the NETWORK
(internet radio and such), iPod/USB, or ADAPTER PORT
from the time the power is turned on.
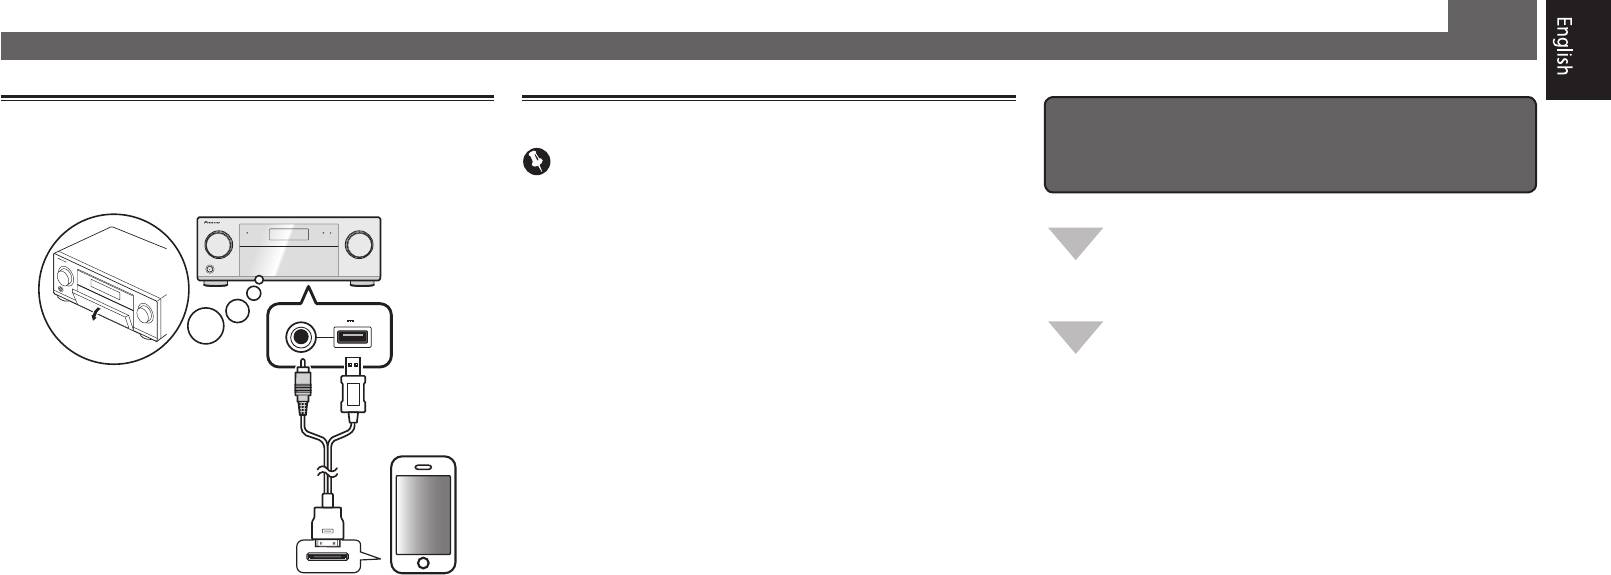
Basic playback
(continued)
Playing an iPod
Listening to Internet radio stations
To enjoy the many functions of the
1
Connect your iPod.
Important
unit to the fullest extent
An iPod/iPhone/iPad can be connected to the receiver.
• When using a broadband Internet connection, a contract
with an Internet service provider is required. For more
Install the AVNavigator from the included
details, contact your nearest Internet service provider.
CD-ROM into your computer, and use the
• To listen to Internet radio stations, you must have high-
«Interactive Manual».
speed broadband Internet access. With a 56 K or ISDN
5V 2.1
USB
A
modem, you may not enjoy the full benefits of Internet
Load the CD-ROM into your computer and
radio.
iPod iPhone iPad
download the PDF manual from the menu screen
• Access to content provided by third parties requires a
to read.
high speed internet connection and may also require
account registration and a paid subscription. Third
party content services may be changed, suspended,
Functions
iPod/iPhone/iPad
interrupted, or discontinued at any time without notice,
■
Playing a USB device
iPod cable
and Pioneer disclaims any liability in connection with such
■
Bluetooth ADAPTER for Wireless Enjoyment of Music
(supplied)
occurrences. Pioneer does not represent or warrant that
■
Playback with NETWORK feature
content services will continue to be provided or available
for a particular period of time, and any such warranty,
■
Setting the Audio options
express or implied, is disclaimed.
■
Setting the Video options
1
Press NET repeatedly to select the INTERNET
■
Using the MULTI-ZONE controls
2
Press iPod USB to select the iPod/USB input.
RADIO input.
FAQ
When the display shows the names of folders and files,
It may take several seconds for this receiver to access the
you’re ready to play music from the iPod.
network.
Glossary
3
Use
/
to select a category, then press
2
Use
/
to select the Internet radio station to
Features index
ENTER to browse that category.
play back, and then press ENTER.
• To return to the previous level any time, press
RETURN
.
4
Use
/
to browse the selected category (e.g.,
albums).
• Use
/l
to move to previous/next levels.
5
Continue browsing until you arrive at what
you want to play, then press
to start
playback.
7
Оглавление
Аннотации для Ресивера Pioneer SC-2022-K в формате PDF
Топ 10 инструкций
Другие инструкции
-
Страница 1
Operating Instructions AV Receiv er SC — 65[…]
-
Страница 2
2 The exclamation point within an equilateral triangle is intended to alert the user to the presence of important operating and maintenance (servicing) instructions in the literature accompanying the appliance. The lightning flash with arrowhead symbol, within an equilateral triangle, is intended to alert the user to the presence of uninsulated “[…]
-
Страница 3
3 IMPORT ANT NOTICE THE MODEL NUMBER AND SERIAL NUMBER OF THIS EQUIPMENT ARE ON THE REAR OR BOT TOM. RECORD THESE NUMBERS ON YO UR ENC LO SED WA RRANTY CARD AND KEEP IN A SAFE PL ACE FOR FUTURE REFERENCE. D36-AP9-1_A1_En CAUTION This product satisfies FCC regulations when shielded cables and connectors are used to connect the unit to other equipmen[…]
-
Страница 4
4 Thank you for buying this Pioneer product. Please read through these operating instructions so you will know how to operate your model properly. Contents 01 Before you start Checking what’s in the box ……………………………………………………………………………………………………………………………… […]
-
Страница 5
5 10 Controlling the rest of your system About the Remote Setup menu ……………………………………………………………………………………………………………………… 79 Operating multiple receivers …………………………………………………………………………………………………..[…]
-
Страница 6
6 Flow of settings on the receiver Flow for connecting and setting the receiver The unit is a full-fledged AV receiver equipped with an abundance of functions and terminals. It can be used eas — ily after following the procedure below to make the connections and settings. Required setting item : 1 , 2 , 3 , 4 , 5 , 7 , 9 Setting to be made as neces[…]
-
Страница 7
7 Checking what’s in the box ……………………………………………………………………………………………… 8 Our philosophy ……………………………………………………………………………………………………………….. 8 Features ……………………………….[…]
-
Страница 8
8 01 Before you start Checking what’s in the box Please check that you’ve received the following supplied accessories: ! Setup microphone (cable: 5 m (16.4 ft.)) ! Remote control unit ! AAA size IEC R03 dry cell batteries (to confirm system operation) x2 ! AM loop antenna ! FM wire antenna ! iPod cable ! MHL cable ! Power cord ![…]
-
Страница 9
9 01 Before you start % Bluetooth compatible Using the Bluetooth ADAPTER (AS-BT100 or AS-BT200) lets you enjoy music files on an iPhone or other Bluetooth wireless technology device wirelessly. % Auto Sound Retriever The Auto Sound Retriever feature employs DSP technology to restore sound pressure and smooth jagged arti — facts left[…]
-
Страница 10
10 01 Before you start Operating range of remote control unit The remote control may not work properly if: ! There are obstacles between the remote control and the receiver’s remote sensor. ! Direct sunlight or fluorescent light is shining onto the remote sensor. ! The receiver is located near a device that is emitting infrared ra[…]
-
Страница 11
11 Remote control ……………………………………………………………………………………………………………… 12 Display ………………………………………………………………………………………………………………………….. 14 Front panel ………………….[…]
-
Страница 12
12 02 Controls and displays Remote control This section explains how to operate the remote control for the receiver. RECEIVE R D. AC CESS CH LEVEL DIMMER HDMI OUT SLEEP SIGNAL SEL MCACC AU T O/ALC/ DIRECT TH X AU TO S.RTR V ST ANDARD ADV SURR SPEAKER S D.FILT MP X PRESET TUN E PQLS B AND PHAS E Hi-Bit PT Y iP od CTRL HOME MENU FEA T[…]
-
Страница 13
13 02 Controls and displays 10 MULTI-ZONE select buttons Switch to perform operations in ZONE 2 and ZONE 3 ( page 75 ). 11 Remote control LED Lights when a command is sent from the remote control. 12 Switches the remote to control the receiver (used to select the white commands). Switch to perform operations in the main zone. Also u[…]
-
Страница 14
14 02 Controls and displays Display HDMI DIGIT AL ANALOG L C R SL SR XL XR XC LFE AUTO DIGIT AL PL US AU TO SURROUND STREAM DIRECT PROL OGI C x Neo: 6 THX AD V .SURROUND ST ANDARD SP AB SLEEP DSD PCM DTS HD ES 96/24 MSTR S.RTRV SOUND UP MIX OV ER MONO dB 2 MUL T I-ZON E STEREO Tr ueHD TUNED PQLS AL C AT T 2 2 US B VIDE O TV DV D HDM[…]
-
Страница 15
15 02 Controls and displays Front panel MASTER VOLUME STANDBY /O N INPUT SELECTOR iPod iPhone iPad HDMI ADVANCE D MCAC C FL OFF PHONES SPEAKERS MULTI-ZONE CONTROL ON/OFF MCACC SETUP MIC ENTER TUNE TUNE PRESET PRESET VIDEO PARAMETER AUDIO PARAMETER TUNER EDIT US BH DMI 5 INPUT/ MHL ( ) iPod iPhone iPad AUTO SURR/ALC / STREAM DIREC TH[…]
-
Страница 16
16 02 Controls and displays 20 iPod iPhone iPad USB terminals Use to connect your Apple iPod/iPhone/iPad as an audio and video source ( page 37 ), or connect a USB device for audio and photo playback ( page 38 ). 21 HDMI input/MHL connector Use for connection to a compatible HDMI device (Video camera, etc.) ( page 38 ). An MHL-compa[…]
-
Страница 17
17 Connecting your equipment …………………………………………………………………………………………… 18 Rear panel …………………………………………………………………………………………………………………….. 18 Determining the speakers’ application …….[…]
-
Страница 18
18 03 Connecting your equipment Connecting your equipment This receiver provides you with many connection possibilities, but it doesn’t have to be difficult. This chapter explains the kinds of components you can connect to make up your home theater system. CAUTION ! Before making or changing the connections, switch off the power a[…]
-
Страница 19
19 03 Connecting your equipment Determining the speakers’ application This unit is equipped with speaker terminals for 11 channels, allowing users to select a variety of speaker layouts/ usage patterns according to their tastes. The terminals to which the speakers should be connected differ accord — ing to the speaker layout/usage[…]
-
Страница 20
20 03 Connecting your equipment [D] 7.2 channel surround system (Surround back) & ZONE 2 connection (Multi Zone) ! Speaker System setting: 7.1ch + ZONE 2 With these connections you can simultaneously enjoy 7.2-channel surround sound in the main zone with stereo playback on another component in ZONE 2. (The selection of input dev[…]
-
Страница 21
21 03 Connecting your equipment Placing the speakers Refer to the chart below for placement of the speakers you intend to connect. L SW 2S W 1 C FHL FWL SL SBL SBR SB SR FWR R FHR 30 30 60 60 60 120 120 ! Place the surround speakers at 120º from the center. If you, (1) use the surround back speaker, and, (2) don’t use the front h[…]
-
Страница 22
22 03 Connecting your equipment Connecting the speakers Each speaker connection on the receiver comprises a positive (+) and negative (–) terminal. Make sure to match these up with the terminals on the speakers themselves. This unit supports speakers with a nominal impedance of 4 W to 16 W . CAUTION ! These speaker terminals carry[…]
-
Страница 23
23 03 Connecting your equipment Bi-wiring your speakers Your speakers can also be bi-wired if they support bi-amping. ! With these connections, the Speaker System setting makes no difference. CAUTION ! Don’t connect different speakers from the same terminal in this way. ! When bi-wiring as well, heed the cautions for bi-amping sho[…]
-
Страница 24
24 03 Connecting your equipment [B] 7.2 channel surround system & Speaker B connection ! Select ‘ 7.1ch + Speaker B ’ from the Speaker System menu. See Speaker system setting on page 93 to do this. ! When only connecting one surround back speaker, connect it to the SURROUND BACK L (Single) terminals. (Single) SPEAKERS FRONT […]
-
Страница 25
25 03 Connecting your equipment [D] 7.2 channel surround system (Surround back) & ZONE 2 connection (Multi Zone) ! Select ‘ 7.1ch + ZONE 2 ’ from the Speaker System menu. See Speaker system setting on page 93 to do this. ! When only connecting one surround back speaker, connect it to the SURROUND BACK L (Single) terminals. ([…]
-
Страница 26
26 03 Connecting your equipment [F] 5.2 channel surround system & Front Bi-amping connection (High quality surround) & ZONE 2 connection (Multi Zone) ! Select ‘ 5.1ch Bi-Amp + ZONE 2 ’ from the Speaker System menu. See Speaker system setting on page 93 to do this. (Single) SPEAKERS FRONT CENTE R A A RL SURROUND RL SURROU[…]
-
Страница 27
27 03 Connecting your equipment About the audio connection Transferable audio signals Sound signal priority HDMI HD audio Digital (Coaxial )C onventional digital audio RCA (Analog) ( White / Red ) Conventional analog audio Digital (Optical) Types of cables and terminals ! With an HDMI cable, video and audio signals can be transferre[…]
-
Страница 28
28 03 Connecting your equipment About HDMI The HDMI connection transfers uncompressed digital video, as well as almost every kind of digital audio. This receiver incorporates High-Definition Multimedia Interface (HDMI ® ) technology. This receiver supports the functions described below through HDMI connections. ! Digital transfer o[…]
-
Страница 29
29 03 Connecting your equipment ! If you want to listen to the sound of the TV over the receiver, connect the receiver and TV with audio cables. — When the TV and receiver are connected by HDMI connections, if the TV supports the HDMI ARC (Audio Return Channel) function, the sound of the TV can be input to the receiver via the HDM[…]
-
Страница 30
30 03 Connecting your equipment Connecting your TV with no HDMI input This diagram shows connections of a TV (with no HDMI input) and DVD player (or other playback component) to the receiver. Important ! With these connections, the picture is not output to the TV even if the DVD player is connected with an HDMI cable. Connect the re[…]
-
Страница 31
31 03 Connecting your equipment Connecting an HDD/DVD recorder, BD recorder and other video sources This receiver has audio/video inputs suitable for connecting analog or digital video devices, including HDD/DVD recorders and BD recorders. When you set up the receiver you’ll need to tell the receiver which input you connected the […]
-
Страница 32
32 03 Connecting your equipment Connecting a satellite/cable receiver or other set-top box Satellite and cable receivers, and terrestrial digital TV tuners are all examples of so-called ‘set-top boxes’. When you set up the receiver you’ll need to tell the receiver which input you connected the set-top box to (see The Input Set[…]
-
Страница 33
33 03 Connecting your equipment Connecting other audio components This receiver has both digital and analog inputs, allowing you to connect audio components for playback. When you set up the receiver you’ll need to tell the receiver which input you connected the component to (see also The Input Setup menu on page 44 ). HDMI BD IN […]
-
Страница 34
34 03 Connecting your equipment Connecting AM/FM antennas Connect the AM loop antenna and the FM wire antenna as shown below. To improve reception and sound quality, connect external antennas (see Connecting external antennas on page 34 ). ANTENNA AM LOOP FM UN BA L 75 ANTENN A AM LOOP FM UN BA L 75 1 4 5 2 3 ab c 1 Pull off the pro[…]
-
Страница 35
35 03 Connecting your equipment MULTI-ZONE setup This receiver can power up to three independent systems in separate rooms after you have made the proper MULTI-ZONE connections. Different sources can be playing in three zones at the same time or, depending on your needs, the same source can also be used. The main and sub zones have […]
-
Страница 36
36 03 Connecting your equipment To use the surround back speaker terminals for ZONE 2: R Sub zone ( ZONE 2 ) Main zone VIDEO IN (Single ) S URR O UND BA CK RL ZONE 2 OUT (Single) SURROUND BACK RL ZONE 2 OUT L A A 2 1 Secondary MULTI-ZONE setup (ZONE 3) % Connect a separate amplifier to the AUDIO ZONE 3 OUT jacks on this receiver. Yo[…]
-
Страница 37
37 03 Connecting your equipment Connecting to the network through LAN interface By connecting this receiver to the network via the LAN terminal, you can listen to Internet radio stations. To listen to Internet radio stations, you must sign a contract with an ISP (Internet Service Provider) beforehand. When connected in this way, you[…]
-
Страница 38
38 03 Connecting your equipment Tip ! An iPod/iPhone/iPad can be connected to the receiver. For details on supported models and versions of the respective products, see Playing an iPod on page 48 . % Switch the receiver into standby then use the supplied iPod cable to connect your iPod to the iPod iPhone iPad USB terminal on the fro[…]
-
Страница 39
39 03 Connecting your equipment Connecting to a wireless LAN Wireless connection to the network is possible through a wireless LAN connection. Use the separately sold AS-WL300 for connection. ! Use only the furnished accessory connecting cable. ! Certain settings are required to use a wireless LAN converter (AS-WL300). For instructi[…]
-
Страница 40
40 03 Connecting your equipment Plugging in the receiver Only plug in after you have connected all your components to this receiver, including the speakers. CAUTION ! Handle the power cord by the plug part. Do not pull out the plug by tugging the cord, and never touch the power cord when your hands are wet, as this could cause a sho[…]
-
Страница 41
41 Changing the OSD display language (OSD Language) ……………………………………………………… 42 Automatically conducting optimum sound tuning (Full Auto MCACC) ……………………………… 42 The Input Setup menu ………………………………………………………………………………[…]
-
Страница 42
42 04 Basic Setup Changing the OSD display language (OSD Language) The language used on the Graphical User Interface screen can be changed. ! The explanations in these operating instructions are for when English is selected for the GUI screen. ! The OSD display is only displayed when the receiver’s HDMI OUT terminal and the TV’s[…]
-
Страница 43
43 04 Basic Setup Install the microphone on a stable floor. Placing the microphone on any of the following surfaces may make accurate measurement impossible: ! Sofas or other soft surfaces. ! High places such as tabletops and sofa tops. The Full Auto MCACC display appears once the microphone is connected. Speaker System : 9.1ch FH/F[…]
-
Страница 44
44 04 Basic Setup The Input Setup menu You only need to make settings in the Input Setup menu if you didn’t hook up your digital equipment according to the default settings (see Input function default and possible settings on page 44 ). In this case, you need to tell the receiver what equipment is hooked up to which terminal so th[…]
-
Страница 45
45 04 Basic Setup Operation Mode Setup This receiver is equipped with a great number of functions and settings. The Operation Mode feature is provided for users who find it difficult to master all these functions and settings. One of two settings can be selected for the Operation Mode : Expert and Basic . ! The OSD display is only d[…]
-
Страница 46
46 Playing a source …………………………………………………………………………………………………………….. 47 Playing an iPod ……………………………………………………………………………………………………………… 48 Playing a USB device ………………[…]
-
Страница 47
47 05 Basic playback Playing a source Here are the basic instructions for playing a source (such as a DVD disc) with your home theater system. INPUT SELECT iPod USB CBL SA TM HL TUNE R ADPT CD TV RECEIVER BDR BD DV DD VR NET HDMI VO LUME RECEIVE R AU TO /ALC / DIRECT RECEIVER 1 1 Switch on your system components and receiver. Start […]
-
Страница 48
48 05 Basic playback Playing an iPod This receiver has the iPod iPhone iPad USB terminal that will allow you to control playback of audio content from your iPod using the controls of this receiver. Here we describe the procedure for playback on an iPod. For playback on a USB device, see Playing a USB device on page 49 . Important ! […]
-
Страница 49
49 05 Basic playback Playing a USB device It is possible to play files using the USB interface on the front of this receiver. ! Compatible USB devices include external magnetic hard drives, portable flash memory drives (particularly key drives) and digital audio players (MP3 players) of format FAT16/32. ! Pioneer cannot guarantee co[…]
-
Страница 50
50 05 Basic playback About playable file formats The USB function of this receiver supports the following file formats. Note that some file formats are not available for playback although they are listed as playable file formats. Music files Category Extension Stream MP3 <a> .mp3 MPEG-1 Audio Layer-3 Sampling frequency 32 kHz,[…]
-
Страница 51
51 05 Basic playback Listening to the radio The following steps show you how to tune in to FM and AM radio broadcasts using the automatic (search) and manual (step) tuning functions. If you already know the frequency of the station you want, see Tuning directly to a station below. Once you are tuned to a station you can memorize the[…]
-
Страница 52
52 05 Basic playback Bluetooth ADAPTER for Wireless Enjoyment of Music This receiver Re mote control operation Music data Bluetooth ® ADAPTER Bluetooth wireless technology enabled device: cell phone Bluetooth wireless technology enabled device: Digital music player Device not equipped with Bluetooth wireless technology : Digital mu[…]
-
Страница 53
53 05 Basic playback Listening to music contents of a Bluetooth wireless technology device with your system 1 Press ADPT on the remote control to switch the receiver to ADAPTER PORT input. ! The AD APTER PORT input can also be selected by pressing SOUND RETRIEVER AIR on the receiver. In this case, the optimum listening mode ( SOUND […]
-
Страница 54
54 Enjoying various types of playback using the listening modes ………………………………………… 55 Selecting MCACC presets ……………………………………………………………………………………………….. 57 Choosing the input signal ………………………………………………[…]
-
Страница 55
55 06 Listening to your system Enjoying various types of playback using the listening modes Using this receiver, you can listen to any source in surround sound. However, the options available will depend on your speaker setup and the type of source you’re listening to. To play with surround sound, check “ Standard surround sound[…]
-
Страница 56
56 06 Listening to your system Using the Home THX modes THX and Home THX are technical standards created by THX Ltd. for cinema and home theater sound. Home THX is designed to make home theater audio sound more like what you hear in a cinema. Different THX options will be available depending on the source and the setting for surroun[…]
-
Страница 57
57 06 Listening to your system Using Stream Direct Use the Stream Direct modes when you want to hear the truest possible reproduction of a source. All unneces — sary signal processing is bypassed, and you’re left with the pure analog or digital sound source. Processing differs depending on the input signal and whether or not surro[…]
-
Страница 58
58 06 Listening to your system Better sound using Phase Control This receiver’s Phase Control feature uses phase correction measures to make sure your sound source arrives at the listening position in phase, preventing unwanted distortion and/or coloring of the sound. Phase Control technology provides coherent sound reproduction t[…]
-
Страница 59
59 Introduction ………………………………………………………………………………………………………………….. 60 Playback with Network functions …………………………………………………………………………………… 61 About network playback ……………………….[…]
-
Страница 60
60 07 Playback with NETWORK features Introduction This receiver is equipped with the LAN terminal and you can enjoy the following features by connecting your components to these terminals. Listening to Internet radio stations You can select and listen to your favorite Internet radio station from the list of Internet radio stations c[…]
-
Страница 61
61 07 Playback with NETWORK features Playback with Network functions Important ! About one minute is required between turning the power on and completion of startup. ! When you play back audio files, ‘ Connecting… ’ is displayed before playback starts. The display may continue for several seconds depending on the type of file.[…]
-
Страница 62
62 07 Playback with NETWORK features 4 Access the special Pioneer Internet radio site from your computer and perform the registration process. http://www.radio-pioneer.com Access the above site and use the access code in step 3 to perform user registration, following the instructions on the screen. 5 Register the desired broadcast s[…]
-
Страница 63
63 07 Playback with NETWORK features The DLNA certification logo makes it easy to find products that comply with the DLNA Interoperability Guidelines. This unit complies with DLNA Interoperability Guidelines v1.5. When a PC running DLNA server software or other DLNA compatible device is connected to this player, some setting changes[…]
-
Страница 64
64 07 Playback with NETWORK features About playable file formats The NETWORK feature of this receiver supports the following file formats. Note that some file formats are not available for playback although they are listed as playable file formats. Also, the compatibility of file formats var — ies depending on the type of server. Ch[…]
-
Страница 65
65 About the Control with HDMI function …………………………………………………………………………… 66 Making Control with HDMI connections …………………………………………………………………………. 66 HDMI Setup …………………………………………………………[…]
-
Страница 66
66 08 Control with HDMI function About the Control with HDMI function Synchronized operations below with a Control with HDMI-compatible Pioneer TV or Blu-ray Disc player are pos — sible when the component is connected to the receiver using an HDMI cable. ! The receiver’s volume can be set and the sound can be muted using the TV’[…]
-
Страница 67
67 08 Control with HDMI function Before using synchronization Once you have finished all connections and settings, you must: 1 Put all components into standby mode. 2 Turn the power on for all components, with the power for the TV being turned on last. 3 Choose the HDMI input to which the TV is connected to this receiver, and see if[…]
-
Страница 68
68 08 Control with HDMI function Cautions on the Control with HDMI function ! Connect the TV directly to this receiver. Interrupting a direct connection with other amps or an AV converter (such as an HDMI switch) can cause operational errors. ! Only connect components (Blu-ray Disc player, etc.) you intend to use as a source to the […]
-
Страница 69
69 Setting the Audio options ……………………………………………………………………………………………… 70 Setting the Video options ………………………………………………………………………………………………. 72 Switching the speaker terminals ………………….[…]
-
Страница 70
70 09 Using other functions Setting the Audio options There are a number of additional sound settings you can make using the AUDIO PARAMETER menu. The defaults, if not stated, are listed in bold. Important ! Note that if a setting doesn’t appear in the AUDIO PARAMETER menu, it is unavailable due to the current source, settings and[…]
-
Страница 71
71 09 Using other functions Setting What it does Option(s) LFE (LFE Attenuate) Some audio sources include ultra-low bass tones. Set the LFE attenu — ator as necessary to prevent the ultra-low bass tones from distorting the sound from the speakers. The LFE is not limited when set to 0 dB, which is the recommended value. When set to ?[…]
-
Страница 72
72 09 Using other functions k ! You can’t use the Virtual Height mode when the headphones are connected to this receiver or when any of the stereo, Front Stage Surround Advance, Sound Retriever Air or Stream Direct modes is selected. ! You can only use the Virtual Height mode if the surround speakers are on and the FH setting is s[…]
-
Страница 73
73 09 Using other functions Setting What it does Option(s) V.ADJ (Advanced Video Adjust) Sets the optimum picture quality for the type of monitor that is con — nected. Select PDP for plasma displays, LCD for liquid crystal moni — tors, FPJ for front projectors, PRO for professional monitors. If you want to adjust the picture quality[…]
-
Страница 74
74 09 Using other functions Setting What it does Option(s) ASP (Aspect) <g> Specifies the aspect ratio when input signals are output at the HDMI output. Make your desired settings while checking each setting on your display (if the image doesn’t match your monitor type, cropping or black bands appear). THROUGH NORMAL a ! If […]
-
Страница 75
75 09 Using other functions Using the MULTI-ZONE controls The following steps use the front panel controls to adjust the sub zone volume and select sources. See MULTI- ZONE remote controls on page 75 . 1 Press MULTI-ZONE ON/OFF on the front panel. Each press selects a MULTI-ZONE option: ! ZONE 2 ON – Selects your primary ( ZONE 2 […]
-
Страница 76
76 09 Using other functions Using the sleep timer The sleep timer switches the receiver into standby after a specified amount of time so you can fall asleep without worrying about the receiver being left on all night. Use the remote control to set the sleep timer. % Press to the receiver operation mode, then press SLEEP repeatedly t[…]
-
Страница 77
77 09 Using other functions Setting Default Mute Level FULL Phase Control ON Auto Sound Retriever iPod/USB, INTERNET RADIO, SiriusXM, PANDORA, MEDIA SERVER, FAVORITES, ADAPTER PORT input function ON Other input functions OFF Sound Delay 0.0 frame Dual Mono CH1 DRC AUTO SACD Gain 0 dB LFE Attenuate 0 dB Auto delay OFF Digital Safety […]
-
Страница 78
78 About the Remote Setup menu ………………………………………………………………………………………. 79 Operating multiple receivers ………………………………………………………………………………………….. 79 Setting the remote to control other components ……………[…]
-
Страница 79
79 10 Controlling the rest of your system About the Remote Setup menu The Remote Setup mode is set by pressing the number button while pressing RCU SETUP . The different items on the Remote Setup menu are described below. For their setting procedures, refer to the explanations for the respective items. Setting What it does Preset re[…]
-
Страница 80
80 10 Controlling the rest of your system 4 Repeat steps 2 through 3 for the other components you want to control. To try out the remote control, switch the component on or off (into standby) by pressing u SOURCE . If it doesn’t seem to work, select the next code from the list (if there is one). 5 Press RCU SETUP to exit the prese[…]
-
Страница 81
81 10 Controlling the rest of your system Direct function ! Default setting: On You can use the direct function feature to control one component using the remote control while at the same time, using your receiver to playback a different component. This could let you, for example, use the remote control to set up and listen to a CD […]
-
Страница 82
82 10 Controlling the rest of your system Controlling components This remote control can control components after entering the proper codes (see Setting the remote to control other components on page 79 for more on this). Use the input function buttons to select the component. RECEIVER D. A CCESS CH LEVEL DIMMER SLEEP SIGNAL SEL SPE[…]
-
Страница 83
83 10 Controlling the rest of your system Audio/Video components Button(s) LD CD/CD-R/SACD MD/DAT TAPE u SOURCE POWER ON/OFF POWER ON/OFF POWER ON/OFF POWER ON/OFF Number buttons numerics numerics numerics — ! /CLR +10 >10/CLEAR CLEAR <a> CLEAR ENTER (CLASS) ENTER DISC/ENTER OPEN/CLOSE <a> ENTER TOP MENU — — MS […]
-
Страница 84
84 Making receiver settings from the Advanced MCACC menu ……………………………………………. 85 Automatic MCACC (Expert) …………………………………………………………………………………………….. 85 Manual MCACC setup …………………………………………………………[…]
-
Страница 85
85 11 The Advanced MCACC menu Making receiver settings from the Advanced MCACC menu The Advanced MCACC (Multi Channel ACoustic Calibration) system was developed in Pioneer’s laboratories with the aim of making it possible for home users to perform adjustments of the same level as in a studio easily and with high precision. The aco[…]
-
Страница 86
86 11 The Advanced MCACC menu PHONES SPEAKERS MU LT I- ZO NE CO NTROL ON/OFF MCACC SETUP MIC TUNER EDIT USB iPod iPhone iPad AUTO SURR/A LC / STREAM DIREC T ST ANDAR D SURROUND AD VA NCED SURROUND iP od iPhone iP ad DIRECT CONTRO L BAND 5V 2.1 A HOME THX HDMI 5 INPUT/ MHL ( ) 5V 1 A Microphone T ripod If you have a tripod, use it to[…]
-
Страница 87
87 11 The Advanced MCACC menu Manual MCACC setup You can use the settings in the Manual MCACC setup menu to make detailed adjustments when you’re more familiar with the system. Before making these settings, you should have already completed Automatically con — ducting optimum sound tuning (Full Auto MCACC) on page 42 . You only ne[…]
-
Страница 88
88 11 The Advanced MCACC menu Standing Wave ! Default setting: ON / ATT 0.0dB (all filters) Acoustic standing waves occur when, under certain conditions, sound waves from your speaker system resonate mutually with sound waves reflected off the walls in your listening area. This can have a negative effect on the overall sound, especi[…]
-
Страница 89
89 11 The Advanced MCACC menu 3 If you selected ‘Reverb Measurement’, select EQ ON or EQ OFF, and then START. The following options determine how the reverb characteristics of your listening area are displayed in Reverb View : ! EQ OFF – You will see the reverb characteristics of your listening area without the equalization pe[…]
-
Страница 90
90 11 The Advanced MCACC menu Speaker Distance Use this to display the distance from the different channels to the listening position. See Speaker Distance on page 94 for more on this. 1 Select ‘Speaker Distance’ from the MCACC Data Check menu. 2 When ‘MCACC’ is highlighted, use k / l to select the MCACC preset you want to c[…]
-
Страница 91
91 11 The Advanced MCACC menu 4 Select ‘OK’ to confirm and copy the settings. When MCACC Memory Copy? is displayed, select YES . If NO is selected, the memory is not copied. Completed! shows in the GUI screen to confirm the MCACC preset has been copied, then you automatically return to the Data Management setup menu. Clearing MC[…]
-
Страница 92
92 Making receiver settings from the System Setup menu …………………………………………………… 93 Manual speaker setup ……………………………………………………………………………………………………. 93 Network Setup menu ………………………………………………..[…]
-
Страница 93
93 12 The System Setup and Other Setup menus Making receiver settings from the System Setup menu The following section describes how to change the speaker-related settings manually and make various other settings (input selection, OSD language selection, etc.). 1 Press u RECEIVER to switch on the receiver and your TV. Make sure that[…]
-
Страница 94
94 12 The System Setup and Other Setup menus 2 Choose the set of speakers that you want to set, then select a speaker size. Use k / l to select the size (and number) of each of the following speakers: ! Front – Select LARGE if your front speakers reproduce bass frequencies effectively, or if you didn’t connect a subwoofer. Selec[…]
-
Страница 95
95 12 The System Setup and Other Setup menus 2 Choose the X-Curve setting you want. Use k / l to adjust the setting. The X-Curve is expressed as a downwards slope in decibels per octave, starting at 2 kHz. The sound becomes less bright as the slope increases (to a maximum of –3.0dB/oct ). Use the following guidelines to set the X-[…]
-
Страница 96
96 12 The System Setup and Other Setup menus Proxy Hostname / Proxy Port This setting is required when you connect this receiver to the Internet via a proxy server. Enter the IP address of your proxy server in the ‘ Proxy Hostname ’ field. Also, enter the port number of your proxy server in the ‘ Proxy Port ’ field. 1 Select[…]
-
Страница 97
97 12 The System Setup and Other Setup menus The Other Setup menu The Other Setup menu is where you can make customized settings to reflect how you are using the receiver. 1 Press on the remote control, then press HOME MENU. A Graphical User Interface (GUI) screen appears on your TV. Use i / j / k / l and ENTER to navigate through t[…]
-
Страница 98
98 12 The System Setup and Other Setup menus ! If an update file is provided on the Pioneer website, download it onto your computer. When downloading an update file from the Pioneer website onto your computer, the file will be in ZIP format. Unzip the ZIP file before saving it on the USB memory device. If there are any old downloade[…]
-
Страница 99
99 12 The System Setup and Other Setup menus The low frequency component output from the AUDIO ZONE 2 OUT terminals is cut. When a subwoofer is con — nected in Zone 2, we recommend setting this to “ ON ”. This is only valid when Zone 2 is connected using the AUDIO ZONE 2 OUT terminals. ! OFF (default) – The High Pass Filter fu[…]
-
Страница 100
100 Troubleshooting ………………………………………………………………………………………………………….. 101 Power ………………………………………………………………………………………………………………………….. 101 No sound ………………………[…]
-
Страница 101
101 13 FAQ Troubleshooting Incorrect operations are often mistaken for trouble and malfunctions. If you think that there is something wrong with this component, check the points below. Sometimes the trouble may lie in another component. Investigate the other components and electrical appliances being used. If the trouble cannot be r[…]
-
Страница 102
102 13 FAQ Symptom Remedy No sound from subwoofer. Check that the subwoofer is connected properly, switched on and the volume turned up. If your subwoofer has a sleep function, make sure it is switched off. Make sure that the Subwoofer setting is YES or PLUS (see Speaker Setting on page 93 ). The crossover frequency may be set too l[…]
-
Страница 103
103 13 FAQ ADAPTER PORT terminal Symptom Remedy The Bluetooth wireless technology device cannot be connected or oper — ated. Sound from the Bluetooth wire — less technology device is not emitted or the sound is interrupted. Check that no object that emits electromagnetic waves in the 2.4 GHz band (microwave oven, wireless LAN device[…]
-
Страница 104
104 13 FAQ Symptom Remedy The various system settings are not stored. Do not pull out the power cord while conducting the settings. (The settings will be stored when both the main zone and sub zone turn off. Turn off all zones before pulling out the power cord.) Certain listening modes or HOME MENU items cannot be selected. When Ope[…]
-
Страница 105
105 13 FAQ Symptom Remedy No picture or sound. This receiver is HDCP-compatible. Check that the components you are connecting are also HDCP-compatible. If they are not, please connect them using the component or composite video jacks. Depending on the connected source component, it’s possible that it will not work with this receiv[…]
-
Страница 106
106 13 FAQ USB interface Symptoms Causes Remedies The folders/files stored on a USB memory device are not displayed. The folders/files are currently stored in a region other than the FAT (File Allocation Table) region. Store the folders/files in the FAT region. The number of levels in a folder is more than 9. Limit the maximum numbe[…]
-
Страница 107
107 13 FAQ Symptoms Causes Remedies Audio playback is undesir — ably stopped or disturbed. The audio file currently being played back was not recorded in a format playable on this receiver. Check whether the audio file was recorded in a format sup — ported by this receiver. Check whether the folder has been damaged or corrupted. Not[…]
-
Страница 108
108 13 FAQ Wireless LAN Network cannot be accessed via wireless LAN. Wireless LAN converter’s power is not on. (Wireless LAN converter’s “Power”, “WPS” and “Wireless” indica — tors are not all lit.) ! Check that the USB cable connecting the wireless LAN converter to the receiver’s DC OUTPUT for WIRELESS LAN termina[…]
-
Страница 109
109 Surround sound formats ………………………………………………………………………………………………. 110 About THX …………………………………………………………………………………………………………………… 110 About iPod ……………………………..[…]
-
Страница 110
110 14 Additional information Surround sound formats Below is a brief description of the main surround sound formats you’ll find on BDs, DVDs, satellite, cable and terrestrial broadcasts, and video cassettes. Dolby The Dolby technologies are explained below. See http://www.dolby.com for more detailed information. Manufactured unde[…]
-
Страница 111
111 14 Additional information THX Select2 Plus Before any home theatre component can be THX Select2 Plus certified, it must incorporate all the features above and also pass a rigorous series of quality and performance tests. Only then can a product feature the THX Select2 Plus logo, which is your guarantee that the Home Theatre prod[…]
-
Страница 112
112 14 Additional information THE FOUNDATION OR CONTRIBUTORS BE LIABLE FOR ANY DIRECT, INDIRECT, INCIDENTAL, SPECIAL, EXEMPLARY, OR CONSEQUENTIAL DAMAGES (INCLUDING, BUT NOT LIMITED TO, PROCUREMENT OF SUBSTITUTE GOODS OR SERVICES; LOSS OF USE, DATA, OR PROFITS; OR BUSINESS INTERRUPTION) HOWEVER CAUSED AND ON ANY THEORY OF LIABILITY,[…]
-
Страница 113
113 14 Additional information Speaker Setting Guide In order to achieve an even better surround effect, it is important to accurately position the speakers and make their volume and tone characteristics uniform so as to finely focus the multi-channel sound. The three major elements in positioning the speakers are distance , angle an[…]
-
Страница 114
114 14 Additional information About messages displayed when using network functions Refer to the following information when you come up with a status message while operating the Network functions. Status messages Descriptions Connection Down The selected category or Internet radio station cannot be accessed. File Format Error Cannot[…]
-
Страница 115
115 14 Additional information Glossary Audio formats/Decoding Dolby The Dolby technologies are explained below. See http://www.dolby.com for more detailed information. Dolby Digital Dolby Digital is a multichannel digital audio coding system widely used in cinemas, and in the home for DVD and digital broadcast soundtracks. Dolby Tru[…]
-
Страница 116
116 14 Additional information Auto Sound Retriever The Auto Sound Retriever feature employs DSP technology to restore sound pressure and smooth jagged arti — facts left over after compression. With some audio inputs, the Sound Retriever effect is automatically optimized based on the bitrate information of the contents that have been[…]
-
Страница 117
117 14 Additional information Wireless LAN/Wi-Fi “Wi-Fi” (Wireless Fidelity) is a trademark coined by the Wi-Fi Alliance trade association to increase recognition of wireless LAN standards. With the increase in the number of devices connected to computers in recent years, Wi-Fi offers the advantage of eliminating the complexity […]
-
Страница 118
118 14 Additional information Features index Operation Mode See Operation Mode Setup on page 45 . AVNavigator See About using AVNavigator (included CD-ROM) on page 10 . Full Auto MCACC See Automatically conducting optimum sound tuning (Full Auto MCACC) on page 42 . Automatic MCACC (Expert) See Automatic MCACC (Expert) on page 85 . M[…]
-
Страница 119
119 14 Additional information Specifications Amplifier section Continuous average power output* 8 W ……………………………………………………………………………………………………………………………130 W** per channel 6 W ……………………………………………………………[…]
-
Страница 120
120 14 Additional information Preset code list You should have no problem controlling a component if you find the manufacturer in this list, but please note that there are cases where codes for the manufacturer in the list will not work for the model that you are using. There are also cases where only certain functions may be contro[…]
-
Страница 121
121 14 Additional information BD If operations are not possible using the preset codes below, you may be able to conduct operations with the preset codes for the DVD , DVR (BDR, HDR) . Pioneer 2034, 2192, 2255, 2258, 2259, 2260, 2281 Denon 2310, 2311, 2312 Hitachi 2307, 2308, 2309 JVC 2290, 2291, 2293, 2294, 2295, 2296 LG 2286, 2287 Marantz 2302, 2[…]
-
Страница 122
122 14 Additional information Satellite Set Top Box Pioneer 6097, 6098, 6325, 6328, 6329 ADB 6035, 6001 Akai 6102 Alba 6005, 6011, 6013 Allsat 6102 Alltech 6011 Amstrad 6033, 6030, 6044 Anttron 6013 Asat 6102 Austar 6000, 6045 Bell ExpressVu 6002, 6003 British Sky Broadcasting 6030 Canal 6105 Chaparral 6034 CNS 6001 Coolsat 6021 Crossdigital 6043 D[…]
-
Страница 123
© 2012 PIONEER CORPORA TION. All rights reser v ed. To register your product, find the nearest authorized se rv ice location , to purchase replacement parts, operating instructions, or accessories, please go to one of following URLs : P our enregistrer votre produit, trouver le se rv ice après-vente agréé le plus proche et pour acheter des piè[…]

5
Первоначальная настройка
Перед началом работы
1
Установите батарейки в пульт ДУ.
Батарейки, поставляемые с данным аппаратом, предназначены
для проверки первоначальных функций управления; их может
не хватить надолго. Рекомендуется использовать щелочные
батарейки, которые обладают продолжительным сроком службы.
2
Включите ресивер и используемый телевизор.
RCU SETUP
SOURCE
RECEIVER
ALL ZONE STBY
DISCRETE ON
BDR
BD
DVD
DVR
HDMI
3
Переключайте вход телевизора до тех пор,
пока он не подключится к ресиверу.
4
Включите низкочатотный громкоговоритель
и поднимите уровень громкости.
ПРЕДУПРЕЖДЕНИЕ
•
Не используйте или храните батарейки в местах, подвергнутых
прямому падению солнечных лучей, или других предельно
жарких местах, например, внутри машины или возле
обогревателя. Это может вызвать протекание, перегрев,
разрыв или возгорание батареек. Это также может привести к
уменьшению срока службы и отразиться на работе батареек.
ПРЕДУПРЕЖДЕНИЕ
•
Производите утилизацию использованных батареек
в соответствии с действующими в стране/регионе
государственными постановлениями или правилами, введенными
общественными институтами по окружающей среды.
Автоматическая настройка объемного звучания (МСАСС)
Настройка Auto Multi-Channel Acoustic Calibration (MCACC)
с помощью поставляемого микрофона настройки измеряет
и анализирует тестовые тональные сигналы, выводимые
громкоговорителями. Данная настройка позволяет
автоматически и с высокой точностью выполнять измерения и
настройки; ее использование позволяет создать оптимальную
среду прослушивания для пользователя.
Важное предупреждение
•
Выполняйте измерения соблюдая тишину.
•
Если у вас есть штатив, используйте его для установки
микрофона приблизительно на уровне уха на обычном
месте слушателя. В противном случае разместите
микрофон на уровне уха на столе или стуле.
•
Наличие препятствий между громкоговорителями и местом
слушателя (микрофоном) может препятствовать точному
измерению.
•
Во время измерения следует находиться вне места
слушателя и управлять от пульта ДУ за пределами зоны
расположения всех громкоговорителей.
1
Подключите поставляемый микрофон
настройки.
MCACC
SETUP MIC
На телевизоре отображается экран Full Auto MCACC.
Speaker System
: Normal(SB/FH)
1a.Full Auto MCACC
A/V RECEIVER
Exit
Return
START
EQ Type
: SYMMETRY
MCACC
: M1.MEMORY 1
THX Speaker
:
NO
2
Нажмите
RECEIVER
на пульте ДУ, затем
нажмите кнопку ENTER.
•
Запускается автоматическое измерение.
•
Измерение займет примерно от 3 до 12 минут.
3
Следуйте инструкциям, отображаемым на
экране.
•
Автоматическая настройка завершается при отображении
экрана Home Menu.
1. Advanced MCACC
2. MCACC Data Check
3. Data Management
4. System Setup
5. Network Information
6. Operation Mode Setup
Exit
Return
HOME MENU
A/V RECEIVER
4
Убедитесь, что микрофон настройки отсоединен.
Отмена Автоматическое отключение питания
Если в течение определенного промежутка времени не
производились любые операции, с отсутствием входящих аудио
или видеосигналов, питание ресивера автоматически будет
отключено. Таймер автоматического отключения в момент
отгрузки с завода установлен на 30 минут, но время на таймере
можно менять или вообще отключить функцию отключения
питания.l «Автоматическое отключение питания»
Штатив
Микрофон
Перед началом работы
Проверка комплекта поставки
Проверьте наличие перечисленных ниже принадлежностей:
Установочный микрофон (кабель: 5 м)
Пульт ДУ
Сухие электрические батарейки IEC R03 размера AAА (для пульта ДУ) x2
Рамочная антенна АМ
Проволочная антенна FM
Кабель iPod
Кабель питания
CD-ROM (AVNavigator)
Краткое руководство пользователя
Брошюра по безопасности
Гарантийный талон
Наша философия
Цель Pioneer максимальное приближение ощущения от просмотра на вашем домашнем кинотеатре к тому что себе представляли создатели кинофильма и инженер монтажа когда они создавали первоначальную звуковую дорожку Мы делаем это путем уделения большого внимания трем важным шагам:
1 Конструирование с использованием тщательно отобранных компонентов позволяющих точно передавать исходную звуковую дорожку 2 Выполнение индивидуальной акустической калибровки в соотвествии с любым местом прослушивания 3 Настройка которая позволяет передавать все нюансы
Особенности
Усилитель Класса D
Данный аппарат является аудио-видео ресивером разработанным на основе самой последней модели высокопроизводительного усилителя Класса D и произведен для воспроизведения высококачественного звучания присущего технологии Pioneer Данный эталонный усилитель нового поколения обладает уникальными характеристиками с высоким качеством звучания и воспроизводит самые последние многоканальные цифровые материалы.
Apple AirPlay
С помощью AirPlay можно передавать музыку с iTunes на SC-2022 и воспроизводить ее на системе домашнего кинотеатра Можно даже использовать ресивер для просмотра на подключенном дисплее таких метаданных как название песни имя исполнителя а также обложку альбома С помощью совместимых с Air Play ресиверов Pioneer можно легко прослушивать музыку с iTunes в любой комнате в доме.
Совместимость с приложением Air Jam
На SC-2022 вместе с эксклюзивным приложением Air Jam от Pioneer работает опционный
Bluetooth адаптер AS-BT200 Являясь доступным бесплатным приложением на App Store и Android Market Air
Jam позволяет обмениваться музыкой с максимум 4 устройствами iPhone iPod touch iPad или Android и создавать групповой список воспроизведения позволяя создать уникальную и развлекательную социальную музыкальную сеть.
AVNavigator
Прилагаемый к данному аппарату CD-ROM (AVNavigator) позволяет использовать различные функции как Wiring Navi с указателем для подключения аппарата и настройки через компьютер а также Interactive Manual для управления аппаратом с одновременным изучением руководства.
Также Operation Guide описывает операции воспроизведения на ресивере и способы использования некоторых функций с помощью видеоматериалов и рисунков.
AVNavigator является не только программным обеспечением для компьютера но также имеет версию для iPad доступную для бесплатной загрузки с App Store Подробнее см вебсайт: http: pioneer.jp/
product/soft/iapp_avnavi/en.html
HDMI (3D Канал возврата аудиосигнала)
Для использования функции выше требуется совместимый компонент.
Битовый поток PQLS
Устойчивое высококачественное воспроизведение возможно при подключении совместимого с PQLS проигрывателя через подключения HDMI.
Данная функция доступна только при подключении проигрывателя Blu-ray Disc производства Pioneer с поддержкой функции PQLS.
Дополнительная функция автоматического управления фазой
Для дисков созданных с учетом стандартов кроме режима Управление фазой канал LFE воспроизводится с задержкой во время записи на первом месте Данная функция автоматически корректирует сдвиг фазы для таких дисков и трансляций.
Данная функция особенно полезна при воспроизведении музыки.
Hi-bit 24
Создает более широкий динамический диапазон для цифровых источников как CD диски DVD диски или BD диски 16 и 20-битовые сигналы PCM а также сжатые аудиосигналы повторно квантуются на 24-битовые сигналы и высокочастотный компонент вставляется во время обработки данных для гладкого более тонкого выражения музыки.
Связь с восстановлением звучания
Подключив проигрыватель Pioneer поддерживающий функцию Связи с Восстановлением звучания сжатые аудиофайлы воспроизводимые на проигрывателе можно выводить с автоматическим исправлением для получения звучания с более высокой плотностью.
Данная функция доступна только при подключении проигрывателя Blu-ray Disc производства Pioneer с поддержкой функции PQLS.
Виртуальный боковой громкоговоритель
Если передние боковые громкоговорители не используются выбор данного режима позволяет прослушивать виртуальный передний боковой канал через передние громкоговорители.
Данный режим улучшает плавность перехода звучания от переднего канала на каналы объемного звучания.
Связь с Выравниванием потоком
Подключив проигрыватель Pioneer поддерживающий функцию Связи с Выравниванием потока сжатые видео или кинофайлы воспроизводимые на проигрывателе можно выводить с автоматическим исправлением для получения более естественной легко просматриваемой картинки.
Данная функция доступна только при подключении проигрывателя Blu-ray Disc производства Pioneer с поддержкой функции PQLS.
Воспроизведение iPod
Подключив iPod iPhone или iPad к терминалу USB и к видеотерминалу RCA ресивера можно воспроизводить музыкальные/видеофайлы на iPod iPhone или iPad.
Также при подключении iPod iPhone или iPad к ресиверу происходит зарядка устройства.
Руководства Pioneer SC-2022 Размер файлов: 2286 KB, Язык: English, Формат: pdf, Платформа: Windows/Linux, Дата: 2016-12-07
На данной странице вы можете скачать руководства Pioneer SC-2022. Мы предлагаем вам ознакомиться с руководством пользователя, инструкцией по сервисному обслуживанию и ремонту.
Также здесь вы найдете список заказных номеров на комплектующие Pioneer SC-2022.
Все файлы предоставляются исключительно в ознакомительных целях. И не являютя руководством по ремонту, а направлены лишь на то чтобы помочь вам более детально ознакомиться с принципом построения устройства.
Содержимое представленных здесь руководств требуют от вас знания технического английского языка.
Если вы собираетесь скачать руководство по сервисному обслуживанию Pioneer SC-2022, иными словами сервис мануал, вы дожны обладать хотя бы минимальными познаниями в области электроники и пониманием базовых принципов работы электромеханических устройств.
Для просмотра руководств вам понадобится Adobe Acrobat Reader версии 9 и выше либо другая программа для просмотра pdf файлов.
В связи с популярностью информации представленной на сайте и ее бесплатного предоставления конечному пользователю, убедительная просьба использовать специальные программные продукты для многопотокового скачивания файлов.
Руководства для Pioneer SC-2022
- Руководство пользователя (User manual)
- Руководство по сервисному обслуживанию (Service manual)
- Руководство по ремонту (Repair manual)
- Перечень комплектующих (PartList)