
Скачать
Mini Hi-Fi
Component
System
Operating Instructions
4-233-738-13(2)
MHC-S3
© 2001 Sony Corporation

WARNING
To prevent fire or shock hazard, do not expose the unit to rain or moisture.
To avoid electrical shock, do not open the cabinet. Refer servicing to qualified personnel only.
Do not install the appliance in a confined space, such as a bookcase or built-in cabinet.
This appliance is classified as a CLASS 1 LASER product. The CLASS 1 LASER PRODUCT MARKING is located on the rear exterior.
The following caution label is located inside the apparatus.
To prevent fire, do not Cover the ventilation of the apparatus with news papers, table-cloths, curtains, etc. And don’t place lighted candles on the apparatus.
To prevent fire or shock hazard, do not place objects filled with liquids, such as vases, on the apparatus.
Don’t throw a battery, dispose it as the injurious wastes.
This system incorporates Dolby* Digital and DTS** System.
*Manufactured under license from Dolby Laboratories.
“Dolby” and the double-D symbol are trademarks of Dolby Laboratories.
Confidential unpublished works. © 1992-1997 Dolby Laboratories. All rights reserved.
**Manufactured under license from Digital Theater Systems, Inc. US Pat. No. 5,451,942, 5,956,674, 5,974,380, 5,978,762 and other world-wide patents issued and pending. “DTS” is a registered trademarks of Digital Theater Systems, Inc.
© 1996, 2000 Digital Theater Systems, Inc. All rights reserved.
The MHC-S3 consists of the following components:
|
– A/V amplifier |
TA-S3 |
|
– Tuner |
ST-S3 |
|
– CD player |
CDP-S3 |
|
– Cassette deck |
TC-S3 |
|
– Speaker system |
SS-S3 |
2

Parts Identification
The items are arranged in alphabetical order.
Refer to the pages indicated in parentheses ( ) for details.
Main unit
A/V amplifier
|
DIGITAL 9 (28, 32) |
|||||
|
1 |
2 |
3 4 56 |
7 |
8 9 |
ENTER/O/o/P/p 2 (9, 12, 18, |
|
19, 22–27) |
|||||
|
EQ qa (24) |
|||||
|
EQ ON/OFF qs (9, 24) |
|||||
|
FILE SELECT q; (20, 24) |
|||||
|
FUNCTION 8 (9, 11, 12, 17, 18, |
|||||
|
O |
28) |
||||
|
GROOVE 5 (20) |
|||||
|
P p |
|||||
|
o |
|||||
|
MOVIE MODE 4 (20, 21) |
|||||
|
MULTI CHANNEL DECODING |
|||||
|
indicator 6 (22) |
|||||
|
MUSIC MODE 3 (20, 21) |
|||||
|
PHONES jack qg |
|||||
|
qg qf |
qdqsqaq; |
SET UP qd (23–26) |
|||
|
SUR qf (22) |
|||||
|
VOLUME 7 |
|||||
|
@/1 (power) 1 (8, 9, 32) |
Tuner
|
qh |
qjqk ql |
w; |
|
|
– |
+ |
||
|
– |
+ |
||
|
wh wgwf |
wd ws |
wa |
CLOCK/TIMER wg (9, 18, 26) DISPLAY qh (10, 13, 15, 26, 32) ENTER w; (14, 15)
IR receptor wh
PRESET +/–ws (14, 15) PTY wa (15) STEREO/MONO qj (14) TIMER SELECT wf (19, 27) TUNER/BAND wd (14) TUNER MEMORY qk (14) TUNING +/–ql (14)
4

Remote Control
|
1 |
|||
|
wk |
H |
2 |
|
|
wj |
hH |
3 |
|
|
wh |
hH |
4 |
|
|
wg |
5 |
||
|
wf |
. > |
x |
6 |
|
wd |
m M |
X |
7 |
|
ws |
O |
8 |
|
|
wa |
P |
p |
9 |
|
o |
|||
|
w; |
0 |
||
|
qa |
|||
|
ql |
|||
|
qs |
|||
|
qk |
|||
|
qd |
|||
|
qj |
|||
|
qh |
qf |
||
|
qg |
|||
CD H wk (11, 12) CHECK 3 (12) CLEAR 4 (12)
CLOCK/TIMER SELECT qg (19, 27)
CLOCK/TIMER SET qh (9, 18, 26)
DBFB qd (20)
DISPLAY qk (10, 13, 15, 26, 32) D.SKIP 2 (11)
ENTER wa (9, 12, 14, 15, 18, 19, 22–27)
EQ qa (24)
EQ ON/OFF qs (9, 24)
FUNCTION w; (9, 11, 12, 17, 18, 28)
GROOVE qj (20) SET UP q; (23–26) SLEEP 5 (26)
SUR ql (22)
TAPE A hH wj (16) TAPE B hH wh (16, 17) TUNER/BAND wg (14) TUNING + 7 (14) TUNING –ws (14)
VOL +/–qf
BUTTON DESCRIPTIONS
@/1 (power) 1 X (pause) 8 x (stop) 6
. (go back) wf > (go forward) wd m (rewind) ws M (fast forward) 7
O/o/P/p 9
6
Getting Started
Hooking up the system
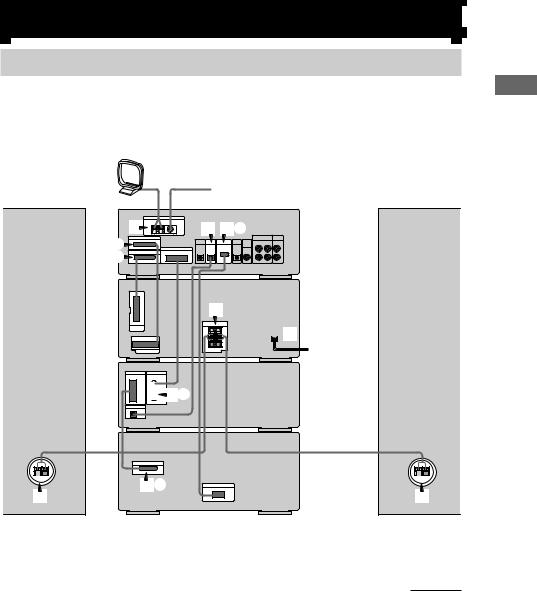
Do the following procedure 1 to 5 to hook up your system using the supplied cords and accessories.
Before connecting, place the system as described below.
AM loop antenna
2A
2B
A/V amplifier
3
 5
5
CD player
 2C
2C
Cassette deck
|
Front speaker |
Front speaker |
|
(Right) |
(Left) |
continued
Started Getting
7
Hooking up the system (continued)
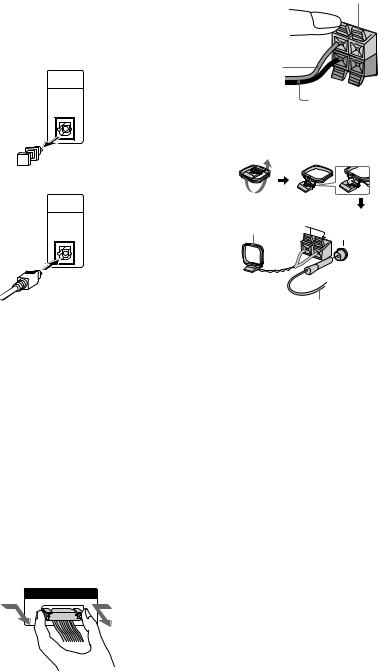
1Connect the CD player and the tuner with the optical cable.
Connect from the OPTICAL OUT jack on the CD player to the OPTICAL IN jack on the tuner.
1 Remove the cover of the jack.
OPTICAL
IN
FROM
CDP-S3
2 Connect the optical cable.
OPTICAL
IN
FROM
CDP-S3
3 Connect the front speakers.
Connect the speaker cords to the FRONT SPEAKER jacks.
Insert only the stripped portion.
Red/Solid (3)
Black/Stripe (#)
4Connect the FM/AM antennas.
Set up the AM loop antenna, then connect it.
|
AM loop antenna |
AM |
|
|
FM75Ω |
||
|
/COAXIAL |
2Connect the flat system control cables to the SYSTEM CONTROL connectors until it clicks.
Connect to the same colored jack in the order indicated on the rear panel.
A SYSTEM CONTROL 1 (Red)
Connect from the tuner to the A/V amplifier.
B SYSTEM CONTROL 2 (Blue)
Connect from the tuner to the A/V amplifier.
C SYSTEM CONTROL 3 (Black)
Connect from the CD player to the tuner.
D SYSTEM CONTROL 4 (Black)
Connect from the tuner to the cassette deck.
E SYSTEM CONTROL 5 (White)
Connect from the cassette deck to the CD player.
To disconnect
SYSTEM CONTROL 3
FROM CDP-S3
Extend the FM lead antenna horizontally.
5Connect the power cord to a wall outlet.
The demonstration appears in the display. When you press ?/1, the system turns on and the demonstration automatically ends.
If the supplied adaptor on the plug does not fit your wall outlet, detach it from the plug (only for models equipped with an adaptor).
8
Tip
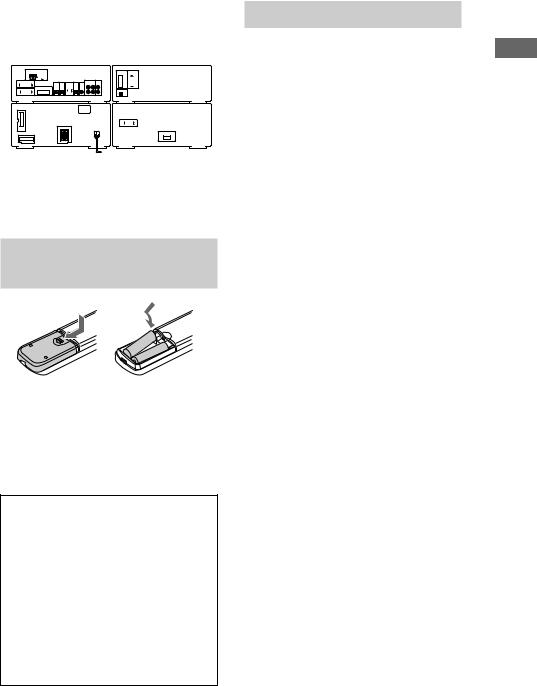
You can place the components as described below. In this case, place the components first, then connect the components.
|
Tuner |
CD player |
||||||||||||||||||||||||||||||||||||||
|
A/V amplifier |
Cassette deck |
Note
Keep the speaker cords away from the antennas to prevent noise.
Inserting two size AA (R6)
batteries into the remote
|
] |
||
|
} |
} |
|
|
] |
||
Tip
When the remote no longer operates the system, replace both batteries with new ones.
Note
If you do not use the remote for a long period of time, remove the batteries to avoid possible damage from battery leakage.
Notice for carrying this system
Do the following to protect the CD mechanism.
1Turn on the system, then turn
FUNCTION to select “CD”.
Make sure that all discs are removed from the unit.
2While holding down EQ ON/OFF, press
?/1 until “LOCK” appears.
3Release ?/1 first, then release EQ ON/ OFF.
4Unplug the AC power cord.
Setting the time
1 Turn on the system.
2 Press CLOCK/TIMER (or CLOCK/TIMER SET on the remote).
When you set the time for the first time, proceed to step 5.
3 Press O or o repeatedly to select “CLOCK SET”.
4 Press ENTER (A/V amplifier or remote).
5 Press O or o repeatedly to set the hour.
6 Press ENTER (A/V amplifier or remote).
7 Press O or o repeatedly to set the minutes.
8 Press ENTER (A/V amplifier or remote).
Tip
If you have made a mistake or want to change the time, start over from step 2.
Note
The clock settings are canceled when you disconnect the power cord or if a power failure occurs.
Started Getting
9

Saving the power in
standby mode
Press DISPLAY repeatedly when the power is off.
Each time you press the button, the system switches cyclically as follows:
Demonstration t Clock t Power Saving
Mode
To cancel the Power Saving Mode
Press DISPLAY once to show the demonstration, twice to show the clock display.
Tips
•?/1 indicator lights up even in the Power Saving Mode.
•The timer functions during the Power Saving Mode.
Note
During the Power Saving Mode, the following functions do not work:
–Setting the time.
–One Touch Play function.
10
CD
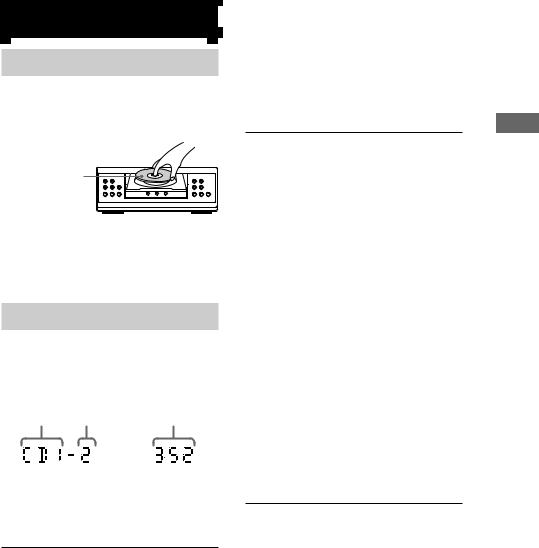
Loading a CD
1 Press one of the DISC 1–3Z buttons.
The disc tray slides out.
2 Place a CD with the label side up on the disc tray.
|
When you play a |
||||||
|
CD single, place it |
||||||
|
on the inner circle |
1 |
2 |
3 |
H |
S |
x |
|
of the tray. |
To insert additional discs, press Z of the other numbers to open the disc tray.
3 Press the same button to close the disc tray.
Playing a CD
— Normal Play/Repeat Play/Shuffle
Play
This unit lets you play the CD in different play modes.
|
Disc tray number Track number |
Playing time |
|
1 Turn FUNCTION to select “CD”.
2 When playback is stopped, press PLAY MODE repeatedly until the mode you want appears in the display.
|
Select |
To play |
|
ALL DISCS |
All CDs in the disc tray |
|
continuously. |
|
|
1 DISC |
The CD you have selected in the |
|
original order. |
|
|
ALL DISCS |
The tracks on all CDs in random |
|
SHUFFLE |
order. |
|
1 DISC |
The tracks on the CD you have |
|
SHUFFLE |
selected in random |
|
order. |
|
|
PROGRAM |
The tracks on all CDs in the |
|
order you want them to be played |
|
|
(see “Programming the CD |
|
|
tracks” on page 12). |
|
3 Press N (CD) (or CD H on the remote).
Tip
You cannot change the play mode during playback.
Other operations
|
To |
Do this |
|
Stop playback |
Press x (CD). |
|
Pause playback |
Press X. |
|
Press again to resume playback. |
|
|
Select a track |
During playback or pause, press |
|
> (CD) (to go forward) or |
|
|
. (CD) (to go back). |
|
|
Find a point in a |
Press and hold M or m |
|
track |
(CD) during playback and |
|
release it at the desired point. |
|
|
Select a CD |
Press one of the DISC 1–3 |
|
buttons (or D.SKIP on the |
|
|
remote). |
|
|
Switch to CD |
Press one of the DISC 1–3 |
|
function from |
buttons (Automatic Source |
|
another source |
Selection). |
|
Play repeatedly |
Press REPEAT during playback |
|
(Repeat Play) |
until “REPEAT” or “REPEAT |
|
1” appears. |
|
|
REPEAT*: For all the tracks on |
|
|
the CD up to 5 times. |
|
|
REPEAT 1: For a single track |
|
|
only. |
|
|
To cancel Repeat Play, press |
|
|
REPEAT until “REPEAT” and |
|
|
“REPEAT 1” disappears. |
|
|
Remove the CD |
Press one of the DISC 1–3Z |
|
buttons. |
*You cannot use this function during ALL DISCS SHUFFLE.
Note
Do not use force to close the disc tray, as this may cause the CD player trouble. Always close the disc tray by pressing one of the DISC 1–3Z buttons.
CD
11
Your Donation Will Be Matched 1-to-1! Can You Chip In?
Dear Patron: Please don’t scroll past this. The Internet Archive is a nonprofit fighting for universal access to quality information. We build and maintain all our own systems, but we don’t charge for access, sell user information, or run ads. Instead, we’re powered by online donations averaging about $14. We’d be deeply grateful if you’d join the one in a thousand users that support us financially.
Right now, we have a matching gift campaign that will double the impact of every donation. We understand that not everyone can donate right now, but if you can afford to contribute this Wednesday, we promise it will be put to good use. Our resources are crucial for knowledge lovers everywhere—so if you find all these bits and bytes useful, please pitch in.
Your Donation Will Be Matched! Can You Chip In?
Dear Patron: Please don’t scroll past this. Right now we have a matching gift campaign that will double the impact of every donation. We understand that not everyone can give right now, but if you can afford to contribute this Wednesday, we promise it will be put to good use. If you find all these bits and bytes useful, please pitch in.
SERVICE MANUAL
AV AMPLIFIER
AEP Model
UK Model
SPECIFICATIONS
TA-S3
Ver 1.0 2001.05
9-873-874-11
Sony Corporation
2001E0500-1
Home Audio Company
C
2001.5
Shinagawa Tec Service Manual Production Group
TA-S3 is the Amplifier section in
MHC-S3.
Amplifier section
DIN power output (rated) 60 + 60 watts
(6 ohms at 1 kHz, DIN)
Continuous RMS power output (reference)
80 + 80 watts
(6 ohms at 1 kHz, 10%
THD)
Music power output (reference)
150 + 150 watts
(6 ohms at 1 kHz, 10%
THD)
Inputs
VIDEO (AUDIO) IN:
voltage 250 mV,
(phono jacks)
impedance 47 kilohms
MD IN:
voltage 450 mV,
(phono jacks)
impedance 47 kilohms
OPTICAL IN:
(Square optical connector jacks, rear panel)
wavelength
700 nm
Outputs
MD OUT:
voltage 250 mV
(phono jacks)
impedance 1 kilohms
PHONES:
accepts headphones of
(stereo mini jack)
8 ohms or more
FRONT SPEAKER:
accepts impedance of 6 to
16 ohms
SUB WOOFER OUT:
Voltage 1 V,
impedance 1 kilohms
General
Power requirements
230 V AC, 50/60 Hz
Power consumption
180 watts
0.6 watts (during Power
Saving Mode)
Dimensions (w/h/d)
Approx. 280 x 128 x 350 mm
Mass
Approx. 6.2 kg
Design and specifications are subject to change
without notice.
2
TA-S3
SAFETY-RELATED COMPONENT WARNING!!
COMPONENTS IDENTIFIED BY MARK
0
OR DOTTED
LINE WITH MARK
0
ON THE SCHEMATIC DIAGRAMS
AND IN THE PARTS LIST ARE CRITICAL TO SAFE
OPERATION. REPLACE THESE COMPONENTS WITH
SONY PARTS WHOSE PART NUMBERS APPEAR AS
SHOWN IN THIS MANUAL OR IN SUPPLEMENTS PUB-
LISHED BY SONY.
TABLE OF CONTENTS
1.
SERVICING NOTES
………………………………………..
3
2.
GENERAL
………………………………………………………….
4
3.
DISASSEMBLY
3-1. Disassembly Flow …………………………………………………..
5
3-2. Cover …………………………………………………………………….
6
3-3. Front Panel Section …………………………………………………
6
3-4. Back Panel (2CH/VCD) Section ………………………………
7
3-5. FRONT AMP Board ……………………………………………….
7
4.
TEST MODE
……………………………………………………..
8
5.
DIAGRAMS
5-1. Note for Printed Wiring Boards
and Schematic Diagrams ………………………………………… 10
5-2. Printed Wiring Boards – FRONT AMP Section – …….. 11
5-3. Schematic Diagram – FRONT AMP Section (1/2) – …. 12
5-4. Schematic Diagram – FRONT AMP Section (2/2) – …. 13
5-5. Printed Wiring Boards – CONTROL Section – ………… 14
5-6. Schematic Diagram – CONTROL Section – …………….. 15
5-7. Printed Wiring Boards – POWER Section – …………….. 16
5-8. Schematic Diagram – POWER Section – ………………… 17
5-9. IC Pin Function Description ……………………………………. 18
6.
EXPLODED VIEWS
6-1. Cover Section ………………………………………………………… 18
6-2. Front Panel Section ………………………………………………… 19
6-3. Chassis Section ……………………………………………………… 20
7.
ELECTRICAL PARTS LIST
…………………………. 21
3
TA-S3
SECTION 1
SERVICING NOTES
This set is a component of the MHC-S3.
The MHC-S3 system configuration is as shown below, and there-
fore it does not operate normally unless all four components are
connected.
In performing the repair, connect all components with the system
cables.
Note:
The precaution to the users is described on the label stuck on the
back panel (CD player) and in the troubleshooting section in the
Operation Manual.
System Configuration:
POWER SUPPLY
AC IN
TA
SYSTEM & CD
µ
con
ST
CDP
TC
µ
con
TC
DISPLAY
FRONT AMP BOARD SERVICE POSITION
In checking the FRONT AMP board, prepare jig
(extension cable J-2501-087-A: 1.25 mm Pitch, 23 core, Length
300 mm)
(Fig A)
(Fig A)
Turn over the FRONT AMP board with Heat Sink, THP board
and RELAY board connected.
Remove the back panel
(2CD/VCD) section.
Remove the fan motor
connector lead wire.
FRONT AMP board
(CN104)
Connect jig (extension
cable J-2501-087-A
to the FRONT AMP board (CN104)
and PANEL board (CN700).
PANEL board (CN700)
4
TA-S3
SECTION 2
GENERAL
This section is extracted from
instruction manual.
Parts Identification
The items are arranged in alphabetical order.
Refer to the pages indicated in parentheses ( ) for details.
P
o
O
p
6
3 4 5
7
8
2
9
q;
qa
qs
qd
qf
qg
1
DIGITAL 9 (28, 32)
ENTER/O/o/P/p 2 (9, 12, 18,
19, 22–27)
EQ qa (24)
EQ ON/OFF qs (9, 24)
FILE SELECT q; (20, 24)
FUNCTION 8 (9, 11, 12, 17, 18,
28)
GROOVE 5 (20)
MOVIE MODE 4 (20, 21)
MULTI CHANNEL DECODING
indicator 6 (22)
MUSIC MODE 3 (20, 21)
PHONES jack qg
SET UP qd (23–26)
SUR qf (22)
VOLUME 7
@/1 (power) 1 (8, 9, 32)
Main unit
A/V amplifier
x
hH
H
hH
O
o
P
p
M
m
X
>
.
1
wa
qf
9
wf
wd
ws
qj
2
3
4
5
0
qs
qa
qd
6
7
8
qh
qg
ql
qk
w;
wk
wj
wh
wg
Remote Control
CD H wk (11, 12)
CHECK 3 (12)
CLEAR 4 (12)
CLOCK/TIMER SELECT qg
(19, 27)
CLOCK/TIMER SET qh (9, 18,
26)
DBFB qd (20)
DISPLAY qk (10, 13, 15, 26, 32)
D.SKIP 2 (11)
ENTER wa (9, 12, 14, 15, 18, 19,
22–27)
EQ qa (24)
EQ ON/OFF qs (9, 24)
FUNCTION w; (9, 11, 12, 17, 18,
28)
GROOVE qj (20)
SET UP q; (23–26)
SLEEP 5 (26)
SUR ql (22)
TAPE A hH wj (16)
TAPE B hH wh (16, 17)
TUNER/BAND wg (14)
TUNING + 7 (14)
TUNING – ws (14)
VOL +/– qf
BUTTON DESCRIPTIONS
@/1 (power) 1
X (pause) 8
x (stop) 6
. (go back) wf
> (go forward) wd
m (rewind) ws
M (fast forward) 7
O
/o/P/p 9
| Языки: |
Испанский И еще 1
|
|---|---|
| Страницы: | 72 |
Стр.
из
результат(ов) по запросу ««
×
|
|
NoDevice
Loading…
-
« Назад
Ctrl + ←
-
Вперёд »
Ctrl + →
Мануал подходит для устройств
-
SONY MHC-S3
-
Страница 1
Mini Hi-Fi Component System Operating Instructions 4-233-738- 13 (2) MHC-S3 © 2001 Sony Corporation[…]
-
Страница 2
2 WARNING To prevent fire or shock hazard, do not expose the unit to rain or moisture. To avoid electrical shock, do not open the cabinet. Refer servicing to qualified personnel only. Do not install the appliance in a confined space, such as a bookcase or built-in cabinet. This appliance is classified as a CLASS 1 LASER product. The CLASS 1 LASER P[…]
-
Страница 3
3 T able of Contents Parts Identification Main unit ……………………………………….. 4 Remote Control ………………………………. 6 Getting Started Hooking up the system …………………….. 7 Inserting two size AA (R6) batteries into the remote ………………………….. 9 Setting the time …………………[…]
-
Страница 4
4 – – + + qh qjqk ql w; wa ws wd wf wg wh P o O p 6 3 4 5 7 8 2 9 q; qa qs qd qf qg 1 DIGITAL 9 (28, 32) ENTER / O / o / P / p 2 (9, 12, 18, 19, 22–27) EQ qa (24) EQ ON/OFF qs (9, 24) FILE SELECT q; (20, 24) FUNCTION 8 (9, 11, 12, 17, 18, 28) GROOVE 5 (20) MOVIE MODE 4 (20, 21) MULTI CHANNEL DECODING indicator 6 (22) MUSIC MODE 3 (20, 21) PHO[…]
-
Страница 5
Parts Identification 5 hH AUTO REVERSE hH AUTO REVERSE M > m H . h x M > m H . h x A A th tg tf td ts ta el r; ra rs rd rf rg rh rj rk rl t; mM . HS x > 1 2 3 wj wkwl e; ea es ed ef eg eh ej ek DISC 1–3 ek (11, 12, 18) DISC 1–3 indicators ej DISC 1–3 Z (eject) wl (11) PLAY MODE wj (11, 12, 18) REPEAT wk (11) N (play) eh (11, 12) X (p[…]
-
Страница 6
6 x hH H hH O o Pp M m X > . 1 wa qf 9 wf wd ws qj 2 3 4 5 0 qs qa qd 6 7 8 qh qg ql qk w; wk wj wh wg Remote Control CD H wk (11, 12) CHECK 3 (12) CLEAR 4 (12) CLOCK/TIMER SELECT qg (19, 27) CLOCK/TIMER SET qh (9, 18, 26) DBFB qd (20) DISPLAY qk (10, 13, 15, 26, 32) D.SKIP 2 (11) ENTER wa (9, 12, 14, 15, 18, 19, 22–27) EQ qa (24) EQ ON/OFF qs[…]
-
Страница 7
7 Getting Started AM loop antenna Front speaker (Left) Front speaker (Right) FM antenna Cassette deck Tuner CD player Getting Started Hooking up the system Do the following procedure 1 to 5 to hook up your system using the supplied cords and accessories. Before connecting, place the system as described below. A/V amplifier continued 2 A 2 B 2 C 2 D[…]
-
Страница 8
8 3 Connect the front speakers. Connect the speaker cords to the FRONT SPEAKER jacks. 4 Connect the FM/AM antennas. Set up the AM loop antenna, then connect it. 5 Connect the power cord to a wall outlet. The demonstration appears in the display. When you press ?/1 , the system turns on and the demonstration automatically ends. If the supplied adapt[…]
-
Страница 9
9 Getting Started Setting the time 1 Turn on the system. 2 Press CLOCK/TIMER (or CLOCK/TIMER SET on the remote). When you set the time for the first time, proceed to step 5. 3 Press O or o repeatedly to select “CLOCK SET”. 4 Press ENTER (A/V amplifier or remote). 5 Press O or o repeatedly to set the hour. 6 Press ENTER (A/V amplifier or remote)[…]
-
Страница 10
10 Saving the power in standby mode Press DISPLAY repeatedly when the power is off. Each time you press the button, the system switches cyclically as follows: Demonstration t Clock t Power Saving Mode To cancel the Power Saving Mode Press DISPLAY once to show the demonstration, twice to show the clock display. Tips • ?/1 indicator lights up even […]
-
Страница 11
11 CD Loading a CD 1 Press one of the DISC 1–3 Z buttons. The disc tray slides out. 2 Place a CD with the label side up on the disc tray. To insert additional discs, press Z of the other numbers to open the disc tray. 3 Press the same button to close the disc tray. Playing a CD — Normal Play/Repeat Play/Shuffle Play This unit lets you play the […]
-
Страница 12
12 Programming the CD tracks — Program Play You can make a program of up to 25 tracks from all the CDs in the order you want them to be played. 1 Turn FUNCTION to select “CD”, then place a CD. 2 Press PLAY MODE repeatedly when the playback is stopped until “PROGRAM” appears in the display. 3 Press one of the DISC 1–3 buttons to select a[…]
-
Страница 13
13 CD Using the CD display You can check the remaining time of the current track or that of the CD. When a CD TEXT disc is loaded, you can check the information stored on the disc. When the unit detects CD TEXT discs, the “CD TEXT” indication appears in the display. Press DISPLAY. Each time you press the button, the display changes cyclically a[…]
-
Страница 14
14 Presetting radio stations You can preset 20 stations for FM and 10 stations for AM. 1 Press TUNER/BAND repeatedly to select FM or AM. 2 Press and hold TUNING + or – until “AUTO” appears in the display. Scanning stops when the system tunes in a station. “TUNED” and “STEREO” (for a stereo program) appear. 3 Press TUNER MEMORY. A pres[…]
-
Страница 15
15 Tuner Using the Radio Data System (RDS) (European model only) What is the Radio Data System? Radio Data System (RDS) is a broadcasting service that allows radio stations to send additional information along with the regular program signal. This tuner offers convenient RDS features like station name display and location of stations by program typ[…]
-
Страница 16
16 Tip When you want to reduce the hiss noise in low-level high-frequency signals, press DOLBY NR so that “DOLBY NR” appears in the display. Searching for the beginning of a track (AMS*) During playback, press . or > (Deck A or B) repeatedly for the number of songs you want to skip forward (or backward). The search direction, + (forward) or […]
-
Страница 17
17 Tape Turn FUNCTION to select the recording source. Recording from a tape (High-Speed Dubbing) Recording from a CD (CD Synchro Recording) Recording manually Insert a recordable tape into deck B. Turn FUNCTION to select “TAPE A”. Turn FUNCTION to select “CD”. Insert the tape you want to record into deck A. Insert the CD you want to record.[…]
-
Страница 18
18 Recording to a tape (continued) Recording a CD by specifying track order — Program Edit When programming, make sure the playing times for each side do not exceed the length of one side of the tape. 1 Insert a CD and a recordable tape into deck B, then turn FUNCTION to select “CD”. 2 Press PLAY MODE repeatedly when the playback is stopped u[…]
-
Страница 19
19 Tape 5 Set the time to stop recording following step 4. The start time appears, followed by the stop time, the preset radio station to be recorded (e.g., “TUNER FM 5”), then the original display appears. 6 Insert a recordable tape into deck B. 7 Turn off the power. When the recording starts, the volume level is set to the minimum. To Check t[…]
-
Страница 20
20 Adjusting the sound To reinforce bass (DBFB*) Press DBFB on the remote. Each time you press the button, the display changes as follows: DBFB ON y DBFB OFF * Dynamic Bass Feedback For a powerful sound Press GROOVE. Each time you press the button, the display changes cyclically as follows: GROOVE t V-GROOVE t GROOVE OFF GROOVE: The GROOVE button l[…]
-
Страница 21
21 Sound Adjustment x DISCO/CLUB Reproduces the acoustics of a discotheque/ dance club. x CHURCH Reproduces the acoustics of a stone church. x LIVE HOUSE Reproduces the acoustics of a 300-seat live house. x ARENA Reproduces the acoustics of a 1000-seat concert hall. x STADIUM Reproduces the feeling of a large open-air stadium. x GAME Obtains maximu[…]
-
Страница 22
22 Understanding the multi channel surround displays 1 VIRTUAL: Lights up when the sound field with virtual speakers is selected. 2 dts: Lights up when DTS signals are input. 3 ; DIGITAL: Lights up when the unit is decoding signals recorded in the Dolby Digital format. 4 Playback channel indicators: The letters (L, C, R, etc.) indicate the channels[…]
-
Страница 23
23 Sound Adjustment x Effect level (EFFECT) Lets you adjust the “presence” of the current surround effect. x Wall type (WALL) Lets you control the level of the high frequencies to alter the sonic character of your listening environment by simulating a softer (S) or harder (H) wall. The midpoint designates a neutral wall (made of wood). x Reverb[…]
-
Страница 24
24 Adjusting the equalizer The EQ menu lets you adjust the equalization (low, mid, and high frequencies) of the front speakers. The equalizer settings are stored individually for each sound field. 1 Start playing a program source encoded with multi channel surround sound, then select a sound field. When the selected sound field contains adjustable […]
-
Страница 25
25 Sound Adjustment To reset the settings of all the customized sound fields 1 Press SET UP. 2 Press P or p repeatedly to select “RESET MENU”. 3 Press ENTER (A/V amplifier or remote). 4 Press P or p repeatedly to select “ALL F. RESET”. 5 Press ENTER (A/V amplifier or remote) again. All the surround, equalizer, and speaker level parameters a[…]
-
Страница 26
26 Press SLEEP once. SLEEP repeatedly to select the time you want. SLEEP repeatedly until “SLEEP OFF” appears. Other Features Changing the spectrum analyzer display Press and hold DISPLAY for more than 2 seconds. Each time you press the button, the display changes as follows: SPECTRUM ON y SPECTRUM OFF T o adjust the brightness of the display 1[…]
-
Страница 27
27 Other Features Do this Press TIMER SELECT (or CLOCK/TIMER SELECT on the remote) and press O or o repeatedly to select the respective mode (“DAILY 1” or “DAILY 2”), then press ENTER (A/V amplifier or remote). Start over from step 1. Press TIMER SELECT (or CLOCK/TIMER SELECT on the remote) and press O or o repeatedly to select “TIMER OFF[…]
-
Страница 28
28 Connecting audio components To connect audio components, connect to the jacks on the rear panel of the tuner. To Make a digital recording from CD to MD Listen to the digital sound of a connected MD deck Listen to the analog sound of a connected MD deck Listen to the analog sound of a connected VCR Tip When you remove the optical cover, keep it f[…]
-
Страница 29
29 Hooking up the Optional Components/Additional Information Additional Information Precautions On operating voltage Before operating the unit, check that the operating voltage of your unit is identical with the voltage of your local power supply. On safety • The unit is not disconnected from the AC power source (mains) as long as it is connected[…]
-
Страница 30
30 Before placing a cassette in the tape deck Take up any slack in the tape. Otherwise the tape may get entangled in the parts of the tape deck and become damaged. When using a tape longer than 90 minutes The tape is very elastic. Do not change the tape operations such as play, stop, and fast-winding etc. frequently. The tape may get entangled in t[…]
-
Страница 31
31 Additional Information “DAILY 1”, “DAILY 2”, or “REC SELECT” does not appear when you press TIMER SELECT (or CLOCK/TIMER SELECT on the remote). • Set the timer correctly. • Set the clock. The remote does not function. • There is an obstacle between the remote and the unit. • The remote is not pointing in the direction of the […]
-
Страница 32
32 Tuner There is severe hum or noise (“TUNED” or “STEREO” flashes in the display). • Adjust the antenna. • The signal is too weak. Connect an external antenna. A stereo FM program cannot be received in stereo. • Press STEREO/MONO so that “MONO” disappears. If other troubles not described above occur, reset the system as follows: […]
-
Страница 33
33 Additional Information Tuner section FM stereo, FM/AM superheterodyne tuner FM tuner section Tuning range 87.5 – 108.0 MHz Antenna FM lead antenna Antenna terminals 75 ohm unbalanced Intermediate frequency 10.7 MHz AM tuner section Tuning range 531 – 1,602 kHz (with the interval set at 9 kHz) Antenna AM loop antenna Antenna terminals Externa[…]
-
Страница 34
34 T able for the settings using SUR, EQ, and SET UP buttons SUR parameters (Press SUR) Press P or p Press O or o Initial setting Page EFFECT [XX] depends on sound field depends on sound field 22 WALL S/H [X] S (–8) to H (+8) midpoint REVERB S/L [X] S (–8) to L (+8) midpoint S.DEPTH [XXX] OFF, M, D M VIR.SP. [XXX] ON, OFF ON EQ parameters (Pres[…]
-
Страница 35
35 Additional Information Adjustable parameters for each sound field The adjusted SUR and EQ parameters are stored in each sound field. The adjusted SP. LEVEL parameters are applied to all of the sound fields. continued < SUR >< SP. LEVEL > EFFECT WALL REVERB SCREEN VIRTUAL FRONT SUB WOOFER LFE* D.COMP.* LEVEL TYPE DEPTH SPEAKER BALANCE[…]
-
Страница 36
36 <E Q > FRONT FRONT FRONT FRONT FRONT FRONT BASS (dB) BASS (Hz) MID (dB) MID (Hz) TREB (dB) TREB (Hz) MUSIC MODE 2CH STEREO zzzzzz SMALL HALL z zzzzz LARGE HALL zzzzzz OPERA HOUSE zzzzzz JAZZ CLUB zzzzzz DISCO/CLUB zzzzzz CHURCH zzzzzz LIVE HOUSE zzzzzz ARENA zzzzzz STADIUM zzzzzz GAME zzzzzz MOVIE MODE SEMI C.EX A zzzzzz SEMI C.EX B zzzzzz[…]