
Перейти к контенту

Русские электронные инструкции по эксплуатации
Постоянно обновляемый большой каталог документации по эксплуатации и использованию современных устройств и оборудования на русском языке. Бесплатное скачивание файлов.
Поиск:
Главная
♥ В закладки
Просмотр инструкции в pdf


Инструкция по эксплуатации автомагнитолы Kenwood KMM-104RY.
Скачать инструкцию к автомагнитоле Kenwood KMM-104RY (901,08 КБ)

Автомагнитолы
« Инструкция к GPS навигатору Garmin GPSmap 64ST
» Инструкция к автомагнитоле Sony CDX-GT565UV
Вам также может быть интересно

Инструкция к кухонной машине Kenwood Sense KVC5100T Белый-Серый

Инструкция к автомагнитоле Kenwood KMM-124

Инструкция к кухонной машине Kenwood KM287

Инструкция к кухонной машине Kenwood KMX760GD

Инструкция к соковыжималке Kenwood JE 850

Инструкция к кухонной машине Kenwood KMX760CH

Инструкция к автомагнитоле Kenwood KDC-364U

Инструкция к холодильнику Kenwood KBM-2003NFDBE
Добавить комментарий
Имя *
Email *
Сайт
Комментарий


Сохранить моё имя, email и адрес сайта в этом браузере для последующих моих комментариев.
- Добавить инструкцию
- Заказать инструкцию
- Политика конфиденциальности
Инструкции
| 1 | Английский, Русский (Инструкция по эксплуатации) Европа | B5A-2103-00.pdf | Загрузить | 972 кб |
| 2 | Итальянский, Португальский, Голландский (Инструкция по эксплуатации) Европа | B5A-2103-02.pdf | Загрузить | 1 187 кб |
| 3 | Украинский (Инструкция по эксплуатации) Европа | B5A-2103-03.pdf | Загрузить | 486 кб |
| 4 | Французский, Испанский, Немецкий (Инструкция по эксплуатации) Европа | B5A-2103-01.pdf | Загрузить | 1 211 кб |
Микропрограммное обеспечение
Характеристики аудио файлов
О форматах MP3, WMA, WAV и FLAC
Воспроизводимый файл MP3/WMA/WAV/FLAC (здесь и далее называемый «аудио файлом») и формат носителя информации имеют следующее ограничение. Не соответствующий спецификации аудио файл может воспроизводиться неправильно, либо могут неправильно отображаться имена файлов и папок.
Воспроизводимый аудио файл
| MP3 | Расширение | .mp3 |
|---|---|---|
| Формат | Аудио файл MPEG 1/2 с уровнем передачи данных 3 | |
| Скорость передачи данных | 8-320 кбит/с / переменная скорость передачи в битах | |
| Частота дискретизации | 8/ 11,025/ 12/ 16/ 22,05/ 24/ 32/ 44,1/ 48 кГц | |
| Joint STEREO |  |
|
| Тегирование ID3 (вер.1) | Версия 1.0/ 1.1 (Название/ Исполнитель/ Альбом) | |
| Тегирование ID3 (вер.2) | Версия 2.2/ 2.3/ 2.4 (Название/ Исполнитель/ Альбом: Не поддерживает показ изображений.) | |
| WMA | Расширение | .wma |
| Формат | Файл в соответствии с Windows Media Audio (кроме файла для Windows Media Player 9 или более поздней версии, в котором реализованы новые функции) |
|
| Скорость передачи данных | 32-192 кбит/с / переменная скорость передачи в битах | |
| Частота дискретизации | 8/ 11,025/ 12/ 16/ 22,05/ 24/ 32/ 44,1/ 48 кГц | |
| Файл DRM | — | |
| Профессиональный | — | |
| Без потерь | — | |
| Голос | — | |
| Тегирование WMA (описание содержимого) | (Название/исполнитель) |
|
| Тегирование WMA (расширенное описание содержимого) | (WM/название альбома) |
|
| WAV | Расширение | .wav |
| Формат | Аудио формат формы волны RIFF (только для LinearPCM) | |
| Частота дискретизации | 44,1 кГц | |
| Контрольная сумма | 16 бит | |
| Канал | Стерео/моно | |
| FLAC | Расширение | .flac |
| Формат | Free Lossless Audio Codec (FLAC) | |
| Частота дискретизации | 8/ 11,025/ 12/ 16/ 22,05/ 24/ 32/ 44,1/ 48 кГц | |
| Канал | Стерео/моно | |
| Контрольная сумма | 16 бит | |
| Уровень сжатия | 0/ 1/ 2/ 3/ 4/ 5/ 6/ 7/ 8 |
・Не присваивайте эти расширения другим файлам, не являющимся аудио файлами. Если присвоить это расширение файлу, который не является аудио файлом, он будет воспроизводиться и издавать громкий шум, в результате чего будут повреждены акустические системы.
・Файл с защитой от копирования не может воспроизводиться.
・Аудио файлы могут не воспроизводиться в зависимости от настроек программного обеспечения кодирования, вида устройства USB и/или условий записи.
・Данное устройство может быть несовместимо с обновленным стандартом формата сжатия и дополнительными характеристиками.
・В некоторых случаях возможен некорректный показ времени воспроизведения, что объясняется условиями записи аудио файла.
・Функция «Supreme» не применима для композиций, закодированных при переменной скорости передачи в битах.
・При воспроизведении файла WAVE звучание может оказаться прерывистым в зависимости от рабочих характеристик носителя информации.
Файловые системы воспроизводимых носителей информации
| Устройство USB | Файловая система (Windows) *1 | FAT12 | |
|---|---|---|---|
| FAT16 | |
||
| FAT32 | |
||
| Файловая система (Macintosh) | — | ||
| Файловая система (UNIX) | — |
・*1 Разбиение на разделы : не поддерживает (некоторые устройства USB могут иметь много разделов, невидимых в операционной системе Windows.)
Ограничение структуры файла и папки
| Устройство USB | Максимальное количество уровней папок | 8 |
|---|---|---|
| Максимальное количество папок (на папку) | 500 | |
| Максимальное количество папок (на устройство) *1 | 500 | |
| Максимальное количество файлов (на папку) | 999 | |
| Максимальное количество файлов и папок (на устройство) | 15000 |
・Иногда воспроизведение начинается не сразу, и время ожидания зависит от условий записи (например, иерархии файлов и структуры папок).
・*1 Сюда относится корневая папка (папка верхнего уровня). Число папок, отображаемое на ПК, меньше на 1.
Максимальное количество отображаемых символов
| Имя файла/папки | 64 символов | |
|---|---|---|
| Тегирование MP3 ID3 | Вер. 1.x | 30 символов |
| Вер. 2.x | 64 символов | |
| Свойство содержимого WMA | 64 символов | |
| WAV | 64 символов | |
| FLAC | 64 символов |
・Количество символов зависит от размера в байтах.
・Имя файла/папки представляет собой количество символов, включая расширения.
・Данное устройство может показывать ID3 метки MP3 следующих версий: 1.0/ 1.1/ 2.2/ 2.3/ 2.4
Порядок воспроизведения аудио файла
・Аудио файлы воспроизводятся в порядке расположения имен файлов. Можно задать порядок воспроизведения файлов, пронумеровав файлы в папке и записав их в папку.
Пример
 К началу страницы
Примечания по поводу использования устройства USB
Данное устройство может воспроизводить аудио файлы, хранимые во флэш-памяти или на цифровом аудиоплеере с портом USB (в настоящем документе эти устройства называются устройствами USB)
Следующие ограничения распространяются на виды и использование имеющихся в продаже устройств USB.
Имеющиеся устройства USB
| Стандарт USB | USB 1.1 / USB 2.0 |
|---|---|
| Скорость передачи | Максимальная скорость (12 Мбит/с) |
| Класс USB | Класс накопителя (устройство MSC) |
| Подкласс USB | SCSI |
| Протокол | Только для передачи массивов данных |
| Источник питания | Макс. 1 А (iPod/iPhone) / Макс. 500 мА (USB) |
・Устройства USB класса массовой памяти:
Устройства USB, которые ПК может распознать как внешние устройства хранения без использования особого драйвера или программного приложения.
・Обратитесь к торговому агенту, чтобы уточнить, соответствует ли ваше устройство USB характеристикам USB класса массовой памяти.
・Использование неподдерживаемого устройства USB может привести к некорректному воспроизведению или отображению аудио файла.
Даже в случае использования устройства USB, соответствующего вышеуказанным характеристикам, аудио файлы могут не воспроизводиться корректно в зависимости от вида или состояния устройства USB.
・При использовании определенных устройств USB некоторые функции ограничены.
・Нормальный режим работы и питания не гарантируется для всех устройств USB.
О подключении устройства USB
・При использовании кабеля, не совместимого с USB, нормальное воспроизведение не гарантируется. Подключение кабеля, общая длина которого превышает 5 м, может привести к некорректному воспроизведению.
・Вы не можете подключить устройство USB через концентратор USB.
 |
・Установите устройство USB в том месте, где оно не помешает вашему передвижению. ・Не оставляйте надолго устройство USB в транспортном средстве. Оно может повредиться или выйти из строя в результате действия прямого солнечного света, высокой температуры и т.д. ・Возьмите с собой резервные копии аудио файлов, используемых с данным устройством. Эти файлы можно стереть в зависимости от условий эксплуатации устройства USB. Мы не несем никакой ответственности за ущерб, понесенный в связи со стиранием хранящихся данных. |
К началу страницы
10
РУССКИЙ
Data Size:
B6L (182 mm x 128 mm)
Book Size:
B6L (182 mm x 128 mm)
ЗВУКОВЫЕ НАСТРОЙКИ
При прослушивании любого источника звука…
1
Нажмите кнопку
AUD
для прямого перехода в режим
[AUDIO CONTROL]
.
2
Чтобы выбрать элемент, поверните ручку регулировки громкости
(см. следующую таблицу), затем нажмите ее.
3
Повторяйте действие
2
до тех пор, пока не будет выбран или
активирован необходимый элемент.
4
Нажмите кнопку
и удерживайте ее нажатой для выхода.
Для возврата к предыдущему элементу настройки нажмите кнопку
.
По умолчанию:
XX
AUDIO CONTROL
SUB-W LEVEL
От
–15
до
+15
(
0
)
Настройте уровень выходного сигнала низкочастотного
динамика.
BASS LEVEL
От
–8
до
+8
(
+2
)
Настройте уровень для сохранения в каждом источнике.
(Перед выполнением настройки выберите источник, который
необходимо настроить.)
MID LEVEL
От
–8
до
+8
(
+1
)
TRE LEVEL
От
–8
до
+8
(
+1
)
EQ PRO
(Данная настройка сохраняется в разделе
[USER]
.)
BASS ADJUST
BASS CTR FRQ
60
/
80
/
100
/
200
или
60HZ
/
80HZ
/
100HZ
/
200HZ
:
Выбор центральной частоты.
BASS LEVEL
От
–8
до
+8
(
+2
): Настройте уровень.
BASS Q FACTOR 1.00
/
1.25
/
1.50
/
2.00
: Настройка коэффициента качества.
BASS EXTEND
ON
: Включение усиленных нижних частот. ;
OFF
: Отмена.
MID ADJUST
MID CTR FRQ
0.5KHZ
/
1.0KHZ
/
1.5KHZ
/
2.5KHZ
: Выбор центральной
частоты.
MID LEVEL
От
–8
до
+8
(
+1
): Настройте уровень.
MID Q FACTOR
0.75
/
1.00
/
1.25
: Настройка коэффициента качества.
TRE ADJUST
TRE CTR FRQ
10.0KHZ
/
12.5KHZ
/
15.0KHZ
/
17.5KHZ
: Выбор
центральной частоты.
TRE LEVEL
От
–8
до
+8
(
+1
): Настройте уровень.
PRESET EQ
DRIVE EQ
/
TOP40
/
POWERFUL
/
ROCK
/
POPS
/
EASY
/
JAZZ
/
NATURAL
/
USER
: Выберите предварительно установленный режим эквалайзера,
соответствующего музыкальному жанру. (Чтобы использовать настройки, заданные
в
[EQ PRO]
, выберите
[USER]
.)
[DRIVE EQ]
— это запрограммированный эквалайзер, снижающий шум извне
автомобиля или шум шин.
BASS BOOST
LV1
/
LV2
/
LV3
или
LEVEL1
/
LEVEL2
/
LEVEL3
: Выбор предпочитаемого уровня
подъема нижних частот. ;
OFF
: Отмена.
LOUDNESS
LV1
/
LV2
или
LEVEL1
/
LEVEL2
: Выбор предпочитаемых низких и высоких частот
для получения хорошо сбалансированного звучания при низком уровне громкости. ;
OFF
: Отмена.
SUBWOOFER SET
ON
: Включение выходного сигнала низкочастотного динамика. ;
OFF
: Отмена.
LPF SUBWOOFER
THROUGH
: Все сигналы передаются в низкочастотный динамик. ;
85HZ
/
120HZ
/
160HZ
: Низкочастотный динамик воспроизводит аудиосигналы с
частотами ниже 85 Гц/120 Гц/160 Гц.
SUB-W PHASE
REVERSE
(180°)/
NORMAL
(0°): Выбор фазы выходного сигнала низкочастотного
динамика в соответствии с выходным сигналом динамика в целях обеспечения
оптимальной производительности. (Доступно только в том случае, если для
параметра
[LPF SUBWOOFER]
выбрано значение, отличное от
[THROUGH]
.)
FADER
От
R15
до
F15
(
0
): Настройка выходного баланса передних и задних динамиков.
BALANCE
От
L15
до
R15
(
0
): Настройка выходного баланса левых и правых динамиков.
VOLUME OFFSET
Для AUX:
От
–8
до
+8
(
0
) ; Для других источников: От
–8
до
0
: Программирование
первоначального уровня громкости для каждого источника. (Перед настройкой
выберите источник, который необходимо настроить.)
SOUND RECNSTR
(реконструкция звука)
ON
: Cоздание реалистичного звука путем компенсации высокочастотных
компонентов и восстановления времени достижения максимального эффекта волны,
которые были потеряны при аудиокомпрессии данных. ;
OFF
: Отмена.
•
Элемент
[SUB-W LEVEL]
/
[SUBWOOFER SET]
/
[LPF SUBWOOFER]
/
[SUB-W PHASE]
доступен только в том случае, если для параметра
[SWITCH PREOUT]
установлено
значение
[SUB-W]
или
[SUBWOOFER]
.
( 4)
•
Элемент
[SUB-W LEVEL]
/
[LPF SUBWOOFER]
/
[SUB-W PHASE]
доступен только в том
случае, если для параметра
[SUBWOOFER SET]
установлено значение
[ON]
.
JS_KWD_KMM_204_EN_E2N_RU.indd 10
JS_KWD_KMM_204_EN_E2N_RU.indd 10
24/8/2017 11:52:11 AM
24/8/2017 11:52:11 AM
Data Size: B6L (182 mm x 128 mm)
Book Size: B6L (182 mm x 128 mm)
B5A-2103-00 (EN/E2N)© 2017 JVC KENWOOD Corporation
KMM-204
KMM-124
KMM-104RY
DIGITAL MEDIA RECEIVER
INSTRUCTION MANUAL
ЦИФРОВОЙ МЕДИА-РЕСИВЕР
ИHCTPУKЦИЯ ПO ЭKCПЛУATAЦИИ
KMM-104GY
KMM-104AY
JS_KWD_KMM_204_EN_C00.indd 1JS_KWD_KMM_204_EN_C00.indd 1 20/6/2017 9:01:17 AM20/6/2017 9:01:17 AM
i
Data Size: B6L (182 mm x 128 mm)
Book Size: B6L (182 mm x 128 mm)
For Israel
Дата изготовления (месяц/год) находится на этикетке устройства.
В соответствии с Законом Российской Федерации “О защите прав потребителей” срок
службы (годности) данного товара “по истечении которого он может представлять
опасность для жизни, здоровья потребителя, причинять вред его имуществу или
окружающей среде” составляет семь (7) лет со дня производства.
Дополнительные косметические материалы к данному товару, поставляемые вместе с
ним, могут храниться в течение двух (2) лет со дня его производства.
Срок службы (годности), кроме срока хранения дополнительных косметических
материалов, упомянутых в предыдущих двух пунктах, не затрагивает никаких других
прав потребителя, в частности, гарантийного обслуживания KENWOOD, которое он может
получить в соответствии с законом о правах потребителя или других законов, связанных
с ним.
Условия хранения:
Температура : от -30°C до +85°C
Влажность : от 0% до 90%
Information on Disposal of Old Electrical and Electronic Equipment and Batteries
(applicable for countries that have adopted separate waste collection systems)
Products and batteries with the symbol (crossed-out wheeled bin) cannot be disposed as
household waste.
Old electrical and electronic equipment and batteries should be recycled at a facility capable of
handling these items and their waste byproducts.
Contact your local authority for details in locating a recycle facility nearest to you. Proper
recycling and waste disposal will help conserve resources whilst preventing detrimental effects
on our health and the environment.
Notice: The sign “Pb” below the symbol for batteries indicates that this battery contains lead.
For Turkey
Bu ürün 28300 sayılı Resmi Gazete’de yayımlanan Atik Elektrikli ve Elektronik Eşyalarin
Kontrolü Yönetmeliğe uygun olarak üretilmiştir.
Eski Elektrik ve Elektronik Ekipmanların İmha Edilmesi Hakkında Bilgi (atık yan ürün
toplama sistemlerini kullanan ülkeleri için uygulanabilir)
Sembollü (üzerinde çarpı işareti olan çöp kutusu) ürünler ev atıkları olarak
atılamaz.
Eski elektrik ve elektronik ekipmanlar, bu ürünleri ve ürün atıklarını geri
dönüştürebilecek bir tesiste değerlendirilmelidir. Yaşadığınız bölgeye
en yakın geri dönüşüm tesisinin yerini öğrenmek için yerel makamlara
müracaat edin. Uygun geri dönüşüm ve atık imha yöntemi sağlığımız ve
çevremiz üzerindeki zararlı etkileri önlerken kaynakların korunmasına da
yardımcı olacaktır.
JS_KWD_KMM_204_EN_C00.indd iJS_KWD_KMM_204_EN_C00.indd i 20/6/2017 9:27:48 AM20/6/2017 9:27:48 AM
ii
Data Size: B6L (182 mm x 128 mm)
Book Size: B6L (182 mm x 128 mm)
• Microsoft and Windows Media are either registered trademarks or trademarks of Microsoft
Corporation in the United States and/or other countries.
• “Made for iPod,” and “Made for iPhone” mean that an electronic accessory has been designed to
connect specifically to iPod, or iPhone, respectively, and has been certified by the developer to
meet Apple performance standards. Apple is not responsible for the operation of this device or its
compliance with safety and regulatory standards. Please note that the use of this accessory with iPod
or iPhone may affect wireless performance.
• iPhone, iPod, iPod classic, iPod nano, and iPod touch are trademarks of Apple Inc., registered in the
U.S. and other countries.
• Lightning is a trademark of Apple Inc.
• Android is trademark of Google Inc.
libFLAC
Copyright (C) 2000-2009 Josh Coalson
Copyright (C) 2011-2013 Xiph.Org Foundation
Redistribution and use in source and binary forms, with or without modification, are permitted provided
that the following conditions are met:
— Redistributions of source code must retain the above copyright notice, this list of conditions and the
following disclaimer.
— Redistributions in binary form must reproduce the above copyright notice, this list of conditions and
the following disclaimer in the documentation and/or other materials provided with the distribution.
— Neither the name of the Xiph.org Foundation nor the names of its contributors may be used to
endorse or promote products derived from this software without specific prior written permission.
THIS SOFTWARE IS PROVIDED BY THE COPYRIGHT HOLDERS AND CONTRIBUTORS “AS IS” AND ANY
EXPRESS OR IMPLIED WARRANTIES, INCLUDING, BUT NOT LIMITED TO, THE IMPLIED WARRANTIES OF
MERCHANTABILITY AND FITNESS FOR A PARTICULAR PURPOSE ARE DISCLAIMED. IN NO EVENT SHALL
THE FOUNDATION OR CONTRIBUTORS BE LIABLE FOR ANY DIRECT, INDIRECT, INCIDENTAL, SPECIAL,
EXEMPLARY, OR CONSEQUENTIAL DAMAGES (INCLUDING, BUT NOT LIMITED TO, PROCUREMENT OF
SUBSTITUTE GOODS OR SERVICES; LOSS OF USE, DATA, OR PROFITS; OR BUSINESS INTERRUPTION)
HOWEVER CAUSED AND ON ANY THEORY OF LIABILITY, WHETHER IN CONTRACT, STRICT LIABILITY,
OR TORT (INCLUDING NEGLIGENCE OR OTHERWISE) ARISING IN ANY WAY OUT OF THE USE OF THIS
SOFTWARE, EVEN IF ADVISED OF THE POSSIBILITY OF SUCH DAMAGE.
JS_KWD_KMM_204_EN_C00.indd iiJS_KWD_KMM_204_EN_C00.indd ii 20/6/2017 9:27:49 AM20/6/2017 9:27:49 AM

iii
Data Size: B6L (182 mm x 128 mm)
Book Size: B6L (182 mm x 128 mm)
Declaration of Conformity with regard to the RE Directive 2014/53/EU
Declaration of Conformity with regard to the RoHS Directive 2011/65/EU
Manufacturer:
JVC KENWOOD Corporation
3-12, Moriya-cho, Kanagawa-ku, Yokohama-shi, Kanagawa, 221-0022, JAPAN
EU Representative:
JVCKENWOOD Europe B.V.
Amsterdamseweg 37, 1422 AC UITHOORN, THE NETHERLANDS
Декларация соответствия относительно Директивы RE 2014/53/EU
Декларация соответствия относительно Директивы RoHS 2011/65/EU
Производитель:
JVC KENWOOD Corporation
3-12, Moriya-cho, Kanagawa-ku, Yokohama-shi, Kanagawa, 221-0022, ЯПОНИЯ
Представительство в EC:
JVCKENWOOD Europe B.V.
Amsterdamseweg 37, 1422 AC UITHOORN, НИДЕРЛАНДЫ
English
Hereby, JVCKENWOOD declares that the radio equipment
“KMM-204/KMM-124/KMM-104RY/KMM-104GY/
KMM-104AY” is in compliance with Directive 2014/53/EU.
The full text of the EU declaration of conformity is available
at the following internet address:
http://www.kenwood.com/cs/ce/eudoc/
Français
Par la présente, JVCKENWOOD déclare que l’équipement
radio « KMM-204/KMM-124/KMM-104RY/KMM-104GY/
KMM-104AY » est conforme à la directive 2014/53/UE.
L’intégralité de la déclaration de conformité UE est
disponible à l’adresse Internet suivante :
http://www.kenwood.com/cs/ce/eudoc/
Deutsch
Hiermit erklärt JVCKENWOOD, dass das Funkgerät
“KMM-204/KMM-124/KMM-104RY/KMM-104GY/
KMM-104AY” der Richtlinie 2014/53/EU entspricht.
Der volle Text der EU-Konformitätserklärung steht unter
der folgenden Internetadresse zur Verfügung:
http://www.kenwood.com/cs/ce/eudoc/
Nederlands
Hierbij verklaart JVCKENWOOD dat de radioapparatuur
“KMM-204/KMM-124/KMM-104RY/KMM-104GY/
KMM-104AY” in overeenstemming is met Richtlijn
2014/53/EU.
De volledige tekst van de EU-verklaring van
overeenstemming is te vinden op het volgende
internetadres:
http://www.kenwood.com/cs/ce/eudoc/
Italiano
Con la presente, JVCKENWOOD dichiara che l΄apparecchio
radio “KMM-204/KMM-124/KMM-104RY/KMM-104GY/
KMM-104AY” è conforme alla Direttiva 2014/53/UE.
Il testo integrale della dichiarazione di conformità UE è
disponibile al seguente indirizzo internet:
http://www.kenwood.com/cs/ce/eudoc/
Español
Por la presente, JVCKENWOOD declara que el equipo de
radio “KMM-204/KMM-124/KMM-104RY/KMM-104GY/
KMM-104AY” cumple la Directiva 2014/53/EU.
El texto completo de la declaración de conformidad con la
UE está disponible en la siguiente dirección de internet:
http://www.kenwood.com/cs/ce/eudoc/
Português
Deste modo, a JVCKENWOOD declara que o equipamento
de rádio “KMM-204/KMM-124/KMM-104RY/KMM-104GY/
KMM-104AY” está em conformidade com a Diretiva
2014/53/UE.
O texto integral da declaração de conformidade da UE está
disponível no seguinte endereço de internet:
http://www.kenwood.com/cs/ce/eudoc/
Polska
Niniejszym, JVCKENWOOD deklaruje, że sprzęt radiowy
“KMM-204/KMM-124/KMM-104RY/KMM-104GY/
KMM-104AY” jest zgodny z dyrektywą 2014/53/UE.
Pełny tekst deklaracji zgodności EU jest dostępny pod
adresem:
http://www.kenwood.com/cs/ce/eudoc/
Český
Společnost JVCKENWOOD tímto prohlašuje, že rádiové
zařízení “KMM-204/KMM-124/KMM-104RY/KMM-104GY/
KMM-104AY” splňuje podmínky směrnice 2014/53/EU.
Plný text EU prohlášení o shodě je dostupný na následující
internetové adrese:
http://www.kenwood.com/cs/ce/eudoc/
Magyar
JVCKENWOOD ezennel kijelenti, hogy a „KMM-204/
KMM-124/KMM-104RY/KMM-104GY/KMM-104AY“
rádióberendezés megfelel a 2014/53/EU irányelvnek.
Az EU konformitási nyilatkozat teljes szövege az alábbi
weboldalon érhető el:
http://www.kenwood.com/cs/ce/eudoc/
JS_KWD_KMM_204_EN_C00.indd iiiJS_KWD_KMM_204_EN_C00.indd iii 20/6/2017 9:01:17 AM20/6/2017 9:01:17 AM

iv
Data Size: B6L (182 mm x 128 mm)
Book Size: B6L (182 mm x 128 mm)
Svenska
Härmed försäkrar JVCKENWOOD att
radioutrustningen “KMM-204/KMM-124/
KMM-104RY/KMM-104GY/KMM-104AY” är i
enlighet med direktiv 2014/53/EU.
Den fullständiga texten av EU-försäkran
om överensstämmelse finns på följande
Internetadress:
http://www.kenwood.com/cs/ce/eudoc/
Suomi
JVCKENWOOD julistaa täten, että radiolaite
“KMM-204/KMM-124/KMM-104RY/KMM-104GY/
KMM-104AY” on direktiivin 2014/53/EU
mukainen.
EU-vaatimustenmukaisuusvakuutusvaatimus
löytyy kokonaisuudessaan seuraavasta internet-
osoitteesta:
http://www.kenwood.com/cs/ce/eudoc/
Slovensko
S tem JVCKENWOOD izjavlja, da je radijska oprema
» KMM-204/KMM-124/KMM-104RY/KMM-104GY/
KMM-104AY « v skladu z Direktivo 2014/53/EU.
Celotno besedilo direktive EU o skladnosti je
dostopno na tem spletnem naslovu:
http://www.kenwood.com/cs/ce/eudoc/
Slovensky
Spoločnosť JVCKENWOOD týmto vyhlasuje,
že rádiové zariadenie „KMM-204/KMM-124/
KMM-104RY/KMM-104GY/KMM-104AY“ vyhovuje
smernici 2014/53/EÚ.
Celý text EÚ vyhlásenia o zhode nájdete na
nasledovnej internetovej adrese:
http://www.kenwood.com/cs/ce/eudoc/
Dansk
Herved erklærer JVCKENWOOD, at radioudstyret
“KMM-204/KMM-124/KMM-104RY/KMM-104GY/
KMM-104AY” er i overensstemmelse med Direktiv
2014/53/EU.
EU-overensstemmelseserklæringens fulde ordlyd
er tilgængelig på følgende internetadresse:
http://www.kenwood.com/cs/ce/eudoc/
Ελληνικά
Με το παρόν, η JVCKENWOOD δηλώνει ότι
ο ραδιοεξοπλισμός «KMM-204/KMM-124/
KMM-104RY/KMM-104GY/KMM-104AY»
συμμορφώνεται με την Οδηγία 2014/53/ΕΕ.
Το πλήρες κείμενο της δήλωσης συμμόρφωσης
της ΕΕ είναι διαθέσιμο στην ακόλουθη διεύθυνση
στο διαδίκτυο:
http://www.kenwood.com/cs/ce/eudoc/
Eesti
Käesolevaga JVCKENWOOD kinnitab, et
„KMM-204/KMM-124/KMM-104RY/KMM-104GY/
KMM-104AY“ raadiovarustus on vastavuses
direktiiviga 2014/53/EL.
ELi vastavusdeklaratsiooni terviktekst on
kättesaadav järgmisel internetiaadressil:
http://www.kenwood.com/cs/ce/eudoc/
Latviešu
JVCKENWOOD ar šo deklarē, ka radio aparatūra
„KMM-204/KMM-124/KMM-104RY/KMM-104GY/
KMM-104AY” atbilst direktīvas 2014/53/ES
prasībām.
Pilns ES atbilstības deklarācijas teksts ir pieejams
šādā tīmekļa adresē:
http://www.kenwood.com/cs/ce/eudoc/
Lietuviškai
Šiuo JVCKENWOOD pažymi, kad radijo įranga
„KMM-204/KMM-124/KMM-104RY/KMM-104GY/
KMM-104AY“ atitinka 2014/53/EB direktyvos
reikalavimus.
Visą EB direktyvos atitikties deklaracijos tekstą
galite rasti šiuo internetiniu adresu:
http://www.kenwood.com/cs/ce/eudoc/
Malti
B’dan, JVCKENWOOD jiddikjara li t-tagħmir
tar-radju “KMM-204/KMM-124/KMM-104RY/
KMM-104GY/KMM-104AY” huwa konformi mad-
Direttiva 2014/53/UE.
It-test kollu tad-dikjarazzjoni ta’ konformità huwa
disponibbli fl-indirizz intranet li ġej:
http://www.kenwood.com/cs/ce/eudoc/
HRVATSKI / SRPSKI JEZIK
JVCKENWOOD ovim izjavljuje da je radio oprema
“KMM-204/KMM-124/KMM-104RY/KMM-104GY/
KMM-104AY” u skladu s Direktivom 2014/53/EU.
Cjeloviti tekst deklaracije Europske unije o
usklađenosti dostupan je na sljedećoj internet
adresi:
http://www.kenwood.com/cs/ce/eudoc/
ROMÂNĂ
Prin prezenta, JVCKENWOOD declară că
echipamentul radio “KMM-204/KMM-124/
KMM-104RY/KMM-104GY/KMM-104AY” este în
conformitate cu Directiva 2014/53/UE.
Textul integral al declarației de conformitate UE
este disponibil la urmatoarea adresă de internet:
http://www.kenwood.com/cs/ce/eudoc/
БЪЛГАРСКИ
С настоящото JVCKENWOOD декларира, че
радиооборудването на “KMM-204/KMM-124/
KMM-104RY/KMM-104GY/KMM-104AY” е в
съответствие с Директива 2014/53/ЕС.
Пълният текст на ЕС декларацията за
съответствие е достъпен на следния интернет
адрес:
http://www.kenwood.com/cs/ce/eudoc/
Turkish
Burada, JVCKENWOOD “KMM-204/KMM-124/
KMM-104RY/KMM-104GY/KMM-104AY” radyo
ekipmanının 2014/53/AB Direktifine uygun
olduğunu bildirir.
AB uyumluluk deklarasyonunun tam metni
aşağıdaki internet adresinde mevcuttur.
http://www.kenwood.com/cs/ce/eudoc/
Русский
JVCKENWOOD настоящим заявляет, что
радиооборудование «KMM-204/KMM-124/
KMM-104RY/KMM-104GY/KMM-104AY»
соответствует Директиве 2014/53/EU.
Полный текст декларации соответствия
ЕС доступен по следующему адресу в сети
Интернет:
http://www.kenwood.com/cs/ce/eudoc/
Українська
Таким чином, компанія JVCKENWOOD заявляє,
що радіообладнання «KMM-204/KMM-124/
KMM-104RY/KMM-104GY/KMM-104AY»
відповідає Директиві 2014/53/EU.
Повний текст декларації про відповідність ЄС
можна знайти в Інтернеті за такою адресою:
http://www.kenwood.com/cs/ce/eudoc/
JS_KWD_KMM_204_EN_C00.indd ivJS_KWD_KMM_204_EN_C00.indd iv 20/6/2017 9:01:17 AM20/6/2017 9:01:17 AM
Data Size: B6L (182 mm x 128 mm)
Book Size: B6L (182 mm x 128 mm)
2
ENGLISH
CONTENTS BEFORE USE
IMPORTANT
•
To ensure proper use, please read through this manual before using this product. It is especially important that you read and observe
Warning and Caution in this manual.
•
Please keep the manual in a safe and accessible place for future reference.
WARNING
•
Do not operate any function that takes your attention away from safe driving.
Caution
Volume setting:
•
Adjust the volume so that you can hear sounds outside the car to prevent accidents.
•
Lower the volume before playing digital sources to avoid damaging the speakers by the sudden increase of the output level.
General:
•
Avoid using the external device if it might hinder safe driving.
•
Make sure all important data has been backed up. We shall bear no responsibility for any loss of recorded data.
•
Never put or leave any metallic objects (such as coins or metal tools) inside the unit, to prevent a short circuit.
•
Depending on the types of cars, the antenna will automatically extend when you turn on the unit with the antenna control wire connected
( 16)
. Turn off the unit or change the source to STANDBY when parking at a low ceiling area.
How to read this manual
•
Operations are explained mainly using buttons on the faceplate of .
•
English indications are used for the purpose of explanation. You can select the display language from the
[FUNCTION]
menu.
( 5)
•
[XX]
indicates the selected items.
•
( XX)
indicates references are available on the stated page.
BEFORE USE 2
BASICS 3
GETTING STARTED 4
1 Select the display language
and cancel the demonstration
2 Set the clock and date
3 Set the initial settings
RADIO 5
USB/iPod/ANDROID 7
AUX 9
AUDIO SETTINGS 10
DISPLAY SETTINGS 11
TROUBLESHOOTING 12
REFERENCES 13
Maintenance
More information
INSTALLATION/
CONNECTION 14
SPECIFICATIONS 17
JS_KWD_KMM_204_EN_EN_1.indd 2JS_KWD_KMM_204_EN_EN_1.indd 2 20/6/2017 9:16:08 AM20/6/2017 9:16:08 AM
ENGLISH
3
Data Size: B6L (182 mm x 128 mm)
Book Size: B6L (182 mm x 128 mm)
BASICS
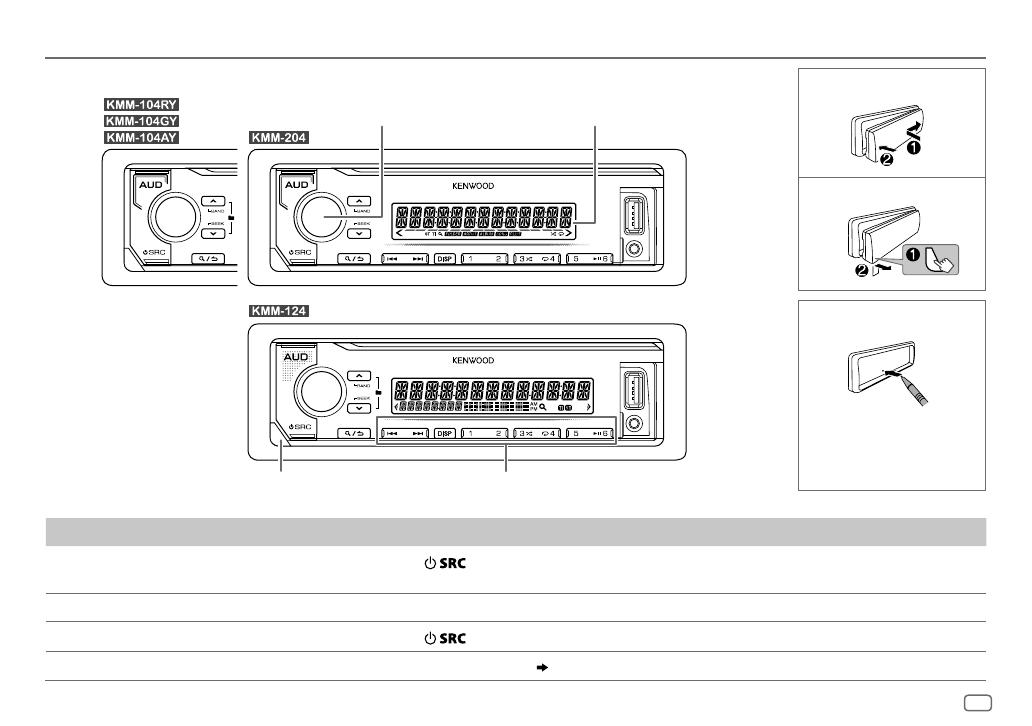
To On the faceplate
Turn on the power
Press
.
• Press and hold to turn off the power.
Adjust the volume Turn the volume knob.
Select a source
Press
repeatedly.
Change the display information Press DISP repeatedly.
( 14)
Faceplate
How to reset
Attach
Detach
Display window
Your preset adjustments
will be erased except
stored radio stations.
Volume knob
Detach button
Flashes when the unit enters searching status.
JS_KWD_KMM_204_EN_EN_1.indd 3JS_KWD_KMM_204_EN_EN_1.indd 3 20/6/2017 9:16:09 AM20/6/2017 9:16:09 AM
4
ENGLISH
Data Size: B6L (182 mm x 128 mm)
Book Size: B6L (182 mm x 128 mm)
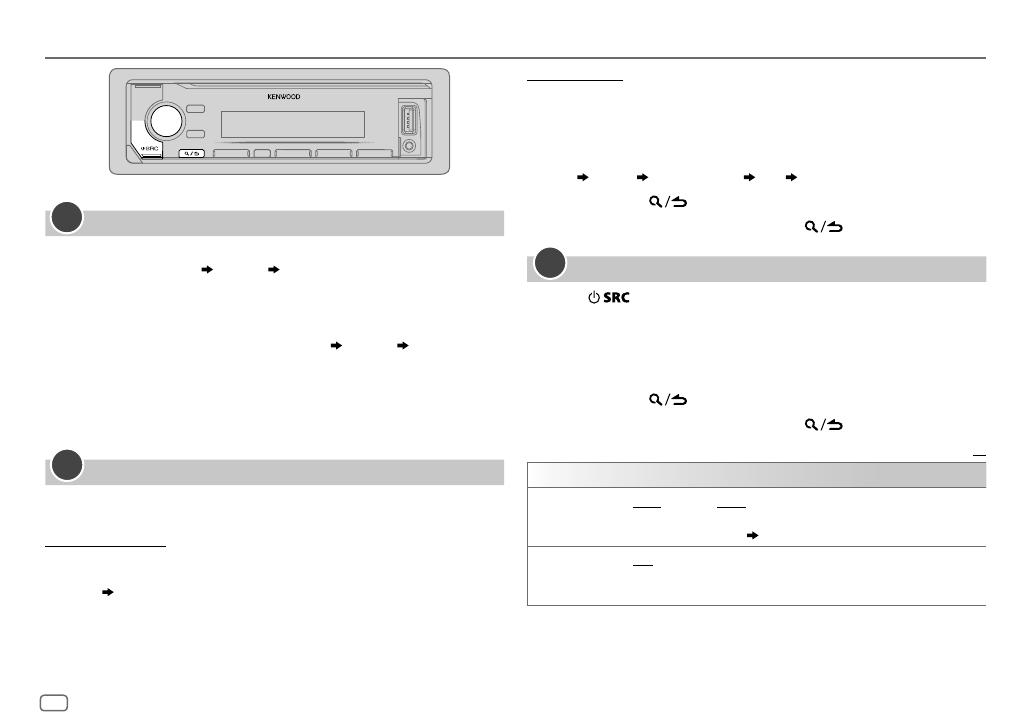
GETTING STARTED
Select the display language and cancel the demonstration
When you turn on the power (or after you reset the unit), the display
shows: “SEL LANGUAGE”
“PRESS” “VOLUME KNOB”
1 Turn the volume knob to select
[ENG]
(English),
[RUS]
(Russian) or
[SPA]
(Spanish), then press the knob.
[ENG]
is selected for the initial setup.
Then, the display shows: “CANCEL DEMO”
“PRESS” “VOLUME
KNOB”.
2 Press the volume knob.
[YES]
is selected for the initial setup.
3 Press the volume knob again.
“DEMO OFF” appears.
Set the clock and date
1
Press the volume knob to enter
[FUNCTION]
.
2 Turn the volume knob to select
[CLOCK]
, then press the knob.
To adjust the clock
3 Turn the volume knob to select
[CLOCK ADJUST]
, then press the knob.
4 Turn the volume knob to make the settings, then press the knob.
Hour
Minute
5 Turn the volume knob to select
[CLOCK FORMAT]
, then press the knob.
6 Turn the volume knob to select
[12H]
or
[24H]
, then press the knob.
1
2
To set the date
7 Turn the volume knob to select
[DATE FORMAT]
, then press the knob.
8 Turn the volume knob to select
[DD/MM/YY]
or
[MM/DD/YY]
, then press
the knob.
9 Turn the volume knob to select
[DATE SET]
, then press the knob.
10 Turn the volume knob to make the settings, then press the knob.
Day
Month Year or Month Day Year
11 Press and hold to exit.
To return to the previous setting item, press
.
Set the initial settings
1
Press repeatedly to enter STANDBY.
2 Press the volume knob to enter
[FUNCTION]
.
• Pressing AUD enters
[AUDIO CONTROL]
directly.
3 Turn the volume knob to select an item (see the following table),
then press the knob.
4 Repeat step 3 until the desired item is selected or activated.
5 Press and hold to exit.
To return to the previous setting item, press
.
Default:
XX
AUDIO CONTROL
SWITCH PREOUT
REAR
/
SUB-W
or
REAR
/
SUBWOOFER
: Selects whether rear speakers or
a subwoofer are connected to the line out terminals on the rear (through
an external amplifier).
( 16)
SP SELECT
OFF
/
5/4
/
6 × 9/6
/
OEM
: Selects according to the speaker size (5inches
or 4inches, 6×9inches or 6inches) or OEM speakers for optimum
performance.
3
JS_KWD_KMM_204_EN_EN_1.indd 4JS_KWD_KMM_204_EN_EN_1.indd 4 20/6/2017 9:16:09 AM20/6/2017 9:16:09 AM
ENGLISH
5
Data Size: B6L (182 mm x 128 mm)
Book Size: B6L (182 mm x 128 mm)
DISPLAY
EASY MENU
(For )
When entering
[FUNCTION]
…
ON
:ZONE 1 illumination changes to white color.;
OFF
:ZONE 1 illumination remains as
[COLOR SELECT]
color.
( 11)
•
ZONE 2 illumination changes to light blue color when you enter
[FUNCTION]
,
irregardless of the
[EASY MENU]
setting.
•
Refer to the illustration on page
11
for zone identification.
TUNER SETTING
PRESET TYPE
NORMAL
:Memorizes one station for each preset button in each band (FM1/FM2/
FM3/MW/LW).;
MIX
:Memorizes one station for each preset button, regardless of the
selected band.
SYSTEM
KEY BEEP
ON
:Activates the keypress tone.;
OFF
:Deactivates.
SOURCE SELECT
BUILT-IN AUX
ON
:Enables AUX in source selection.;
OFF
:Disables.
( 9)
P-OFF WAIT
Applicable only when the demonstration mode is turned off. Sets the duration when
the unit will automatically turn off (while in standby mode) to save the battery.
20M
: 20minutes;
40M
: 40minutes;
60M
: 60minutes;
WAIT TIME – – –
or
OFF – – –
:Cancels
F/W UPDATE
UPDATE SYSTEM
F/W UP xxxx
YES
:Starts upgrading the firmware.;
NO
:Cancels (upgrading is not activated).
For details on how to update the firmware, visit <www.kenwood.com/cs/ce/>.
CLOCK
CLOCK DISPLAY
ON
:The clock time is shown on the display even when the unit is turned off.;
OFF
:Cancels.
ENGLISH
Select the display language for
[FUNCTION]
menu and music information if applicable.
By default,
[ENGLISH]
is selected.
РУССКИЙ
ESPANOL
GETTING STARTED RADIO
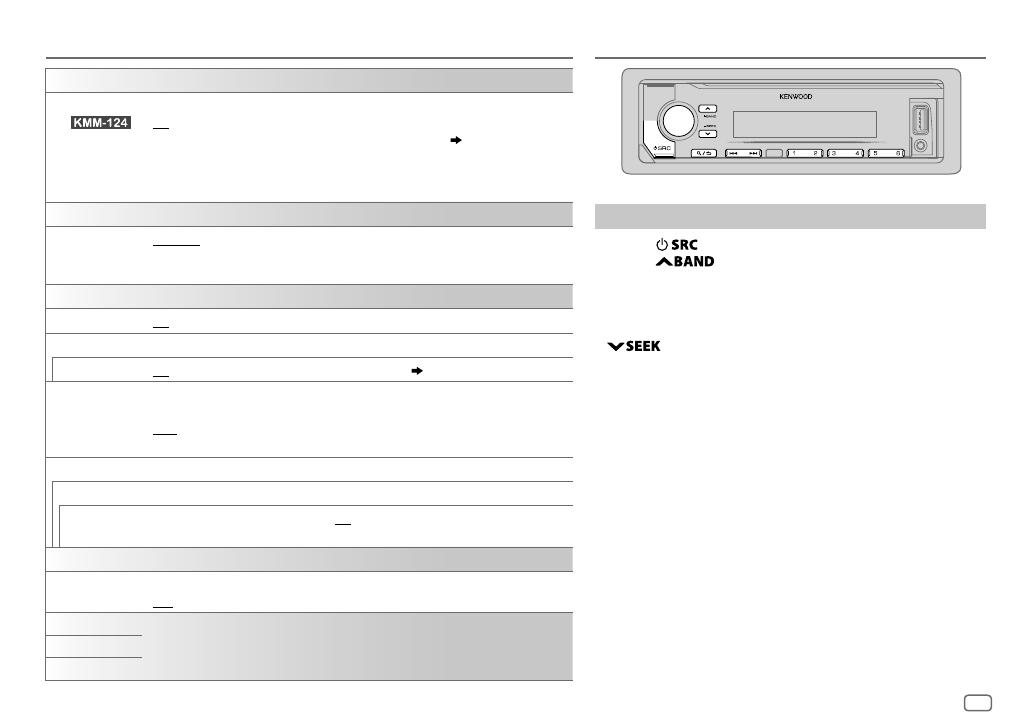
Search for a station
1
Press repeatedly to select RADIO.
2 Press repeatedly to select FM1/FM2/FM3/MW/
LW.
3 Press S/T to search for a station.
• To change the searching method for S/T: Press
repeatedly.
AUTO1 : Automatically search for a station.
AUTO2 : Search for a preset station.
MANUAL : Manually search for a station.
• To store a station: Press and hold one of the number
buttons (1to6).
• To select a stored station: Press one of the number buttons
(1to6).
JS_KWD_KMM_204_EN_EN_3.indd 5JS_KWD_KMM_204_EN_EN_3.indd 5 7/8/2017 12:04:51 PM7/8/2017 12:04:51 PM
6
ENGLISH
Data Size: B6L (182 mm x 128 mm)
Book Size: B6L (182 mm x 128 mm)
RADIO
Other settings
1
Press the volume knob to enter
[FUNCTION]
.
2 Turn the volume knob to select an item (see the following table),
then press the knob.
3 Repeat step 2 until the desired item is selected or activated.
4 Press and hold to exit.
To return to the previous setting item, press
.
Default:
XX
TUNER SETTING
LOCAL SEEK
ON
: Searches only stations with good reception. ;
OFF
: Cancels.
•
Settings made are applicable only to the selected source/station. Once
you change the source/station, you need to make the settings again.
AUTO
MEMORY
YES
:Automatically starts memorizing 6 stations with good reception.;
NO
:Cancels.
•
Selectable only if
[NORMAL]
is selected for
[PRESET TYPE]
.
( 5)
MONO SET
ON
:Improves the FM reception, but the stereo effect may be lost.;
OFF
:Cancels.
NEWS SET ON
: The unit will temporarily switch to News Programme if available. ;
OFF
:Cancels.
REGIONAL ON
: Switches to another station only in the specific region using the “AF”
control.;
OFF
:Cancels.
AF SET ON
: Automatically searches for another station broadcasting the same
program in the same Radio Data System network with better reception
when the current reception is poor.;
OFF
:Cancels.
TI ON
:Allows the unit to temporarily switch to Traffic Information if available
(“TI” lights up).;
OFF
:Cancels.
PTY SEARCH
1
Turn the volume knob to select the available Program Type, then press
the knob.
2
Turn the volume knob to select the PTY language (
ENGLISH
/
FRENCH
/
GERMAN
), then press the knob.
3
Press
S
/
T
to start searching.
CLOCK
TIME SYNC
ON
:Synchronizes the unit’s time to the Radio Data System station time.;
OFF
:Cancels.
Available Program Type for
[PTY SEARCH]
SPEECH
:
NEWS
,
AFFAIRS
,
INFO
(information),
SPORT
,
EDUCATE
,
DRAMA
,
CULTURE
,
SCIENCE
,
VARIED
,
WEATHER
,
FINANCE
,
CHILDREN
,
SOCIAL
,
RELIGION
,
PHONE IN
,
TRAVEL
,
LEISURE
,
DOCUMENT
MUSIC
:
POP M
(music),
ROCK M
(music),
EASY M
(music),
LIGHT M
(music),
CLASSICS
,
OTHER M
(music),
JAZZ
,
COUNTRY
,
NATION M
(music),
OLDIES
,
FOLK M
(music)
The unit will search for the Program Type categorized under
[SPEECH]
or
[MUSIC]
if selected.
•
[LOCAL SEEK]
/
[MONO SET]
/
[NEWS SET]
/
[REGIONAL]
/
[AF SET]
/
[TI]
/
[PTY SEARCH]
is
selectable only when the band is FM1/FM2/FM3.
• If the volume is adjusted during reception of traffic information or news
bulletin, the adjusted volume is memorized automatically. It will be
applied the next time traffic information or news bulletin is turned on.
JS_KWD_KMM_204_EN_EN_1.indd 6JS_KWD_KMM_204_EN_EN_1.indd 6 20/6/2017 9:16:10 AM20/6/2017 9:16:10 AM
ENGLISH
7
Data Size: B6L (182 mm x 128 mm)
Book Size: B6L (182 mm x 128 mm)
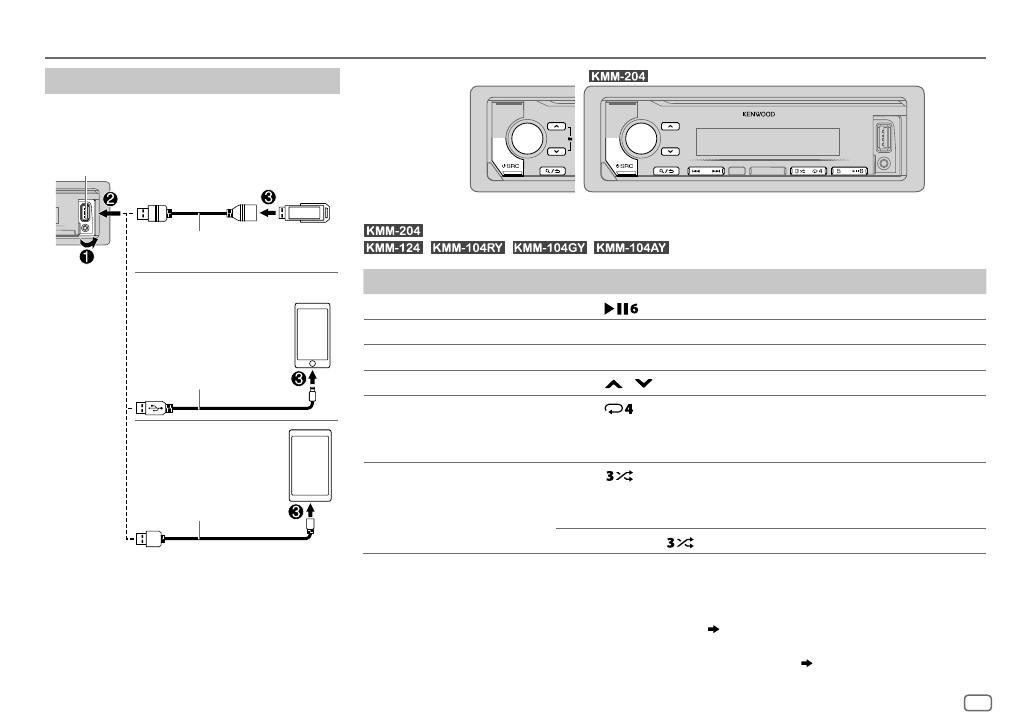
USB/iPod/ANDROID
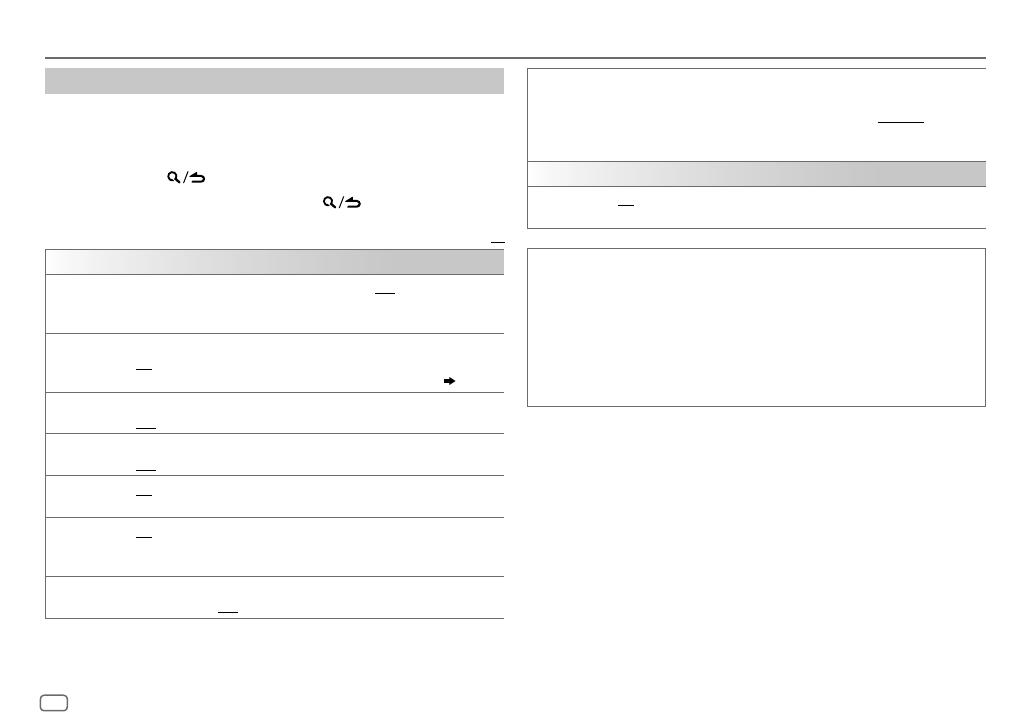
Start playback
The source changes automatically and
playback starts.
*
1
KCA-iP102 : 30-pin type, KCA-iP103 : Lightning type
*
2
Do not leave the cable inside the car when not using.
Selectable source:
: USB/iPod/ANDROID
/ / / : USB/ANDROID
To On the faceplate
Playback/pause Press .
Reverse/Fast-forward
*
4
Press and hold S/T.
Select a file
Press S/T.
Select a folder
*
5
Press / .
Repeat play
*
6
Press repeatedly.
FILE REPEAT
/
FOLDER REPEAT
/
ALL REPEAT
: MP3/WMA/WAV/FLAC file
FILE REPEAT
/
FOLDER REPEAT
/
REPEAT OFF
: iPod or ANDROID
Random play
*
6
Press repeatedly.
FOLDER RANDOM
/
RANDOM OFF
: MP3/WMA/WAV/FLAC file, iPod or
ANDROID
Press and hold
to select
ALL RANDOM
.
*
3
When connecting an Android device, “Press [VIEW] to install KENWOOD MUSIC PLAY APP” is shown. Follow the instructions
to install the application. You can also install the latest version of KENWOOD MUSIC PLAY application on your Android device
before connecting. For more information, visit <www.kenwood.com/cs/ce/>.
*
4
For ANDROID: Applicable only when
[BROWSE MODE]
is selected.
(
*
5
This does not work for iPod/ANDROID.
*
6
For iPod/ANDROID: Applicable only when
[MODE OFF]
/
[BROWSE MODE]
is selected.
(
USB input terminal
CA-U1EX (max.: 500mA)
(optional accessory)
USB cable
*
2
(commercially available)
KCA-iP102/KCA-iP103
(optional accessory)
*
1
or accessory of the iPod/
iPhone
*
2
USB
iPod/iPhone
ANDROID
*
3
Other models
JS_KWD_KMM_204_EN_EN_1.indd 7JS_KWD_KMM_204_EN_EN_1.indd 7 20/6/2017 9:16:10 AM20/6/2017 9:16:10 AM
8
ENGLISH
Data Size: B6L (182 mm x 128 mm)
Book Size: B6L (182 mm x 128 mm)
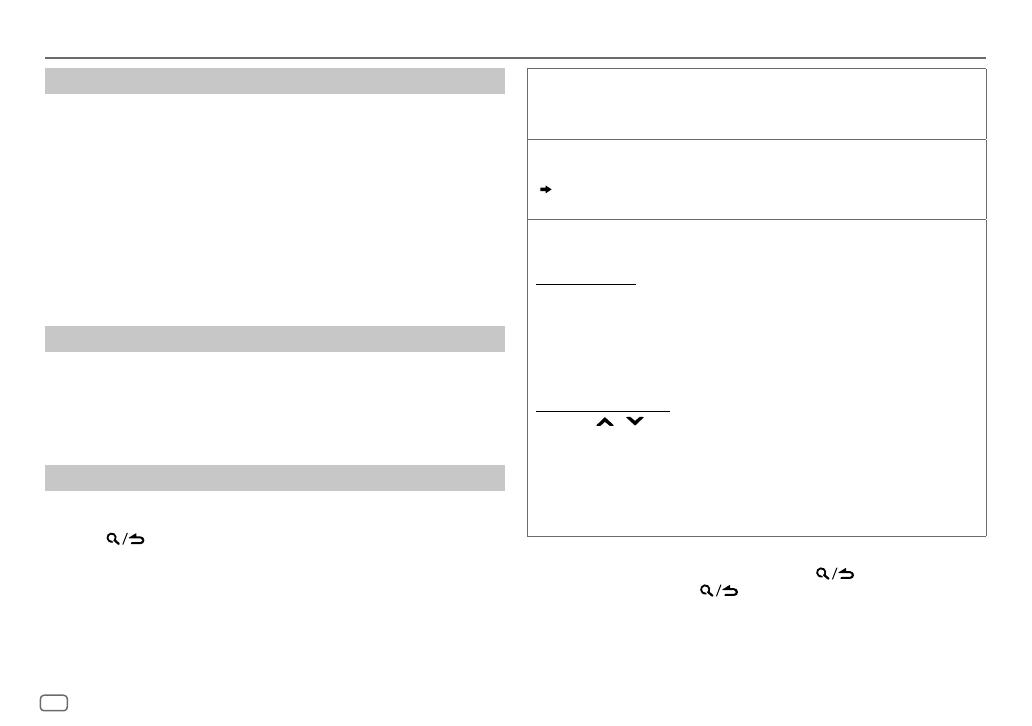
USB/iPod/ANDROID
Select control mode
While in iPod source, press 5 repeatedly.
MODE ON
: Control iPod using the iPod itself
. However,
you can still play/
pause, file skip, fast-forward or reverse from this unit.
MODE OFF
: Control iPod from this unit.
While in ANDROID source, press 5 repeatedly.
BROWSE MODE
: Control Android device from this unit via KENWOOD
MUSIC PLAY application installed in the Android device.
HAND MODE
: Control Android device using the Android device itself via
other media player applications installed in the Android
device. However, you can still play/pause and file skip from
this unit.
Select music drive
While in USB source, press 5 repeatedly.
Stored songs in the following drive will be played back.
• Selected internal or external memory of a smartphone (Mass Storage
Class).
• Selected drive of a multiple drives device.
Select a file from a folder/list
For iPod/ANDROID, applicable only when
[MODE OFF]
/
[BROWSE MODE]
is
selected.
1 Press .
2 Turn the volume knob to select a folder/list, then press the knob.
3 Turn the volume knob to select a file, then press the knob.
Quick Search
(applicable only for USB and ANDROID source)
If you have many files, you can search through them quickly.
Turn the volume knob quickly to browse through the list quickly.
Skip Search
(applicable only for iPod and ANDROID source)
Press S/T to search at a preset skip search ratio.
( 9, [SKIP SEARCH])
• Pressing and holding S/T searches at a 10
%
ratio.
Alphabet search
(applicable only for iPod and ANDROID source)
You can search for a file according to the first character.
For iPod source
1 Turn the volume knob quickly to enter character search.
2 Turn the volume knob to select the character.
• Select “
*
” to search for a character other than AtoZ, 0to9.
3 Press S/T to move to the entry position.
• You can enter up to 3characters.
4 Press the volume knob to start searching.
For ANDROID source
1 Press / to enter character search.
2 Turn the volume knob to select the character.
^A^: Upper case letters (A to Z)
_A_: Lower case letters (a to z)
-0-: Numbers (0 to 9)
***
: Character other than AtoZ, 0to9
3 Press the volume knob to start searching.
• To return to the root folder/first file/top menu, press 5.
• To return to the previous setting item, press
.
• To cancel, press and hold
.
JS_KWD_KMM_204_EN_EN_1.indd 8JS_KWD_KMM_204_EN_EN_1.indd 8 20/6/2017 9:16:10 AM20/6/2017 9:16:10 AM
ENGLISH
9
Data Size: B6L (182 mm x 128 mm)
Book Size: B6L (182 mm x 128 mm)
USB/iPod/ANDROID
Listen to TuneIn Radio/TuneIn Radio Pro/Aupeo
(for )
While listening to TuneIn Radio, TuneIn Radio Pro or Aupeo, connect the
iPod/iPhone to the USB input terminal of the unit.
• The unit will output the sound from these applications.
Other settings
1
Press the volume knob to enter
[FUNCTION]
.
2 Turn the volume knob to select an item (see the following table),
then press the knob.
3 Repeat step 2 until the desired item is selected or activated.
4 Press and hold to exit.
To return to the previous setting item, press
.
Default:
XX
USB
MUSIC DRIVE DRIVE CHANGE
:The next drive (
[DRIVE 1]
to
[DRIVE 5]
) is selected
automatically and playback starts.
Repeat steps
1
to
3
to select the following drives.
SKIP SEARCH 0.5%
/
1%
/
5%
/
10%
: While listening to iPod or ANDROID source, selects
the skip search ratio over the total files.
Preparation:
Select
[ON]
for
[BUILT-IN AUX]
in
[SOURCE SELECT]
.
( 5)
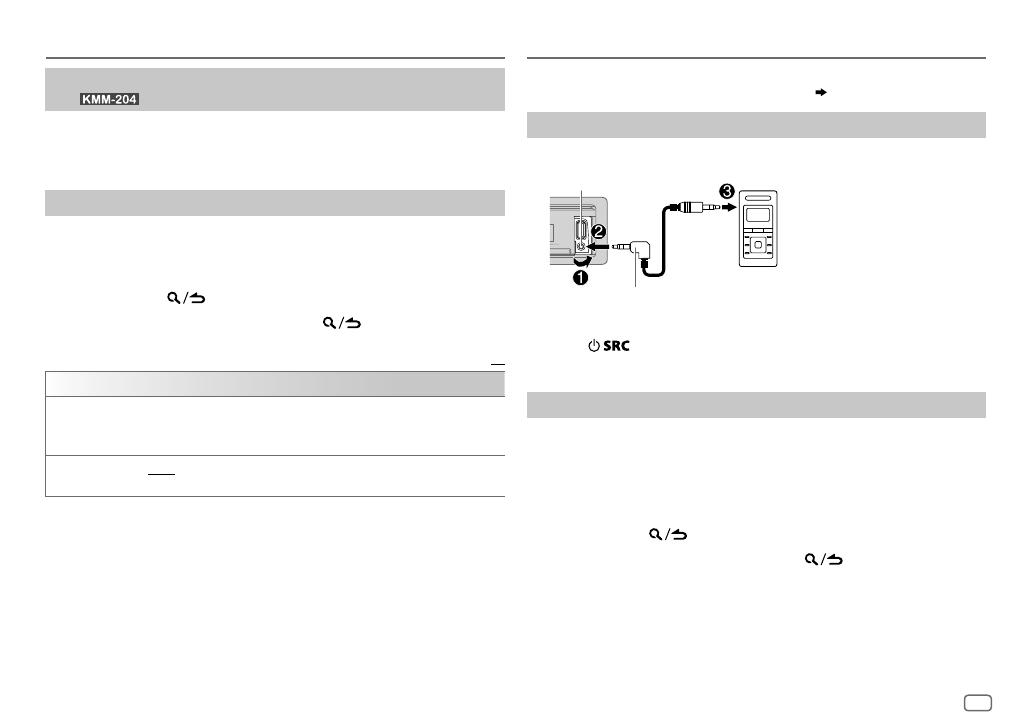
Start listening
1
Connect a portable audio player (commercially available).
2 Press repeatedly to select AUX.
3 Turn on the portable audio player and start playback.
Set the AUX name
While listening to a portable audio player connected to the unit…
1 Press the volume knob to enter
[FUNCTION]
.
2 Turn the volume knob to select
[SYSTEM]
, then press the knob.
3 Turn the volume knob to select
[AUX NAME SET]
, then press the knob.
4 Turn the volume knob to select an item, then press the knob.
AUX
(default)/
DVD
/
PORTABLE
/
GAME
/
VIDEO
/
TV
5 Press and hold to exit.
To return to the previous setting item, press
.
AUX
Auxiliary input jack
Portable audio player
3.5mm (1/8″) stereo mini plug with “L” shaped connector
(commercially available)
JS_KWD_KMM_204_EN_EN_1.indd 9JS_KWD_KMM_204_EN_EN_1.indd 9 20/6/2017 9:16:10 AM20/6/2017 9:16:10 AM
10
ENGLISH
Data Size: B6L (182 mm x 128 mm)
Book Size: B6L (182 mm x 128 mm)
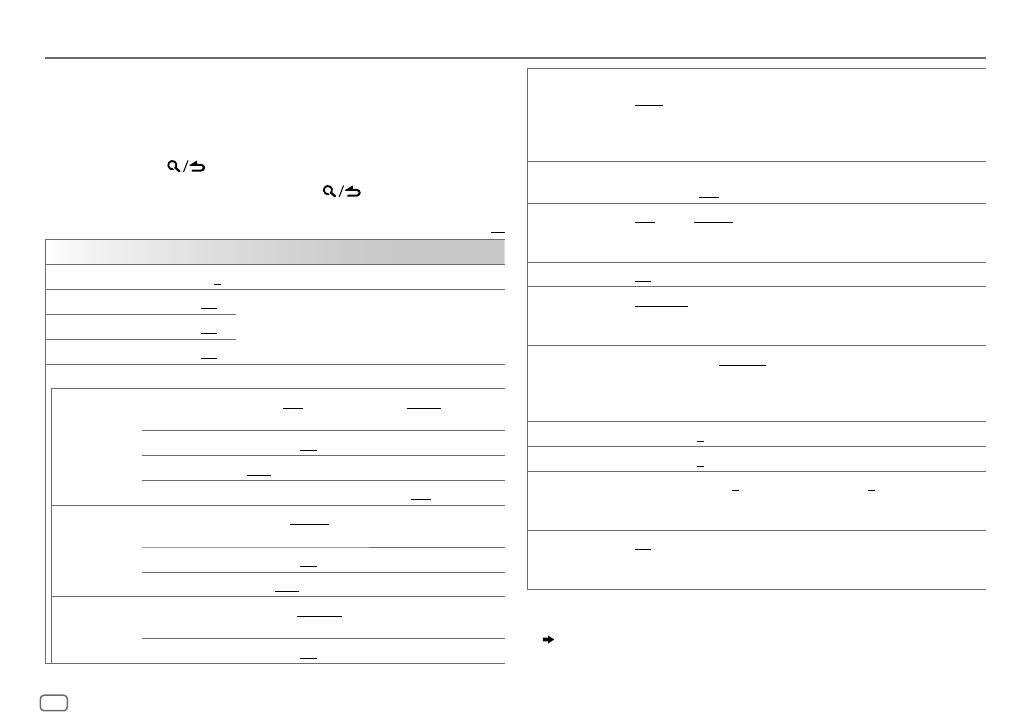
AUDIO SETTINGS
While listening to any source…
1 Press AUD to enter
[AUDIO CONTROL]
directly.
2 Turn the volume knob to select an item (see the following table),
then press the knob.
3 Repeat step 2 until the desired item is selected or activated.
4 Press and hold to exit.
To return to the previous setting item, press
.
Default:
XX
AUDIO CONTROL
SUB-W LEVEL
–15
to
+15
(
0
) Adjusts the subwoofer output level.
BASS LEVEL –8
to
+8
(
+2
)
Adjusts the level to memorize for each source.
(Before making an adjustment, select the source you
want to adjust.)
MID LEVEL –8
to
+8
(
+1
)
TRE LEVEL –8
to
+8
(
+1
)
EQ PRO
(This setting is stored to
[USER]
.)
BASS ADJUST BASS CTR FRQ 60
/
80
/
100
/
200
or
60HZ
/
80HZ
/
100HZ
/
200HZ
:
Selects the center frequency.
BASS LEVEL –8
to
+8
(
+2
):Adjusts the level.
BASS Q FACTOR 1.00
/
1.25
/
1.50
/
2.00
:Adjusts the quality factor.
BASS EXTEND ON
:Turns on the extended bass.;
OFF
:Cancels.
MID ADJUST MID CTR FRQ 0.5KHZ
/
1.0KHZ
/
1.5KHZ
/
2.5KHZ
:Selects the
center frequency.
MID LEVEL –8
to
+8
(
+1
):Adjusts the level.
MID Q FACTOR 0.75
/
1.00
/
1.25
:Adjusts the quality factor.
TRE ADJUST TRE CTR FRQ 10.0KHZ
/
12.5KHZ
/
15.0KHZ
/
17.5KHZ
:Selects the
center frequency.
TRE LEVEL –8
to
+8
(
+1
):Adjusts the level.
PRESET EQ DRIVE EQ
/
TOP40
/
POWERFUL
/
ROCK
/
POPS
/
EASY
/
JAZZ
/
NATURAL
/
USER
: Selects a preset equalizer suitable to the music genre. (Select
[USER]
to use the settings made in
[EQ PRO]
.)
[DRIVE EQ]
is a preset equalizer that reduces noise outside the car or
running noise of the tyres.
BASS BOOST LV1
/
LV2
/
LV3
or
LEVEL1
/
LEVEL2
/
LEVEL3
:Selects your preferred bass
boost level.;
OFF
:Cancels.
LOUDNESS LV1
/
LV2
or
LEVEL1
/
LEVEL2
:Selects your preferred low and high
frequencies boost to produce a well-balanced sound at a low volume
level.;
OFF
:Cancels.
SUBWOOFER SET ON
:Turns on the subwoofer output.;
OFF
:Cancels.
LPF SUBWOOFER THROUGH
:All signals are sent to the subwoofer.;
85HZ
/
120HZ
/
160HZ
:Audio signals with frequencies lower than
85Hz/120Hz/160Hz are sent to the subwoofer.
SUB-W PHASE REVERSE
(180°)/
NORMAL
(0°):Selects the phase of the subwoofer
output to be in line with the speaker output for optimum performance.
(Selectable only if a setting other than
[THROUGH]
is selected for
[LPF SUBWOOFER]
.)
FADER R15
to
F15
(
0
):Adjusts the rear and front speaker output balance.
BALANCE L15
to
R15
(
0
):Adjusts the left and right speaker output balance.
VOLUME OFFSET
For AUX:
–8
to
+8
(
0
) ; For other sources:
–8
to
0
:Preset the initial
volume level of each source. (Before adjustment, select the source you
want to adjust.)
SOUND RECNSTR
(Sound
reconstruction)
ON
:Creates realistic sound by compensating the high-frequency
components and restoring the rise-time of the waveform that are lost in
audio data compression.;
OFF
:Cancels.
•
[SUB-W LEVEL]
/
[SUBWOOFER SET]
/
[LPF SUBWOOFER]
/
[SUB-W PHASE]
is
selectable only if
[SWITCH PREOUT]
is set to
[SUB-W]
or
[SUBWOOFER]
.
( 4)
•
[SUB-W LEVEL]
/
[LPF SUBWOOFER]
/
[SUB-W PHASE]
is selectable only if
[SUBWOOFER SET]
is set to
[ON]
.
JS_KWD_KMM_204_EN_EN_3.indd 10JS_KWD_KMM_204_EN_EN_3.indd 10 22/8/2017 11:48:20 AM22/8/2017 11:48:20 AM
ENGLISH
11
Data Size: B6L (182 mm x 128 mm)
Book Size: B6L (182 mm x 128 mm)
DISPLAY SETTINGS
Default:
XX
DISPLAY
COLOR SELECT
(For )
Select color for
ALL ZONE
,
ZONE 1
and
ZONE 2
separately.
1
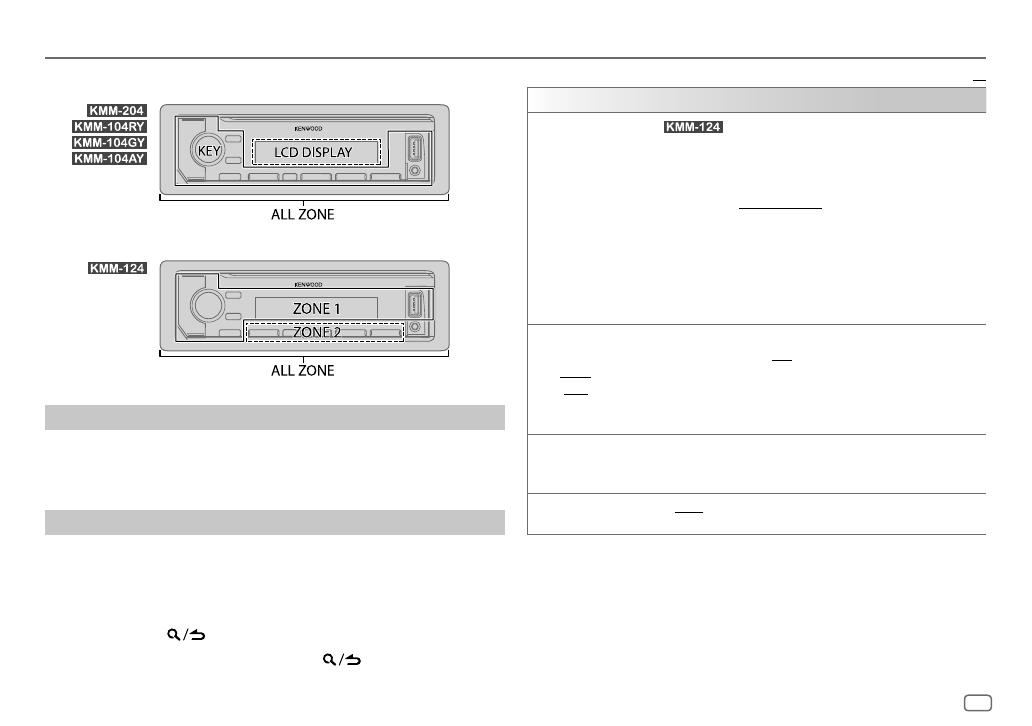
Select a zone. (See the illustration on the left column.)
2
Select a color for the selected zone.
INITIAL COLOR
/
VARIABLE SCAN
/
CUSTOM R/G/B
/preset colors
*
To make your own color, select
[CUSTOM R/G/B]
. The color you have
made will be stored in
[CUSTOM R/G/B]
.
1
Press the volume knob to enter the detailed color adjustment.
2
Press
S
/
T
to select the color (
R
/
G
/
B
) to adjust.
3
Turn the volume knob to adjust the level (
0
to
9
), then press the
knob.
DIMMER
(Default:
[ON]
:
18:00
;
[OFF]
:
6:00
)
Dim the illumination.
ON
:Dimmer is turned on.;
OFF
:Cancels.
DIMMER TIME
:Set the dimmer on and off time.
1
Turn the volume knob to adjust the
[ON]
time, then press the knob.
2
Turn the volume knob to adjust the
[OFF]
time, then press the
knob.
BRIGHTNESS
1
Select a zone. (See the illustration on the left column.)
2
0
—
31
: Select your preferred brightness level for the selected
zone.
TEXT SCROLL AUTO
/
ONCE
:Select whether to scroll the display information
automatically, or scroll only once.;
OFF
:Cancels.
*
Preset colors:
RED1
/
RED2
/
RED3
/
PURPLE1
/
PURPLE2
/
PURPLE3
/
PURPLE4
/
BLUE1
/
BLUE2
/
BLUE3
/
SKYBLUE1
/
SKYBLUE2
/
LIGHTBLUE
/
AQUA1
/
AQUA2
/
GREEN1
/
GREEN2
/
GREEN3
/
YELLOWGREEN1
/
YELLOWGREEN2
/
YELLOW
/
ORANGE1
/
ORANGE2
/
ORANGERED
Zone identification for brightness settings
Zone identification for color and brightness settings
Set the dimmer
Press and hold DISP to turn on or off the dimmer.
• If you have set
[DIMMER TIME]
, it will be canceled once you press and
hold this button.
Other settings
1
Press the volume knob to enter
[FUNCTION]
.
2 Turn the volume knob to select an item (see the following table),
then press the knob.
3 Repeat step 2 until the desired item is selected/activated or follow
the instructions stated on the selected item.
4 Press and hold to exit.
To return to the previous setting item, press
.
JS_KWD_KMM_204_EN_EN_1.indd 11JS_KWD_KMM_204_EN_EN_1.indd 11 20/6/2017 9:16:11 AM20/6/2017 9:16:11 AM
12
ENGLISH
Data Size: B6L (182 mm x 128 mm)
Book Size: B6L (182 mm x 128 mm)
TROUBLESHOOTING
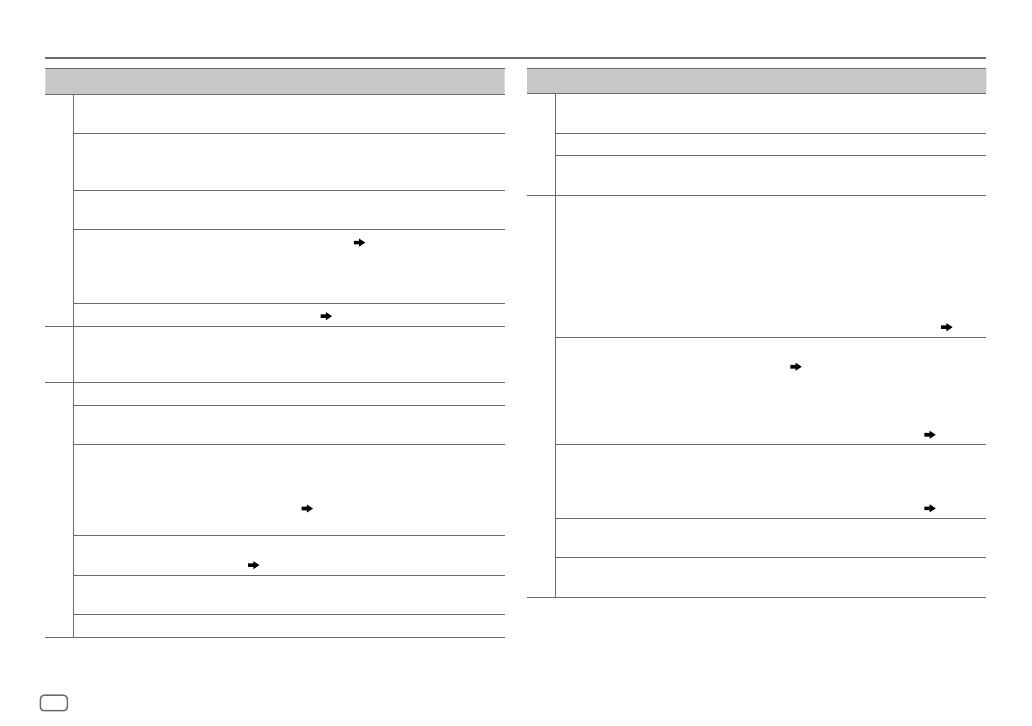
Symptom Remedy
General
Sound cannot be heard.
•
Adjust the volume to the optimum level.
•
Check the cords and connections.
“MISWIRING CHECK WIRING
THEN PWR ON” appears.
Turn the power off, then check to be sure the
terminals of the speaker wires are insulated properly.
Turn the power on again.
“PROTECTING SEND SERVICE”
appears.
Send the unit to the nearest service center.
•
Sound cannot be heard.
•
The unit does not turn on.
•
Information shown on the
display is incorrect.
Clean the connectors.
( 13)
The unit does not work at all. Reset the unit.
( 3)
Radio
•
Radio reception is poor.
•
Static noise while listening
to the radio.
Connect the antenna firmly.
USB/iPod
“READING” keeps flashing. Do not use too many hierarchical levels or folders.
Elapsed playing time is not
correct.
This is caused by how the files are recorded.
Correct characters are not
displayed (e.g. album name).
•
This unit can only display uppercase letters,
numbers, and a limited number of symbols.
•
Depending on the display language you have
selected
( 5)
, some characters may not be
displayed correctly.
“NA FILE” Make sure the media contains supported audio files.
( 13)
“NO DEVICE” Connect a USB device, and change the source to USB
again.
“COPY PRO” A copy-protected file is played.
Symptom Remedy
USB/iPod
“NA DEVICE” Connect a supported USB device, and check the
connections.
“NO MUSIC” Connect a USB device that contains playable audio files.
“iPod ERROR”
•
Reconnect the iPod.
•
Reset the iPod.
ANDROID
•
Sound cannot
be heard during
playback.
•
Sound output only
from the Android
device.
•
Reconnect the Android device.
•
If in
[HAND MODE]
, launch any media player application
on the Android device and start playback.
•
If in
[HAND MODE]
, relaunch the current media player
application or use another media player application.
•
Restart the Android device.
•
If this does not solve the problem, the connected Android
device is unable to route the audio signal to unit.
( 13)
Cannot playback at
[
BROWSE MODE
].
•
Make sure KENWOOD MUSIC PLAY APP is installed on the
Android device.
( 7)
•
Reconnect the Android device and select the appropriate
control mode.
•
If this does not solve the problem, the connected Android
device does not support
[BROWSE MODE]
.
( 13)
“NO DEVICE” or
“READING” keeps
flashing.
•
Switch off the developer options on the Android device.
•
Reconnect the Android device.
•
If this does not solve the problem, the connected Android
device does not support
[BROWSE MODE]
.
( 13)
Playback is intermittent
or sound skips.
Turn off the power saving mode on the Android device.
“ANDROID ERROR”/
“NADEVICE”
•
Reconnect the Android device.
•
Restart the Android device.
JS_KWD_KMM_204_EN_EN_1.indd 12JS_KWD_KMM_204_EN_EN_1.indd 12 20/6/2017 9:16:11 AM20/6/2017 9:16:11 AM
ENGLISH
13
Data Size: B6L (182 mm x 128 mm)
Book Size: B6L (182 mm x 128 mm)
REFERENCES
Maintenance
Cleaning the unit
Wipe off dirt on the faceplate with a dry silicone or soft cloth.
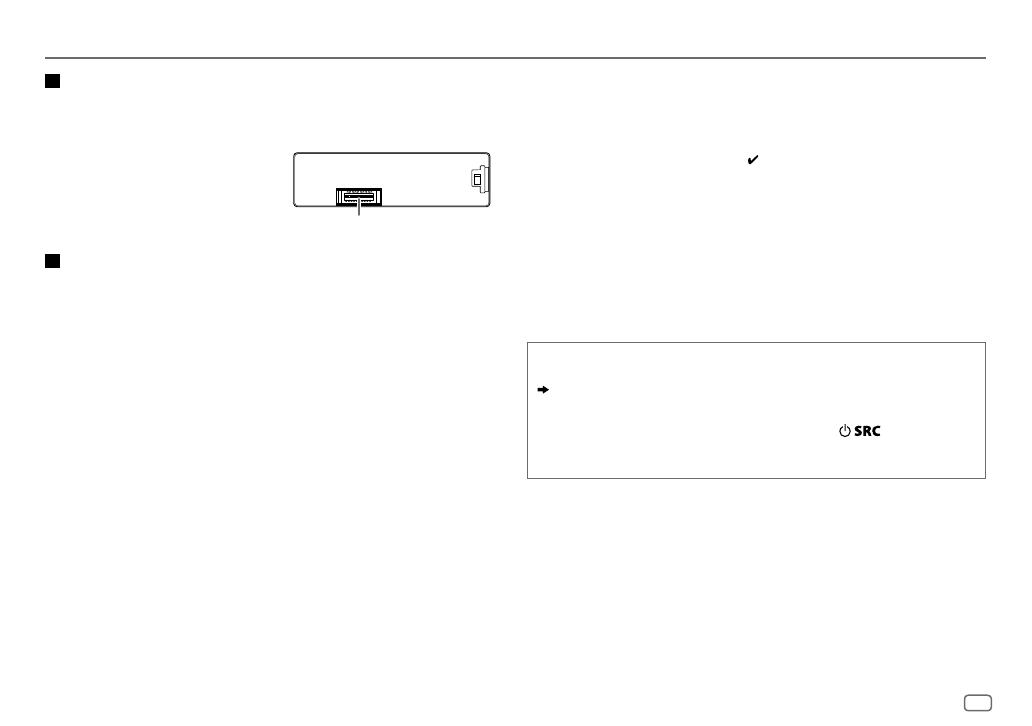
Cleaning the connector
Detach the faceplate and clean the connector
gently with a cotton swab, being careful not to
damage the connector.
More information
For: – Latest firmware updates and latest compatible item list
– Any other latest information
Visit <www.kenwood.com/cs/ce/>.
Playable files
•
Playable audio file for USB mass storage class device: MP3 (.mp3), WMA (.wma),
WAV (.wav), FLAC (.flac)
•
Playable USB device file system: FAT12, FAT16, FAT32
Even when audio files comply with the standards listed above, playback may be impossible
depending on the types or conditions of media or device.
•
For detailed information and notes about the playable audio files, visit
<www.kenwood.com/cs/ce/audiofiles>.
About USB devices
•
You cannot connect a USB device via a USB hub.
•
Connecting a cable whose total length is longer than 5m may result in abnormal playback.
•
This unit cannot recognize a USB device whose rating is other than 5V and exceeds 1A.
Connector (on the reverse
side of the faceplate)
About iPod/iPhone
Made for
–
iPod touch (5th, and 6th generation)
–
iPod nano (7th generation)
–
iPhone 4S, 5, 5S, 5C, 6, 6 Plus, 6S, 6S Plus, SE, 7, 7 Plus
•
You cannot operate iPod if “KENWOOD” or “ ” is displayed on iPod.
•
Depending on the version of the operating system of the iPod/iPhone, some functions may
not operate on this unit.
About Android device
•
This unit supports Android OS 4.1 and above.
•
Some Android devices (with OS 4.1 and above) may not fully support Android Open Accessory
(AOA) 2.0.
•
If the Android device supports both mass storage class device and AOA 2.0, this unit always
playback via AOA 2.0 as priority.
Muting upon the reception of a phone call
Connect the MUTE wire to your telephone using a commercial telephone accessory.
( 16)
When a call comes in, “CALL” appears.
(The audio system pauses.)
•
To continue listening to the audio system during a call, press . “CALL” disappears
and the audio system resumes.
When the call ends, “CALL” disappears.
(The audio system resumes.)
JS_KWD_KMM_204_EN_EN_3.indd 13JS_KWD_KMM_204_EN_EN_3.indd 13 7/8/2017 11:45:33 AM7/8/2017 11:45:33 AM
14
ENGLISH
Data Size: B6L (182 mm x 128 mm)
Book Size: B6L (182 mm x 128 mm)
REFERENCES
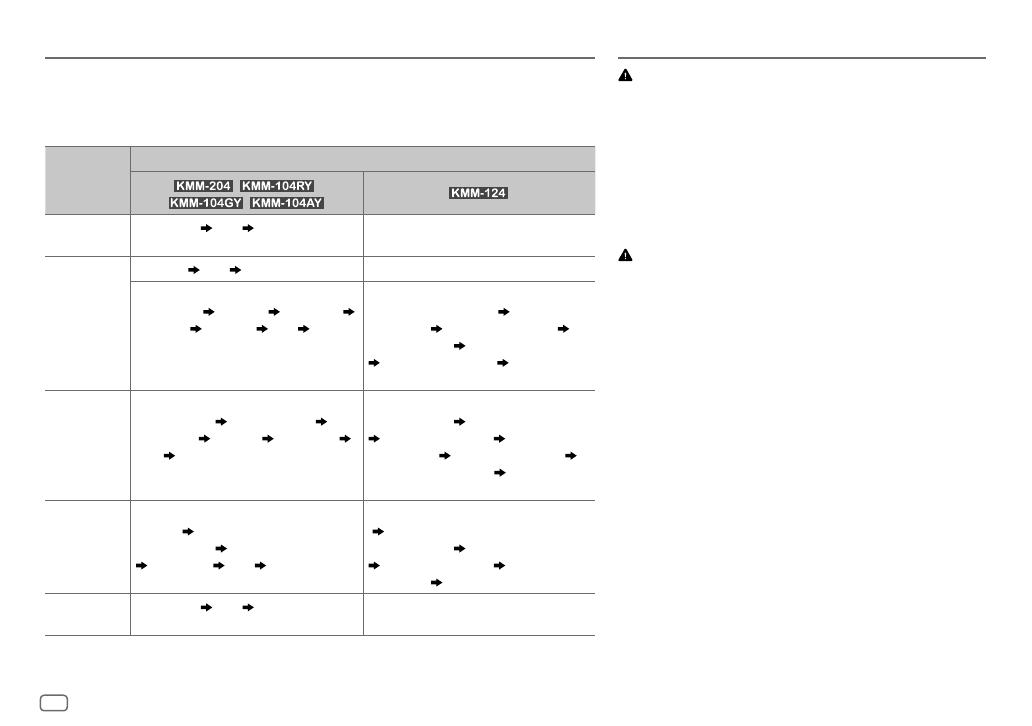
Change the display information
Each time you press
DISP
, the display information changes.
•
If the information is unavailable or not recorded, “NO TEXT”, “NO INFO”, or other information (eg. station name,
playing time) appears.
Source name
Display information
/ /
/
STANDBY Source name Clock (back to the
beginning)
Source name (Date/Clock)
RADIO Frequency
Clock (back to the beginning) Frequency (Date/Clock)
(For FM Radio Data System stations only)
Station name Radio text Radio text+
Title/Artist
Frequency Clock (back to
the beginning)
(For FM Radio Data System stations only)
Station name (Date/Clock) Radio text
(Date/Clock)
Radio text+ (R.TEXT+)
Song title (Artist)
Song title (Date/Clock)
Frequency (Date/Clock) (back to the
beginning)
USB
(For MP3/WMA/WAV/FLAC files)
Song title/Artist Album title/artist
Folder name
File name Playing time
Clock
(back to the beginning)
(For MP3/WMA/WAV/FLAC files)
Song title (Artist) Song title (Album title)
Song title (Date/Clock) File name
(Folder name)
File name (Date/Clock)
Playing time (Date/Clock)
(back to the
beginning)
iPod or
ANDROID
When
[MODE OFF]
/
[BROWSE MODE]
is
selected
( 8):
Song title/Artist Album title/Artist
Playing time Clock (back to the
beginning)
When
[BROWSE MODE]
is selected
( 9)
:
Song title (Artist)
Song title (Album name)
Song title (Date/Clock) Playing time
(Date/Clock)
(back to the beginning)
AUX Source name
Clock (back to the
beginning)
Source name (Date/Clock)
Warning
•
The unit can only be used with a 12V DC power supply, negative ground.
•
Disconnect the battery’s negative terminal before wiring and mounting.
•
Do not connect Battery wire (yellow) and Ignition wire (red) to the car
chassis or Ground wire (black) to prevent a short circuit.
•
To prevent short circuit:
–
Insulate unconnected wires with vinyl tape.
–
Be sure to ground this unit to the car’s chassis again after installation.
–
Secure the wires with cable clamps and wrap vinyl tape around the
wires that come into contact with metal parts to protect the wires.
Caution
•
For safety’s sake, leave wiring and mounting to professionals. Consult the
car audio dealer.
•
Install this unit in the console of your vehicle. Do not touch the metal
parts of this unit during and shortly after use of the unit. Metal parts such
as the heat sink and enclosure become hot.
•
Do not connect the
[
wires of speakers to the car chassis or Ground wire
(black), or connect them in parallel.
•
Mount the unit at an angle of less than 30º.
•
If your vehicle wiring harness does not have the ignition terminal,
connect Ignition wire (red) to the terminal on the vehicle’s fuse box which
provides 12V DC power supply and is turned on and off by the ignition
key.
•
Keep all cables away from heat dissipate metal parts.
•
After the unit is installed, check whether the brake lamps, blinkers,
wipers, etc. on the car are working properly.
•
If the fuse blows, first make sure the wires are not touching car’s chassis,
then replace the old fuse with one that has the same rating.
INSTALLATION/CONNECTION
JS_KWD_KMM_204_EN_EN_1.indd 14JS_KWD_KMM_204_EN_EN_1.indd 14 20/6/2017 9:16:11 AM20/6/2017 9:16:11 AM
ENGLISH
15
Data Size: B6L (182 mm x 128 mm)
Book Size: B6L (182 mm x 128 mm)
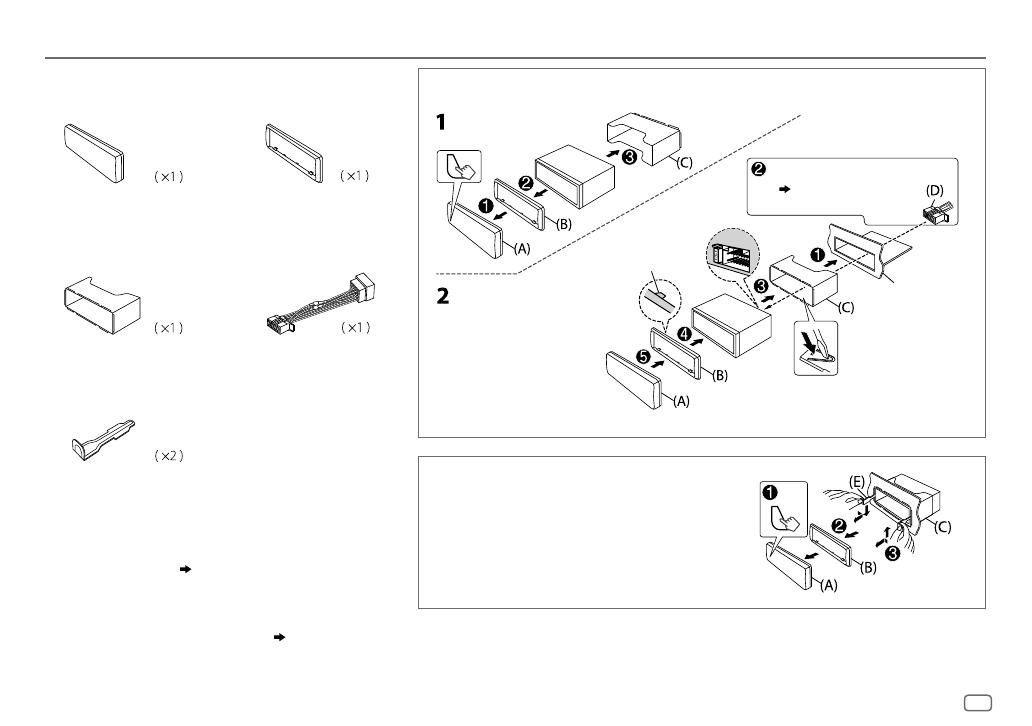
Do the required wiring.
( 16)
Dashboard of
your car
Bend the appropriate tabs to hold the
mounting sleeve firmly in place.
How to remove the unit
1
Detach the faceplate.
2
Remove the trim plate.
3
Insert the extraction keys deeply into the
slots on each side, then follow the arrows as
shown on the illustration.
Installing the unit (in-dash mounting)
Hook on the top side
Orientate the trim plate as
illustrated before fitting.
INSTALLATION/CONNECTION
(A)
Faceplate
(C)
Mounting sleeve
(B)
Trim plate
(D)
Wiring harness
(E)
Extraction key
Part list for installation
Basic procedure
1
Remove the key from the ignition switch, then disconnect the
[
terminal of the car battery.
2
Connect the wires properly.
See Wiring connection.
( 16)
3
Install the unit to your car.
See Installing the unit (in-dash mounting).
4
Connect the
[
terminal of the car battery.
5
Detach the faceplate and reset the unit.
( 3)
JS_KWD_KMM_204_EN_EN_1.indd 15JS_KWD_KMM_204_EN_EN_1.indd 15 20/6/2017 9:16:12 AM20/6/2017 9:16:12 AM
16
ENGLISH
Data Size: B6L (182 mm x 128 mm)
Book Size: B6L (182 mm x 128 mm)
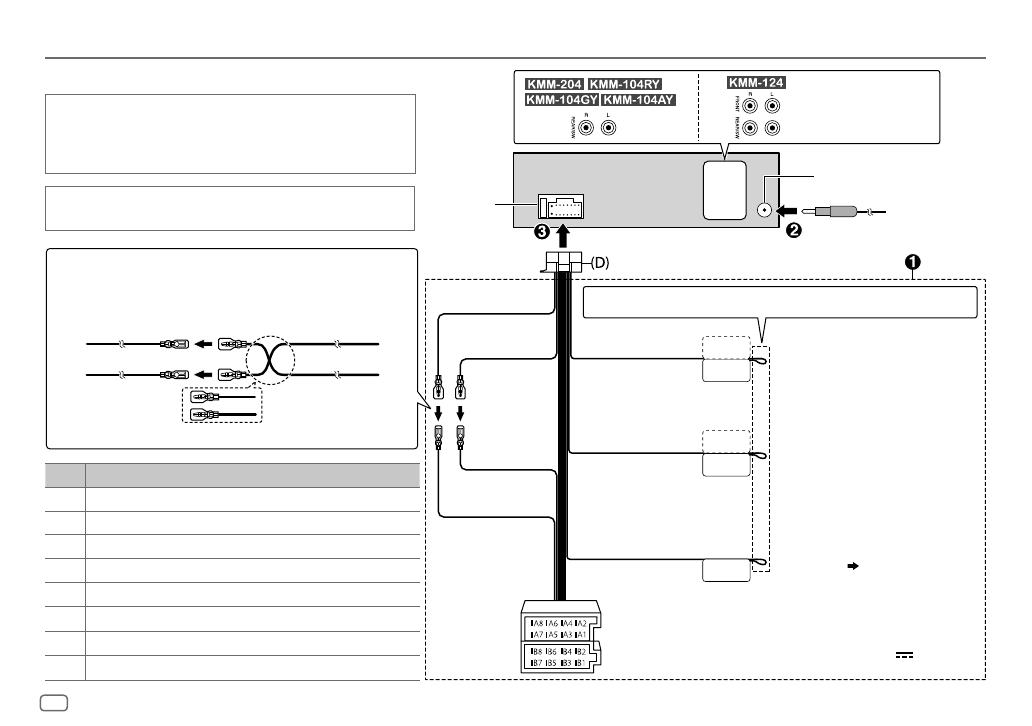
REMOTE CONT
STEERING WHEEL
REMOTE INPUT
P. CONT
ANT CONT
MUTE
INSTALLATION/CONNECTION
Fuse (10A)
Antenna terminal
Output terminals
Blue/White*
2
(Power control wire/
Antenna control wire)
Light blue/yellow
(Steering remote
control wire)
To the power control terminal when
using the optional power amplifier or
to the antenna control terminal in the
vehicle
Brown
(Mute control wire)
To the terminal that is grounded
when the telephone rings or during
conversation.
( 13)
(To connect the Kenwood navigation
system, refer your navigation manual.)
If no connections are made, do not let the wire come out from the tab.
To the steering wheel remote control
adapter
When connecting to an external amplifier, connect its ground wire to the
car’s chassis to avoid damaging the unit.
Pin
Color and function (for ISO connectors)
A4 Yellow
:
Battery
A5 Blue/White*
1
:
Power control
A7 Red
:
Ignition (ACC)
A8 Black
:
Earth (ground) connection
B1/B2
Purple
]
/Purple/black
[
:
Rear speaker (right)
B3/B4
Gray
]
/Gray/black
[
:
Front speaker (right)
B5/B6
White
]
/White/black
[
:
Front speaker (left)
B7/B8
Green
]
/Green/black
[
:
Rear speaker (left)
If your car does not have an ISO terminal:
We recommend installing the unit with a commercially available custom
wiring harness specific for your car and leave this job to professionals for
your safety. Consult your car audio dealer.
Connecting the ISO connectors on some VW/Audi or Opel
(Vauxhall) automobiles
You may need to modify the wiring of the supplied wiring harness as
illustrated below.
UnitVehicle
A7 (Red) Ignition wire (Red)
A4 (Yellow)
Default wiring
Battery wire (Yellow)
Yellow (A4)
Red (Ignition wire)
Red (A7)
Yellow (Battery wire)
ISO connectors
Wiring connection
NOTE: Total output for Blue/White wire (*
1
) + (*
2
) is 12V 350mA
JS_KWD_KMM_204_EN_EN_1.indd 16JS_KWD_KMM_204_EN_EN_1.indd 16 20/6/2017 9:16:12 AM20/6/2017 9:16:12 AM
Data Size: B6L (182 mm x 128 mm)
Book Size: B6L (182 mm x 128 mm)
B5A-2103-00 (EN/E2N)© 2017 JVC KENWOOD Corporation
KMM-204
KMM-124
KMM-104RY
DIGITAL MEDIA RECEIVER
INSTRUCTION MANUAL
ЦИФРОВОЙ МЕДИА-РЕСИВЕР
ИHCTPУKЦИЯ ПO ЭKCПЛУATAЦИИ
KMM-104GY
KMM-104AY
JS_KWD_KMM_204_EN_C00.indd 1JS_KWD_KMM_204_EN_C00.indd 1 20/6/2017 9:01:17 AM20/6/2017 9:01:17 AM
i
Data Size: B6L (182 mm x 128 mm)
Book Size: B6L (182 mm x 128 mm)
For Israel
Дата изготовления (месяц/год) находится на этикетке устройства.
В соответствии с Законом Российской Федерации “О защите прав потребителей” срок
службы (годности) данного товара “по истечении которого он может представлять
опасность для жизни, здоровья потребителя, причинять вред его имуществу или
окружающей среде” составляет семь (7) лет со дня производства.
Дополнительные косметические материалы к данному товару, поставляемые вместе с
ним, могут храниться в течение двух (2) лет со дня его производства.
Срок службы (годности), кроме срока хранения дополнительных косметических
материалов, упомянутых в предыдущих двух пунктах, не затрагивает никаких других
прав потребителя, в частности, гарантийного обслуживания KENWOOD, которое он может
получить в соответствии с законом о правах потребителя или других законов, связанных
с ним.
Условия хранения:
Температура : от -30°C до +85°C
Влажность : от 0% до 90%
Information on Disposal of Old Electrical and Electronic Equipment and Batteries
(applicable for countries that have adopted separate waste collection systems)
Products and batteries with the symbol (crossed-out wheeled bin) cannot be disposed as
household waste.
Old electrical and electronic equipment and batteries should be recycled at a facility capable of
handling these items and their waste byproducts.
Contact your local authority for details in locating a recycle facility nearest to you. Proper
recycling and waste disposal will help conserve resources whilst preventing detrimental effects
on our health and the environment.
Notice: The sign “Pb” below the symbol for batteries indicates that this battery contains lead.
For Turkey
Bu ürün 28300 sayılı Resmi Gazete’de yayımlanan Atik Elektrikli ve Elektronik Eşyalarin
Kontrolü Yönetmeliğe uygun olarak üretilmiştir.
Eski Elektrik ve Elektronik Ekipmanların İmha Edilmesi Hakkında Bilgi (atık yan ürün
toplama sistemlerini kullanan ülkeleri için uygulanabilir)
Sembollü (üzerinde çarpı işareti olan çöp kutusu) ürünler ev atıkları olarak
atılamaz.
Eski elektrik ve elektronik ekipmanlar, bu ürünleri ve ürün atıklarını geri
dönüştürebilecek bir tesiste değerlendirilmelidir. Yaşadığınız bölgeye
en yakın geri dönüşüm tesisinin yerini öğrenmek için yerel makamlara
müracaat edin. Uygun geri dönüşüm ve atık imha yöntemi sağlığımız ve
çevremiz üzerindeki zararlı etkileri önlerken kaynakların korunmasına da
yardımcı olacaktır.
JS_KWD_KMM_204_EN_C00.indd iJS_KWD_KMM_204_EN_C00.indd i 20/6/2017 9:27:48 AM20/6/2017 9:27:48 AM
ii
Data Size: B6L (182 mm x 128 mm)
Book Size: B6L (182 mm x 128 mm)
• Microsoft and Windows Media are either registered trademarks or trademarks of Microsoft
Corporation in the United States and/or other countries.
• “Made for iPod,” and “Made for iPhone” mean that an electronic accessory has been designed to
connect specifically to iPod, or iPhone, respectively, and has been certified by the developer to
meet Apple performance standards. Apple is not responsible for the operation of this device or its
compliance with safety and regulatory standards. Please note that the use of this accessory with iPod
or iPhone may affect wireless performance.
• iPhone, iPod, iPod classic, iPod nano, and iPod touch are trademarks of Apple Inc., registered in the
U.S. and other countries.
• Lightning is a trademark of Apple Inc.
• Android is trademark of Google Inc.
libFLAC
Copyright (C) 2000-2009 Josh Coalson
Copyright (C) 2011-2013 Xiph.Org Foundation
Redistribution and use in source and binary forms, with or without modification, are permitted provided
that the following conditions are met:
— Redistributions of source code must retain the above copyright notice, this list of conditions and the
following disclaimer.
— Redistributions in binary form must reproduce the above copyright notice, this list of conditions and
the following disclaimer in the documentation and/or other materials provided with the distribution.
— Neither the name of the Xiph.org Foundation nor the names of its contributors may be used to
endorse or promote products derived from this software without specific prior written permission.
THIS SOFTWARE IS PROVIDED BY THE COPYRIGHT HOLDERS AND CONTRIBUTORS “AS IS” AND ANY
EXPRESS OR IMPLIED WARRANTIES, INCLUDING, BUT NOT LIMITED TO, THE IMPLIED WARRANTIES OF
MERCHANTABILITY AND FITNESS FOR A PARTICULAR PURPOSE ARE DISCLAIMED. IN NO EVENT SHALL
THE FOUNDATION OR CONTRIBUTORS BE LIABLE FOR ANY DIRECT, INDIRECT, INCIDENTAL, SPECIAL,
EXEMPLARY, OR CONSEQUENTIAL DAMAGES (INCLUDING, BUT NOT LIMITED TO, PROCUREMENT OF
SUBSTITUTE GOODS OR SERVICES; LOSS OF USE, DATA, OR PROFITS; OR BUSINESS INTERRUPTION)
HOWEVER CAUSED AND ON ANY THEORY OF LIABILITY, WHETHER IN CONTRACT, STRICT LIABILITY,
OR TORT (INCLUDING NEGLIGENCE OR OTHERWISE) ARISING IN ANY WAY OUT OF THE USE OF THIS
SOFTWARE, EVEN IF ADVISED OF THE POSSIBILITY OF SUCH DAMAGE.
JS_KWD_KMM_204_EN_C00.indd iiJS_KWD_KMM_204_EN_C00.indd ii 20/6/2017 9:27:49 AM20/6/2017 9:27:49 AM
iii
Data Size: B6L (182 mm x 128 mm)
Book Size: B6L (182 mm x 128 mm)
Declaration of Conformity with regard to the RE Directive 2014/53/EU
Declaration of Conformity with regard to the RoHS Directive 2011/65/EU
Manufacturer:
JVC KENWOOD Corporation
3-12, Moriya-cho, Kanagawa-ku, Yokohama-shi, Kanagawa, 221-0022, JAPAN
EU Representative:
JVCKENWOOD Europe B.V.
Amsterdamseweg 37, 1422 AC UITHOORN, THE NETHERLANDS
Декларация соответствия относительно Директивы RE 2014/53/EU
Декларация соответствия относительно Директивы RoHS 2011/65/EU
Производитель:
JVC KENWOOD Corporation
3-12, Moriya-cho, Kanagawa-ku, Yokohama-shi, Kanagawa, 221-0022, ЯПОНИЯ
Представительство в EC:
JVCKENWOOD Europe B.V.
Amsterdamseweg 37, 1422 AC UITHOORN, НИДЕРЛАНДЫ
English
Hereby, JVCKENWOOD declares that the radio equipment
“KMM-204/KMM-124/KMM-104RY/KMM-104GY/
KMM-104AY” is in compliance with Directive 2014/53/EU.
The full text of the EU declaration of conformity is available
at the following internet address:
http://www.kenwood.com/cs/ce/eudoc/
Français
Par la présente, JVCKENWOOD déclare que l’équipement
radio « KMM-204/KMM-124/KMM-104RY/KMM-104GY/
KMM-104AY » est conforme à la directive 2014/53/UE.
L’intégralité de la déclaration de conformité UE est
disponible à l’adresse Internet suivante :
http://www.kenwood.com/cs/ce/eudoc/
Deutsch
Hiermit erklärt JVCKENWOOD, dass das Funkgerät
“KMM-204/KMM-124/KMM-104RY/KMM-104GY/
KMM-104AY” der Richtlinie 2014/53/EU entspricht.
Der volle Text der EU-Konformitätserklärung steht unter
der folgenden Internetadresse zur Verfügung:
http://www.kenwood.com/cs/ce/eudoc/
Nederlands
Hierbij verklaart JVCKENWOOD dat de radioapparatuur
“KMM-204/KMM-124/KMM-104RY/KMM-104GY/
KMM-104AY” in overeenstemming is met Richtlijn
2014/53/EU.
De volledige tekst van de EU-verklaring van
overeenstemming is te vinden op het volgende
internetadres:
http://www.kenwood.com/cs/ce/eudoc/
Italiano
Con la presente, JVCKENWOOD dichiara che l΄apparecchio
radio “KMM-204/KMM-124/KMM-104RY/KMM-104GY/
KMM-104AY” è conforme alla Direttiva 2014/53/UE.
Il testo integrale della dichiarazione di conformità UE è
disponibile al seguente indirizzo internet:
http://www.kenwood.com/cs/ce/eudoc/
Español
Por la presente, JVCKENWOOD declara que el equipo de
radio “KMM-204/KMM-124/KMM-104RY/KMM-104GY/
KMM-104AY” cumple la Directiva 2014/53/EU.
El texto completo de la declaración de conformidad con la
UE está disponible en la siguiente dirección de internet:
http://www.kenwood.com/cs/ce/eudoc/
Português
Deste modo, a JVCKENWOOD declara que o equipamento
de rádio “KMM-204/KMM-124/KMM-104RY/KMM-104GY/
KMM-104AY” está em conformidade com a Diretiva
2014/53/UE.
O texto integral da declaração de conformidade da UE está
disponível no seguinte endereço de internet:
http://www.kenwood.com/cs/ce/eudoc/
Polska
Niniejszym, JVCKENWOOD deklaruje, że sprzęt radiowy
“KMM-204/KMM-124/KMM-104RY/KMM-104GY/
KMM-104AY” jest zgodny z dyrektywą 2014/53/UE.
Pełny tekst deklaracji zgodności EU jest dostępny pod
adresem:
http://www.kenwood.com/cs/ce/eudoc/
Český
Společnost JVCKENWOOD tímto prohlašuje, že rádiové
zařízení “KMM-204/KMM-124/KMM-104RY/KMM-104GY/
KMM-104AY” splňuje podmínky směrnice 2014/53/EU.
Plný text EU prohlášení o shodě je dostupný na následující
internetové adrese:
http://www.kenwood.com/cs/ce/eudoc/
Magyar
JVCKENWOOD ezennel kijelenti, hogy a „KMM-204/
KMM-124/KMM-104RY/KMM-104GY/KMM-104AY“
rádióberendezés megfelel a 2014/53/EU irányelvnek.
Az EU konformitási nyilatkozat teljes szövege az alábbi
weboldalon érhető el:
http://www.kenwood.com/cs/ce/eudoc/
JS_KWD_KMM_204_EN_C00.indd iiiJS_KWD_KMM_204_EN_C00.indd iii 20/6/2017 9:01:17 AM20/6/2017 9:01:17 AM
iv
Data Size: B6L (182 mm x 128 mm)
Book Size: B6L (182 mm x 128 mm)
Svenska
Härmed försäkrar JVCKENWOOD att
radioutrustningen “KMM-204/KMM-124/
KMM-104RY/KMM-104GY/KMM-104AY” är i
enlighet med direktiv 2014/53/EU.
Den fullständiga texten av EU-försäkran
om överensstämmelse finns på följande
Internetadress:
http://www.kenwood.com/cs/ce/eudoc/
Suomi
JVCKENWOOD julistaa täten, että radiolaite
“KMM-204/KMM-124/KMM-104RY/KMM-104GY/
KMM-104AY” on direktiivin 2014/53/EU
mukainen.
EU-vaatimustenmukaisuusvakuutusvaatimus
löytyy kokonaisuudessaan seuraavasta internet-
osoitteesta:
http://www.kenwood.com/cs/ce/eudoc/
Slovensko
S tem JVCKENWOOD izjavlja, da je radijska oprema
» KMM-204/KMM-124/KMM-104RY/KMM-104GY/
KMM-104AY « v skladu z Direktivo 2014/53/EU.
Celotno besedilo direktive EU o skladnosti je
dostopno na tem spletnem naslovu:
http://www.kenwood.com/cs/ce/eudoc/
Slovensky
Spoločnosť JVCKENWOOD týmto vyhlasuje,
že rádiové zariadenie „KMM-204/KMM-124/
KMM-104RY/KMM-104GY/KMM-104AY“ vyhovuje
smernici 2014/53/EÚ.
Celý text EÚ vyhlásenia o zhode nájdete na
nasledovnej internetovej adrese:
http://www.kenwood.com/cs/ce/eudoc/
Dansk
Herved erklærer JVCKENWOOD, at radioudstyret
“KMM-204/KMM-124/KMM-104RY/KMM-104GY/
KMM-104AY” er i overensstemmelse med Direktiv
2014/53/EU.
EU-overensstemmelseserklæringens fulde ordlyd
er tilgængelig på følgende internetadresse:
http://www.kenwood.com/cs/ce/eudoc/
Ελληνικά
Με το παρόν, η JVCKENWOOD δηλώνει ότι
ο ραδιοεξοπλισμός «KMM-204/KMM-124/
KMM-104RY/KMM-104GY/KMM-104AY»
συμμορφώνεται με την Οδηγία 2014/53/ΕΕ.
Το πλήρες κείμενο της δήλωσης συμμόρφωσης
της ΕΕ είναι διαθέσιμο στην ακόλουθη διεύθυνση
στο διαδίκτυο:
http://www.kenwood.com/cs/ce/eudoc/
Eesti
Käesolevaga JVCKENWOOD kinnitab, et
„KMM-204/KMM-124/KMM-104RY/KMM-104GY/
KMM-104AY“ raadiovarustus on vastavuses
direktiiviga 2014/53/EL.
ELi vastavusdeklaratsiooni terviktekst on
kättesaadav järgmisel internetiaadressil:
http://www.kenwood.com/cs/ce/eudoc/
Latviešu
JVCKENWOOD ar šo deklarē, ka radio aparatūra
„KMM-204/KMM-124/KMM-104RY/KMM-104GY/
KMM-104AY” atbilst direktīvas 2014/53/ES
prasībām.
Pilns ES atbilstības deklarācijas teksts ir pieejams
šādā tīmekļa adresē:
http://www.kenwood.com/cs/ce/eudoc/
Lietuviškai
Šiuo JVCKENWOOD pažymi, kad radijo įranga
„KMM-204/KMM-124/KMM-104RY/KMM-104GY/
KMM-104AY“ atitinka 2014/53/EB direktyvos
reikalavimus.
Visą EB direktyvos atitikties deklaracijos tekstą
galite rasti šiuo internetiniu adresu:
http://www.kenwood.com/cs/ce/eudoc/
Malti
B’dan, JVCKENWOOD jiddikjara li t-tagħmir
tar-radju “KMM-204/KMM-124/KMM-104RY/
KMM-104GY/KMM-104AY” huwa konformi mad-
Direttiva 2014/53/UE.
It-test kollu tad-dikjarazzjoni ta’ konformità huwa
disponibbli fl-indirizz intranet li ġej:
http://www.kenwood.com/cs/ce/eudoc/
HRVATSKI / SRPSKI JEZIK
JVCKENWOOD ovim izjavljuje da je radio oprema
“KMM-204/KMM-124/KMM-104RY/KMM-104GY/
KMM-104AY” u skladu s Direktivom 2014/53/EU.
Cjeloviti tekst deklaracije Europske unije o
usklađenosti dostupan je na sljedećoj internet
adresi:
http://www.kenwood.com/cs/ce/eudoc/
ROMÂNĂ
Prin prezenta, JVCKENWOOD declară că
echipamentul radio “KMM-204/KMM-124/
KMM-104RY/KMM-104GY/KMM-104AY” este în
conformitate cu Directiva 2014/53/UE.
Textul integral al declarației de conformitate UE
este disponibil la urmatoarea adresă de internet:
http://www.kenwood.com/cs/ce/eudoc/
БЪЛГАРСКИ
С настоящото JVCKENWOOD декларира, че
радиооборудването на “KMM-204/KMM-124/
KMM-104RY/KMM-104GY/KMM-104AY” е в
съответствие с Директива 2014/53/ЕС.
Пълният текст на ЕС декларацията за
съответствие е достъпен на следния интернет
адрес:
http://www.kenwood.com/cs/ce/eudoc/
Turkish
Burada, JVCKENWOOD “KMM-204/KMM-124/
KMM-104RY/KMM-104GY/KMM-104AY” radyo
ekipmanının 2014/53/AB Direktifine uygun
olduğunu bildirir.
AB uyumluluk deklarasyonunun tam metni
aşağıdaki internet adresinde mevcuttur.
http://www.kenwood.com/cs/ce/eudoc/
Русский
JVCKENWOOD настоящим заявляет, что
радиооборудование «KMM-204/KMM-124/
KMM-104RY/KMM-104GY/KMM-104AY»
соответствует Директиве 2014/53/EU.
Полный текст декларации соответствия
ЕС доступен по следующему адресу в сети
Интернет:
http://www.kenwood.com/cs/ce/eudoc/
Українська
Таким чином, компанія JVCKENWOOD заявляє,
що радіообладнання «KMM-204/KMM-124/
KMM-104RY/KMM-104GY/KMM-104AY»
відповідає Директиві 2014/53/EU.
Повний текст декларації про відповідність ЄС
можна знайти в Інтернеті за такою адресою:
http://www.kenwood.com/cs/ce/eudoc/
JS_KWD_KMM_204_EN_C00.indd ivJS_KWD_KMM_204_EN_C00.indd iv 20/6/2017 9:01:17 AM20/6/2017 9:01:17 AM
Data Size: B6L (182 mm x 128 mm)
Book Size: B6L (182 mm x 128 mm)
2
ENGLISH
CONTENTS BEFORE USE
IMPORTANT
•
To ensure proper use, please read through this manual before using this product. It is especially important that you read and observe
Warning and Caution in this manual.
•
Please keep the manual in a safe and accessible place for future reference.
WARNING
•
Do not operate any function that takes your attention away from safe driving.
Caution
Volume setting:
•
Adjust the volume so that you can hear sounds outside the car to prevent accidents.
•
Lower the volume before playing digital sources to avoid damaging the speakers by the sudden increase of the output level.
General:
•
Avoid using the external device if it might hinder safe driving.
•
Make sure all important data has been backed up. We shall bear no responsibility for any loss of recorded data.
•
Never put or leave any metallic objects (such as coins or metal tools) inside the unit, to prevent a short circuit.
•
Depending on the types of cars, the antenna will automatically extend when you turn on the unit with the antenna control wire connected
( 16)
. Turn off the unit or change the source to STANDBY when parking at a low ceiling area.
How to read this manual
•
Operations are explained mainly using buttons on the faceplate of .
•
English indications are used for the purpose of explanation. You can select the display language from the
[FUNCTION]
menu.
( 5)
•
[XX]
indicates the selected items.
•
( XX)
indicates references are available on the stated page.
BEFORE USE 2
BASICS 3
GETTING STARTED 4
1 Select the display language
and cancel the demonstration
2 Set the clock and date
3 Set the initial settings
RADIO 5
USB/iPod/ANDROID 7
AUX 9
AUDIO SETTINGS 10
DISPLAY SETTINGS 11
TROUBLESHOOTING 12
REFERENCES 13
Maintenance
More information
INSTALLATION/
CONNECTION 14
SPECIFICATIONS 17
JS_KWD_KMM_204_EN_EN_1.indd 2JS_KWD_KMM_204_EN_EN_1.indd 2 20/6/2017 9:16:08 AM20/6/2017 9:16:08 AM
ENGLISH
3
Data Size: B6L (182 mm x 128 mm)
Book Size: B6L (182 mm x 128 mm)
BASICS
To On the faceplate
Turn on the power
Press
.
• Press and hold to turn off the power.
Adjust the volume Turn the volume knob.
Select a source
Press
repeatedly.
Change the display information Press DISP repeatedly.
( 14)
Faceplate
How to reset
Attach
Detach
Display window
Your preset adjustments
will be erased except
stored radio stations.
Volume knob
Detach button
Flashes when the unit enters searching status.
JS_KWD_KMM_204_EN_EN_1.indd 3JS_KWD_KMM_204_EN_EN_1.indd 3 20/6/2017 9:16:09 AM20/6/2017 9:16:09 AM
4
ENGLISH
Data Size: B6L (182 mm x 128 mm)
Book Size: B6L (182 mm x 128 mm)
GETTING STARTED
Select the display language and cancel the demonstration
When you turn on the power (or after you reset the unit), the display
shows: “SEL LANGUAGE”
“PRESS” “VOLUME KNOB”
1 Turn the volume knob to select
[ENG]
(English),
[RUS]
(Russian) or
[SPA]
(Spanish), then press the knob.
[ENG]
is selected for the initial setup.
Then, the display shows: “CANCEL DEMO”
“PRESS” “VOLUME
KNOB”.
2 Press the volume knob.
[YES]
is selected for the initial setup.
3 Press the volume knob again.
“DEMO OFF” appears.
Set the clock and date
1
Press the volume knob to enter
[FUNCTION]
.
2 Turn the volume knob to select
[CLOCK]
, then press the knob.
To adjust the clock
3 Turn the volume knob to select
[CLOCK ADJUST]
, then press the knob.
4 Turn the volume knob to make the settings, then press the knob.
Hour
Minute
5 Turn the volume knob to select
[CLOCK FORMAT]
, then press the knob.
6 Turn the volume knob to select
[12H]
or
[24H]
, then press the knob.
1
2
To set the date
7 Turn the volume knob to select
[DATE FORMAT]
, then press the knob.
8 Turn the volume knob to select
[DD/MM/YY]
or
[MM/DD/YY]
, then press
the knob.
9 Turn the volume knob to select
[DATE SET]
, then press the knob.
10 Turn the volume knob to make the settings, then press the knob.
Day
Month Year or Month Day Year
11 Press and hold to exit.
To return to the previous setting item, press
.
Set the initial settings
1
Press repeatedly to enter STANDBY.
2 Press the volume knob to enter
[FUNCTION]
.
• Pressing AUD enters
[AUDIO CONTROL]
directly.
3 Turn the volume knob to select an item (see the following table),
then press the knob.
4 Repeat step 3 until the desired item is selected or activated.
5 Press and hold to exit.
To return to the previous setting item, press
.
Default:
XX
AUDIO CONTROL
SWITCH PREOUT
REAR
/
SUB-W
or
REAR
/
SUBWOOFER
: Selects whether rear speakers or
a subwoofer are connected to the line out terminals on the rear (through
an external amplifier).
( 16)
SP SELECT
OFF
/
5/4
/
6 × 9/6
/
OEM
: Selects according to the speaker size (5inches
or 4inches, 6×9inches or 6inches) or OEM speakers for optimum
performance.
3
JS_KWD_KMM_204_EN_EN_1.indd 4JS_KWD_KMM_204_EN_EN_1.indd 4 20/6/2017 9:16:09 AM20/6/2017 9:16:09 AM
ENGLISH
5
Data Size: B6L (182 mm x 128 mm)
Book Size: B6L (182 mm x 128 mm)
DISPLAY
EASY MENU
(For )
When entering
[FUNCTION]
…
ON
:ZONE 1 illumination changes to white color.;
OFF
:ZONE 1 illumination remains as
[COLOR SELECT]
color.
( 11)
•
ZONE 2 illumination changes to light blue color when you enter
[FUNCTION]
,
irregardless of the
[EASY MENU]
setting.
•
Refer to the illustration on page
11
for zone identification.
TUNER SETTING
PRESET TYPE
NORMAL
:Memorizes one station for each preset button in each band (FM1/FM2/
FM3/MW/LW).;
MIX
:Memorizes one station for each preset button, regardless of the
selected band.
SYSTEM
KEY BEEP
ON
:Activates the keypress tone.;
OFF
:Deactivates.
SOURCE SELECT
BUILT-IN AUX
ON
:Enables AUX in source selection.;
OFF
:Disables.
( 9)
P-OFF WAIT
Applicable only when the demonstration mode is turned off. Sets the duration when
the unit will automatically turn off (while in standby mode) to save the battery.
20M
: 20minutes;
40M
: 40minutes;
60M
: 60minutes;
WAIT TIME – – –
or
OFF – – –
:Cancels
F/W UPDATE
UPDATE SYSTEM
F/W UP xxxx
YES
:Starts upgrading the firmware.;
NO
:Cancels (upgrading is not activated).
For details on how to update the firmware, visit <www.kenwood.com/cs/ce/>.
CLOCK
CLOCK DISPLAY
ON
:The clock time is shown on the display even when the unit is turned off.;
OFF
:Cancels.
ENGLISH
Select the display language for
[FUNCTION]
menu and music information if applicable.
By default,
[ENGLISH]
is selected.
РУССКИЙ
ESPANOL
GETTING STARTED RADIO
Search for a station
1
Press repeatedly to select RADIO.
2 Press repeatedly to select FM1/FM2/FM3/MW/
LW.
3 Press S/T to search for a station.
• To change the searching method for S/T: Press
repeatedly.
AUTO1 : Automatically search for a station.
AUTO2 : Search for a preset station.
MANUAL : Manually search for a station.
• To store a station: Press and hold one of the number
buttons (1to6).
• To select a stored station: Press one of the number buttons
(1to6).
JS_KWD_KMM_204_EN_EN_3.indd 5JS_KWD_KMM_204_EN_EN_3.indd 5 7/8/2017 12:04:51 PM7/8/2017 12:04:51 PM
6
ENGLISH
Data Size: B6L (182 mm x 128 mm)
Book Size: B6L (182 mm x 128 mm)
RADIO
Other settings
1
Press the volume knob to enter
[FUNCTION]
.
2 Turn the volume knob to select an item (see the following table),
then press the knob.
3 Repeat step 2 until the desired item is selected or activated.
4 Press and hold to exit.
To return to the previous setting item, press
.
Default:
XX
TUNER SETTING
LOCAL SEEK
ON
: Searches only stations with good reception. ;
OFF
: Cancels.
•
Settings made are applicable only to the selected source/station. Once
you change the source/station, you need to make the settings again.
AUTO
MEMORY
YES
:Automatically starts memorizing 6 stations with good reception.;
NO
:Cancels.
•
Selectable only if
[NORMAL]
is selected for
[PRESET TYPE]
.
( 5)
MONO SET
ON
:Improves the FM reception, but the stereo effect may be lost.;
OFF
:Cancels.
NEWS SET ON
: The unit will temporarily switch to News Programme if available. ;
OFF
:Cancels.
REGIONAL ON
: Switches to another station only in the specific region using the “AF”
control.;
OFF
:Cancels.
AF SET ON
: Automatically searches for another station broadcasting the same
program in the same Radio Data System network with better reception
when the current reception is poor.;
OFF
:Cancels.
TI ON
:Allows the unit to temporarily switch to Traffic Information if available
(“TI” lights up).;
OFF
:Cancels.
PTY SEARCH
1
Turn the volume knob to select the available Program Type, then press
the knob.
2
Turn the volume knob to select the PTY language (
ENGLISH
/
FRENCH
/
GERMAN
), then press the knob.
3
Press
S
/
T
to start searching.
CLOCK
TIME SYNC
ON
:Synchronizes the unit’s time to the Radio Data System station time.;
OFF
:Cancels.
Available Program Type for
[PTY SEARCH]
SPEECH
:
NEWS
,
AFFAIRS
,
INFO
(information),
SPORT
,
EDUCATE
,
DRAMA
,
CULTURE
,
SCIENCE
,
VARIED
,
WEATHER
,
FINANCE
,
CHILDREN
,
SOCIAL
,
RELIGION
,
PHONE IN
,
TRAVEL
,
LEISURE
,
DOCUMENT
MUSIC
:
POP M
(music),
ROCK M
(music),
EASY M
(music),
LIGHT M
(music),
CLASSICS
,
OTHER M
(music),
JAZZ
,
COUNTRY
,
NATION M
(music),
OLDIES
,
FOLK M
(music)
The unit will search for the Program Type categorized under
[SPEECH]
or
[MUSIC]
if selected.
•
[LOCAL SEEK]
/
[MONO SET]
/
[NEWS SET]
/
[REGIONAL]
/
[AF SET]
/
[TI]
/
[PTY SEARCH]
is
selectable only when the band is FM1/FM2/FM3.
• If the volume is adjusted during reception of traffic information or news
bulletin, the adjusted volume is memorized automatically. It will be
applied the next time traffic information or news bulletin is turned on.
JS_KWD_KMM_204_EN_EN_1.indd 6JS_KWD_KMM_204_EN_EN_1.indd 6 20/6/2017 9:16:10 AM20/6/2017 9:16:10 AM
ENGLISH
7
Data Size: B6L (182 mm x 128 mm)
Book Size: B6L (182 mm x 128 mm)
USB/iPod/ANDROID
Start playback
The source changes automatically and
playback starts.
*
1
KCA-iP102 : 30-pin type, KCA-iP103 : Lightning type
*
2
Do not leave the cable inside the car when not using.
Selectable source:
: USB/iPod/ANDROID
/ / / : USB/ANDROID
To On the faceplate
Playback/pause Press .
Reverse/Fast-forward
*
4
Press and hold S/T.
Select a file
Press S/T.
Select a folder
*
5
Press / .
Repeat play
*
6
Press repeatedly.
FILE REPEAT
/
FOLDER REPEAT
/
ALL REPEAT
: MP3/WMA/WAV/FLAC file
FILE REPEAT
/
FOLDER REPEAT
/
REPEAT OFF
: iPod or ANDROID
Random play
*
6
Press repeatedly.
FOLDER RANDOM
/
RANDOM OFF
: MP3/WMA/WAV/FLAC file, iPod or
ANDROID
Press and hold
to select
ALL RANDOM
.
*
3
When connecting an Android device, “Press [VIEW] to install KENWOOD MUSIC PLAY APP” is shown. Follow the instructions
to install the application. You can also install the latest version of KENWOOD MUSIC PLAY application on your Android device
before connecting. For more information, visit <www.kenwood.com/cs/ce/>.
*
4
For ANDROID: Applicable only when
[BROWSE MODE]
is selected.
( 
*
5
This does not work for iPod/ANDROID.
*
6
For iPod/ANDROID: Applicable only when
[MODE OFF]
/
[BROWSE MODE]
is selected.
(
USB input terminal
CA-U1EX (max.: 500mA)
(optional accessory)
USB cable
*
2
(commercially available)
KCA-iP102/KCA-iP103
(optional accessory)
*
1
or accessory of the iPod/
iPhone
*
2
USB
iPod/iPhone
ANDROID
*
3
Other models
JS_KWD_KMM_204_EN_EN_1.indd 7JS_KWD_KMM_204_EN_EN_1.indd 7 20/6/2017 9:16:10 AM20/6/2017 9:16:10 AM
8
ENGLISH
Data Size: B6L (182 mm x 128 mm)
Book Size: B6L (182 mm x 128 mm)
USB/iPod/ANDROID
Select control mode
While in iPod source, press 5 repeatedly.
MODE ON
: Control iPod using the iPod itself
. However,
you can still play/
pause, file skip, fast-forward or reverse from this unit.
MODE OFF
: Control iPod from this unit.
While in ANDROID source, press 5 repeatedly.
BROWSE MODE
: Control Android device from this unit via KENWOOD
MUSIC PLAY application installed in the Android device.
HAND MODE
: Control Android device using the Android device itself via
other media player applications installed in the Android
device. However, you can still play/pause and file skip from
this unit.
Select music drive
While in USB source, press 5 repeatedly.
Stored songs in the following drive will be played back.
• Selected internal or external memory of a smartphone (Mass Storage
Class).
• Selected drive of a multiple drives device.
Select a file from a folder/list
For iPod/ANDROID, applicable only when
[MODE OFF]
/
[BROWSE MODE]
is
selected.
1 Press .
2 Turn the volume knob to select a folder/list, then press the knob.
3 Turn the volume knob to select a file, then press the knob.
Quick Search
(applicable only for USB and ANDROID source)
If you have many files, you can search through them quickly.
Turn the volume knob quickly to browse through the list quickly.
Skip Search
(applicable only for iPod and ANDROID source)
Press S/T to search at a preset skip search ratio.
( 9, [SKIP SEARCH])
• Pressing and holding S/T searches at a 10
%
ratio.
Alphabet search
(applicable only for iPod and ANDROID source)
You can search for a file according to the first character.
For iPod source
1 Turn the volume knob quickly to enter character search.
2 Turn the volume knob to select the character.
• Select “
*
” to search for a character other than AtoZ, 0to9.
3 Press S/T to move to the entry position.
• You can enter up to 3characters.
4 Press the volume knob to start searching.
For ANDROID source
1 Press / to enter character search.
2 Turn the volume knob to select the character.
^A^: Upper case letters (A to Z)
_A_: Lower case letters (a to z)
-0-: Numbers (0 to 9)
***
: Character other than AtoZ, 0to9
3 Press the volume knob to start searching.
• To return to the root folder/first file/top menu, press 5.
• To return to the previous setting item, press
.
• To cancel, press and hold
.
JS_KWD_KMM_204_EN_EN_1.indd 8JS_KWD_KMM_204_EN_EN_1.indd 8 20/6/2017 9:16:10 AM20/6/2017 9:16:10 AM
ENGLISH
9
Data Size: B6L (182 mm x 128 mm)
Book Size: B6L (182 mm x 128 mm)
USB/iPod/ANDROID
Listen to TuneIn Radio/TuneIn Radio Pro/Aupeo
(for )
While listening to TuneIn Radio, TuneIn Radio Pro or Aupeo, connect the
iPod/iPhone to the USB input terminal of the unit.
• The unit will output the sound from these applications.
Other settings
1
Press the volume knob to enter
[FUNCTION]
.
2 Turn the volume knob to select an item (see the following table),
then press the knob.
3 Repeat step 2 until the desired item is selected or activated.
4 Press and hold to exit.
To return to the previous setting item, press
.
Default:
XX
USB
MUSIC DRIVE DRIVE CHANGE
:The next drive (
[DRIVE 1]
to
[DRIVE 5]
) is selected
automatically and playback starts.
Repeat steps
1
to
3
to select the following drives.
SKIP SEARCH 0.5%
/
1%
/
5%
/
10%
: While listening to iPod or ANDROID source, selects
the skip search ratio over the total files.
Preparation:
Select
[ON]
for
[BUILT-IN AUX]
in
[SOURCE SELECT]
.
( 5)
Start listening
1
Connect a portable audio player (commercially available).
2 Press repeatedly to select AUX.
3 Turn on the portable audio player and start playback.
Set the AUX name
While listening to a portable audio player connected to the unit…
1 Press the volume knob to enter
[FUNCTION]
.
2 Turn the volume knob to select
[SYSTEM]
, then press the knob.
3 Turn the volume knob to select
[AUX NAME SET]
, then press the knob.
4 Turn the volume knob to select an item, then press the knob.
AUX
(default)/
DVD
/
PORTABLE
/
GAME
/
VIDEO
/
TV
5 Press and hold to exit.
To return to the previous setting item, press
.
AUX
Auxiliary input jack
Portable audio player
3.5mm (1/8″) stereo mini plug with “L” shaped connector
(commercially available)
JS_KWD_KMM_204_EN_EN_1.indd 9JS_KWD_KMM_204_EN_EN_1.indd 9 20/6/2017 9:16:10 AM20/6/2017 9:16:10 AM
10
ENGLISH
Data Size: B6L (182 mm x 128 mm)
Book Size: B6L (182 mm x 128 mm)
AUDIO SETTINGS
While listening to any source…
1 Press AUD to enter
[AUDIO CONTROL]
directly.
2 Turn the volume knob to select an item (see the following table),
then press the knob.
3 Repeat step 2 until the desired item is selected or activated.
4 Press and hold to exit.
To return to the previous setting item, press
.
Default:
XX
AUDIO CONTROL
SUB-W LEVEL
–15
to
+15
(
0
) Adjusts the subwoofer output level.
BASS LEVEL –8
to
+8
(
+2
)
Adjusts the level to memorize for each source.
(Before making an adjustment, select the source you
want to adjust.)
MID LEVEL –8
to
+8
(
+1
)
TRE LEVEL –8
to
+8
(
+1
)
EQ PRO
(This setting is stored to
[USER]
.)
BASS ADJUST BASS CTR FRQ 60
/
80
/
100
/
200
or
60HZ
/
80HZ
/
100HZ
/
200HZ
:
Selects the center frequency.
BASS LEVEL –8
to
+8
(
+2
):Adjusts the level.
BASS Q FACTOR 1.00
/
1.25
/
1.50
/
2.00
:Adjusts the quality factor.
BASS EXTEND ON
:Turns on the extended bass.;
OFF
:Cancels.
MID ADJUST MID CTR FRQ 0.5KHZ
/
1.0KHZ
/
1.5KHZ
/
2.5KHZ
:Selects the
center frequency.
MID LEVEL –8
to
+8
(
+1
):Adjusts the level.
MID Q FACTOR 0.75
/
1.00
/
1.25
:Adjusts the quality factor.
TRE ADJUST TRE CTR FRQ 10.0KHZ
/
12.5KHZ
/
15.0KHZ
/
17.5KHZ
:Selects the
center frequency.
TRE LEVEL –8
to
+8
(
+1
):Adjusts the level.
PRESET EQ DRIVE EQ
/
TOP40
/
POWERFUL
/
ROCK
/
POPS
/
EASY
/
JAZZ
/
NATURAL
/
USER
: Selects a preset equalizer suitable to the music genre. (Select
[USER]
to use the settings made in
[EQ PRO]
.)
[DRIVE EQ]
is a preset equalizer that reduces noise outside the car or
running noise of the tyres.
BASS BOOST LV1
/
LV2
/
LV3
or
LEVEL1
/
LEVEL2
/
LEVEL3
:Selects your preferred bass
boost level.;
OFF
:Cancels.
LOUDNESS LV1
/
LV2
or
LEVEL1
/
LEVEL2
:Selects your preferred low and high
frequencies boost to produce a well-balanced sound at a low volume
level.;
OFF
:Cancels.
SUBWOOFER SET ON
:Turns on the subwoofer output.;
OFF
:Cancels.
LPF SUBWOOFER THROUGH
:All signals are sent to the subwoofer.;
85HZ
/
120HZ
/
160HZ
:Audio signals with frequencies lower than
85Hz/120Hz/160Hz are sent to the subwoofer.
SUB-W PHASE REVERSE
(180°)/
NORMAL
(0°):Selects the phase of the subwoofer
output to be in line with the speaker output for optimum performance.
(Selectable only if a setting other than
[THROUGH]
is selected for
[LPF SUBWOOFER]
.)
FADER R15
to
F15
(
0
):Adjusts the rear and front speaker output balance.
BALANCE L15
to
R15
(
0
):Adjusts the left and right speaker output balance.
VOLUME OFFSET
For AUX:
–8
to
+8
(
0
) ; For other sources:
–8
to
0
:Preset the initial
volume level of each source. (Before adjustment, select the source you
want to adjust.)
SOUND RECNSTR
(Sound
reconstruction)
ON
:Creates realistic sound by compensating the high-frequency
components and restoring the rise-time of the waveform that are lost in
audio data compression.;
OFF
:Cancels.
•
[SUB-W LEVEL]
/
[SUBWOOFER SET]
/
[LPF SUBWOOFER]
/
[SUB-W PHASE]
is
selectable only if
[SWITCH PREOUT]
is set to
[SUB-W]
or
[SUBWOOFER]
.
( 4)
•
[SUB-W LEVEL]
/
[LPF SUBWOOFER]
/
[SUB-W PHASE]
is selectable only if
[SUBWOOFER SET]
is set to
[ON]
.
JS_KWD_KMM_204_EN_EN_3.indd 10JS_KWD_KMM_204_EN_EN_3.indd 10 22/8/2017 11:48:20 AM22/8/2017 11:48:20 AM
ENGLISH
11
Data Size: B6L (182 mm x 128 mm)
Book Size: B6L (182 mm x 128 mm)
DISPLAY SETTINGS
Default:
XX
DISPLAY
COLOR SELECT
(For )
Select color for
ALL ZONE
,
ZONE 1
and
ZONE 2
separately.
1
Select a zone. (See the illustration on the left column.)
2
Select a color for the selected zone.
INITIAL COLOR
/
VARIABLE SCAN
/
CUSTOM R/G/B
/preset colors
*
To make your own color, select
[CUSTOM R/G/B]
. The color you have
made will be stored in
[CUSTOM R/G/B]
.
1
Press the volume knob to enter the detailed color adjustment.
2
Press
S
/
T
to select the color (
R
/
G
/
B
) to adjust.
3
Turn the volume knob to adjust the level (
0
to
9
), then press the
knob.
DIMMER
(Default:
[ON]
:
18:00
;
[OFF]
:
6:00
)
Dim the illumination.
ON
:Dimmer is turned on.;
OFF
:Cancels.
DIMMER TIME
:Set the dimmer on and off time.
1
Turn the volume knob to adjust the
[ON]
time, then press the knob.
2
Turn the volume knob to adjust the
[OFF]
time, then press the
knob.
BRIGHTNESS
1
Select a zone. (See the illustration on the left column.)
2
0
—
31
: Select your preferred brightness level for the selected
zone.
TEXT SCROLL AUTO
/
ONCE
:Select whether to scroll the display information
automatically, or scroll only once.;
OFF
:Cancels.
*
Preset colors:
RED1
/
RED2
/
RED3
/
PURPLE1
/
PURPLE2
/
PURPLE3
/
PURPLE4
/
BLUE1
/
BLUE2
/
BLUE3
/
SKYBLUE1
/
SKYBLUE2
/
LIGHTBLUE
/
AQUA1
/
AQUA2
/
GREEN1
/
GREEN2
/
GREEN3
/
YELLOWGREEN1
/
YELLOWGREEN2
/
YELLOW
/
ORANGE1
/
ORANGE2
/
ORANGERED
Zone identification for brightness settings
Zone identification for color and brightness settings
Set the dimmer
Press and hold DISP to turn on or off the dimmer.
• If you have set
[DIMMER TIME]
, it will be canceled once you press and
hold this button.
Other settings
1
Press the volume knob to enter
[FUNCTION]
.
2 Turn the volume knob to select an item (see the following table),
then press the knob.
3 Repeat step 2 until the desired item is selected/activated or follow
the instructions stated on the selected item.
4 Press and hold to exit.
To return to the previous setting item, press
.
JS_KWD_KMM_204_EN_EN_1.indd 11JS_KWD_KMM_204_EN_EN_1.indd 11 20/6/2017 9:16:11 AM20/6/2017 9:16:11 AM
12
ENGLISH
Data Size: B6L (182 mm x 128 mm)
Book Size: B6L (182 mm x 128 mm)
TROUBLESHOOTING
Symptom Remedy
General
Sound cannot be heard.
•
Adjust the volume to the optimum level.
•
Check the cords and connections.
“MISWIRING CHECK WIRING
THEN PWR ON” appears.
Turn the power off, then check to be sure the
terminals of the speaker wires are insulated properly.
Turn the power on again.
“PROTECTING SEND SERVICE”
appears.
Send the unit to the nearest service center.
•
Sound cannot be heard.
•
The unit does not turn on.
•
Information shown on the
display is incorrect.
Clean the connectors.
( 13)
The unit does not work at all. Reset the unit.
( 3)
Radio
•
Radio reception is poor.
•
Static noise while listening
to the radio.
Connect the antenna firmly.
USB/iPod
“READING” keeps flashing. Do not use too many hierarchical levels or folders.
Elapsed playing time is not
correct.
This is caused by how the files are recorded.
Correct characters are not
displayed (e.g. album name).
•
This unit can only display uppercase letters,
numbers, and a limited number of symbols.
•
Depending on the display language you have
selected
( 5)
, some characters may not be
displayed correctly.
“NA FILE” Make sure the media contains supported audio files.
( 13)
“NO DEVICE” Connect a USB device, and change the source to USB
again.
“COPY PRO” A copy-protected file is played.
Symptom Remedy
USB/iPod
“NA DEVICE” Connect a supported USB device, and check the
connections.
“NO MUSIC” Connect a USB device that contains playable audio files.
“iPod ERROR”
•
Reconnect the iPod.
•
Reset the iPod.
ANDROID
•
Sound cannot
be heard during
playback.
•
Sound output only
from the Android
device.
•
Reconnect the Android device.
•
If in
[HAND MODE]
, launch any media player application
on the Android device and start playback.
•
If in
[HAND MODE]
, relaunch the current media player
application or use another media player application.
•
Restart the Android device.
•
If this does not solve the problem, the connected Android
device is unable to route the audio signal to unit.
( 13)
Cannot playback at
[
BROWSE MODE
].
•
Make sure KENWOOD MUSIC PLAY APP is installed on the
Android device.
( 7)
•
Reconnect the Android device and select the appropriate
control mode.
•
If this does not solve the problem, the connected Android
device does not support
[BROWSE MODE]
.
( 13)
“NO DEVICE” or
“READING” keeps
flashing.
•
Switch off the developer options on the Android device.
•
Reconnect the Android device.
•
If this does not solve the problem, the connected Android
device does not support
[BROWSE MODE]
.
( 13)
Playback is intermittent
or sound skips.
Turn off the power saving mode on the Android device.
“ANDROID ERROR”/
“NADEVICE”
•
Reconnect the Android device.
•
Restart the Android device.
JS_KWD_KMM_204_EN_EN_1.indd 12JS_KWD_KMM_204_EN_EN_1.indd 12 20/6/2017 9:16:11 AM20/6/2017 9:16:11 AM
ENGLISH
13
Data Size: B6L (182 mm x 128 mm)
Book Size: B6L (182 mm x 128 mm)
REFERENCES
Maintenance
Cleaning the unit
Wipe off dirt on the faceplate with a dry silicone or soft cloth.
Cleaning the connector
Detach the faceplate and clean the connector
gently with a cotton swab, being careful not to
damage the connector.
More information
For: – Latest firmware updates and latest compatible item list
– Any other latest information
Visit <www.kenwood.com/cs/ce/>.
Playable files
•
Playable audio file for USB mass storage class device: MP3 (.mp3), WMA (.wma),
WAV (.wav), FLAC (.flac)
•
Playable USB device file system: FAT12, FAT16, FAT32
Even when audio files comply with the standards listed above, playback may be impossible
depending on the types or conditions of media or device.
•
For detailed information and notes about the playable audio files, visit
<www.kenwood.com/cs/ce/audiofiles>.
About USB devices
•
You cannot connect a USB device via a USB hub.
•
Connecting a cable whose total length is longer than 5m may result in abnormal playback.
•
This unit cannot recognize a USB device whose rating is other than 5V and exceeds 1A.
Connector (on the reverse
side of the faceplate)
About iPod/iPhone
Made for
–
iPod touch (5th, and 6th generation)
–
iPod nano (7th generation)
–
iPhone 4S, 5, 5S, 5C, 6, 6 Plus, 6S, 6S Plus, SE, 7, 7 Plus
•
You cannot operate iPod if “KENWOOD” or “ ” is displayed on iPod.
•
Depending on the version of the operating system of the iPod/iPhone, some functions may
not operate on this unit.
About Android device
•
This unit supports Android OS 4.1 and above.
•
Some Android devices (with OS 4.1 and above) may not fully support Android Open Accessory
(AOA) 2.0.
•
If the Android device supports both mass storage class device and AOA 2.0, this unit always
playback via AOA 2.0 as priority.
Muting upon the reception of a phone call
Connect the MUTE wire to your telephone using a commercial telephone accessory.
( 16)
When a call comes in, “CALL” appears.
(The audio system pauses.)
•
To continue listening to the audio system during a call, press . “CALL” disappears
and the audio system resumes.
When the call ends, “CALL” disappears.
(The audio system resumes.)
JS_KWD_KMM_204_EN_EN_3.indd 13JS_KWD_KMM_204_EN_EN_3.indd 13 7/8/2017 11:45:33 AM7/8/2017 11:45:33 AM
14
ENGLISH
Data Size: B6L (182 mm x 128 mm)
Book Size: B6L (182 mm x 128 mm)
REFERENCES
Change the display information
Each time you press
DISP
, the display information changes.
•
If the information is unavailable or not recorded, “NO TEXT”, “NO INFO”, or other information (eg. station name,
playing time) appears.
Source name
Display information
/ /
/
STANDBY Source name Clock (back to the
beginning)
Source name (Date/Clock)
RADIO Frequency
Clock (back to the beginning) Frequency (Date/Clock)
(For FM Radio Data System stations only)
Station name Radio text Radio text+
Title/Artist
Frequency Clock (back to
the beginning)
(For FM Radio Data System stations only)
Station name (Date/Clock) Radio text
(Date/Clock)
Radio text+ (R.TEXT+)
Song title (Artist)
Song title (Date/Clock)
Frequency (Date/Clock) (back to the
beginning)
USB
(For MP3/WMA/WAV/FLAC files)
Song title/Artist Album title/artist
Folder name
File name Playing time
Clock
(back to the beginning)
(For MP3/WMA/WAV/FLAC files)
Song title (Artist) Song title (Album title)
Song title (Date/Clock) File name
(Folder name)
File name (Date/Clock)
Playing time (Date/Clock)
(back to the
beginning)
iPod or
ANDROID
When
[MODE OFF]
/
[BROWSE MODE]
is
selected
( 8):
Song title/Artist Album title/Artist
Playing time Clock (back to the
beginning)
When
[BROWSE MODE]
is selected
( 9)
:
Song title (Artist)
Song title (Album name)
Song title (Date/Clock) Playing time
(Date/Clock)
(back to the beginning)
AUX Source name
Clock (back to the
beginning)
Source name (Date/Clock)
Warning
•
The unit can only be used with a 12V DC power supply, negative ground.
•
Disconnect the battery’s negative terminal before wiring and mounting.
•
Do not connect Battery wire (yellow) and Ignition wire (red) to the car
chassis or Ground wire (black) to prevent a short circuit.
•
To prevent short circuit:
–
Insulate unconnected wires with vinyl tape.
–
Be sure to ground this unit to the car’s chassis again after installation.
–
Secure the wires with cable clamps and wrap vinyl tape around the
wires that come into contact with metal parts to protect the wires.
Caution
•
For safety’s sake, leave wiring and mounting to professionals. Consult the
car audio dealer.
•
Install this unit in the console of your vehicle. Do not touch the metal
parts of this unit during and shortly after use of the unit. Metal parts such
as the heat sink and enclosure become hot.
•
Do not connect the
[
wires of speakers to the car chassis or Ground wire
(black), or connect them in parallel.
•
Mount the unit at an angle of less than 30º.
•
If your vehicle wiring harness does not have the ignition terminal,
connect Ignition wire (red) to the terminal on the vehicle’s fuse box which
provides 12V DC power supply and is turned on and off by the ignition
key.
•
Keep all cables away from heat dissipate metal parts.
•
After the unit is installed, check whether the brake lamps, blinkers,
wipers, etc. on the car are working properly.
•
If the fuse blows, first make sure the wires are not touching car’s chassis,
then replace the old fuse with one that has the same rating.
INSTALLATION/CONNECTION
JS_KWD_KMM_204_EN_EN_1.indd 14JS_KWD_KMM_204_EN_EN_1.indd 14 20/6/2017 9:16:11 AM20/6/2017 9:16:11 AM
ENGLISH
15
Data Size: B6L (182 mm x 128 mm)
Book Size: B6L (182 mm x 128 mm)
Do the required wiring.
( 16)
Dashboard of
your car
Bend the appropriate tabs to hold the
mounting sleeve firmly in place.
How to remove the unit
1
Detach the faceplate.
2
Remove the trim plate.
3
Insert the extraction keys deeply into the
slots on each side, then follow the arrows as
shown on the illustration.
Installing the unit (in-dash mounting)
Hook on the top side
Orientate the trim plate as
illustrated before fitting.
INSTALLATION/CONNECTION
(A)
Faceplate
(C)
Mounting sleeve
(B)
Trim plate
(D)
Wiring harness
(E)
Extraction key
Part list for installation
Basic procedure
1
Remove the key from the ignition switch, then disconnect the
[
terminal of the car battery.
2
Connect the wires properly.
See Wiring connection.
( 16)
3
Install the unit to your car.
See Installing the unit (in-dash mounting).
4
Connect the
[
terminal of the car battery.
5
Detach the faceplate and reset the unit.
( 3)
JS_KWD_KMM_204_EN_EN_1.indd 15JS_KWD_KMM_204_EN_EN_1.indd 15 20/6/2017 9:16:12 AM20/6/2017 9:16:12 AM
16
ENGLISH
Data Size: B6L (182 mm x 128 mm)
Book Size: B6L (182 mm x 128 mm)
REMOTE CONT
STEERING WHEEL
REMOTE INPUT
P. CONT
ANT CONT
MUTE
INSTALLATION/CONNECTION
Fuse (10A)
Antenna terminal
Output terminals
Blue/White*
2
(Power control wire/
Antenna control wire)
Light blue/yellow
(Steering remote
control wire)
To the power control terminal when
using the optional power amplifier or
to the antenna control terminal in the
vehicle
Brown
(Mute control wire)
To the terminal that is grounded
when the telephone rings or during
conversation.
( 13)
(To connect the Kenwood navigation
system, refer your navigation manual.)
If no connections are made, do not let the wire come out from the tab.
To the steering wheel remote control
adapter
When connecting to an external amplifier, connect its ground wire to the
car’s chassis to avoid damaging the unit.
Pin
Color and function (for ISO connectors)
A4 Yellow
:
Battery
A5 Blue/White*
1
:
Power control
A7 Red
:
Ignition (ACC)
A8 Black
:
Earth (ground) connection
B1/B2
Purple
]
/Purple/black
[
:
Rear speaker (right)
B3/B4
Gray
]
/Gray/black
[
:
Front speaker (right)
B5/B6
White
]
/White/black
[
:
Front speaker (left)
B7/B8
Green
]
/Green/black
[
:
Rear speaker (left)
If your car does not have an ISO terminal:
We recommend installing the unit with a commercially available custom
wiring harness specific for your car and leave this job to professionals for
your safety. Consult your car audio dealer.
Connecting the ISO connectors on some VW/Audi or Opel
(Vauxhall) automobiles
You may need to modify the wiring of the supplied wiring harness as
illustrated below.
UnitVehicle
A7 (Red) Ignition wire (Red)
A4 (Yellow)
Default wiring
Battery wire (Yellow)
Yellow (A4)
Red (Ignition wire)
Red (A7)
Yellow (Battery wire)
ISO connectors
Wiring connection
NOTE: Total output for Blue/White wire (*
1
) + (*
2
) is 12V 350mA
JS_KWD_KMM_204_EN_EN_1.indd 16JS_KWD_KMM_204_EN_EN_1.indd 16 20/6/2017 9:16:12 AM20/6/2017 9:16:12 AM