
Перейти к контенту
![]()
Русские электронные инструкции по эксплуатации
Постоянно обновляемый большой каталог документации по эксплуатации и использованию современных устройств и оборудования на русском языке. Бесплатное скачивание файлов.
Поиск:
Главная
♥ В закладки
Просмотр инструкции в pdf


Инструкция по эксплуатации кофемашины Siemens EQ.500 Integral.
Скачать инструкцию к кофемашине Siemens EQ.500 Integral (17,72 МБ)

Инструкции кофемашин Siemens
« Инструкция к кофемашине Krups Intuition Preference EA873810
» Инструкция к кофемашине Jura E8 Piano White
Вам также может быть интересно

Инструкция к газовой варочной панели Siemens iQ300 EG6B6PO90R

Инструкция к холодильнику Siemens KF91NPJ20R

Инструкция к холодильнику Siemens iQ500 KG39NAW21R

Инструкция к холодильнику Siemens iQ700 KG49NSB2AR

Инструкция к газовой варочной панели Siemens EC6A6PB90R

Инструкция к холодильнику Siemens KA90IVI20R

Инструкция к стиральной машине Siemens iQ500 WM14T6H2OE

Инструкция к газовой варочной панели Siemens iQ500 EP6A6HB20R
Добавить комментарий
Имя *
Email *
Сайт
Комментарий


![]()


Сохранить моё имя, email и адрес сайта в этом браузере для последующих моих комментариев.
- Добавить инструкцию
- Заказать инструкцию
- Политика конфиденциальности
![]()


|
en |
|
|
Table of contents |
|
|
Safety ……………………………………….. |
8 |
|
General information ……………………… |
8 |
|
Intended use……………………………….. |
8 |
|
User group restrictions………………….. |
8 |
|
Safe use …………………………………….. |
9 |
|
Environmental protection and |
|
|
energy saving …………………………… |
12 |
|
Disposing of packaging ………………. |
12 |
|
Tips for saving energy…………………. |
12 |
|
Installation and connection ………… |
12 |
|
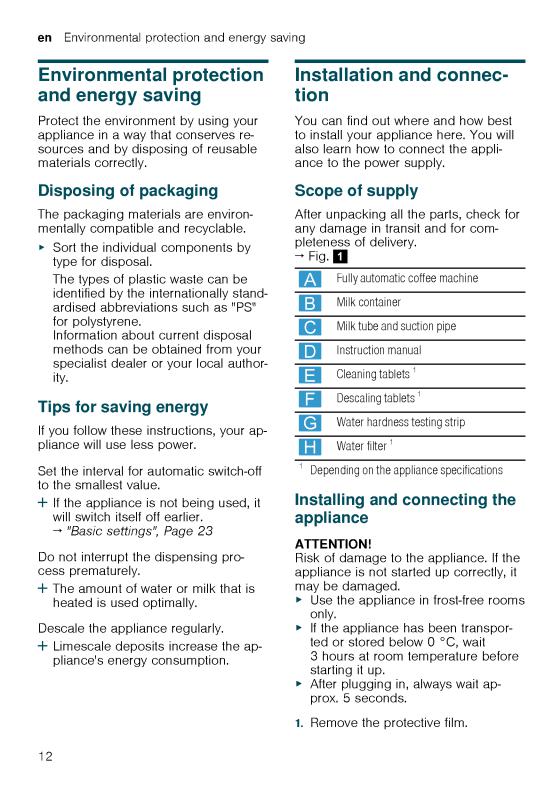
Scope of supply…………………………. |
12 |
|
Installing and connecting the ap- |
|
|
pliance……………………………………… |
12 |
|
Familiarising yourself with your |
|
|
appliance …………………………………. |
13 |
|
Appliance …………………………………. |
13 |
|
Controls……………………………………. |
13 |
|
Display …………………………………….. |
13 |
|
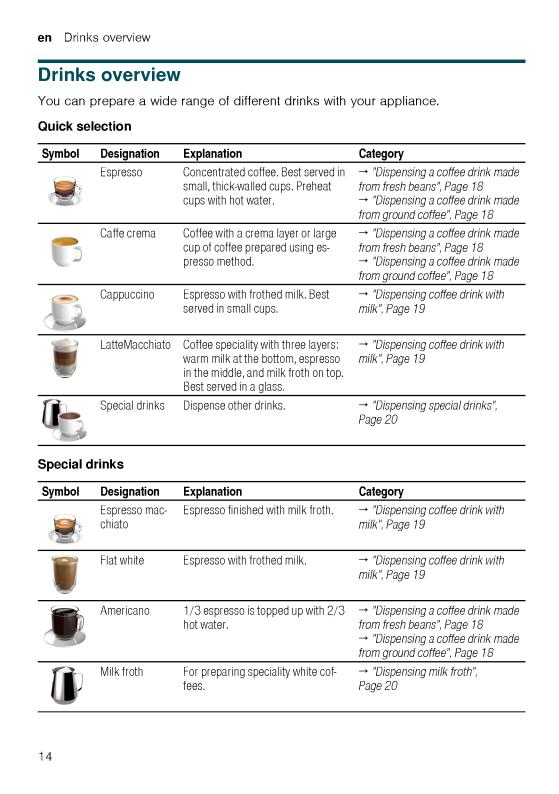
Drinks overview………………………… |
14 |
|
Accessories……………………………… |
15 |
|
Before using for the first time……… |
15 |
|
Perform the initial start-up ……………. |
15 |
|
Fill the water tank……………………….. |
15 |
|
Fill coffee bean container…………….. |
15 |
|
Setting the language…………………… |
16 |
|
Setting the water hardness…………… |
16 |
|
General information ……………………. |
16 |
|
Basic operation ………………………… |
17 |
|
Switching the appliance on and |
|
|
off……………………………………………. |
17 |
|
Dispensing drinks ………………………. |
17 |
|
Dispensing a coffee drink made |
|
|
from fresh beans ……………………….. |
18 |
|
Dispensing a coffee drink made |
|
|
from ground coffee …………………….. |
18 |
|
Dispensing drinks with milk………….. |
18 |
|
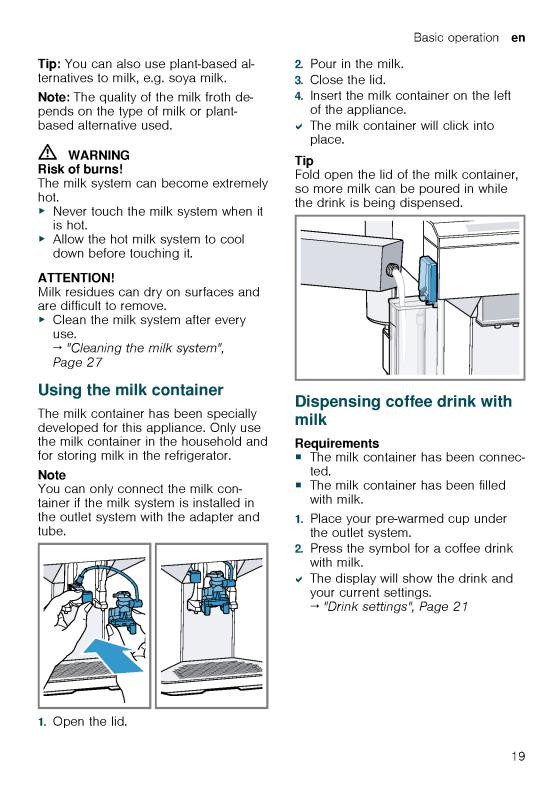
Using the milk container ……………… |
19 |
|
Dispensing coffee drink with milk….. |
19 |
|
Dispensing special drinks ……………. |
20 |
|
Dispensing milk froth ………………….. |
20 |
|
Dispensing hot water ………………….. |
20 |
|
Drink settings…………………………….. |
21 |
|
Water filter ………………………………… |
22 |
|
Childproof lock …………………………. |
23 |
|
Activating the childproof lock ……….. |
23 |
|
Deactivating the childproof lock ……. |
23 |
|
Cup heater1 ………………………………. |
23 |
|
Basic settings…………………………… |
23 |
|
Overview of the basic settings ……… |
24 |
|
Changing the basic settings…………. |
24 |
|
Cleaning and maintenance …………. |
25 |
|
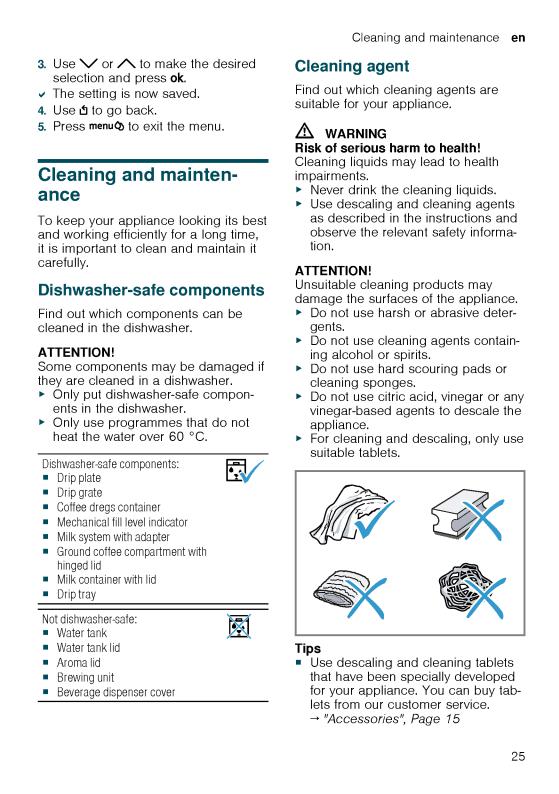
Dishwasher-safe components ………. |
25 |
|
Cleaning agent ………………………….. |
25 |
|
Cleaning the appliance ……………….. |
26 |
|
Cleaning the drip tray and coffee |
|
|
dregs container …………………………. |
26 |
|
Cleaning the ground coffee com- |
|
|
partment …………………………………… |
26 |
|
Cleaning the milk system …………….. |
27 |
|
Cleaning the milk container………….. |
27 |
|
Cleaning brewing unit …………………. |
27 |
|
Service programmes…………………… |
28 |
|
Rectifying faults ……………………….. |
32 |
|
Malfunctions ……………………………… |
32 |
|
Notifications on the display panel….. |
33 |
|
Problem with results …………………… |
35 |
|
Transportation, storage and dis- |
|
|
posal……………………………………….. |
37 |
|
Activate frost protection ………………. |
37 |
|
Disposing of your old appliance……. |
37 |
1 Depending on the appliance specifications
6
en
|
After-sales service…………………….. |
37 |
|
E number and FD number …………… |
38 |
|
Warranty conditions ……………………. |
38 |
|
Technical specifications…………….. |
38 |
7

en Safety
 Safety
Please read the safety information to ensure that you use the appliance safely.
General information
Here you can find general information about this information product.
¡Read this manual carefully. Only then can you operate the appliance safely and efficiently.
¡This manual is intended for the user of the appliance.
¡Observe the safety instructions and warnings.
¡Keep the manual and the product information in a safe place for future reference or for the next owner.
¡Check the appliance for damage after unpacking it. Do not connect the appliance if it has been damaged in transit.
Intended use
Please read the information on intended use to ensure that you use the appliance safely and correctly.
Only use this appliance:
¡as specified in this instruction manual.
¡for preparing hot drinks.
¡Up to an altitude of max. 2000 m above sea level.
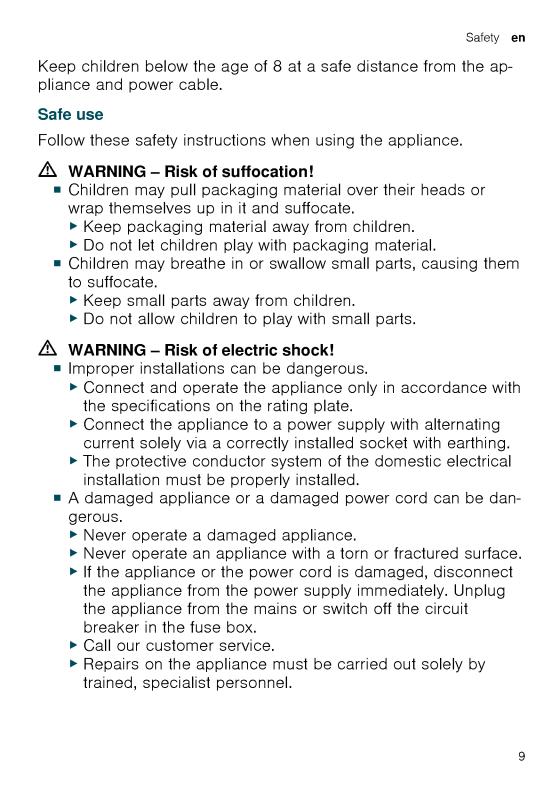
User group restrictions
Avoid risks to children and vulnerable persons.
This appliance may be used by children aged 8 or over and by people who have reduced physical, sensory or mental abilities or inadequate experience and/or knowledge, provided they are supervised or have been instructed on how to use the appliance safely and have understood the resulting dangers.
Do not let children play with the appliance.
Children must not perform cleaning or user maintenance unless they are at least 8 years old and are being supervised.
8
![]()
2.Place the appliance on a level, wa- ter-resistant surface that is capable of bearing its weight.
3.Using the mains plug, connect the appliance to an earthed socket that has been correctly installed.
Familiarising yourself with your appliance
Familiarise yourself with the parts of your appliance.
Appliance
Here you can find an overview of the parts of your appliance.
Note: Individual details and colours may differ, depending on the appliance model.
→ Fig. 2
|
1 |
Water tank |
|
2 |
Cover for water tank |
|
3 |
Cup heater1 |
|
4 |
Aroma lid |
|
5 |
Bean container |
|
6 |
Ground coffee compartment |
|
7 |
Display |
|
8 |
Control panel |
|
9 |
Cup lighting1 |
|
10 |
Cover |
|
11 |
Outlet system |
|
12 |
Brewing chamber door |
1 Depending on the appliance specifications
Familiarising yourself with your appliance en
|
13 |
Rating plate |
|
14 |
Drip tray |
|
15 |
Milk container |
1 Depending on the appliance specifications
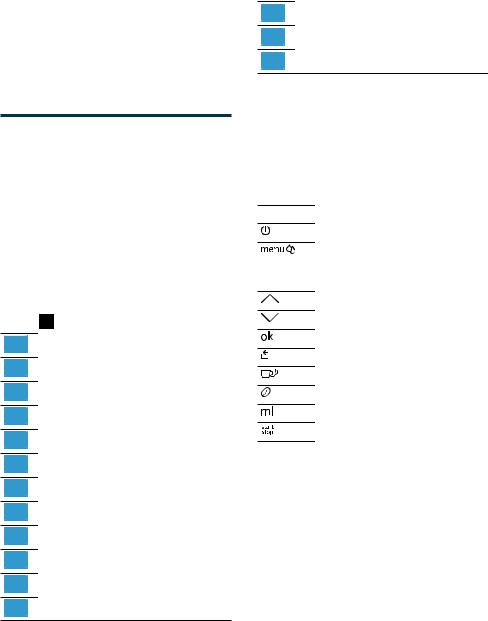
Controls
Here you can find an overview of the symbols on your appliance. Press the symbols to make a selection, start the dispensing process or make/adjust a setting.
Symbol Explanation
Switch appliance on/off
Open menu/leave menu
Note: The menu buttons are only visible when the menu is open.
Navigate upwards in the menu
Navigate downwards in the menu
Confirm/save in the menu
Go back in the menu
Dispense two cups
Select coffee strength
Adjusting the amount
Start/stop
Display
The display shows the selected drinks, settings and setting options, as well as messages about the appliance’s operating status.
The display shows additional information and action steps. The information is hidden after a short period, or by pressing a button. The action steps are hidden when they have been completed.
13

en Before using for the first time
Do not use coffee beans that have been treated with additives containing sugar.
Do not add ground coffee.
1.Open the lid.
2.Fill with the coffee beans.
The appliance will adjust to the coffee beans with the next dispensing process.
3.Close the lid.
Tip: To keep the coffee beans at their best, store them in a sealed container in a cool place.
You can keep the coffee beans in the bean container for a number of days without them losing their aroma.
Setting the language
1.Press  to switch the appliance on.
a The display will show the language that is preset.
2.Press  or
or  until the display shows the desired language.
3.Press 
 .
.
Tip: You can change the language at any time.
→ «Overview of the basic settings»,
Page 24
Setting the water hardness
It is important to set the water hardness correctly, so that the appliance indicates in good time that it needs descaling. You can use the enclosed test strip to determine the water hardness, or ask your local water company.
1.Briefly dip the test strip in fresh tap water.
2.Allow the water to drip off the test strip.
a The test strip will indicate the water hardness after 1 minute.
3.If a water softening system is installed in your house, select «Softening system».
4.Press  or
or  until the display shows the desired water hardness.
The table shows the allocation of the levels to the different degrees of water hardness:
|
Level |
German de- |
Total hard- |
|
grees in °dH |
ness in |
|
|
(mmol/l) |
||
|
1 |
1-7 |
0.18 — 1.25 |
|
2 |
8-14 |
1.42 — 2.49 |
|
3 |
15-21 |
2.67 — 3.74 |
|
41 |
22-30 |
3.92 — 5.34 |
1Factory setting (may vary according to model)
5.Press 
 .
.
6.Check whether the bean container has been filled.
7.Press 
 .
.
a The appliance now rinses itself.
a When the symbols for drink selection and the buttons light up on the operating panel, the appliance is ready for use.
Tip: You can change the water hardness at any time.
→ «Overview of the basic settings»,
Page 24
General information
Please bear this information in mind so that you can get the best out of your appliance.
Notes
¡The appliance has been programmed at the factory with standard settings for optimum operation.
¡The grinder has been factory-set for optimum operation. If coffee is only dispensed drop by drop or is too thin with too little crema, you can adjust the grinding level when the
16

en Basic operation
Notes
¡If you do not change any settings for approx. 5 seconds, the appliance will exit settings mode. The settings will be automatically saved.
¡With a number of settings your coffee is prepared in several steps. Wait until the process is fully completed.
Dispensing a coffee drink made from fresh beans
1.Place your pre-warmed cup under the outlet system.
2.Press the drinks symbol for a coffee drink without milk.
a The display will show the drink and your current settings.
→«Drink settings», Page 21
3.Change the settings where necessary:
‒ Use  to adjust the amount.
→«Adjusting the amount»,
Page 21
‒Use  to adjust the coffee strength.
→ «Adjusting the coffee strength»,
Page 21
4.Press 
 .
.
The coffee beans are freshly ground for each brewing process.
a The coffee is brewed and then dispensed into the cup.
Tip
¡You can press 

 to stop the dispensing process early.
¡Find out how to make coffee drinks with milk.
→ «Dispensing drinks with milk»,
Page 18
Dispensing a coffee drink made from ground coffee
ATTENTION!
The ground coffee compartment can become blocked.
Do not used coffee beans.
Do not use instant coffee.
Use a soft brush to gently direct the ground coffee residue into the shaft.
Note
When using ground coffee, the following selections are not available:
¡Two cups at once
¡Coffee strength
¡AromaDouble Shot
1.Place your pre-warmed cup under the outlet system.
2.Press the symbol for your desired drink.
3.Press  repeatedly until the display shows «Gr. coffee».
4.Open the ground coffee compartment.
5.Add a maximum of 2 level teaspoons of ground coffee, max. 12 g.
6.Close the ground coffee compartment.
7.Press 


 .
.
a The coffee is brewed and then dispensed into the cup.
Tip
¡You can press 


 to stop the dispensing process prematurely.
¡If you would like another drink with ground coffee, repeat the process.
¡Always add the ground coffee just before making the drink.
Dispensing drinks with milk
You can use your appliance to dispense coffee drinks with milk and milk froth.
18
5.Press 

 to stop the dispensing process.
Drink settings
Prepare a drink according to your taste.
Adjusting the coffee strength
1.Press the symbol for your desired drink.
2.To select the strength of the coffee, press  .
.
You can select the following coffee strengths:
–Mild
–Regular
–Strong
–Very strong
–AromaDouble Shot
Tip: For a strong taste of coffee, select a high coffee strength when setting a large capacity.
Selecting ground coffee
1.Press the symbol for your desired drink.
2.Press  repeatedly until the display shows «Gr. coffee».
→ «Dispensing a coffee drink made from ground coffee», Page 18
AromaDouble Shot
You can dispense an extra-strong coffee by using the AromaDouble Shot function.
The longer coffee is brewed, the more bitter substances and undesirable aromas are released. The bitter substances and undesirable aromas affect the taste and digestibility of the coffee. To ensure that only pleasant-tasting and easily digestible aromatic substances are released, fresh coffee beans are ground and brewed when half the quantity has been prepared.
Basic operation en
Tip: You can select the AromaDouble Shot function for any drink containing a proportion of at least 35 ml coffee volume.
Note: The AromaDouble Shot function is not available for every drink and drink volume.
Adjusting the amount
1.Press the symbol for your desired drink.
2.Press  repeatedly until the desired volume is shown on the display.
Dispensing two cups at once
Depending on the appliance model, you can prepare two cups at the same time for certain drinks.
Note
The «Two cups at once» function is not available for the following selections:
¡Ground coffee
¡AromaDouble Shot
¡Volume smaller than 35 ml
1.Press the symbol for your desired drink.
2.Press  .
.
a The setting is shown on the display.
3.Place two cups on the left and right below the outlet system.
4.Press 
 .
.
The drink is prepared in 2 steps. The beans are ground in 2 grinding oper-
ations.
a The drink is brewed and then runs into the cup.
5. Wait until the process is completed.
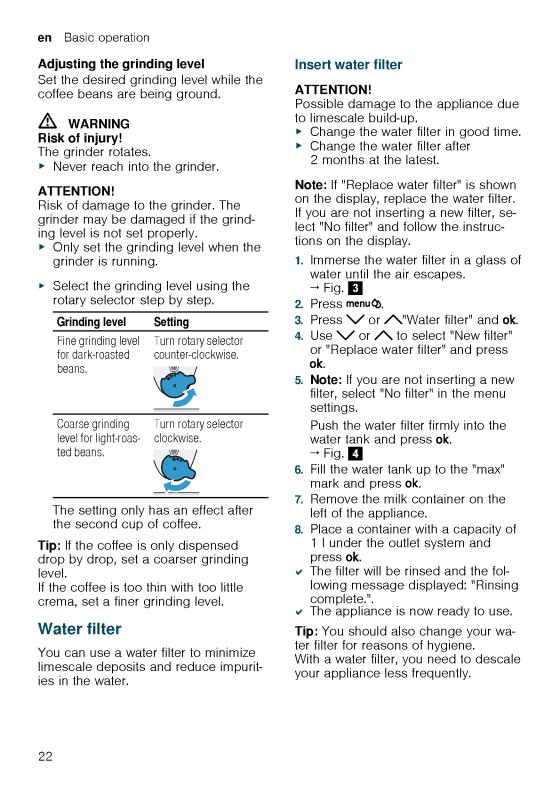
Grinder
Your appliance has an adjustable grinder, which you can use to customise the grinding level of your coffee beans.
21

en Basic settings
Overview of the basic settings
|
Setting |
Selection |
Description |
|
Cleaning and care |
Milk system |
Start service programme. |
|
Descale |
→ «Service programmes», |
|
|
Clean |
Page 28 |
|
|
calc’nClean |
||
|
Cup warmer 1 |
Cup warmer off 2 |
Switch cup heater on or off. |
|
Cup warmer on |
→ «Cup heater», Page 23 |
|
|
Water filter |
New filter |
Set use of the water filter. |
|
No filter |
|
Coffee temp. |
normal |
|
high |
|
|
max. |
Set the temperature for coffee drinks.
Note: The setting is effective for all preparation types.
|
Languages |
See options on the appliance. |
Set menu language. Changes are immediately displayed.
|
Autom. switch-off |
See options on the appliance. |
Set how long the appliance should wait after preparing the last drink before automatically switching itself off.
|
Water hardness |
1 |
(soft) |
Set the appliance to the local wa- |
|
2 |
(medium) |
ter hardness. |
|
|
3 |
(hard) |
→ «Setting the water hardness», |
|
|
4 |
(very hard)2 |
Page 16 |
|
|
Water-softening system |
|||
|
Key tones |
Key tones on 2 |
Switch the button tones on or off. |
|
|
Key tones off |
|
Factory settings |
Full reset? |
|
Continue: OK |
|
|
Cancel: ← |
Restore settings to the factory settings.
Note: All individual settings will be deleted and reset to the factory settings.
1Depending on the appliance specifications
2Factory setting (may vary according to model)
Changing the basic settings
1. Press 

 .
.
2.Use  or
or  to select the desired basic setting and press
  .
.
a The display will show the setting options and the navigation symbols will light up. The display indicates the current setting.
24

¡If you accidentally interrupt the service programme, you must reset it. → «Resetting a service programme»,
Page 29
Tips
¡If you use a water filter, this prolongs the time interval until a service programmes needs to be performed.
¡You can combine the cleaning and descaling programmes using the calc’nClean service programme. → «Using calc’nClean», Page 30
¡Clean your appliance with a soft, damp cloth immediately after a service programme to remove any descaling solution residues and prevent corrosion.
Resetting a service programme
Take the following steps if the service programme is interrupted, e.g. due to a power failure.
1.Rinse out the water tank.
2.Fill the water tank with fresh, noncarbonated water up to the «max» marking.
3.Press  .
.
a The appliance will rinse itself for approx. 2 minutes.
4.Empty and clean the drip tray.
5.Insert the drip tray and close the door.
6.Restart the service programme.
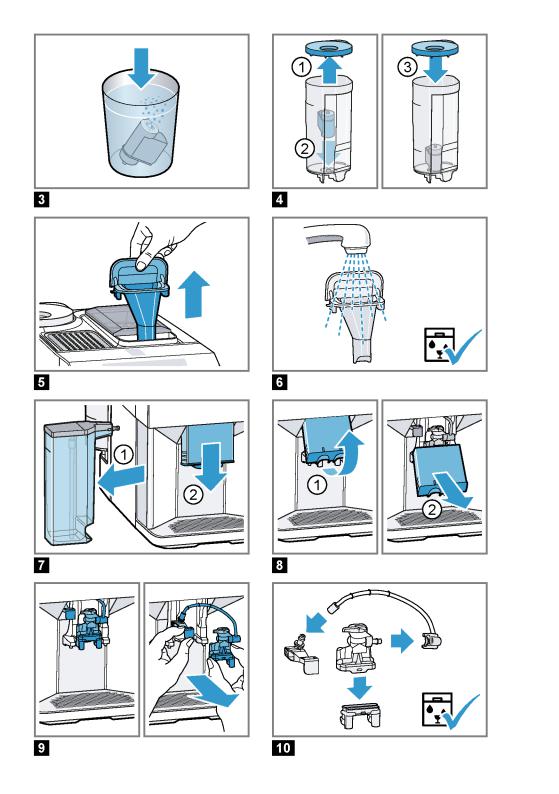
Using the milk system cleaning programme
Rinse the milk system with water, if necessary. The rinsing process takes approx. 1 minute.
Requirement: The brewing unit is cleaned.
→ «Cleaning brewing unit», Page 27
1.Press 

 .
.
2.Use  and
and  to select «Cleaning and care» and press
  .
.
Cleaning and maintenance en
3.Use  and
and  to select «Milk system» and press
  .
.
4.To start the programme, press  .
.
a The display will guide you through the programme.
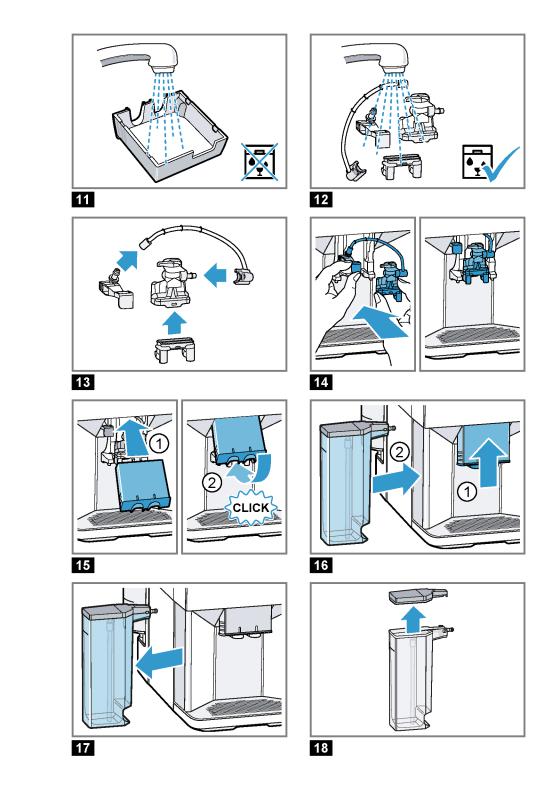
5.Remove and empty the milk container.
6.Clean the milk container, milk tube and suction pipe.
7.Fit the components and insert the milk container.
→ Fig. 19
8.Place an empty glass under the outlet system and press  .
.
The milk system will now clean itself automatically.
a The program has ended and the appliance is ready for operation.
Tip: If you want to clean the milk system particularly thoroughly, clean regularly by hand.
→ «Cleaning the milk system», Page 27
Using the descaling programme
Run the descaling programme when your appliance prompts you. The process takes approx. 30 minutes.
Requirement: The brewing unit is cleaned.
→ «Cleaning brewing unit», Page 27
1.Press 

 .
.
2.Use  and
and  to select «Cleaning and care» and press
  .
.
3.Use  and
and  to select «Descale» and press
  .
.
4.To start the programme, press  .
.
a The display will guide you through the programme.
5.Empty and insert the drip tray.
6.Remove and empty the milk container.
7.Clean the milk container, milk tube and suction pipe.
29

en Cleaning and maintenance
8.Fit the components and insert the milk container.
→ Fig. 19
9.If there is a water filter, remove it.
10.Press  .
.
11.Empty the water tank and fill with lukewarm water up to the «0.5 l calc» mark.
12.Dissolve one Siemens descaling tablet in the water tank and press  .
.
13.Place a container with a capacity of 1 l under the outlet system and press  .
.
a The descaling programme will run for approx. 20 minutes.
14.If «Refill descaler.» is shown on the display, add more descaling solution and press  .
.
15.Rinse the water tank.
16.Press  .
.
17.If there is a water filter, insert the water filter.
→ «Insert water filter», Page 22
18.Press  .
.
19.Fill the tank with fresh water up to the «max» mark.
20.Press  .
.
a The descaling programme takes approx. 1 minute and rinses the appliance.
21.Empty and insert the drip tray.
22.Remove and empty the milk container.
23.Clean the milk container, milk tube and suction pipe.
24.Fit the components and insert the milk container.
→ Fig. 19
a The program has ended and the appliance is ready for operation.
Using the cleaning programme
Run the cleaning programme when your appliance prompts you. The process takes approx. 9 minutes.
Requirement: The brewing unit is cleaned.
→ «Cleaning brewing unit», Page 27
1.Press 

 .
.
2.Use  and
and  to select «Cleaning and care» and press
  .
.
3.Use  and
and  to select «Clean» and press
  .
.
4.To start the programme, press  .
.
a The display will guide you through the programme.
5.Empty and insert the drip tray.
6.Open the ground coffee compartment.
7.Place one Siemens cleaning tablet into the ground coffee compartment.
8.Close the ground coffee compartment and press  .
.
9.Place a container with a capacity of 1 l under the outlet system and press  .
.
a The cleaning programme takes approx. 7 minutes.
10.Empty and insert the drip tray.
a The program has ended and the appliance is ready for operation.
Using calc’nClean
You can combine the cleaning and descaling programmes using the calc’nClean service programme. Run the calc’nClean programme when your appliance prompts you. The process takes approx. 43 minutes.
Requirement: The brewing unit is cleaned.
→ «Cleaning brewing unit», Page 27
1.Press 

 .
.
2.Use  and
and  to select «Cleaning and care» and press
  .
.
3.Use  and
and  to select «calc’nClean» and press
  .
.
4.To start the programme, press  .
.
a The display will guide you through the programme.
30
![]()
5.Empty and insert the drip tray.
6.Remove and empty the milk container.
7.Clean the milk container, milk tube and suction pipe.
8.Fit the components and insert the milk container.
→ Fig. 19
9.If there is a water filter, remove it.
10.Press  .
.
11.Empty the water tank and fill with lukewarm water up to the «0.5 l calc» mark.
12.Dissolve one Siemens descaling tablet in the water tank and press  .
.
13.Place a container with a capacity of 1 l under the outlet system and press  .
.
a The descaling programme will run for approx. 20 minutes.
14.If «Refill descaler.» is shown on the display, add more descaling solution and press  .
.
15.Rinse the water tank.
16.Press  .
.
17.If there is a water filter, insert the water filter.
→ «Insert water filter», Page 22
18.Press  .
.
19.Fill the tank with fresh water up to the «max» mark.
20.Press  .
.
a The programme takes ap-
prox. 1 minute and rinses the appliance.
21.Empty and insert the drip tray.
22.Open the ground coffee compartment.
23.Place one Siemens cleaning tablet into the ground coffee compartment.
24.Close the ground coffee compartment and press  .
.
Cleaning and maintenance en
25.Place a container with a capacity of 1 l under the outlet system and press  .
.
a The cleaning programme takes approx. 7 minutes.
26.Empty and insert the drip tray.
27.Remove and empty the milk container.
28.Clean the milk container, milk tube and suction pipe.
29.Fit the components and insert the milk container.
→ Fig. 19
a The program has ended and the appliance is ready for operation.
31


|
Rectifying faults en |
||
|
Errors |
Cause |
Troubleshooting |
|
No milk intake by the milk sys- |
Check whether the milk tube is im- |
|
|
tem. |
mersed in the milk. |
|
|
Appliance is not dispensing |
Milk system is soiled. |
Clean the milk system in the dish- |
|
hot water. |
washer. |
|
|
→ «Cleaning the milk system», |
||
|
Page 27 |
Milk system cannot be assembled or disassembled.
|
Order of assembly is wrong. |
First connect the milk system and |
|
then the milk container. When disas- |
|
|
sembling, you must first remove the |
|
|
milk container and then the milk sys- |
|
|
tem. |
|
Appliance is not dispensing |
Air is in the water filter. |
1. |
Immerse the water filter in water with |
|
drinks. |
the opening facing upwards until no |
||
|
more air bubbles escape. |
|||
|
2. |
Reinsert the filter. |
||
|
→ «Insert water filter», Page 22 |
|||
|
Firmly press the water filter straight |
|||
|
down into the tank connection. |
|||
|
There is dripping water on the |
Drip tray was removed too |
Wait a few seconds after the last |
|
|
inner floor of the appliance. |
soon. |
drink was dispensed before removing |
|
|
the drip tray. |
Brewing unit cannot be removed.
|
Brewing unit is not in the re- |
Switch the appliance back on. |
|
moval position (e.g. frost pro- |
|
|
tection activated). |
|
Appliance cannot be oper- |
Appliance is in demo mode. |
To deactivate demo mode, press and |
|
|
ated. |
hold for at least 5 seconds. |
||
|
Change displays. |
|||
|
Grinder won’t start. |
Appliance is too hot. |
Wait 1 hour so the appliance can cool |
|
|
down. |
Notifications on the display panel
|
Errors |
Cause |
Troubleshooting |
||
|
Display shows «Close» despite |
Door is not properly closed. |
Press the door firmly shut. |
||
|
the fact that the door is |
||||
|
Appliance is too hot. |
Wait 1 hour so the appliance can cool |
|||
|
closed. |
||||
|
down. |
||||
|
Display shows «Please empty |
Appliance is switched off and |
1. |
Switch the appliance on, and remove |
|
|
drip tray and reinsert.» despite |
does not detect emptying. |
the drip tray. |
||
|
the fact that the drip tray is |
2. |
Re-insert the drip tray. |
||
|
empty. |
||||
|
Drip tray is soiled. |
Clean the drip tray thoroughly. |
|||
33

en Rectifying faults
|
Errors |
Cause |
Troubleshooting |
||
|
Display shows «Please refill |
Water tank is wrongly inser- |
Insert the water tank correctly. |
||
|
water tank» despite the fact |
ted. |
|||
|
that the water tank is full. |
||||
|
Carbonated water is in the wa- |
Fill the water tank with fresh tap wa- |
|||
|
ter tank. |
ter. |
|||
|
Float is stuck in the water |
1. |
Remove the water tank. |
||
|
tank. |
2. |
Clean the water tank thoroughly. |
||
|
New water filter was not |
1. |
Rinse the water filter according to the |
||
|
rinsed as per instructions. |
instructions. |
|||
|
→ «Insert water filter», Page 22 |
||||
|
2. |
Place the water filter into operation. |
|||
|
Air is in the water filter. |
1. |
Immerse the water filter in water with |
||
|
the opening facing upwards until no |
||||
|
more air bubbles escape. |
||||
|
2. |
Reinsert the filter. |
|||
|
→ «Insert water filter», Page 22 |
||||
|
Water filter is old. |
Insert a new water filter. |
|||
|
Limescale deposits in the wa- 1. Clean the water tank thoroughly. |
||||
|
ter tank are blocking the sys- |
2. |
Start the descaling programme. |
||
|
tem. |
→ «Using the descaling programme», |
Page 29
Display shows «Fill the bean container with coffee beans.» despite the fact that the ban container is full.
The grinder is not grinding any coffee beans despite full bean container.
Beans are too oily and are not falling into the grinder.
Gently tap the bean container.
Change the coffee variety. Do not use oily beans.
Clean the empty bean container with a damp cloth.
Display shows «Please clean brewing unit, replace and close door.».
|
Brewing unit is soiled. |
Clean the brewing unit. |
|
→ «Cleaning brewing unit», Page 27 |
|
|
Mechanism of brewing unit is |
Clean the brewing unit. |
|
stiff. |
→ «Cleaning brewing unit», Page 27 |
|
Too much ground coffee in |
Use no more than 2 level measuring |
|
the brewing unit. |
spoons of ground coffee. |
|
→ «Cleaning brewing unit», Page 27 |
|
Display shows «Voltage (V) in- |
Voltage in the house system is |
Only operate the appliance at 220 — |
|
correct.». |
incorrect. |
240 V. |
|
Display shows «Please restart |
Brewing unit is heavily soiled |
Restart the appliance. |
|
appliance.». |
or cannot be removed. |
Clean the brewing unit. |
|
→ «Cleaning brewing unit», Page 27 |
||
34

|
Rectifying faults en |
|||
|
Errors |
Cause |
Troubleshooting |
|
|
Display shows «Please restart |
Appliance has a fault. |
1. |
Pull out the mains plug and wait |
|
appliance.». |
5 seconds. |
||
|
2. |
Re-insert the mains plug. |
||
|
Display very frequently shows |
Water is too hard. |
1. |
Insert a new water filter. |
|
«calc’nClean». |
→ «Insert water filter», Page 22 |
||
|
2. |
Set the corresponding water hard- |
||
|
ness. |
|||
|
→ «Setting the water hardness», |
|||
|
Page 16 |
Incorrect or too little descaling agent used.
When descaling, only use suitable tablets.
Problem with results
|
Errors |
Cause |
Troubleshooting |
|
|
Coffee or milk froth quality |
Build-up of limescale in the ap- |
Descale the appliance. |
|
|
varies widely. |
pliance. |
→ «Using the descaling programme», |
|
|
Page 29 |
|||
|
Milk froth quality varies |
Milk froth quality depends on |
Optimise the result through the selec- |
|
|
widely. |
the type of milk or plant-based |
tion of the milk or vegetable-based |
|
|
alternative used. |
drink type. |
||
|
Coffee is not dispensed or has |
Grinding level is set too fine. |
Set a coarser grinding level. |
|
|
slowed to a trickle. |
→ «Adjusting the grinding level», |
||
|
Set quantity is not reached. |
Page 22 |
||
|
Heavy build-up of limescale in |
Descale the appliance. |
||
|
the appliance. |
→ «Using the descaling programme», |
||
|
Page 29 |
|||
|
Air is in the water filter. |
1. |
Immerse the water filter in water with |
|
|
the opening facing upwards until no |
|||
|
more air bubbles escape. |
|||
|
2. |
Reinsert the filter. |
||
|
→ «Insert water filter», Page 22 |
|||
|
Coffee has no crema. |
Type of coffee is not optimal. |
Use a coffee variety with a higher pro- |
|
|
portion of Robusta beans. |
|||
|
Use beans with a darker roast. |
|||
|
Beans are no longer fresh. |
Use fresh beans. |
||
|
Grinding level is not appropri- |
Adjust the grinder to a finer setting. |
||
|
ate for coffee beans. |
→ «Adjusting the grinding level», |
||
|
Page 22 |
|||
35

en Rectifying faults
|
Errors |
Cause |
Troubleshooting |
|
Coffee is too acidic. |
Grinding level is set too |
Adjust the grinder to a finer setting. |
|
coarse. |
→ «Adjusting the grinding level», |
|
|
Page 22 |
||
|
Type of coffee is not optimal. |
Use a coffee variety with a higher pro- |
|
|
portion of Robusta beans. |
||
|
Use beans with a darker roast. |
||
|
Coffee is too bitter. |
Grinding level is set too fine. |
Set a coarser grinding level. |
|
→ «Adjusting the grinding level», |
||
|
Page 22 |
||
|
Type of coffee is not optimal. |
Change the coffee variety. |
|
|
Coffee tastes burnt. |
Grinding level is set too fine. |
Set a coarser grinding level. |
|
→ «Adjusting the grinding level», |
||
|
Page 22 |
||
|
Type of coffee is not optimal. |
Change the coffee variety. |
|
|
Coffee temperature setting is |
Set the coffee temperature lower. |
|
|
too high. |
→ «Overview of the basic settings», |
|
|
Page 24 |
Coffee grounds are not compact and are too wet.
|
The grinding level is not set |
Adjust the grinder to a coarser or |
|
optimally. |
finer setting. |
|
→ «Adjusting the grinding level», |
|
|
Page 22 |
|
Too little ground coffee. |
Use 2 level measuring spoons of |
||
|
ground coffee. |
|||
|
Beans are too oily. |
Use a different type of bean. |
||
36

Transportation, storage and disposal
Here you will find out how to prepare your appliance for transportation and storage. You will also find out how to dispose of old appliances.
Activate frost protection
Protect your appliance from frost during transportation and storage
Requirements
¡The appliance is now ready to use.
¡The water tank has been filled.
ATTENTION!
Possible damage to the appliance during transportation or storage due to liquid residues in the appliance.
Empty the pipe system before transportation or storage.
1.Place a large container under the outlet system.
2.Press 
 and select «Milk froth».
3.Press 


 .
.
4.Remove water tank.
a The appliance will automatically empty its pipe system and switch itself off.
5.Empty the water tank and the drip tray.
6.Clean the appliance thoroughly.
Disposing of your old appliance
Valuable raw materials can be reclaimed by recycling old appliances.
1.Unplug the appliance from the mains.
2.Cut through the power cord.
Transportation, storage and disposal en
3.Dispose of the appliance in an environmentally friendly manner.
This appliance has been identified in accordance with the European Directive 2012/19/EU on Waste Electrical and Electronic Equipment (WEEE).
This Directive provides an EUwide framework for returning and recycling old appliances.
After-sales service
If you have any queries, are unable to rectify faults on the appliance yourself or if your appliance needs to be repaired, contact after-sales service. You can solve many problems yourself by consulting the information on troubleshooting in these instructions or on our website. If this is not the case, contact our after-sales service.
We will always find an appropriate solution.
With any warranty claims, we will make sure that your appliance is repaired by after-sales customer service technicians using original spare parts, including after the manufacturer’s warranty has expired.
Note: Under the manufacturer’s warranty conditions, use of the after-sales service is free.
When contacting after-sales service, you will need the product number (E no.) and the production number (FD no.) of your appliance.
The contact details of the after-sales service can be found in the after-sales service directory at the end of the instructions or on our website.
37

|
en Technical specifications |
||
|
E number and FD number |
Type of grinder |
Ceramic |
The E number and the FD number can be found on the appliance’s rating plate.
Making a note of your appliance’s details and the after-sales telephone number will enable you to find them again quickly.
Warranty conditions
You can make warranty claims for your appliance under the following conditions.
The guarantee conditions for this appliance are as defined by our representative in the country in which it is sold. Details regarding these conditions can be obtained from the dealer from whom the appliance was purchased. The bill of sale or receipt must be produced when making any claim under the terms of this guarantee.
Technical specifications
Facts and figures for your appliance can be found here.
|
Voltage |
220–240 V |
|
Frequency |
50 Hz |
|
Connection rating |
1500 W |
|
Maximum static pump pres- |
15 bar |
|
sure |
|
|
Maximum capacity of water |
1.7 l |
|
tank (without filter) |
|
|
Maximum capacity of bean |
270 g |
|
container |
|
|
Length of the power cable |
100 cm |
|
Appliance height |
37.3 cm |
|
Appliance width |
24.9 cm |
|
Appliance depth |
42.8 cm |
|
Weight, empty |
8-9 kg |
38

|
Table des matières |
|
|
Sécurité …………………………………… |
41 |
|
Indications générales ………………….. |
41 |
|
Utilisation conforme ……………………. |
41 |
|
Limitation du groupe d’utilisateurs…. |
41 |
|
Utilisation sûre …………………………… |
42 |
|
Protection de l’environnement et |
|
|
économies ……………………………….. |
45 |
|
Élimination de l’emballage …………… |
45 |
|
Économies d’énergie ………………….. |
45 |
|
Installation et branchement ………… |
45 |
|
Contenu de la livraison ……………….. |
45 |
|
Installer et raccorder l’appareil……… |
45 |
|
Présentation de l’appareil…………… |
46 |
|
Appareil……………………………………. |
46 |
|
Éléments de commande ……………… |
46 |
|
Écran……………………………………….. |
46 |
|
Aperçu des boissons…………………. |
47 |
|
Accessoires……………………………… |
48 |
|
Avant la première utilisation……….. |
48 |
|
Première mise en service…………….. |
48 |
|
Remplir le réservoir d’eau ……………. |
48 |
|
Remplir le réservoir pour café en |
|
|
grains ………………………………………. |
49 |
|
Régler la langue ………………………… |
49 |
|
Régler la dureté de l’eau……………… |
49 |
|
Indications générales ………………….. |
50 |
|
Utilisation de base …………………….. |
51 |
|
Allumer ou éteindre l’appareil……….. |
51 |
|
Préparation de boisson……………….. |
51 |
|
Préparer une boisson à base de |
|
|
café en grains frais …………………….. |
51 |
|
Préparer une boisson à base de |
|
|
café moulu………………………………… |
52 |
|
Préparation de boisson avec du |
|
|
lait …………………………………………… |
52 |
|
Utiliser le réservoir de lait…………….. |
52 |
|
1 Selon l’équipement de l’appareil |
|
fr |
|
|
Préparer une boisson à base de |
|
|
café avec du lait ………………………… |
53 |
|
Préparer des boissons spéciales ….. |
53 |
|
Préparer de la mousse de lait ………. |
53 |
|
Préparer de l’eau chaude…………….. |
54 |
|
Réglages des boissons ………………. |
54 |
|
Filtre à eau ……………………………….. |
56 |
|
Sécurité enfants ……………………….. |
56 |
|
Activer la sécurité enfants ……………. |
56 |
|
Désactiver la sécurité enfants ………. |
56 |
|
Chauffage pour tasses1 ……………… |
57 |
|
Réglages de base ……………………… |
57 |
|
Aperçu des réglages de base………. |
57 |
|
Modifier des réglages de base …….. |
58 |
|
Nettoyage et entretien ……………….. |
58 |
|
Lavage au lave-vaisselle ……………… |
58 |
|
Produits de nettoyage …………………. |
59 |
|
Nettoyer l’appareil ………………………. |
59 |
|
Nettoyer la cuvette d’égouttage et |
|
|
le bac à marc de café…………………. |
60 |
|
Nettoyer le puits de café moulu ……. |
60 |
|
Nettoyer le système de lait…………… |
60 |
|
Nettoyer le réservoir de lait ………….. |
61 |
|
Nettoyer l’unité de percolation………. |
61 |
|
Programmes d’entretien ………………. |
62 |
|
Dépannage ………………………………. |
66 |
|
Dysfonctionnements …………………… |
66 |
|
Remarques sur le bandeau d’affi- |
|
|
chage ………………………………………. |
68 |
|
Problème de résultat…………………… |
70 |
|
Transport, stockage et élimina- |
|
|
tion …………………………………………. |
72 |
|
Activer la protection contre le gel….. |
72 |
|
Éliminer un appareil usagé ………….. |
72 |
39
|
fr |
|
|
Service après-vente…………………… |
72 |
|
Numéro de produit et numéro de |
|
|
fabrication…………………………………. |
73 |
|
Conditions de garantie………………… |
73 |
|
Données techniques………………….. |
73 |
40
![]()
Sécurité fr
 Sécurité
Respectez les informations relatives à la sécurité afin d’utiliser votre appareil en toute sécurité.
Indications générales
Vous trouverez ici des informations générales concernant ce produit d’information.
¡Lisez attentivement cette notice. C’est la seule façon d’utiliser l’appareil correctement et en toute sécurité.
¡Cette notice d’utilisation s’adresse à l’utilisateur de l’appareil.
¡Respectez les consignes de sécurité et avertissements.
¡Conservez la notice ainsi que les informations produit en vue d’une réutilisation ultérieure ou pour un futur nouveau propriétaire.
¡Contrôlez l’appareil après l’avoir déballé. Ne raccordez pas l’appareil si ce dernier a été endommagé durant le transport.
Utilisation conforme
Pour utiliser l’appareil correctement et en toute sécurité, respectez les consignes d’utilisation conforme.
Utilisez l’appareil uniquement :
¡en conformité avec la présente notice d’utilisation.
¡pour préparer des boissons chaudes.
¡jusqu’à une altitude maximale de 2000 m.
Limitation du groupe d’utilisateurs
Prévenez les dangers pour les enfants et les personnes à risque. Les enfants de 8 ans et plus, les personnes souffrant d’un handicap physique, sensoriel ou mental ou ne détenant pas l’expérience et/ou les connaissances nécessaires pourront utiliser cet appareil à condition de le faire sous surveillance, ou que son utilisation sûre leur ait été enseignée et qu’ils aient compris les dangers qui en émanent.
Ne pas laisser les enfants jouer avec l’appareil.
41


fr Présentation de l’appareil
Si l’appareil a été transporté ou entreposé à moins de 0 °C, attendre 3 heures à température ambiante avant de le mettre en service.
Après chaque branchement, attendre env. 5 secondes.
1.Retirer les films de protection.
2.Poser l’appareil sur une surface plane solide et résistante à l’eau.
3.Brancher la fiche secteur de l’appareil sur une prise de courant à contact de protection installée dans les règles.
Présentation de l’appareil
Découvrez les composants de votre appareil.
Appareil
Vous trouverez ici un aperçu des composants de votre appareil.
Remarque : Des variations de détails et de couleurs sont possibles selon le type d’appareil.
→ Fig. 2
|
1 |
Réservoir d’eau |
|
2 |
Couvercle du réservoir d’eau |
|
3 |
Chauffage pour tasses1 |
|
4 |
Couvercle préservateur d’arôme |
|
5 |
Réservoir pour café en grains |
|
6 |
Puits de café moulu |
|
7 |
Écran |
|
8 |
Bandeau de commande |
|
9 |
Éclairage des tasses1 |
|
10 |
Couvercle |
1 Selon l’équipement de l’appareil
|
11 |
Système verseur |
|
12 |
Porte du compartiment de percolation |
|
13 |
Plaque signalétique |
|
14 |
Cuvette d’égouttage |
|
15 |
Réservoir de lait |
1 Selon l’équipement de l’appareil
Éléments de commande
Vous trouverez ici un aperçu des symboles de votre appareil. Appuyez sur les symboles pour effectuer une sélection, démarrer une préparation ou procéder à un réglage.
Symbole Explication
Éteindre/allumer l’appareil
Ouvrir le menu/quitter le menu
Remarque : Les touches du menu sont visibles uniquement lorsque le menu est ouvert.
Se déplacer vers le haut dans le menu
Se déplacer vers le bas dans le menu
Confirmer/mémoriser dans le menu
Se déplacer en arrière dans le menu
Préparer deux tasses
Sélectionner l’intensité du café
Adapter la quantité
Démarrer/arrêter
Écran
L’écran affiche les boissons sélectionnées, les réglages effectués et les paramètres possibles, de même que des messages concernant l’état de fonctionnement.
L’écran affiche des informations supplémentaires et des étapes de manipulation. Les informations sont masquées
46


2.Retirer le réservoir d’eau par la poignée encastrée.
3.Rincer le réservoir d’eau.
4.Si un filtre à eau est présent, mettre le filtre à eau en place.
→ «Mettre en place le filtre à eau»,
Page 56
5.Remplir le réservoir d’eau jusqu’au repère « max ».
6.Placer le réservoir d’eau droit dans son support.
7.Fermer le couvercle.
Remplir le réservoir pour café en grains
ATTENTION !
Les grains inadaptés peuvent boucher le moulin.
Utiliser exclusivement un mélange de café en grains torréfiés pour expresso ou percolateur.
Ne pas utiliser de grains de café enrobés d’un glaçage.
Ne pas utiliser de grains de café caramélisés.
Ne pas utiliser de grains de café traités avec un additif contenant du sucre.
Ne pas utiliser de café en poudre.
1.Ouvrir le couvercle.
2.Verser les grains de café.
L’appareil se réglera sur le café en grains lors des prochaines préparations.
3.Fermer le couvercle.
Conseil : Stockez le café en grains dans un endroit frais, à l’abri de l’air, pour conserver toute sa qualité. Vous pouvez laisser le café en grains dans le réservoir pour café en grains plusieurs jours sans que le café ne perde son arôme.
Avant la première utilisation fr
Régler la langue
1. Allumer l’appareil avec  .
.
a La langue préréglée s’affiche à l’écran.
2.Appuyer sur  ou
ou  jusqu’à ce que l’écran affiche la langue souhaitée.
3.Appuyer sur 
 .
.
Conseil : Vous pouvez modifier la langue à tout moment.
→ «Aperçu des réglages de base»,
Page 57
Régler la dureté de l’eau
Le réglage correct de la dureté de l’eau est important car il permet à la machine d’indiquer le moment où un détartrage est nécessaire. Vous pouvez déterminer la dureté de l’eau avec la bandelette de test jointe ou la demander à la compagnie locale de distribution d’eau.
1.Plonger brièvement la bandelette de test dans l’eau fraîche du robinet.
2.Laisser la bandelette de test s’égoutter.
a La bandelette de test indique après 1 minute la dureté de l’eau.
3.Si la maison est équipée d’un adoucisseur d’eau, sélectionner «Adoucisseur».
49

 Loading…
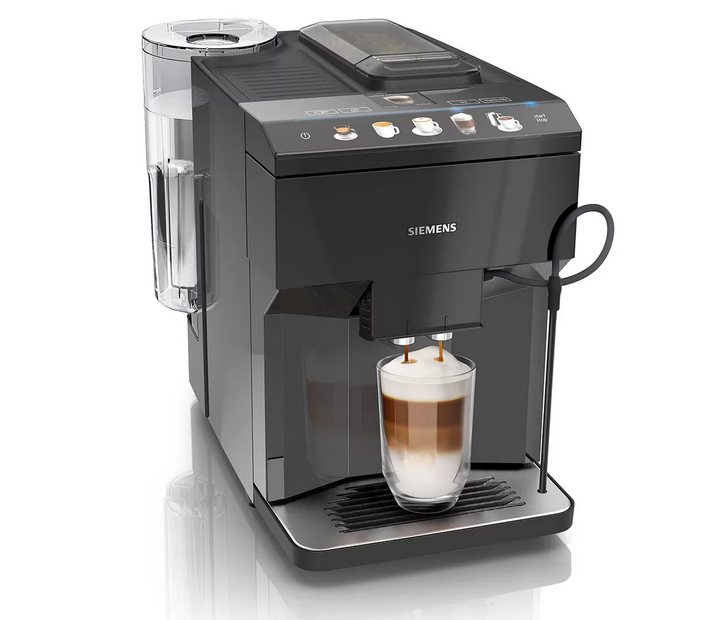
Siemens EQ.500
Загрузить Руководство Пользователя Siemens EQ.500 в формате PDF: siemens-EQ.500-RU
Просто и вкусно: удобное и интуитивно понятное управление для потрясающего кофе.
- aromaDouble Shot: кофе двойной крепости без лишней горечи, благодаря двум последовательным сеансам измельчения
Для крепкого кофе и великолепного аромата — aromaDouble Shot.
Функция aromaDouble Shot — это процесс двойного измельчения и заваривания, созданный для получения наилучшего аромата. Более короткое время экстракции предотвращает горькое послевкусие и гарантирует, что только лучшее от кофейных зерен попадет в вашу чашку, что идеально подходит для приготовления большого количества кофе с самым интенсивным ароматом.
- autoMilk Clean: функция полностью автоматической очистки паром молочной системы.
Автоматическая очистка всей молочной системы — autoMilk Clean
Приготовление действительно хорошего, ароматного кофе доставляет удовольствие, а очистка кофемашины — нет. Siemens разработал функцию автоматической очистки молочной системы. Этот полностью автоматический процесс очистки паром начинается после приготовления каждого напитка, позволяя вам расслабиться и насладиться чашкой отличного кофе.
- CeramDrive: высококачественная керамическая мельница, сделанная из износостойкой керамики.
Идеально измельченные зерна для более насыщенного аромата — ceramDrive.
Керамическая кофемолка высочайшего качества измельчает кофейные зерна до особенно равномерной консистенции, позволяя раскрыться аромату и получить идеальный кофе. Поскольку керамика практически не изнашивается, длительное наслаждение кофе высшего качества гарантировано.
- coffeeSelect display: легкий выбор и приготовление кофейных и молочных напитков прикосновением к клавишам на ярком цифровом дисплее
Дисплей coffeeSelect
Простой и удобный в использовании дисплей делает приготовление кофе приятным. Полноцветный дисплей coffeeSelect обеспечивает интуитивно понятное управление. Каждый рецепт напитка наглядно представлен и может быть выбран одним касанием. Поэтому вы легко можете приготовить кофе с помощью полностью автоматических кофемашин Siemens.
- iAroma System: умное приготовление и идеальный вкус благодаря уникальной технологии.
Для крепкого кофе и великолепного аромата — aromaDouble Shot.
Функция aromaDouble Shot — это процесс двойного измельчения и заваривания, созданный для получения наилучшего аромата. Более короткое время экстракции предотвращает горькое послевкусие и гарантирует, что только лучшее от кофейных зерен попадет в вашу чашку, что идеально подходит для приготовления большого количества кофе с самым интенсивным ароматом.
Техническая спецификация
Вкус
- Многообразие напитков нажатием одной кнопки: эспрессо, кофе, капучино, латте маккиято. Быстро и удобно.
- AromaDouble Shot — приготовление напитка двойной крепости
Комфорт
- coffeeSelect display: Легкий выбор и приготовление кофейных и молочных напитков прикосновением к клавишам на ярком цифровом дисплее
- Возможность использования высоких стаканов для латте-макиато: высота капучинатора регулируется до 15 см.
- Съемная емкость для воды 1.7л
Характеристики
- ceramDrive: высококачественная кофемолка из прочной керамики
- OneTouch кофе с молоком со специальной мелкопористой молочной пеной возможно благодаря инновационной молочной системе для приготовления капучино.
- Выбор напитков: капучино, эспрессо, молочная пена, горячая вода, кофе, латте маккиято
- Быстрый разогрев системы: первая чашка кофе за рекордно короткое время
- Давление помпы 15 бар
- Отсек для молотого кофе
Гигиена
- Удобная дверца на передней панели приборов позволяет с легкостью очистить поддон для капель и блок заваривания
- Съемный заварочный блок
- Программа автоматического ополаскивания при выключении, включении
- AutoMilk Clean: автоматическая чистка молочной системы паром
- Капучинатор легко разбирается, все части можно мыть в посудомоечной машине
- Съемный отсек для кофейной гущи, дренажный поддон для капель, решетка
- Полностью автоматическая программа удаления накипи и очистки системы (комбинированная программа calc`n`clean доступна)
Дополнительно
- Отсек для кофейных зерен (270гр) c изоляцией для снижения шума
- Регулируемая степень помола (многоступенчатая)
- Возможность использования фильтра для воды: использование очищенной воды для приготовления напитка продлевает срок службы прибора
- Выбор языка для сообщений на дисплее
- Блокировка от детей
- Мощность: 1500 Ватт
Аксессуары
- Дополнительные аксессуары: таблетки для очистки (TZ80001), таблетки для декальценации (TZ80002), фильтр для воды BRITA Intenza (TZ70003), набор для обслуживания полностью автоматических кофемашин (TZ80004), контейнер для молока (TZ80009N)
Техническая информация
Тип
| Возможность вращения прибора | Не |
|---|---|
| Дизайн резервуара для воды | интегрированная, прозрачная, съемная, фильтр для воды Brita |
Размер и вес
| Размеры | 373 x 276 x 452 мм |
|---|---|
| Кол-во чашек Эспрессо/ Капучино | 1-2 |
| Вес нетто | 8,4 кг |
Комфорт
| Количество отсеков для зерен | 1 |
|---|---|
| Управление | Электронный |
| Тип дисплея | TFT-дисплей с сенсорными управлением |
| baristaMode | Не |
| Сигнализатор рабочего состояния | Да |
| Резервуар для отработанного кофе | Да |
| Программирование | время выключения, демонстрационный модуль, жесткость воды, защита от детей, звук кнопок, температура кофе, фильтр для воды, язык |
| Программирование | Да |
| Устройство безопасности | Предохранитель с тепловым реле |
| Диалоговый дисплей | Да |
Технические особенности
| Мощность подключения | 1 500 Вт |
|---|---|
| Частота | 50 Гц |
| Тип штепсельной вилки | Вилка с заземлением |
| Напряжение | 220-240 В |
Общая информация
| Марка | Siemens |
|---|---|
| Название модели/ международный код | TP501R09 |
| EAN-код | 4 242 003 837 115 |
| Тип прибора | полноавтом.кофемашина эспрессо |
| Страна производства | SI |
Ремонт и обслуживание
Перейти к контенту
Кофемашины Siemens
 кофемашина")
- Размер инструкции: 14.70 Мб
- Формат файла: pdf
Если вы потеряли инструкцию от кофемашины Siemens TP501R09 (EQ.500 classic), можете скачать файл для просмотра на компьютере или печати.
Инструкция для кофемашины Siemens TP501R09 (EQ.500 classic) на русском языке. В руководстве описаны возможности и полезные функции, а также правила эксплуатации. Перед использованием внимательно ознакомьтесь с инструкцией.
Чтобы не читать всю инструкцию вы можете выполнить поиск по содержимому внутри инструкции и быстро найти необходимую информацию. Рекомендации по использованию помогут увеличить срок службы кофемашины Siemens TP501R09 (EQ.500 classic). Если у вас появилась проблема, то найдите раздел с описанием неисправностей и способами их решения. В нем указаны типичные поломки и способы их решения.
View the manual for the Siemens EQ.500 TQ505R09 here, for free. This manual comes under the category coffee makers and has been rated by 17 people with an average of a 8.4. This manual is available in the following languages: English. Do you have a question about the Siemens EQ.500 TQ505R09 or do you need help? Ask your question here
The Siemens EQ.500 TQ505R09 is a coffee maker that offers a range of features to enhance your coffee brewing experience. Designed with precision and functionality in mind, this appliance combines high-quality materials with innovative technology.
One of the key features of the Siemens EQ.500 TQ505R09 is its built-in grinder. This allows you to grind your coffee beans to your preferred fineness, ensuring a fresh and flavorful cup of coffee every time. The grinder is adjustable, allowing you to customize the grind size to suit your taste.
Another notable feature is the aromaDouble Shot function, which delivers an extra-strong coffee without the bitterness. By using a double grinding and brewing process, this function extracts maximum flavor from your coffee beans, resulting in a rich and intense cup of coffee.
The Siemens EQ.500 TQ505R09 also offers a variety of customizable settings, such as the ability to adjust the temperature and strength of your coffee. This allows you to tailor each cup to your individual preferences.
In terms of design, the Siemens EQ.500 TQ505R09 is sleek and modern, making it a stylish addition to any kitchen. The machine is user-friendly, with an intuitive interface that allows for easy navigation and operation.
Overall, the Siemens EQ.500 TQ505R09 is a reliable and durable coffee maker that delivers excellent performance. With its advanced features and customizable settings, it provides a convenient way to enjoy barista-quality coffee at home. Whether you prefer a strong espresso or a smooth cappuccino, this coffee maker has the capabilities to satisfy your cravings.
General
Can’t find the answer to your question in the manual? You may find the answer to your question in the FAQs about the Siemens EQ.500 TQ505R09 below.
How often should I descale my coffee maker?
How often a coffee machine needs to be descaled depends on how often it is used and the hardness of the water. If hard water is used it is recommended to descale once a month, if soft water is used once a quarter is sufficient.
What is the best way to descale my coffee maker?
To descale the coffee maker, it is recommended to use a liquid descaling agent which is labelled as suitable for coffee machines.
What is espresso?
Espresso is a small amount of concentrated coffee.
How long can I keep coffee beans?
The best-before date can be found on the packaging of the coffee beans. This best-before date applies as long as the bag is closed.
What is the best way to store coffee?
It is recommended to store coffee in an airtight and clean container.
What does the grind say about the taste of the coffee?
How the coffee beans are ground strongly influences the taste of the coffee. If the coffee beans are very finely ground you will have a stronger taste and if the grind is coarser you will have a milder taste.
Why is my coffee not hot enough?
Check the temperature settings on the coffee maker. Increase the temperature if necessary to get hotter coffee.
Why is no water coming out of the coffee maker?
Ensure that the water tank is filled correctly and securely attached. Check if the water filter is clean and unclogged. Run a descaling program to remove any mineral deposits that might be blocking the water flow.
What should I do if the coffee tastes too weak?
Adjust the strength settings on the coffee maker to a stronger level. Additionally, make sure you are using the correct amount of coffee grounds according to the instructions.
How can I fix the coffee machine if it is displaying an error code?
Turn off the coffee maker and unplug it from the power source. Wait for a few minutes, then plug it back in and switch it on. If the error persists, consult the troubleshooting section of the manual or contact customer support for assistance.
Why is the coffee machine leaking water?
Check the water tank and make sure it is properly inserted and not overfilled. Ensure that all the parts, such as the brew group or drip tray, are correctly positioned and free from obstructions. If the issue continues, consult the manual for specific troubleshooting steps.
Is the manual of the Siemens EQ.500 TQ505R09 available in English?
Yes, the manual of the Siemens EQ.500 TQ505R09 is available in English .
Is your question not listed? Ask your question here