
Раздел: Бытовая, кухонная техника, электроника и оборудование
Тип: Хлебопечь
Характеристики, спецификации
Максимальный вес выпечки:
900 г
Регулировка веса выпечки:
есть
Поддержание температуры:
есть, до 1 ч
Количество программ выпечки:
12
Инструкция к Хлебопечь Saturn ST-EC1775
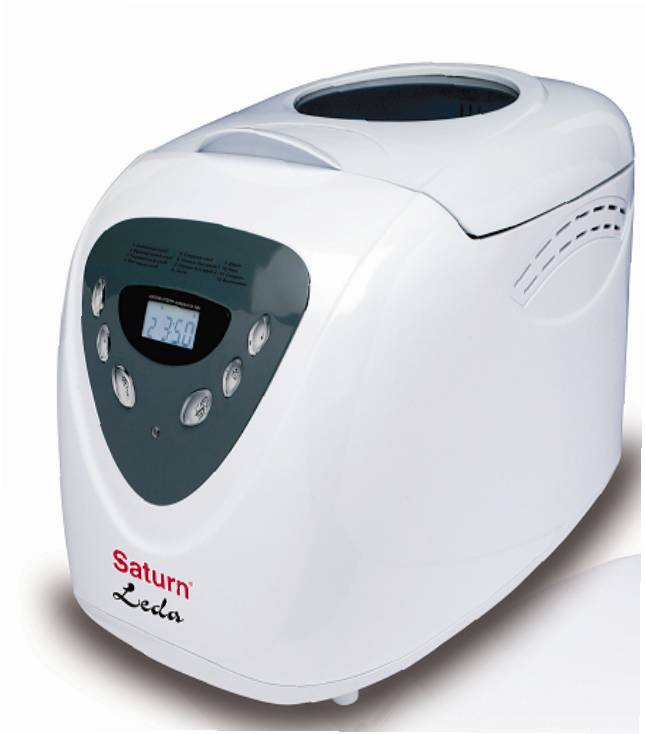
ST-EC 1775
BREAD MAKER
PEC NA CHLEBA
ХЛЕБОПЕЧЬ
ХЛІБОПІЧ
MINI PEKARA
0
IMPORTANT SAFEGUARDS:
Before using the electrical appliance, the following basic precautions should always be
followed:
1. Read all instructions.
2. Before using check that the voltage of wall outlet corresponds to the one shown on the
rating plate.
3. Do not operate any appliance with a damaged cord or plug or after the appliance
malfunctions, or is dropped or damaged in any manner. Return appliance to
manufacturer or the nearest authorized service agent for examination, repair or electrical
or mechanical adjustment.
4. Do not touch hot surfaces. Use handles or knobs.
5. To protect against electric shock do not immerse cord, plugs, or housing in water or
other liquid.
6. Unplug from outlet when not in use, before putting on or taking off parts, and before
cleaning.
7. Do not let cord hang over edge of table or hot surface.
8. The use of accessory attachments not recommended by the appliance manufacturer may
cause injuries.
9. This appliance is not intended for use by persons (including children) with reduced
physical, sensory or mental capabilities, or lack of experience and knowledge, unless they
have been given supervision or instruction concerning use of the appliances by a person
responsible for their safety.
10. Children should be supervised to ensure that they do not play with the appliance.
11. Do not place on or near a hot gas or electric burner, or in a heated oven.
12. Do not touch any moving or spinning parts of the machine when baking.
13. Never switch on the appliance without properly placed bread pan filled ingredients.
2
3
14. Never beat the bread pan on the top or edge to remove the pan, this may damage the
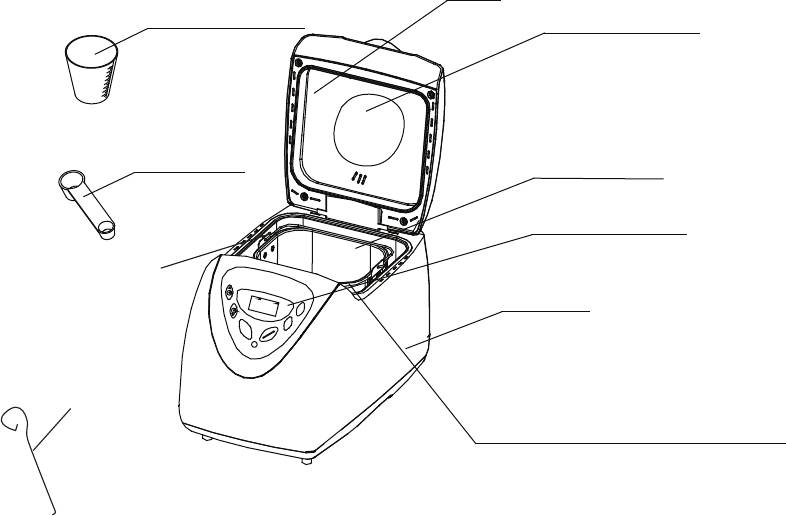
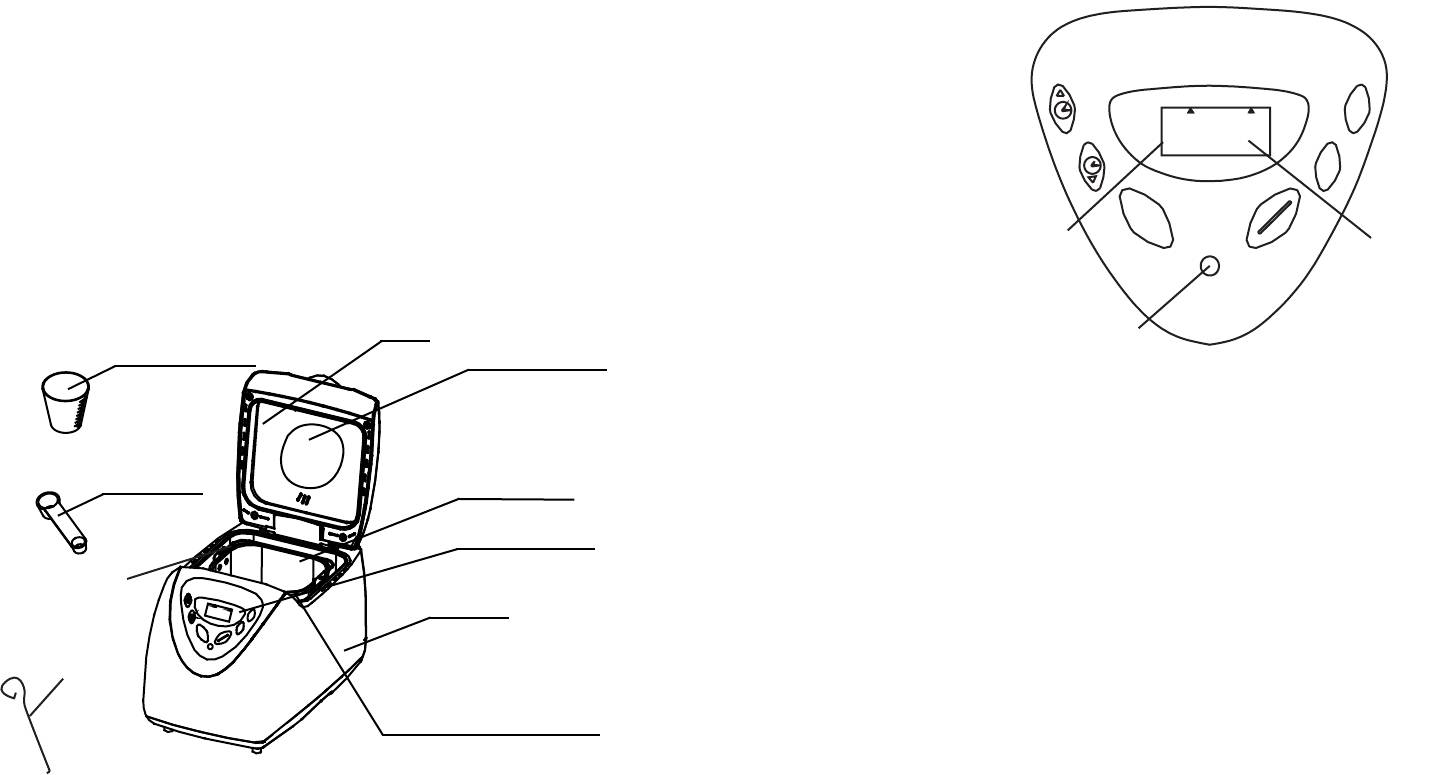
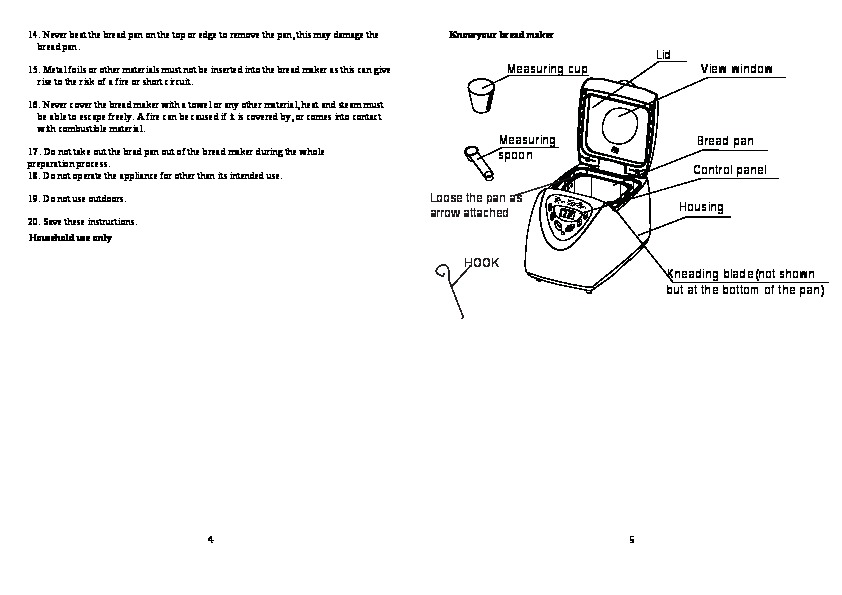
Know your bread maker
bread pan.
Lid
15. Metal foils or other materials must not be inserted into the bread maker as this can give
M easuring cup
View window
rise to the risk of a fire or short circuit.
16. Never cover the bread maker with a towel or any other material, heat and steam must
be able to escape freely. A fire can be caused if it is covered by, or comes into contact
with combustible material.
M easuring
Bread pan
17. Do not take out the brad pan out of the bread maker during the whole
spoon
preparation process.
Control panel
1
8
. Do not operate the appliance for other than its intended use.
1
2
F
.
.
R
B
1
9
. Do not use outdoors.
Loose the pan as
4
.
3
A
E
Q
.
W
N
I
S
U
C
C
H
I
C
O
K
L
E
H
W
H
E
A
T
5
.
6
.
U
S
W
E
E
T
8
7
L
D
.
.
U
L
T
R
U
G
R
T
O
A
A
F
F
A
H
A
S
S
T
T
—
I
—
I
I
1
0
1
9
.
J
A
1
1
.
C
S
.
2
A
M
LIGHT MEDIUM DARK 1
.
B
A
K
A
E
N
K
W
D
E
C
I
H
.5LB
2.0LB
Housing
arrow attached
1
3
:
00
O
O
L
R
C
20
. Save these instructions.
M
A
F
N
E
L
O
I
Z
E
U
S
A
R
S
S
T
T
T
OP
Household use only
HOOK
Kneading blade(not shown
but at the bottom of the pan)
4
5
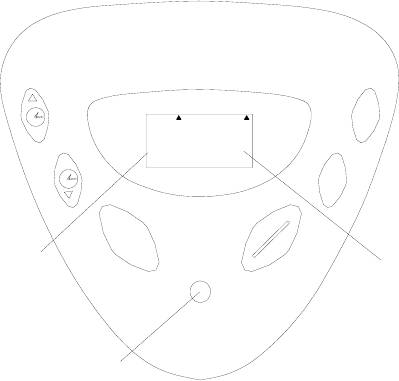
Function Introduction
1. Basic: kneading, rise and baking normal bread. You may also add ingredients to
add flavor.
2. French: kneading, rise and baking with a longer rise time. The bread baked in
1.BASIC
5.SWEET
9.JAM
2.FRENCH
6.ULTRA FAST-I
10.CAKE
this menu usually will have a crisper crust and light texture.
3.WHOLE WHEAT
7.ULTRA FAST-II
11.SANDWICH
4.QUICK
8.DOUGH
12.BAKE
3. Whole wheat: kneading, rise and baking of whole wheat bread. This setting has longer
preheat time to allow the grain to soak up the water and expand. It is not advised to use
LIGHT MEDIUM DARK 750 g 900g
R
O
L
O
the delay function as this can produce poor results.
C
4. Quick: kneading, rise and baking loaf with baking soda or baking powder.
1
3: 00
F
Bread baked on this setting is usually smaller with a dense texture.
A
L
O
E
I
Z
5. Sweet: kneading, rise and baking the sweat bread. For baking the crisp and
S
sweet bread.
M E N U
T
R
A
6. Ultra fast-I: kneading, rise and baking 750 g loaf in a shortest time. Usually
ST
TOP
the bread made is smaller and rougher than that made with Quick program.
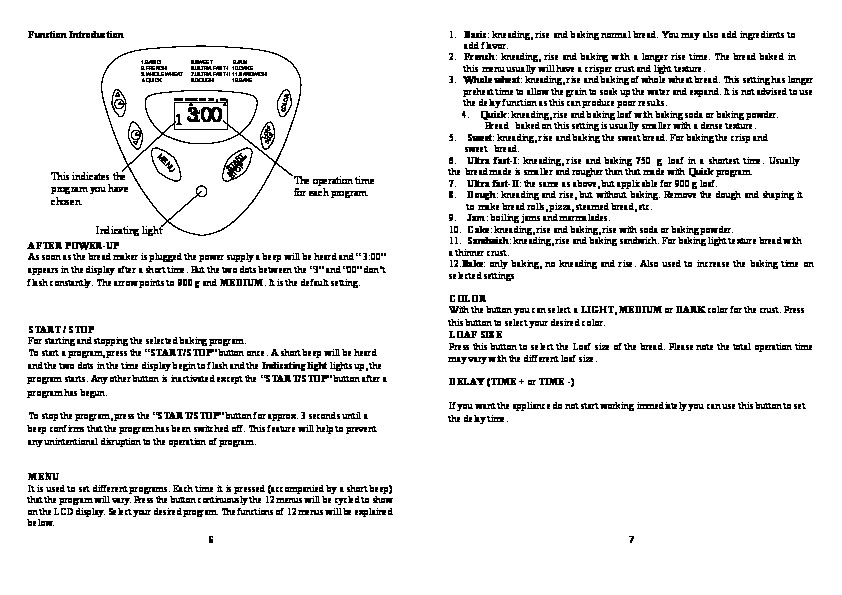
This indicates the
S
The operation time
7. Ultra fast-II: the same as above, but applicable for 900 g loaf.
program you have
for each program.
8. Dough: kneading and rise, but without baking. Remove the dough and shaping it
chosen.
to make bread rolls, pizza, steamed bread, etc.
9. Jam: boiling jams and marmalades.
Indicating light
10. Cake: kneading, rise and baking, rise with soda or baking powder.
11. Sandwich: kneading, rise and baking sandwich. For baking light texture bread with
AFTER POWER-UP
a thinner crust.
As soon as the bread maker is plugged the power supply a beep will be heard and “ 3:00”
12.Bake: only baking, no kneading and rise. Also used to increase the baking time on
appears in the display after a short time. But the two dots between the “3” and “00” don’t
selected settings
flash constantly. The arrow points to 900 g and MEDIUM. It is the default setting.
COLOR
With the button you can select a LIGHT, MEDIUM or DARK color for the crust. Press
this button to select your desired color.
START / STOP
LOAF SIZE
For starting and stopping the selected baking program.
Press this button to select the Loaf size of the bread. Please note the total operation time
To start a program, press the “START/STOP” button once. A short beep will be heard
may vary with the different loaf size.
and the two dots in the time display begin to flash and the Indicating light lights up, the
program starts. Any other button is inactivated except the “START/STOP” button after a
DELAY (TIME + or TIME —)
program has begun.
If you want the appliance do not start working immediately you can use this button to set
To stop the program, press the “START/STOP” button for approx. 3 seconds until a
the delay time.
beep confirms that the program has been switched off. This feature will help to prevent
any unintentional disruption to the operation of program.
MENU
It is used to set different programs. Each time it is pressed (accompanied by a short beep)
that the program will vary. Press the button continuously the 12 menus will be cycled to show
on the LCD display. Select your desired program. The functions of 12 menus will be explained
below.
6
7
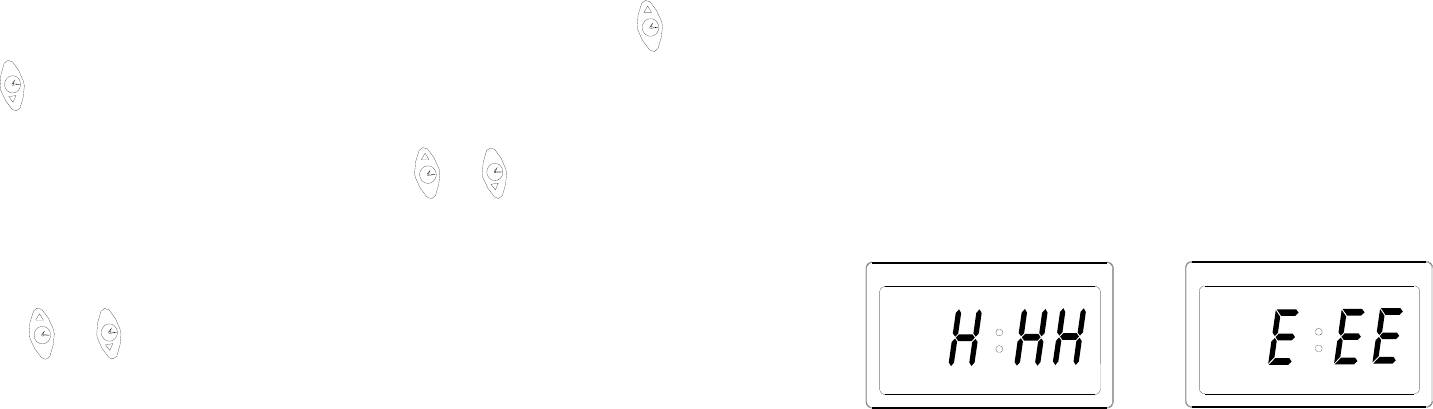
WARNING DISPLAY:
You must decide how long it will be before your bread is ready by pressing the “ ”or
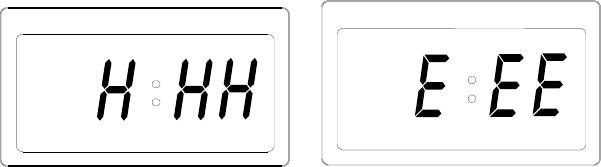
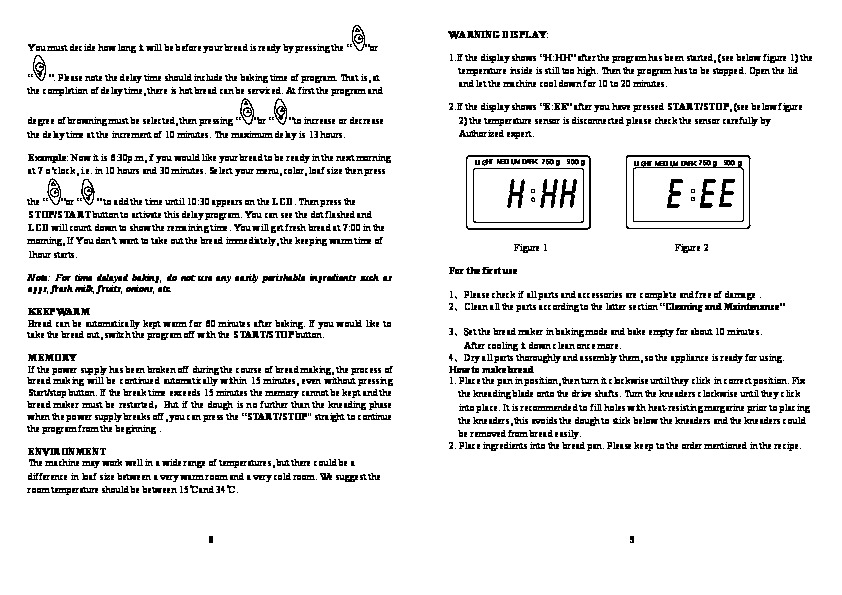
1.If the display shows “H:HH” after the program has been started, (see below figure 1) the
temperature inside is still too high. Then the program has to be stopped. Open the lid
“ ”. Please note the delay time should include the baking time of program. That is, at
and let the machine cool down for 10 to 20 minutes.
the completion of delay time, there is hot bread can be serviced. At first the program and
2.If the display shows “E:EE” after you have pressed START/STOP, (see below figure
degree of browning must be selected, then pressing “ ”or “ ”to increase or decrease
2) the temperature sensor is disconnected please check the sensor carefully by
the delay time at the increment of 10 minutes. The maximum delay is 13 hours.
Authorized expert.
Example: Now it is 6:30p.m, if you would like your bread to be ready in the next morning
L
I
G
H
T
M
E
D
I
U
M
D
A
R
K
750 g 900 g
L
I
G
H
T
M
E
D
I
U
M
D
A
R
K
750 g 900 g
at 7 o’clock, i.e. in 10 hours and 30 minutes. Select your menu, color, loaf size then press
the “
”or “ ” to add the time until 10:30 appears on the LCD. Then press the
STOP/START button to activate this delay program. You can see the dot flashed and
LCD will count down to show the remaining time. You will get fresh bread at 7:00 in the
morning, If You don’t want to take out the bread immediately, the keeping warm time of
Figure 1 Figure 2
1hour starts.
For the first use
Note: For time delayed baking, do not use any easily perishable ingredients such as
eggs, fresh milk, fruits, onions, etc.
1、Please check if all parts and accessories are complete and free of damage .
2、Clean all the parts according to the latter section “Cleaning and Maintenance”
KEEP WARM
Bread can be automatically kept warm for 60 minutes after baking. If you would like to
3、Set the bread maker in baking mode and bake empty for about 10 minutes.
take the bread out, switch the program off with the START/STOP button.
After cooling it down clean once more.
MEMORY
4、Dry all parts thoroughly and assembly them, so the appliance is ready for using.
If the power supply has been broken off during the course of bread making, the process of
How to make bread
bread making will be continued automatically within 15 minutes, even without pressing
1. Place the pan in position, then turn it clockwise until they click in correct position. Fix
Start/stop button. If the break time exceeds 15 minutes the memory cannot be kept and the
the kneading blade onto the drive shafts. Turn the kneaders clockwise until they click
bread maker must be restarted,But if the dough is no further than the kneading phase
into place. It is recommended to fill holes with heat-resisting margarine prior to placing
when the power supply breaks off, you can press the “START/STOP” straight to continue
the kneaders, this avoids the dough to stick below the kneaders and the kneaders could
the program from the beginning .
be removed from bread easily.
2. Place ingredients into the bread pan. Please keep to the order mentioned in the recipe.
ENVIRONMENT
The machine may work well in a wide range of temperatures, but there could be a
difference in loaf size between a very warm room and a very cold room. We suggest the
room temperature should be between 15 and 34 .
℃ ℃
8
9

Usually the water or liquid substance should be put firstly, then add sugar, salt and
14.Remove the bread carefully from the pan and cool for about 20 minutes before slicing.
flour, always add yeast or baking powder as the last ingredient. In case of heavy dough
15.If you are out of the room or have not pressed START/STOP button at the end of
with high Rye or wholemeal portion we advise to reverse the order of ingredients. i.e.
operation, the bread will be kept warm automatically for 1 hour and then stop further
to fill in first the dry yeast and flour, and finally the liquid to get a better kneading
keeping warm.
result.
16. When do not use or completely operation, unplug the power cord.
Note: the maximum quantities of the flour and yeast which may be used refer to the recipe.
Note: Before slicing the loaf, use the hook to remove out the Kneading blade hidden on the
3. With finger make a small indentation on one side of the flour. Add yeast to indentation,
bottom of loaf. The loaf is hot, never use the hand to remove the kneading blade.
Special introduction
Make sure it does not come into contact with the liquid ingredients or salt.
1.For Quick breads
Quick breads are made with baking powder and baking soda that activated by moisture
4. Close the lid gently and plug the power cord into a wall outlet.
and heat. For perfect quick breads, it is suggested that all liquids be placed in the bottom
of the bread pan, dry ingredients on top. During the initial mixing of quick bread batters
5. Press the Menu button until your desired program is selected.
and dry ingredients may collect in the corners of the pan, it may be necessary to help
machine mix to avoid flour clumps. If so, use a rubber spatula.
6. Press the COLOR button to select the desired crust color.
7. Press the LOAF SIZE button to select the desired size (7
50 g
or
900 g
).
2.About Ultra fast program
8. Set the delay time by pressing “ ”or “ ” button. This step may be skipped if you
The bread maker can bake loaf within 1 hour with ultra fast program. These 2 settings can
bake bread in 58 minutes,the bread is a little more dense in texture. Ultra fast I is for
want the bread maker to start working immediately.
baking
750 g
bread while Ultra fast II is for
900 g
. Please noted ingredient of water
0
should be hot water in the range of 48—50
С, you must use a cooking thermometer to
9. Press the START/STOP button to start working.
measure the temperature. The water temperature is very critical to the performance of
baking. If the water temperature is too low the bread will not be rise to expected size; if
10.For the program of BASIC, FRENCH, WHOLE WHEAT, SWEET, SANDWICH
,
the water temperature is too high it will kill the yeast prior to rising, which also will
a long beep sound will be heard during operation. This is to prompt you to add
largely affect the baking performance.
ingredients. Open the Lid and put in some ingredients. It is possible that steam will
escape through the vent slits in the lid during baking. This is normal.
Cleaning and Maintenance
11.Once the process has been completed 10 beeps sound will be heard. You can press
Disconnect the machine from the power and let it cool down prior to cleaning.
START/STOP
button for approx. 3-5 seconds to stop the process and take out the
bread. Open the Lid and while using oven mitts, firmly grasp the bread pan handle.
1.bread pan: Rub inside and outside with a damp cloth. Do not use any sharp or abrasive
Turn the pan anti-clockwise and gently pull the pan straight up and out of the machine.
agents for the consideration of protecting the non-stick coating. The pan must be dried
completely prior to installing.
12. Use non-stick spatula to gently loosen the sides of the bread from the pan.
2.
K
neading blade: If the kneading bar is difficult to remove from the axle, In such an
event
fill the Container with warm water and allow it to soak for approx.30minutes.
Caution: the Bread pan and bread may be very hot! Always handle with care and
The
kneader can then be easily removed for cleaning. Also wipe the blade carefully
use oven mitts.
with a
cloth.
13.Turn bread pan upside down onto a clean cooking surface and gently shake until bread
falls out onto rack.
10
11
cotton damp cloth, Please note both the bread pan and kneading blade are dishwashing
Cake powder is made by grinding soft wheat or low protein wheat, which is specially
safe components.
used for making cakes. Different flour seems to be alike, Actually yeast performance or
absorbability of various flour differs largely for growing areas ,growth reasons,
4. lid and window: clean the lid inside and outside with a slightly damp cloth.
grinding process and storage life. You may choose flour with different trademark to test,
5. Housing: gently wipe the outer surface of housing with a wet cloth. Do not use any
taste and compare in local market, and select the one which could produce the best
abrasive cleaner to clean as this would degrade the high polish of the surface. Never
result according to your own experiences and taste.
immerse the housing into water for cleaning.
6. Before the bread maker is packed away for storage, ensure that it has completely
6. Corn flour and oatmeal flour
cooled down, is clean and dry, and put the spoon and the kneading blade in the drawer,
and the lid is closed.
Corn flour and oat flour are made by grinding corn and oatmeal respectively, they both
are the additive ingredients of making rough bread, which are used for enhancing the
Introduction of bread ingredients
flavor and texture.
1. Bread flour
7. Sugar
Bread flour has high content of high gluten (so it can be also called high-gluten flour
which contains high protein), it has good elastic and can keep the size of the bread from
Sugar is very important ingredient to add sweet taste and color of bread. While it helps to
sunken after rising. As the gluten content is higher than the common flour so it can be
yeast bread as nourishment. white sugar is largely used. Brown sugar, powder sugar or
used for making bread with large size and better inner fiber. Bread flour is the most
cotton sugar may be called by special requirements.
important ingredients of making bread.
8. Yeast
2. Plain flour
Yeast passes doughy yeasting process, then produces carbon dioxide, making bread
expand and inner fibre soft. However, yeast fast breeding needs carbohydrate in sugar
Plain flour is made by mixing well-chosen soft and hard wheat and applicable for making
and flour as nourishment.
express bread or cakes.
1tsp. active dry yeast =3/4 tsp.instant yeast
3. Whole wheat flour
5tsp. active dry yeast =1 tsp. instant yeast
Whole wheat flour is made by grinding whole wheat, it contains wheat skin and gluten
whole wheat flour is heavier and more nutrient than common flour. The bread made by
2tsp. active dry yeast =1.5 tsp. instant yeast
whole wheat flour is usually small in size. So many recipes usually combine the whole
wheat flour and bread flour to achieve best results.
Yeast must be stored in refrigerator as it will be killed at high temperature, before
using check the date and storage life of your yeast. Store it back to the refrigerator as
4. Black wheat flour
soon as possible after each use. Usually the failure of bread rising is caused by the
dead yeast.
Black wheat flour, also named by“rough flour”, is a kind of high fiber flour that is
similar to whole wheat flour. To obtain the large size after rising it must be used in
The ways described below will check whether your yeast is fresh and active or not.
combination with high proportion of bread flour.
0
(1)pour 1/2 cup warm water (45-50
C) into a measuring cup
5. Cake powder
(2)Put 1 tsp. white sugar into the cup and stir, then sprinkle 2tsp. yeast over the water.
12
13

(3)Place the measuring cup in a warm place for about 10min. Do not stir the water.
It is strongly suggest to used measuring cup, measuring spoon to obtain accurate amount,
otherwise the bread will be largely influenced.
(4)The froth will be up to 1 cup. Otherwise the yeast is dead or inactive.
1. Weighing liquid ingredients
9. Salt
Water, fresh milk or milk powder solution should be measured with measuring cups.
Salt is necessary to improve bread flavor and crust color. But salt can also restrain yeast
Observe the level of the measuring cup with your eyes horizontally.
from rising. Never use too much salt in a recipe. if you don’t want to use salt, omit it.
When you measure cooking oil or other ingredients, clean the measuring cup
And bread would be larger if without salt.
thoroughly without any other ingredients.
10. Egg
2. Measure dry powder
Eggs can improve bread texture, make the bread more nourish and larger in size, add
Dry powder should be kept in natural and loose conditions, level the cup mouth gently
special egg flavor to bread. when using it must be peeled and stirred evenly.
by blade to ensure accurate measure.
11. Grease, butter and vegetable oil
3. Ingredient sequence
Grease can make bread be soft and delay storage life. Butter should be melted or
chopped to small particles prior use, so as to be stir evenly when you take it out from
The sequence of placing ingredients should be observed, generally speaking, the
refrigerator.
sequence is: liquid ingredients, eggs, salt and milk powder etc. When placing the
ingredients, the flour can’t be wet by liquid completely. The yeast can only be placed
12. Baking powder
on the dry flour. Exclusively, yeast can’t touch with salt. After the flour has been
kneaded for some time and a beep remind you to put Fruit ingredients into the mixture.
Baking powder mainly is used to rise the Ultra Fast bread and cake. As it do not need
If the fruit ingredients are added too early the flavor will be diminished after long time
rise time and produce gas which will form bubble or soften the texture of bread
mixing. When you use the delaying function for a long time, never add the perishable
utilizing chemical principle.
ingredients such as eggs, fruit ingredient.
13. Soda
Trouble shooting guide
The same principle as above. It can also used in combination with baking powder.
14. Water and other liquid
No.
Problem Course Solution
Water is essential ingredient for making bread. Generally speaking, water temperature
Some ingredients adhere
Unplug the bread maker and
0
0
between 20
C and 25
C is the most proper. But the water temperature should be within
Smoke from
to the heat element or
clean the heat element, but be
0
1
ventilation hole
nearby, for the first use,
careful not to burn you,
45-50
C for achieving rising speed for make Ultra Fast bread. The water may be
when baking
oil remained on the
during the first use, dry
replaced by fresh milk or water mixed with 2% milk powder, which may enhance
surface of heat element
operating and open the lid.
bread flavor and improve crust color. Some recipes may call for juice for the purpose
of enhancing bread flavor, eg: apple juice, orange juice, lemon juice and so on.
2
Keep bread warm and
Bread bottom crust
Take bread out soon without
leave bread in the bread
Ingredients weight
One of important step for making good bread is utilizing proper amount of ingredients.
14
15

is too thick pan for a long time so
keeping it warm
no rise moreover, yeast may
increase the environment
that water is losing too
have a poor activity as
temperature properly.
much
water temperature is too
high or yeast is mixed
After taking bread out, put
together with salt, or the
hot water into bread pan and
environment temperature
It is very difficult
Kneader adheres tightly
3
immerge kneader for 10
is lower.
to take bread out
to the shaft in bread pan
minutes, then take it out and
clean.
The amount of liquids is
Dough is so large
so much as to make
Reduce the amount of liquids
9
to overflow bread
1.selected program menu
Select the proper program
dough soft and yeast is
and improve dough rigidity
pan
is improper
menu
also excessive.
2.after operating, open
1.used flour is not strong
Use bread flour or strong
cover several times and
Don’t open cover at the last
powder and can’t make
powder.
Stir ingredients not
bread is dry, no brown
rise
dough rise
4
evenly and bake
crust color
Bread collapses in
badly
2.yeast rate is too rapid or
the middle parts
Yeast is used under room
Check kneader hole, then take
10
yeast temperature is too
3.Stir resistance is too
when baking
temperature
bread pan out and operate
high
large so that kneader
dough
without load, if not normal,
almost can’t rotate and
contact with the authorized
According to the ability of
stir adequately
2.Excessive water makes
service facility.
absorbing water, adjust water
dough too wet and soft.
on recipe
Press “start/stop” button and
Display “H:HH”
The temperature in bread
unplug bread maker, then
1.too much flour or short
Reduce flour or increase
after pressing
Bread weight is
5
maker is too high to
take bread pan out and open
of water
water
“start/stop”
very large and
make bread.
cover until the bread maker
button
11
organization
cools down
2.too many fruit
Reduce the amount of
construct is too
ingredients or too much
corresponding ingredients
dense
Check whether bread pan is
whole wheat flour
and increase yeast
Hear the motor
Bread pan is fixed
fixed properly and dough is
6
noises but dough
improperly or dough is
made according to recipe and
1. Excessive water or
Reduce properly water or
isn’t stirred
too large to be stirred
the ingredients is weighed
Middle parts are
yeast or no salt
yeast and check salt
accurately
12
hollow after
cutting bread
2.water temperature is
Check water temperature
Yeast is too much or
too high
Bread size is so
flour is excessive or
Check the above factors,
7
large as to push
water is too much or
reduce properly the amount
1.there is strong
cover
environment temperature
according to the true reasons
Bread surface is
glutinosity
Do not add strong glutinosity
is too high
13
adhered to dry
ingredients in bread
ingredients into bread.
powder
such as butter and
8
Bread size is too
No yeast or the amount
Check the amount and
bananas etc.
small or bread has
of yeast is not enough,
performance of yeast,
16
17
2.stir not adequately for
Check water and mechanical
RU
short of water
construct of bread maker
ХЛЕБОПЕЧЬ
If baking color is too dark for
the recipe with excessive
Уважаемый покупатель!
Crust is too thick
Different recipes or
sugar, press start/stop to
Поздравляем Вас с приобретением изделия торговой марки «Saturn». Уверены,
and baking color is
ingredients have great
interrupt the program ahead
что наши изделия будут верными и надежными помощниками в Вашем
too dark when
effect on making bread,
5-10min of intended finishing
14
домашнем хозяйстве.
making cakes or
baking color will become
time. Before removing out
food with
very dark because of
the bread you should keep the
ОСНОВНЫЕ МЕРЫ ПРЕДОСТОРОЖНОСТИ:
excessive sugar
much sugar
bread or cake in bread pan for
При использовании электрооборудования необходимо соблюдать основные меры
about 20 minutes with cover
предосторожности:
1. П покючи хбопчки к пиию, поь, чобы
closed
пжи, укзо пибо, соосоо пжию ш
о. Еси эо к, сжись со сои ио и НЕ испоьзуй
Specification
хбопчку.
Working voltage: 220-230V
2. Окючй усойсо о си, си испоьзу о.
Working frequency: 50 Hz
3. Зпщс испоьзоь усойсо, си о копкующи и
Rated current: 2.7A
(сой шу, шпсь ик и п.) пожы. Н пыйсь
Power: 600 W
оиоь усойсо сосоьо. Обись оизиоый
Set
сисый ц кифициооо осо и о.
Bread maker . . . . .…… 1pc
4. Н ксйсь очй похоси усойс.
Instruction manual . … 1pc
5. Во избжи пожи экичски око поужй шу,
Warranty book . . . . ….
. . ….
1pc
1pc
Cooking book
. . ….
шпсьую ику и копус усойс оу ии уи жикоси.
1pc
Package .
. . ….
1pc
6. Си, чобы шу пии сис с к со и ксс осых
уо и очих похосй.
Environment friendly disposal
7. Зпщс испоьзои й и ксссуо, посых
You can help protect the environment!
копк с усойсо.
Please remember to respect the local regulations: hand in the non-working electrical
8. Ко пибо испоьзус ьи ии бизи их, обхои соий
кооь.
equipments to an appropriate waste disposal center.
9. Н зщй усойсо бизи ии зоой ии экичской
пи ии ой ухок.
10. Н ксйсь щющихс й усойс поцсс боы.
11. Нико кючй пибо бз ожы обзо зпоых
иио.
12. Аккуо изкй оок, бжо общи ож поиь о.
13. Н испоьзуй ичскую фоьу ии уи иы уи
хбопчки, эо ож сь пичиой коокоо зыки.
14. Д обспчи оьой иции и избжи иск
озикои пож ико кый хбопчку пооц ии
юбы уи ио.
18
19
15. Н испоьзуй пибо кких—ибо уих цх, ко укзых
ой исукции.
1.Основной хлеб
5. Сладкий хлеб
9. Джем
2. Французский хлеб
6. Ультра-быстрый-I
10.
Кекс
16. Н испоьзуй усойсо пощи.
3.Пшеничный хлеб
7. Ультра-быстрый-II
11. Сэндвич
4. Быстрый хлеб
8. Тесто
12. Выпечка
17. Сохи исукцию по экспуции буущ.
Светлая Средняя Темная 750 г 900 г
Т
Е
В
Ц
13
: 00
Р
Е
К
И
А
З
М
Р
Б
У
Х
А
Н
М
T
Е
Н
Р
Ю
A
СТ
ОПИСАНИЕ
уазание выбранной
СТОП
ограммы
Время работы для каждой
программы
Индикатор
ВКЛЮЧЕНИЕ ПИТАНИЯ
После подключения к сети раздастся звуковой сигнал, на дисплее появится «1 3:00″.
Точки между «3» и «00» не мигают постоянно. Цифра “1” – это программа по
умолчанию. Стрелки указывают на 900 г и СРЕДНЯЯ. Это настройки по
умолчанию.
СТАРТ/СТОП
Запуск и завершение выбранной программы для выпекания.
2
.
1
4
3
.
W
.
A
B
S
.
Q
U
I
H
RE
F
IC
O
NC
CK
L
E
H
W
H
AT
E
5
.
S
8.
U
.
6.U
7
L
W
L
T
E
DOUGH
T
RA
R
E
A
T
FA
F
A
S
S
T-
T
II
-I
1
0
1
.
.
C
J
9
1
2
1
AM
.
S
B
.
A
AKE
LIGHT
MEDIUM DARK
AK
N
D
W
CH
I
Для включения программы нажмите кнопку «СТАРТ/СТОП » один раз. При этом
1.
5L
B
2.0LB
E
1
3
:
00
C
O
O
L
R
M
E
NU
I
S
A
L
O
E
раздастся короткий звуковой сигнал, две точки в иконке показа времени будут
Z
F
S
S
T
T
O
A
R
P
T
мигать, загорится индикатор. После включения кнопки «СТАРТ/СТОП » все
( .
другие кнопки становятся неактивными. Для остановки программы нажимайте
)
кнопку «СТАРТ/СТОП » в течение приблизительно 3 секунд, пока звуковой сигнал
не
по
дтвердит,
что программа была выключена. Эта особенность позволит
избежать ненамеренного прерывания выполнения заданной программы.
МЕНЮ
Используется для установки различных программ, которые изменяются при каждом
ОСНОВНЫЕ ФУНКЦИИ
нажатии (нажатие сопровождается коротким звуковым сигналом). При
непрерывном нажатии 12 меню будут появляться в циклическом порядке на ЖК
мониторе. Выберите желаемую программу.
Описание функций
20
21
1.
Основной хлеб
: вымешивание теста, подъем теста, выпекание обычного хлеба.
ФУНКЦИЯ ЗАДЕРЖКИ DELAY (В
РЕМЯ
+ или
ВРЕМЯ
-)
2. Ф
ранцузский хлеб
: вымешивание теста, подъем теста, выпекание с
Для установки времени начала приготовления используйте данную функцию.
более длительным сроком подъема. Хлеб, испеченный таким способом,
Установите срок задержки нажимая » » или » «. Пожалуйста, помните, что время
обычно имеет хрустящую корочку и легкую структуру.
задержки должно включить время выпекания. Таким образом, при завершении
3. П
шеничный хлеб
: вымешивание теста, подъем теста, выпекание хлеба
времени задержки, вы получите свежий горячий хлеб. Сначала
с использованием муки из цельного зерна. Функция с более длительным
выберите программу и степень поджаривания корочки, затем нажмите « «или
подогревом позволяет муке из цельного зерна впитать влагу. При этом
» «чтобы увеличить или уменьшить время задержки (шаг счетчика равен 10
нежелательно использование функции задержки выпекания.
4. Б
ыстрый хлеб
: вымешивание теста, подъем теста и выпекание с использованием
минутам). Максимальное время задержки 13 часов.
пищевой соды или разрыхлителя для теста. Хлеб, испеченный таким способом,
Например: сейчас 18 часов 30 минут, если вы хотите получить готовый хлеб к 7
обычно не поднимается до больших размеров и имеет плотную структуру.
часам утра, к примеру, через 10 часов 30 минут, выберите программу, цвет корочки,
5. С
ладкий хлеб
: вымешивание, подъем и выпекание сладкого хлеба с хрустящей
размер хлеба и нажмите или пока на дисплее не появится 10:30 (время
корочкой.
задержки). Затем нажмите кнопку
СТАРТ/СТОП
для включения программы.
6.
Ультра—быстрый
-I: вымешивание, подъем и выпекание 7
50 г
хлеба в короткий
На экране будет отображаться оставшееся время до окончания программы. К 7
срок. Хлеб, приготовленный таким способом обычно меньше в размере и с более
часам у вас будет свежий горячий хлеб. Хлеб автоматически подогревается в
грубой структурой, чем приготовленный при помощи программы Б
ыстрый хлеб
.
7.
Ультра—быстрый
-II: то же самое как описано выше, но применимый для хлеба 9
00 г
.
течение одного часа после завершения выпекания.
8. Т
есто
: вымешивание и подъем теста без выпекания. Готовое тесто используйте
Внимание: при задержке выпекания не используйте быстропортящиеся
для приготовления булочек, пиццы и т.д.
продукты, такие как яйца, цельное молоко, фрукты, овощи и т.д.
9. Д
жем
: приготовление варенья и джема
АВТОМАТИЧЕСКИЙ ПОДОГРЕВ
10. К
екс
: вымешивание, подъем и выпекание теста с использованием пищевой соды
Хлеб автоматически подогревается в течение одного часа после завершения
или разрыхлителя для теста.
выпекания. Для извлечения хлеба нажмите кнопку START/STOP.
11. С
ендвич
: вымешивание, подъем теста для сендвичей. Для приготовления
УСЛОВИЯ ДЛЯ НОРМАЛЬНОГО ФУНКЦИОНИРОВАНИЯ
легкого хлеба с тонкой корочкой.
Хлебопечка может работать при различных температурах, однако при низкой
12. В
ыпечка
: только выпекание без замешивания и подъема. Также используется
для увеличения срока выпекания.
температуре тесто может подняться не так хорошо, что повлияет на его размер и
структуру. Рекомендуемая температура помещения от +15° до +34°.
ВЕТ
ПРЕДУПРЕЖДАЮЩИЕ ЗНАКИ:
Выбор цвета корочки:
Светлая
,
С
редн
яя,
Р
умяная
. Нажмите эту кнопку, чтобы
выбрать желаемый эффект.
РАЗМЕР БУХАНКИ
Нажмите для выбора размера хлеба.
Помните, размер хлеба влияет на общее время приготовления.
22
23
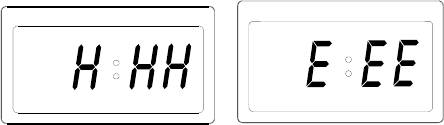
1. Если после запуска программы на дисплее отображается «H:HH» (рисунок 1), это
8. Установите время задержки если это необходимо.
означает, что температура внутри слишком высока и программа должна быть
9. Для начала работы включите кнопку СТАРТ/СТОП
10. Процесс приготовления по программам ОСНОВНОЙ ХЛЕБ,
остановлена. Откройте крышку и дайте хлебопечке остыть в течение 10 — 20 минут.
ФРАНЦУЗСКИЙ ХЛЕБ, ПШЕНИЧНЫЙ ХЛЕБ, СЛАДКИЙ ХЛЕБ,
СЭЕНДВИЧ сопровождается длинным звуковым сигналом, это говорит о
2. Если после нажатия кнопки СТАРТ/СТОП на дисплее отображается
необходимости добавления ингредиентов. Откройте крышку и загрузите
«E:EE» (рисунок 2), это означает, что датчик температуры не установлен должным
ингредиенты. Во время выпекания возможен выход пара через
образом. Обратитесь к квалифицированному персоналу для выявления
вентиляционные отверстия, это нормально.
неполадки и ее устранения.
11. 10 коротких звуковых сигналов сообщат об окончании процесса выпекания.
Нажимайте кнопку СТАРТ/СТОП в течение приблизительно 3-5 секунд, чтобы
Светлая Средняя Румяная
Светлая Средняя Румяная
9
00
7
50
9
00
7
50
остановить процесс и вынуть хлеб. Откройте крышку. Используя прихватки
прокрутите противень против часовой стрелки и аккуратно выньте его из
хлебопечки.
12. При помощи лопатки аккуратно отделите края хлеба от противня.
Внимание: помните о том, что противень и хлеб могут быть очень
горячими, будьте осторожны и всегда используйте прихватки.
.1
Рис.2
13. Переверните противень вверх дном над чистой поверхностью и аккуратно
ПЕРЕД ПРИМЕНЕНИЕМ
встряхните для извлечения хлеба.
14. Аккуратно извлеките хлеб и охладите в течение 20 минут.
1. Убедитесь в наличии и исправности всех элементов.
15. Если в момент завершения выпекания вы отсутствуете в помещении или не
2. Очистите все элементы согласно главе «УХОД И ОЧИСТКА»
была нажата кнопка СТАРТ/СТОП, хлеб будет автоматически
3. Включите программу ЫПЕЧК и прогревайте без ингредиентов
подогреваться в течение 1 часа.
в течение 10 минут. После охлаждения очистите еще раз.
16. Выключайте аппарат из сети, если не используете долгое время. Внимание:
4. Высушите все элементы и соберите, аппарат готов к эксплуатации.
перед нарезанием хлеба отделите лопасть тестомешалки от
ПРИГОТОВЛЕНИЕ ХЛЕБА
хлеба при помощи крючка (входит в комплект). Не отделяйте лопасть
1.Вставьте противень и прокрутите по часовой стрелке до появления щелчка. Установите
тестомешалку в ведущие валы, поверните по часовой стрелке до появления щелчка.
руками, помните, что температура слишком высока.
Перед установкой тестомешалки рекомендуется заполнить отверстия маргарином
ПОЛЕЗНАЯ ИНФОРМАЦИЯ
или другим жиром, это позволит снизить уровень прилипания теста к лопастям
тестомешалки.
1. Быстрое выпекание
2.Загрузите ингредиенты в противень придерживаясь рецепта. Обычно в
При выпекании хлеба ускоренным способом применяются пищевая сода и
первую очередь заливается жидкость, затем добавляется сахар, соль, и мука.
разрыхлитель, активируемые жидкостью и высокой температурой. Для
Дрожжи, пищевая сода и разрыхлитель добавляются в последнюю очередь.
улучшения вкусовых качеств рекомендуется загружать жидкость на дно
При изготовлении хлеба из зерна грубого помола или ржаного хлеба,
противня, а сыпучие ингредиенты сверху, т.к. при первоначальном
рекомендуется изменить порядок закладывания ингредиентов: сначала
вымешивании теста сыпучие ингредиенты могут плохо размешаться и остаться
загрузить сухие дрожжи и муку, в последнюю очередь добавить жидкость.
в уголках противня. В этом случае отделите сыпучие ингредиенты от стенок
3. Сделайте углубление в муке и добавьте туда дрожжи. Следите за тем, чтобы
дрожжи не соприкасались с солью или жидкостью.
при помощи шпателя.
4. Закройте крышку и подключите шнур питания к розетке.
2. Ускоренное выпекание
5. Нажмите кнопку МЕН для выбора желаемой программы.
При помощи ускоренного выпекания вы можете приготовить хлеб в течение
6. Нажмите кнопку ЦВЕТ для выбора цвета корочки.
одного часа, при этом он будет иметь более плотную структуру. Программа
7. Нажмите кнопку РЗМЕР ХНИК для выбора желаемого размера (750 г
ЛТР-ЫСТРЫ I предназначена для выпекания хлеба 750 , программа
или 900 г.).
ЛТР ЫСТРЫ II предназначена для выпекания хлеба 900 г.
24
25
Помните, что вода, добавляемая в тесто, должна иметь температуру от 48°С
3. Мука из цельного зерна
до 50°С, используйте термометр для измерения температуры воды, это очень
Мука из цельного зерна содержит больше клейковины и питательных веществ.
важно для получения хорошего теста. Вода низкой температуры может
Хлеб, приготовленный из такой муки обычно небольших размеров. Многие
стать причиной недостаточного подъема теста, вода слишком высокой
рецепты предлагают смешивание обычной муки из цельного зерна.
4. Мука грубого помола
температуры может уничтожить дрожжи, что также повлияет на подъем теста.
Мука грубого помола по структуре напоминает муку из цельного зерна. Для
УХОД И ОЧИСТКА
достижения нормального подъема теста необходимо комбинировать муку
Перед очисткой всегда выключайте аппарат из розетки и дайте ему охладиться.
грубого помола с мукой для хлеба.
1. Противень: протрите противень внутри и снаружи при помощи мягкой
5. Мука для сдобы
ткани. Не используйте для протирания грубые и абразивные материалы,
Муку для сдобы получают из сортов мягкой пшеницы или пшеницы с низким
чтобы не повредить противопригарное покрытие.
содержанием белка, которая наиболее подходит для приготовления кексов. На
2. Тестомешалка: если у вас возникли трудности при извлечении тестомешалки
качество дрожжей и муки влияют условия производства, хранения и обработки.
из вала, наполните аппарат теплой водой и оставьте на 30 минут, затем
Попробуйте продукты разных производителей, чтобы выбрать наиболее
извлеките тестомешалку. Протрите при помощи мягкой влажной ткани.
подходящий.
Тестомешалка и противень предназначены для мытья в посудомоечной машине.
6. Кукурузная и овсяная мука
3. Крышка и смотровое окошко: протрите крышку внутри и снаружи при
Кукурузную и овсяную муку получают из кукурузы и овса соответственно.
помощи мягкой влажной ткани.
Используется для усиления вкусовых качеств хлеба из муки грубого помола.
4. Корпус: аккуратно протрите корпус влажной тканью. Не используйте
7. Сахар
абразивные материалы, чтобы не повредить покрытие. Не погружайте корпус в
Сахар является важным компонентом для придания продукту сладости и
воду.
аппетитного цвета. Также он очень важен для процесса работы дрожжей.
5. Перед тем как убрать хлебопечку на сохранение, убедитесь, что она полностью
остыла, уберите мерную ложку и тестомешалку внутрь и закройте крышку.
Наиболее распространен белый сахарный песок, реже используются
ИНФОРМАЦИЯ О ПРОДУКТАХ
коричневый сахар или сахарная пудра.
1. Мука для хлеба
8. Дрожжи
Мука для хлеба имеет высокое содержание клейковины (также называется
Дрожжи вырабатывают углекислый газ, придавая тесту объем и рыхлость.
мукой с высоким содержанием клейковины и белков), обладает высокой
Хранить дрожжи следует в холодильнике, не подвергать воздействию высокой
эластичностью. Мука с более высоким содержанием клейковины позволяет
температуры. Перед употреблением проверьте срок годности и срок хранения.
выпекать хлеб большого размера. Мука является наиболее важным
Испорченные дрожжи чаще всего становятся причиной не поднявшегося теста.
ингредиентом для приготовления хлеба.
Определение годности дрожжей:
2. Обычная мука
— залейте в емкость ½ стакана теплой воды (45-50°C)
Получается путем смешивания тщательно отобранных твердых и мягких
— добавьте 1 чайную ложку сахара и размешайте, сверху добавьте 2 чайные
сортов пшеницы, используется для быстрого выпекания хлеба и приготовления
ложки дрожжей
кексов.
— оставьте емкость в теплом месте на 10 минут, не перемешивайте
26
27

—дрожжи должны вспениться и увеличиться в размере, если этого не
1. Взвешивание жидкостей
произошло, дрожжи не пригодны для употребления
Воду, свежее и сухое молоко меряют мерными стаканами. После взвешивания
9. Соль
кухонного жира, тщательно вымойте мерный стакан.
2. Взвешивание сухих порошков.
Соль является важной вкусовой добавкой, а также необходимым компонентом
Сухие порошки должны сохраняться в рыхлом состоянии. Для точного
для образования корочки. Однако, соль может плохо влиять на процесс
взвешивания сгладьте порошок в стакане лопаткой. Чрезмерное количество
подъема дрожжей. Вы можете совсем отказаться от использования соли, тогда
может повлиять на баланс рецепта. При измерении сухих ингредиентов в
ваш хлеб будет значительно больше в размере.
небольшом количестве, используйте мерную кружку.
3. Порядок добавления ингредиентов.
1.Яйца
Порядок добавления ингредиентов следующий: жидкости, яйца, соль, сухое
Яйца делают хлеб питательным и большим в размере, придают особый вкус.
молоко и т.д. Не замачивайте всю муку в воде. Дрожжи можно класть только на
сухую поверхность. Не добавляйте в дрожжи соль. После того как тесто
2.Жир, сливочное, растительное масло
замесится, сигнал оповестит вас о том, что можно добавлять фрукты. Если вы
Жир придает хлебу мягкость и позволяет продлить срок хранения. Сливочное
раньше времени добавите фрукты, выпечка может потерять аромат после
масло перед добавлением в тесто следует растопить или нарезать маленькими
долгого перемешивания. Используя функцию приостановки выпекания, не
кусочками.
используйте продукты, которые быстро портятся, такие как яйца, фрукты.
3.Разрыхлитель для теста
Разрыхлитель для теста обычно используется для приготовления хлеба по
ускоренной программе (
льтра быстрый
)
УСТРАНЕНИЕ НЕПОЛАДОК
4.Пищевая сода
Имеет те же функции, что и разрыхлитель для теста
No.
Проблема Причина Метод устранения
5.Вода, другие жидкости
Выделение дыма
На нагревательном
Выключите хлебопечку
Вода является необходимым компонентом для изготовления хлеба. Наиболее
из
элементе есть
и очистите
оптимальная температура воды для приготовления теста 20-25°
С
.
вентиляционного
частички пищевых
нагревательный элемент,
1
При изготовлении хлеба ускоренным способом вода должна иметь температуру
отверстия в
продуктов, жир
будьте осторожны,
45-50°
С
. Воду можно заменить свежим или растворимым молоком. В некоторых
процессе
или растительное
помните о наличии
рецептах используются фруктовые соки (яблочный, апельсиновый, лимонный и др.)
выпекания
масло
высокой температуры
Хлеб находился в
Нижняя корочка
Вынимайте хлеб из
КОЛИЧЕСТВО И МЕРА ИНГРЕДИЕНТОВ
процессе
2
хлеба слишком
противня сразу после
подогрева долгое
толстая
выпекания
Важно строго придерживаться меры ингредиентов, указанной в рецепте.
время
Используйте мерный стакан и мерную ложку.
28
29

слишком высокой
Выберите правильную
температуры воды,
Выбор меню
программу.
смешивания с
программы
Не открывайте крышку
солью, или из—за
неверный.
после последнего
Трудности при
низкой
Нет коричневой
подъема.
3
попытке вынуть
температуры в
корочки.
После того, как хлеб был
хлеб из противня
помещении.
Тестомешалка
вынут, залейте
Слишком много
плотно прилегает к
противень горячей водой
Излишнее
теста, которое не
Уменьшите количество
противню
и оставьте на 10 минут,
9
количество
умещается в
жидкости
хорошо промойте.
жидкости
противне
1. Выбрана
1. Недостаточно
Используйте муку для
некорректная
Выберите корректную
плотная мука для
изготовления хлеба
программа
программу
подъема
Компоненты
выпекания
2. Излишне
плохо
Выньте противень и
высокая скорость
4
вымешаны,
Используйте дрожжи
включите тестомешалку,
подъема дрожжей,
плохое
2. Сопротивление
Проседание теста
при комнатной
если проблема не
10
или слишком
выпекание
при смешивании
внутри хлеба
температуре
исчезнет, обратитесь к
высокая
слишком велико
квалифицированному
температура
персоналу.
2. Влажное или
Следуйте
Нажмите кнопку
слишком мягкое
Мигание дисплея
рекомендациям в
Слишком высокая
“СТАРТ/СТОП”,
тесто из—за
“H:HH” после
рецепте
5
температура
отключите шнур
избытка воды
нажатия кнопки
внутри хлебопечки
питания, выньте
1. Избыток муки
Уменьшите количество
“СТАРТ/СТОП”
противень, дайте
или недостаток
муки или увеличьте
Неправильно
хлебопечке остыть
Проверьте правильность
воды
количество воды
Слышен шум
11 Тяжелое тесто
установлен
установки противня.
2. Избыток
Уменьшите количество
работающего
6
противень,
Проверьте количество
фруктов или муки
фруктов и увеличьте
мотора, но тесто
слишком много
ингредиентов согласно
из цельного зерна
количество дрожжей
не вымешивается
теста
рецепту.
1. Избыток воды
Следите за количеством
Излишнее
или дрожжей,
ингредиентов согласно
количество
Хлеб полый
отсутствие соли
рецепту
12
Хлеб слишком
дрожжей, воды
внутри
2. Вода слишком
Уменьшите количество
Следите за температурой
7
большого
или муки.
высокой
согласно рецепту
воды
размера
Слишком высокая
температуры
температура в
1. Наличие липких
помещении
Мука прилипла к
ингредиентов,
Следите за количеством
Нет дрожжей, или
Проверьте необходимое
13
поверхности
таких как масло
ингредиентов
Хлеб маленького
недостаточное
количество дрожжей и
хлеба
или бананы и др.
8
размера или не
количество.
их годность. Увеличьте
поднялся
Дрожжи утратили
температуру в
активность из—за
помещении.
30
31
Проверьте количество
UA
2. Плохое
воды и исправность
вымешивание из—
механизма
ХЛІБОПІЧ
за недостатка воды
тестомешалки.
Слишком
Если цвет корочки
Шановний покупець!
толстая корочка,
слишком темный,
цвет изделия
Сахар влияет на
нажмите кнопку
Поздоровляємо Вас із придбанням виробу торговельної марки «Saturn». Упевнені, що
14
слишком темный
цвет теста
СТАРТ/СТОП за 5-10
наші вироби будуть вірними і надійними помічниками у Вашому домашньому
при выпекании
минут до окончания
господарстві.
сладкого теста
процесса выпекания.
Технические характеристики
ВАЖЛИВІ ІНСТРУКЦІЇ З БЕЗПЕКИ
Напряжение: 220-230 В
1.Перед використанням прочитайте всі інструкції.
Частота: 50 Гц
2. П пікюч хібопічки о жи, пі, щоб пу, ззч
Сила тока: 2.7А
Мощность: 600 Вт
пиі, іпоі пузі жі. Якщо ц к, з’жіьс зі сої ио і
НЕ икоисоуй хібопічку.
3.Вікючй писій і жі, кщо икоисоує йоо.
Комплектность
Хлебопечка . . ……………………… 1 ттт
шшш ...
4. Збооєьс икоисоуи писій, кщо йоо копкуючі і
Инструкция по эксплуатации 1
шт.
(жий шу, шпсь ик і..) пошкожі. Н йсь
Гарантийный талон . .…… 1 шт.
оуи писій сосійо. Зіьс у оизоий сісий ц
Книга рецептов
.……………. 1 шт.
кіфікооо оу оу.
Упаковка . .…………………………… 1 шт.
5. Н с хібопічку чі похі.
Безопаснот окружающей среды.
6. Щоб уикуи уж кичи суо зуюй шу, шпсьу
ику і копус писою у оу бо іші іии.
Вы можете помочь в охране окружающей среды!
7. Сікуй, щоб шу жи зис з кю со і окс осих куі
П, соблюдайте местные правила: передавайте неработающее
і чих похоь.
электрическое оборудование в соответствующий центр у
8. Збооєьс икоис й кссуі, що посчюьс
отходов.
копкі з писоє.
9. Буь особио ужі кои пи икоисоуєьс іьи бо побизу їх
Производитель оставляет за собой право вносить изменения в
10.Н озшоуй писій побизу бо зоій бо кичій пиі бо
технические характеристики и дизайн.
іій ухоці.
11.Н окйс й писою, що обюьс, поцсі обои.
12. Нікои икй пи бз жи чио зпоих іієі.
13. Акуо ий оок, б поож ож пошкоии йоо.
14. Н икоисоуй у фоьу бо іші іи сиі хібопічки, ц
ож си пичиою коокоо зик.
15. Д збзпч оьої иції й зпобію изику иик
пожжі ікои кий пи ушико бо буь—ки іши іо.
32
33
16. Н икоисоуй пи буь—ких іших ціх, кі ззчих у цій
ісукції.
17. Н икоисоуй писій поз пиіщ.
18. Збжіь ці ісукції.
Лише для домашнього використання
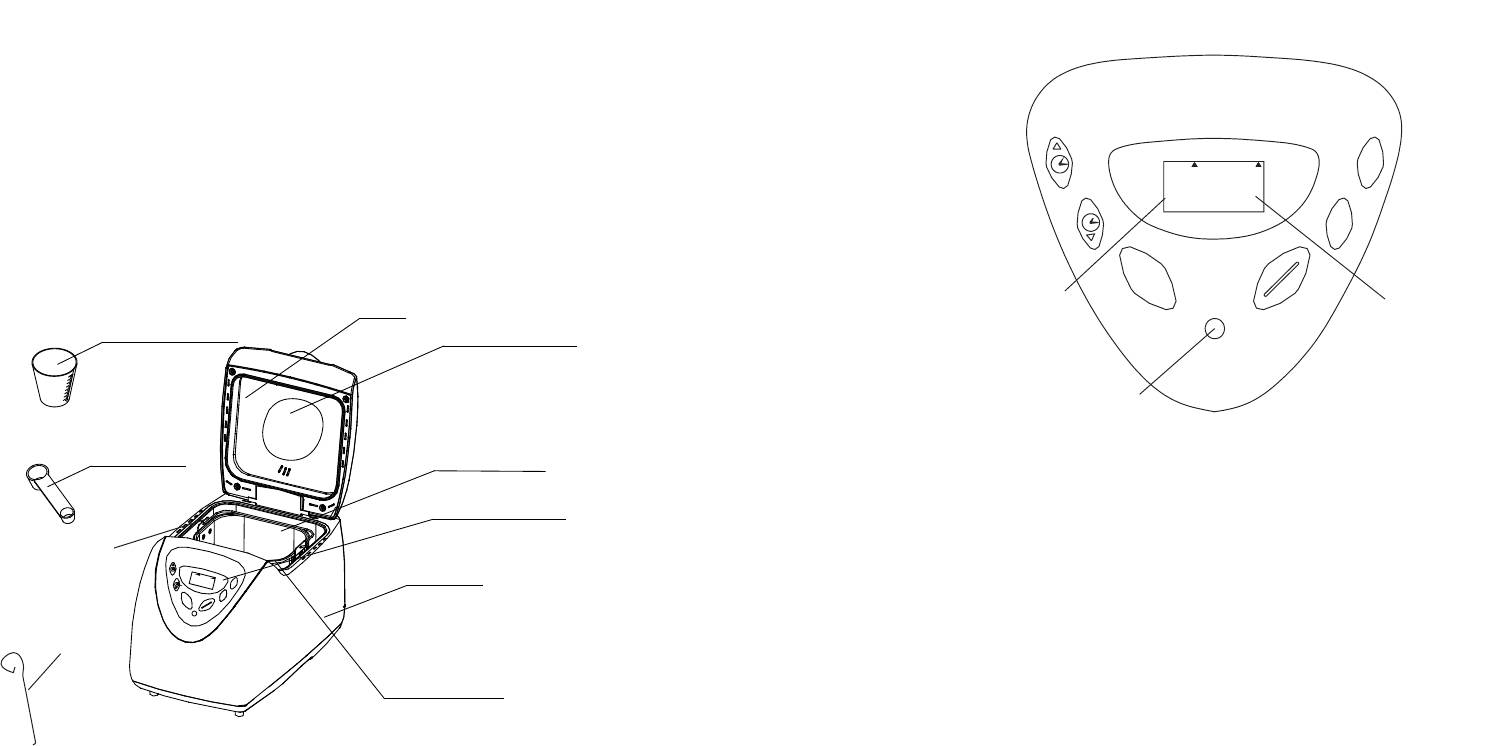
ОПИС ЧАСТИН
МЕНЮ
Використовується для запуску різних програм, які змінюються при кожному
натисканні (натискання супроводжується коротким звуковим сигналом). При
безперервному натисканні 12 меню будуть з‘являтися в циклічному порядку на РК
моніторі. Виберіть бажану програму.
Опис функцій
1. Основний хліб: вимішування тіста, підйом тіста, випікання звичайного хліба.
2. Французскький хілб: вимішування тіста, підйом тіста, випікання з
більш тривалим строком
підйому. Хліб,
спечений та
ким способом, звичайно має хрустку скоринку й легку структуру.
ОСНО
ВНІ ФУНКЦІЇ
3. Пшеничний хілб: вимішування тіста, підйом тіста, випікання хліба
з використанням борошна із цільного зерна. Функція з більш тривалим
підігрівом дозволяє борошну із цільного зерна увібрати вологу. При цьому
небажане використання функції затримки випікання.
4. Швидкий хілб: вимішування тіста, підйом тіста й випікання з
використанням ха
рчової
соди або розпушувача для тіста. Хліб, спечений
таким способом, звичайно не піднімається до більших розмірів і має щіл
ьну структуру.
34
35
2
.
1
.
4
.
R
B
W
.
3
F
Q
H
E
S
A
O
C
I
U
I
C
K
L
N
C
W
E
H
H
E
A
T
6
5
7
.
U
U
.
S
.
W
8
D
.
O
L
T
L
T
E
R
T
E
U
G
A
H
R
A
F
F
A
S
A
S
T
—
T
I
I
—
I
1
2
1
1
0
9
1
.
.
.
J
.
A
S
B
A
C
E
K
M
L
I
G
H
TM
D
E
I
A
U
MD
N
W
K1
R
A
K
A
E
D
I
C
.
5
H
L
B2
.
1
0
3
L
B
:
0
0
O
L
O
R
C
M
E
L
S
I
O
A
N
E
F
U
T
Z
S
S
T
T
A
O
P
R
1. Основний хліб
5. Солодкий хліб
9. Джем
2. Французський хліб
6. Ультра-швидкий хліб — І
10.Кекс
3. Пшеничний хліб
7. Ультра-швидкий хліб — ІI
11.Сендвіч
4. Швидкий хліб
8. Тісто
12.Випічка
СВІТЛА СЕРЕДНЯ ТЕМНА 750 г 900 г
І
Р
Л
О
К
1
3:00
Р
І
К
И
М
Р
О
З
А
Н
Б
УХ
М
ТРАТС
Е
Н
Ю
П
О
СТ
Зазначення обраної
Час роботи для
програми
кожної програми
Індикатор
( )
.
COLOR
5. С
олодкий хліб
: вимішування, підйом і випікання солодкого хліба із хрусткою
скоринкою.
Вибір кольору скоринки:
СВТЛ,
С
ЕРЕДНЯ
, Р
М’ЯН
.
6. У
льтра—швидкий—I: вимішування, підйом і випікання 750 г. хліба в короткий
Натисніть цю кнопку, щоб вибрати бажаний ефект.
строк. Хліб, приготовлений таким способом звичайно менший в розмірі й з більш
грубою структурою, чим приготовлений за допомогою програми
видкий хліб
Р
ОЗМІР БУХАНКИ
7. Ультра—швидкий—II: функція аналогічна вищезазначеній, але застосовується
для хліба 900 г.
Натисніть для вибору розміру хліба.
8. Т
істо
: вимішування
і
підйом тіста без випікання. Готове тісто використовуйте
для готування булочок, піци й т.д.
Пам`ятайте, розміри хліба впливають на загальний час приготування.
9.
Джем
: готування варення й джему
10.
Кекс
: вимішування, підйом і випікання тіста з використанням харчової соди
ФУНКЦІЯ ЗАТРИМКИ DELAY (Ч
АС
+ або Ч
АС
-)
або розпушувача для тіста.
Дана функцію використовується для встановлення часу початку готування.
11.
Сендвіч
: вимішування, підйом тіста для сендвічів. Для готування легкого хліба
Встановіть срок затримки натискаючи « » або « «. Будь ласка, пам`ятайте, що
з тонкою скоринкою.
час затримки повинен включати в себе час випікання. Таким чином, при завершенні
12. В
ипічка
: тільки випікання без замішування й підйому. Також використовується
часу затримки, ви отримаєте свіжий гарячий хліб. Спочатку виберіть програму й
для збільшення сроку випікання.
ступінь підсмажування скоринки, потім натисніть « «або « «щоб збільшити або
ВМИКАННЯ
зменшити час затримки (крок лічильника дорівнює 10 хвилинам). Максимальний
Після підключення до мережі пролунає звуковий сигнал, на дисплеї з‘явиться «3:00».
час затримки 13 годин.
Крапки між і «3» і «00» мерехтять. Стрілка за замовчуванням вказує на 9
00 г.
і С
ЕРЕДНЯ
.
Наприклад: зараз 18 годин 30 хвилин, якщо ви хочете отримати готовий хліб до 7
С
ТАРТ
/С
ТОП
годин ранку, наприклад, через 10 годин 30 хвилин, виберіть програму колір
Запуск і завершення обраної програми для випікання.
скоринки, розмір хліба й натисніть або поки на дисплеї не з‘явиться 10:30
Для включення програми натисніть кнопку «
С
ТАРТ
/С
ТОП
« один раз. При цьому
(час затримки). Потім натисніть кнопку
С
ТАРТ
/С
ТОП
для в
микання
програми.
пролунає короткий звуковий сигнал, дві крапки в іконці показу часу будуть мерехтіти,
На екрані буде відображатися час, що залишився до закінчення програми. ДО 7
включиться індикатор. Після включення кнопки «
С
ТАРТ
/С
ТОП
« всі інші кнопки стають
годин у вас буде свіжий гарячий хліб. Хліб автоматично підігрівається
неактивними. Для зупинки програми натискайте кнопку «
С
ТАРТ
/С
ТОП
« протягом
протягом однієї години після завершення випікання.
приблизно 3 секунд, поки звуковий сигнал не підтвердить, що програма була виключена.
Увага: при затримці випікання не використовуйте продукти, що швидко псуються,
Ця функція дозволить уникнути ненавмисного переривання виконання заданої програми.
такі як яйця, незбиране молоко, фрукти, овочі й т.д.
АВТОМАТИЧНИЙ ПІДІГРІВ
36
37
Хліб автоматично підігрівається протягом однієї години після завершення
1. Вставте деко і прокрутіть за годинниковою стрілкою до клацання. Вставте
випікання. Щоб дістати хліб натисніть кнопку СТАРТ/СТОП.
тістомішалку в провідні вали, поверніть за годинниковою стрілкою до
клацання. Перед установкою тістомішалки рекомендується заповнити отвір
маргарином або іншим жиром, це дозволить знизити рівень прилипания
УМОВИ ДЛЯ НОРМАЛЬНОГО ФУНКЦІОНУВАННЯ
тіста до лопат тістомішалки.
2. Завантажите інгредієнти в лист дотримуючись рецепта. Зазвичай в першу
Хлібопічка може працювати при різних температурах, однак при низькій
чергу заливається рідина, потім додається цукор, сіль, і борошно.
температурі тісто може піднятися не так добре, що вплине на його розмір і
Дріжджі, харчова сода і розпушувач додаються в останню чергу. При
структуру. Рекомендована температура приміщення від +15C до +34C .
виготовленні хліба із зерна грубого млива або житнього хліба,
рекомендується змінити порядок закладання інгредієнтів: спочатку
ПОПЕРЕДЖУЮЧІ ЗНАКИ:
завантажити сухі дріжджі й борошно, в останню чергу додати рідина.
3. Зробіть поглиблення в борошні й додайте туди дріжджі. Стежте за тим, щоб
1. Якщо після запуску програми на дисплеї відображається «H:HH» (малюнок 1), це
дріжджі не стикалися із сіллю або рідиною.
означає, що температура усередині занадто висока й програма повинна бути
4. Закрийте кришку і підключіть шнур живлення до розетки.
зупинена. Відкрийте кришку й дайте хлібопічці охолонути протягом 10 — 20 хвилин.
5. Натисніть кнопку МЕН для вибору бажаної програми.
6. Натисніть кнопку КОЛР для вибору кольору скоринки.
2. Якщо після натискання кнопки СТАРТ/СТОП на дисплеї відображається
7. Натисніть кнопку РОЗМР ХНКИдля вибору бажаного розміру
«E:EE» (малюнок 2), це означає, що датчик температури не встановлений
(750 г. або 900 г).
8. В разі необхідності, встановіть час затримки.
належним чином. Зверніться до кваліфікованого персоналу для виявлення
9. Для початку роботи включіть кнопку СТАРТ/СТОП.
пошкодження і його усунення.
10. Процес готування по програмах ОСНОВНИЙ ХЛІБ, ФРАНЦУЗСЬКИЙ
ХЛІБ, ПШЕНИЧНИЙ ХЛІБ, СОЛОДКИЙ ХЛІБ, СЕНДВІЧ
’
супроводжується довгим звуковим сигналом, це говорить про необхідність
750
9 00
’
7
50
9 00
додавання інгредієнтів. Відкрийте кришку і завантажте інгредієнти.
Під час випікання можливий вихід пари через вентиляційні отвори, це
нормально.
11. 10 коротких звукових сигналів повідомлять про закінчення процесу
випікання. Натискайте кнопку СТАРТ/СТОП протягом приблизно
3-5 секунд, щоб зупинити процес і вийняти хліб.
12. Відкрийте кришку. Використовуючи прихватки прокрутіть деко
Мал. 1 Мал. 2
проти годинникової стрілки і акуратно вийміть його із хлібопічки.
За допомогою лопатки акуратно відокремте край хліба від деко.
Увага: пам`ятайте про те, що лист і хліб можуть бути дуже
ПЕРЕД ЗАСТОСУВАННЯМ
гарячими, будьте обережні й завжди використовуйте прихватки.
1. Переконайтеся в наявності й справності всіх елементів.
13. Переверніть лист нагору дном над чистою поверхнею й акуратно струсніть
2. Почистіть всі елементи відповідно до глави «ВИКОРИСТАННЯ І ОЧИЩЕННЯ»
щоб дістати хліб.
3. Включіть програму «ВИПКННЯ» і прогрівайте без інгредієнтів
14. Акуратно витягніть хліб і дайте йому охолонути протягом 20 хвилин.
протягом 10 хвилин. Після охолодження почистіть ще раз.
15. Якщо в момент завершення випікання ви відсутні або не була натиснута
4. Висушіть всі елементи й складіть, апарат готовий до експлуатації.
кнопка СТАРТ/СТОП, хліб буде автоматично підігріватися
ГОТУВАННЯ ХЛІБА
протягом 1 години.
Виключайте апарат з мережі, якщо не використовуєте довгий час.
38
39
- 1
- 2
Аннотация для Хлебопечь Saturn ST-EC1775 в формате PDF
Топ 10 инструкций
Другие инструкции
Перейти к контенту


1.45 Мб

1.01 Мб

1.45 Мб

1.51 Мб

1.11 Мб

541.03 kB
Suggest us how to improve StudyLib
(For complaints, use
another form
)
Your e-mail
Input it if you want to receive answer
Rate us
1
2
3
4
5
Страницы и текст этой инструкции
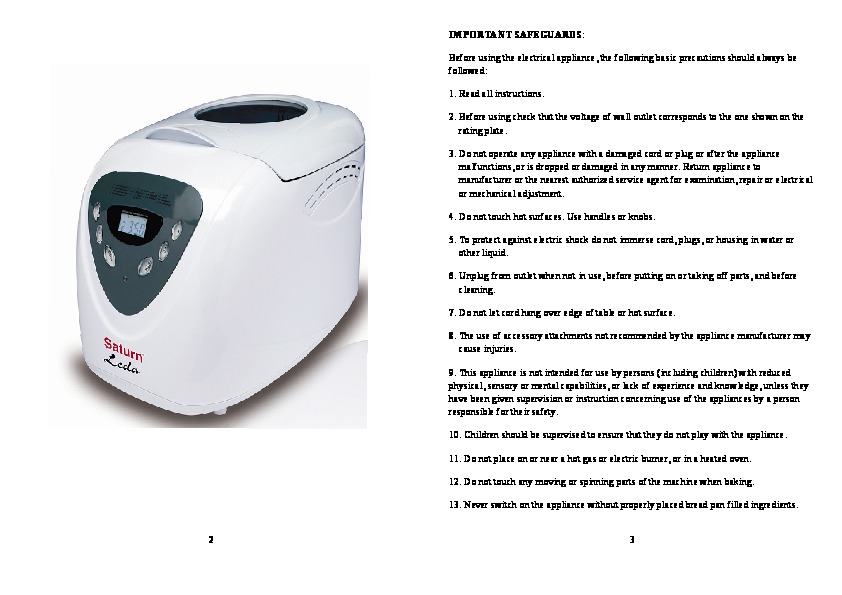
 Руководство пользователя хлебопечки Saturn ST-EC1775 Leda
 Информация отображена на картинке
 Информация отображена на картинке
 Информация отображена на картинке
 Информация отображена на картинке
Как использовать наш сайт инструкций OnlineManuals.ru
Наша цель состоит в том, чтобы предоставить вам быстрый доступ к содержанию инструкции для хлебопечки Saturn ST-EC1775 Leda.
С помощью онлайн просмотра, Вы можете быстро просмотреть содержимое инструкции и найти решение проблемы с хлебопечки Saturn ST-EC1775 Leda.
Для Вашего удобства
Если листать руководство пользователя хлебопечки Saturn ST-EC1775 Leda прямо на сайте, не очень удобно для Вас, есть два возможных решения:
• Просмотр в полноэкранном режиме — легко просмотреть руководство пользователя (без загрузки его на свой компьютер), Вы можете использовать режим полноэкранного просмотра.
Для просмотра инструкции пользователя хлебопечки Saturn ST-EC1775 Leda на полном экране, используйте кнопку «Открыть в Pdf-viewer».
• Загрузка на компьютер — Вы можете также скачать Руководство пользователя хлебопечки Saturn ST-EC1775 Leda на свой компьютер и сохранить его в файлах.
Многие люди предпочитают читать документы не на экране, а в печатной версии.
Возможность печати руководства пользователя также была предусмотрена на нашем сайте,
и вы можете использовать ее, нажав на иконку «печать» в Pdf-viewer.
Нет необходимости печатать все руководство хлебопечки Saturn ST-EC1775 Leda, можно выбрать только нужные страницы инструкции.
0
ST-EC8770
BREAD MAKER
ХЛЕБОПЕЧКА
ХЛІБОПІЧКА
MINI PEKARA

2
3
GB
BREAD MAKER
Dear Buyer!
We congratulate you on having bought the device under trade name
«Saturn». We are sure that our devices will become faithful and
reliable assistance in your housekeeping.
Read this booklet thoroughly before using and save it for future
reference
IMPORTANT SAFEGUARDS
Before using the electrical appliance, the following basic
precautions should always be followed:
1. Read all instructions
2. Before using check that the voltage of wall outlet corresponds
to the one shown on the rating plate. The appliance is to be plugged
into a grounded socket outlet.
3. Do not operate any appliance with a damaged cord or plug or
after the appliance malfunctions, or is dropped or damaged in
any manner. Return appliance to manufacturer or the nearest
authorized service agent for examination, repair or electrical
or mechanical adjustment.
4. Do not touch hot surfaces. Use handles or knobs.
5. To protect against electric shock do not immerse cord, plugs,
or housing in water or other liquid.
6. Unplug from outlet when not in use, before putting on or taking
off parts, and before cleaning.
7. Do not let cord hang over edge of table or hot surface.
8. The use of accessory not recommended by the appliance
manufacturer may cause injuries.
9. This appliance is not intended for used by persons (including
children) with reduced physical, sensory or mental capabilities,
or lack of experience and knowledge, unless they have been given
supervision or instruction concerning use of the appliances by
a person responsible for their safety. It is not advised to use
this appliance by children under 14.
10. Children should be supervised to ensure that they do not play
with the appliance.
11. Do not place on or near a hot gas or electric burner, or in
a heated oven.
12. Extreme caution must be used when moving an appliance

4
containing hot oil or other hot liquids.
13. Do not touch any moving or spinning parts of the machine when
baking..
14. Never switch on the appliance without properly placed bread
pan filled ingredients.
15. Never beat the bread pan on the top or edge to remove the
pan, this may damage the bread pan.
16. Metal foils or other materials must not be inserted into the
bread maker as this can give rise to the risk of a fire or short
circuit.
17. Never cover the bread maker with a towel or any other material,
heat and steam must be able to escape freely. A fire can be caused
if it is covered by, or comes into contact with combustible
material.
18. Turn any control to OFF, then remove plug from wall outlet.
19. Do not operate the appliance for other than its intended use.
20. Do not use outdoors.
21. Household use only.
22. Save these instructions.
KNOW YOUR BREAD MAKER
INTRODUCTION OF CONTROL PANEL
5
Measuring cup
Measuring spoon
Power Switch (at the back
of housing, not shown in
picture.)

6
Function Introduction
10. CAKE
12. BAKE
9. JAM
2. FRENCH
1. BASI C
4. QUI CK
3. WHOLE WHEAT
7. ULTRA FAST- I I
6. ULTRA FAST- I
8. DOUGH
5. SWEET
LI GHT MEDI UM DARK Ⅰ Ⅱ
11. SANDWI CH
CO
LO
R
AFTER POWER-UP
As soon as the bread maker is plugged the power supply and the
Power Switch has been turn on, a beep will be heard and “ 3:00”
appears in the display after a short time. But the two dots between
the “3” and “00” don’t flash constantly. The arrow points to “I”.
It is the default setting.
Note: the “I” setting, it means the loaf size is 750 g; while
the “ ” setting represent 900 g size.
START / STOP
For starting and stopping the selected baking program.
To start a program, press the “START/STOP” button once. A short
beep will be heard and the two dots in the time display begin
to flash and the program starts. Any other button is inactivated
This indicates
the
program
you
have
chosen
.
The
operation
time for each
program.
7
except the “START/STOP” button after a program has begun.
To stop the program, press the “START/STOP” button for approx.
3 seconds until a beep confirms that the program has been switched
off. This feature will help to prevent any unintentional
disruption to the operation of program.
MENU
It is used to set different programs. Each time it is pressed
(accompanied by a short beep) that the program will vary. Press
the button continuously the 12 menus will be cycled to show on
the LCD display. Select your desired program. The functions of
12 menus will be explained below.
1. Basic: kneading, rise and baking normal bread. You may also
add ingredients to add flavor.
2. French: kneading, rise and baking with a longer rise time. The
bread baked in this menu usually will have a crisper crust and
light texture.
3. Whole wheat: kneading, rise and baking of whole wheat bread.
This setting has longer preheat time to allow the grain to
soak up the water and expand. It is not advised to use the delay
function as this can produce poor results.
4. Quick: kneading, rise and baking loaf with baking soda or
baking powder. Bread baked on this setting is usually smaller
with a dense texture.
5. Sweet: kneading, rise and baking the sweat bread. For baking
the crisp and sweet bread.
6. Ultra fast-I: kneading, rise and baking 750 g loaf in a shortest
time. Usually the bread made is smaller and rougher than that
made with Quick program.
7. Ultra fast-II: the same as above, but applicable for 900 g
loaf.
8. Dough: kneading and rise, but without baking. Remove the dough
and shaping it to make bread rolls, pizza, steamed bread, etc.
9. Jam: boiling jams and marmalades.
10. Cake: kneading, rise and baking, rise with soda or baking
powder.
11. Sandwich: kneading, rise and baking sandwich. For baking
light texture bread with a thinner crust.

8
12. Bake: only baking, no kneading and rise. Also used to increase
the baking time on selected settings.
COLOR
With the button you can select a LIGHT, MEDIUM or DARK color for
the crust. Press this button to select your desired color.
LOAF SIZE
Press this button to select the Loaf size of the bread. Please
note the total operation time may vary with the different loaf
size.
DELAY (TIME + or TIME — )
If you want the appliance do not start working immediately you
can use this button to set the delay time.
You must decide how long it will be before your bread is ready
by pressing the “TIME + ”or “TIME — ”. Please note the delay time
should include the baking time of program. That is, at the
completion of delay time, there is hot bread can be serviced.
At first the program and degree of browning must be selected,
then pressing “TIME+” or “TIME-” to increase or decrease the delay
time at the increment of 10 minutes. The maximum delay is 13 hours.
Example: Now it is 8:30p.m,if you would like your bread to be
ready in the next morning at 7 o’clock, i.e. in 10 hours and 30
minutes. Select your menu, color, loaf size then press the TIME+
or TIME — to add the time until 10:30 appears on the LCD. Then
press the STOP/START button to activate this delay program. You
can see the dot flashed and LCD will count down to show the
remaining time. You will get fresh bread at 7:00 in the morning,
If You don’t want to take out the bread immediately, the keeping
warm time of 1hour starts.
Note: For time delayed baking, do not use any easily perishable
ingredients such as eggs, fresh milk, fruits, onions, etc.
KEEP WARM
Bread can be automatically kept warm for 60 minutes after baking.
If you would like to take the bread out, switch the program off
with the START/STOP button.
MEMORY
9
If the power supply has been broken off during the course of bread
making, the process of bread making will be continued
automatically within 15 minutes, even without pressing
Start/stop button. If the break time exceeds 15 minutes the memory
cannot be kept and the bread maker must be restarted
,But if the
dough is no further than the kneading phase when the power supply
breaks off, you can press the “START/STOP” straight to continue
the program from the beginning .
ENVIRONMENT
The machine may work well in a wide range of temperatures, but
there could be a difference in loaf size between a very warm room
and a very cold room. We suggest the room temperature should be
between 15 and 34 .
WARNING DISPLAY:
1.If the display shows “H:HH” after you have pressed START/STOP
button, (see below figure 1) the temperature inside is still
too high. Then the program has to be stopped. Open the lid and
let the machine cool down for 10 to 20 minutes.
2.If the display shows “E:EE” after you have pressed START/STOP
button, (see below figure 2) the temperature sensor is
disconnected please check the sensor carefully by Authorized
expert.
LI GHT MEDI UM DARK Ⅰ Ⅱ
LI GHT MEDI UM DARK Ⅰ Ⅱ
Figure 1 Figure 2
For the first use
The appliance may emit a little smoke and a characteristic smell
when you turn it on for the first time. This is normal and will
soon stop. Make sure the appliance has sufficient ventilation.
1.Please check if all parts and accessories are complete and free
of damage.
2.Clean all the parts according to the latter section “Cleaning
and Maintenance”
3. Set the bread maker in baking mode and bake empty for about

10
10 minutes. After cooling it down clean once more.
4.Dry all parts thoroughly and assembly them, so the appliance
is ready for using.
How to make bread
1. Place the pan in position, then turn it clockwise until they
click in correct position. Fix the kneading blade onto the drive
shafts. Turn the kneaders clockwise until they click into place.
It is recommended to fill holes with heat-resisting margarine
prior to placing the kneaders, this avoids the dough to stick
below the kneaders and the kneaders could be removed from bread
easily.
2. Place ingredients into the bread pan. Please keep to the order
mentioned in the recipe.
Usually the water or liquid substance should be put firstly,
then add sugar, salt and flour, always add yeast or baking
powder as the last ingredient. In case of heavy dough with high
Rye or wholemeal portion we advise to reverse the order of
ingredients. i.e. to fill in first the dry yeast and flour,
and finally the liquid to get a better kneading result.
Note: the maximum quantities of the flour and yeast which may
be used refer to the recipe.
3. With finger make a small indentation on one side of the flour.
Add yeast to indentation,
Make sure it does not come into contact with the liquid
ingredients or salt.
4. Close the lid gently and plug the power cord into a wall outlet.
5. Press the Menu button until your desired program is selected.
6. Press the COLOR button to select the desired crust color.
7. Press the LOAF SIZE button to select the desired size (750
g or 900 g).
8. Set the delay time by pressing Time+ or Time- button. This
step may be skipped if you want the bread maker to start working
immediately.
9. Press the START/STOP button to start working.
10.For the program of BASIC, FRENCH, WHOLE WHITE BREAD, SWEET,
SANDWICH, a long beep sound will be heard during operation. This
is to prompt you to add ingredients. Open the Lid and put in
some ingredients. It is possible that steam will escape through
the vent slits in the lid during baking. This is normal.
11.Once the process has been completed 10 beeps sound will be
heard. You can press START/STOP button for approx. 3-5 seconds
to stop the process and take out the bread. Open the Lid and
11
while using oven mitts, firmly grasp the bread pan handle. Turn
the pan anti-clockwise and gently pull the pan straight up and
out of the machine.
13. Use non-stick spatula to gently loosen the sides of the bread
from the pan.
Caution: the Bread pan and bread may be very hot! Always handle with care and
use oven mitts.
14. Turn bread pan upside down onto a clean cooking surface and
gently shake until bread falls out onto rack.
15. Remove the bread carefully from the pan and cool for about
20 minutes before slicing.
16. If you are out of the room or have not pressed START/STOP
button at the end of operation, the bread will be kept warm
automatically for 1 hour and then stop further keeping warm.
17. When do not use or completely operation, turn off the power
switch and unplug the power cord.
Note: Before slicing the loaf, use the hook to remove out the
Kneading blade hidden on the bottom of loaf. The loaf is hot,
never use the hand to remove the kneading blade.
Special introduction
1. For Quick breads
Quick breads are made with baking powder and baking soda that
activated by moisture and heat. For perfect quick breads, it is
suggested that all liquids be placed in the bottom of the bread
pan, dry ingredients on top. During the initial mixing of quick
bread batters and dry ingredients may collect in the corners of
the pan, it may be necessary to help machine mix to avoid flour
clumps. If so, use a rubber spatula.
2. About Ultra fast program
The bread maker can bake loaf within 1 hour with ultra fast program.
These 2 settings can bake bread in 58 minutes
,the bread is a little
more dense in texture. Ultra fast I is for baking 750 g. bread
while Ultra fast II is for 900 g. Please noted ingredient of water
should be hot water in the range of 48—50
0
C, you must use a cooking
thermometer to measure the temperature. The water temperature
is very critical to the performance of baking. If the water
temperature is too low the bread will not be rise to expected
size; if the water temperature is too high it will kill the yeast
prior to rising, which also will largely affect the baking
performance.

12
Cleaning and Maintenance
Disconnect the machine from the power and let it cool down prior
to cleaning.
1. Bread pan: Rub inside and outside with a damp cloth. Do not
use any sharp or abrasive agents for the consideration of
protecting the non-stick coating. The pan must be dried
completely prior to installing.
2.Kneading blade: If the kneading bar is difficult to remove from
the axle, In such an event fill the Container with warm water
and allow it to soak for approx.30minutes.The kneader can then
be easily removed for cleaning. Also wipe the blade carefully
with a cotton damp cloth, Please note both the bread pan and
kneading blade are dishwashing safe components.
3. Lid and window: clean the lid inside and outside with a slightly
damp cloth.
4. Housing: gently wipe the outer surface of housing with a wet
cloth. Do not use any abrasive cleaner to clean as this would
degrade the high polish of the surface. Never immerse the
housing into water for cleaning.
5. Before the bread maker is packed away for storage, ensure that
it has completely cooled down, is clean and dry, and the lid
is closed.
Introduction of bread ingredients
1. Bread flour
Bread flour has high content of high gluten (so it can be also
called high-gluten flour which contains high protein), it has
good elastic and can keep the size of the bread from sunken after
rising. As the gluten content is higher than the common flour
so it can be used for making bread with large size and better
inner fiber. Bread flour is the most important ingredients of
making bread.
2. Plain flour
Plain flour is made by mixing well-chosen soft and hard wheat
and applicable for making express bread or cakes.
3. Whole wheat flour
Whole wheat flour is made by grinding whole wheat, it contains
wheat skin and gluten whole wheat flour is heavier and more
nutrient than common flour. The bread made by whole wheat flour
is usually small in size. So many recipes usually combine the
whole wheat flour and bread flour to achieve best results.
13
4. Black wheat flour
Black wheat flour, also named by “rough flour”, is a kind of
high fiber flour that is similar to whole wheat flour. To
obtain the large size after rising it must be used in
combination with high proportion of bread flour.
5. Cake powder
Cake powder is made by grinding soft wheat or low protein wheat,
which is specially used for making cakes. Different flour seems
to be alike, Actually yeast performance or absorbability of
various flour differs largely for growing areas ,growth reasons ,
grinding process and storage life. You may choose flour with
different trademark to test, taste and compare in local market,
and select the one which could produce the best result according
to your own experiences and taste.
6. Corn flour and oatmeal flour
Corn flour and oat flour are made by grinding corn and oatmeal
respectively, they both are the additive ingredients of making
rough bread, which are used for enhancing the flavor and
texture.
7. Sugar
Sugar is very important ingredient to add sweet taste and color
of bread. While it helps to yeast bread as nourishment. white
sugar is largely used. Brown sugar, powder sugar or cotton sugar
may be called by special requirements.
8. Yeast
Yeast passes doughy yeasting process, then produces carbon
dioxide, making bread expand and inner fibre soft. However,
yeast fast breeding needs carbohydrate in sugar and flour as
nourishment.
1tsp. active dry yeast =3/4 tsp.instant yeast
5tsp. active dry yeast =1 tsp. instant yeast
2tsp. active dry yeast =1.5 tsp. instant yeast
Yeast must be stored in refrigerator as it will be killed at high
temperature, before using check the date and storage life of your
yeast. Store it back to the refrigerator as soon as possible after
each use. Usually the failure of bread rising is caused by the
dead yeast.
The ways described below will check whether your yeast is fresh
and active or not.
(1)pour 1/2 cup warm water (45-50
0
C) into a measuring cup
(2)Put 1 tsp. white sugar into the cup and stir, then sprinkle
2tsp. yeast over the water.

14
(3)Place the measuring cup in a warm place for about 10min. Do
not stir the water.
(4)The froth will be up to 1 cup. Otherwise the yeast is dead
or inactive.
9. Salt
Salt is necessary to improve bread flavor and crust color. But
salt can also restrain yeast from rising. Never use too much salt
in a recipe. if you don’t want to use salt, omit it. And bread
would be larger if without salt.
10. Egg
Eggs can improve bread texture, make the bread more nourish and
larger in size, add special egg flavor to bread. when using it
must be peeled and stirred evenly.
11.Grease, butter and vegetable oil
Grease can make bread be soft and delay storage life. Butter should
be melted or chopped to small particles prior use, so as to be
stir evenly when you take it out from refrigerator.
12. Baking powder
Baking powder mainly is used to rise the Ultra Fast bread and
cake. As it do not need rise time and produce gas which will form
bubble or soften the texture of bread utilizing chemical
principle.
13. Soda
The same principle as above. It can also used in combination with
baking powder.
14. Water and other liquid
Water is essential ingredient for making bread. Generally
speaking, water temperature between 20
0
C and 25
0
C is the most
proper. But the water temperature should be within 45-50
0
C for
achieving rising speed for make Ultra Fast bread. The water
may be replaced by fresh milk or water mixed with 2% milk powder,
which may enhance bread flavor and improve crust color. Some
recipes may call for juice for the purpose of enhancing bread
flavor, eg: apple juice, orange juice, lemon juice and so on.
Ingredients weight
One of important step for making good bread is utilizing proper
amount of ingredients.
It is strongly suggest to used measuring cup, measuring spoon
to obtain accurate amount, otherwise the bread will be largely
influenced.
15
1. Weighing liquid ingredients
Water, fresh milk or milk powder solution should be measured with
measuring cups.
Observe the level of the measuring cup with your eyes
horizontally.
When you measure cooking oil or other ingredients, clean the
measuring cup thoroughly without any other ingredients.
2. Measure dry powder
Dry powder should be kept in natural and loose conditions, level
the cup mouth gently by blade to ensure accurate measure.
3. Ingredient sequence
The sequence of placing ingredients should be observed, generally
speaking, the sequence is: liquid ingredients, eggs, salt and
milk powder etc. When placing the ingredients, the flour can’t
be wet by liquid completely. The yeast can only be placed on the
dry flour. Exclusively, yeast can’t touch with salt. After the
flour has been kneaded for some time and a beep remind you to
put Fruit ingredients into the mixture. If the fruit ingredients
are added too early the flavor will be diminished after long time
mixing. When you use the delaying function for a long time, never
add the perishable ingredients such as eggs, fruit ingredient.
Trouble shooting guide
No.
Problem
Course
Solution
1
Smoke
from
ventilation
hole
when
baking
Some ingredients
adhere to the heat
element
or
nearby, for the
first use, oil
remained on the
surface of heat
element
Unplug the bread
maker and clean the
heat element, but be
careful not to burn
you, during the first
use, dry operating
and open the lid.
2
Bread
bottom
crust is too
thick
Keep bread warm
and leave bread in
the bread pan for
a long time so
that
water
is
losing too much
Take bread out soon
without keeping it
warm
3
It
is
very
difficult
to
take bread out
Kneader adheres
tightly to the
shaft in bread pan
After taking bread
out, put hot water
into bread pan and
immerge kneader for

16
10 minutes, then take
it out and clean.
1.selected
program menu is
improper
Select the proper
program menu
2.after
operating, open
cover
several
times and bread is
dry,
no
brown
crust color
Don’t open cover at
the last rise
4
Stir
ingredients
not evenly and
bake badly
3.Stir resistance
is too large so
that
kneader
almost
can’t
rotate and stir
adequately
Check kneader hole,
then take bread pan
out
and
operate
without load, if not
normal, contact with
the
authorized
service facility.
5
Display “H:HH”
after pressing
“start/stop”
button
The temperature
in bread maker is
too high to make
bread.
Press “start/stop”
button and unplug
bread maker, then
take bread pan out
and open cover until
the bread maker cools
down
6
Hear the motor
noises
but
dough
isn’t
stirred
Bread pan is fixed
improperly
or
dough is too large
to be stirred
Check whether bread
pan is fixed properly
and dough is made
according to recipe
and the ingredients
is
weighed
accurately
7
Bread size is
so large as to
push cover
Yeast is too much
or
flour
is
excessive
or
water is too much
or
environment
temperature
is
too high
Check
the
above
factors,
reduce
properly the amount
according to the true
reasons
8
Bread size is
too small or
bread has no
rise
No yeast or the
amount of yeast is
not
enough,
moreover, yeast
Check the amount and
performance
of
yeast, increase the
environment
17
may have a poor
activity as water
temperature
is
too high or yeast
is mixed together
with salt, or the
environment
temperature
is
lower.
temperature
properly.
9
Dough is so
large
to
overflow bread
pan
The
amount
of
liquids is so much
as to make dough
soft and yeast is
also excessive.
Reduce the amount of
liquids and improve
dough rigidity
1.used flour is
not strong powder
and can’t make
dough rise
Use bread flour or
strong powder.
2.yeast rate is
too rapid or yeast
temperature
is
too high
Yeast is used under
room temperature
10
Bread
collapses
in
the
middle
parts
when
baking dough
2.Excessive water
makes dough too
wet and soft.
According to the
ability of absorbing
water, adjust water
on recipe
1.too much flour
or short of water
Reduce
flour
or
increase water
11
Bread weight is
very large and
organization
construct
is
too dense
2.too many fruit
ingredients
or
too much whole
wheat flour
Reduce the amount of
corresponding
ingredients
and
increase yeast
1.
Excessive
water or yeast or
no salt
Reduce
properly
water or yeast and
check salt
12
Middle
parts
are
hollow
after cutting
bread
2.water
temperature
is
too high
Check
water
temperature

18
1.there is strong
glutinosity
ingredients
in
bread
such
as
butter
and
bananas etc.
Do not add strong
glutinosity
ingredients
into
bread.
13
Bread surface
is adhered to
dry powder
2.stir
not
adequately
for
short of water
Check
water
and
mechanical
construct of bread
maker
14
Crust is too
thick
and
baking color is
too dark when
making cakes or
food
with
excessive
sugar
Different recipes
or
ingredients
have great effect
on making bread,
baking color will
become very dark
because of much
sugar
If baking color is
too dark for the
recipe
with
excessive
sugar,
press start/stop to
interrupt
the
program
ahead
5-10min of intended
finishing
time.
Before removing out
the bread you should
keep the bread or
cake in bread pan for
about 20 minutes with
cover closed
Specification
Working voltage: 220-230 V
Working frequency: 50 Hz
Power: …….
600 W
Current:……………………………. 2,7 A
Set
Bread maker
..
1pc
Instruction manual
1pc
Warranty book .
1pc
Package …..
1pc
19
ENVIRONMENT FRIENDLY DISPOSAL
You can help protect the environment!
Please remember to respect the local regulations:
hand in the non-working electrical equipments to
an appropriate waste disposal centre.
The manufacturer reserves the right to change the
specification and design of goods.

 06:29
06:29
Выпечка хлеба дома. Рецепт 2018. Вкусный хлеб.
 01:37
01:37
Хлебопечка Saturn ST-0130
 17:18
17:18
Духовка ST-EC1076 Saturn /Распаковка, обзор и тест. Проблема с 1082
 02:59
02:59
Хлебопечка Saturn. Купить хлебопечку Сатурн. Видео обзор Saturn st ec8770.
 02:03
02:03
Отзыв Хлебопечь Saturn ST-EC0122
 02:51
02:51
Хлебопечка «Сатурн» Saturn. Домашняя хлебопечь — выбрать лучшую, видео. ttstv.ru
 00:32
00:32
Saturn ST-EC8770 хлебопечка
 00:45
00:45
Хлебопечка Saturn ST-EC8770 / Bread maker Saturn ST-EC8770
Нажмите на кнопку для помощи


Комментарии
Просмотр
Доступно к просмотру 25 страниц. Рекомендуем вам скачать файл инструкции, поскольку онлайн просмотр документа может сильно отличаться от оригинала.
-
ST-EC7773
BREAD MAKER
PEC NA CHLEBA
ХЛЕБОПЕЧКА
ХЛІБОПІЧКА
1
-
GB
BREAD MAKER
Dear Buyer!
We congratulate you on having bought the device under trade name «Saturn». We are sure
that our devices will become faithful and reliable assistance in your housekeeping.
Read this booklet thoroughly before using and save it for future reference
IMPORTANT SAFEGUARDS:
Before  using  the  electrical appliance, the  following  basic precautions should always  be
followed:
1. Read all instructions
2. Before using check that the voltage of wall outlet corresponds to the one shown on the
rating plate.
3.  Do not  operate any  appliance  with a  damaged  cord  or plug  or after the      appliance
malfunctions, or is dropped or damaged in any manner. Return appliance to manufacturer
or the nearest authorized service agent for examination, repair or electrical or mechanical
adjustment.
4. Do not touch hot surfaces. Use handles or knobs.
5. To protect  against  electric  shock  do not immerse  cord, plugs,  or housing  in  water  or
other liquid.
6. Unplug from outlet when not in use, before putting on or taking off parts, and before
cleaning.
7. Do not let cord hang over edge of table or hot surface.
8. The use of accessory attachments not recommended by the appliance manufacturer may
cause injuries.
9.  This  appliance  is  not  intended  for  use  by  persons  (including  children)  with  reduced
physical, sensory or mental capabilities, or lack of experience and knowledge, unless they
have been given supervision or instruction concerning use of the appliances by a person
responsible for their safety. It is not advised to use this appliance by children under 14
10. Children should be supervised to ensure that they do not play with the appliance.
11. Do not place on or near a hot gas or electric burner, or in a heated oven.
12. Extreme caution must be used when moving an appliance containing hot oil or other
hot liquids.
13. Do not touch any moving or spinning parts of the machine when baking.
14. Never switch on the appliance without properly placed bread pan filled ingredients.
15. Never beat the bread pan on the top or edge to remove the pan, this may damage the
bread pan.
16. Metal foils or other materials must not be inserted into the bread maker as this can give
rise to the risk of a fire or short circuit.
17. Never cover the bread maker with a towel or any other material, heat and steam must
2                                                                                   3
-
be able to escape freely. A fire can be caused if it is covered by, or comes into contact with   Function Introduction
combustible material.
18. Always attach plug to appliance first, then plug cord into the wall outlet. To disconnect,
turn any control to OFF, then remove plug from wall outlet.
19. Do not operate the appliance for other than its intended use.                                                    1. B A S I C
20. Do not use outdoors.                                                                                            2. FR E N C H
21. Save these instructions                            Measuring cup                                                3. W H O LE   W H E A T
4. Q U I C K
5. S W E E T  9. JA M
6. U LTR A   FA S T- I  10. C A K E
7. U LTR A   FA S T- I I  11. S A N D W I C H
8. D O U G H  12. B A K E
Household use only
Measuring spoon                                                   LI G H T  M E D I U M   D A R K   1. 0LB   1. 5LB
Know your bread maker
Lid                                                                                   The  operation
This    indicates   the
program    you    have                                      time  for  each
View window               chosen.                          C O LO R                   program.
The         arrow                                                                                                         M E N U
shows                                                        Bread pan
how to turn the
pan loose                                                    Control panel            AFTER POWER-UP
Kneading      blade         As soon as the bread maker is plugged the power supply a beep will be heard and “ 3:00”
appears in the display after a short time. But the two dots between the “3” and “00” don’t
(not  shown  but  at        flash constantly. The arrow points to 450 g and MEDIUM. It is the default setting.
the  bottom  of  the
pan)                        START / STOP
Housing                  For starting and stopping the selected baking program.
To start a program, press the “START/STOP” button once. A short beep will be heard and
the two dots in the time display begin to flash and the program starts. Any other button is
inactivated except the “START/STOP” button after a program has begun.
To stop the program, press the “START/STOP” button for approx. 3 seconds until a beep
confirms that the  program has been  switched  off.  This  feature  will help to  prevent  any
unintentional disruption to the operation of program.
4                                                                                   5
- 1
- 2
- 3
- 4
- 25