
Для этого звоните с 8 до 22.00 по телефонам:
+7 (495) 215 – 14 – 41
+7 (903) 722 – 17 – 03
или оформляйте электронную форму на сайте. В разговоре с оператором или электронной заявке, пожалуйста, сообщите следующую информацию:
- Марку и модель неисправной стиралки.
- Признаки поломки. Например, стиральная машина не набирает или не сливает воду, не включается или зависает на режиме отжима белья.
- Удобные день и время приезда мастера.
- Имя, адрес, телефон.
Мастер свяжется с вами в день ремонта для согласования времени приезда.
Обнаружив, что ваша Electrolux EWT 105205 вышла из строя, обратитесь за помощью к профессионалам в мастерскую «РемБытТех»! Наш специалист приедет к вам уже в течение 24 часов вызова и прямо при вас выполнит ремонт стиралки с гарантией до 2 лет.

User manual
Инструкцияѝпоѝэксплуатации
Washing machine
Стиральнаяѝмашина
EWT 11420 W — EWT 10420 W
We were thinking of you when we made this product
3
Welcome to the world of Electrolux
Thank you for choosing a first class product from Electrolux, which hopefully will provide you with lots of pleasure in the future. The Electrolux ambition is to offer a wide variety of quality products that make your life more comfortable. You find some examples on the cover in this manual. Please take a few minutes to study this manual so that you can take advantage of the benefits of your new machine. We promise that it will provide a superior User Experience delivering Ease-of-Mind. Good luck !
Доброѝпожаловатьѝвѝмирѝ
Electrolux
Выѝ выбралиѝ первоклассный продуктѝотѝElectrolux,ѝкоторый,ѝмы надеемся,ѝ доставитѝ Вамѝ много радостиѝ вѝ будущем.ѝ Electrolux стремитсяѝ предложитьѝ какѝ можно болееѝ широкийѝ ассортимент качественнойѝ продукции,ѝ который сможетѝ сделатьѝ Вашуѝ жизньѝ еще болееѝудобной.ѝВыѝможетеѝувидеть несколькоѝэкземпляровѝнаѝобложке этойѝ инструкции.ѝ Внимательно изучитеѝ данноеѝ руководство, чтобыѝ правильноѝ использовать Вашѝновыйѝприборѝиѝнаслаждаться егоѝ преимуществами.ѝ Мы гарантируем,ѝчтоѝонѝсделаетѝВашу жизньѝ намногоѝ легчеѝ благодаря легкостиѝвѝиспользовании.ѝУдачиѝ!

|
4 contents |
|
|
Contents |
|
|
Warnings ……………………………………. |
5 |
|
Description of the appliance ………….. |
7 |
|
Personalisation ……………………………. |
8 |
|
How to run a wash cycle ? ……………. |
9 |
|
Washing guide ………………………….. |
14 |
|
Programmes table ……………………… |
16 |
|
Consumption ……………………………. |
17 |
|
Care and cleaning ……………………… |
18 |
|
Operating problems …………………… |
19 |
|
Technical specifications ………………. |
22 |
|
Installation ………………………………… |
22 |
|
Environment ……………………………… |
25 |
The following symbols have been used in this user guide :
Important information about concerning your safety and information on how to avoid damaging the appliance.
 General information.
Information concerning the environment.

Warnings
These warnings are for the safety of you and others around you.
Please read these points carefully before installing and using your appliance. Thank you for your attention.
Keep this user manual with your appliance. If the appliance is sold or given to another person, please make sure this user manual is included. This way, the new user will have the relevant operating instructions and warnings.
General safety
•Do not modify or attempt to modify this appliance. This would put yourself in danger.
•Ensure that all coins, safety pins, brooches, screws etc have been removed before starting a washing programme. If left in washing, they can seriously damage the appliance.
•Use the amount of detergent recommended in the paragraph “Using the right amount of detergent”.
•Put small items together (socks, belts etc.) in a small linen bag or pillow case.
•Unplug and close inlet hose tap after using appliance.
•Always disconnect the power supply from the appliance before cleaning or maintenance.
•Do not machine wash clothes with ribbing, unfinished or torn material.
warnings 5
Installation
•Unpack or ask for the appliance to be unpacked immediately upon arrival. Check the outside of the appliance is not damaged in any way. Put any complaints you may have in writing on your copy of the delivery receipt.
•The appliance must be untied before connecting to power supply or using. If all transit packaging is not completely removed, the appliance or surrounding furniture could be damaged.
•Connection to the water supply must be carried out by a qualified plumber.
•If your domestic electrical circuit needs adapting to allow the appliance to be plugged in, use a qualified electrician.
•Ensure that, after installation, the power cable is not trapped under the appliance.
•If the appliance is installed on carpeted floor, ensure that the carpet does not obstruct any ventilation ducts located at the base of the appliance.
•The appliance must be equipped with an earthed power plug which conforms to regulations.
•Before connecting your appliance to the power supply, carefully read the instructions in the chapter entitled “Electrical connection”.
•Replacing the power cable should only be carried out by the After Sales Service.
•The manufacturer cannot be held responsible for any damage resulting from incorrect installation.
6 warnings
Precautions to be taken against frost
If your appliance is exposed to temperatures below 0°C, the following precautions must be taken :
•Close the tap and disconnect the inlet hose.
•Place the end of this hose and the drain hose in a basin on the floor.
•Select the Drain programme let it run until the end of the cycle.
•Disconnect the appliance from the power supply by turning the program selector to “Stop”.
•Unplug the appliance.
•Screw the inlet hose back on and replace the drain hose.
This way, the water remaining in the hoses will be drained away, avoiding any ice formation which would damage your appliance.
Before turning your appliance on again, ensure that it is installed in an area where the temperature will not fall below freezing.
Use
•Your appliance is intended for normal domestic use. Do not use the appliance for commercial or industrial purposes or for any purpose other than the one it was designed for : washing, rinsing and spinning.
•Only wash items suitable for this treatment. Refer to the instructions on the label of each item.
•Do not put items into the washing machine which have had stains removed with petrol, alcohol, trichlorethylne etc. If such stain removers have been used, wait until the product has evaporated before putting
these items into the drum.
•Your appliance has been designed for use by adults. Ensure children do not touch the appliance or use it as a toy.
description of the appliance / personalisation 7
Description of the appliance
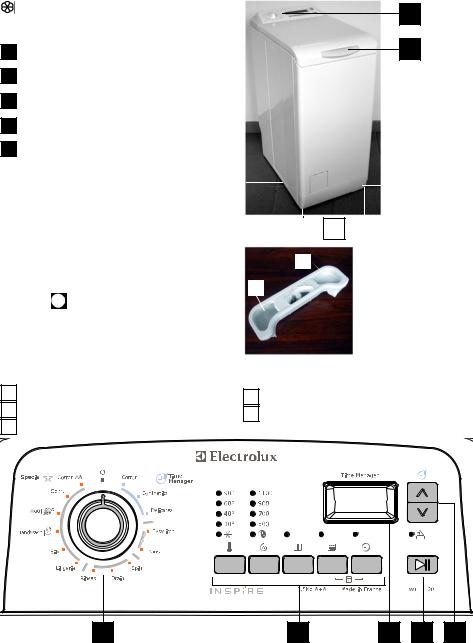
1The control panel
2Lid handle
3Filter access cover
4Lever for moving the appliance
5Adjustable levelling feet
|
3 |
|||||||||||
|
4 |
|||||||||||
|
Dispenser box |
5 |
||||||||||
 Prewash
 Wash
Wash
 Softener (do not fill above the MAX symbol M )
|
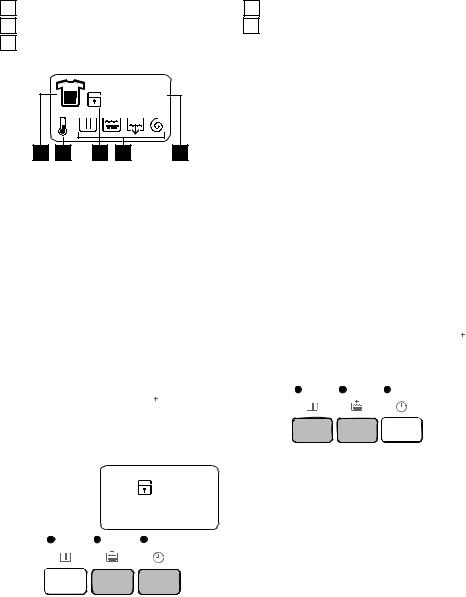
The control panel |
|||||||||
|
1 |
Programme selector |
“Start/Pause” pushbutton |
|||||||
|
4 |
|||||||||
|
Pushbuttons and their functions |
|||||||||
|
2 |
“Time Manager” pushbuttons |
||||||||
|
5 |
|||||||||
|
Display |
|||||||||
|
3 |
|||||||||
|
1 |
2 |
3 |
4 |
5 |
|
8 description of the appliance / personalisation |
|||||
|
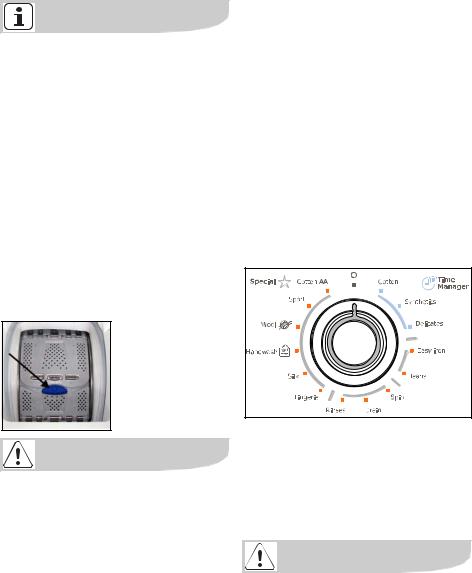
The symbols |
|||||
|
Time manager |
Cycle running |
||||
|
1 |
|||||
|
4 |
|||||
|
Temperature |
Length of cycle or Timer delay |
||||
|
2 |
5 |
||||
|
Child safety |
countdown |
||||
|
3 |
|
8.88 |
||||
|
1 |
2 |
3 |
4 |
5 |
Personalisation
Child safety
This option provides two types of locking :
—if the option is activated after the cycle has started, no changes to the options or program are possible.
The cycle runs and you must deactivate the option to run a new cycle.
—if the option is activated before the cycle has started, the appliance cannot be started.
To activate child safety, turn appliance
on and press “Rinse plus”  and “Delay
start”  simultaneously until the confirmation symbol
  comes on in the display.
The appliance memorises the selection of this option.
To deactivate child safety, repeat the process.
Audible signal
When a button is depressed, an audible signal sounds, at the end of a programme or to indicate a fault.
To deactivate, turn appliance on and press “Prewash”  and “Rinse plus”
  simultaneously until the beep sounds.
The signal is only active if alarm sounds.
To reactivate it, repeat the same process.
How to run a wash cycle? Using for the first time
•Ensure the electrical and water connections comply with the installation instructions.
•Remove the polystyrene insert and all other items inside the drum.
•Run an initial wash cycle at 90°C, without any washing but with detergent to clean the water tank.
Daily use
Loading washing
•Open the lid of the appliance.
•Open the drum by depressing the locking button A : The two shutters unlock automatically.
•Load the washing, close the drum and the lid of your washing machine.
A
Before closing the lid of your appliance, ensure that the drum is properly closed :
•When the two shutters are closed,
•locking button A released.
how to run a wash cycle 9
Proportioning of detergents
Your washing machine has been designed to reduce your water and detergent consumption. You can therefore reduce the amounts recommended by detergent manufacturers.
Pour the amount of washing powder into the washing  and prewash
  compartments if you have selected the “prewash” option. Pour fabric softener into the compartment if necessary
  .
.
If you use another detergent type, refer to the section “detergents and additives” in the washing guide.
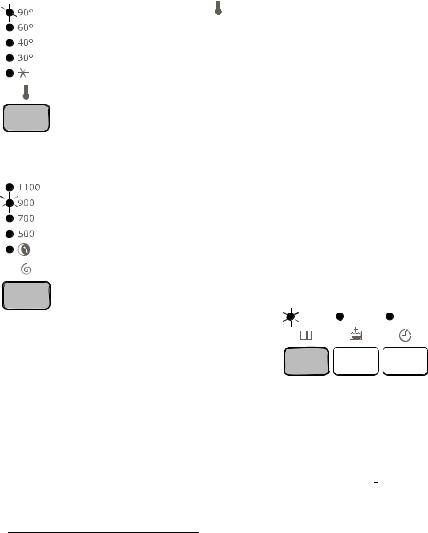
Selection of desired programme
You can find the right programme for different types of washing in the programme table (see “Programme table”).
Turn the programme selector to the required programme. The “Start/Pause” pushbutton flashes green.
The symbols which correspond to the different stages of the cycle are displayed (  Wash,
Wash,  Rinse,
  Drain,
  Spin).
If you turn the programme selector to another programme while a cycle is in
10 how to run a wash cycle
progress, the appliance will ignore the new selected programme. “Err” flashes and the “Start/Pause” pushbutton flashes red for a few seconds then the current cycle display reappears.
Selecting the temperature
Press the “Temperature”
pushbutton repeatedly to in-
crease or decrease the tem-
perature if you want your
washing to be washed at a different temperature to the one selected by the appliance. The  symbol means a cold wash.
Selecting the spin speed
Press the “Spin”  pushbut-
ton to change the spin
speed, if you want your
washing to be spun at a dif-
ferent speed to the one selected by the appliance. You can also select “No spin”*, “Rinse hold”* or “Night silence plus”  *.
*.
The maximum speeds are :
for Cotton, Jeans, Cotton AA : 1100 rpm (EWT 11420W), 1000 rpm (EWT 10420W),
for Handwash, Wool : 900 rpm (EWT 11420W), 1000 (EWT 10420W),
for Synthetics, Easy iron, Lingerie, Sport: 900 rpm,
for Delicates, Silk : 700 rpm.
At the end of the programme, if you have selected “Rinse and hold” or “Night silence plus”  , you then need to select
*depending on model
a “Spin” or “Drain” programme to finish the cycle.
“Night silence plus” 
The washing machine does not empty the water after the final rinse which prevents the washing from creasing. Because there are no spin cycles, the washing programme is very quiet and can be selected at night. In Cotton and Synthetics programmes, the rinsing cycle uses more water.
Selecting options
You must select the different options after selecting the programme and before pressing the “Start/Pause” pushbutton (see “Programme table”). Press the desired button(s) ; the corresponding lights come on. If pressed again, the lights go out. If one of the options is not compatible with the selected programme, “Err” flashes on the display and the “Start/ Pause” pushbutton flashes red.
“Prewash” option 
The appliance runs a prewash at 30°C max. The prewash finishes with a short spin cycle for cotton or synthetic programmes, and with an empty cycle for delicates programmes.
“Rinse plus” option 
The washing machine will add one or more rinses during the cycle. This option is recommended for people with sensitive skin and in soft water areas.

• Temporary :
Press the “Rinse plus” pushbutton  . The option is only active for the selected programme.
• Permanent :
how to run a wash cycle 11
the “Start/Pause” pushbutton, by pressing the “Delay start”  pushbutton again (0’ indicates immediate start).
If you have already pressed the “Start/ Pause” pushbutton and you want to change or cancel the delayed start, proceed as follows :
•To cancel the delayed start and start
the cycle immediately, press “Start/Pause” and then “Delay start”  . Press “Start/Pause” to start the cycle.
•To change the timer delay period, you must go through the “Stop”  position and reprogramme your cycle.
Hold down the “Prewash”  and “Delay start”
  pushbuttons for a few seconds. The option is permanently activated, even if the appliance is switched off.
To deactivate it, repeat the process.
“Delay start” option 
30’ 
This option allows you to delay the start of a wash programme by 30, 60, 90, 2 hours to 20 hours.
The selected time appears on the display for a few seconds*.
You can change or cancel the delayed start time at any time before you press
**The light does not come on.
The lid will be locked during the delayed start time. If you need to open it, you must first pause the appliance by pressing the “Start/Pause” pushbutton. After closing the lid again, press the “Start/ Pause” pushbutton.
Time Manager
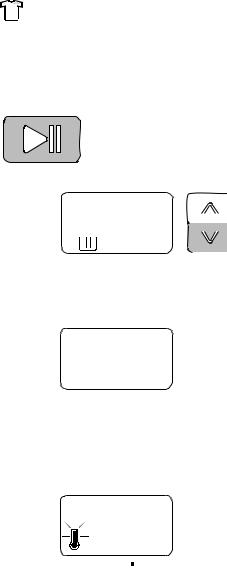
The washing machine will suggest the “Normally soiled laundry” cycle by default. The cycle can be made longer or shorter by using the “Time Manager”  pushbuttons. The level of soiling of the laundry is also indicated.
Heavily soiled laundry
Normally soiled laundry
Lightly soiled laundry
12 how to run a wash cycle
Very lightly soiled laundry or half load
The availability of these different levels varies depending on the selected programme type.
Start of the programme
Press the “Start/Pause” pushbutton to start the cycle ; the corresponding light will come on
green.
2.00 
It is normal for the programme selector to remain stationary during the cycle. The symbol for the current cycle and the remaining time appear on the display.
2H
If a delayed start has been selected, the countdown appears on the display (hour by hour, then 90, and minute by minute from 60 min).
Warming up
During the cycle, the  symbol comes on when the appliance is reaching the right temperature.
Interrupting a programme Adding washing
When the “Add washing” light  is on, you can add washing by proceeding as follows.
Press the “Start/Pause” pushbutton : the corresponding light will flash green while the appliance is paused and the message “Pause” is displayed. The locking mechanism “snaps” twice to indicate that the lid is open. Press the “Start/Pause” pushbutton again to continue the programme.
Modifying the programme in progress
Before making any changes to the current programme, you need to pause the washing machine by pressing the “Start/ Pause” pushbutton. If the modification is not possible, “Err” flashes in the display and the “Start/Pause” pushbutton flashes red for a few seconds. If you still decide to change the programme, you must cancel the current programme (see below).
Cancelling the programme
If you want to cancel the programme, turn the programme selector to the “Stop”  position.
End of the programme
The washing machine stops automatically ; the “Start/Pause” pushbutton goes out and “0” flashes on the display. The locking mechanism “snaps” twice to indicate that the lid is open.

how to run a wash cycle 13
Turn the programme selector to the “Stop”  position.
Remove washing
Unplug and close water inlet tap.
We recommend leaving the lid and drum open after use to ventilate the water tank.
Standby mode
If the appliance is on but no commands are selected for 10 min before or after a cycle, it goes into standby mode. The screen light goes out and “Start/Pause” flashes slowly.
To exit standby mode, simply press any pushbutton or turn the programme selector.

14 washing guide
Washing guide
Sorting and preparing the washing
•Sort washing by type and care label (refer to International symbols section below) : normal wash for tough fabrics which can withstand intense washing and spinning cycles ; delicate wash for delicate fabrics which need to be treated with care. For mixed loads, loads with items of different types of material, choose a programme and a temperature suitable for the most fragile material.
•Wash whites and colours separately : Otherwise, whites will be coloured or will turn grey.
•New coloured clothes often contain excess dye. It is recommended to wash such items separately the first time. Follow care instructions “wash separately” and “wash separately several times”.
•Empty pockets and unfold items.
•Remove loose buttons, pins and fasteners. Close zip fasteners, tie ups laces and straps.
•Turn multilayered fabrics (sleeping bags, anoraks, etc.), coloured headwear, wool and material with printed designs inside out.
•Wash small fragile items (socks, tights, bras, etc) in a net bag.
•Take special care with curtains. Remove hooks and place net curtains in a net or bag.
Wash loads depending on type of materials
The amount of washing placed in the drum must not exceed the maximum capacity of the washing machine. This capacity can vary depending on the type of materials. Reduce the quantity if washing is heavily soiled or made of absorbant material.
Not all textiles have the same volume in the drum or the same water absorption levels. In general, the drum must therefore be filled :
•to full capacity but avoiding excessive pressure on cotton, linen and cotton/linen mixtures,
•to half capacity for processed cottons and synthetic fibres,
•to a third of its capacity for very fragile items such as net curtains and woollens.
For mixed loads, fill drum depending on most fragile materials.
Detergents and additives
Only use detergents and additives designed for use in a washing machine. Refer to manufacturer’s recommendations and also Dispenser box and Using the right amount of detergent sections.
We do not recommend mixing different types of detergents. This may spoil the washing.
The amount of detergent to be used depends on the size of the load, the hardness of the water and how heavily soiled the washing is.
If the water is soft, reduce the amount slightly. If the water contains lime scale (a descaler is recommended) or if the washing is heavily soiled or stained, increase the amount slightly.
You can obtain information on the hardness level of water in your area by contacting your water company or other competent source.
There are no restrictions on the use of powder detergents.
Liquid detergents must not be used when a prewash has been selected. For cycles without prewash, they can be added either via means of a dosing ball, or in the detergent compartment. In either
washing guide 15
case, the wash cycle must be started immediately.
Detergent tablets or doses must be placed in the detergent compartment of your appliance’s dispenser box.
For stain removal before a wash cycle, please refer to manufacturer’s recommended amounts and instructions. If you use a detergent to remove stains, the wash cycle must be started immediately.
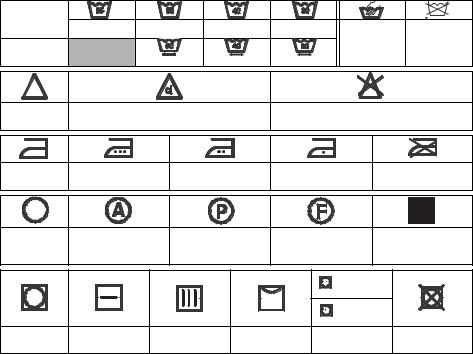
International symbols
|
NORMAL |
||||
|
WASH |
||||
|
Wash at 95°C |
Wash at 60°C |
Wash at 40°C |
Wash at 30°C |
|
|
DELICATE |
Hand wash |
Do not wash |
||
|
WASH |
|
BLEACHING |
Whitewashing (bleach) allowed (cold only and in dilu- |
No whitewashing (bleach) |
||||
|
ted solution) |
||||||
|
IRONING |
High temperature |
Mid temperature |
Low temperature |
Do not iron |
||
|
(max 200°C) |
(max 150°C) |
(max 100°C) |
||||
|
DRY |
Dry cleaning |
Dry cleaning |
Dry cleaning |
Do not dry clean |
||
|
CLEANING |
(all common solvents) |
(all common solvents |
(only oil-based solvents |
|||
|
except trichlorethylene |
and R113) |
|||||
|
High |
||||||
|
temperature |
||||||
|
Mid |
||||||
|
temperature |
||||||
|
DRYING |
Dry flat |
Hang dry |
Dry on clothes |
Tumble drying |
Do not tumble dry |
|
|
hanger |
permitted |

16 programmes table / consumption
Programmes table
|
Programme / Type of washing |
Load |
Possible options |
||
|
Cotton : White or colour, e.g., normally soiled work clo- |
5,5 kg |
|||
|
thes, bed linen, table linen, body linen, towels. |
Night silence plus |
|||
|
Prewash |
||||
|
Synthetics : Synthetic fabrics, body linen, coloured fa- |
2,5 kg |
|||
|
Rinse plus |
||||
|
brics, non-iron shirts, blouses. |
||||
|
Delay start |
||||
|
Delicates : For all delicate materials, for example, cur- |
2,5 kg |
Time manager |
||
|
tains. |
||||
|
Easy iron : Reduces creasing and makes ironing easier. |
1,0 kg |
Prewash |
||
|
Rinse plus |
||||
|
Delay start |
||||
|
Jeans : For washing denim clothes. The Rinse plus op- |
3,0 kg |
Night silence plus |
||
|
tion is activated. |
Prewash |
|||
|
Delay start |
||||
|
Spin : A spin cycle from 500 to 1100/1000* rpm after a |
5,5 kg |
Delay start |
||
|
Rinse hold (or Night silence plus). |
||||
|
Drain : Runs an empty cycle after a Rinse hold or (Night |
5,5 kg |
|||
|
Silence Plus). |
||||
|
Rinses : Hand washed items can be rinsed in this pro- |
5,5 kg |
Night silence plus |
||
|
gram. |
Rinse plus |
|||
|
Delay start |
||||
|
Lingerie : For very delicate items, like lingerie. |
1,0 kg |
|||
|
Silk : Fabric machine washable at 30°C. |
1,0 kg |
|||
|
Night silence plus |
||||
|
Handwash : Very delicate items carrying the “wash |
1,0 kg |
|||
|
Delay start |
||||
|
by hand” label. |
||||
|
Wool : Machine washable wool carrying the labels |
1,0 kg |
|||
|
“pure new wool, machine washable, does not shrink”. |
||||
|
Sport : For dirty outside sport clothes. The Prewash op- |
2,5 kg |
Night silence plus |
||
|
tion is activated. |
Rinse plus |
|||
|
Delay start |
||||
|
Cotton AA** : White or colour, e.g., normally soiled |
5,5 kg |
Night silence plus |
||
|
work clothes, bed linen, table linen, body linen, towels. |
Prewash |
|||
|
Rinse plus |
||||
|
Delay start |
||||
*Depending on model.
**Reference programme for test conforming to CEI 456 standard ( Cotton AA 60° programme).

programmes table / consumption 17
Consumption
|
Programme |
Tempera- |
Average |
|||
|
Washing type |
tures |
consumption** |
|||
|
°C |
Litres |
kWh |
Time |
||
|
Cotton |
cold — 90 |
63 |
2,10 |
||
|
Synthetics |
cold — 60 |
45 |
0,80 |
||
|
Delicates |
cold — 40 |
50 |
0,50 |
||
|
Easy iron |
cold — 60 |
55 |
0,55 |
||
|
Jeans |
cold — 60 |
55 |
0,90 |
||
|
Spin |
— |
— |
0,015 |
display |
|
|
Drain |
— |
— |
0,002 |
||
|
Rinses |
— |
32 |
0,05 |
See |
|
|
Lingerie |
cold — 40 |
50 |
0,50 |
||
|
Silk |
cold — 30 |
40 |
0,30 |
||
|
Handwash |
cold — 40 |
45 |
0,45 |
||
|
Wool |
cold — 40 |
45 |
0,45 |
||
|
Sport |
cold — 40 |
50 |
0,70 |
||
|
Cotton AA* |
40 — 90 |
63 |
1,80 |
||
*Reference programme for test conforming to CEI 456 standard (Cotton AA 60° programme) : 46 L / 0,93 kWh / 140 min
**Average figures which can vary depending on conditions of use.
Consumptions shown refer to the maximum temperature for each programme.
 Loading…
Перейти к контенту
Стиральные машины Electrolux

- Размер инструкции: 773.92 kB
- Формат файла: pdf
Если вы потеряли инструкцию от стиральной машины Electrolux EWT 10420 W, можете скачать файл для просмотра на компьютере или печати.
Инструкция для стиральной машины Electrolux EWT 10420 W на русском языке. В руководстве описаны возможности и полезные функции, а также правила эксплуатации. Перед использованием внимательно ознакомьтесь с инструкцией.
Чтобы не читать всю инструкцию вы можете выполнить поиск по содержимому внутри инструкции и быстро найти необходимую информацию. Рекомендации по использованию помогут увеличить срок службы стиральной машины Electrolux EWT 10420 W. Если у вас появилась проблема, то найдите раздел с описанием неисправностей и способами их решения. В нем указаны типичные поломки и способы их решения.
More products and manuals for Washing machines Electrolux
| Models | Document Type |
|---|---|
|
EWP127101W |
User Manual
32 pages |
|
WAGLES7000 |
User Manual
52 pages |
|
ESI6560ROX |
User Manual
52 pages |
|
EWW1696SWD |
User Manual
36 pages |
|
EWW168543W |
User Manual
64 pages |
|
GA55GLV |
User Manual
56 pages |
|
EWF148540W |
User Manual
28 pages |
|
EWS1266EDW |
User Manual
28 pages |
|
ESF5521LOX |
User Manual
60 pages |
|
EWF7242SXM |
User Manual
52 pages |
|
WAL4E200 |
User Manual
56 pages |
|
EWF12933 |
User Manual
68 pages |
|
EWP1474TDW |
User Manual
24 pages |
|
EWF12479W |
User Manual
40 pages |
|
EWF7040WSM |
User Manual
52 pages |
|
EWS1264EDW |
User Manual
24 pages |
|
EWT6020W |
User Manual
12 pages |
|
EWW1486HDW |
User Manual
32 pages |
|
ESI8521ROK |
User Manual
24 pages |
|
UFW47K8141 |
User Manual
28 pages |


-
Страница 1
User manual Инструкцияѝпоѝэксплуатации EWT 11420 W — EWT 10420 W W ashing machine Стир альнаяѝмашина[…]
-
Страница 2
W e wer e thinking of you when we made this pr oduct[…]
-
Страница 3
3 Welcome to the world of Electrolux Thank you for choosing a first class product from Electrolux, which hopefu lly will provide you with lots of pleasure in the future. T he Electrolux ambition is t o offer a wide variety of quality produc ts that make your life mor e comfortable. You find some example s on the cover in this manual. Please take a […]
-
Страница 4
4 contents Contents Warnings ……. …………………….. ………. 5 Description of the appliance ………….. 7 Personalisation . …………………….. ……. 8 How to run a wash cycle ? ……………. 9 Washing guide ……………………… ….. 14 Programmes tabl e ……………. ……….. 16 Consumption … ……….[…]
-
Страница 5
warnings 5 Warnings These warnings ar e for the safety of you and others around you. Please read these p oints carefully before installing and us ing your ap- pliance. Thank yo u for your atten- tion. Keep this user manual with your ap — pliance. If the appliance is sold or gi- ven to another person, pleas e make sure this user manual is included. […]
-
Страница 6
6 warnings Precautions to be taken aga inst frost If your applianc e is exposed to tempera- tures belo w 0°C, th e following precau- tions must be taken : • C lose the tap and disconn ect the inlet hose. • Place the end of this hose and the drain hose in a basin on the floor . • Select the Drain pr ogra mme let it run until the end of t he c[…]
-
Страница 7
description of the app liance / personalisation 7 Description of the appliance The control pa nel Lid handle Filter access cove r Lever for movi ng the appliance Adjustable levelling feet Dispenser box Prewash Wash Softener (do not fill above the MAX symbol ) The control panel Programme selector Pushbuttons and th eir functions Display “Start/Pau[…]
-
Страница 8
8 description of the app liance / personalisation The symbols Time manager Temperatur e Child safety Cycle running Length of cycle or T imer delay countdown Personalisation Child safety This option provides tw o types of locking : — if the option is activated aft er the cycle has started, no changes to the options or program ar e possible. The cycl[…]
-
Страница 9
how to run a wash cycle 9 How to run a wash cycle? Using for the first time • Ensur e the electric al and water con- nections co mply with the installation instructions. • Remove th e polystyr ene in sert and all other items in side the drum . • Run an initial w ash cycle at 90°C, without any washin g but with deter- gent to clea n the water[…]
-
Страница 10
10 how to run a wash cycle progress, t he applianc e will ignore the new selected pro gramme. “Err” flashes and the “Sta rt/Pause” pushbut ton flashes red fo r a few seconds then t he current cycle disp lay reappears. Selecting the t emperature Press the “Tem perature” pushbutton re peatedly to in- crease or de crease the tem- perature […]
-
Страница 11
how to run a wash cycle 11 • T emporary : Press the “Rinse plus” pushbutton . The option is only a c tive for the selected program me. • Permane nt : Hold down the “Prewash” and “De- lay start” pushbuttons for a few se — conds. The opt ion is permanently activated, even if the appliance is swit- ched off. To deactivate it, repeat th[…]
-
Страница 12
12 how to run a wash cycle Very lightly soiled laundry or half load The availability of th ese different levels varies depend ing on the selected pro- gramme type. Start of the programme Press the “Start/Paus e” pushbutton to start the cycle ; the co rrespon- d i n g l i g h t w i l l c o m e o n green. It is normal for the pr ogramme selector […]
-
Страница 13
how to run a wash cycle 13 Turn the prog ramme selector to the “Stop” position. Remove washing Unplug and close wate r inlet tap. We recommend leavin g the lid and drum open after use t o ventilate the water tank. Standby mode If the appliance is on but no commands are selected for 10 min before or after a cycle, it goes in to standby mode. The[…]
-
Страница 14
14 washing guide Washing guide Sorting and preparing the washing • Sort washing by type and care label (refer to International symbols section below) : normal wash for tough fabrics which ca n withstand intense washing an d spinning cycles ; deli- cate wash for delicate fabrics wh ich need to be tr eated with care. For mixed loads, loads with ite[…]
-
Страница 15
washing guide 15 You can obtain info rmation on the hard- ness level of wate r in your area by c on- tacting your wate r company or other competent s ource. There are no rest rictions on the use of powder deterg ents. Liquid de tergents must not be used when a prew ash has been selected . For cycles withou t prewash, they can be ad- ded either via […]
-
Страница 16
16 programmes table / consumption Programmes table Programme / Type of washing Load Possible options Cotton : White or colour, e.g., normally soiled work clo- thes, bed linen, table linen, body linen, towels. 5,5 kg Night silence plus Prewash Rinse plus Delay start Time manager Synthetics : Synthetic fabrics, body linen, coloured fa- brics, non-iro[…]
-
Страница 17
programmes table / consumption 17 Consumption Programme Washing type Tempera- tures Average consumption** °C Litres kWh Time Cotton cold — 90 63 2,10 See display Synthetics cold — 60 45 0,80 Delicates cold — 40 50 0,50 Easy iron cold — 60 55 0,55 Jeans cold — 60 55 0,90 Spin — — 0,015 Drain — — 0,002 Rinses — 32 0,05 Lingerie cold — 40 50 0,50 Sil[…]
-
Страница 18
18 care and cleaning Care and cleaning Unplug the ap pliance before clea ning. Descaling the appliance To descale the appliance, use a n appro- priate non- corrosive product designe d for washing machines. Read product la- bel for recommended am ounts and how often descaling should be carried out. The exterior Use warm soapy wate r to clean the ex-[…]
-
Страница 19
operating problems 19 Operating problems Numerous che cks were carried out on yo ur appliance before it left the factory. However, shoul d you notice a malfunction, please refer to the sectio ns below before contacting th e after-sales service. Problems Causes The washing ma chine doesn’t star t or doesn’t fill : • the applianc e isn’t plug[…]
-
Страница 20
20 operating problems Wash is unsatisfactory : • the detergen t is unsuitable for machine washing, • there is too much wa shing in the drum, • the wash cycle is unsuitable , • there isn’t enough deterg ent. The appliance vib rates, is noisy : • the appliance hasn’t been untied properly (see untying sectio n), • the applianc e isn’[…]
-
Страница 21
operating problems 21 The E20 error co de ap- pears in the display** and the Start/Pause pu shbut- ton flashes red*** : • the drain age filter is obstructed, • the drain hose is blocked or bent , • the drain hose is fixed too high (see “Installa- tion” sectio n). • the drain age pump is blocked, • the stand pipe is blocked. The E10 er[…]
-
Страница 22
22 technical specifications / installati on Technical specifications Installation Remove all protective packaging for transit before using f or the first time. Keep in case n eeded for future tr ansit : Transportin g a non-secured applianc e may damage int ernal components an d cause leakage s and malfunctions. The appliance ca n also be damaged th[…]
-
Страница 23
technical specificati ons / installation 23 Untying To install your wash ing machine at the same level as sur rounding furniture, pr o- ceed as follows : Water suppl y Install the supplied water inlet hose at the rear of your washing machine b y proceeding as follows (Do not reuse an old hose) : Open the wate r inlet tap. Check there are no leaks. […]
-
Страница 24
24 technical specifications / installati on Drainage — The conn ector at the end of the fle xi- ble hose can be at- tached t o all common type s of standpipe. Attach the c onnec- tor to the standp ipe with the hose clam p supplied with the appliance * . — Fit the U-pie ce on the draina ge hose. Place ev erything in a drainage point ( or in a sink) […]
-
Страница 25
environment 25 Environment Disposing of the appli ance All materials carrying the symbol ar e recyclabl e. Dispose of them at a waste collection site (enquire at your local council) for co llection and recyc ling. When disposing of your appliance, re- move all parts which could be dang e- rous to others: cut off the powe r supply cable at the b ase[…]
-
Страница 26
26 оглавление Оглавление Мерыѝпредосторожностиѝ ………..27 Описаниеѝприбораѝ …………………29 Дополнительныеѝнастройкиѝ …….30 Какѝстиратьѝ ? ѝ ………………………..32 Руководствоѝпоѝстиркеѝ …………… 38 […]
-
Страница 27
Мерыѝпредосторожности 27 Мерыѝ предосторожности Описанныеѝ здесьѝ меры предосторожностиѝ направлены н а ѝо б е с п е ч е н и е ѝв а ш е й ѝл и ч н о й б е з о п а с н о с т и ѝи ѝб е з о п а с н о с т и др[…]
-
Страница 28
28 Мерыѝпредосторожности доме , ѝ необходимоѝ обратитьсяѝ к квалифицированномуѝэлектрику . • Послеѝ установкиѝ прибора необходимоѝ удостоверитьсяѝ в том , ѝчтоѝонѝнеѝопирае тсяѝнаѝсвой ка?[…]
-
Страница 29
описаниеѝприбораѝ / ѝдополнительныеѝнастройки 29 Описаниеѝприбора Панельѝуправления Ручкаѝдляѝоткрыванияѝкрышки Крышкаѝотделенияѝфильтра Рычагѝ дляѝ перемещенияѝ прибора Ре гу лир уем ?[…]
-
Страница 30
30 описаниеѝприбораѝ / ѝдополнительныеѝна стройки Символы Time ѝ manager Температура Безопасностьѝдетей Ходѝвыполненияѝцикла Продолжительностьѝциклаѝили обратныйѝотсчетѝвремени задержки Доп?[…]
-
Страница 31
описаниеѝприбораѝ / ѝдополнительныеѝнастройки 31 случаеѝаварийнойѝситуации . Дляѝ повторногоѝ включения функцииѝ подачиѝ сигналаѝ повторите туѝжеѝпроцедуру .[…]
-
Страница 32
32 какѝстират ь Какѝстиратьѝ ? Первоеѝпользованиеѝ прибором • Проверьте , ѝч т о б ы ѝв с е подключенияѝ кѝ электросетиѝ иѝ к сетиѝ водоснабжения соответствовалиѝ инструкциям поѝустановке . •[…]
-
Страница 33
какѝстирать 33 Индикаторѝ кнопкиѝ “ Ста рт / Пауза ” начинаетѝмигатьѝзеленымѝцветом . Н а ѝд и с п л е й ѝв ы в о д я т с я ѝс и м в о л ы , соответствующиеѝ разнымѝ стадиям выполненияѝ цикла ѝ ( ѝС т[…]
-
Страница 34
34 какѝстират ь “ Ночнойѝрежимѝплюс ” ѝ Сливѝ водыѝ послеѝ последнего полосканияѝ неѝ производится , ѝт а к и м образом , ѝ бельеѝ неѝ сминается . Посколькуѝ всеѝстадииѝ отжимаѝ будут отменены[…]
-
Страница 35
какѝстирать 35 “ Задержкаѝпуска ” ѝ Выбравѝ этуѝ функцию , ѝм о ж н о отложитьѝ пу скѝ программыѝ стирки наѝ 30, ѝ 60, ѝ 90 ѝминут , ѝ 2 ѝчаса ѝиѝвплоть доѝ 20 ѝчасов . Выбранноеѝ времяѝ задержки вывод?[…]
-
Страница 36
36 какѝстират ь Пауза ”; ѝс о о т в е т с т в у ю щ и й индикаторѝ загоритсяѝ зеленым цветом . Считаетсяѝ нормальнымѝ явлением тотѝ факт , ѝч т о ѝп е р е к л ю ч а т е л ь программѝ неѝ поворачивается?[…]
-
Страница 37
какѝстирать 37 Конецѝпрограммы Стиральная ѝ машина останавливаетсяѝ автоматически ; кнопкаѝ “ Старт / Пауза ” ѝг а с н е т , ѝа ѝн а дисплееѝ мигаетѝ символѝ “0”. ѝК р ы ш к а можетѝ бытьѝ открыт[…]
-
Страница 38
38 р уководствоѝпоѝстирке Руководствоѝ поѝ стирке Сортировкаѝиѝподготовкаѝбелья • Рассортируйтеѝ бельеѝ п оѝ типуѝ и символуѝ обработкиѝ ( см . ѝн и ж е разделѝ “ Международные символы ”): ѝ?[…]
-
Страница 39
р уководствоѝпоѝст ирке 39 Моющиеѝсредстваѝиѝдобав ки Пользуйтесьѝтолькоѝтемиѝмоющими с р е д с т в а м и ѝи ѝд о б а в к а м и , ѝк о т о р ы е предназначеныѝ дляѝ стиральных машин . ѝ Следуйтеѝ ин[…]
-
Страница 40
40 р уководствоѝпоѝстирке Международныеѝсимволы ОБЫЧНАЯ СТИРКА Стиркаѝприѝ 95°C Стиркаѝприѝ 60°C Стиркаѝприѝ 40°C Стиркаѝприѝ 30°C Щадящаяѝ ручнаяѝстирка Неѝстирать ЩАДЯЩАЯ СТИРКА ОБРАБОТКА ѝ ?[…]
-
Страница 41
таблицаѝпр ограммѝ / ѝпотреблениеѝводыѝиѝэне ргии 41 Таблицаѝпрограмм Программа / Типѝбелья Загру зка Возможныеѝ дополнительныеѝ функции Хлопокѝ (Cotton) ѝ : ѝ белоеѝ илиѝ цветн оеѝ белье , напри[…]
-
Страница 42
42 таблицаѝ программѝ / ѝпотреблениеѝводыѝиѝ энергии Тонкоеѝ нижнееѝ бельеѝ (Lingerie) ѝ : ѝ очень нежное , ѝтонк оеѝбелье , ѝнапр имер , ѝ нижнееѝбелье . 1,0 ѝкг Ночнойѝрежимѝп люс Задержкаѝпус ка Шёл[…]
-
Страница 43
таблицаѝпр ограммѝ / ѝпотреблениеѝводыѝиѝэне ргии 43 Потреблениеѝводыѝиѝэнергии Программа Типѝбелья Температура Примерныеѝпок азатели потребления ** °C литры кВт длит — сть Хлопок холоднаяѝ[…]
-
Страница 44
44 уходѝиѝчистка Уходѝиѝчистка Передѝ чисткойѝ всегдаѝ отключайте прибор ѝотѝэлектросе ти . Удалениеѝизвестковыхѝ отложенийѝвѝприборе Дляѝ удаленияѝ извест ковых отложенийѝ используйте с[…]
-
Страница 45
уходѝиѝчистка 45 Фильтрыѝнаѝлинииѝ подачиѝводы Дляѝ чисткиѝ этихѝ фильтров выполнитеѝ действия , ѝ показанные нижеѝ : 1 2[…]
-
Страница 46
46 вѝслучаеѝнеисправности Вѝслучаеѝнеисправности Приѝ изготовл енииѝ приборѝ п рошелѝ множествоѝ проверок . ѝЕ с л и ѝв с е ѝж е имеетѝ местоѝ сбой / неисправность , ѝ ознакомьтесьѝ сѝ изложен?[…]
-
Страница 47
вѝслучаеѝнеисправности 47 Следыѝ во дыѝ около машиныѝ : • переливѝ пеныѝ из — заѝ избыточного количестваѝмоющегоѝсредства , • используемоеѝ моющ ееѝ с редствоѝ не подходитѝ дляѝ стиркиѝ вѝ с?[…]
-
Страница 48
48 вѝслучаеѝнеисправности Слишком продолжительныйѝ цикл стиркиѝ : • засореныѝфильтрыѝвѝлинииѝѝподачиѝводы , • сбойѝподачиѝводы , • сработалаѝ системаѝ термозащиты двигателя , • температу[…]
-
Страница 49
вѝслучаеѝнеисправности 49 Наѝ дисплееѝ выводится кодѝ ошибкиѝ E20**, ѝи кнопкаѝ “ Старт / Пауза ” мигаетѝ красным цветом *** ѝ : • засоренѝсливнойѝфильтр , • закупоренѝилиѝперегнутѝсливнойѝшла?[…]
-
Страница 50
50 техническиеѝданн ыеѝ / ѝустановка Техническиеѝданные Установка Обязательноѝ уд алитеѝ передѝ первым включениемѝприбораѝвсеѝз ащитные детали , ѝ установленныеѝ для транспортировки . ѝС о […]
-
Страница 51
техническиеѝда нныеѝ / ѝустановка 51 Подготовкаѝмашиныѝкѝработе Е с л и ѝн у ж н о ѝс о х р а н и т ь выравниваниеѝ машины относительноѝ стоящейѝ рядом мебели , ѝ выполнитеѝ показанные нижеѝдейс[…]
-
Страница 52
52 техническиеѝданн ыеѝ / ѝустановка Откройтеѝкранѝподачиѝводы . Проверьтеѝнаѝотсутствиеѝут ечек . Ш л а н г ѝп о д а ч и ѝв о д ы ѝн е ѝм о ж е т ѝб ы т ь удлинен . ѝ Еслиѝ егоѝ длинаѝ всеѝ же недост[…]
-
Страница 53
техническиеѝда нныеѝ / ѝустановка 53 Т о ч н о е ѝв ы с т а в л е н и е ѝп р и б о р а ѝп о уровнюѝ позволяетѝ предотвратить вибрации , ѝш у м ѝи ѝс м е щ е н и е прибораѝвоѝвремяѝработы . 2 3[…]
-
Страница 54
54 защитаѝокружающей ѝсреды Защитаѝокружающейѝ среды Удалениеѝвѝотходы Всеѝ м атериалы , ѝи м е ю щ и е ѝс и м в о л , ѝд о п у с к а ю т ѝр е у т и л и з а ц и ю . Доставьтеѝ эти ѝ материалыѝ вѝ место с?[…]
-
Страница 55
108 3597 01 — 02/09 www.electrolux.com[…]