
Дракон из проволоки по чертежам своими руками
30 апреля 2023 г. 19:07
Всем привет! Хочу поделиться с вами технологией изготовления дракона из проволоки. Его высота 150 см. Каркас более сложный, так как несимметричный. Это придает изящества фигуре.
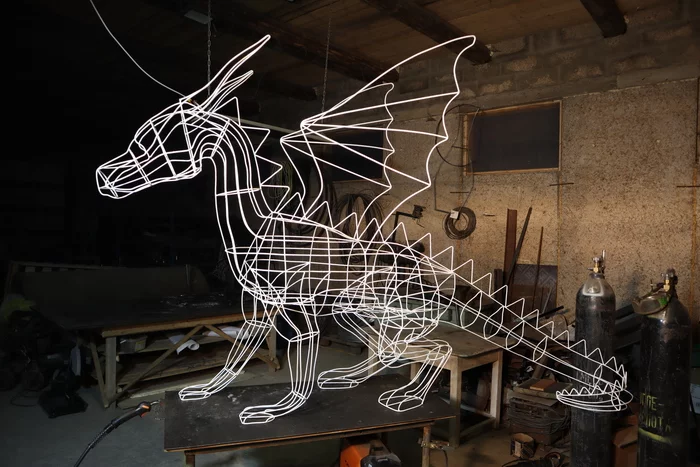
Чтобы сделать такого дракона нам понадобятся: сварочный аппарат(обычный), сварочная маска «Хамелеон», железная вязальная проволока диаметром 5-6 мм(около 20 кг).
Первым делом нужно распечатать чертежи в масштабе. Их можно приобрести здесь, на сайте. Они в формате pdf. Открывыть чертежи нужно через программу Acrobat Reader. Режим печати «Постер» с галочкой на «метки вырезки». Затем листы склеиваются в единый чертеж. А уже по контурам на чертеже выгибается проволока. Затем гнутые элементы крепятся между собой при помощи электросварки.
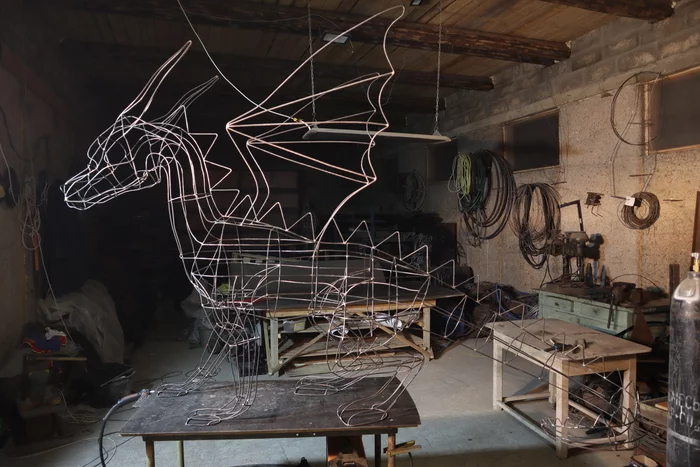
На видео пот этим текстом показано как собирается каркас.
Полученный каркас дракона можно украсить гирляндами или сделать из него топиари, обтянув искусственным газоном. Видео по обшивке вы можете найти на моем ютуб-канале.
Так же можно сделать дракона любого размера. Для этого нужно поменять масштаб при распечатке чертежей.
Моя группа в вк:
https://vk.com/topiarydiy
Introduction: Wire Dragon
Thanks to OniTora for the inspiring instructable «wire scorpions» i found how to make a wire dragon by looking at a picture. Hope you all enjoy!
Step 1: Supplies
Too make this dragon you will need:
24. gauge wire
wire cutters
needle nose pliers
Step 2: Cutting the Wire
Cut fourteen strips of wire each 6-7 inches long
Step 3: Tail
Take six wires and set aside the rest for later. Pinch the middle of all six wires with the needle nose pliers. Bend one wire at a 90 degree angle and twist around the bundle of wires. Repeat this process until you have one wire left.
Step 4: First Body Half and Legs
Bend the remaining 8 pieces of wire in half. set four aside. These will be your dragon’s legs and body. Beginning at the end of the coil , wrap the end of a bent wire around the bundle , and pull tight. the less they slide the better. Repeat for all four wires. Be sure each wire crosses in the same order (Left over right is how i do it)
Step 5: Making the Body and Legs
Flip dragon over and take the furthest back pair of wires, and wrap them forward over each other right over left, and then around the wires again. Repeat four times. You will end up with four wires protruding from both sides. Take one wire and wrap it around the other three as you did for the tail. take the other three wires and twist together, then leave three toes at the bottom. Repeat this step to make another body segment and use up your last four wires.
Step 6: The Head
This is your chance to be creative. your can make the head any way you would like to. i like to twist the two middle wires into a snout, leave two for the whiskers and two for the eyes. Like i said, be creative. There is no right or wrong way. Once you have the head done, your finished! These make great gifts and such for friends and family!
Introduction: Pocket Dragon
Sometimes, you just need a friend who can be with you all the time. What better friend can you have than a dragon? What better place for that dragon than in your pocket?
I’ve been making projects out of telephone wire for almost 50 years, using methods I learned from the X-Acto Company’s Suji Wire Art kits (marketed in 1955). (https://www.instructables.com/id/Wire-Skier-a-Suji… )
When I make wire dragons, I usually make ones that stretch between 1 and 2 feet long. For this challenge, I made a dragon that measures only 5 1/2 inches (14 cm) from tongue to tail tip.
Now, I know I’ve been doing this for longer than many of you have been alive, but Suji is a lot of fun, and you can make many different things, once you learn the basic techniques.
Supplies
What Do You Need?
- Telephone Wire — The wire I use is plastic-covered, usually 22-or-24 gauge, legally-obtained.
- Scissors — Of course, wire -cutters are designed for cutting wire, but I’m cheap. Scissors work just fine.
- Patience — I can make a full-scale dragon in about an hour, but I’ve been doing this for ages. Take your time, and don’t be afraid if it doesn’t look exactly like the example.
Step 1: Armature, Framework, Core, Start. Whatever You Call It, It’s a Beginning
I do the framework in three sections of folded wire. Each section of folded wire (first picture) is between four and 5 inches long.
- Front legs, body, hind legs — 8 lengths.
- Head, neck, body, tail — 6 lengths.
- Wings, body, (maybe) part of the tail — 8 lengths
Front legs, body, hind legs — It should resemble a lopsided U. The front legs will be about one inch, then a 90-degree angle, about 1 1/2 inches for the body, another 90 degree turn, and the hind legs will be about 2 1/2 inches. This dragon will have four toes on each foot. If it was an Asian dragon, four toes would mean it was Chinese. The Imperial Chinese dragons had five toes. The Japanese dragons had three toes. According to legend, as dragons left the Imperial Palace, they lost toes the further they traveled to the east. However, this dragon is based on the European dragon, like the one St. George is supposed to have fought.
Head, neck, body, tail — This section stays a straight line, for now. About 1 1/2 inches is tail, 1 1/2 inches for the body, and 2 inches is the neck and head.
Wings, body, (maybe) part of the tail — It should resemble the letter L, with 1 1/2 inches along the body, and 3 inches going up for the wings.
Step 2: Body & Neck
The first part of the dragon that is wrapped is the body. The piece of wire should be near four feet long. Start from the hind legs and wrap tightly toward the head. Each turn around the body should be right next to the one before it, so the core wires are covered and can’t be seen. Do not overlap backwards — That makes it lumpy.
Wrap 20 turns for the body, wrap past the wing & foreleg joint, and keep wrapping out the neck 20 turns.
Step 3: Body and Tail
With another long piece of wire, start on the head side of the forelegs and wrap 4 or 5 turns winding the opposite direction from the way you wrapped the first layer. Cross in front of the wings and wrap 20 turns to the junction of the hind legs. You will now have less core wires as you start the tail. Wrap 8 turns and clip one of the folded core wires and unfold the fold to extend the tail. Another 8 turns, and another clip. continue that way until you only have two wires left.
Step 4: End of the Tail
Wrap another 8 times, and spread the two core wires. Do two or three sets of S-curves, wrapping around one core wire, then around the other. Bring the core wires back together. Wrap another, tighter S-curve, and wrap twice around the cores together. Trim the wrapping wire and one of the cores. Finally, trim the last core half-an-inch longer.
Step 5: Reach Out!
Clip each loop of the arm wires at the middle. Divide the arm wires into two bundles of four wires. Fold a one-foot-long wire in half. Hold it under the arm wires and start wrapping tightly out one arm 18 times. Take the other end of the wrapping wire and make 18 turns out the other arm. Bend and trim the core wires so they look like claws. Trim the wrapping wires.
Step 6: You’ve Got Legs! You’ve Got Thighs!
Divide the leg wires into two groups and clip them at the bend. Fold a two-foot-long wire in half, and hang it around the legs. Wrap one leg 24 times, then wrap the other leg 24 turns with the other half of the wrapping wire.
To make the dragon’s legs seem more powerful, take a foot-long wire, fold it in half, and hang it on the other side of the legs. Wrap around the thick leg in the opposite direction of your first layer about 10 times. Take the other half of the wrapping wire and wrap around the other leg about 10 times to make the thighs. Trim off the wrapping wires. Bend the legs at the knee, and spread the core wires of each leg to make toes and trim to the desired length.
Step 7: The Jaw-Bone’s Connected to The….
Clip the loops of the core wires to make 6 wires. Divide the cores into two groups of 2 and 4. the group of 2 will be the lower jaw. Take a two-foot wire and fold it at the 8-inch mark. the shorter end will wrap the jaw. Wrap the two core wires in an S-curve 8-10 times. Wrap once around one core wire to lock it in place. Trim the wrapping wire, bend the core wires up and trim them to make the lower teeth.
Step 8: Get A-Head
Spread out the four core wires like a sunburst. Take the long end of the wrapping wire and do two loose S-curves, crossing between the pairs of core wires. Next, weave in and out of the four core wires, building a curve as you go forward and back, two more times. Bend the four core wires forward, away from the neck. Weave forward, trying to keep a curve to the skull. after 4 forward-and-back weaving rows, press the two center cores together and continue weaving, narrowing as you create the snout. The upper jaw should be 2 or 3 rows longer than the lower jaw. Wrap one last turn over a core wire, and trim the weaver. Separate the center core wires, and wrap each one over the nearest outside core wire 2 or 3 times. cut the wrapping wires, and trim the remaining cores to the length of dangerous fangs.
Step 9: Wing It!
Clip the wire loops and divide them into two bunches of 4 core wires. Fold a 3-to-4-foot wire in half.
For the first wing, choose a half and wrap 4 times away from the body. Bend down one of the core wires, and continue wrapping 8 times up the remaining cores. Bend down another core, and wrap up 8 times. Bend another core, and wrap 8 turns up the remaining core.
Bend that last core wire, and begin weaving in and out of the core wires, then weave back up. When you get back to the top core, wrap one turn around it, and weave down and up again. Each time you reach the top core, wrap one turn. This gives a curve and angle to the wing. When you reach the end of the weaving wire, make one last turn to lock it in place. Trim it. Go to the bottom core and begin weaving with it, making that extra turn around the top core wire each time you reach it, and lock it off when you run out. Follow that pattern with the next core wire, weaving, wrapping, and locking. The last core wire below the top one wraps around the top core 4 times, and is trimmed. Trim the top core about an inch beyond the wrapping (or less, if you like.).
NOW, follow the same instructions to make the OTHER wing!
Step 10: Eyes and Tongue
The eyes and tongue are made from one piece of wire about 6 inches long (I use red, most of the time). Fold the wire in half, spread the jaw and head wide to give access to the inside of the head, Run the ends of the wire up through the spaces between the outer and inner ribs of the head, then poke them in between the inner ribs of the head, one or two weaves closer to the snout to make dangerous-looking eyes.
Now you have two red wires sticking out between the head and the jaw. Begin twisting the wires together tightly to make a tongue, until the twisted part goes past the snout and fangs. Trim it to give an impressive forked tongue.
Step 11: Hook ‘Em, Horns!
Take two 4-inch wires of a color in contrast to the main color of the dragon (I usually use black, white, or yellow). Run one wire into and out of the head across the area where you switched from weaving in a curve to weaving toward the snout. Run the other wire in the same direction, but one weave closer to the snout.
Even up the wires, and wrap one wire of each pair around its partner 5 times. Clip the wrapping wires and trim the core wires to your desired length.
Step 12: That’s My Dragon!
Look at that! You just made a dragon!
Now you can bend and pose it any way you please, but you know where a pocket dragon belongs, don’t you?
Step 13: One in the Pocket
Of course! In a pocket!
Don’t be afraid to try this. Once you get the hang of it, it’s relaxing, makes a great gift, and helps time pass if you’re in a doctor’s waiting room with a pile of old magazines.
Vote for this Instructable for the 2020 Pocket-Size Speed Challenge.
Хотите создать удивительного дракона из проволоки? Это отличный способ проявить свою творческую натуру и добавить немного магии в вашу жизнь. В этом пошаговом руководстве вы узнаете, как сделать дракона своими руками с использованием доступных материалов и простых инструментов.
Для начала, вам понадобятся следующие материалы: проволока различной толщины, плоскогубцы, ножницы и пинцет. Вы можете использовать разные цвета проволоки, чтобы придать своему дракону более реалистичный и живой вид.
Первый шаг заключается в создании основной формы дракона из проволоки. Используйте плоскогубцы и ножницы, чтобы изгибать и резать проволоку в нужном месте. Постепенно формируйте голову, тело, крылья и хвост дракона, придавая им желаемую форму и пропорции. Будьте творческими и экспериментируйте с разными формами и изгибами проволоки.
Подсказка: чтобы избежать порезов, используйте пинцет для держания проволоки при ее изгибе.
Когда основа готова, вы можете начать создавать детали дракона, такие как чешуя на спине, зубы и когти. Используйте тонкую проволоку для создания этих мелких элементов и прикрепите их к основной форме дракона. Следите за пропорциями и деталями, чтобы ваш дракон выглядел реалистично и уникально.
После завершения всех деталей, вы можете добавить цвет и текстуры на вашего дракона с помощью краски, тканей или других материалов. Вы можете окрасить проволоку разными цветами или добавить пайетки для создания блеска. И снова, будьте креативными и следуйте своему воображению!
Теперь, когда ваш дракон готов, вы можете использовать его как украшение для вашего дома или подарок для друзей. Он станет настоящей достопримечательностью и привлечет внимание всех посетителей. Создание дракона из проволоки — это увлекательное занятие, которое поможет вам развить творческие навыки и получить удовольствие от процесса.
Так что, возьмите проволоку и приступайте к созданию собственного магического дракона. Вы удивитесь, насколько великим и уникальным может быть ваше творение!
Содержание
- Подготовка к созданию дракона
- Выбор материалов и инструментов
- Создание основы дракона
- Изгибание проволоки
- Соединение элементов
- Формирование формы дракона
Подготовка к созданию дракона
Прежде чем приступить к созданию дракона из проволоки, вам потребуется подготовиться. В этом разделе вы найдете список материалов и инструментов, которые понадобятся вам для работы.
|
Материалы:
|
Инструменты:
|
Убедитесь, что у вас есть все необходимое перед началом работы. Если какой-то предмет отсутствует, приобретите его заранее.
Выбор материалов и инструментов
Для создания дракона из проволоки вам понадобятся следующие материалы и инструменты:
- Проволока: использование мягкой проволоки, такой как медь или алюминий, позволит легко изгибать и моделировать ее.
- Плоскогубцы: эти инструменты помогут вам изгибать и обрабатывать проволоку.
- Ножницы: пригодятся для отрезания проволоки на нужные размеры.
- Гибкая пена или силикон: понадобится для создания основы тела дракона.
- Покрывало или газеты: помогут защитить поверхность от различных материалов и красок.
- Краска и кисти: позволят придать дракону яркий и красочный вид.
Для получения наиболее реалистичного и интересного результата рекомендуется выбирать материалы разных цветов и текстур. Используйте свою фантазию и творческий подход при выборе материалов и инструментов для создания уникального дракона своими руками.
Создание основы дракона
Чтобы основа дракона была прочной, рекомендуется использовать толстую проволоку, примерно 3-5 мм в диаметре. Она должна быть достаточно гибкой, чтобы легко изгибаться и создавать нужную форму.
Вы можете начать с создания каркаса тела дракона, изгибая проволоку в форме петли или зигзага. Затем создайте отдельные сегменты для головы, шеи, хвоста и конечностей, в зависимости от того, какой вид дракона вы планируете создать.
Для крепления отдельных сегментов к основе, используйте кусочки проволоки, чтобы прочно закрепить их в нужном положении. Когда основа дракона будет собрана и закреплена, можно приступать к созданию подробностей и украшений.
Не забудьте оставить достаточно проволоки на законченный проект, чтобы можно было придать ему желаемую форму и позу.
Главное – быть терпеливым и творческим, и уже через некоторое время у вас будет собственный дракон, сделанный своими руками!
Изгибание проволоки
- Проволока необходимой толщины.
- Кусачки или плоскогубцы для срезания проволоки.
- Набор инструментов для изгибания проволоки: круглогубцы, плоскогубцы, гибкие пинцеты.
Процесс изгибания проволоки может варьироваться в зависимости от формы, которую вы хотите получить. Однако некоторые общие правила помогут вам успешно справиться с этим шагом:
- Постарайтесь согнуть проволоку плавно и равномерно. Переборщить с изгибами или слишком ослабить проволоку может привести к сложностям при сборке дракона.
- Используйте инструменты для точного и аккуратного изгибания проволоки. Круглогубцы и плоскогубцы помогут вам создать нужный угол и форму.
- Не забывайте о безопасности. Работая с проволокой, используйте перчатки, чтобы избежать травм и порезов.
При выполнении этого шага будьте терпеливы и внимательны. Изгибание проволоки — это важный процесс, который определит форму вашего дракона. Если у вас возникнут трудности, не стесняйтесь обратиться к видео-инструкциям или консультации специалистов.
Соединение элементов
Для создания дракона из проволоки необходимо умело соединять различные элементы. Правильное соединение гарантирует прочность и устойчивость конструкции.
Одним из самых простых способов соединения элементов является использование обычной пластиковой или металлической проволоки. В данном руководстве мы будем использовать металлическую проволоку.
Для соединения элементов сначала необходимо готовым инструментом изготовить дырку или петлю в одном из элементов. Затем проволоку проводят через дырку и закручивают её вокруг элемента, чтобы соединить их надёжно и прочно.
Важно: Регулярно проверяйте крепость соединений и при необходимости дополнительно закручивайте проволоку, чтобы предотвратить возможность разъединения элементов.
Для более сложных элементов, где требуется соединить несколько проволок, можно использовать методы плетения или спайки. При плетении проволоки переплетают между собой и закручивают концы, чтобы образовать прочное соединение.
Совет: При использовании проволоки следите, чтобы не оставаться слишком длинным куском, так как чрезмерная длина может повредить конструкцию или создать предпосылки для повреждения дракона.
Зная основные методы соединения элементов, вы сможете с легкостью создать своего уникального дракона из проволоки, придавая ему нужную форму и структуру.
Запомните: правильное соединение элементов — залог качественного и прочного изделия!
Формирование формы дракона
Для создания формы дракона сначала нужно создать базовую структуру из проволоки. Проволоку следует разрезать на несколько одинаковых отрезков, которые будут использоваться для создания различных частей дракона.
Наиболее экономичной и удобной методикой является использование «скелета» из проволоки. Для этого нужно создать основу дракона, которая будет поддерживать его форму.
Начните с создания основы тела дракона. Для этого изготовьте отрезки проволоки нужной длины, которые соедините между собой, чтобы получить ось тела. Разместите отрезки параллельно и продумайте, как они будут поддерживать форму дракона.
Затем переходите к формированию конечностей дракона. Сгибайте отрезки проволоки в нужных местах, чтобы создать суставы и соединять их с телом. Уделите особое внимание формированию суставов в районе плеч и бедер, чтобы дракон мог свободно двигаться.
Создайте голову дракона, используя форму, аналогичную формированию тела. Оставьте открытой область для рта и ноздрей, которые вы сможете дополнить в последующих шагах.
Соедините все части дракона с помощью дополнительных отрезков проволоки и закрепите их так, чтобы они были надежно закреплены.
После формирования основы дракона, вы можете приступить к его оформлению и украшению различными материалами, такими как бумага, ткань, цветная проволока и т. д.