
Посмотреть инструкция для Bosch BGL35MOVE7 MoveOn бесплатно. Руководство относится к категории пылесосы, 1 человек(а) дали ему среднюю оценку 9.1. Руководство доступно на следующих языках: русский, английский. У вас есть вопрос о Bosch BGL35MOVE7 MoveOn или вам нужна помощь? Задайте свой вопрос здесь
Не можете найти ответ на свой вопрос в руководстве? Вы можете найти ответ на свой вопрос ниже, в разделе часто задаваемых вопросов о Bosch BGL35MOVE7 MoveOn.
Мой пылесос Bosch не всасывает как раньше. В чем может быть проблема?
Как часто следует проверять фильтр?
Что делать при появлении от пылесоса неприятного запаха?
С какой частотой необходимо пылесосить помещения?
Инструкция Bosch BGL35MOVE7 MoveOn доступно в русский?
Не нашли свой вопрос? Задайте свой вопрос здесь
Требуется руководство для вашей Bosch BGL35MOVE6 MoveOn Пылесос? Ниже вы можете просмотреть и загрузить бесплатно руководство в формате PDF. Кроме того, приведены часто задаваемые вопросы, рейтинг изделия и отзывы пользователей, что позволит оптимально использовать ваше изделие. Если это не то руководство, которое вы искали, – свяжитесь с нами.
Ваше устройство неисправно, и в руководстве отсутствует решение? Перейдите в Repair Café для получения бесплатных ремонтных услуг.
Руководство

Рейтинг
Сообщите нам, что вы думаете о Bosch BGL35MOVE6 MoveOn Пылесос, оставив оценку продукта. Хотите поделиться вашими впечатлениями от данного изделия или задать вопрос? Вы можете оставить комментарий в нижней части страницы.
Довольны ли вы данным изделием Bosch?
Да Нет
1 проголосовать
Часто задаваемые вопросы
Наша служба поддержки выполняет поиск полезной информации по изделиям и отвечает на часто задаваемые вопросы. Если вы заметили неточность в наших часто задаваемых вопросах, сообщите нам об этом с помощью нашей контактной формы.
Шланг моего пылесоса забит. Как его прочистить? Проверенный
Отсоедините шланг и посмотрите в него, чтобы определить, действительно ли он забит. Если да, то возьмите длинный узкий предмет, например, метлу, и осторожно протолкните его через шланг. Это обычно удаляет любые предметы, которые забивают шланг. Если это не помогло, обратитесь к производителю.
Это было полезно (1380)
Какие размеры мешков для пыли есть? Проверенный
Следует учитывать два размера. Во-первых, это размер тарелки с входом в мешок. Это определяет, подойдет ли мешок для пыли к определенному пылесосу. Тогда есть размер сумки. Обычно это указывается в литрах и определяет, сколько пыли может вместить мешок.
Это было полезно (791)
Шнур пылесоса не сматывается обратно в корпус пылесоса. Что мне делать? Проверенный
Вероятно, шнур перекрутился. Несколько раз полностью размотайте и смотайте шнур обратно в пылесос, контролируя процесс руками. Если это не помогло устранить проблему, вероятно, сломан механизм смотки шнура. В этом случае обратитесь к производителю или в ремонтную службу.
Это было полезно (551)
Пылесос издает свист. Что мне делать? Проверенный
Обычно причиной неполадки является заполненный пылесборник или фильтр либо отверстие в шланге, пропускающее воздух. Проверьте пылесборник и фильтр и при необходимости замените их. Проверьте, нет ли в шланге отверстий или непрочных соединений. Если это не поможет, обратитесь к производителю.
Это было полезно (470)
Как удалить пыль и волосы с насадки-щетки пылесоса? Проверенный
Удаление пыли и волос с насадки-щетки пылесоса производится вручную. Если все идет не так, как нужно, можно использовать тонкую расческу, чтобы удалить оставшуюся грязь.
Это было полезно (438)
Какую настройку на щеточной головке пылесоса мне следует использовать? Проверенный
Почти все пылесосы имеют насадку с регулируемой щеткой. Используйте щетку для твердых поверхностей, чтобы предотвратить царапины и повреждения. Отключите щетку для ковровых покрытий и ковриков.
Это было полезно (354)
Можно ли использовать бумажный пылесборник более одного раза? Проверенный
Это делать не рекомендуется. Микропоры в мешке могут засориться, что приведет к снижению силы всасывания и может повредить двигатель.
Это было полезно (234)
Что такое HEPA? Проверенный
HEPA означает высокоэффективный воздух для твердых частиц. Многие пылесосы имеют фильтр HEPA. HEPA-фильтр задерживает от 85% до 99,999995% всех частиц размером 0,3 микрометра (мкм) и выше.
Это было полезно (220)
Могу ли я использовать обычный пылесос для сбора золы? Проверенный
Нет, это невозможно. Пепел, который кажется остывшим, может оставаться внутри теплым или даже горячим. Обычный пылесос для этого не предназначен и может вызвать пожар. Кроме того, фильтры обычных пылесосов не всегда подходят для удержания очень мелких частиц, таких как зола. Затем он может попасть в двигатель пылесоса и вызвать повреждение.
Это было полезно (215)
Перейти к контенту
![]()
Русские электронные инструкции по эксплуатации
Постоянно обновляемый большой каталог документации по эксплуатации и использованию современных устройств и оборудования на русском языке. Бесплатное скачивание файлов.
Главная
Просмотр инструкции в pdf


/%D0%9F%D1%8B%D0%BB%D0%B5%D1%81%D0%BE%D1%81%D1%8B/MoveOn%20BGL35MOV41.jpg)
Инструкция по эксплуатации пылесосов Bosch (Бош) MoveOn BGL35MOV41.
Скачать инструкцию к пылесосу Bosch (Бош) MoveOn BGL35MOV41 (3,39 МБ)

Инструкции по эксплуатации пылесосов Bosch (Бош)
« Инструкция к пылесосу Bosch BWD421PET
» Инструкция к пылесосу Bosch Runn’n BGS42234
Вам также может быть интересно
/%D0%9F%D0%BE%D1%81%D1%83%D0%B4%D0%BE%D0%BC%D0%BE%D0%B5%D1%87%D0%BD%D1%8B%D0%B5%20%D0%BC%D0%B0%D1%88%D0%B8%D0%BD%D1%8B/SilencePlus%20SPS25CW01R.jpg)
Инструкция к посудомоечной машине Bosch (Бош) SilencePlus SPS25CW01R
/%D0%A5%D0%BE%D0%BB%D0%BE%D0%B4%D0%B8%D0%BB%D1%8C%D0%BD%D0%B8%D0%BA%D0%B8/Serie|8%20KGF39SQ3AR.jpeg)
Инструкция к холодильнику Bosch (Бош) Serie|8 KGF39SQ3AR
/%D0%92%D1%81%D1%82%D1%80%D0%B0%D0%B8%D0%B2%D0%B0%D0%B5%D0%BC%D1%8B%D0%B5%20%D0%BC%D0%B8%D0%BA%D1%80%D0%BE%D0%B2%D0%BE%D0%BB%D0%BD%D0%BE%D0%B2%D1%8B%D0%B5%20%D0%BF%D0%B5%D1%87%D0%B8/BEL554MS0.jpeg)
Инструкция к встраиваемой микроволновой печи Bosch (Бош) BEL554MS0
/%D0%A1%D1%82%D0%B8%D1%80%D0%B0%D0%BB%D1%8C%D0%BD%D1%8B%D0%B5%20%D0%BC%D0%B0%D1%88%D0%B8%D0%BD%D1%8B/WLL2426EOE.jpeg)
Инструкция к стиральной машине Bosch (Бош) WLL2426EOE
/%D0%A5%D0%BE%D0%BB%D0%BE%D0%B4%D0%B8%D0%BB%D1%8C%D0%BD%D0%B8%D0%BA%D0%B8/VitaFresh%20Serie%20|%206%20KGN39AI31R.jpeg)
Инструкция к холодильнику Bosch (Бош) VitaFresh Serie | 6 KGN39AI31R
/%D0%A1%D1%82%D0%B8%D1%80%D0%B0%D0%BB%D1%8C%D0%BD%D1%8B%D0%B5%20%D0%BC%D0%B0%D1%88%D0%B8%D0%BD%D1%8B/Serie%206%20WLT2446SOE.jpg)
Инструкция к стиральной машине Bosch Serie 6 WLT2446SOE
/%D0%A5%D0%BE%D0%BB%D0%BE%D0%B4%D0%B8%D0%BB%D1%8C%D0%BD%D0%B8%D0%BA%D0%B8/Serie%20|%206%20KGN39AD3OR.jpeg)
Инструкция к холодильнику Bosch (Бош) Serie | 6 KGN39AD3OR
/%D0%A1%D1%82%D0%B8%D1%80%D0%B0%D0%BB%D1%8C%D0%BD%D1%8B%D0%B5%20%D0%BC%D0%B0%D1%88%D0%B8%D0%BD%D1%8B/WLL%2024163%20OE.jpg)
Инструкция к стиральной машине Bosch (Бош) WLL 24163 OE
- Добавить инструкцию
- Заказать инструкцию

2
de
Die Gebrauchsanweisung bitte aufbewahren.
Bei Weitergabe des Staubsaugers an Dritte bitte
Gebrauchsanweisung mitgeben.
Bestimmungsgemäße Verwendung
Dieser Staubsauger ist für den Gebrauch im Haushalt
und nicht für gewerbliche Zwecke bestimmt. Den
Staubsauger ausschließlich gemäß den Angaben in die-
ser Gebrauchsanweisung verwenden. Der Hersteller
haftet nicht für eventuelle Schäden, die durch nicht
bestimmungsgemäßen Gebrauch oder falsche
Bedienung verursacht werden.
Deshalb beachten Sie bitte unbedingt die nachfolgen-
den Hinweise!
Der Staubsauger darf nur bedient werden mit:
Original-Ersatzteilen, -Zubehör oder -Sonderzubehör
Um Verletzungen und Schäden zu vermeiden, darf
der Staubsauger nicht benutzt werden für:
das Absaugen von Menschen oder Tieren.
das Aufsaugen von:
—
Kleinlebewesen (z. B. Fliegen, Spinnen, …).
—
gesundheitsschädlichen, scharfkantigen, heißen
oder glühenden Substanzen.
—
feuchten oder flüssigen Substanzen.
—
leicht entflammbaren oder explosiven Stoffen und
Gasen.
—
Asche, Ruß aus Kachelöfen und Zentral-
Heizungsanlagen.
—
Tonerstaub aus Druckern und Kopierern.
Sicherheitshinweise
Dieser Staubsauger entspricht den aner-
kannten Regeln der Technik und den ein-
schlägigen Sicherheitsbestimmungen.
Das Gerät kann von Kindern ab 8 Jahren
und darüber und von Personen mit
verringerten physischen, sensorischen
oder mentalen Fähigkeiten oder Mangel
an Erfahrung und / oder Wissen benutzt
werden, wenn sie beaufsichtigt werden
oder bezüglich des sicheren Gebrauchs
des Gerätes unterwiesen wurden und
die daraus resultierenden Gefahren ver-
standen haben.
Kinder dürfen nicht mit dem Gerät
spielen.
Reinigung und Benutzer-Wartung dürfen
nicht durch Kinder ohne Beaufsichtigung
durchgeführt werden.
Plastiktüten und Folien sind außer
Reichweite von Kleinkindern aufzube-
wahren und zu entsorgen.
=> Es besteht Erstickungsgefahr!
Sachgemäßer Gebrauch
Staubsauger nur gemäß Typenschild anschließen und
in Betrieb nehmen.
Niemals ohne Filterbeutel bzw. Staubbehälter,
Motorschutz — und Ausblasfilter saugen.
=> Gerät kann beschädigt werden!
Vermeiden Sie das Saugen mit Düse und Rohr in
Kopfnähe.
=> Es besteht Verletzungsgefahr!
Beim Saugen auf Treppen muss das Gerät immer
unterhalb des Benutzers stehen.
Das Netzanschlusskabel und den Schlauch nicht zum
Tragen / Transportieren des Staubsaugers benutzen.
Wenn die Netzanschlussleitung dieses Gerätes
beschädigt ist, muss sie durch den Hersteller oder
seinen Kundendienst oder eine ähnlich qualifizierte
Person ersetzt werden, um Gefährdungen zu vermei-
den.
Bei mehrstündigem Dauerbetrieb Netzanschluss-
kabel vollständig ausziehen.
Nicht am Anschlusskabel, sondern am Stecker zie-
hen, um das Gerät vom Netz zu trennen.
Das Netzanschlusskabel nicht über scharfe Kanten
ziehen und nicht einquetschen.
Vor allen Arbeiten am Staubsauger Netzstecker zie-
hen.
Beschädigten Staubsauger nicht in Betrieb nehmen.
Beim Vorliegen einer Störung Netzstecker ziehen.
Um Gefährdungen zu vermeiden, dürfen Reparaturen
und Ersatzteileaustausch am Staubsauger nur vom
autorisierten Kundendienst durchgeführt werden.
Staubsauger vor Witterungseinflüssen, Feuchtigkeit
und Hitzequellen schützen.
Keine brennbaren oder alkoholhaltigen Stoffe auf die
Filter (Filterbeutel, Motorschutzfilter, Ausblasfilter
etc.) geben.
Staubsauger ist für den Baustellenbetrieb nicht
geeignet.
=> Einsaugen von Bauschutt kann zur Beschädigung
des Gerätes führen.
Gerät ausschalten, wenn nicht gesaugt wird.
Ausgediente Geräte sofort unbrauchbar machen,
danach das Gerät einer ordnungsgemäßen
Entsorgung zuführen.
GA 9000 883 910_GL35 04.03.2013 12:02 Seite 2
Перейти к контенту

Пылесос Bosch BGL252101 MoveOn Mini — инструкция пользователя по применению, эксплуатации и установке на русском языке. Мы надеемся, она поможет вам решить возникшие у вас вопросы при эксплуатации техники.
Вы можете скачать инструкцию к Bosch BGL252101 MoveOn Mini по ссылке ниже, если не хотите ждать загрузки. Если остались вопросы, задайте их в комментариях после инструкции.
«Загружаем инструкцию», означает, что нужно подождать пока файл загрузится и можно будет его читать онлайн. Некоторые инструкции очень большие и время их появления зависит от вашей скорости интернета.
Остались вопросы?
Не нашли свой ответ в руководстве или возникли другие проблемы? Задайте свой вопрос в форме ниже с подробным описанием вашей ситуации, чтобы другие люди и специалисты смогли дать на него ответ. Если вы знаете как решить проблему другого человека, пожалуйста, подскажите ему
Часто задаваемые вопросы

Как посмотреть инструкцию к Bosch BGL252101 MoveOn Mini?
Необходимо подождать полной загрузки инструкции в сером окне на данной странице или скачать кликнув по специальной кнопке.
Руководство на русском языке?
Все наши руководства представлены на русском языке или схематично, поэтому вы без труда сможете разобраться с вашей моделью
Как можно распечатать инструкцию?
Скачайте ее по специальной кнопке над формой чтения на ваше устройства и отправьте на печать.
Инструкцию для Bosch MoveOn Mini BGL252101 на русском языке, в формате pdf можно скачать с нашего сайта. Наш каталог предоставляем Вам инструкцию производителя фирмы Bosch, которая была взята из открытых источников. Ознакомившись с руководством по эксплуатации от Bosch, Вы на все 100% и правильно сможете воспользоваться всеми функциями устройства.
Для сохранения инструкции «Пылесос с контейнером для пыли Bosch MoveOn Mini BGL252101» на русском языке на вашем компьютере либо телефоне, нажмите кнопку «Скачать инструкцию». Если активна кнопка «Инструкция онлайн», то Вы можете просмотреть документ (manual), в своём браузере онлайн.
Если у Вас нет возможности скачать инструкцию по эксплуатации либо просмотреть её, Вы можете поделиться ссылкой на эту страницу в социальных сетях и при удобном моменте скачать инструкцию. Либо добавьте эту страницу в закладки Вашего браузера, нажав кнопку «Добавить страницу в закладки браузера».
С новой линейкой пылесосов BOSCH навести в доме порядок получается быстрее. Преимущества отмечены большинством домохозяек: универсальность, бесшумность в работе, отличная всасываемость, включая шерсть животных, легкость в использовании, компактность. Одним из популярных пылесосов линейки MoveOn является Bosch BGL252101 Moveon Mini.

Внешний вид и комплектность
Данный пылесос оснащен современным мотором HiSpin мощностью 2100 Вт, аэродинамическими лопастями, которые обеспечивают максимум всасывания мелкого мусора.
Выходной микрофильтр надежно удерживает до 99,9% пыли и шерсти животных.
Конструкция модели позволяет использовать контейнер из пластика или бумажный пылесборник, в зависимости от типа уборки.

Сетевой шнур имеет длину 5 м, что дает возможность пылесосить в радиусе 8 м. Заданной длины хватит для уборки помещения средней площади без переключения розеток. После завершения работы провод сматывается в автоматическом режиме. Шланг с текстильной оплеткой надежен и прочен, прослужит в течение всего срока службы пылесоса Bosch BGL252101.
В комплект поставки входит:
- 4 насадки.
- Телескопическая регулируемая трубка (по росту пользователя).
- Фильтр тонкой очистки.

Характеристики и функции
При покупке товара покупателей волнует вопрос о технической составляющей оборудования. Основные функции и характеристики пылесоса Bosch BGL252101 Moveon Mini имеют следующие показатели.
Производительность:
- инновационный мотор HiSpin c аэродинамическими лопастями и оптимизированным воздушным потоком с минимальным энергопотреблением для максимального сбора пыли;
- для большей мощности всасывания (до 60% с наполовину заполненным пылесборником) и лучшей производительности пылесоса рекомендуется использовать пылесборники PowerProtect, тип G.
Гигиена:
Техникой какого производителя пользуетесь дома?
- моющийся гигиенический фильтр для чистого воздуха на выходе;
- съемный пылесборник: G_A.

Комфорт:
- технология Bag&Bagless: возможность использовать как контейнер, так и пылесборник;
- насадка ковер-пол;
- насадка для чистки твердых полов с мягкой щетиной подходит для бережной очистки паркета;
- насадка для мягкой мебели и щелевая насадка;
- текстильный шланг;
- телескопическая труба;
- эргономичная ручка;
- большой объем пылесборника (L), несмотря на компактные размеры пылесоса, за счет чего минимизируется частота смены пылесборника и уменьшаются расходы;
- автоматическая намотка кабеля;
- радиус действия: 8 м;
- большие колеса с мягкой поверхностью для защиты пола;
- электронная регулировка мощности с поворотным регулятором;
- 2 больших колеса сзади и 1 ролик;
- индикатор замены пылесборника;
- удобная парковка и хранение прибора;
- вес: 3 кг (без насадок).
Аналоги
Аналогом из линейки Bosch серии BGL считают модель BGL25A100. Технические характеристики схожи с пылесосом BGL252101 Moveon Mini с 1 отличием в мощности. У первого она составляет 2200 Вт, у второго — 2100 Вт. Оба получили хорошие отзывы от потребителей.
Наталья 31, Одинцово
Приобрели пылесос Бош в Эльдорадо по акции, стоил 3000 рублей. За свои деньги полностью оправдал наши ожидания. Из достоинств отметили: низкий уровень шума, мощность, компактный дизайн.
Евгений 38, Москва
Довольны «немцем», оказался «чистым». На наши 60 квадратов + ковры хватает с лихвой. Рекомендую к приобретению!
Руководство пользователя
Важно: этот прибор предназначен только для домашнего использования в бытовых условиях.
Во избежание травм и повреждений пылесос Bosch BGL252101 не использовать для:
- Чистки людей и животных.
- Всасывания сажи (различных видов), мокрых предметов и жидкостей, легковоспламеняющихся и взрывчатых веществ, тонера из копировальных аппаратов.

Подключение к электросети и включение прибора должно производиться с учетом типовой таблички. Запрещено использовать пылесос без сменного пылесборника либо контейнера для сбора пыли, моторного и выпускного фильтров. При уборке лестницы пылесос должен находится ниже использующего его человека. Не используется сетевой шнур и шланг для механического переноса/транспортировки. Ремонт и обслуживание рекомендуется производить только в сертифицированных и авторизованных центрах.
Читайте также:
- Комбинированый садовый пылесос-воздуходувка Bosch ALS 30
- Многофункциональный ручной пылесос (Handstick) Bosch BBHMOVE1N
- Немецкий пылесос Bosch BGL 32000 для сухой уборки помещений
- Мощный пылесос Bosch BGL 252000 с инновационным двигателем HiSpin
( 1 оценка, среднее 5 из 5 )
Посмотреть инструкция для Bosch BGL35MOVE7 MoveOn бесплатно. Руководство относится к категории Пылесосы, 1 человек(а) дали ему среднюю оценку 9.1. Руководство доступно на следующих языках: русский, английский. У вас есть вопрос о Bosch BGL35MOVE7 MoveOn или вам нужна помощь? Задайте свой вопрос здесь
Не можете найти ответ на свой вопрос в руководстве? Вы можете найти ответ на свой вопрос ниже, в разделе часто задаваемых вопросов о Bosch BGL35MOVE7 MoveOn.
Мой пылесос Bosch не всасывает как раньше. В чем может быть проблема?
Как часто следует проверять фильтр?
Что делать при появлении от пылесоса неприятного запаха?
С какой частотой необходимо пылесосить помещения?
Инструкция Bosch BGL35MOVE7 MoveOn доступно в русский?
Не нашли свой вопрос? Задайте свой вопрос здесь
Перейти к контенту
![]()
Русские электронные инструкции по эксплуатации
Постоянно обновляемый большой каталог документации по эксплуатации и использованию современных устройств и оборудования на русском языке. Бесплатное скачивание файлов.
Главная
Просмотр инструкции в pdf
Инструкция по эксплуатации пылесосов Bosch (Бош) MoveOn BGL35MOV41.
Скачать инструкцию к пылесосу Bosch (Бош) MoveOn BGL35MOV41 (3,39 МБ)
Инструкции по эксплуатации пылесосов Bosch (Бош)
« Инструкция к пылесосу Bosch GS 10 BGS1U1805
» Инструкция к пылесосу Bosch BGS5ZOORU Zoo’o ProAnimal
Вам также может быть интересно
/%D0%A1%D1%82%D0%B8%D1%80%D0%B0%D0%BB%D1%8C%D0%BD%D1%8B%D0%B5%20%D0%BC%D0%B0%D1%88%D0%B8%D0%BD%D1%8B/Serie%20|%204%20PerfectCare%20WLP2026EOE.jpeg)
Инструкция к стиральной машине Bosch (Бош) Serie | 4 PerfectCare WLP2026EOE
/%D0%A1%D1%82%D0%B8%D1%80%D0%B0%D0%BB%D1%8C%D0%BD%D1%8B%D0%B5%20%D0%BC%D0%B0%D1%88%D0%B8%D0%BD%D1%8B/Serie%20|%204%20WTH83001OE.jpg)
Инструкция к стиральной машине Bosch (Бош) Serie | 4 WTH83001OE
/%D0%A1%D1%82%D0%B8%D1%80%D0%B0%D0%BB%D1%8C%D0%BD%D1%8B%D0%B5%20%D0%BC%D0%B0%D1%88%D0%B8%D0%BD%D1%8B/%20%D0%BC%D0%B0%D1%88%D0%B8%D0%BD%D0%B0%20%D1%83%D0%B7%D0%BA%D0%B0%D1%8F%20Bosch%20Serie%20|%206%20WLL24347OE.jpg)
Инструкция к стиральной машине Bosch (Бош) машина узкая Bosch Serie | 6 WLL24347OE
/%D0%9C%D0%B8%D0%BA%D1%81%D0%B5%D1%80%D1%8B/MFQ%203020.jpeg)
Инструкция к миксеру Bosch (Бош) MFQ 3020
/%D0%A5%D0%BE%D0%BB%D0%BE%D0%B4%D0%B8%D0%BB%D1%8C%D0%BD%D0%B8%D0%BA%D0%B8/Serie%20|%204%20KGN39NL2AR.jpeg)
Инструкция к холодильнику Bosch (Бош) Serie | 4 KGN39NL2AR
/%D0%A1%D1%82%D0%B8%D1%80%D0%B0%D0%BB%D1%8C%D0%BD%D1%8B%D0%B5%20%D0%BC%D0%B0%D1%88%D0%B8%D0%BD%D1%8B/%20%D0%BC%D0%B0%D1%88%D0%B8%D0%BD%D0%B0%20%D1%83%D0%B7%D0%BA%D0%B0%D1%8F%20Bosch%20Gold%20Edition%20WLK2426GOE.jpg)
Инструкция к стиральной машине Bosch (Бош) машина узкая Bosch Gold Edition WLK2426GOE
/%D0%A1%D1%82%D0%B8%D1%80%D0%B0%D0%BB%D1%8C%D0%BD%D1%8B%D0%B5%20%D0%BC%D0%B0%D1%88%D0%B8%D0%BD%D1%8B/Serie%206%203D%20Washing%20WLK24247OE.jpg)
Инструкция к стиральной машине Bosch Serie 6 3D Washing WLK24247OE
/%D0%A5%D0%BE%D0%BB%D0%BE%D0%B4%D0%B8%D0%BB%D1%8C%D0%BD%D0%B8%D0%BA%D0%B8/VitaFresh%20Serie|6%20KGN39LM31R.jpeg)
Инструкция к холодильнику Bosch (Бош) VitaFresh Serie|6 KGN39LM31R
- Добавить инструкцию
- Заказать инструкцию
Перейти к контенту
![]()
Русские электронные инструкции по эксплуатации
Постоянно обновляемый большой каталог документации по эксплуатации и использованию современных устройств и оборудования на русском языке. Бесплатное скачивание файлов.
Поиск:
Главная
♥ В закладки
Просмотр инструкции в pdf
Инструкция по эксплуатации пылесосов Bosch (Бош) MoveOn BGL35MOV41.
Скачать инструкцию к пылесосу Bosch (Бош) MoveOn BGL35MOV41 (3,39 МБ)
Инструкции по эксплуатации пылесосов Bosch (Бош)
« Инструкция к пылесосу Bosch Unlimited Serie | 6 BCS612KA2
» Инструкция к пылесосу Bosch Relyy’y Bosch BGS32002
Вам также может быть интересно
/%D0%9F%D0%BE%D1%81%D1%83%D0%B4%D0%BE%D0%BC%D0%BE%D0%B5%D1%87%D0%BD%D1%8B%D0%B5%20%D0%BC%D0%B0%D1%88%D0%B8%D0%BD%D1%8B/Serie%20|%202%20EcoSilence%20Drive%20SMS25AW01R.jpg)
Инструкция к посудомоечной машине Bosch (Бош) Serie | 2 EcoSilence Drive SMS25AW01R
Инструкция к стиральной машине Bosch Serie 6 3D Washing WLK24247OE
/%D0%9F%D0%BE%D1%81%D1%83%D0%B4%D0%BE%D0%BC%D0%BE%D0%B5%D1%87%D0%BD%D1%8B%D0%B5%20%D0%BC%D0%B0%D1%88%D0%B8%D0%BD%D1%8B/Serie%20|%202%20Hygiene%20Dry%20SPS25FW12R.jpeg)
Инструкция к посудомоечной машине Bosch (Бош) Serie | 2 Hygiene Dry SPS25FW12R
/%D0%A1%D1%82%D0%B8%D1%80%D0%B0%D0%BB%D1%8C%D0%BD%D1%8B%D0%B5%20%D0%BC%D0%B0%D1%88%D0%B8%D0%BD%D1%8B/%20%D0%BC%D0%B0%D1%88%D0%B8%D0%BD%D0%B0%20%D1%83%D0%B7%D0%BA%D0%B0%D1%8F%20Bosch%20Serie%20|%204%20VarioPerfect%20WLG2426SOE.jpg)
Инструкция к стиральной машине Bosch (Бош) машина узкая Bosch Serie | 4 VarioPerfect WLG2426SOE
/%D0%9F%D1%8B%D0%BB%D0%B5%D1%81%D0%BE%D1%81%D1%8B/BCH6ATH18.jpg)
Инструкция к пылесосу Bosch BCH6ATH18
/%D0%92%D1%81%D1%82%D1%80%D0%B0%D0%B8%D0%B2%D0%B0%D0%B5%D0%BC%D1%8B%D0%B5%20%D0%B3%D0%B0%D0%B7%D0%BE%D0%B2%D1%8B%D0%B5%20%D0%B2%D0%B0%D1%80%D0%BE%D1%87%D0%BD%D1%8B%D0%B5%20%D0%BF%D0%B0%D0%BD%D0%B5%D0%BB%D0%B8/NeoKlassik%20Serie%20|%204%20PGP6B1B90R.jpeg)
Инструкция к газовой варочной панели Bosch (Бош) NeoKlassik Serie | 4 PGP6B1B90R
/%D0%9F%D1%8B%D0%BB%D0%B5%D1%81%D0%BE%D1%81%D1%8B/Relyy%20Bosch%20(%D0%91%D0%BE%D1%88)%20BGS32002.jpg)
Инструкция к пылесосу Bosch Relyy’y Bosch BGS32002
/%D0%A5%D0%BE%D0%BB%D0%BE%D0%B4%D0%B8%D0%BB%D1%8C%D0%BD%D0%B8%D0%BA%D0%B8/VitaFresh%20Serie%20|%206%20KGN39LR31R.jpeg)
Инструкция к холодильнику Bosch (Бош) VitaFresh Serie | 6 KGN39LR31R
Добавить комментарий
Имя *
Email *
Сайт
Комментарий


![]()


Сохранить моё имя, email и адрес сайта в этом браузере для последующих моих комментариев.
- Добавить инструкцию
- Заказать инструкцию
- Политика конфиденциальности

26
Детям запрещено играть с прибором.
Чистка и уход не должны
производиться детьми без присмотра.
Пластиковые мешки и полимерную
плёнку храните и утилизируйте в
недоступном для детей месте.
=> Опасность удушья!
Правильное использование
Подключение к электросети и включение пылесо-
са должно производиться только с учётом данных
типовой таблички.
Никогда не используйте пылесос без сменного
пылесборника либо контейнера для сбора пыли,
моторного и выпускного фильтров.
=> Пылесос может быть повреждён!
Не подносите всасывающую насадку и трубку к
голове.
=> Это может привести к травме!
При уборке лестницы пылесос всегда должен
находиться ниже пользователя.
Не используйте сетевой кабель и шланг для пере-
носки /транспортировки пылесоса.
Во избежание опасности замена поврежденного
сетевого кабеля данного прибора может быть
выполнена только производителем или авторизо-
ванной им сервисной службой либо лицом, имею-
щим аналогичную квалификацию.
Для многочасовой работы в непрерывном режиме
полностью вытягивайте сетевой кабель.
При отсоединении прибора от электросети всегда
беритесь рукой за вилку, а не за сетевой кабель.
Следите за тем, чтобы сетевой кабель не был
зажат и не попадал на острые края предметов.
Перед выполнением любых операций по ремонту
и техни-ческому обслуживанию пылесоса отсоеди-
няйте его от электросети.
Не пользуйтесь неисправным пылесосом. При воз-
никновении неисправности вынимайте вилку из
розетки.
Во избежание опасности все работы по ремонту и
замене деталей пылесоса следует выполнять толь-
ко в авторизованной сервисной службе.
Защищайте пылесос от воздействия неблагопри-
ятных метеорологических условий, влажности и
источников тепла.
Не подвергайте фильтры (сменный пылесборник,
моторный фильтр, выпускной фильтр и т. д.) воз-
действию воспламеняющихся или спиртосодержа-
щих веществ.
Пылесос не предназначен для эксплуатации на
строительных объектах.
=> При засасывании строительного мусора пыле-
сос может выйти из строя.
Выключайте пылесос даже при небольших паузах
в уборке.
Отслужившие приборы сделайте непригодными
для дальнейшего использования, а затем утилизи-
руйте в соответствии с действующими правилами.
!
Внимание:
Сетевая розетка должна быть защищена предохра-
нителем не менее чем на 16A.
При включении прибора предохранитель может
сразу сработать, если одновременно в данную
электрическую цепь включены другие приборы с
большой общей потребляемой мощностью.
Срабатывание предохранителя можно предотвра-
тить, если перед включением прибора установить
минимальную мощность, а затем постепенно уве-
личить её.
Инструкция по утилизации
Упаковка
Упаковка служит для защиты пылесоса от повреж-
дений при транспортировке. Она изготовлена из
экологически чистых материалов, поэтому её
можно использовать для вторичной переработки.
Использованные упаковочные материалы относите
в пункты приёма вторсырья.
Отслужившие приборы
Отслужившие приборы являются ценным сырьем
для дальнейшего использования. Поэтому отслу-
живший прибор следует отнести дилеру или в
пункт приёма вторсырья для дальнейшей утилиза-
ции. Информация о возможности утилизации нахо-
дится у дилера или в местной администрации.
Утилизация фильтров и сменного пылесборника
Фильтры и сменный пылесборник изготовлены из
экологически безвредных материалов. Если они
не содержат в себе никаких веществ, запрещён-
ных к утилизации с бытовым мусором, то вы
можете утилизировать их вместе с бытовым мусо-
ром.
GA 9000 883 910_GL35 04.03.2013 12:02 Seite 26
Раздел: Бытовая, кухонная техника, электроника и оборудование
Тип: Пылесос
Характеристики, спецификации
Потребляемая мощность:
2100 Вт
Тип управления:
механический
Регулировка мощности:
на корпусе
Работа с пылесборником:
Да
Наим. пылесборника:
Type G
Инд. заполнения пылесбор.:
Да
Плавный запуск двигателя:
Да
Отключение при перегреве:
Да
Горизонтальная парковка:
Да
Тип трубки:
телескопическая
Насадка для пола и ковров:
Да
Насадка для мягкой мебели:
Да
Инструкция к Пылесосу Bosch BSGL 2MOVE2
GA 9000 362 949 A
6 78*
9*
5*
4*
3*
11*
10
12
2*
13
A
1*
BSGL2
20* 1819 17
151416
Printed on recycled paper
Gedruckt auf Recyclingpapier
en Instructions for use
de Gebrauchsanweisung
pt Instruções de utilização
Imprimé sur papier recyclé
el Οδηγίες χρήσης
Stampato su carta riciclata
fr Notice d’utilisation
A B CD
Typ G
Gedrukt op recyclingpapier
it Istruzioni per l’uso
tr Kullanma kılavuzu
pl Instrukcja obsługi
Trykt på genbrugspapir
nl Gebruiksaanwijzing
Trykket på resirkulert papir
da Brugsanvisning
hu Használati utasítás
Tryckt på återvunnet papper
sv Bruksanvisning
no Bruksanvisning
ru Руководство по
bg àÌÒÚÛ͈Ëfl Á‡ ÔÓÎÁ‚‡ÌÂ
fi Käyttöohje
эксплуатации
Impreso sobre papel reciclable
Painettu uusiopaperille
es Instrucciones de uso
ro Instrucţiuni de utilizare
ar
Imprimido em papel reciclado
Εκτυπωµνο σε ανακυκλσιµο χαρτ
EF
G
Wydrukowano na papierze z recyklingu
Geri kazanılmıș ka ˘gıda basılmıștır.
Újrahasznosított papírra nyomtatva
ç‡Ô˜‡Ú‡ÌÓ Ì‡ ˆËÍΡ̇ ı‡ÚËfl.
ç‡Ô˜‡Ú‡ÌÓ Ì‡ ·Ûχ„Â, ËÁ„ÓÚÓ‚ÎÂÌÌÓÈ
ËÁ χÍÛ·ÚÛ˚.
燉ÛÍÓ‚‡ÌÓ Ì‡ Ô‡ÔÂ¥ Á ‚ÚÓËÌÌÓª ÒËÓ‚ËÌË.
Tip˘arit pe hîrtie din materiale reciclabile.
Umschlag 362 949 A 11.06.2008 13:13 Uhr Seite 1
Let’s
10*ab c
11
12
13
14
15*
16
17 a
17 b
1*
2 ba
CLICK!
3*
4* ab
5* a
5* b
6
7 8
9
de Gebrauchsanweisung . . . . . . . . . . . . . . . . . . . . . . . . . . . . . . . . . . . . . . . . . . . . .1
gekennzeichnet.
Alle Kunststoffteile sind zur Wiederverwertung
Das Design dieses Produkts ist umweltfreundlich.
All plastic parts are identified for recycling purposes
The design of this product is environment-friendly.
en Instructions for use . . . . . . . . . . . . . . . . . . . . . . . . . . . . . . . . . . . . . . . . . . . . . . .5
Le design de ce produit est écologique.
fr Notice d’utilisation . . . . . . . . . . . . . . . . . . . . . . . . . . . . . . . . . . . . . . . . . . . . . . . .9
recyclées.
Toutes les pièces en matière plastique peuvent être
armonia con l’ambiente.
Questo prodotto è stato ideato per essere in
it Instruzioni per l´uso . . . . . . . . . . . . . . . . . . . . . . . . . . . . . . . . . . . . . . . . . . . . . .13
riciclaggio.
Tutte le parti in plastica sono contrassegnate per il loro
Alle kunststof delen zijn gemarkeerd voor hernieuwd
Het design van dit product is milieuvriendelijk.
nl Gebruiksaanwijzing . . . . . . . . . . . . . . . . . . . . . . . . . . . . . . . . . . . . . . . . . . . . . .17
gebruik.
Alle dele af plast er markeret til genanvendelse.
Dette produkts design er miljøvenlig.
da Brugsanvisning . . . . . . . . . . . . . . . . . . . . . . . . . . . . . . . . . . . . . . . . . . . . . . . . .21
Alle plastdelene er merket for resirkulering.
Dette produktet har en miljøvennlig utforming.
no Bruksanvisning . . . . . . . . . . . . . . . . . . . . . . . . . . . . . . . . . . . . . . . . . . . . . . . . .25
Alla delar av plast är märkta för återvinning
Denna produkt är miljövänlig.
Kaikki muoviosat on merkitty uudelleenkäyttöä varten.
Tämä tuote on ympäristöystävällinen.
sv Bruksanvisning . . . . . . . . . . . . . . . . . . . . . . . . . . . . . . . . . . . . . . . . . . . . . . . . .29
Todas las piezas de plástico se han marcado para el
El diseño de este producto es ecológico.
fi Käyttöohje . . . . . . . . . . . . . . . . . . . . . . . . . . . . . . . . . . . . . . . . . . . . . . . . . . . . .33
posterior reciclaje.
sobre o ambiente.
O design deste produto é sem efeito nocivo
es Instrucciones de uso . . . . . . . . . . . . . . . . . . . . . . . . . . . . . . . . . . . . . . . . . . . . . .37
Todas as peças de material plástico foram caracterizadas
para a reciclagem
Το ντισιν αυτο του προϊντοσ εναι φιλικ
pt Instruções de utilização . . . . . . . . . . . . . . . . . . . . . . . . . . . . . . . . . . . . . . . . . . .41
προσ το περιβλλον.
λα τα µρη που αποτελονται απ συνθετικ λη
φρουν διακριτικ ανακκλωσησ.
el Οδηγίες χρήσης . . . . . . . . . . . . . . . . . . . . . . . . . . . . . . . . . . . . . . . . . . . . . . . .45
edilmiștir.
Bu ürün, çevre korumasına dikkat edilerek dizayn
Tüm plastik parçalar geri kazanma ișlemi için
tr Kullanma kılavuzu . . . . . . . . . . . . . . . . . . . . . . . . . . . . . . . . . . . . . . . . . . . . . . .49
ișaretlenmiștir.
środowiska.
Konstrukcja tego produktu jest przyjazna dla
pl Instrukcja obsługi . . . . . . . . . . . . . . . . . . . . . . . . . . . . . . . . . . . . . . . . . . . . . . . . .53
są do recyklingu.
Wszystkie elementy z tworzyw sztucznych przeznaczone
A műanyag részek meg vannak jelölve az
A termék formatervezése környezetbarát.
hu Használati utasítás . . . . . . . . . . . . . . . . . . . . . . . . . . . . . . . . . . . . . . . . . . . . . . . . .57
újraértékesítéshez.
ÇÒ˘ÍË Ô·ÒÚχÒÓ‚Ë ˜‡ÒÚË Ò‡ Ó·ÓÁ̇˜ÂÌË Á‡ ˆËÍΡÌÂ.
ÑËÁ‡ÈÌ˙Ú Ì‡ ÚÓÁË ÔÓ‰ÛÍÚ Â ÂÍÓÎӄ˘ÂÌ.
bg àÌÒÚÛ͈Ëfl Á‡ ÔÓÎÁ‚‡Ì . . . . . . . . . . . . . . . . . . . . . . . . . . . . . . . . . . . . . . . . . .61
‡ÁÛÏÌ˚È ‰ËÁ‡ÈÌ.
чÌÌ˚È ÔÓ‰ÛÍÚ ËÏÂÂÚ ˝ÍÓÎӄ˘ÂÒÍË
ÇÒ Ô·ÒÚχÒÒÓ‚˚ ‰ÂÚ‡ÎË ËÏÂ˛Ú Ï‡ÍËÓ‚ÍÛ,
ru êÛÍÓ‚Ó‰ÒÚ‚Ó ÔÓ ˝ÍÒÔÎÛ‡Ú‡ˆËË . . . . . . . . . . . . . . . . . . . . . . . . . . . . . . . . . . . . .65
Û͇Á˚‚‡˛˘Û˛ ̇ ‚ÓÁÏÓÊÌÓÒÚ¸ ÛÚËÎËÁ‡ˆËË.
ambiant
Designul acestui produs este simpatich mediului
ro Instrucţiuni de utilizare . . . . . . . . . . . . . . . . . . . . . . . . . . . . . . . . . . . . . . . . . . . .69
ñÂÈ ‚Ë¥· ‚¥‰ÔÓ‚¥‰‡π ‚ËÏÓ„‡Ï ¥Á Á‡ıËÒÚÛ Ì‡‚ÍÓÎ˯̸ӄÓ
ìÒ¥ Ô·ÒÚχÒÓ‚¥ ‰ÂڇΥ ÏÓÊÛÚ¸ ·ÛÚË ‚ËÍÓËÒڇ̥, flÍ
Ò‰ӂˢ‡.
77 . . . . . . . . . . . . . . . . . . . . . . . . . . . . . . . . . . . . . . . . . . . . . . . . . ar
‚ÚÓËÌ̇ ÒËÓ‚Ë̇.
Umschlag 362 949 A 11.06.2008 13:13 Uhr Seite 2

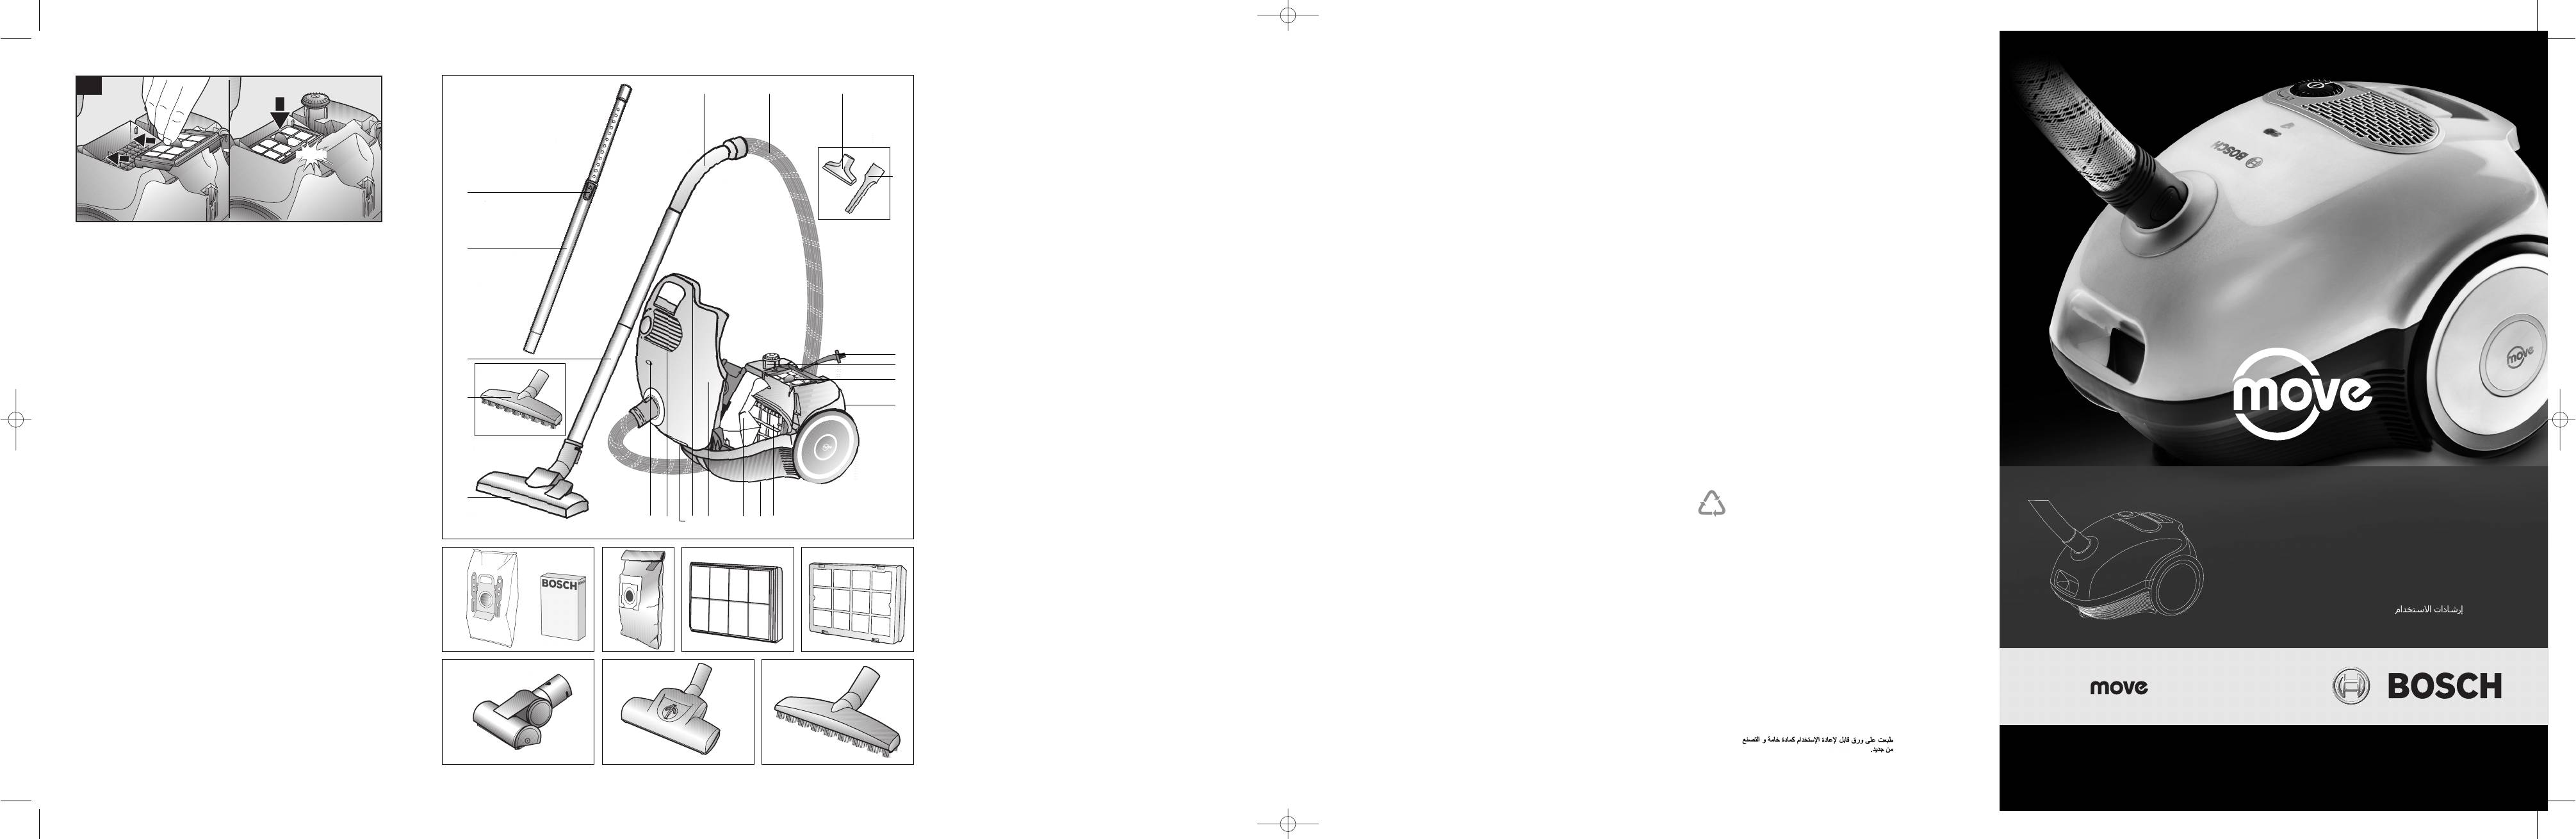
Gerätebeschreibung
1 umschaltbare Bodendüse*
13 Parkhilfe
2 Hartbodendüse
*
14 Motorschutzfilter
3 Saugrohr
*
15 Abstellhilfe (an der Geräteunterseite)
4 Teleskoprohr
*
16 Filterbeutel
5 Verriegelungsknopf *
17 Deckel
6 Schlauchhandgriff
*
18 Tragegriff
7 Saugschlauch
19 Ausblasgitter
8 Polsterdüse
*
20 Filterwechselanzeige
*
9 Fugendüse
*
10 Netzanschlusskabel
11 Ein-/Austaste mit elektronischem Saugkraftregler
*
*
je nach Ausstattung
12 Ausblasfilter
Ersatzteile und Sonderzubehör
Fadenheber (1) und Polierstreifen (2) können bei Bedarf über
2
den Kundendienst bezogen werden.
1
1
A Austauschfilterpackung BBZ52AFG1
E TURBO-UNIVERSAL
®
Inhalt: 5 Filterbeutel mit Verschluss
Bürsten und Saugen in einem Arbeitsgang von
-Bürste für Polster BBZ42TB
http://
www.dust-bag-bosch.com
1 Micro-Hygienefilter
Besonders geeignet zum Aufsaugen von Tierhaaren.
Polstermöbeln, Matratzen, Autositzen, usw.
B Textilfilter (Dauerfilter) BBZ10TFG
Antrieb der Bürstenwalze erfolgt über Saugstrom des
Wiederverwendbarer Filter mit Klettverschluss.
Kein Elektroanschluss erforderlich.
Staubsaugers.
C HEPA-Filter BBZ8SF1
F TURBO-UNIVERSAL
®
Empfohlen für Allergiker. Jährlich auswechseln.
Zusatzlicher Filter für reinere Ausblasluft.
Besonders geeignet zum Aufsaugen von Tierhaaren.
florigen Teppichen undTeppichböden bzw. für alle Beläge.
Bürsten und Saugen in einem Arbeitsgang von kurz-
-Bürste für Böden BBZ102TBB
D Micro-Aktivkohlefilter BBZ8KF1
Kombination von Micro und Aktivkohlefilter.
Antrieb der Bürstenwalze erfolgt über Saugstrom des
Verhindert für lange Zeit störende Gerüche.
Staubsaugers.
Kein Elektroanschluss erforderlich.
Halterahmen Microfilter austauschen.
Halbjährlich auswechseln. Kohlefilterrahmen gegen
G Hartboden-Düse BBZ123HD
»Micro-Aktivkohlefilter« nicht möglich.
Bitte beachten! Kombination »Hepa-Filter« +
(Parkett, Fliesen, Terracotta,…)
Zum Saugen glatter Böden
1
Innenteil 362 949 A 11.06.2008 13:13 Uhr Seite 1

de
Die Gebrauchsanweisung bitte aufbewahren.
Bei Weitergabe des Staubsaugers an Dritte bitte
Vor allen Arbeiten am Staubsauger Netzstecker ziehen.
Gebrauchsanweisung mitgeben.
Beschädigten Staubsauger nicht in Betrieb nehmen.
Bestimmungsgemäße Verwendung
und Ersatzteileaustausch am Staubsauger nur vom
Um Gefährdungen zu vermeiden, dürfen Reparaturen
Beim Vorliegen einer Störung Netzstecker ziehen.
autorisierten Kundendienst durchgeführt werden.
Dieser Staubsauger ist für den Gebrauch im Haushalt und
Hitzequellen schützen.
Staubsauger vor Witterungseinflüssen, Feuchtigkeit und
nicht für gewerbliche Zwecke bestimmt.
dieser Gebrauchsanweisung verwenden.
Den Staubsauger ausschließlich gemäß den Angaben in
Gerätes führen.
=> Einsaugen von Bauschutt kann zur Beschädigung des
Staubsauger ist für Baustellenbetrieb nicht geeignet.
Der Hersteller haftet nicht für eventuelle Schäden, die durch
Bedienung verursacht werden.
nicht bestimmungsgemäßen Gebrauch oder falsche
Gerät ausschalten, wenn nicht gesaugt wird.
Ausgediente Geräte sofort unbrauchbar machen, danach
Der Staubsauger darf nur bedient werden mit:
Hinweise!
Deshalb beachten Sie bitte unbedingt die nachfolgenden
das Gerät einer ordnungsgemäßen Entsorgung zuführen.
Aus Sicherheitsgründen sind Staubsauger, die eine
Leistung von 2000 W und mehr haben, mit einem
Original-Filterbeuteln.
Überhitzungsschutz ausgestattet.
Sollte eine Blockierung auftreten und das Gerät zu heiß
Original-Ersatzteilen, -Zubehör oder
Der Staubsauger ist nicht geeignet für:
-Sonderzubehör
Netzstecker und stellen Sie sicher, dass Düse, Saugrohr
werden, schaltet es sich automatisch ab. Ziehen Sie den
oder Schlauch nicht verstopft sind, bzw. der Filter
das Aufsaugen von:
das Absaugen von Menschen oder Tieren
gewechselt werden muß.
– Kleinlebewesen
Nach Beseitigung der Störung lassen Sie das Gerät
– gesundheitsschädlichen, scharfkantigen, heißen oder
glühenden Substanzen
wieder einsatzbereit.
mindestens 1 Stunde abkühlen. Danach ist das Gerät
– feuchten oder flüssigen Substanzen
– leicht entflammbaren oder explosiven Stoffen und
Hinweise zur Entsorgung
– Asche, Ruß aus Kachelöfen und Zentral-Heizungs-
Gasen
Verpackung
anlagen.
Die Verpackung schützt den Staubsauger vor
Sie besteht aus umweltfreundlichen Materialien und ist
Beschädigung auf dem Transport.
deshalb recycelbar.
Sicherheitshinweise
Regeln der Technik und den einschlägigen
Dieser Staubsauger entspricht den anerkannten
system »Grüner Punkt«.
terialien an den Sammelstellen für das Verwertungs-
Entsorgen Sie nicht mehr benötigte Verpackungsma-
Sicherheitsbestimmungen. Wir bestätigen die
Altgerät
Übereinstimmung mit den folgenden europäischen Richt-
Altgeräte enthalten vielfach noch wertvolle Materialien.
linien: 89/336/EWG (geändert durch RL 91/263/EWG,
Händler bzw. einem Recyclingcenter zur Wieder—
Geben Sie deshalb Ihr ausgedientes Gerät bei Ihrem
92/31/EWG und 93/68/EWG). 73/23/EWG (geändert durch
RL 93/68/EWG).
verwertung ab.
Betrieb nehmen.
Staubsauger nur gemäß Typenschild anschließen und in
Ihrem Händler oder Ihrer Gemeindeverwaltung.
Aktuelle Entsorgungswege erfragen Sie bitte bei
Niemals ohne Filterbeutel saugen.
!
Bitte beachten
Aufsicht gestatten.
Kindern die Benutzung des Staubsaugers nur unter
=> Gerät kann beschädigt werden!
einer Sicherung von mindestens 16 A abgesichert ist!
Das Gerät nur an eine Steckdose anschließen, die mit
einmal ausgelöst werden, so kann dies daran liegen, daß
Sollte die Sicherung beim Einschalten des Gerätes
Kopfnähe.
Vermeiden Sie das Saugen mit Düse und Rohr in
Das Netzanschlusskabel nicht zumTragen /
=> Es besteht Verletzungsgefahr!
wert am gleichen Stromkreis angeschlossen sind.
gleichzeitig andere Elektrogeräte mit hohem Anschluss-
vor dem Einschalten des Gerätes die niedrigste
Das Auslösen der Sicherung ist vermeidbar, in dem Sie
Bei mehrstündigem Dauerbetrieb Netzanschlusskabel
Transportieren des Staubsaugers benutzen.
Leistungsstufe einstellen und erst danach eine höhere
Nicht am Anschlusskabel, sondern am Stecker ziehen,
vollständig ausziehen.
Leistungsstufe wählen.
um das Gerät vom Netz zu trennen.
ziehen und nicht einquetschen.
Das Netzanschlusskabel nicht über scharfe Kanten
2
Innenteil 362 949 A 11.06.2008 13:13 Uhr Seite 2

de
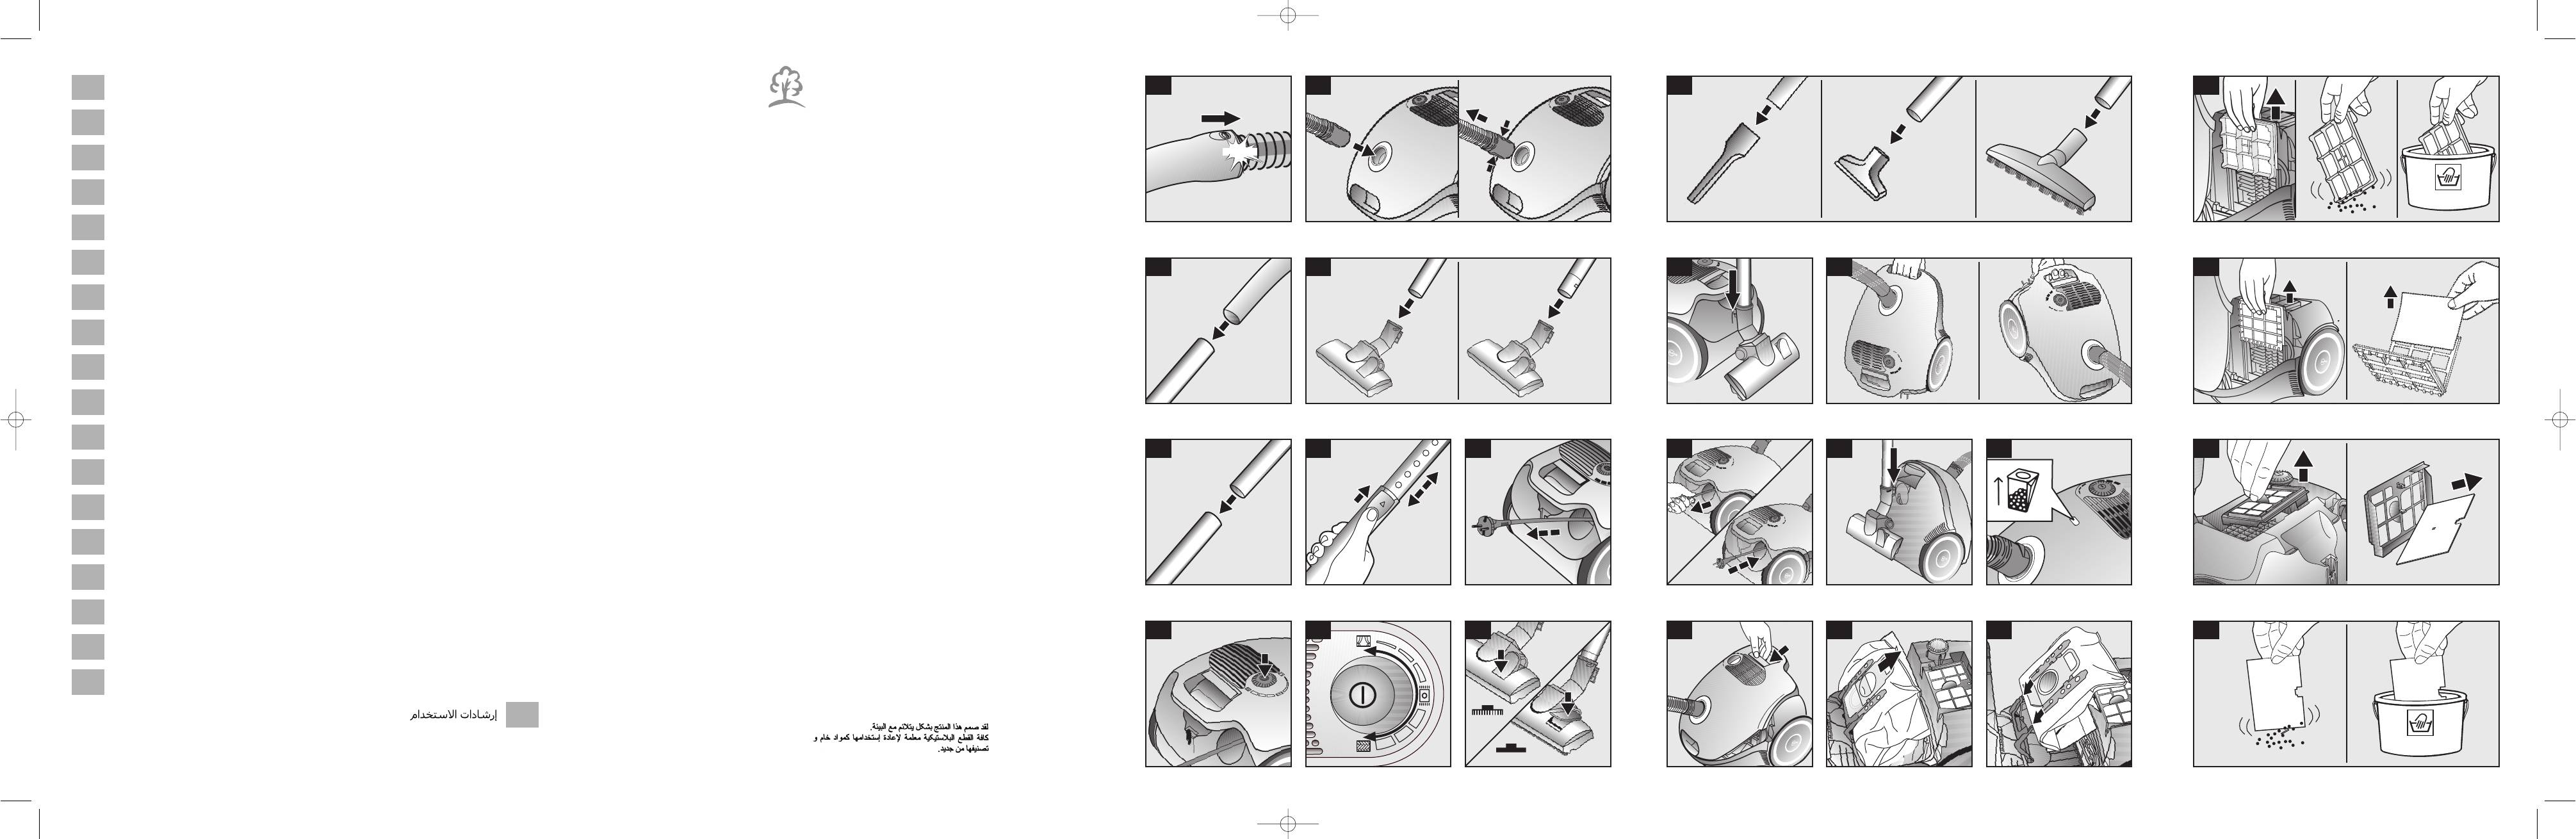
Bitte Bildseiten ausklappen!
Saugen
Bild 9
Bodendüse einstellen:
Teppiche und Teppichboden =>
glatte Böden =>
Bild 10*
Vor dem ersten Gebrauch
Saugen mit Zubehör
Bild 1*
a) Fugendüse
( je nach Bedarf auf Handgriff bzw. Saugrohr stecken ).
Handgriff auf Saugschlauch stecken und verrasten.
b) Polsterdüse
Zum Absaugen von Fugen und Ecken.
c) Hartbodendüse
Zum Absaugen von Polstermöbeln, Vorhängen usw.
Inbetriebnahme
Zum Saugen von harten Bodenbelägen
Bild 2
(Fliesen, Parkett usw.)
b) Beim Entfernen des Saugschlauches beide Rastnasen
a) Saugschlauchstutzen in die Saugöffnung einrasten.
Bild 11
zusammendrücken und Schlauch herausziehen.
Bei kurzen Saugpausen können Sie die Parkhilfe an der
Bild 3*
Haken an der Bodendüse in die Aussparung an der
Geräterückseite benutzen.
Handgriff und Saugrohr zusammenstecken.
Geräterückseite schieben.
Bild 4*
Bild 12
a) Bodendüse und Saugrohr zusammenstecken.
Beim Saugen, z. B. auf Treppen, kann das Gerät auch an
b) Bodendüse und Teleskoprohr zusammenstecken.
beiden Griffen transportiert werden.
b) Durch Verschieben des Verstellknopfes / Schiebemuffe in
a) Saugrohre zusammenstecken.
Bild 5*
Nach der Arbeit
Länge einstellen.
Pfeilrichtung Teleskoprohr entriegeln und gewünschte
Bild 13
Bild 6
(Kabel rollt sich automatisch auf).
Kurz am Netzanschlusskabel ziehen und loslassen
Netzstecker ziehen.
Netzanschlusskabel am Stecker greifen, auf die ge-
wünschte Länge herausziehen und Netzstecker
Bild 14
einstecken.
die Abstellhilfe an der Geräteunterseite benutzen.
Zum Abstellen /Transportieren des Gerätes können Sie
Bild 7
Aussparung an der Geräteunterseite schieben.
Gerät aufrecht hinstellen. Haken an der Bodendüse in die
Pfeilrichtung ein-/ ausschalten.
Staubsauger durch Betätigen der Ein- / Austaste in
Bild 8
Filterwechsel
Saugkrafteinstellung durch Drehen der Ein-/ Austaste in
Pfeilrichtung.
Filterbeutel austauschen
Bild 15*
Filterwechselanzeige im Deckel ist vollständig gelb
ausgefüllt.
Bild 16
Deckel durch Betätigung des Verschlusshebels in
Pfeilrichtung öffnen.
*
je nach Ausstattung
3
Innenteil 362 949 A 11.06.2008 13:13 Uhr Seite 3
de
Bild 17
a) Filterbeutel durch Ziehen an der Verschlusslasche
Pflege
b) Neuen Filterbeutel bis zum Anschlag in die Halterung
verschließen und herausnehmen.
Vor jeder Reinigung des Staubsaugers, muß dieser
ausgeschaltet und der Netzstecker gezogen werden.
!
Achtung: Deckel schließt nur mit eingelegtem
einschieben.
Staubsauger und Zubehörteile aus Kunststoff können mit
Filterbeutel.
einem handelsüblichen Kunststoffreiniger gepflegt
werden.
Gips, Zement, usw.), Motorfilter reinigen, evtl. Microfilter
Nach dem Aufsaugen feiner Staubpartikel ( wie z. B.
austauschen.
!
Keine Scheuermittel, Glas oder Allzweckreiniger
verwenden. Staubsauger niemals in Wasser tauchen.
Motorschutzfilter reinigen
Der Staubraum kann bei Bedarf mit einem zweiten
Der Motorschutzfilter sollte in regelmäßigen Abständen
Staubsauger ausgesaugt, oder einfach mit einem
durch Ausklopfen bzw. Auswaschen gereinigt werden!
trockenen Staubtuch / Staubpinsel gereinigt werden.
Bild 18*
Staubraumdeckel öffnen (siehe Bild 16).
Motorschutzfilter in Pfeilrichtung herausziehen.
Motorschutzfilter durch Ausklopfen reinigen.
ausgewaschen werden.
Bei starker Verschmutzung sollte der Motorschutzfilter
Den Filter anschließend mindestens 24 Stunden trocknen
Nach der Reinigung, Motorschutzfilter in das Gerät
lassen.
einschieben und Staubraumdeckel schließen.
Micro-Hygienefilter austauschen
packung.
Wann tausche ich aus: Bei jeder neuen Austauschfilter—
sind).
(Enfällt bei Geräten, die mit einem HEPA Filter ausgestattet
Bild 19*
Deckel öffnen.
Filterhalterung herausziehen und aufklappen.
Alten Micro-Hygienefilter entsorgen und neuen Micro-
Filterhalterung in Gerät einschieben und Deckel
Hygienefilter einlegen.
schließen
Ausblasfilter reinigen
Der Ausblasfilter sollte in regelmäßigen Abständen durch
Ausklopfen bzw. Auswaschen gereinigt werden!
Bild 20
Staubraumdeckel öffnen (siehe Bild 16).
Ausblasfilter durch Ausklopfen reinigen.
Filterrahmen in Pfeilrichtung herausziehen.
Bei starker Verschmutzung sollte der Ausblasfilter
Filterrahmen unter die beiden Halterippen schieben und
lassen.
Den Filter anschließend mindestens 24 Stunden trocknen
ausgewaschen werden.
Technische Änderungen vorbehalten.
Staubraumdeckel schließen.
in Pfeilrichtung schwenken bis er einrastet.
4
Innenteil 362 949 A 11.06.2008 13:13 Uhr Seite 4

Appliance description
1 Adjustable floor nozzle*
12 Exhaust filter
2 Hard floor nozzle*
13 Parking aid
3 Suction pipe*
14 Motor protection filter
4 Telescopic pipe*
15 Storing aid
5 Locking button*
16 Paper filter
6 Hose grip*
17 Lid
7 Suction hose
18 Handle
8 Upholstery nozzle*
19 Exhaust grid
9 Corner nozzle*
20 Filter change display*
10 Mains cable
11 On / off switch with electronic suction regulator*
*Depending on version
Spare parts and accessories
Filament lever (1) and polishing strips (2) can be obtained
2
from the customer services and can also be replaced there
1
1
A Paper filter pack BBZ52AFG1
E TURBO-UNIVERSAL
®
Contents:
http://
www.dust-bag-bosch.com
Particularly suitable for vacuuming animal hair and fur.
mattresses, car seats, etc..
Simultaneously brush and vacuum upholstered furniture,
-upholstery brush BBZ42TB
5 x paper filters with fasteners and 1 micro hygiene filter
B Textile filter (long-term filter) BBZ10TFG
The brush roller is driven by the suction force of the
Reusable filter with Velcro fastening.
F TURBO-UNIVERSAL
No electrical connection required.
vacuum cleaner.
®
C HEPA Filter BBZ8SF1
and fitted carpets or any kind of covers. Particularly
Simultaneously brush and vacuum short-pile carpets
— floor brush BBZ102TBB
Replace every year.
Recommended for those with allergies.
additional filter for pure exhaust air.
suitable for vacuuming animal hair and fur. The brush
roller is driven by the suction force of the vacuum
D Micro active carbon filter BBZ8KF1
cleaner.
Combination of micro filter and active carbon filter.
No electrical connection required.
G Hard floor nozzle BBZ123HD
frame.
twice a year. Replace carbon filter frame with micro filter
Combats unpleasant odours over a long period. Replace
To vacuum smooth flooring (parquet, tiles, terracotta…).
active carbon filter.
It is not possible to combine a HEPA filter and a micro
Please note
5
Innenteil 362 949 A 11.06.2008 13:13 Uhr Seite 5

deen
Please keep this instruction manual.
Please pass on this instruction manual if you pass this
vacuum cleaner on to a new owner.
Intended use
weather conditions, moisture and sources of heat.
The vacuum cleaner should be protected from outside
only be carried out by the authorised after-sales service.
aner repairs and the fitting of replacement parts must
To prevent you from being exposed to risks, vacuum cle-
This vacuum cleaner is intended for domestic use and not
sites.
The vacuum cleaner is not suitable for use on building
for commercial use.
=> Vacuuming up building rubble could damage the
This vacuum cleaner should only be used in accordance
vacuum cleaner.
with this instruction manual.
Switch off the vacuum cleaner when it is not in use.
The manufacturer will not accept any responsibility for
At the end of its life, the vacuum cleaner should be
disposed of in an appropriate manner.
Therefore, please note the following points.
damage caused by improper use or incorrect operation.
For safety reasons, vacuum cleaners with a power rating
The vacuum cleaner must only be operated with:
of more than 2,000 W are fitted with a temperature safety
This automatically switches off the vacuum cleaner if it is
and optional accessories
Manufacturer’s replacement parts, accessories
Manufacturer’s original dust bags
switch.
blocked and overheating. Unplug the vacuum cleaner
The vacuum cleaner is not to be used for:
from the mains and make sure that the nozzles, suction
Vacuuming up:
Vacuuming persons or animals
filter needs replacing.
pipe and hose are not blocked and check whether the
Having cleared the blockage, leave the vacuum cleaner
– hazardous, sharp-edged, hot or burning substances
– insects or spiders
– damp or liquid substances
switched back on again.
to cool down for at least one hour. It can then be
– Ash, soot from tiled stoves and central heating
– highly flammable or explosive substances and gases
systems
Disposal information
Packaging
Safety information
from being damaged during transportation.
The packaging is designed to protect the vacuum cleaner
It is made of environment-friendly materials and can be
recycled.
appropriate recycling point.
Dispose of packaging that is no longer required at an
Directive 93/68/EEC).
92/31/EEC and 93/68/EEC). 73/23/EEC (amended by
89/336/EEC (amended by Directives 91/263/EEC,
compliance with the following European directives:
technology and the relevant safety regulations. We confirm
This vacuum cleaner complies with the recognised rules of
Used vacuum cleaners
Always observe the information on the rating plate when
using the vacuum cleaner and connecting to the power
materials.
Used vacuum cleaners still contain many recyclable
supply.
retailer or recycling centre so that they can be recycled.
Therefore, please take used vacuum cleaners to your
Never use the vacuum cleaner without a dust bag fitted.
=> This can damage the vacuum cleaner.
appliance dealership or local council.
For current disposal methods, please enquire at your
strict supervision.
Only allow children to use the vacuum cleaner under
Please note
!
tools and tubes.
Keep the vacuum cleaner away from the face when using
=> Risk of injury.
by at least a 16 amp fuse.
Only connect the appliance to a socket that is protected
Never carry the vacuum cleaner by the power cord.
cleaner, this may be because other electrical appliances
If a fuse should blow when you switch on the vacuum
cleaner continuously for several hours.
Fully extend the power cord when using the vacuum
which have a high current draw are connected to the
same power circuit.
the plug, not the power cord.
When disconnecting the appliance from the mains, pull
To prevent the fuse from tripping, select the lowest
power setting before switching the vacuum cleaner on,
it to become trapped.
Do not pull the power cord around sharp corners or allow
and increase the power only once it is running.
the power cord from the mains if a fault is detected.
Do not use the vacuum cleaner if it is damaged. Unplug
carrying out any work on it.
Unplug the vacuum cleaner from the mains before
6
Innenteil 362 949 A 11.06.2008 13:13 Uhr Seite 6

en
de
Please fold out the picture page
Suction
Illustration 9
Setting the floor nozzle:
fitted carpets and carpets
smooth floors
Illustration 10*
Before using for the first time
b) Corner nozzle
(connect to the handle or the suction hose as required)
Vacuuming with accessories
Illustration 1*
Push the handle onto the flexible tube and until it
engages.
c) Upholstery nozzle
For vacuuming in corners and joins
e) Hard floor nozzle
For vacuuming upholstery, curtains etc.
Starting up
For vacuuming hard floor surfaces (tiles, parquet etc.)
b) When removing the suction hose, press together both
a) Lock the suction hose supports into the suction opening.
Illustration 2
Illustration 11
parking aid on the back of the appliance. Push the hook
When taking brief vacuuming pauses, you can use the
latches and pull out the hose.
appliance.
on the floor nozzle in to the recess on the back of the
Illustration 3*
Connect the handle and the suction hose.
Illustration 12
When vacuuming, e.g. stairs, the appliance can also be
Illustration 4*
carried using the two grips.
a) Connect the floor nozzle and the suction hose.
b) Connect the floor tool and the telescopic tube together.
After work
Illustration 5*
a) Connect the suction hoses.
Illustration 13
b) Unlock the telescopic pipe and adjust to the desired
Pull out the mains plug.
length by moving the adjusting button / sliding sleeve in
(the cable rolls up automatically).
Pull briefly on the mains cable and then let go
the direction of the arrow.
Illustration 6
Illustration 14
Take the mains cable by the plug and pull out the desired
storing aid on the underside of the appliance. Stand the
To store / transport the appliance, you can use the
length and then plug in to the mains socket.
in to the recess on the underside of the appliance.
appliance up straight. Push the hook on the floor nozzle
Illustration 7
Switch on / off the vacuum cleaner by pressing the on /
off button in the direction of the arrow.
Illustration 8
Set the level of suction by turning the on / off button in
the direction of the arrow.
*Depending on version
7
Innenteil 362 949 A 11.06.2008 13:13 Uhr Seite 7

en
de
Changing the filter
Cleaning the exhaust filter
Replace the dust bag
The exhaust filter should be cleaned regularly by tapping
out and rinsing.
Illustration 15*
The filter change display on the lid turns yellow.
Illustration 20
Open the dust compartment lid (see Fig. 16).
Illustration 16
Pull out the filter frame in the direction of the arrow.
Tap the dirt out of the exhaust filter.
direction of the arrow.
Open the covering by pressing the adjusting lever in the
If it is very dirty, the exhaust filter should be rinsed.
Illustration 17
Slide the filter frame under the two retaining ribs and
The filter must then be left to dry for at least 24 hours.
a) Close and remove the dust bag by pulling on the cover
Close the dust compartment lid.
push in the direction of the arrow until it engages.
b) Insert the new dust bag in the holding fixture, up to the
clips.
stop.
Maintenance
!
After vacuuming fine dust particles (e.g. cement, plaster,
Attention: Cover will only close if a paper filter is inserted!
switched off and the mains plug removed.
Before the appliance is cleaned, ensure that it has been
etc.), clean the motor filter and replace the microfilter if
necessary.
Vacuum cleaners and accessories made of plastic can
be cleaned using a general commercial plastic cleaner.
Cleaning the motor protection filter
Do not use scouring agents, glass or all-purpose
The motor protection filter should be cleaned regularly by
!
Never immerse the vacuum cleaner in water!
cleaners.
knocking out the dirt and rinsing.
Illustration 18*
If necessary, the dust section can be cleaned using
another vacuum cleaner, or simply cleaned out using a
dry dust cloth / dust brush.
Clean the motor protection filter by tapping it.
arrow.
Pull out the motor protection filter in the direction of the
Open the dust bag compartment lid (see Figure 16).
rinsed.
If it is very dirty, the motor protection filter should be
vacuum cleaner and close the dust bag compartment lid.
After cleaning, slide the motor protection filter into the
The filter must then be left to dry for at least 24 hours.
Replacing the hygiene microfilter
(Omitted on vacuum cleaners which have a HEPA filter).
filter pack is fitted.
When should I change the filter? Each time a new paper
Illustration 19*
Slide the filter holding fixture in and close the covering.
hygiene microfilter.
Dispose of the old hygiene microfilter and insert a new
Pull out the filter holding fixture and open up.
Open the covering.
Subject to technical change without notice.
8
Innenteil 362 949 A 11.06.2008 13:13 Uhr Seite 8

Description de l’appareil
1 Brosse pour sols multifonction*
12 Filtre de sortie d’air
2 Brosse pour sols durs*
13 Position parking
3 Tube d’aspiration*
14 Filtre de protection du moteur
4 Tube télescopique*
15 Dispositif de rangement
5 Bouton de verrouillage*
16 Sac aspirateur interchangeable en papier
6 Poignée du flexible*
17 Couvercle
7 Flexible d’aspiration
18 Poignée de transport
8 Suceur pour coussins*
19 Grille d’échappement
9 Suceur pour joints*
20 Indication de changement du sac*
10 Câble de raccordement au réseau
11 Touche Marche/Arrêt avec régulateur électronique de
*suivant équipement
la force d’aspiration *
Pièces de rechange et accessoires spéciaux
Le ramasse-fils (1) et bande de polisage (2) sont disponibles
2
auprès du service après vente, qui les remplace également.
1
1
A Paquet de sac interchangeables en papier BBZ52AFG1
E Brosse TURBO-UNIVERSAL
®
fermeture 1 microfiltre hygiénique
Contient: 5 sacs interchangeables en papier avec
www.dust-bag-bosch.com
Convient particulièrement pour aspirer les poils
capitonnés, matelas, sièges auto, etc.
Brosser et aspirer en même temps les meubles
-pour coussins BBZ42TB
http://
B Sac textile (filtre permanent) BBZ10TFG
d’animaux. Le flux aspirant de l’aspirateur ent raîne la
Sac réutilisable, à fermeture Velcro.
Aucun branchement électrique nécessaire.
brosse rotative.
®
C Filtre HEPA BBZ8SF1
F Brosse TURBO-UNIVERSAL
Convient particulièrement pour aspirer les poils
sols.
moquettes à poils courts et tous les revêtements de
Brosser et aspirer en même temps les tapis et
-pour sols BBZ102TBB
Remplacer une fois par an.
Conseillé aux personnes souffrant d’allergies.
Filtre supplémentaire pour un air soufflé plus pur.
D Micro-filtre à charbon actif BBZ8KF1
d’animaux. Le flux aspirant de l’aspirateur entraîne la
Combinaison de microfiltre et de filtre à charbon actif.
brosse rotative.
G Suceur pour sols durs BBZ123HD
charbon actif » n’est pas possible.
Important ! La combinaison « Filtre Hepa » + « Micro-filtre à
charbon par le cadre support du microfiltre.
A changer tous les six mois. Remplacer le cadre du filtre à
Empêche pour une longue durée des odeurs désagréables.
Aucun branchement électrique nécessaire
(parquets, carrelages, terre cuite, …)
Pour aspirer les sols lisses
9
Innenteil 362 949 A 11.06.2008 13:13 Uhr Seite 9

defr
Conservez cette notice d’utilisation.
Si vous remettez l’aspirateur à un tiers, veuillez-y joindre sa
notice d’utilisation.
En cas de panne, retirer la fiche de la prise.
Ne pas mettre l’aspirateur en service s’il est défectueux.
la prise.
Avant tous les travaux sur l’aspirateur, retirer la fiche de
Utilisation conforme aux prescriptions
Pour éviter des dangers, seul le service après-vente
et à l’emploi prévu
placement de pièces de rechange sur l’aspirateur.
agréé est autorisé à effectuer des réparations et le rem-
atmosphériques, à l’humidité ni aux sources de chaleur.
Utilisez l’aspirateur exclusivement selon les indications
à l’usage industriel.
Cet aspirateur est destiné à l’emploi domestique et non pas
Ne pas exposer l’aspirateur aux influences
L’aspirateur n’est pas approprié au travail de chantier.
Le fabricant n’est pas responsable d’éventuels dommages
figurant dans cette notice d’utilisation.
=> L’aspiration de gravats peut conduire à
Eteignez l’appareil si vous n’aspirez pas.
l’endommagement de l’appareil.
Rendre immédiatement inutilisables les appareils hors
Veuillez donc respecter impérativement les consignes
incorrect.
résultant d’un emploi non conforme ou d’un maniement
d’usage, ensuite mettre l’appareil au rebut de manière
L’aspirateur doit être utilisé uniquement avec:
suivantes!
réglementaire.
des sacs aspirateur d’origine
puissance de 2000 W et plus sont équipés d’une
Pour des raisons de sécurité, les aspirateurs d’une
spéciaux d’origine
pièces de rechange, accessoires ou accessoires
Il s’arrête automatiquement en cas de blocage et de
protection de surchauffe.
L’aspirateur n’est pas approprié à:
surchauffe de l’appareil. Retirez la fiche de la prise et
aspirer sur des personnes ou animaux
aspirer des:
ne sont pas obstrués ou si le filtre (sac) doit être changé.
vérifiez que la brosse, le tube d’aspiration ou le flexible
— petits organismes vivants (p.ex. mouches, araignées,
Après l’élimination du dérangement, laissez refroidir
— substances nocives, à arêtes vives, chaudes ou
…).
nouveau opérationnel.
l’appareil au moins 1 heure. Ensuite l’appareil est de
— substances humides ou liquides.
incandescentes.
— substances et gaz facilement inflammables ou
Indication pour la mise au rebut
— cendres, suie des poêles et d’installations de chauffage
explosifs.
Emballage
central.
L’emballage protège l’aspirateur contre un
Il est constitué de matériaux écologiques et est donc
endommagement pendant le transport.
Consignes de sécurité
recyclable.
que l’appareil correspond aux directives européennes
aux prescriptions de sécurité applicables. Nous déclarons
Cet aspirateur répond aux règles techniques reconnues et
système de recyclage «Point vert».
doivent être mis au rebut aux points collecteurs du
Les matériaux d’emballage qui ne sont plus utilisés
91/263/CEE, 92/31/CEE et 93/68/CEE). 73/23/CEE
suivantes: 89/336/CEE (modifiée par la directive
Les appareils usagés contiennent souvent des matériaux
Appareil usagé
(modifiée par la directive 93/68/CEE).
Raccorder et mettre l’aspirateur en service uniquement
Remettez donc votre appareil usagé à votre revendeur ou
précieux.
Pour connaître les possibilités d’élimination actuelles,
à un centre de recyclage pour la revalorisation.
Ne jamais aspirer sans sac aspirateur.
selon les indications figurant sur la plaque signalétique.
=> L’appareil peut être endommagé!
demandez à votre revendeur ou à votre mairie.
Permettre aux enfants d’utiliser l’aspirateur uniquement
sous surveillance.
!
Important!
protégée par un fusible d’au moins 16 A.
Brancher l’appareil uniquement sur une prise qui est
tête.
Eviter d’aspirer avec le suceur et le tube à proximité de la
=> Il y a risque de blessure!
Si le disjoncteur se déclenche lors de la mise en marche
porter/transporter l’aspirateur.
Ne pas utiliser le cordon électrique pour
appareils électriques d’une puissance connectée élevée
de l’appareil, ceci peut être dû au fait que d’autres
électrique.
sont branchés en même temps sur le même circuit
En cas de fonctionnement continu de plusieurs heures,
Ne pas tirer sur le cordon électrique, mais sur la fiche
dérouler complètement le cordon électrique.
réglant l’appareil sur la plus faible puissance avant de le
Le déclenchement du disjoncteur peut être évité en
Ne pas tirer le cordon électrique par-dessus d’arêtes
pour déconnecter l’appareil de la prise.
vives et ne pas le coincer.
puissance supérieure.
mettre en marche et en le réglant ensuite sur une
10
Innenteil 362 949 A 11.06.2008 13:13 Uhr Seite 10

defr
Prière d’ouvrir les pages portant les illustrations.
Aspiration
Figure 9
Régler le suceur pour sols :
tapis et moquettes
Figure 10*
sols lisses
Avant la première utilisation
(les enficher sur la poignée ou le tube d’aspiration, selon
Aspiration avec les accessoires
b) Suceur pour joints
les besoins).
Figure 1*
Emmancher la poignée sur le flexible d’aspiration et
l’enclencher.
c) Suceur pour coussins
Pour aspirer les joints et dans les coins.
e) Suceur pour sols durs
Pour aspirer les meubles capitonnés, les rideaux, etc.
Mise en service
Pour aspirer les revêtements de sols durs
(carrelages, parquets, etc.)
a) Enclencher l’embout du flexible d’aspiration dans
Figure 2
Figure 11
b) Pour retirer le flexible d’aspiration, appuyer sur les deux
l’ouverture d’aspiration.
Pour les pauses de courte durée pendant l’utilisation,
vous pouvez utiliser la position parking qui se trouve sur
boutons d’arrêt et retirer le flexible.
brosse dans l’encoche sur l’arrière de l’appareil.
l’arrière de l’appareil. Introduire le crochet situé surla
Figure 3*
Assembler la poignée et le tube d’aspiration.
Figure 12
Pendant l’utilisation, par exemple dans un escalier, vous
a) Assembler la brosse pour sols et le tube d’aspiration.
Figure 4*
pouvez transporter l’appareil à l’aide des deux poignées.
b) Assembler la brosse pour sols et le tube télescopique.
Lorsque le travail est terminé
b) Pousser le bouton de réglage / le manchon coulissant
a) Assembler les tubes d’aspiration.
Figure 5*
Figure 13
Tirer légèrement sur le câble de raccordement au réseau
Débrancher la fiche de secteur.
télescopique et régler la longueur souhaitée.
dans le sens de la flèche pour déverrouiller le tube
et le relâcher (le câble s’enroule automatiquement).
Figure 6
Figure 14
Saisir la fiche et tirer le câble de raccordement au réseau
Pour entreposer/transporter l’appareil, vous pouvez
utiliser le dispositif de rangement situé sous l’appareil.
dans la prise.
de la longueur souhaitée et introduire la fiche de secteur
sur la brosse dans l’encoche situé sous l’appareil.
Placer l’appareil verticalement. Introduire le crochet situé
Figure 7
bouton Marche/Arrêt dans le sens de la flèche.
Mettre l’aspirateur en marche/l’arrêter en actionnant le
Changement du sac
Figure 8
Changement du sac à poussière
Régler la force d’aspiration en tournant le bouton
Marche/Arrêt dans le sens de la flèche.
Figure 15*
L’indicateur de changement du sac sur le couvercle
devient jaune.
Figure 16
dans le sens de la flèche.
Ouvrir le couvercle en actionnant le levier de fermeture
*suivant équipement
11
Innenteil 362 949 A 11.06.2008 13:13 Uhr Seite 11

fr
Figure 17
a) Fermer le sac à poussière en tirant la languette de
Nettoyer le filtre de sortie d’air
b) Introduire le nouveau sac à poussière en le poussant à
fermeture et le retirer.
Le filtre de sortie d’air doit être nettoyé régulièrement en le
fond dans le support.
frappant ou en le rinçant !
Figure 20
!
papier est en place !
Attention : le couvercle ne se ferme que lorsque le sac en
Ouvrir le couvercle du compartiment de poussière
exemple du plâtre, du ciment, etc.), nettoyer le sac du
Après avoir aspiré des poussières fines (comme par
Retirer le cadre de filtre dans le sens de la flèche.
(cf. fig. 16).
moteur et remplacer éventuellement le microfiltre.
Si le filtre de sortie d’air est très encrassé, il est
Nettoyer le filtre de sortie d’air en le frappant.
Nettoyer le filtre de protection du moteur
recommandé de le rincer.
Pousser le cadre de filtre sous les deux renforts de
Laisser ensuite sécher le filtre au moins 24 heures.
nettoyé en le frappant ou le rinçant!
Le filtre de protection du moteur devrait être régulièrement
Figure 18*
Fermer le couvercle du compartiment de poussière.
ce qu’il s’enclenche.
fixation et le pivoter dans le sens de la flèche jusqu’à
Ouvrir le couvercle du compartiment de poussière
(voir fig. 16).
Entretien
flèche.
Retirer le filtre de protection du moteur dans le sens de la
Avant chaque nettoyage, arrêter l’appareil et
Si le filtre de protection du moteur est très encrassé, il
Nettoyer le filtre de protection du moteur en le frappant.
débrancher la fiche de secteur.
nettoyer l’aspirateur et les accessoires en matière
Après le nettoyage, glisser le filtre de protection du
Laisser ensuite sécher le filtre au moins 24 heures.
est recommandé de le rincer.
Un produit nettoyant pour matières plastiques suffit pour
plastique.
moteur dans l’appareil et fermer le couvercle du
compartiment de poussière.
!
Ne pas utiliser de nettoyants abrasifs, pour
Ne jamais plonger l’aspirateur dans l’eau.
verre ou universels.
Changement du filtre avant moteur
Si besoin est, vous pouvez aspirer le compartiment à
(Ne s’applique pas aux appareils équipés d’un fitre HEPA).
poussière à l’aide d’un second aspirateur ou le nettoyer
simplement avec un chiffon à poussière / pinceau à
nouveau paquet de sacs de rechange en papier.
Quand le remplacer : chaque fois que l’on entame un
poussière sec.
Figure 19*
Retirer le support du filtre et l’ouvrir.
Ouvrir le couvercle.
couvercle.
Introduire le support du filtre dans l’appareil et fermer le
un nouveau microfiltre hygiénique.
Retirer le microfiltre hygiénique usagé et le remplacer par
Sous réserve de modifications techniques
12
Innenteil 362 949 A 11.06.2008 13:13 Uhr Seite 12

Descrizione dell’elettrodomestico
1 Spazzola d’aspirazione convertibile per pavimenti*
12 Filtro di soffiaggio
2 Bocchetta per pavimenti lisci*
13 Supporto
3 Tubo d’aspirazione*
14 Filtro di protezione motore
4 Tubo telescopico*
15 Ausilio d’appoggio
5 Bottone di bloccaggio*
16 Filtri di carta intercambiabili
6 Impugnatura del tubo flessibile*
17 Coperchio
7 Tubo flessibile d’aspirazione
18 mpugnatura di trasporto
8 Bocchetta per imbottiture*
19 Griglia di sfiato
9 Bocchetta per fessure*
20 Indicatore di sostituzione filtro*
10 Cavo di collegamento alla rete elettrica
11 Tasto di inserimento/disinserimento con regolazione
elettronica della potenza aspirante*
*A secondo dell’equipaggiamento
Parti di ricambio ed accessori speciali
Staccafili (1) e bordo per lucidare (2) sono ottenibili presso il
2
servizio di assistenza clienti e possono essere sostituiti a cura
dello stesso servizio
1
1
A Confezione di filtri intercambiabili di carta BBZ52AFG1
E TURBO-UNIVERSAL
®
1 microfiltro igienico
Contenuto: 5 filtri intercambiabili di carta con chiusura
www.dust-bag-bosch.com
imbottiti, materassi, sedili d’automobile, ecc.
Spazzolare ed aspirare contemporaneamente mobili
BBZ42TB
— Spazzola per imbottiture
http://
B Filtro di tessuto (filtro perenne) BBZ10TFG
Particolarmente adatto per aspirare peli di animali.
Filtro riusabile con chiusura a strappo.
L’azionamento dei rulli a spazzola avviene tramite la cor
C Filtro-HEPA BBZ8SF1
Collegamento elettrico non necessario
rente d’aspirazione dell’aspirapolvere.
F TURBO-UNIVERSAL
®
Consigliato per allergici. Sostituire ogni anno.
Filtro supplementare per aria di scarico.
Spazzolare ed aspirare contemporaneamente tappeti e
BBZ102TBB
-Spazzola per pavimenti
D Microfiltro a carbone attivo BBZ8KF1
Abbinamento di microfiltro e filtro a carbone attivo
Particolarmente adatto per aspirare peli di animali.
moquette a pelo corto e per qualsiasi altro rivestimenti.
odi di tempo. Sostituire ogni sei mesi. Sostituire il supporto
Impedisce la formazione di odori sgradevoli per lunghi peri-
L’azionamento dei rulli a spazzola avviene tramite la cor
rente d’aspirazione dell’aspirapolvere.
attivo» non è possibile.
L’abbinamento «filtro Hepa» + «microfiltro a carbone
Attenzione!
del filtro a carbone con il supporto del microfiltro.
Collegamento elettrico non necessario.
G Bocchetta per pavimenti lisci BBZ123HD
(parquet, piastrelle, mattonelle, ….)
Per la pulizia di pavimenti lisci
13
Innenteil 362 949 A 11.06.2008 13:13 Uhr Seite 13

it
Conservare le istruzioni per l’uso.
In caso di cessione dell’aspirapolvere a terzi, si
Non mettere in funzione l’apparecchio qualora esso sia
raccomanda di consegnare anche le istruzioni per l’uso.
danneggiato. In caso di anomalia, staccare la spina dalla
Le riparazioni e le sostituzioni dei componenti dell’aspira-
rete.
Utilizzo conforme
nale autorizzato del servizio di assistenza tecnica.
polvere devono essere effettuate esclusivamente da perso-
Questo aspirapolvere è destinato esclusivamente all’utilizzo
in ambito domestico e non è adatto all’uso industriale.
L’aspirapolvere non é adatto all’uso in cantiere.
dall’umidità e dalle fonti di calore.
Proteggere l’aspirapolvere dagli agenti atmosferici,
Il costruttore non si assume alcuna responsabilità per gli
presenti istruzioni per l’uso.
Utilizzare l’aspirapolvere soltanto così come indicato dalle
=> L’aspirazione di macerie può causare il
danneggiamento dell’apparecchio.
eventuali danni causati da un utilizzo non conforme o
Disattivare l’apparecchio quando non lo si usa.
Gli apparecchi dismessi devono essere resi
conformità alle normative vigenti in materia.
L’aspirapolvere può essere utilizzato esclusivamente con:
seguenti avvertenze.
Si raccomanda pertanto di osservare scrupolosamente le
errato.
immediatamente inutilizzabili, per essere poi smaltiti in
Per motivi di sicurezza, gli aspirapolvere con una potenza
sacchetti filtranti originali.
parti di ricambio, accessori o accessori speciali originali
antisurriscaldamento.
di 2000 W o superiore sono dotati di un dispositivo
L’aspirapolvere non è adatto all’uso nei seguenti casi:
aspirazione di polvere su persone o animali
Staccare la spina e accertarsi che la bocchetta, il tubo di
surriscaldi, quest’ultimo si disattiva automaticamente.
Nel caso in cui si verifichi un blocco e l’apparecchio si
aspirazione di:
– insetti e piccole creature (per esempio mosche, ragni,
aspirazione o il tubo flessibile non siano otturati o non sia
– sostanze nocive, oggetti affilati, materiali caldi o
ecc.)
necessario sostituire il filtro.
Dopo aver eliminato l’anomalia insorta, lasciare
– cenere, fuliggine delle stufe di maiolica e degli impianti
– materiali e sostanze infiammabili o esplosive.
– sostanze umide o liquide
incandescenti
raffreddare l’apparecchio almeno per un’ora. Soltanto
successivamente sarà nuovamente possibile utilizzarlo.
di riscaldamento centrali
Avvertenze per lo smaltimento
Imballaggio
Norme di sicurezza
L’imballaggio protegge l’aspirapolvere da eventuali danni
durante il trasporto.
Questo aspirapolvere è conforme alle regole tecniche
riconosciute e alle norme di sicurezza in vigore. Si certifica
essere riciclato.
E’ costituito da materiali non inquinanti e può pertanto
la conformità con le seguenti direttive europee: 89/336/CEE
Provvedere allo smaltimento dei materiali di imballaggio
(emendata attraverso le normative RL 91/263/CEE,
sistema di riciclaggio «Punto verde».
non più necessari rivolgendosi ai centri di raccolta per il
92/31/CEE e 93/68/CEE). 73/23/CEE (emendata attraverso
la normativa RL 93/68/CEE).
Apparecchi dismessi
Gli apparecchi dismessi contengono ancora molteplici
identificazione.
conformemente a quanto riportato sulla targhetta di
Collegare e mettere in funzione l’aspirapolvere solo
Si consiglia pertanto di restituire l’apparecchio dismesso
materiali preziosi.
al proprio rivenditore o presso un centro di riciclaggio.
Non utilizzare mai l’aspirapolvere senza sacchetto
filtrante.
Per informazioni sulle modalità del riciclaggio, rivolgersi al
I bambini possono usare l’aspirapolvere soltanto sotto
=> l’apparecchio può essere danneggiato!
propria città.
proprio rivenditore o all’amministrazione comunale della
!
Attenzione!
prossimità della testa.
Non tenere la bocchetta e il tubo dell’aspiratore in
sorveglianza di un adulto.
L’apparecchio deve essere collegato a una sola presa, la
Non utilizzare il cavo di collegamento alla rete elettrica
=> pericolo di lesioni!
a 16 A.
quale deve essere dotata di una protezione non inferiore
In caso di uso prolungato dell’apparecchio, estrarre
per trasportare l’aspirapolvere.
dell’attivazione dell’apparecchio, la causa può essere
Se il dispositivo di protezione scatta al momento
completamente il cavo di collegamento alla rete elettrica.
dovuta al fatto che altri apparecchi con elevata potenza
allacciata sono stati collegati contemporaneamente allo
spina per staccare l’apparecchio dalla rete.
Non tirare il cavo di allacciamento, bensì afferrare la
stesso circuito.
Per evitare che il dispositivo di protezione scatti, prima di
su bordi affilati e non piegarlo.
Non far passare il cavo di collegamento alla rete elettrica
attivare l’apparecchio impostare il livello di potenza
livello dell’aspirapolvere.
Staccare la spina dalla rete prima di effettuare lavori a
livello di potenza superiore.
minimo e scegliere quindi solo successivamente un
14
Innenteil 362 949 A 11.06.2008 13:13 Uhr Seite 14
it
Aprire la pagina con le illustrazioni
Aspirare
Figura 9
pavimenti
Impostare la spazzola d’aspirazione per
Tappeti e moquette
Pavimento liscio
Figura 10*
Prima di utilizzare l’apparecchio per la
prima volta
Figura 1*
a) Bocchetta per fessure
seconda del fabbisogno)
(collegare ovvero inserire sul tubo d’aspirazione a
Aspirare con accessori
aspirazione.
Collegare e fissare l’impugnatura al tubo flessibile di
b) Bocchetta per imbottiture
Per l’aspirazione di fessure ed angoli.
c) Bocchetta per pavimenti lisci
Per l’aspirazione di mobili imbottiti, tendine, ecc.
Messa in funzione
Per l’aspirazione di pavimenti con rivestimenti lisci
(piastrelle, parquet, ecc.)
a) IInserire fino al punto d’arresto il manicotto del tubo
Figura 2
Figura 11
flessibile d’aspirazione nell’apposito raccordo.
Per brevi pause è possibile utilizzare l’ausilio d’appoggio
b) Per staccare il tubo flessibile premere sui due arresti.
presente sul retro dell’elettrodomestico. Inserire il gancio
A presente sulla bocchetta per pavimenti nell’incavo
Figura 3*
presente sul retro dell’aspirapolvere.
Unire assieme maniglia e tubo flessibile.
Figura 12
Per utilizzare l’aspirapolvere in luoghi scomodi, ad
a) Unire assieme bocchetta per pavimenti e tubo
Figura 4*
esempio su scale, è possibile trasportare
l’elettrodomestico afferrandolo per le due maniglie.
b) Collegare la spazzola per pavimenti e il tubo telescopico.
d’aspirazione.
Dopo aver fatto uso dell’aspirapolvere
a) Unire assieme i tubi d’aspirazione.
Figura 5*
b) Per impostare la necessitata lunghezza sbloccare il tubo
Figura 13
telescopico mediante il pulsante di regolazione e
freccia.
(il cavo si avvolge automaticamente)”.
brevemente il cavo di collegamento e lasciarlo poi libero
Staccare la spina dalla presa di corrente. Tirare
spostare il manicotto scorrevole in direzione della
Figura 6
Figura 14
presa di corrente.
desiderata lunghezza di cavo; inserire la spina in una
Afferrare la spina del cavo di collegamento ed estrarre la
uso dell’ausilio di riposizione presente sul retro
Per riporre/trasportare l’elettrodomestico è possibile far
Collocare l’aspirapolvere in posizione verticale e Inserire
dell’aspirapolvere.
Figura 7
il gancio presente sulla spazzola per pavimenti
nell’incavo presente sul lato inferiore dell’aspirapolvere.
della freccia.
di inserimento/disinserimento nella relativa direzione
Inserire/disinserire l’aspirapolvere azionando il comando
Figura 8
inserimento/disinserimento nella relativa direzione della
Regolare la potenza d’aspirazione girando il comando di
freccia.
*A secondo dell’equipaggiamento
15
Innenteil 362 949 A 11.06.2008 13:13 Uhr Seite 15

it
Sostituzione dei filtri
Pulizia del filtro igienico
Sostituire del sacchetto raccoglipolvere
Si consiglia di pulire il filtro igienico a intervalli regolari,
battendolo leggermente e lavandolo!
Figura 15*
L’indicatore di sostituzione filtro sostituzione presente sul
Figura 20
coperchio assume il colore giallo.
Aprire il coperchio del vano di raccolta dello sporco
Estrarre il supporto del filtro nel senso indicato dalla
(cfr. Figura 16).
Figura 16
direzione della freccia.
Aprire il coperchio azionando la leva di chiusura in
In caso di sporco resistente, lavare il filtro igienico.
Pulire il filtro igienico battendolo leggermente
freccia.
Successivamente, lasciarlo asciugare per almeno 24 ore.
a) Chiudere il sacchetto della polvere tirando l’apposita
Figura 17
Spingere il supporto del filtro al di sotto delle due alette
linguetta ed estrarlo dall’aspirapolvere.
innesta in posizione.
e muoverlo nel senso indicato dalla freccia finché non si
b) Inserire fino all’arresto nel supporto un nuovo sacchetto
della polvere.
Chiudere il coperchio del vano di raccolta dello sporco.
!
applicato il filtro di carta.
Attenzione – Chiudere il coperchio solo dopo aver
Cura dell’elettrodomestico
gesso, cemento, ecc.), pulire il filtro del motore, se
Dopo aver aspirato polveri finissime (come ad esempio
Prima di procedere ad ogni pulizia disinserire
necessario sostituire il microfiltro.
l’elettrodomestico e staccare sempre la spina dalla presa
di corrente.
Pulizia del filtro di protezione del motore
L’aspirapolvere e tutti gli accessori di plastica possono
Si consiglia di pulire il filtro di protezione del motore a
plastica.
essere puliti con un normale detersivo per parti di
intervalli regolari, battendolo leggermente e lavandolo!
Non utilizzare detersivi abrasivi, detersivi per
Figura 18*
!
Aprire il coperchio del vano di raccolta dello sporco
Non immergere mai in acqua l’aspirapolvere.
vetri oppure detersivi d’uso generale.
(cfr. Figura 16).
indicato dalla freccia.
Estrarre il filtro di protezione del motore nel senso
aspirato con un altro aspirapolvere oppure con un panno
Alla necessità l’interno dell’aspirapolvere può essere
o pennello asciutti.
di protezione del motore.
In caso di forte imbrattamento, é necessario lavare il filtro
leggermente.
Pulire il filtro di protezione del motore battendolo
di raccolta dello sporco.
motore nell’apparecchio e chiudere il coperchio del vano
In seguito alla pulizia, inserire il filtro di protezione del
Successivamente, lasciarlo asciugare per almeno 24 ore.
Sostituzione del microfiltro d’igiene
(Non è presente negli apparecchi dotati di filtro HEPA).
confezione di filtri di carta.
Quando va sostituito il microfiltro: all’inizio di ogni nuova
Figura 19*
chiudere il coperchio.
Spingere il supporto del filtro nell’elettrodomestico e
nel supporto.
Smaltire il vecchio microfiltro d’igiene ed inserire il nuovo
Estrarre ed aprire il supporto del filtro.
Aprire il coperchio.
Cambiamenti riservati.
16
Innenteil 362 949 A 11.06.2008 13:13 Uhr Seite 16
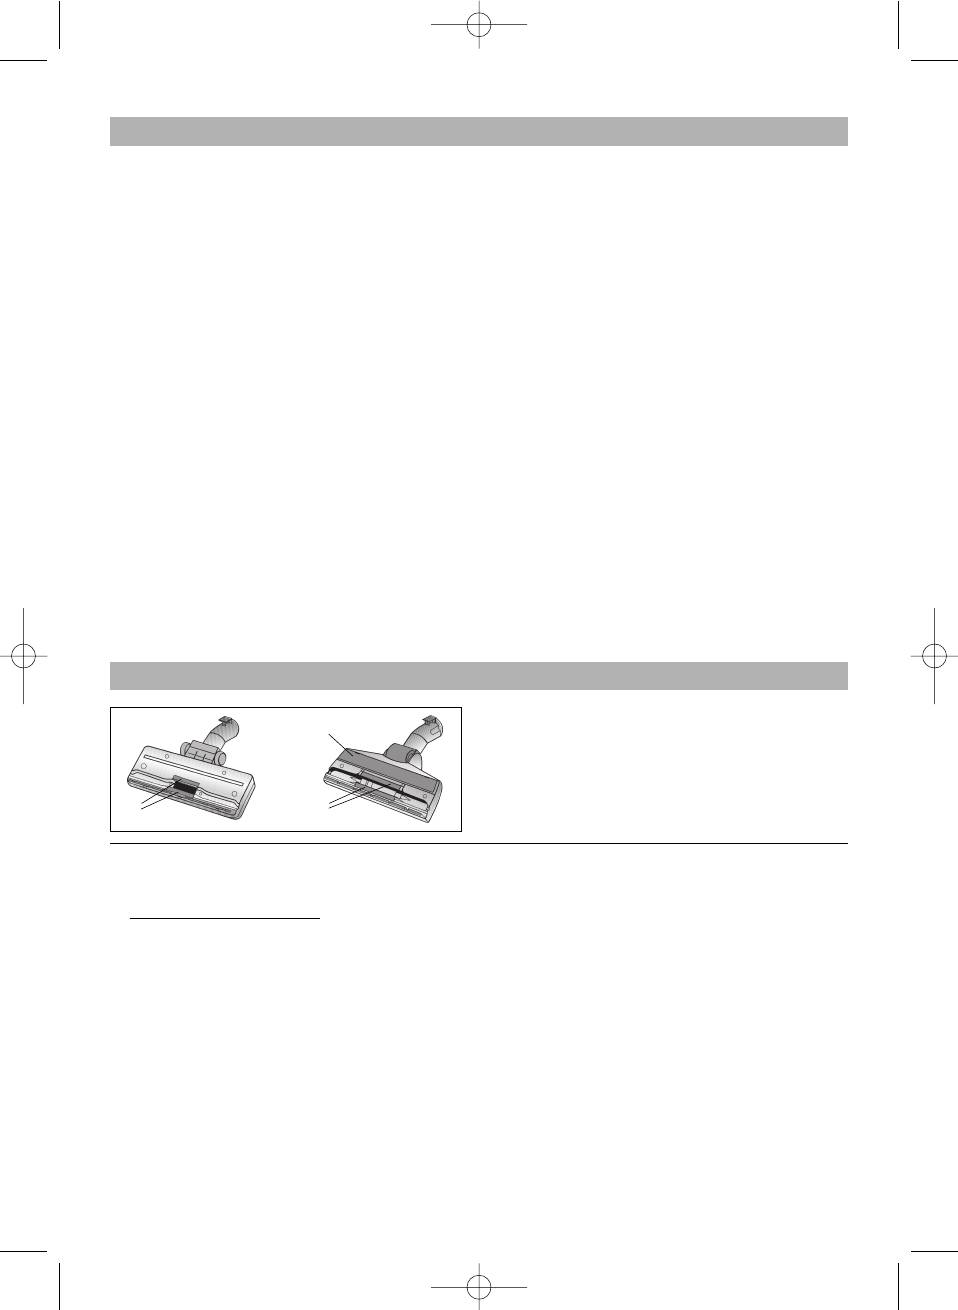
Toestelbeschrijving
1 omschakelbaar vloermondstuk*
12 Uitblaasfilter
2 Zuigmondstuk voor harde vloeren*
13 parkeerhulp
3 zuigstang*
14 Motorbeveiligingsfilter
4 telescoopbuis*
15 wegzethul
5 Vergrendelingsknop*
16 papieren filter
6 handgreep*
17 deksel
7 zuigslang
18 draaggreep
8 Kussenmondstuk*
19 uitblaasrooster
9 Voegmondstuk*
20 filtervervangingsindicator*
10 netaansluitkabel
11 In-/Uit-toets met elektronische zuigkrachtregelaar*
*al naar uitrusting
Reservedelen en speciale accessoires
Draadlichter (1) en polijststrip (2) zijn verkrijgbaar bij de klan-
2
tenservice en worden daar verwisseld
1
1
A Papierfilterverpakking BBZ52AFG1
E TURBO-UNIVERSAL
®
1 micro-hygiënefilter
Inhoud: 5 papierfilters met sluiting
http://
Bijzonder geschikt voor het opzuigen van die renharen.
matrassen, autostoelen enz.
Borstelen en zuigen in één bewerking bij zitmeubelen,
-borstel voor kussensr BBZ42TB
www.dust-bag-bosch.com
B Textielfilter (continu filter) BBZ10TFG
Het van klitteband voorziene filter kan weer gebruikt
Geen elektrische aansluiting vereist.
de stofzuiger.
De borstel wordt aangedreven dooe de zuigstroom van
worden.
C HEPA-filter BBZ8SF1
F TURBO-UNIVERSAL
®
-borstel voor vloeren BBZ102TBB
Extra filter voor schone uitblaaslucht.
Borstelen en zuigen in één bewerking van laagpolig tapijt
Aanbevolen voor mensen die aan allergieën lijden. ieder
en vloerbedekkingen resp. voor alle bekledingen.
jaar vervangen.
Bijzonder geschikt voor het opzuigen van dierenharen.
De borstel wordt aangedreven dooe de zuigstroom van
D Micro-actiefkoolfilter BBZ8KF1
de stofzuiger.
Combinatie van micro- en actiefkoolfilter. Gaat lange tijd
Geen elektrische aansluiting nodig.
Voor het zuigen van gladde vloeren (parket, tegels,
Combinatie »Hepa-filter« + »micro-actiefkoolfilter« niet
ter. Let op!
Koolfilterframe vervangen door het frame van het microfil-
storende geurtjes tegen. Halfjaarlijks vervangen.
G Mondstuk voor harde vloeren BBZ123HD
plaruizen, …)
mogelijk.
17
Innenteil 362 949 A 11.06.2008 13:13 Uhr Seite 17

nl
De gebruiksaanwijzing goed bewaren.
Wanneer u de stofzuiger doorgeeft aan derden de
beschadigd is. In geval zich een storing voordoet de
De stofzuiger niet in gebruik nemen wanneer hij
gebruiksaanwijzing erbij voegen.
Gebruik volgens de voorschriften
daartoe bevoegde Klantenservice reparaties aan de
In verband met de veiligheid mogen er alleen door de
stekker uit het stopcontact halen.
stofzuiger worden uitgevoerd en onderdelen worden
zakelijk gebruik bestemd.
Deze stofzuiger is alleen voor huishoudelijk en niet voor
De stofzuiger beschermen tegen weersinvloeden, vocht
vervangen.
De stofzuiger uitsluitend gebruiken zoals aangegeven in
en hittebronnen.
deze gebruiksaanwijzing.
bouwplaatsen.
De stofzuiger is niet geschikt voor gebruik op
De fabrikant is niet aansprakelijk voor eventuele schade die
ontstaat wanneer het apparaat niet volgens de
=> Het opzuigen van bouwafval kan tot beschadiging
voorschriften of op een verkeerde manier wordt gebruikt.
van het apparaat leiden.
Volg daarom beslist de volgende aanwijzingen op!
De stofzuiger mag alleen maar worden gebruikt met:
uitschakelen.
Wanneer er niet wordt gezogen het apparaat
Versleten apparaten onmiddellijk onbruikbaar maken,
afvoeren.
De stofzuiger is niet geschikt voor:
toebehoren
originele reserveonderdelen, -toebehoren of -speciale
originele filterzakken.
het apparaat daarna op een verantwoorde wijze
vermogen van 2000 W en meer voorzien van een
Om veiligheidsredenen zijn stofzuigers met een
het schoonzuigen van mensen of dieren
het opzuigen van:
beveiliging tegen oververhitting.
– substanties die schadelijk voor de gezondheid, heet of
– insecten ( bijv. vliegen, spinnen, …).
heet worden, dan schakelt het automatisch uit. Trek de
Mocht er een blokkering optreden en het apparaat te
stekker uit het stopcontact en zorg ervoor dat het
– licht ontvlambare of explosieve stoffen en gassen.
– vochtige of vloeibare stoffen.
gloeiend zijn, of scherpe randen hebben..
Nadat de storing is opgeheven dient u het apparaat
controleer of het filter vervangen moet worden.
mondstuk, de zuigbuis of de slang niet verstopt zijn, of
– as, roet uit haard en centrale verwarmingsinstallaties.
minstens 1 uur te laten afkoelen. Hierna kan het weer
worden gebruikt.
Veiligheidsvoorschriften
Deze stofzuiger voldoet aan de erkende regels van de
Instructies voor recycling
techniek en de veiligheidsbepalingen die van toepassing
Verpakking
volgende Europese richtlijnen: 89/336/EWG (gewijzigd door
zijn. We bevestigen dat het apparaat voldoet aan de
De verpakking beschermt de stofzuiger tegen
(gewijzigd door RL 93/68/EWG).
RL 91/263/EWG, 92/31/EWG en 93/68/EWG). 73/23/EWG
De stofzuiger alleen volgens het typeplaatje aansluiten en
in gebruik nemen.
Breng verpakkingsmateriaal dat u niet meer nodig heeft
recyclebaar.
Deze bestaat uit milieuvriendelijk materiaal en is daarom
beschadiging tijdens het transport.
naar een verzamelplaats voor de verwerking van afval.
Nooit zuigen zonder filterzak.
Kinderen mogen de stofzuiger alleen onder toezicht
=> het apparaat kan worden beschadigd!
Oude apparaten
gebruiken.
Oude apparaten bevatten vaak nog waardevol materiaal.
Geef daarom uw oude apparaat voor hergebruik af aan
Vermijd het zuigen met mondstuk en buis in de nabijheid
van het hoofd.
uw handelaar of een recyclecentrum.
Het elektriciteitssnoer niet gebruiken om de stofzuiger te
=> Er bestaat gevaar voor letsel!
kunt u krijgen bij uw handelaar of uw gemeente.
Informatie over actuele methoden van afvalverwijdering
dragen/transporteren.
!
Let op
elektriciteitssnoer volledig uittrekken.
Bij gebruik van meerdere uren achter elkaar het
Niet aan het aansluitsnoer trekken maar de stekker uit
het apparaat wordt geactiveerd, dan kan dit worden
Als de zekering in de meterkast bij het inschakelen van
het stopcontact halen om het apparaat van de stroom af
veroorzaakt doordat er tegelijkertijd meerdere elektrische
stroomcircuit zijn aangesloten.
apparaten met hoge aansluitwaarde op hetzelfde
en niet bekneld laten raken.
Het elektriciteitssnoer niet over scherpe randen trekken
te sluiten.
Het in werking treden van de zekering kan worden
voorkomen door, alvorens het apparaat in te schakelen,
uit het stopcontact halen.
Voor alle werkzaamheden aan de stofzuiger de stekker
de laagste vermogensstand in te stellen en pas daarna
een hogere vermogensstand te kiezen.
18
Innenteil 362 949 A 11.06.2008 13:13 Uhr Seite 18