

Slicer
VS12D, VS12CD, VS12D-R, VS12D-V,
VS12D-V/R
Operating instructions
6.083.98.5.10.10 en
Bizerba Service
www.bizerba.com
Alle Rechte vorbehalten
All rights reserved
Tous droits réservés
Reservados todos los derechos
Tutti i diritti riservati
© 03/2013
Bizerba GmbH & Co. KG,
72336 Balingen
P.O. Box 10 01 64
72301 Balingen, Germany
Telephone (+49 7433) 12-0, Fax (+49 7433) 12-2696
[email protected]
Email:
Internet:
www.bizerba.com
Translation of original Instruction manual
6.083.98.5.10.10 en
Chapter index
About these instructions
1
About this machine
2
Safety instructions
3
Installation
4
Machine and operating elements
5
Operation
6
Troubleshooting
7
Maintenance
8
Technical data
9
Appendix
6.083.98.5.10.10 en
10
6.083.98.5.10.10 en
Operating instructions VS12D /C /-R /-V /V/R
Contents
Contents
1
2
3
4
Page
About these instructions . . . . . . . . . . . . . . . . . . . . . . . . . . . . . . . . . . . . . . . . . . . . 1 - 1
1.1
Safe-keeping . . . . . . . . . . . . . . . . . . . . . . . . . . . . . . . . . . . . . . . . . . . . . . . .
1-
1
1.2
Target group . . . . . . . . . . . . . . . . . . . . . . . . . . . . . . . . . . . . . . . . . . . . . . . . . 1 -
1
1.3
Symbols used . . . . . . . . . . . . . . . . . . . . . . . . . . . . . . . . . . . . . . . . . . . . . . . . 1 -
1
1.4
Warnings . . . . . . . . . . . . . . . . . . . . . . . . . . . . . . . . . . . . . . . . . . . . . . . . . . . . 1 -
2
About this machine . . . . . . . . . . . . . . . . . . . . . . . . . . . . . . . . . . . . . . . . . . . . . . . . . 2 -
1
2.1
Intended use . . . . . . . . . . . . . . . . . . . . . . . . . . . . . . . . . . . . . . . . . . . . . . . . . 2 -
1
2.2
2.2.1
2.2.2
Machine description . . . . . . . . . . . . . . . . . . . . . . . . . . . . . . . . . . . . . . . . . . 2 Name of components VS12D . . . . . . . . . . . . . . . . . . . . . . . . . . . . . . . . . . 2 Name of components VS12D-V . . . . . . . . . . . . . . . . . . . . . . . . . . . . . . . 2 -
2
3
5
2.3
Accessories . . . . . . . . . . . . . . . . . . . . . . . . . . . . . . . . . . . . . . . . . . . . . . . . . . 2 -
6
2.4
Directives . . . . . . . . . . . . . . . . . . . . . . . . . . . . . . . . . . . . . . . . . . . . . . . . . . . . 2 -
6
2.5
Warranty . . . . . . . . . . . . . . . . . . . . . . . . . . . . . . . . . . . . . . . . . . . . . . . . . . . .
2-
6
2.6
Disposal of the machine / environmental protection . . . . . . . . . . . . .
2-
7
Safety instructions . . . . . . . . . . . . . . . . . . . . . . . . . . . . . . . . . . . . . . . . . . . . . . . . .
3-
1
3.1
General notes on safety . . . . . . . . . . . . . . . . . . . . . . . . . . . . . . . . . . . . . .
3-
1
3.2
Safety instructions for transport and installation . . . . . . . . . . . . . . . . . 3 -
2
3.3
Safety instructions during operation, slicing . . . . . . . . . . . . . . . . . . . . . 3 -
2
3.4
Safety instructions for sharpening, cleaning . . . . . . . . . . . . . . . . . . . .
3-
2
3.5
Protective and safety equipment . . . . . . . . . . . . . . . . . . . . . . . . . . . . . . . 3 -
3
Installation . . . . . . . . . . . . . . . . . . . . . . . . . . . . . . . . . . . . . . . . . . . . . . . . . . . . . . . . .
4-
1
4.1
Transport and storage . . . . . . . . . . . . . . . . . . . . . . . . . . . . . . . . . . . . . . . . 4 -
1
4.2
4.2.1
4.2.2
4.2.3
Installation and assembly . . . . . . . . . . . . . . . . . . . . . . . . . . . . . . . . . . . . .
Installation requirements . . . . . . . . . . . . . . . . . . . . . . . . . . . . . . . . . . . . . .
Position on bench . . . . . . . . . . . . . . . . . . . . . . . . . . . . . . . . . . . . . . . . . . . .
Electrical connection . . . . . . . . . . . . . . . . . . . . . . . . . . . . . . . . . . . . . . . . . .
4444-
1
1
2
2
4.3
4.3.1
4.3.2
Start-up . . . . . . . . . . . . . . . . . . . . . . . . . . . . . . . . . . . . . . . . . . . . . . . . . . . . . 4 Switching the slicer on . . . . . . . . . . . . . . . . . . . . . . . . . . . . . . . . . . . . . . . . 4 Switching the machine off . . . . . . . . . . . . . . . . . . . . . . . . . . . . . . . . . . . . . 4 -
3
3
3
4.4
Placing out of operation . . . . . . . . . . . . . . . . . . . . . . . . . . . . . . . . . . . . . . . 4 -
4
6.083.98.5.10.10 en
0-1
Contents
5
6
7
8
0-2
Operating instructions VS12D /C /-R /-V /V/R
Machine and operating elements . . . . . . . . . . . . . . . . . . . . . . . . . . . . . . . . . . . . 5 -
1
5.1
5.1.1
5.1.2
5.1.3
Membrane keyboard VS12D, VS12D-V . . . . . . . . . . . . . . . . . . . . . . . .
Function keys . . . . . . . . . . . . . . . . . . . . . . . . . . . . . . . . . . . . . . . . . . . . . . . .
Change of depositing programs . . . . . . . . . . . . . . . . . . . . . . . . . . . . . . .
Distance between slices during shingling . . . . . . . . . . . . . . . . . . . . . . .
5555-
1
2
3
4
5.2
5.2.1
5.2.2
Selecting operating mode for VS12D . . . . . . . . . . . . . . . . . . . . . . . . . . . 5 Manual operation . . . . . . . . . . . . . . . . . . . . . . . . . . . . . . . . . . . . . . . . . . . . . 5 Automatic operation . . . . . . . . . . . . . . . . . . . . . . . . . . . . . . . . . . . . . . . . . . 5 -
4
4
5
5.3
Slice thickness setting . . . . . . . . . . . . . . . . . . . . . . . . . . . . . . . . . . . . . . . . 5 -
7
5.4
Unlocking of slice thickness control . . . . . . . . . . . . . . . . . . . . . . . . . . . . 5 -
7
5.5
Product holder . . . . . . . . . . . . . . . . . . . . . . . . . . . . . . . . . . . . . . . . . . . . . . .
5-
8
5.6
Product fixation device . . . . . . . . . . . . . . . . . . . . . . . . . . . . . . . . . . . . . . . . 5 -
9
5.7
Product support . . . . . . . . . . . . . . . . . . . . . . . . . . . . . . . . . . . . . . . . . . . . . . 5 -
9
5.8
Paper holder . . . . . . . . . . . . . . . . . . . . . . . . . . . . . . . . . . . . . . . . . . . . . . . . . 5 - 10
5.9
Round platter (optional) . . . . . . . . . . . . . . . . . . . . . . . . . . . . . . . . . . . . . . . 5 - 10
Operation . . . . . . . . . . . . . . . . . . . . . . . . . . . . . . . . . . . . . . . . . . . . . . . . . . . . . . . . . .
6-
1
6.1
Inserting and slicing product with the VS12D . . . . . . . . . . . . . . . . . . .
6-
1
6.2
Inserting and slicing product with the VS12D-V . . . . . . . . . . . . . . . . .
6-
3
6.3
Slicing with round platter (optional) . . . . . . . . . . . . . . . . . . . . . . . . . . . .
6-
5
Troubleshooting . . . . . . . . . . . . . . . . . . . . . . . . . . . . . . . . . . . . . . . . . . . . . . . . . . . . 7 -
1
7.1
7-
1
Maintenance . . . . . . . . . . . . . . . . . . . . . . . . . . . . . . . . . . . . . . . . . . . . . . . . . . . . . . . . 8 -
1
8.1
Preparation for cleaning . . . . . . . . . . . . . . . . . . . . . . . . . . . . . . . . . . . . . .
8-
1
8.2
Removing components . . . . . . . . . . . . . . . . . . . . . . . . . . . . . . . . . . . . . . .
8-
2
8.3
Cleaning . . . . . . . . . . . . . . . . . . . . . . . . . . . . . . . . . . . . . . . . . . . . . . . . . . . . . 8 -
7
8.4
Cleaning plan for slicing machines . . . . . . . . . . . . . . . . . . . . . . . . . . . . . 8 - 10
8.5
Preparing the machine for operation . . . . . . . . . . . . . . . . . . . . . . . . . . .
Procedure . . . . . . . . . . . . . . . . . . . . . . . . . . . . . . . . . . . . . . . . . . . . . . . . . . .
8 - 12
6.083.98.5.10.10 en
Operating instructions VS12D /C /-R /-V /V/R
9
Contents
8.6
8.6.1
8.6.2
8.6.3
8.6.4
8.6.5
8.6.6
8.6.7
Blade sharpening . . . . . . . . . . . . . . . . . . . . . . . . . . . . . . . . . . . . . . . . . . . .
Sharpener . . . . . . . . . . . . . . . . . . . . . . . . . . . . . . . . . . . . . . . . . . . . . . . . . . .
Preparation for sharpening . . . . . . . . . . . . . . . . . . . . . . . . . . . . . . . . . . . .
Attaching the sharpener . . . . . . . . . . . . . . . . . . . . . . . . . . . . . . . . . . . . . .
Sharpening . . . . . . . . . . . . . . . . . . . . . . . . . . . . . . . . . . . . . . . . . . . . . . . . . .
Honing . . . . . . . . . . . . . . . . . . . . . . . . . . . . . . . . . . . . . . . . . . . . . . . . . . . . . .
Removing sharpener . . . . . . . . . . . . . . . . . . . . . . . . . . . . . . . . . . . . . . . . .
Removing sharpening dust . . . . . . . . . . . . . . . . . . . . . . . . . . . . . . . . . . . .
88888888-
17
17
17
18
19
19
20
20
8.7
Care of machine, servicing, maintenance . . . . . . . . . . . . . . . . . . . . . . . 8 - 21
Technical data . . . . . . . . . . . . . . . . . . . . . . . . . . . . . . . . . . . . . . . . . . . . . . . . . . . . . . 9 -
1
9.1
Dimensions VS12D . . . . . . . . . . . . . . . . . . . . . . . . . . . . . . . . . . . . . . . . . . . 9 -
1
9.2
Dimensions VS12D-V . . . . . . . . . . . . . . . . . . . . . . . . . . . . . . . . . . . . . . . .
9-
2
9.3
Supply voltage . . . . . . . . . . . . . . . . . . . . . . . . . . . . . . . . . . . . . . . . . . . . . . . 9 -
3
9.4
Ambient conditions . . . . . . . . . . . . . . . . . . . . . . . . . . . . . . . . . . . . . . . . . . . 9 -
4
Appendix
Declaration of conformity
Declaration of conformity for plastic materials with direct food contact
6.083.98.5.10.10 en
0-3
Contents
0-4
Operating instructions VS12D /C /-R /-V /V/R
6.083.98.5.10.10 en
Operating instructions VS12D /C /-R /-V /V/R
About these instructions
1
1
About these instructions
Read the instruction manual very carefully before connecting and switching on the machine to ensure that you utilize the full quality and potential of this machine and avoid any
potential risks.
This instruction manual covers the use, installation, operating, cleaning and maintenance
of the machine.
Our products undergo continuous further development and are subject to different countryspecific regulations. Examples of pictures and graphics included in these instructions may
vary from the version you have received.
1.1
Safe-keeping
The owner's manual are an integral part of the machine and must be stored close to the
machine to be easily accessible to others.
If the machine is sold, the owner's manual must be included in its entirety.
1.2
Target group
The machine may only be operated by trained personnel over the age of 14. This means
that the operator has to be familiar with the contents of these operating instructions.
Installation, maintenance and repair must be performed by Bizerba authorized specialists
only.
1.3
Symbols used
Various symbols are used in these instructions.
Symbol
Meaning
Text with arrow prompts you to carry out an action.
Position number in figure.
1
<Key>
"Display"
Text within < > refers to a key.
Text inside a " " refers to display text.
Prerequirements are displayed with a gray background.
Notes
These instructions are mandatory for you.
Information
This information helps for better understanding.
6.083.98.5.10.10 en
1-1
About these instructions
Operating instructions VS12D /C /-R /-V /V/R
1
1.4
Warnings
Warnings are divided into danger levels by the signal word above the warning symbol.
Structure of warnings and meaning of signal words are described in these instructions as
follows.
DANGER
Source of danger with high risk of imminent danger to persons!
The consequences are:
life threatening injuries,
severe damage to health.
–
WARNING
Measures to avoid the danger are specified.
Source of danger with medium risk with potentially threatening
danger for personnel!
The consequences can be:
serious injuries,
damage to health,
serious damage to property.
–
CAUTION
Measures to avoid the danger are specified.
Source of danger with slight risk with potentially threatening danger for personnel!
The consequences can be:
injuries,
damage to property.
–
CAUTION
Measures to avoid the danger are specified.
Source of danger, improper use!
Damage to property can result.
–
1-2
Measures to avoid the danger are specified.
6.083.98.5.10.10 en
Operating instructions VS12D /C /-R /-V /V/R
2
About this machine
2.1
Intended use
About this machine
2
The slicers in the VS12D series are technical tools exclusively intended for commercial
use.
They may only be operated by instructed personnel over the age of 14.
The VS12D series includes all types listed in the enclosed declaration of conformity.
With the VS12D you can choose between 2 operating modes.
Manual operation: Carriage drive and product feeding are operated by hand.
Automatic operation: Carriage drive and product feeding are operated by a motor. The operating mode can be set at the switch knob at the drive housing and with the locking lever
at the carriage.
The VS12D-V operates in automatic mode. Carriage drive and product feeding are motorized.
Approved sliced products, taking sizes into consideration
–
–
–
–
–
–
–
–
All kinds of cold cuts, deli meat
Ham, bacon
Smoked ham with / without rind
Roast meats, roast beef
Meat, roulades
Sliceable cheese
Bread
Fruit, vegetables
Note: If cheese is the main product being sliced, we recommend using a special cheese
blade.
The following may not be sliced due to risk of injury and damage:
–
–
–
–
NON-FOOD articles
Bone-in products
Products that include hard components (e.g. stone fruit)
Frozen products
Product sizes
min. 50 x 50 mm (W x H) or 50 mm diameter (with depositing system)
min. 240 x 183 mm (W x H) or 183 mm diameter (with depositing system)
min. 260 x 224 mm (W x H) or 224 mm diameter (without depositing system)
6.083.98.5.10.10 en
2-1
About this machine
2
Operating instructions VS12D /C /-R /-V /V/R
Applications
The slicers in the VS12D series are intended for installation in the sales area. Installation
in preparation areas is permissible, making allowances for a cleaning plan and protection
type IP 33.
Permissible ambient temperatures from -10°C up to 40°C.
Operating time
The slicers are designed for permanent operation.
2.2
Machine description
Drive
The drive systems for blade, carriage, depositing table, depositing arm and chains are
separated. The blade motor is operated with supply voltage; the other drives are operated
with mains voltage.
The contactor control having a self-locking circuit prevents automatic restarting after a
power cut.
The membrane keyboard On/Off with signal lamp is located on the motor tower.
The functional keys are integrated in the membrane keyboard.
Depositing system
The slicer is equipped with an automatic slice depositing system. The depositing system
deposits slices with a max. slice thickness of 8 mm. A max. slice thickness of 24 mm can
be reached without depositing system and with unlocked slice thickness limit.
The depositing system consists of a chain frame with transport chain, feed roller with guide
cam as well as depositing arm and depositing table incl. paper holder.
The depositing system is controlled by means of an encoder depending on carriage speed
and carriage stroke.
Product holder
The product holder can be lifted up into an unstable equilibrium in order to insert the product for slicing (VS12D).
The product holder can be locked or unlocked in order to insert the product. Can be removed for cleaning (VS12D-V).
Carriage
The carriage with the additional product fixation holds the sliced product (VS12D) in place
and prevents it from slipping or tilting.
The carriage with the product fixation holds the sliced product in place and prevents it from
slipping or tilting (VS 12D-V).
At a slice thickness set below "0" the tilting device of the carriage is unlocked. This allows
the carriage to be tilted to the outside in any position.
2-2
6.083.98.5.10.10 en
Operating instructions VS12D /C /-R /-V /V/R
About this machine
Materials
The complete machine housing as well as the gauge plate, blade cover and carriage, are
made of anodized aluminium.
Optionally the surface can be finished with Ceraclean (VS12CD).
The back panel , the slider guard and the remnant holder plate are made of transparent,
break-proof and food-grade plastic, which is approved for foodstuffs.
For better gliding of the product, parts which are in contact with the product to be sliced
are provided with grooves.
All materials used in the food zone and in the working area comply with the food hygiene
regulations. For bearings in visual range, food-grade lubricants are used.
Work place-related emission noise level value
LpA = 53 dB (A). The value takes into consideration an instable measuring of 3 dB.
Vibration
The total vibration of the items, which get into contact with hand and arm is below 2.5 m/s2
and therefore below the required limited value.
2.2.1
Name of components VS12D
Fig. 1: Name of components VS12D
6.083.98.5.10.10 en
2-3
2
About this machine
2
Operating instructions VS12D /C /-R /-V /V/R
The machine is available in different versions. The figure shows an example:
1
Blade guard ring
2
Blade
3
Blade cover
4
Pusher protection
5
Locking lever
6
Remnant holder plate
7
Remnant holder
8
Product fixation device
9
Carriage
10
Handle for product holder
11
Star knob for carriage
12
Rating plate
13
Unlocking of slice thickness control
14
Slice thickness setting
15
Push button operating mode
16
Table guide
17
Depositing table with paper holder
18
Deflector
19
Gauge plate
20
Depositing arm
21
Back panel
22
Feed roller with cam
23
Three-square knob for blade cover
24
Chain frame
25
Membrane keyboard
2-4
6.083.98.5.10.10 en
Operating instructions VS12D /C /-R /-V /V/R
2.2.2
About this machine
Name of components VS12D-V
2
Fig. 2: Name of components VS12D-V
The machine is available in different versions. The figure shows an example:
1
Blade guard ring
2
Blade
3
Blade cover
4
Product support
5
Locking lever
6
Product holder
7
Carriage
8
Handle on carriage base
9
Rating plate
10
Slice thickness setting
11
Unlocking of slice thickness control
12
Table guide
13
Depositing table with paper holder
14
Deflector
6.083.98.5.10.10 en
2-5
About this machine
2
15
Gauge plate
16
Three-square knob for depositing arm
17
Back panel
18
Feed roller with cam
19
Depositing arm
20
Chain frame
21
Membrane keyboard
2.3
Operating instructions VS12D /C /-R /-V /V/R
Accessories
Only use the original Bizerba spare parts and accessories in order to
ensure safe and trouble-free operations.
standard
–
Accessories kit including sharpener, paper felt, cleaning cloth, scrubber and brush
and service oil
–
Operating instructions
optional
–
Blade available in various models
–
Product fixation device
–
Round platter / with suction cup
–
Bench
2.4
Directives
For directives and legal requirements see attachment Declarations of conformity.
2.5
Warranty
We are not responsible for damages caused by:
–
–
–
–
–
–
Non-compliance with the instruction manual
or unauthorized and incorrect electrical installation by the customer
incorrect operation, utilization contrary to terms and conditions
structural modifications, removal of protective devices
use of replacement parts and accessory components or third-party resources that are
not Bizerba originals
natural wear and tear
In such cases, the user is acting at his own risk and is responsible for any damage occurred.
2-6
6.083.98.5.10.10 en
Operating instructions VS12D /C /-R /-V /V/R
2.6
About this machine
Disposal of the machine / environmental protection
To ensure that the machine is recycled environmentally friendly, return the machine to the
manufacturer or the dealer after intended use has expired.
Naturally, Bizerba and its dealers will take back free of charge old machines no longer in
operation.
Please contact your specialist in this case.
The application of these disposal regulations are based upon legal regulations of the respective country.
6.083.98.5.10.10 en
2-7
2
About this machine
Operating instructions VS12D /C /-R /-V /V/R
2
2-8
6.083.98.5.10.10 en
Operating instructions VS12D /C /-R /-V /V/R
3
Safety instructions
Safety instructions
The safety instructions must be observed throughout the installation, operation, cleaning
and maintenance procedures.
3.1
General notes on safety
DANGER
Damaged power supply cables or faulty protective devices!
Risk of life from electric current. Acute risk of injury of operating
personnel.
–
–
–
–
DANGER
Damaged supply lines must be replaced immediately with new cables and installed by a professional electrical company or by
Bizerba Service.
The mains cable must be routed in a way that it is no cause of risk.
Protective devices must be checked every day with regards to
function before start-up.
Protective devices may not be removed, modified or bypassed.
Open the electrical installation area!
Risk of life from electric current.
–
–
WARNING
The electrical installation area may only be opened by Bizerba
Service.
Pull power plug before moving the machine.
Unauthorized persons!
Serious injuries to fingers and hands and damage to health.
–
–
–
6.083.98.5.10.10 en
Only trained personnel over 14 years may operate, clean and
maintain the machine. Subsequent training sessions should be repeated whenever necessary.
Unauthorized persons, particularly children, may not stay in the
work area of the machine.
People with pacemakers should consult a doctor before operating
the machine (magnetic field).
3-1
3
Safety instructions
3.2
3
Operating instructions VS12D /C /-R /-V /V/R
Safety instructions for transport and installation
CAUTION
Carriage might move due to its unladen weight.
Risk of hand injuries due to crushing!
–
3.3
Be careful when unpacking.
Safety instructions during operation, slicing
WARNING
Rotating blade!
Cut-injuries.
–
–
–
–
CAUTION
Do not allow yourself to become distracted. Concentrate on the
task in hand and avoid time pressure.
Do not put your hand underneath the remnant holder plate.
During operation, do not reach into the path of the carriage.
Never push product ends towards blade by hand.
There are spikes on the product holder!
Risk of injury.
–
–
3.4
Use handle when working with product holder.
Before you begin slicing, always position the product holder on or
behind the product.
Safety instructions for sharpening, cleaning
WARNING
Unprotected blade!
Coming in contact with the sharp blade can lead to serious injuries.
–
–
3-2
Always wear cut-proof gloves during the cleaning and sharpening
procedures and shoes with toe caps when the blades are replaced.
Do not clean the blades when operating the machine.
6.083.98.5.10.10 en
Operating instructions VS12D /C /-R /-V /V/R
CAUTION
Safety instructions
Chain-, driver-, gripper hooks, scraper edge!
3
Stab and cut wounds.
Twisted guide cogs or chain hooks can cause malfunctions.
–
–
WARNING
Always wear cut-proof gloves when cleaning.
Avoid touching the chain hooks.
Missing components!
The operator can only be protected from injuries and the machine
protected against damage if all the components of the machine are
assembled properly.
–
–
–
3.5
–
–
–
–
–
–
–
–
Check if the machine is complete before it is re-started.
Check if components are positioned correctly and firmly.
Only use original Bizerba spare parts and accessories.
Protective and safety equipment
Blade guard ring, stationary, cannot be removed
Blade cover closed, stationary, can be removed
Gauge plate, covering carriage stroke area
Back panel, not removable
Product holder on or behind the product
Forced guidance of product holder in cutting range less than 60 mm (VS12D)
Protective circuit in case of voltage cutoff
Sharpener with protective cover of open blade area
Remaining risks that cannot be excluded by technical measures:
–
–
6.083.98.5.10.10 en
Risk of tripping/slipping if the work area is not kept tidy.
Risk of injury if the required personal protective clothing is not
worn.
3-3
Safety instructions
Operating instructions VS12D /C /-R /-V /V/R
3
3-4
6.083.98.5.10.10 en
Operating instructions VS12D /C /-R /-V /V/R
4
Installation
4.1
Transport and storage
Installation
When transporting the machine, shoes with toe caps must be worn and
suitable lifting devices must be used.
At least two persons are necessary to move the machine. Weight of
machine is higher than 25 kg.
Before installation, store and transport the machine in the original packaging.
The machine has to be transported and stored in accordance with the symbols on the
packaging.
The machine must only be moved with the bench and is only permissible on a surface with
a very low degree of roughness and unevenness of not more than 2cm.
The machine must not be moved during operation.
Unplug power plug before moving the machine!
4.2
Installation and assembly
Installation, start-up, as well as instructions on how to operate, clean, maintain and service
the device are provided for the first time by the relevant Bizerba customer services or the
Bizerba trade consultant.
Only lift the machine at the lifting straps. The drawing "Packing/unpacking the machine" is
included.
The lifting straps must only be used for machine handling before unpacking. They must not be used as load-carrying equipment.
CAUTION
Risk of crushing!
Carriage might move due to its unladen weight.
–
4.2.1
Be careful when unpacking.
Installation requirements
The machine can be installed either on a table or on a bench.
6.083.98.5.10.10 en
4-1
4
Installation
Operating instructions VS12D /C /-R /-V /V/R
The installation surface needs to:
4
–
–
–
–
provide sufficient space, Dimensions, see chapter 9.1 until 9.2
be horizontal and flat
be slip-proof and tilt-proof
be stable and rigid, Machine weight, see chapter 9.1 until 9.2
The recommended table height is approx. 800 mm.
4.2.2
Position on bench
Bench optional.
Load the legs of the mobile bench and block the 4 castors through the brakes.
4.2.3
Electrical connection
Information on the rating plate
Bizerba logo
BIZERBA
Machine type
VS12D /D-R /CD
Machine description
VS12D-V /D-V/R
Slicer
Machine number
...
...
Production code
X-..
X-..
Protection class
IP 33
IP 33
see specification plate
see specification plate
Electrical data
Manufacturer's address
Bizerba GmbH & Co.KG
D-72336 Balingen
MADE IN GERMANY
Check before mains connection
Before you connect the machine, check the electric data on the rating
plate with the mains data about the power supply.
4-2
6.083.98.5.10.10 en
Operating instructions VS12D /C /-R /-V /V/R
CAUTION
Installation
Incorrect supply voltage!
Damage of electric components, fire hazard.
–
–
Do not connect the machine to the power supply if the power supply data does not correspond to the machine's connection values.
Mains data must be identical.
Inform Bizerba Customer Service.
Installation of power supply provided by customer
Installation of the power supply to connect our machines must be carried out in accordance with country-specific regulations and the terms and conditions derived thereof. These
essentially include the recommendations of at least one of the following commissions:
–
–
International Electro-technical Commission (IEC)
European Committee for Electro-technical Standardization (CENELEC)
The machine has been built according to Protection Type I and has to be connected to the
protective conductor.
Measures for suppressing interference:
With severely contaminated mains supplies (e.g. when "thyristor-controlled systems" are
used) measures must be taken on-site to suppress interferences, e.g.:
–
–
A separate supply line must be planned for Bizerba machines
In problem cases, install capacitive decoupled isolating transformers or other suppressors into the supply mains prior to Bizerba machines
4.3
Start-up
Initial start-up as well as instructions on how to operate, clean, maintain and service the
machine are initially provided by the responsible Bizerba service department or by a
Bizerba specialist.
4.3.1
Switching the slicer on
Press the green key <I>.
White lamp goes on.
The blade motor is turning.
The display becomes active.
Carriage, depositing table and depositing arm move in their initial position.
4.3.2
Switching the machine off
Press <O> (red). (reduced operating force)
The machine is switched off.
6.083.98.5.10.10 en
4-3
4
Installation
4.4
Operating instructions VS12D /C /-R /-V /V/R
Placing out of operation
If the machine is not going to be used for a longer period of time:
4
Switch off machine.
Pull out power plug.
Clean machine as per cleaning instructions.
4-4
6.083.98.5.10.10 en
Operating instructions VS12D /C /-R /-V /V/R
Machine and operating elements
5
Machine and operating elements
5.1
Membrane keyboard VS12D, VS12D-V
5
Fig. 3: Membrane keyboard VS12D, VS12D-V
1 Display of number of portions and number of slices
2
Function keys
3
Set maximum speed
4
<Gradually reduce carriage speed>
5
Set full stroke
6
<Gradually reduce the carriage stroke>
7
<Carriage drive> on/off
8
<Blade drive> on (red LED goes on)/off
9
<O> (red) - switch machine off (reduced activation force)
10
Light (white) display machine on / off
11
<I> (green) switch machine on
Keyboard inputs are only possible with activated machine. Selected keys are backlit except for keys <+>, <->, <carriage stroke> and <carriage speed>.
6.083.98.5.10.10 en
5-1
Machine and operating elements
5.1.1
Operating instructions VS12D /C /-R /-V /V/R
Function keys
<Plus>
Input key to increase number of slices or portions
For number of slices there is an overflow of 99 over U (infinitely)
to 1.
For number of portions there is an overflow of P9 over PU (continuous operation w/o counting) to P1.
5
<Minus>
Input key to reduce number of slices or portions
For number of slices there is an overflow of 1 over U (infinitely)
to 99.
For number of portions there is an overflow of P1 over PU (continuous operation w/o counting) to P9.
<P> Portion key
Activation key to enter number of portions
Input with keys <+> and <->
<S> Set key
Activation key for depositing programs. Depositing table and
depositing arm move towards their initial position.
Exception: For depositing programs <Shingling lengthwise> and
<Shingling crosswise> the current values of the number of slices/distance between slices are saved by selecting the
<S> key, see chapter 5.1.3.
The factory settings for the depositing programs are as follows:
Depositing program <1 stack>
with number of portions P 1, number of slices U (infinitely),
depositing position on the right of the depositing table,
stack height up to 60 mm
Depositing program <2 stacks>
with number of portions P 2, number of slices U (infinitely),
depositing position on the right of the depositing table,
stack height up to 60 mm,
product size up to 105 mm
The product is deposited in two stacks one behind the other.
Depositing program <Shingling lengthwise>
with number of portions P 1, 8 slices per row,
depositing position on the right of depositing table
Depositing program <Shingling crosswise>
with number of portions P 1, 8 slices per row,
depositing position at the back of depositing table
5-2
6.083.98.5.10.10 en
Operating instructions VS12D /C /-R /-V /V/R
Machine and operating elements
Depositing program <Circular pattern>
with 5 slices per circle,
large product diameter (key on the <right>)
The number of slices for the selected depositing mode can be
changed up to 99 using <+> and <-> keys. This number remains stored until a new depositing program is selected.
Product depositing on the <right>
or large product diameter,
product depositing on the right of depositing table
Exceptions: Depositing program <Shingling crosswise> Product
depositing at the back of depositing table,
Depositing program <Circular pattern> 5 slices per circle
Product depositing in the <center>
or medium product diameter,
product depositing in the center of depositing table
Exception: Depositing program <Circular pattern> 9 slices per
circle
Product depositing on the <left>
or small product diameter,
product depositing on the left of depositing table
Exceptions: Depositing program <Shingling crosswise> Product
depositing at the front of depositing table,
Depositing program <Circular pattern> 12 slices per circle
5.1.2
Change of depositing programs
In general, all depositing programs can be set and stored for individual numbers of slices
and portions as well as depositing positioning.
Key combination for storing:
<Press and hold P> and activate <->.
Restoring of factory setting:
<Press and hold P> and activate <on the left>.
The program stored last before machine is switched off will become active when restarting the machine.
6.083.98.5.10.10 en
5-3
5
Machine and operating elements
5.1.3
Operating instructions VS12D /C /-R /-V /V/R
Distance between slices during shingling
The distance between slices during shingling cannot be influenced depending on the selected number of slices (see table, rounded values).
5
Number of slices
Distance between slices
<Shingling lengthwise>
Distance between slices
<Shingling crosswise>
Selection (1-99 possible)
max. length 160 mm
max. width 125 mm
5
40 mm
31 mm
6
32 mm
26 mm
8
23 mm
18 mm
10
18 mm
14 mm
12
15 mm
11 mm
15
11 mm
9 mm
17
10 mm
8 mm
24
7 mm
5 mm
33
5 mm
4 mm
41
4 mm
3 mm
54
3 mm
2 mm
Example: With program selection <Shingling lengthwise> and number of slices
"10" set, the 10 slices are deposited at a distance of 18 mm over a total length of
160 mm. Now we want to slice 10 slices with a slice distance of 10 mm:
Enter number of slices "17".
Distance between slices is 10 mm.
Start slicing.
After the 10th slice, press the <S> key.
10 slices are deposited on the depositing table with a distance of 10 mm
This setting remains in memory until exiting the depositing programs.
If the depositing program is saved, this program setting will remain in place until the next
program storage.
5.2
Selecting operating mode for VS12D
5.2.1
Manual operation
In manual operation, carriage drive and product feeding are operated by hand.
5-4
6.083.98.5.10.10 en
Operating instructions VS12D /C /-R /-V /V/R
Machine and operating elements
Applied for
–
delicate products
–
with low number of slices
–
thick slices
Pull push button until its stop.
5
Fig. 4: Push button MAN
Set locking lever to MANUELL.
In this position, carriage and product fixation device can be moved by hand.
Fig. 5: Locking lever MANUELL
In an area less than 60 mm from the blade, the product fixation device
cannot be swiveled in upwards direction.
5.2.2
Automatic operation
In automatic operation, carriage drive and product feeding are operated by a motor.
6.083.98.5.10.10 en
5-5
Machine and operating elements
Operating instructions VS12D /C /-R /-V /V/R
Applied for
–
non-delicate products
–
with high number of slices
–
for slicing with depositing program, e.g. to fill up the service counter
Press push button until its stop.
5
Fig. 6: Push button AUTO
Set locking lever to AUTOM..
In this position, the carriage cannot be
moved.
Fig. 7: Locking lever AUTOM.
The product holder device can be moved if the locking lever is decoupled and can be lifted at every point.
5-6
6.083.98.5.10.10 en
Operating instructions VS12D /C /-R /-V /V/R
5.3
Machine and operating elements
Slice thickness setting
The slice thickness is adjusted by means of
the rotary knob.
Large fine adjustment range between 0 to
3 mm.
5
With slice thickness setting below "0" the
tilting device is unlocked (black marking).
The carriage can only be tilted to the outside in this setting. (e.g. for cleaning purposes).
Slice thickness adjustment up to 8 mm:
Adjustment range for automatic slice depositing. The infinitely adjustable range is up to Fig. 8: Slice thickness setting
8 mm.
Slice thickness adjustment above 8 mm:
For blade sharpening set slice thickness to
"24" or open until stop. Only possible after
removal of depositing device. Only possible
if slice thickness is unlocked.
5.4
Unlocking of slice thickness control
Remove depositing arm and chain frame,
see chapter 8.2.
Turn the switch lever downwards. This releases the mechanical locking.
Set slice thickness to "24". Release switch
lever.
The slice thickness is automatically relocked when the slice thickness control
knob is turned back to less than 8 mm.
Fig. 9: Unlocking of slice thickness control
6.083.98.5.10.10 en
5-7
Machine and operating elements
5.5
Operating instructions VS12D /C /-R /-V /V/R
Product holder
VS12D
When placing the product on the carriage,
the product holder can be lifted up to its unstable equilibrium.
5
For slicing purposes, the product holder is
set on top or behind the product.
Fig. 10: Product holder VS12D
VS12D-V
The products holder with movable prongs
can be locked and unlocked for loading the
product.
For slicing purposes, the product holder is
placed behind the product.
Can be removed for cleaning.
Fig. 11: Product holder VS12D-V
5-8
6.083.98.5.10.10 en
Operating instructions VS12D /C /-R /-V /V/R
5.6
Machine and operating elements
Product fixation device
VS12D
The correctly positioned product support
holds the product in place and prevents deflecting and turning of product during the
slicing process.
5
The product fixation is irreversibly self-locking on its shaft and is movable across the
full width of the carriage. This way, it can be
positioned on any product dimension.
Fig. 12: Product fixation device VS12D
5.7
Product support
VS12D-V
The applied product support holds the product in position during slicing preventing the
product from tipping over.
The product support is guided on its shaft
and can be moved across the entire carriage width. This way, it can be positioned
on any product size.
Fig. 13: Product support VS12D-V
6.083.98.5.10.10 en
5-9
Machine and operating elements
5.8
Operating instructions VS12D /C /-R /-V /V/R
Paper holder
The paper holder is used when the sliced product has to be delivered straight on to paper
or foil.
5
Positioning of several sheets of paper or film:
Using your thumb, press lever to the
right against spring pressure until it
clicks into place.
Push the stack underneath the open
holder.
Release the lever by pressing the top of
it lightly out of the locked position.
Fig. 14: Paper holder
Removing of deposited portions and paper:
Using your thumb, press lever slightly to the right; at the same time pull top-most
piece of paper with portion under the open holders.
Release lever.
5.9
Round platter (optional)
This machine is fitted with an additional
guide shaft for installing the round platter.
For quick and easy handling, the round platter is attached to the guide shaft by a magnet lock.
During slicing, the turning of the round platter is depending on the number of slices.
Circular pattern depositing of rectangular
products is only possible by using the round
platter.
Fig. 15: Round platter
5 - 10
6.083.98.5.10.10 en
Operating instructions VS12D /C /-R /-V /V/R
6
Operation
Operation
Only products approved in compliance with the specifications of this
documentation may be sliced. See chapter on Intended Use.
6.1
Inserting and slicing product with the VS12D
WARNING
6
Rotating blade!
Cut injuries
–
–
–
–
CAUTION
Do not allow yourself to become distracted. Concentrate on the
task in hand and avoid time pressure.
Do not put your hand underneath the remnant holder plate.
During operation, do not reach into the path of the carriage.
Never push product ends towards blade by hand.
There are spikes on the product holder!
Risk of injury.
–
–
Use handle when working with product holder.
Before you begin slicing, always position the product holder on or
behind the product.
Select operating mode, see chapter 5.2.
Move carriage towards operator.
Decouple product holder device with locking lever in automatic operation.
Using the handle, move product holder away from blade and tilt it up.
Place the product against carriage rear
wall and push on to gauge plate.
Position the product fixation against the
product.
In order to slice product ends approx. 15
mm and smaller, the product fixation device needs to be moved behind the remnant holder.
Move the product holder to position it on
or behind the product.
Fig. 16: Inserting the product
6.083.98.5.10.10 en
6-1
Operation
Operating instructions VS12D /C /-R /-V /V/R
Switch on machine.
Depositing program <Stacking 1 time> is the default setting of the device at delivery.
Select desired function on membrane keyboard.
Depositing table and depositing arm move towards their initial position.
6
Set slice thickness at knob.
Manual operation
The fingers of the right hand hold on to
the product, the thumb is positioned at
the back of the carriage.
Uniformly slide carriage forth and back,
simultaneously apply slight pressure to
product by hand and push towards
blade.
Based on the program setting, the slices
are placed on the depositing table.
If necessary, re-clamp product holder.
Fig. 17: Manual operation
Automatic operation
Set the carriage stroke and speed in automatic operation or change after start.
Start <carriage drive>.
The carriage starts moving, the slices are
placed on the depositing table based on
program settings.
Drive is automatically turned off in the following instances:
–
Maximum stacking height or number
of slices is reached
–
End of sliced products
–
End of program
Fig. 18: Automatic operation
Once the slicing process is completed set slice thickness to "0".
Switch off machine.
If the distance between the product holder and the blade is shorter than
60 mm, the product holder is force-guided and cannot be swiveled upwards.
To safely slice leftover pieces the end of the sliced product has to be
cut off.
6-2
6.083.98.5.10.10 en
Operating instructions VS12D /C /-R /-V /V/R
6.2
Operation
Inserting and slicing product with the VS12D-V
WARNING
Rotating blade!
Cut injuries
–
–
–
CAUTION
Do not allow yourself to become distracted. Concentrate on the
task in hand and avoid time pressure.
During operation, do not reach into the path of the carriage.
Never push product ends towards blade by hand.
There are spikes on the product holder!
Risk of injury.
–
–
Use handle when working with product holder.
Claws are lowered into a rest position.
The machine is switched on, all functional parts are in a stop position.
Disengage product holder using the
locking lever, pull away from blade.
Fig. 19: Inserting the product
6.083.98.5.10.10 en
6-3
6
Operation
Operating instructions VS12D /C /-R /-V /V/R
Using the left hand, position product
against carriage rear wall and push
against holder.
With the right hand, push lever of the
holder downwards causing prongs to
enter the product and holding it firmly.
Transport product towards gauge plate.
6
Fig. 20: Inserting the product
Position product support against product.
Set slice thickness at knob.
Switch on machine.
Depositing program <Stacking 1 time> is
the default setting.
Select desired function on membrane
keyboard.
Depositing table and depositing arm
move towards their initial position.
Set <carriage stroke> and
<carriage speed> or change after start.
Fig. 21: Inserting the product
Start <carriage drive>.
The carriage starts moving, the slices are
placed on the depositing table based on
program settings.
Drive is automatically turned off in the following instances:
–
Maximum stacking height or number
of slices is reached
–
End of sliced products
–
End of program
Fig. 22: Slicing the product
Once the slicing process is completed set slice thickness to "0".
Switch off machine.
6-4
6.083.98.5.10.10 en
Operating instructions VS12D /C /-R /-V /V/R
6.3
Operation
Slicing with round platter (optional)
WARNING
The round platter is equipped with magnets to ensure a fast and
easy mounting.
If the distance to the magnet is lower than 50 mm, pacemakers can
be affected.
–
People with pacemakers should consult a doctor before operating
the machine.
Remove depositing table
Pull depositing table towards you until it
stops, in vertical position lift up towards
you and remove to the top.
Fig. 23: Remove depositing table
Installing round platter
Install round platter in guide shaft from
the top.
If necessary, turn until round platter is
engaged.
Once the round platter is attached, the
machine automatically switches to depositing program <Circular pattern> and
the table moves to its initial position.
Fig. 24: Installing round platter
Load and slice product, see chapter 6.1 or 6.2.
6.083.98.5.10.10 en
6-5
6
Operation
Operating instructions VS12D /C /-R /-V /V/R
Setting possibilities
In order to obtain a depositing pattern
(see picture) the number of slices has to
be increased accordingly.
Circular pattern depositing of rectangular
products is only possible by using the
round platter.
6
Fig. 25: Deposit on round platter
Standard pre-setting: Depositing program <Circular pattern> with 5 slices per circular
pattern.
The number of slices can be changed to up to 99 slices per circular pattern and circle diameter.
Depositing programs <Stacking 2 times> and <Shingling transversal>
cannot be selected with the round platter placed on the machine.
6-6
6.083.98.5.10.10 en
Operating instructions VS12D /C /-R /-V /V/R
7
Troubleshooting
7.1
Procedure
Troubleshooting
Switch off machine immediately if untypical noises are heard or if there is a suspected
risk of injury.
Call the responsible Customer Service if you are unable to rectify the fault yourself.
Please provide your Bizerba customer service point with the following details:
–
Machine type (see rating plate),
–
Machine number (see rating plate),
–
Error description.
This will facilitate preparations by customer service staff.
Should there be a stoppage and the problem cannot be corrected right
away, food products have to be removed for protection in compliance
with the maximum limit of 30 minutes for products to remain on the machine.
6.083.98.5.10.10 en
7-1
7
Troubleshooting
Operating instructions VS12D /C /-R /-V /V/R
7
7-2
6.083.98.5.10.10 en
Operating instructions VS12D /C /-R /-V /V/R
8
Maintenance
8.1
Preparation for cleaning
Maintenance
Clean thoroughly:
–
Before putting into operation,
–
Depending on use and application frequency,
–
If extremely soiled, several times a day,
–
After sharpening,
–
after longer down times.
8
WARNING
Unprotected blade!
Coming in contact with the sharp blade can lead to serious injuries.
–
–
Always wear cut-proof gloves when cleaning.
Do not clean the surfaces of the blade when operating the machine!
Switch off machine.
Pull out power plug.
Set slice thickness below "0" (black
marking).
Fig. 26: Slice thickness below "0"
6.083.98.5.10.10 en
8-1
Maintenance
8.2
Operating instructions VS12D /C /-R /-V /V/R
Removing components
WARNING
The round platter is equipped with magnets to ensure a fast and
easy mounting.
For fast and easy installation, the remnant holder is fixed to the
guiding shaft by means of a magnet lock.
If the distance to the magnet is lower than 50 mm, pacemakers can
be affected.
–
People with pacemakers should consult a doctor before operating
the machine.
8
Do not place parts on top of each other to avoid mechanical damage.
Remove components as follows:
Depositing table
Move depositing table towards you until
it stops, raise the depositing table to a
vertical position towards you and remove vertically.
Fig. 27: Remove depositing table
8-2
6.083.98.5.10.10 en
Operating instructions VS12D /C /-R /-V /V/R
Maintenance
Round platter (optional)
Lift round platter out of guide shaft and
remove in upward direction
For quick and easy handling, the remnant
holder is attached to the pusher guard by
a magnet lock.
If the distance is less than
50 mm, pacemakers can be affected.
8
Fig. 28: Round platter
Depositing arm
Loosen three-square knob and pull the
hub of the depositing arm out of the
bearing to the left.
Fig. 29: Depositing arm
Chain frame
Using the right hand turn the feed roller
to the left and hold it firmly.
Using the left hand lift the complete
chain frame out of the bearing in the upward direction.
Put chain frame aside with rear side
downward.
Fig. 30: Chain frame
6.083.98.5.10.10 en
8-3
Maintenance
Operating instructions VS12D /C /-R /-V /V/R
Guide cam
Loosen the clamp handle on the frame
and remove guide cam from between
the transport chains.
8
Fig. 31: Guide cam
Remnant holder plate VS12D
Using the handle, move product holder
away from blade and tilt it up.
Push remnant holder plate out of magnetic lock and remove from pusher
guard.
For quick and easy handling, the remnant
holder is attached to the pusher guard by
a magnet lock.
If the distance is less than
50 mm, pacemakers can be affected.
Fig. 32: Remnant holder plate VS12D
Product fixation device VS12D
Pull the product holder fixation as far as
it will go towards the operator and pull
off the guide shaft, moving it to the right.
Fig. 33: Product fixation device VS12D
8-4
6.083.98.5.10.10 en
Operating instructions VS12D /C /-R /-V /V/R
Maintenance
Support plate VS12D
Loosen star knob on guide element.
Remove support plate in an upward direction.
Place the product holder on the carriage.
8
Fig. 34: Support plate VS12D
Product support VS12D-V
Loosen star knob on guide element.
Remove product support.
Fig. 35: Product support VS12D-V
Product holder, complete VS12D-V
Loosen star knob.
Remove complete product holder in upward direction.
Fig. 36: Product holder VS12D-V
6.083.98.5.10.10 en
8-5
Maintenance
Operating instructions VS12D /C /-R /-V /V/R
Carriage
Turn out knob on carriage foot.
Tilt the carriage to the outside.
8
Fig. 37: Tilt the carriage to the outside,
VS12D
Fig. 38: Tilt the carriage to the outside,
VS12D-V
Blade cover
Hold blade cover on handle with your
right hand.
Using your left hand loosen the fixing
bolt by means of three-square knob and
push the blade cover out of centering.
Use your left hand to keep the cover
held away from the blade and remove it.
Fig. 39: Blade cover
8-6
6.083.98.5.10.10 en
Operating instructions VS12D /C /-R /-V /V/R
Maintenance
Deflector
Remove deflector from magnet lock and
move away in arrow direction.
8
Fig. 40: Deflector
Now the machine is ready for cleaning.
8.3
Cleaning
CAUTION
Splash water!
If water gets into the machine it can damage electric components.
–
–
–
Do not clean machine with a steam jet or similar device!
Use only a moist, not wet, cleaning cloth.
Cover the machine when the surroundings are cleaned with spray
and/or pressurized water.
Removed parts
Clean removed parts in warm water using a soft cleaning agent. Leave to dry in
the air.
Fig. 41: Removed parts
6.083.98.5.10.10 en
8-7
Maintenance
Operating instructions VS12D /C /-R /-V /V/R
Blade cleaning
Press a wet disposable cleaning cloth
against the blade surface and slowly
wipe away from the center.
Clean the back of the blade in the same
manner.
After this process, repeat using a dry
disposable cleaning cloth.
8
Fig. 42: Blade cleaning
Thread a moist disposable cleaning
cloth into the front between blade and
guard ring.
Use your hands to turn the blade and
the disposable cleaning cloth; while you
are doing so, press the cloth lightly
against the inside of the guard ring.
Fig. 43: Blade guard ring
Fixed machine parts
Clean, rinse and sanitize all surfaces including deflector as per cleaning plan.
Fig. 44: Depositing area
8-8
6.083.98.5.10.10 en
Operating instructions VS12D /C /-R /-V /V/R
Maintenance
Wipe gauge plate away from blade.
Never wipe towards the blade.
8
Fig. 45: Gauge plate
Wipe carriage. Leave surfaces dry in the
air.
Fig. 46: Carriage
VS12D-V
Clean gap with a brush.
Fig. 47: Gap
6.083.98.5.10.10 en
8-9
Maintenance
8.4
Cleaning plan for slicing machines
Work steps
8
Operating instructions VS12D /C /-R /-V /V/R
Recommended cleaning
agents
Procedure
Cleaning devices Notes
Preparatory
measures
Close slice thickness, switch off
machine, pull out
power plug
Disassemble
all removable
parts
in accordance
with instruction
manual
Rough cleaning
(not necessary for machines with
Ceraclean)
Remove any
product remnants manually
Plastic deflector, Start immediately
plastic spatula,
after production
brush
has finished, if necessary, begin with
the removed parts
after thorough
pre-rinsing with
water (max.
50°C, depend.
on when grease
can be easily removed)
manually, brush
(not for slicers
with Ceraclean),
tub, disposable
cleaning cloth
all disassembled
and permanent
parts of machine
Manual spray
device
* see comment
Dish-washing
machine
removed parts
Cleaning
Disinfect
Additional
measure
Acid cleaning
Additional
measure
(not necessary for machines with
Ceraclean)
8 - 10
2% P3-steril
Contact time
is approx. 15
minutes
Use 0.5- 2%
P3-alcodes in
concentrate
Application
time according to product
data sheet
or manually
Disposable
cleaning cloth
Recommended application quantity
40-50 ml/m 2
spray
Manual spray
device
* see comment
Add. safety: distance to surface
when spraying,
0.30 m
max. 3% P3riksan
max. 15 minutes contact
time
manually, mechanically
Brush for remov- only if required for
ing lime residue lime residue
rinse directly after
cleaning
foam
Manual spray
device
* see comment
6.083.98.5.10.10 en
Operating instructions VS12D /C /-R /-V /V/R
Work steps
Recommended cleaning
agents
Procedure
Rinse
Drinking water Max. 50°C temperature depend.
on when grease
can be easily removed
Maintenance
Cleaning devices Notes
Disposable
cleaning cloth
other machine
Water pipe
Manual spray
device
removed parts
Check
visually on optical cleanliness
Drying
rub dry or leave
to dry
Disposable
cleaning cloth
Leave dismantled
parts apart from
one another to dry
apply
Disposable
cleaning cloth
Product-parts that
touch products
must be rinsed before commencing
operations
Care
Additional
measure
Bizerba H1Service-Oil
Assembly
in reverse order
like disassembly,
see instruction
manual
Personnel must
have clean and disinfected hands
Precautionary Cover the machine when the surroundings are cleaned with spray and/or
measures
pressurized water
* Comment: Appropriate precautionary measures have to be taken to
ensure that no damage is done to the environment!
The safety sheets and product sheets supplied with the cleaning and
disinfectants must be read.
If cleaning agents are used that have not been recommended by the
manufacturer, damage can be caused to the machine, which is no longer protected by guarantee.
6.083.98.5.10.10 en
8 - 11
8
Maintenance
Operating instructions VS12D /C /-R /-V /V/R
The cleaning agent can be acquired from the BIZERBA customer services:
8
Description
Order No.
Packaging unit
P3-steril
50003250000
5 liters
P3-riksan
50003270000
5 liters
P3-alcodes
50003260000
5 liters
Clean Station
50003280000
H1-Service-Oil
94008900022
8.5
400 ml
Preparing the machine for operation
Attach the components as follows:
Deflector
Move deflector downward up to magnetic lock while observing exact positioning
in recess of blade guard ring.
Fig. 48: Deflector
Blade cover
Using your right hand hold blade cover
on handle, tilt towards the blade and fix
into position with square stud.
Screw fixing bolts as far as they will go
via the three-square knob.
Fig. 49: Blade cover
8 - 12
6.083.98.5.10.10 en
Operating instructions VS12D /C /-R /-V /V/R
Maintenance
Carriage
Tilt carriage.
Using the handle screw into place on
the carriage foot.
8
Fig. 50: Tilting carriage, VS12D
Fig. 51: Tilting carriage, VS12D-V
Support plate VS12D
Insert support plate from top, screw it to
guide piece with star knob screw.
Fig. 52: Support plate VS12D
6.083.98.5.10.10 en
8 - 13
Maintenance
Operating instructions VS12D /C /-R /-V /V/R
Product fixation device VS12D
On the operator side, place product
holder fixation device horizontally on to
the guide shaft and move on guide
shaft.
8
Fig. 53: Product fixation device VS12D
Remnant holder plate VS12D
Attach remnant holder plate to product
holder by taking the fixation into account.
For quick and easy handling, the remnant
holder is attached to the pusher guard by
a magnet lock.
If the distance is less than
50 mm, pacemakers can be affected.
Place the product holder on the carriage.
Fig. 54: Remnant holder plate VS12D
Product holder, complete VS12D-V
Install complete product holder to fixation from the top.
Screw tight with the star grip screw.
Fig. 55: Product holder VS12D-V
8 - 14
6.083.98.5.10.10 en
Operating instructions VS12D /C /-R /-V /V/R
Maintenance
Product support VS12D-V
Push product support onto guide piece,
tighten both star knob screws firmly.
8
Fig. 56: Product support VS12D-V
Guide cam
Install guide cam between the transport
chains and tighten with locking handle.
By turning the feed roller check if chains
are mounted correctly.
Fig. 57: Guide cam
Chain frame
Install chain frame with swiveled in feed
roller from the top in the holding fixtures
and drive shaft.
Fig. 58: Chain frame
6.083.98.5.10.10 en
8 - 15
Maintenance
Operating instructions VS12D /C /-R /-V /V/R
Depositing arm
Push depositing arm onto carriage shaft
and turn until the hub catches the
groove.
Fasten with three-square knob.
8
Fig. 59: Depositing arm
Depositing table
Pull table guide towards you. From the
top place depositing table in vertical position on supporting pin and swivel backwards.
Fig. 60: Attaching the depositing table
Round platter (optional)
Install round platter in guide shaft from
the top.
The round platter is equipped with magnets to ensure fast and easy handling.
If the distance is less than
50 mm, pacemakers can be affected.
If necessary, turn until round platter is
engaged.
Fig. 61: Round platter
8 - 16
6.083.98.5.10.10 en
Operating instructions VS12D /C /-R /-V /V/R
WARNING
Maintenance
Missing components!
The operator can only be protected from injuries and the machine
protected against damage if all the components of the machine are
assembled properly.
–
–
–
8.6
Check if the machine is complete before it is re-started.
Check if components are positioned correctly and firmly.
Only use original Bizerba spare parts and accessories.
Blade sharpening
8
Re-sharpening is necessary if the slicing result is unsatisfactory.
The time intervals are dependant on the wear and tear of the blade and/or its operating
usage as also the properties and conditions of the product.
If there is an annular gap greater than 6 mm between the blade and the
guard ring, the effect of the sharpener deteriorates and the blade has to
be replaced by Bizerba Customer Services.
8.6.1
Sharpener
The sharpener identified by the machine number has been adjusted for this machine.
The device is fitted with a coarse sharpening stone and a finely grained honing stone. Dirty
or greasy sharpening stones do not sharpen well.
Before sharpening, clean with brush and solving detergent.
If sharpening stones are worn, replace stones.
Replacement parts are supplied by Bizerba customer services.
When replacing, do not confuse sharpening and honing stones.
8.6.2
Preparation for sharpening
Remove parts and clean machine. See chapter 8.1 and the following.
Place paper felt or thin cardboard on carriage and cut off a few strips in order to entirely remove grease from blade.
Switch off machine.
Remove the paper felt.
Tilt deflector away from blade.
6.083.98.5.10.10 en
8 - 17
Maintenance
8.6.3
Operating instructions VS12D /C /-R /-V /V/R
Attaching the sharpener
WARNING
Unprotected blade!
Coming in contact with the sharp blade can lead to serious injuries.
–
–
8
Wear cut-proof gloves when cleaning and sharpening.
Do not clean the blades when operating the machine.
Unlock slice thickness limit, see chapter 5.4.
Set slice thickness to "24" or open until stop.
Set locking lever to MANUAL (VS12D).
Set handwheel marking on sharpener to
"0".
Move carriage to relevant position.
Mount sharpener to gauge plate from
the top.
Fig. 62: Attaching the sharpener
Push the sharpener and carriage towards the blade until the adapter contacts the front of the blade guard ring.
Keep the sharpener in this position and
use the star knob to screw it to the
gauge plate.
Fig. 63: Tightening sharpener
8 - 18
6.083.98.5.10.10 en
Operating instructions VS12D /C /-R /-V /V/R
8.6.4
Maintenance
Sharpening
Wear eye protection!
Hearing protection is recommended.
Switch on machine.
Set handwheel marking to "1".
The sharpening stone is engaged.
Sharpen until right blade edge shows a
burr.
Set handwheel marking to "0".
Switch machine off, wait until blade
stops rotating.
8
Fig. 64: Handwheel marking
Checking burr:
Using a pen or pencil, touch the right edge of the blade while moving the pen from
inside to outside.
Burr must be noticeable, otherwise the sharpening procedure must
be repeated.
8.6.5
Honing
Start blade motor.
Set handwheel marking to "2".
The honing stone is engaged.
Hone until a honing bevel of about 0.5 1 mm can be seen on the right blade
edge (after about 3-4 seconds)
Set handwheel marking to "0".
Switch machine off, wait until blade
stops rotating.
Fig. 65: Handwheel marking
6.083.98.5.10.10 en
8 - 19
Maintenance
8.6.6
Operating instructions VS12D /C /-R /-V /V/R
Removing sharpener
Pull sharpener back after loosening the star grip screw and remove to the top.
Set slice thickness immediately to "0".
8.6.7
–
–
–
–
8
Removing sharpening dust
Slice thickness to "0"
Power plug is pulled
Wear cut-resistant gloves
Blade cover removed
Press dry disposable cleaning towel to
blade surface and slowly clean from
center to outside.
Clean the back of the blade in the same
manner.
Fig. 66: Blade cleaning
From the front, insert a dry disposable
cleaning cloth between the blade and
the guard ring.
Use your hands to turn the blade and
the disposable cleaning cloth; while you
are doing so, press the cloth lightly
against the inside of the guard ring.
Fig. 67: Blade guard ring
Machine housing:
Remove sharpening dust from the surfaces with either a dry disposable cleaning cloth
or brush.
If necessary, carry out a complete cleaning cycle.
8 - 20
6.083.98.5.10.10 en
Operating instructions VS12D /C /-R /-V /V/R
Maintenance
Preparing the machine for operation. See chapter 8.5.
WARNING
Missing components!
The operator can only be protected from injuries and the machine
protected against damage if all the components of the machine are
assembled properly.
–
–
–
8.7
Check if the machine is complete before it is re-started.
Check if components are positioned correctly and firmly.
Only use original Bizerba spare parts and accessories.
8
Care of machine, servicing, maintenance
The entire machine must be thoroughly cleaned based on usage, but at least twice a
day.
Re-sharpen blade if necessary.
When necessary, clean or exchange sharpening stones. Caution! Left-handed
thread!
Slightly lubricate 1 product holder
guide shaft and 2 toothed bar of table
guide once a week with oil from the accessories kit.
Fig. 68: Maintenance
At an annular gap of 6 mm between the blade and the guard ring, the
sharpener no longer has a sharpening effect and the blade has to be replaced.
WARNING
Changing the blade!
Severe injuries and damage to property.
–
–
6.083.98.5.10.10 en
For safety reasons, the blade may only be changed by Bizerba
customer service.
Wear cut-proof gloves and shoes with toe caps.
8 - 21
Maintenance
Operating instructions VS12D /C /-R /-V /V/R
8
8 - 22
6.083.98.5.10.10 en
Operating instructions VS12D /C /-R /-V /V/R
9
Technical data
9.1
Dimensions VS12D
Technical data
9
Fig. 69: VS12D, example
The machine is available in different versions. The figure shows an example:
Outer dimensions:
1
Length
= 620 mm = 24.4"
2
Width
= 795 mm = 31.3"
3
Height
= 551 mm = 21.7"
Installation surface:
4
Length
= 515 mm = 20.3"
5
Width
= 430 mm = 16.9"
Work area:
6
Length
= 800 mm = 31.5"
7
Width
= 980 mm = 38.6"
Weight
= approx. 71 kg = 70.76 kg
Blade diameter
= 330 mm = 13"
Blade speed
= 266 rpm
Number of carriage
strokes
= approx. 30 - 70 strokes/min
6.083.98.5.10.10 en
9-1
Technical data
9
Operating instructions VS12D /C /-R /-V /V/R
Product size, diameter
= min./max. 50/183 mm = 2"/7.2" with product depositing
= 224 mm = 8.9" w/o product depositing
Max. product height
= min./max. 50 x 50/183 x 240 mm
= 2" x 2"/7.2" x 9.5" with product depositing
= 224 x 260 mm = 8.9" x 10.3" w/o product depositing
Slice thickness setting
= 0.5 to 8 mm = 0.02" to 0.32" infinitely variable, with product
depositing
= 0.5 to 24 mm = 0.02" to 0.95" infinitely variable, w/o product
depositing
Types of current, voltages, power consumptions
= see rating plate
Depositing table
= 254 x 346 mm = 10" x 13.7"
Paper size 1/8 sheet
= 250 x 375 mm = 9.9" x 14.8"
Foil size
= 240 x 360 mm = 9.5" x 14.2"
Table travel
= 160 mm = 6.3"
Round platter (optional)
= 280 mm = 11.1"
9.2
Dimensions VS12D-V
Fig. 70: VS12D-V, example
The machine is available in different versions. The figure shows an example:
Outer dimensions:
1
Length
= 630 mm = 24.8"
2
Width
= 980 mm = 38.6"
3
Height
= 556 mm = 21.9"
9-2
6.083.98.5.10.10 en
Operating instructions VS12D /C /-R /-V /V/R
Technical data
Installation surface:
4
Length
= 510 mm = 20.1"
5
Width
= 430 mm = 16.9"
Work area:
6
Length
= 800 mm = 31.5"
7
Width
= 1,000 mm = 39.4"
Weight
= approx. 73 kg = 73.03 kg
Blade diameter
= 330 mm = 13"
Blade speed
= 266 rpm
Number of carriage
strokes
= approx. 30 - 70 strokes/min
Product size, diameter
= min./max. 50/183 mm = 2"/7.2" with product depositing
= 224 mm = 8.9" w/o product depositing
Max. product height
= min./max. 50 x 50/183 x 240 mm
= 2" x 2"/7.2" x 9.5" with product depositing
= 224 x 260 mm = 8.9" x 10.3" w/o product depositing
Slice thickness setting
= 0.5 to 8 mm = 0.02" to 0.32" infinitely variable, with product
depositing
= 0.5 to 24 mm = 0.02" to 0.95" infinitely variable, w/o product
depositing
Types of current, voltages, power consumptions
= see rating plate
Depositing table
= 254 x 346 mm = 10" x 13.7"
Paper size 1/8 sheet
= 250 x 375 mm = 9.9" x 14.8"
Foil size
= 240 x 360 mm = 9.5" x 14.2"
Table travel
= 160 mm = 6.3"
Round platter (optional)
= 280 mm = 11.1"
9.3
9
Supply voltage
Technical data of power supply
–
–
–
–
Mains supply
Single-phase alternating current, see rating plate
Permissible mains voltage tolerance (static) normal
At 100 to 240 V: +6% to -10% of nominal value
Mains frequency: 50 (60) Hz
Permissible tolerance of mains frequency: +2% to -2% of nominal value
Leakage current protective conductor max.: 3.5 mA
6.083.98.5.10.10 en
9-3
Technical data
9.4
–
–
–
–
–
9
Operating instructions VS12D /C /-R /-V /V/R
Ambient conditions
Surrounding temperature
for operation and storage: -10 to +40°C (+14 to +104 degF)
Humidity
Protection type IP 33. High air humidity and condensation can result in damage to the
machine.
Relative humidity
for operation and storage: 90 % (condensation of the unit is not permissible)
Air convection
Free air convection must be able to form around the device in order to avoid overheating.
Required lighting
500 Lux
9-4
6.083.98.5.10.10 en
Operating instructions VS12D /C /-R /-V /V/R
Appendix
Appendix
Declaration of conformity
Declaration of conformity for plastic materials with direct food contact
6.083.98.5.10.10 en
Appendix
Operating instructions VS12D /C /-R /-V /V/R
6.083.98.5.10.10 en
Hauptverwaltung Balingen
P.O. Box 10 01 64, 72301 Balingen
Wilhelm-Kraut-Straße 65
72336 Balingen, Germany
Declaration of conformity
We hereby declare that the design of the machine described below
Description:
Slicer
Type:
VS12D
VS12D-R
VS12CD
VS12D-V
VS12D-V/R
complies with the applicable requirements of the following EC directives:
Machinery Directive
2006/42/EC
Electromagnetic Compatibility Directive (EMC)
2004/108/EC
Authorized person for putting together the relevant technical documents:
Berthold Roller, Quality Management, Bizerba GmbH & Co. KG
The basis for the declaration of conformity is the contract documents (Bizerba purchase order documents).
In the event of a modification to a machine of the above description that is not coordinated with Bizerba or not carried out by Bizerba, this declaration looses its validity.
Date:
28 Mar 2013
Signature of manufacturer:
Title of signatory:
ppa.
Andreas W. Kraut
Chairman of the Executive Board
Chief Executive Officer (CEO) & Shareholder
Bizerba GmbH & Co. KG
6.083.98.5.10.10 en
Hauptverwaltung Balingen
P.O. Box 10 01 64, 72301 Balingen
Wilhelm-Kraut-Straße 65
72336 Balingen, Germany
Declaration of conformity for plastic materials with direct food contact
We herewith declare that the materials used in the following machine
Description:
Slicer
Type:
VS12 (all variants)
VS12D (all variants)
are in conformance with the general requirements of the following directives and laws in
the valid version at the time of issuance of this declaration:
•
•
Regulation (EU) No. 1935/2004 on materials and articles intended for contact with
food
Regulation (EU) No. 10/2011 on materials and articles made of plastic intended for
contact with food
For the plastic parts used which, when properly used, can come into contact with food, laboratory tests were performed by a certified test laboratory. Both the total migration and the
specific migrations are below the legal threshold values.
The materials and raw materials used conform to regulation (EU) No. 10/2011.
Specifications on proper use or limitations:
–
–
–
Type(s) of food that may come into contact with the materials:
Meat, sausage, fish, cheese, vegetables, fruit, bread
Handling duration and temperature when in contact with food:
Maximum 30 minutes at max. 40°C
Ratio between the area coming into contact with food and the volume, used to determine the conformity of the material or article:
6
Functional barriers made of plastic are not used in the specified machine.
Information on suppliers or preliminary suppliers can be provided on request.
Date:
22 Jul 2011
Signature of manufacturer:
Title of signatory:
ppa.
Andreas W. Kraut
Chairman of the Executive Board
Chief Executive Officer (CEO) & Shareholder
Bizerba GmbH & Co. KG
6.083.98.5.10.10 en
-
Домой
-
Автоматический слайсер VS12 D, с прямым углом нарезки
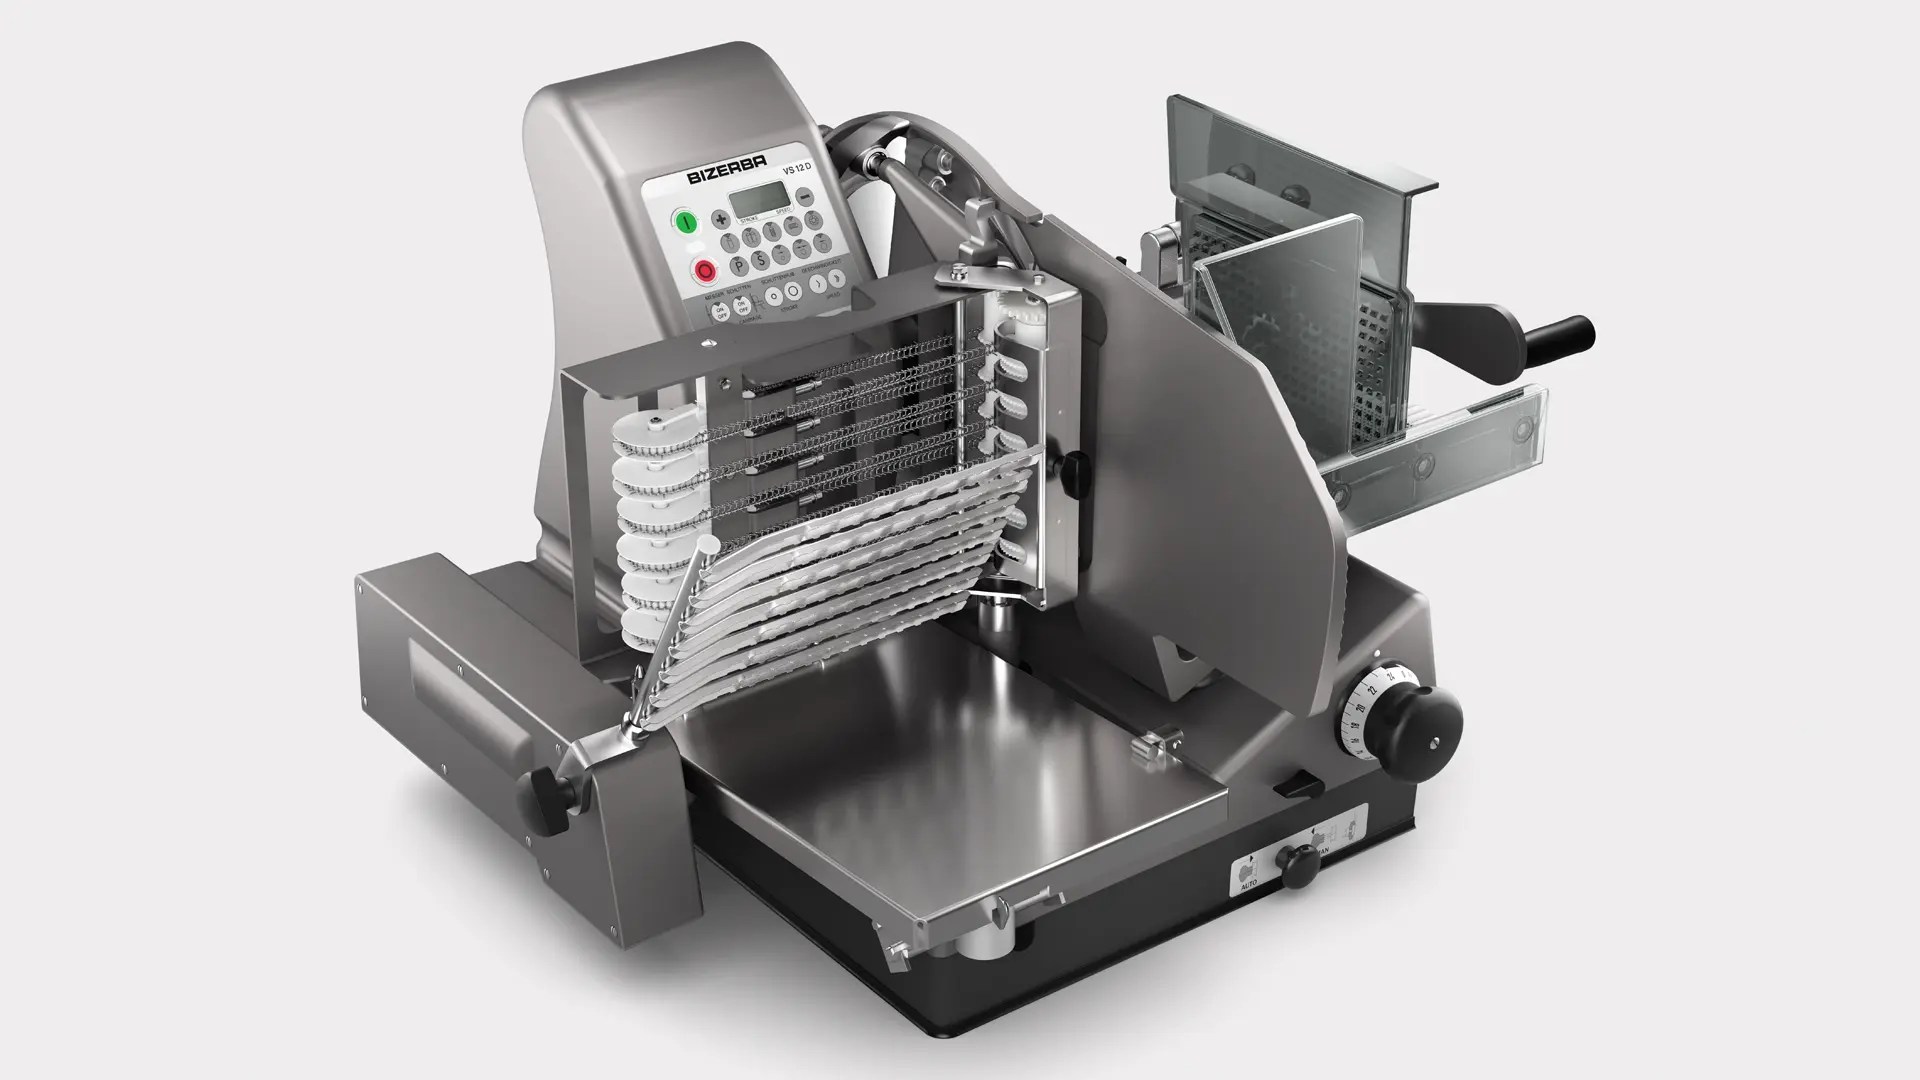
Автоматический слайсер премиум-класса, с прямым углом нарезки. Бесконтактная нарезка, обеспечивающая максимальный уровень гигиены и оптимальную точность нарезки.
Связаться с консультантом
Сердцем машины является мощный привод ножа с интеллигентным двигателем Emotion®. Автоматическая система укладки обеспечивает бесконтактную укладку продукта и различные варианты укладки, делающие продукт наиболее аппетитным и привлекательным. Система укладки, изготовленная полностью из нержавеющей стали, отличается удобством и скоростью демонтажа, что позволяет чистить ее основательно и эффективно.Пленочная клавиатура с интуитивно понятным интерфейсом гарантирует легкое и удобное управление. Форма укладки продукта быстро и удобно конфигурируется с помощью обычных клавиш. Помимо этого, PLU сохраняются в долгосрочную память.
- Слайсеры
- Устройства и системы
- Автоматический слайсер
- Торговля
- Торговля продуктами питания
- Гастрономия
- Овощи & фрукты
- Мясная лавка
- Жидкие продукты
- Кухня & Кейтеринг
- Нарезка
- Автоматически
- Вертикальный
Особенности
- Три режима в одной машине — ручной, полуавтоматический и автоматический
- Точная настройка толщины ломтика в диапазоне 0 — 3 мм
- Гигиенически идеальный дизайн: демонтаж без использования инструментов и возможность мойки отдельных частей из нержавеющей стали в посудомоечной машине (Ceraclean®), открытая конструкция для удобной ручной чистки
- Покрытие Ceraclean® (опция)
- Мощный двигатель Bizerba с умной системой управления Emotion®: энергосберегающая работа с низким уровнем шума и практически без нагрева зоны укладки продукта
Изображения продуктов и техническая информация могут отличаться и могут быть недоступны в вашей стране.
Области применения
- Машина VS12 D всегда уместна у прилавков, где время нарезки продукта можно использовать более эффективно — в общении с покупателями.
Дополнительная информация
Как мы можем помочь?
Мы будем рады проинформировать и проконсультировать вас об этом решении или услуге. Пожалуйста, предоставьте нам некоторую информацию, чтобы мы могли помочь вам наилучшим образом. Мы свяжемся с вами как можно скорее.
Связаться с консультантом
Детали и параметры
- 18 различных вариантов укладки продукта
- Минимальная степень опасности, благодаря закрыванию всей зоны нарезки во время заточки ножа
- Тонкая регулировка компонентов машины, обеспечивающих качество и точность нарезки в течение всего срока службы ножа
- Укладка по кругу, в том числе продуктов прямоугольной формы (опция)
- Машина предусмотрена для нарезки продуктов различных калибров, включая продукты с большим диаметром
- Для удобства сенсорные клавиши отмечены разными цветами.
- Защитный выключатель (Вкл/Выкл) с блокировкой от непреднамеренного включения
- Нож с поверхностью Ceraclean
- Вогнутый нож для нарезки сыра
- Круглые тарелки, предназначенные специально для укладки продукта в форме звезды, а также для накладывания на них картонной подложки для лосося
- Исполнение с кареткой для длинных продуктов
- Напряжение
- 230 В, однофазный переменный ток
- 220 — 240 В, однофазный переменный ток с Emotion®
- 400 В, трехфазный переменный ток
- Материал корпуса
- Анодированный алюминий
- Ceraclean® (опция)
- Место установки (Д x Ш)
- 520 x 433 мм / 20,5” x 17,1”
- Макс. размеры (Д x Ш x В)
- 744 х 941 х 536 мм / 29,3″ х 37,1″ х 21,1″
- Диаметр ножа
- 330 мм / 13,0”
- Проход для продуктов
- Без самоукладчика:Для продуктов круглого сечения: Ø 225 мм / 8,9”Высота: 175 мм / 6,9”Ширина: 260 мм / 10,2”
- С самоукладчиком:Для продуктов круглого сечения: Ø 180 мм / 7,1”Высота: 175 мм / 6,9”Ширина: 240 мм / 9,4”
- Регулировка толщины ломтиков
- Плавная, без самоукладчика: 0 — 24 мм / 0 — 0,9”
- Плавная, с самоукладчиком: 0,5 — 8 мм / 0,02 — 0,3”
- Точная настройка 0 — 3 мм / 0 — 0,1
- Класс защиты
- IP33
Загрузки
Вы можете найти инструкции по эксплуатации, обновления программного обеспечения, лицензии, запросы на обслуживание для вашего личного устройства на портале клиента Bizerba.

Пожалуйста, свяжитесь с нашими специалистами в любое время
Фамилия *
Мы сожалеем, но содержание неправильно отформатировано
Компания *
Мы сожалеем, но содержание неправильно отформатировано
E-mail *
Мы сожалеем, но содержание неправильно отформатировано
Телефон *
Мы сожалеем, но содержание неправильно отформатировано
Улица *
Мы сожалеем, но содержание неправильно отформатировано
Почтовый индекс *
Мы сожалеем, но содержание неправильно отформатировано
Город *
Мы сожалеем, но содержание неправильно отформатировано
Ваше сообщение для нас *
Мы сожалеем, но содержание неправильно отформатировано
Отправить
Ваше сообщение уже в пути
Форма была успешно отправлена
Упс! Что-то пошло не так
При отправке формы произошла ошибка. Пожалуйста, попробуйте еще раз
Похожие продукты
Автоматический слайсер премиум-класса, с прямым углом нарезки. Бесконтактная нарезка, обеспечивающая максимальный уровень гигиены и оптимальную точность нарезки.
Сердцем машины является мощный привод ножа с интеллигентным двигателем Emotion®. Автоматическая система укладки обеспечивает бесконтактную укладку продукта и различные варианты укладки, делающие продукт наиболее аппетитным и привлекательным. Система укладки, изготовленная полностью из нержавеющей стали, отличается удобством и скоростью демонтажа, что позволяет чистить ее основательно и эффективно.
Пленочная клавиатура с интуитивно понятным интерфейсом гарантирует легкое и удобное управление. Форма укладки продукта быстро и удобно конфигурируется с помощью обычных клавиш. Помимо этого, PLU сохраняются в долгосрочную память.
Область применения
- Машина VS12 D всегда уместна у прилавков, где время нарезки продукта можно использовать более эффективно — в общении с покупателями.
Основные преимущества
- Три режима в одной машине — ручной, полуавтоматический и автоматический
- Точная настройка толщины ломтика в диапазоне 0 — 3 мм
- Гигиенически идеальный дизайн: демонтаж без использования инструментов и возможность мойки отдельных частей из нержавеющей стали в посудомоечной машине (Ceraclean®), открытая конструкция для удобной ручной чистки
- Покрытие Ceraclean® (опция)
- Мощный двигатель Bizerba с умной системой управления Emotion®: энергосберегающая работа с низким уровнем шума и практически без нагрева зоны укладки продукта
- 18 различных вариантов укладки продукта
- Минимальная степень опасности, благодаря закрыванию всей зоны нарезки во время заточки ножа
- Тонкая регулировка компонентов машины, обеспечивающих качество и точность нарезки в течение всего срока службы ножа
- Укладка по кругу, в том числе продуктов прямоугольной формы (опция)
- Машина предусмотрена для нарезки продуктов различных калибров, включая продукты с большим диаметром
- Для удобства сенсорные клавиши отмечены разными цветами.
- Защитный выключатель (Вкл/Выкл) с блокировкой от непреднамеренного включения
Технические характеристики
Напряжение
- 230 В, однофазный переменный ток
- 220 — 240 В, однофазный переменный ток с Emotion®
- 400 В, трехфазный переменный ток
Материал корпуса
- Анодированный алюминий
- Ceraclean® (опция)
Место установки (Д x Ш)
- 520 x 433 мм / 20,5” x 17,1”
Макс. размеры (Д x Ш x В)
- 744 х 941 х 536 мм / 29,3″ х 37,1″ х 21,1″
Диаметр ножа
- 330 мм / 13,0”
Проход для продуктов
- Без самоукладчика:
- Для продуктов круглого сечения: Ø 225 мм / 8,9”
- Высота: 175 мм / 6,9”
- Ширина: 260 мм / 10,2”
- С самоукладчиком:
- Для продуктов круглого сечения: Ø 180 мм / 7,1”
- Высота: 175 мм / 6,9”
- Ширина: 240 мм / 9,4”
Регулировка толщины ломтиков
- Плавная, без самоукладчика: 0 — 24 мм / 0 — 0,9”
- Плавная, с самоукладчиком: 0,5 — 8 мм / 0,02 — 0,3”
- Точная настройка 0 — 3 мм / 0 — 0,1
Класс защиты
- IP33
- Home
- Brands
- Bizerba Manuals
- Kitchen Appliances
- Bizerba VS12D
1 docs – User Manuals, Help Guides and Specs – for the Bizerba VS12D product are present in our data base.
|
|
Product Types:
|
")
Tips for Finding Manuals:
This web-page provides a list of 1 accessible operating manuals and information books describing Bizerba VS12D.
All manuals and instructions for Bizerba VS12D are introduced in an easy-to-use PDF format and may be gratuitously downloaded or looked through directly from the site.
The page offers the following types of manuals: Kitchen Appliances.
Helpful hints: While selecting a necessary guide for Bizerba VS12D one should pay special attention to the type of the document.
We try to supply you with the fullest possible set of papers we or our users are able to find. These may be overviews and specifications of the device, mounting and installing instructions, the unit operating rules and maintenance regulations and much more.
Haven’t found a required manual for your Bizerba VS12D?
Check in a while. We update our guides collection and add new documents on a daily basis for you to be always able to find the very paper you need on our web-site. In case you own a directory or an instruction for Bizerba VS12D, which is absent on our site, and you’d like to share it with the public, please send it to us as a scanned copy or a PDF file, and we’ll definitely place it on our page while providing your name as a supplier of the doc. Lots of our users will be grateful for your assistance!