
Instructions for use
EN
AMW 730
2
EN
YOUR SAFETY AND THAT OF
OTHERS IS VERY IMPORTANT
This manual and the appliance
itself provide important safety
warnings, to be read and
observed at all times.
This is the danger symbol,
pertaining to safety, which alerts
users to potential risks to
themselves and others.
All safety warnings are
preceded by the danger
symbol and the following
terms:
DANGER
Indicates a hazardous
situation which, if not avoided,
will cause serious injury.
WARNING
Indicates a hazardous
situation which, if not avoided,
could cause serious injury.
All safety warnings give specic
details of the potential risk present
and indicate how to reduce risk of
injury, damage and electric shock
resulting from improper use of the
appliance. Carefully observe the
following instructions:
— Keep these instructions close
at hand for future reference.
— Use protective gloves to
perform all unpacking and
installation operations.
— The appliance must be
handled and installed by two
or more persons.
— The appliance must be
disconnected from the power
supply before carrying out any
installation work.
— Installation and maintenance
must be carried out by a
qualied technician, in
compliance with the
manufacturer’s instructions and
local safety regulations. Do not
repair or replace any part of the
appliance unless specically
stated in the user manual.
— Power cable replacement
must be carried out by a
qualied electrician. Contact
an authorised service centre.
This insTrucTion shall also be available on website:
docs.whirlpool.eu
IMPORTANT SAFETY INSTRUCTIONS

3
EN
— Regulations require that the
appliance is earthed.
— The power cable must be long
enough for connecting the
Appliance, once tted in its
housing, to the main power
supply.
— For installation to comply with
current safety regulations, an
omnipolar switch with
minimum contact gap of
3 mm must be used.
— Do not use extension leads,
multiple socket adapters.
— Do not connect the appliance to
a socket which can be operated
by remote control or timer.
— Do not pull the power supply
cable.
— The electrical components
must not be accessible to the
user after installation.
— Do not touch the appliance
with any wet part of the body
and do not operate it when
barefoot.
— This appliance is designed
solely for use as a domestic
appliance for cooking food.
No other type of use is
permitted (e.g.: heating rooms
or outdoor use).
The Manufacturer declines
any liability for injury to
persons or animals or damage
to property if these advices
and precautions are not
respected.
— This appliance is intended to
be used in household and
similar applications such as:
Sta kitchen areas in shops,
oces and other working
environments; Farm houses;
By clients in hotels, motels and
other residential
environments; Bed and
breakfast type environments.
— This appliance is intended to
be used built-in. Do not use it
freestanding or in a cabinet
with door.
— The appliance and its
accessible parts become hot
during use. Care should be
taken to avoid touching
heating elements.
— Very young (0-3 years) and
young children (3-8 years)
shall be kept away unless
continuously supervised.
— Children from 8 years and
above and persons with
reduced physical, sensory or
mental capabilities or lack of
experience and knowledge
can use this appliance only if
they are supervised or have
been given instructions on
safe appliance use and if they
understand the hazards
involved. Children shall not
play with the appliance.
Cleaning and user
maintenance shall not be
made by children without
supervision.

4
EN
— During and after use, do not
touch the heating elements or
interior surfaces of the
appliance: risk of burns.
Do not allow the appliance to
come into contact with cloths
or other ammable materials
until all the components have
cooled down completely.
— At the end of cooking, exercise
caution when opening the
appliance door, letting the hot
air or steam exit gradually
before accessing the
appliance. Do not obstruct the
vent apertures.
— Use oven gloves to remove
pans and accessories, taking
care not to touch the heating
elements.
— Do not place ammable
materials in or near the
appliance: a re may break out
if the appliance is
inadvertently switched on.
— Do not use the microwave
oven for heating anything in
airtight sealed containers.
The pressure increases and
may cause damage when
opening or may explode.
— Do not use the microwave
oven for drying textiles, paper,
spices, herbs, wood, owers,
fruit or other combustible
materials. Fire could result.
— Do not leave the appliance
unattended, especially when
using paper, plastic or other
combustible materials in the
cooking process. Paper can
char or burn and some plastics
can melt if used when heating
foods.
— Use containers suitable for use
in a microwave oven only.
— Overheating the liquid beyond
boiling point can occur
without evidence of bubbling.
This could result in a sudden
boil over of the hot liquid.
— Do not use microwave oven
for deep-frying, because the
oil temperature cannot be
controlled.
— After heating baby food or
liquids in a baby bottle or in a
baby food jar, always stir and
check the temperature before
serving. Ensure the lid and the
teat is removed before
heating.
— If alcoholic beverages are
used when cooking foods
(e.g. rum, cognac, wine),
remember that alcohol
evaporates at high
temperatures. As a result,
there is a risk that vapors
released by the alcohol may
catch re upon coming into
contact with the electrical
heating element.

5
EN
— Overheated oils and fats catch
re easily. Always remain
vigilant when cooking foods
rich in fat, oil or alcohol
(e.g. rum, cognac, wine).
— Do not use microwave oven
for cooking or reheating
whole eggs with or without
shell since they may explode
even after microwave heating
has ended.
— If material inside/outside the
appliance should ignite or
smoke is observed, keep
appliance door closed and
turn the appliance o.
Disconnect the power cord or
shut o power at the fuse or
circuit breaker panel.
— Do not over-cook food. Fire
could result.
— Cleaning is the only
maintenance normally
required. Failure to maintain
the appliance in a clean
condition could lead to
deterioration of the surface
that could adversely aect the
life of the appliance and
possibly result in a hazardous
situation.
— Never use steam cleaning
equipment.
— Do not use harsh abrasive
cleaners or sharp metal
scrapers to clean the
appliance door glass since
they can scratch the surface,
which may result in shattering
of the glass.
— Do not use corrosive
chemicals or vapors in this
appliance. This type of
appliance is specically
designed to heat or cook food.
It is not designed for industrial
or laboratory use.
— Do not remove any cover.
The door seals and the door
seal areas must be regularly
inspected for damage. If these
areas are damaged the
appliance should not be
operated until it has been
repaired by an authorized
service technician.
— Service only to be carried out
by an authorized service
technician. It is hazardous for
anyone other than an
authorized person to carry out
any service or repair
operation, which involves the
removal of any cover, which
gives protection against
exposure to microwave
energy.

6
EN
SAFEGUARDING THE ENVIRONMENT
Disposal of packaging maTerials
The packaging material is 100% recyclable and
is marked with the recycle symbol ( ).
The various parts of the packing must therefore
be disposed of responsibly and in full
compliance with local authority regulations
governing waste disposal.
scrapping The proDucT
— This appliance is marked in conformity with
European Directive 2012/19/EU, Waste
Electrical and Electronic Equipment (WEEE).
— By ensuring this product is disposed of
correctly, you will help prevent potential
negative consequences for the
environment and human health, which
could otherwise be caused by inappropriate
waste handling of this product.
— The symbol on the product or on the
accompanying documentation indicates
that it should not be treated as domestic
waste but must be taken to an appropriate
collection centre for the recycling of
electrical and electronic equipment.
SCRAPPING OF HOUSEHOLD APPLIANCES
— This appliance is manufactured with recyclable or reusable materials. Scrap the appliance in
accordance with local regulations on waste disposal. Before scrapping, cut o the power cords
so that the appliances cannot be connected to the mains.
— For further information on the treatment, recovery and recycling of household electrical
appliances, contact a competent local authority, the collection service for household waste or
the store where the appliance is purchased.

7
EN
PRIOR TO CONNECTING
MOUNTING THE APPLIANCE
INSTALLATION
After unpAcking the AppliAnce, make sure that it has
not been damaged during transport and that the
appliance door closes properly.
in the event of problems, contact the dealer or the
nearest After-sales Service.
follow The supplieD separaTe mounTing insTrucTions
when installing the appliance.
check ThaT The volTage on the rating plate
corresponds to the voltage in the home.
Do noT remove the microwave inlet protection
plates located on the side of the microwave
oven cavity wall. They prevent grease & food
particles from entering the microwave inlet
channels.
ensure The microwave oven cavity is empty before
mounting.
ensure ThaT The appliance is noT DamageD. Check
that the microwave oven door closes rmly
against the door support and that the internal
door seal is not damaged. Empty the microwave
oven and clean the interior with a soft, damp
cloth.
Do noT operaTe this appliance if it has a damaged
mains cord, if it is not working properly, or if it
has been damaged or dropped. Do not immerse
the mains cord in water. Keep the cord away
from hot surfaces. Electrical shock, re or other
hazards may result.
if The power supply corD is too short, have a
qualied electrician or serviceman installer an
outlet near the appliance.
The power supply corD must be long enough for
connecting the appliance, once tting in its
housing, to the main power supply.
for insTallaTion to comply with current safety
regulations, an omnipolar switch with
minimum contact gap of 3 mm must be utilized.
AFTER CONNECTING
The appliance can be operated only if the
microwave oven door is rmly closed.
The earThing of This appliance is compulsory. The
manufacturer will accept no responsibility for
injury to persons, animals or damage to objects
arising from the non-observance of this
requirement.
to prevent Any dAmAge, only remove the appliance
from its polystyrene foam base at the time of
installation.
children should not perform instAllAtion operAtions.
Keep children away during installation of the
appliance. Keep the packaging materials (plastic
bags, polystyrene parts, etc.) out of reach of children,
during and after the installation of the appliance.
The manufacTurers are not liable for any
problems caused by the user’s failure to observe
these instructions.
afTer insTallaTion, the bottom of the appliance
must no longer be accessible. For correct
appliance operation, do not obstruct the
minimum gap between the worktop and the
upper edge of the oven.

8
EN
COOKING FOOD
CLING FILM AND BAGS
RECOMMENDED USE AND TIPS
remove wire TwisT—Ties from paper or plastic bags
before placing the bag in the microwave oven
cavity.
cling film shoulD be scoreD or pricked with a fork
to relieve the pressure and to prevent bursting
because steam builds up during cooking.
since microwaves penetrate the food to a limited
depth, if there are a number of pieces to cook at
once, arrange the pieces in a circle to create
more outside pieces.
small pieces cook more quickly than large pieces.
cuT fooD into pieces of equal size for uniform
cooking.
moisTure evaporaTes during microwave cooking.
a microwave—proof cover on the container helps
reduce moisture loss.
mosT fooDs will conTinue to cook after microwave
has nished cooking it. Therefore, always allow
for standing time to complete the cooking.
sTirring is usually necessary during microwave
cooking. When stirring, bring the cooked
portions on the outside edges towards the
centre and the less-cooked centre portions
towards the outside.
place Thin slices of meaT on top of each other or
interlace them. Thicker slices such as meat loaf
and sausages have to be placed close to each
other.
LIQUIDS
liquiDs may overheaT beyond boiling point
without visibly bubbling. This could cause hot
liquids to suddenly boil over.
To prevenT This possibiliTy:
q Avoid using straight-sided containers with
narrow necks.
w Stir the liquid before placing the container
in the microwave oven cavity and leave
the teaspoon in the container.
e After heating, stir again before carefully
removing the container from the
microwave oven.
BABY FOOD
afTer heaTing baby fooD or liquids in a baby bottle
or in a baby food jar, always stir and check the
temperature before serving.
This will ensure that the heat is evenly
distributed and avoid the risk of scalding or
burns.
ensure that the lid and the teat are removed
before heating.
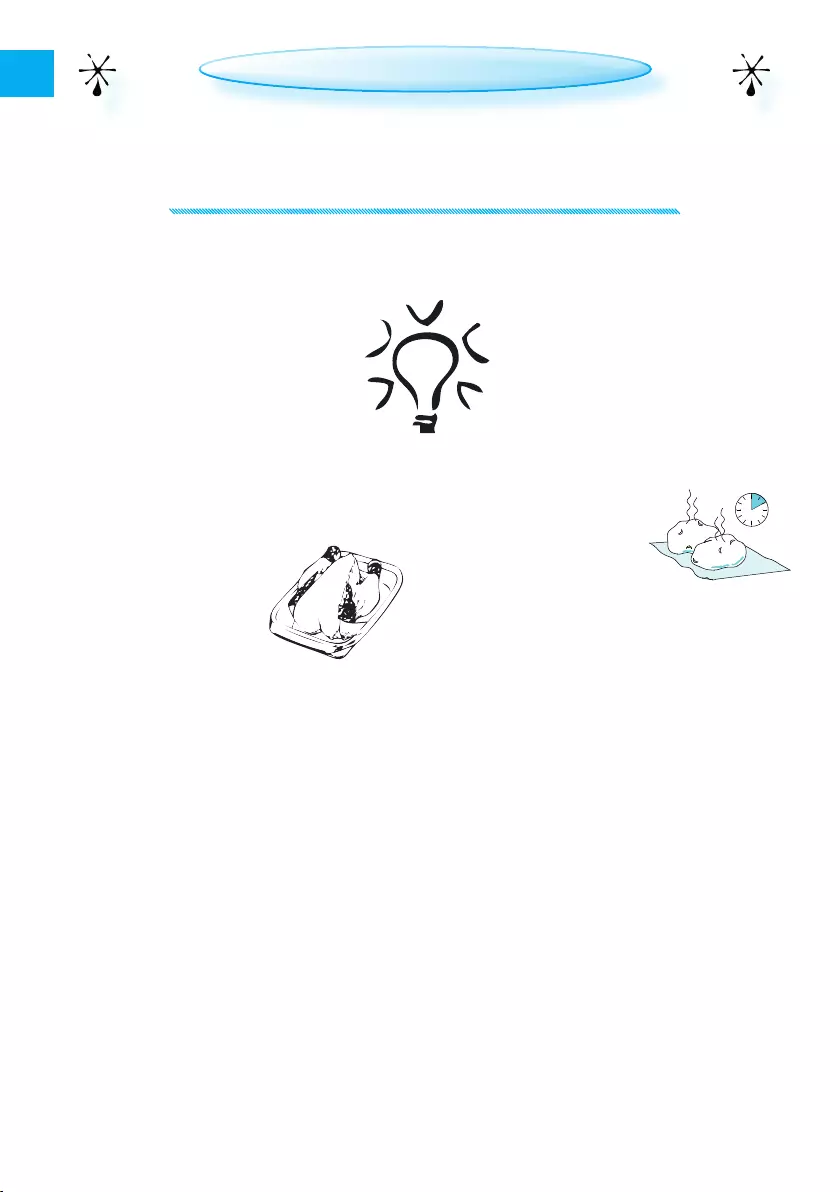
FROZEN FOOD
for besT resulTs, we recommend defrosting
directly on the glass turntable. If needed, it is
possible to use a light-plastic container that is
suitable for microwave.
boileD fooD, stews and meat sauces defrost
better if stirred during the defrosting time.
separaTe pieces as they begin to defrost.
Individual slices defrost more easily.
HOW TO READ THE COOKING TABLE
The Table inDicaTes The besT funcTions to use for any
given food. Cooking times, where indicated,
start from the moment when food is placed in
the microwave oven cavity, excluding pre-
heating (where required).
cooking seTTings anD Times are purely for
guidance and will depend on the amount of
food and type of accessory used. Always cook
food for the minimum cooking time given and
check that is it cooked through.
To obTain The besT resulTs, carefully follow the
advice given in the cooking table regarding the
choice of accessories (if supplied) to be used (if
present).
9
EN
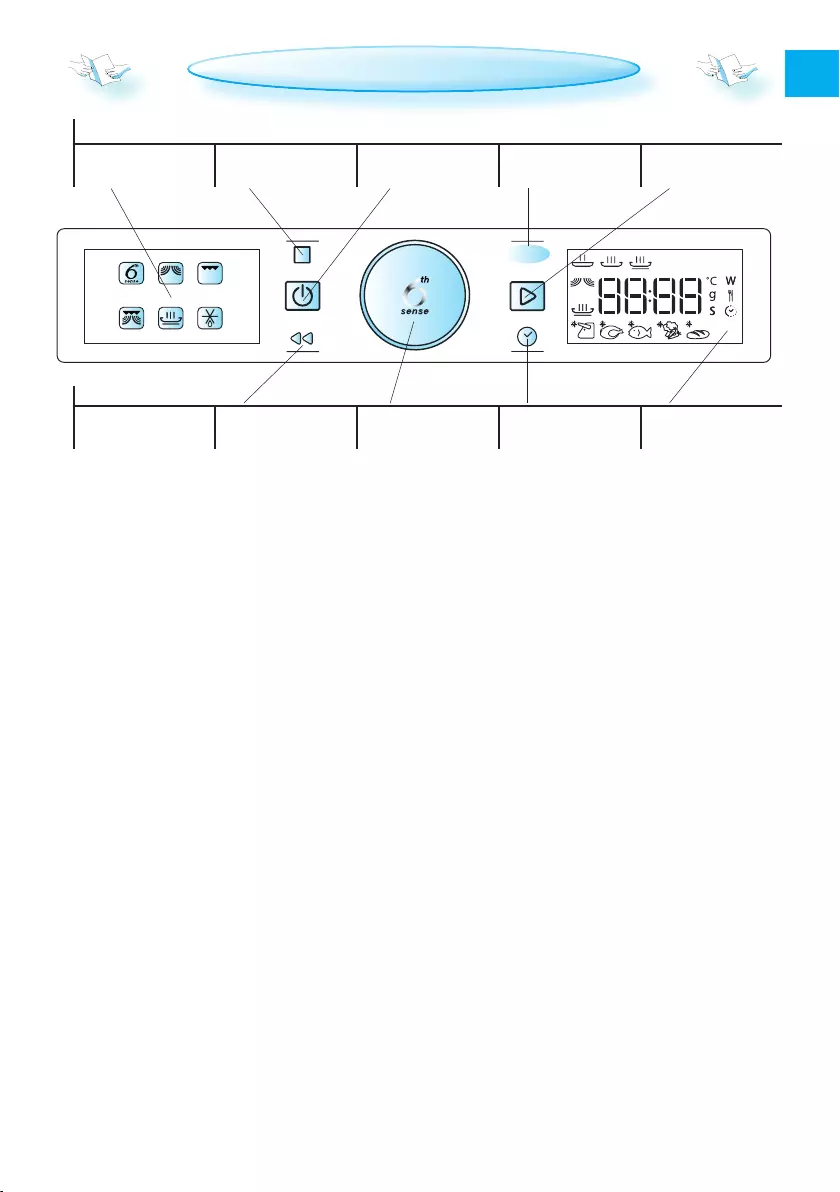
PANEL DESCRIPTION
Function
symbols
STOP/PAUSE
button
ON/OFF
button
POWER
button
START
button
BACK
button
ADJUST
knob
CLOCK
button
Digital
display
Power

10
EN
KEY LOCK / SAFETY LOCK
To unlock the Key Lock, press and
hold the BACK button for 5 sec—
onds.
The Door musT be openeD anD closeD, for example
to put food in it, before the safety lock is re-
leased. Otherwise the display will show “door”.
The key lock funcTion is acTivaTeD by
pressing and holding the BACK but-
ton (approx. 5 seconds) until a key
symbol appears instead of digits.
The key disappears after 3
seconds and the display re—
turns to the previous screen.
GLASS TURNTABLE
use The glass TurnTable with all cooking meth—
ods. It collects the dripping juic-
es and food particles that would
otherwise stain and soil the inte—
rior of the oven.
ɳPlace the glass turntable on the turntable
support.
WIRE RACK
use The wire rack when cooking
with Grill or Grill Combi.
CRISP HANDLE
use The special crisp hanDle sup—
plieD to remove the hot crisp plate
from the oven.
CRISP PLATE
place The fooD DirecTly on The crisp plaTe.
Always use the glass turn-
table as support when us-
ing the crisp plate.
Do noT place any uTensils on the crisp
plate since it will quickly become very
hot and is likely to damage the utensil.
The crisp plaTe may be preheated before use
(max. 3 minutes). Always use the Crisp function
when preheating the crisp plate.
GENERAL
There are a number of accessories available on
the market. Make sure that they are suitable for
microwave use before making any purchases.
make sure ThaT The uTensils you use are micro—
wave-safe and test them briefly in the micro—
wave first before using them
for cooking.
when placing fooD anD/or accessories in the mi-
crowave oven, make sure that they do not
come into contact with the interior of the
oven.
This is especially important with acces—
sories made of metal or which have met-
al parts.
if accessories conTaining meTal come into con—
tact with the oven interior, sparking may oc—
cur while the oven is in operation and the oven
could be damaged.
always make sure that the turntable is able to
turn freely before starting the oven.
TURNTABLE SUPPORT
use The TurnTable supporT under the
glass turntable. Never put any other
utensils on the turntable support.
ɳFit the turntable support in the
oven.
ACCESSORIES
11
EN
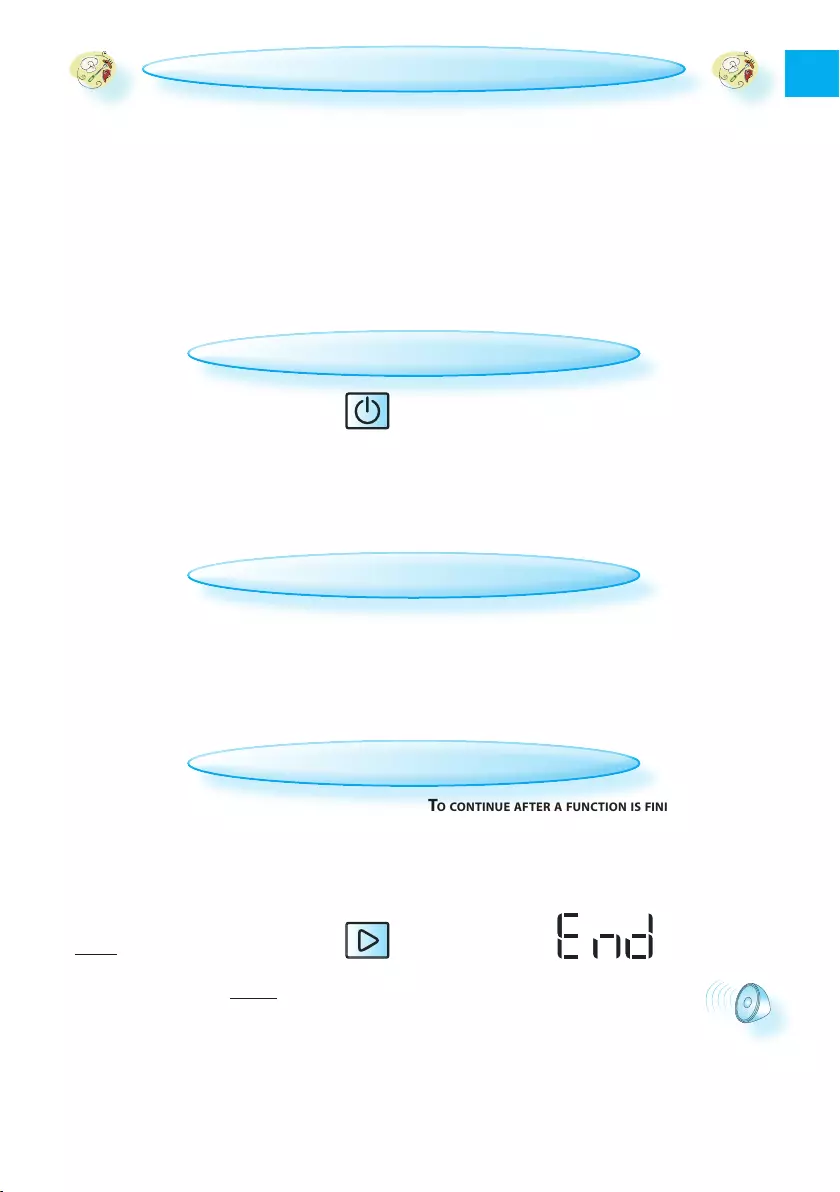
To conTinue afTer a funcTion is finisheD:
when enD is DisplayeD, you can prolong the cook—
ing time by 30 seconds by pressing the Start but—
ton. Each time the button is pressed, another 30
seconds is added to the cooking time.
a beep sounDs once a minute for 10
minutes when cooking is finished.
Press the STOP button or open the
door to stop the beeping.
noTe: The oven will only maintain the settings
for 60 seconds if the door is opened and then
closed after cooking is finished.
To pause cooking:
cooking can be pauseD to check, turn or stir the
food by opening the door. The setting will be
maintained for 10 minutes.
To conTinue cooking:
close The Door and press the Start but-
ton ONCE. Cooking is resumed from
where it was paused.
pressing The sTarT buTTon TWICE will increase
the time by 30 seconds.
STIR OR TURN FOOD (6TH SENSE FUNCTIONS ONLY)
ON / OFF
noTe: in JeT DefrosT moDe, The oven conTinues au—
TomaTically afTer 2 minuTes if the food has not
been turned. The defrost time will be longer in
this case.
when The appliance is TurneD off, all the buttons
and the adjust knob are non-responsive (apart
from the Start button). The 24 hour clock is dis-
played.
noTe: The DescripTions in These insTrucTions for
use assume that the oven is turned ON.
when using some of The 6Th sense funcTions the
oven may stop (depending on the chosen pro—
gram and food class) and prompt you to TURN
FOOD.
To continue cooking:
ɳOpen the door.
ɳTurn the food.
ɳClose the door and restart by pressing the
Start button.
Turn The appliance on or off by press-
ing the On/Off button for ½ a second.
when The appliance is TurneD on, all but-
tons and knobs function normally and the
24-hour clock is not displayed.
STANDBY MODE
When the appliance is in Standby, the dimmed
24-hour clock is displayed. Turn the rota—
ry knob or press any button to exit Standby
mode.
afTer pressing The sTop buTTon, or if the user
does not interact with the product for a certain
time, the oven enters Standby mode.
STOP / PAUSE / CONTINUE COOKING
12
EN
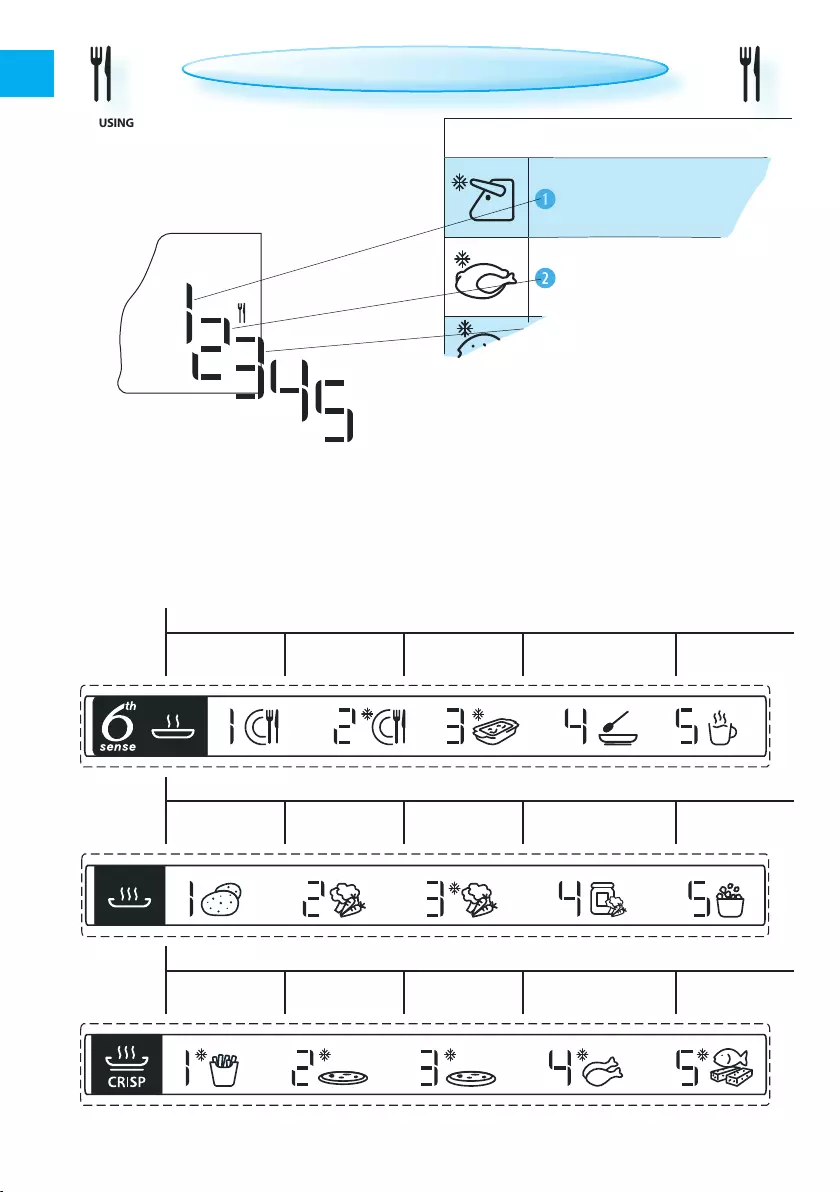
FOOD CLASSES (6TH SENSE FUNCTIONS ONLY)
when using The 6Th sense funcTions the oven needs
to know which food class it needs to use in or—
der to achieve good results. The food class digit
and food class symbol is displayed when you are
choosing a food class with the adjust knob.
The fooD classes are listed in the tables for each
6th Sense function.
The fooD class guiDe on this oven indicates
which food class is used in the functions that
apply food classes.
FOOD
MEaT (100 g — 2.0 kg)
POULTrY (100 g —
for fooD noT lisTeD in The Tables and if the
weight is lesser or greater than the recom-
mended weights, you should follow the proce-
dure for “Cook & Reheat with microwaves”.
6th SENSE
Reheat
Dinner plate Frozen
portion
Frozen
lasagne Soup Beverage
6th SENSE
Cook
Baked
potato
Fresh
vegetables
Frozen
vegetables
Canned
vegetables Popcorn
6th SENSE
Crisp
French fries Pizza,
thin crust
Pizza,
deep pan
Buffalo wings /
chicken nuggets Fish fingers
13
EN
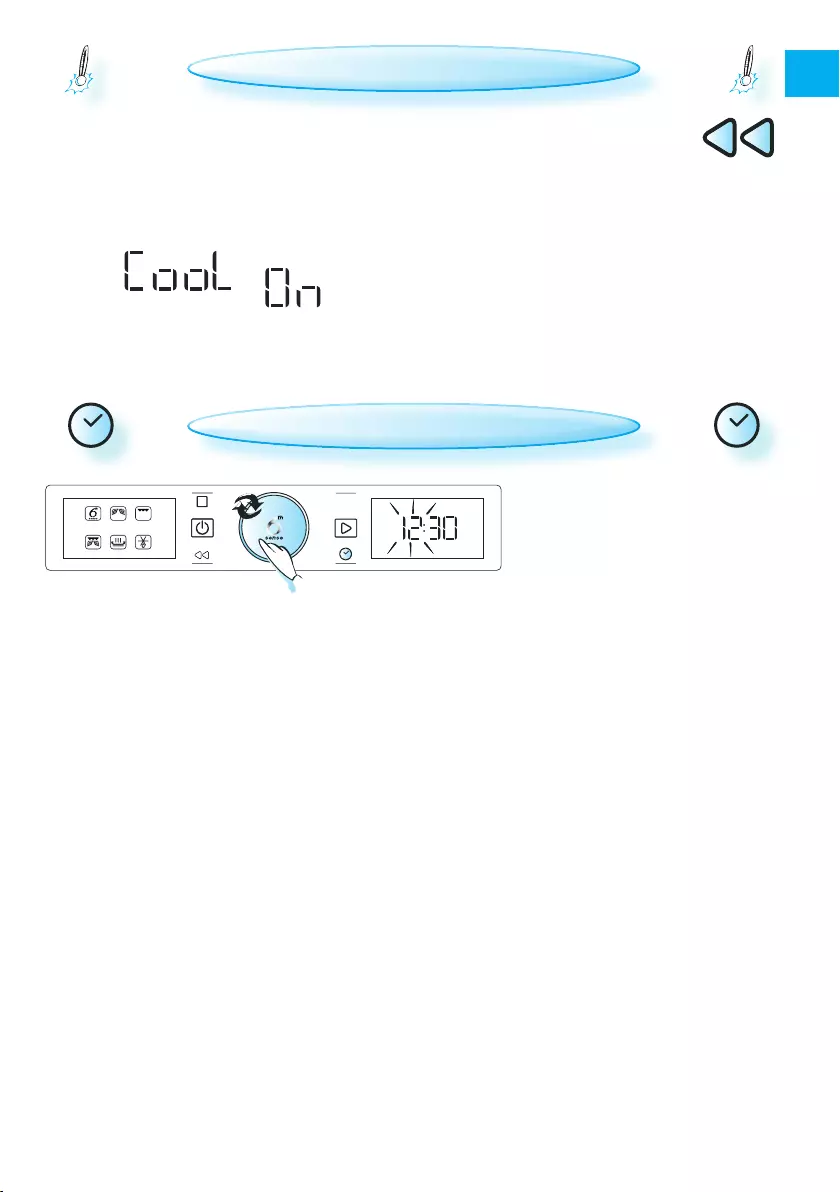
when a funcTion is finisheD, the oven may per-
form a cooling process. This is normal and the
display shows “Cool On”.
After this process, the oven switches off auto-
matically.
press The back buTTon to temporarily
view the 24-hour clock when “Cool
On” is displayed.
The cooling process can be interrupted without
damaging the oven by opening the door.
COOLING DOWN
q press The clock buTTon (½ a seconD). (The two digits on the left (hours) flash).
w Turn The aDJusT knob to set the hours.
e press The aDJusT knob. (The two digits on the right (minutes) flash).
r Turn The aDJusT knob to set the minutes.
t press The aDJusT knob again to confirm the change.
The clock is seT anD is in operaTion.
SETTING THE CLOCK
when The appliance is firsT pluggeD in
it will ask you to set the clock.
afTer a power failure, the clock will
flash and needs to be reset.
Power
14
EN
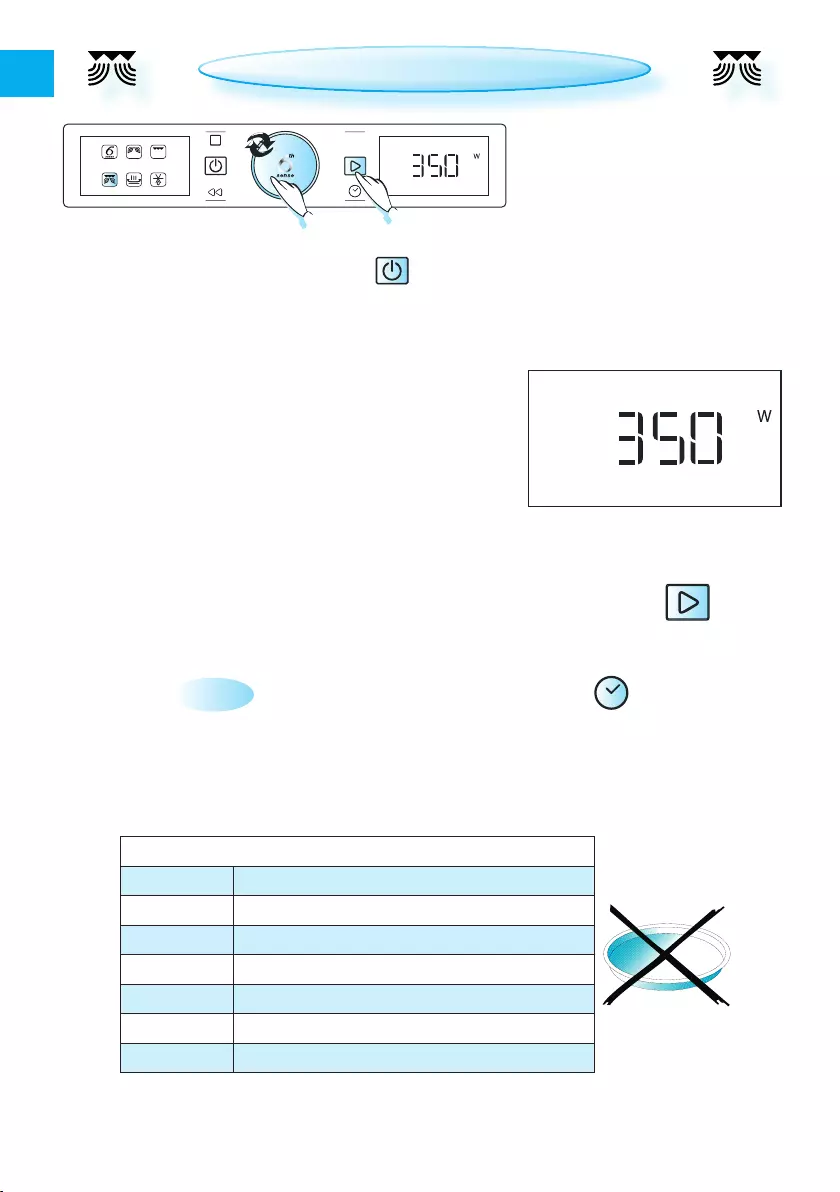
POWER LEVEL
MICROWAVES ONLY
power suggesTeD use:
1000 W reheaTing of beverages, water, clear soup, coffee, tea or other food with a high water con-
tent. If the food contains egg or cream choose a lower power.
800 W cooking vegetables, meat etc.
650 W cooking fish.
500 W more careful cooking e.g. high protein sauces, cheese and egg dishes and to finish cook-
ing casseroles.
350 W simmering sTews, melting butter and chocolate.
160 W DefrosTing. Softening butter, cheeses.
90 W sofTening ice cream
0 W when using the Timer only.
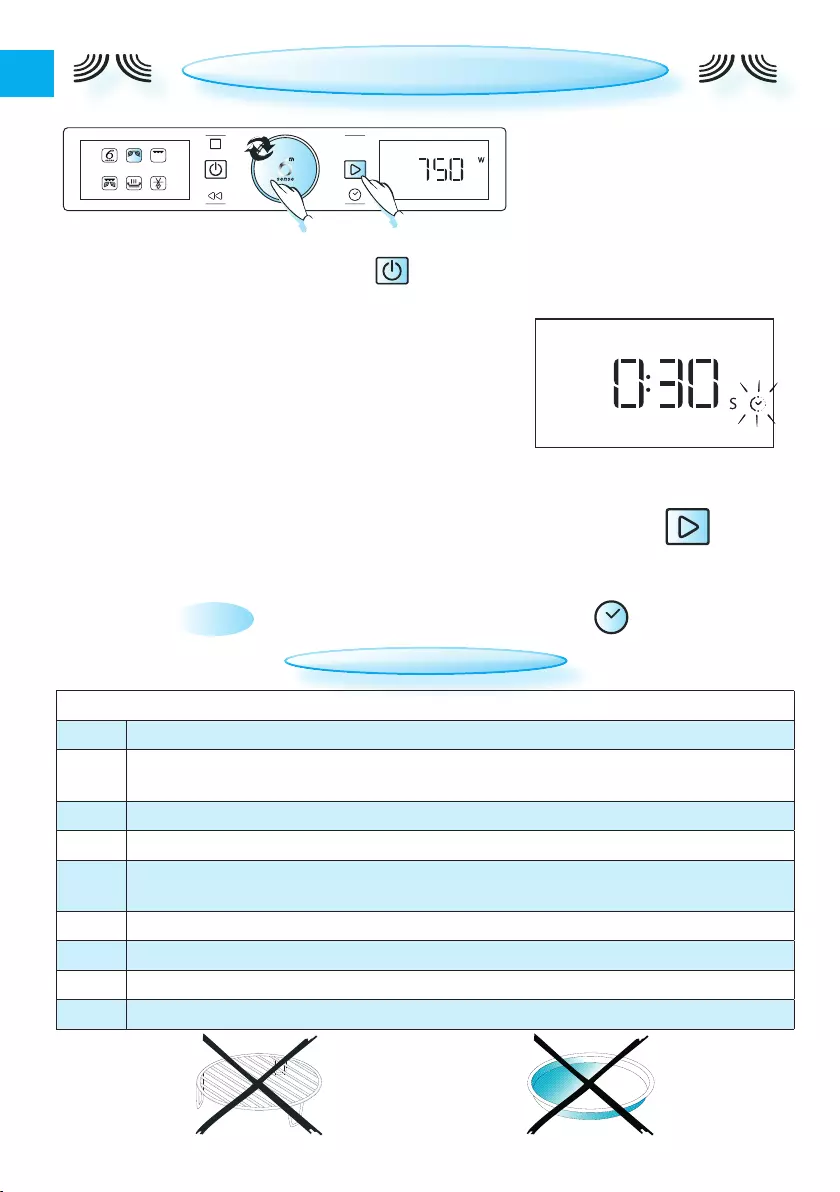
COOK & REHEAT WITH MICROWAVES
Switch on the microwave by pressing the button and proceed as follows:
q Turn The aDJusT knob until you find the microwave function.
w press The aDJusT knob to confirm your selection.
e Turn The aDJusT knob to set the microwave power level.
r press The aDJusT knob to confirm your selection.
t Turn The aDJusT knob to set the cooking time.
y press The sTarT buTTon or aDJusT knob.
once The cooking process has been sTarTeD:
The time can easily be increased in 30-second steps by pressing the
Start button. Each press increases the time with 30 seconds. You
may also alter the time by turning the adjust knob to increase or
decrease the time.
During cooking you can change the cooking time and/or power level.
<= by pressing the desired button: =>
use This funcTion for normal cook-
ing and reheating, such as vegeta-
bles, fish, potatoes and meat.
Power
Power

15
EN
Switch on the microwave by pressing the button and proceed as follows:
q open The Door and place food in the oven. Close the door.
w press The sTarT buTTon To auTomaTically sTarT the oven with
full microwave power (1000 W) and the cooking time set to
30 seconds. Each additional press increases the time by 30
seconds.
JET START
This funcTion is useD to quickly re—
heat food with a high water con—
tent such as clear soup, coffee or
tea.
you can also alTer The Time by Turning The aDJusT knob to increase or
decrease the time after the function has started.
noTe:
This funcTion is only available when the oven is switched off or in
Standby mode while the multifunction knob is in the Microwave
position.
Power
16
EN
follow The proceDure for “Cook & Reheat with
microwaves” and choose power level 160 W
when defrosting manually.
check anD inspecT The fooD regularly. You will
learn the times required for various amounts
from experience.
MANUAL DEFROST
Turn large JoinTs halfway through the defrost—
ing process.
boileD fooD, sTews anD meaT sauces defrost
better if stirred during defrosting.
when DefrosTing it is better to under
thaw the food slightly and allow the
process to finish during standing time.
sTanDing Time afTer DefrosTing always proDuces beT—
Ter resulTs since the temperature
will then be evenly distributed
throughout the food.
frozen fooD in plasTic bags, plastic film or card-
board packaging can be placed directly in the
oven provided the packaging does not
have any metal parts (e.g. metal twist
ties).
The shape of The package changes the de—
frosting time. Shallow packaging de—
frosts more quickly than deep packag-
ing.
separaTe iTems as they begin to defrost.
Individual slices defrost more easily.
cover areas of fooD with small
pieces of aluminium foil if they
start to become warm (e.g.
chicken legs and wing tips).
17
EN
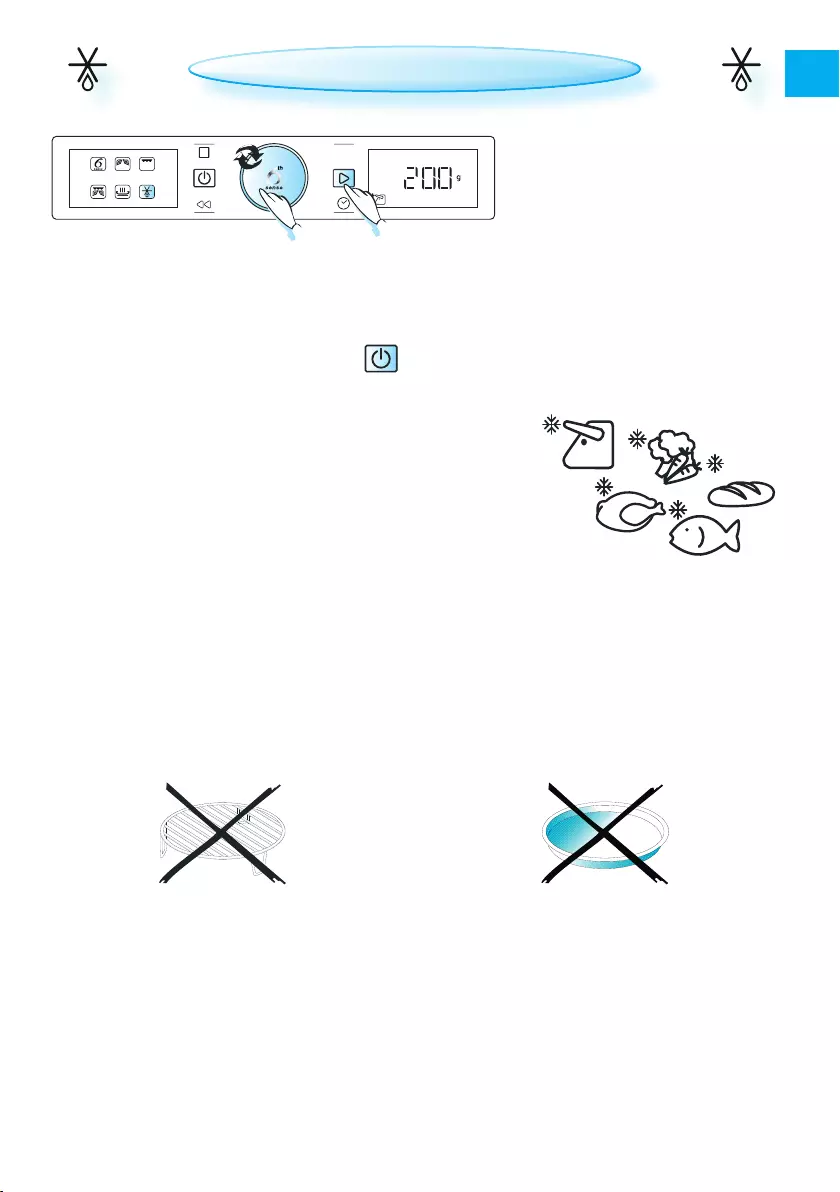
JET DEFROST
Switch on the microwave by pressing the button and proceed as follows:
q Turn The aDJusT knob until you find the Jet Defrost function.
w press The aDJusT knob to confirm your selection.
e Turn The aDJusT knob to select the food class.
r press The aDJusT knob to confirm your selection.
t Turn The aDJusT knob to set the weight.
y press The sTarT buTTon.
use This funcTion for defrosting
meat, poultry, fish, vegetables
and bread.
Jet Defrost should only be used
if the net weight is between
100 g and 2.5 kg.
always place The fooD on the glass
turntable.
miDway Through The DefrosTing process, the oven
stops and prompts you to “TURN” the food.
ɳOpen the door.
ɳTurn the food.
ɳClose the door and restart by pressing the
Start button.
noTe: The oven continues automatically after
2 minutes if the food has not been turned.
The defrosting time will be longer in this case.
Power
18
EN
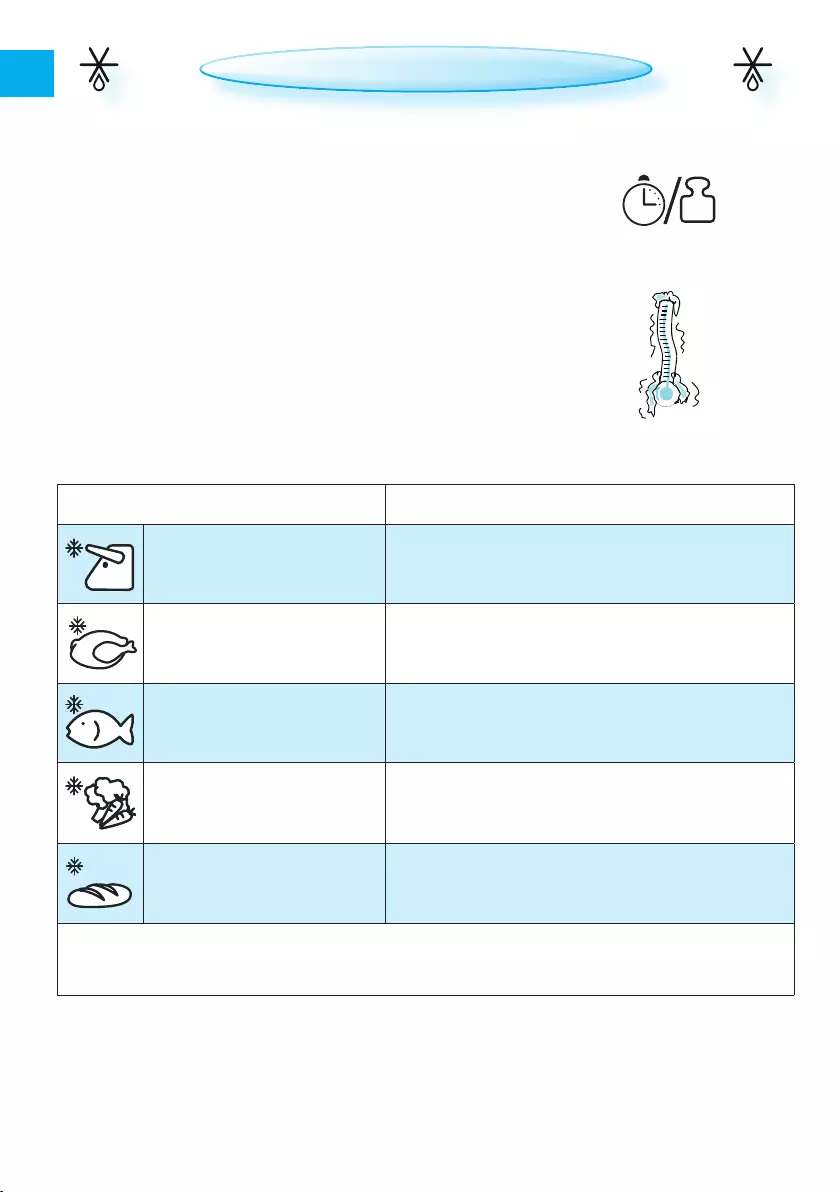
WEIGHT:
This funcTion neeDs To know the net weight of the food. The oven
will then automatically calculate the time needed to finish the
process.
if The weighT is lesser or greaTer Than recommenDeD weighT: Follow
the procedure for “Cook & Reheat with microwaves” and choose
160 W when defrosting.
FROZEN FOODS:
if The fooD is warmer than deep-freeze temperature (-18°C),
choose a lower food weight.
if The fooD is colDer than deep-freeze temperature (—18°C),
choose a higher food weight.
FOOD TIPS
q meaT (100 g — 2.0 kg) minceD meaT, cutlets, steaks or roasts.
w poulTry (100 g — 2.5 kg) chicken, whole, pieces or fillets.
e fish (100 g — 1.5 kg) whole sTeaks or fillets.
r vegeTables (100 g — 1.5 kg) mixeD vegeTables, peas, broccoli etc.
t breaD (100 g — 1.0 kg) loaf, buns or rolls.
for fooD noT lisTeD in This Table and if the weight is lesser or greater than the recommended
weight, you should follow the procedure for “Cook & reheat with microwaves” and choose 160 W
when defrosting.
JET DEFROST

19
EN
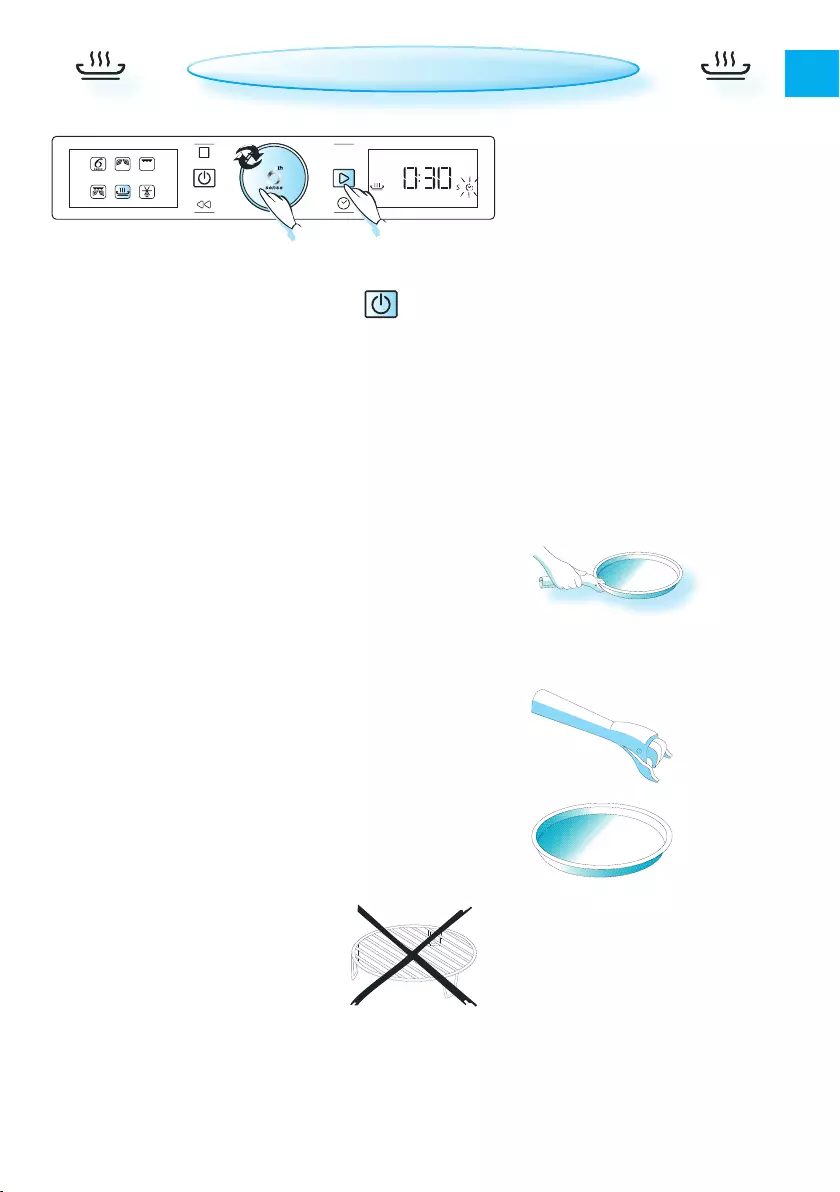
GRILL
Switch on the microwave by pressing the button and proceed as follows:
q Turn The aDJusT knob until you find the Grill function.
w press The aDJusT knob to confirm your selection.
e Turn The aDJusT knob to set the cooking time.
r press The sTarT buTTon.
use This funcTion To quickly turn the
surface of any food placed on the
wire rack golden brown.
place fooD on the wire rack. Turn food during cooking.
mAke sure thAt the utensils used are heat resistant and microwave-
safe before grilling with them.
do not use plAstic utensils when grilling. They will melt. Items made
of wood or paper are not suitable either.
Power
20
EN
GRILL COMBI
Switch on the microwave by pressing the button and proceed as follows:
q Turn The aDJusT knob until you find the Grill Combi function.
w press The aDJusT knob to confirm your selection.
e Turn The aDJusT knob to set the Microwave power level.
r press The aDJusT knob to confirm your selection.
t Turn The aDJusT knob to set the cooking time.
y press The sTarT buTTon.
once The cooking process has been sTarTeD:
The time can easily be increased in 30-second steps by pressing the
Start button. Each press increases the time by 30 seconds. You may
also alter the time by turning the adjust knob to increase or de-
crease the time.
During cooking you can change the cooking time and/or power level.
<= by pressing the desired button: =>
The max. possible microwave power level when using the Grill Combi is
limited to a factory-preset level.
place fooD on the wire rack or on the glass turntable.
use This funcTion To cook food such
as lasagne, fish and potato gratin.
Power
GRILL COMBI
power: suggesTeD use:
650 W cooking vegeTables anD graTins
350 — 500 W cooking poulTry anD lasagne
160 — 350 W cooking fish anD frozen graTins
160 W cooking meaT
90 W fruiT graTins
0 W browning only During cooking
Power
21
EN
CRISP
Switch on the microwave by pressing the button and proceed as follows:
q Turn The aDJusT knob until you find the Crisp function.
w press The aDJusT knob to confirm your selection.
e Turn The aDJusT knob to set the cooking time.
r press The sTarT buTTon.
use This funcTion To reheat and
cook pizzas and other dough—
based food. It is also good for fry—
ing bacon and eggs, sausages,
hamburgers etc.
er
The oven auTomaTically uses Microwaves and Grill to heat the crisp
plate. This way the crisp plate will rapidly reach its working tem—
perature and begin to brown and crisp the food.
make sure that the crisp plate is correctly placed in the
middle of the glass turntable.
The oven anD The crisp plaTe become very hot when
using this function.
Do noT place The hoT crisp plaTe on any surface susceptible to heat.
Take care noT To Touch the grill element.
use oven miTTs or the special crisp handle supplied when remov-
ing the hot crisp plate.
only use the crisp plate supplied with this function.
Other available crisp plates on the market will not
give the correct results when using this function.
Power
22
EN
FOOD TIPS
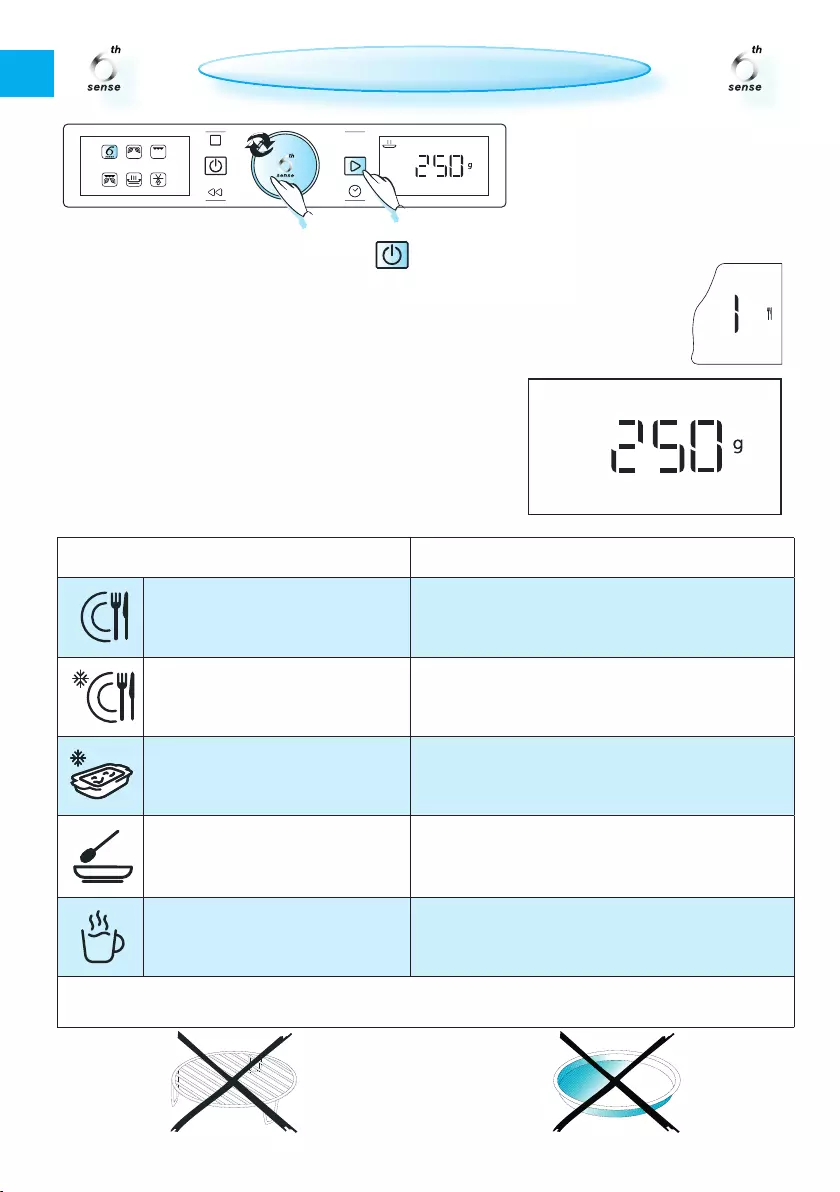
q Dinner plaTe (250 g — 500 g)
heaT covereD.
for perfecT resulTs, prepare food in line with the
recommendations on next page.
w frozen porTion (250 g — 500 g)
follow The DirecTions on The packaging, i.e. ventila—
tion, pricking, etc..
e frozen lasagne (250 g — 500 g) reheaT covereD Turn if needed.
r soup (200 g — 800 g)
reheaT uncovereD in separate bowls or in a large
one.
t beverage (100 g — 500 g) heaT uncovereD.
for fooD noT lisTeD in This Table and if the weight is lesser or greater than the recommended
weight, you should follow the procedure for “Cook & Reheat with microwaves”.
Switch on the microwave by pressing the button and proceed as follows:
q Turn The aDJusT knob until you find the 6th Sense function.
w press The aDJusT knob to confirm your selection.
e Turn The aDJusT knob until you find the 6th Sense Reheat function.
r press The aDJusT knob to confirm your selection.
t Turn The aDJusT knob to select the desired food class.
y press The aDJusT knob to confirm your selection.
u Turn The aDJusT knob to set the weight.
i press The sTarT buTTon.
use This funcTion when reheat—
ing ready-made food from frozen,
chilled or room temperature.
place fooD onto a microwave-safe
heat-proof dinner plate or dish.
6TH SENSE REHEAT
Power
23
EN
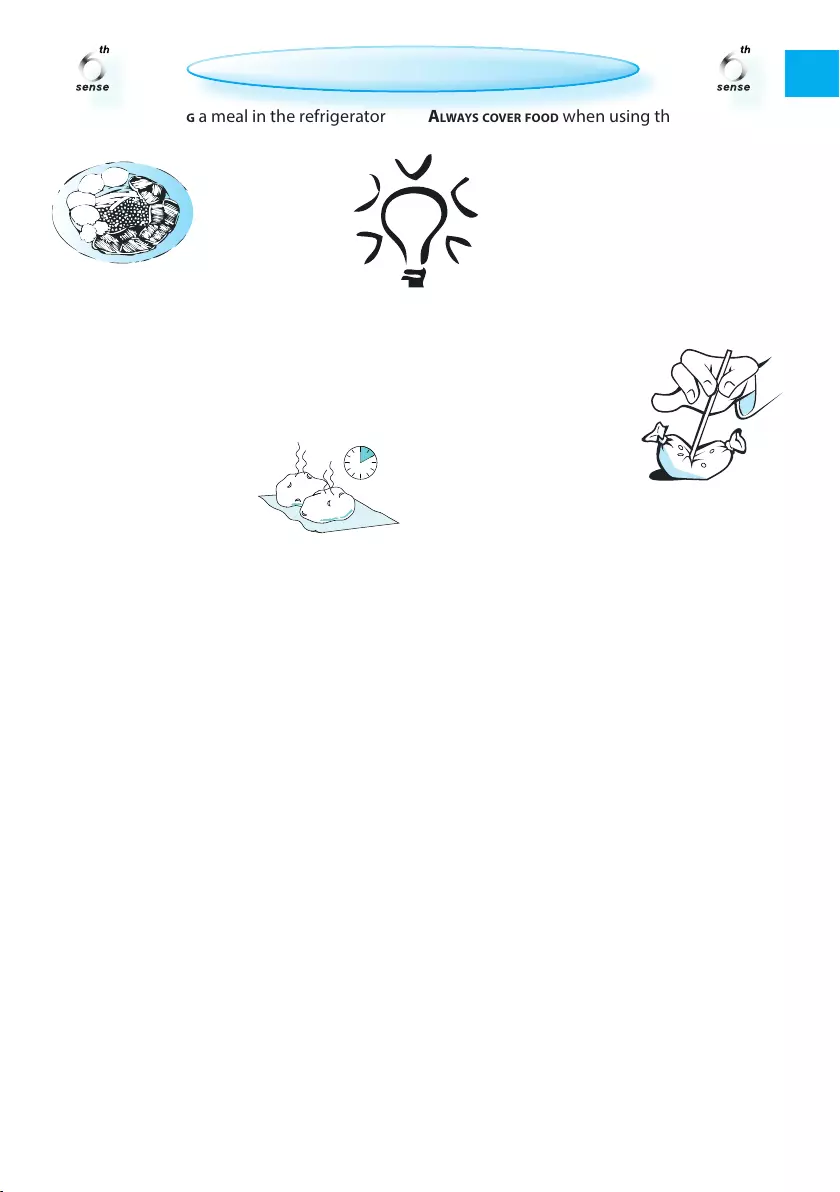
always cover fooD when using this function ex—
cept when reheating chilled soups, in which
case a cover is not needed.
if The fooD is packageD in such way that
it is already covered, the packaging
should be cut with 2-3 scores to allow
excess pressure to escape during re—
heating.
plasTic foil should be
scored or pricked with a
fork to relieve the pressure
and to prevent bursting
as steam builds up during
cooking.
when you are keeping a meal in the refrigerator
or “plating” a meal for reheating, arrange the
thicker, denser food
around the outside
of the plate and
the thinner or less
dense food in the
middle.
place Thin slices of meat on top of each other or
interlace them.
Thicker slices such as meat loaf and sausages
should be placed close to each other.
The resulTs are always beTTer afTer
a sTanDing Time .of 1-2 minutes.
sTirring During heaTing
During The heaTing process the oven may stop
(depending on program) and prompt you to
“STIR” the food.
ɳOpen the door.
ɳStir the food.
ɳClose the door and restart by pressing the
Start button.
noTe: The oven continues automatically after
1 minute if the food has not been stirred.
The heating time will be longer in this case.
6TH SENSE REHEAT

24
EN
FOOD TIPS
q bakeD poTaToes (200 g — 1.0 kg)
prick The poTaToes and place them in a micro—
wave-safe and oven-proof dish. Turn the po—
tatoes when the oven beeps. Please be aware
that the oven, dish and food are hot.
w fresh vegeTables (200 g — 800 g)
cuT vegeTables into even-sized pieces. Add 2-4
tablespoons of water and cover. Stir when the
oven beeps.
e frozen vegeTables (200 g — 800 g) cook covereD. Stir when the oven beeps.
r canneD vegeTables (200 g — 600 g)
pour away most of the liquid and cook – cov-
ered – in a microwave-safe dish.
t popcorn (100 g)
only cook one bag aT The Time. If more popcorn is
needed, cook the bags one after another.
for fooD noT lisTeD in This Table and if the weight is lesser or greater than the recommended
weight, you should follow the procedure for “Cook & Reheat with microwaves”.
Switch on the microwave by pressing the button and proceed as follows:
q Turn The aDJusT knob until you find the 6th Sense function.
w press The aDJusT knob to confirm your selection.
e Turn The aDJusT knob until you find the 6th Sense Cook function.
r press The aDJusT knob to confirm your selection.
t Turn The aDJusT knob to select the desired food class.
y press The aDJusT knob to confirm your selection.
u Turn The aDJusT knob to set the weight.
i press The sTarT buTTon.
use This funcTion for cooking ONLY.
6th Sense Cook can only be used
for food in the categories listed
here.
6TH SENSE COOK
plasTic film should be scored or
pricked with a fork to relieve the pres-
sure and to prevent bursting as steam
builds up during cooking.
Power
25
EN
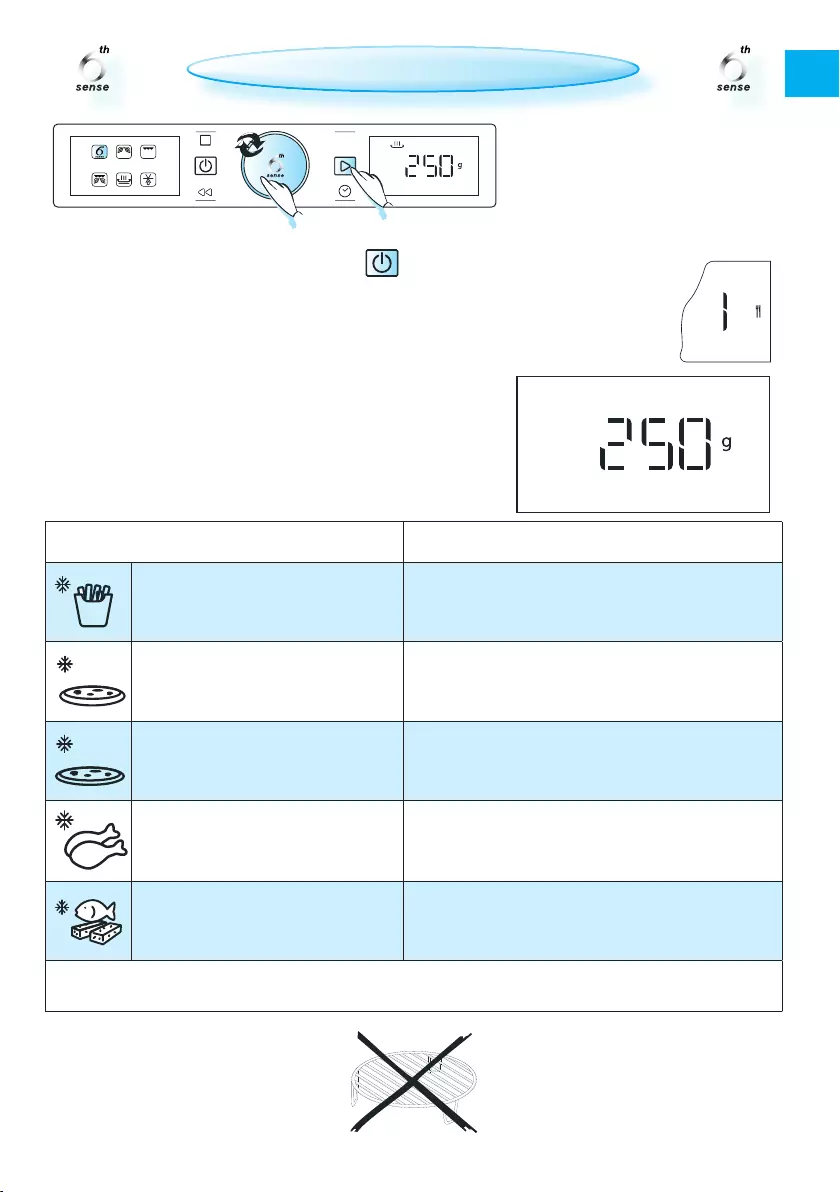
FOOD TIPS
q french fries (200 g — 500 g)
spreaD ouT The fries in an even layer on the crisp
plate. Sprinkle with salt if desired.
w pizza, Thin crusT (200 g — 500 g) for pizzas wiTh Thin crusT.
e pizza, Deep pan (200 g — 800 g) for pizzas wiTh Thick crusT.
r buffalo wings /
chicken nuggeTs (200 g — 500 g) for chicken nuggeTs, oil the crisp plate.
t fish fingers (200 g — 500 g)
place The fish fingers in The appliance, leaving suffi—
cient space between them. Turn the food when
the appliance asks you to do so.
for fooD noT lisTeD in This Table and if the weight is lesser or greater than the recommended
weight, you should follow the procedure for “Cook & Reheat with microwaves”.
Switch on the microwave by pressing the button and proceed as follows:
q Turn The aDJusT knob until you find the 6th Sense function.
w press The aDJusT knob to confirm your selection.
e Turn The aDJusT knob until you find the 6th Sense Crisp function.
r press The aDJusT knob to confirm your selection.
t Turn The aDJusT knob to select the desired food class.
y press The aDJusT knob to confirm your selection.
u Turn The aDJusT knob to set the weight.
i press The sTarT buTTon.
use This funcTion for crisping ONLY.
6th Sense Crisp can only be used
for food in the categories listed
here.
place fooD onto the crisp plate.
Power
6TH SENSE CRISP
26
EN
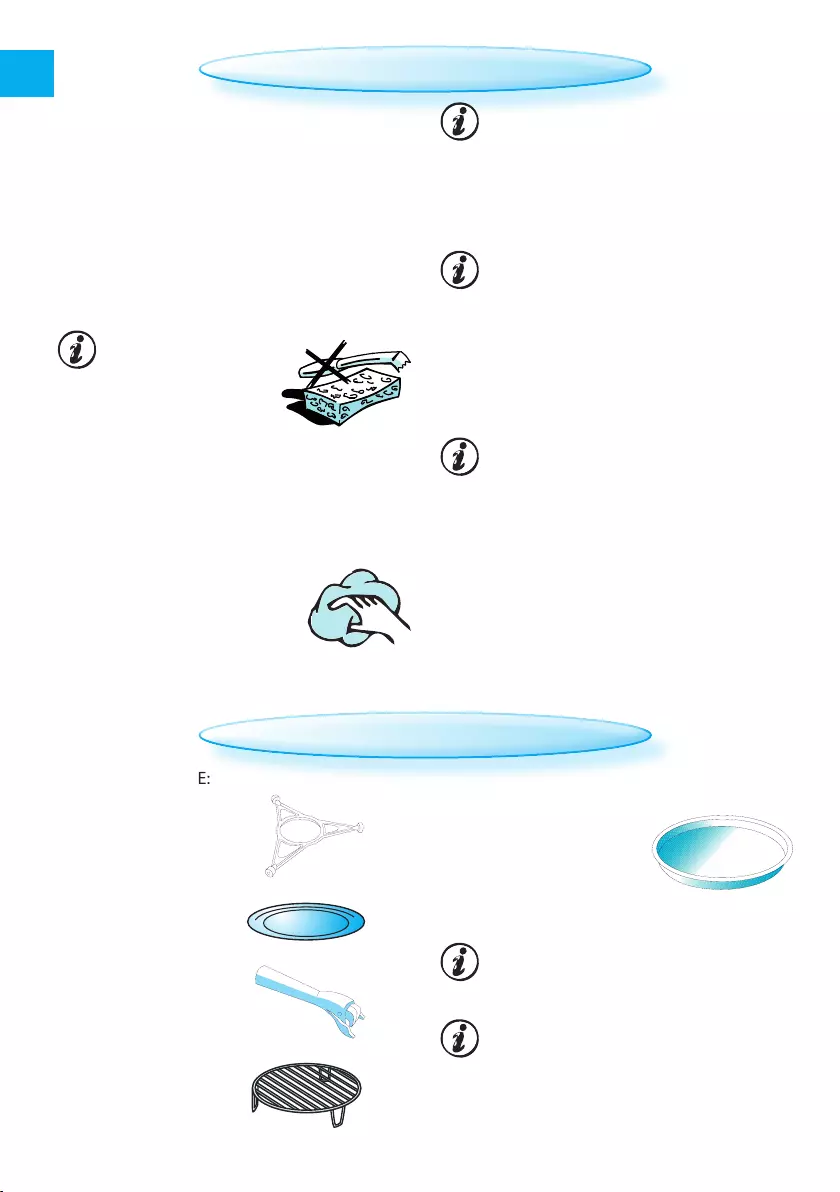
DISHWASHERSAFE:
TurnTable supporT.
glass TurnTable.
crisp hanDle.
wire rack.
cleaning is The only mainTenance
normally required.
failure To mainTain The oven in a
clean condition could lead to de—
terioration of the surface, which
could adversely affect the life of
the appliance and possibly result
in a hazardous situation.
Do noT use meTal scouring paDs,
abrAsive cleAnsers, steel—
wool pads, rough cloths,
etc. which could dam-
age the control pan-
el and interior and exterior oven surfaces.
Use a sponge with a mild detergent or pa—
per towel with spray glass cleaner. Apply
spray glass cleaner to paper towel.
do not sprAy directly on the oven.
aT regular inTervals, and especially af-
ter any spillovers, remove the turn-
table, the turntable support and
wipe clean the base of the oven.
This oven is DesigneD to operate
with the turntable in place.
MAINTENANCE & CLEANING
MAINTENANCE & CLEANING
Do noT operate the microwave oven
when the turntable has been removed
for cleaning.
use a milD DeTergenT, water and a soft cloth to
clean the interior surfaces, front and rear of the
door and the door opening.
Do noT allow grease or food particles to
build up around the door.
for sTubborn sTains, boil a cup of water in the oven
for 2 or 3 minutes. Steam will soften the marks.
aDDing some lemon Juice to a cup of water, plac—
ing this on the turntable and boiling for a few
minutes can eliminate odours inside the oven.
Do noT use sTeam cleaning
appliances when cleaning
your microwave oven.
The grill elemenT does not need cleaning since
the intense heat burns off any splashes, al-
though the ceiling above it may need regular
cleaning.
This should be done using warm water, deter—
gent and a sponge. If the grill is not used regu—
larly, it should be run for 10 minutes a month.
CAREFUL CLEANING:
The crisp plaTe should be cleaned in water with
a mild detergent. Heavily
soiled areas can be cleaned
with a scouring sponge and
a mild cleanser.
always let the crisp plate cool before cleaning.
Do noT immerse or rinse the crisp plate
while it is hot. Rapid cooling may dam-
age it.
Do noT use sTeel—wool paDs. They will
scratch the surface.
27
EN
TROUBLESHOOTING GUIDE
This is To avoiD making unnecessary calls
for which you will be charged.
When calling Service, please give the se-
rial number and type number of the oven
(see Service label). Consult your warranty
booklet for further advice.
if The oven Does noT work, do not make a service
call until you have made the following checks:
ɳThe turntable and turntable support is in
place.
ɳThe door is properly closed.
ɳCheck the fuses and make sure that there is
power available.
ɳCheck that the oven has ample ventilation.
ɳWait for 10 minutes, then try to operate the
oven once more.
ɳOpen and then close the door before you
try again.
ɳDisconnect the oven from the power sup—
ply. Wait for 10 minutes before reconnect-
ing and trying again.
DATA FOR TESTING HEATING PERFORMANCE
in accorDance wiTh iec 60705 anD iec 60350.
The inTernaTional elecTroTechnical commission has developed a standard for comparative testing of the
heating performance of different microwave ovens. We recommend the following for this oven:
TesT funcTion amounT (gr) cooking Time (min:sec) power accessory
Egg CUSTard MW 750 12:00 – 13:00 650 pyrex #220
sponge cake MW 475 8:30 – 9:30 650 pyrex #827
meaTloaf MW 900 18:00 – 19:00 800 pyrex #838
meaT DefrosT MW 500 12:00 – 13:00 160
POTaTO graTIN MW + grILL 1100 30:00 – 35:00 500 pyrex #827
chicken MW + grILL 1000 40:00 – 45:00 350 pyrex #220
ToasT grILL — 6:00 – 7:00 — griD
TECHNICAL SPECIFICATIONS
supply volTage 230 V/50 Hz
raTeD power inpuT 2300 W
fuse 10 a
mw ouTpuT power 1000 W
grill 800 W
ouTer Dimensions (hxwxD) 385 x 595 x 468
inner Dimensions (hxwxD) 200 x 405 x 380

400010878167
Whirlpool is a registered trademark of Whirlpool, USA.
![]()
|
ВАЖНЫЕ УКАЗАНИЯ ПО БЕЗОПАСНОСТИ |
RU |
ВНИМАТЕЛЬНО ПРОЧИТАЙТЕ НАСТОЯЩУЮ ИНСТРУКЦИЮ И СОХРАНИТЕ ЕЕ ДЛЯ ДАЛЬНЕЙШЕГО ИСПОЛЬЗОВАНИЯ
Не нагревайте внутри печи и не ис—
пользуйте вблизи нее горючие ма—
териалы. Выделяющиеся пары могут привести к возгоранию или взрыву.
Не используйте микроволновую
печь для сушки тканей, бумаги, специй, трав, дерева, цветов, фруктов и прочих горючих материалов. Это может привести к возгоранию.
В случае возгорания или за—
дымления внутри или снару—
жи печи не открывайте дверцу, выключите печь. Отсоедините сетевой шнур от розетки или отключите питание на щите предохранителей.
Не передерживайте продукты в
печи. Это может привести к возгоранию.
Не оставляйте печь без присмотра,
особенно, если в процессе приготовления используются бумага, пластмасса и прочие горючие материалы. Бумага может обуглиться или загореться, а некоторые виды пластмасс — расплавиться при нагревании пищи.
Не используйте в прибо—
ре агрессивные химические вещества и пары. Данная печь предназначена для
подогревания и приготовления пищи. Она не предназначена для промышленного или лабораторного применения.
ЯЙЦА
Не используйте
микроволновую
печь для приготовления или разогрева цельных
яиц в скорлупе или без нее, поскольку они могут взорваться, даже после окончания микроволнового нагрева.
Дети, начиная с 8-летнего возраста, лица с ограниченными физическими, сенсорными или умственными способностями и лица, не имеющие достаточных знаний и навыков, могут пользоваться прибором только под присмотром или после того, как получат указания по безопасному использованию прибора и осознают имеющиеся опасности.
Не позволяйте детям играть с
прибором.
Использование прибора, чистка и
уход разрешены детям в возрасте с 8 лет, только под присмотром взрослых.
1

RU
ВАЖНЫЕ УКАЗАНИЯ ПО БЕЗОПАСНОСТИ
В Н И М А Н И Е !
Прибор и его доступные части
могут нагреваться во время
использования.
Соблюдайте осторожность во
избежание прикосновения к нагревательным элементам.
Не допускайте к прибору детей
в возрасте 8 лет и младше без
постоянного наблюдения взрослых.
Не используйте
микроволновую печь
для разогрева 


 продуктов в

 герметичных
  емкостях. Избыточное
внутреннее давление может привести к разрыву емкости либо стать причиной травмы при ее открытии.
При необходимости замены сетевого шнура используйте
оригинальный сетевой шнур, который можно приобрести в наших сервисных центрах. Замена сетевого шнура должна производиться
квалифицированным
сервисным
специалистом.
Выполнение 


 технического
 обслуживания разрешается только квалифицированным
сервисным специалистам. Лица,
не обладающие достаточной технической квалификацией, подвергают себя опасности в случае обслуживания или ремонта прибора со снятием кожухов, предохраняющих от воздействия микроволнового излучения.
Не демонтируйте кожухи и экраны. Регулярно проверяйте уплотнители дверцы и
прилегающие к ним участки на
предмет повреждений. Если эти участки повреждены, не используйте прибор, пока он не будет отремонтирован квалифицированным сервисным специалистом.
2

|
ВАЖНЫЕ МЕРЫ ПРЕДОСТОРОЖНОСТИ |
RU |
ОБЩАЯ ИНФОРМАЦИЯ
Данный прибор предназначен только для бытового применения.
Прибор является встраиваемым.
Не используйте его как отдельностоящее устройство.
Данный прибор предназначен для
нагревапродуктовпитанияи напитков.Сушкапродуктов,атакже нагревгрелок,тапочек,губок, мокрыхтканейит.п.могутсоздать опасностьтравмыиливозгорания.
Не включайте прибор, если в микро-
волновой печи нет продуктов. В противном случае прибор может выйти из строя.
Во время практического ознаком— ления с работой печи поставьте
внутрь нее стакан с водой. Вода поглощает микроволновую энергию, предохраняя печь от повреждений.
Не используйте камеру печи для
хранения предметов.
Передтемкакпомещатьвпечь
бумажныеилипластиковыепакеты,снимитес нихпроволочныезавязки.
ЖАРКА ВО ФРИТЮРЕ
Не пользуйтесь микроволновой
печью для жарки во  фритюре, посколь-


 ку при этом невоз-


 можно контролиро-
вать температуру масла.
Используйте прихватки или кухон—
ные рукавицы для защиты от ожогов при касании емкостей, форм или поверхностей печи после приготовления пищи.
3

4
Перед началом установки убеди—
тесь, что камера печи пуста.
Не снимайте щитки на каналах для подачи микро—
волнового излуче—
ния, расположенные на боковой стенке рабочей камеры. Они предотвращают попадание жира и частиц пищи в эти каналы.
Не пользуйтесь прибором, если у
него повреждены сетевой шнур или вилка, если он неисправен или был поврежден вследствие удара или падения. Не погружайте сетевой шнур или вил-
ку в воду. Держите шнур вдали от горячих поверхностей. Не-
соблюдение этих требований может привести к поражению электрическим током, пожару и
другим опасным последствиям.
Если сетевой шнур слишком
короткий, перенесите ро-
зетку ближе к прибору,
воспользовавшись услуга-
ми квалифицированного
электрика или сервисного
Убедитесь, что прибор не име— специалиста.
ет повреждений. Убедитесь, что Сетевой шнур должен иметь до- при закрытии дверца плотно статочную длину для того, чтоприлегает к корпусу, и что вну- бы после встраивания прибор треннее уплотнение дверцы не мог быть без труда подключен к повреждено. Выньте из печи выходу электросети.
все принадлежности и протри- Согласно действующим прави- те ее изнутри мягкой влажной лам безопасности при установке
салфеткой. прибора должен быть использован многополюсный выключатель с зазором между разомкнутыми контактами не менее 3 мм.
Убедитесь, что напряжение на та-
бличке технических данных соответствует напряжению домашней электросети.
УСТАНОВКА
УСТАНОВКА ПРИБОРА
При установке прибора следуйте указани-
ям прилагаемой отдельно инструкции по монтажу.
ПЕРЕД ПОДКЛЮЧЕНИЕМ К ЭЛЕКТРОСЕТИ
RU

|
ПОСЛЕ ПОДКЛЮЧЕНИЯ |
RU |
|||
|
рибор должен быть обязатель- |
||||
|
Печью можно пользоваться только |
П |
|||
|
при плотно закрытой дверце. |
но заземлен. Производитель не |
|||
|
несет ответственности за трав- |
||||
|
мы людей и животных и мате- |
||||
|
риальный ущерб возникающие |
||||
|
в связи с несоблюдением дан- |
||||
|
ного требования. |
Производитель не несет ответственности за последствия несоблюдения пользователем данной инструкции.
ОПИСАНИЕ ПАНЕЛИ
|
Символы |
Кнопка |
Кнопка |
Кнопка |
Кнопка |
|
режимов |
STOP/ПАУЗА |
ON/OFF |
POWER |
СТАРТ |
Power
|
Кнопка |
РУЧКА |
Кнопка |
Цифровой |
|||||||||||
|
НАЗАД |
настройки |
ЧАСЫ |
дисплей |
5

ОБЩАЯ ИНФОРМАЦИЯ В продаже имеется большой выбор кулинар-
ных принадлежностей. При покупке проверяйте их пригодность для использования в микроволновой печи.
Удостоверьтесь, что используемая вами посуда
выдерживает воздействие микроволн. Перед использованием проверьте ее в печи в течение ко- 


роткого времени.
СТЕКЛЯННЫЙ ПОВОРОТНЫЙ СТОЛ
Используйте стеклянный поворотный стол во
всех режимах приготовления. Стеклянный стол служит для сбора капель сока и частиц пищи, которые, в противном случае, загрязняли бы внутренниеɳ поверхности печи.
ɳ Установите стеклянный поворотный стол на предназначенную для него подставку.
При размещении продуктов и посуды в микро-
волновой печи следите за тем, чтобы они не касались ее внутренних стенок.
Это особенно важно при использовании посуды из металла или с металлическими частями.
При соприкосновении такой посуды с внутренними
стенками работающей печи возможно образование искр, при этом печь может выйти из строя.
Прежде чем включать печь, убедитесь, что
поворотный стол свободно вращается.
ПОДСТАВКА ПОД ПОВОРОТНЫЙ СТОЛ
Используйте специальную подстав—
ку под стеклянный поворотный 


 стол. Никогда не ставьте посуду
  непосредственноɳ на подставку.
  ɳ Установите в печь подставку под пово-
ротный стол.
РЕШЕТКА
Используйте решетчатую подстав—
ку при приготовлении пищи в режимах «Grill» и «Grill Combi».
ЗАХВАТ ДЛЯ CRISP-ТАРЕЛКИ
Используйте прилагаемый захват для извле-
чения Crisp-тарелки из микроволновой печи.
CRISP-ТАРЕЛКА
Помещайте приготавли— ваемый продукт непосред—
ственно на Crisp—тарелку.
В качестве подставки под  Crisp-тарелку используйте только

 стеклянный поворотный стол.
Не ставьте на Crisp—тарелку другую посуду. Та-
релка быстро нагревается, что может привести к повреждению посуды.
Crisp—тарелку можно предварительно нагреть (не более 3 минут). Для предварительного нагрева Crisp-тарелки используйте только режим «Crisp».
БЛОКИРОВКА КНОПОК / ЗАЩИТНАЯ БЛОКИРОВКА
Функция блокировки кнопок вводит—
ся в действие длительным нажатием кнопки НАЗАД (примерно 5 се-
кунд) — до появления на дисплее символа ключа вместо цифр.
Через 3 секунды ключ исче-
зает, и на дисплей возвращается исходное изображение.
Для снятия блокировки кнопок нажмите и удерживайте кнопку НАЗАД в течение 5 секунд.
Перед снятием блокировки следует открыть и за-
крыть дверцу (например, поместив внутрь пищу). Иначе на дисплее появится надпись «DOOR».
6

РАЗМЕШИВАНИЕ И ПЕРЕВОРОТ ПИЩИ
(ТОЛЬКО ДЛЯ РЕЖИМОВ «6TH SENSE»)
 RU
RU
|
При использовании некоторых режимов «6th |
Примечание: В режиме «Турбо—разморозка«, |
||||
|
Sense» печь может останавливаться (в зави- |
если продукт не был перевернут, печь воз- |
||||
|
симости от выбранной программы и класса |
обновляет работу автоматически через |
||||
|
продукта) и предлагать пользователю пере- |
2 минуты. Время размораживания в этом |
||||
|
вернуть продукт («TURN»). |
случае увеличивается. |
||||
|
Продолжение приготовления пищи: |
|||||
|
ɳɳОткройте дверцу. |
|||||
|
ɳɳПереверните продукт. |
|||||
|
ɳɳЗакройте дверцу и возобновите процесс |
|||||
|
кнопкой «Старт». |
|||||
|
ON / OFF |
|||||
|
Для включения или |
выключения прибо— |
Когда прибор выключен, все кнопки и ручка |
|||
|
ра нажмите кнопку «ON/OFF» на пол- |
настройки не действуют (кроме кнопки |
||||
|
секунды. |
«Старт»). На дисплее отображается время в |
||||
|
Когда прибор включен, все кнопки и ручки |
24-часовом формате. |
||||
|
Примечание: Во все описаниях, приводимых в |
|||||
|
действуют обычным образом, а на дисплее |
|||||
|
отсутствует время в 24-часовом формате. |
настоящей Инструкции, предполагается, что |
||||
|
печь включена. |
|||||
|
РЕЖИМ ОЖИДАНИЯ |
|||||
|
После нажатия кнопки «Stop» или определен- |
Когда прибор находится в режиме ожи- |
||||
|
ного времени бездействия, печь переходит |
дания, на дисплее отображается время в |
||||
|
в режим ожидания. |
24-часовом формате с пониженной ярко- |
||||
|
стью. Для выхода из режима ожидания по- |
|||||
|
верните ручку или нажмите любую кнопку. |
STOP / ПАУЗА / ПРОДОЛЖЕНИЕ ПРИГОТОВЛЕНИЯ
Приостановка приготовления пищи:
Открыв дверцу, можно приостановить процесс
приготовления, чтобы проверить, перевернуть или размешать приготавливаемый продукт. Заданные настройки сохраняются в течение 10 минут.
Продолжение приготовления пищи:
Закройте дверцу и нажмите кнопку «Старт» ОДИН РАЗ. Процесс приготовления возобновится с момента приостановки.
Если нажать кнопку «Старт» ДВАЖДЫ, длитель-
ность увеличится на 30 секунд.
Продолжение после окончания работы:
Когда на дисплее высвечивается надпись «END»,
можно увеличить время приготовления на 30 секунд нажатием кнопки «Старт». При каждом нажатии кнопки ко времени приготовления добавляется еще 30 секунд.
О завершении приготовления указы— вает звуковой сигнал, подаваемый с
частотой один раз в минуту в течение 10 минут. Чтобы отключить сигнал,
нажмите кнопку «Stop» или откройте дверцу. Примечание: Если по окончании приготовления открыть, а потом снова закрыть дверцу, печь будет хранить заданные настройки только в течение 60 секунд.
7

|
RU |
КЛАССЫ ПРОДУКТОВ (ТОЛЬКО ДЛЯ РЕЖИМОВ «6TH SENSE») |
|
|
При использовании режимов «6th Sense» для полу- |
ПРОДУКТЫ |
|
|
чения качественного результата необходимо |
||
|
указать класс приготавливаемого продукта. |
||
|
При выборе класса продукта ручкой настрой- |
Мясо (100 г — 2.0 кг) |
|
|
ки на дисплее высвечивается цифра и символ, |
||
|
указывающие тот или иной класс. |
||
|
Птица (100 г — |
Классы продукта приводятся в таблицах для каждого режима «6th Sense».
Для продуктов, отсутствующих в таблицах, а
также в случаях когда вес продуктов меньше или больше рекомендованного, следуйте процедуре «Приготовление и разогрев блюд с помощью микроволн».
Классы продуктов, используемые для различных
режимов, указаны в справочнике классов
продуктов данной печи.
|
6th SENSE |
Разогрев |
|||||||||||||||||||||
|
Тарелка с |
Замороженное |
Замороженная |
Суп |
Напиток |
||||||||||||||||||
|
ужином |
блюдо |
лазанья |
||||||||||||||||||||
|
6th SENSE |
Приготовление |
|||
|
Печеный |
Свежие |
Заморожен- |
Консервирован- |
Попкорн |
|
картофель |
овощи |
ные овощи |
ные овощи |
|
|
6th SENSE |
Crisp |
||||||||||||||||||||||||||||||||||||||||||||
|
Картофель- |
Пицца, |
Пицца, |
Куриные крылышки |
Рыбные |
|||||||||||||||||||||||||||||||||||||||||
|
фри |
тонкое тесто |
толстое тесто |
/ наггетсы |
палочки |
|||||||||||||||||||||||||||||||||||||||||
8
Узнавай о новинках и акциях первым
Вы успешно зарегистрированы на сайте.
Вам доступен личный кабинет пользователя.
Перейти к покупкам
Ваш пароль воcстановлен!
Теперь вы можете полноценно пользоваться
всеми возможностями нашего интернет-магазина.
Здравствуйте, Ваша претензия принята и зарегистрирована.
В течение 3-х рабочих дней Вам, на электронную почту, будет дан письменный ответ. В случае возникновения дополнительных вопросов, менеджер претензионного отдела свяжется с Вами.
Перейти к покупкам

Ваше сообщение об ошибке на сайте успешно отправлено.
Большое спасибо!
Добавить отзыв о магазине
Торг для данного товара сейчас не возможен!
Сколько вы готовы заплатить за этот товар?
Введите ваше ценовое предложение
Мы согласны с вашим предложением
Мы принимаем вашу цену, и вы можете купить товар по цене:
0 руб.
-
Инструкции по эксплуатации
1

Whirlpool AMW 730 WH инструкция по эксплуатации
(24 страницы)
- Языки:Русский
-
Тип:
PDF -
Размер:
5.05 MB -
Описание:
Микроволновая печь
Просмотр
На NoDevice можно скачать инструкцию по эксплуатации для Whirlpool AMW 730 WH. Руководство пользователя необходимо для ознакомления с правилами установки и эксплуатации Whirlpool AMW 730 WH. Инструкции по использованию помогут правильно настроить Whirlpool AMW 730 WH, исправить ошибки и выявить неполадки.
1
RU
ВАЖНЫЕ УКАЗАНИЯ ПО БЕЗОПАСНОСТИ
ЯЙЦА
Н
е
используйте
микроволНовую
печь для приготов-
ления или разогрева цельных
яиц в скорлупе или без нее, по-
скольку они могут взорваться,
даже после окончания микро-
волнового нагрева.
Д
ети
,
НачиНая
с
8-летнего воз-
раста, лица с ограниченными
физическими, сенсорными или
умственными способностями и
лица, не имеющие достаточных
знаний и навыков, могут поль-
зоваться прибором только под
присмотром или после того,
как получат указания по безо-
пасному использованию при-
бора и осознают имеющиеся
опасности.
Н
е
позволяйте
Детям
играть
с
прибором.
и
спользоваНие
прибора
,
чистка
и
ухоД
разрешены детям в
возрасте с 8 лет, только под
присмотром взрослых .
Н
е
Нагревайте
вНутри
печи
и
Не
ис
—
пользуйте
вблизи
Нее
горючие
ма
—
териалы
. Выделяющиеся пары
могут привести к возгоранию
или взрыву.
Н
е
используйте
микроволНовую
печь для сушки тканей, бумаги,
специй, трав, дерева, цветов,
фруктов и прочих горючих
материалов. Это может
привести к возгоранию.
в
случае
возгораНия
или
за
—
ДымлеНия
вНутри
или
сНару
—
жи
печи
не открывайте дверцу,
выключите печь. Отсоедините
сетевой шнур от розетки или
отключите питание на щите
предохранителей.
Н
е
переДерживайте
проДукты
в
печи
. Это может привести к
возгоранию.
Н
е
оставляйте
печь
без
присмотра
,
особенно, если в процессе
приготовления используются
бумага, пластмасса и прочие
горючие материалы. Бумага
может обуглиться или заго-
реться, а некоторые виды
пластмасс — расплавиться при
нагревании пищи.
Н
е
используйте
в
прибо
—
ре
агрессивные химические
вещества и пары. Данная
печь предназначена для
подогревания и приготовления
пищи. Она не предназначена
для промышленного или
лабораторного применения.
ВНИМАТЕЛЬНО ПРОЧИТАЙТЕ НАСТОЯЩУЮ ИНСТРУКЦИЮ И
СОХРАНИТЕ ЕЕ ДЛЯ ДАЛЬНЕЙШЕГО ИСПОЛЬЗОВАНИЯ