
![]()
WD Elements™ Play
Multimedia Drive
User Manual
WD® Service and Support
Should you encounter any problem, please give us an opportunity to address it before returning this product. Most technical support questions can be answered through our knowledge base or e-mail support service at http://support. wdc.com. If the answer is not available or, if you prefer, please contact WD at the best telephone number shown below.
Your product includes 30 days of free telephone support during the warranty period. This 30-day period starts on the date of your first telephone contact with WD technical support. E-mail support is free for the entire warranty period and our extensive knowledge base is available 24/7. To help us keep you informed of new features and services, remember to register your product online at http://register.wdc.com.
Accessing Online Support
Visit our product support website at http://support. wdc.com and choose from these topics:
Downloads — Download drivers, software, and updates for your WD product.
Registration — Register your WD product to get the latest updates and special offers.
Warranty & RMA Services — Get Warranty, Product Replacement (RMA), RMA Status, and Data Recovery Information.
Knowledge Base — Search by keyword, phrase, or answer ID.
Installation — Get online installation help for your WD product or software.
Contacting WD Technical Support
When contacting WD for support, have your WD product serial number, system hardware, and system software versions available.
|
North America |
Asia Pacific |
|||||
|
English |
800.ASK.4WDC |
Australia |
1 800 42 9861 |
|||
|
(800.275.4932) |
China |
800 820 6682/+65 62430496 |
||||
|
Spanish |
800.832.4778 |
Hong Kong |
+800 |
6008 |
6008 |
|
|
India |
1 800 11 9393 |
(MNTL)/1 800 200 5789 (Reliance) |
||||
|
011 26384700 |
(Pilot Line) |
|||||
|
Europe (toll free)* |
00800 ASK4 WDEU |
Indonesia |
+803 |
852 9439 |
||
|
(00800 27549338) |
Japan |
00 531 650442 |
||||
|
Korea |
02 719-3240 |
|||||
|
Europe |
+31 880062100 |
Malaysia |
+800 |
6008 |
6008/1 800 88 1908/+65 62430496 |
|
|
Middle East |
+31 880062100 |
Philippines |
1 800 1441 0159 |
|||
|
Africa |
+31 880062100 |
Singapore |
+800 |
6008 |
6008/+800 608 6008/+65 62430496 |
|
|
Taiwan |
+800 |
6008 |
6008/+65 62430496 |
* Toll free number available in the following countries: Austria, Belgium, Denmark, France, Germany, Ireland, Italy, Netherlands, Norway, Spain, Sweden, Switzerland, United Kingdom.

Table of Contents
1 Important User Information . . . . . . . . . . . . . . . . . . . . 1
Important Safety Instructions . . . . . . . . . . . . . . . . . . . . . . . . . . . . . . 1 Recording your WD Product Information . . . . . . . . . . . . . . . . . . . . . 2 Registering your WD Product . . . . . . . . . . . . . . . . . . . . . . . . . . . . . 2 Accessories . . . . . . . . . . . . . . . . . . . . . . . . . . . . . . . . . . . . . . . . . . 2
2 Product Overview . . . . . . . . . . . . . . . . . . . . . . . . . . . . 3
3 Features and Functions . . . . . . . . . . . . . . . . . . . . . . . 4
Features. . . . . . . . . . . . . . . . . . . . . . . . . . . . . . . . . . . . . . . . . . . . . . 4
Connections . . . . . . . . . . . . . . . . . . . . . . . . . . . . . . . . . . . . . . . . . 6
LED Indicator . . . . . . . . . . . . . . . . . . . . . . . . . . . . . . . . . . . . . . . . . . 7
Remote Control . . . . . . . . . . . . . . . . . . . . . . . . . . . . . . . . . . . . . . . . 8
4 Getting Started . . . . . . . . . . . . . . . . . . . . . . . . . . . . . . 9
Package Contents . . . . . . . . . . . . . . . . . . . . . . . . . . . . . . . . . . . . . 9
Installation Requirements . . . . . . . . . . . . . . . . . . . . . . . . . . . . . . . . 9
Operating System Compatibility . . . . . . . . . . . . . . . . . . . . . . . . . . . 9
Installation Procedure. . . . . . . . . . . . . . . . . . . . . . . . . . . . . . . . . . . 10
5 Operating the Multimedia Drive. . . . . . . . . . . . . . . . 18
Using the Remote Control . . . . . . . . . . . . . . . . . . . . . . . . . . . . . . . 18
Using the Multimedia Drive Menu . . . . . . . . . . . . . . . . . . . . . . . . . . 19
File Management . . . . . . . . . . . . . . . . . . . . . . . . . . . . . . . . . . . . . . 20
Auto Play . . . . . . . . . . . . . . . . . . . . . . . . . . . . . . . . . . . . . . . . . . . . 23
6 Watching Video . . . . . . . . . . . . . . . . . . . . . . . . . . . . 24
Video Playback . . . . . . . . . . . . . . . . . . . . . . . . . . . . . . . . . . . . . . . 24
Video Playback Controls . . . . . . . . . . . . . . . . . . . . . . . . . . . . . . . . 27
Video Playback Options . . . . . . . . . . . . . . . . . . . . . . . . . . . . . . . . . 28
7 Playing Music . . . . . . . . . . . . . . . . . . . . . . . . . . . . . . 30
Music Playback . . . . . . . . . . . . . . . . . . . . . . . . . . . . . . . . . . . . . . . 30
Music Playback Controls . . . . . . . . . . . . . . . . . . . . . . . . . . . . . . . . 32
TABLE OF CONTENTS – i

8 Viewing Photos. . . . . . . . . . . . . . . . . . . . . . . . . . . . . 35
Photo Display. . . . . . . . . . . . . . . . . . . . . . . . . . . . . . . . . . . . . . . . . 35
Photo Display Options . . . . . . . . . . . . . . . . . . . . . . . . . . . . . . . . . . 36
Photo Slideshow . . . . . . . . . . . . . . . . . . . . . . . . . . . . . . . . . . . . . . 37
9 Settings and Advanced Features. . . . . . . . . . . . . . . 38
Settings Navigation Buttons . . . . . . . . . . . . . . . . . . . . . . . . . . . . . 39
Available Settings. . . . . . . . . . . . . . . . . . . . . . . . . . . . . . . . . . . . . . 40
Locating Media Content. . . . . . . . . . . . . . . . . . . . . . . . . . . . . . . . . 44
10 System Maintenance . . . . . . . . . . . . . . . . . . . . . . . . 46
System Firmware Upgrade. . . . . . . . . . . . . . . . . . . . . . . . . . . . . . . 46
Troubleshooting . . . . . . . . . . . . . . . . . . . . . . . . . . . . . . . . . . . . . . 47
Common Error Messages . . . . . . . . . . . . . . . . . . . . . . . . . . . . . . . 49
Installing, Partitioning, and Formatting the Drive . . . . . . . . . . . . . . . 49
Frequently Asked Questions . . . . . . . . . . . . . . . . . . . . . . . . . . . . . 50
11 Appendix . . . . . . . . . . . . . . . . . . . . . . . . . . . . . . . . . . 52
Supported Media File Formats . . . . . . . . . . . . . . . . . . . . . . . . . . . . 52
Regulatory Compliance . . . . . . . . . . . . . . . . . . . . . . . . . . . . . . . . . 56
Warranty Information . . . . . . . . . . . . . . . . . . . . . . . . . . . . . . . . . . . 58
TABLE OF CONTENTS – ii

WD ELEMENTS PLAY MULTIMEDIA DRIVE
USER MANUAL
1 Important User Information
Important Safety Instructions
This device is designed and manufactured to assure personal safety. Improper use can result in electric shock or fire hazard. The safeguards incorporated into this unit will protect you if you observe the following procedures for installation, use, and servicing.
Read these instructions.
Keep these instructions.
Heed all warnings.
Follow all instructions.
Do not use this apparatus near water.
Clean only with dry cloth.
Do not block any ventilation openings. Install in accordance with the manufacturer’s instructions.
Do not install near any heat sources such as radiators, heat registers, stoves, or other apparatus (including amplifiers) that produce heat.
Do not expose the batteries or the remote control with batteries installed to excessive heat (direct sunlight, fire, etc.).
Do not defeat the safety purpose of the polarized or grounding-type plug. A polarized plug has two blades with one wider than the other. A grounding type plug has two blades and a third grounding prong. The wide blade or the third prong are provided for your safety. If the provided plug does not fit into your outlet, consult an electrician for replacement of the obsolete outlet.
Protect the power cord from being walked on or pinched particularly at plugs, convenience receptacles, and the point where they exit from the apparatus.
Only use attachments/accessories specified by the manufacturer.
Unplug this apparatus during lightning storms or when unused for long periods of time.
Refer all servicing to qualified service personnel. Servicing is required when the apparatus has been damaged in any way, such as power-supply cord or plug is damaged, liquid has been spilled or objects have fallen into the apparatus, the apparatus has been exposed to rain or moisture, does not operate normally, or has been dropped.
Carefully read and follow the Quick Install Guide and User Manual.
Do not operate this device outside the temperature range of 5°C–35°C (41°F–95°F).
Do not drop or shake the device.
Do not move the device when it is powered on.
Power supply cords should be routed so that they are not likely to be walked on or pinched by items placed upon them or against them.
Do not overload wall outlets.
For additional safety information, refer to www.wdc.com.
IMPORTANT USER INFORMATION – 1

WD ELEMENTS PLAY MULTIMEDIA DRIVE
USER MANUAL
Recording your WD Product Information
In the following table, write the serial and model numbers of your new WD product. You can find this information on the label on the bottom of the device. You should also note the date of purchase. This information may be required when requesting technical support.
Serial Number:
Model Number:
Purchase Date:
System and Software Notes:
Registering your WD Product
Your WD product includes 30 days of free technical support during the applicable warranty period for your product. The 30-day period commences on the date of your first telephone contact with WD technical support. Register your WD product online at http://register.wdc.com.
Accessories
For U.S. residents, visit www.shopwd.com to view additional accessories available for your multimedia drive. For users outside the U.S., visit http://support.wdc.com.
IMPORTANT USER INFORMATION – 2

WD ELEMENTS PLAY MULTIMEDIA DRIVE
USER MANUAL
2 Product Overview
Thank you for purchasing the WD Elements Play multimedia drive. This user manual provides step-by-step instructions for installing and using your new multimedia drive. For the latest WD product information and news, visit our website at www.westerndigital.com.
The WD Elements Play multimedia drive is an easy, affordable way to supersize your movies and photos on your big-screen TV and play your music collection on your home entertainment center. Save your media collection on the multimedia drive, then simply connect the drive to your TV and you’re ready to enjoy all your digital media in Full-HD 1080p resolution.
Full-HD 1080p resolution – Experience spectacular Full-HD video picture quality and crystal-clear digital audio. The HDMI port lets you connect to the highest quality HDTV or home theater.
Plenty of room for your media collection – The built-in high capacity hard drive offers room for tons of media. If you need more space, plug USB drives into the available ports.
Supports a wide variety of file formats – Most popular formats are supported including RMVB, H264, and MKV.
Camera compatible – Connect your digital camera or camcorder and play or transfer content from your camera to the drive.
Easy, intuitive user interface – Simple, intuitive and beautiful, the user interface provides the following navigation options:
DVD navigation with complete menu navigation, chapter listings, special features, and subtitles
Photo slideshow with unique transitions and music on your HDTV
Supports photo thumbnails, video cover art and music album art
Music playlist support for PLS, M3U, WPL file types
Preview your video during navigation
Multi-language subtitle support for video playback
Automatic play – Set the player to play a selected media file automatically when the unit is turned on. Perfect for living art on your HD TV or for digital signage.
Composite video connection – Composite (RCA) outputs ensure compatibility with virtually all television sets.
Digital optical audio – High fidelity audio or pass-through digital audio signal to your AV receiver for surround sound experience. Supports SPDIF and Dolby Digital native playback.
PRODUCT OVERVIEW – 3

WD ELEMENTS PLAY MULTIMEDIA DRIVE
USER MANUAL
3 Features and Functions
Features
Audio/Video Interface
HDMI 1.4 interface for digital audio and high-definition video
Composite interface (RCA yellow/white/red) for analog AV connection
Toslink (optical) audio for high-fidelity digital audio
Video output resolution includes 480i and 576i (composite interface), or 480p, 576p, 720p, 1080i, and 1080p (HDMI interface)
Stereo or multi-channel digital surround (pass through only) audio output
Advanced Navigation Options
Thumbnail and list views—browse your content by filename or by thumbnails of photos, album covers, and movie preview
Search—search by filename and partial filename
Content Playback
The multimedia drive is capable of playing several different types of multiformat files. For a detailed list of supported formats, go to “Supported Media File Formats” on page 52. The included remote control lets you quickly browse through your media and configure settings.
Photo Viewing
Create custom slide shows with a variety of transitions
Zoom, pan, repeat, shuffle, and rotate
Movie Viewing
Fast forward, rewind, previous, next, pause, repeat, shuffle, and zoom
View subtitles
View video menu (if supported by the file format)
Video preview (if supported by the file format)
Music Playback
Fast forward, rewind, pause, shuffle, and repeat
View album art
File Management:
View all files together
Copy or delete files directly from the TV
FEATURES AND FUNCTIONS – 4

WD ELEMENTS PLAY MULTIMEDIA DRIVE
USER MANUAL
Additional Features
Real Media (RMVB) playback
Plug-and-play convenience
Popular media format support
Metadata support
Thumbnail support
Aggregated music/photo/video view
HDMI or composite video outputs
Toslink (optical) audio output
Plug-n-Play USB 2.0 Support
USB storage device with a USB connector
Portable multimedia drives with USB connector
Digital cameras with USB connector
For a list of tested, compatible USB devices, see Article #5675 in our knowledge base at http://support.wdc.com.
USB Storage File System Support
NTFS
HFS+
HFS+Journaling (read only)
For instructions on how to disable Journaling, see Article #2615 in our knowledge base at http://support.wdc.com.
FEATURES AND FUNCTIONS – 5
WD ELEMENTS PLAY MULTIMEDIA DRIVE
USER MANUAL
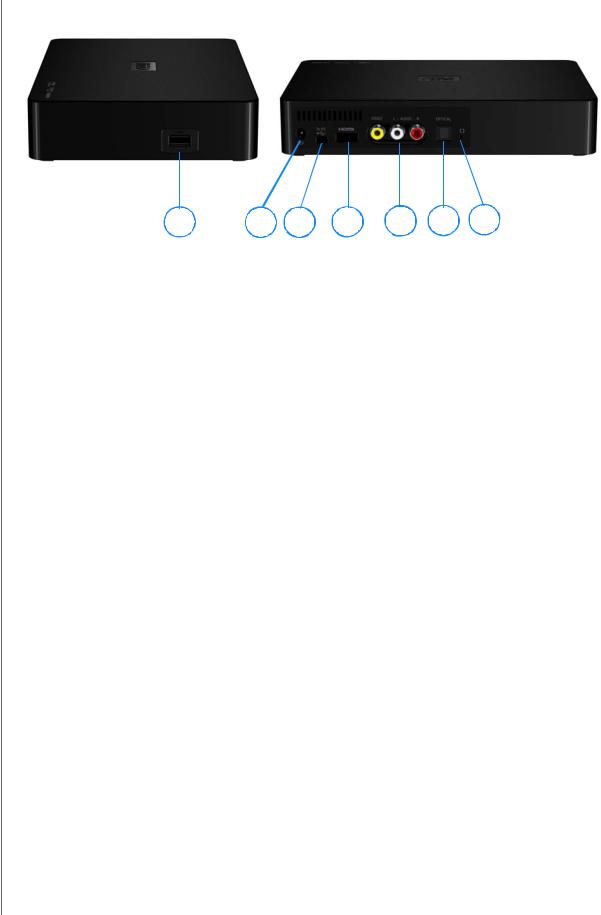
Connections
|
1 |
2 |
3 |
4 |
5 |
6 |
7 |
|
|
Item |
Component |
Description |
|||||
|
1 |
USB port |
Supports connection of removable storage devices, portable |
|||||
|
multimedia drives, and digital cameras with USB connectors |
|||||||
|
2 |
Power jack |
Connects the power adapter |
|||||
|
3 |
Mini USB port |
Supports connection of the multimedia drive to a computer as |
|||||
|
an external USB storage device for content transfer. |
|||||||
|
4 |
HDMI port |
Connects to your TV’s HDMI port (HDMI cable sold separately) |
|||||
|
5 |
Composite jacks |
Connect to your TV’s analog video and audio jacks |
|||||
|
(composite cable sold separately). |
|||||||
|
Note: When making an audio connection through the Toslink |
|||||||
|
(optical) port, only the composite video connection is required. |
|||||||
|
6 |
Toslink (optical) audio port |
Connects to your AV receiver (Toslink cable sold separately) |
|||||
|
7 |
Reset switch |
Reset the multimedia drive to factory settings (using a fine- |
|||||
|
tipped stylus or the unfolded end of a paperclip) |
|||||||
FEATURES AND FUNCTIONS – 6
![]()
WD ELEMENTS PLAY MULTIMEDIA DRIVE
USER MANUAL
LED Indicator
 1
1 
 2
2 
|
Item |
Component |
Description |
|
1 |
Infrared receiver |
Receives signals from the remote control. Point the tip of the |
|
remote control to the infrared receiver and ensure that the path |
||
|
between the two is unobstructed. |
||
|
2 |
Power/activity |
On (steady blue)—The power cable is connected and the power is |
|
LED |
on. |
|
|
Activity—Fast flashing (approximately three times per second) |
||
|
System standby— Slow flashing (approximately every 2.5 |
||
|
seconds) |
||
|
Off—The multimedia drive is in standby mode or the power cable |
||
|
is disconnected. |
||
FEATURES AND FUNCTIONS – 7
WD ELEMENTS PLAY MULTIMEDIA DRIVE
USER MANUAL
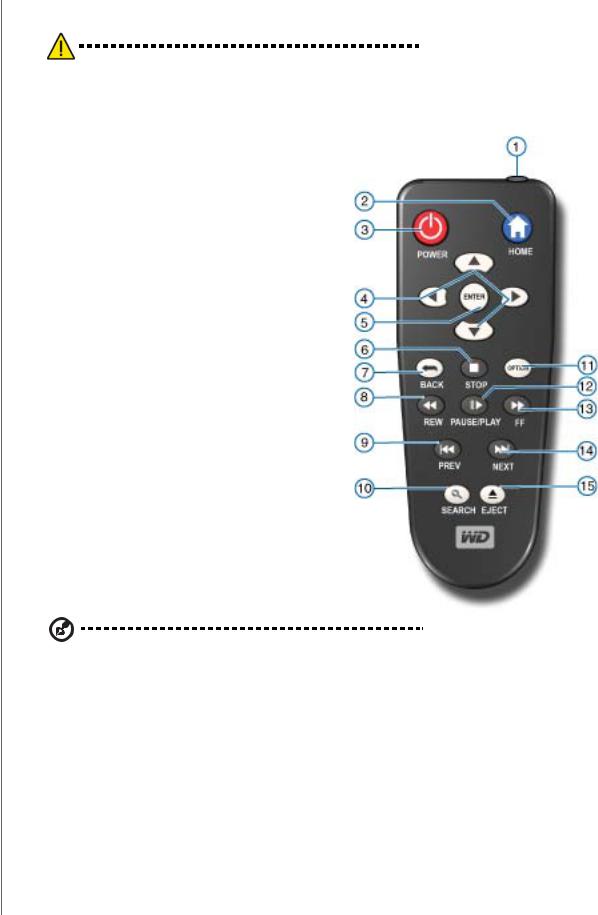
Remote Control
CAUTION: Do not expose the batteries or the remote control with batteries installed to excessive heat (direct sunlight, fire, etc.).
1.Infrared transmitter
2.HOME
3.POWER
4.Navigation buttons
5.ENTER
6.STOP
7.BACK
8.REV (rewind)
9.PREV (previous track)
10.SEARCH
11.OPTION
12.PAUSE/PLAY
13.FF (fast forward)
14.NEXT (next track)
15.EJECT (safe removal of attached storage)
Note: For additional information, see “Using the Remote Control” on page 18.
FEATURES AND FUNCTIONS – 8
WD ELEMENTS PLAY MULTIMEDIA DRIVE
USER MANUAL
4 Getting Started
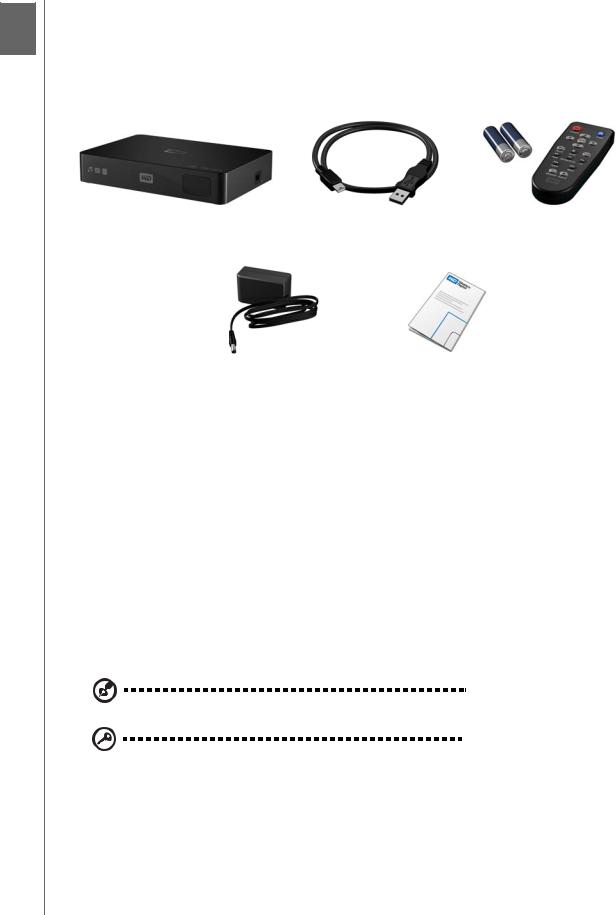
Package Contents
|
Multimedia Drive |
USB cable |
Remote control and |
|
Two AAA batteries |
|
AC power adapter |
Quick Install Guide |
Installation Requirements
Standard or HD TV with an HDMI or composite audio/video input
Computer with a USB 2.0 connector
Optional: Stereo or AV receiver with a digital optical (Toslink) cable.
Operating System Compatibility
The multimedia drive is compatible with the following operating systems:
|
Windows® |
Mac® OS X® |
||||
|
Windows XP |
Tiger® |
||||
|
Windows Vista® |
Leopard® |
||||
|
Windows 7 |
Snow Leopard™ |
||||
Note: Compatibility may vary depending on user’s hardware configuration and operating system.
Important: For highest performance and reliability, it is recommended that you install the latest updates and service pack (SP). For Windows, go to the Start menu and select Windows Update. For Mac, go to the Apple menu and select Software Update.
GETTING STARTED – 9

WD ELEMENTS PLAY MULTIMEDIA DRIVE
USER MANUAL
Multimedia Drive Reformatting
The multimedia drive is preformatted as a single NTFS partition for compatibility with all updated Windows operating systems. Go to http://support.wdc.com and refer to Knowledge Base Answer ID 3865 for reformatting the drive to Mac OS X format. See “Troubleshooting” on page 57 for more information about reformatting a drive.
Important: Reformatting the multimedia drive erases all its contents. If you have already saved files on the multimedia drive, be sure to back them up before reformatting it.
Installation Procedure
The multimedia drive installation procedure is outlined below:
1.Connect the power cable.
2.Transfer content from your computer to the multimedia drive.
3.Disconnect the multimedia drive from your computer, then connect it to your TV or entertainment unit through the desired interface option.
4.Insert the batteries into the remote control.
5.Connect a USB device containing media content (optional).
GETTING STARTED – 10

WD ELEMENTS PLAY MULTIMEDIA DRIVE
USER MANUAL
Step 1 — Connecting the Power Cable
1.Connect the power clip to the power cable plug.
The AC power adapter will vary, depending on your location. Some locations do not require a power plug clip. Units sold in those locations will have a fixed power plug. Refer to the illustration below.
US/JA/TW EU/KO
US/JA/TW EU/KO
|
Installing |
Removing |
Installing |
Removing |
2.Connect the power cable to the multimedia drive’s DC connector, and then plug the opposite end into an AC power outlet. The multimedia drive powers up automatically.
GETTING STARTED – 11
WD ELEMENTS PLAY MULTIMEDIA DRIVE
USER MANUAL
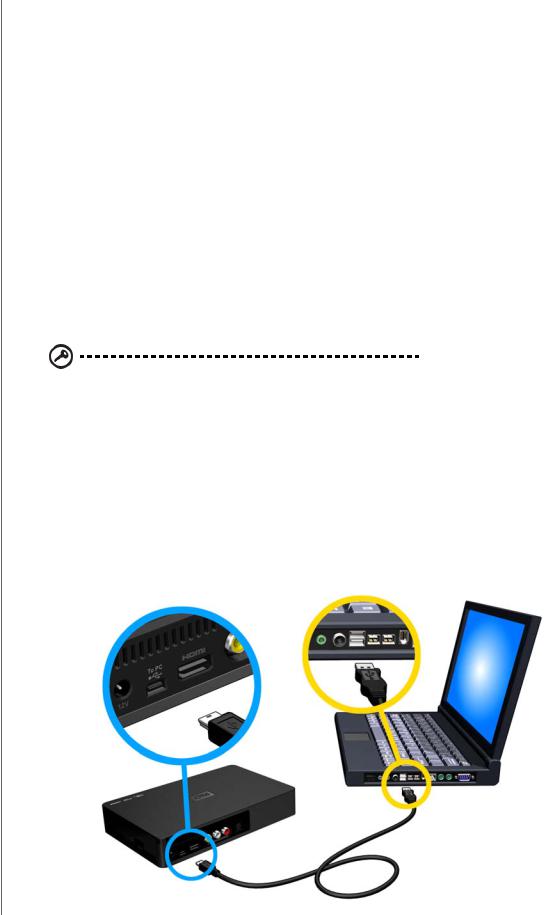
Step 2 — Loading Content On Your Multimedia Drive
Transfer your favorite content from your computer to your multimedia drive. You can also transfer files from your multimedia drive to your computer.
Windows
1.Turn on your computer.
2.Connect the drive’s power cable (see “Step 1 — Connecting the Power Cable” on page 11) and USB cable as shown below.
3.Drive utilities are installed automatically. If a security alert is displayed during this installation, click Accept or Continue.
4.The multimedia drive appears as a new drive volume in Computer (Windows 7 or Windows Vista) or My Computer (Windows XP).
5.Drag and drop your media files from your computer to the multimedia drive or from the multimedia drive to your computer.
Macintosh
Important: To transfer content to or from the multimedia drive using a Mac, you must reformat the drive. See “Multimedia Drive Reformatting” on page 10 for details.
1.Turn on your computer.
2.Connect the drive’s power cable (see “Step 1 — Connecting the Power Cable” on page 11) and USB cable as shown below.
3.The drive mounts to the desktop and a WD Multimedia icon appears. Double-click the WD Multimedia drive icon.
4.Drag and drop your media files from your computer to the multimedia drive or from the multimedia drive to your computer.
GETTING STARTED – 12
WD ELEMENTS PLAY MULTIMEDIA DRIVE
USER MANUAL
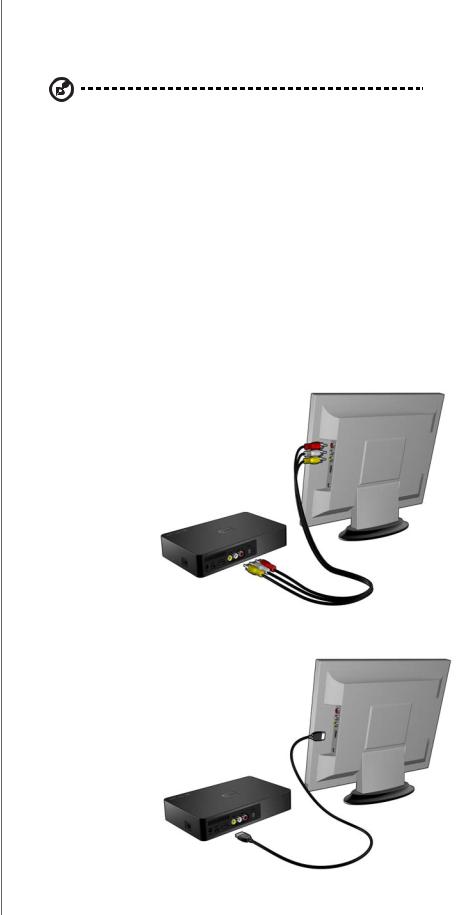
Step 3 — Connecting the Multimedia Drive
The following figures illustrate the cable connections supported by the multimedia drive.
Note: Composite, HDMI, and Toslink (optical) cables are sold separately.
Choosing the Best Connection
The quality of the picture produced by your TV depends on the quality of your TV and its connection to the multimedia drive.
|
Connection |
Quality |
Connectors |
|
HDMI |
Best |
Specialized, high-definition connector |
|
(up to 1080p) |
||
|
Composite |
Good (480i/576i) |
Yellow = video |
|
Red = right audio |
||
|
White = left audio |
||
|
Composite (Standard Definition) |
HDMI (High Definition)
GETTING STARTED – 13

WD ELEMENTS PLAY MULTIMEDIA DRIVE
USER MANUAL
Composite AV Connection (Standard Definition)
To use a composite connection (composite cable sold separately):
1.Plug the composite connectors into the input ports on your multimedia drive, yellow to yellow, red to red, and white to white
2.Plug the opposite ends into the composite input ports on your TV, yellow to yellow, red to red, and white to white.
3. Select the appropriate TV input source.
Wait a few seconds for your TV to detect the multimedia drive. If the multimedia drive is not detected, you may need to change the input source on your TV to HDMI or composite, depending on your connection. Check the user documentation of your TV for more information.
Once the multimedia drive is detected, the splash screen displays to indicate system bootup, then the home screen of the user interface opens. Go to “Using the Multimedia Drive Menu” on page 19.
GETTING STARTED – 14
WD ELEMENTS PLAY MULTIMEDIA DRIVE
USER MANUAL
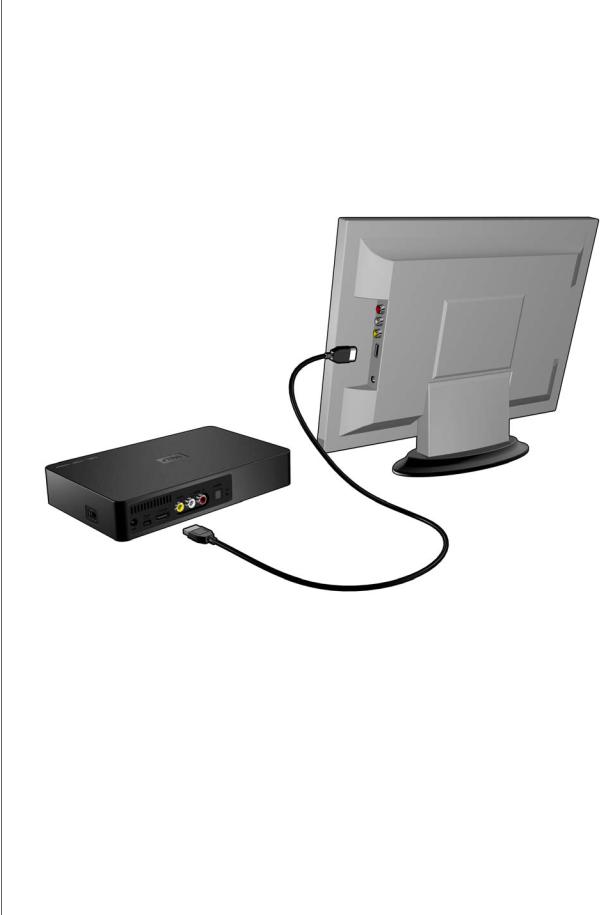
HDMI Video and Audio (High Definition)
HDMI combines high-definition video, multi-channel audio, and inter-component control in a single digital cable. This interface provides video quality resolution of up to 1080p.
To connect your multimedia drive using an HDMI cable:
1.Plug an HDMI cable (sold separately) into the HDMI connector on the multimedia drive.
2.Plug the opposite end into the HDMI port on your TV or audio/video system (if available).
Wait a few seconds for your TV to detect the multimedia drive. If the multimedia drive is not detected, you may need to change the input source on your TV to HDMI or composite, depending on your connection. Check the user documentation of your TV for more information.
Once the multimedia drive is detected, the splash screen displays to indicate system bootup, then the home screen of the user interface opens. Go to “Using the Multimedia Drive Menu” on page 19.
GETTING STARTED – 15
WD ELEMENTS PLAY MULTIMEDIA DRIVE
USER MANUAL
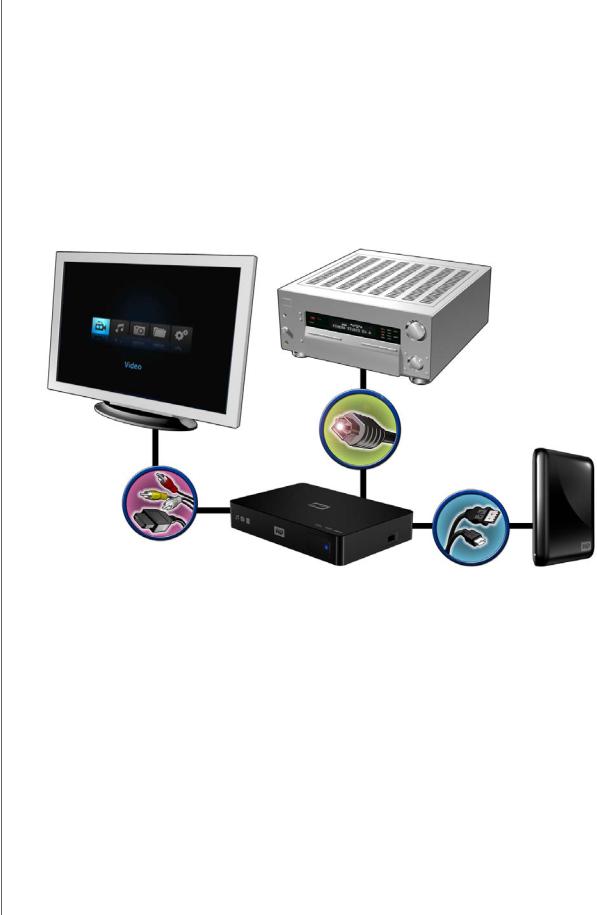
Toslink (optical) Digital Audio
Toslink (optical) digital can send digital audio to a receiver capable of decoding multichannel audio through an AV receiver.
1.Complete the composite or HDMI video connection as described in “Composite AV Connection (Standard Definition)” on page 14 or “HDMI Video and Audio (High Definition)” on page 15.
2.Plug a Toslink (optical) cable (sold separately) into the S/PDIF digital optical port on your multimedia drive.
3.Plug the other end of the Toslink (optical) cable into the digital optical port on your AV receiver.
4.Select the appropriate audio source on your AV receiver.
GETTING STARTED – 16
 Loading…
Вы здесь
Каталог инструкций » W » Western Digital » Мультимедиа Western Digital » Western Digital WD Elements Play User Manual » Страница инструкции 1
-

1
-
2
-
3
-
4
-
5
-
6
-
7
-
8
-
9
-
10
-
11
-
12
-
13
-
14
-
15
-
16
-
17
-
18
-
19
-
20
-
21
-
22
-
23
-
24
-
25
-
26
-
27
-
28
-
29
-
30
-
31
-
32
-
33
-
34
-
35
-
36
-
37
-
38
-
39
-
40
-
41
-
42
-
43
-
44
-
45
-
46
-
47
-
48
-
49
-
50


- 1
- 2
- ››
Распечатать
Страница 1 из
- << Предыдущая
- Следующая >>

Wd elements, Play в инструкции по эксплуатации Western Digital WD Elements Play User Manual
WD Elements
Play
Мультимедийный накопитель
Руководство по эксплуатации
- << Предыдущая
- Следующая >>

Ремонт
и
поддержка
продукции
WD
®
При
возникновении
неполадок
в
работе
изделия
,
пожалуйста
,
не
торопитесь
его
возвращать
.
Мы
всегда
готовы
помочь
вам
устранить
неполадки
самостоятельно
.
Ответы
на
большинство
технических
вопросов
можно
получить
,
обратившись
к
нашей
базе
знаний
или
к
службе
поддержки
по
электронной
почте
на
сайте
http://support.wdc.com
.
Если
вы
не
нашли
ответа
на
свой
вопрос
или
предпочитаете
общаться
со
службой
поддержки
по
телефону
,
позвоните
по
наиболее
удобному
для
вас
номеру
из
числа
приведенных
ниже
.
На
приобретенное
вами
изделие
распространяется
30-
дневная
бесплатная
техническая
поддержка
по
телефону
в
течение
гарантийного
срока
.
Этот
30-
дневный
период
начинается
в
момент
вашего
первого
обращения
в
службу
технической
поддержки
WD
по
телефону
.
Техническая
поддержка
по
электронной
почте
оказывается
бесплатно
в
течение
всего
гарантийного
срока
,
а
наша
обширная
база
знаний
работает
ежедневно
и
круглосуточно
.
Если
вы
хотите
получать
от
нас
известия
о
новых
возможностях
и
услугах
,
зарегистрируйте
свое
изделие
на
сайте
http://register.wdc.com
.
Ресурсы
поддержки
в
Интернете
Посетите
сайт
поддержки
нашей
продукции
по
адресу
http://support.wdc.com
,
где
вам
предоставляются
следующие
возможности
:
Файлы
–
Загрузить
драйверы
,
программы
и
обновления
для
изделий
WD.
Регистрация
–
Зарегистрировать
изделие
WD,
чтобы
получать
последние
обновления
и
специальные
предложения
.
Гарантийное
обслуживание
и
RMA
–
Получить
сведения
о
гарантии
,
возврате
изделий
(RMA),
состоянии
RMA
и
восстановлении
данных
.
База
знаний
–
Поиск
по
ключевым
словам
или
номеру
ответа
.
Установка
–
Получить
справку
в
Интернете
об
установке
изделия
или
программы
WD.
Порядок
обращения
в
службу
технической
поддержки
WD
При
обращении
в
компанию
WD
за
технической
поддержкой
необходимо
знать
серийный
номер
своего
изделия
WD,
конфигурацию
своего
компьютера
и
версию
операционной
системы
.
Северная
Америка
Азиатско
—
тихоокеанский
регион
Английский
800.ASK.4WDC
Австралия
1 800 42 9861
(800.275.4932)
Китай
800 820 6682/+65 62430496
Испанский
800.832.4778
Гонконг
+800 6008 6008
Индия
1 800 11 9393 (MNTL)/1 800 200 5789 (Reliance)
011 26384700 (Pilot Line)
Европа
(
бесплатный
)*
00800 ASK4 WDEU
Индонезия
+803 852 9439
(00800 27549338)
Япония
00 531 650442
Корея
02 719-3240
Европа
+31 880062100
Малайзия
+800 6008 6008/1 800 88 1908/+65 62430496
Ближний
Восток
+31 880062100
Филиппины
1 800 1441 0159
Африка
+31 880062100
Сингапур
+800 6008 6008/+800 608 6008/+65 62430496
Тайвань
+800 6008 6008/+65 62430496
*
Бесплатные
телефоны
работают
в
следующих
странах
:
Австрия
,
Бельгия
,
Дания
,
Франция
,
Германия
,
Ирландия
,
Италия
,
Нидерланды
,
Норвегия
,
Испания
,
Швеция
,
Швейцария
,
Великобритания
.
A good user manual
The rules should oblige the seller to give the purchaser an operating instrucion of Western Digital Elements Play, along with an item. The lack of an instruction or false information given to customer shall constitute grounds to apply for a complaint because of nonconformity of goods with the contract. In accordance with the law, a customer can receive an instruction in non-paper form; lately graphic and electronic forms of the manuals, as well as instructional videos have been majorly used. A necessary precondition for this is the unmistakable, legible character of an instruction.
What is an instruction?
The term originates from the Latin word „instructio”, which means organizing. Therefore, in an instruction of Western Digital Elements Play one could find a process description. An instruction’s purpose is to teach, to ease the start-up and an item’s use or performance of certain activities. An instruction is a compilation of information about an item/a service, it is a clue.
Unfortunately, only a few customers devote their time to read an instruction of Western Digital Elements Play. A good user manual introduces us to a number of additional functionalities of the purchased item, and also helps us to avoid the formation of most of the defects.
What should a perfect user manual contain?
First and foremost, an user manual of Western Digital Elements Play should contain:
— informations concerning technical data of Western Digital Elements Play
— name of the manufacturer and a year of construction of the Western Digital Elements Play item
— rules of operation, control and maintenance of the Western Digital Elements Play item
— safety signs and mark certificates which confirm compatibility with appropriate standards
Why don’t we read the manuals?
Usually it results from the lack of time and certainty about functionalities of purchased items. Unfortunately, networking and start-up of Western Digital Elements Play alone are not enough. An instruction contains a number of clues concerning respective functionalities, safety rules, maintenance methods (what means should be used), eventual defects of Western Digital Elements Play, and methods of problem resolution. Eventually, when one still can’t find the answer to his problems, he will be directed to the Western Digital service. Lately animated manuals and instructional videos are quite popular among customers. These kinds of user manuals are effective; they assure that a customer will familiarize himself with the whole material, and won’t skip complicated, technical information of Western Digital Elements Play.
Why one should read the manuals?
It is mostly in the manuals where we will find the details concerning construction and possibility of the Western Digital Elements Play item, and its use of respective accessory, as well as information concerning all the functions and facilities.
After a successful purchase of an item one should find a moment and get to know with every part of an instruction. Currently the manuals are carefully prearranged and translated, so they could be fully understood by its users. The manuals will serve as an informational aid.