
Nov 12, 2013 1 / 5
Please be informed that the data shown in this PDF Document is generated from our Online Catalog. Please find the complete data in
the user’s documentation. Our General Terms of Use for Downloads are valid
(http://download.phoenixcontact.com)
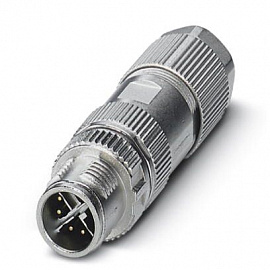
M12 connector, CAT6
A
, connector, straight, 8-pos., shielded, for cable diameters of 4 mm … 8 mm
Key commercial data
package_quantity
1
GTIN
4046356530699
Technical data
Dimensions
External diameter
4 mm … 8 mm
Ambient conditions
Ambient temperature (operation)
-40 °C … 85 °C
Degree of protection
IP65
Degree of protection
IP67
General
Rated current at 40°C
0.5 A
Rated voltage
48 V
Number of positions
8
Contact resistance
≤ 10 mΩ
Insulation resistance
≥ 100 MΩ
Coding
X — data
Signal type/category
Ethernet CAT6
A
Surge voltage category
III
Pollution degree
2
Connection method
Piercecon
®
Conductor cross section
0.14 mm²
AWG conductor cross section
26
Insertion/withdrawal cycles
≥ 100
Torque
0.4 Nm (M12 knurl)
Torque
1 Nm (Connector with coupling sleeve)

|
ESPAÑOL |
||||||
|
10 Gbit/s M12 CAT6A |
Conector enchufable M12 para 10 Gbit/s, CAT6A |
|||||
|
1. 2 |
1. Estructura (Fig. 2) |
|||||
|
1 |
1 |
Tuerca |
||||
|
2 |
2 |
Junta |
||||
|
3 |
3 |
Corona |
||||
|
4 |
4 |
Casquillo |
||||
|
5 |
5 |
Organizador de cables |
||||
|
6 |
6 Parte superior del conductor |
|||||
|
2. |
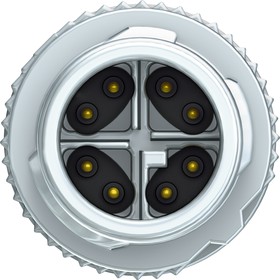
2. Distribución de conectores |
|||||
|
Pin |
Color del conductor |
|||||
|
1 |
WHOG |
1 |
WHOG |
|||
|
2 |
OG |
2 |
OG |
|||
|
3 |
WHGN |
3 |
WHGN |
|||
|
4 |
GN |
4 |
GN |
|||
|
5 |
WHBN |
5 |
WHBN |
|||
|
6 |
BN |
6 |
BN |
|||
|
7 |
WHBU |
7 |
WHBU |
|||
|
8 |
BU |
8 |
BU |
3.
•1 2 3 44 3
•3 4
•70 mm 4
•PiMF 10 mm 4
•5
5
•5 4 3 11 Nm 6
• 5 135°
7
• 5
• 6 42 Nm 8
3. Confección
•Deslice tuerca 1, junta 2, corona 3y casquillo 4sobre el cable. Tenga en cuenta al hacerlo que el casquillo 4 se introduzca con el lado roscado largo en primer lugar sobre el cable (Fig. 3).
•Deslice la corona 3 en el casquillo 4.
¡Tenga en cuenta al deslizar la corona la codificación del conector enchufable!
•Pele la envoltura del cable 70 mm. (Fig. 4)
•Doble hacia atrás la pantalla trenzada sobre la envoltura del cable. Recorte el PiMF 10 mm. (Fig. 4)
•Lleve cada conductor al organizador de cables según el color. Vuelva a poner la cubierta trenzada hacia delante y córtela justo por encima del anillo del organizador de cables 5 (la cubierta trenzada debe solaparse con el organizador de cables). (Fig. 5)
•Inserte el organizador de cables 5 en el casquillo 4, deslice
a continuación la corona 3 y enrósquela con la tuerca 1. Aplique para ello un par de apriete de 1 Nm. (Fig. 6)
Para la variante en ángulo:
•Oriente la ranura codificada del organizador de cables 5 para el sentido de salida estándar a 135° de la salida de cables. (Fig. 7)
•Corte los hilos individuales al ras con el organizador de cables 5. Se recomienda el uso de una cortadora lateral sin bisel.
•Enrosque la parte superior del conector 6 y el casquillo 4 una con otro.
Aplique para ello un par de apriete de 2 Nm. (Fig. 
|
FRANÇAIS |
ENGLISH |
DEUTSCH |
||||||||||
|
Connecteur mâle M12 pour 10 Gbit/s, CAT6A |
M12 plug connector for 10 Gbit/s, CAT6A |
M12-Steckverbinder für 10 Gbit/s, CAT6A |
||||||||||
|
1. Structure (Fig. 2) |
1. Structure (Fig. 2) |
1. Aufbau (Abb. 2) |
||||||||||
|
1 |
Ecrou |
1 |
Nut |
1 |
Mutter |
|||||||
|
2 |
Joint |
2 |
Grommet |
2 |
Dichtung |
|||||||
|
3 |
Couronne |
3 |
Collar |
3 |
Krone |
|||||||
|
4 |
Douille |
4 |
Sleeve |
4 |
Tülle |
|||||||
|
5 |
Gestionnaire de câbles |
5 |
Cable manager |
5 |
Kabelmanager |
|||||||
|
6 Partie supérieure du connecteur |
6 |
Upper part of plug |
6 |
Steckeroberteil |
||||||||
|
2. Affectation des broches |
2. Connector pin assignment |
2. Steckerbelegung |
||||||||||
|
Broche |
Couleur du fil |
Pin |
Conductor color |
Pin |
Aderfarbe |
|||||||
|
1 |
WHOG |
1 |
WHOG |
1 |
WHOG |
|||||||
|
2 |
OG |
2 |
OG |
2 |
OG |
|||||||
|
3 |
WHGN |
3 |
WHGN |
3 |
WHGN |
|||||||
|
4 |
GN |
4 |
GN |
4 |
GN |
|||||||
|
5 |
WHBN |
5 |
WHBN |
5 |
WHBN |
|||||||
|
6 |
BN |
6 |
BN |
6 |
BN |
|||||||
|
7 |
WHBU |
7 |
WHBU |
7 |
WHBU |
|||||||
|
8 |
BU |
8 |
BU |
8 |
BU |
|||||||
|
3. Confection |
3. Assembly |
3. Konfektionierung |
||||||||||
|
• Enfiler l’écrou 1, le joint 2, la couronne 3et le capot 4sur le câ- |
• |
Push the nut 1, grommet 2, collar 3 and sleeve 4 onto the ca- |
• Schieben Sie Mutter 1, Dichtung 2, Krone 3 und Tülle 4 auf |
|||||||||
|
ble. Attention, le capot 4 doit être enfilé sur le câble avec le côté |
ble. Make sure that when the sleeve 4 is pushed onto the cable, |
das Kabel. Beachten Sie dabei, dass die Tülle 4mit der längeren |
||||||||||
|
fileté le plus long en premier. (Fig. 3) |
• |
the side with the longer thread goes on first (Fig. 3). |
Gewindeseite zuerst auf das Kabel geschoben wird. (Abb. 3) |
|||||||||
|
• Enfiler la couronne 3 dans le capot 4. |
Push the collar 3 into the sleeve 4. |
• Schieben sie die Krone 3 in die Tülle 4. |
Lors de l’enfilage de la couronne, respecter le codage du connecteur.
•Dénuder le câble sur environ 70 mm. (Fig. 4)
•Rabattre la tresse de blindage vers l’arrière, sur la gaine du câble. Raccourcir le PiMF de 10 mm. (Fig. 4)
•Introduire les fils individuels dans le gestionnaire de câble en respectant les couleurs.
Rabattre la tresse de blindage vers l’avant et la sectionner peu après la bague du gestionnaire de câble 5(la tresse de blindage doit se superposer au gestionnaire de câbles). (Fig. 5)
•Enfiler le gestionnaire de câbles 5 dans le capot 4, puis la couronne 3 et visser le tout avec l’écrou 1. Appliquer un couple de serrage de 1 Nm. (Fig. 6)
Avec la version coudée :
•Diriger la rainure de détrompage du gestionnaire de câbles 5 à 135° à partir de la sortie du câble pour obtenir la direction de sortie standard. (Fig. 7)
•Raccourcir les fils à ras du gestionnaire de câbles 5. Il est recommandé d’utiliser pour ce faire une pince coupante diagonale.
•Assembler la partie supérieur du connecteur 6 et le capot 4 en les vissant.
Appliquer un couple de serrage de 2 Nm (Fig. 8).
When pushing the collar onto the rest of the assembly, pay attention to the coding of the connector!
•Strip 70 mm off the cable. (Fig. 4)
•Push back the braided shield on the cable sheath. Shorten the PiMF to 10 mm. (Fig. 4)
•Insert the individual conductors into the cable manager, in accordance with the color assignments.
Fold the braided shield forward and shorten it just above the circumferential ring at the cable manager 5 (braided shield has to overlap at the cable manager). (Fig. 5)
•Insert the cable manager 5into the sleeve 4, subsequently push the collar 3 onto it and use the nut 1 to tighten the assembly.
A torque of 1 Nm is required. (Fig. 6)
For the angled version:
•For the default outlet direction, align the keying groove of the cable manager 5 135° from the cable outlet. (Fig. 7)
•Cut the individual conductors flush at the cable manager 5. We recommend using a flush wire cutter.
•Screw together the upper part of the plug 6 and the sleeve 4. A torque of 2 Nm is required. (Fig.
Achten Sie beim Aufschieben der Krone auf die Kodierung des Steckverbinders!
•Manteln Sie die Leitung auf 70 mm ab. (Abb. 4)
•Schlagen Sie das Schirmgeflecht auf den Kabelmantel zurück. Kürzen Sie den PiMF auf 10 mm. (Abb. 4)
•Führen Sie die Einzeladern entsprechend der Farbbelegung in den Kabelmanager ein.
Schlagen Sie das Schirmgeflecht nach vorn zurück und kürzen es knapp oberhalb des umlaufenden Ringes am Kabelmanagers 5 (Schirmgeflecht muss am Kabelmanager überlappen). (Abb. 5)
•Fügen Sie den Kabelmanager 5in die Tülle 4ein, anschließend Krone 3aufschieben und mit Mutter 1verschrauben. Hierfür ist
ein Drehmoment von 1 Nm aufzubringen. (Abb. 6)
Für die gewinkelt Variante:
•Richten Sie die Kodiernut des Kabelmanagers 5 für die Standardabgangsrichtung in Richtung 135° vom Kabelabgang aus. (Abb. 7)
•Kürzen Sie die Einzeladern bündig am Kabelmanager 5. Hierfür ist die Verwendung eines watenlosen Seitenschneiders zu empfehlen.
•Schrauben Sie Steckeroberteil 6 und Tülle 4 zusammen. Hierfür ist ein Drehmoment von 2 Nm aufzubringen. (Abb.
PHOENIX CONTACT GmbH & Co. KG
D-32823 Blomberg, Germany
Fax +49-(0)5235-341200, Phone +49-(0)5235-300
|
www.phoenixcontact.com |
MNR 0118520-00 / 2010 — 03 |
|
DE |
Konfektionieranleitung |
||
|
EN |
Assembly instructions |
||
|
FR |
Instructions d’installation |
||
|
ES |
Instrucciones de montaje |
||
|
ZH |
|||
|
VS-08-M12MS-10G-P SCO |
Order No.: 1417430 |
||
|
VS-08-M12MR-10G-P SCO |
Order No.: 1417443 |
||
|
1 |
|||
2
6
5
4
3
2
1
3
4
3
2
1
UL 94
4
10mm
|
5 |
6 |
|
Datos técnicos |
Caractéristiques techniques |
Technical data |
Technische Daten |
||||||||||
|
Datos mecánicos |
Caractéristiques mécaniques |
Mechanical data |
Mechanische Daten |
||||||||||
|
Número de polos |
Nombre de pôles |
Number of positions |
Polzahl |
8 |
|||||||||
|
Grado de protección |
Indice de protection |
Degree of protection |
Schutzart |
IP65/IP67/IP69K |
7 |
8 |
|||||||
|
Clase de combustibilidad según UL 94 |
Classe d’inflammabilité selon UL 94 |
Inflammability class according to UL 94 |
Brennbarkeitsklasse nach UL 94 |
V0 |
|||||||||
|
Ciclos de conexión |
Cycles de couplage |
Insertion/withdrawal cycles |
Steckzyklen |
≥100 |
|||||||||
|
Tipo de conexión (conexión rápida) |
Mode de raccordement (raccordement autodénudant) |
Connection method (fast connection) |
Anschlussart (Schnellanschluss) |
Piercecon® |
|||||||||
|
Temperatura ambiente (servicio) |
Température ambiante (fonctionnement) |
Ambient temperature (operation) |
Umgebungstemperatur (Betrieb) |
-40 °C…85 °C |
135° |
||||||||
|
Sección de conexión |
Section de raccordement |
Connection cross section |
Anschlussquerschnitt |
0,14 mm2/AWG 26 |
|||||||||
|
Diámetro de cable |
Diamètre du câble |
Cable cross section |
Kabeldurchmesser |
4 mm…8 mm |
|||||||||
|
Datos eléctricos |
Caractéristiques électriques |
Electrical data |
Elektrische Daten |
||||||||||
|
Tensión asignada |
Tension de référence |
Rated voltage |
Bemessungsspannung |
48 V |
|||||||||
|
Corriente asignada |
Courant nominal |
Rated current |
Bemessungsstrom |
0,5 A |
|||||||||
|
Velocidad de transmisión |
Vitesse de transmission |
Transmission speed |
Übertragungsrate |
10 Gbit/s |
|||||||||
|
Características de transmisión |
Propriétés de transmission |
Transmission properties |
Übertragungseigenschaften |
CAT6A |
© PHOENIX CONTACT 2010
Изображения служат только для ознакомления,
см. техническую документацию
от 10 шт. —
17 770 руб.
от 50 шт. —
16 420 руб.
от 100 шт. —
15 642.37 руб.
Добавить в корзину 1 шт.
на сумму 19 320 руб.
Посмотреть альтернативные предложения2
Номенклатурный номер: 8005102031
Артикул: 1417430
Бренд / Производитель: Phoenix Contact

Описание
Phoenix Contact brings you the M12 series of SPEEDCON connector. The SPEEDCON connector offers you a faster locking-system, saving you on the amount of installation time.
Технические параметры
| Body Orientation | Straight |
| Coding | X |
| Connector Size | M12 |
| Contact Gender | Female |
| Contact Material | Bronze |
| Contact Plating | Gold over Nickel |
| Current Rating | 500.0mA |
| Housing Material | Zinc |
| IP Rating | IP65, IP67 |
| Maximum Operating Temperature | +85°C |
| Minimum Operating Temperature | -40°C |
| Mounting Type | Cable Mount |
| Number of Contacts | 8 |
| Plug/Socket | Plug |
| Series | SACC |
| Shell Size | M12 |
| Termination Method | IDC |
| Voltage Rating | 60 V |
| Кодировка Датчика | X Кодировка |
| Количество позиций | 8 Позиций |
| Материал Контакта | Бронза |
| Материал Корпуса Соединителя | Корпус из Цинка |
| Монтаж Разъема Датчика | Прямой Монтаж на Кабель |
| Номинальное Напряжение | 60В |
| Покрытие Контакта | Золото |
| Рейтинг IP / NEMA | IP65 |
| Тип разъема датчика | Male |
| Ток | 500мА |
| Automotive | No |
| ECCN (US) | EAR99 |
| Gender | RCP |
| Insulation Resistance (MOhm) | 100 |
| Mating Cycle (Cycles) | 100 |
| Mating Style | Screw Lock |
| Maximum Contact Resistance (MOhm) | 10 |
| Maximum Current Rating (A) | 0.5 |
| Maximum Operating Temperature (°C) | 85 |
| Maximum Voltage Rating | 60VDC|48VAC |
| Minimum Operating Temperature (°C) | -40 |
| Mounting | Cable Mount |
| Number of Ports | 1 |
| Part Status | Active |
| PPAP | No |
| Product Diameter (mm) | 15 |
| Type | M12 Circular |
| Wire Size (AWG) | 26 |
| Вес, г | 29.7 |
Техническая документация
Сроки доставки
Доставка в регион Камышеваха
| Курьер | 22 января1 | 644 руб.2 |
| ПВЗ Яндекс Доставка | 22 января1 | 99 руб.2 |
Цена и наличие в магазинах
| Ростов-на-Дону, проспект Соколо́ва, 53/182 |
нет в наличии |
Заказной номер:
1417430
Ваша цена:
Вместе с НДС
Минимальная партия:
от 1 шт
Наличие всего:
3
шт
Цена и наличие, ВРЕМЕННО могут быть неточными, уточняйте у менеджеров. Счет, договор, коммерческое предложение и другие документы генерируются автоматически при оформлении заказа по текущему курсу ЦБ РФ в рублях. USELOGIC официальный партнер Phoenix Contact в России.
Штекерные соединители для передачи данных
| Артикул | 1417430 |
| Минимальное количество для заказа | 1 |
| Закупочная валюта | EUR |
| Срок доставки | 15-20 недель |
Для данного продукта нет Документации
Для данного продукта нет Видеообзора