
VT-1210.indd 1VT-1210.indd 1 22.07.2009 17:18:3422.07.2009 17:18:34
2
VT-1210.indd 2VT-1210.indd 2 22.07.2009 17:18:3622.07.2009 17:18:36
3
VT-1210.indd 3VT-1210.indd 3 22.07.2009 17:18:3622.07.2009 17:18:36

ENGLISH
STEAM IRON
• Close supervision is necessary when chil-
dren or infirm persons are near the unit.
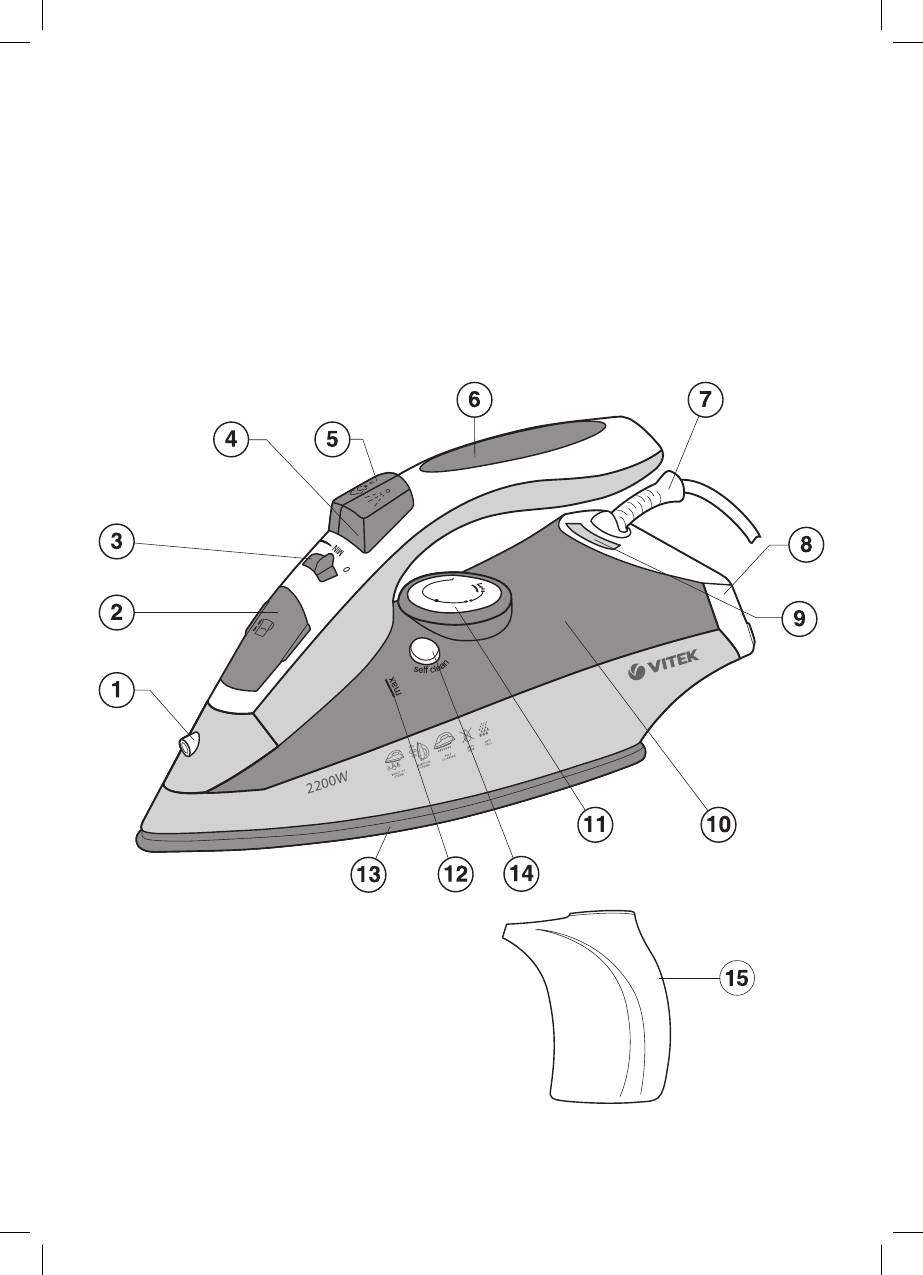
DESCRIPTION
• Never leave the working unit unattend-
1. Water spray nozzle
ed.
2. Water tank lid
• Always unplug the unit if you do not use
3. Steam supply regulator
it.
4. Spray button
• In order to avoid electric shock do not
5. Additional steam release button
immerse the unit into water or other liq-
6. Handle
uids.
7. Power cord protection
• Do not fill the water tank with scented liq-
8. Base
uids, vinegar, starch solution, descaling
9. Heating element on/off indication
reagents, chemical agents etc.
10. Water tank
• Avoid contact with hot surfaces or out-
11. Temperature regulator
going steam of the iron in order to avoid
12. Maximal water level indication
getting burns.
13. Iron soleplateplateplate
• Make sure that the power cord is not
14. Self clean button
hanging over the edge of the ironing
15. Measuring cup
board and make sure that it does not
touch heated surfaces.
SAFETY MEASURES
• To unplug the unit always take it by the
Before using the unit, please read the
plug, do not pull by the power cord.
instructions carefully and pay attention
• Before taking the unit away for storage,
to the illustrations.
pour out the remaining water and let the
• Before switching on the unit, make sure
unit cool down.
that your home electricity supply corre-
• Pour out water only after you have un-
sponds to the voltage of current speci-
plugged the unit.
fied on the unit.
• Do not use the unit if the plug or the pow-
• Power cord is equipped with a euro plug;
er cord is damaged or if there are other
insert it into the socket, with secure
damages in the unit.
grounding.
• In order to avoid electric shock do not
• In order to avoid risk of fire do not use
repair the unit yourself. If there are some
adapters while connecting the appliance
damages in the unit apply to the author-
to the outlet.
ized service center.
• In order to avoid overloading of the pow-
er network do not switch on several ap-
BEFORE USAGE
pliances with high power consumption
• Take out the iron from the package and
simultaneously.
remove the protective cartoon covering
• Use the unit only for the intended pur-
from the iron soleplate (13).
poses.
• Make sure that the electrical supply volt-
• Use the iron only on the ironing board.
age corresponds to the iron’s operating
• Place the iron on a flat stable surface.
voltage.
• Always unplug the unit while filling the
water tank with water.
Note:
• While using the unit, make sure that the
The iron’s heating element is broken
water tank lid is firmly closed.
in during the first use; it is normal for a
small amount of smoke to be released.
4
VT-1210.indd 4VT-1210.indd 4 22.07.2009 17:18:3622.07.2009 17:18:36

ENGLISH
CHOICE OF WATER
Determination of Fabric type/tempera-
• To fill the water tank use regular tap wa-
ture
ter. If the water is hard then it is recom-
Synthetics, nylon, acryl, polyester
•
mended to mix it with distilled water at a
(low temperature)
ratio of 1:1, if the water is very hard, mix it
••
Silk/wool (medium temperature)
with distilled water at a ratio of 1:2 or use
•••
Cotton/linen (high temperature)
only distilled water.
• This table is only for smooth materials.
Note:
Fabrics of other types (crimped, raised
Do not fill the water tank (10) with
etc.) are best ironed at low temperature.
scented liquids, vinegar, starch solu-
• First sort items by ironing temperature:
tions, descaling reagents, chemical
wool with wool, cotton with cotton etc.
substances etc.
• The iron heats up faster than it cools
down. For this reason it is recommended
FILLING THE WATER TANK
to begin ironing at low temperature (for
Make sure that the iron is disconnected
instance synthetic fabrics). After that,
from electrical power before filling it with
move to higher temperature ironing.
water.
Cotton and linen should be ironed after
• Set the steam release regulator (3) to the
all the others.
position of steam vapor OFF.
• If an item is made from a mix of fabrics,
• Open the water tank lid (2).
then the iron should be set for the fab-
• Fill the water tank with water (10). Close
ric with the lowest ironing (for instance if
the lid (2).
an item is made from 60% polyester and
40% cotton, it should be ironed at the
Note:
temperature used for ironing polyester
• Do not fill it with water above MAX. in-
“•”).
dication.
• If you cannot define the fabric the item is
• If you need to refill the water tank dur-
made from, find a place on it that is hid-
ing ironing, turn off the iron and un-
den while wearing and, on practice select
plug the power cord from the outlet.
the ironing temperature (always start at
• When you finish ironing, open the
the lowest and gradually raise it until you
water tank lid (2) and pour out the re-
get the desired result.)
maining water.
• Corduroy and other fabrics that start
glossy quickly should be ironed strictly in
IRONING TEMPERATURE
one direction (along the lines) with slight
Before ironing test the heated iron on the
pressure.
old cloth to be sure that the iron soleplate
• To avoid appearance of glossy spots on
(13) and the water tank (10) are clean.
the synthetic and silk fabrics, iron them
• Always check the recommended iron
back-side.
temperature indicated on the tag before
ironing.
SETTING THE IRONING TEMPERATURE
• If the tag does not list the recommended
• Place the iron on the base (8).
ironing temperature, but you know the
• Insert the power plug into the outlet.
type of fabric, then use the following
• Set the temperature regulator (11) to the
table to determine the proper tempera-
required ironing temperature: “•”, “••”,
ture.
“•••” or “max” (depending on the type
5
VT-1210.indd 5VT-1210.indd 5 22.07.2009 17:18:3622.07.2009 17:18:36

15
РУССКИЙ
гладить вещи, которые требуют низ-
кой температуры (например, синтети-
ческие ткани). После чего переходите
на глаженье при более высоких тем-
пературах (шелк, шерсть). Изделия
из хлопка и льна гладьте в последнюю
очередь.
• Если в состав ткани входят смесовые
волокна, то необходимо установить
температуру глаженья самую низкую
(например, если изделие состоит на
60% из полиэстера и на 40% из хлоп-
ка, то его следует гладить при темпе-
ратуре, подходящей для полиэстера
«•»).
• Если вы не можете определить состав
ткани, то найдите на изделии место,
которое незаметно при носке, и опыт-
ным путём выберите температуру
глаженья (всегда начинайте с самой
низкой температуры и постепенно по-
вышайте её, пока не добьётесь желае-
мого результата).
• Вельветовые и другие ткани, которые
быстро начинают лосниться, следует
гладить строго в одном направлении
(в направлении ворса) с небольшим
нажимом.
• Чтобы избежать появления лоснящихся
пятен на синтетических и шелковых тка-
нях, гладьте их с изнаночной стороны.
УСТАНОВКА ТЕМПЕРАТУРЫ
ГЛАЖЕНЬЯ
• Поставьте утюг на основание (8).
• Вставьте вилку сетевого шнура в ро-
зетку.
• Поворотом регулятора (11) установи-
те требуемую температуру глаженья:
«•», «••», «•••» или «МАХ» (в зави-
симости от типа ткани), при этом заго-
рится индикатор (9).
•
Когда температура подошвы утюга
(13) достигнет установленной темпе-
ратуры, индикатор (9) погаснет, можно
приступать к глаженью.
Примечание: при паровом глаженье
необходимо устанавливать темпера-
туру глаженья «•••» или «МАХ».
РАЗБРЫЗГИВАТЕЛЬ ВОДЫ
• Вы можете увлажнить ткань, нажав не-
сколько раз на кнопку разбрызгивате-
ля (4).
• Убедитесь, что в резервуаре (10) до-
статочно воды.
СУХОЕ ГЛАЖЕНЬЕ
• Поставьте утюг на основание (8).
• Вставьте вилку сетевого шнура в ро-
зетку.
• Поворотом регулятора (11) установи-
те требуемую температуру глаженья:
«•», «••», «•••»или «МАХ» (в зави-
симости от типа ткани), при этом заго-
рится индикатор (9).
•
Когда температура подошвы утюга
(13) достигнет установленной темпе-
ратуры, индикатор (9) погаснет, можно
приступать к глаженью.
• После использования утюга установи-
те регулятор температуры (11) в поло-
жение «MIN».
• Выньте вилку сетевого шнура из ро-
зетки и дождитесь полного остывания
утюга.
ПАРОВОЕ ГЛАЖЕНЬЕ
При паровом глаженье необходимо
устанавливать температуру глаженья
«•••» или «МАХ». Утюг снабжен проти-
вокапельным клапаном, который закры-
вает подачу воды, при слишком низкой
температуре подошвы утюга, это пре-
дотвращает появление капель из отвер-
стий подошвы утюга (13). При нагрева-
нии и остывании подошвы утюга (13), вы
услышите характерные щелчки откры-
вания/закрывания противокапельного
клапана, что свидетельствует о его нор-
мальной работе.
• Поставьте утюг на основание (8).
VT-1210.indd 15
VT-1210.indd 15
22.07.2009 17:18:36
22.07.2009 17:18:36
Page 1
VT-1210.indd 1VT-1210.indd 1 22.07.2009 17:18:3422.07.2009 17:18:34
Page 2
10 DEUTSCHzu 40% aus Baumwolle Besteht, so soll es bei der Temperatur gebügelt werden, die für das Bügeln von Polyester geeignet ist «•“)• Wenn
Page 3
11 DEUTSCH oder «MAX», dabei wird der Indikator (9) aufl euchten. • Wenn die Temperatur der Gleitsohle (13) auf die
Page 4 — ENGLISH
12 DEUTSCHREINIGUNG UND PFLEGE• Vor der Reinigung des Bügeleisens verge-wissern Sie sich, dass es vom Stromnetz abgeschaltet und abgekühlt ist.• Wi
Page 5
13 РУССКИЙ 13ПАРОВОЙ УТЮГОПИСАНИЕ1. Сопло разбрызгивателя воды2. Крышка заливочного отверстия3. Регулятор постоянной по
Page 6
14 РУССКИЙПЕРЕД ПЕРВЫМ ИСПОЛЬЗОВАНИЕМ• Извлеките утюг из упаковки, при нали-чии защиты на подошве (13) удалите ее.• Убедитесь, что напряжение в сети
Page 7
15 РУССКИЙ гладить вещи, которые требуют низ-кой температуры (например, синтети-ческие ткани). После чего переходите на глаже
Page 8
16 РУССКИЙ• Вставьте вилку сетевого шнура в ро-зетку.• Убедитесь, что в резервуаре (10) до-статочно воды.• Поворотом регулятора (11) установи-те тр
Page 9
17 РУССКИЙ УХОД И ЧИСТКА• Прежде чем чистить утюг, убедитесь, что он отключен от сети и уже остыл.• Протирайте корпус утюга
Page 10 — DEUTSCH
18 ҚАЗАҚҮТІКСИПАТТАМАСЫ1. Су шашыратқыштың соплосы 2. Су құятын саңылау қақпағы3. Үнемі бу шығару реттегіші4. Су шашыратқышының түймешігі5. Қосым
Page 11
19 ҚАЗАҚ АЛҒАШҚЫ ПАЙДАЛАНАР АЛДЫНДА • Үтікті қораптан шығарып алыңыз, оның табанында қорғаныш қабаты (13) болса оны алып тастаңы
Page 12
2VT-1210.indd 2VT-1210.indd 2 22.07.2009 17:18:3622.07.2009 17:18:36
Page 13
20 ҚАЗАҚ• Үтіктің сууынан қызуы тез. Сондықтан заттарды төменгі температурада үтіктеген жөн (мысалы, синтетикалық маталар). Бұдан кейін аса жоғары те
Page 14 — РУССКИЙ
21 ҚАЗАҚ • Желі шнурының ашасын розеткаға сұғыңыз. • Резервуарда (10) судың жеткілікті екендігін тексеріңіз.• Реттегішті (11)
Page 15
22 ҚАЗАҚшықпайынша үтікті сəл алдыға-артқа шайқаңыз.• Үтікті оның негізіне (8)қойыңыз да, оның əбден суытыңыз.• Үтік табаны (13) əбден суыған кезде,
Page 16
23 POLSKI ŻELAZKOOPIS1. Dysza spryskiwacza wody2. Pokrywa otworu wlewu wody3. Regulator stałego wyrzutu pary4. Przycis
Page 17
24 POLSKIWYBÓR WODYDo napełniania zbiornika używaj wody z kra-nu. Jeżeli woda z kranu jest twarda, zalecane jest zmieszanie jej w proporcji 1:1 z wodą
Page 18
25 POLSKI • Poprzez obracanie regulatora (11) ustaw żądaną temperaturę prasowania: „•”, „••”, „•••” lub „MAX” (w zależności o
Page 19 — ҚАЗАҚ
26 POLSKICZYSZCZENIE KOMORY PAROWEJW celu wydłużenia okresu użytkowania że-lazka zaleca się regularne czyszczenie jego komory parowej szczególnie w re
Page 20
27 ČESKÝ ŽEHLIČKAPOPSÁNÍ1. Dýza rozstřikovače vody2. Víko nálevového otvoru3. Regulátor stalého dodávky páry4. Tláčítk
Page 21
28 ČESKÝvypněte žehličku a dejte vidlici pryč ze zásůvky.• Po ukončení žehlení, vypněte žehličku, dočkejte až zchladne a po tom otevřete víko zalevné
Page 22
29 ČESKÝ ne nastavené teploty, indikátor zhasne (9) a bude možné začít žehlit.• Regulátorem dodávky páry (3) nastavte potřebn
Page 23
3VT-1210.indd 3VT-1210.indd 3 22.07.2009 17:18:3622.07.2009 17:18:36
Page 24
УКРАЇНЬСКИЙПРАСКАОПИС1. Сопло розбризкувача води2. Кришка заливального отвору3. Регулятор постійної подачі пари/4. Кнопка розбризкувача води5
Page 25
31 УКРАЇНЬСКИЙ • Щоб уникнути ураження електричним струмом, ніколи не розбирайте праску самотужки, у разі виявлення несп
Page 26
32 УКРАЇНЬСКИЙ• Цією таблицею можна користуватися тільки стосовно гладких матеріалів. Якщо тканина іншого типу (гофрована, рельєфна тощо), то найкращ
Page 27
33 УКРАЇНЬСКИЙ ПАРОВЕ ПРАСУВАННЯПри паровому прасуванні необхідно встановлювати температуру прасування «•••» або «МАХ».
Page 28
34 УКРАЇНЬСКИЙнакипом будуть викидатися з отворів підошви праски (13).• Злегка погойдайте праску вперед-назад, доки вся вода не вийде з резервуара (10
Page 29
35 БЕЛАРУСКI ПРАСАПІСАННЕ1. Сапло распырсквальніка вады2. Крышка залівачнай адтуліны3. Рэгулятар пастаяннай падачы
Page 30 — УКРАЇНЬСКИЙ
36 БЕЛАРУСКIлюбымі іншымі няспраўнасцямі.• Каб пазбегнуць паражэння электрычным токам ніколі не разбірайце прас самастойна, пры выяўленні няспраўнасці
Page 31
37 БЕЛАРУСКI •••бавоўна/лён (высокая тэмпература)• Табліца падыходзіць толькі для гладкіх матэрыялаў. Калі матэрыял інша
Page 32
38 БЕЛАРУСКIПАРАВОЕ ПРАСАВАННЕПры паравым прасаванні неабходна ўстанаўліваць тэмпературу прасавання «•••» ці «МАХ». Прас мае протывакропельны клапан,
Page 33
39 БЕЛАРУСКI ракавінай, устанавіце і ўтрымліваючы кнопку (14).• Кіпячая вада і пара разам з накіпам будуць выкідвацца з а
Page 34
ENGLISH4STEAM IRON DESCRIPTION1. Water spray nozzle2. Water tank lid3. Steam supply regulator4. Spray button5. Additional steam release but
Page 35
40 ЎЗБЕК 40DAZMOL TA’RIFI1. Suv purkagichining tuynugi2. Suv quyish teshigining qopqog’i3. Bug’ni doimiy berish sozlagichi 4. Suv purkagichini
Page 36 — БЕЛАРУСКI
41 ЎЗБЕК elementi ozgina kuyadi, shuning uchun ozgina tutun yoki begona hidi chiqishi mumkin — bu normal holat.SUVNI TA
Page 37
42 ЎЗБЕК paydo bo’lishining oldini olish uchun ularni orqa (astar) tomonidan dazmollang.DAZMOLLASH HARORATINI O’RNATISH• Dazmolni asosiga qo’ying (8)
Page 38
43 ЎЗБЕК mintaqalarda bug’ kamerasini muntazam tozalash tavsiya etiladi.• Sig’imni (10) suv bilan MAX belgisigacha (12
Page 39
GBA production date of the item is indicated in the serial number on the technical data plate. A serial number is an eleven-unit number, with the firs
Page 40
5 ENGLISH CHOICE OF WATER• To fill the water tank use regular tap wa-ter. If the water is hard then it is recom-mended to m
Page 41
6 ENGLISHof fabric), the (9) indicator will light up. • When the soleplate temperature (13) reaches the desired temperature value, the (9) indicator
Page 42
7 ENGLISH • Put the iron on the base (9). • Insert the power plug into the outlet.• Set the temperature regulator (11) to
Page 43
8 DEUTSCH8BÜGELEISENBESCHREIBUNG1. Sprühdüse 2. Deckel der Wassereinfüllöffnung3. Regler der konstanten Dampfzufuhr4. Sprühtaste 5. Taste de
Page 44
9 DEUTSCH • Vergewissern Sie sich, ob die Spannung des Geräts mit der Netzspannung über-einstimmt.Anmerkung:Bei der ersten Ei
-
Инструкции по эксплуатации
1

Vitek VT-1210 VT инструкция по эксплуатации
(44 страницы)
- Языки:Русский
-
Тип:
PDF -
Размер:
668.75 KB -
Описание:
Утюг
Просмотр
На NoDevice можно скачать инструкцию по эксплуатации для Vitek VT-1210 VT. Руководство пользователя необходимо для ознакомления с правилами установки и эксплуатации Vitek VT-1210 VT. Инструкции по использованию помогут правильно настроить Vitek VT-1210 VT, исправить ошибки и выявить неполадки.

|
VT-1210.indd 1 |
22.07.2009 17:18:34 |
||||||||||
2
|
VT-1210.indd 2 |
22.07.2009 17:18:36 |
|
3 |
|||
|
VT-1210.indd |
3 |
22.07.2009 |
17:18:36 |

ENGLISH
STEAM IRON
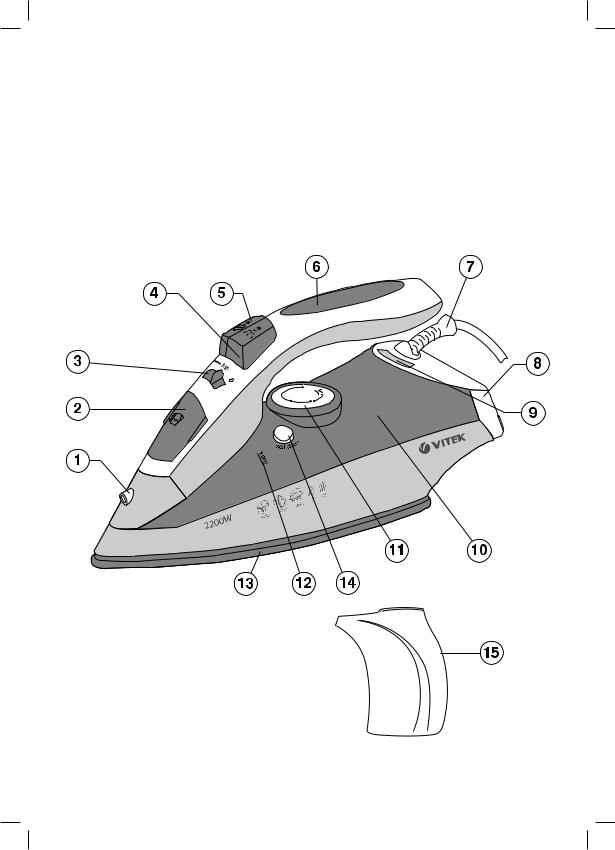
DESCRIPTION
1.Water spray nozzle
2.Water tank lid
3.Steam supply regulator
4.Spray button
5.Additional steam release button
6.Handle
7.Power cord protection
8.Base
9.Heating element on/off indication
10.Water tank
11.Temperature regulator
12.Maximal water level indication
13.Iron soleplateplateplate
14.Self clean button
15.Measuring cup
SAFETY MEASURES
Before using the unit, please read the instructions carefully and pay attention to the illustrations.
•Before switching on the unit, make sure that your home electricity supply corresponds to the voltage of current specified on the unit.
•Power cord is equipped with a euro plug; insert it into the socket, with secure grounding.
•In order to avoid risk of fire do not use adapters while connecting the appliance to the outlet.
•In order to avoid overloading of the power network do not switch on several appliances with high power consumption simultaneously.
•Use the unit only for the intended purposes.
•Use the iron only on the ironing board.
•Place the iron on a flat stable surface.
•Always unplug the unit while filling the water tank with water.
•While using the unit, make sure that the water tank lid is firmly closed.
•Close supervision is necessary when children or infirm persons are near the unit.
•Never leave the working unit unattended.
•Always unplug the unit if you do not use it.
•In order to avoid electric shock do not immerse the unit into water or other liquids.
•Do not fill the water tank with scented liquids, vinegar, starch solution, descaling reagents, chemical agents etc.
•Avoid contact with hot surfaces or outgoing steam of the iron in order to avoid getting burns.
•Make sure that the power cord is not hanging over the edge of the ironing board and make sure that it does not touch heated surfaces.
•To unplug the unit always take it by the plug, do not pull by the power cord.
•Before taking the unit away for storage, pour out the remaining water and let the unit cool down.
•Pour out water only after you have unplugged the unit.
•Do not use the unit if the plug or the power cord is damaged or if there are other damages in the unit.
•In order to avoid electric shock do not repair the unit yourself. If there are some damages in the unit apply to the authorized service center.
BEFORE USAGE
•Take out the iron from the package and remove the protective cartoon covering from the iron soleplate (13).
•Make sure that the electrical supply voltage corresponds to the iron’s operating voltage.
Note:
The iron’s heating element is broken in during the first use; it is normal for a small amount of smoke to be released.
4
|
VT-1210.indd 4 |
22.07.2009 17:18:36 |

ENGLISH
CHOICE OF WATER
•To fill the water tank use regular tap water. If the water is hard then it is recommended to mix it with distilled water at a ratio of 1:1, if the water is very hard, mix it with distilled water at a ratio of 1:2 or use only distilled water.
Note:
Do not fill the water tank (10) with scented liquids, vinegar, starch solutions, descaling reagents, chemical substances etc.
FILLING THE WATER TANK
Make sure that the iron is disconnected from electrical power before filling it with water.
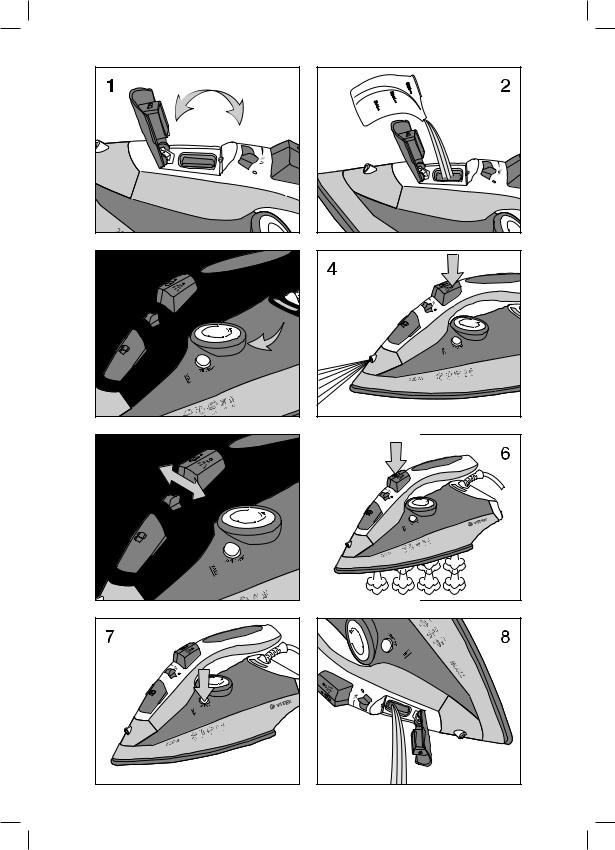
•Set the steam release regulator (3) to the position of steam vapor OFF.
•Open the water tank lid (2).
•Fill the water tank with water (10). Close the lid (2).
Note:
•Do not fill it with water above MAX. indication.
•If you need to refill the water tank during ironing, turn off the iron and unplug the power cord from the outlet.
•When you finish ironing, open the water tank lid (2) and pour out the remaining water.
IRONING TEMPERATURE
Before ironing test the heated iron on the old cloth to be sure that the iron soleplate (13) and the water tank (10) are clean.
•Always check the recommended iron temperature indicated on the tag before ironing.
•If the tag does not list the recommended ironing temperature, but you know the type of fabric, then use the following table to determine the proper temperature.
Determination of Fabric type/temperature
•
Synthetics, nylon, acryl, polyester (low temperature)
•• Silk/wool (medium temperature)
•••Cotton/linen (high temperature)
•This table is only for smooth materials. Fabrics of other types (crimped, raised etc.) are best ironed at low temperature.
•First sort items by ironing temperature: wool with wool, cotton with cotton etc.
•The iron heats up faster than it cools down. For this reason it is recommended to begin ironing at low temperature (for instance synthetic fabrics). After that, move to higher temperature ironing. Cotton and linen should be ironed after all the others.
•If an item is made from a mix of fabrics, then the iron should be set for the fabric with the lowest ironing (for instance if an item is made from 60% polyester and 40% cotton, it should be ironed at the temperature used for ironing polyester “•”).
•If you cannot define the fabric the item is made from, find a place on it that is hidden while wearing and, on practice select the ironing temperature (always start at the lowest and gradually raise it until you get the desired result.)
•Corduroy and other fabrics that start glossy quickly should be ironed strictly in one direction (along the lines) with slight pressure.
•To avoid appearance of glossy spots on the synthetic and silk fabrics, iron them back-side.
SETTING THE IRONING TEMPERATURE
•Place the iron on the base (8).
•Insert the power plug into the outlet.
•Set the temperature regulator (11) to the required ironing temperature: “•”, “••”, “•••” or “max” (depending on the type
5
|
VT-1210.indd 5 |
22.07.2009 17:18:36 |

ENGLISH
of fabric), the (9) indicator will light up.
•When the soleplate temperature (13) reaches the desired temperature value, the (9) indicator will go out, you can start ironing.
Note: While steam ironing set the temperature «•••» or «МАХ».
WATER SPRAYER
•You can dampen the fabric by pressing the spray button (4) several times.
•Make sure that there is enough water in the water tank (10).
IRONING
•Place the iron on the base (8).
•Insert the power plug into the outlet.
•Set the temperature regulator (11) to the required ironing temperature: “•”, “••”, “•••” or “max” (depending on the type of fabric), the (9) indicator will light up.
•When the soleplate temperature (13) reaches the desired temperature point, the (9) indicator will go out, you can start ironing.
•When you finish ironing set the (11) regulator to the “min” position.
•Pull the plug out of the socket and let the iron cool down completely.
STEAM IRONING
For steam ironing set the temperature regulator to «•••» or «МАХ». The iron has an anti-drop valve, which stops water supply, when the soleplate temperature is too low it prevents the appearance of drops out of the soleplate openings (13). While heating or cooling down of the soleplate (13), you will hear clicks of opening/closing of the anti-drop valve it means that the valve works normally.
•Place the iron on the base (8).
•Insert the power plug into the outlet.
•Make sure that there is enough water in the water tank (10).
•Set the temperature regulator (11) to the required ironing temperature: “•••” or “max”, the (9) indicator will light up.
•When the soleplate temperature (13) reaches the desired temperature point, the (9) indicator will go out, you can start ironing.
•Turn the steam supply regulator (3) to set the intensity of steaming, steam will start outgoing from the openings of the soleplate (13).
•When you finish ironing set the (11) regulator to the “min” position and the steam supply regulator (3) to the left position.
•Pull the plug out of the socket and let the iron cool down completely.
ATTENTION!
If during the operation steam is not constantly supplied, check whether the temperature regulator (11) is set properly.
ADDITIONAL STEAM RELEASE
Additional steam release function is useful when ironing folds and can only be used at high ironing temperatures (when the iron temperature regulator (11) is set to “•••” or “max”).
•When the additional steam release button (5) is pressed, steam will be vigorously released from the openings in the iron soleplate.
Note: In order to avoid leakage of water from steam openings, press the additional steam supply button (5) with 4-5 sec. interval.
STEAM CHAMBER CLEANING
To prolong lifetime of the iron we recommend cleaning the steam chamber, especially in the regions with “hard” water.
•Set the steam supply regulator (3) to the steam release OFF position.
•Fill the water tank (10) till the MAX mark (12).
6
|
VT-1210.indd 6 |
22.07.2009 17:18:36 |

ENGLISH
•Put the iron on the base (9).
•Insert the power plug into the outlet.
•Set the temperature regulator (11) to the MAX. temperature: “max” the (9) indicator will light up.
•When the soleplate temperature (13) reaches the desired temperature point, the (9) indicator will go out, you can start cleaning of the iron chamber.
•Unplug the iron, set the temperature regulator (11) to the «MIN» position.
•Pull the plug out of the socket.
•Hold the iron above the sink, press and hold the button (14).
•Boiling water together with scale will be throwing out from the openings in the iron soleplate (13).
•Slightly sway the iron back and forth, until water goes out of the water tank (10).
•Place the iron on the base (8) and let it cool down completely.
•When the soleplate (13) cools down completely, wipe it with a dry cloth.
•Before you take the iron for storing, make sure that there is no water in the water tank (10) and that the iron soleplate (13) is completely dry.
CARE AND CLEANING
•Before cleaning the iron, make sure that it is turned off and has cooled completely.
•Wipe the iron’s outer surface with a damp cloth and then wipe dry.
•Sediment on the iron soleplate can be removed with a cloth soaked in vinegarwater solution.
•After removing sediment, polish the soleplate with a dry cloth.
•Do not use abrasive substances to clean the soleplate and body of the iron.
•Avoid touching the iron soleplate with sharp metal objects.
STORAGE
•Turn the temperature regulator (11) anticlockwise till MIN position, set the steam
release regulator (3) to the steam release OFF position.
•Remove the power plug from the outlet.
•Open the water tank lid (2), turn over the iron and pour out any remaining water from the water tank (10).
•Close the lid (2).
•Set the iron vertically and allow it to cool completely.
•Keep the iron at dry cool place in vertical position out of the reach of children.
TECHNICAL CHARACTERISTICS
Power requirements: 220-240 V ~ 50 Hz Power consumption: 1850-2200 W
Specifications subject to change without prior notice.
MINIMUM SERVICE LIFE — 3 YEARS
GUARANTEE
Details regarding guarantee conditions can be obtained from the dealer from whom the appliance was purchased. The bill of sale or receipt must be produced when making any claim under the terms of this guarantee.
This product conforms to the EMC-Requirements as laid down by the Council Directive 89/336/ EEC and to the Law Voltage Regulation (73/23 EEC)
7
|
VT-1210.indd 7 |
22.07.2009 17:18:36 |

DEUTSCH
BÜGELEISEN
BESCHREIBUNG
1.Sprühdüse
2.Deckel der Wassereinfüllöffnung
3.Regler der konstanten Dampfzufuhr
4.Sprühtaste
5.Taste der zusätzlichen Dampfzufuhr
6.Handgriff
7.Netzkabelschutz
8.Bügeleisenfußplatte
9.Indikator der Ein /Ausschaltung des Heizkörpers
10.Wasserbehälter
11.Temperaturregler
12.Wasserstandgrenzlinie
13.Gleitsohle
14.Selbstreinigungstaste
15.Messbecher
SICHERHEITSMAßNAHMEN
Vor der Inbetriebnahme des Geräts lesen Sie aufmerksam diese Betriebsanleitung durch, achten Sie auf die Abbildungen.
Vor der ersten Inbetriebnahme vergewissern Sie sich, dass die Spannung des Geräts mit der Netzspannung übereinstimmt.
•Das Netzkabel ist mit einem „Eurostecker“ ausgestattet; schalten Sie diesen in die Steckdose mit sicherer Erdung.
•Verwenden Sie keine Verlängerungen beim Anschließen des Geräts an das Stromnetz, um Brandrisiko zu vermeiden.
•Es ist nicht gestattet, mehrere Geräte mit hoher Verbrauchsleistung gleichzeitig einzuschalten, um die Überlastung des Stromnetzes zu vermeiden.
•Nutzen Sie das Gerät nut gemäß der Bedienungsanleitung.
•Bügeln Sie nur auf dem Bügelbrett.
•Stellen Sie das Bügeleisen auf eine gerade stabile Oberfläche auf.
•Beim Auffüllen des Wasserbehälters schalten Sie das Bügeleisen vom Stromnetz immer ab.
•Der Deckel der Einfüllöffnung soll beim Bügeln dicht geschlossen sein.
8
•Besondere Vorsichtsmaßnahmen sind in den Fällen angesagt, wenn sich Kinder oder behinderte Personen während der Nutzung des Geräts in der Nähe aufhalten. Lassen Sie das eingeschaltet Gerät nie unbeaufsichtigt.
•Schalten Sie das Gerät nach dem Gebrauch vom Stromnetz immer ab.
•Tauchen Sie das Gerät nie ins Wasser oder andere Flüssigkeiten, um Stromschlagrisiko zu vermeiden.
•Es ist nicht gestattet, Aromaflüssigkeiten, Essig, Stärkelösung, Reagenzien für die Entfernung von Kalkstein, chemische Lösungen usw. ins Wasserbehälter einzugießen.
•Vermeiden Sie die Berührung der Haut mit heißen Oberflächen des Bügeleisens oder austretendem Dampfes, um Verbrennungen zu vermeiden.
•Achten Sie darauf, dass das Gerät vom Bügeleisenbrett nicht frei hängt oder heiße Oberfläche nicht berührt.
•Es ist nicht gestattet, das Gerät beim Abschalten vom Stromnetz am Netzkabel zu ziehen, halten und ziehen Sie ihn am Stecker.
•Vor der Reinigung schalten Sie das Gerät vom Stromnetz ab, gießen Sie das Wasser ab und lassen Sie es abkühlen.
•Gießen Sie das Wasser nur nach dem Abschalten des Bügeleisens vom Stromnetz ab.
•Es ist nicht gestattet, das Gerät zu nutzen, wenn das Netzkabel oder der Netzstecker beschädigt oder bei anderen Störungen.
•Es ist nicht gestattet, das Gerät selbständig zu reparieren, um Stromschläge zu vermeiden. Bei der Feststellung von Beschädigungen wenden Sie sich an den autorisierten Kundenservicedienst.
VOR DER ERSTNUTZUNG DES GERÄTS
•Vor der ersten Nutzung nehmen Sie das Bügeleisen aus der Verpackung heraus und entfernen Sie das Schutzmaterial von der Gleitsohle (13).
|
VT-1210.indd 8 |
22.07.2009 17:18:36 |
DEUTSCH
•Vergewissern Sie sich, ob die Spannung des Geräts mit der Netzspannung übereinstimmt.
Anmerkung:
Bei der ersten Einschalten des Bügeleisens verbrennen das Heizelement, es kann zur Entstehung des Rauches oder eines fremden Geruchs führen – es ist normal.
WASSERAUSWAHL
Zum Auffüllen des Wasserbehälters des Bügeleisens nutzen Sie Leitungswasser. Wenn das Leitungswasser hart ist, wird empfohlen, es mit destilliertem Wasser im Verhältnis 1:1 zu mischen, bei der Nutzung des Wassers mit sehr hoher Härte wird empfohlen, es mit destilliertem Wasser im Verhältnis 1:2 oder nur destilliertes Wasser zu nutzen.
Anmerkung: Es ist nicht gestattet, Aromaflüssigkeiten, Essig, Stärkelösung, Reagenzien für die Entfernung von
Kalkstein, chemische Lösungen usw. ins Wasserbehälter (10) einzugießen.
AUFFÜLLEN DES WASSERBEHÄLTERS
Vor dem Auffüllen des Bügeleisens mit Wasser, vergewissern Sie sich, dass es vom Stromnetz abgeschaltet ist.
•Stellen Sie den Regler der konstanten Dampfzufuhr (3) in die linke Endposition, um den Dampf auszuschalten.
Öffnen Sie den Deckel der Wassereinfüllöffnung (2).
•Gießen Sie Wasser ein (10), schließen Sie den Deckel (2) zu.
Anmerkung: Es ist nicht gestattet, das Gerät mit Wasser über die Grenzlinie MAX zu füllen.
•Wenn sie während des Bügelns Wasser nachgießen sollen, schalten Sie das
Bügeleisen aus und ziehen Sie den
Netzstecker aus der Steckdose.
•Nach dem Bügeln schalten Sie das Gerät aus, lassen Sie es abkühlen, danach öff-
9
nen Sie den Deckel der Einfüllöffnung (2), drehen Sie das Bügeleisen um und gießen Sie Restwasser aus.
TEMPERATUR BEIM BÜGELN
Vor der Inbetriebnahme prüfen Sie das aufgeheizte Bügeleisen auf einem Tuch, ob die Gleitsohle (13) und der Wasserbehälter (10) sauber sind.
•Vor dem Bügeln sollen Sie die Überschriften auf dem Etikett der Kleidung beachten, wo die empfohlene Temperatur angegeben ist.
•Wenn das Etikett mit den Hinweisen fehlt, aber Sie kennen den Stofftyp, so entnehmen Sie die Temperaturangaben der folgenden Tabelle:
Bezeichnungen des Stofftyps (Temperatur)
•
Synthesefaser, Nylon, Acryl,
Polyester (niedrige Temperatur)
••Seide/Wolle (mittlere Temperatur)
•••
Baumwolle/Leinen (hohe
Temperatur)
•Die Tabelle ist nur für glatte Stoffe geeignet. Wenn Sie das Material eines anderen Typs verwenden (gaufriert, geriffelt usw.), dann soll es bei der niedrigen Temperatur gebügelt werden.
|
• Zuerst |
sollen Sie die Sachen nach |
|
der |
Bügeltemperatur aussortieren: |
Synthesefaser zu Synthesefaser, Wolle zu Wolle, Baumwolle zu Baumwolle usw.
•Das Bügeleisen wird schneller aufgeheizt als abgekühlt. Aus diesem Grund wird empfohlen, die Sachen bei der niedrigen Temperatur zu bügeln (z.B. synthetische Stoffe). Danach können Sie auch zum Bügel bei höheren Temperaturen übergehen (Seide, Wolle). Erzeugnisse aus Baumwolle und Leinen sollen zuletzt gebügelt werden.
•Wenn das Kleidungsstück aus Mischfasern ist, soll die Temperatur auf die niedrigste Stufe eingestellt werden (z.B. wenn das Kleidungsstück zu 60% aus Polyester und
|
VT-1210.indd 9 |
22.07.2009 17:18:36 |

DEUTSCH
zu 40% aus Baumwolle Besteht, so soll es bei der Temperatur gebügelt werden, die für das Bügeln von Polyester geeignet ist «•“)
•Wenn Sie den Stofftyp nicht bestimmen können, woraus das Kleidungsstück hergestellt ist, finden Sie darauf ein unbemerkbare Stelle beim Tragen, und wählen Sie durch das Prüfen die Temperatur des Bügelns aus (fangen Sie immer von der niedrigsten Temperatur an und erhöhen Sie diese, bis das gewünschte Ergebnis nicht erreicht wird).
•Kordstoffe und andere Stoffe, die sehr schnell beginnen zu glänzen, sollen unter leichtem Druck streng in einer Richtung gebügelt werden (in Richtung des Strichs).
•Um die Entstehung von Glanzflecken auf den synthetischen und seidenen Stoffen zu vermeiden, bügeln Sie diese von der Innenseite.
EINSTELLEN DER BÜGELTEMPERATUR
Wasser im Wasserbehälter (10) vorhanden ist.
TROCKENES BÜGELN
•Stellen Sie das Bügeleisen auf die Bügeleisenfußplatte (9) auf.
•Stecken Sie den Stecker des Netzkabels in die Steckdose.
•Stellen Sie mit dem Regler (11) die gewünschte Bügeltemperatur ein: „•“, „••“, „•••“ oder «MAX» (abhängig vom Stofftyp), dabei wird der Indikator (9) aufleuchten.
•Wenn die Temperatur der Gleitsohle (13) auf die gewünschte Temperatur steigt und der Indikator (9) erlöscht, können Sie zum Bügeln übergehen.
Schalten Sie das Bügeleisen aus, indem Sie den Temperaturregler (11) in die Position „MIN“ stellen.
•Schalten Sie das Gerät vom Stromnetz ab und warten Sie ab, bis diese abgekühlt wird.
•Stellen Sie das Bügeleisen auf die Bügeleisenfußplatte (8) auf.
•Stecken Sie den Stecker des Netzkabels in die Steckdose.
•Stellen Sie mit dem Regler (11) die gewünschte Bügeltemperatur ein: „•“, „••“, „•••“ oder «MAX» (abhängig vom Stofftyp), dabei wird der Indikator (9) aufleuchten.
•Wenn die Temperatur der Gleitsohle (13) auf die gewünschte Temperatur steigt und der Indikator (9) erlöscht, können Sie zum Bügeln übergehen.
Anmerkung: Beim Bügeln mit Dampf soll die Temperatur in die Position „•••“oder „MAX“ eingestellt werden.
WASSERSPRÜHER
•Sie können den Stoff anfeuchten, indem Sie den Sprühknopf (4) einige Male drücken.
•Vergewissern Sie sich, dass es genug
10
BÜGELN MIT DAMPF
Beim Bügeln mit Dampf soll die Temperatur in die Position „•••“oder „MAX“ eingestellt werden. Das Bügeleisen ist mit einem Antitropfventil ausgestattet, das die Wasserzufuhr bei einer sehr niedrigen Temperatur der Gleitsohle unterbricht. Dies verhindert das Austreten der Tropfen aus den Öffnungen der Gleitsohle (13) des Bügeleisens. Beim Erhitzen und der Abkühlung der Gleitsohle (13), ertönen typische Knacktöne der Eröffnung/ Schließung des Antitropfventils, was über seinen normalen Betrieb zeugt
•Stellen Sie das Bügeleisen auf die Bügeleisenfußplatte (8) auf.
•Stecken Sie den Stecker des Netzkabels in die Steckdose.
•Vergewissern Sie sich, dass es genug Wasser im Wasserbehälter (10) vorhanden ist.
•Stellen Sie mit dem Regler (11) die gewünschte Bügeltemperatur ein: „•••“
|
VT-1210.indd 10 |
22.07.2009 17:18:36 |

DEUTSCH
oder «MAX«, dabei wird der Indikator (9) aufleuchten.
•Wenn die Temperatur der Gleitsohle (13) auf die gewünschte Temperatur steigt und der Indikator (9) erlöscht, können Sie zum Bügeln übergehen.
•Stellen Sie den Regler der konstanten Dampfzufuhr (3) die gewünschte Intensität der Dampfbildung ein, dabei fängt der Dampf an, aus den Öffnungen der Gleitsohle (13) des Bügeleisens auszutreten.
Schalten Sie das Bügeleisen aus, indem Sie den Temperaturregler (11) in die Position „MIN“ und den Regler der konstanten Dampfzufuhr (3) in die linke Endposition stellen.
•Schalten Sie das Gerät vom Stromnetz ab und warten Sie ab, bis diese abgekühlt wird.
ACHTUNG!
Wenn konstante Dampfzufuhr während des Betriebs des Geräts nicht passiert, prüfen Sie die Richtigkeit der Positionierung des Temperaturreglers (11).
ZUSÄTZLICHE DAMPFZUFUHR
DieFunktionderzusätzlichenDampfzufuhrist fürs Glätten der Falten nützlich und kann nur beim Hochtemperaturbetrieb des Bügelns verwendet werden (Temperaturregler (11) in der Position «•••“ oder „MAX“.
•Bei Drücken der Taste der zusätzlichen Dampfzufuhr (5) wird der Dampf intensiver aus der Gleitsohle austreten.
Anmerkung: Um das Auslaufen des Wassers aus den Dampföffnungen zu vermeiden, drücken Sie den die Taste der zusätzlichen
Dampfzufuhr mit dem Intervall von 4 5 Sekunden.
REINIGUNG DER DAMPFKAMMER
Für die Erhöhung der Nutzungsfrist des Geräts wird empfohlen, die Reinigung der Dampfkammer regelmäßig durchzuführen,
11
besonders in den Regionen mit hartem Leitungswasser.
•Füllen Sie den Wasserbehälter (10) mit Wasser bis zum maximalen Füllstand MAX (12) auf.
•Stellen Sie das Bügeleisen auf die Bügeleisenfußplatte (8) auf.
•Stecken Sie den Stecker des Netzkabels in die Steckdose.
•Stellen Sie durch den Regler (11) die maximale Temperatur (11) der Aufheizung der Gleitsohle in die Position “MAX”, es wird dabei der Indikator (9) aufleuchten.
•Wenn die Temperatur der Gleitsohle (13) auf die gewünschte Temperatur steigt und der Indikator (9) erlöscht, können Sie zur Reinigung der Dampfkammer übergehen.
Schalten Sie das Bügeleisen aus, indem Sie den Temperaturregler (11) in die Position „MIN“ stellen.
•Ziehen Sie den Netzstecker aus der Steckdose.
•Stellen Sie das Bügeleisen in horizontaler Position über dem Waschbecken auf und halten Sie den Selbstreinigungsknopf (14) an.
•Kochendes Wasser und der Dampf werden zusammen mit dem Kalk aus den Öffnungen der Gleitsohle (13) austreten.
•Schaukeln Sie das Bügeleisen hin und zurück, bis das ganze Wasser aus dem Wasserbehälter (10) entfernt wird.
•Stellen Sie das Bügeleisen auf die Fußplatte (8) und lassen Sie es vollständig abkühlen.
•Wenn die Gleitsohle des Geräts (13) vollständig abgekühlt wird, wischen Sie diese mit einem Tuch ab.
•Bevor Sie das Bügeleisen zur Aufbewahrung wegpacken, vergewissern Sie sich, dass im Wasserbehälter (10) kein Wasser übrig geblieben ist und die Gleitsohle (13) des Bügeleisens vollständig trocken ist.
|
VT-1210.indd 11 |
22.07.2009 17:18:36 |

DEUTSCH
REINIGUNG UND PFLEGE
•Vor der Reinigung des Bügeleisens vergewissern Sie sich, dass es vom Stromnetz abgeschaltet und abgekühlt ist.
•Wischen Sie das Gehäuse des Bügeleisens mit einem feuchten Tuch, danach trocknen Sie es.
•Ablagerungen an der Gleitsohle des Bügeleisens können Sie mit einem Stoff abwischen, der mit Essiglösung angefeuchtet ist.
•Nach der Entfernung des Kalkablagerungen polieren Sie die Gleitsohle des Bügeleisens mit einem trockenen Tuch.
•Es ist nicht gestattet, Abrasivmittel für die Reinigung der Gleitsohle und des Gehäuses des Bügeleisens zu nutzen.
•Vermeiden Sie den Kontakt der Gleitsohle mit scharfen Metallgegenständen.
AUFBEWAHRUNG
•Drehen Sie den Temperaturregler (11) gegen Uhrzeigesinn in die Position „MIN“, stellen Sie den Regler der Dampfzufuhr
(3)in die position, um den Dampf auszuschalten
•Ziehen Sie den Netzstecker aus der Steckdose.
•Öffnen Sie den Deckel der Wassereinfüllöffnung (2) und gießen Sie das Restwasser aus dem Wasserbehälter
•Schließen Sie den Deckel (2) zu.
•Stellen Sie das Bügeleisen senkrecht auf und lassen Sie es vollständig abkühlen.
•Bewahren Sie das Bügeleisen senkrecht an der trockenen kühlen Stelle, die für die Kinder unzugänglich ist
TECHNISCHE EIGENSCHAFTEN
Stromversorgung: 220-240 V ~ 50 Hz
Leistung: 1850-2200 W
Der Hersteller behält sich das Recht vor die Charakteristiken des Gerätes ohne Vorbescheid zu ändern.
Die Lebensdauer des Gerätes beträgt nicht weniger, als 3 Jahre
Gewährleistung
Ausführliche Bedingungen der Gewährleistung kann man beim Dealer, der diese Geräte verkauft hat, bekommen. Bei beliebiger Anspruchserhebung soll man während der Laufzeit der vorliegenden Gewährleistung den Check oder die Quittung über den Ankauf vorzulegen.
Das vorliegende Produkt entspricht den Forderungen
der elektromagnetischen Verträglichkeit, die in 89/336/EWG -Richtlinie des Rates und den Vorschriften
73/23/EWG über die Niederspannungsgeräte vorgesehen sind.
12
|
VT-1210.indd 12 |
22.07.2009 17:18:36 |

РУССКИЙ
ПАРОВОЙ УТЮГ
ОПИСАНИЕ
1.Сопло разбрызгивателя воды
2.Крышка заливочного отверстия
3.Регулятор постоянной подачи пара
4.Кнопка разбрызгивателя воды
5.Кнопка дополнительной подачи пара
6.Ручка
7.Защита сетевого шнура
8.Основание утюга
9.Индикатор включения/выключения нагревательного элемента
10.Резервуар для воды
11.Регулятор температуры
12.Указатель максимального уровня воды
13.Подошва утюга
14.Кнопка режима самоочистки
15.Мерный стаканчик
МЕРЫ БЕЗОПАСНОСТИ Перед эксплуатацией внимательно
прочитайте инструкцию, а также обратите внимание на иллюстрации.
•Перед включением убедитесь, что напряжение в сети соответствует рабочему напряжению утюга.
•Сетевой шнур снабжен «евровилкой»; включайте ее в розетку, имеющую надежный контакт заземления.
•Чтобы избежать риска возникновения пожара, не используйте переходники при подключении прибора к электрической розетке.
•Во избежание перегрузки электрической сети не включайте одновременно несколько приборов с большой потребляемой мощностью.
•Используйте утюг только в тех целях, которые предусмотрены инструкцией.
•Пользуйтесь утюгом только на гладильной доске.
•Ставьте утюг на ровную устойчивую поверхность.
•При наполнении резервуара водой всегда отключайте утюг от сети.
•При пользовании утюгом крышка заливочного отверстия должна быть плотно закрыта.
•Будьте особенно внимательны при использовании прибора в непосредственной близости от детей и людей с ограниченными возможностями.
•Не оставляйте включенный утюг без присмотра.
•Всегда отключайте утюг от сети, если не пользуетесь им.
•Чтобы избежать поражения электрическим током, не погружайте утюг в воду или в любую другую жидкость.
•Запрещается заливать в резервуар для воды ароматизирующие жидкости, уксус, раствор крахмала, реагенты для удаления накипи, химические вещества и т.д.
•Избегайте контакта открытых участков кожи с горячими поверхностями утюга или выходящим паром, чтобы избежать получения ожогов.
•Следите, чтобы сетевой шнур не свешивался с края гладильной доски и не касался горячих поверхностей.
•При отключении утюга от электрической сети всегда держитесь за сетевую вилку, никогда не тяните за сетевой шнур.
•Перед тем как убрать утюг, слейте остатки воды и дайте ему полностью остыть.
•Сливайте воду только после отключения утюга от сети.
•Не используйте утюг с поврежденной сетевой вилкой, сетевым шнуром, а также с любыми другими неисправностями.
•Во избежание поражения электрическим током никогда не разбирайте утюг самостоятельно, при обнаружении неисправности обращайтесь в авторизованный сервисный центр.
13
|
VT-1210.indd 13 |
22.07.2009 17:18:36 |

РУССКИЙ
ПЕРЕД ПЕРВЫМ ИСПОЛЬЗОВАНИЕМ
•Извлеките утюг из упаковки, при наличии защиты на подошве (13) удалите ее.
•Убедитесь, что напряжение в сети соответствует рабочему напряжению утюга.
Примечание При первом включении нагреватель-
ный элемент утюга обгорает, поэтому возможно появление небольшого количества дыма или постороннего запаха — это нормальное явление.
ВЫБОР ВОДЫ
Для наполнения резервуара используйте водопроводную воду. Если водопроводная вода жесткая, то рекомендуется смешивать ее с дистиллированной водой в соотношении 1:1, при очень жесткой воде смешивайте ее с дистиллированной водой в соотношении 1:2 или используйте только дистиллированную воду.
Примечание Запрещается заливать в резерву-
ар для воды (10) ароматизирующие жидкости, уксус, раствор крахмала, реагенты для удаления накипи, химические вещества и т.д.
НАПОЛНЕНИЕ РЕЗЕРВУАРА ДЛЯ ВОДЫ
Прежде чем залить воду в утюг, убедитесь, что он отключен от сети.
•Установите регулятор постоянной подачи пара (3) в крайнее левое положение — подача пара выключена.
•Откройте крышку заливочного отверстия (2).
•Залейте воду в резервуар (10), плотно закройте крышку (2).
Примечание
•Не наливайте воду выше отметки «MAX».
•Если во время глаженья необходимо долить воду, то отключите утюг и выньте сетевую вилку из розетки.
•После того как вы закончите гладить, выключите утюг, дождитесь его полного остывания, затем откройте крышку заливочного отверстия (2), переверните утюг и слейте остатки воды.
ТЕМПЕРАТУРА ГЛАЖЕНЬЯ
Перед началом эксплуатации протестируйте нагретый утюг на кусочке ткани, чтобы убедиться в том, что подошва утюга (13) и резервуар для воды (10) чистые.
•Всегда перед глаженьем вещей смотрите на ярлык изделия, где указана рекомендуемая температура глаженья.
•Если ярлык с указаниями по глаженью отсутствует, но вы знаете тип материала, то для выбора температуры глаженья воспользуйтесь таблицей.
Обозначения Тип ткани (температура)
|
• |
синтетика, нейлон, акрил, полиэстер |
|
(низкая температура) |
|
|
•• |
шелк/шерсть (средняя температура) |
|
••• |
хлопок/лен (высокая температура) |
•Таблица применима только для гладких материалов. Если материал другого типа (гофрированный, рельефный и т.д.), то лучше всего его гладить при низкой температуре.
•Сначала отсортируйте вещи по температуре глаженья: синтетику — к синтетике, шерсть — к шерсти, хлопок — к хлопку и т.д.
•Утюг нагревается быстрее, чем остывает. Поэтому сначала рекомендуется
14
|
VT-1210.indd 14 |
22.07.2009 17:18:36 |
 Loading…