
На чтение 12 мин Просмотров 23к.

Специалист техподдержки, PHP-программист, разработчик WordPress
Задать вопрос
IT-технологии не стоят на месте. Если раньше для пользователя в диковинку был стандарт беспроводной связи 802.11n, то именитые бренды уже давно продвигают 802.11ас. И TP-Link, по праву называемый флагманом сетевого оборудования, — яркий тому пример. Ещё не так давно считавший новинкой TP-Link Archer C5 (AC1200) плавно сменился моделью TP-Link Archer C5 V4 (AC1200). И хотя разница между моделями только в версиях ревизий, о чем говорит буква V, даже поверхностный обзор сразу находит множество отличий между двумя «братьями».
Содержание
- Особенности и технические характеристики
- Индикаторы и разъёмы
- Подключение
- Вход в настройки роутера
- Автоматическая настройка
- Ручная настройка
- Подключение и параметры Wi-Fi
- Настройка IPTV
- Смена пароля
- Режим повторителя
- Обновление прошивки
- Сброс настроек
- Отзывы
Особенности и технические характеристики
Основная деталь, которая сразу разделяет двух братьев Арчер, — это наличие у TP-Link Archer C5 V4 технологий Agile Config и TR-069.

Agile Config позволяет провайдеру пользователя управлять кастомизацией роутера, TR-069 — настраивать его удалённо. Если ранее оператор ТП по телефону играл в «угадай, какой у меня роутер», с Archer C5 V4 он сможет, не сходя с места, удалённо помогать пользователям в настройках.
Что же касается основных характеристик, то особой разницы между моделями нет.
- Оба Wi-Fi роутера поддерживают стандарт 802.11ас;
- 2 диапазона беспроводной связи (2.4 и 5 ГГц);
- гигабитные порты;
- полнофункциональный USB 2.0.
Как и у других моделей TP-Link, Archer C5 имеет кнопку питания, слегка вогнутый дизайн, закруглённый пластик.
Как у новых моделей бренда, у C5 (AC1200) четыре несъемные антенны (2 по бокам, 2 сзади). В отличие от более старых вариаций, в оформлении использован белый цвет с отдельными элементами серого оттенка.
По программной начинке маршрутизатор тоже не отстаёт:
- встроенный DHCP-сервер — возможность автоматического получения устройством всего необходимого при выходе в сеть;
- поддержка всех стандартов связи, используемыми провайдерами в РФ;
- возможность настройки постоянных IP посредством No-ip и DynDNS — возможность работы в торрент-сетях;
- перенаправление портов и фиксация адреса;
- IGMP — поддержка IPTV;
- конечно, полная защита и аутентификация в сетях WPA2 (чтоб не дарить Wi-Fi соседу);
- полный комплекс настроек для USB 2.0 (только у V4. У первой версии только под HDD).
Отдельно можно упомянуть, что в возможностях Archer C5 присутствуют функция родительского контроля, доступа по расписанию, настройки разнообразных правил.
Удобство и простота настройки
8
Роутеры с похожими техническим характеристиками — TP-Link Archer C7 AC1750, Tp-Link Archer C2300.
Индикаторы и разъёмы
Верхняя крышка Archer C5 имеет слегка вогнутый вид, выложенные в одну ленточку индикаторы работы, логотип бренда. По отзывам пользователей, пластик качественный, «пальчики» не собирает.
Индикаторов семь.
При первом взгляде заметно что для каждого диапазона беспроводной сети у маршрутизатора свой сигнал:
- питание;
- Wi-Fi — 2,4 ГГц;
- Wi-Fi — 5 ГГц;
- WAN порт — с 2-цветной индикацией (Есть/нет подключение);
- LAN-порты (1 на все 4);
- USB;
- WPS.
Задняя панель у Archer C5 более богата.

Слева направо:
- WPS, под ним заглублена кнопка сброса к заводским настройкам;
- 4 порта оранжевого оттенка — для соединения с устройствами пользователя по кабелю (со скоростью до 1 Гбит/с);
- Синий порт — соединение с провайдером (1 Гбит/с);
- USB 2.0 — для подсоединения устройств, поддерживающих этот интерфейс;
- Кнопка питания;
- Разъём для адаптера.
Сзади 2 антенны. Ещё две вынесены на боковые грани.

На нижней крышке наклейка с основными параметрами, вокруг нее большое количество отверстий для вентиляции. Здесь же 4 резиновые лапки, чтобы «маршрутизатор» не ездил по столу, и уши — для крепления на стене.
Пользователи отмечают, что если в USB нужно что-то включить или переключить, в настенном положении это сделать неудобно, так как верхняя крышка «нависает» над устройством, кроме того, разъёмы немного ниже задней грани.
Подключение
Подключить роутер TP-Link не сложнее любого другого аналогичного устройства.
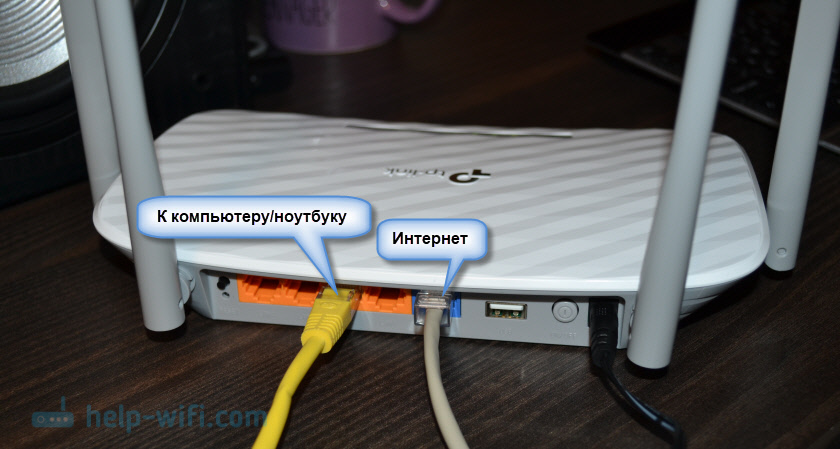
Схему можно представить в виде пошагового плана:
- Вынуть кабель интернета из компьютера.
- Вставить его в синее гнездо на задней крышке роутера.
- Кабелем RJ-45 из комплекта роутера подсоединить освободившийся порт компьютера к одному из оранжевых гнёзд маршрутизатора.
- Подключение выполнено.
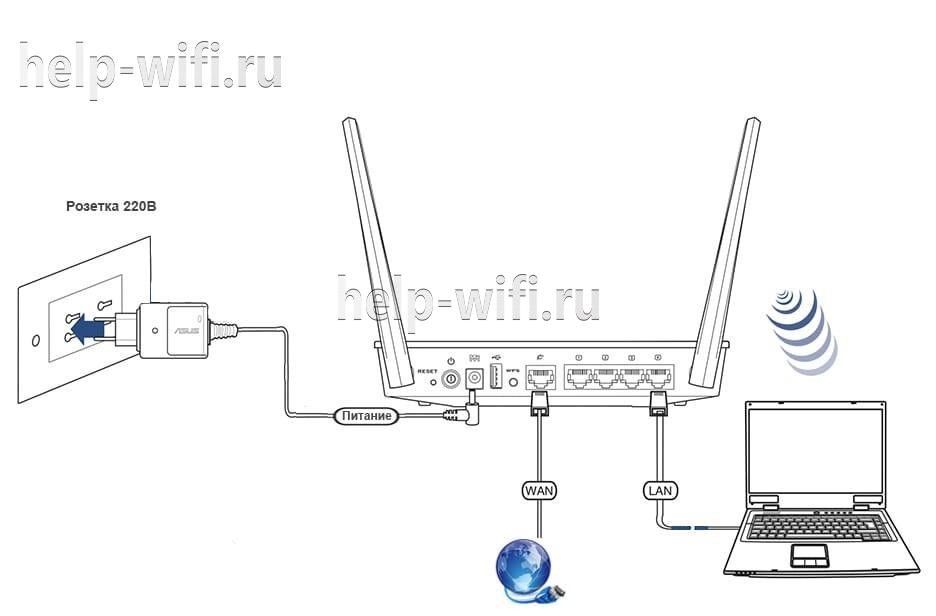
Далее включается компьютер и маршрутизатор, нажимается кнопка питания на нём. После нескольких секунд загрузки, когда индикатор питания перестанет моргать, роутер готов к работе.
Wi-Fi на роутере включен уже из «коробки». После загрузки в поиске сетей должны появится две новые сети:
- TP-Link_XXXX
- TP-Link_XXXX_5G.
Соответственно, 2.4 и 5 ГГц. Пароля нет. Иногда могут быть другие наименования — актуальное имя сети – на наклейке на нижней крышке.
Вход в настройки роутера
Вход в настройки роутера производится стандартным образом. В любом браузере, установленном на устройстве пользователя, вводится адрес http://192.168.0.1 или вариант, используемый на всех новых устройствах бренда, — tplinkwifi.net.
Стоит отметить, что для настройки параметров с мобильного устройства можно скачать и установить программу TP-Link Tether, собственную разработку компании для настройки. Но, по отзывам пользователей, программа некорректно работает в новой ревизии (V4).
Первое, что бросается в глаза при входе — полностью обновленный дизайн панели управления. Если в старых устройствах это встречалось через раз, то у нового Арчера вместо мрачных чёрно-зелёных экранов пользователя встречает весёлое голубое окошко.
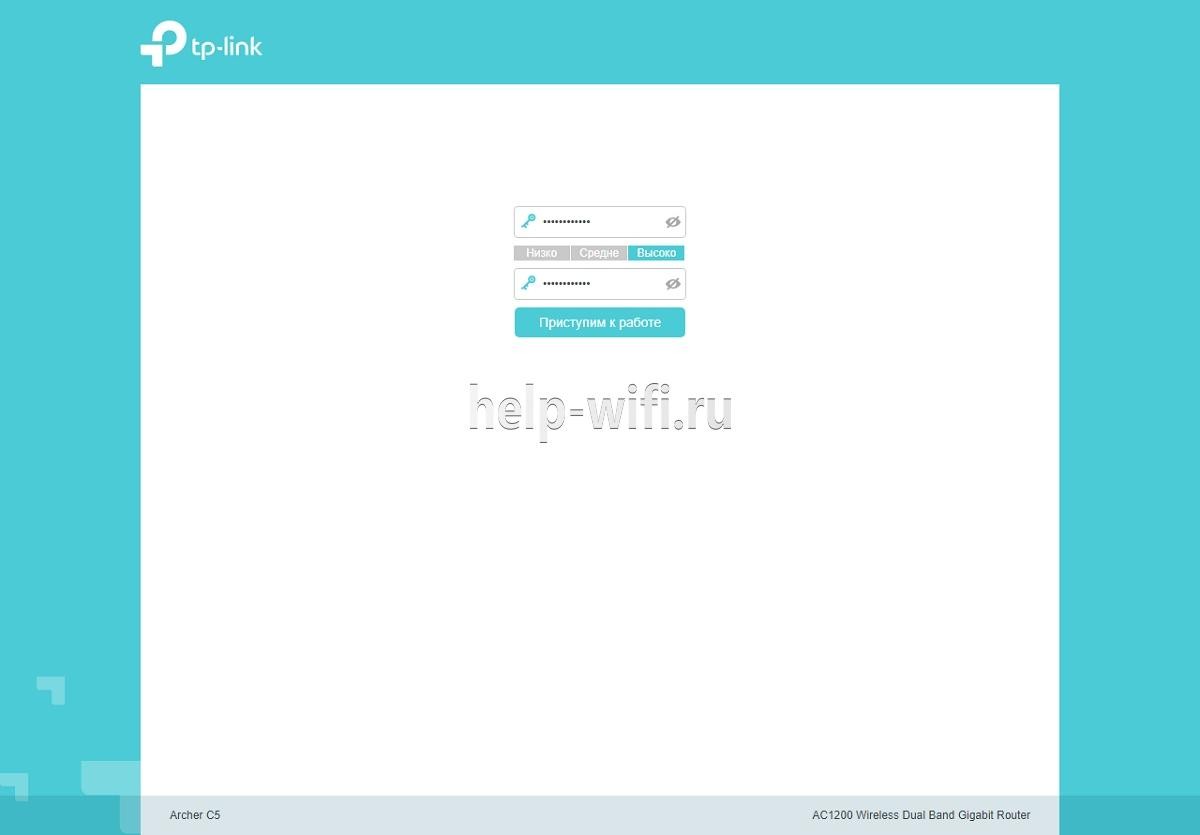
Нужно придумать пароль, ввести его дважды, нажать кнопку «Приступим к работе». Пароль запоминается, потом его можно изменить в системных настройках.
Автоматическая настройка
Если роутер ранее не настраивался, то после открытия Web-интерфейса пользователю предлагается провести автоматическую настройку. От неё можно отказаться или вернуться позднее по нажатию кнопки «Быстрая настройка» в верхнем меню.
В этом режиме можно настроить все необходимые параметры, не углубляясь в детали. Ниже в нескольких скринах показан весь процесс. О том, что понадобится договор с провайдером, можно не упоминать.

Ручная настройка
Если же пользователь хочет настроить какие-то дополнительные возможности или предпочитает понимать, что и где он включает, можно закрыть экран быстрой установки и перейти к настройке роутера в ручном режиме.
В комплекте поставки есть инструкция, но картинки в ней в основном относятся к режиму автонастроек.
Все сведения о подключении к интернету собраны в одном разделе, который так и называется «Интернет».

Здесь выбирается тип подключения к сетям провайдера, вводятся логин и пароль из договора, устанавливаются адреса (если провайдер предлагает сделать это самому пользователю).
Подключение и параметры Wi-Fi
Установить соединение с мобильного гаджета можно ещё до основных настроек, так как на роутере «из коробки» включены оба диапазона для беспроводных сетей. Но если есть желание их перенастроить или закрыть доступы для соседей, переходят в раздел «Беспроводной режим».

Удивляться минимуму настроек на этом экране не стоит — расширенные возможности спрятаны в разделе «дополнительных настроек». Но и представленного в этом разделе для обычной настройки wi-fi вполне хватает.
Для каждого диапазона (по отдельности) можно установить имя и пароль, включить/выключить или скрыть сетку в целях безопасности. При вводе пароля по умолчанию включается режим защиты по протоколу WPA2 — максимум. Перенастроить это можно в разделе дополнительных настроек.
После установки сети и настройки имён сохраняют настройки.
Роутер сразу применяет обновления, поэтому если настройка проводилась с гаджета и в этом разделе было что-то изменено, сеть перезапустится и подключиться придётся заново.
Настройка IPTV
На роутере предусмотрена настройка IP TV, но так как функция нужна не всем, разработчики убрали её из основного меню. Для включения нужно перейти в раздел дополнительных настроек, где выбрать вкладку «Сеть». Но в списке настроек IPTV не появится, так как все необходимые настройки для просмотра на компьютере уже заложены в прошивке.
Переходят в раздел «Интернет», где находятся все подключения к внешней сети. В новом окне (если уже настроено соединение с провайдером, то здесь будет одна сеть), выбирается «Добавить». У появившегося подключения выбирается режим «Мост». Действия подтверждаются кнопкой «Сохранить».
Для просмотра на компьютере этого достаточно, но если планируется просмотр ещё и на приставке (-ах) — нужно выбрать в той же вкладке раздел «группировка интерфейсов». Перейдя в раздел, снова «добавить».
И в открывшейся таблице в левой части выбрать порт, к которому подключена приставка. Дальше выбрать имя группы настроек (выше таблицы) «Сохранить».
В окне группировки должны появиться две группы. На этом настройки ТВ на роутере закончены.
Смена пароля
Установленный при первом подключении пароль меняется в том же окне дополнительных настроек на вкладке «Системные инструменты».
В списке выбирается пункт «Учётные записи». В окне, по традиции для устройств бренда, можно сменить как имя пользователя, так и пароль. Новые данные вступят в силу после автоматической перезагрузки.
Режим повторителя
В некоторых случаях, например, на большом расстоянии от основного подключения у пользователя может возникнуть необходимость включения роутера в режим повторителя.
Делается это в системных настройках, в окне «параметры устройства»:
- Нужно выбрать какой из диапазонов станет повторителем, а затем в соответствующем окне установить галочку «Включить мост WDS».
- Ниже через кнопку поиска выбрать сеть для усиления, прописать МАС основного устройства (обычно подставляется автоматически).
- Настроить защиту, такую же, как на основном девайсе.
- На вкладке «Сеть» в окне «LAN» выключить DHCP сервер, так как все адреса будут выдаваться основным устройством.
Так как адрес роутера тоже изменится, для выключения режима нужно будет смотреть его адрес уже в настройках беспроводной сети основного устройства.
Обновление прошивки
Прошивка роутера меняется по стандартной схеме:
- Переходят в «Дополнительные настройки».
- Выбирают раздел «Системные инструменты».
- Затем переходят в окно «Обновление встроенного ПО»
- Здесь приводится информация о текущей установленной прошивке.
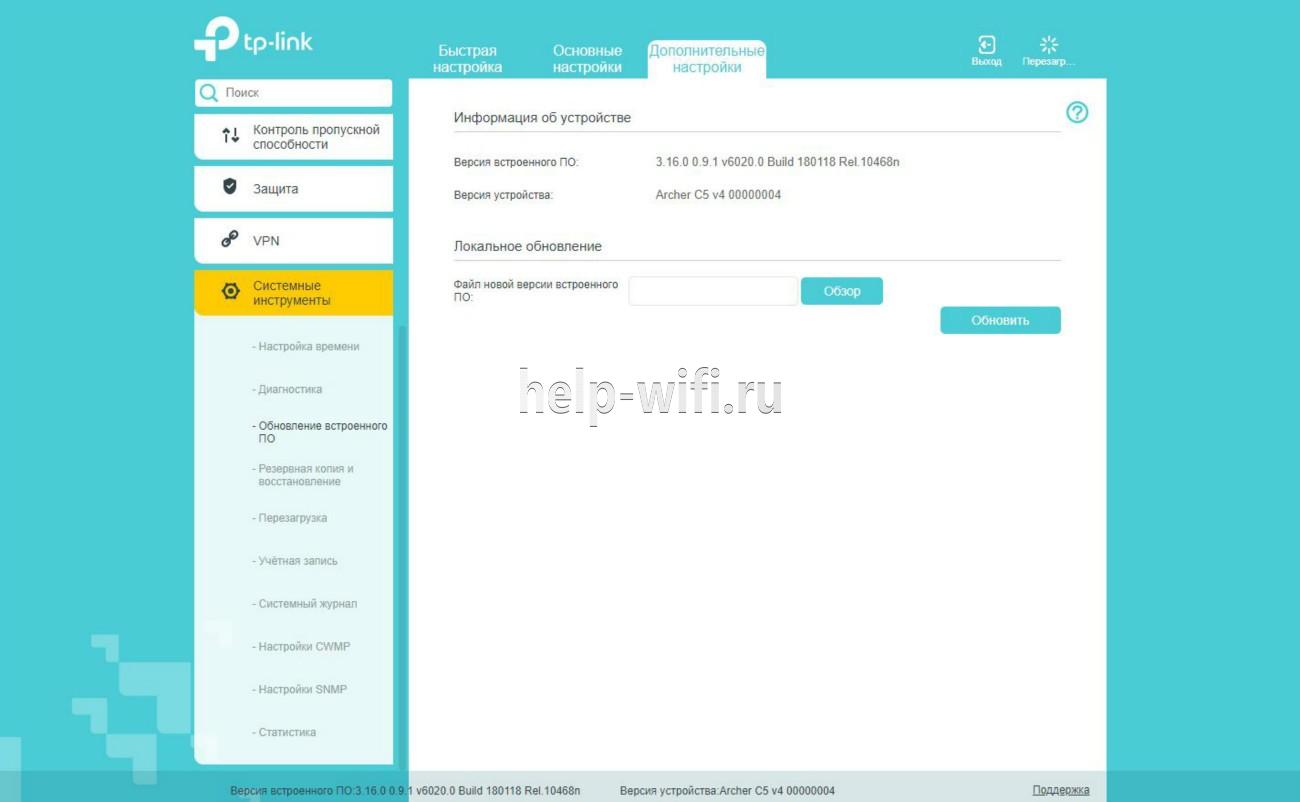
При необходимости заменить скачивается новая прошивка с официального сайта производителя:
- В поле для файла прошивки указывается скачанный файл, для поиска можно воспользоваться кнопкой «Обзор»
- Нажимается кнопка «Обновить».
- Роутер перегрузится и попробует применить новую прошивку.
Во время обновления питание роутера отключать нельзя!
Сброс настроек
В системных инструментах функции сброса настроек к заводским не предусмотрено, но такая кнопка есть у всех моделей. У TP-Link Archer C5 она находится на задней панели под кнопкой WPS. Нужно нажать и удержать её в течение 10 сек. стержнем или каким-то похожим тонким предметом. Роутер начнёт перезагрузку, на что будет указывать мигающий индикатор питания. После загрузки будут применены заводские настройки.
Отзывы
Мы посмотрели отзывы покупателей и выделили достоинства и недостатки модели TP-Link Archer C5
стабильную работу LAN;
широкий диапазон настроек;
защиту от DDOS;
WI-FI на диапазоне 2.4
WI-FI на диапазоне 5 отваливается с периодичностью в 15 мин;
Не работающий VPN.
Пользователи первой ревизии отмечали, что USB работает только с накопителем (В V4 устранено).
Пользователи часто отмечают, что по непонятной идее разработчиков, сходные настройки разнесены по разным окнам.
Возможно, вы уже прочитали мой обзор TP-Link Archer C5 V4, купили себе этот маршрутизатор и теперь вам не терпится его настроить. Не исключены и другие причины, по которым вы могли зайти на эту страницу. Например, возникли какие-то проблемы в работе роутера, или вы хотите настроить дополнительные функции. В этой статье я покажу весь процесс подключения и настройки TP-Link Archer C5 V4. Это как дополнение, или замена руководства, которое есть в комплекте с маршрутизатором. С одним огромным отличием – обратная связь в комментариях 🙂 Где вы всегда можете дополнить статью, или задать вопрос.
TP-Link Archer C5 V4 немного отличается от других маршрутизаторов этой компании. Я имею введу процесс настройки. На этот роутер установлена уже новая панель управления, с которой работать намного проще и приятнее. Например, нет уже заводского имени пользователя и пароля (admin/admin), а роутер предлагает нам установить пароль в процессе первой настройки. И это очень удобно. Так же изменились настройки интернет-подключения (WAN). Но вы это скорее всего не заметите, если будете использовать мастер быстрой настройки.

Чтобы настроит оборудование, его сначала нужно подключить. Поэтому, достаем наш Archer C5 V4 из коробки и подключаем питание. Если индикатор питания не загорится, то включите питание с помощью кнопки «On/Off».
Дальше подключите интернет в WAN-порт маршрутизатора. Я имею введу сетевой кабель, который идет от провайдера, или от модема. Так же нам нужно подключить к роутеру устройство, с которого мы будем выполнять настройку. Лучше всего для этого дела подходит стационарный компьютер, или ноутбук. Если у вас он есть, то соедините его с роутером с помощью сетевого кабеля.
Если у вас нет компьютера, или на нем нет/не работает сетевая карта, то можно подключится с любого устройства по Wi-Fi. Откройте список доступных Wi-Fi сетей на своем устройстве и подключитесь к беспроводной сети, которую транслирует TP-Link Archer C5 V4. Заводское имя сети (оно же SSID) и пароль беспроводной сети (PIN) указаны на наклейке, которая находится снизу маршрутизатора.

Так как роутер у нас двухдиапазонный, то сети будет две. Та, которая в диапазоне 5 GHz будет с индексом «_5G». Подключится можно к любой.

Ваше устройство должно быть подключено только к этому роутеру. Другие активные подключения необходимо отключить. Изначально, статус подключения к Archer C5 V4 возможно будет «Без доступа к интернету». Не обращайте на это внимания.
Быстрая настройка TP-Link Archer C5 V4
Чтобы настроить роутер для подключения к интернету и задать параметры Wi-Fi сети, нам необходимо получить доступ к веб-интерфейсу.
Сделать это очень просто. Запускаем любой браузер и в нем переходим по адресу http://tplinkwifi.net (подробнее в статье: tplinkwifi.net – вход в настройки маршрутизатора). Или по адресу http://192.168.0.1 (подробная инструкция: 192.168.0.1 – вход в роутер, или модем. admin и admin).
Если маршрутизатор уже был настроен, то он попросит вас ввести пароль, который был установлен.
Вы всегда можете сделать сброс настроек роутера кнопкой Reset. Нужно нажать на нее острым предметом и подержать, пока не загорятся и погаснут все индикаторы.
Если же он еще не настраивался, то появится окно, в котором нужно придумать и указать пароль. Этот пароль в дальнейшем будет использоваться для авторизации в настройках TP-Link Archer C5 V4. Постарайтесь его не забыть.

Сразу появится мастер быстрой настройки. С помощью которого можно быстро задать все необходимые параметры. И не придется делать это в разных разделах панели управления.
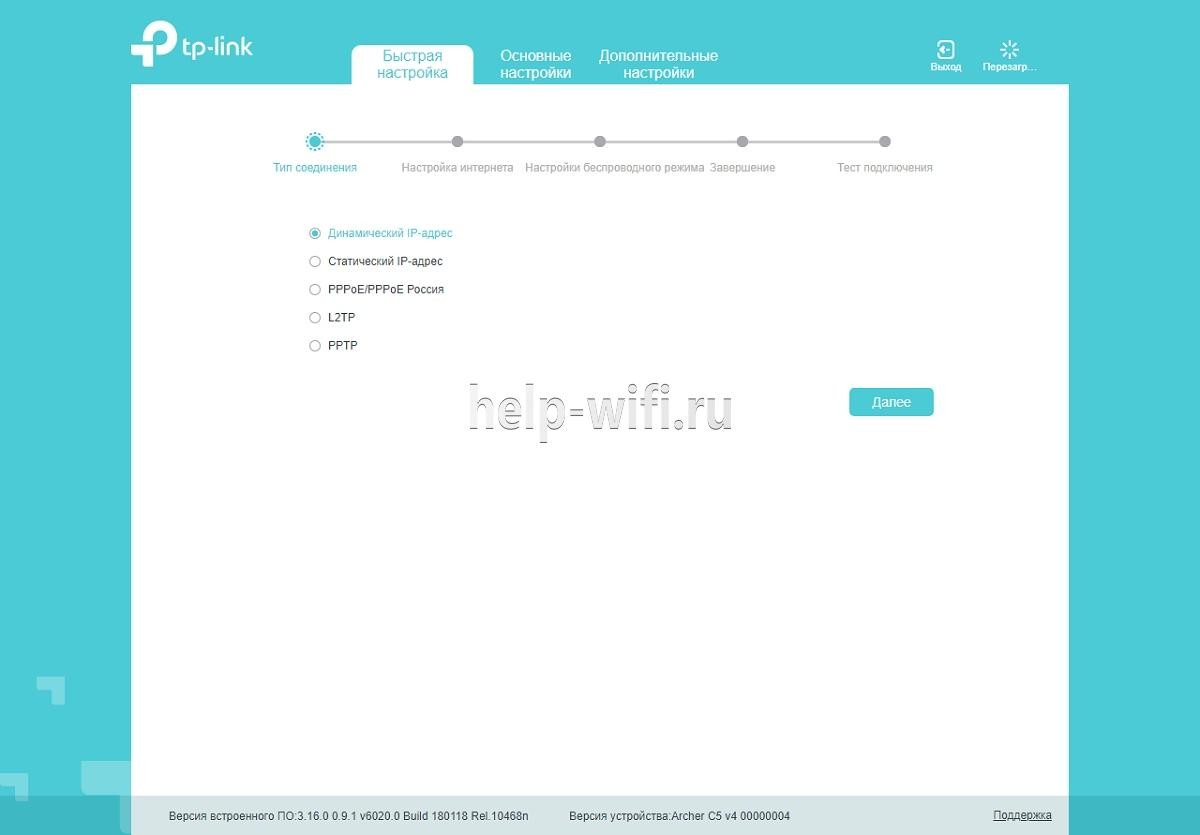
Конечно же роутер сначала предложит нам задать самые важные настройки – подключение к интернету.
Выберите тип подключения к интернету, который использует ваш провайдер. Если не знаете какой – уточняйте у поддержки интернет-провайдера. Чаще всего это Динамический IP, или PPPoE. Так же часто используется L2TP и PPTP.

Так как у меня Динамический IP, то дополнительные параметры задавать не нужно. Если у вас PPPoE, то нужно указать имя пользователя и пароль. А если L2TP или PPTP, то еще и адрес сервера. Эти параметры выдает интернет-провайдер. Поэтому, все вопросы к нему.
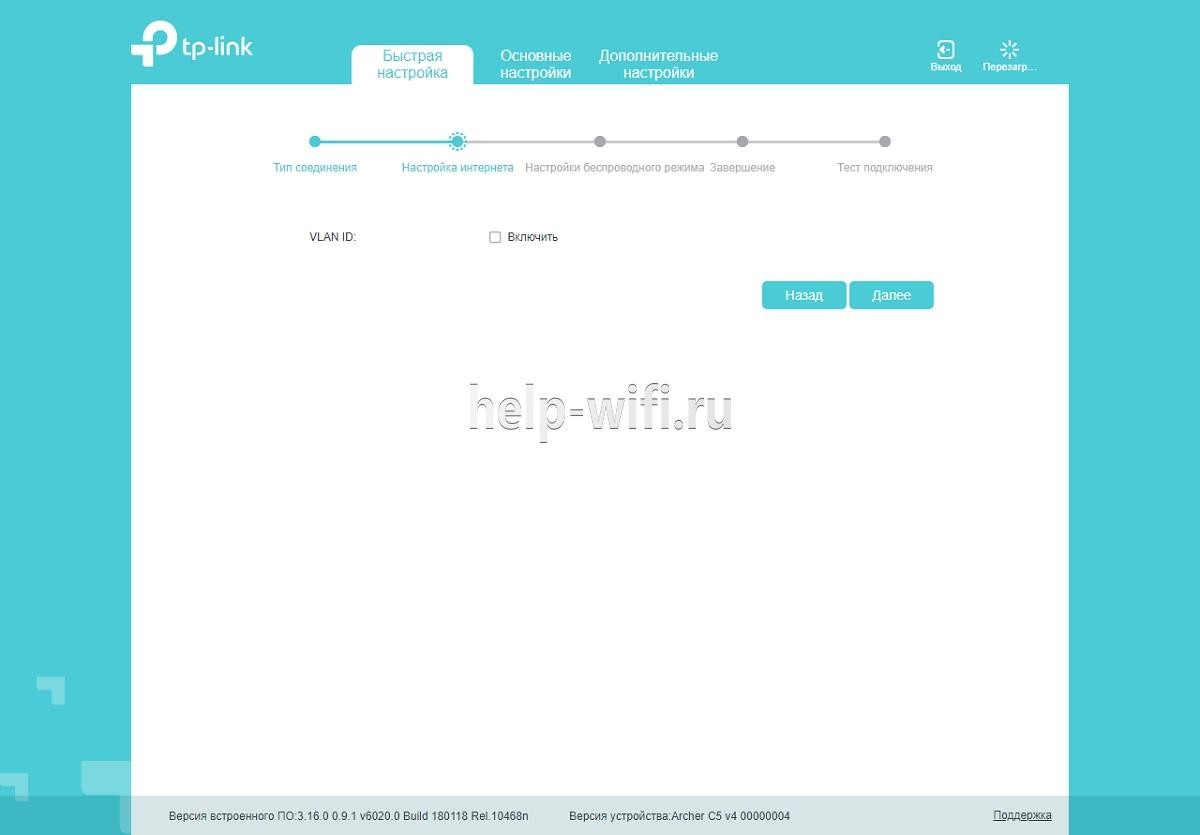
Можно включить «VLAN ID» и задать номер. Не очень понимаю, для чего это нужно. Скорее всего для просмотра IPTV. Я не включал. Это можно сделать позже, если понадобится.

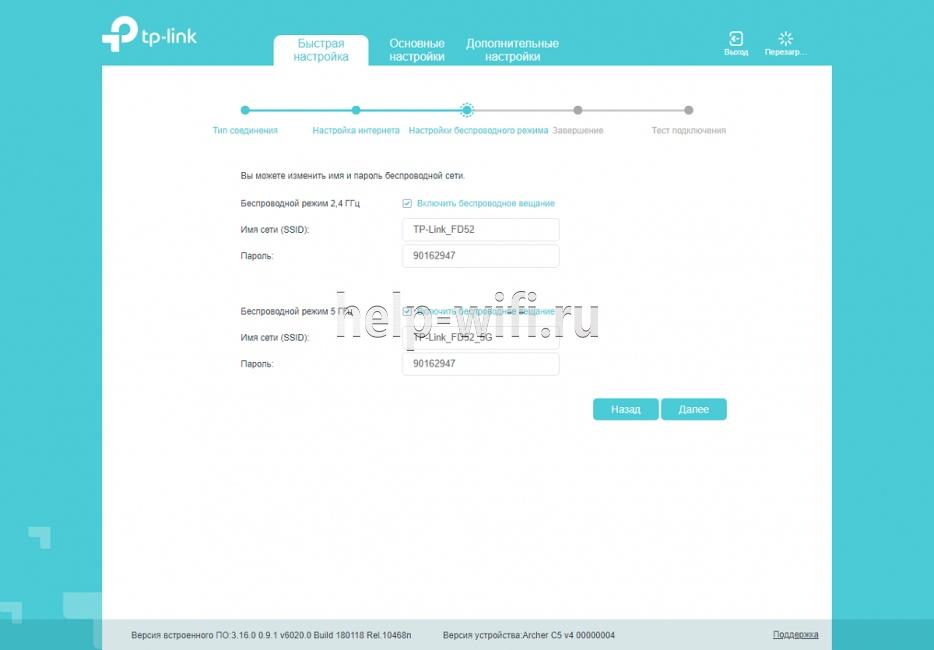
На следующем шаге можно настроить Wi-Fi сеть, которую будет раздавать TP-Link Archer C5 V4. Нужно сменить имя Wi-Fi сети и пароль. Для каждого диапазона. При необходимости, можно отключить сеть в определенном диапазоне. Достаточно убрать галочку возле «Включить беспроводное вещание». Если, например, вы пока не планируете подключать свои устройства к сети на частоте 5 ГГц. Или у вас нет устройств, которые поддерживают эту сеть. Потом можно будет включить ее в настройках.

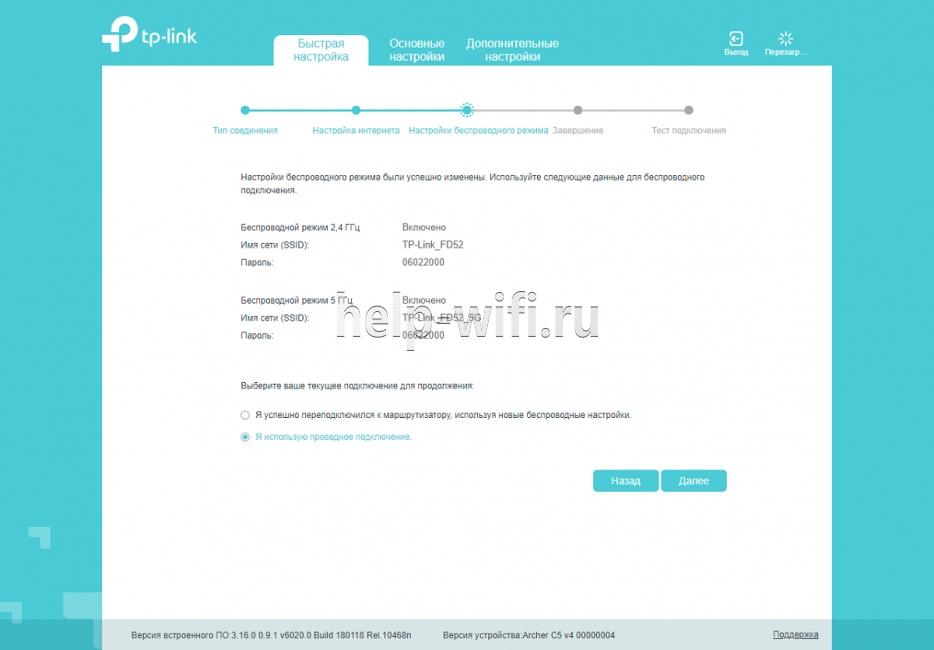
Если вы были подключены по Wi-Fi, то подключитесь уже к новой сети. Выберите один из вариантов в следующем окне и нажмите «Далее».
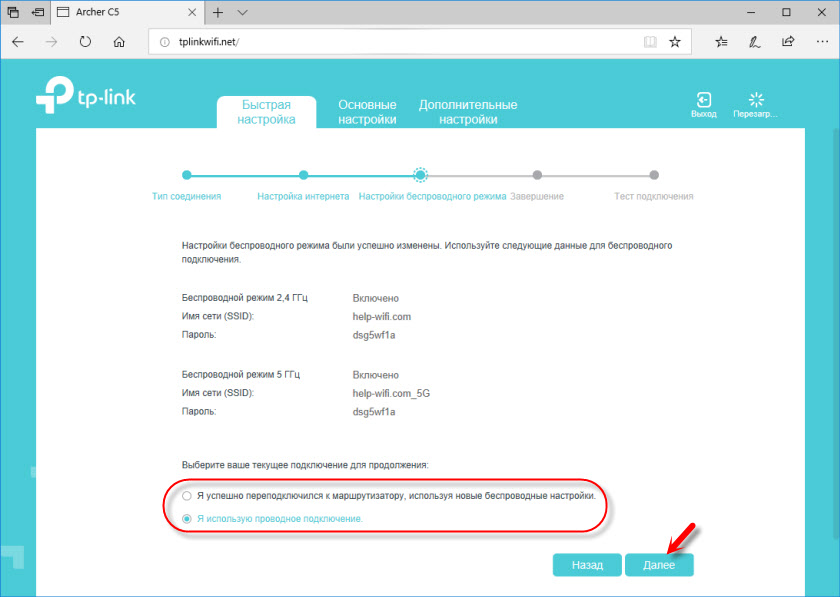
Сохраняем параметры.

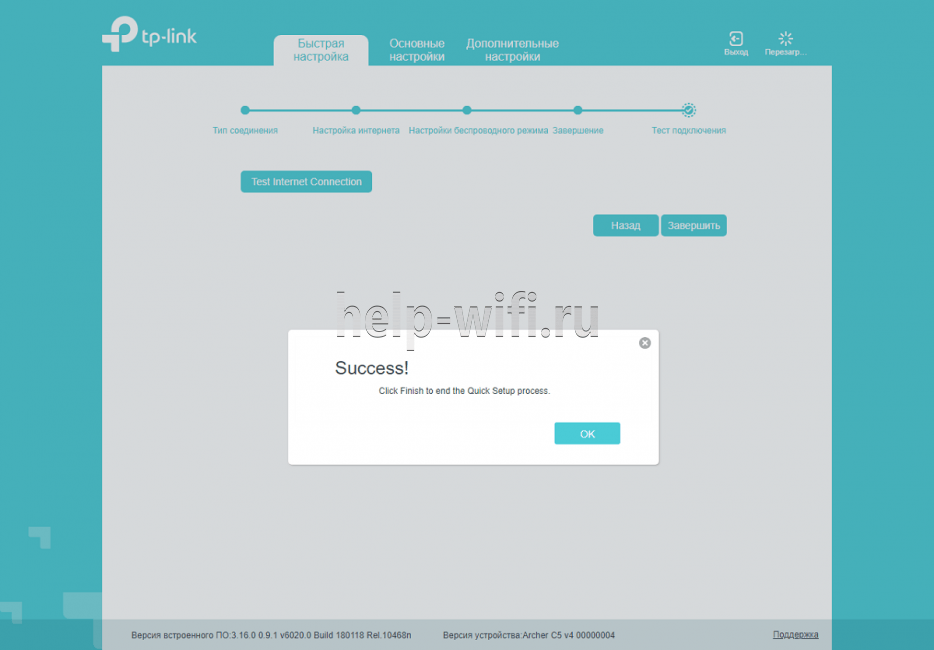
Можно сделать тест подключения к интернету. И если роутер подключен к интернету (результат «Success!» «Успех!»), то нажимаем на кнопку «Завершить». Если же подключения к интернету нет, то с помощью кнопки «Назад» вернитесь к выбору типа соединения и проверьте все параметры. Уточните настройки у провайдера.

Откроется карта сети.

Настройка завершена. Можно менять другие параметры маршрутизатора.
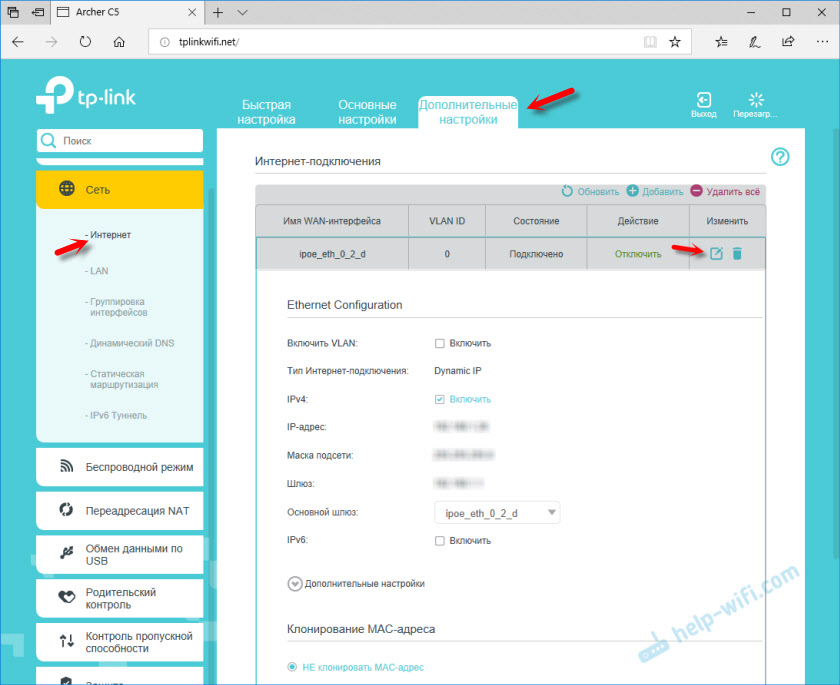
В разделе «Дополнительные настройки», на вкладке «Сеть» – «Интернет» можно сменить параметры подключения к интернету. Отредактировать или уделить уже созданное правило, или создать новое. Но если интернет через роутер работает, то лучше ничего не менять.
Там же можно найти более расширенные настройки. Например, сменить MTU, или клонировать MAC-адрес (если это требует провайдер).
В разделе «Беспроводной режим» находятся настройки Wi-Fi сети. Сама панель управления очень простая и на русском языке. Думаю, нет особого смысла делать обзор всех настроек.
Так как в TP-Link Archer C5 V4 есть USB-порт, то возможно вам пригодится эта инструкция: доступ к USB диску (флешке) через роутер TP-Link по сети. Если вы захотите подключить к своему роутеру флешку, или внешний жесткий диск. Или настроить DLNA через роутер TP-Link.
![]()
Archer C5
AC1200 Wireless Dual Band Gigabit Router
REV1.3.0
1910011192
COPYRIGHT & TRADEMARKS
Specifications are subject to change without notice.  is a registered trademark of TP-LINK TECHNOLOGIES CO., LTD. Other brands and product names are trademarks or registered trademarks of their respective holders.
No part of the specifications may be reproduced in any form or by any means or used to make any derivative such as translation, transformation, or adaptation without permission from TP-LINK TECHNOLOGIES CO., LTD. Copyright © 2015 TP-LINK TECHNOLOGIES CO., LTD. All rights reserved.
http://www.tp-link.com

FCC STATEMENT
This equipment has been tested and found to comply with the limits for a Class B digital device, pursuant to part 15 of the FCC Rules. These limits are designed to provide reasonable protection against harmful interference in a residential installation. This equipment generates, uses and can radiate radio frequency energy and, if not installed and used in accordance with the instructions, may cause harmful interference to radio communications. However, there is no guarantee that interference will not occur in a particular installation. If this equipment does cause harmful interference to radio or television reception, which can be determined by turning the equipment off and on, the user is encouraged to try to correct the interference by one or more of the following measures:
Reorient or relocate the receiving antenna.
Increase the separation between the equipment and receiver.
Connect the equipment into an outlet on a circuit different from that to which the receiver is connected.
Consult the dealer or an experienced radio/ TV technician for help.
This device complies with part 15 of the FCC Rules. Operation is subject to the following two conditions:
1 This device may not cause harmful interference.
2 This device must accept any interference received, including interference that may cause undesired operation.
Any changes or modifications not expressly approved by the party responsible for compliance could void the user’s authority to operate the equipment.
Note: The manufacturer is not responsible for any radio or TV interference caused by unauthorized modifications to this equipment. Such modifications could void the user’s authority to operate the equipment.
FCC RF Radiation Exposure Statement:
This equipment complies with FCC RF radiation exposure limits set forth for an uncontrolled environment. This device and its antenna must not be co-located or operating in conjunction with any other antenna or transmitter.
“To comply with FCC RF exposure compliance requirements, this grant is applicable to only Mobile Configurations. The antennas used for this transmitter must be installed to provide a separation distance of at least 20 cm from all persons and must not be co-located or operating in conjunction with any other antenna or transmitter.”

CE Mark Warning
This is a class B product. In a domestic environment, this product may cause radio interference, in which case the user may be required to take adequate measures.
National Restrictions
This device is intended for home and office use in all EU countries (and other countries following the EU directive 1999/5/EC) without any limitation except for the countries mentioned below:
Country Restriction Reason/remark
|
Bulgaria |
General authorization required for outdoor use and |
|
None |
|
|
public service |
|
Outdoor use limited to
10 mW e.i.r.p. within
France
the band 2454-2483.5 MHz
Military Radiolocation use. Refarming of the 2.4 GHz band has been ongoing in recent years to allow current relaxed regulation. Full implementation planned 2012
|
Italy |
None |
If used outside of own premises, general authorization is |
|
|
required |
|||
|
Luxembourg |
None |
General authorization required for network and service |
|
|
supply(not for spectrum) |
|||
|
Norway |
Implemented |
This subsection does not apply for the geographical area |
|
|
within a radius of 20 km from the centre of Ny-Ålesund |
|||
|
Russian Federation |
None |
Only for indoor applications |
|
|
5150-5250 MHz |
|||
|
Country |
Restriction |
Reason/remark |
|
|
Bulgaria |
Not implemented |
Planned |
|
|
Croatia |
License required |
||
|
Italy |
General authorization required if used outside own |
||
|
premises |
|||

|
Luxembourg |
None |
General authorization required for network and service |
||||||
|
supply (not for spectrum) |
||||||||
|
Russian Federation |
No info |
|||||||
|
5250-5350 MHz |
||||||||
|
Country |
Restriction |
Reason/remark |
||||||
|
Bulgaria |
Not |
Planned |
||||||
|
implemented |
||||||||
|
Croatia |
License required |
|||||||
|
Italy |
General authorization required |
if used outside own |
||||||
|
premises |
||||||||
|
Luxembourg |
None |
General authorization required for network and service |
||||||
|
supply (not for spectrum) |
||||||||
|
Russian Federation |
No info |
|||||||
|
5470-5725 MHz |
||||||||
|
Country |
Restriction |
Reason/remark |
||||||
|
Bulgaria |
Not |
Planned |
||||||
|
implemented |
||||||||
|
Relevant+ provisions for the implementation of DFS |
||||||||
|
France |
mechanism described in ETSI standard EN 301 893 |
|||||||
|
V1.3.1 and subsequent versions |
||||||||
|
Italy |
General authorization required |
if used outside own |
||||||
|
premises |
||||||||
|
Luxembourg |
None |
General authorization required for network and service |
||||||
|
supply (not for spectrum) |
||||||||
|
Russian Federation |
No info |
|||||||
|
Turkey |
Not implemented |
Defence systems |
||||||
Note: Please don’t use the product outdoors in France.
Canadian Compliance Statement
This device complies with Industry Canada license-exempt RSS standard(s). Operation is subject to the following two conditions:
(1) This device may not cause interference, and
(2)This device must accept any interference, including interference that may cause undesired operation of the device.
Cet appareil est conforme aux norms CNR exemptes de licence d’Industrie Canada. Le fonctionnement est soumis aux deux conditions suivantes:
(1)cet appareil ne doit pas provoquer d’interférences et
(2)cet appareil doit accepter toute interférence, y compris celles susceptibles de provoquer un fonctionnement non souhaité de l’appareil.
To reduce potential radio interference to other users, the antenna type and its gain should be so chosen that the equivalent isotropically radiated power (e.i.r.p.) is not more than that permitted for successful communication.
Industry Canada Statement
Complies with the Canadian ICES-003 Class B specifications.
Cet appareil numérique de la classe B est conforme à la norme NMB-003 du Canada.
This device complies with RSS 210 of Industry Canada. This Class B device meets all the requirements of the Canadian interference-causing equipment regulations.
Cet appareil numérique de la Classe B respecte toutes les exigences du Règlement sur le matériel brouilleur du Canada.
Korea Warning Statements
.
NCC Notice & BSMI Notice
加大功率或變更原設計之特性或功能。

●
●
●
●
●
●
Продукт сертифіковано згідно с правилами системи УкрСЕПРО на відповідність вимогам нормативних документів та вимогам, що передбачені чинними законодавчими актами України.
Safety Information
When product has power button, the power button is one of the way to shut off the product; when there is no power button, the only way to completely shut off power is to disconnect the product or the power adapter from the power source.
Don’t disassemble the product, or make repairs yourself. You run the risk of electric shock and voiding the limited warranty. If you need service, please contact us.
Avoid water and wet locations.
This product can be used in the following countries:
|
AT |
BG |
BY |
CA |
CZ |
DE |
DK |
EE |
|
ES |
FI |
FR |
GB |
GR |
HU |
IE |
IT |
|
LT |
LV |
MT |
NL |
NO |
PL |
PT |
RO |
|
RU |
SE |
SK |
TR |
UA |
US |
||

 TP-LINK TECHNOLOGIES CO., LTD
DECLARATION OF CONFORMITY
For the following equipment:
Product Description: AC1200 Wireless Dual Band Gigabit Router
Model No.: Archer C5
Trademark: TP-LINK
We declare under our own responsibility that the above products satisfy all the technical regulations applicable to the product within the scope of Council Directives:
Directives 1999/5/EC, Directives 2004/108/EC, Directives 2006/95/EC, Directives 1999/519/EC, Directives 2011/65/EU
The above product is in conformity with the following standards or other normative documents
EN 300 328 V1.8.1
EN 301 489-1 V1.9.2 & EN 301 489-17 V2.2.1 EN 55022: 2010 + AC: 2011
EN 55024: 2010
EN 61000-3-2: 2006 + A1: 2009 + A2: 2009 EN 61000-3-3: 2013
EN 60950-1: 2006 + A11: 2009 + A1: 2010 + A12: 2011 EN 50385: 2002
EN 301 893 V1.7.1
The product carries the CE Mark:
Person responsible for making this declaration:
Yang Hongliang
Product Manager of International Business
Date of issue: 2014
TP-LINK TECHNOLOGIES CO., LTD.
Building 24 (floors 1, 3, 4, 5), and 28 (floors 1-4) Central Science and Technology Park, Shennan Rd,
Nanshan, Shenzhen, China
|
CONTENTS |
|||
|
Package Contents……………………………………………………………………………………….. |
1 |
||
|
Chapter 1. Introduction…………………………………………………………………………….. |
2 |
||
|
1.1 |
Overview of the router…………………………………………………………………………………… |
2 |
|
|
1.2 |
Conventions ………………………………………………………………………………………………… |
3 |
|
|
1.3 |
Main Features ……………………………………………………………………………………………… |
3 |
|
|
1.4 |
Panel Layout ……………………………………………………………………………………………….. |
4 |
|
|
1.4.1 |
The Front Panel…………………………………………………………………………………. |
4 |
|
|
1.4.2 |
The Rear Panel …………………………………………………………………………………. |
5 |
|
|
Chapter 2. Connecting the router ……………………………………………………………… |
7 |
||
|
2.1 |
System Requirements…………………………………………………………………………………… |
7 |
|
|
2.2 |
Installation Environment Requirements……………………………………………………………. |
7 |
|
|
2.3 |
Connecting the router……………………………………………………………………………………. |
7 |
|
|
Chapter 3. Quick Installation Guide…………………………………………………………… |
9 |
||
|
3.1 |
TCP/IP Configuration ……………………………………………………………………………………. |
9 |
|
|
3.2 |
Quick Installation Guide ………………………………………………………………………………. |
11 |
|
|
Chapter 4. Configuring the router……………………………………………………………. |
21 |
||
|
4.1 |
Login ………………………………………………………………………………………………………… |
21 |
|
|
4.2 |
Status……………………………………………………………………………………………………….. |
21 |
|
|
4.3 |
Quick Setup……………………………………………………………………………………………….. |
22 |
|
|
4.4 |
Network…………………………………………………………………………………………………….. |
23 |
|
|
4.4.1 |
WAN………………………………………………………………………………………………. |
23 |
|
|
4.4.2 |
LAN ……………………………………………………………………………………………….. |
32 |
|
|
4.4.3 |
MAC Clone……………………………………………………………………………………… |
32 |
|
|
4.4.4 |
IPTV ………………………………………………………………………………………………. |
33 |
|
|
4.5 |
Dual Band Selection……………………………………………………………………………………. |
34 |
|
|
4.6 |
Wireless 2.4GHz ………………………………………………………………………………………… |
34 |
|
|
4.6.1 |
Wireless Settings……………………………………………………………………………… |
35 |
|
|
4.6.2 |
WPS ………………………………………………………………………………………………. |
37 |
|
|
4.6.3 |
Wireless Security……………………………………………………………………………… |
39 |
|
|
4.6.4 |
Wireless MAC Filtering……………………………………………………………………… |
42 |
|
|
4.6.5 |
Wireless Advanced…………………………………………………………………………… |
44 |
|
|
4.6.6 |
Wireless Statistics…………………………………………………………………………….. |
45 |
|
|
4.7 |
Wireless 5GHz …………………………………………………………………………………………… |
46 |
— I —
|
4.7.1 |
Wireless Settings ……………………………………………………………………………… |
46 |
|
|
4.7.2 |
WPS ………………………………………………………………………………………………. |
48 |
|
|
4.7.3 |
Wireless Security ……………………………………………………………………………… |
51 |
|
|
4.7.4 |
Wireless MAC Filtering ……………………………………………………………………… |
54 |
|
|
4.7.5 |
Wireless Advanced …………………………………………………………………………… |
56 |
|
|
4.7.6 |
Wireless Statistics …………………………………………………………………………….. |
57 |
|
|
4.8 |
Guest Network …………………………………………………………………………………………… |
58 |
|
|
4.8.1 |
Wireless Settings ……………………………………………………………………………… |
58 |
|
|
4.9 |
DHCP |
……………………………………………………………………………………………………….. |
60 |
|
4.9.1 ………………………………………………………………………………… |
DHCP Settings |
60 |
|
|
4.9.2 …………………………………………………………………………….. |
DHCP Clients List |
61 |
|
|
4.9.3 ………………………………………………………………………… |
Address Reservation |
62 |
|
|
4.10 |
USB Settings……………………………………………………………………………………………… |
63 |
|
|
4.10.1 ……………………………………………………………………………………. |
Disk Settings |
63 |
|
|
4.10.2 …………………………………………………………………………………. |
Folder Sharing |
64 |
|
|
4.10.3 ……………………………………………………………………………………… |
Print Server |
66 |
|
|
4.11 NAT………………………………………………………………………………………………………….. |
67 |
||
|
4.12 Forwarding ………………………………………………………………………………………………… |
67 |
||
|
4.12.1 …………………………………………………………………………………. |
Virtual Servers |
68 |
|
|
4.12.2 …………………………………………………………………………………. |
Port Triggering |
69 |
|
|
4.12.3 ……………………………………………………………………………………………….. |
DMZ |
72 |
|
|
4.12.4 ………………………………………………………………………………………………UPnP |
72 |
||
|
4.13 |
Security…………………………………………………………………………………………………….. |
73 |
|
|
4.13.1 ………………………………………………………………………………….. |
Basic Security |
73 |
|
|
4.13.2 ……………………………………………………………………………. |
Advanced Security |
75 |
|
|
4.13.3 …………………………………………………………………………… |
Local Management |
77 |
|
|
4.13.4 ………………………………………………………………………..Remote Management |
77 |
||
|
4.14 |
Parental ………………………………………………………………………………………….Control |
78 |
|
|
4.15 |
Access ……………………………………………………………………………………………Control |
81 |
|
|
4.15.1 ………………………………………………………………………………………………..Rule |
82 |
||
|
4.15.2 ………………………………………………………………………………………………..Host |
87 |
||
|
4.15.3 ………………………………………………………………………………………………Target |
89 |
||
|
4.15.4 ………………………………………………………………………………………….Schedule |
91 |
||
|
4.16 Advanced ……………………………………………………………………………………….Routing |
93 |
||
|
4.16.1 ……………………………………………………………………………..Static Routing List |
93 |
||
|
4.16.2 ………………………………………………………………………..System Routing Table |
94 |
— II —
|
4.17 |
Bandwidth Control………………………………………………………………………………………. |
95 |
|
4.17.1 Control Settings……………………………………………………………………………….. |
95 |
|
|
4.17.2 Rules List………………………………………………………………………………………… |
95 |
|
|
4.18 |
IP & MAC Binding……………………………………………………………………………………….. |
96 |
|
4.18.1 Binding Settings……………………………………………………………………………….. |
97 |
|
|
4.18.2 ARP List………………………………………………………………………………………….. |
98 |
|
|
4.19 |
Dynamic DNS…………………………………………………………………………………………….. |
99 |
|
4.19.1 Comexe.cn DDNS ……………………………………………………………………………. |
99 |
|
|
4.19.2 Dyndns.org DDNS………………………………………………………………………….. |
100 |
|
|
4.19.3 No-ip.com DDNS……………………………………………………………………………. |
101 |
|
|
4.20 |
IPv6 Support ……………………………………………………………………………………………. |
102 |
|
4.20.1 IPv6 Status ……………………………………………………………………………………. |
103 |
|
|
4.20.2 IPv6 Setup…………………………………………………………………………………….. |
104 |
|
|
4.21 |
System Tools……………………………………………………………………………………………. |
109 |
|
4.21.1 Time Settings…………………………………………………………………………………. |
110 |
|
|
4.21.2 Diagnostic………………………………………………………………………………………. |
111 |
|
|
4.21.3 Firmware Upgrade………………………………………………………………………….. |
113 |
|
|
4.21.4 Factory Defaults …………………………………………………………………………….. |
114 |
|
|
4.21.5 Backup & Restore…………………………………………………………………………… |
114 |
|
|
4.21.6 Reboot………………………………………………………………………………………….. |
115 |
|
|
4.21.7 Password………………………………………………………………………………………. |
116 |
|
|
4.21.8 System Log……………………………………………………………………………………. |
116 |
|
|
4.21.9 Statistics ……………………………………………………………………………………….. |
118 |
|
|
4.22 |
Logout…………………………………………………………………………………………………….. |
120 |
|
Appendix A: FAQ …………………………………………………………………………………….. |
121 |
|
|
Appendix B: Configuring the PCs…………………………………………………………….. |
126 |
|
|
Appendix C: Specifications ……………………………………………………………………… |
128 |
|
|
Appendix D: Glossary……………………………………………………………………………… |
129 |
— III —

Archer C5 AC1200 Wireless Dual Band Gigabit Router
Package Contents
The following items should be found in your package:
Archer C5 AC1200 Wireless Dual Band Gigabit Router
DC Power Adapter for Archer C5 AC1200 Wireless Dual Band Gigabit Router
Ethernet Cable
Quick Installation Guide
Resource CD for Archer C5 AC1200 Wireless Dual Band Gigabit Router, including:
This Guide
Other Helpful Information
Note:
Make sure that the package contains the above items. If any of the listed items are damaged or missing, please contact your distributor.
— 1 —

Archer C5 AC1200 Wireless Dual Band Gigabit Router
Chapter 1. Introduction
1.1Overview of the router
The Archer C5 AC1200 Wireless Dual Band Gigabit Router integrates 4-port Switch, Firewall, NAT-router and Wireless AP. Powered by 3×3 MIMO technology, the AC1200 Wireless Dual Band Gigabit Router delivers exceptional range and speed, which can fully meet the need of Small Office/Home Office (SOHO) networks and the users demanding higher networking performance. Your wireless connections are radio band selectable to avoid interference in your area, and the four built-in Gigabit ports supply high-speed connection to your wired devices.
Incredible Speed
The Archer C5 AC1200 Wireless Dual Band Gigabit Router provides up to 1200Mbps wireless connection with other wireless clients. The incredible speed makes it ideal for handling multiple data streams at the same time, which ensures your network stable and smooth. The performance of this 802.11ac wireless router will give you the unexpected networking experience at speed much faster than 802.11n. It is also compatible with all IEEE 802.11n, IEEE 802.11a, IEEE 802.11b and IEEE 802.11g products.
Multiple Security Protections
With multiple protection measures, including SSID broadcast control and wireless LAN 64/128/152-bit WEP encryption, Wi-Fi Protected Access (WPA2PSK, WPAPSK), as well as advanced Firewall protections, the Archer C5 AC1200 Wireless Dual Band Gigabit Router provides complete data privacy.
Flexible Access Control
The Archer C5 AC1200 Wireless Dual Band Gigabit Router provides flexible access control, so that parents or network administrators can establish restricted access policies for children or staff. It also supports Virtual Server and DMZ host for Port Triggering, and then the network administrators can manage and monitor the network in real time with the remote management function.
Simple Installation
Since the router is compatible with virtually all the major operating systems, it is very easy to manage. Quick Setup Wizard is supported and detailed instructions are provided step by step in this user guide. Before installing the router, please look through this guide to know all the router’s functions.
— 2 —

Archer C5 AC1200 Wireless Dual Band Gigabit Router
1.2Conventions
The router or Archer C5 mentioned in this guide stands for Archer C5 AC1200 Wireless Dual Band Gigabit Router without any explanation.
1.3Main Features
Complies with IEEE 802.11ac.
One 10/100/1000M Auto-Negotiation RJ45 Internet port, four 10/100/1000M Auto-Negotiation RJ45 Ethernet ports, supporting Auto MDI/MDIX.
Provides USB ports supporting storage/FTP/Media/Print Server.
Provides WPA/WPA2, WPA-PSK/WPA2-PSK authentication, TKIP/AES encryption security.
Shares data and Internet access for users, supporting Dynamic IP/ Static IP/ PPPoE/ PPTP/ L2TP/ BigPond Internet access.
Supports simultaneous 2.4GHz and 5GHz connections for 1200Mbps of total available bandwidth.
Supports Virtual Server, Special Application and DMZ host.
Supports UPnP, Dynamic DNS, Static Routing.
Provides Automatic-connection and Scheduled Connection on certain time to the Internet.
Built-in NAT and DHCP server supporting static IP address distributing.
Supports Parental Control and Access Control.
Connects Internet on demand and disconnects from the Internet when idle for PPPoE.
Provides 64/128/152-bit WEP encryption security and wireless LAN ACL (Access Control List).
Supports Flow Statistics.
Supports IPv6.
Supports firmware upgrade and Web management.
— 3 —
Archer C5 AC1200 Wireless Dual Band Gigabit Router
1.4Panel Layout
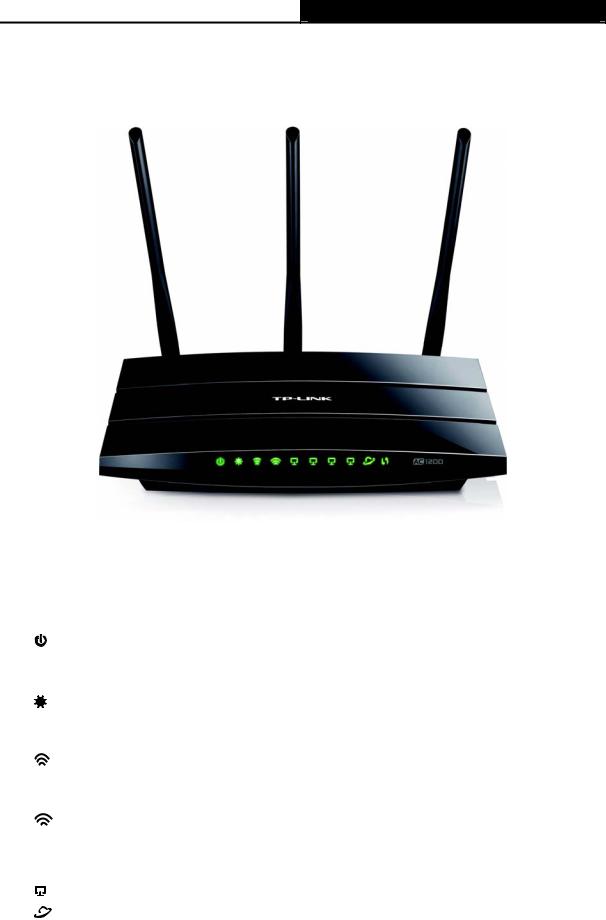
1.4.1The Front Panel
Figure 1-1 LEDs on the front panel
The router’s LEDs are located on the front panel (View from left to right).
|
Name |
Status |
Indication |
|||
|
(Power) |
Off |
Power is off. |
|||
|
On |
Power is on. |
||||
|
On |
The router is initializing or maybe has a system error. |
||||
|
(System) |
Flashing |
The router is working properly. |
|||
|
Off |
The router has a system error. |
||||
|
(Wireless |
Off |
The wireless function is disabled. |
|||
|
2.4GHz) |
Flashing |
The wireless function is enabled. The router is working on |
|||
|
2.4GHz radio band. |
|||||
|
(Wireless |
Off |
The wireless function is disabled. |
|||
|
5GHz) |
Flashing |
The wireless function is enabled. The router is working on |
|||
|
5GHz radio band. |
|||||
|
(Ethernet) |
Off |
There is no device linked to the corresponding port. |
|||
|
On |
There is a device linked to the corresponding port but there |
||||
|
(Internet) |
is no activity. |
||||
|
Flashing |
There is an active device linked to the corresponding port. |
||||
— 4 —
|
Archer C5 |
AC1200 Wireless Dual Band Gigabit Router |
||||
|
Slow |
A wireless device is connecting to the network by WPS |
||||
|
Flash |
function. This process will last in the first 2 minutes. |
||||
|
(WPS) |
On |
A wireless device has been successfully added to the |
|||
|
network by WPS function. |
|||||
|
Quick |
Awireless device failed to be added to the network by WPS |
||||
|
Flash |
function. |
||||
|
(USB on |
Off |
No storage device or printer is plugged into the USB port. |
|||
|
the rear panel) |
On |
A storage device or printer has connected to the USB port. |
|||
Table 1-1 The LEDs Description
Note:
1.After a device is successfully added to the network by WPS function, the WPS LED will keep on for about 5 minutes and then turn off.
2.The router is set to working concurrently in 2.4GHz and 5GHz by default. If you desire to choose the working frequency, please go to 4.5 Dual Band Selection.
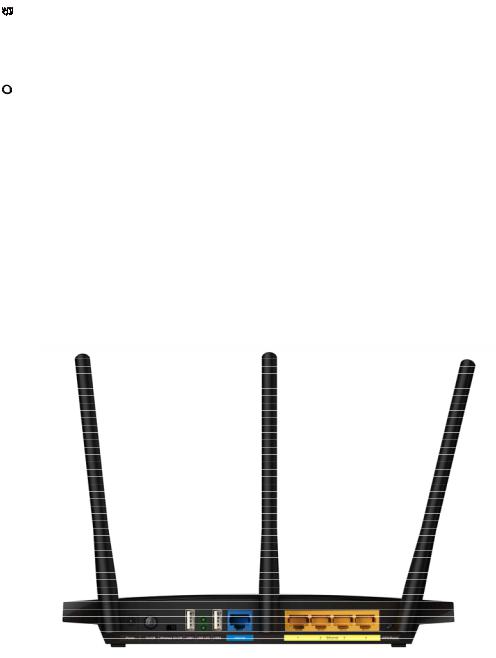
1.4.2The Rear Panel
Figure 1-2 Rear Panel sketch
The following parts are located on the rear panel (View from left to right).
Power: The Power socket is where you will connect the power adapter. Please use the power adapter provided with this Archer C5 AC1200 Wireless Dual Band Gigabit Router.
On/Off: The switch for the power.
Wireless On/Off: The switch for the wireless function.
USB: The USB port connects to a USB storage device or a USB printer.
—5 —

Archer C5 AC1200 Wireless Dual Band Gigabit Router
Internet: This port is where you will connect the DSL/cable Modem, or Ethernet.
Ethernet (1, 2, 3, 4): These ports (1, 2, 3, 4) connect the router to the local PC(s).
WPS/Reset:
Pressing this button for less than 5 seconds enables the WPS function. If your client devices, such as wireless adapters, that support Wi-Fi Protected Setup, then you can press this button to quickly establish a connection between the router and client devices and automatically configure wireless security for your wireless network.
Pressing this button for more than 5 seconds enables the Reset function. With the router powered on, press and hold the WPS/Reset button (approximately 8 seconds) until the SYS LED becomes quick-flash from slow-flash. And then release the button and wait the router to reboot to its factory default settings.
Wireless antenna: To receive and transmit the wireless data.
— 6 —

Archer C5 AC1200 Wireless Dual Band Gigabit Router
Chapter 2. Connecting the router
2.1System Requirements
Broadband Internet Access Service (DSL/Cable/Ethernet)
One DSL/Cable Modem that has an RJ45 connector (which is not necessary if the router is connected directly to the Ethernet)
PCs with a working Ethernet Adapter and an Ethernet cable with RJ45 connectors
TCP/IP protocol on each PC
Web browser, such as Microsoft Internet Explorer, Mozilla Firefox or Apple Safari
2.2Installation Environment Requirements
Place the router in a well-ventilated place far from any heater or heating vent
Avoid direct irradiation of any strong light (such as sunlight)
Keep at least 2 inches (5 cm) of clear space around the router
Operating Temperature: 0 ~40 (32 ~104 )
Operating Humidity: 10%~90%RH, Non-condensing
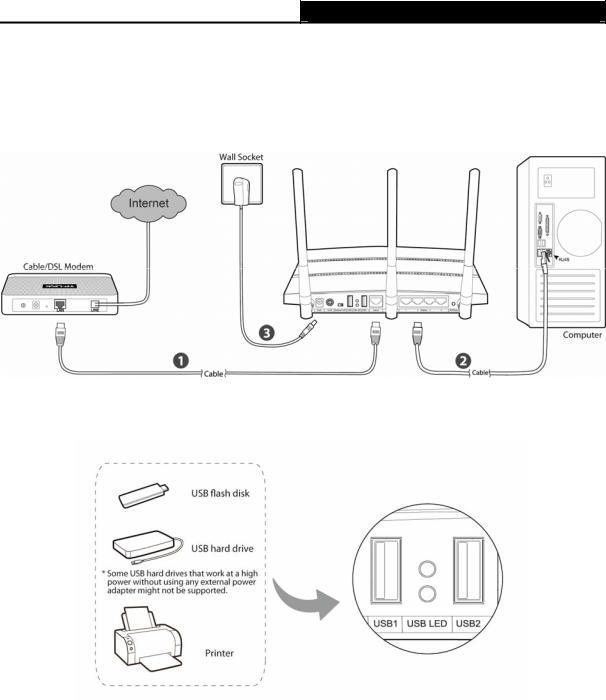
2.3Connecting the router
Before installing the router, make sure your PC is connected to the Internet through the broadband service successfully. If there is any problem, please contact your ISP. After that, please install the router according to the following steps. Don’t forget to pull out the power plug and keep your hands dry.
1.Power off your modem (if the modem has a backup battery, please remove it too.), and disconnect your existing router if you have one.
2.Connect the Internet port on your Router to the Modem’s LAN port with an Ethernet cable.
3.Connect your computer to one of the Ethernet ports labeled 1~4 on the Router with an Ethernet cable.
4.Power on the modem and wait for 2 minutes.
—7 —
Archer C5 AC1200 Wireless Dual Band Gigabit Router
5.Make sure the Wireless switch is ON. Then plug the provided power adapter into the Power jack and the other end to a standard electrical wall socket. Press the On/Off button to power on the Router. (Before you power on the Router, please make sure your computer is NOT connected to any other wireless network.)
Figure 2-1 Hardware Installation
Figure 2-2 USB Installation
Note:
If you want to use the router to share files or printer, plug the USB storage device to the USB port or connect the printer to the router with a matching cable.
— 8 —
Archer C5 AC1200 Wireless Dual Band Gigabit Router
Chapter 3. Quick Installation Guide
This chapter will show you how to configure the basic functions of your AC1200 Wireless Dual Band Gigabit Router using Quick Setup Wizard within minutes.
3.1TCP/IP Configuration
The default IP address of the router is 192.168.0.1 and the default Subnet Mask is 255.255.255.0. These values can be changed as you desire. In this guide, we use all the default values for description.
Connect the local PC to the Ethernet ports of the router and then you can configure the IP address for your PC by the following method: Set up the TCP/IP Protocol in «Obtain an IP address automatically» mode on your PC. If you need instructions as to how to do this, please refer to Appendix B: Configuring the PC. Then the built-in DHCP server will assign IP address for the PC.
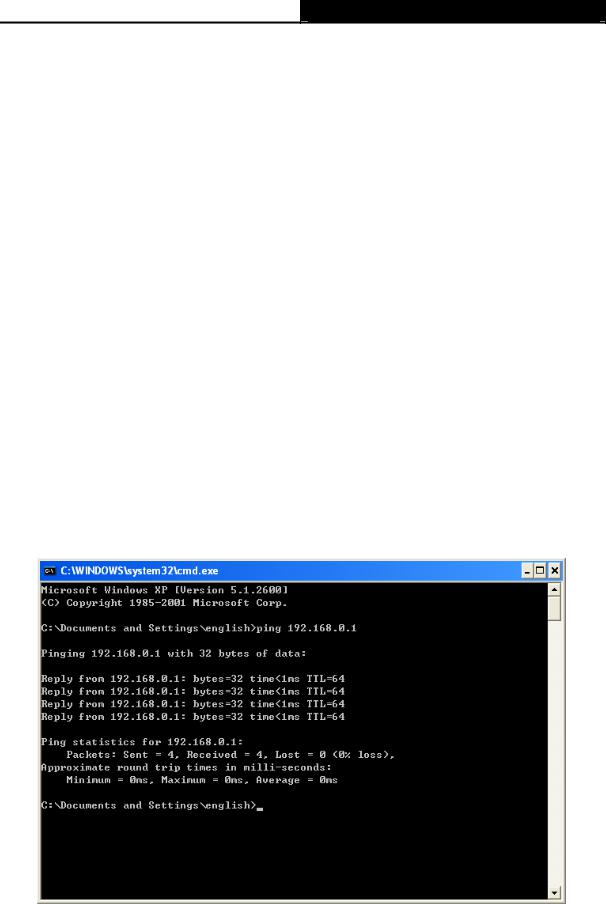
Now, you can run the Ping command in the command prompt to verify the network connection between your PC and the router. The following example is in Windows XP OS.
Open a command prompt, and type ping 192.168.0.1, and then press Enter.
If the result displayed is similar to the Figure 3-1, it means the connection between your PC and the router has been established well.
Figure 3-1 Success result of Ping command
— 9 —
![]()
Archer C5 AC1200 Wireless Dual Band Gigabit Router
If the result displayed is similar to Figure 3-2, it means the connection between your PC and the router failed.
Figure 3-2 Failure result of Ping command
Please check the connection following these steps:
1.Is the connection between your PC and the router correct?
Note:
The 1/2/3/4 LEDs of Ethernet ports which you link to on the router and LEDs on your PC’s adapter should be lit.
2.Is the TCP/IP configuration for your PC correct?
Note:
If the router’s IP address is 192.168.0.1, your PC’s IP address must be within the range of 192.168.0.2 ~ 192.168.0.254.
3.Is the default LAN IP of the router correct?
Note:
If the LAN IP of the modem connected with your router is 192.168.0.x, the default LAN IP of the router will automatically switch from 192.168.0.1 to 192.168.1.1 to avoid IP conflict. Therefore, in order to verify the network connection between your PC and the router, you can open a command prompt, and type ping 192.168.1.1, and then press Enter.
— 10 —
Archer C5 AC1200 Wireless Dual Band Gigabit Router
3.2Quick Installation Guide
With a Web-based utility, it is easy to configure and manage the AC1200 Wireless Dual Band Gigabit Router. The Web-based utility can be used on any Windows, Macintosh or UNIX OS with a Web browser, such as Microsoft Internet Explorer, Mozilla Firefox or Apple Safari.
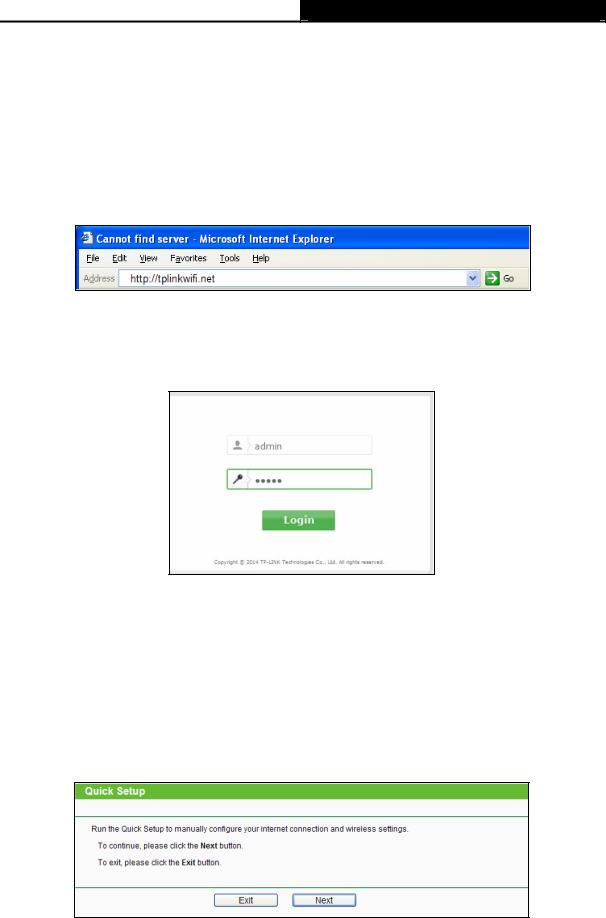
1.To access the configuration utility, open a web-browser and type in the default IP address http://tplinkwifi.net in the address field.
Figure 3-3 Log in the router
After a moment, a login window will appear, similar to Figure 3-4. Enter admin for the User Name and Password, both in lower case letters. Then click the Login button or press the
Enter key.
Figure 3-4 Login Windows
Note:
If the above screen does not pop up, it means that your Web-browser has been set to a proxy. Go to Tools menu>Internet Options>Connections>LAN Settings, in the screen that appears, cancel the Using Proxy checkbox, and click OK to finish it.
2.After successful login, the Quick Setup page will appear for you to quickly configure your router.
Figure 3-5 Quick Setup
— 11 —

Archer C5 AC1200 Wireless Dual Band Gigabit Router
3.Click Next, and then WAN Connection Type page will appear, shown in Figure 3-6.
Figure 3-6 WAN Connection Type
The router provides Auto-Detect function and supports five popular ways PPPoE, Dynamic IP, Static IP, L2TP and PPTP to connect to the Internet. It’s recommended that you make use of the Auto-Detect function. If you are sure of what kind of connection type your ISP provides, you can select the very type and click Next to go on configuring.
4.If you select Auto-Detect, the router will automatically detect the connection type your ISP provides. Make sure the cable is securely plugged into the Internet port before detection. The appropriate configuration page will be displayed when an active Internet service is successfully detected by the router.
1)If the connection type detected is Dynamic IP, the next screen will appear as shown in Figure 3-7. Please select to clone the MAC address or not, according to your situation.
Figure 3-7 Quick Setup – MAC Clone
— 12 —
Archer C5 AC1200 Wireless Dual Band Gigabit Router
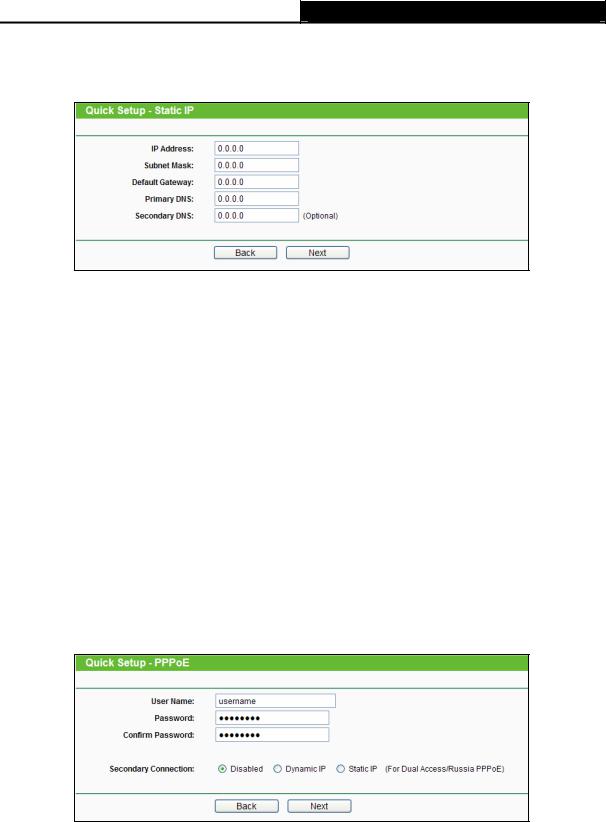
2)If the connection type detected is Static IP, the next screen will appear as shown in Figure 3-8. Configure the following parameters and then click Next to continue.
Figure 3-8 Quick Setup — Static IP
IP Address — This is the WAN IP address as seen by external users on the Internet (including your ISP). Your ISP will provide you with the IP address you need to enter here. Enter the IP address into the field.
Subnet Mask — The Subnet Mask is used for the WAN IP address. Your IPS will provide you with the subnet mask which is usually 255.255.255.0.
Default Gateway — Your ISP will provide you with the Gateway address which is the ISP server’s address. Enter the gateway IP address into the box if required.
Primary DNS — Enter the DNS Server IP address into the box if required.
Secondary DNS — Optional If your ISP provides another DNS server, enter it into this field.
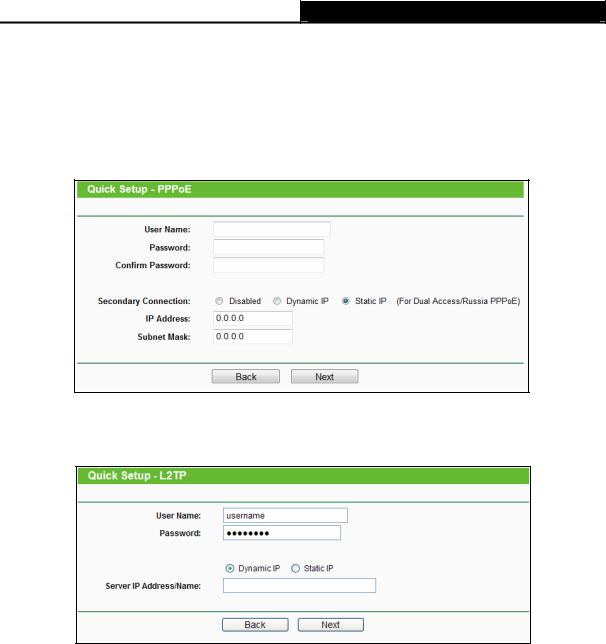
3)If the connection type detected is PPPoE/Russian PPPoE, the next screen will appear as shown in Figure 3-9. Configure the following parameters and then click Next to continue.
Figure 3-9 Quick Setup – PPPoE/Russia PPPoE
User Name/Password — Enter the User Name and Password provided by your ISP. These fields are case-sensitive. If you have difficulty with this process, please contact your ISP.
—13 —
Archer C5 AC1200 Wireless Dual Band Gigabit Router
Confirm Password — Enter the password again to make sure that the password is correct.
Check the radio button of Dynamic/Static IP to activate the secondary connection if your ISP provides an extra Connection type such as Dynamic/Static IP to connect to a local area network.
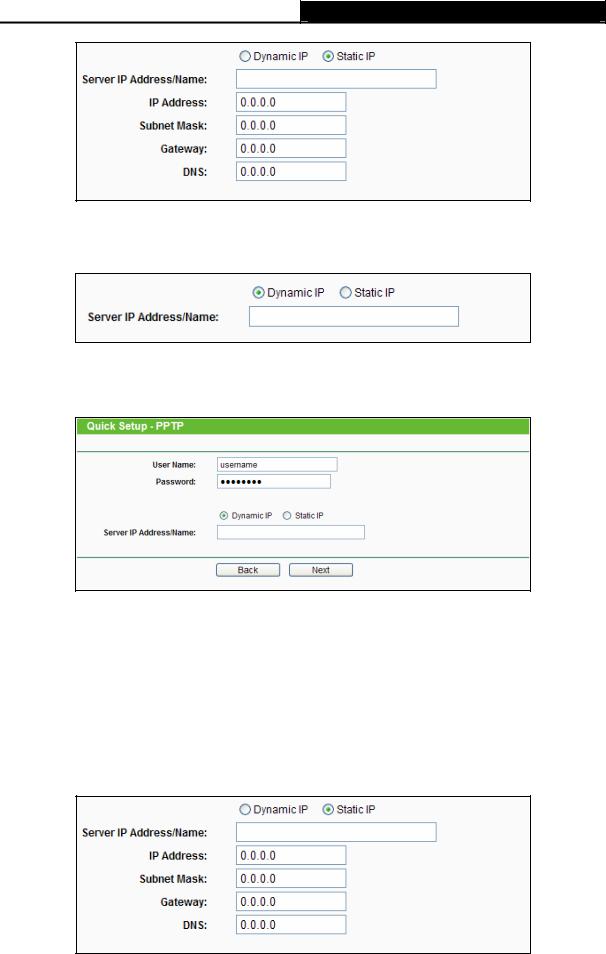
4)If the connection type detected is L2TP/ Russian L2TP, the next screen will appear as shown in Figure 3-10. Configure the following parameters and then click Next to continue.
Figure 3-10 Quick Setup – PPTP/Russia PPTP
User Name/Password — Enter the User Name and Password provided by your ISP. These fields are case-sensitive. If you have difficulty with this process, please contact your ISP.
Select Static IP if IP Address/ Subnet Mask/ Gateway and DNS server address have been provided by your ISP. Then please enter server IP address or domain name provided by your ISP, and also enter the corresponding parameters.
— 14 —
Archer C5 AC1200 Wireless Dual Band Gigabit Router
Select Dynamic IP if none of the above parameters are provided. Then you just need to enter server IP address or domain name provided by your ISP.
5)If the connection type detected is PPTP/Russian PPTP, the next screen will appear as shown in Figure 3-11. Configure the following parameters and then click Next to continue.
Figure 3-11 Quick Setup – L2TP/Russia L2TP
User Name/Password — Enter the User Name and Password provided by your ISP. These fields are case-sensitive. If you have difficulty with this process, please contact your ISP.
Select Static IP if IP Address/ Subnet Mask/ Gateway and DNS server address have been provided by your ISP. Then please enter server IP address or domain name provided by your ISP, and also enter the corresponding parameters.
— 15 —
Archer C5 AC1200 Wireless Dual Band Gigabit Router
Select Dynamic IP if none of the above parameters are provided. Then you just need to enter server IP address or domain name provided by your ISP.
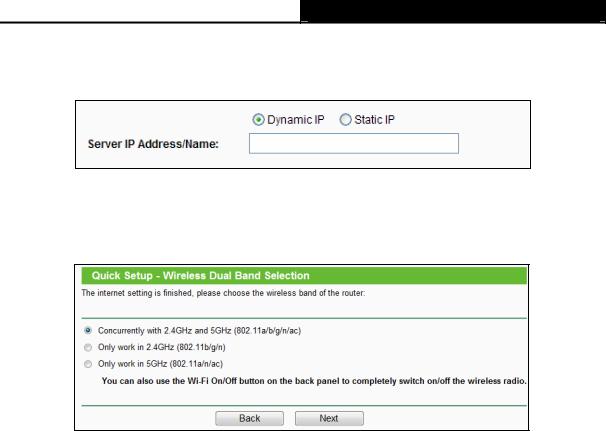
5.After finishing WAN Connection Type selection, the Dual Band Selection page will appear as shown in Figure 3-12. Here we take “Concurrently with 2.4GHz and 5GHz (802.11a/b/g/n)” for example. Click Next to continue.
Figure 3-12 Quick Setup – Dual Band Selection
2.4GHz — You can use the 2.4GHz band to connect to many classic wireless devices like gaming consoles, laptops, DVRs, ect.
5GHz — This band is less crowded and is used for time-sensitive music, video streaming or gaming. Using this band can avoid interference with 2.4GHz networks or noisy devices like cordless phones and microwave ovens.
6.Configure the basic parameters for 2.4GHz wireless network in the following screen as shown in Figure 3-13, and then click Next.
— 16 —
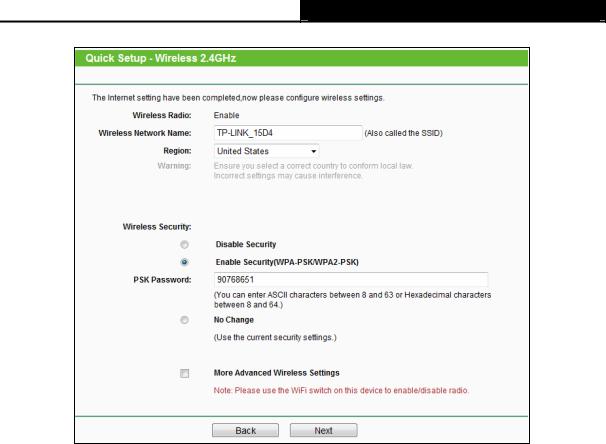
Archer C5 AC1200 Wireless Dual Band Gigabit Router
Figure 3-13 Quick Setup – Wireless
Wireless Radio — Indicates whether the wireless radio feature of the Router is enabled or disabled.
Wireless Network Name — Enter a string of up to 32 characters. The same Name (SSID) must be assigned to all wireless devices in your network. The default SSID is set to be TP-LINK_XXXX(XXXX indicates the last unique four characters of each Router’s MAC address), which can ensure your wireless network security. But it is recommended strongly that you change your networks name (SSID) to a different value. This value is case-sensitive. For example, MYSSID is NOT the same as MySsid.
Region — Select your region from the drop-down list. This field specifies the region where the wireless function of the router can be used. It may be illegal to use the wireless function of the router in a region other than one of those specified in this field. If your country or region is not listed, please contact your local government agency for assistance.
Note:
Limited by local law regulations, version for North America does not have region selection option.
— 17 —
Archer C5 AC1200 Wireless Dual Band Gigabit Router
Wireless Security
Disable Security — The wireless security function can be enabled or disabled. If disabled, the wireless stations will be able to connect the router without encryption.
Enable Security (WPA-PSK/WPA2-PSK) – It’s selected by default, with the default PSK password the same as the default PIN code.
No Change — If you chose this option, wireless security configuration will not change!
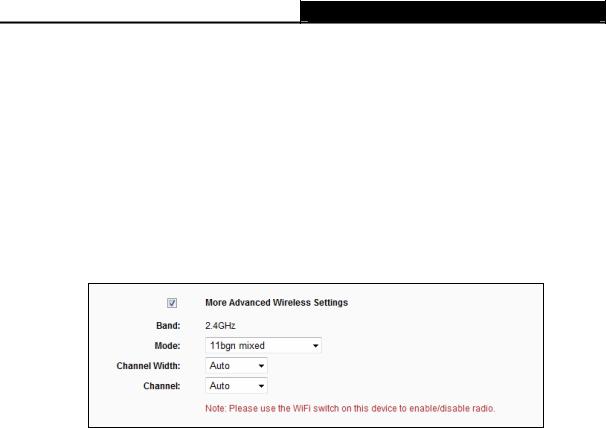
The above settings are only for basic wireless parameters. For advanced settings, please check “More Advanced Wireless Settings”, and then you can set the following parameters.
Band — This field displayed the operating frequency being configured.
Mode — This field determines the wireless mode which the router works on.
11bg mixed — Select if you are using both 802.11b and 802.11g wireless clients.
11bgn mixed — Select if you are using a mix of 802.11b, 11g, and 11n wireless clients.
Channel Width — Select any channel width from the drop-down list. The default setting is “Auto”, which can adjust the channel width for your clients automatically.
Channel — This field determines which operating frequency will be used. It is not necessary to change the wireless channel unless you notice interference problems with another nearby access point. If you select “Auto”, then the AP will select the best channel automatically.
7.Configure the basic parameters for 5GHz wireless network in the following screen as shown in Figure 3-14, and then click Next.
— 18 —
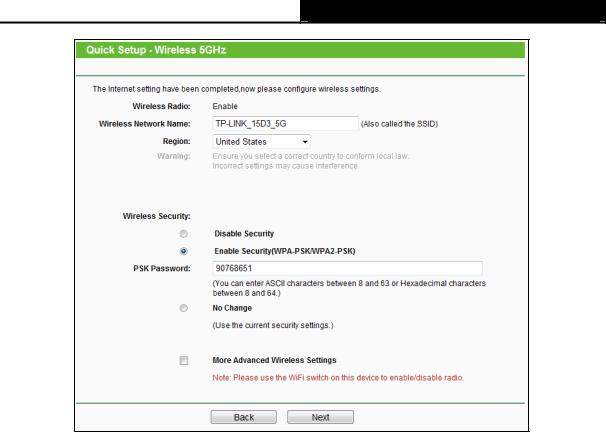
Archer C5 AC1200 Wireless Dual Band Gigabit Router
Figure 3-14 Quick Setup – Wireless
Wireless Radio — Choose from the drop-down list to enable or disable the wireless radio.
Wireless Network Name — Enter a string of up to 32 characters. The same Name (SSID) must be assigned to all wireless devices in your network. The default SSID is set to be TP-LINK_XXXX_5G(XXXX indicates the last unique four characters of each Router’s MAC address), which can ensure your wireless network security. But it is recommended strongly that you change your networks name (SSID) to a different value. This value is case-sensitive. For example, MYSSID is NOT the same as MySsid.
Region — Select your region from the drop-down list. This field specifies the region where the wireless function of the router can be used. It may be illegal to use the wireless function of the router in a region other than one of those specified in this field. If your country or region is not listed, please contact your local government agency for assistance.
Note:
Limited by local law regulations, version for North America does not have region selection option.
Wireless Security
Disable Security — The wireless security function can be enabled or disabled. If disabled, the wireless stations will be able to connect the router without encryption.
—19 —
![]()
Archer C5 AC1200 Wireless Dual Band Gigabit Router
Enable Security (WPA-PSK/WPA2-PSK) – It’s selected by default, with the default PSK password the same as the default PIN code.
No Change — If you chose this option, wireless security configuration will not change!
The above settings are only for basic wireless parameters. For advanced settings, please check “More Advanced Wireless Settings”, and then you can set the following parameters.
Band — This field displayed the operating frequency being configured.
Mode — This field determines the wireless mode which the router works on.
11an mixed — Select if you are using both 802.11a and 802.11n wireless clients.
11a/n/ac mixed – Select if you are using 802.11a, 802.11n and 802.11ac wireless clients.
Channel — This field determines which operating frequency will be used. It is not necessary to change the wireless channel unless you notice interference problems with another nearby access point. If you select “Auto”, then the AP will select the best channel automatically.
8.Click the Finish button to complete the Quick Setup.
Figure 3-15 Quick Setup — Finish
— 20 —

Archer C5 AC1200 Wireless Dual Band Gigabit Router
Chapter 4. Configuring the router
This chapter will show each Web page’s key functions and the configuration way.
4.1Login
After your successful login, you will see the main menus on the left of the Web-based utility. On the right, there are the corresponding explanations and instructions.
The detailed explanations for each Web page’s key function are listed below.
4.2Status
The Status page provides the current status information about the router. All information is read-only.
— 21 —

Archer C5 AC1200 Wireless Dual Band Gigabit Router
Figure 4-1 Status
4.3Quick Setup
Please refer to 3.2 Quick Installation Guide.
— 22 —

Archer C5 AC1200 Wireless Dual Band Gigabit Router
4.4Network
Figure 4-2 the Network menu
There are three submenus under the Network menu (shown in Figure 4-2): WAN, LAN and MAC Clone, and IPTV. Click any of them, and you will be able to configure the corresponding function.
4.4.1WAN
Choose menu “Network → WAN”, you can configure the IP parameters of the WAN on the screen below.
1.If your ISP provides the DHCP service, please choose Dynamic IP type, and the router will automatically get IP parameters from your ISP. You can see the page as follows (Figure 4-3):
Figure 4-3 WAN – Dynamic IP
This page displays the WAN IP parameters assigned dynamically by your ISP, including IP address, Subnet Mask, Default Gateway, etc. Click the Renew button to renew the IP parameters from your ISP. Click the Release button to release the IP parameters.
— 23 —

Archer C5 AC1200 Wireless Dual Band Gigabit Router
MTU Size — The normal MTU (Maximum Transmission Unit) value for most Ethernet networks is 1500 Bytes. It is not recommended that you change the default MTU Size unless required by your ISP.
Use These DNS Servers — If your ISP gives you one or two DNS addresses, select Use These DNS Servers and enter the primary and secondary addresses into the correct fields. Otherwise, the DNS servers will be assigned dynamically from your ISP.
Note:
If you find error when you go to a website after entering the DNS addresses, it is likely that your DNS servers are set up improperly. You should contact your ISP to get DNS server addresses.
Host Name — This option specifies the Host Name of the router.
Get IP with Unicast DHCP — A few ISPs’ DHCP servers do not support the broadcast applications. If you cannot get the IP Address normally, you can choose this option. (It is rarely required.)
Click the Save button to save your settings.
2.If your ISP provides a static or fixed IP Address, Subnet Mask, Gateway and DNS setting, select Static IP. The Static IP settings page will appear, shown in Figure 4-4.
Figure 4-4 WAN — Static IP
IP Address — Enter the IP address in dotted-decimal notation provided by your ISP.
Subnet Mask — Enter the subnet Mask in dotted-decimal notation provided by your ISP, usually is 255.255.255.0.
Default Gateway — (Optional) Enter the gateway IP address in dotted-decimal notation provided by your ISP.
—24 —

Archer C5 AC1200 Wireless Dual Band Gigabit Router
MTU Size — The normal MTU (Maximum Transmission Unit) value for most Ethernet networks is 1500 Bytes. It is not recommended that you change the default MTU Size unless required by your ISP.
Primary/Secondary DNS — (Optional) Enter one or two DNS addresses in dotted-decimal notation provided by your ISP.
Click the Save button to save your settings.
3.If your ISP provides a PPPoE connection, select PPPoE/Russia PPPoE option. And you should enter the following parameters (Figure 4-5):
Figure 4-5 WAN — PPPoE
User Name/Password — Enter the User Name and Password provided by your ISP. These fields are case-sensitive.
Secondary Connection — It’s available only for PPPoE Connection. If your ISP provides an extra Connection type such as Dynamic/Static IP to connect to a local area network, then you can check the radio button of Dynamic/Static IP to activate this secondary connection.
Disabled — The Secondary Connection is disabled by default, so there is PPPoE connection only. This is recommended.
Dynamic IP — You can check this radio button to use Dynamic IP as the secondary connection to connect to the local area network provided by ISP.
Static IP — You can check this radio button to use Static IP as the secondary connection to connect to the local area network provided by ISP.
—25 —

Archer C5 AC1200 Wireless Dual Band Gigabit Router
Connect on Demand — In this mode, the Internet connection can be terminated automatically after a specified inactivity period (Max Idle Time) and be re-established when you attempt to access the Internet again. If you want your Internet connection keeps active all the time, please enter “0” in the Max Idle Time field. Otherwise, enter the number of minutes you want to have elapsed before your Internet access disconnects.
Connect Automatically — The connection can be re-established automatically when it was down.
Time-based Connecting — The connection will only be established in the period from the start time to the end time (both are in HH:MM format).
Note:
Only when you have configured the system time on “System Tools → Time Settings” page, will the Time-based Connecting function can take effect.
Connect Manually — You can click the Connect/Disconnect button to connect/disconnect immediately. This mode also supports the Max Idle Time function as Connect on Demand mode. The Internet connection can be disconnected automatically after a specified inactivity period and re-established when you attempt to access the Internet again.
Click the Connect button to connect immediately. Click the Disconnect button to disconnect immediately.
Caution: Sometimes the connection cannot be terminated although you specify a time to Max Idle Time because some applications are visiting the Internet continually in the background.
If you want to do some advanced configurations, please click the Advanced button, and the page shown in Figure 4-6 will then appear:
Figure 4-6 PPPoE Advanced Settings
MTU Size — The default MTU size is “1480” bytes, which is usually fine. It is not recommended that you change the default MTU Size unless required by your ISP.
—26 —

Archer C5 AC1200 Wireless Dual Band Gigabit Router
Service Name/AC Name — The service name and AC (Access Concentrator) name should not be configured unless you are sure it is necessary for your ISP. In most cases, leaving these fields blank will work.
ISP Specified IP Address — If your ISP does not automatically assign IP addresses to the router during login, please click “Use IP address specified by ISP” check box and enter the IP address provided by your ISP in dotted-decimal notation.
Detect Online Interval — The router will detect Access Concentrator online at every interval. The default value is “0”. You can input the value between “0” and “120”. The value “0” means no detect.
Primary DNS/Secondary DNS — If your ISP does not automatically assign DNS addresses to the router during login, please click “Use the following DNS servers” check box and enter the IP address in dotted-decimal notation of your ISP’s primary DNS server. If a secondary DNS server address is available, enter it as well.
Click the Save button to save your settings.
4.If your ISP provides BigPond Cable (or Heart Beat Signal) connection, please select BigPond Cable. And you should enter the following parameters (Figure 4-7):
Figure 4-7 WAN — BigPond Cable
User Name/Password — Enter the User Name and Password provided by your ISP. These fields are case-sensitive.
Auth Server — Enter the authenticating server IP address or host name.
Auth Domain — Type in the domain suffix server name based on your location.
—27 —

Archer C5 AC1200 Wireless Dual Band Gigabit Router
e.g.
NSW / ACT — nsw.bigpond.net.au
VIC / TAS / WA / SA / NT — vic.bigpond.net.au
QLD — qld.bigpond.net.au
MTU Size — The normal MTU (Maximum Transmission Unit) value for most Ethernet networks is 1500 Bytes. It is not recommended that you change the default MTU Size unless required by your ISP.
Connect on Demand — In this mode, the Internet connection can be terminated automatically after a specified inactivity period (Max Idle Time) and be re-established when you attempt to access the Internet again. If you want your Internet connection keeps active all the time, please enter “0” in the Max Idle Time field. Otherwise, enter the number of minutes you want to have elapsed before your Internet access disconnects.
Connect Automatically — The connection can be re-established automatically when it was down.
Connect Manually — You can click the Connect/Disconnect button to connect/disconnect immediately. This mode also supports the Max Idle Time function as Connect on Demand mode. The Internet connection can be disconnected automatically after a specified inactivity period and re-established when you attempt to access the Internet again.
Click the Connect button to connect immediately. Click the Disconnect button to disconnect immediately.
Caution: Sometimes the connection cannot be terminated although you specify a time to Max Idle Time because some applications are visiting the Internet continually in the background.
Click the Save button to save your settings.
5.If your ISP provides L2TP connection, please select L2TP/Russia L2TP option. And you should enter the following parameters (Figure 4-8):
— 28 —

Archer C5 AC1200 Wireless Dual Band Gigabit Router
Figure 4-8 WAN — L2TP/Russia L2TP
User Name/Password — Enter the User Name and Password provided by your ISP. These fields are case-sensitive.
Dynamic IP/ Static IP — Choose either as you are given by your ISP. Click the Connect button to connect immediately. Click the Disconnect button to disconnect immediately.
Connect on Demand — You can configure the router to disconnect from your Internet connection after a specified period of inactivity (Max Idle Time). If your Internet connection has been terminated due to inactivity, Connect on Demand enables the router to automatically re-establish your connection as soon as you attempt to access the Internet again. If you wish to activate Connect on Demand, check the radio button. If you want your Internet connection to remain active at all times, enter 0 in the Max Idle Time field. Otherwise, enter the number of minutes you want to have elapsed before your Internet connection terminates.
Connect Automatically — Connect automatically after the router is disconnected. To use this option, check the radio button.
—29 —
![]()
Archer C5 AC1200 Wireless Dual Band Gigabit Router
Connect Manually — You can configure the router to make it connect or disconnect manually. After a specified period of inactivity (Max Idle Time), the router will disconnect from your Internet connection, and you will not be able to re-establish your connection automatically as soon as you attempt to access the Internet again. To use this option, check the radio button. If you want your Internet connection to remain active at all times, enter «0» in the Max Idle Time field. Otherwise, enter the number of minutes that you wish to have the Internet connecting last unless a new link is requested.
Caution: Sometimes the connection cannot be disconnected although you specify a time to Max Idle Time, because some applications are visiting the Internet continually in the background.
Click the Save button to save your settings.
6.If your ISP provides PPTP connection, please select PPTP/Russia PPTP option. And you should enter the following parameters (Figure 4-9):
Figure 4-9 PPTP Settings
User Name/Password — Enter the User Name and Password provided by your ISP. These fields are case-sensitive.
Dynamic IP/ Static IP — Choose either as you are given by your ISP and enter the ISP’s IP address or the domain name.
—30 —

Archer C5 AC1200 Wireless Dual Band Gigabit Router
If you choose static IP and enter the domain name, you should also enter the DNS assigned by your ISP. And click the Save button.
Click the Connect button to connect immediately. Click the Disconnect button to disconnect immediately.
Connect on Demand — You can configure the router to disconnect from your Internet connection after a specified period of inactivity (Max Idle Time). If your Internet connection has been terminated due to inactivity, Connect on Demand enables the router to automatically re-establish your connection as soon as you attempt to access the Internet again. If you wish to activate Connect on Demand, check the radio button. If you want your Internet connection to remain active at all times, enter “0” in the Max Idle Time field. Otherwise, enter the number of minutes you want to have elapsed before your Internet connection terminates.
Connect Automatically — Connect automatically after the router is disconnected. To use this option, check the radio button.
Connect Manually — You can configure the router to make it connect or disconnect manually. After a specified period of inactivity (Max Idle Time), the router will disconnect from your Internet connection, and you will not be able to re-establish your connection automatically as soon as you attempt to access the Internet again. To use this option, click the radio button. If you want your Internet connection to remain active at all times, enter «0» in the Max Idle Time field. Otherwise, enter the number in minutes that you wish to have the Internet connecting last unless a new link is requested.
Caution: Sometimes the connection cannot be disconnected although you specify a time to Max Idle Time because some applications are visiting the Internet continually in the background.
Click the Save button to save your settings.
Note:
If you don’t know how to choose the appropriate connection type, click the Detect button to allow the router to automatically search your Internet connection for servers and protocols. The connection type will be reported when an active Internet service is successfully detected by the router. This report is for your reference only. To make sure the connection type your ISP provides, please refer to the ISP. The various types of Internet connections that the router can detect are as follows:
PPPoE — Connections which use PPPoE that requires a user name and password.
Dynamic IP — Connections which use dynamic IP address assignment.
Static IP — Connections which use static IP address assignment.
—31 —

Archer C5 AC1200 Wireless Dual Band Gigabit Router
The router cannot detect PPTP/L2TP/Big Pond connections with your ISP. If your ISP uses one of these protocols, then you must configure your connection manually.
4.4.2LAN
Choose menu “Network → LAN”, you can configure the IP parameters of the LAN on the screen as below.
Figure 4-10 LAN
MAC Address — The physical address of the router, as seen from the LAN. The value can’t be changed.
IP Address — Enter the IP address of your router or reset it in dotted-decimal notation (factory default: 192.168.0.1).
Subnet Mask — An address code that determines the size of the network. Normally use 255.255.255.0 as the subnet mask.
Note:
1)If you change the IP Address of LAN, you must use the new IP Address to log in the router.
2)If the new LAN IP Address you set is not in the same subnet, the IP Address pool of the DHCP server will change accordingly at the same time while the Virtual Server and DMZ Host will not take effect until they are re-configured.
4.4.3MAC Clone
Choose menu “Network → MAC Clone”, you can configure the MAC address of the WAN on the screen below, Figure 4-11:
Figure 4-11 MAC Address Clone
Some ISPs require that you register the MAC Address of your adapter. Changes are rarely needed here.
— 32 —
 Loading…
Чтобы настроить Wi-Fi роутер TP-Link Archer C5, надо сначала обязательно подключиться к его локальной сети с помощью LAN-кабеля или через Wi-Fi сеть. Заводское имя беспроводной сети маршрутизатора и пароль от Вай-Фай написаны на наклейке, приклеенной внизу корпуса. Там же написан адрес для входа в настройки и пароль на вход, используемый по умолчанию. На модели Archer C5 используется адрес интерфейса http://tplinkwifi.net. Так же войти в настройки роутера можно через локальный IP адрес — 192.168.0.1.
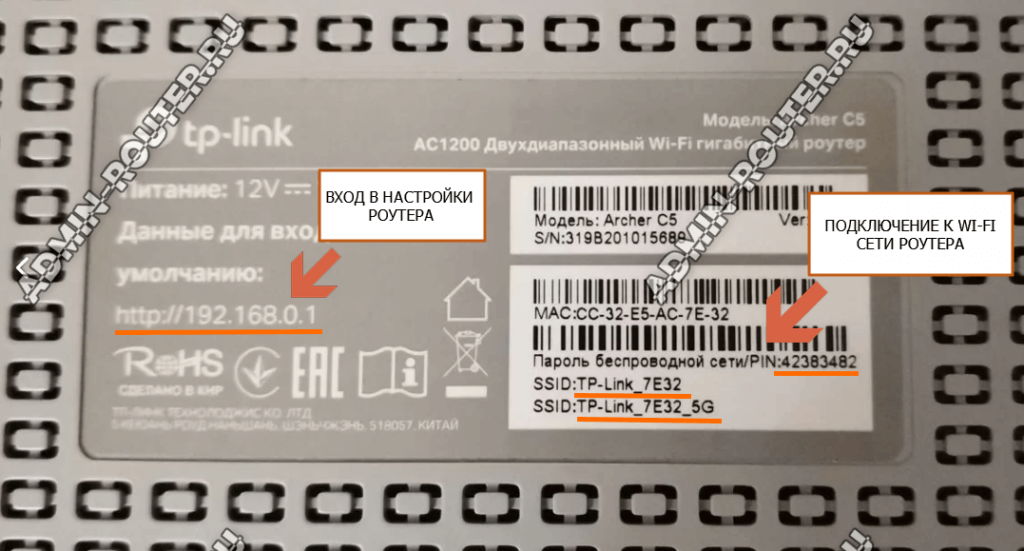
После подключения своего компьютера или телефона к роутеру, запустите на нём браузер (Internet Explorer, Mozilla Firefox, Opera, Google Chrome) и в адресной строке введите адрес роутера с наклейки. Нажмите клавишу «Ввод» на клавиатуре.

Откроется страница авторизации web-интерфейса маршрутизатора. На последних прошивках роутера TP-Link Archer C5 на этой странице надо всего лишь ввести пароль — «admin». Вводить логин не нужно. Нажмите кнопку «OK». Откроется меню настроек роутера.
Если у Вас не получается попасть в настройки роутера — смотрите вот эту инструкцию: как зайти в настройки роутера.
В качестве наглядного примера рассмотрим как настроить роутер TP-Link Archer C5 для работы с провайдером Ростелеком.
Мы намеренно не будем использовать мастер быстрой настройки — он прост и понятен, потому нет смысла его показывать. К тому же, в случае с цифровым телевидением лучше использовать полноценную версию web-интерфейса.
Настройка подключения к Интернет
В главном меню интерфейса откройте «Основные настройки» и выберите подпункт меню «Интернет».
Поставьте «Тип подключения» к интернет в режим PPPoE/PPPoE Россия.
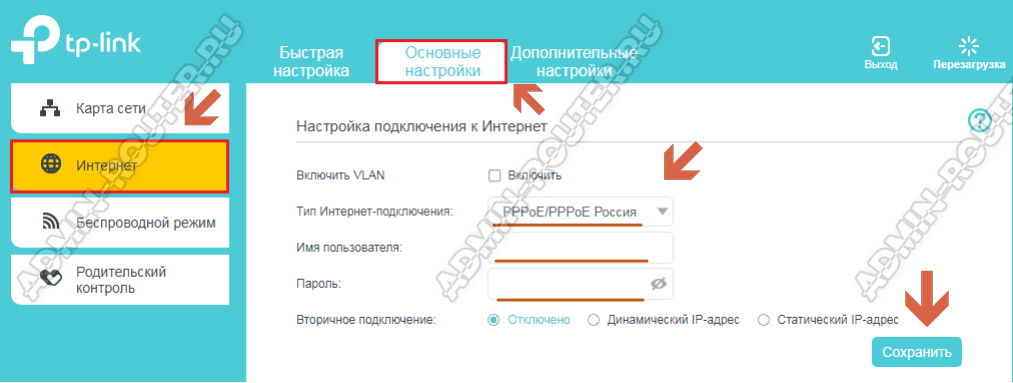
Введите логин и пароль пользователя на подключение к Интернет в поля «Имя пользователя» и «Пароль» соответственно. Укажите пароль повторно в поле «Подтвердите пароль».
Обязательно проверьте, что пункт «Вторичное подключение» установлен в значение Отключить (обычно установлено по умолчанию).
Нажмите на кнопку «Сохранить», чтобы сохранить изменения в настройках. Подключите кабель провайдера к роутеру и проверьте подключение к сети Интернет.
В заводском варианте настройки уже установлены оптимальные параметры сети Wi-FI на TP-Link Archer C5: задано индивидуальное имя сети, установлен уникальный и достаточно сложный пароль. При необходимости всегда можно изменить эти настройки WI-FI через раздел «Дополнительные настройки» ⇒ «Беспроводной режим». Там для каждого из диапазонов надо выбрать затем выберите пункт меню «Настройки беспроводного режима».
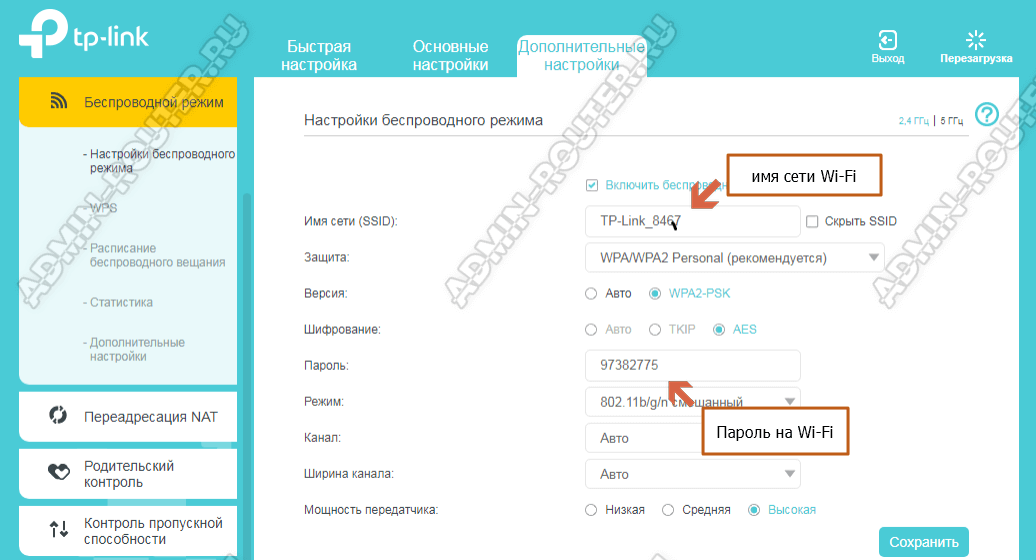
Вы можете изменить имя сети Вай-Фай в поле «Имя сети (SSID)», а так же пароль в соответствующем поле «Пароль». Более особо ничего менять не стоит.
Используйте стандарт безопасности WPA2+PSK и шифрование AES — это обеспечит максимальную безопасность сети Вай-Фай!
Нажмите кнопку «Сохранить» для сохранения выполненных настроек.
Как настроить телевидение IPTV на Archer C5
Выберите пункт меню «Дополнительные настройки» ⇒ «Интернет». Чтобы создать новое подключение, необходимое для работы интерактивного телевидения, нажмите кнопку «Добавить».

Так Мы добавим новое подключение. «Тип подключения» надо выбрать «Мост».
Если у Вашего провайдера ( в нашем случае в конкретном филиале Ростелеком) необходимо использовать номер VLAN ID, тогда надо будет поставить галку «Включить VLAN» и прописать номер VLAN ID ( предварительно узнав его в техподдержке). Приоритет для IPTV поставьте равным «4».

Нажмите на кнопку «Сохранить».
Следующим шагом надо сгруппировать порты. Выберите пункт меню «Дополнительные настройки» ⇒ «Сеть», после чего выберите пункт меню «Группировка интерфейсов».
Нажмите на кнопку «Добавить».

Создайте новую группу. В открывшемся окне настроек введите имя группы – IPTV. В доступных WAN-интерфейсах надо выбрать созданное выше подключение типа «Мост». В доступных LAN-интерфейсах выберите тот LAN порт (или несколько портов если подключается несколько приставок) к которому будет подключена STB-приставка. Вот так:
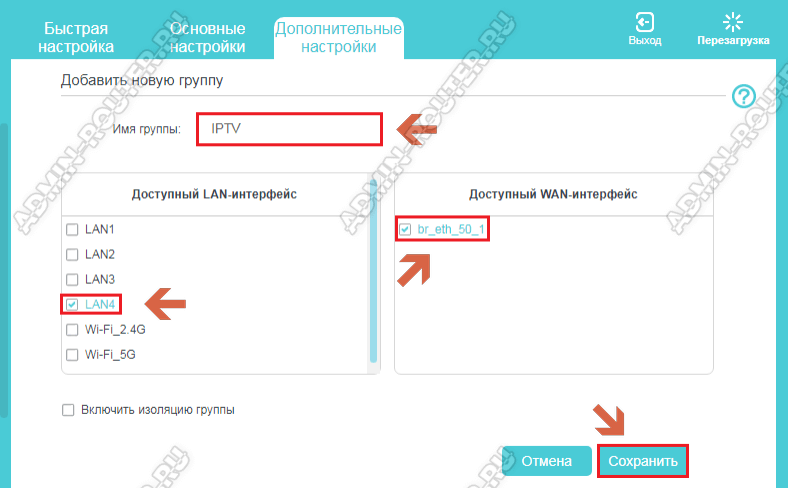
Нажимите кнопку «Сохранить». Перейдите в следующий раздел настройки TP-Link Archer C5.
Крайний этап — надо отключить локальный DHCP для созданной группы IPTV. Выберите пункт меню «Дополнительные настройки» ⇒ «Сеть» , Кликните на пункт меню «LAN». В группе IPTV нажмите на иконку – «Изменить»
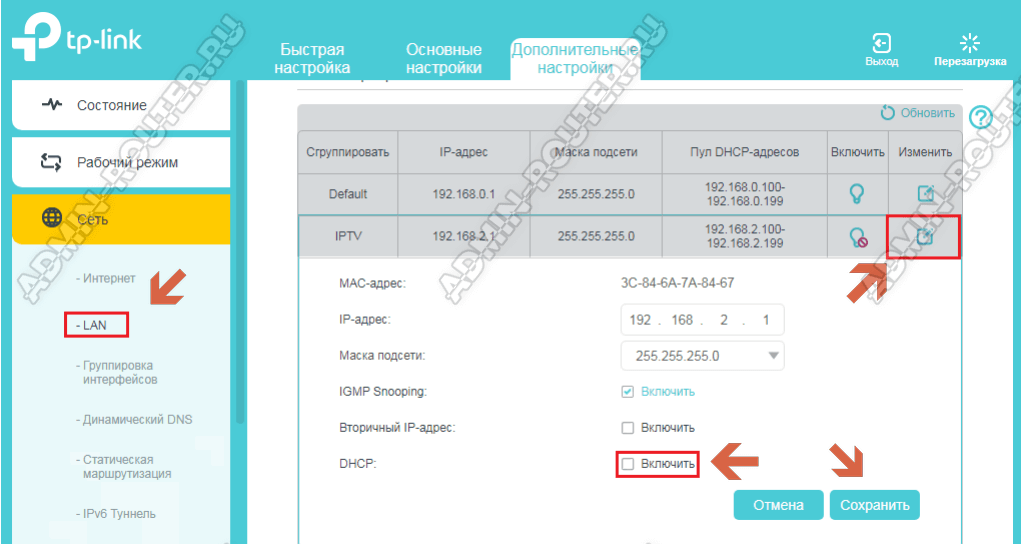
В открывшемся окне снимите галку с пункта DHCP. Нажмите кнопку «Сохранить».
После завершения всех показанных выше настроек, я всегда советую перезагрузить свой роутер.