
Toyota Corolla 2001 — 2006, кузов E120. Руководство пользователя
Время создания: 25.12.2015 11:12
Текстовые метки: Toyota Corolla, руководство, документация, пользователь, владелец, автомобиль
Раздел: Автомобиль — Toyota Corolla
Запись: xintrea/mytetra_syncro/master/base/1451031165atm7liw2wu/text.html на raw.github.com
|
|
Здесь размещена подготовленная мною к печати документация на Toyota Corolla 2001-2006 г. выпуска.
См. прикрепленный файл.
Полное название:
Руководство для владельца автомобиля
Toyota Corolla 2001-2006 г. E120 (седан и хетчбек)
с двигателем 3ZZ-FE и 4ZZ-FE
с автоматической и ручной коробкой передач — 320 стр.
Как делался этот вариант руководства: http://webhamster.ru/site/page/index/main/news/324
Решил выложить всё что скопилось с разных источников, за почти 2 года эксплуатации своего авто, думаю будет полезно. Скажу заранее спасибо, если найдёте тут свои труды 
Всё на Яндекс.Диске
На русском:
Manual_Corolla_E12_Rus

Самое обычное руководство пользователя на русском, иногда полезно, чтобы не лазить в бардачок, PDF 2 части. yadi.sk/d/BOZDqBl-ntK9m
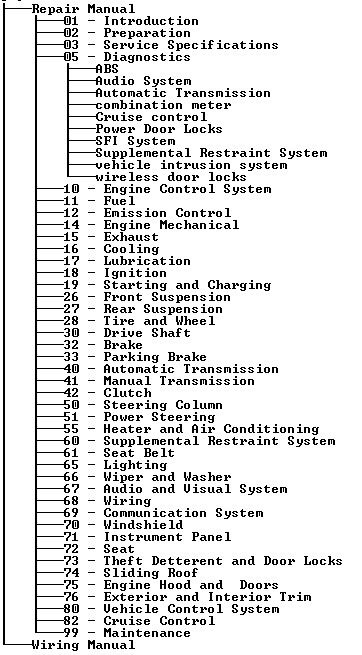
Corolla руководство по ремонту

Хорошая справка по ремонту и диагностике, судя по картинкам внутри — для дорестайла.
Внимание! Запускать по ярлычку «Запустить.bat» yadi.sk/d/BPQQr38FntK85
3zz-fe по русски

Очень годный мануал не только по 3zz, но и по подкапотке в целом, взят откуда-то с драйва.
yadi.sk/d/afrUWRKdntK69
На Английском:
2004 Corolla USA
Полное руководство по ремонту американской короллы, включая схемы эл. цепей
yadi.sk/d/d8pGQ_XVntKf6
SIL
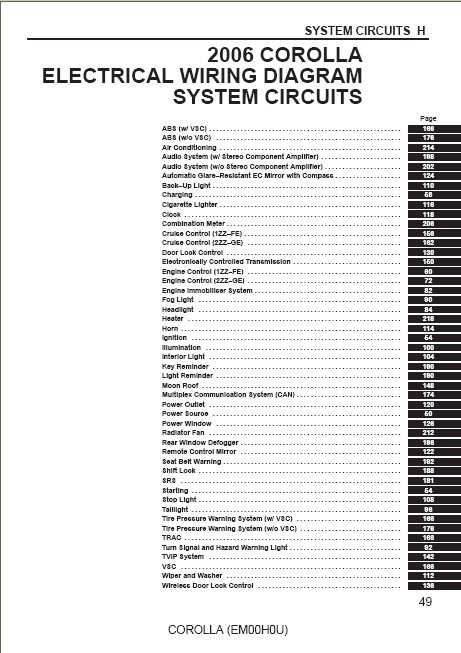
Схема электрики, pdf
yadi.sk/d/rTox__85ntKmw
Toyota Corolla models USA 2003 — 2008
Скан книги на английском, от весьма известного американского издателя книг по ремонту и обслуживанию (американская королла). yadi.sk/d/yBTIUaWUntL6n
Ссылки на каталоги з/ч
Удобно для поиска part-num. запчастей
www.japancats.ru/Toyota/
aes24.ru/?page=originalcats спасибо ssmitti
Если у кого-то есть что-то ещё — обязательно пишите, соберём всю коллекцию в одном месте!
Цена вопроса: 0 ₽
Пробег: 124 200 км
![]()
’01 Corolla U (L/O 0005)
Foreword
Welcome to the growing group of value−conscious people who drive Toyotas. We are proud of the advanced engineering and quality construction of each vehicle we build.
This Owner’s Manual explains the features of your new Toyota. Please read it and follow the instructions carefully so that you can enjoy many years of safe motoring.
When it comes to service, remember that your Toyota dealer knows your vehicle best and is interested in your complete satisfaction. He will provide quality maintenance and any other assistance you may require.
Please leave this Owner’s Manual in this vehicle at the time of resale. The next owner will need this information also.
All information and specifications in this manual are current at the time of printing. However, because of Toyota’s policy of continual product improvement, we reserve the right to make changes at any time without notice.
Please note that this manual applies to all models and explains all equipment, including options. Therefore, you may find some explanations for equipment not installed on your vehicle.
♥ 2000 TOYOTA MOTOR CORPORATION
All rights reserved. This material may not be reproduced or copied, in whole or in part, without the written permission of Toyota Motor Corporation.
2001MY_COROLLA_U (OM12720U)
i
’01 Corolla U (L/O 0005)
New vehicle warranty
Your new vehicle is covered by the following Toyota limited warranties:
D New vehicle warranty
D Emission control systems warranty
D Others
For further information, please refer to the Owner’s Warranty Information Booklet» or Owner’s Manual Supplement».
Your responsibility for maintenance
It is the owner’s responsibility to make sure that the specified maintenance is performed. Section 6 gives details of these maintenance requirements. Also included in Section 6 is general maintenance. For scheduled maintenance information, please refer to the Scheduled Maintenance Guide» or Owner’s Manual Supplement».
Accessories, spare parts and modification of your Toyota
A wide variety of non−genuine spare parts and accessories for Toyota vehicles are currently available in the market. You should know that Toyota does not warrant these products and is not responsible for their performance, repair, or replacement, or for any damage they may cause to, or adverse effect they may have on, your Toyota vehicle.
This vehicle should not be modified with non−genuine Toyota products. Modification with non−genuine Toyota products could affect its performance, safety or durability, and may even violate governmental regulations. In addition, damage or performance problems resulting from the modification may not be covered under warranty.
|
ii |
2001MY_COROLLA_U (OM12720U) |

’01 Corolla U (L/O 0005)
Spark ignition system of your Toyota
The spark ignition system in your Toyota meets all requirements of the Canadian Interference−Causing Equipment Standard.
Installation of a mobile two−way radio system
As the installation of a mobile two−way radio system in your vehicle could affect electronic systems such as multiport fuel injection system/sequential multiport fuel injection system, cruise control system, anti−lock brake system, SRS airbag system and seat belt pretensioner system, be sure to check with your Toyota dealer for precautionary measures or special instructions regarding installation.
Scrapping of your Toyota
The SRS airbag and seat belt pretensioner devices in
|
your Toyota |
contain |
explosive |
chemicals. If the |
vehicle |
|
is scrapped |
with the |
airbags |
and pretensioners |
left as |
they are, this may cause an accident such as fire. Be sure to have the systems of the SRS airbag and seat belt pretensioner removed and disposed of by a qualified service shop or by your Toyota dealer before you dispose of your vehicle.
|
iii |
2001MY_COROLLA_U (OM12720U) |
’01 Corolla U (L/O 0005)
Important information about this manual
Safety and vehicle damage warnings Safety symbol
In this manual, you will see CAUTION and NOTICE warnings. These are used in the following ways:
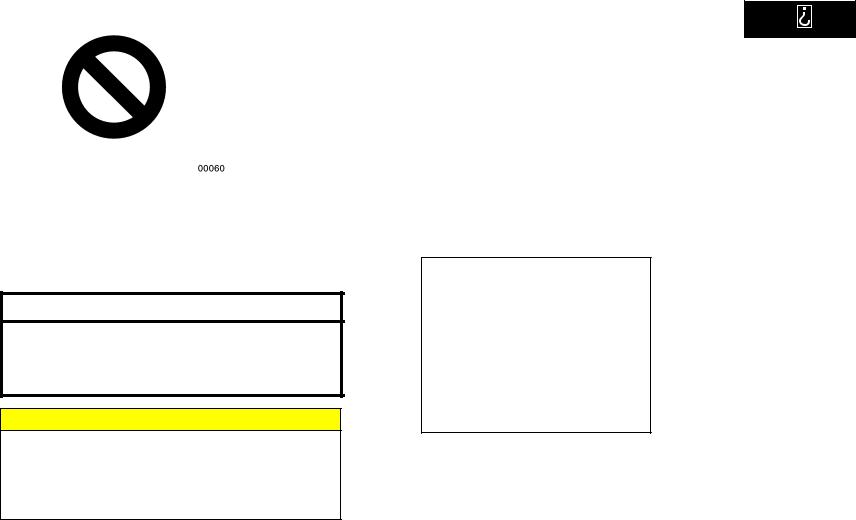
 CAUTION
This is a warning against something which may cause injury to people if the warning is ignored. You are informed what you must or must not do in order to avoid or reduce the risk to yourself and other people.
NOTICE
This is a warning against something which may cause damage to the vehicle or its equipment if the warning is ignored. You are informed what you must or must not do in order to avoid or reduce the risk of damage to your vehicle and its equipment.
In this manual, you will also see a circle with a slash through it. This means Do not», Do not do this», or Do not let this happen».
|
iv |
2001MY_COROLLA_U (OM12720U) |

’01 Corolla U (L/O 0005)
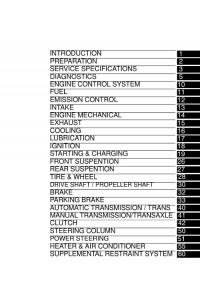
SECTION 1− 1
OPERATION OF INSTRUMENTS AND CONTROLS
Overview of instruments and controls
Instrument panel overview . . . . . . . . . . . . . . . . . . . . . . . . . . . . . . . . . . . . . 2 Instrument cluster overview . . . . . . . . . . . . . . . . . . . . . . . . . . . . . . . . . . . . 4
Indicator symbols on the instrument pane . . . . . . . . . . . . . . . . . . . . . . . 7
|
2001MY_COROLLA_U (OM12720U) |
1 |

’01 Corolla U (L/O 0005)
Instrument panel overview
1. Rear view mirror remote control levers
2. Side vents
3. Instrument cluster
4. Center vents
5. Electric moon roof switches
6. Personal light
(with electric moon roof)
7. Personal lights
(without electric moon roof)
8. Power door lock switches (without power windows)
9. Glove box
10. Power door lock switches (with power windows)
11. Power window switches
12. Automatic transmission selector lever or manual transmission gear shift lever
13. Parking brake lever
14. Cup holder
15. Power outlet
16. Hood lock release lever
17. Window lock switch
|
2 |
2001MY_COROLLA_U (OM12720U) |

’01 Corolla U (L/O 0005)
1.Power rear view mirror control switch
2.Headlight, turn signal and front fog light switches
3.Wiper and washer switches
4.Emergency flasher switch
5.Clock
6.Car audio
7.Rear window defogger switch
8.Air conditioning controls
9.Auxiliary boxes
10.Cup holder
11.Cigarette lighter
12.Ashtray
13.Ignition switch
14.Cruise control switch
15.Tilt steering lock release lever
16.Instrument panel light control knob
|
2001MY_COROLLA_U (OM12720U) |
3 |
’01 Corolla U (L/O 0005)
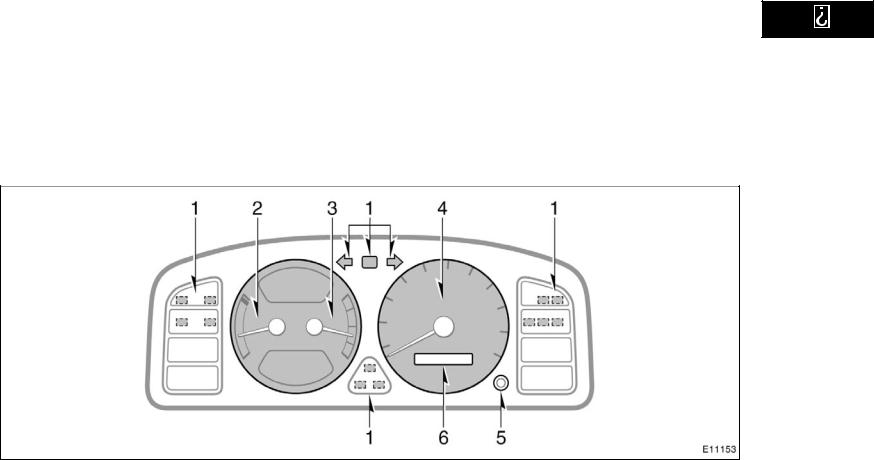
Instrument cluster overview
«Type A
1.Service reminder indicators and indicator lights
2.Engine coolant temperature gauge
|
3. Fuel gauge |
6. Odometer and two trip meters |
4.Speedometer
5.Trip meter reset knob
|
4 |
2001MY_COROLLA_U (OM12720U) |
’01 Corolla U (L/O 0005)
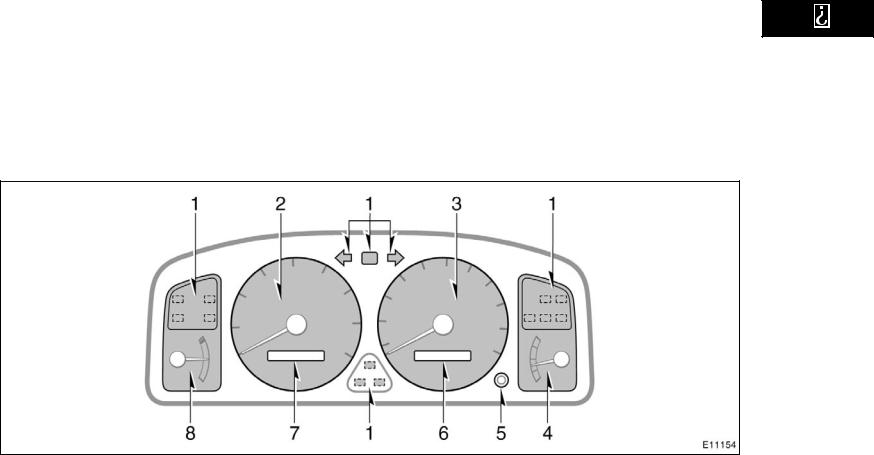
«Type B
|
1. |
Service |
reminder indicators and |
3. Speedometer |
6. |
Odometer and two trip meters |
||
|
indicator |
lights |
4. |
Fuel gauge |
7. |
Outside temperature display |
||
|
2. |
Tachometer |
5. |
Trip meter reset knob |
8. |
Engine coolant temperature |
gauge |
|
|
2001MY_COROLLA_U (OM12720U) |
5 |

’01 Corolla U (L/O 0005)
«Type C
|
1. |
Service |
reminder indicators and |
3. Speedometer |
6. |
Odometer and two trip meters |
||
|
indicator |
lights |
4. |
Fuel gauge |
7. |
Outside temperature display |
||
|
2. |
Tachometer |
5. |
Trip meter reset knob |
8. |
Engine coolant temperature |
gauge |
|
|
6 |
2001MY_COROLLA_U (OM12720U) |
![]()
Indicator symbols on the instrument panel
|
or |
Brake system warning light 1 |
Seat belt reminder light 1
Discharge warning light 1
Malfunction indicator lamp 1
Low fuel level warning light 1
Low oil pressure warning light 1
or Anti−lock brake system warning light 1
’01 Corolla U (L/O 0005)
Open door warning light 1
SRS warning light 1
Low windshield washer fluid level warning light 1
Headlight high beam indicator light
Turn signal indicator lights
Overdrive−off indicator light
Cruise control indicator light 2
1: For details, see Service reminder indicators and warning buzzers» in Section 1−5.
2: If this light flashes, see Cruise control» in Section 1−6.
|
2001MY_COROLLA_U (OM12720U) |
7 |

’01 Corolla U (L/O 0005)
|
8 |
2001MY_COROLLA_U (OM12720U) |

’01 Corolla U (L/O 0005)
SECTION 1− 2
|
OPERATION OF INSTRUMENTS AND |
|
|
CONTROLS |
|
|
Keys and Doors |
|
|
Keys . . . . . . . . . . . . . . . . . . . . . . . . . . . . . . . . . . . . . . . . . . . . . . . . . . . . . . . |
10 |
|
Side doors . . . . . . . . . . . . . . . . . . . . . . . . . . . . . . . . . . . . . . . . . . . . . . . . . . |
10 |
|
Power windows . . . . . . . . . . . . . . . . . . . . . . . . . . . . . . . . . . . . . . . . . . . . . . |
12 |
|
Trunk lid . . . . . . . . . . . . . . . . . . . . . . . . . . . . . . . . . . . . . . . . . . . . . . . . . . . . |
14 |
|
Hood . . . . . . . . . . . . . . . . . . . . . . . . . . . . . . . . . . . . . . . . . . . . . . . . . . . . . . . |
16 |
|
Fuel tank cap . . . . . . . . . . . . . . . . . . . . . . . . . . . . . . . . . . . . . . . . . . . . . . . |
17 |
|
Electric moon roof . . . . . . . . . . . . . . . . . . . . . . . . . . . . . . . . . . . . . . . . . . . |
18 |
|
2001MY_COROLLA_U (OM12720U) |
9 |

’01 Corolla U (L/O 0005)
|
Keys |
Side doors |
||||
Your vehicle is supplied with two kinds of keys.
1.Master key This key works in every lock.
2.Sub key This key will not work in the trunk.
To protect things locked in the trunk when you have your vehicle parked, leave the sub key with the attendant.
Since the doors and trunk lid can be locked without a key, you should always carry a spare master key in case you accidentally lock your keys inside the vehicle.
KEY NUMBER PLATE
Your key number is shown on the plate. Keep the plate in a safe place such as your wallet, not in the vehicle.
If you should lose your keys or if you need additional keys, duplicates can be made by a Toyota dealer using the key number.
We recommend you to write down the key number and keep it in safe place.
LOCKING AND UNLOCKING WITH KEY
Insert the key into the keyhole and turn it.
To lock: Turn the key forward.
To unlock: Turn the key backward.
Vehicles with power door lock system All the doors lock and unlock simultaneously with either front door. In the driver’s door lock, turning the key once will unlock the driver’s door and twice in succession will unlock all the doors simultaneously.
|
10 |
2001MY_COROLLA_U (OM12720U) |

’01 Corolla U (L/O 0005)
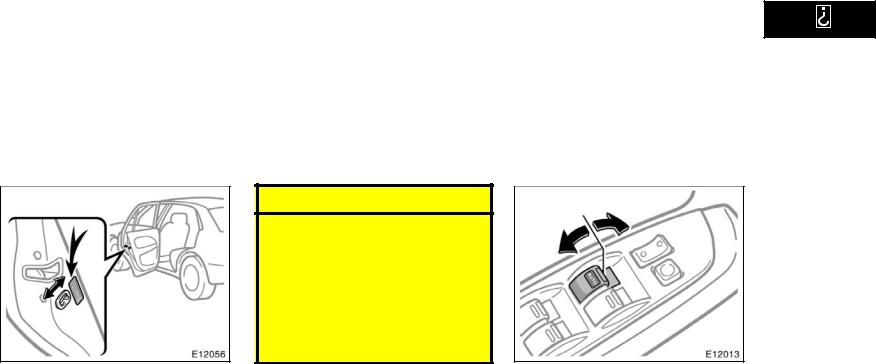
|
LOCKING |
AND |
UNLOCKING |
With power windows (driver’s side) |
Without power windows |
||||||||
|
WITH |
||||||||||||
|
INSIDE LOCK BUTTON |
LOCKING |
AND |
UNLOCKING WITH |
|||||||||
|
Move the |
lock button. |
|||||||||||
|
POWER DOOR LOCK SWITCH |
||||||||||||
|
To |
lock: Push |
the |
button |
down. |
Push the switch. |
|||||||
|
To |
unlock: Pull |
the |
button |
up. |
||||||||
|
Closing |
the door |
with the lock button in |
Vehicles with power |
windows |
||||||||
|
the |
lock |
position |
will also lock the door. |
To lock: Push the switch on the front side. |
||||||||
|
Be careful not to lock your keys in the |
To unlock: Push the switch on the rear |
|||||||||||
|
vehicle. |
side. |
|||||||||||
|
Vehicles |
with |
power door |
lock |
sys- |
Vehicles without power windows |
|||||||
|
tem The door cannot be locked if you |
To lock: Push the switch on the LOCK» |
|||||||||||
|
leave the |
key |
in |
the ignition |
switch. |
side. |
|||||||
|
To unlock: Push the switch on the oppo- |
||||||||||||
|
With power windows (passenger’s side) |
||||||||||||
|
site side of |
the LOCK» side. |
All the doors lock or unlock simultaneously.
|
2001MY_COROLLA_U (OM12720U) |
11 |
’01 Corolla U (L/O 0005)
REAR DOOR CHILD−PROTECTORS
Move the lock lever to the LOCK» position as shown on the label.
This feature allows you to lock a rear door so it can be opened from the outside only, not from inside. We recommend us-
|
ing |
this feature whenever small children |
|
are |
in the vehicle. |
 CAUTION
Before driving, be sure that the doors are closed and locked, especially when small children are in the vehicle. Along with the proper use of seat belts, locking the doors helps prevent the driver and passengers from being thrown out from the vehicle during an accident. It also helps prevent the doors from being opened unintentionally.
Power windows
The windows can be operated with the switch on each door.
The power windows work when the ignition switch is in the ON» position.
OPERATING THE DRIVER’S WINDOW
Use the switch on the driver’s door.
Normal operation: The window moves as long as you hold the switch.
To open: Lightly push down the switch. To close: Pull up the switch.
|
12 |
2001MY_COROLLA_U (OM12720U) |

’01 Corolla U (L/O 0005)
Automatic operation (to open only):
Push the switch completely down and then release it. The window will fully open. To stop the window partway, lightly pull the switch up and then release it.
Window lock switch
OPERATING THE PASSENGERS’ WINDOWS
Use the switches on the passengers’ doors. The driver’s door also has switches that control the passengers’ windows.
The window moves as long as you hold the switch.
To open: Push down the switch. To close: Pull up the switch.
If you push in the window lock switch on the driver’s door, the passengers’ windows cannot be operated.
|
2001MY_COROLLA_U (OM12720U) |
13 |
’01 Corolla U (L/O 0005)
 CAUTION
To avoid serious personal injury, you must do the following.
D Always make sure the head, hands and other parts of the body of all occupants are kept completely inside the vehicle before you close the power windows. If someone’s neck, head or hands gets caught in a closing window, it could result in a serious injury. When anyone closes the power windows, be sure that they operate the windows safely.
D When small children are in the vehicle, never let them use the power window switches without supervision. Use the window lock switch to prevent them from making unexpected use of the switches.
D Never leave small children alone in the vehicle, especially with the ignition key still inserted. They could use the power window switches and get trapped in a window. Unattended children can become involved in serious accidents.
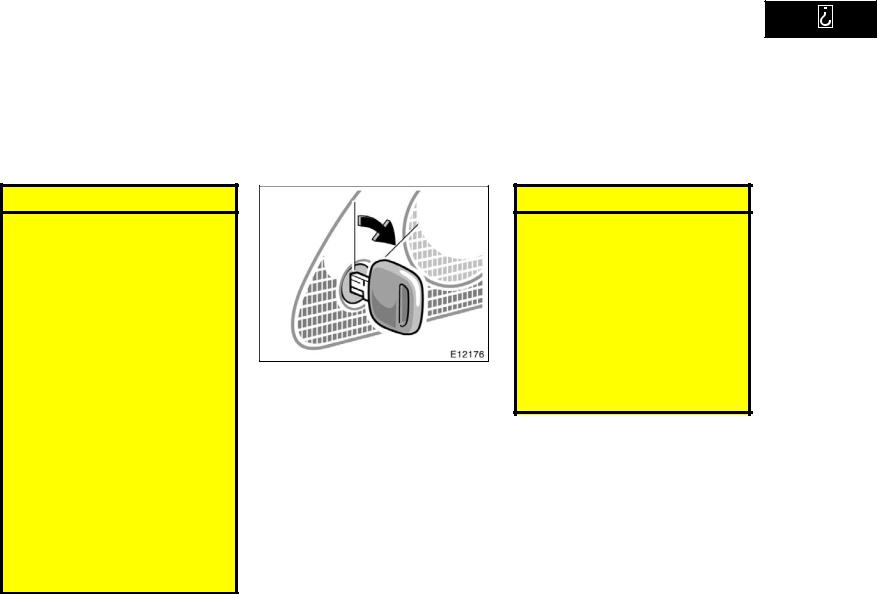
Trunk lid
To open the trunk lid from the outside, insert the master key and turn it clockwise.
See Luggage stowage precautions» in Section 2 for precautions in loading luggage.
To close the trunk lid, lower it and press down on it. After closing the trunk lid, try pulling it up to make sure it is securely closed.
 CAUTION
D Keep the trunk lid closed while driving. This not only keeps the luggage from being thrown out but also prevents exhaust gases from entering the vehicle.
D Always lock the trunk lid and all doors, and keep away the vehicle keys out of children’s reaches.
D Never leave children unattended in the vehicle. Unsupervised children may lock themselves in the vehicle or trunk and suffer serious injuries or death.
|
14 |
2001MY_COROLLA_U (OM12720U) |

’01 Corolla U (L/O 0005)
|
Lock release lever |
Internal trunk release |
||||
|
Lock release lever |
cancelling system |
handle |
|||
To open the trunk lid from the driver’s seat, pull up on the lock release lever.
After closing the trunk lid, insert the master key and turn it counterclockwise to deactivate the lock release lever.
After closing the trunk lid, try pulling it up to make sure it is securely locked.
If a person is locked in the trunk, pull down the phosphorescent handle lever on the inside of trunk lid in case of emergency to open the trunk lid.
|
2001MY_COROLLA_U (OM12720U) |
15 |
’01 Corolla U (L/O 0005)
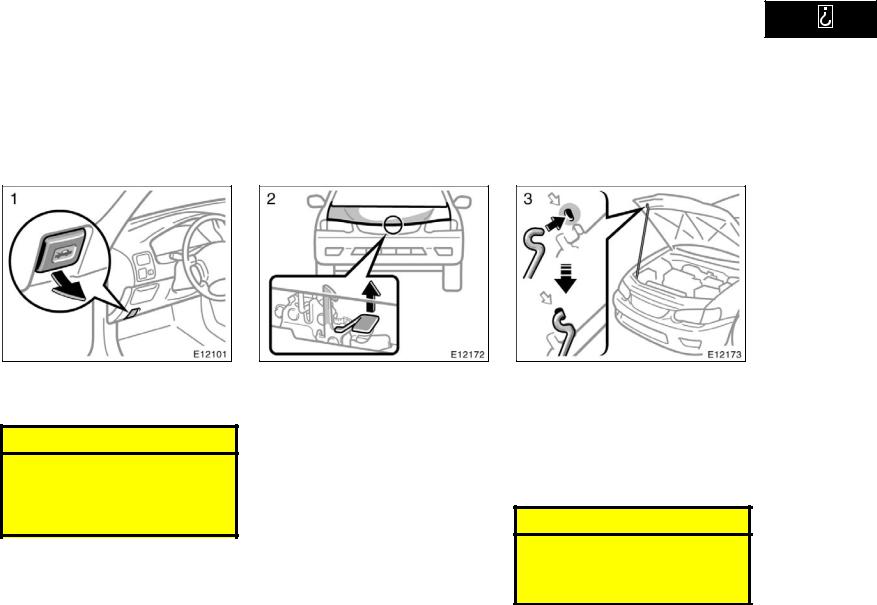
Hood
To open the hood:
1. Pull the hood lock release lever. The hood will spring up slightly.
 CAUTION
Before driving, be sure that the hood is closed and securely locked. Otherwise, the hood may open unexpectedly while driving and an accident may occur.
2. In front of the vehicle, pull up the auxiliary catch lever and lift the hood.
3.Hold the hood open by inserting the support rod into the slot.
Before closing the hood, check to see that you have not forgotten any tools, rags, etc. and return the support rod to its clip this prevents rattles. Then lower the hood make sure it locks into place. If necessary, press down gently on the front edge to lock it.
 CAUTION
After inserting the support rod into the slot, make sure the rod supports the hood security from falling down on to your head or body.
|
16 |
2001MY_COROLLA_U (OM12720U) |
![]()
’01 Corolla U (L/O 0005)
Fuel tank cap
|
This |
indicates |
that the fuel filler door |
|
is on |
the left |
side of your vehicle. |
1.To open the fuel filler door, pull the lever up.
When refueling, turn off the engine.
 CAUTION
D Do not smoke, cause sparks or allow open flames when refueling. The fumes are flammable.
D When opening the cap, do not remove the cap quickly. In hot weather, fuel under pressure could cause injury by spraying out of the filler neck if the cap is suddenly removed.
|
2. To |
remove the fuel tank cap, turn |
||
|
the |
cap |
slowly |
counterclockwise, |
|
then pause slightly before removing |
|||
|
it. After |
removing |
the cap, hang it |
|
|
on |
the cap hanger. |
It is not unusual to hear a slight swoosh when the cap is opened. When installing, turn the cap clockwise till you hear a click.
If the cap is not tightened securely, the malfunction indicator lamp comes on. Make sure the cap is tightened securely.
|
2001MY_COROLLA_U (OM12720U) |
17 |

’01 Corolla U (L/O 0005)
Electric moon roof
The indicator lamp goes off after driving several times. If the indicator lamp does not go off, contact your Toyota dealer as soon as possible.
 CAUTION
D Make sure the cap is tightened securely to prevent fuel spillage in case of an accident.
D Use only a genuine Toyota fuel tank cap for replacement. It is designed to regulate fuel tank pressure.
Sliding operation
Tilting operation
To operate the moon roof, use the switches beside the personal light.
The moon roof works when the ignition switch is in the ON» position.
Sun shade operation
The sun shade can be opened or closed by hand.
Sliding operation
To open: Push the switch on the rear side.
The sun shade will be opened together with the roof.
To close: Push the switch on the front side.
As a precaution when closing, the roof stops at the half closed position before fully closing. Therefore, release the switch and then push it again to close it completely.
|
18 |
2001MY_COROLLA_U (OM12720U) |

’01 Corolla U (L/O 0005)
Tilting operation
To tilt up: Push the switch on the UP» side.
To lower: Push the switch on the opposite side of the UP» side.
You may stop the moon roof at any desired position. The roof will move while the switch is being pushed and stop when released except to slide open.
 CAUTION
To avoid serious personal injury, you must do the following.
D While the vehicle is moving, always keep the head, hands and other parts of the body of all occupants away from the roof opening. Otherwise, you could be seriously injured if the vehicle stops suddenly or if the vehicle is involved in an accident.
D Always make sure nobody places his/her head, hands and other parts of the body in the roof opening before you close the roof. If someone’s neck, head or hands gets caught in the closing roof, it could result in a serious injury. When anyone closes the roof, first make sure it is safe to do so.
D Never leave small children alone in the vehicle, especially with the ignition key still inserted. They could use the moon roof switches and get trapped in the roof opening. Unattended children can become involved in serious accidents.
|
D Never |
sit |
on |
top of the vehicle |
|
around |
the |
roof |
opening. |
|
2001MY_COROLLA_U (OM12720U) |
19 |

’01 Corolla U (L/O 0005)
|
20 |
2001MY_COROLLA_U (OM12720U) |

’01 Corolla U (L/O 0005)
SECTION 1− 3
|
OPERATION OF INSTRUMENTS AND |
|
|
CONTROLS |
|
|
Seats, Seat belts, Steering wheel and Mirrors |
|
|
Seats . . . . . . . . . . . . . . . . . . . . . . . . . . . . . . . . . . . . . . . . . . . . . . . . . . . . . . |
22 |
|
Front seats . . . . . . . . . . . . . . . . . . . . . . . . . . . . . . . . . . . . . . . . . . . . . . . . . |
22 |
|
Fold−down rear seat . . . . . . . . . . . . . . . . . . . . . . . . . . . . . . . . . . . . . . . . . |
24 |
|
Head restraints . . . . . . . . . . . . . . . . . . . . . . . . . . . . . . . . . . . . . . . . . . . . . . |
26 |
|
Seat belts . . . . . . . . . . . . . . . . . . . . . . . . . . . . . . . . . . . . . . . . . . . . . . . . . . . |
27 |
|
SRS driver and front passenger airbags . . . . . . . . . . . . . . . . . . . . . . . . |
36 |
|
SRS side airbags . . . . . . . . . . . . . . . . . . . . . . . . . . . . . . . . . . . . . . . . . . . . |
43 |
|
Child restraint . . . . . . . . . . . . . . . . . . . . . . . . . . . . . . . . . . . . . . . . . . . . . . . |
48 |
|
Tilt steering wheel . . . . . . . . . . . . . . . . . . . . . . . . . . . . . . . . . . . . . . . . . . . |
70 |
|
Outside rear view mirrors . . . . . . . . . . . . . . . . . . . . . . . . . . . . . . . . . . . . . |
71 |
|
Anti−glare inside rear view mirro . . . . . . . . . . . . . . . . . . . . . . . . . . . . . . . |
72 |
|
Vanity mirror . . . . . . . . . . . . . . . . . . . . . . . . . . . . . . . . . . . . . . . . . . . . . . . . |
73 |
|
2001MY_COROLLA_U (OM12720U) |
21 |
’01 Corolla U (L/O 0005)
Seats
While the vehicle is being driven, all vehicle occupants should have the seatback upright, sit well back in the seat and properly wear the seat belts provided.
 CAUTION
D Do not drive the vehicle unless the occupants are properly seated. Do not allow sitting on top of a folded−down seatback, or in the luggage compartment. Persons not properly seated and/or properly restrained by seat belts can be severely injured in the event of emergency braking or a collision.
D During driving, do not allow passengers to stand up or move around between seats. Severe injuries can occur in the event of emergency braking or a collision.
Front seats
Front seat precautions (with SRS side airbags)
 CAUTION
The SRS side airbags are installed in the driver and front passenger seats. Observe the following precautions.
D Do not lean against the front door when the vehicle is in use. The side airbag inflates with considerable speed and force; you may be killed or seriously injured.
D Do not modify or replace the seats or surface of the front seats with the side airbags. Such changes may disable the system or cause the side airbags to inflate, resulting in
|
death |
or |
serious |
injury. |
Consult |
|
|
your |
Toyota dealer. |
||||
|
D Do |
not |
use accessories |
for the |
||
|
seats which cover the parts where |
|||||
|
the |
side |
airbags |
should |
inflate. |
|
|
Such accessories may prevent the |
|||||
|
side airbags from activating correct- |
|||||
|
ly, |
causing death or |
serious injury. |
Seat adjustment precautions
Adjust the driver’s seat so that the foot pedals, steering wheel and instrument panel controls are within easy reach of the driver.
 CAUTION
D Adjustments should not be made while the vehicle is moving, as the seat may unexpectedly move and cause the driver to lose control of the vehicle.
D When adjusting the seat, be careful not to hit the seat against a passenger or luggage.
D After adjusting the seat position, try sliding it forward and backward to make sure it is locked in position.
D After adjusting the seatback, exert body pressure to make sure it is locked in position.
D Do not put objects under the seats. The objects may interfere with the seat−lock mechanism or unexpectedly push up the seat position adjusting lever; the seat may suddenly move, causing the driver to lose control of the vehicle.
|
22 |
2001MY_COROLLA_U (OM12720U) |

’01 Corolla U (L/O 0005)
Adjusting front seats
D While adjusting the seat, do not put your hands under the seat or near the moving parts. You may catch and injure your hands or fingers.
1. SEAT POSITION ADJUSTING LEVER
Pull the lever up. Then slide the seat to the desired position with slight body pressure and release the lever.
2.SEATBACK ANGLE ADJUSTING LEVER
Lean forward and pull the lever up. Then lean back to the desired angle and release the lever.
 CAUTION
To reduce the risk of sliding under the lap belt during a collision, avoid reclining the seatback any more than needed. The seat belts provide maximum protection in a frontal or rear collision when the driver and the passenger are sitting up straight and well back in the seats. If you are reclined, the lap belt may slide past your hips and apply restraint forces directly to the abdomen. Therefore, in the event of a frontal collision, the risk of personal injury may increase with increasing recline of the seatback.
|
2001MY_COROLLA_U (OM12720U) |
23 |
’01 Corolla U (L/O 0005)
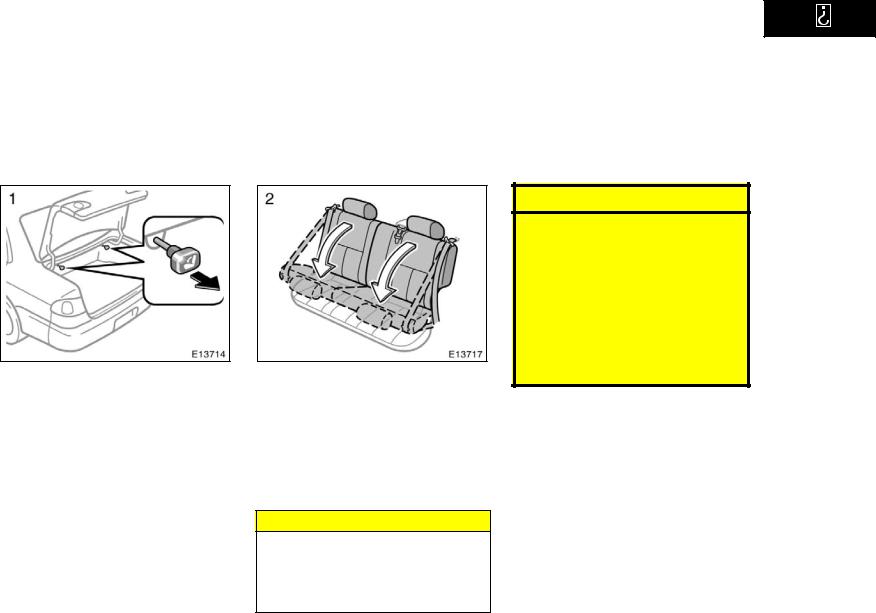
Fold−down rear seat
(A) FOLDING DOWN REAR SEAT
1.To unlock the seatback, pull the lever in the trunk.
2. Fold down the seatback.
Each seatback may be folded separately. On vehicles with built−in child restraint system, only the left seatback can be folded down.
This will enlarge the trunk as far as the seatbacks. See Luggage stowage precautions» in Section 2 for precautions in loading luggage.
NOTICE
Make sure the luggage loaded in the enlarged trunk will not damage the webbing of the rear center seat belt when the left seatback is folded down.
 CAUTION
When returning the seatback to the upright position:
D Make sure the seat belts are not twisted or caught in the seatback and are arranged in the proper position and are ready to use.
D Make sure the seatback is securely locked by pushing forward and rearward on the top of the seatback. Failure to do so will prevent seat belt from operating properly.
|
24 |
2001MY_COROLLA_U (OM12720U) |

’01 Corolla U (L/O 0005)
 CAUTION
Disconnect the rear center seat belt only under the above mentioned circumstances; do not disconnect it in other circumstances.
(B)PREVENTING DAMAGE TO REAR CENTER SEAT BELT WEBBING
When folding down the left seatback, if the luggage loaded in the enlarged trunk will damage the webbing of the rear center seat belt, disconnect the rear center seat belt to prevent damage.
Insert the key into the hole (light gray) on the buckle to release tab 1 (light gray), and allow the belt to retract.
(C) BEFORE RETURNING REAR SEAT
Make sure the shoulder belt pass through the guide when returning the seatback up.
|
2001MY_COROLLA_U (OM12720U) |
25 |
’01 Corolla U (L/O 0005)
Before returning the seatback to the upright position, make sure to correctly connect the center seat belt for ready use.
Insert tab 1 (light gray) into the buckle with light gray buckle−release button.
You will hear a click when the tab locks into the buckle.
 CAUTION
D Be careful not to mix up the proper match of tab and buckle. Do not insert tab 1 (light gray) into other buckle than the one with light gray buckle release button. (See Seat belts» in this section for proper matching of the buckles and tabs.)
D After inserting the tab, make sure the tab and buckle are locked.
D Do not insert coins, clips, etc. in the buckle as this may prevent you from properly latching the tab and buckle.
D Make sure the belt is not twisted or caught in the seatback and that it is arranged in the proper position for ready use.
D If the seat belt does not function normally, immediately contact your Toyota dealer.
Rear
|
26 |
2001MY_COROLLA_U (OM12720U) |
![]()
’01 Corolla U (L/O 0005)
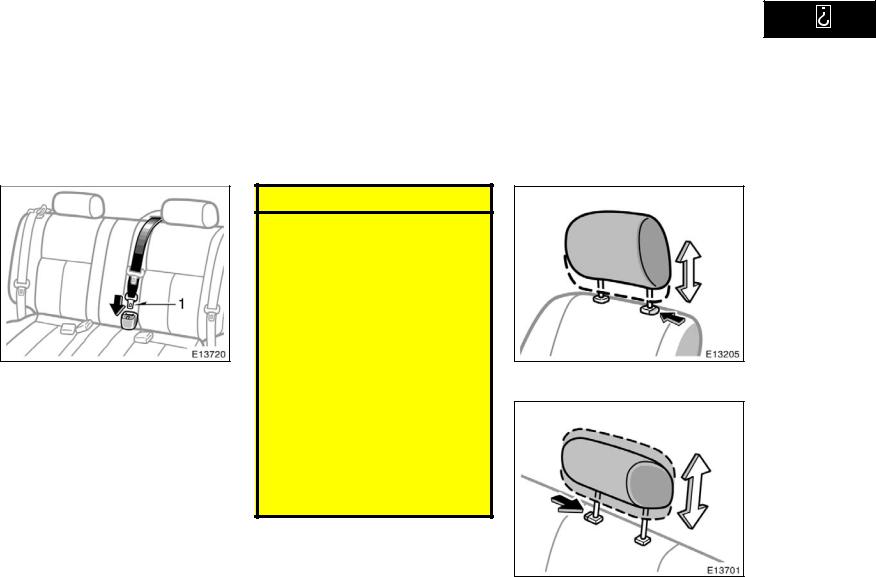
For your safety and comfort, adjust the head restraint before driving.
To raise: Pull it up.
To lower: Push it down while pressing the
|
lock |
release button. |
|||||
|
The |
head |
restraint |
is most |
effective |
when |
|
|
it |
is |
close |
to |
your |
head. Therefore, |
using |
|
a |
cushion |
on |
the |
seatback |
is not recom- |
mended.
 CAUTION
D Adjust the center of the head restraint so that it is closest to the top of your ears.
D After adjusting the head restraint, make sure it is locked in position.
|
D Do not |
drive with the head re- |
|
straints |
removed. |
Seat belts
Seat belt precautions
Toyota strongly urges that the driver and passengers in the vehicle be properly restrained at all times with the seat belts provided. Failure to do so could increase the chance of injury and/or the severity of injury in accidents.
Child. Use a child restraint system appropriate for the child until the child becomes large enough to properly wear the vehicle’s seat belts. See Child restraint» for details.
If a child is too large for a child restraint system, the child should sit in the rear seat and must be restrained using the vehicle’s seat belt. According to accident statistics, the child is safer when properly
|
restrained |
in the |
rear |
seat than in |
the |
|
|
front |
seat. |
||||
|
If a |
child |
must sit |
in |
the front seat, |
the |
seat belts should be worn properly. If an accident occurs and the seat belts are not worn properly, the force of the rapid inflation of the airbag may cause death or serious injury to the child.
Do not allow the child to stand up or kneel on either rear or front seats. An unrestrained child could suffer serious injury or death during emergency braking or a collision. Also, do not let the child sit on your lap. It does not provide sufficient restraint.
Pregnant woman. Toyota recommends the use of a seat belt. Ask your doctor for specific recommendations. The lap belt should be worn securely and as low as possible over the hips and not on the waist.
Injured person. Toyota recommends the use of a seat belt. Depending on the injury, first check with your doctor for specific recommendations.
 CAUTION
Persons should ride in their seats properly wearing their seat belts whenever the vehicle is moving. Otherwise, they are much more likely to suffer serious bodily injury or death in the event of sudden braking or a collision.
|
2001MY_COROLLA_U (OM12720U) |
27 |

’01 Corolla U (L/O 0005)
When using the seat belts, observe the following:
D Use the belt for only one person at a time. Do not use a single belt for two or more people even children.
D Avoid reclining the seatbacks too much. The seat belts provide maximum protection when the seatbacks are in the upright position. (Refer to the seat adjustment instructions.)
D Be careful not to damage the belt webbing or hardware. Take care that they do not get caught or pinched in the seat or doors.
D Inspect the belt system periodically. Check for cuts, fraying, and loose parts. Damaged parts should be replaced. Do not disassemble or modify the system.
|
D Keep the belts clean |
and dry. If |
|
they need cleaning, use a mild soap |
|
|
solution or lukewarm |
water. Never |
use bleach, dye, or abrasive cleaners they may severely weaken the
|
belts. (See |
Cleaning the interior» |
|
in Section |
5.) |
D Replace the belt assembly (including bolts) if it has been used in a severe impact. The entire assembly should be replaced even if damage is not obvious.
Front and rear seat belts
Adjust the seat as needed (front seats only) and sit up straight and well back in the seat. To fasten your belt, pull it out of the retractor and insert the tab into the buckle.
You will hear a click when the tab locks into the buckle.
The seat belt length automatically adjusts to your size and the seat position.
The retractor will lock the belt during a sudden stop or on impact. It also may lock if you lean forward too quickly. A slow, easy motion will allow the belt to extend, and you can move around freely.
|
28 |
2001MY_COROLLA_U (OM12720U) |

’01 Corolla U (L/O 0005)
If the seat belt cannot be pulled out of the retractor, firmly pull the belt and release it. You will then be able to smoothly pull the belt out of the retractor.
When a passenger’s shoulder belt is completely extended and is then retracted even slightly, the belt is locked in that position and cannot be extended. This feature is used to hold the child restraint system securely. (For details, see Child restraint» in this section.) To free the belt
|
again, fully retract the belt |
and then pull |
|
the belt out once more. |
|
|
CAUTION |
|
|
D After inserting the tab, |
make sure |
|
the tab and buckle are locked and |
|
|
that the belt is not twisted. |
|
|
D Do not insert coins, clips, etc. in |
|
|
the buckle as this may prevent you |
|
|
from properly latching the tab and |
|
|
buckle. |
|
|
D If the seat belt does not function |
|
|
normally, immediately contact your |
|
|
Toyota dealer. Do not use the seat |
|
|
until the seat belt is fixed. It cannot |
|
|
protect an adult occupant or your |
|
|
child from injury. |
|
Seat belts with an adjustable shoulder anchor
Adjust the shoulder anchor position to your size.
To raise: Slide the anchor up.
To lower: Push in the lock release button and slide the anchor down.
After adjustment make sure the anchor is locked in position.
 CAUTION
Always make sure the shoulder belt is positioned across the center of your shoulder. The belt should be kept away from your neck, but not falling off your shoulder. Failure to do so could reduce the amount of protection in an accident and cause serious injures in a collision.
|
2001MY_COROLLA_U (OM12720U) |
29 |

’01 Corolla U (L/O 0005)
Take up
slack
Too high
Keep as low on
hips as possible
Adjust the position of the lap and shoulder belts.
Position the lap belt as low as possible on your hips not on your waist, then adjust it to a snug fit by pulling the shoulder portion upward through the latch plate.
 CAUTION
D High−positioned lap belts and loose−fitting belts both could cause serious injuries due to sliding under the lap belt during a collision or other unintended result. Keep the lap belt positioned as low on hips as possible.
D For your safety, do not place the shoulder belt under your arm.
To release the belt, press the buckle−release button and allow the belt to retract.
If the belt does not retract smoothly, pull it out and check for kinks or twists. Then make sure it remains untwisted as it retracts.
|
30 |
2001MY_COROLLA_U (OM12720U) |

’01 Corolla U (L/O 0005)
 CAUTION
Make sure the both buckles are correctly located and securely latched. Failure to properly match the buckle and tab may cause severe injury in case of an accident or a collision.
REAR CENTER SEAT BELT (WITH FOLD−DOWN SEAT)
The rear center seat belt is a 3−point type restraint with 2 buckles. Both seat belt buckles must be correctly located and securely latched for proper operation.
Make sure the buckle 1 (with light gray buckle−release button) is securely latched for ready use of the center seat belt.
The buckle 1 should be separated only when the rear left seatback is folded down, if the luggage loaded in the enlarged trunk will damage the webbing of the rear center seat belt. (See Fold−down rear seat» in this section for the instruction of how to correctly connect the seat belt.)
Two buckles and tabs for rear center seat belt
The two buckles for the rear center seat belt are distinguished with colors of the buckle release button. Also the two tabs have different shape for its end so that the belt is not buckled in the wrong place.
Buckle 1 Properly matches with light gray tab
Buckle 2 Properly matches with interior color tab
|
2001MY_COROLLA_U (OM12720U) |
31 |

’01 Corolla U (L/O 0005)
 CAUTION
Do not use the rear center seat belt with either buckle released. Fastening only the shoulder belt or lap belt may cause severe personal injury in case of sudden braking or a collision.
Seat belt extender
If your seat belt cannot be fastened securely because it is not long enough, a personalized seat belt extender is available from your Toyota dealer free of charge.
Please contact your local Toyota dealer so that the dealer can order the proper required length for the extender. Bring the heaviest coat you expect to wear for proper measurement and selection of length. Additional ordering information is available at your Toyota dealer.
 CAUTION
When using the seat belt extender, observe the following. Failure to follow these instructions could result in less effectiveness of the seat belt restraint system in case of vehicle accident, increasing the chance of personal injury.
D Never use the seat belt extender if you can fasten the seat belt without it.
D Remember that the extender provided for you may not be safe when used on a different vehicle, or for another person or at a different seating position than the one originally intended for.
|
32 |
2001MY_COROLLA_U (OM12720U) |

’01 Corolla U (L/O 0005)
To connect the extender to the seat belt, insert the tab into the seat belt buckle so that the PRESS» signs on the buckle−release buttons of the extender and the seat belt are both facing outward as shown.
You will hear a click when the tab locks into the buckle.
When releasing the seat belt, press on the buckle−release button on the extender, not on the seat belt. This helps prevent damage to the vehicle interior and extender itself.
|
When not in use, remove |
the extender |
|
and store in the vehicle for |
future use. |
 CAUTION
D After inserting the tab, make sure the tab and buckle are locked and that the seat belt extender is not twisted.
D Do not insert coins, clips, etc. in the buckle as this may prevent you from properly latching the tab and buckle.
D If the seat belt does not function normally, immediately contact your Toyota dealer.
Front seat belt pretensioners
The driver and front passenger’s seat belt pretensioners are designed to be activated in response to a severe frontal impact.
When the airbag sensor detects the shock of a severe frontal impact, the front seat belt is quickly drawn back in by the retractor so that the belt snugly restrains the front seat occupants.
The seat belt pretensioners are activated even with no passenger in the front seat.
Collisions occurring at certain speeds and angles may cause the seat belt pretensioners and SRS airbags not to operate all together.
|
2001MY_COROLLA_U (OM12720U) |
33 |

’01 Corolla U (L/O 0005)
This indicator comes on when the ignition key is turned to the ACC» orON» position. It goes off after about 6 seconds. This means the front seat belt pretensioners are operating properly.
This warning light system monitors the airbag sensor assembly, front airbag sensors, seat belt pretensioner assemblies, warning light, interconnecting wiring and power sources. (For details, see Service reminder indicators and warning buzzers» in Section 1−5.)
The seat belt pretensioner system mainly consists of the following components and their locations are shown in the illustration.
1.Front airbag sensors
2.SRS warning light
3.Seat belt pretensioner assemblies
4.Airbag sensor assembly
The seat belt pretensioner is controlled by the airbag sensor assembly. The airbag sensor assembly consists of a safing sensor and airbag sensor.
When a seat belt pretensioner is activated, an operating noise may be heard and a small amount of smoke−like gas may be released. This gas is harmless and does not indicate that a fire is occurring.
Once the seat belt pretensioner has been activated, the seat belt retractor remains locked.
 CAUTION
Do not modify, remove, strike or open the front seat belt pretensioner assemblies, airbag sensor or surrounding area or wiring. Doing any of these may cause sudden operation of the front seat belt pretensioners or disable the system, which could result in serious injury.
Failure to follow these instructions can result in serious injuries.
|
34 |
2001MY_COROLLA_U (OM12720U) |

’01 Corolla U (L/O 0005)
NOTICE
Do not perform any of the following changes without consulting your Toyota dealer. Such changes can interfere with proper operation of the seat belt pretensioners in some cases.
|
z Installation |
of |
electronic |
devices |
|
such as a mobile two−way radio, |
|||
|
cassette |
tape |
player or |
compact |
|
disc player |
|||
|
z Repairs |
on |
or |
near the front seat |
|
belt retractor assemblies |
z Modification of the suspension system
z Modification of the front end structure
z Attachment of a grille guard (bull bar, kangaroo bar, etc.), snowplow, winches or any other equipment to the front end
z Repairs made on or near the front fenders, front end structure or console
This front seat belt pretensioner system has a service reminder indicator to inform the driver of operating problems. If any of the following conditions occurs, this indicates a malfunction of the airbags or pretensioners. Contact your Toyota dealer as soon as possible to service the vehicle.
D The light does not come on when the ignition key is turned to the ACC» orON» position, or the light remains on.
D The light comes on or flashes while driving.
D If either front seat belt does not retract or can not be pulled out due to a malfunction or activation of the pretensioner.
In the following cases, contact your Toyota dealer as soon as possible:
D The front seat belt pretensioner assembly or surrounding area has been damaged.
D The front part of the vehicle (shaded in the illustration) was involved in an accident that was not severe enough to cause the SRS airbags to inflate.
D The front seat belt pretensioner assembly is scratched, cracked, or otherwise damaged.
|
2001MY_COROLLA_U (OM12720U) |
35 |

SRS driver and front passenger airbags
The SRS (Supplemental Restraint System) airbags are designed to provide further protection for the driver and front passenger in addition to the primary safety protection provided by the seat belts.
In response to a severe frontal impact, the SRS airbags work together with the seat belts to help reduce injury by inflating. The SRS airbags help to reduce injuries mainly to the driver’s or front passenger’s head or chest directly hitting the steering wheel or dashboard. The passenger airbag is activated even with no passenger in the front seat.
Be sure to wear your seat belt.
’01 Corolla U (L/O 0005)
Your vehicle is equipped with a crash sensing and diagnostic module, which will record the use of the seat belt restraint system by the driver when the SRS airbags inflated.
 CAUTION
A driver or front passenger too close to the steering wheel or dashboard during airbag deployment can be killed or seriously injured. Toyota strongly recommends that:
D The driver sit as far back as possible from the steering wheel while still maintaining control of the vehicle.
D The front passenger sit as far back as possible from the dashboard.
D All vehicle occupants be properly restrained using the available seat belts.
This indicator comes on when the ignition key is turned to the ACC» orON» position. It goes off after about 6 seconds. This means the SRS airbags are operating properly.
This warning light system monitors the airbag sensor assembly, front airbag sensors, inflators, warning light, interconnecting wiring and power sources. (For details, see Service reminder indicators and warning buzzers» in Section 1−5.)
|
36 |
2001MY_COROLLA_U (OM12720U) |
![]()
’01 Corolla U (L/O 0005)
The SRS airbag system is designed to activate in response to a severe frontal impact within the shaded area between the arrows in the illustration.
The SRS airbags will deploy if the severity of the impact is above the designed threshold level, comparable to an approximate 25 km/h (15 mph) collision when impacting straight into a fixed barrier that does not move or deform.
If the severity of the impact is below the above threshold level, the SRS airbags may not deploy.
However, this threshold velocity will be considerably higher if the vehicle strikes an object, such as a parked vehicle or sign pole, which can move or deform on impact, or if it is involved in an underride collision (e.g. a collision in which the nose of the vehicle underrides», or goes under, the bed of a truck, etc.).
It is possible that in some collisions at the lower zone of airbag sensor detection and activation the SRS airbags and seat belt pretensioners will not operate all together.
For the safety of all occupants, always wear your seat belts.
Collision from the rear
Collision from the side
Vehicle rollover
The SRS airbags are not designed to inflate if the vehicle is involved in a side or rear collision, if it rolls over, or if it is involved in a low−speed frontal collision.
|
2001MY_COROLLA_U (OM12720U) |
37 |

’01 Corolla U (L/O 0005)
|
Hitting a curb, edge |
Falling into or |
|
of pavement or |
jumping over a |
|
hard material |
deep hole |
Landing hard or vehicle falling
The SRS airbags may deploy if a serious impact occurs to the underside of your vehicle. Some examples are shown in the illustration.
The SRS airbag system consists mainly of the following components, and their locations are shown in the illustration.
1.Front airbag sensors
2.SRS warning light
3.Airbag module for passenger (airbag and inflator)
4.Airbag sensor assembly
5.Airbag module for driver (airbag and inflator)
The airbag sensor assembly consists of a safing sensor and airbag sensor.
In a severe frontal impact, sensors detect deceleration and the system triggers the airbag inflators. Then a chemical reaction in the inflators quickly fills the airbags with non−toxic gas to help restrain the forward motion of the occupants.
When the airbags inflate, they produce a fairly loud noise and release some smoke and residue along with non−toxic gas. This does not indicate a fire. This gas is normally harmless; however, for those who have delicate skin, it may cause a minor skin irritation. Be sure to wash off any residue as soon as possible to prevent any potential skin irritation.
Deployment of the airbags happens in a fraction of a second, so the airbags must inflate with considerable force. While the system is designed to reduce serious injuries, it may also cause minor burns or abrasions and swelling.
Parts of the airbag module (steering wheel hub, dashboard) may be hot for several minutes, but the airbags themselves will not be hot. The airbags are designed to inflate only once.
|
38 |
2001MY_COROLLA_U (OM12720U) |

’01 Corolla U (L/O 0005)
A crash severe enough to inflate the airbags may break the windshield as the vehicle buckles. In vehicles with a passenger airbag the windshield may also be damaged by absorbing some of the force of the inflating airbag.
 CAUTION
D The SRS airbag system is designed only as a supplement to the primary protection of the driver side and front passenger side seat belt systems. The front seat occupants can be killed or seriously injured by an inflating airbag if they do not wear the available seat belts. During sudden braking just before a collision, an unrestrained driver or front passenger can move forward into direct contact with or close proximity to the airbag which may then deploy during the collision. To ensure maximum protection in an accident, the driver and all passengers in the vehicle must wear their seat belts. Wearing a seat belt during an accident reduces the chances of death or serious injury or being thrown out of the vehicle. For instructions and precautions concerning the seat belt system, see Seat belts» in this section.
D Improperly seated and/or restrained infants and children can be killed or seriously injured by a deploying airbag. An infant or child who is too small to use a seat belt should be properly secured using a child restraint system. Toyota strongly recommends that all infants and children be placed in the rear seat of the vehicle and properly restrained. The rear seat is the safest for infants and children. For instructions concerning the installation of a child restraint system, seeChild restraint» in this section.
|
2001MY_COROLLA_U (OM12720U) |
39 |

’01 Corolla U (L/O 0005)
D Never put a rear−facing child restraint system on the front seat because the force of the rapid inflation of the passenger airbag can cause death or serious injury to the child.
Move seat fully back
D A forward−facing child restraint system should be allowed to be put on the front seat only when it is unavoidable. Always move the seat as far back as possible, because the force of a deploying airbag could cause death or serious injury to the child. On vehicles with side airbags, do not allow the child to lean against the front door or around the front door even if the child is seated in the child restraint system. It is dangerous if the side airbag inflates, and the impact could cause death or serious injury to the child.
For instructions concerning the installation of a child restraint system, see Child restraint» in this section.
|
40 |
2001MY_COROLLA_U (OM12720U) |

’01 Corolla U (L/O 0005)
D Do not sit on the edge of the seat or lean over the dashboard when the vehicle is in use. The airbags inflate with considerable speed and force; you may be killed or seriously injured. Sit up straight and well back in the seat, and always use your seat belt.
D Do not allow a child to stand up, or to kneel on the front passenger seat. The airbag inflates with considerable speed and force; the child may be killed or seriously injured.
D Do not hold a child on your lap or in your arms. Use a child restraint system in the rear seat. For instructions concerning the installation of a child restraint system, see Child restraint» in this section.
D Do not put objects or your pets on or in front of the dashboard or steering wheel pad that houses the airbag system. They might restrict inflation or cause death or serious injury as they are projected rearward by the force of deploying airbags. Likewise, the driver and front passenger should not hold things in their arms or on their knees.
|
2001MY_COROLLA_U (OM12720U) |
41 |

’01 Corolla U (L/O 0005)
D Do not modify or remove any wiring. Do not modify, remove, strike or open any components such as the steering wheel pad, steering wheel, column cover, front passenger airbag cover, front passenger airbag or airbag sensor assembly. Doing any of these may cause sudden SRS airbag inflation or disable the system, which could result in death or serious injury.
Failure to follow these instructions can result in death or serious injury.
NOTICE
Do not perform any of the following changes without consulting your Toyota dealer. Such changes can interfere with proper operation of the SRS airbag system in some cases.
|
z Installation |
of |
electronic devices |
||
|
such as a mobile two−way radio, |
||||
|
cassette tape |
player or |
compact |
||
|
disc player |
||||
|
z Modification |
of |
the |
suspension sys- |
|
|
tem |
||||
|
z Modification |
of |
the |
front |
end struc- |
|
ture |
z Attachment of a grille guard (bull bar, kangaroo bar, etc.), snowplow, winches or any other equipment to the front end
z Repairs made on or near the front fenders, front end structure, console, steering column, steering wheel or dashboard near the front passenger’s airbag
This SRS airbag system has a service reminder indicator to inform the driver of operating problems. If either of the following conditions occurs, this indicates a malfunction of the airbags. Contact your Toyota dealer as soon as possible to service the vehicle.
D The light does not come on when the ignition key is turned to the ACC» orON» position, or the light remains on.
D The light comes on while driving.
|
42 |
2001MY_COROLLA_U (OM12720U) |

’01 Corolla U (L/O 0005)
In the following cases, contact your Toyota dealer as soon as possible:
D The SRS airbags have been inflated.
D The front part of the vehicle (shaded in the illustration) was involved in an accident that was not severe enough to cause the SRS airbags to inflate.
D The pad section of the steering wheel or front passenger airbag cover (shaded in the illustration) is scratched, cracked, or otherwise damaged.
NOTICE
Do not disconnect the battery cables before contacting your Toyota dealer.
SRS side airbags
The SRS (Supplemental Restraint System) side airbags are designed to provide further protection for the driver and front passenger in addition to the primary safety protection provided by the seat belts.
In response to a severe side impact, the SRS side airbags work together with the seat belts to help reduce injury by inflating. The SRS side airbags help to reduce injuries mainly to the driver’s or front passenger’s chest. The SRS side airbag on the passenger seat is activated even with no passenger in the front seat.
Be sure to wear your seat belt.
Your vehicle is equipped with a crash sensing and diagnostic module, which will record the use of the seat belt restraint system by the driver when the SRS side airbags inflated.
 CAUTION
SRS side airbags inflate with considerable force. To avoid potential death or serious injury when they inflate, the driver and front passenger must:
D Wear their seat belts.
D Remain properly seated with their back upright and against the seat at all times.
|
2001MY_COROLLA_U (OM12720U) |
43 |

’01 Corolla U (L/O 0005)
This indicator comes on when the ignition key is turned to the ACC» orON» position. It goes off after about 6 seconds. This means the SRS side airbags are operating properly.
This warning light system monitors the airbag sensor assembly, side airbag sensor assemblies, inflators, warning light, interconnecting wiring and power sources. (For details, see Service reminder indicators and warning buzzers» in Section 1−5.)
The SRS side airbag system may not inflate if the vehicle is subjected to a collision from the side at certain angles, or a collision to the side of the vehicle body other than the passenger compartment as shown in the illustration.
The SRS side airbags are designed to inflate when the passenger compartment area suffers a severe impact from the side.
For the safety of all occupants, always wear your seat belts.
Collision from the rear
Collision from the front
Vehicle rollover
The SRS side airbags are not designed to inflate if the vehicle is involved in a front or rear collision, if it rolls over, or if it is involved in a low−speed side collision.
|
44 |
2001MY_COROLLA_U (OM12720U) |

’01 Corolla U (L/O 0005)
The SRS side airbag system consists mainly of the following components, and their locations are shown in the illustration.
1.SRS warning light
2.Side airbag modules (airbag and inflator)
3.Side airbag sensor assemblies
4.Airbag sensor assembly
The SRS side airbag system is controlled by the airbag sensor assembly. The airbag sensor assembly consists of a safing sensor and airbag sensor.
In a severe side impact, the side airbag sensor triggers the side airbag inflators. Then a chemical reaction in the inflators quickly fills the airbags with non−toxic gas to help restrain the lateral motion of the occupants.
When the airbags inflate, they produce a fairly loud noise and release some smoke and residue along with non−toxic gas. This does not indicate a fire. This gas is normally harmless; however, for those who have delicate skin, it may cause a minor skin irritation. Be sure to wash off any residue as soon as possible to prevent any potential skin irritation.
Deployment of the airbags happens in a fraction of a second, so the airbags must inflate with considerable force. While the system is designed to reduce serious injuries, it may also cause minor burns or abrasions and swelling.
Front seats may be hot for several minutes, but the airbags themselves will not be hot. The airbags are designed to inflate only once.
 CAUTION
D The SRS side airbag system is designed only as a supplement to the primary protection of the driver side and front passenger side seat belt systems. To ensure maximum protection in an accident, the driver and all passengers in the vehicle must wear their seat belts. Wearing a seat belt during an accident reduces the chances of death or serious injury or being thrown out of the vehicle. For instructions and precautions concerning the seat belt system, see Seat belts» in this section.
|
2001MY_COROLLA_U (OM12720U) |
45 |

’01 Corolla U (L/O 0005)
D Improperly seated and/or restrained infants and children can be killed or seriously injured by a deploying airbag. An infant or child who is too small to use a seat belt should be properly secured using a child restraint system. Toyota strongly recommends that all infants and children be placed in the rear seat of the vehicle and properly restrained. The rear seat is the safest for infants and children. For instructions concerning the installation of a child restraint system, seeChild restraint» in this section.
D Do not allow a child to lean his/her head or any part of his/her body against the front door or the area of the seat from which the side airbag deploys even if he/she is seated in the child restraint system. It is dangerous if the side airbag inflates, and the impact could cause death or serious injury to the child. For instructions concerning the installation of a child restraint system, see Child restraint» in this section.
D Do not lean against the front door when the vehicle is in use. The side airbag inflates with considerable speed and force; you may be killed or be seriously injured.
|
D Do not |
apply |
excessive weight to |
|
the outer side of the front seats on |
||
|
vehicles |
with |
side airbags. |
D Do not attach a cup holder or any other device or object on or around the door. When the side airbag inflates, the cup holder or any other device or object will be thrown with great force or the side airbag may not activate correctly, resulting in death or serious injury. Likewise, the driver and front passenger should not hold things in their arms or on their knees.
|
46 |
2001MY_COROLLA_U (OM12720U) |
 Loading…
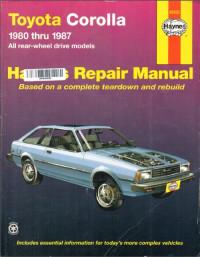
Руководство на английском языке по техническому обслуживанию и ремонту автомобиля Toyota Corolla 1980-1987 годов выпуска.
- Автор: —
- Издательство: Haynes Publishing
- Год издания: 1990
- Страниц: 339
- Формат: PDF
- Размер: 489 Mb
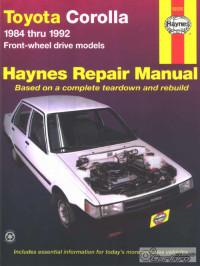
Руководство на английском языке по техническому обслуживанию и ремонту автомобиля Toyota Corolla 1984-1992 годов выпуска.
- Автор: —
- Издательство: Haynes Publishing
- Год издания: —
- Страниц: 291
- Формат: PDF
- Размер: 111,2 Mb
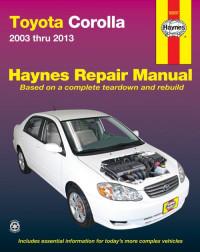
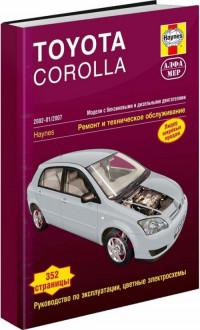
Руководство на английском языке по техническому обслуживанию и ремонту автомобиля Toyota Corolla 2003-2008 годов выпуска.
- Автор: —
- Издательство: Haynes Publishing
- Год издания: —
- Страниц: 244
- Формат: PDF
- Размер: 105,1 Mb

Руководство на английском языке по техническому обслуживанию и ремонту автомобиля Toyota Corolla 1997-2002 годов выпуска с бензиновыми двигателями.
- Автор: —
- Издательство: Haynes Publishing
- Год издания: 2006
- Страниц: 278
- Формат: PDF
- Размер: 33,9 Mb
Сборник руководств на английском языке по техническому обслуживанию и ремонту автомобиля Toyota Corolla 2004 года выпуска.
- Автор: —
- Издательство: Toyota Motor Corporation
- Год издания: —
- Страниц: —
- Формат: PDF
- Размер: 29,6 Mb
Сборник руководств на английском языке по техническому обслуживанию и ремонту автомобиля Toyota Corolla 2009-2010 годов выпуска.
- Автор: —
- Издательство: Toyota Motor Corporation
- Год издания: —
- Страниц: —
- Формат: PDF
- Размер: 272,4 Mb
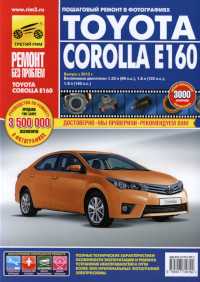
Руководство по эксплуатации, техническому обслуживанию и ремонту автомобилей Toyota Corolla с 2013 года выпуска с бензиновыми двигателями объемом 1,3/1,6/1,8 л.
- Автор: —
- Издательство: Третий Рим
- Год издания: —
- Страниц: 328
- Формат: —
- Размер: —
Руководство по эксплуатации, техническому обслуживанию и ремонту автомобиля Toyota Corolla 2002-2007 годов выпуска с бензиновыми и дизельными двигателями.
- Автор: —
- Издательство: Алфамер
- Год издания: —
- Страниц: 352
- Формат: —
- Размер: —
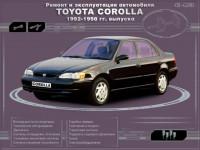
Мультимедийное руководство по эксплуатации и ремонту автомобиля Toyota Corolla 1992-1998 годов выпуска.
- Автор: —
- Издательство: —
- Год издания: —
- Страниц: —
- Формат: —
- Размер: 223,0 Mb
Руководство по эксплуатации и техническому обслуживанию автомобиля Toyota Corolla 2001-2006 годов выпуска.
- Автор: —
- Издательство: Toyota Motor Corporation
- Год издания: 2006
- Страниц: 320
- Формат: PDF
- Размер: 42,4 Mb
Руководство по эксплуатации и техническому обслуживанию автомобиля Toyota Corolla с 2007 года выпуска.
- Автор: —
- Издательство: Toyota Motor Corporation
- Год издания: 2006
- Страниц: 400
- Формат: PDF
- Размер: 33,6 Mb
Мультимедийное руководство по техническому обслуживанию и ремонту автомобиля Toyota Corolla с 2002 года выпуска.
- Автор: —
- Издательство: —
- Год издания: —
- Страниц: —
- Формат: CHM
- Размер: 293,8 Mb
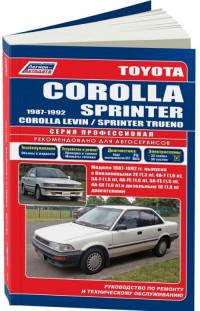
Руководство по техническому обслуживанию и ремонту автомобилей Toyota Corolla/Corolla Levin/Sprinter/Sprinter Trueno 1987-1992 годов выпуска с бензиновыми и дизельными двигателями.
- Автор: —
- Издательство: Легион-Автодата
- Год издания: —
- Страниц: 352
- Формат: —
- Размер: —
Руководство по эксплуатации, техническому обслуживанию и ремонту автомобилей Toyota Corolla/Corolla Levin/Corolla Ceres/Sprinter/Sprinter Marino/Sprinter Trueno 1991-2002 годов выпуска с бензиновыми и дизельными двигателями.
- Автор: —
- Издательство: Легион-Автодата
- Год издания: —
- Страниц: 544
- Формат: —
- Размер: —
Руководство по эксплуатации, техническому обслуживанию и ремонту автомобилей Toyota Allex/Corolla/Corolla Fielder/Corolla Runx 2000-2006 годов выпуска с бензиновыми двигателями объемом 1,3/1,5/1,8 л.
- Автор: —
- Издательство: Легион-Автодата
- Год издания: —
- Страниц: 408
- Формат: —
- Размер: —
Руководство по техническому обслуживанию и ремонту автомобиля Toyota Corolla 2001-2006 годов выпуска с бензиновыми двигателями объемом 1,4/1,6/1,8 л.
- Автор: —
- Издательство: Легион-Автодата
- Год издания: —
- Страниц: 392
- Формат: —
- Размер: —
Руководство по эксплуатации, техническому обслуживанию и ремонту + каталог расходных запчастей автомобилей Toyota Auris 2007-2012 и Toyota Corolla 2006-2013 годов выпуска с бензиновыми двигателями объемом 1,3/1,4/1,6 л. В книге представлены модели с левым расположением руля.
- Автор: —
- Издательство: Легион-Автодата
- Год издания: —
- Страниц: 598
- Формат: —
- Размер: —
Руководство по эксплуатации, техническому обслуживанию и ремонту автомобилей Toyota Corolla Axio и Toyota Corolla Fielder 2006-2012 годов выпуска с бензиновыми двигателями объемом 1,5/1,8 л.
- Автор: —
- Издательство: Легион-Автодата
- Год издания: —
- Страниц: 424
- Формат: —
- Размер: —
Руководство по эксплуатации и ремонту автомобиля Toyota Corolla 2001-2006 годов выпуска с бензиновыми и дизельными двигателями.
- Автор: —
- Издательство: Монолит
- Год издания: —
- Страниц: 342
- Формат: —
- Размер: —
Руководство по эксплуатации, техническому обслуживанию и ремонту автомобилей Toyota Allex/Corolla/Corolla Fielder/Corolla Runx с 2001 года выпуска.
- Автор: —
- Издательство: Монолит
- Год издания: —
- Страниц: 260
- Формат: —
- Размер: —
Руководство по эксплуатации и ремонту автомобилей Toyota Auris и Toyota Corolla с 2007 года выпуска с бензиновыми и дизельными двигателями.
- Автор: —
- Издательство: Монолит
- Год издания: —
- Страниц: 464
- Формат: —
- Размер: —
Руководство по эксплуатации и ремонту автомобиля Toyota Corolla с 2013 года выпуска с бензиновыми и дизельными двигателями.
- Автор: —
- Издательство: Монолит
- Год издания: —
- Страниц: 618
- Формат: —
- Размер: —

Руководство по эксплуатации и ремонту автомобиля Toyota Corolla с 2013 года выпуска с бензиновыми и дизельными двигателями.
- Автор: —
- Издательство: Монолит
- Год издания: —
- Страниц: 628
- Формат: —
- Размер: —
Руководство по эксплуатации, техническому обслуживанию и ремонту автомобиля Toyota Corolla 1983-1992 годов выпуска с бензиновыми и дизельными двигателями.
- Автор: —
- Издательство: Машсервис
- Год издания: 1998
- Страниц: 166
- Формат: PDF
- Размер: 77,4 Mb
Руководство по эксплуатации и техническому обслуживанию автомобилей Toyota Auris/Corolla/Corolla Verso.
- Автор: —
- Издательство: За рулем
- Год издания: —
- Страниц: 214
- Формат: PDF
- Размер: 35,5 Mb
Руководство по эксплуатации, техническому обслуживанию и ремонту автомобиля Toyota Corolla 2000-2007 годов выпуска с бензиновыми и дизельными двигателями.
- Автор: —
- Издательство: Арго-Авто
- Год издания: —
- Страниц: 624
- Формат: —
- Размер: —
Руководство по эксплуатации, техническому обслуживанию и ремонту автомобилей Toyota Auris/Corolla/Corolla Axio/Corolla Fielder с 2006 года выпуска с бензиновыми и дизельными двигателями.
- Автор: —
- Издательство: Арго-Авто
- Год издания: —
- Страниц: 720
- Формат: —
- Размер: —
Руководство по техническому обслуживанию и ремонту автомобиля Toyota Corolla 1983-1992 годов выпуска.
- Автор: —
- Издательство: Аринас
- Год издания: 1995
- Страниц: 313
- Формат: PDF
- Размер: 124,0 Mb
Руководство по техническому обслуживанию и ремонту автомобилей Toyota Corolla/Corolla Levin/Sprinter/Sprinter Trueno 1995-2000 годов выпуска, праворульные модели с бензиновыми и дизельными двигателями.
- Автор: —
- Издательство: Легион-Автодата
- Год издания: —
- Страниц: 432
- Формат: —
- Размер: —
Руководство по техническому обслуживанию и ремонту автомобиля Toyota Corolla 1997-2001 годов выпуска, леворульные модели с бензиновыми двигателями объемом 1,3/1,4/1,6 л.
- Автор: —
- Издательство: Легион-Автодата
- Год издания: —
- Страниц: 480
- Формат: —
- Размер: —

Руководство по эксплуатации и ремонту автомобиля Toyota Corolla с 2019 года выпуска с бензиновым двигателем объемом 1,6 л.
- Автор: —
- Издательство: Монолит
- Год издания: —
- Страниц: 438
- Формат: —
- Размер: —
Руководство по эксплуатации, техническому обслуживанию и ремонту автомобилей Toyota Corolla с 2013 года выпуска с бензиновыми двигателями объемом 1,3/1,6/1,8 л.
- Автор: —
- Издательство: Третий Рим
- Год издания: —
- Страниц: 328
- Формат: —
- Размер: —
Руководство по эксплуатации, техническому обслуживанию и ремонту автомобилей Toyota Auris и Toyota Corolla с 2006 года выпуска.
- Автор: —
- Издательство: Мир Автокниг
- Год издания: —
- Страниц: 440
- Формат: —
- Размер: —

5. Функционирование приборов и органов управления
Фары головного освещения и указатели поворотов
Для включения следующих световых сигналов поверните ручку рычага включения фар головного освещения/указателей поворота.
Стоп-сигнал и задние фонари, подсветка номерного знака и приборной панели.
На некоторых моделях индикатор задних фонарей (зеленый) на приборной панели сообщит вам о том, что задние фары включены.
Фары головного освещения и все указанное выше освещение
На некоторых моделях, однако, все вышеперечисленные сигналы также включаются во время запуска двигателя при выключенных фарах головного освещения.
Отрегулируйте уровень луча света фар перед тем как включить фары.
Если вы извлекли ключ при включенных фарах, зуммер напомнит вам о необходимости выключить фары, когда дверь водителя откроется.
Предупреждение!
Чтобы избежать разрядки аккумуляторной батареи, не оставляйте фары включенными в течение длительного времени при неработающем двигателе.
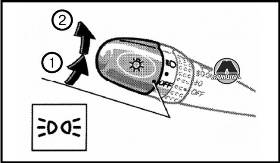
Дальний/ближний свет фар головного освещения
Для дальнего света фар включите фары головного освещения и нажмите рычаг от себя (положение 1).
Для переключения фар на ближний свет потяните рычаг на себя (положение 2).
Сигнальный индикатор (синий) на приборной панели сообщит вам о том, что включен дальний свет фар.
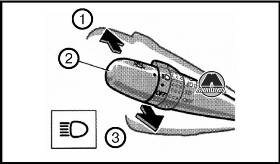
Подача светового сигнала фарами дальнего света (положение 3)
Потяните рычаг назад до упора. Когда вы отпустите рычаг, фары дальнего света выключатся. Вы можете выполнять подачу светового сигнала фарами дальнего света, когда ручка повернута в положение «OFF».
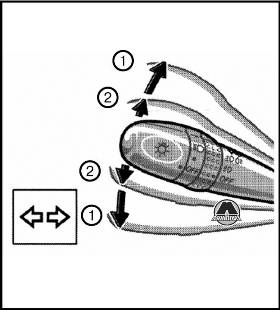
Чтобы включить сигнал поворота, переместите рычаг включения фар головного освещения/указателей поворота вверх или вниз в положение 1.
Ключ должен находиться в положении «ON». Рычаг автоматически вернется в исходное положение после завершения поворота, однако, вам, возможно, понадобится вернуть его в исходное положение рукой после смены полосы движения.
Чтобы включить сигнал смены полосы движения, переместите рычаг вверх или вниз до положения, где почувствуется сопротивление его дальнейшему передвижению (положение 2), и подержите его в этом положении. Если сигнальные индикаторы указателей поворота (зеленые) на приборной панели мигают быстрее, чем обычно, лампочка переднего или заднего указателя поворота перегорела.
Регулятор уровня луча света фар
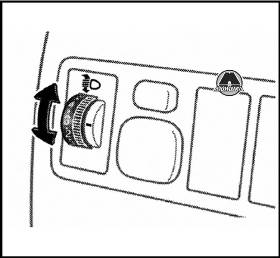
Чтобы отрегулировать уровень луча света фар головного освещения, поверните регулятор.
Ниже приведен перечень примеров правильных установок регулятора. Для условий нагрузки, отличных от приведенных в списке, отрегулируйте положение регулятора так, чтобы уровень луча был такой же, как и в случае, когда в автомобиле находится один водитель. Чем выше номер положения регулятора, тем ниже уровень луча света фар.
Всегда держите луч фар головного освещения на надлежащем уровне в соответствии с условиями нагрузки, в противном случае Ваши передние фары могут слепить других участников движения.
Условие нагрузки и положение регулятора
| Условия нагрузки | Положение регулятора | |
| Модели Sedan | Модели Hatchback | |
| Только водитель или водитель + один пассажир на переднем сидении | 0 | 0 |
| Все пассажиры (включая водителя) | 1,5 | 2 |
| Все пассажиры (включая водителя + полная загрузка багажного отделения) | 2,5 | 3 |
| Водитель + полная загрузка багажного отделения | 4 | 4 |
Световая аварийная сигнализация
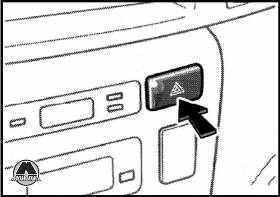
Для включения световой аварийной сигнализации нажмите выключатель.
Все указатели поворота будут мигать. Для их выключения нажмите выключатель еще раз. Световую аварийную сигнализацию следует включать для предупреждения других водителей в случае, если вы вынуждены остановить автомобиль там, где он может представлять опасность для движения транспорта.
В любом случае постарайтесь убрать автомобиль с дороги как можно скорее.
При включенной световой аварийной сигнализации выключатель указателей сигналов поворота не действует.
Предупреждение!
Чтобы избежать разрядки аккумуляторной батареи не оставляйте выключатель во включенном положении дольше, чем нужно, при неработающем двигателе.
Передние и задняя противотуманные фары
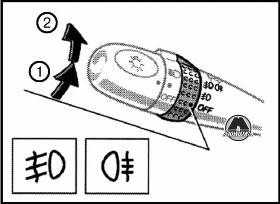
Чтобы включить следующие фары, поверните ободок рычага включения фар головного освещения/указателей поворота при включенных задних и/или передних фарах.
Передние противотуманные фары Индикатор передних противотуманных фар на приборной панели сообщит вам о том, что передние противотуманные фары включены.
Передние противотуманные фары и задняя противотуманная фара
Индикаторы передних и задней противотуманных фар на приборной панели сообщат вам о том, что передние и задняя противотуманные фары включены.
Передние и задняя противотуманные фары выключаются автоматически при выключении всех других фар.
После перевода выключателя передних фар в положение выключения задняя противотуманная фара не включается, даже если вы снова переведете выключатель фар головного освещения в положение включения.
Чтобы снова включить заднюю противотуманную фару, поверните ободок рычага включения фар головного освещения/указателей поворота при указанных выше условиях.
Задняя противотуманная фара
Чтобы включить заднюю противотуманную фару, поверните ободок рычага включения головного освещения/указателей поворота. Она включится при включенных передних фарах. Индикатор задней противотуманной фары на приборной панели сообщит вам о том, что задняя противотуманная фара включена. Задняя противотуманная фара выключается автоматически при выключении все других фар. После перевода выключателя передних фар в положение выключения задняя противотуманная фара не включается, даже если вы снова переведете выключатель фар головного освещении в положение включения.
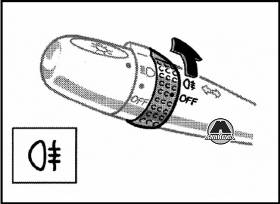
Чтобы включить заднюю противотуманную фару, поверните ободок рычага головного освещения/указателей поворота в положение задней противотуманной фары снова при указанных выше условиях.

Чтобы включить внутреннее освещение, передвиньте выключатель.
Выключатель внутреннего освещения имеет следующие положения:
«ON» — освещение остается включенным все время.
«OFF» — освещение выключено.
«DOOR» — освещение включается при открытии любой боковой или задней двери. Освещение выключается, когда все боковые двери и задняя дверь закрыты.
Автомобили с противоугонной системой
Если система активизирована, когда выключатель внутреннего освещения в положении «DOOR», внутреннее освещение включается.
Система подсветки при открытии дверей (автомобили с системой дистанционного управления)
Когда выключатель в положении «DOOR», освещение включается при открытии любой из боковых дверей или задней двери. После закрытия всех дверей освещение остается приблизительно на 15 секунд, а затем выключается.
Однако в следующих случаях освещение выключается немедленно.
— Все боковые двери и задняя дверь закрываются, когда ключ зажигания находится в положении «ON».
— Ключ зажигания поворачивается в положение «ON», когда все боковые двери и задняя дверь закрыты.
— Все боковые двери и задняя дверь закрываются, а дверь водителя запирается
— Когда все боковые двери и задняя дверь одновременно отпираются при помощи ключа (автомобили без системы двойной блокировки) или дистанционного управления, освещение включается приблизительно на 15 секунд и затем выключается.
Функция задержки выключения внутреннего освещения (автомобили с системой дистанционного управления)
Если вы извлекаете ключ, а внутреннее освещение остается включенным при выключателе в положении «DOOR», оно автоматически выключится через 20 минут. Если вы откроете любую из закрытых дверей, когда система в работе, система переустановится.
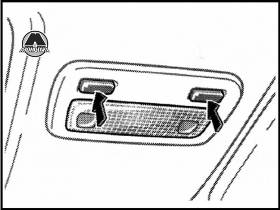
Автомобили, не оснащенные люком с сервоприводом
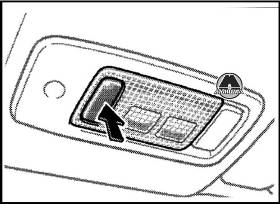
Автомобили, оснащенные люком с сервоприводом
Чтобы включить персональное освещение, нажмите на выключатель. Чтобы выключить его, нажмите на выключатель еще раз.
Подсветка багажного отделения (автомобили модели Hatchback)
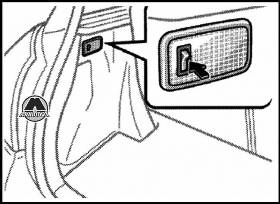
Чтобы включить освещение багажного отделения, откройте заднюю дверь и нажмите на выключатель.
Чтобы выключить освещение багажного отделения, закройте заднюю дверь.
Стеклоочистители и омыватель ветрового стекла (с регулятором интервала)
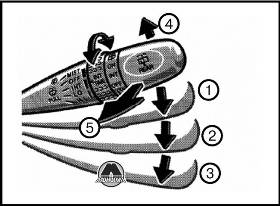
Для очистки стекла передвиньте рычаг в желаемое положение.
Ключ должен находиться в положении «ON».
Положение рычага Работа
Положение 1 — периодичный ход
Положение 2 — низкая скорость
Положение 3 — высокая скорость
Положение 4 — однократный ход
Положение 5 — включение омывателя
Ободок «INT TIME» позволяет вам регулировать интервал работы стеклоочистителя, когда рычаг находится в положении периодичного хода (положение 1). Поверните ободок вверх, чтобы увеличить интервал между движениями, и вниз, чтобы уменьшить его.
Чтобы активировать омыватель потяните рычаг на себя (положение 5). Если стеклоочистители ветрового стекла выключены, они сработают несколько раз после распыления жидкости омывателя.
В морозную погоду перед использованием омывателя подогрейте ветровое стекло с помощью антиобледенителя. Это предотвратит замерзание жидкости омывателя на вашем ветровом стекле, что может препятствовать обзору.
Предупреждение!
Не допускайте работы стеклоочистителей при сухом ветровом стекле. При этом стекло может поцарапаться.
Стеклоочистители и омыватель ветрового стекла (с датчиком дождя)
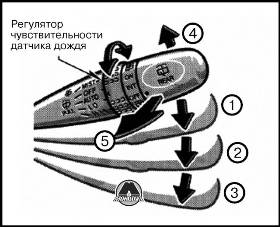
Для включения стеклоочистителей ветрового стекла передвиньте рычаг в желаемое положение. Ключ должен находиться в положении «ON».
Положение 5 — включение омывателя
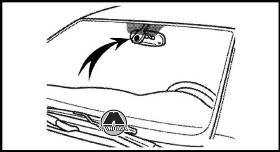
Работа датчика дождя (положение 1)
Скорость стеклоочистителей зависит от количества дождевых капель и солнечного света, определяемого датчиком дождя, который находится на внутренней стороне ветрового стекла, как показано выше. Вы можете регулировать чувствительность датчика дождя, поворачивая регулятор в направлении «-», что требует большее количество дождевых капель для начала работы стеклоочистителей, или в направлении «+», что требует меньшее количество дождевых капель для начала работы стеклоочистителей.
Если зажигание выключено, когда рычаг стеклоочистителей в положении 1, а затем включено снова, режима работы датчика дождя может не начаться, даже если на ветровом стекле есть дождевые капли. В этом случае переведите рычаг в другое положение и снова верните его в положение 1.
Предупреждение!
Будьте внимательны, чтобы не защемить Ваши пальцы между стеклоочистителями и ветровым стеклом.
Когда рычаг стеклоочистителей в положении 1 при включенном зажигании, стеклоочистители могут сработать автоматически в следующих случаях:
— Если вы задеваете верхнюю центральную часть ветрового стекла вблизи датчика.
— Если вы вытираете верхнюю центральную часть ветрового стекла (вблизи которой находится датчик) полотенцем или другим предметом.
— Если ветровое стекло подвержено вибрации.
— Если вы задеваете датчик.
Предупреждение!
— Не допускайте попадания чистящего средства или влаги на датчик дождя при чистке внутренней стороны ветрового стекла.
— Не пропускайте автомобиль через автоматическую мойку с рычагом стеклоочистителей в положении 1. Стеклоочистители могут начать работать и повредиться.
Стеклоочиститель и омыватель заднего окна (модели автомобилей Hatchback)
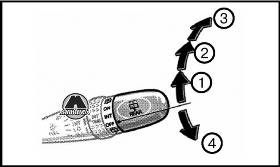
Чтобы включить стеклоочиститель заднего окна, поверните ручку рычага вверх. Ключ должен находиться в положении «ON».
Положение 1 — периодический ход
Положение 2 — нормальная работа
Чтобы активировать омыватель поверните ручку вверх или вниз до упора (положение 3 или 4). Ручка автоматически вернется в исходное положение, как только вы ее отпустите.
Предупреждение!
Не допускайте работы стеклоочистителей при сухом стекле. При этом стекло может поцарапаться.
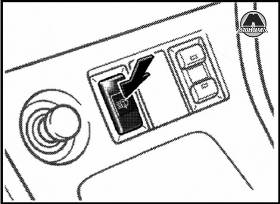
Чтобы активировать омыватель фар, включите фары и нажмите на выключатель. Ключ должен находиться в положении «ON».
Почаще проверяйте уровень жидкости в прозрачном бачке для жидкости омывателя фар. Используйте жидкость омывателя для наполнения.
Предупреждение!
Не включайте омыватель фар при пустом бачке жидкости омывателя. Это может привести к перегреву сервопривода омывателя.
Подогрев заднего окна и внешних зеркал
Для устранения запотевания или обледенения заднего окна нажмите на выключатель.
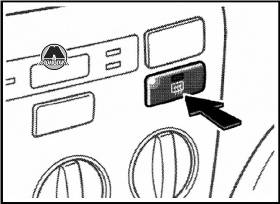
Модели автомобилей, оснащенные системой кондиционирования с ручным управлением
Тонкие провода обогревателя на внутренней стороне заднего окна быстро очистят поверхность окна. Сигнальный индикатор загорится, чтобы показать, что подогрев работает. На некоторых моделях панели обогревателя в наружных зеркалах заднего вида также быстро очистят поверхности зеркал. Нажмите выключатель еще раз для выключения подогрева. С таймером: Система автоматически выключится, после того как подогрев проработает приблизительно 15 минут.
Предупреждение!
На некоторых моделях, когда подогрев включен, не прикасайтесь к поверхности зеркал, т.к. они могут стать горячими.
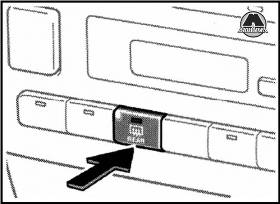
Модели автомобилей, оснащенные системой кондиционирования с автоматическим управлением
Система кондиционирования с ручным управлением
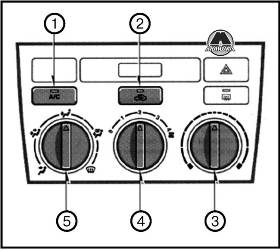
1. Кнопка «А/С» (на некоторых моделях)
2. Селектор режима забора воздуха
3. Селектор температуры
4. Селектор скорости вентилятора
5. Селектор воздушного потока
Селектор скорости вентилятора
Поверните ручку для регулировки скорости вентилятора (вправо — для увеличения, влево — для уменьшения).
Поверните ручку для регулировки температуры (вправо — для повышения температуры, влево — для понижения).
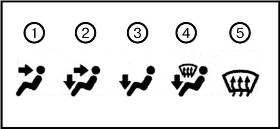
Селектор воздушного потока
Поверните ручку для выбора вентиляционных отверстий, используемых для воздушного потока.
1. Панель
Воздух подается главным образом через вентиляционные отверстия приборной панели.
2. Два уровня
Воздух подается как через вентиляционные отверстия пола, так и через вентиляционные отверстия приборной панели.
3. Пол
Воздух подается главным образом через вентиляционные отверстия пола. На некоторых моделях при обогреве через центральные вентиляционные отверстия поступает также и не нагретый воздух.
4. Пол/Ветровое стекло
Воздух подается главным образом через вентиляционные отверстия пола и ветрового стекла. На некоторых моделях при обогреве через центральные вентиляционные отверстия поступает также и не нагретый воздух.
5. Ветровое стекло
Воздух подается главным образом через вентиляционные отверстия ветрового стекла. На некоторых моделях при обогреве через центральные вентиляционные отверстия поступает также и не нагретый воздух. Это положение позволяет воздухозаборнику автоматически выбирать режим внешнего забора воздуха. Это предназначено для более быстрого очищения ветрового стекла от конденсата
Если вы желаете вернуть установку в режим рециркуляции, нажмите на кнопку селектора воздухозаборника еще раз.
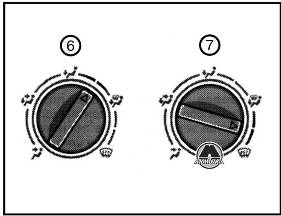
6. Между положениями Пол и Пол/Ветровое стекло Воздух подается главным образом через вентиляционные отверстия пола.
7. Между положениями Пол/Ветровое стекло, и Ветровое стекло
Воздух подается главным образом через вентиляционные отверстия ветрового стекла.
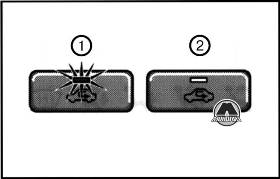
Селектор режима забора воздуха
Нажмите на кнопку для выбора необходимого режима забора воздуха.
1. Режим рециркуляции воздуха (световой индикатор горит) — воздух циркулирует внутри автомобиля.
2. Режим внешнего забора воздуха (световой индикатор не горит) — свежий воздух подается в систему.
Для предотвращения запотевания ветрового стекла режим воздухозаборника может автоматически переключиться в режим забора внешнего воздуха в зависимости от состояния системы кондиционирования воздуха.
Если вы желаете переключить установку в режим рециркуляции, нажмите на кнопку селектора воздухозаборника еще раз.
Нажмите на кнопку «А/С» для включения кондиционирования воздуха. Сигнальный индикатор кнопки «А/С» загорится. Для выключения кондиционирования воздуха нажмите на эту кнопку еще раз.
На некоторых моделях—Если сигнальный индикатор кнопки «А/С» мигает, имеется проблема в системе кондиционирования воздуха, и система кондиционирования воздуха автоматически выключается. Если это произошло, доставьте ваш автомобиль к любому авторизованному дилеру или ремонтнику фирмы Toyota или другому соответствующему требованиям профессионалу для технического обслуживания.
Система кондиционирования воздуха с автоматическим управлением
1. Селектор скорости вентилятора
2. Кнопка «ТЕМР»
3. Кнопка «AUTO»
4. Кнопка «OFF»
5. Селектор режима забора воздуха
6. Кнопка «MODE» (селектор воздушного потока)
7. Кнопка подачи воздуха на ветровое стекло
8. Кнопка«А/С»
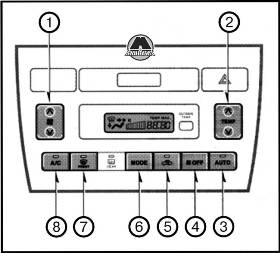
Чтобы переключить систему кондиционирования воздуха в режим автоматической работы, нажмите на кнопку «AUTO». Загорится индикатор, указывающий на то, что выбран режим автоматической работы. В режиме автоматической работы система кондиционирования воздуха выбирает оптимальные скорость вентилятора, воздушный поток, установку режима забора воздуха и включение-выключение кондиционирования воздуха в соответствии с температурой. Если вы нажмете на кнопку «AUTO», когда включен режим внешнего забора воздуха, может быть использован режим рециркуляции для максимального охлаждения.
Можно использовать ручную регулировку, если вы желаете выбрать собственные установки. Чтобы выключить автоматическую работу, нажмите на кнопку селектора воздушного потока или кнопку селектора скорости вентилятора.
Для регулирования скорости вентилятора нажмите на кнопку (увеличить) или «V» (уменьшить).
При автоматической работе регулирование скорости вентилятора необходимо, только если вы желаете установить другую скорость вентилятора.
Чтобы увеличить температуру, нажмите на сторону «Д», а чтобы уменьшить температуру, нажмите на сторону «V».
При установке на максимальное охлаждение на дисплее появляется «МАХ. COLD», а при установке на максимальное обогревание на дисплее появляется «МАХ. НОТ».
Нажмите на эту кнопку, чтобы выключить систему кондиционирования воздуха.

Кнопка «MODE» (селектор воздушного потока)
Нажмите на кнопку «MODE», чтобы выбрать вентиляционные отверстия для подачи воздуха. При автоматической работе выбор вентиляционных отверстий для подачи воздуха необходим, только если вы желаете установить другой режим воздушного потока.
Воздух подается главным образом через вентиляционные отверстия пола.
Воздух подается главным образом через вентиляционные отверстия пола и ветрового стекла.
Кнопка подачи воздуха на ветровое стекло
При нажатии на эту кнопку воздух подается главным образом через вентиляционные отверстия ветрового стекла, и автоматически устанавливается режим внешнего забора воздуха. Эта установка быстрее очищает ветровое стекло от конденсата. Если вы желаете вернуть установку в режим рециркуляции, нажмите на кнопку селектора режима забора воздуха еще раз.
При повторном нажатии на эту кнопку режим воздушного потока возвращается в исходное положение.
Нажатие на кнопку ветрового стекла включает кондиционирование воздуха, связанное с антиобледенителями. В этом случае индикатор кнопки «А/С» загорается независимо от того, нажата ли кнопка «А/С». Это предназначено для более быстрого очищения ветрового стекла. Чтобы выключить только кондиционирование воздуха, нажмите на кнопку «А/С» еще раз. Когда кнопка «А/С» не нажата, нажатие на другую кнопку воздушного потока выключает кондиционирование воздуха.
Селектор режима забора воздуха