
Характеристики
-
Свойства IP-телефонов
-
100 Мбит/с, Fast Ethernet, 1 Гбит/с, Gigabit Ethernet
-
Поддержка PoE, Web-интерфейс
-
Программируемые BLF клавиши
Описание
Avaya J179 — многофункционвальный IP-телефон оснащен 4 программными клавишами, качеством звука высокой четкости, встроенным интерфейсом Gigabit Ethernet, поддерживает Wi-Fi, гарнитуры, а так же до трех 24-кнопочных модулей расширения. IP-телефон J179 использует вашу корпоративную IP-сеть для доставки сложных голосовых сообщений из головного офиса, удаленных мест или домашних офисов.
IP-телефон Avaya J179 тесно интегрирован с АТС Avaya Aura и мини АТС Avaya IP Office, он оптимизирует коммуникации благодаря гибкой архитектуре, которая использует существующие инвестиции и учитывает изменяющиеся потребности бизнеса. Стоимость телефона Avaya J179 высока, но цена вполне конкурентная с аналогичными моделями других производителей, кроме того, благодаря поддержке телефоном протокола IP телефонии SIP, аппарат можно использовать с другими АТС.
Характеристики телефона Avaya J179
- Цветной дисплей — 7,0 см х 5,3 см, с диагональю: 8,8 см
- 8 кнопок с двойными светодиодами (красный, зеленый)
- 4 функциональных клавиши
- Отдельные клавиши: сообщений, контактов, истории, home, навигации, гарнитуры, динамика, громкости, отключения звука.
- Светодиоды для динамиков, отключения звука, гарнитуры, сообщения, истории.
- 24 административных клавиш
- Широкополосный звук в телефонной трубке и гарнитуре
- Полнодуплексная громкая связь
- Эргономичная телефонная трубка, поддерживающая слуховой аппарат, поддерживает TTD-акустический соединитель
- Индикатор ожидания сообщения
- Кнопка Mute с дополнительным отключением
- Информация о вызове IC с 360-градусной видимостью
- Популярные, классические, альтернативные и загружаемые мелодии звонка
- Двухпозиционная стойка, дополнительное настенное крепление.
- Линейный интерфейс Gigabit Ethernet (10/100/1000)
- Второй интерфейс Ethernet 10/100/1000 Мбит / с
- Класс PoE (IEEE 802.3af) регистрируется как устройство класса 1 и поддерживает 802.3az.
- Опциональный источник питания переменного тока до 5 В
- Поддержка протокола SIP
- Поддержка кодеков на основе стандартов: G.711, G.726, G.729A / B, G.722, Opus.
3.0
Rated 3.0 out of 5
3.0 out of 5 stars (based on 1 review)
Your overall rating
AVAYA J179 (01) PDF MANUAL
Click here to download AVAYA J179 (01) PDF MANUAL
AVAYA J179 (01) PDF MANUAL
FREE ENGLISH PDF
OPERATING INSTRUCTIONS
USER GUIDE – USER MANUAL
OWNER GUIDE – OWNER MANUAL
REFERENCE GUIDE – REFERENCE MANUAL
INSTRUCTION GUIDE – INSTRUCTION MANUAL
Your overall rating
- YouTube
AVAYA J179 (01) PDF MANUAL
AVAYA J179 (01) PDF MANUAL

Avaya J100 Series IP Phones
Partner configuration guide for 3CX
April 2019
Document Version 1.0
Contents
|
Introduction to J100 Series IP Phones ……………………………………………………………………………………………. |
4 |
||
|
Supported models……………………………………………………………………………………………………………………. |
4 |
||
|
Deployment |
……………………………………………………………………………………………………………………………….. |
4 |
|
|
Avaya J100 …………………………………………………………..IP Phones with Device Enrolment Service (DES) |
4 |
||
|
Avaya J100 ………………………………………………………………IP Phones with a custom Provisioning Server |
4 |
||
|
Avaya J100 …………………………………………………………………………………………IP Phones with 3CX server |
4 |
||
|
Provisioning ……………………………………………………………………………………………………………………….server |
5 |
||
|
Files on the Provisioning ……………………………………………………………………………………………………..Server |
5 |
||
|
Phone configuration ……………………………………………………………………………………………………………………. |
5 |
||
|
Centralized …………………………………………………………………………………………………………..configuration |
5 |
||
|
System Level ……………………………………………………………………………………………………….Configuration |
5 |
||
|
1.1.1 …………………………………………………………………………………….. |
Configure Network Settings |
6 |
|
|
1.1.2 ……………………………………………………………………………….. |
Configure SIP Interface Settings |
6 |
|
|
1.1.3 ………………………………………………………………………………………. |
Configure Service Settings |
7 |
|
|
1.1.4 ……………………………………………………………………………………… |
Configure J100 Settings file |
7 |
|
|
1.2 |
SIP ……………………………………………………………………………………………….Feature Configuration |
7 |
|
|
1.2.1 ……………………………………………………………………………. |
Registration and P2Pcall with 3CX |
8 |
|
|
1.2.2 ………………………………………………………………………………………………………………… |
Transfer |
9 |
|
|
1.2.3 …………………………………………………………………………………………………………….. |
Call pickup |
9 |
|
|
1.2.4 ………………………………………………………………………………………………………… |
Call Forward |
12 |
|
|
1.2.5 ………………………………………………………………………………………………………….. |
Conference |
14 |
|
|
1.2.6 ……………………………………………………………………………………………………………………. |
MWI |
15 |
|
|
1.2.7 …………………………………………………………………………………………………….. |
Emergency call |
17 |
|
|
1.2.8 ……………………………………………………………………………………………………….. |
DND support |
17 |
|
|
1.2.9 ………………………………………………………………………………………………….. |
SRTP call support |
19 |
|
|
1.2.10 …………………………………………………………………………………………….. |
Call park and unpark |
20 |
|
|
1.2.11 ……………………………………………………………………………………… |
Automatic redial/callback |
21 |
|
|
1.2.12 …………………………………………………………………………………… |
Anonymous calling support |
21 |
|
|
1.2.13 ……………………………………………………………………………………………………… |
DTMF support |
22 |
|
|
1.2.14 ………………………………………………………………………………. |
Busy Lamp Field Configuration |
23 |
|
|
1.2.15 …………………………………………………………….. |
Feature Key Synchronization Configuration |
23 |
|
|
1.2.16 ………………………………………………………………………………… |
Emergency Call Configuration |
23 |
|
|
2 |
|
1.2.17 |
User Service Configuration ……………………………………………………………………………………. |
23 |
|
1.2.18 |
Directory Configuration ………………………………………………………………………………………… |
23 |
|
1.2.19 |
Call Logs Configuration …………………………………………………………………………………………. |
24 |
|
1.2.20 |
Visual Voice Mail Configuration……………………………………………………………………………… |
24 |
3

Introduction to J100 Series IP Phones
Avaya J100 Series IP Phones provide a range of applications and features for unified communications. The phones leverage the enterprise IP network and eliminate the need of a separate voice network. The phones offer superior audio quality with the amplified handsets and customization with low power requirements in a Session Initiation Protocol (SIP) environment.
The phones can be configured
Supported models
Deployment
Avaya J100 IP Phones with Device Enrolment Service (DES)
To ease deployment and to be able to plug in the phone right out of the box and have the phone automatically configure and login it is recommended to use the Device Enrolment Service (DES). DES allows the phone to be automatically pointed to the appropriate Provisioning Server (either custom provisioning server (below) or 3CX server. To use this service, you must have an account on DES. Please see “Installing and Administering Avaya J100 series IP Phone in third-party call control setup” for more information on the DES. Alternatively, the phone can be pointed to the Provisioning Server via DHCP.
Avaya J100 IP Phones with a custom Provisioning Server
You can configure a custom Provisioning Server and use it to provide the configuration files to the phones. The provisioning server hosts the J100Supgrade.txt file, the J100settings.txt file as well as other configuration files (e.g. language, images, certificates) needed to get the phone configured and connected to the network.
Avaya J100 IP Phones with 3CX server
With 3CX server, you can automatically create the appropriate device (J100settings.txt) and user (<MACaddress>.txtspecific configuration files from the management system on the 3CX Provisioning Server. In this configuration, the phone does not require a custom Provisioning Server and connects to the 3CX Provisioning Server instead. For more information specifically related to the 3CX Provisioning service please see the 3CX support portal https://www.3cx.com/support/
4
Provisioning server
The Provisioning Server is an HTTP or an HTTPS server that hosts the phone firmware and configuration files.
Files on the Provisioning Server
|
File name |
Content |
|
J100Supgrade.txt |
Contains pointers to the firmware and upgrade files |
|
J100setting.txt |
Contains the configurable parameters that apply to all devices in a |
|
given deployment |
|
|
<MACaddress>.txt |
Contains configurable parameters that apply to an individual device |
|
in a deployment (typically the username, extension and password) |
|
|
Resource files |
e.g. languages, background and screen saver images, ringtones, |
|
trust certificate files, |
Phone configuration
You can configure Avaya J100 Series IP Phones to work in the 3CX environment in the following ways:
•Centralized configuration using file server
•Configuration through the web interface
Please see “Installing and Administering Avaya J100 series IP Phone in third-party call control setup” for more information on the Configuration through the web interface.
Centralized configuration
You can bulk configure Avaya J100 Series IP Phones by using the 46xxsettings file. The phone can access the settings file via HTTP and HTTPS.
The following configuration files must be available on the file server configured for the devices.
|
Avaya J100 Configuration Files |
Level |
Description |
||
|
J100Supgrade.txt |
System |
Contains the device firmware load. |
||
|
46xxsettings.txt |
System |
Contains configurable parameters that |
||
|
apply to all devices in a given |
||||
|
deployment. |
||||
|
<MACaddress>.txt |
Subscriber |
Contains configurable parameters that |
||
|
apply to an individual device in a |
||||
|
deployment |
||||
System Level Configuration
This section describes system-wide configuration items in the file that are generally required for each Avaya J129 IP Phone to work with. Subscriber-specific settings are described
5

in the next section. For parameter description, see the Installing and Administering Avaya J129 IP Phone in third-party call control setup for J129.
1.1.1 Configure Network Settings
Step
Step 1
Step 2
Step 3
Step 4
Step 5
Command
SET ENABLE_UDP_TRANSPORT 1
SET DNSSRVR “8.8.8.8”
SET DOMAIN “”
SET SNTPSRVR pool.ntp.org
SET SNTP_SYNC_INTERVAL 144000
1.1.2 Configure SIP Interface Settings
Step
Step 3
Step 4
Step 5
Step 6
Step 7
Step 8
Step 9
Step 10
Step 11
Step 12
Step 13
Step 14
Step 15
Step 16
Step 17
Step 18
Step 19
Step 20
Step 21
Step 22
Step 23
Command
SET SIPDOMAIN «3cx.hcm.com«
SET SIP_CONTROLLER_LIST «3cx.hcm.com:5060;transport=tcp» (or udp, tls)
SET ENABLE_G711A 1
SET ENABLE_G711U 1
SET ENABLE_G722 1
SET ENABLE_G726 0
SET G726_PAYLOAD_TYPE 110
SET ENABLE_G729 1
SET ENABLE_OPUS 0
SET SEND_DTMF_TYPE 2
SET DTMF_PAYLOAD_TYPE 120
SET 100REL_SUPPORT 1
SET PLAY_TONE_UNTIL_RTP 1
SET SYMMETRIC_RTP 1
SET REGISTERWAIT 1200
SET WAIT_FOR_UNREGISTRATION_TIMER 32
SET WAIT_FOR_INVITE_RESPONSE_TIMEOUT 60
SET FAILED_SESSION_REMOVAL_TIMER 30
SET TCP_KEEP_ALIVE_STATUS 1
SET TCP_KEEP_ALIVE_TIME 60
SET TCP_KEEP_ALIVE_INTERVAL 10
SET SIP_TIMER_T1 500
SET SIP_TIMER_T2 4000
6

Step 24 SET SIP_TIMER_T4 5000
Step 25 SET ENABLE_SIP_USER_ID 1
Step 26 SET SIMULTANEOUS_REGISTRATIONS 1
Step 27 SET LOCALLY_ENFORCE_PRIVACY_HEADER 1
Step 28 SET ENABLE_STRICT_USER_VALIDATION 0
1.1.3 Configure Service Settings
Step
Step 1
Step 2
Step 3
Step 4
Step 5
Step 6
Step 7
Step 8
Step 9
Step 10
Step 11
Step 12
Step 13
Step 14
Step 15
Command
SET DIALPLAN [23]xxxx|91xxxxxxxxxx|9[2-9]xxxxxxxxx|7xxx
SET NO_DIGITS_TIMEOUT 20
SET INTER_DIGIT_TIMEOUT 5
SET CALLFWDSTAT 7
SET CALLFWDDELAY 1
SET ENABLE_DND 1
SET ENABLE_DND_PRIORITY_OVER_CFU_CFB 0
SET ENABLE_AUTO_ANSWER_SUPPORT 1
SET AUTO_ANSWER_MUTE_ENABLE 1
SET HOLD_REMINDER_TIMER 0
SET CONFERENCE_FACTORY_URI «conference@as.iop2..net»
SET SIPCONFERENCECONTINUE 0
SET PSTN_VM_NUM «*62»
SET SUBSCRIBE_LIST_NON_AVAYA «message-summary»
SET RINGTONESTYLE 0
1.1.4 Configure J100 Settings file
Step
Step 1
Step 2
Step 3
Step 4
Step 5
Step 6
Step 7
Command
SET ENABLE_AVAYA_ENVIRONMENT 0
SET DISCOVER_AVAYA_ENVIRONMENT 0
SET ENABLE_IPOFFICE 0
SET ENABLE_3PCC_ENVIRONMENT 1
SET 3PCC_SERVER_MODE 0
SET SIPDOMAIN «3cx.hcm.com»
SET TRUSTCERTS 3cx.pem
SET SIP_CONTROLLER_LIST «3cx.hcm.com:5060;transport=tcp» (or udp, tls)
1.2 SIP Feature Configuration
This section provides configuration instructions for SIP features supported by the phone.
7
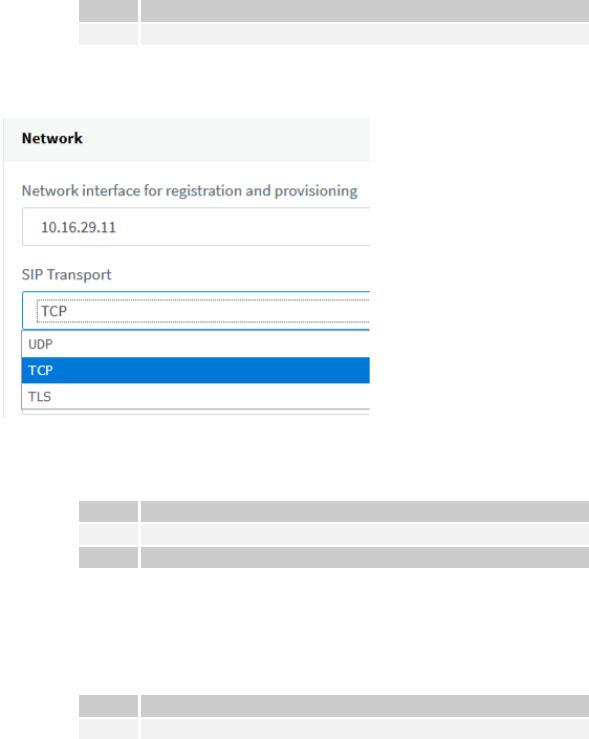
1.2.1 Registration and P2Pcall with 3CX
TCP configuration
Configure J100 Settings file
Step Command
Step 1 SET SIP_CONTROLLER_LIST «3cx.hcm.com:5060;transport=tcp»
In 3Cx server
Step 1: Go to Extensions > «Edit extension xxxx» > Phone Provisioning > SIP Transport: TCP
TLS configuration
Configure J100 Settings file
Step Command
Step 1 SET SIP_CONTROLLER_LIST «3cx.hcm.com:5061;transport=tls»
Step 2 SET TRUSTCERTS 3cx.pem
In 3Cx server
Go to Extensions > «Edit extension xxxx» > Phone Provisioning > SIP Transport: TLS
UDP configuration
Configure J100 Settings file
Step Command
Step 1 J100 settings file: SET SIP_CONTROLLER_LIST «3cx.hcm.com:5060;transport=udp»
In 3CX server
8
 Loading…
На этой странице вы можете совершенно бесплатно скачать Инструкция по эксплуатации Avaya B179 SIP Conference Phone.
У документа PDF Инструкция по эксплуатации 66 страниц, а его размер составляет 5.03 Mb.
Читать онлайн Конференц-телефоны Avaya B179 SIP Conference Phone Инструкция по эксплуатации

Скачать файл PDF «Avaya B179 SIP Conference Phone Инструкция по эксплуатации» (5.03 Mb)
Популярность:
4078 просмотры
Подсчет страниц:
66 страницы
Тип файла:
Размер файла:
5.03 Mb
Прочие инструкции Avaya B179 SIP Conference Phone


Прочие инструкции Avaya Конференц-телефоны




Прочие инструкции Avaya


-
Page 1
Using Avaya J169/J179 IP Phone SIP in third-party call control setup Release 2.0 Issue 2 May 2018… -
Page 2
RESERVES THE RIGHT TO TAKE LEGAL ACTION AGAINST YOU the express behalf of Avaya. End User agrees to indemnify and hold AND ANYONE ELSE USING OR SELLING THE SOFTWARE harmless Avaya, Avaya’s agents, servants and employees against all WITHOUT A LICENSE. -
Page 3
IMPLIED FOR ANY OTHER USE. ADDITIONAL INFORMATION written consent of Avaya can be a criminal, as well as a civil offense FOR H.264 (AVC) AND H.265 (HEVC) CODECS MAY BE under the applicable law. -
Page 4
AC adapters shipped with the equipment or specified by • Increase the separation between the equipment and receiver. Avaya to be used with the equipment. If you use any other equipment, it may cause failures, malfunctioning, • Connect the equipment into an outlet on a circuit different from or fire. -
Page 5
The trademarks, logos and service marks (“Marks”) displayed in this site, the Documentation, Hosted Service(s), and product(s) provided by Avaya are the registered or unregistered Marks of Avaya, its affiliates, its licensors, its suppliers, or other third parties. Users are not permitted to use such Marks without prior written consent from Avaya or such third party which may own the Mark. -
Page 6: Table Of Contents
………………….28 Managing Contacts ………………..33 Managing Conference calls …………………. 35 Managing Call history Chapter 6: Advanced features………………..37 ……………………..37 Features May 2018 Using Avaya J169/J179 IP Phone SIP in third-party call control setup Comments on this document? infodev@avaya.com…
-
Page 7
Enabling and disabling Microsoft Exchange contact synchronization ………………….63 Calendar Settings ………………66 Enabling SAC when DND is active ………………………. 67 Audio May 2018 Using Avaya J169/J179 IP Phone SIP in third-party call control setup Comments on this document? infodev@avaya.com… -
Page 8
Chapter 8: Resources………………….80 ……………………80 Documentation …………. 80 Finding documents on the Avaya Support website ………………..81 Viewing Avaya Mentor videos ……………………..81 Support May 2018 Using Avaya J169/J179 IP Phone SIP in third-party call control setup Comments on this document? infodev@avaya.com… -
Page 9: Chapter 1: Introduction
Purpose This document describes how to use Avaya J169/J179 IP Phonefeatures in third-party call control setup. This document is intended for people who want to learn how to use Avaya J169/J179 IP Phone features and capabilities. May 2018 Using Avaya J169/J179 IP Phone SIP in third-party call control setup…
-
Page 10: Chapter 2: Avaya J169/J179 Phone Overview
The phone supports eight call appearances with four lines of call display. The phone can support up to three button modules, and each button module supports 24 call appearances. The Avaya J169 IP Phone has a grayscale display, and the Avaya J179 IP Phone has a color display. Physical specifications •…
-
Page 11: Physical Layout
Physical layout Physical layout May 2018 Using Avaya J169/J179 IP Phone SIP in third-party call control setup Comments on this document? infodev@avaya.com…
-
Page 12
• (+) : To increases the volume. • (-): To decrease the volume. Mute Button Used to mute and unmute the outgoing audio. May 2018 Using Avaya J169/J179 IP Phone SIP in third-party call control setup Comments on this document? infodev@avaya.com… -
Page 13: Connection Jacks
Displays the entries in your contact list. Recents Displays all call history list. Connection Jacks The following image illustrates the connection jacks that are present on the back panel of Avaya J169/J179 IP Phone. Note: The image schematically describes which device to connect to which jack.
-
Page 14
Avaya J169/J179 phone overview May 2018 Using Avaya J169/J179 IP Phone SIP in third-party call control setup Comments on this document? infodev@avaya.com… -
Page 15: Optional Components
You can use the following optional components with phone: • 5V DC Power adapter • Button module (JBM24) • J100 Wireless Module • GSPPOE — Avaya 48V PoE power inserter May 2018 Using Avaya J169/J179 IP Phone SIP in third-party call control setup Comments on this document? infodev@avaya.com…
-
Page 16: Chapter 3: Getting Started
To enter the dot symbol (.) in the field, press the alphanumeric softkey to toggle to the alphanumeric mode. 6. Press Save. The phone restarts. May 2018 Using Avaya J169/J179 IP Phone SIP in third-party call control setup Comments on this document? infodev@avaya.com…
-
Page 17: Logging In To Your Phone
Logging out of your phone Procedure 1. Press Main menu. 2. Scroll to Applications, and press Select. 3. Scroll to Log Out. May 2018 Using Avaya J169/J179 IP Phone SIP in third-party call control setup Comments on this document? infodev@avaya.com…
-
Page 18
Getting Started 4. Press one of the following: • Select • OK 5. Press Log Out soft key to confirm. May 2018 Using Avaya J169/J179 IP Phone SIP in third-party call control setup Comments on this document? infodev@avaya.com… -
Page 19: Chapter 4: Navigation
Chapter 4: Navigation Main Menu Note: The icons of Avaya J169/J179 IP Phone look similar but Avaya J169 IP Phone has grayscaled icons and the Avaya J179 IP Phone has colored icons Icons Name Description Features To access administrator activated features.
-
Page 20
Team icon indicating this team member is busy on a call and unavailable. Team icon indicating this team member is not on a call, but is forwarding incoming calls. Table continues… May 2018 Using Avaya J169/J179 IP Phone SIP in third-party call control setup Comments on this document? infodev@avaya.com… -
Page 21: Multiple Level Precedence And Preemption Icons
Multiple Level Precedence and Preemption icons The following table lists the icons used in Avaya J169/J179 IP Phone. Note that the icons of Avaya J169/J179 IP Phone look similar but Avaya J169 IP Phone has grayscaled icons and the Avaya…
-
Page 22: Wi-Fi Icons
Indicates that the phone is connected to a secured wireless network. No Wi-Fi signal Indicates that there is no wireless network available May 2018 Using Avaya J169/J179 IP Phone SIP in third-party call control setup Comments on this document? infodev@avaya.com…
-
Page 23: Chapter 5: Call Operations
The phone starts a call when the inter digit timer times out. Redialing a number Before you begin Ensure that the call history is not empty. May 2018 Using Avaya J169/J179 IP Phone SIP in third-party call control setup Comments on this document? infodev@avaya.com…
-
Page 24: Making A Call Using Speed Dial
Use this procedure to make a call from the corporate database Сontacts list. This feature is only ® available in the Avaya Aura environment. May 2018 Using Avaya J169/J179 IP Phone SIP in third-party call control setup Comments on this document? infodev@avaya.com…
-
Page 25: Emergency Call
Making an emergency call Before you begin Ensure that the feature is activated by the administrator. May 2018 Using Avaya J169/J179 IP Phone SIP in third-party call control setup Comments on this document? infodev@avaya.com…
-
Page 26: Making An International Call
• Press the Answer softkey. Answering a call when on another call Procedure Press one of the following: • The Answer softkey May 2018 Using Avaya J169/J179 IP Phone SIP in third-party call control setup Comments on this document? infodev@avaya.com…
-
Page 27: Ignoring A Call
1. To put an active call on hold, press Hold. 2. To resume the call, press one of the following: • Resume • OK May 2018 Using Avaya J169/J179 IP Phone SIP in third-party call control setup Comments on this document? infodev@avaya.com…
-
Page 28: Managing Contacts
About this task Use this procedure to add a number to your Contacts list from your call history. Procedure 1. Press Recents. May 2018 Using Avaya J169/J179 IP Phone SIP in third-party call control setup Comments on this document? infodev@avaya.com…
-
Page 29
2. (Optional) To navigate through Main menu, scroll to the following: a. Applications, and press Select. b. Contacts, and press Select. 3. Select the contact that you want to view. May 2018 Using Avaya J169/J179 IP Phone SIP in third-party call control setup Comments on this document? infodev@avaya.com… -
Page 30
3. Scroll to the contact that you want to combine, and press Details > More > Combine. The select mode displays the Contacts list without the current content. May 2018 Using Avaya J169/J179 IP Phone SIP in third-party call control setup Comments on this document? infodev@avaya.com… -
Page 31
Before you begin • Ensure that your Contacts list is not empty. • Create minimum one local group to add your contacts. May 2018 Using Avaya J169/J179 IP Phone SIP in third-party call control setup Comments on this document? infodev@avaya.com… -
Page 32
Use this procedure to assign a ringtone to a contact. You can only assign a ring tone to a contact that is saved in the Contacts list. Procedure 1. Press Contacts. May 2018 Using Avaya J169/J179 IP Phone SIP in third-party call control setup Comments on this document? infodev@avaya.com… -
Page 33: Managing Conference Calls
Procedure 1. In the Phone screen, select your active call. 2. Press Conf or Add if you are already in a conference. May 2018 Using Avaya J169/J179 IP Phone SIP in third-party call control setup Comments on this document? infodev@avaya.com…
-
Page 34
Depending on which server your extension is configured in, you might not see the details of a conference. If you are not able to view the details of a conference, contact your system administrator. May 2018 Using Avaya J169/J179 IP Phone SIP in third-party call control setup Comments on this document? infodev@avaya.com… -
Page 35: Managing Call History
• Outgoing call icon • Missed call icon • Call type (incoming, outgoing, missed) • Name • Extension number • Time • Date • Duration May 2018 Using Avaya J169/J179 IP Phone SIP in third-party call control setup Comments on this document? infodev@avaya.com…
-
Page 36
4. Select one of the following when the phone prompts for confirmation: • Delete: To delete all entries. • Cancel: To cancel and return to the previous menu. May 2018 Using Avaya J169/J179 IP Phone SIP in third-party call control setup Comments on this document? infodev@avaya.com… -
Page 37: Chapter 6: Advanced Features
™ SLA Mon overview ™ SLA Mon technology is a patented Avaya technology embedded in Avaya products to facilitate ™ advanced diagnostics. The phones support SLA Mon agent which works with Avaya Diagnostic May 2018 Using Avaya J169/J179 IP Phone SIP in third-party call control setup…
-
Page 38: Making A Priority Call
The person who is paged can only hear the announcement. Before you begin Ensure that the feature is activated by the administrator. Procedure 1. Press Main menu, and scroll to Features. May 2018 Using Avaya J169/J179 IP Phone SIP in third-party call control setup Comments on this document? infodev@avaya.com…
-
Page 39: Call Forwarding To Your Cell Phone Using Ec500
A hears the message. Call forwarding to your cell phone using EC500 About this task Use this procedure to receive an incoming call of your Avaya phone on your personal phone, when you are away from your desk. Before you begin •…
-
Page 40: Extending A Call To Your Cell Phone
1. Navigate to the Features screen. 2. Scroll to choose Send All Calls. 3. Press Select or the corresponding line button to activate the feature. May 2018 Using Avaya J169/J179 IP Phone SIP in third-party call control setup Comments on this document? infodev@avaya.com…
-
Page 41: Hunt Group Busy
1. Press Main menu, and scroll to Features. 2. Press one of the following: • Select • OK 3. Scroll to Call Pickup, and press Select. May 2018 Using Avaya J169/J179 IP Phone SIP in third-party call control setup Comments on this document? infodev@avaya.com…
-
Page 42: Call Forward
In the IP Office environment, this feature is supported using short code dialing. Contact your system administrator for the list of short codes. Before you begin Ensure that the feature is activated by your administrator. May 2018 Using Avaya J169/J179 IP Phone SIP in third-party call control setup Comments on this document? infodev@avaya.com…
-
Page 43: Call Parking
Before you begin Ensure that you are on a call. Procedure 1. Press Main Menu. 2. Scroll to Features, and press Select. May 2018 Using Avaya J169/J179 IP Phone SIP in third-party call control setup Comments on this document? infodev@avaya.com…
-
Page 44: Call Transfer
About this task Use this procedure to hold an active call and establish a second call with the call-transfer recipient before transferring the call. May 2018 Using Avaya J169/J179 IP Phone SIP in third-party call control setup Comments on this document? infodev@avaya.com…
-
Page 45
Ensure that the blind transfer feature is activated by your administrator. Procedure 1. While on a call, press Transfer. The phone displays the Enter transfer destination screen. May 2018 Using Avaya J169/J179 IP Phone SIP in third-party call control setup Comments on this document? infodev@avaya.com… -
Page 46: Automatic Callback
When you end the callback call, the phone deactivates the feature automatically. Calling in your intercom group About this task Use this procedure to call a specific extension or intercom group. May 2018 Using Avaya J169/J179 IP Phone SIP in third-party call control setup Comments on this document? infodev@avaya.com…
-
Page 47: Blocking Your Extension From Displaying During Calls
If you used the Calling Party Number (CPN) Block feature to block displaying your extension on the calls you make, you can change it back using CPN Unblock. CPN Unblock allows parties you call see your extension. May 2018 Using Avaya J169/J179 IP Phone SIP in third-party call control setup Comments on this document? infodev@avaya.com…
-
Page 48: Retrieving A Voice Mail
1. Enter the URI extension by using relevant input method for uppercase and lowercase letters, and numbers. 2. Press the Call softkey to make the call. May 2018 Using Avaya J169/J179 IP Phone SIP in third-party call control setup Comments on this document? infodev@avaya.com…
-
Page 49: Tracing A Malicious Call
Team button. Making a precedence call by using Main menu Procedure 1. Press Main menu. 2. Scroll to Applications, and press Select. May 2018 Using Avaya J169/J179 IP Phone SIP in third-party call control setup Comments on this document? infodev@avaya.com…
-
Page 50: Team Button
The override feature ensures that the call made to the monitored phone rings on the monitored phone and is not routed to the redirected number. May 2018 Using Avaya J169/J179 IP Phone SIP in third-party call control setup Comments on this document? infodev@avaya.com…
-
Page 51
• The monitoring phone setting that enables the phone to override the call redirection feature that is active on a monitored phone. ® For more information to set the overriding permission on SMGR, see Administering Avaya Aura System Manager. Answering an active call on a monitored extension Procedure 1. -
Page 52
2. If necessary, scroll to the line button for the extension you want to check. If that extension is in use, the Busy Indicator displays next to the Busy. May 2018 Using Avaya J169/J179 IP Phone SIP in third-party call control setup Comments on this document? infodev@avaya.com… -
Page 53: Bridged Call Appearance
Joining a call on a bridged line Procedure 1. On the phone screen, select an active bridge line number. 2. Press Bridge. May 2018 Using Avaya J169/J179 IP Phone SIP in third-party call control setup Comments on this document? infodev@avaya.com…
-
Page 54: Calendar
3. Scroll to Applications, and press Select. 4. Scroll to Exchange credentials, and press Select. 5. Type the following details: • Exchange username • Exchange password May 2018 Using Avaya J169/J179 IP Phone SIP in third-party call control setup Comments on this document? infodev@avaya.com…
-
Page 55
6. In Calendar Event Month screen, press one of the following: • Today: To view calendar event of the current date. • Day: To view calendar event of the selected day. May 2018 Using Avaya J169/J179 IP Phone SIP in third-party call control setup Comments on this document? infodev@avaya.com… -
Page 56: Using Guest Login
Activating the screen saver Procedure 1. Press Main menu. 2. Press Applications. 3. Scroll down to Activate screen saver, and press Select. May 2018 Using Avaya J169/J179 IP Phone SIP in third-party call control setup Comments on this document? infodev@avaya.com…
-
Page 57: Chapter 7: Customization
Use this procedure to display the duration of calls. Procedure 1. Press Main menu. 2. Scroll to Settings, and press Select. 3. Scroll to Phone, and press Select. May 2018 Using Avaya J169/J179 IP Phone SIP in third-party call control setup Comments on this document? infodev@avaya.com…
-
Page 58: Setting Key Repeat Delay
5. Press Change, and select one of the following: • One Number: To see the last dialed number. • List: To see a list of the recent eight dialed numbers. May 2018 Using Avaya J169/J179 IP Phone SIP in third-party call control setup Comments on this document? infodev@avaya.com…
-
Page 59: Assigning Speed Dial Entries
4. Select Assign speed dial entries. 5. Use the Down Arrow key to go to the Speed Dial contact that you want to replace or clear. May 2018 Using Avaya J169/J179 IP Phone SIP in third-party call control setup Comments on this document? infodev@avaya.com…
-
Page 60: Setting Mute Alert
1. Press Main menu. 2. Scroll to Settings, and press Select. 3. Scroll to Phone, and press Select. 4. Scroll to Visual alerting. May 2018 Using Avaya J169/J179 IP Phone SIP in third-party call control setup Comments on this document? infodev@avaya.com…
-
Page 61: Customizing Phone Keys
Use this procedure to clear customized keys and restore them to administrator settings Procedure 1. Press Main menu. 2. Scroll to Phone, and press Select. 3. Scroll to Phone keys customization, and press Select. May 2018 Using Avaya J169/J179 IP Phone SIP in third-party call control setup Comments on this document? infodev@avaya.com…
-
Page 62: Applications
• Change: To turn on or off the call history. • Right Arrow key: To turn on the call history. • Left Arrow key: To turn off the call history. May 2018 Using Avaya J169/J179 IP Phone SIP in third-party call control setup Comments on this document? infodev@avaya.com…
-
Page 63: Enabling And Disabling Microsoft Exchange Contact Synchronization
• Right Arrow key: To enable Exchange calendar. • Left Arrow key: To disable Exchange calendar. 6. Press one of the following: • Save • OK May 2018 Using Avaya J169/J179 IP Phone SIP in third-party call control setup Comments on this document? infodev@avaya.com…
-
Page 64
• Right Arrow key: To enable reminder tone. • Left Arrow key: To disable reminder tone. 6. Press one of the following: • Save • OK May 2018 Using Avaya J169/J179 IP Phone SIP in third-party call control setup Comments on this document? infodev@avaya.com… -
Page 65
1. Press Main menu. 2. Scroll to Settings, and press Select. 3. Scroll to Applications, and press Select. 4. Scroll to Calendar, and press Select. May 2018 Using Avaya J169/J179 IP Phone SIP in third-party call control setup Comments on this document? infodev@avaya.com… -
Page 66: Enabling Sac When Dnd Is Active
4. Scroll to Presence Integration, and press Select. 5. Scroll to DND invokes SAC. 6. Press Change, and set the value to Yes. 7. Press Save. May 2018 Using Avaya J169/J179 IP Phone SIP in third-party call control setup Comments on this document? infodev@avaya.com…
-
Page 67: Audio
Use this procedure to activate the error tone alarm when you perform an incorrect action while using the phone. Procedure 1. Press Main menu. 2. Scroll to Settings, and press Select. May 2018 Using Avaya J169/J179 IP Phone SIP in third-party call control setup Comments on this document? infodev@avaya.com…
-
Page 68: Setting Headset Mic Level
• Plantronics: EncorePro HW291N/HW301N (HIS) ™ • Sennheiser: Circle SC 230/260 (CAVA-31) ™ Profile 4 • Jabra: BIZ 2400 (GN1216) Table continues… May 2018 Using Avaya J169/J179 IP Phone SIP in third-party call control setup Comments on this document? infodev@avaya.com…
-
Page 69: Configuring Hearing Aid Compatibility
Use the procedure to select the headset profile that best matches the acoustic properties of the headset. Procedure 1. Press Main menu. May 2018 Using Avaya J169/J179 IP Phone SIP in third-party call control setup Comments on this document? infodev@avaya.com…
-
Page 70: Setting A Personalized Ring Tone
• Select • OK 7. Scroll to the ringtone, and press Select. 8. (Optional) To play the ringtone, press Play. 9. Press Save. May 2018 Using Avaya J169/J179 IP Phone SIP in third-party call control setup Comments on this document? infodev@avaya.com…
-
Page 71: Display
5. Scroll to the new image. 6. (Optional) To preview the image, press Preview and then Dismiss. 7. Press one of the following: • Select • OK May 2018 Using Avaya J169/J179 IP Phone SIP in third-party call control setup Comments on this document? infodev@avaya.com…
-
Page 72: Setting Screen Saver Details
• Select • OK The phone displays the following list: • Phone • Name of the button module attached to the phone. May 2018 Using Avaya J169/J179 IP Phone SIP in third-party call control setup Comments on this document? infodev@avaya.com…
-
Page 73: Setting The Display Language
4. Scroll to Backlight timer, and enter the number of minutes. The range is 0 to 999. 5. Press one of the following: • Save • OK May 2018 Using Avaya J169/J179 IP Phone SIP in third-party call control setup Comments on this document? infodev@avaya.com…
-
Page 74: Setting The Time Format
• mm.dd • dd.mm • mm-dd • dd-mm • mmm dd 5. Press Change to select one of the options. 6. Press Save. May 2018 Using Avaya J169/J179 IP Phone SIP in third-party call control setup Comments on this document? infodev@avaya.com…
-
Page 75: Setting The Time Zone
• Save • OK Setting the network mode About this task Use this procedure to set the network mode to Ethernet or Wi-Fi. May 2018 Using Avaya J169/J179 IP Phone SIP in third-party call control setup Comments on this document? infodev@avaya.com…
-
Page 76: Enabling Wi-Fi
• Ensure that the feature is activated by your administrator. Procedure 1. Press Main menu. 2. Scroll to Settings, and press Select. 3. Scroll to Network, and press Select. May 2018 Using Avaya J169/J179 IP Phone SIP in third-party call control setup Comments on this document? infodev@avaya.com…
-
Page 77: Setting The Network Configuration
Use this procedure to enable the network configuration to set automatically or manually on your phone. Procedure 1. Press Main menu. 2. Scroll to Settings, and press Select. 3. Scroll to Network, and press Select. May 2018 Using Avaya J169/J179 IP Phone SIP in third-party call control setup Comments on this document? infodev@avaya.com…
-
Page 78: Backup And Restore
Backup process is initiated only after retrieval of user-specific data is successful. Backing up and restoring data Before you begin Ensure that the system administrator sets the URI for backup and restore. May 2018 Using Avaya J169/J179 IP Phone SIP in third-party call control setup Comments on this document? infodev@avaya.com…
-
Page 79
• When Manual Backup is successful: Backup successful • When Manual Restore is not successful: Retrieval failed • When Manual Restore is successful: Retrieval successful May 2018 Using Avaya J169/J179 IP Phone SIP in third-party call control setup Comments on this document? infodev@avaya.com… -
Page 80: Chapter 8: Resources
For example, for user guides, click User Guides in the Content Type filter. The list displays the documents only from the selected category. 7. Click Enter. May 2018 Using Avaya J169/J179 IP Phone SIP in third-party call control setup Comments on this document? infodev@avaya.com…
-
Page 81: Viewing Avaya Mentor Videos
Avaya Mentor videos provide technical content on how to install, configure, and troubleshoot Avaya products. About this task Videos are available on the Avaya Support website, listed under the video document type, and on the Avaya-run channel on YouTube. Procedure •…
-
Page 82
Manual Restore …………hold …………….27 blind transfer ……………. ignoring ……………..27 Bridged Call Appearance incoming call …………..26 answering a bridged line call ……..international …………..May 2018 Using Avaya J169/J179 IP Phone SIP in third-party call control setup Comments on this document? infodev@avaya.com… -
Page 83
Automatic callback …………46 dialing mode Bridged Call Appearance ……….53 automatic dialing …………57 call transfer …………..manual dialing ………….. Setting up Automatic Callback ……..46 May 2018 Using Avaya J169/J179 IP Phone SIP in third-party call control setup Comments on this document? infodev@avaya.com… -
Page 84
…………language ……………73 prefix digits …………Main Menu …………….Main menu …………..49 making a call May 2018 Using Avaya J169/J179 IP Phone SIP in third-party call control setup Comments on this document? infodev@avaya.com… -
Page 85
…………..visual alerting …………..60 ™ SLA Mon …………….Speaker …………….67 speed dialing contacts ……………. removing contact …………replacing contact …………support ……………..81 May 2018 Using Avaya J169/J179 IP Phone SIP in third-party call control setup Comments on this document? infodev@avaya.com…
Мы предлагаем следующие способы доставки товара:
Самовывоз из пункта выдачи
Самостоятельное получение заказа в пункте выдачи. Дата и время получения заранее согласуется с менеджером магазина.
Отгрузка товара юридическим лицам осуществляется только при наличии печати или правильно оформленной и заполненной доверенности, наличии паспорта получателя.
Отгрузка физическим лицам, в случае оплаты заказа банковскими картами, возможна только при предъявлении паспорта плательщика.
Для получения заказа, оплаченного вышеуказанным способом, третьим лицом необходимо наличие нотариально заверенной доверенности.
Курьерская доставка по Москве
Доставка по адресу покупателя или до пункта приема транспортной компании в г. Москве. Дата и время доставки заранее согласуется с менеджером магазина.
Доставка транспортной компанией по России
Доставка транспортной компанией по России до пункта выдачи транспортной компании или до конечного адреса покупателя.
Мы предлагаем следующие способы оплаты товара:
Оплата наличными
Оплата за наличный расчет для физических и юридических лиц. После внесения денежных средств Покупатель подписывает товаросопроводительные документы и получает кассовый чек. Отгрузка товара юридическим лицам осуществляется только при наличии печати или правильно оформленной и заполненной доверенности, наличии паспорта получателя.
Безналичная оплата
Мы работаем с физическими и юридическими лицами за безналичный расчёт со 100% предоплатой с оформлением всех предусмотренных законодательством документов. Счёт на оплату направляется Покупателю на электронную почту после запроса счета через форму на сайте либо по электронной почте. Цена на заказанный товар действительна в течение 2 дней с момента оформления Заказа.
Электронные способы
Оплата Заказа электронными способами, в т.ч. банковскими картами. Оплата Заказа данным способом доступна запросом ссылки на оплату у нашего менеджера.