
-
Consumer services
>
-
User manual, instruction for use
>
-
Electrical Cooking
>
-
Deep Fryer
>

User manual and frequently asked questions MAXI FRY
Family capacity, ideal for 5 to 6 servings!
MaxiFry, a compact deep fryer to made 1.2 kg of fried food!
Maxifry is one of Tefal’s favorite family fryers. With Maxifry you can cook up to 1.2 Kg of food. This fryer is cooltouch and therefore very safe to use. It is also very easy to use thanks to its adjustable thermostat and its on/off switch. MaxiFry is easy to store with its very compact size and the folding basket handle.
Reference : FF100071
Frequent questions
Battered food should not be put into the basket directly. The batter will wrap around the basket coils and get stuck.
Lower the basket into the oil first. Wearing gloves when placing battered food directly in oil.
The fryer cooks all types of food: vegetables, meat, fish, seafood, fruits. You can prepare desserts with your fryer: fritters, doughnuts, fruit.
Store the oil in the fryer with the lid closed, thereby keeping it fresh and clean. If the fryer will not be used for a long time, store the oil in a separate container and clean the fryer.
Never mix different oils together as each type of oil has a different frying temperature, which can cause the oils to emulsify and boil over during cooking.
The heating time will vary depending on the model and size. Whether you have a fixed bowl model or a removable bowl can make a difference. The average time for all should be between 10 and 18 minutes. The temperature indicator light will be on while the fryer is heating up. The light will go off when the fryer has reached temperature.
Metallic charcoal filters should be changed between 35 to 50 frying sessions, depending on model (the saturation indicator shows when the filter needs to be changed). Foam filters should be changed after 20 frying sessions. If you are frying fish we recommend using a separate filter and changing the oil after use. Waterclean filters made of carbon fibres should be washed after 80 uses (it regenerates after each wash). The Pure Air system is a permanent system that does not need to be replaced.
The oil in your fryer must be changed after 10 uses, as a minimum. Sunflower oil and groundnut oil must be changed after 5 uses or if you hear a popping sound (this means that there is water in the oil). To extend the life of the oil, filter it regularly. You may need to change it more often if frying fish, seafood or battered foods.
Oil should be strained and or filtered (by using paper filters or a filtering pot or a skimmer) after it cools and after each use. This will keep the oil from early contamination. Oil used for fish should be stored separately.
a) The oil is not hot enough. If you have an adjustable thermostat be sure it is set at the proper setting for the food you are cooking. If your unit does not have an adjustable thermostat, be sure the light on the fryer has gone off, this tells you that the oil is ready for frying.
b) Too much food is in the basket. Fry the food in smaller quantities (particularly frozen foods) for better results.
c) You did not cook the food long enough. Increase cooking time by a few minutes, lift basket to check for crispness.
a) The fryer was filled beyond the maximum level (either with oil or with food in the frying basket). Check the oil level. The bowl is marked with a minimum and a maximum level.
b) Wet food has been dropped into the oil. Dry the food completely or remove any loose ice from frozen foods before frying.
Use a fat content recommended for frying. For best results we recommend unsaturated vegetable oil.
Never mix different types of oil in your fryer, they may have different boiling points.
If you use solid vegetable fat:
• cut it into pieces and melt it in a bowl (at 150 °C) before putting it into your fryer.
• never melt solid fat in the basket of your fryer.
Never put solid fat directly into the frying basket.
Unpleasant odours can be due to aged oil and/or a saturated filter that needs to be changed. Change oil or filter or both.
Wipe the window with a little lemon juice or cut a potato in half and wipe this over the window before cooking.
Depending on the model:
a) Exterior Basket Control (allows you to lower food into the hot oil with the lid closed to prevent splashing).
b) Cool Touch Exterior.
c) Sealed Locking Lid with one-touch automatic opening.
d) Your fryer is equipped with thermal limiter to prevent overheating (dry-boil). This limiter is resettable for semi-pro models. If the appliance is not working, check to ensure that the limiter has not been triggered.
The fryer tank should be cold and filled before use, and the appliance should be unplugged.
After a few uses, you should adjust the level. Always do this with the appliance unplugged and cold.
Never use the fryer without oil or without cooking fat.
There are usually two markers in the tank: minimum and maximum. See the instructions for use.
In any case, do not exceed the maximum level, and do not add less oil than the minimum level indicated.
• As soon as the oil is heated to the proper frying temperature (Pilot light off).
• Selected models include a multi-position thermostat that lets you choose between various cooking temperatures. The lower position regulates the oil at around 170°C / 338°F, the higher position at 190°C / 374°F. The lower setting may be used when cooking delicate foods that do not stand up well under higher temperatures (mushrooms, some types of fish). The higher setting will provide excellent results when deep-frying chips, meat, prepared frozen foods, vegetables etc.
Put the foods in the basket in accordance with the maximum fill mark set forth in the instructions.
To get even better tasting food, we recommend filling to the half-way level rather than the maximum fill mark.
We recommend limiting the cooking temperature for potatoes to 170°C (338ºF).
• Let the fryer cool completely.
• Pour the oil into a separate container. This is a good time to strain the oil or replace it with new oil.
• Remove the filters and the lid from the fryer (see specific model instructions). The lid should be cleaned with hot soapy water and dried thoroughly. Some lids can be cleaned in a dishwasher (see specific model instructions).
• Change the filter (see specific model instructions).
• The removable bowl (on selected models) should be cleaned with hot soapy water and dried thoroughly. Do not use abrasives. Removable bowls are also dishwasher safe. Do not forget to drain your valve if it is equipped with a filtration system.
• Fixed bowls will need to be wiped out with paper towels to clean out as much oil residue as possible. Never immerse the fryer, cord or plug in water. You can place the fryer in a dry sink and fill the fryer halfway with water and a little washing up liquid. A non-abrasive sponge or kitchen brush can be used to scrub down the inside. Make sure the water does not overflow onto the outside of the fryer or over the heating element.
• Pour the water out and rinse just the inside, dry thoroughly.
• The outside of all fryers can be wiped down with a damp sponge. This is recommended after each use.
Regularly change the oil (8–10 uses).
Remove the burned particles at the bottom of the fryer (cooking residue) after each use in order to keep the oil in better condition for longer.
Regularly change (*according to model) or clean the filter: if this is not done, the filter will become clogged and prevent water from draining off during use.
Regularly clean your fryer according to the precautions for use in the instructions.
Put the used oil in an air-tight container and dispose of it (consult your local recycling service as waste collection and infrastructure differ from one region to another. The ability to process recyclables varies depending on the local recycling service).
Do not empty it in the sink.
Water and oil are not miscible: if they mix and overheat, the sudden evaporation of water can cause the oil to splatter.
If the fryer makes a noise, this indicates that there is water in it. The noise is caused by the water evaporating.
As soon as you hear these popping noises, please change the oil. If you do not change the oil, it may start to splatter.
‒ In semi-professional models, a safety device is activated if the fryer heats without oil.
• Leave the product to cool down.
• Use the RESET function on the base unit.
‒ Conventional cool wall fryers do not have a RESET function. Please take your product to one of our approved repair services.
• The lid is not properly closed, make sure it is properly locked.
For removable lids, make sure the hinges are properly sealed.
• The gasket may be damaged. Contact an Approved Service Centre to get a replacement.
The battery is flat. Replace it.
After following the instructions in the user manual for starting the appliance, make sure that your electrical socket is working by plugging another appliance. If it still does not work, do not try to dismantle or repair the appliance yourself, instead, take it to an approved repair centre
Do not use your appliance. To avoid any danger, have it replaced by an approved repair centre.
• Chips made with fresh potatoes:
— Put the fresh, uncooked chips in boiling water to remove the starch and stop them from sticking together.
— Dry them with a tea towel, then put them on to cook in the basket for 8 minutes. Take them out and wait for the fryer to reach the right temperature, then put the basket of cooked chips into the fryer for two or three minutes to brown them.
• For frozen chips, never add the chips directly to the basket or into the fryer. Remove as much ice as possible and dry them with a tea towel before putting them in the boiling oil.
• For other types of food to be evenly cooked, cut them into pieces that are not too large and the same size.
• Add the salt or seasoning to accompany the fried food at a distance from the fryer to avoid it falling inside.
Electric fryers are controlled by a thermostat which is designed to keep the oil at the right temperature to avoid it overheating and igniting, which makes them safer. Most deep fat fryers also feature a thermal safety cut-out system to stop it working if it gets too hot. Other safety features include viewing windows so the cooking food is visible, cool walls to keep the outsides from getting too hot, and locking lids that prevent oil from splashing out while cooking and reducing the risks of spills if a fryer is knocked.
Too much water may have collected in the oil.
It is essential to dry the food completely and remove any ice from frozen foods before cooking.
If there is too much water in the oil, the water will boil and force its way to the surface, making the oil spit.
Peanut oil has a lower smoking point than most vegetable oils, so it may slightly smoke at frying temperatures. It also imparts a slight flavour that may or may not be desirable.
Battered food should not be put into the basket directly. The batter will wrap around the basket coils and get stuck.
Water and oil are not miscible: if they mix and overheat, the sudden evaporation of water can cause the oil to splatter.
Always remove the excess water from foods before frying to ensure that the amount of water in the oil is kept to a minimum.
Never pour food (in particular frozen food) directly into the basket or over the fryer, as the ice will introduce water into the oil.
Do not cover the frying basket with the lid after use, as this can produce condensation in the fryer.
Do not allow condensation from the lid to drip into the fryer.
Never store or use the fryer outside, as this produces condensation.
The fryer should never operate with fat levels exceeding the maximum fill mark, because that will cause overflows.
Remove the excess fat using a ladle.
Your appliance contains valuable materials which can be recovered or recycled. Leave it at a local civic waste collection point.
Please go to the “Accessories” section of the website to easily find whatever you need for your product.
Find more detailed information in the Guarantee section of this website.
If you believe that one part is missing, please call Consumer Services Center and we will help you find a suitable solution.
-

Warranty
View the product warranty conditions
-
Contact
Our advisors are at your service.
Требуется руководство для вашей Tefal FF100073 Maxi-Fry Фритюрница? Ниже вы можете просмотреть и загрузить бесплатно руководство в формате PDF. Кроме того, приведены часто задаваемые вопросы, рейтинг изделия и отзывы пользователей, что позволит оптимально использовать ваше изделие. Если это не то руководство, которое вы искали, – свяжитесь с нами.
Ваше устройство неисправно, и в руководстве отсутствует решение? Перейдите в Repair Café для получения бесплатных ремонтных услуг.
Руководство

Рейтинг
Сообщите нам, что вы думаете о Tefal FF100073 Maxi-Fry Фритюрница, оставив оценку продукта. Хотите поделиться вашими впечатлениями от данного изделия или задать вопрос? Вы можете оставить комментарий в нижней части страницы.
Довольны ли вы данным изделием Tefal?
Да Нет
6 голоса
Часто задаваемые вопросы
Наша служба поддержки выполняет поиск полезной информации по изделиям и отвечает на часто задаваемые вопросы. Если вы заметили неточность в наших часто задаваемых вопросах, сообщите нам об этом с помощью нашей контактной формы.
Как часто нужно менять фритюр или масло во фритюрнице? Проверенный
Для получения наилучшего результата рекомендуется менять фритюр или масло через каждые 8 прожарок, если вы готовите закуски. Если вы готовите картошку-фри, то масло или фритюр можно менять после 12-ти прожарок.
Это было полезно (920)
Можно ли чистить внутреннюю поверхность фритюрницы металлической губкой? Проверенный
Нельзя. У большинства фритюрниц есть особый слой, который можно повредить металлической губкой или абразивным чистящим средством. Используйте исключительно мягкую сторону губки или влажную салфетку.
Это было полезно (344)
Что такое холодная зона во фритюрнице? Проверенный
Во фритюрницах с холодной зоной часть масла находится под нагревательными элементами. Это масло остается более холодным, чем масло наверху. Когда остатки панировки падают вниз, они попадают в эту холодную зону, благодаря чему масло дольше остается чистым.
Это было полезно (326)
инструкцияTefal Maxi-Fry FF1001

S.A. SEB SELONGEY CEDEX • RC. DIJON B 302 412 226 • REF. 5065062
Friteuse • Fryer • Fritteuse
Посмотреть инструкция для Tefal Maxi-Fry FF1001 бесплатно. Руководство относится к категории фритюрницы, 7 человек(а) дали ему среднюю оценку 7.5. Руководство доступно на следующих языках: английский. У вас есть вопрос о Tefal Maxi-Fry FF1001 или вам нужна помощь? Задайте свой вопрос здесь
Главная
| Tefal | |
| Maxi-Fry FF1001 | FF1001 | |
| фритюрница | |
| 3045386304127 | |
| английский | |
| Руководство пользователя (PDF) |
Дизайн
| Тип конструкции | Одиночный |
| Автоматически открывающаяся крышка | Да |
| Цвет товара | Белый |
Производительность
| Вместимость резервуара для продуктов | 1.2 kg |
| Содержание масла | 2.1 L |
| Регулируемый термостат | Да |
| Цифровой таймер | Да |
Энергопитание
показать больше
Не можете найти ответ на свой вопрос в руководстве? Вы можете найти ответ на свой вопрос ниже, в разделе часто задаваемых вопросов о Tefal Maxi-Fry FF1001.
Как часто следует менять масло или жир во фритюрнице?
Можно ли чистить фритюрницу жесткой губкой?
На чём полезнее жарить, на растительном масле или животном жире?
Инструкция Tefal Maxi-Fry FF1001 доступно в русский?
Не нашли свой вопрос? Задайте свой вопрос здесь

*
*
*
selon modèle, depending on model, je nach Modell, niet op alle modellen aanwezig, a seconda del modello, según modelo, conforme
o modelo, bazı modellerde, afhængig af model, beroende på modell, kun på noen modeller, mallista riippuen,
·У¿ПФБ· МВ ЩФ МФУЩ¤ПФ, в
зависимости от модели, w zale˝noÊci od modelu, podle modelu, podl’a modelu, modelltŒl függŒen, спорeд модeла,
•ºV «∞Luœ¥q
Battered food should not be put into the basket directly. The batter will wrap around the basket coils and get stuck.
Lower the basket into the oil first. Wearing gloves when placing battered food directly in oil.
The fryer cooks all types of food: vegetables, meat, fish, seafood, fruits. You can prepare desserts with your fryer: fritters, doughnuts, fruit.
Store the oil in the fryer with the lid closed, thereby keeping it fresh and clean. If the fryer will not be used for a long time, store the oil in a separate container and clean the fryer.
Never mix different oils together as each type of oil has a different frying temperature, which can cause the oils to emulsify and boil over during cooking.
The heating time will vary depending on the model and size. Whether you have a fixed bowl model or a removable bowl can make a difference. The average time for all should be between 10 and 18 minutes. The temperature indicator light will be on while the fryer is heating up. The light will go off when the fryer has reached temperature.
Metallic charcoal filters should be changed between 35 to 50 frying sessions, depending on model (the saturation indicator shows when the filter needs to be changed). Foam filters should be changed after 20 frying sessions. If you are frying fish we recommend using a separate filter and changing the oil after use. Waterclean filters made of carbon fibres should be washed after 80 uses (it regenerates after each wash). The Pure Air system is a permanent system that does not need to be replaced.
The oil in your fryer must be changed after 10 uses, as a minimum. Sunflower oil and groundnut oil must be changed after 5 uses or if you hear a popping sound (this means that there is water in the oil). To extend the life of the oil, filter it regularly. You may need to change it more often if frying fish, seafood or battered foods.
Oil should be strained and or filtered (by using paper filters or a filtering pot or a skimmer) after it cools and after each use. This will keep the oil from early contamination. Oil used for fish should be stored separately.
a) The oil is not hot enough. If you have an adjustable thermostat be sure it is set at the proper setting for the food you are cooking. If your unit does not have an adjustable thermostat, be sure the light on the fryer has gone off, this tells you that the oil is ready for frying.
b) Too much food is in the basket. Fry the food in smaller quantities (particularly frozen foods) for better results.
c) You did not cook the food long enough. Increase cooking time by a few minutes, lift basket to check for crispness.
a) The fryer was filled beyond the maximum level (either with oil or with food in the frying basket). Check the oil level. The bowl is marked with a minimum and a maximum level.
b) Wet food has been dropped into the oil. Dry the food completely or remove any loose ice from frozen foods before frying.
Use a fat content recommended for frying. For best results we recommend unsaturated vegetable oil.
Never mix different types of oil in your fryer, they may have different boiling points.
If you use solid vegetable fat:
• cut it into pieces and melt it in a bowl (at 150 °C) before putting it into your fryer.
• never melt solid fat in the basket of your fryer.
Never put solid fat directly into the frying basket.
Unpleasant odours can be due to aged oil and/or a saturated filter that needs to be changed. Change oil or filter or both.
Wipe the window with a little lemon juice or cut a potato in half and wipe this over the window before cooking.
Depending on the model:
a) Exterior Basket Control (allows you to lower food into the hot oil with the lid closed to prevent splashing).
b) Cool Touch Exterior.
c) Sealed Locking Lid with one-touch automatic opening.
d) Your fryer is equipped with thermal limiter to prevent overheating (dry-boil). This limiter is resettable for semi-pro models. If the appliance is not working, check to ensure that the limiter has not been triggered.
The fryer tank should be cold and filled before use, and the appliance should be unplugged.
After a few uses, you should adjust the level. Always do this with the appliance unplugged and cold.
Never use the fryer without oil or without cooking fat.
There are usually two markers in the tank: minimum and maximum. See the instructions for use.
In any case, do not exceed the maximum level, and do not add less oil than the minimum level indicated.
• As soon as the oil is heated to the proper frying temperature (Pilot light off).
• Selected models include a multi-position thermostat that lets you choose between various cooking temperatures. The lower position regulates the oil at around 170°C / 338°F, the higher position at 190°C / 374°F. The lower setting may be used when cooking delicate foods that do not stand up well under higher temperatures (mushrooms, some types of fish). The higher setting will provide excellent results when deep-frying chips, meat, prepared frozen foods, vegetables etc.
Put the foods in the basket in accordance with the maximum fill mark set forth in the instructions.
To get even better tasting food, we recommend filling to the half-way level rather than the maximum fill mark.
We recommend limiting the cooking temperature for potatoes to 170°C (338ºF).
• Let the fryer cool completely.
• Pour the oil into a separate container. This is a good time to strain the oil or replace it with new oil.
• Remove the filters and the lid from the fryer (see specific model instructions). The lid should be cleaned with hot soapy water and dried thoroughly. Some lids can be cleaned in a dishwasher (see specific model instructions).
• Change the filter (see specific model instructions).
• The removable bowl (on selected models) should be cleaned with hot soapy water and dried thoroughly. Do not use abrasives. Removable bowls are also dishwasher safe. Do not forget to drain your valve if it is equipped with a filtration system.
• Fixed bowls will need to be wiped out with paper towels to clean out as much oil residue as possible. Never immerse the fryer, cord or plug in water. You can place the fryer in a dry sink and fill the fryer halfway with water and a little washing up liquid. A non-abrasive sponge or kitchen brush can be used to scrub down the inside. Make sure the water does not overflow onto the outside of the fryer or over the heating element.
• Pour the water out and rinse just the inside, dry thoroughly.
• The outside of all fryers can be wiped down with a damp sponge. This is recommended after each use.
Regularly change the oil (8–10 uses).
Remove the burned particles at the bottom of the fryer (cooking residue) after each use in order to keep the oil in better condition for longer.
Regularly change (*according to model) or clean the filter: if this is not done, the filter will become clogged and prevent water from draining off during use.
Regularly clean your fryer according to the precautions for use in the instructions.
Put the used oil in an air-tight container and dispose of it (consult your local recycling service as waste collection and infrastructure differ from one region to another. The ability to process recyclables varies depending on the local recycling service).
Do not empty it in the sink.
Water and oil are not miscible: if they mix and overheat, the sudden evaporation of water can cause the oil to splatter.
If the fryer makes a noise, this indicates that there is water in it. The noise is caused by the water evaporating.
As soon as you hear these popping noises, please change the oil. If you do not change the oil, it may start to splatter.
‒ In semi-professional models, a safety device is activated if the fryer heats without oil.
• Leave the product to cool down.
• Use the RESET function on the base unit.
‒ Conventional cool wall fryers do not have a RESET function. Please take your product to one of our approved repair services.
• The lid is not properly closed, make sure it is properly locked.
For removable lids, make sure the hinges are properly sealed.
• The gasket may be damaged. Contact an Approved Service Centre to get a replacement.
The battery is flat. Replace it.
After following the instructions in the user manual for starting the appliance, make sure that your electrical socket is working by plugging another appliance. If it still does not work, do not try to dismantle or repair the appliance yourself, instead, take it to an approved repair centre
Do not use your appliance. To avoid any danger, have it replaced by an approved repair centre.
• Chips made with fresh potatoes:
— Put the fresh, uncooked chips in boiling water to remove the starch and stop them from sticking together.
— Dry them with a tea towel, then put them on to cook in the basket for 8 minutes. Take them out and wait for the fryer to reach the right temperature, then put the basket of cooked chips into the fryer for two or three minutes to brown them.
• For frozen chips, never add the chips directly to the basket or into the fryer. Remove as much ice as possible and dry them with a tea towel before putting them in the boiling oil.
• For other types of food to be evenly cooked, cut them into pieces that are not too large and the same size.
• Add the salt or seasoning to accompany the fried food at a distance from the fryer to avoid it falling inside.
Electric fryers are controlled by a thermostat which is designed to keep the oil at the right temperature to avoid it overheating and igniting, which makes them safer. Most deep fat fryers also feature a thermal safety cut-out system to stop it working if it gets too hot. Other safety features include viewing windows so the cooking food is visible, cool walls to keep the outsides from getting too hot, and locking lids that prevent oil from splashing out while cooking and reducing the risks of spills if a fryer is knocked.
Too much water may have collected in the oil.
It is essential to dry the food completely and remove any ice from frozen foods before cooking.
If there is too much water in the oil, the water will boil and force its way to the surface, making the oil spit.
Peanut oil has a lower smoking point than most vegetable oils, so it may slightly smoke at frying temperatures. It also imparts a slight flavour that may or may not be desirable.
Battered food should not be put into the basket directly. The batter will wrap around the basket coils and get stuck.
Water and oil are not miscible: if they mix and overheat, the sudden evaporation of water can cause the oil to splatter.
Always remove the excess water from foods before frying to ensure that the amount of water in the oil is kept to a minimum.
Never pour food (in particular frozen food) directly into the basket or over the fryer, as the ice will introduce water into the oil.
Do not cover the frying basket with the lid after use, as this can produce condensation in the fryer.
Do not allow condensation from the lid to drip into the fryer.
Never store or use the fryer outside, as this produces condensation.
The fryer should never operate with fat levels exceeding the maximum fill mark, because that will cause overflows.
Remove the excess fat using a ladle.
Your appliance contains valuable materials which can be recovered or recycled. Leave it at a local civic waste collection point.
Please go to the “Accessories” section of the website to easily find whatever you need for your product.
Find more detailed information in the Guarantee section of this website.
If you believe that one part is missing, please call Consumer Services Center and we will help you find a suitable solution.
Руководстве по эксплуатации Tefal Maxi-Fry FF1001 — вам приходилось его терять? Поскольку вы попали сюда, наверняка с вами это случилось. Но вы не единственный человек, сталкивающийся с проблемами с хранением руководства по эксплуатации всех домашних устройств. Ниже несколько советов, касающихся того, зачем собирать руководства по эксплуатации.
Руководстве по эксплуатации Tefal Maxi-Fry FF1001 это определенный вид технической документации, являющейся неразлучным элементом каждого устройства, которое мы приобретаем. Они отличаются между собой количеством информации, которую можно найти на тему данного устройства: напр. Tefal Maxi-Fry FF1001. Конечно же, если производитель считает что необходимо передать нам большее количество информации, касающейся устройства Tefal Maxi-Fry FF1001, то стоит ее хоть раз прочитать — в начале, сразу же после покупки данной вещи. Однако мы считаем, что инструкции должны заключать самую важную, наиболее необходимую информацию о Tefal Maxi-Fry FF1001, так, чтобы не отнимать желания пользователя прочесть ее уже в самом начале. Несомненно, если устройство Tefal Maxi-Fry FF1001 имеет много продвинутых функций, неизбежно большое количество информации в содержании этого документа.
Które из информации в инструкции Tefal Maxi-Fry FF1001 необходимо обязательно прочитать?
- Информацию, касающуюся правильного использования и ухода за устройством Tefal Maxi-Fry FF1001 — нам необходимо ознакомиться с основными правилами, чтобы в случае проблем с устройством сервисный центр не отказал нам в гарантийном обслуживании, из-за неправильного использования
- Информация, касающаяся самых частых проблем с Tefal Maxi-Fry FF1001 и способы их решения
- Информация, касающаяся гарантии устройства Tefal Maxi-Fry FF1001 и ближайших сервисных центров, способных починить устройство в соответствии с рекомендациям производителя Tefal
Как хранить инструкции дома?
Хорошей идеей является предназначение одного ящика, в котором бы хранилась инструкция Tefal Maxi-Fry FF1001 а также всех других домашних устройств которыми мы пользуемся. Тогда значительно легче вам будет ее найти, чем искать в родных коробках, которые наверняка уже выбросили вы, или другие домочадцы. Раз в год достаточно просмотреть ящик и выбросить инструкции, которые касаются устройств, которыми вы уже не пользуетесь. Таким образом вы избежите хранения ненужных документов, а останутся только актуальные. Вы можете также скачать и распечатать инструкцию Tefal Maxi-Fry FF1001 чтобы разместить ее в своем ящике.
Похожие инструкции
-
Page 1: Tefal Maxi-Fry FF1001
S.A. SEB SELONGEY CEDEX • RC. DIJON B 302 412 226 • REF . 5065062 Friteuse • Fryer • Fritteuse[…]
-
Page 2: Tefal Maxi-Fry FF1001
— www .groupeseb.com — Friteuse • Fryer • Fritteuse Mode d’emploi • Instructions for use • Gebruiksaanwijzing • Gebrauchsanweisung[…]
-
Page 3: Tefal Maxi-Fry FF1001
English . . . . . . . . . . . . . . . . . . . . 9 Description . . . . . . . . . . . . . . . . . . . . . .9 Pro t e ct i on of the environment . . . . . . .9 Helpline . . . . . . . . . . . . . . . . . . . . . . . . .9 Safety instructions . . . . . . . . . . . . . . . .9 Before using for the first time . . . . . . .10 F illing the bowl . . . . . . . […]
-
Page 4: Tefal Maxi-Fry FF1001
1 2 4 6 8 10 12 15 3 5 7 9 11 13 14 16[…]
-
Page 5: Tefal Maxi-Fry FF1001
Description 1. F iltre permanent métallique 2. Hublot (selon modèle) 3. Couvercle démontable 4. P anier 5. Bouton de déverrouillage de la poignée 6. Crochets d’accrochage du panier 7. Po ignée escamotable 8. Cuve (à revêtement anti-adhésif selon modèle) 9. Repères Mini et Maxi du remplissage de cuve 10. Po ignées de transport 11. Bout[…]
-
Page 6: Tefal Maxi-Fry FF1001
3 F R F R Avant la première utilisation • Appuyez sur le bouton pour ouvrir le couvercle. • Appuyez sur les deux pattes pour enlever le couvercle •M ettez le couvercle et le panier au lave-vaisselle •N ettoyez le corps avec une éponge et de l’eau savonneuse. Ne plongez jamais le corps de l’appareil dans l’eau. • Remettez le couver[…]
-
Page 7: Tefal Maxi-Fry FF1001
4 F R P réchauffez •B ranchez la friteuse. Ne branchez jamais la friteuse quand elle est vide. •P lacez l’interrupteur Marche-Arrêt à la position I, il s’allumera. • Réglez le thermostat selon les tableaux de cuisson p. 6. Pr éparez le panier • Essuyez les aliments pour enlever l’excès d’eau ou de glace puis remplissez le pani[…]
-
Page 8: Tefal Maxi-Fry FF1001
5 F R F R Plongez le panier •L orsque le voyant de température s’éteint, descendez le panier doucement. • Repliez la poignée dans son logement et fermez le couvercle. • Nous vous conseillons de garder le couvercle fermé durant la friture pour réduire les odeurs, et pour votre sécurité. Attention : ne placez pas la main au-dessus du f[…]
-
Page 9: Tefal Maxi-Fry FF1001
6 F R F R T ableaux de cuisson Les temps de cuisson sont donnés à titre indicatif. Ils peuvent varier en fonction des quantités et du goût de chacun. F rites 600g 170°C 11-16 min. P oulets frits en quartiers 1-2 180°C 14-16 min. F ilets de poisson 1-2 170°C 6-8 min. Champignons 8 200g mini 5-7 min. Rondelles d’oignons 6-8 170°C 3-4 min. B[…]
-
Page 10: Tefal Maxi-Fry FF1001
7 F R F R Arrêtez l’appareil •L a dernière friture terminée, placez l’interrupteur Marche-Arrêt à la position 0. • Débranchez l’appareil. • Laissez refroidir complètement la friteuse et la matière grasse 4 heures. • Rangez le cordon. • P our déplacer la friteuse, utilisez les poignées de transport. Ne déplacez jamais votr[…]
-
Page 11: Tefal Maxi-Fry FF1001
8 F R •L ’ a ppareil n ’est pas branché. •L ’interrupteur n ’est pas positionné sur la position I. •L e voyant de température n ’est pas allumé. •L a matière grasse est dégradée. •L a matière grasse n ’est pas appropriée. •L e couvercle est mal fermé. •L e j o int d’étanchéité est défectueux. •T rop de cu[…]
-
Page 12: Tefal Maxi-Fry FF1001
9 E NG Description 1. P ermanent metal filter 2. Viewing window (depending on model) 3. Removable lid 4. Basket 5. Basket handle unlocking button 6. Basket hanging hooks 7. Fo l d -away handle 8. Fr yi ng bowl (with non-stick coating depending on model) 9. Mini and Maxi oil level markers 10. Carrying handles 11. Lid opening button 12. Adjustable th[…]
-
Page 13: Tefal Maxi-Fry FF1001
10 E NG Before using for the first time •P ress on the lid opening button. •P ress on the two tabs that lock the lid in place and lift upwards to remove the lid. •P lace the lid and the basket in the dishwasher or wash by hand with warm water and washing up liquid. •C lean the body by wiping it with a sponge and soapy water . Y ou should ne[…]
-
Page 14: Tefal Maxi-Fry FF1001
11 E NG P reheating •C lose the lid and plug in the deep fryer . Never operate your fryer without any oil or fat in the bowl. • T urn the fryer on by pressing the on/off switch. The indicator light will switch on. • Adjust the thermostat according to the type of food to fry (see the table of cooking times, p. 13). Loading the bask et • Remo[…]
-
Page 15: Tefal Maxi-Fry FF1001
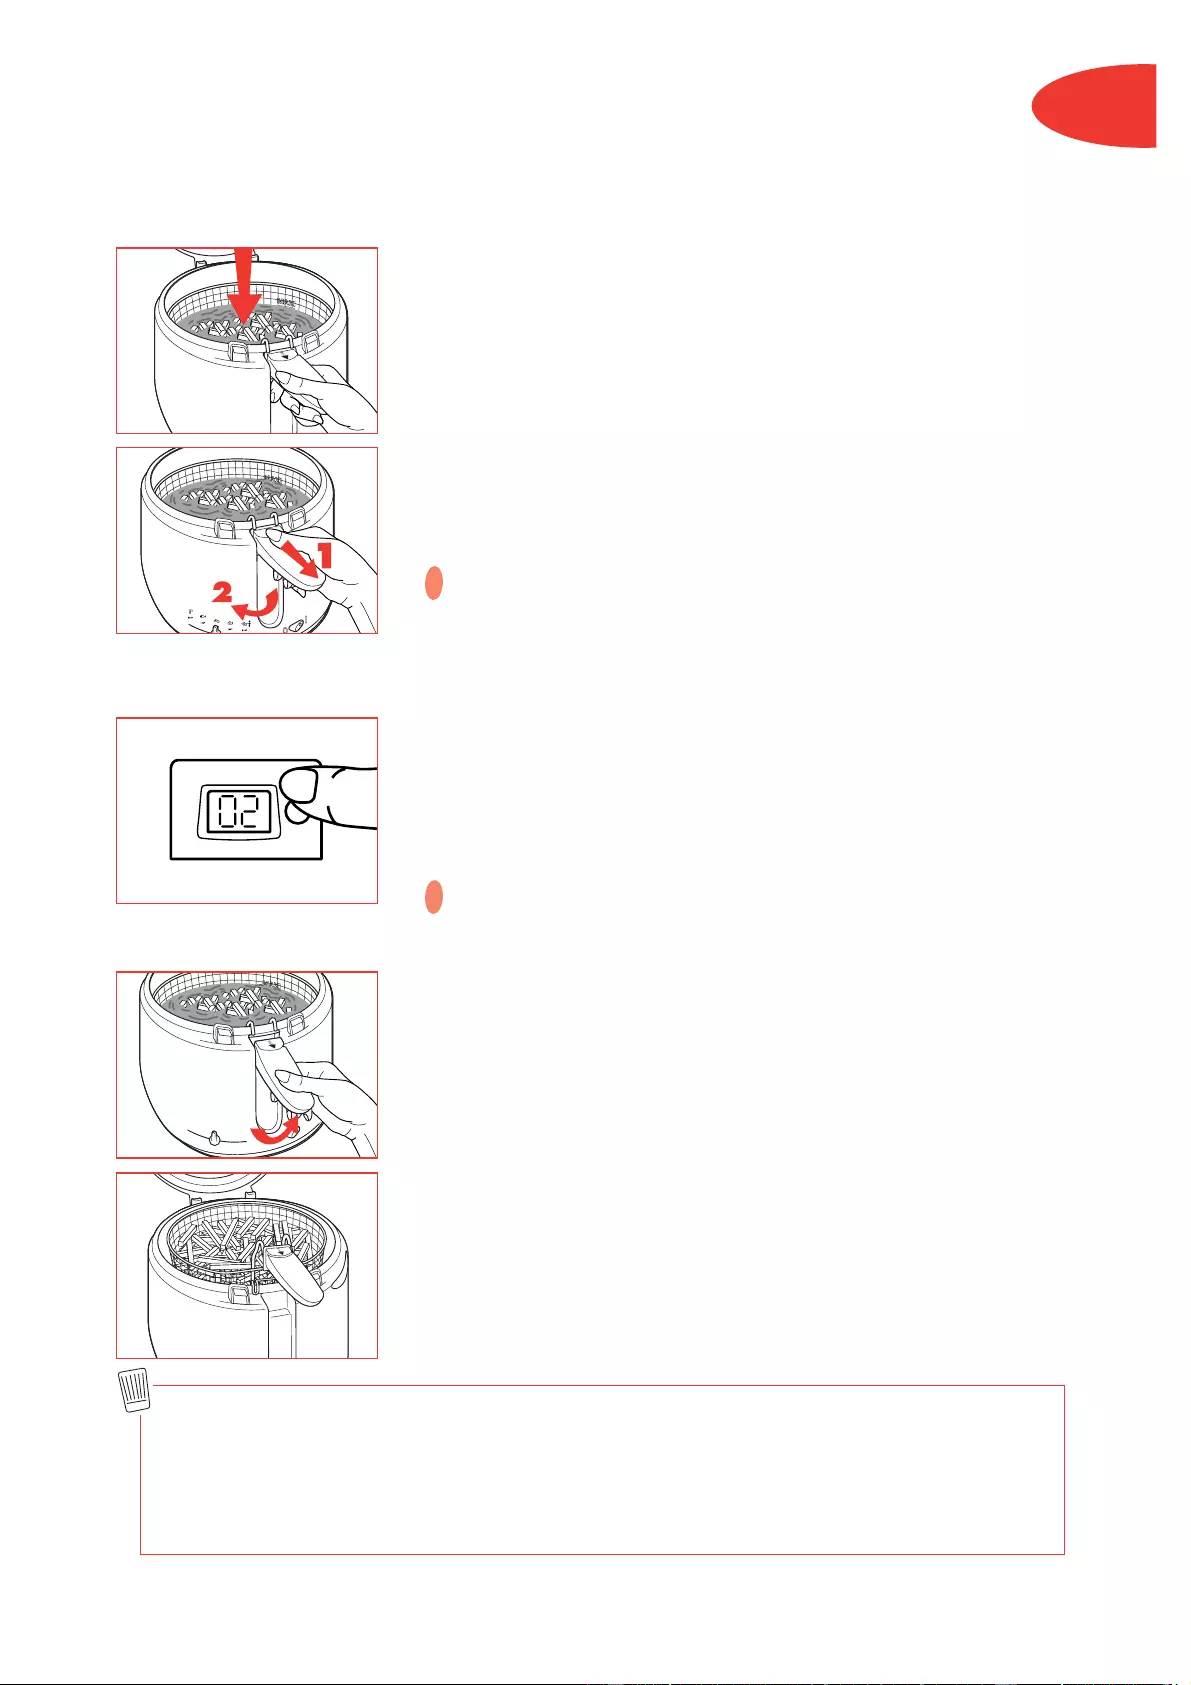
12 E NG Lowering the bask et •A fter the temperature indicator light goes out place the basket in the oil. •C lose the lid. • The handle can be folded back fully into its housing on the outside of the fryer . •K eeping the lid closed during frying is recommended to help alleviate odours and reduce splattering. Wa rning: do not place your ha[…]
-
Page 16: Tefal Maxi-Fry FF1001
13 E NG T able of cooking times The times given are only a guide and may vary depending on quantities and personal taste. Thicker foods may require turning halfway through frying to ensure even cooking on both sides. We recommend you to: — Limit the cooking temperature at 170°C, especially for potatoes. — Control the cooking: do not eat very brown[…]
-
Page 17: Tefal Maxi-Fry FF1001
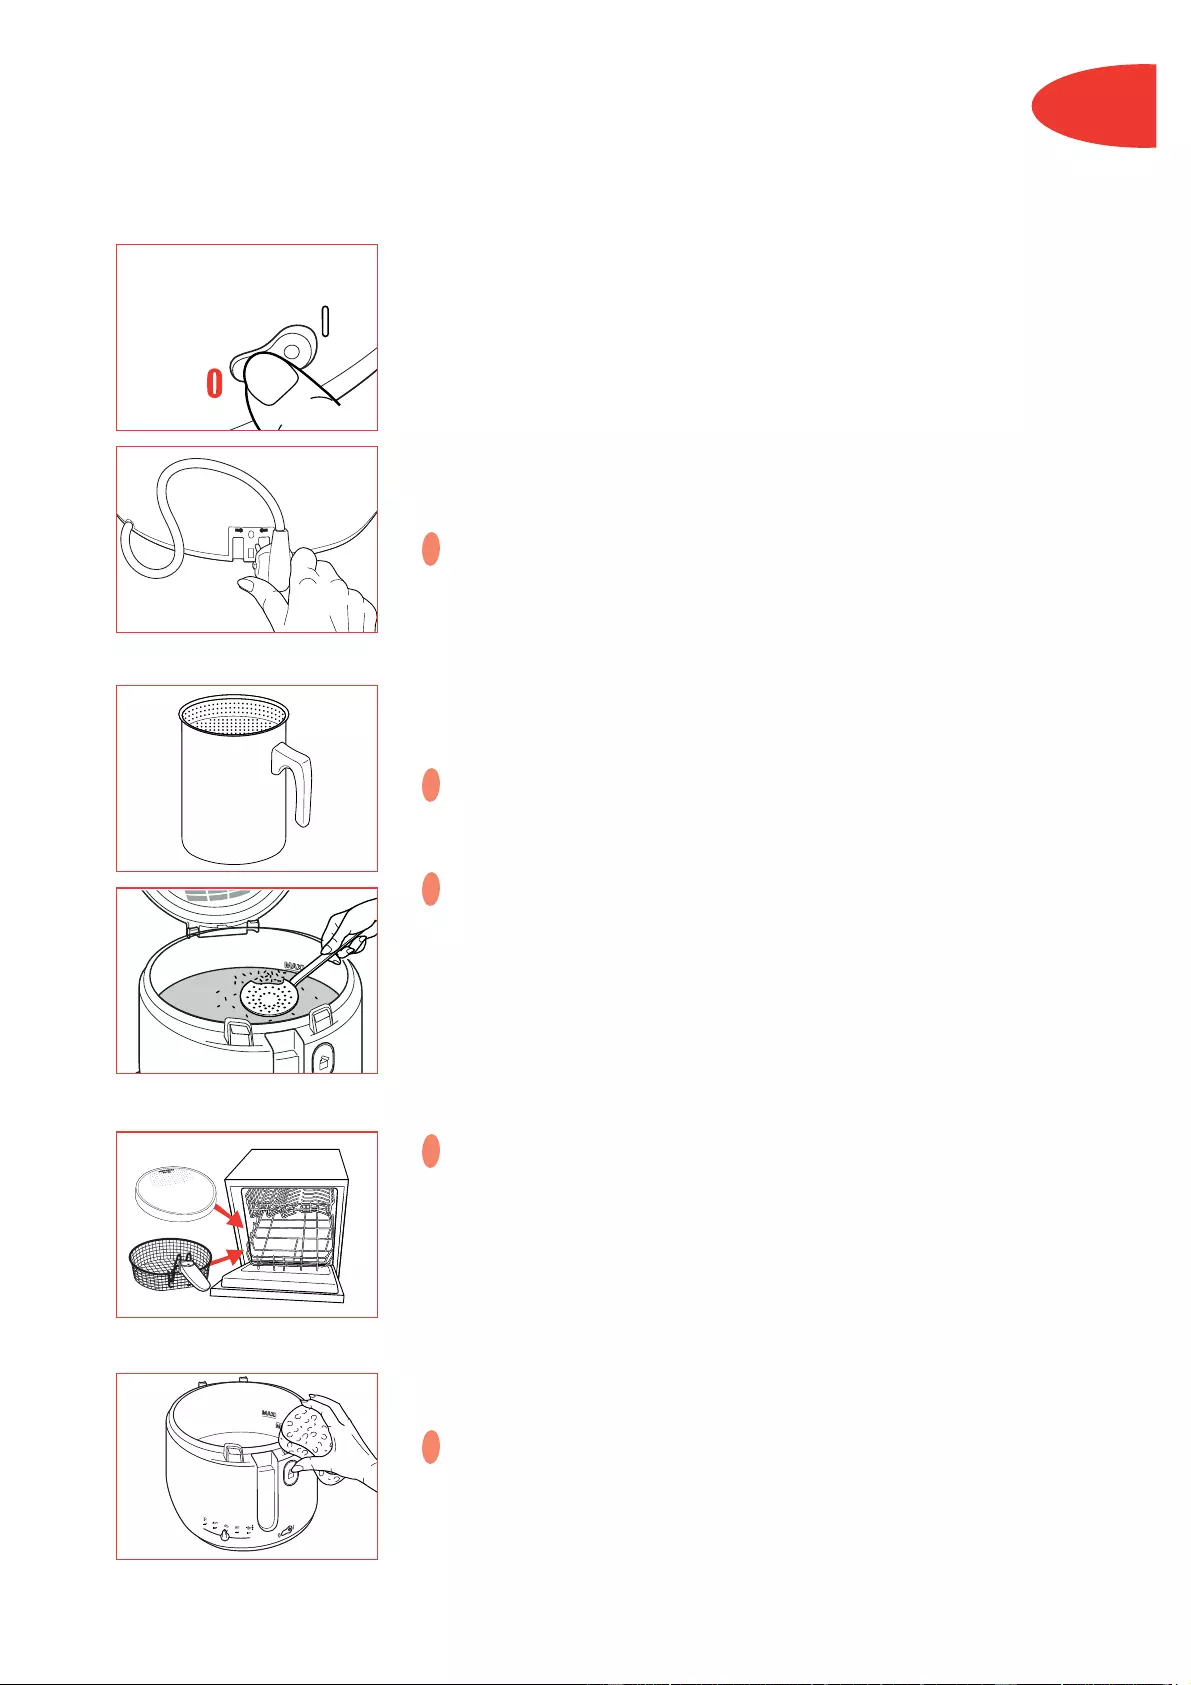
E NG Switching off the fryer •W hen you have finished frying, press the switch to the 0 position. • Unplug the fryer . • Leave the fryer (and the oil inside) to cool completely (approx. 4 hours). • Store the plug. • Move the fryer using the carrying handles. Never move the fryer while the oil or fat is still hot. Never move the fryer with[…]
-
Page 18: Tefal Maxi-Fry FF1001
15 E NG • The fryer is not plugged in. • The on-off switch is not set to I. • The temperature indicator light does not come on. • The anti-odour filter is saturated. • The oil has deteriorated. •U nsuitable oil has been used. •N ot cleaning the window often enough or using an inappropriate cloth. • The lid is not closed properly . ?[…]
-
Page 19: Tefal Maxi-Fry FF1001
Beschrijving van het apparaat 1. P ermanent metalen filter 2. Kijkvenster (afhankelijk van het model) 3. Deksel 4. F rituurmandje 5. Ontgrendelingsknop van het frituurmandje 6. Ophanghaakjes mandje 7. Inklapbaar handgreep 8. Binnenpan met anti-aanbaklaag (afhankelijk van het model) 9. Vu lstreepjes voor het minimum en maximum olie/vetniveau 10. Han[…]
-
Page 20: Tefal Maxi-Fry FF1001
17 NL F R Vóór het eerste gebruik •H et deksel gaat automatisch open door op de daarvoor bestemde knop te drukken. •Z et de deksel verticaal omhoog en haal hem eraf . •M aak het deksel en het frituurmandje schoon in de vaatwasmachine. •M aak de behuizing van de friteuse schoon met een vochtige doek met afwasmiddel. Dompel het apparaat noo[…]
-
Page 21: Tefal Maxi-Fry FF1001
18 NL V oorverwarmen •S teek de stekker in het stopcontact. Zet nooit de friteuse aan zonder olie of vet. • Zet de aan/uit -schakelaar op stand I . • Stel de thermostaat in op de juiste stand (zie eventueel de tabellen op blz. 20). V ullen van het frituurmandje •D roog de etenswaren goed af . Zorg ervoor dat de te frituren producten zo droo[…]
-
Page 22: Tefal Maxi-Fry FF1001
19 NL F R Het mandje in de olie laten zakk en •A ls het controlelampje uitgaat, het mandje laten zakken. •V ouw de handgreep in de behuizing aan de buitenkant van de friteuse. •D ruk het deksel goed dicht. •T ijdens en na het frituren kan het zijn dat er condensdruppels in de hete olie vallen. Het (knallende) geluid dat dit met zich meebren[…]
-
Page 23: Tefal Maxi-Fry FF1001
20 NL F R F rituurtabellen De in deze tabellen genoemde frituurtijden zijn slechts een richtlijn. Zij kunnen variëren afhank elijk van de hoeveelheid en ieders persoonlijk e smaak. F rites 600g 170°C 11-16 min. Gefrituurde stukken kip 1-2 180°C 14-16 min. V isfilet 1-2 170°C 6-8 min. Champignons 8 200g mini 5-7 min. Uienringen 6-8 170°C 3-4 mi[…]
-
Page 24: Tefal Maxi-Fry FF1001
21 NL F R De friteuse uitzetten •N a de laatste frituurbeurt, de aan/uit -schakelaar op stand o zetten. •D e stekker uit het stopcontact halen. • De friteuse 4 uur laten afkoelen. • Berg de stekker op in de stekkerpositie. •G ebruik uitsluitend de transporthandgrepen om de friteuse te verplaatsen. De friteuse nooit verplaatsen als deze no[…]
-
Page 25: Tefal Maxi-Fry FF1001
22 NL •D e stekker zit niet in het stopcontact •D e aan/uit -schakelaar staat niet op stand I . • Het temperatuurwaarschuwingslampje brandt niet. •H et frituurvet is aan vervanging toe. •V e r k eerd soort vet of olie. •U heeft te lang gefrituurd zonder het kijkvenster schoon te maken. Gebruik in geen geval schuurmiddelen of schuurspons[…]
-
Page 26: Tefal Maxi-Fry FF1001
D Gerätebeschreibung 1. P ermanenter Metallfilter 2. Sichtfenster (je nach Modell) 3. Abnehmbarer Deckel 4. F rittierkorb 5. F rittierkorb -Entriegelungstaste 6. F rittierkorb Aufhängevorrichtung 7. W egklappbar Griff 8. F rittierbehälter (mit Antihaft Beschichtung je nach Modell) 9. Füllstandsmarke () im F rittierbehälter 10. Griffmulde zum T[…]
-
Page 27: Tefal Maxi-Fry FF1001
24 D V or dem ersten Gebrauch •Ö ffnen Sie den Deckel durch Druck auf eine der beiden Öffnungstasten. •H eben Sie den Deckel an, um ihn zu entfernen. •G eben Sie den Deckel und den Frittierkorb in die Spülmaschine • Reinigen Sie das Thermogehäuse mit einem Schwamm und einer Seifenlauge. T auchen Sie das Gerät niemals in W asser ein. ?[…]
-
Page 28: Tefal Maxi-Fry FF1001
25 D V orheizen •S chließen Sie die Fritteuse an. Die Fritteuse darf auf k einen Fall leer betrieben werden. • Stellen Sie den On/Off Schalter auf I , die K ontrolllampe leuchtet auf . • Stellen Sie das Thermostat ein (sieheT abelle S.27). Vo rbereitung des F rittierk orbes • Entfernen Sie überflüssige F euchtigkeit ( W asser und Eis) vo[…]
-
Page 29: Tefal Maxi-Fry FF1001
26 D Absenk en des F rittierk orbes •B ei Erlöschen des beleuchteten Schalters, senken Sie langsam den Frittierkorb ab. •K lappen Sie den Griff in seine, am Äusseren der Fritteuse vorgesehene Aussparung. •D rücken Sie fest auf den Deckel, um ihn gut zu schliessen. Achtung : Halten Sie Ihre Hände nicht über die Filterkammer oder das Sicht[…]
-
Page 30: Tefal Maxi-Fry FF1001
27 D Fr ittiertabelle FRISCHE NAHRUNGSMITTEL Die angegebenen Frittierzeiten sind nur Richtwerte. Sie können je nach Füllmenge und eigenen Wünschen variiert werden. W ir empfehlen Ihnen folgende Hinweise zu beachten: — Reduzieren Sie die F rittiertemperatur auf 170°C, insbesondere bei stärkehaltigen P rodukten (z.B . P ommes F rites). — Überwa[…]
-
Page 31: Tefal Maxi-Fry FF1001
D Abschalten des Gerätes •S tellen Sie nach Beenden des letzten Frittiervorganges den Ein- /Ausschalter auf 0. •Z iehen Sie das Stromkabel des Gerätes heraus. •L assen Sie die Fritteuse auskühlen (4 Stunden lang). • Schieben Sie das Stromkabel in das K abelfach ein. •D ie Fritteuse zum T ransportieren nur in den Griffmulden halten. Tr […]
-
Page 32: Tefal Maxi-Fry FF1001
29 D •D as Gerät ist nicht angeschlossen. •D er Ein-/Ausschalter steht nicht auf I . •D ie T emperatur-K ontrollleuchte leuchtet nicht auf . •D as Frittierfett ist nicht einwandfrei. •D as Öl bzw . F ett ist zum Frittieren nicht geeignet •E s wurde zuviel frittiert ohne das das Sichtfenster gereinigt wurde. • Reinigen Sie die Fritte[…]
Хорошее руководство по эксплуатации
Законодательство обязывает продавца передать покупателю, вместе с товаром, руководство по эксплуатации Tefal Maxi-Fry FF1001. Отсутствие инструкции либо неправильная информация, переданная потребителю, составляют основание для рекламации в связи с несоответствием устройства с договором. В законодательстве допускается предоставлении руководства в другой, чем бумажная форме, что, в последнее время, часто используется, предоставляя графическую или электронную форму инструкции Tefal Maxi-Fry FF1001 или обучающее видео для пользователей. Условием остается четкая и понятная форма.
Что такое руководство?
Слово происходит от латинского «instructio», тоесть привести в порядок. Следовательно в инструкции Tefal Maxi-Fry FF1001 можно найти описание этапов поведения. Цель инструкции заключается в облегчении запуска, использования оборудования либо выполнения определенной деятельности. Инструкция является набором информации о предмете/услуге, подсказкой.
К сожалению немного пользователей находит время для чтения инструкций Tefal Maxi-Fry FF1001, и хорошая инструкция позволяет не только узнать ряд дополнительных функций приобретенного устройства, но и позволяет избежать возникновения большинства поломок.
Из чего должно состоять идеальное руководство по эксплуатации?
Прежде всего в инструкции Tefal Maxi-Fry FF1001 должна находится:
— информация относительно технических данных устройства Tefal Maxi-Fry FF1001
— название производителя и год производства оборудования Tefal Maxi-Fry FF1001
— правила обслуживания, настройки и ухода за оборудованием Tefal Maxi-Fry FF1001
— знаки безопасности и сертификаты, подтверждающие соответствие стандартам
Почему мы не читаем инструкций?
Как правило из-за нехватки времени и уверенности в отдельных функциональностях приобретенных устройств. К сожалению само подсоединение и запуск Tefal Maxi-Fry FF1001 это слишком мало. Инструкция заключает ряд отдельных указаний, касающихся функциональности, принципов безопасности, способов ухода (даже то, какие средства стоит использовать), возможных поломок Tefal Maxi-Fry FF1001 и способов решения проблем, возникающих во время использования. И наконец то, в инструкции можно найти адресные данные сайта Tefal, в случае отсутствия эффективности предлагаемых решений. Сейчас очень большой популярностью пользуются инструкции в форме интересных анимаций или видео материалов, которое лучше, чем брошюра воспринимаются пользователем. Такой вид инструкции позволяет пользователю просмотреть весь фильм, не пропуская спецификацию и сложные технические описания Tefal Maxi-Fry FF1001, как это часто бывает в случае бумажной версии.
Почему стоит читать инструкции?
Прежде всего здесь мы найдем ответы касательно конструкции, возможностей устройства Tefal Maxi-Fry FF1001, использования отдельных аксессуаров и ряд информации, позволяющей вполне использовать все функции и упрощения.
После удачной покупки оборудования/устройства стоит посвятить несколько минут для ознакомления с каждой частью инструкции Tefal Maxi-Fry FF1001. Сейчас их старательно готовят или переводят, чтобы они были не только понятными для пользователя, но и чтобы выполняли свою основную информационно-поддерживающую функцию.
Содержание руководства
-
Tefal Maxi-Fry FF1001 — page 1
S.A. SEB SELONGEY CEDEX • RC. DIJON B 302 412 226 • REF . 5065062 Friteuse • Fryer • Fritteuse …
-
Tefal Maxi-Fry FF1001 — page 2
— www .groupeseb.com — Friteuse • Fryer • Fritteuse Mode d’emploi • Instructions for use • Gebruiksaanwijzing • Gebrauchsanweisung …
-
Tefal Maxi-Fry FF1001 — page 3
English . . . . . . . . . . . . . . . . . . . . 9 Description . . . . . . . . . . . . . . . . . . . . . .9 Pro t e ct i on of the environment . . . . . . .9 Helpline . . . . . . . . . . . . . . . . . . . . . . . . .9 Safety instructions . . . . . . . . . . . . . . . .9 Before using for the first time . . . . . . .10 F illing the bowl . . . . . . . …
-
Tefal Maxi-Fry FF1001 — page 4
1 2 4 6 8 10 12 15 3 5 7 9 11 13 14 16 …
-
Tefal Maxi-Fry FF1001 — page 5
Description 1. F iltre permanent métallique 2. Hublot (selon modèle) 3. Couvercle démontable 4. P anier 5. Bouton de déverrouillage de la poignée 6. Crochets d’accrochage du panier 7. Po ignée escamotable 8. Cuve (à revêtement anti-adhésif selon modèle) 9. Repères Mini et Maxi du remplissage de cuve 10. Po ignées de transport 11. Bout …
-
Tefal Maxi-Fry FF1001 — page 6
3 F R F R Avant la première utilisation • Appuyez sur le bouton pour ouvrir le couvercle. • Appuyez sur les deux pattes pour enlever le couvercle •M ettez le couvercle et le panier au lave-vaisselle •N ettoyez le corps avec une éponge et de l’eau savonneuse. Ne plongez jamais le corps de l’appareil dans l’eau. • Remettez le couver …
-
Tefal Maxi-Fry FF1001 — page 7
4 F R P réchauffez •B ranchez la friteuse. Ne branchez jamais la friteuse quand elle est vide. •P lacez l’interrupteur Marche-Arrêt à la position I, il s’allumera. • Réglez le thermostat selon les tableaux de cuisson p. 6. Pr éparez le panier • Essuyez les aliments pour enlever l’excès d’eau ou de glace puis remplissez le pani …
-
Tefal Maxi-Fry FF1001 — page 8
5 F R F R Plongez le panier •L orsque le voyant de température s’éteint, descendez le panier doucement. • Repliez la poignée dans son logement et fermez le couvercle. • Nous vous conseillons de garder le couvercle fermé durant la friture pour réduire les odeurs, et pour votre sécurité. Attention : ne placez pas la main au-dessus du f …
-
Tefal Maxi-Fry FF1001 — page 9
6 F R F R T ableaux de cuisson Les temps de cuisson sont donnés à titre indicatif. Ils peuvent varier en fonction des quantités et du goût de chacun. F rites 600g 170°C 11-16 min. P oulets frits en quartiers 1-2 180°C 14-16 min. F ilets de poisson 1-2 170°C 6-8 min. Champignons 8 200g mini 5-7 min. Rondelles d’oignons 6-8 170°C 3-4 min. B …
-
Tefal Maxi-Fry FF1001 — page 10
7 F R F R Arrêtez l’appareil •L a dernière friture terminée, placez l’interrupteur Marche-Arrêt à la position 0. • Débranchez l’appareil. • Laissez refroidir complètement la friteuse et la matière grasse 4 heures. • Rangez le cordon. • P our déplacer la friteuse, utilisez les poignées de transport. Ne déplacez jamais votr …
-
Tefal Maxi-Fry FF1001 — page 11
8 F R •L ’ a ppareil n ’est pas branché. •L ’interrupteur n ’est pas positionné sur la position I. •L e voyant de température n ’est pas allumé. •L a matière grasse est dégradée. •L a matière grasse n ’est pas appropriée. •L e couvercle est mal fermé. •L e j o int d’étanchéité est défectueux. •T rop de cu …
-
Tefal Maxi-Fry FF1001 — page 12
9 E NG Description 1. P ermanent metal filter 2. Viewing window (depending on model) 3. Removable lid 4. Basket 5. Basket handle unlocking button 6. Basket hanging hooks 7. Fo l d -away handle 8. Fr yi ng bowl (with non-stick coating depending on model) 9. Mini and Maxi oil level markers 10. Carrying handles 11. Lid opening button 12. Adjustable th …
-
Tefal Maxi-Fry FF1001 — page 13
10 E NG Before using for the first time •P ress on the lid opening button. •P ress on the two tabs that lock the lid in place and lift upwards to remove the lid. •P lace the lid and the basket in the dishwasher or wash by hand with warm water and washing up liquid. •C lean the body by wiping it with a sponge and soapy water . Y ou should ne …
-
Tefal Maxi-Fry FF1001 — page 14
11 E NG P reheating •C lose the lid and plug in the deep fryer . Never operate your fryer without any oil or fat in the bowl. • T urn the fryer on by pressing the on/off switch. The indicator light will switch on. • Adjust the thermostat according to the type of food to fry (see the table of cooking times, p. 13). Loading the bask et • Remo …
-
Tefal Maxi-Fry FF1001 — page 15
12 E NG Lowering the bask et •A fter the temperature indicator light goes out place the basket in the oil. •C lose the lid. • The handle can be folded back fully into its housing on the outside of the fryer . •K eeping the lid closed during frying is recommended to help alleviate odours and reduce splattering. Wa rning: do not place your ha …
-
Tefal Maxi-Fry FF1001 — page 16
13 E NG T able of cooking times The times given are only a guide and may vary depending on quantities and personal taste. Thicker foods may require turning halfway through frying to ensure even cooking on both sides. We recommend you to: — Limit the cooking temperature at 170°C, especially for potatoes. — Control the cooking: do not eat very brown …
-
Tefal Maxi-Fry FF1001 — page 17
E NG Switching off the fryer •W hen you have finished frying, press the switch to the 0 position. • Unplug the fryer . • Leave the fryer (and the oil inside) to cool completely (approx. 4 hours). • Store the plug. • Move the fryer using the carrying handles. Never move the fryer while the oil or fat is still hot. Never move the fryer with …
-
Tefal Maxi-Fry FF1001 — page 18
15 E NG • The fryer is not plugged in. • The on-off switch is not set to I. • The temperature indicator light does not come on. • The anti-odour filter is saturated. • The oil has deteriorated. •U nsuitable oil has been used. •N ot cleaning the window often enough or using an inappropriate cloth. • The lid is not closed properly . ? …
-
Tefal Maxi-Fry FF1001 — page 19
Beschrijving van het apparaat 1. P ermanent metalen filter 2. Kijkvenster (afhankelijk van het model) 3. Deksel 4. F rituurmandje 5. Ontgrendelingsknop van het frituurmandje 6. Ophanghaakjes mandje 7. Inklapbaar handgreep 8. Binnenpan met anti-aanbaklaag (afhankelijk van het model) 9. Vu lstreepjes voor het minimum en maximum olie/vetniveau 10. Han …
-
Tefal Maxi-Fry FF1001 — page 20
17 NL F R Vóór het eerste gebruik •H et deksel gaat automatisch open door op de daarvoor bestemde knop te drukken. •Z et de deksel verticaal omhoog en haal hem eraf . •M aak het deksel en het frituurmandje schoon in de vaatwasmachine. •M aak de behuizing van de friteuse schoon met een vochtige doek met afwasmiddel. Dompel het apparaat noo …
-
Tefal Maxi-Fry FF1001 — page 21
18 NL V oorverwarmen •S teek de stekker in het stopcontact. Zet nooit de friteuse aan zonder olie of vet. • Zet de aan/uit -schakelaar op stand I . • Stel de thermostaat in op de juiste stand (zie eventueel de tabellen op blz. 20). V ullen van het frituurmandje •D roog de etenswaren goed af . Zorg ervoor dat de te frituren producten zo droo …
-
Tefal Maxi-Fry FF1001 — page 22
19 NL F R Het mandje in de olie laten zakk en •A ls het controlelampje uitgaat, het mandje laten zakken. •V ouw de handgreep in de behuizing aan de buitenkant van de friteuse. •D ruk het deksel goed dicht. •T ijdens en na het frituren kan het zijn dat er condensdruppels in de hete olie vallen. Het (knallende) geluid dat dit met zich meebren …
-
Tefal Maxi-Fry FF1001 — page 23
20 NL F R F rituurtabellen De in deze tabellen genoemde frituurtijden zijn slechts een richtlijn. Zij kunnen variëren afhank elijk van de hoeveelheid en ieders persoonlijk e smaak. F rites 600g 170°C 11-16 min. Gefrituurde stukken kip 1-2 180°C 14-16 min. V isfilet 1-2 170°C 6-8 min. Champignons 8 200g mini 5-7 min. Uienringen 6-8 170°C 3-4 mi …
-
Tefal Maxi-Fry FF1001 — page 24
21 NL F R De friteuse uitzetten •N a de laatste frituurbeurt, de aan/uit -schakelaar op stand o zetten. •D e stekker uit het stopcontact halen. • De friteuse 4 uur laten afkoelen. • Berg de stekker op in de stekkerpositie. •G ebruik uitsluitend de transporthandgrepen om de friteuse te verplaatsen. De friteuse nooit verplaatsen als deze no …
-
Tefal Maxi-Fry FF1001 — page 25
22 NL •D e stekker zit niet in het stopcontact •D e aan/uit -schakelaar staat niet op stand I . • Het temperatuurwaarschuwingslampje brandt niet. •H et frituurvet is aan vervanging toe. •V e r k eerd soort vet of olie. •U heeft te lang gefrituurd zonder het kijkvenster schoon te maken. Gebruik in geen geval schuurmiddelen of schuurspons …
-
Tefal Maxi-Fry FF1001 — page 26
D Gerätebeschreibung 1. P ermanenter Metallfilter 2. Sichtfenster (je nach Modell) 3. Abnehmbarer Deckel 4. F rittierkorb 5. F rittierkorb -Entriegelungstaste 6. F rittierkorb Aufhängevorrichtung 7. W egklappbar Griff 8. F rittierbehälter (mit Antihaft Beschichtung je nach Modell) 9. Füllstandsmarke () im F rittierbehälter 10. Griffmulde zum T …
-
Tefal Maxi-Fry FF1001 — page 27
24 D V or dem ersten Gebrauch •Ö ffnen Sie den Deckel durch Druck auf eine der beiden Öffnungstasten. •H eben Sie den Deckel an, um ihn zu entfernen. •G eben Sie den Deckel und den Frittierkorb in die Spülmaschine • Reinigen Sie das Thermogehäuse mit einem Schwamm und einer Seifenlauge. T auchen Sie das Gerät niemals in W asser ein. ? …
-
Tefal Maxi-Fry FF1001 — page 28
25 D V orheizen •S chließen Sie die Fritteuse an. Die Fritteuse darf auf k einen Fall leer betrieben werden. • Stellen Sie den On/Off Schalter auf I , die K ontrolllampe leuchtet auf . • Stellen Sie das Thermostat ein (sieheT abelle S.27). Vo rbereitung des F rittierk orbes • Entfernen Sie überflüssige F euchtigkeit ( W asser und Eis) vo …
-
Tefal Maxi-Fry FF1001 — page 29
26 D Absenk en des F rittierk orbes •B ei Erlöschen des beleuchteten Schalters, senken Sie langsam den Frittierkorb ab. •K lappen Sie den Griff in seine, am Äusseren der Fritteuse vorgesehene Aussparung. •D rücken Sie fest auf den Deckel, um ihn gut zu schliessen. Achtung : Halten Sie Ihre Hände nicht über die Filterkammer oder das Sicht …
-
Tefal Maxi-Fry FF1001 — page 30
27 D Fr ittiertabelle FRISCHE NAHRUNGSMITTEL Die angegebenen Frittierzeiten sind nur Richtwerte. Sie können je nach Füllmenge und eigenen Wünschen variiert werden. W ir empfehlen Ihnen folgende Hinweise zu beachten: — Reduzieren Sie die F rittiertemperatur auf 170°C, insbesondere bei stärkehaltigen P rodukten (z.B . P ommes F rites). — Überwa …
-
Tefal Maxi-Fry FF1001 — page 31
D Abschalten des Gerätes •S tellen Sie nach Beenden des letzten Frittiervorganges den Ein- /Ausschalter auf 0. •Z iehen Sie das Stromkabel des Gerätes heraus. •L assen Sie die Fritteuse auskühlen (4 Stunden lang). • Schieben Sie das Stromkabel in das K abelfach ein. •D ie Fritteuse zum T ransportieren nur in den Griffmulden halten. Tr …
-
Tefal Maxi-Fry FF1001 — page 32
29 D •D as Gerät ist nicht angeschlossen. •D er Ein-/Ausschalter steht nicht auf I . •D ie T emperatur-K ontrollleuchte leuchtet nicht auf . •D as Frittierfett ist nicht einwandfrei. •D as Öl bzw . F ett ist zum Frittieren nicht geeignet •E s wurde zuviel frittiert ohne das das Sichtfenster gereinigt wurde. • Reinigen Sie die Fritte …

Friteuse • Fryer • Fritteuse
www.groupeseb.com
Mode d’emploi • Instructions for use • Gebruiksaanwijzing • Gebrauchsanweisung

English . . . . . . . . . . . . . . . . . . . . 9
Description . . . . . . . . . . . . . . . . . . . . . .9
Protection of the environment . . . . . . .9
Helpline . . . . . . . . . . . . . . . . . . . . . . . . .9
Safety instructions . . . . . . . . . . . . . . . .9
Before using for the first time . . . . . . .10
Filling the bowl . . . . . . . . . . . . . . . . . .10
Preheating . . . . . . . . . . . . . . . . . . . . . .11
Loading the basket . . . . . . . . . . . . . . .11
Lowering the basket . . . . . . . . . . . . .12
Setting the timer . . . . . . . . . . . . . . . . .12
At the end of cooking time . . . . . . . . .12
Table of cooking times . . . . . . . . . . . .13
Switching off the deep fryer . . . . . . . .14
Filtering the oil . . . . . . . . . . . . . . . . . .14
Cleaning the lid and the basket . . . . .14
Cleaning the fryer . . . . . . . . . . . . . . . .14
Problem and possible causes . . . . . . .15
Nederlands . . . . . . . . . . . . . 16
Beschrijving van het apparaat . . . . . .16
Bescherming van het milieu . . . . . . . .16
Veiligheidsvoorschriften . . . . . . . . . . .16
Vóór het eerste gebruik . . . . . . . . . . . 17
Vullen van de binnenpan . . . . . . . . . .17
Voorverwarmen . . . . . . . . . . . . . . . . .18
Vullen van het frituurmandje . . . . . . . .18
Het mandje in de olie laten zakken . . .19
Instellen van de timer . . . . . . . . . . . . .19
Uitnemen van het frituurmandje . . . . .19
Frituurtabellen . . . . . . . . . . . . . . . . . . .20
De friteuse uitzetten . . . . . . . . . . . . . .21
Filteren van het frituurvet . . . . . . . . . .21
Schoonmaken . . . . . . . . . . . . . . . . . . .21
Problemen en mogelijke oorzaken . . .22
Francais . . . . . . . . . . . . . . . . . . 2
Description . . . . . . . . . . . . . . . . . . . . .2
Protection de l’environnement . . . . . . .2
Consignes de Sécurité . . . . . . . . . . . . .2
Avant la première utilisation . . . . . . . . 3
Remplissez la cuve . . . . . . . . . . . . . . . .3
Préchauffez . . . . . . . . . . . . . . . . . . . . . .4
Préparez le panier . . . . . . . . . . . . . . . . .4
Plongez le panier . . . . . . . . . . . . . . . . .5
Réglez le minuteur . . . . . . . . . . . . . . . .5
En fin de cuisson . . . . . . . . . . . . . . . . .5
Tableaux de cuisson . . . . . . . . . . . . . . .6
Arrêtez l’appareil . . . . . . . . . . . . . . . . . .7
Filtrez la matière grasse . . . . . . . . . . . .7
Nettoyez le couvercle et le panier . . . . 7
Nettoyez la friteuse . . . . . . . . . . . . . . . .7
Problèmes et causes possibles . . . . . . .8
Deutsch . . . . . . . . . . . . . . . . . 23
Gerätebeschreibung . . . . . . . . . . . . .23
Hinweise zum Umweltschutz . . . . . . .23
Sicherheitshinweise . . . . . . . . . . . . . .23
Vor dem ersten Gebrauch . . . . . . . . . 24
Füllen Sie den Frittierbehälter . . . . . . .24
Vorheizen . . . . . . . . . . . . . . . . . . . . . .25
Vorbereitung des Frittierkorbes . . . . .26
Absenken des Frittierkorbes . . . . . . .26
Stellen Sie den Timer ein . . . . . . . . .26
Am Ende der Frittierzeit . . . . . . . . . . .26
Frittiertabelle . . . . . . . . . . . . . . . . . . . .27
Abschalten des Gerätes . . . . . . . . . . .28
Filtern des Frittierfettes . . . . . . . . . . . .28
Reinigung . . . . . . . . . . . . . . . . . . . . . .28
Probleme und mögliche Ursachen . . .29

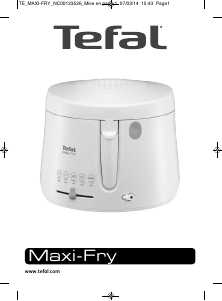
Description
1. Filtre permanent métallique
2. Hublot (selon modèle)
3. Couvercle démontable
4. Panier
5. Bouton de déverrouillage
de la poignée
6. Crochets d’accrochage du
panier
7. Poignée escamotable
8. Cuve (à revêtement anti-adhésif
selon modèle)
9. Repères Mini et Maxi du
remplissage de cuve
10. Poignées de transport
11. Bouton d’ouverture du
couvercle
12. Thermostat réglable
13. Minuteur (selon modèle)
14. Interrupteur Marche -Arrêt avec
témoin lumineux
15. Cordon
16. Range prise
Protection de l’environnement
•Votre appareil est prévu de fonctionner durant de longues années. Toutefois, le jour où vous envisagerez de
remplacer votre friteuse, n’oubliez pas de penser à la contribution que vous pouvez apporter à la protection de
l’environnement.
• Avant la mise au rebut de votre friteuse, la pile de la minuterie doit être retirée par un Centre de Service Agréé.
• Les centres services agrées reprendront vos appareils usagés afin de procéder à leur destruction dans le
respect des règles de l’environnement.
Consignes de sécurité
•Cet appareil est conforme aux règles et conditions
de sécurité en vigueur ainsi qu’aux directives
— 89/336/CEE modifiée par 93/68/CEE
— 72/23/cee modifiée par 93/68/CEE
•Cet appareil électrique fonctionne à des
températures élevées qui peuvent provoquer des
brûlures. Malgré la haute protection thermique de la
friteuse, ne pas toucher les parties métalliques
apparentes après ouverture du couvercle.
•Ne laissez pas l’appareil fonctionner sans
surveillance.
•Branchez toujours l’appareil sur une prise de courant
reliée à la terre.
•N’utilisez pas de rallonge. Si vous en prenez la
responsabilité, n’utilisez qu’une rallonge en bon état,
avec une prise de courant reliée à la terre et adaptée
à la puissance de l’appareil.
•Vérifiez que la tension du réseau correspond bien à
celle indiquée sur l’appareil (courant alternatif
seulement)
•Si l’appareil est utilisé dans un autre pays que celui
de l’achat, faites-le vérifier par un Centre de Service
Agréé.
•N’utilisez et ne branchez jamais votre appareil, si :
— Son cordon est défectueux ou endommagé,
— L’appareil est tombé
— Il présente des détériorations visibles ou des
anomalies de fonctionnement
Dans ces cas, afin d’éviter tout danger, prenez
contact avec un Centre de Service Agréé le plus
proche pour faire réparer l’appareil car des outils
spéciaux sont nécessaires. Ne démontez jamais
l’appareil vous-même.
•Si le câble d’alimentation est endommagé, il doit
être remplacé par le fabricant, son SAV ou toute
personne de qualification similaire afin d’éviter un
danger.
•En cas d’incendie, ne tentez jamais d’éteindre les
flammes avec de l’eau. Fermez le couvercle. Etouffez
les flammes avec un linge humide.
•Ne faites pas fonctionner l’appareil à proximité de
matériaux inflammables (stores, rideaux,…) ni à
proximité d’une source de chaleur extérieure
(gazinière, plaque chauffante,…
•Cet appareil a été conçu pour usage domestique
seulement. Toute utilisation professionnelle, non
appropriée ou non conforme au mode d’emploi,
n’engage ni la responsabilité, ni la garantie du
constructeur.
3
FR
FR
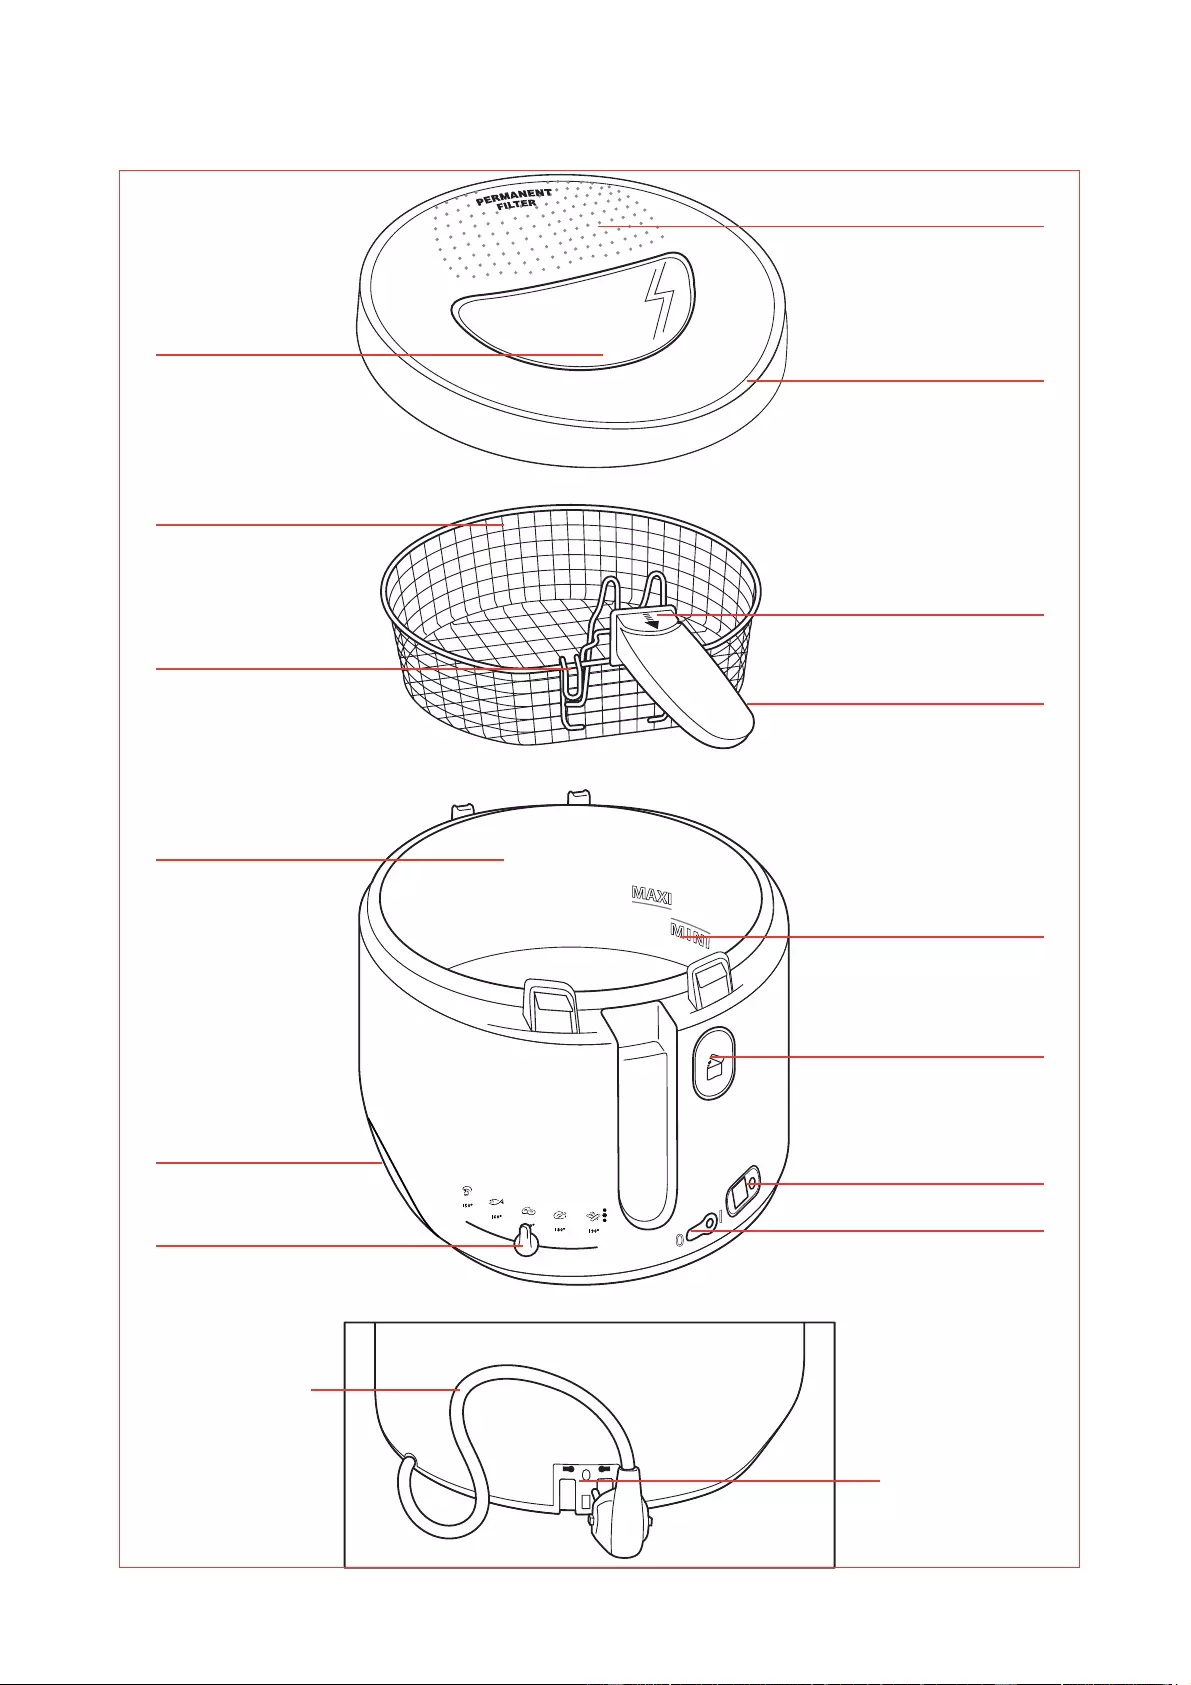
Avant la première utilisation
•Appuyez sur le bouton pour ouvrir le couvercle.
•Appuyez sur les deux pattes pour enlever le couvercle
•Mettez le couvercle et le panier au lave-vaisselle
•Nettoyez le corps avec une éponge et de l’eau savonneuse.
Ne plongez jamais le corps de l’appareil dans l’eau.
•Remettez le couvercle en place.
Remplissez la cuve
•Utilisez une matière grasse alimentaire recommandée pour la
friture : tournesol, arachide, olive, pépin de raisin, palme…
Le niveau de matière grasse doit toujours se situer entre les
repères mini et maxi de la cuve. Vérifiez avant chaque
cuisson et rectifiez si nécessaire avec la même matière
grasse.
•Si vous utilisez une matière grasse solide :
— Coupez-la en morceaux et faites-la fondre à part pour ensuite
la verser dans la cuve (ne la faites jamais fondre dans le
panier, ni dans la cuve).
Ne mélangez pas différentes sortes de matières grasses.
!
!
!
Huile Matière grasse
Min. 1,8 l 1660 g
Max. 2,1 l 1910g
4
FR
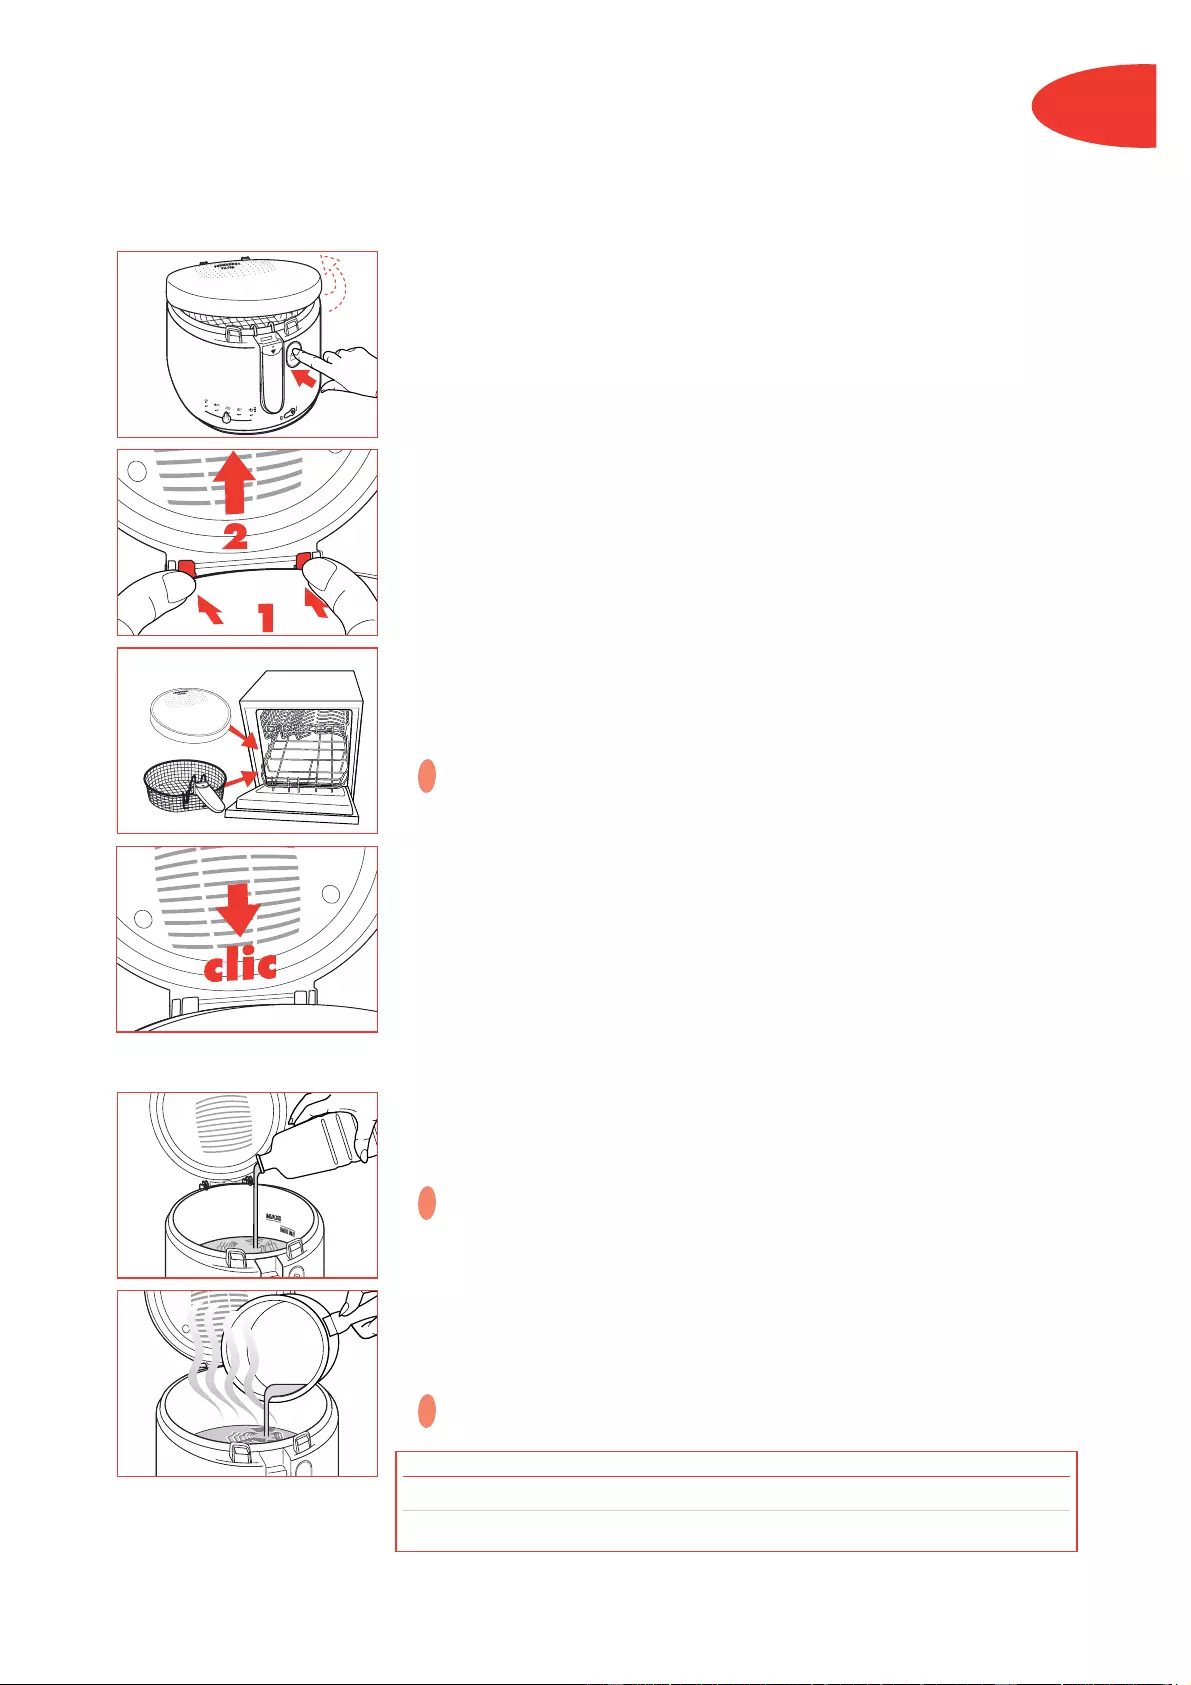
Préchauffez
•Branchez la friteuse.
Ne branchez jamais la friteuse quand elle est vide.
•Placez l’interrupteur Marche-Arrêt à la position I, il s’allumera.
• Réglez le thermostat selon les tableaux de cuisson p. 6.
Préparez le panier
•Essuyez les aliments pour enlever l’excès d’eau ou de glace
puis remplissez le panier avant de placer celui-ci dans la
friteuse.
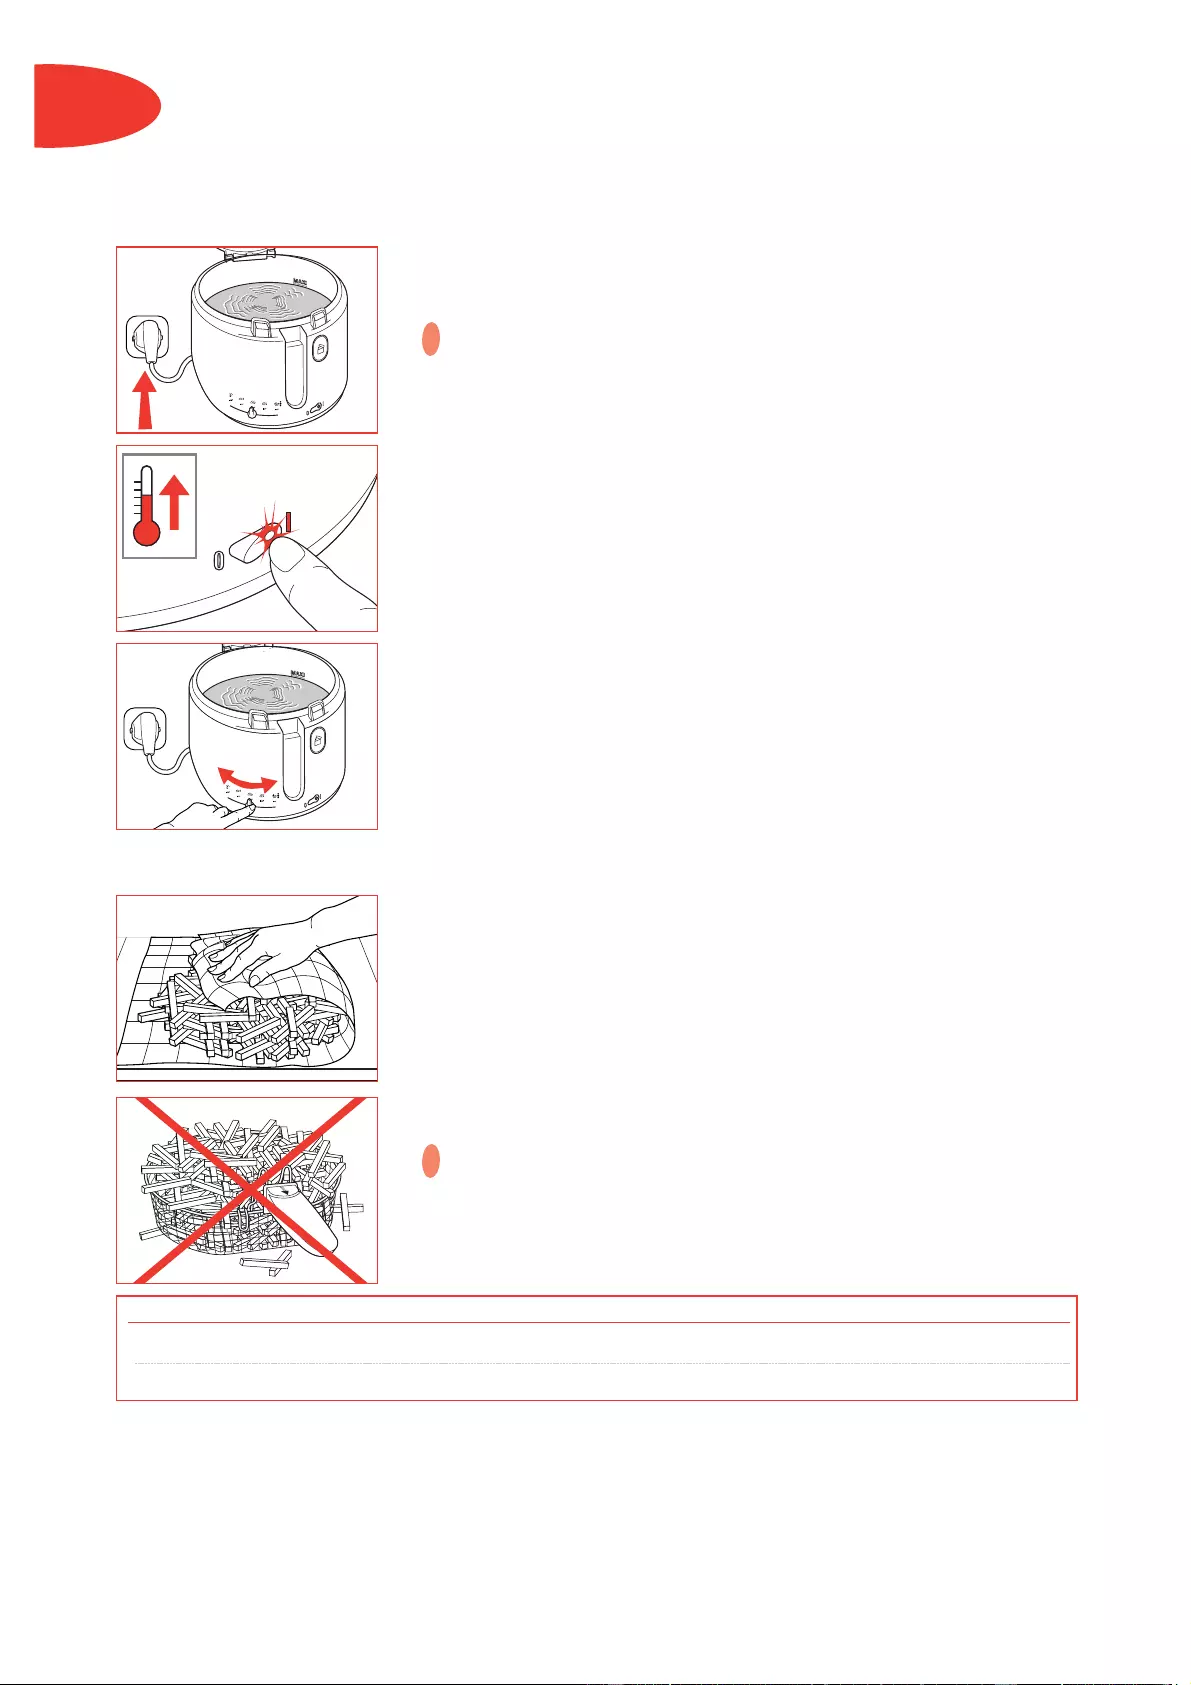
•Réduisez les quantités pour les aliments surgelés (voir le
tableau ci-dessous et les tableaux de cuisson p. 6).
Ne dépassez jamais la quantité limite de sécurité.
Pour une cuisson correcte et rapide, limitez la quantité de
frites à 1/2 panier par bain.
FR
!
!
Frites fraîches Frites surgelées
Quantité limite de sécurité 1200 g 900 g
Quantité recommandée 600 g 450 g
5
FR
FR
Plongez le panier
•Lorsque le voyant de température s’éteint, descendez le panier
doucement.
•Repliez la poignée dans son logement et fermez le couvercle.
•Nous vous conseillons de garder le couvercle fermé durant la
friture pour réduire les odeurs, et pour votre sécurité.
Attention : ne placez pas la main au-dessus du filtre, ni sur le
hublot. La vapeur et le verre sont brûlants.
Réglez le minuteur (selon modèle)
•Appuyez sur le bouton pour régler le temps minute par minute.
Relâchez. Le temps affiché est sélectionné et le décompte
commence.
•En cas d’erreur ou pour effacer le temps sélectionné, maintenir
le bouton appuyé pendant 2 secondes. Pour arrêter la sonnerie,
appuyez sur le bouton.
Le minuteur signale la fin du temps de cuisson mais n’arrête
pas l’appareil.
En fin de cuisson
•Relevez la poignée du panier à l’horizontale jusqu’au «clic» de
verrouillage.
•Ouvrez le couvercle en appuyant sur le bouton d’ouverture.
•Placez le panier sur le bord de la cuve grâce aux pattes
d’accrochage du panier et égouttez les aliments.
•Sortez le panier.
•Servez.
•Refermez le couvercle lorsque la friteuse est non utilisée.
!
!
Nous vous recommandons :
— de contrôler la cuisson : ne mangez pas les aliments frits lorsqu’ils sont brûlés. Préférez une friture
légèrement dorée.
— de nettoyer votre huile après chaque utilisation pour éviter que les résidus ne brûlent et de la
changer régulièrement.
— d’avoir un régime équilibré et varié comportant beaucoup de fruits et de légumes.
Pour une cuisson réussie et rapide, limitez la quantité de frites à 1/2 panier par bain.

6
FRFR
Tableaux de cuisson Les temps de cuisson sont donnés à titre indicatif. Ils peuvent
varier en fonction des quantités et du goût de chacun.
Frites 1000g 190°C 11-16 min.
Frites (quantité limite de sécurite) 1200g*❶ 170°C 11-13 min.
❷ 190°C 8-10 min.
Frites (quantité recommandée) 600g 170°C 11-16 min.
Croquettes de pomme de terre 8-11 190°C 9-10 min.
Poulets frits en quartiers 1 180°C 14-16 min.
Filets de poisson 1-2 170°C 6-8 min.
Champignons 8 mini 5-7 min.
Rondelles d’oignons 6-8 170°C 3-4 min.
Beignets de pommes 4 180°C 5-6 min.
Beignets 4 180°C 6-8 min.
Camembert frit 6 190°C 2-3 min.
ALIMENTS FRAIS
Nb
ALIMENTS SURGELÉS
Nb
Frites (quantité limite de sécurite) 900g 190°C 12-14 min.
Frites (quantité recommandée) 450g 170°C 9 — 13 min.
Pommes noisettes 500g 190°C 8-10 min.
Filets de poisson pané 8 190°C 5-7 min.
Nuggets de poulet 12 190°C 4-5 min.
Cuisses de poulet 1-2 190°C 14-15 min.
Beignets aux crevettes 12 170°C 4-5 min.
Rondelles d’oignons 6-8 180g 190°C 3-4 min.
* Faites toujours frire 1,2kg de frites fraîches en deux bains : une première plongée à 170°, une
deuxième plongée à 190°
7
FR
FR
Arrêtez l’appareil
•La dernière friture terminée, placez l’interrupteur Marche-Arrêt
à la position 0.
• Débranchez l’appareil.
• Laissez refroidir complètement la friteuse et la matière grasse
4 heures.
• Rangez le cordon.
• Pour déplacer la friteuse, utilisez les poignées de transport.
Ne déplacez jamais votre friteuse lorsque la matière grasse
est chaude.
Ne déplacez jamais la friteuse lorsque le couvercle est ouvert.
Filtrez la matière grasse
• Vous pouvez conserver la matière grasse dans votre friteuse ou
la mettre dans un récipient à part.
Ne versez jamais la matière grasse usagée dans l’évier.
Laissez-la refroidir puis jetez-la avec les ordures ménagères,
conformément aux réglementations locales.
La matière grasse doit être filtrée après chaque friture.
Les débris qui se détachent des aliments ont tendance à
brûler et entraînent une altération plus rapide du corps gras,
et à la longue des risques d’inflammation.
• Nous vous recommandons de changer la matière grasse toutes
les 8 à 12 utilisations.
Nettoyez le couvercle et le panier la friteuse
Ne nettoyez jamais la friteuse sans l’avoir débranchée et
laissée refroidir 4 heures auparavant.
•Retirez le couvercle.
•Nettoyez, après chaque utilisation, le couvercle et le panier au
lave-vaisselle ou à l’eau savonneuse.
•Séchez-les bien avant de les remettre en place.
Nettoyez la friteuse
•Nettoyez le corps de la friteuse avec une éponge humide et de
l’eau savonneuse. Séchez soigneusement.
Ne plongez jamais le corps de l’appareil dans l’eau, ne le
passez pas sous le robinet.
!
!
!
!
!
ref. 982775

8
FR
•L’appareil n’est pas branché.
•L’interrupteur n’est pas positionné sur la
position I.
•Le voyant de température n’est pas allumé.
•La matière grasse est dégradée.
•La matière grasse n’est pas appropriée.
•Le couvercle est mal fermé.
•Le joint d’étanchéité est défectueux.
•Trop de cuissons sans nettoyage du hublot
ou nettoyage avec un torchon non-
approprié
•Le repère maxi de remplissage de la cuve a
été dépassé.
•Le panier est déformé.
•Mélange d’huile et de matière grasse
différentes.
•Les aliments sont humides ou contiennent
trop d’eau (surgelés).
• Vous faites frire 1,2 kg de fites fraîches en 1
seul bain.
•Ils sont trop épais et contiennent de l’eau.
•Trop d’aliments sont cuits à la fois et le bain
de cuisson n’est plus à la bonne
température.
•La température du bain de friture peut-être
insuffisante : le thermostat est mal réglé.
•La pile est usagée.
•Branchez l’appareil.
•Placez l’interrupteur lumineux sur la position I.
•Placez le thermostat sur la température souhaitée et
vérifiez que le voyant de température s’allume.
•Changez le bain de friture (8 à 12 utilisations).
•Utilisez une matière grasse pour friture de bonne
qualité.
•Assurez-vous du bon verrouillage du couvercle.
•Contactez votre Centre de Service Agréé le plus
proche.
•Pour une bonne visibilité, nettoyez le couvercle au
lave-vaisselle ou passez une éponge additionnée de
détergent alimentaire citronné.
Laissez sécher le hublot à l’air ambiant ou essuyez-le
avec un torchon propre en coton.
•Vérifiez le niveau du bain (maxi) et enlevez le surplus.
Vérifiez que le panier n’est pas trop rempli.
•Changez votre panier.
•Videz et nettoyez la cuve. Remplissez la cuve avec
une seule nature de matière grasse.
•Retirez la glace des surgelés et séchez bien les
aliments. Descendez très lentement le panier.
•Respectez la cuisson en 2 bains ( voir tableaux de
cuisson p.6)
•A titre d’essai, prolongez le temps de cuisson.
•Faites frire les aliments en petites quantités (surtout
les surgelés).
•Réglez le thermostat sur la température conseillée.
•Faites -la changer au Centre de Service Agréé.
Si le problème persiste, consultez votre revendeur ou un Centre de Service Agréé.
Toute intervention doit être effectuée uniquement par un Centre de Service Agréé
avec des pièces détachées d’origine.
Consultez notre site web : www.groupeseb.com
Dégagement de mauvaises odeurs
De la vapeur s’échappe autour du couvercle
Le bain de friture déborde
Les aliments ne dorent pas et restent mous
Le minuteur ne fonctionne plus (selon modèle)
La vision à travers le hublot est mauvaise
Problèmes et causes possibles Solutions
La friteuse ne fonctionne pas

9
ENG
Description
1. Permanent metal filter
2. Viewing window (depending on
model)
3. Removable lid
4. Basket
5. Basket handle unlocking button
6. Basket hanging hooks
7. Fold-away handle
8. Frying bowl (with non-stick coating
depending on model)
9. Mini and Maxi oil level
markers
10. Carrying handles
11. Lid opening button
12. Adjustable thermostat
13. Digital timer (depending on
model)
14. On/Off switch with temperature
indicator light
15. Cord
16. Plug storage
Protection of the environment
Your appliance has been designed to work for many years. However, when you finally decide to replace it, do not
forget to think of what you can do to help to protect the environment by disposing of it at your local waste
disposal centre..
Helpline
For any problems or queries please telephone : 0845 602 14 54 — UK (calls charged at local rates)
(01) 4751947 — Ireland
or consult our web site : www.tefal.co.uk
•This appliance complies with current safety
regulations and requirements as well as directives:
— 89/336/CEE modified by 93/68/CEE
— 73/23/CEE modified by 93/68/CEE
•This electrical appliance operates at high
temperatures which may cause burns. Despite the
high heat protection of the deep fryer, do not touch
the apparent metal parts or the window.
•Do not leave the appliance switched on while
unattended.
•The basket handle may become hot after prolonged
use.
•Use and store it out of children’s reach.
•Never insert any object between the removable
bowl and the bottom of the equipment.
•Always plug in the appliance at an earthed power
socket.
•Do not use an extension lead. If you accept liability
for doing so, only use an extension lead which is in
good condition, has an earthed plug, and is suited to
the power of the equipment.
•Check that the mains voltage corresponds with that
shown on the appliance (alternating current only).
•If the appliance is used in a country other than that
of purchase, have it checked by an approved
Service Centre.
•Never use or plug in your appliance if:
— its power cord is faulty or damaged,
— the appliance has been dropped,
— it has visible damage or operating faults.
In such cases, to avoid any danger contact your
nearest approved Service Centre to have the
appliance repaired, as special tools are needed.
Never dismantle the appliance yourself. This will
negate the guarantee.
•If the power cord is damaged, it must be replaced
by an authorised service centre, in order to avoid
any danger.
•The lid’s seal should be replaced if damaged.
Contact an appoved Service Centre or call our
Helpline (see page 9).
•In the event of fire, never try to extinguish the
flames with water. Close the lid. Smother the flames
with a damp cloth.
•Do not switch on the appliance near to inflammable
materials (blinds, curtains, etc.) or close to an
external heat source (gas stove, hotplate, etc.)
•This appliance has been designed for domestic use
only. Any professional use, inappropriate use or
failure to comply with the instructions, the
manufacturer accepts no responsibility and the
guarantee does not apply.
Voltage
•This appliance is designed to work on 230-240 volts
AC only. Check that the mains supply corresponds to
that shown on the rating plate of the appliance. If the
appliance is to be used in any country other than
that of purchase, it should be checked by an
approved Service Dealer. Standards can vary from
country to country.
Important:
if the electrical cord of this appliance is damaged, it
must only be replaced by an authorised Service
Dealer. The safety of this appliance complies with
the technical regulations and standards in force.
Safety instructions
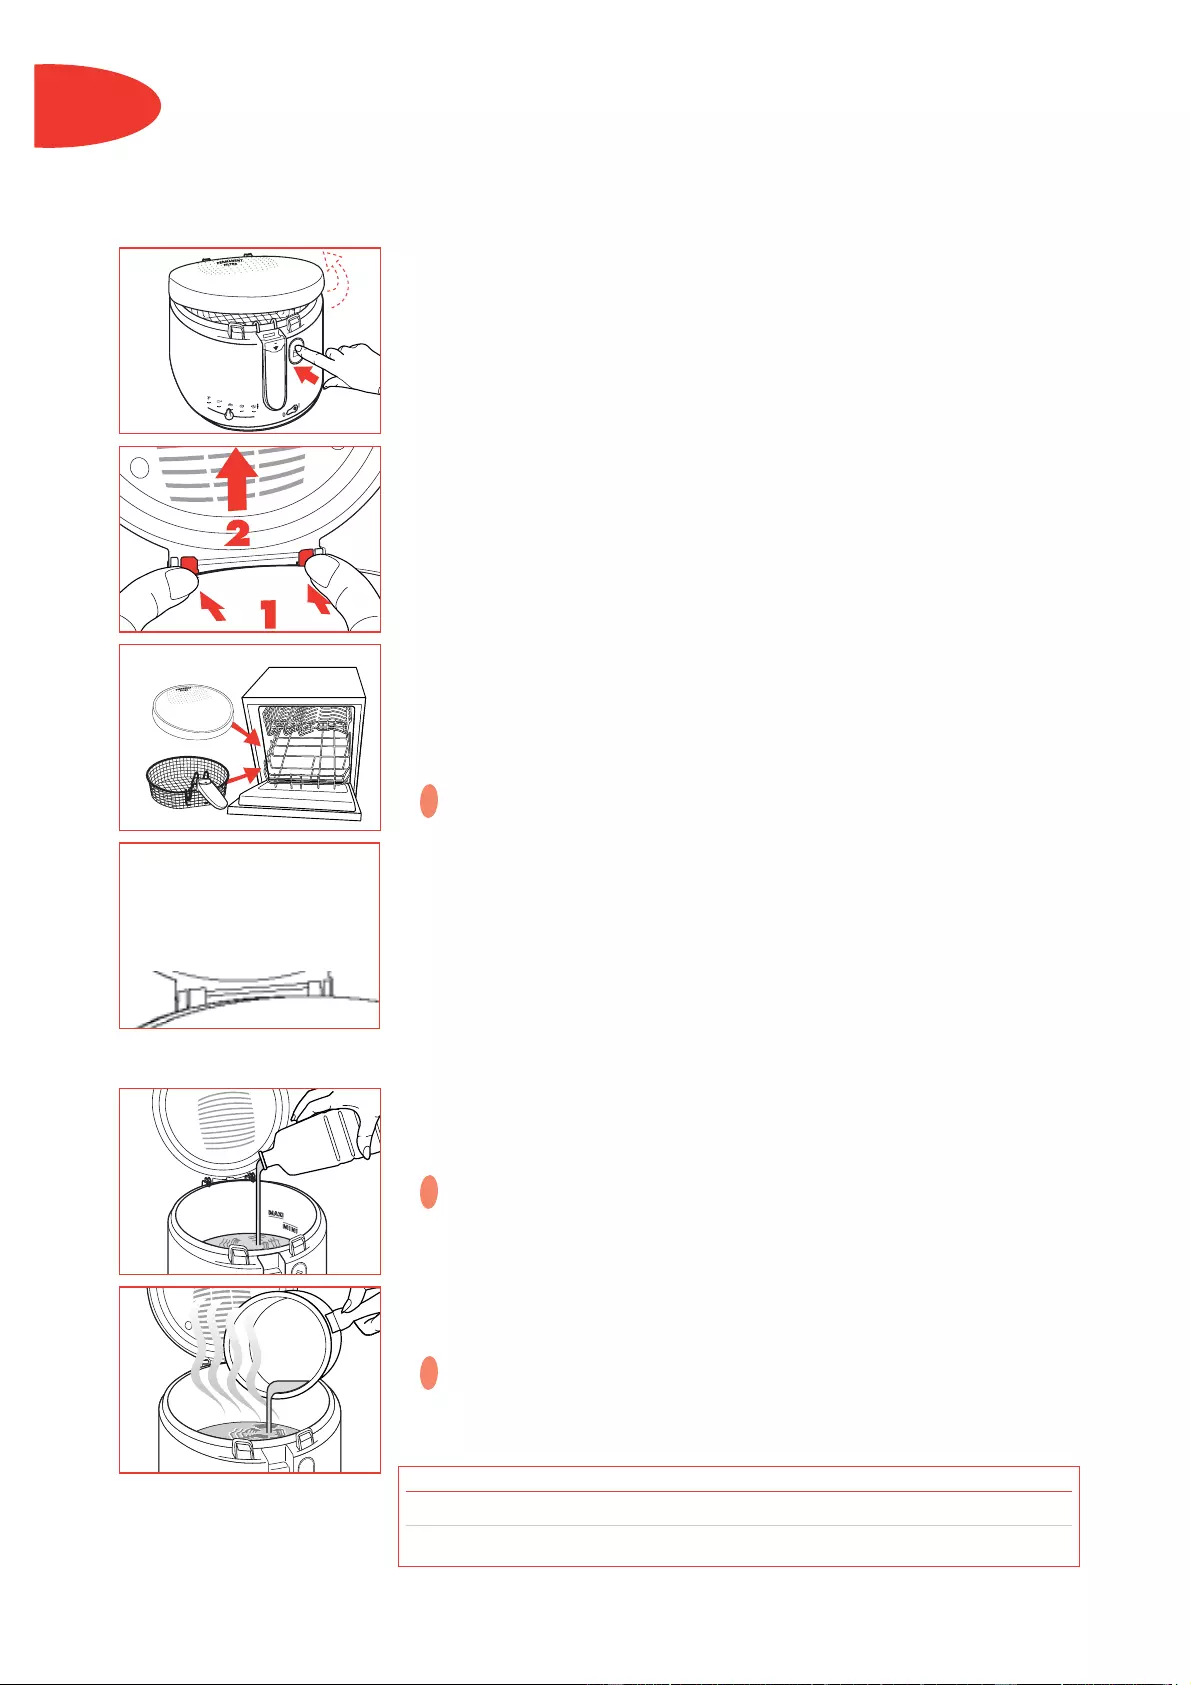
10
ENG
Before using for the first time
•Press on the lid opening button.
•Press on the two tabs that lock the lid in place and lift upwards
to remove the lid.
•Place the lid and the basket in the dishwasher or wash by hand
with warm water and washing up liquid.
•Clean the body by wiping it with a sponge and soapy water.
You should never immerse the appliance body in water.
•When the lid is thoroughly dry, place it back on the fryer.
Filling the bowl
•Use an oil recommended for frying: sunflower, blended
vegetable, etc. If using sunflower oil ensure the oil is changed
after every 5 uses.
The oil/fat level must always be between the mini and maxi
markers, stamped inside the bowl. Check this each time prior
to cooking and add some of the same type of oil if necessary.
•If you use solid vegetable fat:
Cut it into pieces and melt it in a separate pan then pour it
inside the fryer (do not let it melt in the basket , nor in the
bowl).
Do not mix different types of oil or fat.
Oil which should not be used under any circumstances and
may cause overflowing/smoking/risk of fire are: ground nut
oil, soya oil, olive oil, lard or dripping.
!
!
!
Oil Solid vegetable fat
Min. 1.8 l 1660 g
Max. 2.1 l 1910g
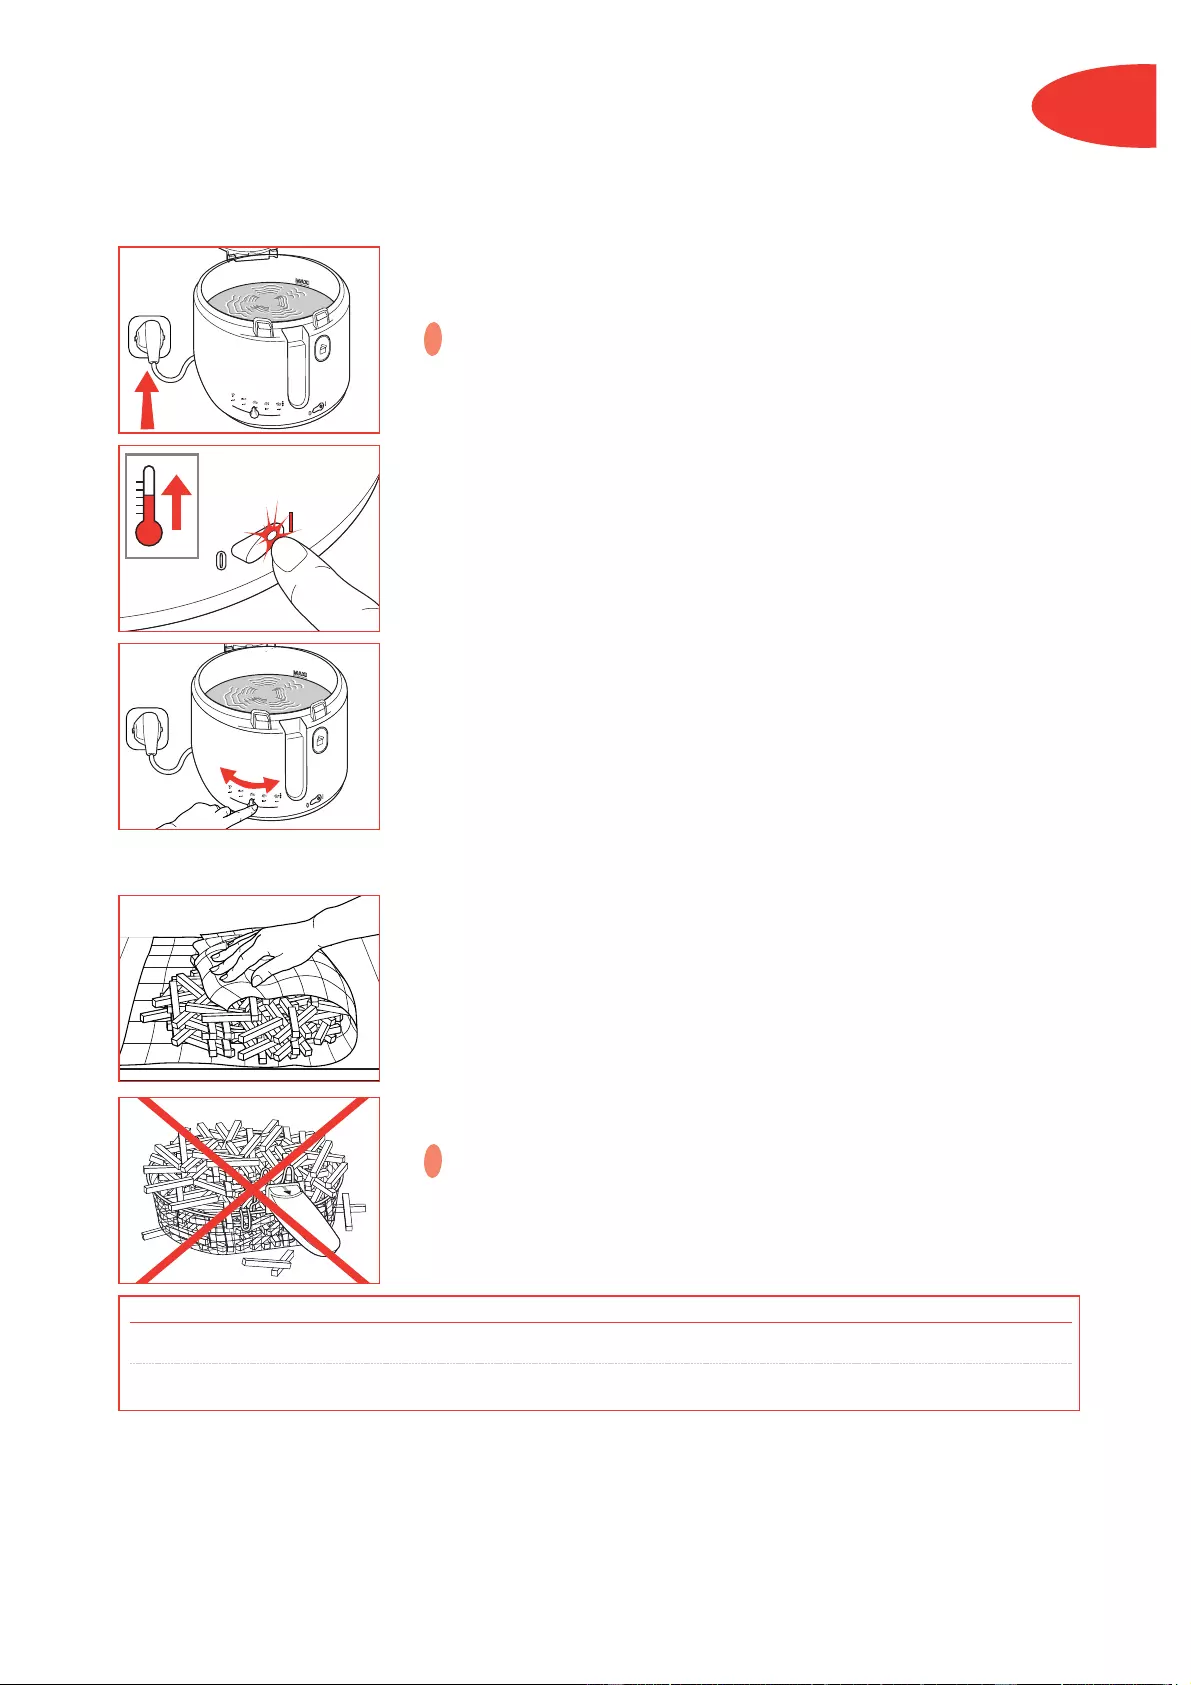
11
ENG
Preheating
•Close the lid and plug in the deep fryer.
Never operate your fryer without any oil or fat in the bowl.
• Turn the fryer on by pressing the on/off switch. The indicator
light will switch on.
• Adjust the thermostat according to the type of food to fry (see
the table of cooking times, p. 13).
Loading the basket
•Remove excess moisture (water and ice) from the food. Fill the
basket, away from the fryer, as per the chart below.
•Reduce food quantity for frozen foods (see table below and
table of cooking times p. 13).
Never exceed the maximum capacity. For a good and fast
cooking, limit the quantity of chips to 1/2 basket per frying.
!
!
Fresh potato chips Frozen potato chips
Maximum capacity 1200 g 900 g
Quantity for best results 600g 450 g
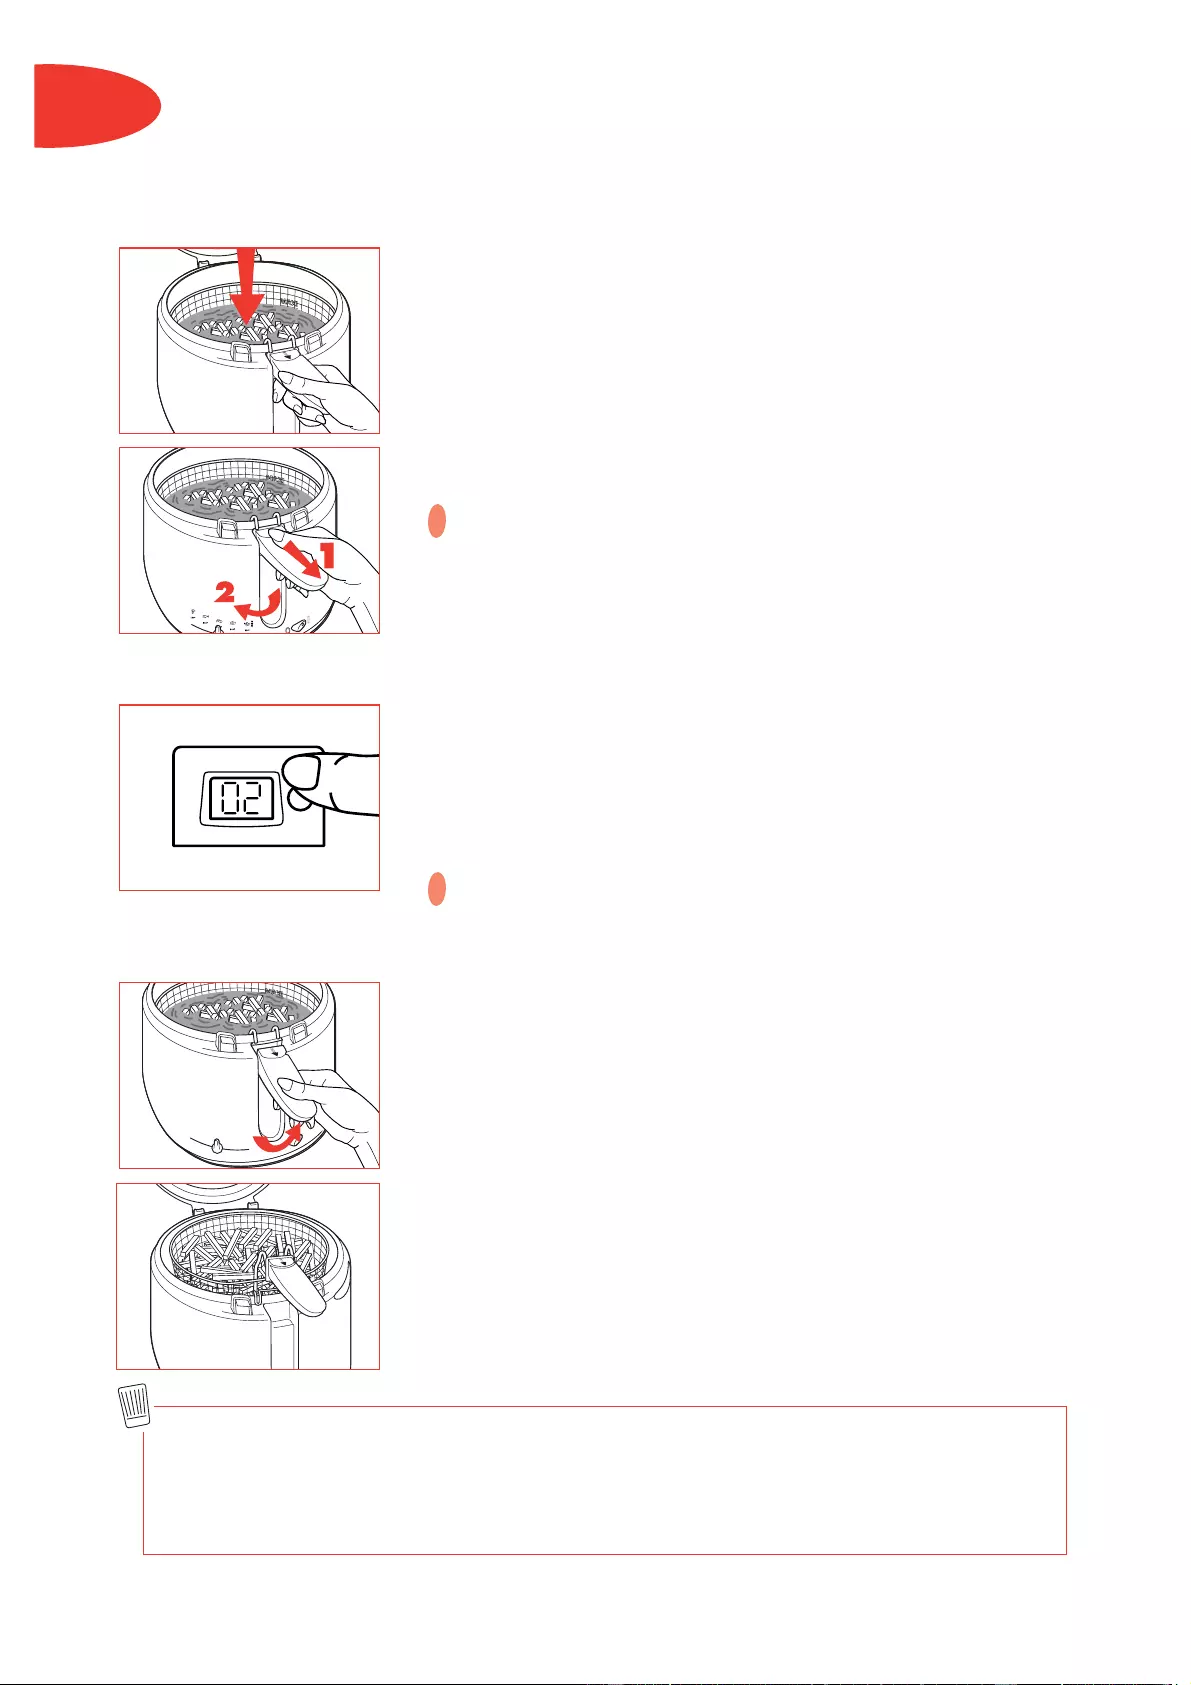
12
ENG
Lowering the basket
•After the temperature indicator light goes out place the basket
in the oil.
•Close the lid.
•The handle can be folded back fully into its housing on the
outside of the fryer.
•Keeping the lid closed during frying is recommended to help
alleviate odours and reduce splattering.
Warning: do not place your hand above the filter or on the
window. The steam and glass are very hot. The steam coming
from the filter is extremely hot, so are the window and metallic
parts
Setting the timer
(depending on model)
•Press the button to set the time, minute by minute. Release the
button. The time displayed is selected and the countdown
begins.
•If you make a mistake, or want to cancel the time selected,
press the button for 2 seconds. To stop the timer alarm, press
the button.
The timer signals that the cooking time is complete, but does
not switch off the fryer.
At the end of cooking time
•Press the handle unlocking button. Lift the handle horizontally,
until you hear a click as it locks.
•Open the lid.
•Place the basket on the edge of the bowl with basket hanging
clips. Let the food drain.
•Remove the basket.
•Serve the food.
• Close the lid when the fryer is not in use.
•To use a second time wait for the temperature indicator light to
go out before frying.
!
!
We recommend you to:
— Control the cooking: do not eat very brown or burnt food, but golden food.
— Clean your oil after each use to avoid burnt crumbs and change it regularly.
— Eat a balanced and varied diet which includes plenty of fruits and vegetables.
For a good and fast cooking, limit the quantity of chips to 1/2 basket per frying.
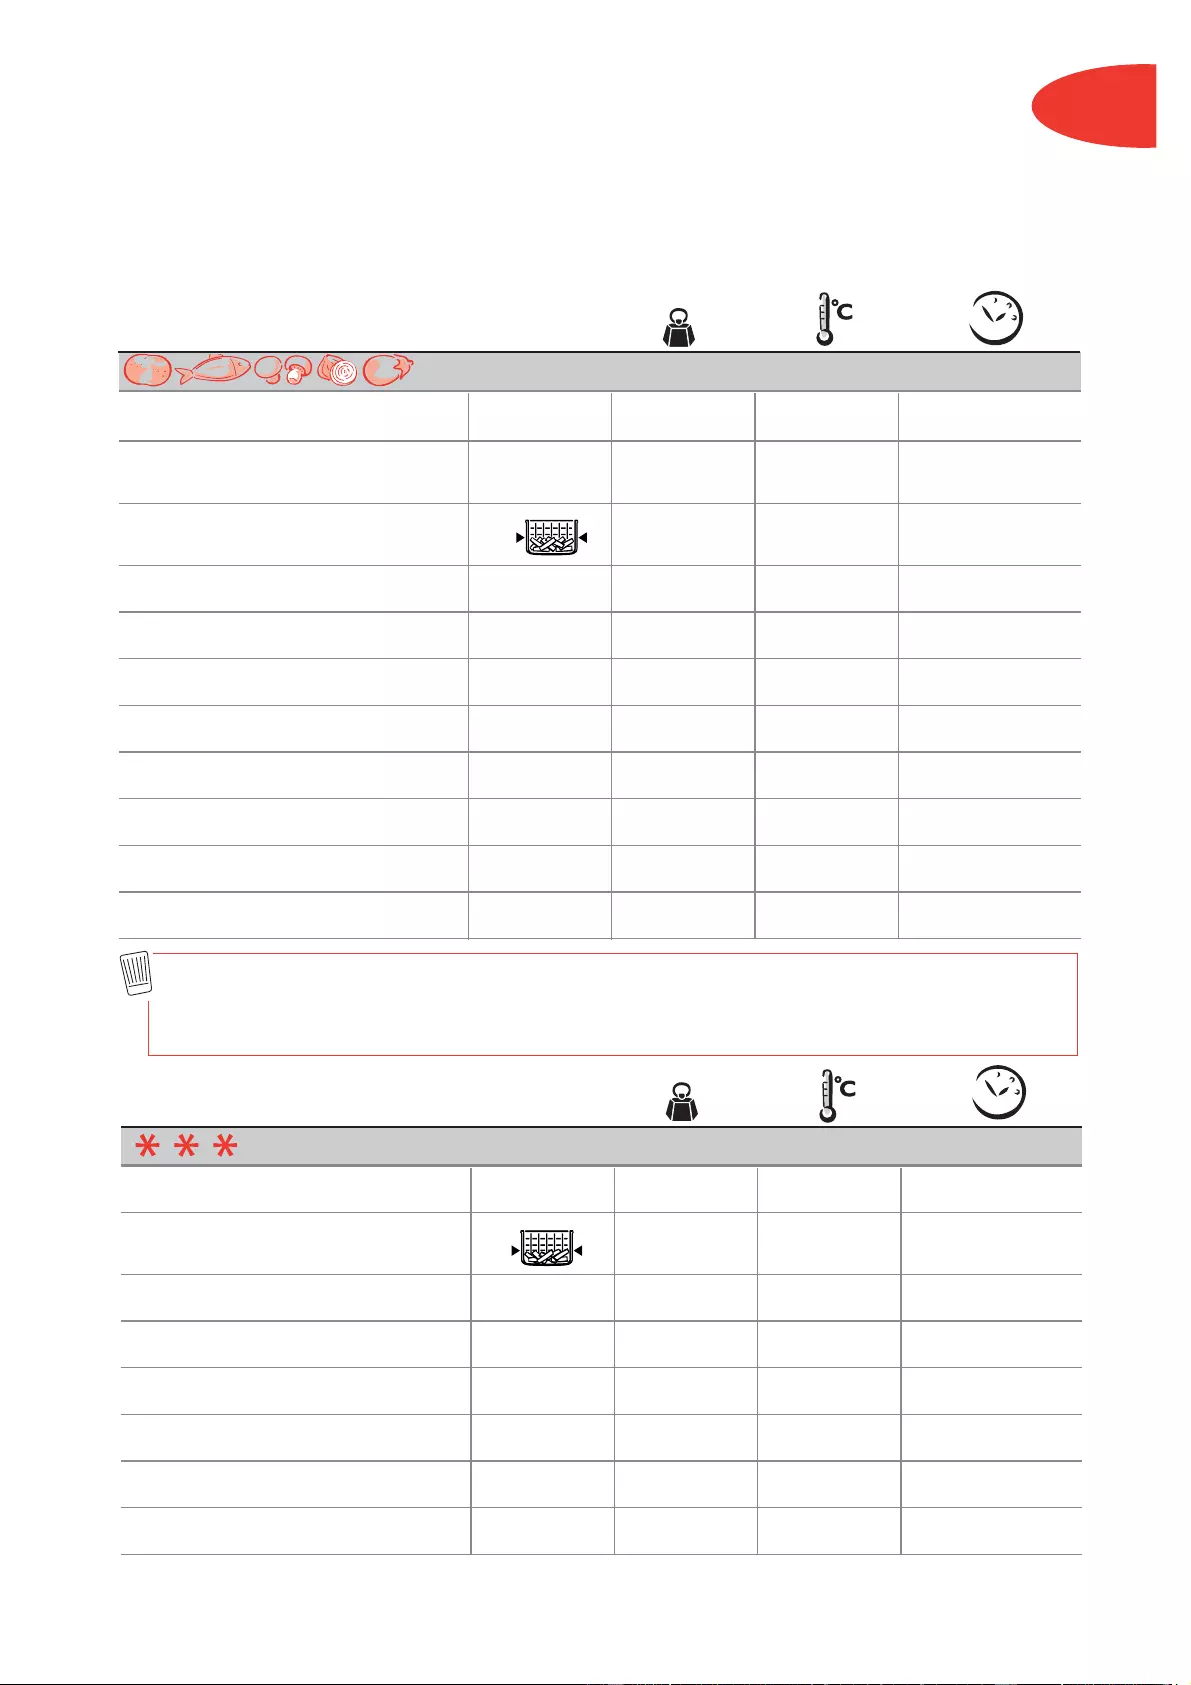
13
ENG
Table of
cooking times The times given are only a guide and may vary depending on
quantities and personal taste. Thicker foods may require turning
halfway through frying to ensure even cooking on both sides.
Chips 1000g 190°C 11-16 min.
Chips
(maximum quantity)
1200g*❶ 170°C 11-13 min.
➋ 190°C 8-10 min.
Chips (quantity recommended 600g 190°C 11-16 min.
for best results)
Battered cod fillet 8-11 190°C 9-10 min.
Fried Chicken (leg portion) 1-2 180°C 14-16 min.
Breaded plaice fillet 1-2 170°C 6-8 min.
Fried whole mushrooms 8 mini 5-7 min.
Fried onion rings 6-8 170°C 3-4 min.
Apple fritters 4 180°C 5-6 min.
Ring doughnuts 4 180°C 6-8 min.
Breaded camembert wedge 6 190°C 2-3 min.
FRESH FOOD
No.
FROZEN FOOD
No.
Chips
(maximum quantity)
900g 190°C 12-14 min.
Chips (quantity recommended 450g 170°C 9 — 13 min.
for best results)
American style thin cut chips 500g 190°C 8-10 min.
Fish fingers 8 190°C 5-7 min.
Chicken nuggets 12 190°C 4-5 min.
Fried Chicken (leg portion) 1-2 190°C 14-15 min.
Breaded scampi 12 170°C 4-5 min.
Fried onion rings 6-8 180g 190°C 3-4 min.
* Always fry freshly made chips twice: a first fry at 170°C and a second fry at 190°C.
Cooks tip: When cooking battered foods or doughnuts, remove the wire basket to prevent food
sticking to it. Take great care when handling the food and use tongs. Gradually place the food in the
hot oil, submerging it an inch at a time to prevent it from sinking straight away.
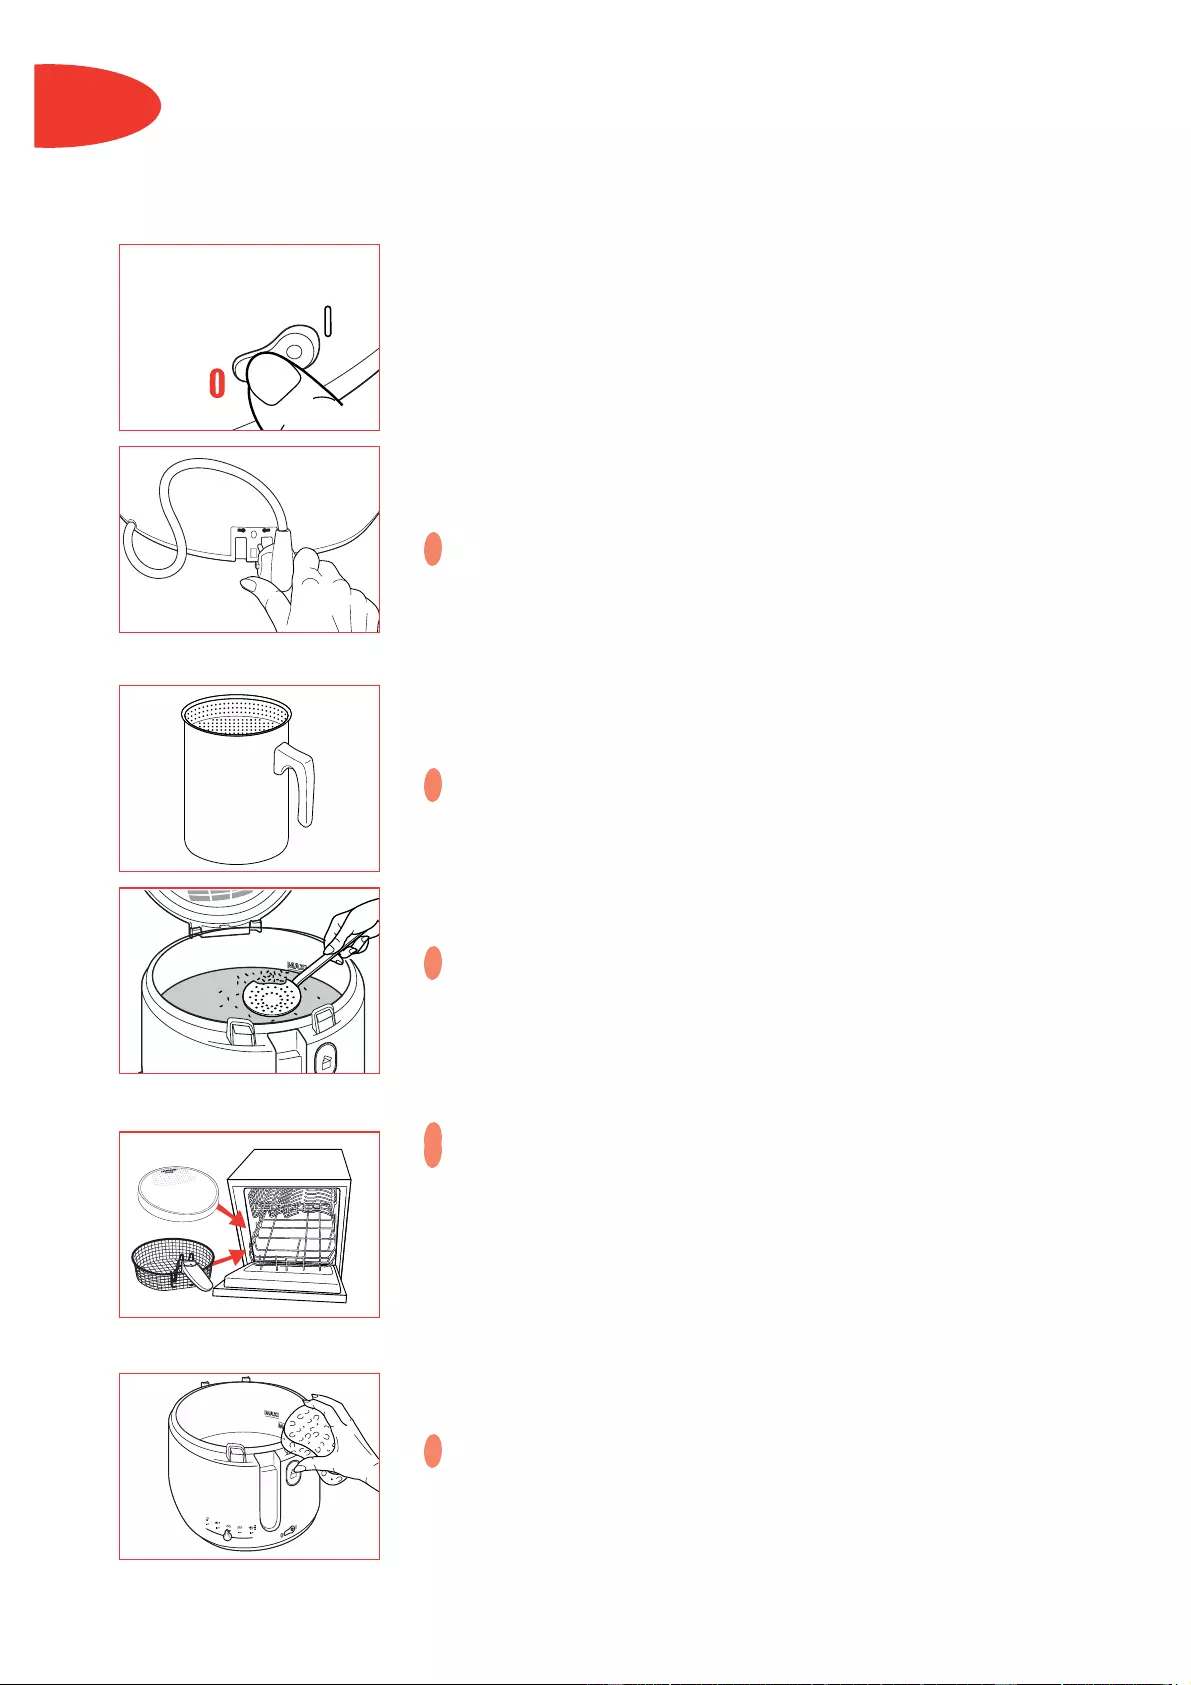
ENG
Switching off the fryer
•When you have finished frying, press the switch to the 0
position.
• Unplug the fryer.
• Leave the fryer (and the oil inside) to cool completely (approx.
4 hours).
• Store the plug.
• Move the fryer using the carrying handles.
Never move the fryer while the oil or fat is still hot. Never
move the fryer with the lid open.
Filtering the oil
•Remove small pieces of food with a non-metallic skimmer. You
may store the oil or fat in the fryer, or in separate airtight
container.
Filter the oil after each use with filter paper (available from
approved Service Centres) or a filter pot. Crumbs that break
away from food tend to burn and alter the quality of the oil
more rapidly. Over time, this increases the risk of catching
fire. For this reason, filter the oil regularly.
•We recommend changing the oil after a maximum of 8 to 12
uses. If using sunflower oil, change after every 5 uses.
Do not pour used oil into the sink. Leave it to cool, and
throw it away with the household waste — according to the
local community regulations-.
Cleaning the lid and the bask et
Never clean the fryer unless it has been unplugged and left to
cool completely beforehand (approx. 4 hours).
•Remove the lid from the fryer.
•Clean the lid and the basket after each use in a dishwasher or
by wiping it with a damp sponge and washing-up liquid.
•Dry the lid before replacing it. The lid is fitted with a permanent
metallic filter, you don’t need to change it.
Cleaning the fryer
•Clean the bowl and the body using a damp sponge with some
washing-up liquid. Dry carefully.
Never immerse the appliance in water, or put it under the
tap.
!
!
!
!
!
!
ref. 982775
14
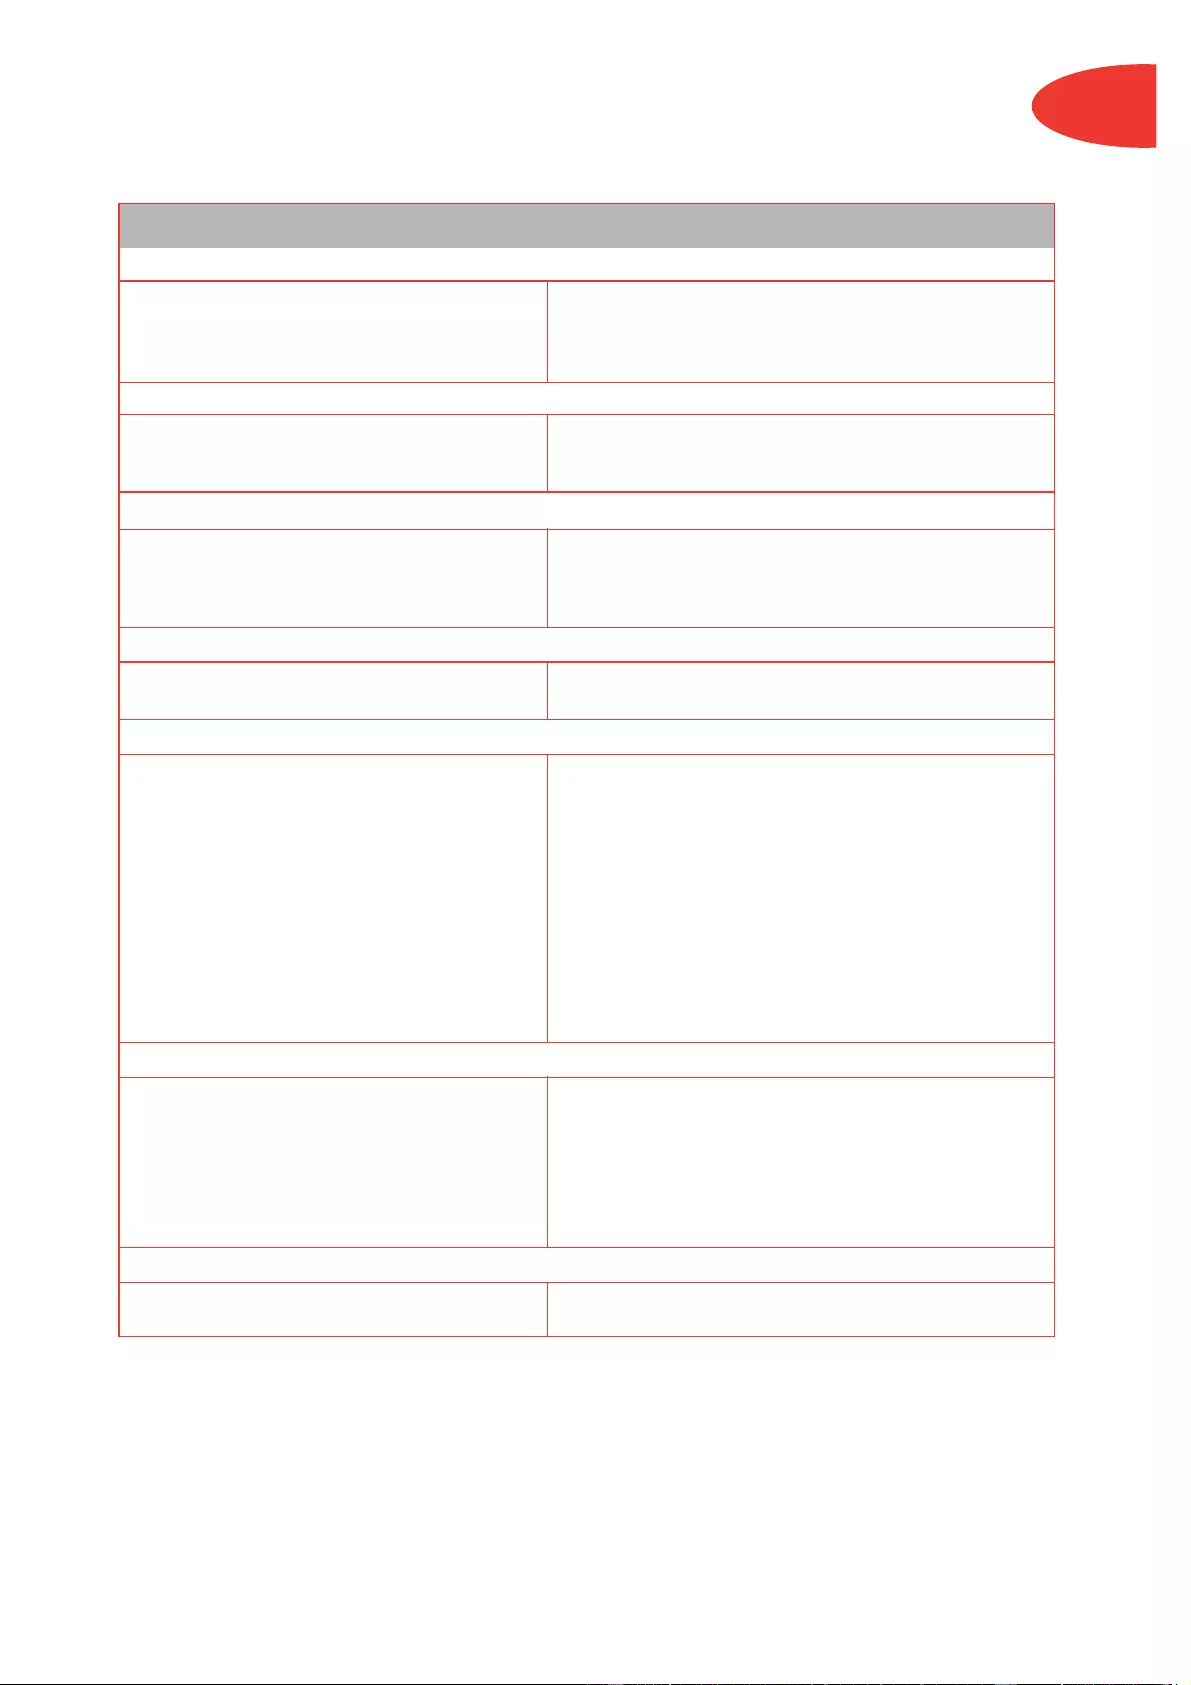
15
ENG
• The fryer is not plugged in.
• The on-off switch is not set to I.
• The temperature indicator light does not
come on..
• The anti-odour filter is saturated.
• The oil has deteriorated.
•Unsuitable oil has been used.
•Not cleaning the window often enough or
using an inappropriate cloth.
• The lid is not closed properly.
• The seal is defective.
• The Max. marker for filling the bowl has
been exceeded.
• Overfilling the basket with food.
• The basket is misshapen.
• Mixture of different oils and fats.
• Food is wet or contains too much water
(frozen food).
•Not changing the oil often enough. Using
the wrong oil.
• Frying 1,2 kg of fresh chips in one fry.
•They are too thick and contain a lot of
water.
• Too much food is being cooked at the same
time and the cooking oil is no longer at the
right temperature.
• The frying oil temperature may not be high
enough; the thermostat is set incorrectly.
•The battery is spent.
• Plug in the fryer.
• Set the light switch to I.
• Set the thermostat to the required temperature and
check that the temperature indicator light comes on.
• Replace it.
• Renew the oil after 8 to 12 uses.
• Use a good quality blended vegetable oil.
•To ensure good visibility, clean the viewing window
by wiping it with a sponge and lemon juice.
• Allow the window to dry at room temperature or dry
with a clean cotton cloth.
• Check that the lid is properly locked closed.
• Contact your nearest approved Service Centre.
• Check the oil level (Max.), and remove the excess.
• Check that the basket is not too full.
• Change your basket.
• Empty and clean the bowl. Refill the bowl with one
type of oil.
• Remove the ice and dry the food thoroughly. Lower
the basket very slowly.
•Only use vegetable oil / fats.
•Always cook them in 2 fries : 1st fry 13 min. at 170°,
2nd fry 10 min. at 190°.
• As a test, try a longer cooking time.
• Fry the food in small quantities (particularly frozen
food).
• Set the thermostat to the recommended temperature.
•Have it replaced at an approved Service Centre.
Any repairs must only be carried out by an approved Servicing Centre with the
manufacturer’s own replacement parts.
If the problem remains, please call our Customer Relations team first for expert help and
advice on:
HELPLINE : 0845 602 14 54 — UK (calls charged at local rates)
(01) 4751947 — Ireland
or consult our web site : www.tefal.co.uk
Unpleasant odours
Vision through the viewing window is not clear
The frying oil overflows
The food does not become golden and remains soggy
The timer no longer works (depending on model)
Steam escapes from around the lid
Problems and possible causes Solutions
The deep fryer does not work

Beschrijving van het apparaat
1. Permanent metalen filter
2. Kijkvenster (afhankelijk van het
model)
3. Deksel
4. Frituurmandje
5. Ontgrendelingsknop van het
frituurmandje
6. Ophanghaakjes mandje
7. Inklapbaar handgreep
8. Binnenpan met anti-aanbaklaag
(afhankelijk van het model)
9. Vulstreepjes voor het minimum
en maximum olie/vetniveau
10. Handgrepen voor het
verplaatsen van de friteuse
11. Knop voor het automatisch
openen van het deksel
12. Regelbare thermostaat
13. Timer (niet op alle modellen aanwezig)
14. Aan/uit— schakelaar met
controlelampje
15. Snoer
16. Snoeropbergruimte
Bescherming van het milieu
•Dit apparaat is ontworpen om vele jaren mee te gaan. Denk op het moment dat u een nieuw apparaat
overweegt aan te schaffen aan de bijdrage die u kunt leveren aan een schoner milieu en gooi het oude apparaat
nooit zomaar weg.
Veiligheidsvoorschriften
•Dit apparaat is uitgevoerd overeenkomstig de
huidige normen en veiligheidsvoorschriften:
— EMC richtlijn 89/336, gewijzigd door 93/68
— Laagspanningsrichtlijn 73/23 gewijzigd door 93/68
•Tijdens het gebruik van dit apparaat kunnen hoge
temperaturen bereikt worden, die verbrandingen
kunnen veroorzaken. De metalen delen niet
aanraken voordat deze volledig zijn afgekoeld.
•Laat de friteuse nooit zonder toezicht aan staan.
• De handgreep van het mandje kan heet worden bij
langdurig gebruik.
•Houd het apparaat buiten bereik van kinderen.
• Zorg dat er zich nooit iets tussen de uitneembare
binnenpan en de bodem van het apparaat bevindt.
•Sluit het apparaat altijd aan op een geaard
stopcontact.
•Gebruik voor dit apparaat geen verlengsnoer. Doet u
dit toch -op eigen verantwoordelijkheid- gebruik dan
een in perfecte staat verkerend verlengsnoer
voorzien van een geaarde stekker en met een
toelaatbare belasting die ten minste gelijk is aan het
vermogen van de friteuse.
•Controleer of de spanning (V) aangegeven op het
typeplaatje van de friteuse overeenkomt met die van
uw lichtnet (uitsluitend wisselstroom).
•Wordt de friteuse in een ander land gebruikt dan het
land van aankoop, laat hem dan vóór gebruik
nakijken door een erkende servicedienst.
•Sluit het apparaat nooit aan en gebruik het niet als:
— het snoer beschadigingen vertoont,
— het apparaat gevallen is,
— het apparaat beschadigingen vertoont of niet
normaal werkt.
•Neem in één van deze gevallen, om elk gevaar te
voorkomen, contact op met de fabrikant of een
erkende servicedienst. Voor reparatie van dit
apparaat is speciaal gereedschap nodig. Demonteer
de friteuse nooit zelf.
•Indien het snoer beschadigd is, moet het door de
fabrikant, een reparatiedienst van de fabrikant of
ander erkend reparateur vervangen worden om elk
gevaar te voorkomen.
•In geval van brand, vlammen nooit proberen te
doven met water. Doe het deksel dicht en doof de
vlammen met een vochtige doek
•De friteuse niet gebruiken in de directe nabijheid van
brandbare materialen (rolgordijnen, lamellen,
gordijnen, vitrage enz.), noch in de buurt van een
warmtebron (gasfornuis, kookplaat e.d.).
•Dit apparaat is uitsluitend bedoeld voor normaal
huishoudelijk gebruik. Bij (semi-)professioneel of
onjuist gebruik en elk gebruik niet overeenkomstig
de gebruiksaanwijzing, vervalt het recht op garantie
en accepteert de fabrikant geen
verantwoordelijkheid op eventueel ontstane schade.

17
NL
FR
Vóór het eerste gebruik
•Het deksel gaat automatisch open door op de daarvoor
bestemde knop te drukken.
•Zet de deksel verticaal omhoog en haal hem eraf.
•Maak het deksel en het frituurmandje schoon in de
vaatwasmachine.
•Maak de behuizing van de friteuse schoon met een vochtige
doek met afwasmiddel.
Dompel het apparaat nooit onder in water of enige andere
vloeistof.
•Plaats het deksel terug op de friteuse.
Vullen van de binnenpan
•Kiest u voor olie, gebruik dan altijd plantaardige olie die
geschikt is voor frituren: bijv. zonnebloemolie, arachide — olie,
olijfolie, druivenpitolie, palmolie.
Het frituurvet moet zich altijd tussen de minimum en
maximum vulstreepjes bevinden. Controleer vóór elke
frituurbeurt of extra vet of olie (van dezelfde soort) nodig is.
•Gebruikt u blokken frituurvet:
— Snij deze dan vóór gebruik in kleinere stukken en plaats ze op
de bodem van de binnenpan (nooit in het mandje). Nog
veiliger is het om het vet apart in een steelpannetje te laten
smelten.
Meng nooit verschillende soorten olie en/of vet.
!
!
!
Olie Vet
Min. 1,8 l 1660 g
Max. 2,1 l 1910 g
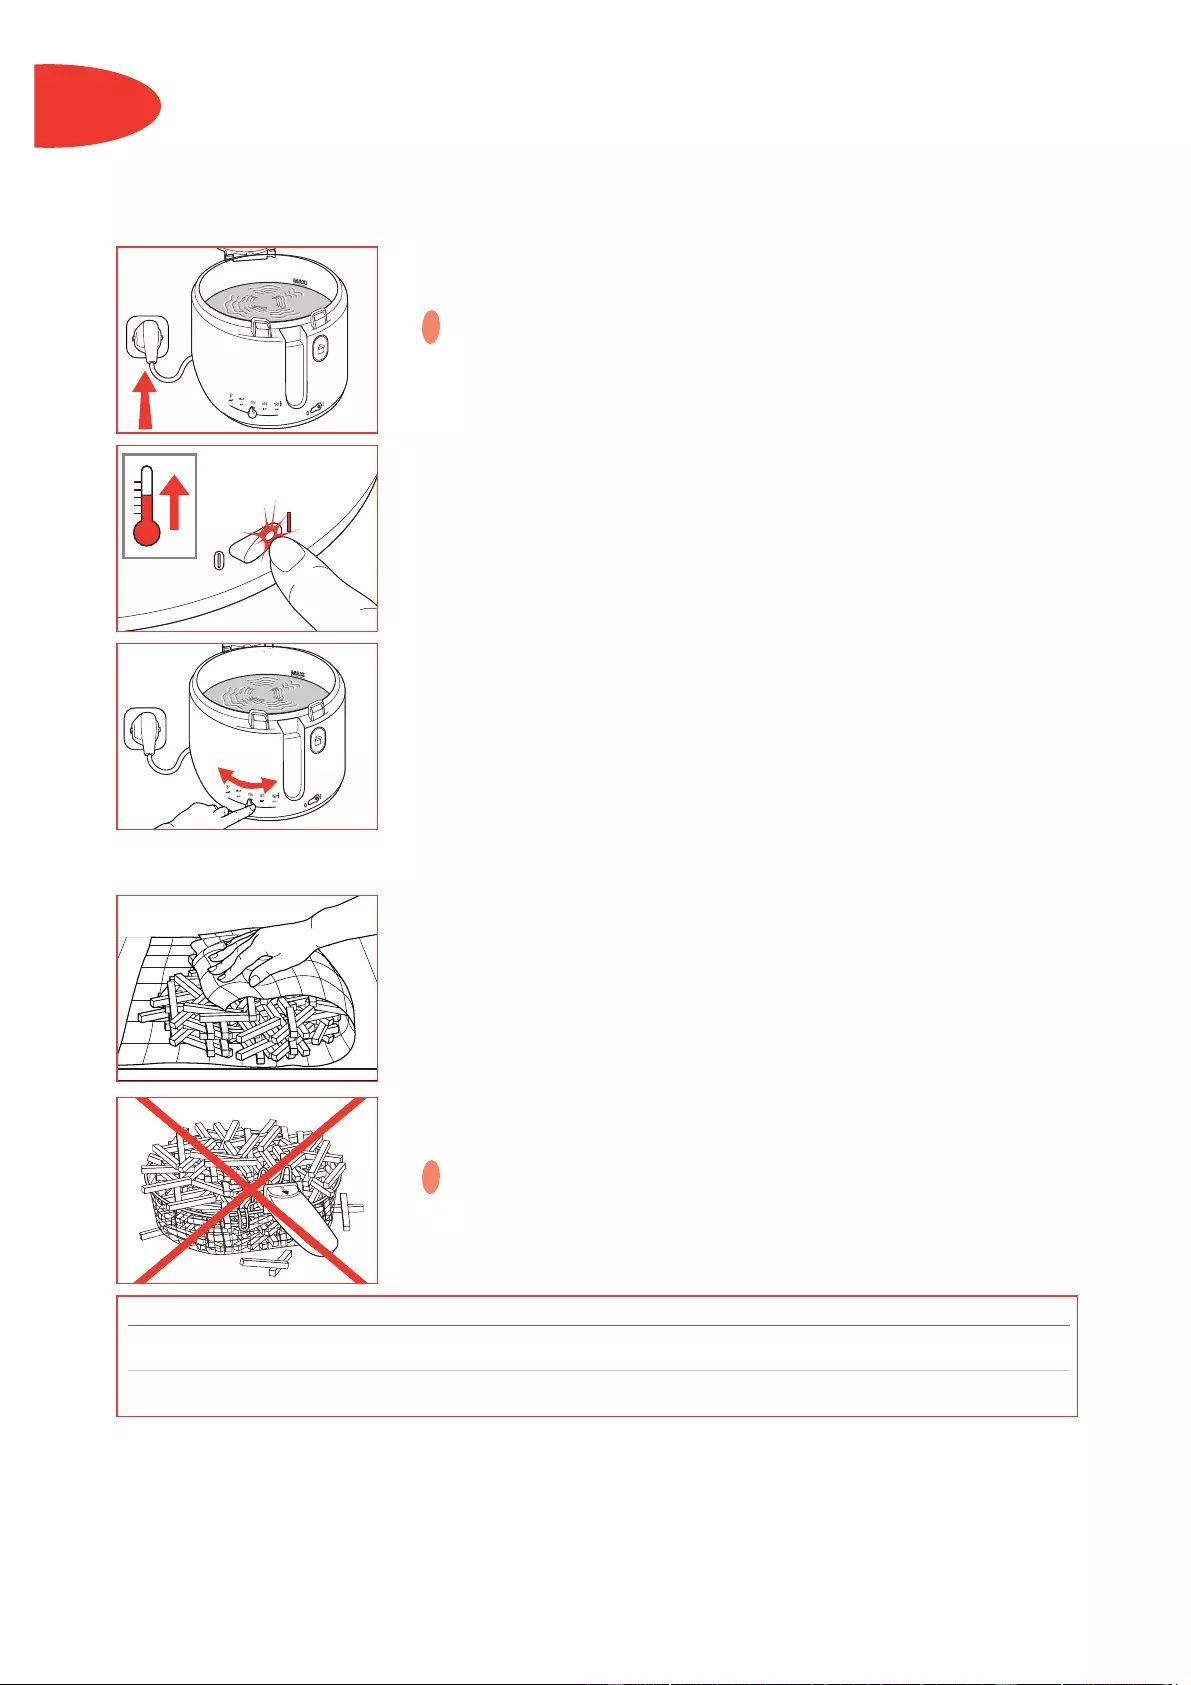
18
NL
Voorverwarmen
•Steek de stekker in het stopcontact.
Zet nooit de friteuse aan zonder olie of vet.
• Zet de aan/uit-schakelaar op stand I.
• Stel de thermostaat in op de juiste stand (zie eventueel de
tabellen op blz. 20).
Vullen van het frituurmandje
•Droog de etenswaren goed af. Zorg ervoor dat de te frituren
producten zo droog mogelijk zijn (bij diepvriesproducten het ijs
verwijderen) om de stoomafgifte zoveel mogelijk te reduceren.
Vul het mandje volgens de onderstaande tabel (niet vullen
boven de friteuse).
• Frituur diepvriesproducten altijd in kleinere porties (zie
kooktabellen, p. 20).
Vul nooit boven de aangegeven maximale hoeveelheid.
FR
!
!
Verse frites Diepvries frites
Maximale hoeveelheid
1200 g 900 g
Max. aanbevolen hoeveelheid voor een optimaal resultaat
600 g 450 g
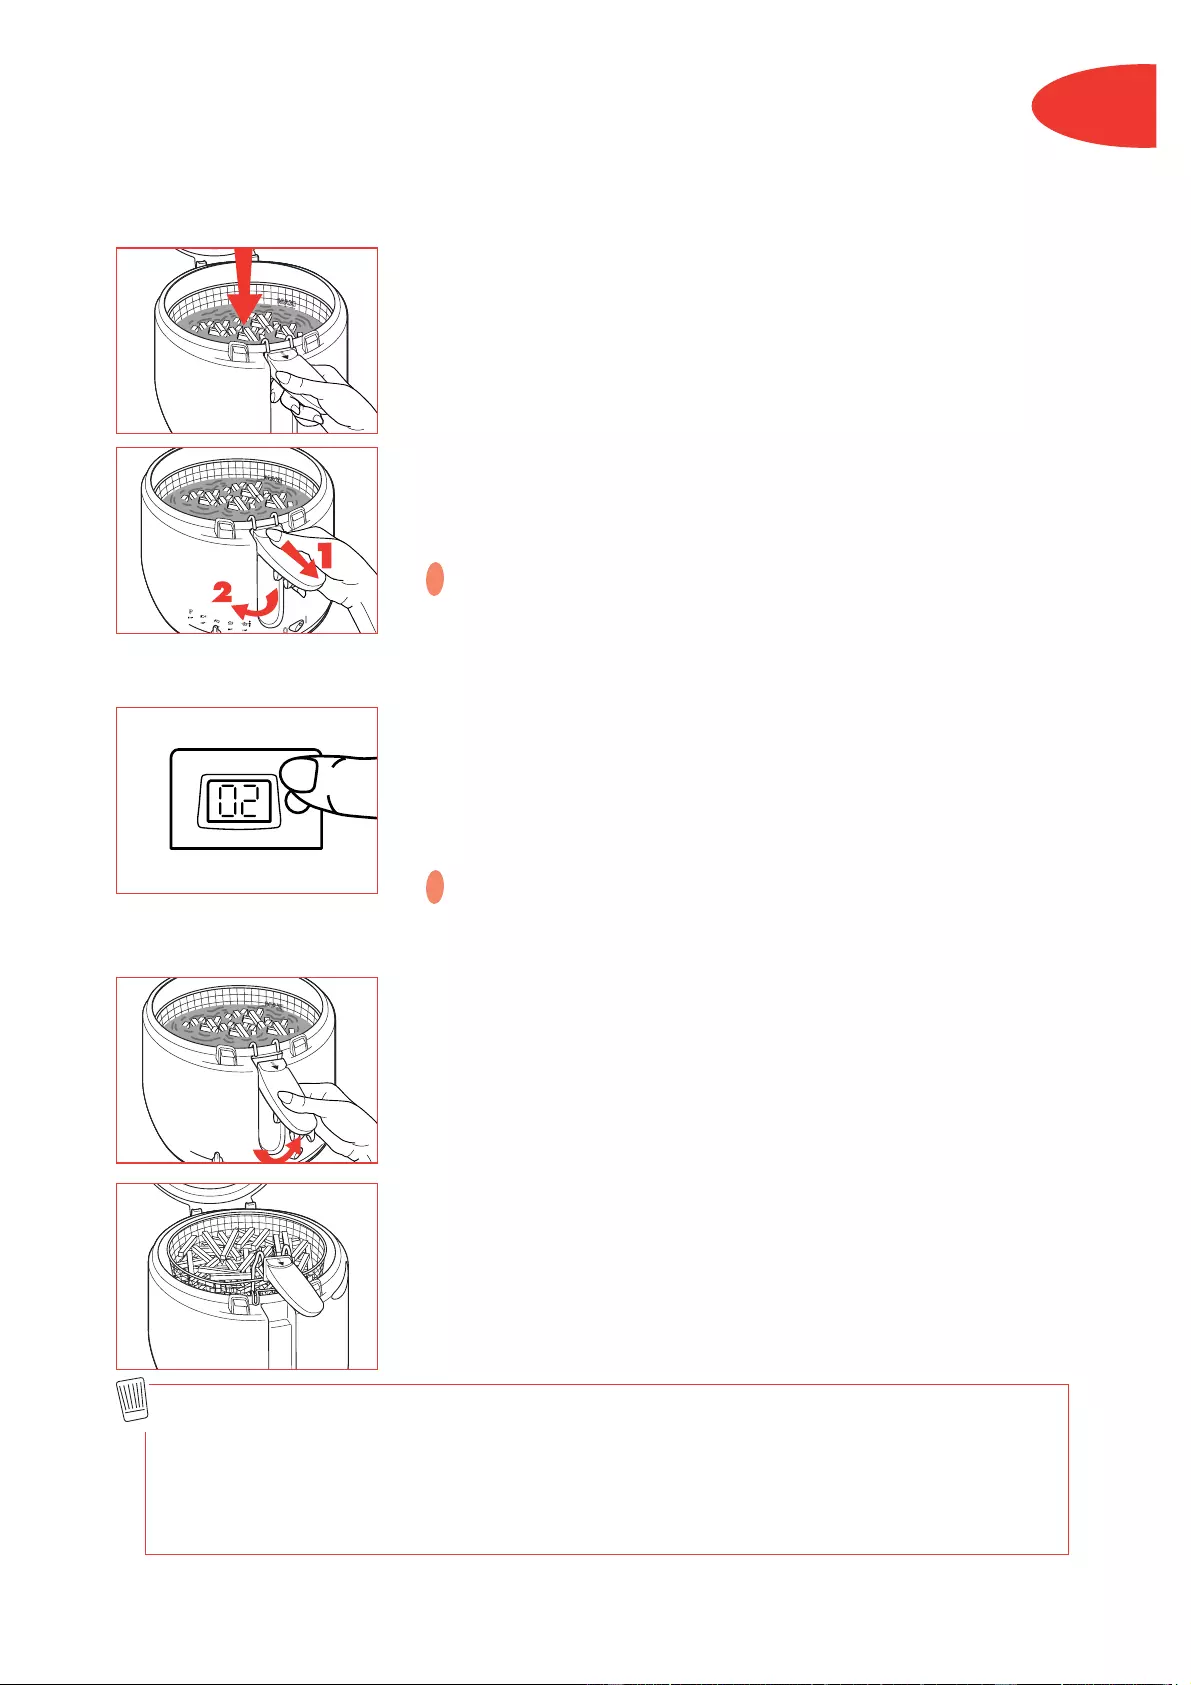
19
NL
FR
Het mandje in de olie laten zakk en
•Hang het mandje aan de rand van de binnenpan.
•Als het controlelampje uitgaat, het mandje laten zakken.
•Vouw de handgreep in de behuizing aan de buitenkant van de
friteuse.
•Druk het deksel goed dicht.
•Tijdens en na het frituren kan het zijn dat er condensdruppels in
de hete olie vallen. Het (knallende) geluid dat dit met zich
meebrengt, is de normale reactie van vocht op hete olie en
heeft geen nadelige gevolgen op de werking van uw friteuse.
Attentie: houd uw hand tijdens het frituren niet boven het
anti-reukfilter en raak het kijkvenster (afhankelijk van het
model) niet aan. De stoom en het glazen venster zijn erg
heet.
Instellen van de timer
(niet op alle modellen aanwezig)
•Druk de toets in om de tijd per minuut in te stellen. Laat de
toets los als de gewenste tijd in het venster verschijnt, de
frituurtijd gaat nu in.
• Vergist u zich of wilt u de ingestelde tijd wissen, houd de toets
dan 2 seconden lang ingedrukt. De toets ook indrukken om het
waarschuwingssignaal stop te zetten.
De timer geeft aan het einde van de ingestelde tijd een
waarschuwingssignaal, maar beëindigt de frituurtijd niet.
Uitnemen van het frituurmandje
•Klap de handgreep van het mandje weer uit totdat u de klik van
de vergrendeling hoort.
•Open het deksel.
•Plaats het mandje met de ophanghaakjes op de rand van de
binnenpan. Laat de producten uitlekken.
•Haal het mandje uit de friteuse en zorg ervoor dat u het
stangetje ook helemaal eruit haalt.
•Sluit het deksel en serveer het gerecht.
•Laat het deksel dicht als u de friteuse niet gebruikt.
!
!
Enkele tips:
— Controleer het bakproces: eet geen verbrand of te bruin voedsel, maar goudkleurig voedsel.
— Zuiver na elk gebruik de olie om te vermijden dat er verbrande resten achterblijven en ververs de olie
regelmatig.
— Eet evenwichtig en gevarieerd en vooral veel groenten en fruit.
Om de patat goed en snel te bakken, raden wij u aan om niet meer dan een half mandje patat per keer
te bakken.

20
NL FR
Frituurtabellen De in deze tabellen genoemde frituurtijden zijn slechts een richtlijn. Zij
kunnen variëren afhankelijk van de hoeveelheid en ieders persoonlijke
smaak.
* Frituur verse frites altijd in twee keer: de 1e frituurbeurt 11-13 min. op 160°C en de 2e
frituurbeurt 8-10 min. op 190°C.
Frites 1000g 190°C 11-16 min.
Frites (Max. hoeveelheid) 1200g*❶170°C 11-13 min.
➋190°C 8-10 min.
Frites (Aanbevolen hoeveelheid voor 600g 170°C 11-16 min.
een optimaal resultaat)
Aardappelkroketjes 8-11 190°C 9-10 min.
Gefrituurde stukken kip 1 180°C 14-16 min.
Visfilet 1-2 170°C 6-8 min.
Champignons 8 mini 5-7 min.
Uienringen 6-8 170°C 3-4 min.
Appelflappen 4 180°C 5-6 min.
Zoete soesjes 4 180°C 6-8 min.
VERSE PRODUCTEN
Aantal
DIEPVRIES PRODUCTEN
Aantal
Frites (Max. hoeveelheid) 900g 190°C 12-14 min.
Frites (Aanbevolen hoeveelheid voor 450g 170°C 9 — 13 min.
een optimaal resultaat)
Aardappelbolletjes 500g 190°C 8-10 min.
Vissticks 8190°C 5-7 min.
Gefrituurde stukken kip 1-2 190°C 14-15 min.
Kipnuggets 12 190°C 4-5 min.
Champignons 12 190°C 4-5 min.
Garnalenbeignets 1-2 170°C 4-5 min.
Uienringen 6-8 180g 190°C 3-4 min.
* Frituur verse frites altijd in twee keer: de 1e frituurbeurt 11-13 min. op 170°C en de 2e
frituurbeurt 8-10 min. op 190°C.
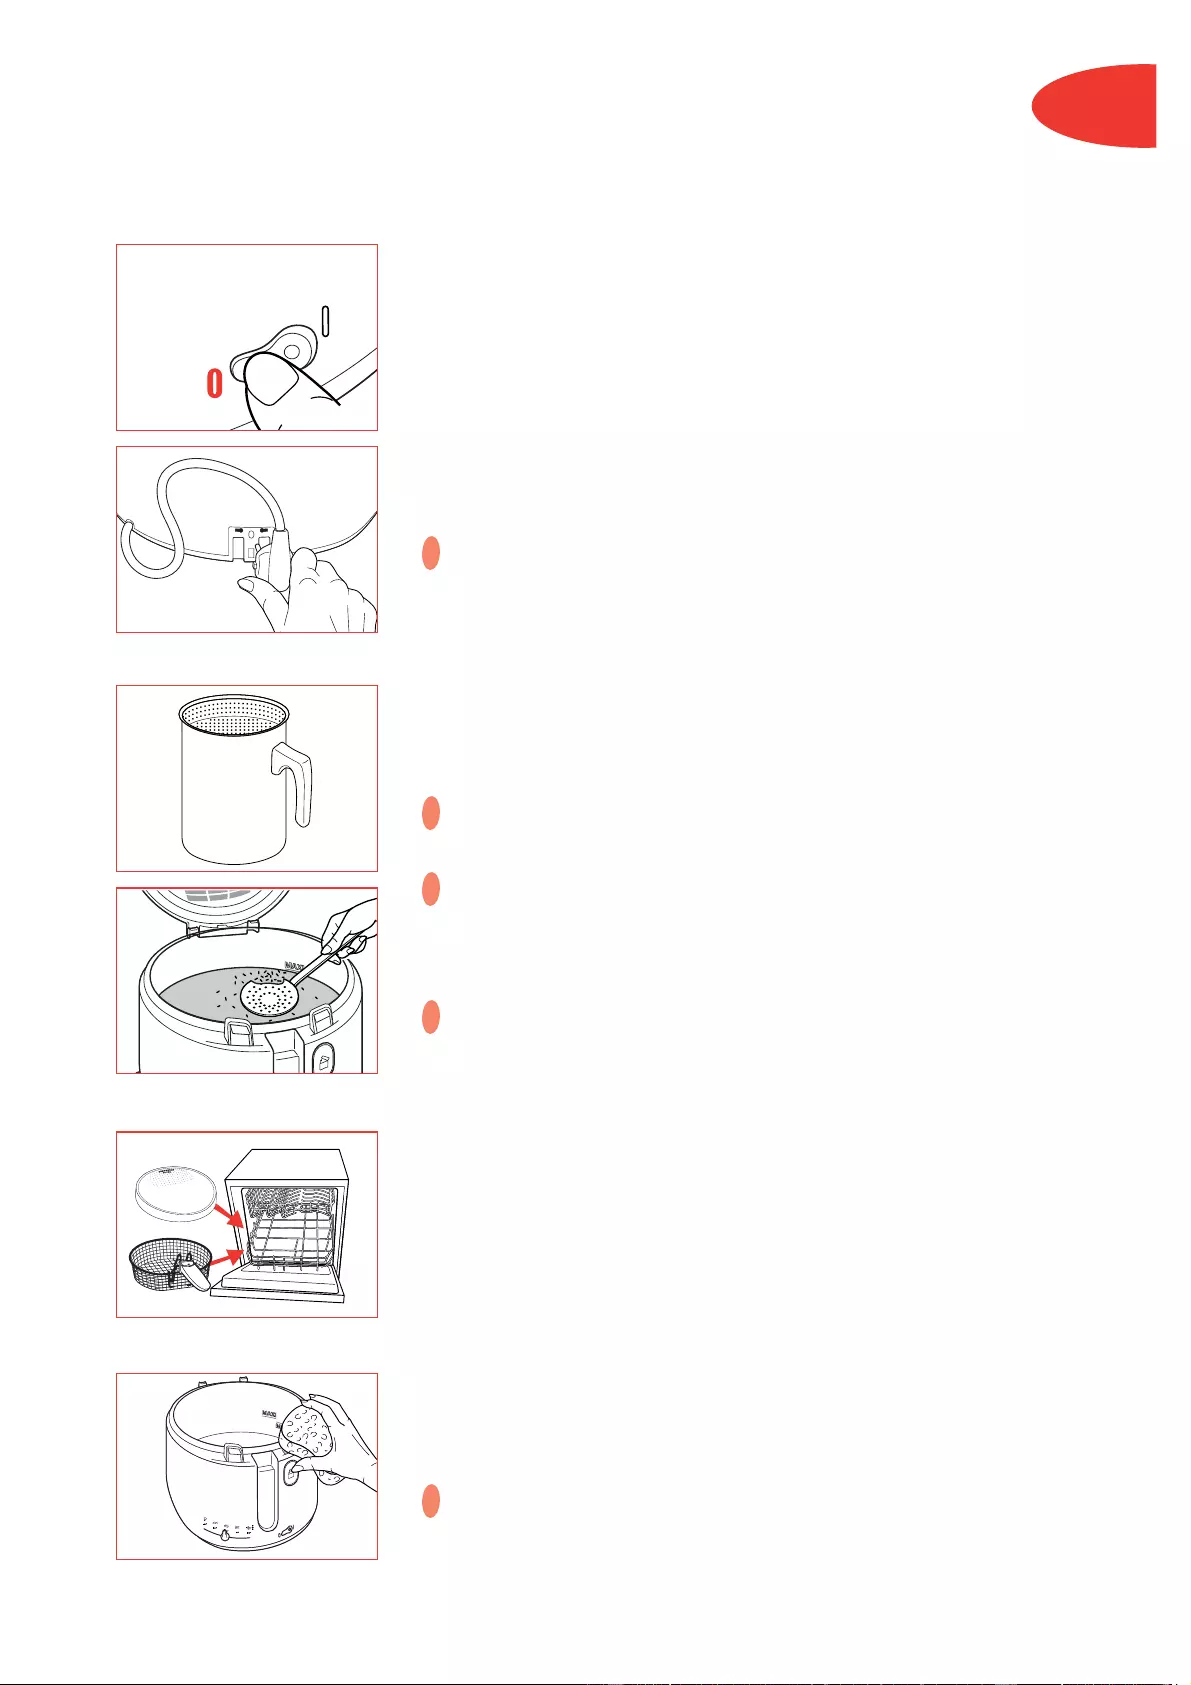
21
NL
FR
De friteuse uitzetten
•Na de laatste frituurbeurt, de aan/uit-schakelaar op stand o
zetten.
•De stekker uit het stopcontact halen.
•De friteuse 4 uur laten afkoelen.
• Berg de stekker op in de stekkerpositie.
•Gebruik uitsluitend de transporthandgrepen om de friteuse te
verplaatsen.
De friteuse nooit verplaatsen als deze nog hete olie of heet
vet bevat. De friteuse nooit verplaatsen met open deksel.
Filteren van het frituurvet
• U kunt de olie of het vet in de friteuse bewaren of in een
daarvoor bestemde filterkan (art.nr. 982775). Losse onderdelen
zijn direct te bestellen bij de afdeling onderdelen van het
dichtstbijzijnde servicecentrum.
Spoel gebruikte olie of vet nooit door de gootsteen. Laat het
afkoelen en gooi het weg (bijv. in een melkpak) met het
normale huisvuil.
Filter de olie of vet na elk gebruik. Frituurrestjes kunnen gaan
verbranden, waardoor de kwaliteit van de olie/het vet snel
achteruit gaat en wat op de lange duur zelfs tot brand kan
leiden.
•Vervang de olie of het vet na 8 tot 12 frituurbeurten.
Maak de friteuse nooit schoon wanneer de stekker nog in het
stopcontact zit en wanneer hij nog niet helemaal is afgekoeld
(na ongeveer 4 uur).
Schoonmak en van het deksel en het frituurmandje
•Open het deksel.
•Maak het mandje met de handgreep schoon in de
vaatwasmachine of met de hand, met warm water en
afwasmiddel.
•Droog het deksel voordat u het terugplaatst. Het deksel bevat
een permanent metalen filter, dat u niet hoeft te vervangen.
Schoonmak en van de friteuse
•Maak de buitenkant van de friteuse schoon met een vochtige
doek.
•Maak de binnenpan schoon met een vochtige spons met wat
afwasmiddel. Goed drogen.
Houd de friteuse nooit onder de kraan.
!
!
!
!
!
ref. 982775

22
NL
•De stekker zit niet in het stopcontact
•De aan/uit-schakelaar staat niet op stand I.
• Het temperatuurwaarschuwingslampje brandt
niet.
•Het frituurvet is aan vervanging toe.
•Verkeerd soort vet of olie.
•U heeft te lang gefrituurd zonder het
kijkvenster schoon te maken. Gebruik in
geen geval schuurmiddelen of
schuursponsjes om het kijkvenster schoon
te maken.
•Het deksel is niet goed dicht.
•De rubberring is defect.
•Het maximum vulniveau van het vet is
overschreden.
•Het mandje is overladen met voedsel.
•Het frituurmandje is vervormd.
•Er zijn verschillende soorten olie en/of vet
gebruikt.
•Het voedsel is vochtig of bevat teveel water
(bevroren voedsel).
•Verkeerd soort olie/vet.
•1,2 kg verse frites wordt in één keer
gefrituurd.
•Ze zijn te groot of te dik en bevatten teveel
water.
•Er wordt een te grote hoeveelheid gefrituurd
en het vet is niet meer op de juiste
temperatuur.
•De temperatuur van het frituurvet is te laag: de
thermostaat staat op een te lage stand.
•De batterij is leeg.
•Steek de stekker in het stopcontact
•Zet de schakelaar op stand I en kijk of het
controlelampje aan gaat.
•Stel de thermostaat in op de juiste temperatuur en
controleer of het temperatuurwaarschuwings-lampje
brandt.
•Vervang alle olie/al het vet (na 8 tot 12 frituurbeurten
maximaal).
•Vervang het vet of de olie door plantaardig frituurvet of
olie van een goede kwaliteit.
•Voor een goed zicht, het deksel in de vaatwasma-chine
reinigen of het kijkvenster afnemen met een doekje en
een beetje afwasmiddel met citroen.
Het kijkvenster op kamertemperatuur op laten drogen of
afnemen met een schone theedoek.
•Controleer of het deksel wel helemaal gesloten is.
•Neem contact op met de fabrikant of een servicedienst.
•Controleer of dit het geval is en verwijder zoveel vet, dat
het niveau niet boven het maxi-streepje komt.
•Controleer of het mandje niet te vol zit.
•Vervang het frituurmandje.
•Maak de binnenpan leeg en schoon. Vul hem met één
soort frituurvet.
•Laat het mandje langzamer zakken. Schud ijs beter af of
dep verse producten goed droog.
•Gebruik alleen plantaardige olie/vet.
•Frituur verse frites altijd in twee keer: 1e frituurbeurt
op 170°C, 2e frituurbeurt op 190°C.
•Verleng de frituurtijd en wacht tot het resultaat beter is.
•Frituur kleinere porties tegelijk (geldt vooral voor
diepvriesproducten).
•Stel de thermostaat in op een hogere stand.
•Laat de batterij vervangen bij een servicedienst of
technische dienst van de fabrikant.
Mocht het probleem hiermee niet opgelost zijn, neem dan contact op met de
consumentenservice van de dichtstbijzijnde servicedienst..
Reparaties mogen uitsluitend uitgevoerd worden door de technische dienst van
de
fabrikant met gebruikmaking van originele onderdelen.
Kijk voor meer handige tips op www.tefal.com
Onaangename lucht tijdens het frituren
Als u niet goed door het kijkvenster kunt kijken
Het vet of de olie bruist over
Producten worden niet bruin en blijven slap
De timer doet het niet (niet op alle modellen aanwezig)
Er ontsnapt veel stoom langs de rand van het deksel
Problemen en mogelijke oorzaken Oplossingen
De friteuse doet het niet

D
Gerätebeschreibung
1. Permanenter Metallfilter
2. Sichtfenster (je nach Modell)
3. Abnehmbarer Deckel
4. Frittierkorb
5. Frittierkorb-Entriegelungstaste
6. Frittierkorb
Aufhängevorrichtung
7. Wegklappbar Griff
8. Frittierbehälter (mit Antihaft
Beschichtung je nach Modell)
9. Füllstandsmarke ()im
Frittierbehälter
10. Griffmulde zum Tragen
der Fritteuse
11. Knopf zum Öffnen
des Deckels
12. Regelbarer Thermostat
13. Timer (je nach Modell)
14. Beleuchteter Ein-/Aus
Schalter
15. Kabel
16. Kabelfach
Hinweise zum Umweltschutz
•Ihr Gerät wurde auf eine lange Haltbarkeit hin konzipiert. Sollten Sie dennoch Ihre Fritteuse ersetzen wollen, denken
Sie daran, etwas zum Umweltschutz beizutragen.
•Bevor Sie Ihre Fritteuse entsorgen, entfernen Sie bitte die Batterie des Timers (je nach Modell) oder beauftragen Sie
eines unserer Vertrags-Service-Center damit.
•Die Vertrags-Service-Center nehmen Ihre gebrauchten Geräte entgegen, um sie den Regeln des Umweltschutzes
entsprechend zu entsorgen.
Sicherheitshinweise
• Dieses Gerät entspricht den geltenden
Sicherheitsbestimmungen sowie den folgenden
WGRichtlinien:
— 89/336/EWG abgeändert durch 93/68/EWG
— 73/23/EWG abgeändert durch 93/68/EWG
• Bei der Inbetriebnahme dieses Elektrogerätes entstehen
hohe Temperaturen, die zu Verbrennungen führen
können. Trotz des hohen Thermoschutzes der Fritteuse
: Berühren Sie nach dem Öffnen des Deckels keine
sichtbaren Metallteile.
• Lassen Sie das Gerät während des Betriebes nicht
unbeaufsichtigt.
• Stecken Sie keine Gegenstände zwischen den
Frittierbehälter und den Boden des Gerätes.
• Schließen Sie das Gerät immer an eine geerdete
Steckdose an.
• Verwenden Sie keine Verlängerungsschnur. Sollten Sie
auf Ihre Verantwortung doch eine benutzen, schließen
Sie nur eine gut erhaltene Verlängerungsschnur an eine
geerdete Steckdose, die der Leistungsfähigkeit Ihres
Gerätes entspricht.
• Überprüfen Sie, ob die Netzspannung mit der auf Ihrem
Gerät angegebenen Spannung übereinstimmt (nur
Wechselstrom).
• Wenn das Gerät außerhalb des Verkaufslandes benutzt
wird, sollte es von einem Vertrags-Service-Center
überprüft werden.
• Das Gerät auf keinen Fall in Betrieb nehmen, wenn :
— das Stromkabel beschädigt ist.
— das Gerät heruntergefallen ist.
— das Gerät sichtbare Schäden oder Funktionsstörungen
aufweist.
• Um jegliche Gefahr zu vermeiden, wenden Sie sich in
diesem Fall an das nächstgelegene Vertrags-Service-
Center, um das Gerät reparieren zu lassen, da hierfür
Spezialwerkzeug erforderlich ist. Reparieren Sie das
Gerät auf keinen Fall selbst.
• Sollte das Anschlußkabel beschädigt sein, muß es vom
Hersteller, vom Kundendienst oder entsprechend
qualifiziertem Personal ausgewechselt werden, um jede
Gefahr zu vermeiden.
• Sollte das Gerät Feuer fangen, versuchen Sie auf keinen
Fall, die Flammen mit Wasser zu löschen. Schließen Sie
den Gerätedeckel. Ersticken Sie die Flammen mit einem
feuchten Tuch.
• Benutzen Sie das Gerät nicht in der Nähe leicht
entflammbarer Materialien (Papier, Vorhänge, …) oder
anderer Wärmequellen (Gasherd, Heizplatten, …).
• Dieses Gerät wurde ausschließlich für den privaten
Gebrauch entwickelt. Bei gewerblicher,
zweckentfremdeter oder der Gebrauchsanweisung
zuwiderhandelnder Benutzung übernimmt der
Hersteller keine Haftung und die Garantie erlischt.
23
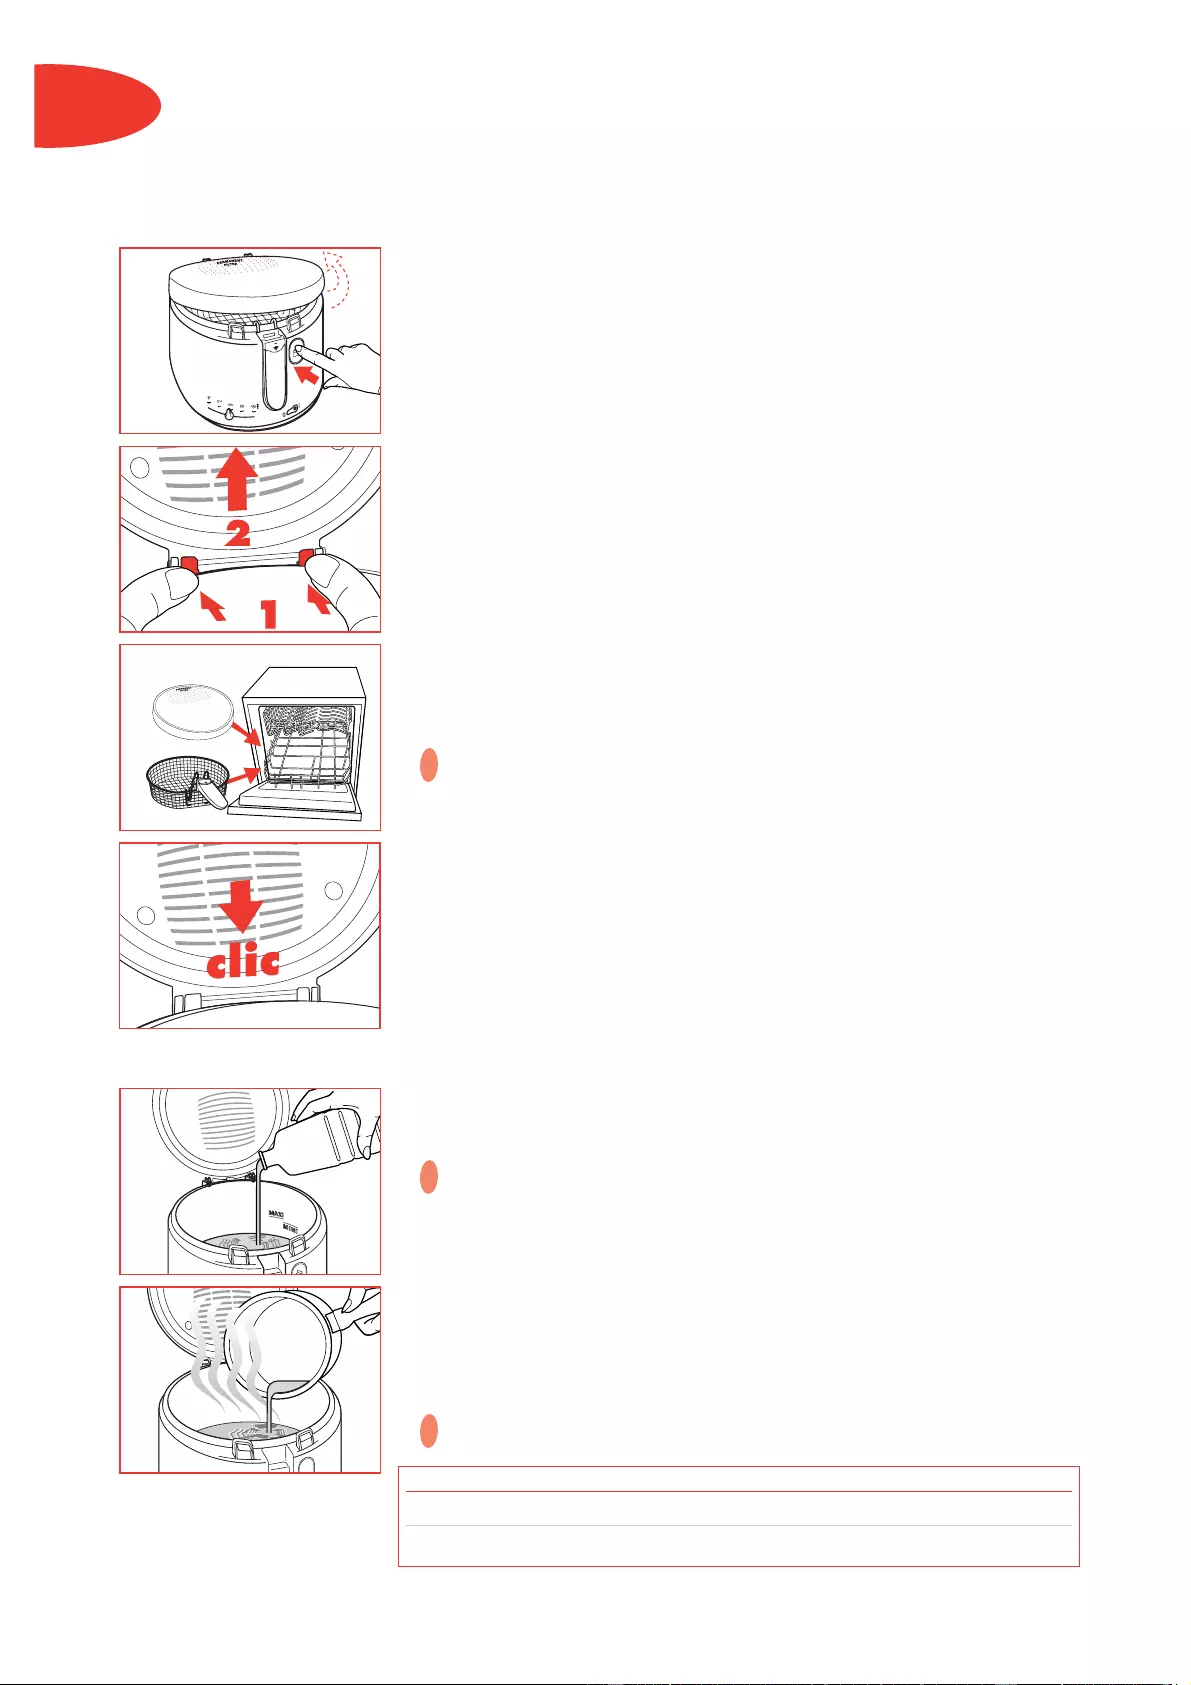
24
D
Vor dem ersten Gebrauch
•Öffnen Sie den Deckel durch Druck auf eine der beiden
Öffnungstasten.
•Heben Sie den Deckel an, um ihn zu entfernen.
•Geben Sie den Deckel und den Frittierkorb in die Spülmaschine
•Reinigen Sie das Thermogehäuse mit einem Schwamm und
einer Seifenlauge.
Tauchen Sie das Gerät niemals in Wasser ein.
•Setzen Sie den Deckel wieder ein.
Füllen Sie den F rittierbehälter
•Verwenden Sie nur Speiseöle bzw. –fette, die für das Frittieren
geeignet sind : Sonnenblumenöl, Erdnußöl, Olivenöl,
Weintraubenkernöl, Palmin…
Der Fettspiegel muß sich immer zwischen der Minimal- und
Maximalmarkierung des Frittierbehälters befinden.
Überprüfen Sie ihn vor jedem Frittiervorgang und
füllen Sie ihn gegebenenfalls mit der gleichen Öl- bzw.
Fettsorte auf.
• Falls Sie feste Fette benutzen :
— Schneiden Sie das Fett in kleine Stücke und schmelzen Sie es
in einer separaten Pfanne. Geben Sie es danach in den
Frittierbehälter (auf keinen Fall in dem Frittierbehälter oder in
dem Frittierkorb das Fett schmelzen lassen).
Verwenden Sie keine Mischungen aus verschiedenen Öl- bzw.
Fettsorten
!
!
!
Öl Fette
Min. 1,8 l 1660g
Max. 2,1 l 1910g
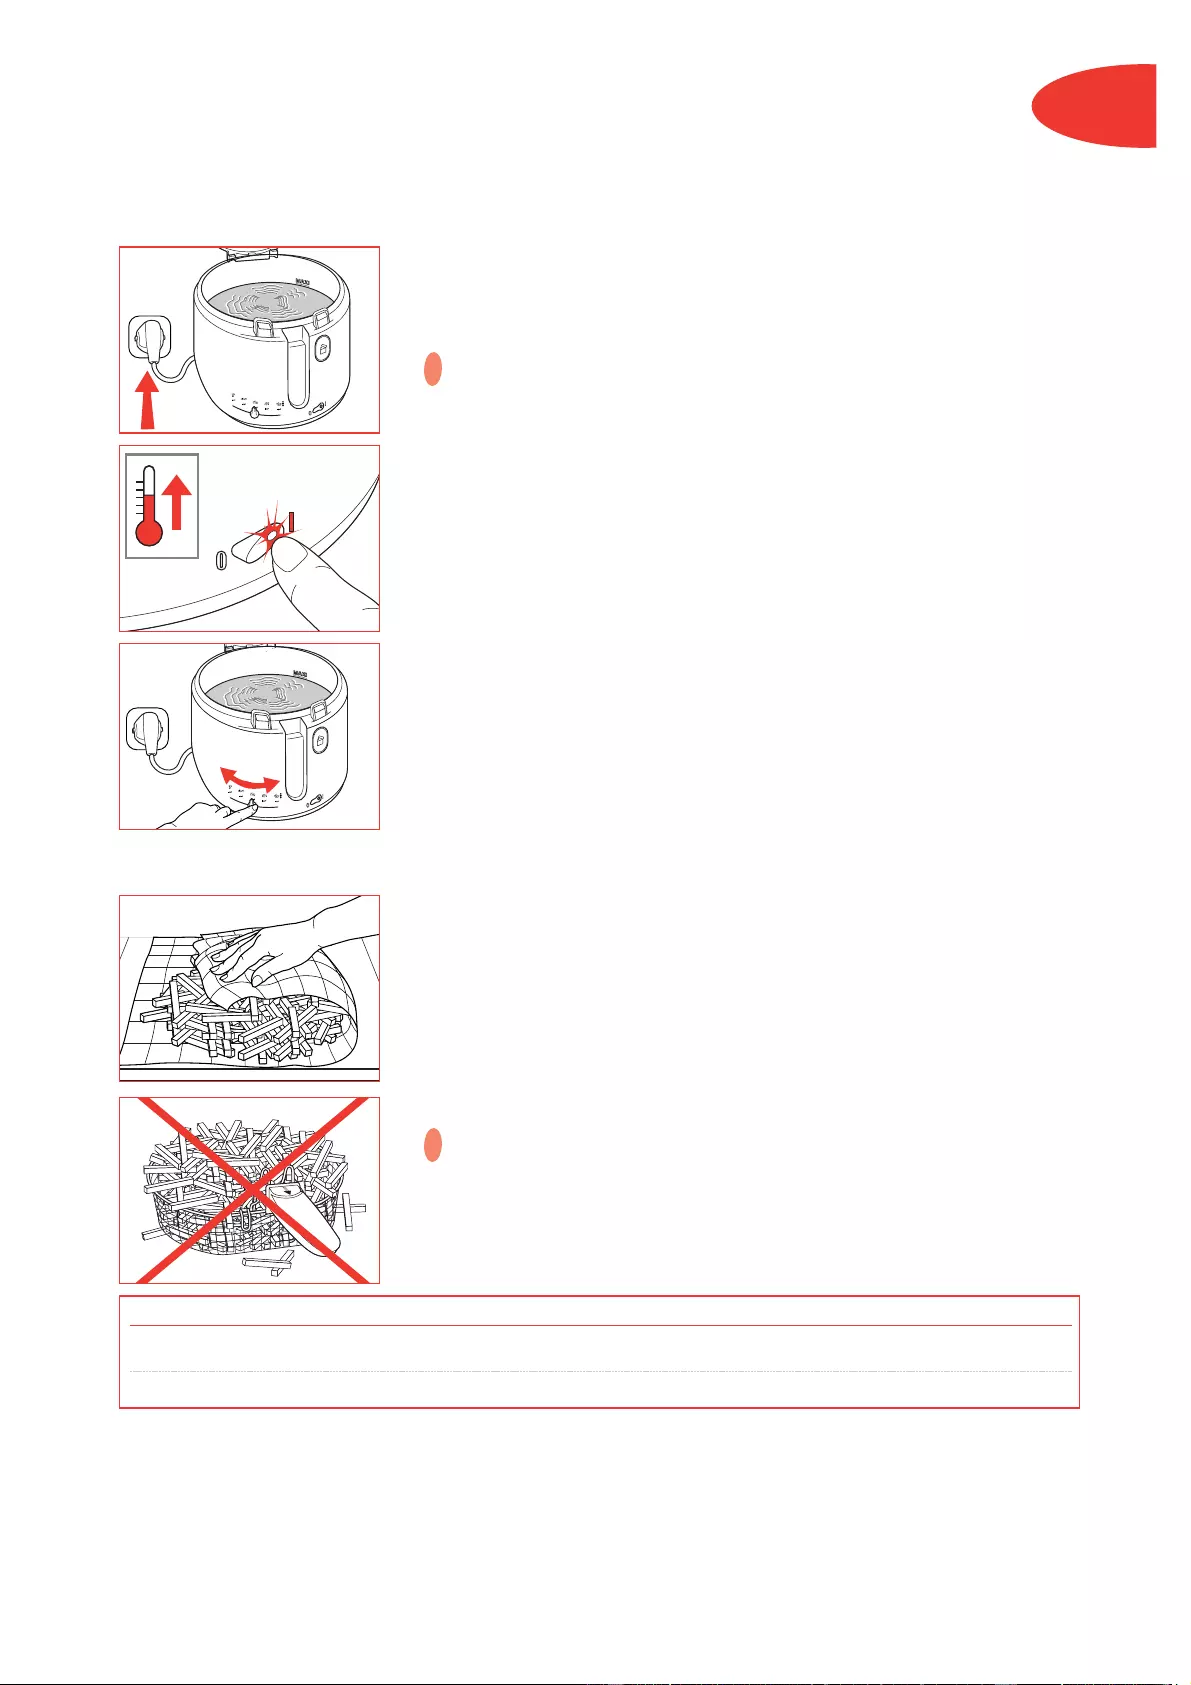
25
D
Vorheizen
•Schließen Sie die Fritteuse an.
Die Fritteuse darf auf keinen Fall leer betrieben werden.
• Stellen Sie den On/Off Schalter auf I, die Kontrolllampe leuchtet
auf.
• Stellen Sie das Thermostat ein (sieheTabelle S.27).
Vorbereitung des Frittierkorbes
•Entfernen Sie überflüssige Feuchtigkeit ( Wasser und Eis) von
der Nahrung. Befüllen Sie den Frittierkorb außerhalb der
Fritteuse, wie auf der unteren Abbildung gezeigt.
• Verringern Sie die Frittiermenge bei Tiefgefrorenem (siehe
unteren Abbildung und Tabelle S. 27).
Für ein gesundes und schnelles Frittieren empfehlen wir
Ihnen die Füllmenge von Pommes Frites auf einen halben
Ko r b p r o Frittierdurchgang zu begrenzen.
!
!
Pommes frites aus frischen Kartoffeln Tiefgefrorene Pommes frites
Max-Füllmenge 1250g 900g
Empfohlene Füllmenge 600g 450g
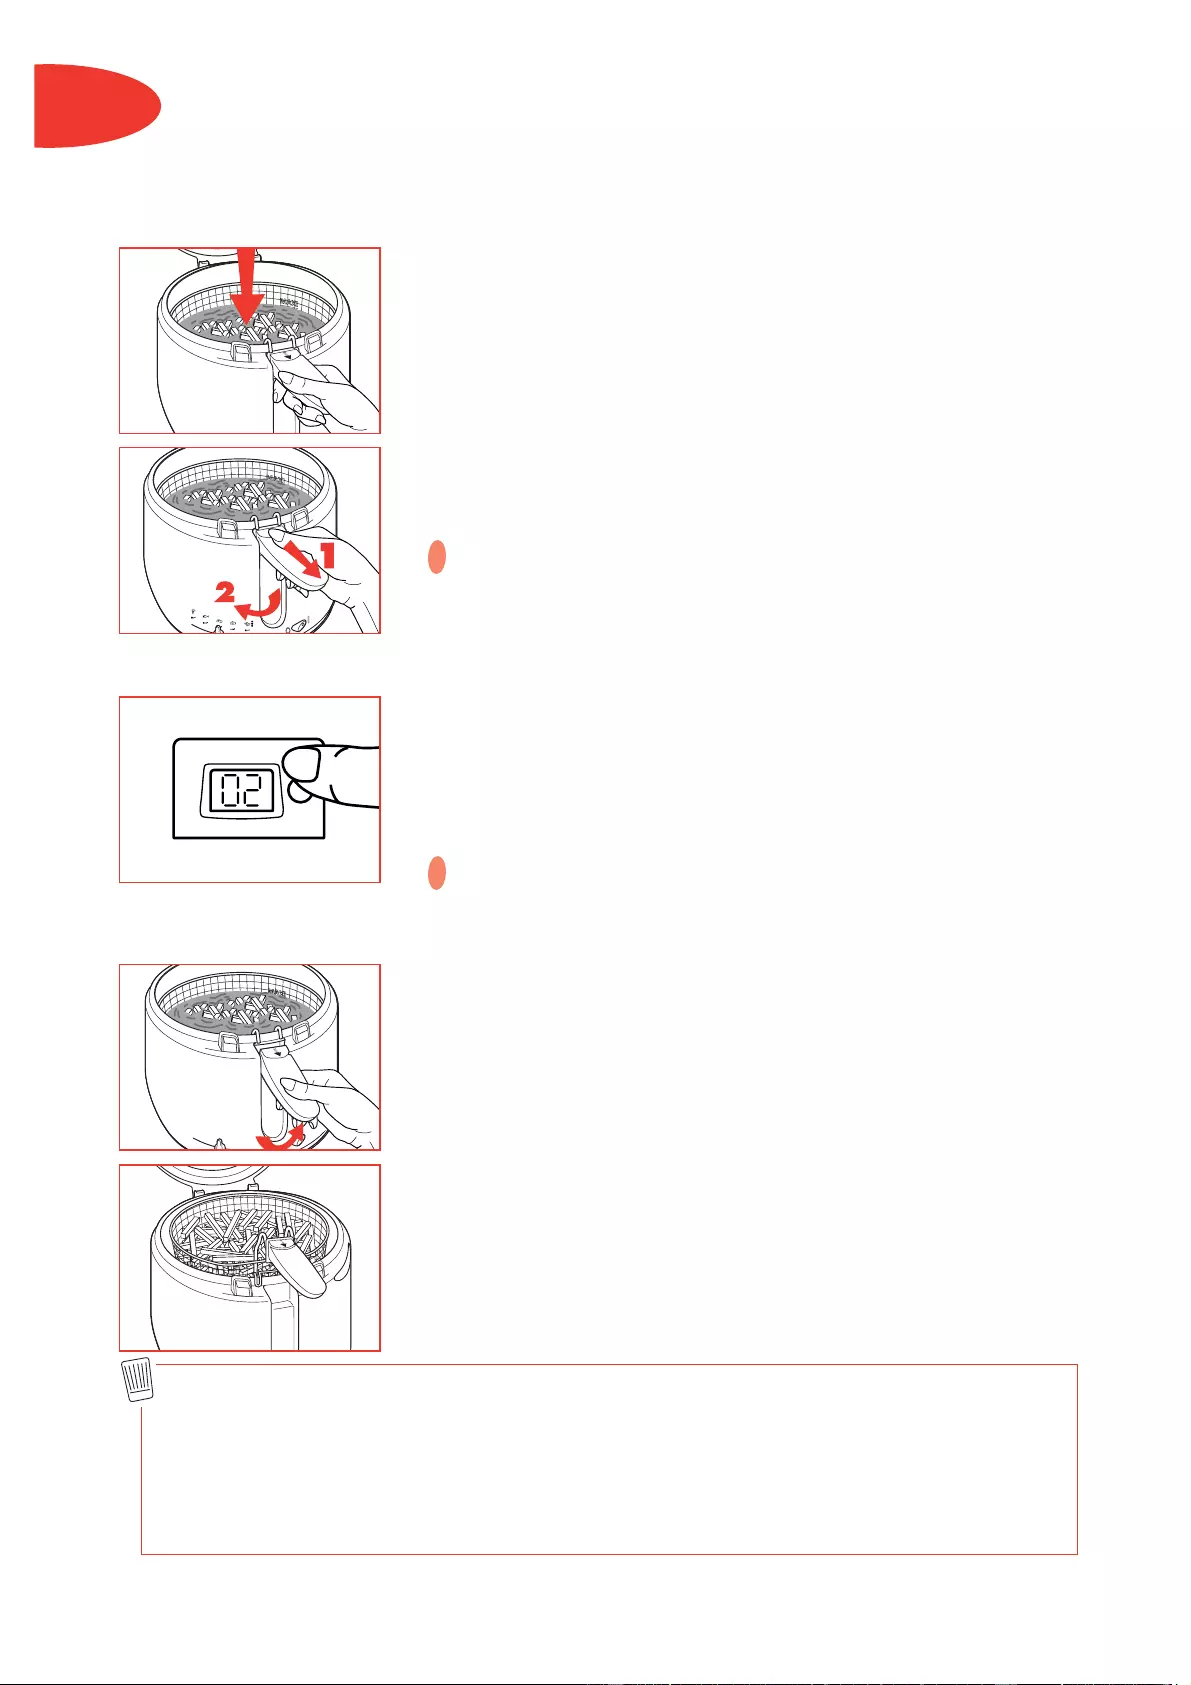
26
D
Absenk en des Frittierk orbes
•Hängen Sie den Fritierkorb auf den Rand des Fritierbehälters.
•Bei Erlöschen des beleuchteten Schalters, senken Sie langsam
den Frittierkorb ab.
•Klappen Sie den Griff in seine, am Äusseren der Fritteuse
vorgesehene Aussparung.
•Drücken Sie fest auf den Deckel, um ihn gut zu schliessen.
Achtung : Halten Sie Ihre Hände nicht über die Filterkammer
oder das Sichtfenster. Der Dampf und das Glas sind sehr
heiß.
Stellen Sie den Timer ein
(je nach Modell)
•Drücken Sie auf den Knopf, um die Zeit minutenweise
einzustellen. Den Knopf wieder loslassen. Die angezeigte Zeit
ist eingestellt und beginnt zu laufen.
• Sollten Sie sich geirrt haben oder die gewählte Zeit löschen
wollen, drücken Sie 2 Sekunden lang auf den Knopf. Zum
Abschalten des Signaltons drücken Sie den Knopf.
Der Timer gibt nur das Ende der Frittierzeit an, schaltet das
Gerät jedoch nicht ab.
Am Ende der F rittierzeit
•Klappen Sie den Griff des Frittierkorbs bis zum hörbaren
Einrasten nach oben.
•Öffnen Sie den Deckel.
•Lassen Sie das Frittiergut abtropfen. Hängen Sie dazu den
Frittierkorb in seine Aufhängevorrichtung auf den
Fritierbehälterrand.
• Servieren Sie.
• Schließen Sie den Deckel, wenn die Fritteuse nicht in Gebrauch
ist.
!
!
Wir empfehlen Ihnen folgende Hinweise zu beachten:
— Überwachen Sie den Frittiervorgang: Essen Sie nur gold-braun frittierte Produkte. Essen Sie keine zu
dunkel frittierte Nahrungsmittel.
— Filtrieren Sie das Öl nach jedem Frittierdurchgang, um evtl. Speisereste zu entfernen. Wechseln Sie
das Öl regelmäßig.
— Essen Sie abwechslungsreiche, ausgewogene Kost mit viel Gemüse und Obst.
Für ein gesundes und schnelles Frittieren empfehlen wir Ihnen die Füllmenge von Pommes Frites auf
einen halben Korb pro Frittierdurchgang zu begrenzen.

27
D
Frittiertabelle
FRISCHE NAHRUNGSMITTEL
Die angegebenen Frittierzeiten sind nur Richtwerte. Sie können je
nach Füllmenge und eigenen Wünschen variiert werden.
St.
TIEFGEFRORENES
St.
Pommes frites 1000g 190°C 11-16 min.
Pommes frites (max. Sicherheitsgrenze) 1200g*❶ 170°C 11-13 min.
❷ 180°C 8-10 min.
Pommes frites (ratsame Menge für 600g 170°C 11-16 min.
optimales Fittieren)
Kartoffelkroketten 8-11 190°C 9-10 min.
Hähnchenschenkel 1 180°C 14-16 min.
Fischfilets 1-2 170°C 6-8 min.
Pilze 8 mini 5-7 min.
Zwiebelringe 6-8 170°C 3-4 min.
Apfelstrudel 4 180°C 5-6 min.
Donuts 4 180°C 6-8 min.
Panierte Camenberts 6 190°C 2-3 min.
Pommes frites (max. Sicherheitsgrenze) 900g 190°C 12-14 min.
Pommes frites (ratsame Menge für 450g 170°C 9 — 13 min.
optimales Fittieren)
Kartoffelkroketten 500g 190°C 8-10 min.
Panierte Fischstäbchen 8 190°C 5-7 min.
Nuggets 12 190°C 4-5 min.
Hähnchenschenkel 1-2 190°C 14-15 min.
Panierte Pilze 12 170°C 4-5 min.
Garnelen in Frittierteig 6-8 170°C 3-4 min.
Zwiebelringe 6-8 180g 190°C 3-4 min.
* BITTE FRITTIEREN SIE FRISCHE POMMES FRITTES ZWEI MAL: Beim erste mal bei 170°C, Beim
zweite mal bei 180°C.
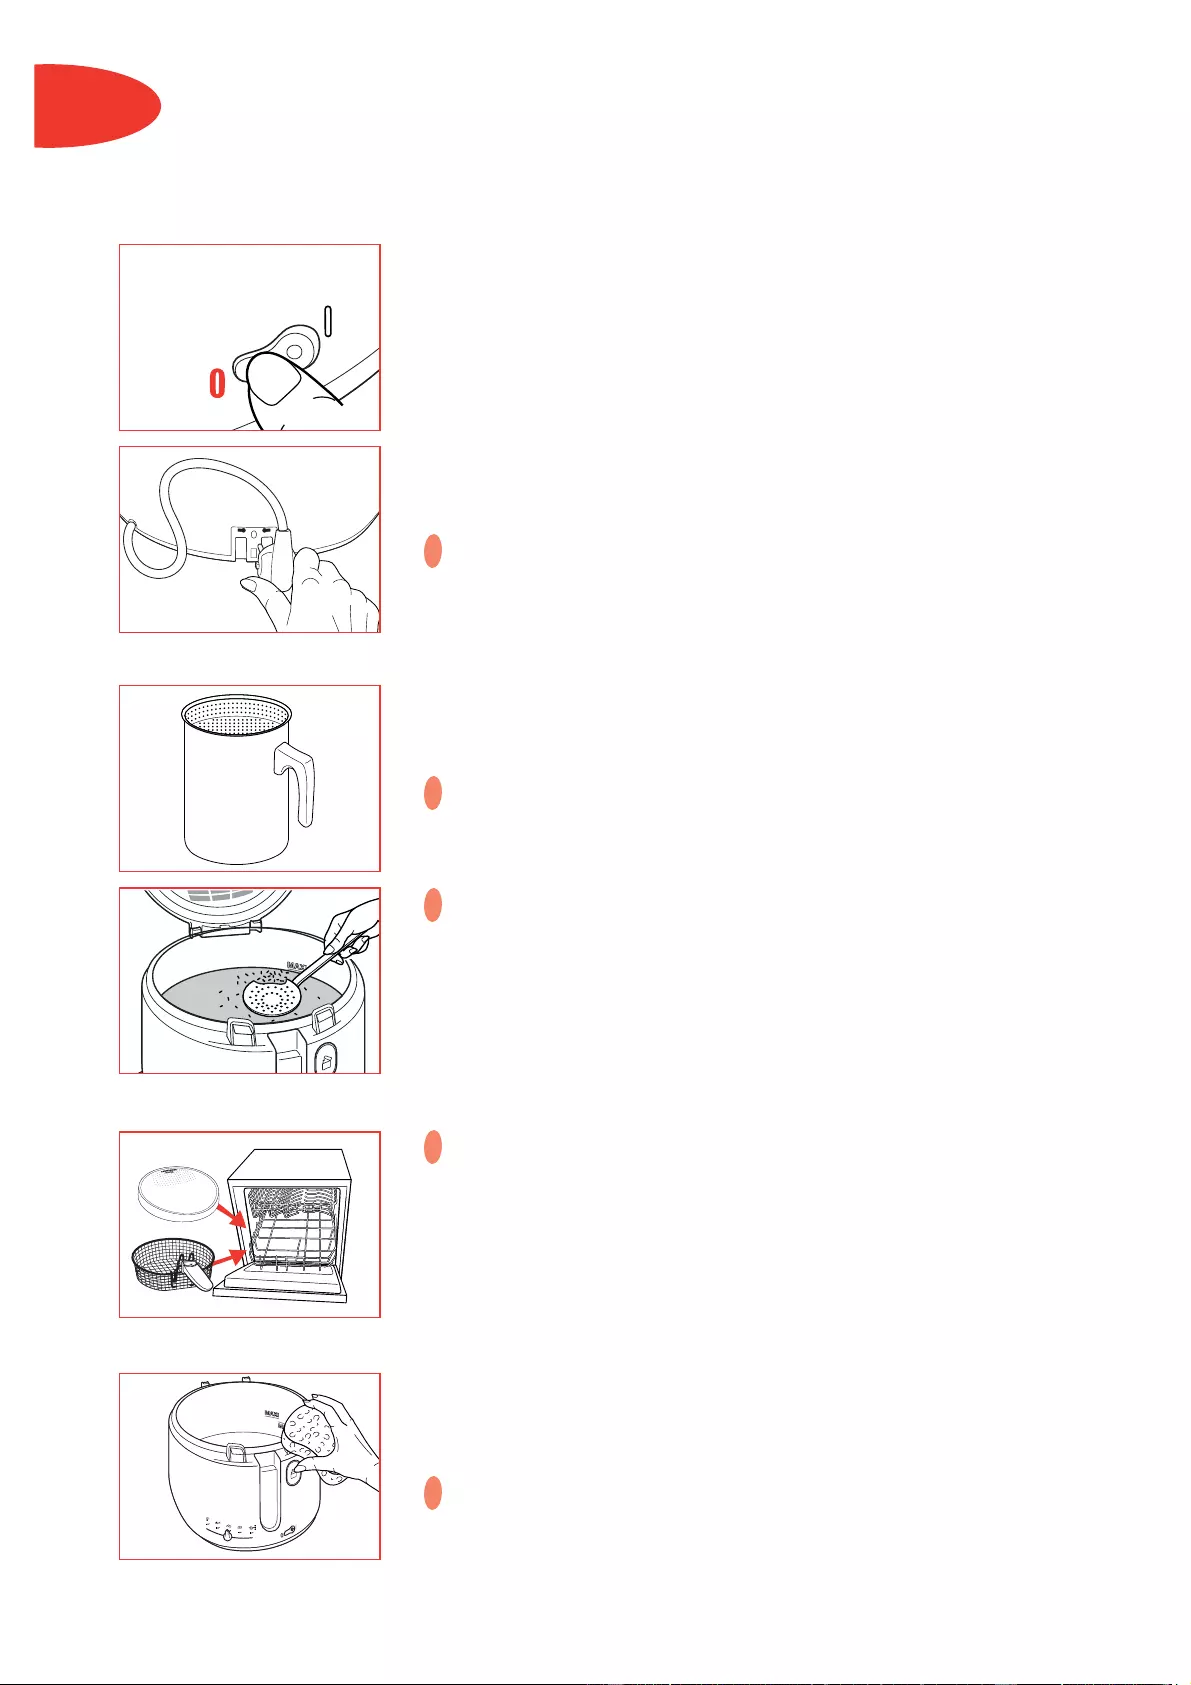
D
Abschalten des Gerätes
•Stellen Sie nach Beenden des letzten Frittiervorganges den Ein-
/Ausschalter auf 0.
•Ziehen Sie das Stromkabel des Gerätes heraus.
•Lassen Sie die Fritteuse auskühlen (4 Stunden lang).
•Schieben Sie das Stromkabel in das Kabelfach ein.
•Die Fritteuse zum Transportieren nur in den Griffmulden halten.
Transportieren Sie die Fritteuse auf keinen Fall mit der noch
heißen Fettmasse. Bewegen Sie die Fritteuse nicht, wenn der
Deckel geöffnet ist.
Filtern des F rittierfettes
• Bewahren Sie das Fett entweder in der Fritteuse oder in einem
separaten Gefäß im Kühlschrank auf (wird empfohlen, wenn Sie
die Fritteuse selten benutzen).
Schütten Sie das gebrauchte Frittierfett nicht in das Spülbecken.
Lassen Sie es auskühlen und entsorgen Sie es mit dem
Hausmüll.
Das Fett muss nach jeder Benutzung gefiltert werden. Die
Nahrungsmittelstückchen, die sich beim Frittieren lösen, können
verbrennen und verderben das Frittierfett schneller.
Auf längere Sicht besteht Brandgefahr.
•Erneuern Sie das Frittierfett nach maximal 8-12
Frittiervorgängen.
Reinigen die F ritteuseLassen Sie die Fritteuse auskühlen (4 Stunden lang).
•Nehmen Sie den Deckel ab.
•Reinigen Sie den Deckel und den Frittierkorb in der
Spülmaschine oder mit einem Schwamm unter Zusatz eines
milden Spülmittels.
•Trocknen Sie den Deckel und den Frittierkorb ab, bevor Sie ihn
wieder auf das Gerät setzen. Den Deckel ist mit einem
permanenten Metallfilter ausgestattet; den Sie nicht zu
wechseln brauchen.
•Reinigen Sie den Frittierbehälter mit heissem Wasser unter
Zusatz eines Spülmittels.
•Reiben Sie das Äussere der Fritteuse mit einem feuchten Tuch
oder Schwamm ab.
Tauchen Sie nie das Thermogehäuse ins Wasser.
!
!
!
!
!
ref. 982775
28

29
D
•Das Gerät ist nicht angeschlossen.
•Der Ein-/Ausschalter steht nicht auf
I
.
•Die Temperatur-Kontrollleuchte leuchtet nicht
auf.
•Das Frittierfett ist nicht einwandfrei.
•Das Öl bzw. Fett ist zum Frittieren nicht
geeignet
•Es wurde zuviel frittiert ohne das das
Sichtfenster gereinigt wurde.
• Reinigen Sie die Fritteuse nur mit einem nicht
abreibenden Schwamm oder Tuch.
•Der Deckel ist nicht richtig verschlossen.
•Die Dichtung ist defekt.
•Die Einfüllobergrenze des Frittierbehälters
wurde überschritten.
•Überfüllen des Frittierkorbes mit Frittiergut.
•Der Frittierkorb hat sich verformt.
•Eine Mischung aus verschiedenen Öl- und
Fettsorten wurde verwandt.
• Die Lebensmittel sind feucht oder enthalten
zuviel Wasser (Tiefkühlkost).
•Sie sind zu dick und enthalten zuviel Wasser.
•Zu viele Nahrungsmittel wurden gleichzeitig
frittiert und das Frittierbad hat nicht mehr die
richtige Temperatur.
•Die Temperatur des Frittierbades kann zu gering
sein : Der Thermostat ist schlecht eingestellt.
•Die Batterie ist verbraucht.
•Schließen Sie das Gerät an.
•Stellen Sie den Ein-/Ausschalter auf
I
.
•Stellen Sie den Thermostatregler auf die gewünschte
Temperatur und prüfen Sie, daß die Temperatur-
Kontrollleuchte aufleuchtet.
•Erneuern Sie das Frittierfett (nach maximal 8 bis 12
Frittiervorgängen).
•Verwenden Sie Pflanzenöle bzw. –fette für ein gutes
Frittierergebnis.
•Reinigen Sie den Deckel in der Spülmaschine oder mit
einem Schwamm, der mit einem zitrushaltigen, für
Lebensmittelkontakt zugelassenen Reinigungs-mittel
getränkt wird oder einem feuchtem Tuch.
•Lassen Sie das Fenster an der Luft trocknen oder reiben
Sie es mit einem sauberen Baumwolltuch trocken.
•Vergewissern Sie sich, daß der Deckel richtig
verriegelt ist.
•Wenden Sie sich an die nächstgelegene Kundendienst—
Werkstatt.
•Überprüfen Sie die Öl- bzw. Fettmenge (Maximal) und
beseitigen Sie den Überschuß.
•Überprüfen Sie, daß die empfohlenen Füllmengen nicht
überschritten werden.
•Wechseln Sie Ihren Frittierkorb.
•Leeren und reinigen Sie den Frittierbehälter. Füllen Sie
den Frittierbehälter mit nur einer Öl- bzw. Fettsorte.
•Senken Sie den Frittierkorb sehr langsam. Nehmen Sie
die Eisstückchen heraus und trocknen Sie die
Nahrungsmittel gut ab.
•BITTE FRITTIEREN SIE in zwei frittier durchgängen: 1.
durchgang 13 min bei 170°C, 2. durchgang 10 min
bei 180°C.
•Versuchen Sie, die Frittierzeit zu verlängern.
•Frittieren Sie nur kleine Mengen an Nahrungsmitteln (vor
allem bei Tiefgefrorenem).
•Lassen Sie sie in der Kundendienst—Werkstatt
auswechseln.
•Lassen Sie sie in der Kundendienst—Werkstatt
auswechseln.
Sollte das Problem bestehen bleiben, setzen Sie sich mit Ihrem Verkäufer oder dem Tefal-
Kundendienst in Verbindung.
Jede Reparatur darf nur von einem Tefal Vertrags-Kundendienst mit den Original-Ersatzteilen
ausgeführt werden.
Entwicklung von unangenehmen Gerüchen
Der Einblick durch das Sichtfenster ist schlecht.
Das Frittierfett läuft über
Die Nahrungsmittel werden nicht goldgelb und bleiben weich
Der Timer funktioniert nicht mehr (je nach Modell)
Dampf entwickelt sich rund um den Deckel
Probleme und mögliche Ursachen Lösungen
Ihre Fritteuse funktioniert nicht