
| Языки: |
Английский |
|---|---|
| Страницы: | 88 |
Стр.
из
результат(ов) по запросу ««
×
|
|
NoDevice
Loading…
-
« Назад
Ctrl + ←
-
Вперёд »
Ctrl + →
Мануал подходит для устройств
-
Tascam DP-008
Скачать
OWNER’S MANUAL
D01175820A
DP-008EX
Digital Multitrack Recorder
-
Page 1: Tascam DP-008
DP-008 8-T rack Digital Pocketstudio D01092520A OWNER’S MANU AL[…]
-
Page 2: Tascam DP-008
2 T ASCAM DP-008 The exclamation point within an equilateral triangle is intended to alert the user to the presence of important operating and maintenance (servicing) instructions in the literature accompanying the appliance. The lightn ing flash with arrowhe ad symbol, with in equilat eral triangle, is intended to alert the user to the presence of[…]
-
Page 3: Tascam DP-008
T ASCAM DP-008 3 1 Read these instructions. 2 Keep these instructions. 3 Heed all warnings. 4 Follow all instructions. 5 Do not use this apparatus near water . 6 Clean only with dry cloth. 7 Do not block any ventilation openings. Install in accordance with the manufacturer’s instructions. 8 Do not install near any heat sources such as radiator[…]
-
Page 4: Tascam DP-008
4 T ASCAM DP-008 CAUTIONS ABOUT BA TTERIES Thi s p rod uc t us es b at te rie s. M isu se of ba t ter- ie s c oul d c aus e a le ak , r uptu re or o the r t rou — ble. A lway s abi de by th e foll owin g p re ca uti ons whe n us ing b at ter ie s. Neve r rec ha rg e non -r ec ha rge ab le ba t ter ies . • Th e b at ter ie s c oul d rup ture or le[…]
-
Page 5: Tascam DP-008
T ASCAM DP-008 5 T able of Contents 1 – Introduction ………………………….. 7 Over view of t his unit ……………………………. 7 Ab out t his manua l ………………………………. 7 Manual c onvent ions ………………………… 7 Pro duc t pa r ts ……………………………………… 7 Inte llec tu al pr[…]
-
Page 6: Tascam DP-008
6 T ASCAM DP-008 T able of Contents Conf irmi ng th e resul t……………………… 53 Loc ate an d sear ch fu nc tions ……………….. 54 Dire c t loc ate f unc tio n …………………….. 54 Retu rn T o Zer o ( RT Z ) an d La st Reco rdin g Posit ion ( L RP ) …………. 54 Fast for wa rd / re wind s earc h ……………. 55 Re[…]
-
Page 7: Tascam DP-008
T ASCAM DP-008 7 1 – Intr oduction Thank you for your purchase of T ASCAM’ s 8-T rack Digital Pocketstudio, the DP-008. The DP-008 is designed to provide you with great sound in an easy-to-use compact package, allowing you to concentrate on the music, and not on the recording process. Before connecting and using the unit, please take time to re[…]
-
Page 8: Tascam DP-008
8 T ASCAM DP-008 Main unit • …………………………………………….. 1 SD Card (in the unit) • …………………………….. 1 USB Cable • …………………………………………… 1 AA alkaline batteries • …………………………….. 4 W arranty card • ………………………………………. 1[…]
-
Page 9: Tascam DP-008
T ASCAM DP-008 9 Cautions on installation T he u nit’ s nom in al op er at i ng te mpe ra t u re • is be t ween 5˚ and 35 ° C ( 4 1 ° – 95 ° F). Do not i ns t all i n t he followi ng t y pe s of • place s. Doi ng so c ould deg r ad e the s ou nd qu al ity a nd / or cau se m alf un ct ions. Place s wit h sig ni f ica nt v ibr at ions or […]
-
Page 10: Tascam DP-008
10 T ASCAM DP-008 Pla y back and mixing First, we will play the demo song on the included SD card. The SD card with the demo song is shipped already installed but we will start by explaining how to insert an SD card here. Preparing to list en to the demo song 1 Open the SD card slot cover on the right side of the unit and insert the supplied S D ca[…]
-
Page 11: Tascam DP-008
T ASCAM DP-008 11 or ins er t the c ar d. If y ou r emov e or in ser t the S D ca rd w he n the u nit ’s pow er i s on, t he u nit c ann ot shu t dow n pr op erl y and all u ns aved d ata an d se t tin gs w ill be los t. T h ese d ata an d set tin gs c annot b e recovered. Do n ot re move t he b at te rie s or • disc onn ec t t he p owe r ca[…]
-
Page 12: Tascam DP-008
12 T ASCAM DP-008 5 Rotate the D ATA wheel to select DEMO_008 , and press the F2 ( EXEC ) key . The demo song loads and the SONG screen reopens. 6 Press the HOME key to reopen the Home Screen. 7 Press the playback ( Á ) key and turn up the TR ACK1– 8 LE V EL knobs, the MAS TE R LE V EL knob and the VOLUME dial to hear the demo song. The MAS TE R[…]
-
Page 13: Tascam DP-008
T ASCAM DP-008 13 From rec ording to creating a master tra ck Here, we will try multitrack recording. In the following example, we will use an electric guitar to record a rhythm guitar part on track 1 and a lead guitar part on track 2. Then, we will use the built-in mic to record a voice on track 3. Finally , we will mix the tracks down. In this se[…]
-
Page 14: Tascam DP-008
14 T ASCAM DP-008 Connecting an d setting the inp ut sources 1 Connect an electric guitar to the INPUT A connector on the r ear panel. Guitar 2 Set the MIC/LINE-GUIT AR switch on the rear panel to G U I TA R . TIP Wh en co nne c tin g an ele c tr ic-ac ous ti c gui tar wit h a bu ilt-in p re amp o r an ac ti ve el ec t ric guit ar, as well as w he […]
-
Page 15: Tascam DP-008
T ASCAM DP-008 15 This sets MIC B , which is the built-in mic on the right side of the front panel as the input source for INP U T B . NOTE Int ern al MI C / Low an d Int er nal M IC / Hi gh chan ge th e se nsi tiv it y of t he bu ilt-i n mic s . Set i t acco rd ing t o the l oud nes s of t he subj ec t b ein g re cor de d. If y ou are n ot sur e w[…]
-
Page 16: Tascam DP-008
16 T ASCAM DP-008 OL indicator When you play the guitar , the input level is shown by the A (INPUT A) and 1 ( TR ACK 1 ) meters on the display . T urn up the TR AC K 1 LE V EL and M AST ER LEV EL knobs and the VOL UME dial to hear the guitar sound through headphones. When doing so, the L and R meters on the right side of the display become active. […]
-
Page 17: Tascam DP-008
T ASCAM DP-008 17 TIP Use t he T R ACK 1 PAN k nob t o set t he s t ere o pos iti on of th e tra ck sig nal. Record guitar to TR ACK 2 Now , you will record lead guitar on TR AC K 2 while listening to the rhythm guitar on TR ACK 1 . Use the following procedures to change the recording source for TR ACK 2 . 1 Press the A SSIGN key to open the I NPUT[…]
-
Page 18: Tascam DP-008
18 T ASCAM DP-008 TRACK 2 REC indicator 5 Return to the beginning of the song and begin playback. Play the lead guitar part along with the already r ecorded rhythm guitar . Raise the TR ACK 2 L E VE L knob to hear the sound of the guitar being input along with the TR ACK 1 playback sound through the headphones. 6 Use the TR ACK 1 and 2 L E VE L and[…]
-
Page 19: Tascam DP-008
T ASCAM DP-008 19 3 Press the HOME key to return to the Home Screen. 4 Press the TR ACK 3 REC key . The key blinks showing that the track is in record standby . TRACK 3 REC indicator 5 Use the IN PUT B TRIM knob to adjust the mic input level. Set the TRIM knob so that the IN PUT B OL indicator does not light even when the loudest sound to be record[…]
-
Page 20: Tascam DP-008
20 T ASCAM DP-008 if th e inp ut se t ti ng is In ter nal M IC / H igh , chan ge it t o Int er nal M IC / Low. If t he O L indi cat or co ntin ues t o light ev en w he n set t o Int ern al MI C / Low, mov e th e sou nd so urc e away fr om t he mi c or low er t he vo lume at the s oun d so urc e. CAUTION Al way s mo nit or th ro ugh h ead pho ne s w[…]
-
Page 21: Tascam DP-008
T ASCAM DP-008 21 2 Play the song back, and press the F4 ( OUT ) key at the position where you want the stereo master track end point. “ S E T O U T ! ” app ea rs a nd t h is po sition is set a s th e OUT poi nt , which w il l be t he en d poi nt of the ma st er. TIP Y ou c an als o set t he OU T p oint w he n playb ac k is s to ppe d by pr es […]
-
Page 22: Tascam DP-008
22 T ASCAM DP-008 7 Press the playback ( Á ) key while pressing and holding the r ecord ( – ) key to start master r ecording. Recording automatically ends when the recorder position reaches the OUT point. NOTE Y ou c an us e th e LE VEL k nob s to ad jus t t he tra ck an d over all lev els as y ou r eco rd . 8 Press the REC MO DE key to open the[…]
-
Page 23: Tascam DP-008
T ASCAM DP-008 23 Shut ting down the unit Shutdown the unit when you are nished. 1 Press the HOME key to return to the Home Screen. 2 Press and hold the S TA N D B Y/ O N key until POCKETSTUD I O appears on the screen. The power turns off after the unit completes its shutdown process, including saving various information from your session. CAUTI[…]
-
Page 24: Tascam DP-008
24 T ASCAM DP-008 1 ST AN DBY/ O N key Pr ess a nd hold th is key t o t u r n the u n it ON and OFF . (See “St a r t-up & shut dow n” on page 32. ) 2 REC M OD E key Use th is key t o set t he re cord er mo de. Select b et ween MUL T I TRACK , BOUNCE , MASTER REC and MASTER PLAY . ( Se e “Rec orde r mod es” on pa ge 3 3. ) 3 PHA NTO M ke[…]
-
Page 25: Tascam DP-008
T ASCAM DP-008 25 9 EQ key Pr ess t h is key t o ope n the t ra ck EQ set t i ng scr ee n. (See “Track EQ ( eq ua li ze r )” on page 45 . ) Pr ess t h is key a nd REVERB key at the sa me t ime t o op en t he TRACK MUTE scr ee n. (See “Mut ing t r a cks” on p age 47 . ) 0 LCD D is play T hi s shows var iou s i nfor m at ion. q RE V ER B k[…]
-
Page 26: Tascam DP-008
26 T ASCAM DP-008 locat e to t he he ad of the s ong ( RTZ) or the l ast r ec ord in g st ar t posit ion ( LR P) . ( Se e “Ret u r n T o Zer o ( R TZ ) and L as t Recor di ng Position ( LR P )” on page 54. ) g / LRP key Pr ess t h is key whe n the t ra ns por t is sto ppe d or playi ng t o fa st for wa rd. P re ss it agai n t o cha nge the […]
-
Page 27: Tascam DP-008
T ASCAM DP-008 27 Rear panel z FOOT SW ITCH j ac k Y ou can u se a foot sw itch t o pu nch in a nd out ( s t ar t and s top r eco rdi ng). x IN PUT B ja ck (1/ 4” ph one j ac k) Use th is a s th e in put sou rc e by set t i ng I N PU T B to ext er nal i np ut (“ Ext . I nput ”) on t he I NPUT SETT I NG scr ee n. Y ou can u se t his ja ck f[…]
-
Page 28: Tascam DP-008
28 T ASCAM DP-008 . SD c ar d sl ot In se r t a n SD ca rd i nto t hi s slot. / US B por t Con ne ct t he u n it to a com pute r usi ng the i nclud ed USB cable. Th is a llows to sha r i ng, i mpor ti ng a nd ex por t i ng f iles bet wee n t he u nit a nd t he com pute r, in cludi ng ba ck up of the s ong d at a. (See “Con n ect i ng w ith a c[…]
-
Page 29: Tascam DP-008
T ASCAM DP-008 29 Bottom panel [Inside of the battery compartment] @ Ba t ter y co mpa r t me nt c over # Ba t ter y co mpa r t me nt T he bat t er ies ( fou r A A) that power t he u nit a re i n ser te d her e. 3 – Names and Functions of Parts[…]
-
Page 30: Tascam DP-008
30 T ASCAM DP-008 Home Screen 1 Re co rd er m ode Shows the cu r re nt rec orde r mode. 2 SD c ar d pr ote c ted i nd ic ati on T hi s app ea rs whe n t he i nse r t ed SD ca rd is pro tected. 3 SD c ar d in se r t io n st atu s If a n SD ca rd is i ns er t ed ap pe ar s. I f not, app ea rs . 4 Ba t ter y st at us W hen a b at te r y i s bei ng u s[…]
-
Page 31: Tascam DP-008
T ASCAM DP-008 31 Preparing the pow er and SD card Inst alling an SD card 1 Make sure the unit power is OFF . Open the SD card slot on the right side of the unit. 2 Insert the SD Card into the slot as shown in the following illustration until it clicks into place. 3 Close the cover . Ejecting the card Push an inserted card in further to eject it. C[…]
-
Page 32: Tascam DP-008
32 T ASCAM DP-008 Connecting an AC adaptor (sold se pa rat el y ) T o use the PS-P520 AC adaptor (sold separately), connect the adaptor to the unit and the adaptor to the power cord before plugging it into an outlet. T ASCAM PS-P520 (sold separately) AC outlet DC plug CAUTION Use o nly t he P S — S52 0 AC adapt er . Us ing an AC adapt er oth er t h[…]
-
Page 33: Tascam DP-008
T ASCAM DP-008 33 CAUTION Do n ot re move t he b at te rie s or • disc onn ec t t he p owe r cab le acc ide ntl y whi le th e unit i s ope rat ing. I f yo u do so , the u nit c ann ot shu t dow n pr op erl y and all uns ave d dat a will b e los t . Los t dat a can not b e res t or ed. We r ec omm end t hat you al so s ave t he dat a manu ally […]
-
Page 34: Tascam DP-008
34 T ASCAM DP-008 Connecting with other equipment Rear panel connections Connect guitar/bass to INPUT A Connect electronic keybard to INPUT A and B Drum machine Foot switch Headphones Powered speakers or amplifier and speakers Connect mics to INPUT A and B Right side panel connections TASCAM PS-P520 (Optional) AC outlet DC plug USB Computer NOTE Re[…]
-
Page 35: Tascam DP-008
T ASCAM DP-008 35 Setting the backlight T o reduce power consumption when using batteries, you can change the length of time that the backlight stays lit. 1 When the recorder is stopped, press the MENU key . 2 Use the D ATA wheel to select the PREFERENCE menu, and press the F4 ( ¥ ) key to open the PREFERENCE screen. 3 Use the F3 ( § ) and F4 ( ?[…]
-
Page 36: Tascam DP-008
36 T ASCAM DP-008 This unit manages data in song les. Ordinarily , every song is given its own le. The rst step is to load the song that you want to manage (load an existing song or create a new song). In a song, the audio data for the recorded multitrack ( TR ACK 1 – 8 ) and stereo master track that have been created are saved. This cha[…]
-
Page 37: Tascam DP-008
T ASCAM DP-008 37 Edit ing names Y ou can edit names on the following screens. W hen c re at ing , savi ng or e d iti ng t he na me • of a tr ack (SA V E , CR EA T E an d NAM E EDI T ) W hen ex por ti ng a W A V f ile ( EX PORT • TR A CK a nd EX POR T M AST ER) W hen b ack i ng up a so ng ( SONG B ACKUP) • Use the following methods to edit na[…]
-
Page 38: Tascam DP-008
38 T ASCAM DP-008 A default song name like SONG*** is given to the new song. The asterisks indicate a number . In the example above the name is SONG005 . 4 Change the song name as necessary (see “Editing names” on page 37). TIP Y ou c an re nam e a son g later by s ele c ti ng NA ME ED IT f ro m the S ON G me nu. You can also e dit t he s ong n[…]
-
Page 39: Tascam DP-008
T ASCAM DP-008 39 1 When the recorder is stopped, press MENU to open the MENU screen. 2 T urn the DATA wheel to select SONG , and press the F4 ( ¥ ) key to open the SONG menu screen. 3 T urn the DATA wheel to select COPY , and press the F4 ( ¥ ) key . T hi s ope ns t he SONG COPY scr ee n, wh ich shows a lis t of songs i n the a ct ive par tit io[…]
-
Page 40: Tascam DP-008
40 T ASCAM DP-008 4 T urn the DATA wheel to select a song that you want to erase and press the F4 ( ✔ ) key . A check ap pe ar s i n t he checkb ox. NOTE T o re move t he c he ck fr om t he ch ec kb ox (dese le c t the s ong ), pr es s th e F4 ( ✔ ) key whi le th e son g is sel ec t ed . 5 T o erase multiple songs, r epeat step 4. 6 After selec[…]
-
Page 41: Tascam DP-008
T ASCAM DP-008 41 Selecting the input source This unit has two inputs ( IN PUT A and IN PU T B ) that can be selected separately as input sources. The built-in mics (front panel MIC A and M IC B ) or external input signals (inputs through the IN PUT A and I NPU T B jacks on the rear panel) can be selected as input sources. In addition to mic and li[…]
-
Page 42: Tascam DP-008
42 T ASCAM DP-008 2 Press F4 ( ON ) to turn phantom power ON. The indicator above the PHA NTO M key lights, and the Home Screen r eopens. T o turn phantom power OFF , pr ess the F1 ( OFF ) key in the previous step. CAUTION T urn t he L EV EL kn obs d ow n bef or e • tur nin g phant om p owe r ON o r OFF. De pe ndin g on t he mic , a lo ud n oi[…]
-
Page 43: Tascam DP-008
T ASCAM DP-008 43 depend on the operating conditions as shown below . REC • in dicat or not l it du r i ng playback : t ra ck playback sig na l REC • in dicat or bli n k i ng (record s t and by ) du r i ng playback : t ra ck playba ck sign al REC • in dicat or bli n k i ng (record s t and by ) when t he re cor der i s stop pe d: t r ack i npu[…]
-
Page 44: Tascam DP-008
44 T ASCAM DP-008 Use the F2 ( ˙¥ ) key to switch between INPUT A and B. Use the F3 ( § ) and F4 ( ¶ ) keys to select parameters. Use the D ATA wheel to adjust the parameters. Press the F1 ( BACK ) key to return to the previous I NPUT SETT I NG screen. 3 After making the settings, pr ess the HOME key to r eturn to the Home Screen. NOTE Wh en in[…]
-
Page 45: Tascam DP-008
T ASCAM DP-008 45 monitoring volume. Use the PA N knobs to set the stereo positions (between the left and right speakers) of each track signal. NOTE Th e PAN and L EV EL kn obs of e ac h tra ck cont rol t hat t rac k’s p layb ac k out pu t signa l or mo nit ore d inp ut sig nal. T hey d o not cont rol t he s ignal b ein g re cor de d to t he trac[…]
-
Page 46: Tascam DP-008
46 T ASCAM DP-008 Set the track EQ using the EQ SETT I NG screen. 1 Press the EQ key to open the EQ SETT I NG screen. 2 Set the track EQ (equalizer). T he t ra ck eq ua li ze r ha s th e follo w i ng pa ra met er s. Parameter Setting value EQ-SW I TCH (track EQ switch) ON/OFF (Default: OFF) H i- F (high frequency range) 1.7 kHz – 18 kHz (Default:[…]
-
Page 47: Tascam DP-008
T ASCAM DP-008 47 TIM E 0.2 (0.8 for plate type) – 3.2 seconds (Default: 1.8 sec) LEVEL 0 – 100 (Default: 80) Use TYPE to set the type of reverb. Use TIM E to adjust the reverb time (depth). Use LEVEL to adjust the amount (volume) of the reverb. T he sign al af t er t he r everb ef fect i s applie d ( ret ur n sig nal) is m i xed i nto t he st […]
-
Page 48: Tascam DP-008
48 T ASCAM DP-008 Mastering When you are satised with your mix, this unit can record and create a stereo master track internally . W e call this process mastering. A stereo master track recorded by this unit is saved as part of the song, and can be recorded by an external stereo recorder . It can also be converted by the unit into a W A V le […]
-
Page 49: Tascam DP-008
T ASCAM DP-008 49 NOTE Y ou c ann ot ente r MA S TER R EC mo de if • you h ave not s et an OU T p oint . If y ou tr y to en ter M A ST ER REC m od e • wh en th e len gt h of th e inte r v al bet we en IN an d OU T poi nt s is to o sh or t , a “ trk t o o sho r t ” po p — up m es sa ge app ea r s and y ou can not en ter M A ST ER REC m[…]
-
Page 50: Tascam DP-008
50 T ASCAM DP-008 Undoing the last operation ( single undo) Press the UN/REDO key to return to the state before the last operation was conducted. After doing this, the UN/REDO indicator lights, showing that redo (see below) is possible. Indicator Cancelling an undo operation (redo) Press the UN/REDO key when it is lit to return to the state of the […]
-
Page 51: Tascam DP-008
T ASCAM DP-008 51 Eras ing the operation history When the power is turned OFF , the operation history of the currently loaded song is erased (cleared). The operation history is not restored, so past operations cannot be undone or redone when the power is turned ON again. NOTE Th e ope rat ion his t ori es of so ngs t hat ar e not loa de d are n ot […]
-
Page 52: Tascam DP-008
52 T ASCAM DP-008 Punching in and out Punching in/out is a technique to replace a part of an already recorded track. Start playback and when you reach the part that you want to replace, switch to record (punch in), then switch back to playback (or stop) when you nish the part that you want to replace (punch out). 1 Decide what part of the track […]
-
Page 53: Tascam DP-008
T ASCAM DP-008 53 Bouncing tra ck s Use this unit’ s bounce function to mix already recorded tracks (1–8) down to one or two tracks. Multitrack tape recorders can only bounce to an open track (in other words, they can not record to a track that is also a source of the mix). For example, tracks 1–7 could be bounced to track 8, but tracks 1–8[…]
-
Page 54: Tascam DP-008
54 T ASCAM DP-008 the song from the beginning. If you are not satisfied with the r esult because, for example, the balance between instruments is poor , or the pan settings are wr ong, use the undo function (see “Undoing the last operation (single undo)” on page 50). If you are satisfied with the r esult, press the REC M OD E key to open the RE[…]
-
Page 55: Tascam DP-008
T ASCAM DP-008 55 TIP RT Z an d LRP b elo w the Ô and key s are ab br eviat ion s for R et urn To Zero and La st R ec ord ing P osi tio n, r esp ec t iv ely. F ast for ward / rewind search Press the Ô or key when stopped or during playback to r ewind or fast forward, respectively . Ea ch ti me you pr ess on e of thes e keys, t he spe ed i[…]
-
Page 56: Tascam DP-008
56 T ASCAM DP-008 Du ring r ep eat p layb ack • In au to pu nch i n/ou t mo de • Wh en t he re cor de r mo de is M A ST ER REC • or MA S TER P L AY Using repeat pla y back 1 Set the starting (IN) and ending (OUT) points for the time that you want to repeat, and then r eturn to the Home Screen. 2 Press the R E P E AT key to start repe[…]
-
Page 57: Tascam DP-008
T ASCAM DP-008 57 2 After setting the IN and OUT points, press the r ecord ( º ) and IN/OUT keys at the same time to enter auto punch in/out mode. 3 Press the playback ( Á ) key . Playback beg i ns f rom t wo sec onds b efore the I N poi nt, a nd t he sou nd mon it ored sw itches a t the I N poi nt f rom t he t r ack playback so un d and t he i n[…]
-
Page 58: Tascam DP-008
58 T ASCAM DP-008 Editing on a conventional tape recorder in the past required advanced techniques, but with this unit editing tracks is easy and accurate. Moreover , with a tape recorder , an editing error could not be undone, but this unit uses nondestructive editing, allowing you to edit without altering the original data. This means that the un[…]
-
Page 59: Tascam DP-008
T ASCAM DP-008 59 4 Select the setting item value. If there ar e multiple setting items, use the F3 ( § ) and F4 ( ¶ ) keys to select one. T urn the D ATA wheel to set an item’ s value. 5 Press the F2 ( EXEC ) key to execute the function. Press the F1 ( BACK ) key to return to the TRACK ED I T menu screen without executing the function. Ex plan[…]
-
Page 60: Tascam DP-008
60 T ASCAM DP-008 COPY TIMES Set the number of times that the copied section will be pasted. Set the number between 1 and 99 . COP Y/ P A STE OUT IN TO OUT IN TO This function copies the audio data from between the IN and OUT points on the COPY source track, and pastes it on the COPY destination track starting from the T O point. This operation doe[…]
-
Page 61: Tascam DP-008
T ASCAM DP-008 61 MOVE / P ASTE OUT IN TO OUT IN TO The audio data between the IN and OUT points on the MOVE source track is removed and pasted in the MOVE destination track starting from the T O point. This operation leaves a silence between the IN and OUT points on the MOVE source track. This operation overwrites recorded data on the MOVE destina[…]
-
Page 62: Tascam DP-008
62 T ASCAM DP-008 OPEN TR K ( • 1 to 8 , 1 / 2 , 3 / 4 , 5 / 6 , 7 / 8 , 1 — 8 , ALL ) I N/O U T • CUT (remove part ) OUT IN IN This function cuts (deletes) the audio data between the IN and OUT points on the selected track, and shifts the remaining recording after the OUT point forward to the IN point. Therefore, the track becomes shorter . Th[…]
-
Page 63: Tascam DP-008
T ASCAM DP-008 63 DESTI NA T ION TR K • NOTE If y ou ch oos e th e sa me tr ack f or b oth t he SOU RCE T RK and t he D EST I NATIO N TRK a nd pre s s th e F2 (E XEC ) key, the “S ame Track” mes s age ap pe ar s an d th e ope rati on is n ot exe cu te d. CLE AN out (track erase) Use this function to completely erase the selected track. This e[…]
-
Page 64: Tascam DP-008
64 T ASCAM DP-008 Metronome This unit has a built-in metronome function that can be used when the recorder is operating. Y ou can set it to function during both playback and recording or only during recording. 1 Press the METRONOME key to open the METRONOME screen. 2 Set the following items. Use the F3 ( § ) and F4 ( ¶ ) keys to select each item,[…]
-
Page 65: Tascam DP-008
T ASCAM DP-008 65 T o use the built-in mic, set the I NPUT SETT I NG to I nterna l M I C . 3 When the recorder is stopped, press TUNER to open the TUNER screen. T he value of the C A L IB item (sta nd ard f re quen cy ) is sele cte d. 4 T urn the DATA wheel to set the standard frequency of the A note between 435 and 445 Hz. The default setting is 4[…]
-
Page 66: Tascam DP-008
66 T ASCAM DP-008 The default setting is 10 0 . Use the F3 ( § ) and F4 ( ¶ ) keys to select parameters, and use the D ATA wheel to set the parameter values. Use the F2 ( ON ) key to turn the output ON and OFF . Use the F1 ( CHROM ) key to change to chromatic tuner mode. 3 When you have finished tuning, press the HOME key to r eturn to the Home S[…]
-
Page 67: Tascam DP-008
T ASCAM DP-008 67 T he I NFORMAT ION scr ee n SONG page app ea rs . T he I NFORMAT ION scr ee n ha s th r ee p ages in cludi ng t hi s one. 3 Use the F3 ( PREV ) and F4 ( NEXT ) keys to change the page. The pages contain the following information. SONG ( 1 /3 ) page: name and partition of currently loaded song, remaining recording time on partition[…]
-
Page 68: Tascam DP-008
68 T ASCAM DP-008 Overv iew of partitions As described in “Partitions and songs” (page 47), SD cards formatted by this unit are divided into partitions. MTR partitions are for recording data while the F A T partition can be accessed with a personal computer . High-capacity cards can have multiple MTR partitions. In this case, you can use the MT[…]
-
Page 69: Tascam DP-008
T ASCAM DP-008 69 Card capacity F A T partition size MTR partition size 512 MB 256 MB 256MB fixed 4 If the card capacity is 8 GB or mor e, turn the D ATA wheel to select the MTR partition size, and press the F2 ( EXEC ) key . A mes sage wa r n i ng t hat al l song s wi ll b e er as ed ap pea r s. 5 Press the F3 ( YES ) key to format the card. For […]
-
Page 70: Tascam DP-008
70 T ASCAM DP-008 Reformatting the F A T par titio n Y ou can also reformat just the F A T partition. The size of the F A T partition cannot be changed. CAUTION Y ou c ann ot und o this o pe rati on! All d ata on th e FA T p ar ti tio n will b e er ase d, s o be cer tain t hat y ou will n ot los e any t hin g imp or t ant w he n ref or mat t ing. 1[…]
-
Page 71: Tascam DP-008
T ASCAM DP-008 71 Y ou can backup song data on this unit to a computer and restore backed-up song data later . Moreover, you can export track les and master les from a song to a computer and import audio les on the computer to the unit. Backed-up data can be restored to a different DP-008 unit than the one that created it. In other words, […]
-
Page 72: Tascam DP-008
72 T ASCAM DP-008 If you turn the unit’ s power ON after making the USB connection, the screen above appears right away . The unit appears as an external drive named “DP-008” on the computer ’ s display . The F A T partition of the T ASCAM DP-008 has three directories (folders): BACKUP , W A VE and UTILITY . CAUTION Thi s unit c an r ece iv[…]
-
Page 73: Tascam DP-008
T ASCAM DP-008 73 2 After the icon disappears fr om the desktop, remove the USB cable. This unit restarts and the Home Scr een appears on the display . Song backup and restor ation Song backup saves not only audio tracks, but also backs up editing data and other song data. Song restoration is the reverse of this process. In short, song data is tran[…]
-
Page 74: Tascam DP-008
74 T ASCAM DP-008 CAUTION If y ou us e a com put er t o chan ge t he • name of a s ong fil e that h as be en b ac ked up, u se n o mor e tha n eigh t ord inar y sing le — by t e Englis h let t er s an d num be r s . Do n ot chan ge t he file e x t ens ion. • Restor ing songs Basically , restoring is the reverse of backing up. In short, […]
-
Page 75: Tascam DP-008
T ASCAM DP-008 75 Impor ting tracks Before importing a track, rst select the partition with the song that you want to import it into as the active partition. Then, load the song that you want to import tracks into. 1 Connect this unit to a computer using the USB cable (see “ Connecting with a computer ” on page 71). 2 Use the computer to cop[…]
-
Page 76: Tascam DP-008
76 T ASCAM DP-008 Ex por ting tracks Y ou can export tracks as 16-bit, 44.1-kHz mono W A V les. 1 When the recorder is stopped, press the MENU key to open the MENU screen. 2 T urn the DATA wheel to select I MPORT / EXPORT , and press the F4 ( ¥ ) key to open the I MPORT /EXPORT menu. 3 T urn the DATA wheel to select the EXPORT TRACK item, and p[…]
-
Page 77: Tascam DP-008
T ASCAM DP-008 77 9 Use the computer to copy track files from the W A VE directory on the F A T partition to the computer . 10 After exporting track files to the computer , disconnect the unit fr om the computer using the pr oper pr ocedures and then remove the USB cable (see “Disconnecting” on page 72). Ex por ting a stereo mast er tra c k Y o[…]
-
Page 78: Tascam DP-008
78 T ASCAM DP-008 When working with any new piece of equipment like the unit, it’ s sometimes difcult to work out why something isn’t happening the way you expect. The main thing is to take your time—after all, you’re not paying hourly studio rates! Stop and think. Ask yourself questions, like the ones below , and you can usually nd t[…]
-
Page 79: Tascam DP-008
T ASCAM DP-008 79 13 – Messages The following popup messages alert you to conditions that may arise while you are using the unit. Consult this table if you see something you do not understand. Messages Meaning and remedy Empty Export T r ack Y ou are trying to export a track («T rack import and export» on page 74) which does not have an[…]
-
Page 80: Tascam DP-008
80 T ASCAM DP-008 Messages Meaning and remedy S a m e T ra c k Y ou cannot clone a track to itself. («CLONE track (track duplication)» on page 62.) Song Protec ted The song is protected («Protecting songs» on page 40) and you are trying to change it (record or edit, etc.). Unprotect the song. T oo Many songs Y ou have 250 songs […]
-
Page 81: Tascam DP-008
T ASCAM DP-008 81 Audio input / output ratings INPUT A jack • XLR type (Balanced) Connector: XLR-3-31 (1: GND, 2: HOT , 3: COLD) Input impedance: 2.4 kΩ Standard input level: –8 dBu Maximum input level: +8 dBu • 1 / 4” pho ne jack type (Unbalanced) Connector: 6.3 mm (1/4”) phone jack Input impedance: 1 0 k Ω (when IN PUT A sele cto r […]
-
Page 82: Tascam DP-008
82 T ASCAM DP-008 Dimensions (WHD) 221 x 36 x 126.5 mm/ 8.70 x 1.42 x 4.98 in (w/o projections) Weight 610 g/19.69 oz (w/o batteries) Optional ac cessories AC adaptor PS-P520 Computer requirements Windows Pentium 300 MHz or faster 128 MB or more memory USB port (USB 2.0 recommended) Macintosh Power PC, iMac, G3, G4 266 MHz or faster 64 MB or more m[…]
-
Page 83: Tascam DP-008
T ASCAM DP-008 83 Dimensi ons 221 mm 36 mm 126.5 mm Block diagr am 14 – Specifications and Block Dia gram[…]
-
Page 84: Tascam DP-008
84 T ASCAM DP-008 15 – Commonly-used Functions This section is a brief guide to some operations on the DP-008 which may not be immediately obvious from looking at the panel controls. Key seq uenc es a re w r it t en l i ke th is: • STO P + Ô mea ns “ pre ss a nd hold the S TOP key and p res s Ô .” Menu ite ms a re w r it t en l i ke th is[…]
-
Page 85: Tascam DP-008
T ASCAM DP-008 85 How to Keys, etc. TO press Description Un-protect a song ME NU ® SONG ® PROTECT See «Protecting songs» on page 40. Display the song name ME NU ® I NFORMAT ION See «Viewing information» on page 66. Copy a song ME NU ® SONG ® COPY See «Copying songs» on page 38. Delete a song ME NU ® SONG ® ERASE[…]
-
Page 86: Tascam DP-008
86 T ASCAM DP-008 How to Keys, etc. TO press Description Record a guitar IN PUT S ET TIN G See «Selecting the input source» on page 41. Change the track to which INPUT A/B is assigned ASSIGN See «Assigning inputs» on page 43. Change the interval time during repeat ME NU ® PREFERENCE See «Setting the interval between repeti[…]
-
Page 87: Tascam DP-008
T ASCAM DP-008 87[…]
-
Page 88: Tascam DP-008
TEAC CORPOR A TION Pho ne : + 81-4 2-35 6 -9143 www. tascam.j p 1-47 Och ia i, T a ma -s hi, Toky o 206 — 8 53 0 Ja pa n TE AC A MER ICA , INC. Pho ne : +1-323 -726- 0 30 3 www. tascam.co m 7733 Tele gr ap h Ro ad, M on teb el lo, C ali fo rn ia 9 0 64 0, US A TE AC CA NA DA LTD. Pho ne : +1905 — 89 0 — 8 00 8 Fa cs imi le : +1905 — 89 0 — 98 8 8 w[…]
-
Страница 1
DP-008 8-T rack Digital Pocketstudio D01092520A OWNER’S MANU AL[…]
-
Страница 2
2 T ASCAM DP-008 The exclamation point within an equilateral triangle is intended to alert the user to the presence of important operating and maintenance (servicing) instructions in the literature accompanying the appliance. The lightn ing flash with arrowhe ad symbol, with in equilat eral triangle, is intended to alert the user to the presence of[…]
-
Страница 3
T ASCAM DP-008 3 1 Read these instructions. 2 Keep these instructions. 3 Heed all warnings. 4 Follow all instructions. 5 Do not use this apparatus near water . 6 Clean only with dry cloth. 7 Do not block any ventilation openings. Install in accordance with the manufacturer’s instructions. 8 Do not install near any heat sources such as radiator[…]
-
Страница 4
4 T ASCAM DP-008 CAUTIONS ABOUT BA TTERIES Thi s p rod uc t us es b at te rie s. M isu se of ba t ter- ie s c oul d c aus e a le ak , r uptu re or o the r t rou — ble. A lway s abi de by th e foll owin g p re ca uti ons whe n us ing b at ter ie s. Neve r rec ha rg e non -r ec ha rge ab le ba t ter ies . • Th e b at ter ie s c oul d rup ture or le[…]
-
Страница 5
T ASCAM DP-008 5 T able of Contents 1 – Introduction ………………………….. 7 Over view of t his unit ……………………………. 7 Ab out t his manua l ………………………………. 7 Manual c onvent ions ………………………… 7 Pro duc t pa r ts ……………………………………… 7 Inte llec tu al pr[…]
-
Страница 6
6 T ASCAM DP-008 T able of Contents Conf irmi ng th e resul t……………………… 53 Loc ate an d sear ch fu nc tions ……………….. 54 Dire c t loc ate f unc tio n …………………….. 54 Retu rn T o Zer o ( RT Z ) an d La st Reco rdin g Posit ion ( L RP ) …………. 54 Fast for wa rd / re wind s earc h ……………. 55 Re[…]
-
Страница 7
T ASCAM DP-008 7 1 – Intr oduction Thank you for your purchase of T ASCAM’ s 8-T rack Digital Pocketstudio, the DP-008. The DP-008 is designed to provide you with great sound in an easy-to-use compact package, allowing you to concentrate on the music, and not on the recording process. Before connecting and using the unit, please take time to re[…]
-
Страница 8
8 T ASCAM DP-008 Main unit • …………………………………………….. 1 SD Card (in the unit) • …………………………….. 1 USB Cable • …………………………………………… 1 AA alkaline batteries • …………………………….. 4 W arranty card • ………………………………………. 1[…]
-
Страница 9
T ASCAM DP-008 9 Cautions on installation T he u nit’ s nom in al op er at i ng te mpe ra t u re • is be t ween 5˚ and 35 ° C ( 4 1 ° – 95 ° F). Do not i ns t all i n t he followi ng t y pe s of • place s. Doi ng so c ould deg r ad e the s ou nd qu al ity a nd / or cau se m alf un ct ions. Place s wit h sig ni f ica nt v ibr at ions or […]
-
Страница 10
10 T ASCAM DP-008 Pla y back and mixing First, we will play the demo song on the included SD card. The SD card with the demo song is shipped already installed but we will start by explaining how to insert an SD card here. Preparing to list en to the demo song 1 Open the SD card slot cover on the right side of the unit and insert the supplied S D ca[…]
-
Страница 11
T ASCAM DP-008 11 or ins er t the c ar d. If y ou r emov e or in ser t the S D ca rd w he n the u nit ’s pow er i s on, t he u nit c ann ot shu t dow n pr op erl y and all u ns aved d ata an d se t tin gs w ill be los t. T h ese d ata an d set tin gs c annot b e recovered. Do n ot re move t he b at te rie s or • disc onn ec t t he p owe r ca[…]
-
Страница 12
12 T ASCAM DP-008 5 Rotate the D ATA wheel to select DEMO_008 , and press the F2 ( EXEC ) key . The demo song loads and the SONG screen reopens. 6 Press the HOME key to reopen the Home Screen. 7 Press the playback ( Á ) key and turn up the TR ACK1– 8 LE V EL knobs, the MAS TE R LE V EL knob and the VOLUME dial to hear the demo song. The MAS TE R[…]
-
Страница 13
T ASCAM DP-008 13 From rec ording to creating a master tra ck Here, we will try multitrack recording. In the following example, we will use an electric guitar to record a rhythm guitar part on track 1 and a lead guitar part on track 2. Then, we will use the built-in mic to record a voice on track 3. Finally , we will mix the tracks down. In this se[…]
-
Страница 14
14 T ASCAM DP-008 Connecting an d setting the inp ut sources 1 Connect an electric guitar to the INPUT A connector on the r ear panel. Guitar 2 Set the MIC/LINE-GUIT AR switch on the rear panel to G U I TA R . TIP Wh en co nne c tin g an ele c tr ic-ac ous ti c gui tar wit h a bu ilt-in p re amp o r an ac ti ve el ec t ric guit ar, as well as w he […]
-
Страница 15
T ASCAM DP-008 15 This sets MIC B , which is the built-in mic on the right side of the front panel as the input source for INP U T B . NOTE Int ern al MI C / Low an d Int er nal M IC / Hi gh chan ge th e se nsi tiv it y of t he bu ilt-i n mic s . Set i t acco rd ing t o the l oud nes s of t he subj ec t b ein g re cor de d. If y ou are n ot sur e w[…]
-
Страница 16
16 T ASCAM DP-008 OL indicator When you play the guitar , the input level is shown by the A (INPUT A) and 1 ( TR ACK 1 ) meters on the display . T urn up the TR AC K 1 LE V EL and M AST ER LEV EL knobs and the VOL UME dial to hear the guitar sound through headphones. When doing so, the L and R meters on the right side of the display become active. […]
-
Страница 17
T ASCAM DP-008 17 TIP Use t he T R ACK 1 PAN k nob t o set t he s t ere o pos iti on of th e tra ck sig nal. Record guitar to TR ACK 2 Now , you will record lead guitar on TR AC K 2 while listening to the rhythm guitar on TR ACK 1 . Use the following procedures to change the recording source for TR ACK 2 . 1 Press the A SSIGN key to open the I NPUT[…]
-
Страница 18
18 T ASCAM DP-008 TRACK 2 REC indicator 5 Return to the beginning of the song and begin playback. Play the lead guitar part along with the already r ecorded rhythm guitar . Raise the TR ACK 2 L E VE L knob to hear the sound of the guitar being input along with the TR ACK 1 playback sound through the headphones. 6 Use the TR ACK 1 and 2 L E VE L and[…]
-
Страница 19
T ASCAM DP-008 19 3 Press the HOME key to return to the Home Screen. 4 Press the TR ACK 3 REC key . The key blinks showing that the track is in record standby . TRACK 3 REC indicator 5 Use the IN PUT B TRIM knob to adjust the mic input level. Set the TRIM knob so that the IN PUT B OL indicator does not light even when the loudest sound to be record[…]
-
Страница 20
20 T ASCAM DP-008 if th e inp ut se t ti ng is In ter nal M IC / H igh , chan ge it t o Int er nal M IC / Low. If t he O L indi cat or co ntin ues t o light ev en w he n set t o Int ern al MI C / Low, mov e th e sou nd so urc e away fr om t he mi c or low er t he vo lume at the s oun d so urc e. CAUTION Al way s mo nit or th ro ugh h ead pho ne s w[…]
-
Страница 21
T ASCAM DP-008 21 2 Play the song back, and press the F4 ( OUT ) key at the position where you want the stereo master track end point. “ S E T O U T ! ” app ea rs a nd t h is po sition is set a s th e OUT poi nt , which w il l be t he en d poi nt of the ma st er. TIP Y ou c an als o set t he OU T p oint w he n playb ac k is s to ppe d by pr es […]
-
Страница 22
22 T ASCAM DP-008 7 Press the playback ( Á ) key while pressing and holding the r ecord ( – ) key to start master r ecording. Recording automatically ends when the recorder position reaches the OUT point. NOTE Y ou c an us e th e LE VEL k nob s to ad jus t t he tra ck an d over all lev els as y ou r eco rd . 8 Press the REC MO DE key to open the[…]
-
Страница 23
T ASCAM DP-008 23 Shut ting down the unit Shutdown the unit when you are nished. 1 Press the HOME key to return to the Home Screen. 2 Press and hold the S TA N D B Y/ O N key until POCKETSTUD I O appears on the screen. The power turns off after the unit completes its shutdown process, including saving various information from your session. CAUTI[…]
-
Страница 24
24 T ASCAM DP-008 1 ST AN DBY/ O N key Pr ess a nd hold th is key t o t u r n the u n it ON and OFF . (See “St a r t-up & shut dow n” on page 32. ) 2 REC M OD E key Use th is key t o set t he re cord er mo de. Select b et ween MUL T I TRACK , BOUNCE , MASTER REC and MASTER PLAY . ( Se e “Rec orde r mod es” on pa ge 3 3. ) 3 PHA NTO M ke[…]
-
Страница 25
T ASCAM DP-008 25 9 EQ key Pr ess t h is key t o ope n the t ra ck EQ set t i ng scr ee n. (See “Track EQ ( eq ua li ze r )” on page 45 . ) Pr ess t h is key a nd REVERB key at the sa me t ime t o op en t he TRACK MUTE scr ee n. (See “Mut ing t r a cks” on p age 47 . ) 0 LCD D is play T hi s shows var iou s i nfor m at ion. q RE V ER B k[…]
-
Страница 26
26 T ASCAM DP-008 locat e to t he he ad of the s ong ( RTZ) or the l ast r ec ord in g st ar t posit ion ( LR P) . ( Se e “Ret u r n T o Zer o ( R TZ ) and L as t Recor di ng Position ( LR P )” on page 54. ) g / LRP key Pr ess t h is key whe n the t ra ns por t is sto ppe d or playi ng t o fa st for wa rd. P re ss it agai n t o cha nge the […]
-
Страница 27
T ASCAM DP-008 27 Rear panel z FOOT SW ITCH j ac k Y ou can u se a foot sw itch t o pu nch in a nd out ( s t ar t and s top r eco rdi ng). x IN PUT B ja ck (1/ 4” ph one j ac k) Use th is a s th e in put sou rc e by set t i ng I N PU T B to ext er nal i np ut (“ Ext . I nput ”) on t he I NPUT SETT I NG scr ee n. Y ou can u se t his ja ck f[…]
-
Страница 28
28 T ASCAM DP-008 . SD c ar d sl ot In se r t a n SD ca rd i nto t hi s slot. / US B por t Con ne ct t he u n it to a com pute r usi ng the i nclud ed USB cable. Th is a llows to sha r i ng, i mpor ti ng a nd ex por t i ng f iles bet wee n t he u nit a nd t he com pute r, in cludi ng ba ck up of the s ong d at a. (See “Con n ect i ng w ith a c[…]
-
Страница 29
T ASCAM DP-008 29 Bottom panel [Inside of the battery compartment] @ Ba t ter y co mpa r t me nt c over # Ba t ter y co mpa r t me nt T he bat t er ies ( fou r A A) that power t he u nit a re i n ser te d her e. 3 – Names and Functions of Parts[…]
-
Страница 30
30 T ASCAM DP-008 Home Screen 1 Re co rd er m ode Shows the cu r re nt rec orde r mode. 2 SD c ar d pr ote c ted i nd ic ati on T hi s app ea rs whe n t he i nse r t ed SD ca rd is pro tected. 3 SD c ar d in se r t io n st atu s If a n SD ca rd is i ns er t ed ap pe ar s. I f not, app ea rs . 4 Ba t ter y st at us W hen a b at te r y i s bei ng u s[…]
-
Страница 31
T ASCAM DP-008 31 Preparing the pow er and SD card Inst alling an SD card 1 Make sure the unit power is OFF . Open the SD card slot on the right side of the unit. 2 Insert the SD Card into the slot as shown in the following illustration until it clicks into place. 3 Close the cover . Ejecting the card Push an inserted card in further to eject it. C[…]
-
Страница 32
32 T ASCAM DP-008 Connecting an AC adaptor (sold se pa rat el y ) T o use the PS-P520 AC adaptor (sold separately), connect the adaptor to the unit and the adaptor to the power cord before plugging it into an outlet. T ASCAM PS-P520 (sold separately) AC outlet DC plug CAUTION Use o nly t he P S — S52 0 AC adapt er . Us ing an AC adapt er oth er t h[…]
-
Страница 33
T ASCAM DP-008 33 CAUTION Do n ot re move t he b at te rie s or • disc onn ec t t he p owe r cab le acc ide ntl y whi le th e unit i s ope rat ing. I f yo u do so , the u nit c ann ot shu t dow n pr op erl y and all uns ave d dat a will b e los t . Los t dat a can not b e res t or ed. We r ec omm end t hat you al so s ave t he dat a manu ally […]
-
Страница 34
34 T ASCAM DP-008 Connecting with other equipment Rear panel connections Connect guitar/bass to INPUT A Connect electronic keybard to INPUT A and B Drum machine Foot switch Headphones Powered speakers or amplifier and speakers Connect mics to INPUT A and B Right side panel connections TASCAM PS-P520 (Optional) AC outlet DC plug USB Computer NOTE Re[…]
-
Страница 35
T ASCAM DP-008 35 Setting the backlight T o reduce power consumption when using batteries, you can change the length of time that the backlight stays lit. 1 When the recorder is stopped, press the MENU key . 2 Use the D ATA wheel to select the PREFERENCE menu, and press the F4 ( ¥ ) key to open the PREFERENCE screen. 3 Use the F3 ( § ) and F4 ( ?[…]
-
Страница 36
36 T ASCAM DP-008 This unit manages data in song les. Ordinarily , every song is given its own le. The rst step is to load the song that you want to manage (load an existing song or create a new song). In a song, the audio data for the recorded multitrack ( TR ACK 1 – 8 ) and stereo master track that have been created are saved. This cha[…]
-
Страница 37
T ASCAM DP-008 37 Edit ing names Y ou can edit names on the following screens. W hen c re at ing , savi ng or e d iti ng t he na me • of a tr ack (SA V E , CR EA T E an d NAM E EDI T ) W hen ex por ti ng a W A V f ile ( EX PORT • TR A CK a nd EX POR T M AST ER) W hen b ack i ng up a so ng ( SONG B ACKUP) • Use the following methods to edit na[…]
-
Страница 38
38 T ASCAM DP-008 A default song name like SONG*** is given to the new song. The asterisks indicate a number . In the example above the name is SONG005 . 4 Change the song name as necessary (see “Editing names” on page 37). TIP Y ou c an re nam e a son g later by s ele c ti ng NA ME ED IT f ro m the S ON G me nu. You can also e dit t he s ong n[…]
-
Страница 39
T ASCAM DP-008 39 1 When the recorder is stopped, press MENU to open the MENU screen. 2 T urn the DATA wheel to select SONG , and press the F4 ( ¥ ) key to open the SONG menu screen. 3 T urn the DATA wheel to select COPY , and press the F4 ( ¥ ) key . T hi s ope ns t he SONG COPY scr ee n, wh ich shows a lis t of songs i n the a ct ive par tit io[…]
-
Страница 40
40 T ASCAM DP-008 4 T urn the DATA wheel to select a song that you want to erase and press the F4 ( ✔ ) key . A check ap pe ar s i n t he checkb ox. NOTE T o re move t he c he ck fr om t he ch ec kb ox (dese le c t the s ong ), pr es s th e F4 ( ✔ ) key whi le th e son g is sel ec t ed . 5 T o erase multiple songs, r epeat step 4. 6 After selec[…]
-
Страница 41
T ASCAM DP-008 41 Selecting the input source This unit has two inputs ( IN PUT A and IN PU T B ) that can be selected separately as input sources. The built-in mics (front panel MIC A and M IC B ) or external input signals (inputs through the IN PUT A and I NPU T B jacks on the rear panel) can be selected as input sources. In addition to mic and li[…]
-
Страница 42
42 T ASCAM DP-008 2 Press F4 ( ON ) to turn phantom power ON. The indicator above the PHA NTO M key lights, and the Home Screen r eopens. T o turn phantom power OFF , pr ess the F1 ( OFF ) key in the previous step. CAUTION T urn t he L EV EL kn obs d ow n bef or e • tur nin g phant om p owe r ON o r OFF. De pe ndin g on t he mic , a lo ud n oi[…]
-
Страница 43
T ASCAM DP-008 43 depend on the operating conditions as shown below . REC • in dicat or not l it du r i ng playback : t ra ck playback sig na l REC • in dicat or bli n k i ng (record s t and by ) du r i ng playback : t ra ck playba ck sign al REC • in dicat or bli n k i ng (record s t and by ) when t he re cor der i s stop pe d: t r ack i npu[…]
-
Страница 44
44 T ASCAM DP-008 Use the F2 ( ˙¥ ) key to switch between INPUT A and B. Use the F3 ( § ) and F4 ( ¶ ) keys to select parameters. Use the D ATA wheel to adjust the parameters. Press the F1 ( BACK ) key to return to the previous I NPUT SETT I NG screen. 3 After making the settings, pr ess the HOME key to r eturn to the Home Screen. NOTE Wh en in[…]
-
Страница 45
T ASCAM DP-008 45 monitoring volume. Use the PA N knobs to set the stereo positions (between the left and right speakers) of each track signal. NOTE Th e PAN and L EV EL kn obs of e ac h tra ck cont rol t hat t rac k’s p layb ac k out pu t signa l or mo nit ore d inp ut sig nal. T hey d o not cont rol t he s ignal b ein g re cor de d to t he trac[…]
-
Страница 46
46 T ASCAM DP-008 Set the track EQ using the EQ SETT I NG screen. 1 Press the EQ key to open the EQ SETT I NG screen. 2 Set the track EQ (equalizer). T he t ra ck eq ua li ze r ha s th e follo w i ng pa ra met er s. Parameter Setting value EQ-SW I TCH (track EQ switch) ON/OFF (Default: OFF) H i- F (high frequency range) 1.7 kHz – 18 kHz (Default:[…]
-
Страница 47
T ASCAM DP-008 47 TIM E 0.2 (0.8 for plate type) – 3.2 seconds (Default: 1.8 sec) LEVEL 0 – 100 (Default: 80) Use TYPE to set the type of reverb. Use TIM E to adjust the reverb time (depth). Use LEVEL to adjust the amount (volume) of the reverb. T he sign al af t er t he r everb ef fect i s applie d ( ret ur n sig nal) is m i xed i nto t he st […]
-
Страница 48
48 T ASCAM DP-008 Mastering When you are satised with your mix, this unit can record and create a stereo master track internally . W e call this process mastering. A stereo master track recorded by this unit is saved as part of the song, and can be recorded by an external stereo recorder . It can also be converted by the unit into a W A V le […]
-
Страница 49
T ASCAM DP-008 49 NOTE Y ou c ann ot ente r MA S TER R EC mo de if • you h ave not s et an OU T p oint . If y ou tr y to en ter M A ST ER REC m od e • wh en th e len gt h of th e inte r v al bet we en IN an d OU T poi nt s is to o sh or t , a “ trk t o o sho r t ” po p — up m es sa ge app ea r s and y ou can not en ter M A ST ER REC m[…]
-
Страница 50
50 T ASCAM DP-008 Undoing the last operation ( single undo) Press the UN/REDO key to return to the state before the last operation was conducted. After doing this, the UN/REDO indicator lights, showing that redo (see below) is possible. Indicator Cancelling an undo operation (redo) Press the UN/REDO key when it is lit to return to the state of the […]
-
Страница 51
T ASCAM DP-008 51 Eras ing the operation history When the power is turned OFF , the operation history of the currently loaded song is erased (cleared). The operation history is not restored, so past operations cannot be undone or redone when the power is turned ON again. NOTE Th e ope rat ion his t ori es of so ngs t hat ar e not loa de d are n ot […]
-
Страница 52
52 T ASCAM DP-008 Punching in and out Punching in/out is a technique to replace a part of an already recorded track. Start playback and when you reach the part that you want to replace, switch to record (punch in), then switch back to playback (or stop) when you nish the part that you want to replace (punch out). 1 Decide what part of the track […]
-
Страница 53
T ASCAM DP-008 53 Bouncing tra ck s Use this unit’ s bounce function to mix already recorded tracks (1–8) down to one or two tracks. Multitrack tape recorders can only bounce to an open track (in other words, they can not record to a track that is also a source of the mix). For example, tracks 1–7 could be bounced to track 8, but tracks 1–8[…]
-
Страница 54
54 T ASCAM DP-008 the song from the beginning. If you are not satisfied with the r esult because, for example, the balance between instruments is poor , or the pan settings are wr ong, use the undo function (see “Undoing the last operation (single undo)” on page 50). If you are satisfied with the r esult, press the REC M OD E key to open the RE[…]
-
Страница 55
T ASCAM DP-008 55 TIP RT Z an d LRP b elo w the Ô and key s are ab br eviat ion s for R et urn To Zero and La st R ec ord ing P osi tio n, r esp ec t iv ely. F ast for ward / rewind search Press the Ô or key when stopped or during playback to r ewind or fast forward, respectively . Ea ch ti me you pr ess on e of thes e keys, t he spe ed i[…]
-
Страница 56
56 T ASCAM DP-008 Du ring r ep eat p layb ack • In au to pu nch i n/ou t mo de • Wh en t he re cor de r mo de is M A ST ER REC • or MA S TER P L AY Using repeat pla y back 1 Set the starting (IN) and ending (OUT) points for the time that you want to repeat, and then r eturn to the Home Screen. 2 Press the R E P E AT key to start repe[…]
-
Страница 57
T ASCAM DP-008 57 2 After setting the IN and OUT points, press the r ecord ( º ) and IN/OUT keys at the same time to enter auto punch in/out mode. 3 Press the playback ( Á ) key . Playback beg i ns f rom t wo sec onds b efore the I N poi nt, a nd t he sou nd mon it ored sw itches a t the I N poi nt f rom t he t r ack playback so un d and t he i n[…]
-
Страница 58
58 T ASCAM DP-008 Editing on a conventional tape recorder in the past required advanced techniques, but with this unit editing tracks is easy and accurate. Moreover , with a tape recorder , an editing error could not be undone, but this unit uses nondestructive editing, allowing you to edit without altering the original data. This means that the un[…]
-
Страница 59
T ASCAM DP-008 59 4 Select the setting item value. If there ar e multiple setting items, use the F3 ( § ) and F4 ( ¶ ) keys to select one. T urn the D ATA wheel to set an item’ s value. 5 Press the F2 ( EXEC ) key to execute the function. Press the F1 ( BACK ) key to return to the TRACK ED I T menu screen without executing the function. Ex plan[…]
-
Страница 60
60 T ASCAM DP-008 COPY TIMES Set the number of times that the copied section will be pasted. Set the number between 1 and 99 . COP Y/ P A STE OUT IN TO OUT IN TO This function copies the audio data from between the IN and OUT points on the COPY source track, and pastes it on the COPY destination track starting from the T O point. This operation doe[…]
-
Страница 61
T ASCAM DP-008 61 MOVE / P ASTE OUT IN TO OUT IN TO The audio data between the IN and OUT points on the MOVE source track is removed and pasted in the MOVE destination track starting from the T O point. This operation leaves a silence between the IN and OUT points on the MOVE source track. This operation overwrites recorded data on the MOVE destina[…]
-
Страница 62
62 T ASCAM DP-008 OPEN TR K ( • 1 to 8 , 1 / 2 , 3 / 4 , 5 / 6 , 7 / 8 , 1 — 8 , ALL ) I N/O U T • CUT (remove part ) OUT IN IN This function cuts (deletes) the audio data between the IN and OUT points on the selected track, and shifts the remaining recording after the OUT point forward to the IN point. Therefore, the track becomes shorter . Th[…]
-
Страница 63
T ASCAM DP-008 63 DESTI NA T ION TR K • NOTE If y ou ch oos e th e sa me tr ack f or b oth t he SOU RCE T RK and t he D EST I NATIO N TRK a nd pre s s th e F2 (E XEC ) key, the “S ame Track” mes s age ap pe ar s an d th e ope rati on is n ot exe cu te d. CLE AN out (track erase) Use this function to completely erase the selected track. This e[…]
-
Страница 64
64 T ASCAM DP-008 Metronome This unit has a built-in metronome function that can be used when the recorder is operating. Y ou can set it to function during both playback and recording or only during recording. 1 Press the METRONOME key to open the METRONOME screen. 2 Set the following items. Use the F3 ( § ) and F4 ( ¶ ) keys to select each item,[…]
-
Страница 65
T ASCAM DP-008 65 T o use the built-in mic, set the I NPUT SETT I NG to I nterna l M I C . 3 When the recorder is stopped, press TUNER to open the TUNER screen. T he value of the C A L IB item (sta nd ard f re quen cy ) is sele cte d. 4 T urn the DATA wheel to set the standard frequency of the A note between 435 and 445 Hz. The default setting is 4[…]
-
Страница 66
66 T ASCAM DP-008 The default setting is 10 0 . Use the F3 ( § ) and F4 ( ¶ ) keys to select parameters, and use the D ATA wheel to set the parameter values. Use the F2 ( ON ) key to turn the output ON and OFF . Use the F1 ( CHROM ) key to change to chromatic tuner mode. 3 When you have finished tuning, press the HOME key to r eturn to the Home S[…]
-
Страница 67
T ASCAM DP-008 67 T he I NFORMAT ION scr ee n SONG page app ea rs . T he I NFORMAT ION scr ee n ha s th r ee p ages in cludi ng t hi s one. 3 Use the F3 ( PREV ) and F4 ( NEXT ) keys to change the page. The pages contain the following information. SONG ( 1 /3 ) page: name and partition of currently loaded song, remaining recording time on partition[…]
-
Страница 68
68 T ASCAM DP-008 Overv iew of partitions As described in “Partitions and songs” (page 47), SD cards formatted by this unit are divided into partitions. MTR partitions are for recording data while the F A T partition can be accessed with a personal computer . High-capacity cards can have multiple MTR partitions. In this case, you can use the MT[…]
-
Страница 69
T ASCAM DP-008 69 Card capacity F A T partition size MTR partition size 512 MB 256 MB 256MB fixed 4 If the card capacity is 8 GB or mor e, turn the D ATA wheel to select the MTR partition size, and press the F2 ( EXEC ) key . A mes sage wa r n i ng t hat al l song s wi ll b e er as ed ap pea r s. 5 Press the F3 ( YES ) key to format the card. For […]
-
Страница 70
70 T ASCAM DP-008 Reformatting the F A T par titio n Y ou can also reformat just the F A T partition. The size of the F A T partition cannot be changed. CAUTION Y ou c ann ot und o this o pe rati on! All d ata on th e FA T p ar ti tio n will b e er ase d, s o be cer tain t hat y ou will n ot los e any t hin g imp or t ant w he n ref or mat t ing. 1[…]
-
Страница 71
T ASCAM DP-008 71 Y ou can backup song data on this unit to a computer and restore backed-up song data later . Moreover, you can export track les and master les from a song to a computer and import audio les on the computer to the unit. Backed-up data can be restored to a different DP-008 unit than the one that created it. In other words, […]
-
Страница 72
72 T ASCAM DP-008 If you turn the unit’ s power ON after making the USB connection, the screen above appears right away . The unit appears as an external drive named “DP-008” on the computer ’ s display . The F A T partition of the T ASCAM DP-008 has three directories (folders): BACKUP , W A VE and UTILITY . CAUTION Thi s unit c an r ece iv[…]
-
Страница 73
T ASCAM DP-008 73 2 After the icon disappears fr om the desktop, remove the USB cable. This unit restarts and the Home Scr een appears on the display . Song backup and restor ation Song backup saves not only audio tracks, but also backs up editing data and other song data. Song restoration is the reverse of this process. In short, song data is tran[…]
-
Страница 74
74 T ASCAM DP-008 CAUTION If y ou us e a com put er t o chan ge t he • name of a s ong fil e that h as be en b ac ked up, u se n o mor e tha n eigh t ord inar y sing le — by t e Englis h let t er s an d num be r s . Do n ot chan ge t he file e x t ens ion. • Restor ing songs Basically , restoring is the reverse of backing up. In short, […]
-
Страница 75
T ASCAM DP-008 75 Impor ting tracks Before importing a track, rst select the partition with the song that you want to import it into as the active partition. Then, load the song that you want to import tracks into. 1 Connect this unit to a computer using the USB cable (see “ Connecting with a computer ” on page 71). 2 Use the computer to cop[…]
-
Страница 76
76 T ASCAM DP-008 Ex por ting tracks Y ou can export tracks as 16-bit, 44.1-kHz mono W A V les. 1 When the recorder is stopped, press the MENU key to open the MENU screen. 2 T urn the DATA wheel to select I MPORT / EXPORT , and press the F4 ( ¥ ) key to open the I MPORT /EXPORT menu. 3 T urn the DATA wheel to select the EXPORT TRACK item, and p[…]
-
Страница 77
T ASCAM DP-008 77 9 Use the computer to copy track files from the W A VE directory on the F A T partition to the computer . 10 After exporting track files to the computer , disconnect the unit fr om the computer using the pr oper pr ocedures and then remove the USB cable (see “Disconnecting” on page 72). Ex por ting a stereo mast er tra c k Y o[…]
-
Страница 78
78 T ASCAM DP-008 When working with any new piece of equipment like the unit, it’ s sometimes difcult to work out why something isn’t happening the way you expect. The main thing is to take your time—after all, you’re not paying hourly studio rates! Stop and think. Ask yourself questions, like the ones below , and you can usually nd t[…]
-
Страница 79
T ASCAM DP-008 79 13 – Messages The following popup messages alert you to conditions that may arise while you are using the unit. Consult this table if you see something you do not understand. Messages Meaning and remedy Empty Export T r ack Y ou are trying to export a track («T rack import and export» on page 74) which does not have an[…]
-
Страница 80
80 T ASCAM DP-008 Messages Meaning and remedy S a m e T ra c k Y ou cannot clone a track to itself. («CLONE track (track duplication)» on page 62.) Song Protec ted The song is protected («Protecting songs» on page 40) and you are trying to change it (record or edit, etc.). Unprotect the song. T oo Many songs Y ou have 250 songs […]
-
Страница 81
T ASCAM DP-008 81 Audio input / output ratings INPUT A jack • XLR type (Balanced) Connector: XLR-3-31 (1: GND, 2: HOT , 3: COLD) Input impedance: 2.4 kΩ Standard input level: –8 dBu Maximum input level: +8 dBu • 1 / 4” pho ne jack type (Unbalanced) Connector: 6.3 mm (1/4”) phone jack Input impedance: 1 0 k Ω (when IN PUT A sele cto r […]
-
Страница 82
82 T ASCAM DP-008 Dimensions (WHD) 221 x 36 x 126.5 mm/ 8.70 x 1.42 x 4.98 in (w/o projections) Weight 610 g/19.69 oz (w/o batteries) Optional ac cessories AC adaptor PS-P520 Computer requirements Windows Pentium 300 MHz or faster 128 MB or more memory USB port (USB 2.0 recommended) Macintosh Power PC, iMac, G3, G4 266 MHz or faster 64 MB or more m[…]
-
Страница 83
T ASCAM DP-008 83 Dimensi ons 221 mm 36 mm 126.5 mm Block diagr am 14 – Specifications and Block Dia gram[…]
-
Страница 84
84 T ASCAM DP-008 15 – Commonly-used Functions This section is a brief guide to some operations on the DP-008 which may not be immediately obvious from looking at the panel controls. Key seq uenc es a re w r it t en l i ke th is: • STO P + Ô mea ns “ pre ss a nd hold the S TOP key and p res s Ô .” Menu ite ms a re w r it t en l i ke th is[…]
-
Страница 85
T ASCAM DP-008 85 How to Keys, etc. TO press Description Un-protect a song ME NU ® SONG ® PROTECT See «Protecting songs» on page 40. Display the song name ME NU ® I NFORMAT ION See «Viewing information» on page 66. Copy a song ME NU ® SONG ® COPY See «Copying songs» on page 38. Delete a song ME NU ® SONG ® ERASE[…]
-
Страница 86
86 T ASCAM DP-008 How to Keys, etc. TO press Description Record a guitar IN PUT S ET TIN G See «Selecting the input source» on page 41. Change the track to which INPUT A/B is assigned ASSIGN See «Assigning inputs» on page 43. Change the interval time during repeat ME NU ® PREFERENCE See «Setting the interval between repeti[…]
-
Страница 87
T ASCAM DP-008 87[…]
-
Страница 88
TEAC CORPOR A TION Pho ne : + 81-4 2-35 6 -9143 www. tascam.j p 1-47 Och ia i, T a ma -s hi, Toky o 206 — 8 53 0 Ja pa n TE AC A MER ICA , INC. Pho ne : +1-323 -726- 0 30 3 www. tascam.co m 7733 Tele gr ap h Ro ad, M on teb el lo, C ali fo rn ia 9 0 64 0, US A TE AC CA NA DA LTD. Pho ne : +1905 — 89 0 — 8 00 8 Fa cs imi le : +1905 — 89 0 — 98 8 8 w[…]
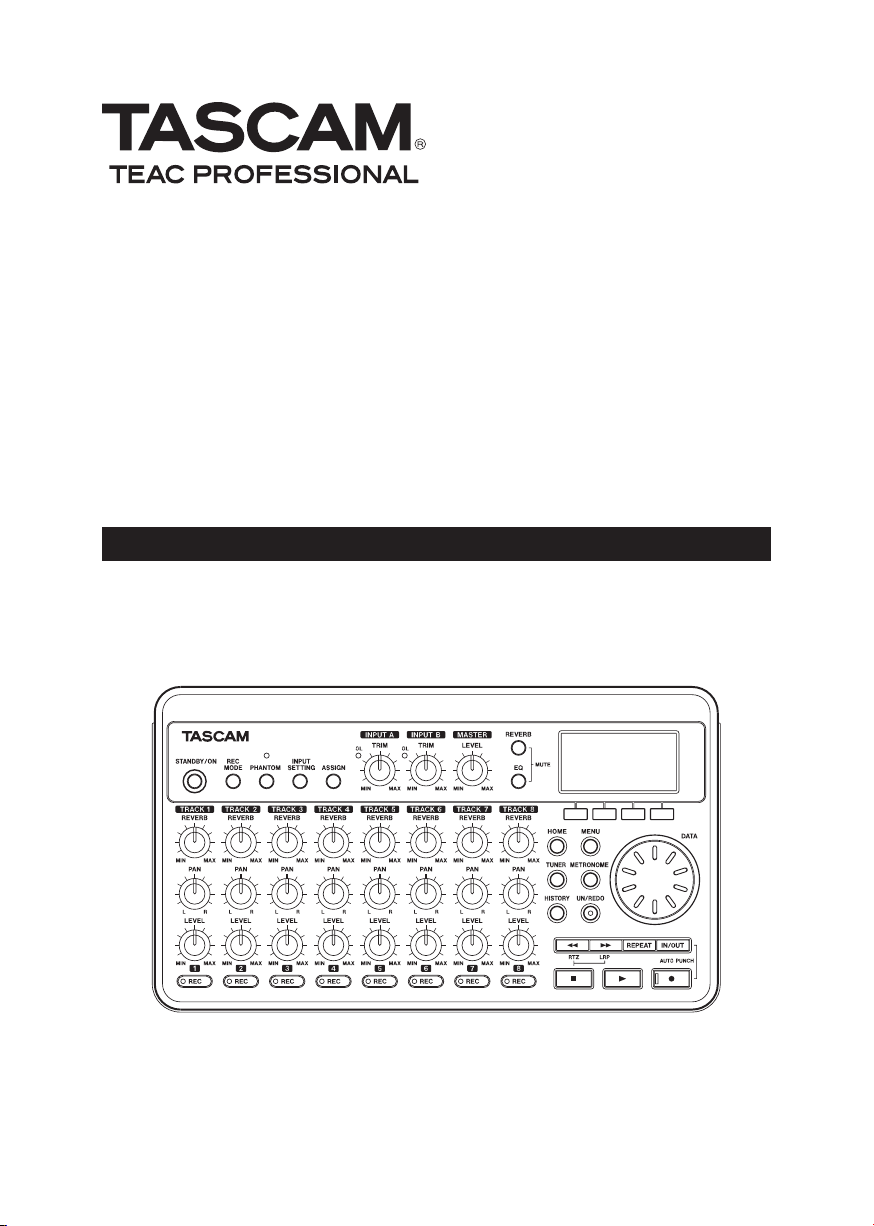
DP-008
8-Track Digital Pocketstudio
OWNER’S MANUAL
D01092520A
IMPORTANT SAFETY INFORMATION
CAUTION: TO REDUCE THE RISK OF ELECTRIC SHOCK, DO
NOT REMOVE COVER (OR BACK). NO USER-SERVICEABLE
PARTS INSIDE. REFER SERVICING TO QUALIFIED SERVICE
PERSONNEL.
The lightning flash with arrowhead symbol, within equilateral
triang le , i s inte nded to alert the user t o t he pres ence of
un i n sul a ted “dan g ero u s vo lta g e” withi n t he prod u ct’s
enclosure that may be of sufficient magnitude to constitute a
risk of electric shock to persons.
The exclamation point within an equilateral triangle is intended
to ale rt the user to t he presence o f i mportant o perating
and maintenance (servicing) instru ct io ns in the litera tu re
accompanying the appliance.
This appliance has a serial number located
on the bottom p anel. Pl ease record the
mo del n umb er and s eri al num ber a nd
retain them for your records.
Model number
Serial number
FOR U.S.A .
TO THE USER
Th is e qu ip me nt has b ee n te st ed and found
to comp ly with the limits for a Clas s B digi ta l
device, pu rs ua nt to Par t 15 of th e FC C
Rule s. T he se limi ts are d es ig ne d to prov id e
reasonable protection against harmful
interference in a residential installation. This
eq uipm en t ge ne ra te s, use s, and can radi at e
radio frequency energy and, if not installed
an d us ed in ac co rd an ce with the in st ru ct io n
manual, may cause harmful interference to radio
communications. However, there is no guarantee
tha t in terfere nc e wi ll not oc cur in a par ticul ar
installation. If this equipment does cause harmful
in te rfe re nce to ra dio or te levis io n rec ep tion,
which ca n be de termined b y tu rn in g th e
equipment of f and on, the user is encouraged to
try to correc t the interference by one or more of
the following measures.
a) Reorient or relocate the receiving antenna.
b) I nc re a s e th e s e p ar at io n b e t we en t h e
equipment and receiver.
c) Co nn ec t th e equipment into an ou tl et on a
circuit different from that to which the receiver
is connected.
d) Consult the dealer or an experienced radio /T V
technician for help.
CAUTION
Changes or modifications to this equipment not
exp re ss ly approved by T EAC CO RP OR ATION
for compliance could void the user’s authority to
operate this equipment.
WARNING: TO PREVENT FIRE
OR SHOCK HAZARD, DO NOT
EXPOSE THIS
APPLIANCE TO RAIN OR
MOISTURE.
Declaration of Conformity
Model Number : DP-008
Trade Name : TASCAM
Responsible party : TEAC AMERICA, INC.
Address : 7733 Telegraph Road, Montebello,
California, U.S. A.
Telephone number : 1-323-726- 0303
This device complies with Par t 15 of the FCC
Rules. Operation is subject to the following two
conditions: (1) this device may not cause harmful
interference, and (2) this device must accept any
interference recieved, including interference that
may cause undesired operation.

IMPORTANT SAFETY INFORMATION
1 Read these instructions.
2 Keep these instructions.
3 Heed all warnings.
4 Follow all instructions.
5 Do not use this apparatus near water.
6 Clean only with dry cloth.
7 Do not block any ventilation openings. Install
in a cco rda n ce w i th the m anu fact ure r’s
instructions.
8 Do not install near any heat sources such
as radiators, heat registers, stoves, or other
apparatus (including amplifiers) that produce
heat.
9 D o no t de f e a t th e sa f et y pu r p o s e of
the p olarize d or groun di ng-type plu g. A
po la rized plug h as t wo bla de s wit h on e
wi der t han the oth er. A gro und ing t ype
plug has two blades and a third grounding
prong. The wide blade or the third pro ng
are provided for your safety. If the provided
plug does not fit into your outlet, consult an
electrician for replacement of the obsolete
outlet.
10 Protect the power cord from being walked
o n or pin c h e d par t i c u l a r l y at p l u g s ,
co nv enien ce recepta cles, and the poi nt
where they exit from the apparatus.
11 Only use attachments/accessories specified
by the manufacturer.
1 2 Us e only wi t h the ca rt, st a n d, tr i p o d,
b r ac ke t , o r t a bl e s p ec i fi ed b y t h e
manufacturer, or sold with the apparatus.
Wh en a car t is used, u se c autio n whe n
moving the cart/apparatus combination to
avoid injury from tip-over.
Do not expose this ap pa ratus to drips or
•
splashes.
Do not place any objects filled with liquids,
•
such as vases, on the apparatus.
Do not install this apparatus in a confined
•
space such as a book case or similar unit.
The apparatus draws nominal non-oper-
•
at ing p owe r fro m the A C out let w ith its
POWER or STANDBY/ON switch not in the
ON position.
Th e appa r atu s sho uld b e lo c ate d clo se
•
en ou gh to the AC outle t so that you c an
ea sily g ra sp the power cor d p lug at any
time.
The mains plug is used as the disconnect
•
device ; the disconnect device shall remain
readily operable.
If the product uses batteries (inclu ding a
•
batt er y pack or insta ll ed ba tteries ), they
should not be exposed to sunshine, fire or
excessive heat.
CAUTION for products that use replaceable
•
lithium batteries: there is danger of explo-
sion if a battery is replaced with an incorrect type of battery. Replace only with the
same or equivalent type.
Caution should be ta ken when using
•
earphones or headphones with the product
because excessive sound pressure (volume)
from earphones or headphones can cause
hearing loss.
If you are experiencing problems with this
•
product, contact TEAC for a service refer-
ral. Do not use the product until it has been
repaired.
13 Unp lug t his a p par atu s duri n g ligh tni ng
storms or when unused for long periods of
time.
14 Re f er all serv i cin g t o qu alif i ed serv i ce
per s onne l . Se r vici n g is r e quir ed wh en
the ap paratus ha s been dama ged in any
way, such as power-supply cord or plug is
damaged, liquid has been spilled or objects
have fallen into the apparatus, the apparatus
has been exposed to rain or moisture, does
not operate normally, or has been dropped.

IMPORTANT SAFETY INFORMATION
Do not heat or disas semble batteries. Do
CAUTIONS ABOUT BATTERIES
This product uses batteries. Misuse of batteries could cause a leak, rupture or other trouble. Always abide by the following precautions
when using batteries.
Never recharge non-rechargeable batteries.
•
The batteries could rupture or leak, causing
fire or injury.
When installing batteries, pay attention to
•
the pola rity indicati on s ( plus/ mi nu s (+/ – )
orientation), and install them correctly in the
battery case as indicated. Putting them in
backward could make the batteries rupture
or leak, causing fire, injury or stains around
them.
When throwing used batteries away, follow
•
the disposal instructions indicated on the
batteries and the local disposal laws.
Do not us e ba t t e r ies ot her th an th o se
•
sp e cif ied . Do n ot m ix a nd u se n ew a nd
old ba tter ie s or di ffer en t t yp es of batteries together. The batteries could rupture or
leak, caus ing fire, injury or stains around
them.
Do not carry or store batteries together with
•
sm al l met al ob je cts. The batteri es could
short, causing leak, rupture or other trouble.
•
no t put them in f ire or w at er. Bat t eri es
could rupture or leak, causing fire, injury or
stains around them.
If the battery fluid leaks, wipe away any fluid
•
on the batter y c as e before inser ting n ew
batteries. If the battery fluid gets in an eye,
it could cause loss of eyesight. If fluid does
enter an eye, wa sh it out thoroug hly wi th
clea n water withou t rub bi ng the eye an d
then consult a d oc tor immediatel y. If th e
fluid gets on a person’s body or clothing,
it could cause skin injuries or burns. If this
should happen, wash it off with clean water
and then consult a doctor immediately.
Th e unit pow er s h oul d be off w hen you
•
install and replace batteries.
Remove the batteries if you do not plan to
•
use the unit for a long time. Batteries could
rupture or leak, causing fire, injury or stains
around them. If the battery fluid leaks, wipe
away any fluid on the battery case before
inserting new batteries.

Table of Contents
1 – Introduction …………………………..7
Overview of this unit ……………………………. 7
About this manual ………………………………. 7
Manual conventions ………………………… 7
Product parts ……………………………………… 7
Intellectual property rights …………………… 8
About SD cards …………………………………… 8
Precautions for use ………………………….. 8
Cautions on installation ……………………….. 9
Beware of condensation ………………………. 9
Cleaning the unit …………………………………. 9
2 – Quick Start Guides ……………….10
Playback and mixing …………………………. 10
Preparing to listen to the demo song .. 10
Playing and mixing the demo song ……11
From recording to creating a master track 13
Creating a new song ……………………… 13
Connecting and setting the input
sources ………………………………………… 14
Setting the guitar as TRACK 1
recording source ……………………………. 15
Adjusting the input level and
monitoring ……………………………………. 15
Recording guitar to TRACK 1…………… 16
Listening to your recording……………… 16
Record guitar to TRACK 2…………………17
Record vocals on TRACK 3 ……………… 18
Mixing the tracks …………………………… 20
Mastering the mix ………………………….20
Shutting down the unit ………………….. 23
3 – Names and Functions of Parts . 24
Top panel …………………………………………. 24
Front panel ……………………………………….. 26
Rear panel ………………………………………… 27
Right side panel …………………………………28
Bottom panel …………………………………….29
Home Screen …………………………………….. 30
4 – Preparations ………………………..31
Preparing the power and SD card ………… 31
Installing an SD card………………………. 31
Preparing the power ………………………. 31
Connecting an AC adaptor (sold
separately) ……………………………………. 32
Start-up & shutdown ………………………….. 32
Starting up the unit ……………………….. 32
Shutting down ………………………………. 32
Formatting SD cards ………………………….. 33
Recorder modes ………………………………..33
Connecting with other equipment ……….. 34
Rear panel connections …………………..34
Right side panel connections…………… 34
Adjusting the contrast ………………………… 34
Setting the backlight ………………………….. 35
5 – Song Management ……………….36
Partitions and songs ………………………….. 36
Selecting the active partition ………………. 36
Editing names …………………………………… 37
Loading a saved song ………………………… 37
Creating a new song ………………………….. 37
Saving a song ……………………………………. 38
Viewing song information ………………….. 38
Copying songs …………………………………… 38
Erasing songs …………………………………….39
Protecting songs ………………………………..40
6 – Basic Recording ……………………41
Selecting the input source ………………….. 41
Phantom power …………………………………. 41
Monitoring input signals …………………….. 42
About the OL indicators and level meters 42
Assigning inputs ……………………………….. 43
Using input EQ ………………………………….. 43
Making the first recording ………………….. 44
Multitrack recording ………………………….. 45
REC indicator settings …………………… 45
Track pan and level settings ……………. 45
Input selection and assignment ……… 45
Input level settings ……………………….. 45
Making additional recordings ………… 45
Mixdown …………………………………………..45
Level and balance ………………………….. 45
Stereo position (panning) ……………….. 45
Track EQ (equalizer) ………………………. 45
Reverb ………………………………………… 46
Muting tracks ……………………………….. 47
Mastering …………………………………………. 48
Setting the end point ……………………… 48
Recording the master track …………….. 48
Undoing operations (undo) …………………. 49
Undoing the last operation
(single undo) ………………………………… 50
Undoing a previous operation
(multi-undo) ………………………………….50
Erasing the operation history ………….. 51
7 – Recorder Functions ……………….52
Punching in and out …………………………… 52
Using the foot switch to punch in/out 52
Setting the foot switch polarity ………. 52
Bouncing tracks ………………………………… 53
Using the bounce function ……………… 53

Table of Contents
Confirming the result……………………… 53
Locate and search functions ………………..54
Direct locate function …………………….. 54
Return To Zero (RTZ) and
Last Recording Position (LRP) …………. 54
Fast forward /rewind search ……………. 55
Repeat playback ………………………………… 55
Setting IN and OUT points ……………… 55
Editing IN/OUT points ……………………. 55
Using repeat playback ……………………. 56
Setting the interval between
repetitions ……………………………………. 56
Locating to the IN or OUT point ……… 56
Automatically punching in and out ……… 56
Rehearsal …………………………………….. 56
Using auto punch in /out to record ….. 57
8 – Editing Tracks ………………………58
Overview of track editing……………………. 58
Editing points ………………………………..58
Basic editing procedures ……………….. 58
Explanation of items ………………………. 59
COPY/PASTE ……………………………………. 60
COPY/INSERT ……………………………………60
MOVE/ PASTE …………………………………… 61
MOVE/ INSERT ………………………………….. 61
OPEN (insert silence) ………………………… 61
CUT (remove part) ……………………………. 62
SILENCE (part erase) …………………………. 62
CLONE track (track duplication)…………… 62
CLEAN out (track erase)……………………… 63
9 – Miscellaneous Functions ……….64
Metronome ……………………………………… 64
Tuner ……………………………………………….. 64
Chromatic tuner mode …………………… 64
Oscillator mode ……………………………..65
Turning the power off automatically …….. 66
Restoring the initial preference settings .. 66
Viewing information …………………………..66
10 – SD Card Management …………68
Overview of partitions ……………………….. 68
Formatting cards and setting
partition sizes …………………………………….68
Reformatting MTR partitions ………………. 69
Reformatting the FAT partition …………….70
Initializing SD cards ……………………………. 70
11 – Exchanging Data with a
Computer …………………………..71
Supported operating systems ……………… 71
Connecting with a computer ………………. 71
Disconnecting ……………………………….. 72
Song backup and restoration ………………. 73
Backing-up songs ………………………….. 73
Restoring songs …………………………….. 74
Track import and export …………………….. 74
Importing tracks ……………………………. 75
Exporting tracks ……………………………. 76
Exporting a stereo master track …………… 77
12 – Troubleshooting …………………78
13 – Messages …………………………..79
14 – Specifications and Block
Diagram …………………………….81
Audio input/output ratings ………………….81
Audio performance ……………………………. 81
General…………………………………………….. 81
Optional accessories ………………………….. 82
Computer requirements ………………………82
Backup memory …………………………………82
Dimensions ……………………………………….. 83
Block diagram …………………………………… 83
15 – Commonly-used Functions ….84

1 – Introduction
Thank you for your purchase of TASCAM’s
8-Track Digital Pocketstudio, the DP-008.
The DP-008 is designed to provide you
with great sound in an easy-to-use compact
package, allowing you to concentrate on the
music, and not on the recording process.
Before connecting and using the unit, please
take time to read this manual thoroughly to
ensure you understand how to properly set up
and connect the unit, as well as the operation
of its many useful and convenient functions.
After you have nished reading this manual,
please keep it in a safe place for future
reference.
You can also download the Owner’s Manual
from the TASCAM web site (http://www.
tascam.com).
Overview of this unit
Using an SD card this unit can record two
tracks simultaneously and work with up to
eight tracks in a multitrack project. Moreover,
using its mixer functions, you can mix down a
multitrack to create a stereo master track.
This stereo master track can then be
transferred to a computer connected by USB.
In addition to copying stereo master tracks
from this unit to the computer, various other
data, including track and song data can be
transferred to a computer as back-ups.
About this manual
Please read chapter 2, “Quick Start Guides,”
rst and follow the instructions in it to learn
about and practice using this unit’s functions.
Chapter 3 explains the functions of the keys,
knobs, connectors and other features. Chapters
4 and 5 explain other things you should
know before you use this unit. Chapters 6
to 11 explains the uses and functions of this
unit in detail. Chapters 12 and 13 provide
troubleshooting information and a list of
messages. Chapter 14 includes the unit’s
specications and block diagram. Chapter 15
provides functions that you might want to use
and where you can nd them in the manual
Manual conventions
This manual often refers to the DP-008 as
•
“the unit” and the SD card as the “card.”
When we refer to DP-008 features such as
•
keys and connections, we display them like
this: MENU.
When we show messages, for example, that
•
appear on the screen, we show them like
this:
SONG LOAD
The four keys beneath the LCD display are
•
called function keys, and are referred to
as F1, F2, F3 and F4 from left to right. The
functions displayed at the bottom of the
screen above the keys are sometimes shown
after the key name in parentheses (e.g. F4
(¥) key, F2 (
Additional information is introduced in the
•
styles below when needed:
TIP
We give hints and tips on using the DP-008
when you see this icon.
NOTE
A note provides additional explanations for
special situations.
CAUTION
A caution shows that you may lose data
(recordings) if you do not follow the
instructions.
This manual cannot begin to be a full guide to
multitrack recording techniques. However, if
you search the Internet or visit a library you
should nd various documents on recording.
EXEC
.
) key).
Product parts
The DP-008 package contains the following
items.
Take care when opening the package not to
damage the items. Keep the package materials
for transportation in the future.
Please contact the store where you purchased
this unit if any of these items are missing or
have been damaged during transportation.
1 – Introduction
Main unit• …………………………………………….. 1
SD Card (in the unit)• …………………………….. 1
USB Cable• ……………………………………………1
AA alkaline batteries• …………………………….. 4
Warranty card• ………………………………………. 1
Owner’s Manual (this document)• ……………. 1
Intellectual property rights
TASCAM is a registered trademark of
•
TEAC Corporation.
SDHC logo is a trademark.
•
Microsoft, Windows, Windows Vista, and
•
Windows 7 are either registered trademarks
or trademarks of Microsoft Corporation in
the United States and/or other countries.
Apple, Macintosh, Mac OS and Mac OS X
•
are trademarks of Apple Inc.
Other company names, product names and
•
logos in this document are the trademarks
or registered trademarks of their respective
owners.
Any data, including, but not limited to
information, described herein are intended
only as illustrations of such data and/or
information and not as the specications
for such data and/or information. TEAC
Corporation disclaims any warranty that
any use of such data and/or information
shall be free from infringement of any third
party’s intellectual property rights or other
proprietary rights, and further, assumes no
liability of whatsoever nature in the event
of any such infringement, or arising from or
connected with or related to the use of such
data and/or information.
This product is designed to help you record
and reproduce sound works to which you
own the copyright, or where you have
obtained permission from the copyright
holder or the rightful licensor. Unless you
own the copyright, or have obtained the
appropriate permission from the copyright
holder or the rightful licensor, your
unauthorized recording, reproduction or
distribution thereof may result in severe
criminal penalties under copyright laws
and international copyright treaties. If you
are uncertain about your rights, contact
your legal advisor. Under no circumstances
will TEAC Corporation be responsible for
the consequences of any illegal copying
performed using the recorder.
About SD cards
This unit uses SD cards for recording and
playback. SD and SDHC cards that are at
least 512 MB in size can be used. A list
of SD cards that have been tested with this unit
can be found on the TASCAM web site (www.
tascam.com).
Precautions for use
SD cards are delicate media. In order to avoid
damaging a card or the card slot, please take
the following precautions when handling them.
Do not leave them in extremely hot or cold
•
places.
Do not leave them in extremely humid
•
places.
Do not let them get wet.
•
Do not put things on top of them or twist
•
them.
Do not hit them.
•

Cautions on installation
The unit’s nominal operating temperature
•
is between 5˚ and 35° C (41° – 95° F).
Do not install in the following types of
•
places. Doing so could degrade the sound
quality and/or cause malfunctions.
Places with significant vibrations or
•
that are otherwise unstable
Near windows or other places exposed
•
to direct sunlight
Near heaters or other extremely hot
•
places
Extremely cold places
•
Places with bad ventilation or high
•
humidity
Beware of condensation
If the unit is moved from a cold to a warm
place, or used after a sudden temperature
change, there is a danger of condensation;
vapor in the air could condense on the
internal mechanism, making correct operation
impossible. To prevent this, or if this occurs,
let the Pocketstudio sit for one or two hours at
the new room temperature before using.
1 – Introduction
Cleaning the unit
To clean the unit, wipe gently with a soft dry
cloth. Do not use any benzene, paint thinner,
ethyl alcohol or other chemical agents to clean
the unit as they could damage the surface.
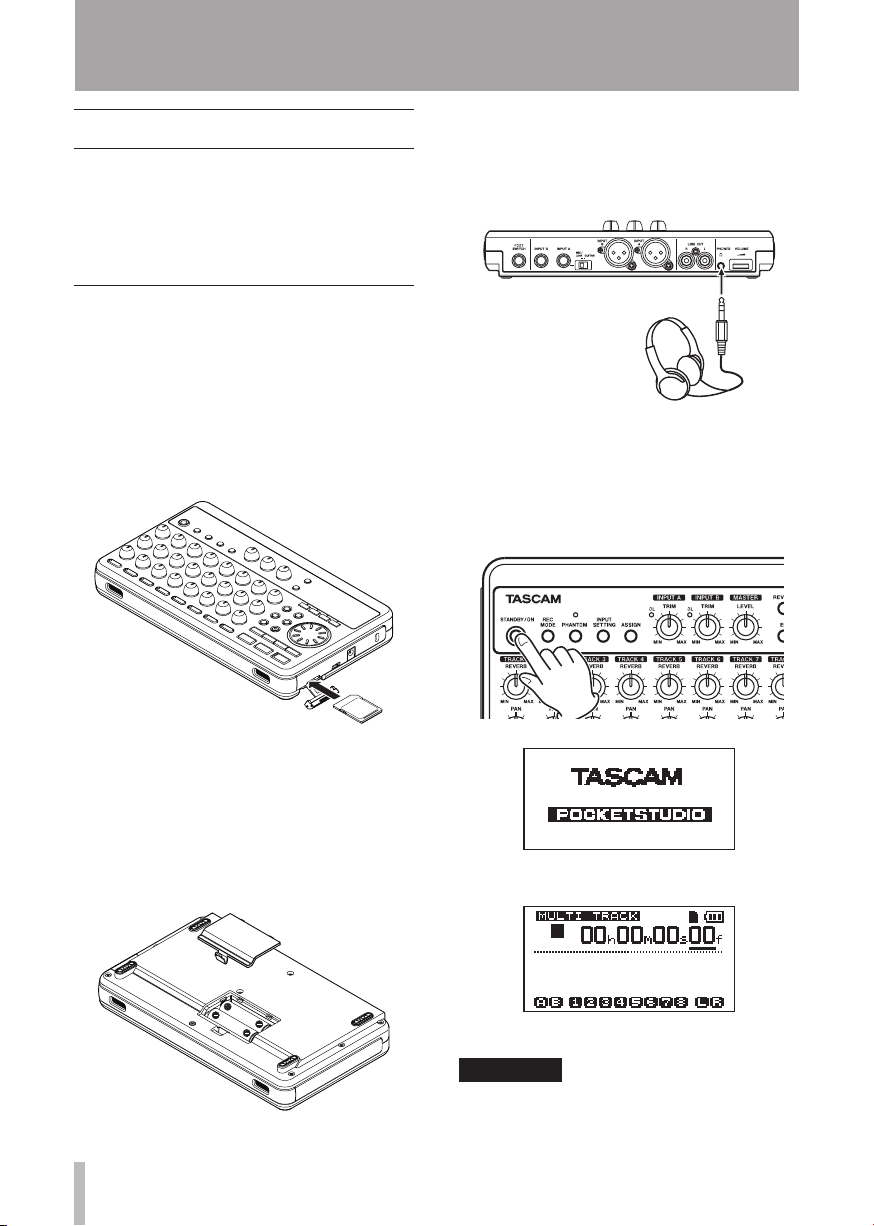
2 – Quick Start Guides
Playback and mixing
First, we will play the demo song on the
included SD card. The SD card with the demo
song is shipped already installed but we will
start by explaining how to insert an SD card
here.
Preparing to listen to the demo
song
1 Open the SD card slot cover on the right
side of the unit and insert the supplied
SD card into the slot.
Do not insert the card backwards or
apply unnecessary force. This could
damage the slot or card.
4 Close the battery compartment cover
after installing the batteries.
5 Connect headphones to the PHONES
connector.
5 Press and hold the STA NDBY/O N key on
the top panel until
screen.
After starting up the Home Screen
appears on the display.
TASCAM
appears on
2 Close the slot cover.
3 Open the battery compartment cover
and insert four AA batteries into the
compartment, paying attention to the
plus/minus (+/–) orientation. This unit
can use alkaline or NiMH batteries.
[Start-Up Screen]
[Home Screen]
CAUTION
Do not remove or insert the SD card •
when the unit’s power is ON. Make sure
the unit power is OFF before you remove
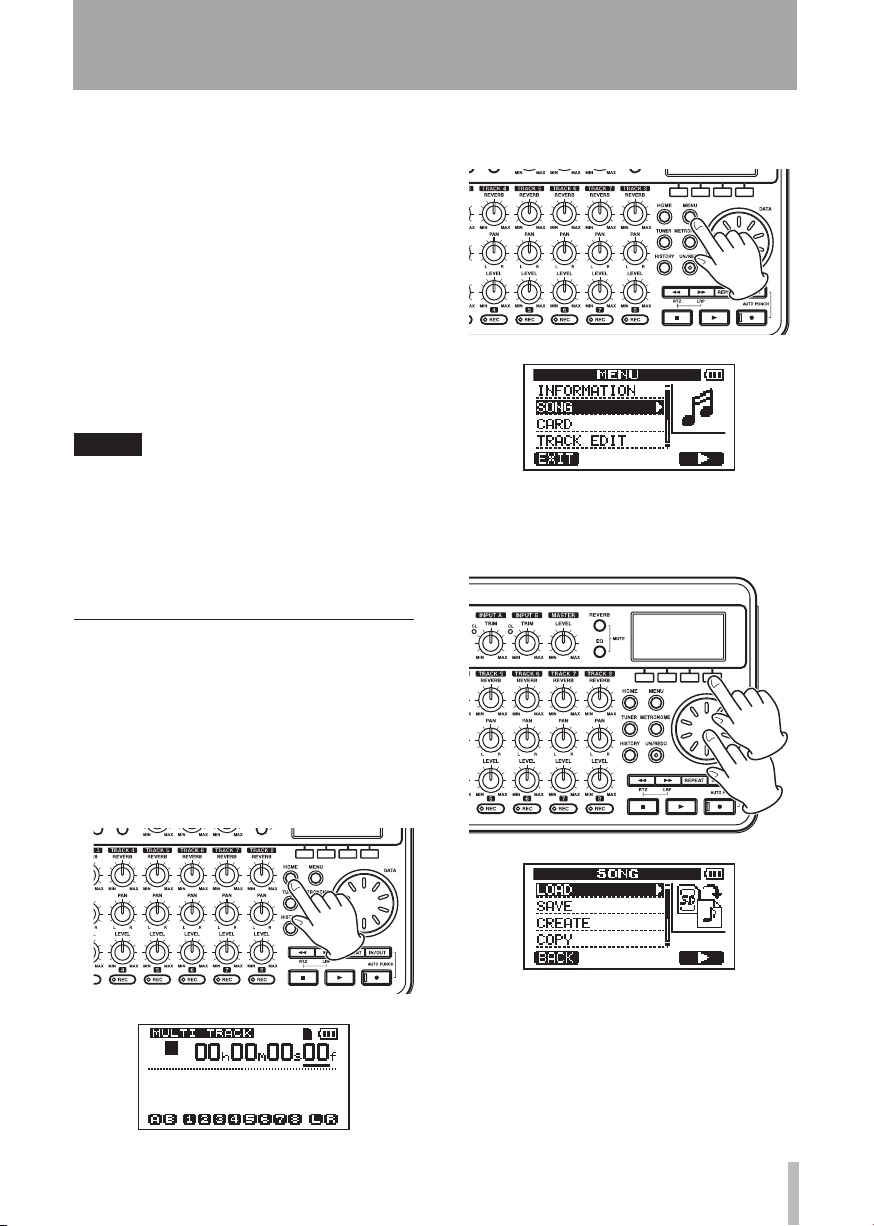
2 – Quick Start Guides
or insert the card. If you remove or insert
the SD card when the unit’s power is
on, the unit cannot shut down properly
and all unsaved data and settings will be
lost. These data and settings cannot be
recovered.
Do not remove the batteries or •
disconnect the power cable while the
unit power is ON.
The included alkaline batteries are for •
confirming operation of the unit and
might not last very long.
Before turning the power ON, completely •
turn down the volume of headphones
and monitoring systems connected to the
unit.
TIP
This unit can also be powered by a •
PS-P520 power adaptor (sold separately)
(see “Connecting an AC adaptor (sold
separately)” on page 32).
You can monitor recordings using •
speakers by connecting an amplifier or
powered speakers to the LINE OUT jacks.
Playing and mixing the demo
song
Before the unit is shipped, a demo song is
stored on its SD card. We are now going to use
basic playback and mixing features with this
demo song.
1 Press the HOME key to open the Home
Screen.
2 When the Home Screen is open, press the
MENU key to open the
3 Use the DATA wheel to select the
MENU
screen.
SONG
menu, and press the F4 (¥) key to open
the
SONG
menu screen.
4 Rotate the DATA wheel to select
press the F4 (¥) key to open the
LOAD
screen that shows a list of songs.
LOAD
SONG
, and
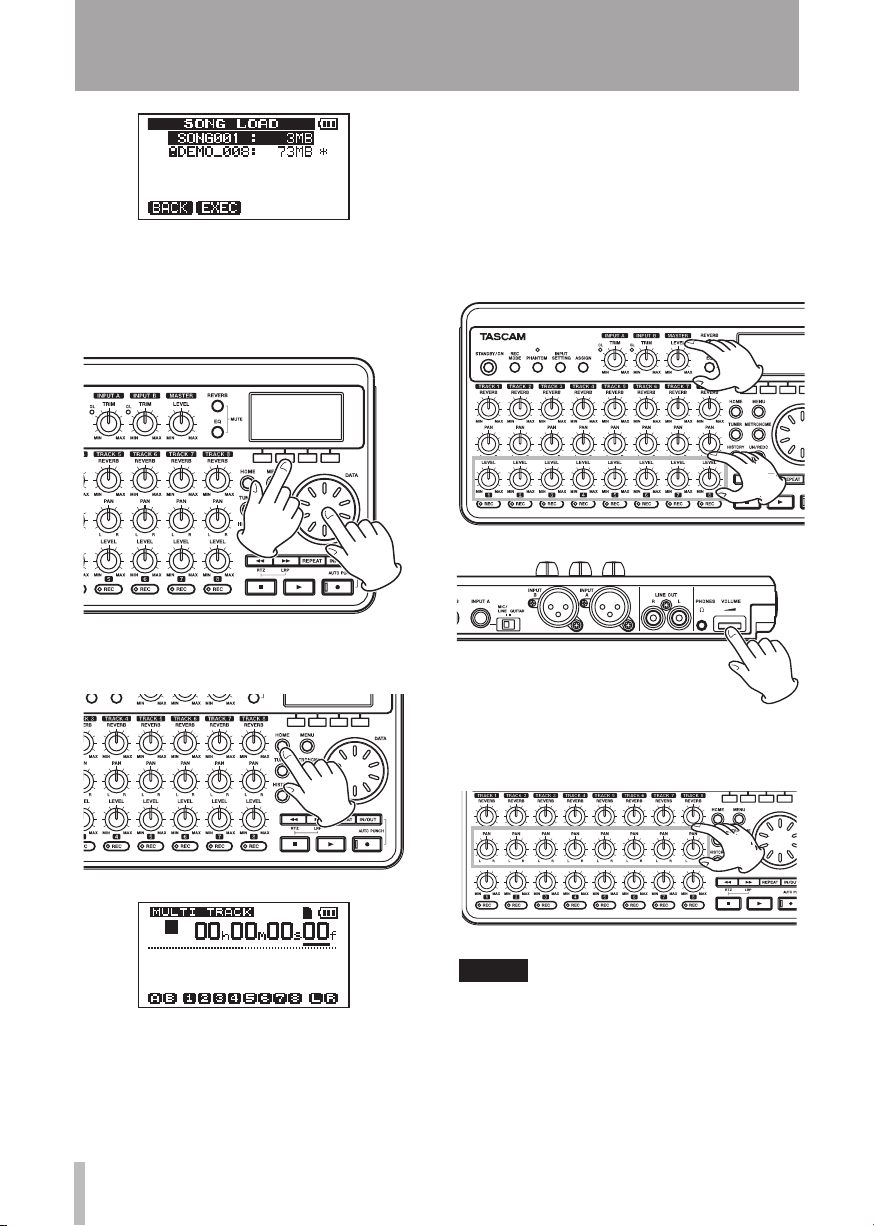
2 – Quick Start Guides
5 Rotate the DATA wheel to select
DEMO_008
The demo song loads and the
reopens.
6 Press the HOME key to reopen the Home
Screen.
, and press the F2 (
EXEC
SONG
) key.
screen
volume of all eight tracks at the same
time. The standard position is around
2–3 o’clock.
Use the LEVEL knobs to adjust the
balance between TRACK 1–8 .
Use the VOLUME dial to adjust the final
monitoring level.
7 Press the playback (Á) key and turn
up the TRACK1–8 LEVEL knobs, the
MASTER LEVEL knob and the VOLUME
dial to hear the demo song.
The MASTER LEVEL knob adjusts the
8 Use the PAN knobs to adjust the stereo
position of TRACK 1–8.
TIP
Press the stop (• ª) key and the Ô key
at the same time to use the RTZ (return
to zero) function to go to the beginning
of the song.
When using a menu, if you make a •
mistake pressing a key and the wrong
screen appears, press the HOME key to
return to the Home Screen.
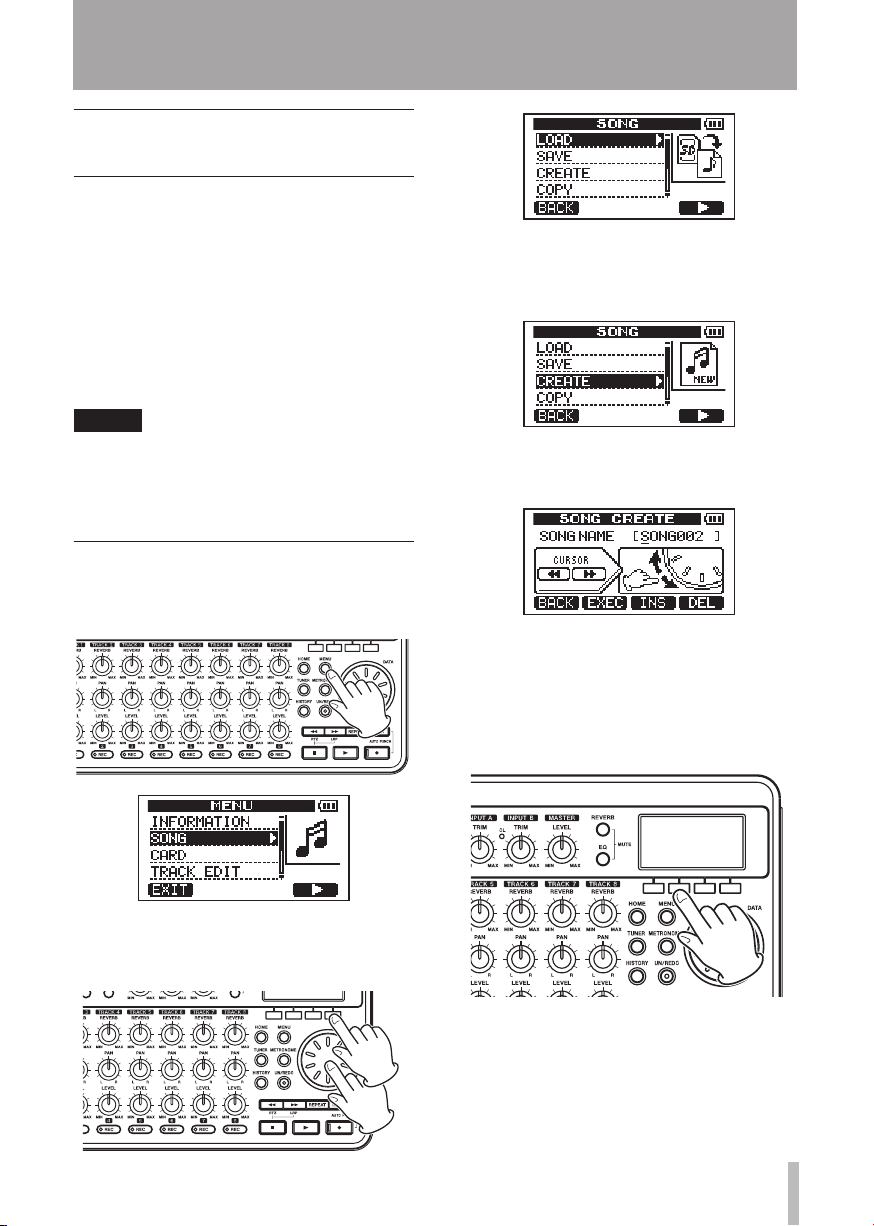
2 – Quick Start Guides
From recording to creating
a master track
Here, we will try multitrack recording. In the
following example, we will use an electric
guitar to record a rhythm guitar part on track 1
and a lead guitar part on track 2. Then, we will
use the built-in mic to record a voice on track
3. Finally, we will mix the tracks down.
In this section, we assume that you have
already followed the instructions in “Playback
and mixing” to connect monitoring equipment
and install the SD card.
TIP
This example uses the built-in mic for
recording vocals, but you could also connect
an external mic to the INPUT A or INPUT B
connector on the rear panel and record it.
Creating a new song
1 When the recorder is stopped, press the
MENU key to open the
MENU
screen.
3 Use the DATA wheel to select
press the F4 (¥) key to open the
CREATE
screen.
CREATE
SONG
When a new song is created, it is given the
name “
SONG***
” (where
***
is a number).
, and
2 Use the DATA wheel to select the
menu, and press the F4 (¥) key to open
the
SONG
menu screen.
SONG
4 Change the song name as necessary. (See
“Editing names” on page 37.)
5 Press the F2 (
EXEC
) key. The currently
loaded song is saved and a new song is
created.
6 Press the HOME key to return to the
Home Screen.
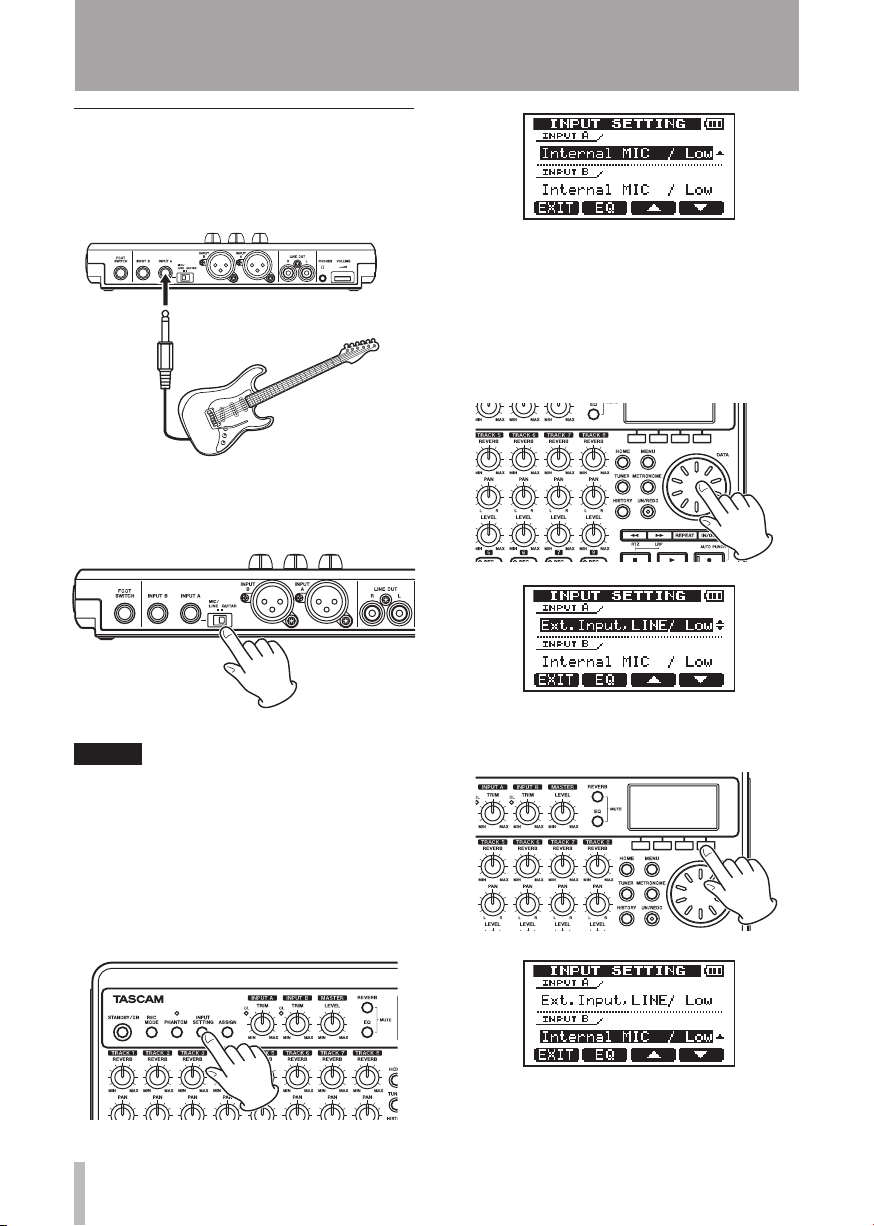
2 – Quick Start Guides
Connecting and setting the input
sources
1 Connect an electric guitar to the INPUT A
connector on the rear panel.
2 Set the MIC/LINE-GUITAR switch on the
rear panel to GUITA R .
On this screen you can set the input
sources for both
At first, the input source for
INPU T A
and
INPU T B
INPU T A
already selected.
4 Use the DATA wheel to change the
A
input source to
Ext.Input, LINE/ Low
INPUT
.
is
.
TIP
When connecting an electric-acoustic guitar
with a built-in preamp or an active electric
guitar, as well as when connecting an
electric guitar with effect boxes between
it and this unit, set the MIC/LINE–GUITAR
switch to MIC/LINE.
3 Press the INPUT SET TING key to open the
INPUT SETTING
screen.
5 Press the F4 (¶) key to select the current
input for
6. Use the DATA wheel to set the
input source to
Inte rnal MIC / High
INPUT B
.
Inte rnal MIC / Low
.
INPUT B
or
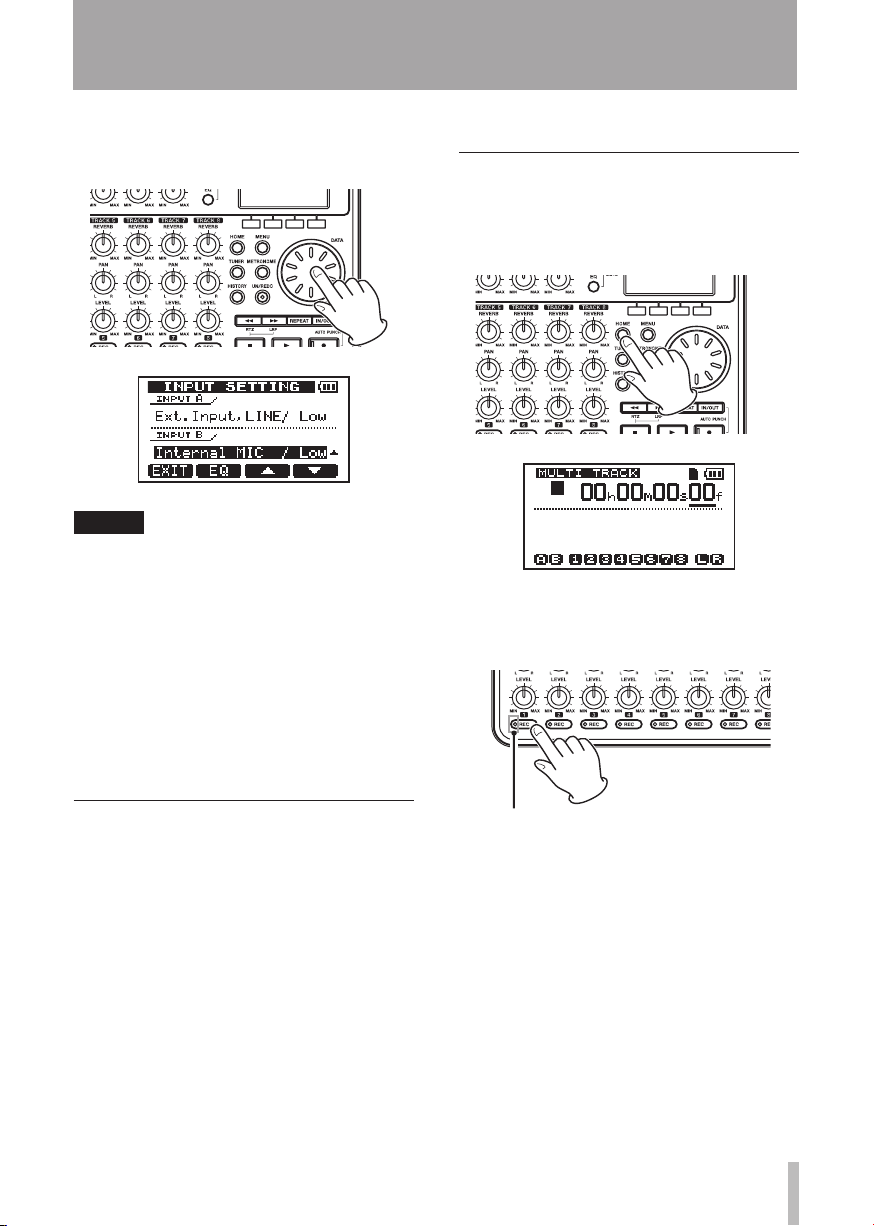
2 – Quick Start Guides
This sets MIC B , which is the built-in mic
on the right side of the front panel as the
input source for
NOTE
Internal MIC / Low and Internal MIC / High
change the sensitivity of the built-in mics.
Set it according to the loudness of the
subject being recorded.
If you are not sure which setting to use,
choose Internal MIC / Low. If the input level
is too low after adjusting it later, return
to this screen and change the setting to
Internal MIC / High.
INPU T B
.
7 After changing the setting, press the
HOME key to return to the Home Screen.
to TRACK 1 in this example.
Adjusting the input level and
monitoring
1 Press the HOME key to return to the
Home Screen.
2. Press the TRACK 1 REC key. The key
blinks showing that the track is in record
standby.
Setting the guitar as TRACK 1
recording source
The default settings are for the
the recording source for TRACK 1, 3, 5 and 7
and for the
for TRACK 2, 4, 6 and 8.
In “Connecting and setting the input sources”
above, we made a guitar the input source for
the
input source for the
guitar is already set to record to TRACK 1, 3, 5
and 7 and MIC B is ready to record to TRACK
2, 4, 6 and 8.
As a result, there is no need to change the
input channel assignments to record the guitar
INPUT A
INPUT B
to be the recording source
and a built-in mic (MIC B) the
INPU T B
. Therefore, the
INPU T A
to be
3 Use the INPUT A TRIM knob to adjust the
guitar input level.
Set the TRIM knob so that the INPUT A
OL indicator does not light even when
the loudest sound to be recorded is input.
If the indicator continues to light even
when the TRIM knob is turned down,
the guitar signal itself is too loud. In this
case, lower the output level on the guitar.
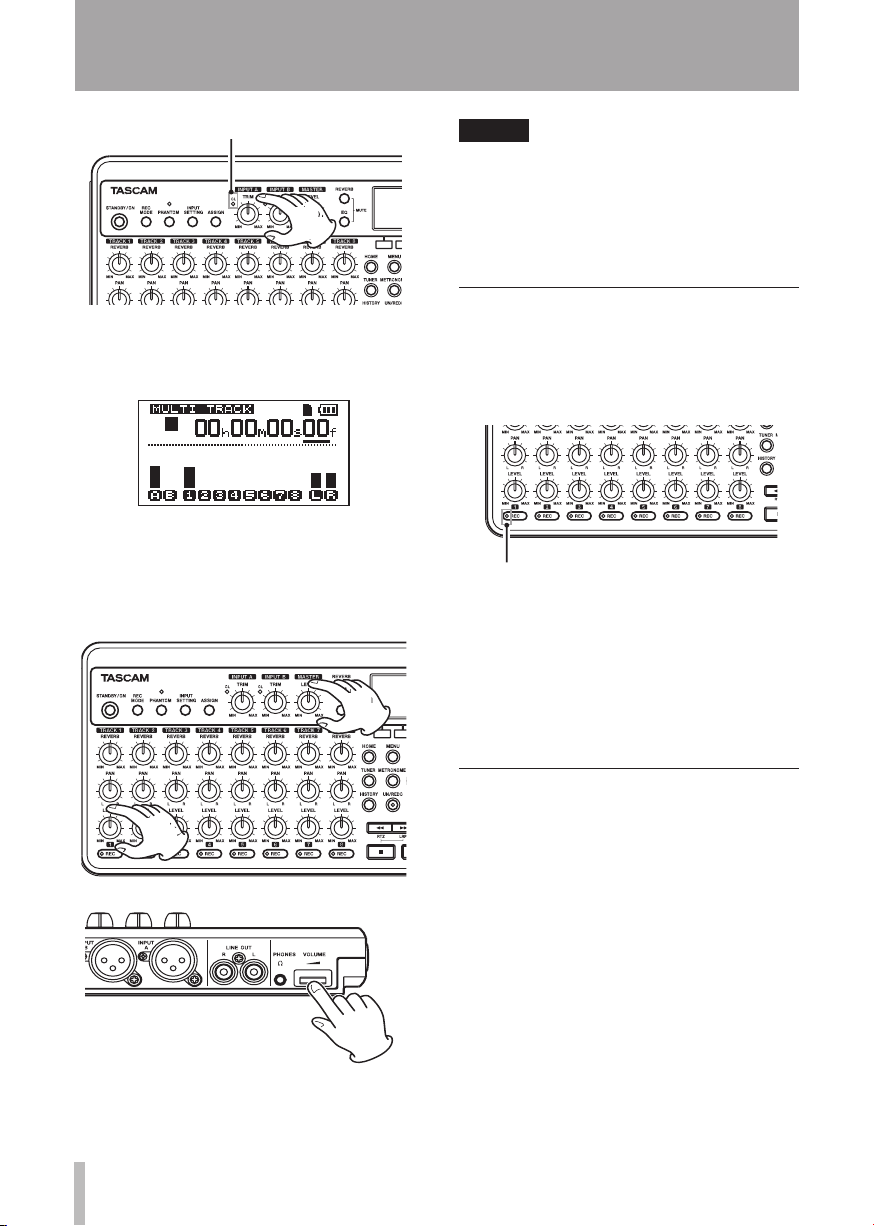
2 – Quick Start Guides
When you play the guitar, the input level is
shown by the A (INPUT A) and 1 (TRACK 1)
meters on the display.
Turn up the TRACK 1 LEVEL and MASTER
LEVEL knobs and the VOLUME dial to hear the
guitar sound through headphones. When doing
so, the L and R meters on the right side of the
display become active.
NOTE
You can use the TRACK 1 PAN knob to •
adjust the stereo position of the signal
when monitoring.
The input signal cannot be monitored if •
the REC indicator of the TRACK 1 that it is
assigned to is not lit.
Recording guitar to TRACK 1
1 Press the playback (Á) key while
pressing and holding the record (–) key
to start recording. The TRACK 1 REC key
stops blinking and stays lit constantly.
You are recording. Play your guitar!
2 When you are finished, press the stop
(ª) key to stop recording.
3 Press the TRACK 1 REC key again. Its
light turns off.
Listening to your recording
1 To go to the beginning of the song, press
the Ô key while pressing and holding
the stop (ª) key. (This is the Return To
Zero (RTZ) function)
2 Press the playback (Á) key to play the
recorded track.
3 Use the TRACK 1 LEVEL knob and the
MASTER LEVEL knob to adjust the
playback level. Use the VOLUME dial to
adjust the final monitoring volume.
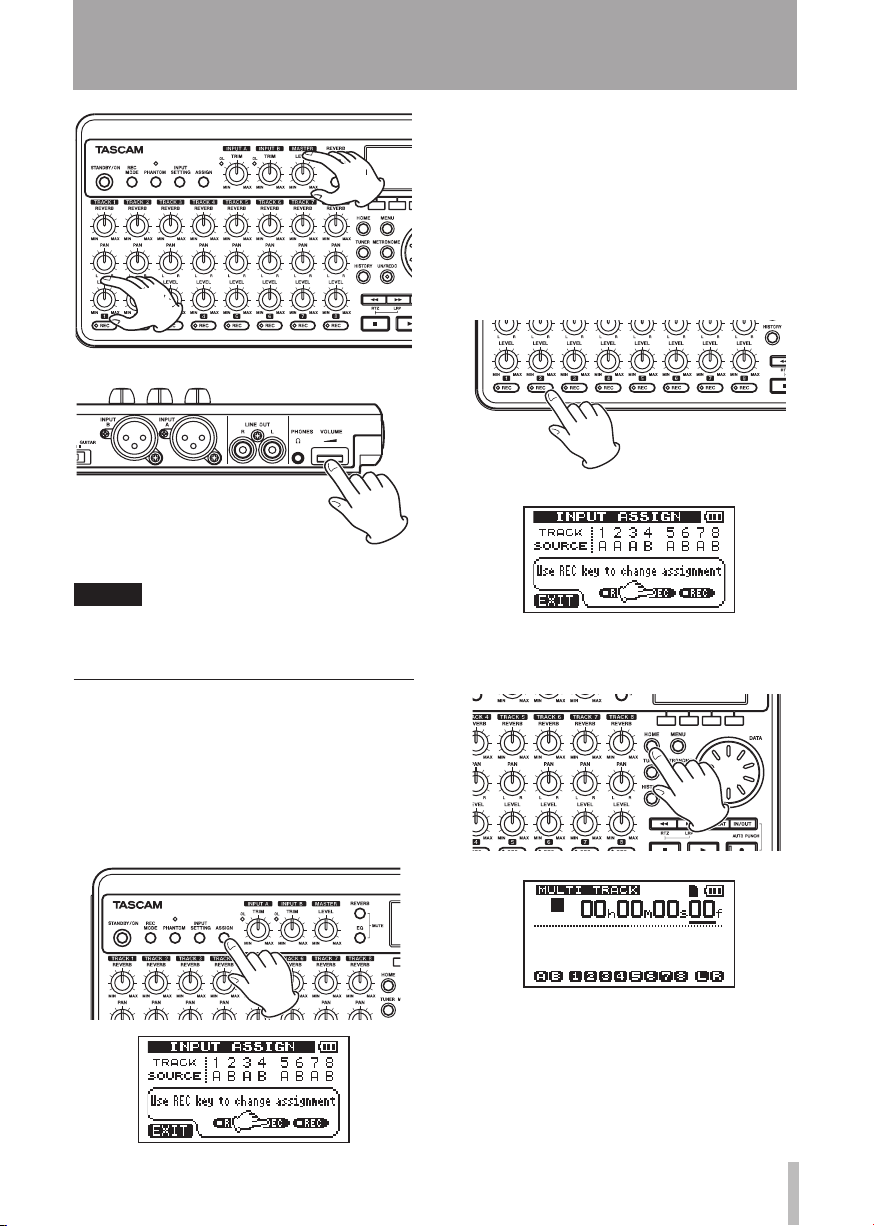
2 – Quick Start Guides
TIP
Use the TR ACK 1 PAN knob to set the stereo
position of the track signal.
Set which input (INPUT A or INPUT
B) is to be the recording source for each
track. In the initial setting, INPUT A (A)
is assigned as the recording source for
tracks 1, 3, 5 and 7, and INPUT B (B)
is assigned as the recording source for
tracks 2, 4, 6 and 8.
2 Press the TRACK 2 REC key to set the
TRACK 2 SOURCE
to A.
3 Press the HOME key to return to the
Home Screen.
Record guitar to TRACK 2
Now, you will record lead guitar on TRACK 2
while listening to the rhythm guitar on TRACK
1. Use the following procedures to change the
recording source for TRACK 2.
1 Press the ASSIGN key to open the
ASSIGN
screen.
INPUT
4 Press the TRACK 2 REC key. The key
blinks showing that the track is in record
standby.
When you play the guitar, the input
level is shown by the A (INPUT A) and 2
(TRACK 2) meters on the display.
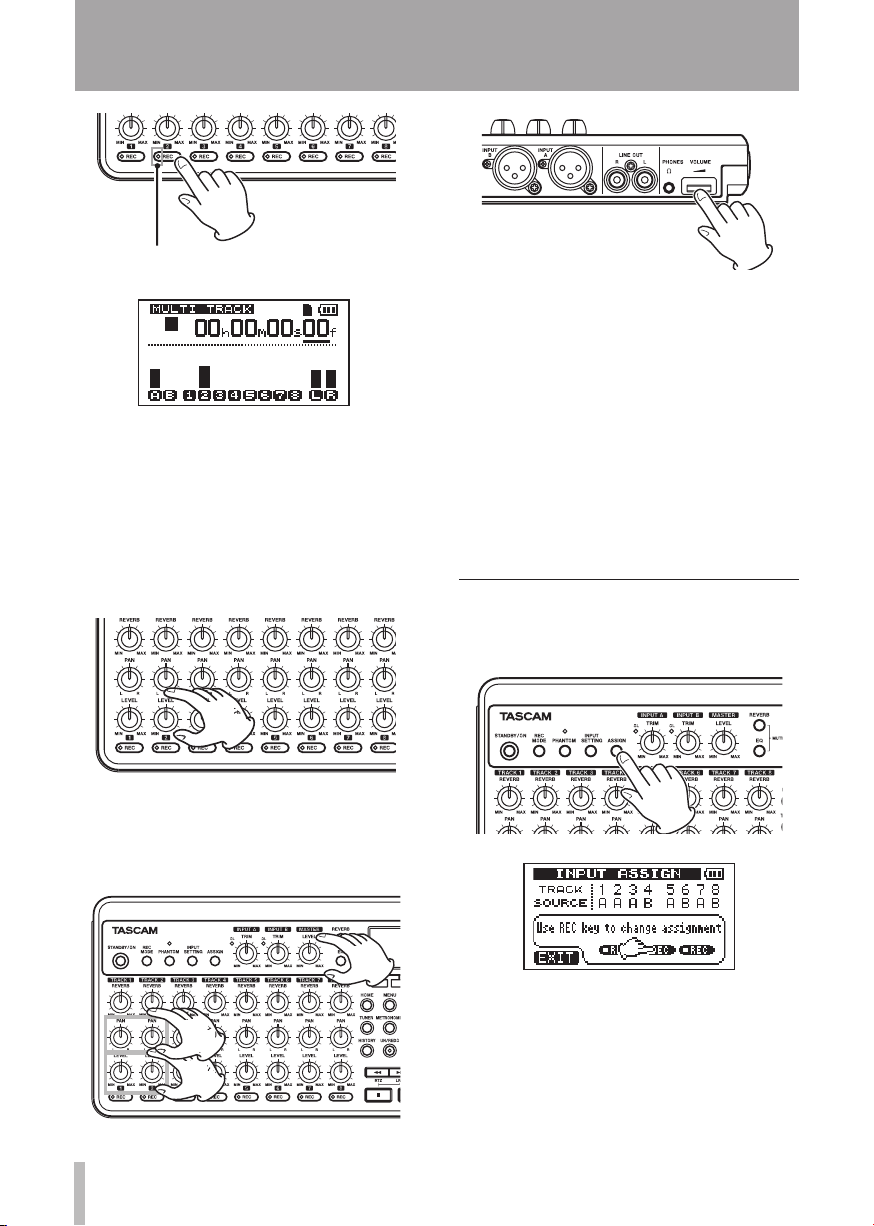
2 – Quick Start Guides
5 Return to the beginning of the song and
begin playback. Play the lead guitar part
along with the already recorded rhythm
guitar.
Raise the TRACK 2 LEVEL knob to hear
the sound of the guitar being input
along with the TRACK 1 playback sound
through the headphones.
7 Return to the start of the song again
and press the playback (Á) key while
pressing and holding the record (–) key
to start recording. The TRACK 2 REC key
stops blinking and stays lit constantly.
You are recording again. Play your
guitar!
8 When you are finished, press the stop
(ª) key to stop recording.
9 Press the TRACK 2 REC key again. Its
light turns off.
Record vocals on TRACK 3
1 Press ASSIGN to open the
screen.
INPUT ASSIGN
6 Use the TRACK 1 and 2 LEVEL and PAN
knobs, the MASTER LEVEL knob and the
VOLUME dial as necessary to adjust the
monitoring levels and balance.
2 Press the TRACK 3 REC key to set the
TRACK 3 SOURCE
to B.
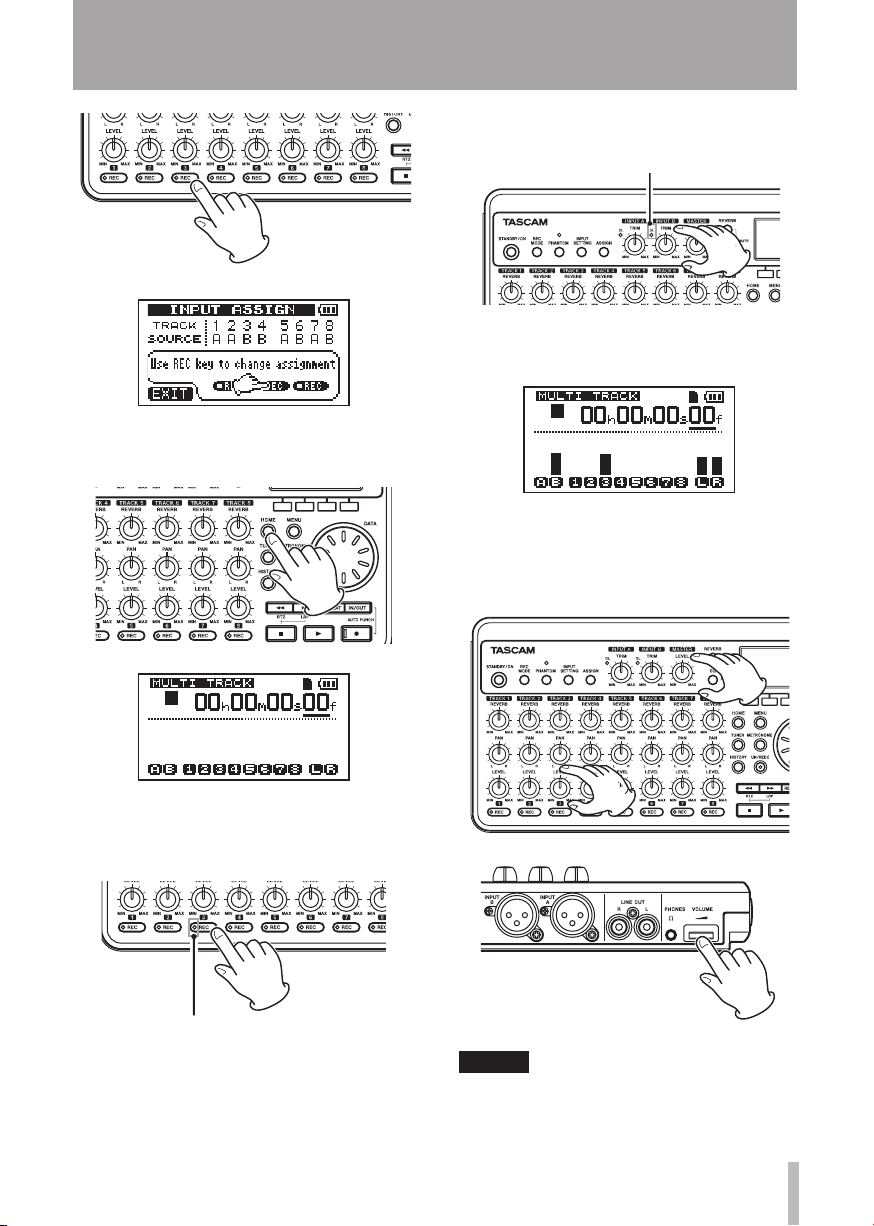
3 Press the HOME key to return to the
Home Screen.
2 – Quick Start Guides
recorded is input.
The input level of built-in MIC B is shown
by the B meter on the screen.
Raise the TRACK 3 LEVEL knob, MASTER
LEVEL knob and VOLUME dial as
necessary to hear the mic input through
the headphones.
4 Press the TRACK 3 REC key. The key
blinks showing that the track is in record
standby.
5 Use the INPUT B TRIM knob to adjust
the mic input level. Set the TRIM knob so
that the INPUT B OL indicator does not
light even when the loudest sound to be
NOTE
If the OL indicator continues to light even
when the TRIM knob is turned down, the
mic signal itself is too loud. In this case,
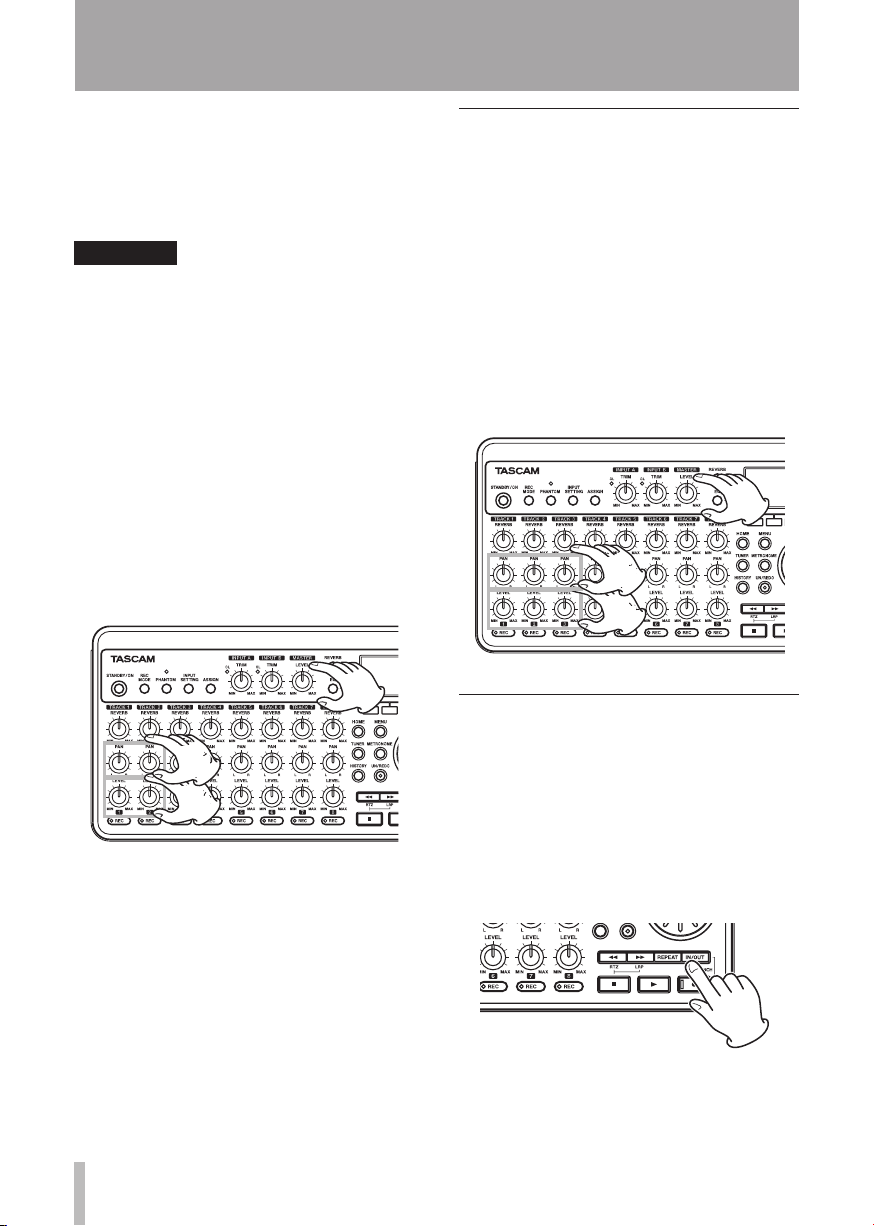
2 – Quick Start Guides
if the input setting is Internal MIC / High,
change it to Internal MIC / Low. If the OL
indicator continues to light even when set to
Internal MIC / Low, move the sound source
away from the mic or lower the volume at
the sound source.
CAUTION
Always monitor through headphones
when using a mic. If you monitor through
speakers, feedback could occur.
6 Return to the beginning of the song and
begin playback. Sing along with the
already recorded rhythm and lead guitar
parts.
You can hear the playback of TRACK
1 and TRACK 2 as well your singing
through the headphones.
7 Use the TRACK 1 and TR ACK 2 LEVEL
and PAN knobs, MASTER LEVEL knob
and VOLUME dial to adjust the output
volume and the balance between the
tracks.
Mixing the tracks
After you nish recording, the next step is to
make a stereo mix.
1 Use the LEVEL knobs for TRACK 1, 2
and 3, to adjust the levels of the tracks
and the balance between them. Use
the MASTER LEVEL knob to adjust the
overall level.
2 Use the track PAN knobs to adjust the
stereo positioning of the tracks.
Watch the L and R meters at the right
side of the display as you adjust levels
and panning.
8 Return to the start of the track again
and press the playback (Á) key while
pressing and holding the record (–) key
to start recording. The TRACK 3 REC key
stops blinking and stays lit constantly.
You are recording again. Sing!
9 When you are finished, press the stop
(ª) key to stop recording.
10 Press the TRACK 3 REC key again. Its
light turns off.
Mastering the mix
Now we will record your stereo mix. We call
this process mastering.
The time between the song’s beginning
(00:00:00:00) and the OUT point will be
recorded as the stereo master track. So, rst we
must set the OUT (end) point.
1 Press the IN/OUT key to open the
SETTING
screen.
I/O
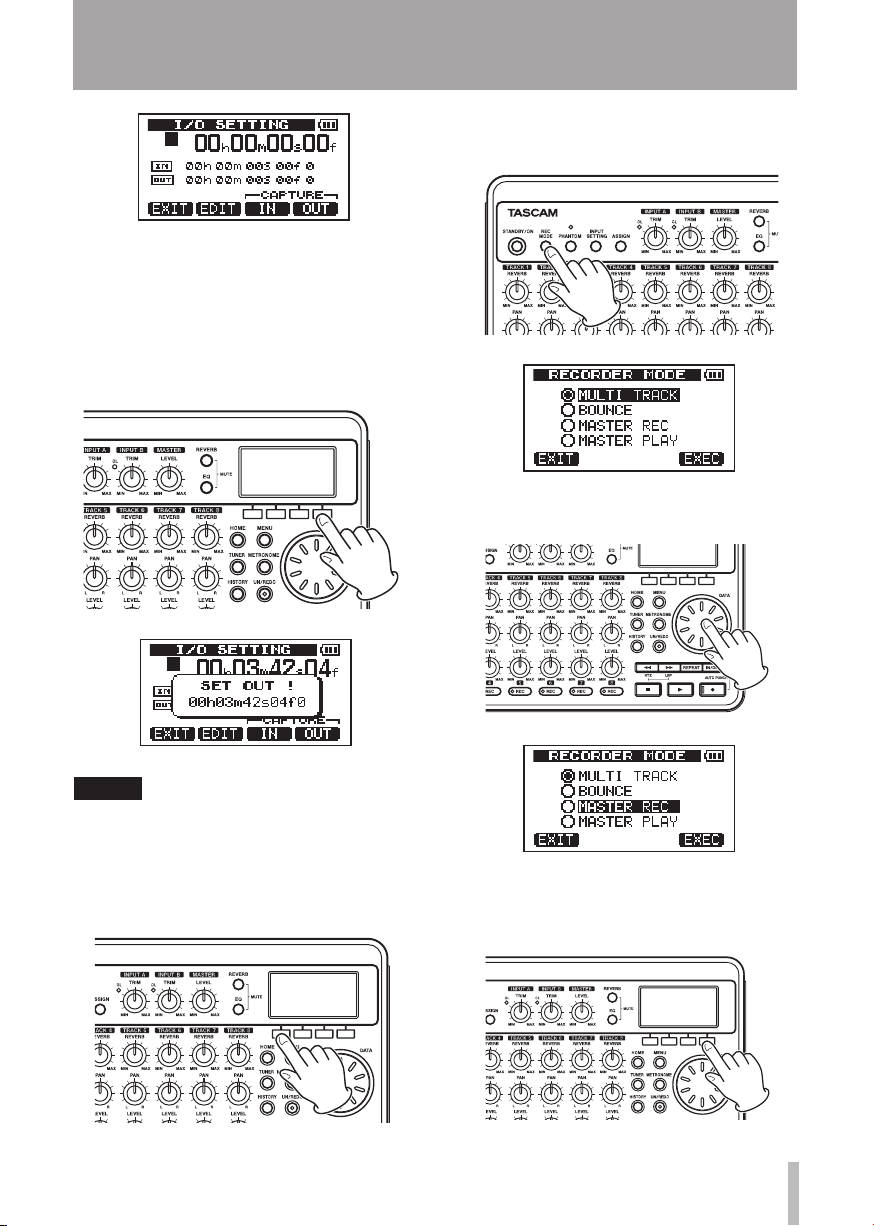
2 – Quick Start Guides
4 Press the REC MODE key to open the
RECORDER MODE
screen.
2 Play the song back, and press the F4 (
OUT
key at the position where you want the
stereo master track end point.
“
SET O UT !
” appears and this position is
set as the OUT point, which will be the end
point of the master.
TIP
You can also set the OUT point when
playback is stopped by pressing the F4 (OUT)
key.
3 Press the F1 (
EXIT
) key (or HOME key) to
return to the Home Screen.
)
5 Turn the DATA wheel to select
REC
.
6 Press the F4 (
EXEC
into master recording mode and return
to the Home Screen.
MASTER
) key to put the unit
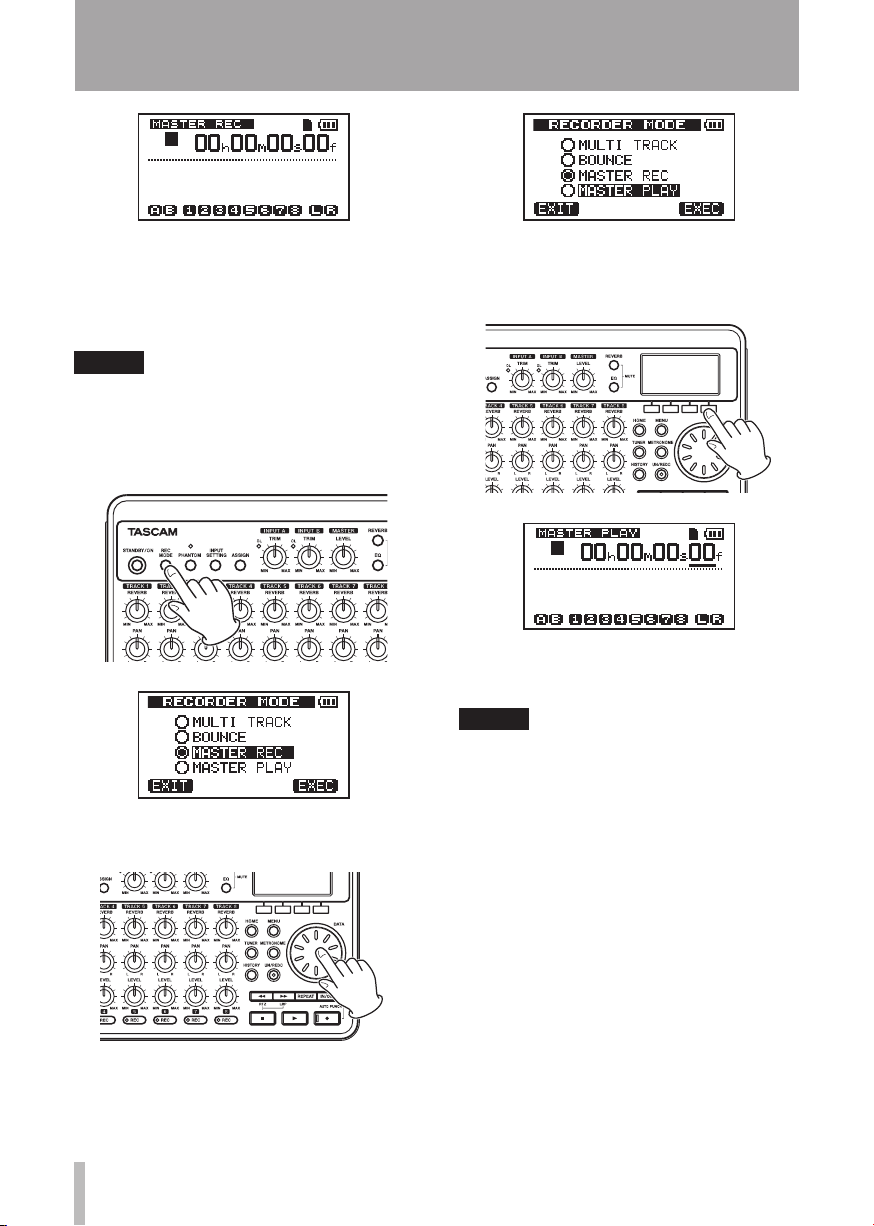
2 – Quick Start Guides
7 Press the playback (Á) key while
pressing and holding the record (–) key
to start master recording. Recording
automatically ends when the recorder
position reaches the OUT point.
NOTE
You can use the LEVEL knobs to adjust the
track and overall levels as you record.
8 Press the REC MODE key to open the
RECORDER MODE
9 Turn the DATA wheel to select
PLAY
.
screen.
MASTER
10 Press the F4 (
EXEC
) key to put this unit
into master playback mode and return to
the Home Screen.
11 Press the playback (Á) key to play the
stereo master track that you created.
NOTE
In MASTER PLAY mode, you cannot adjust
the level with the MASTER LEVEL knob.
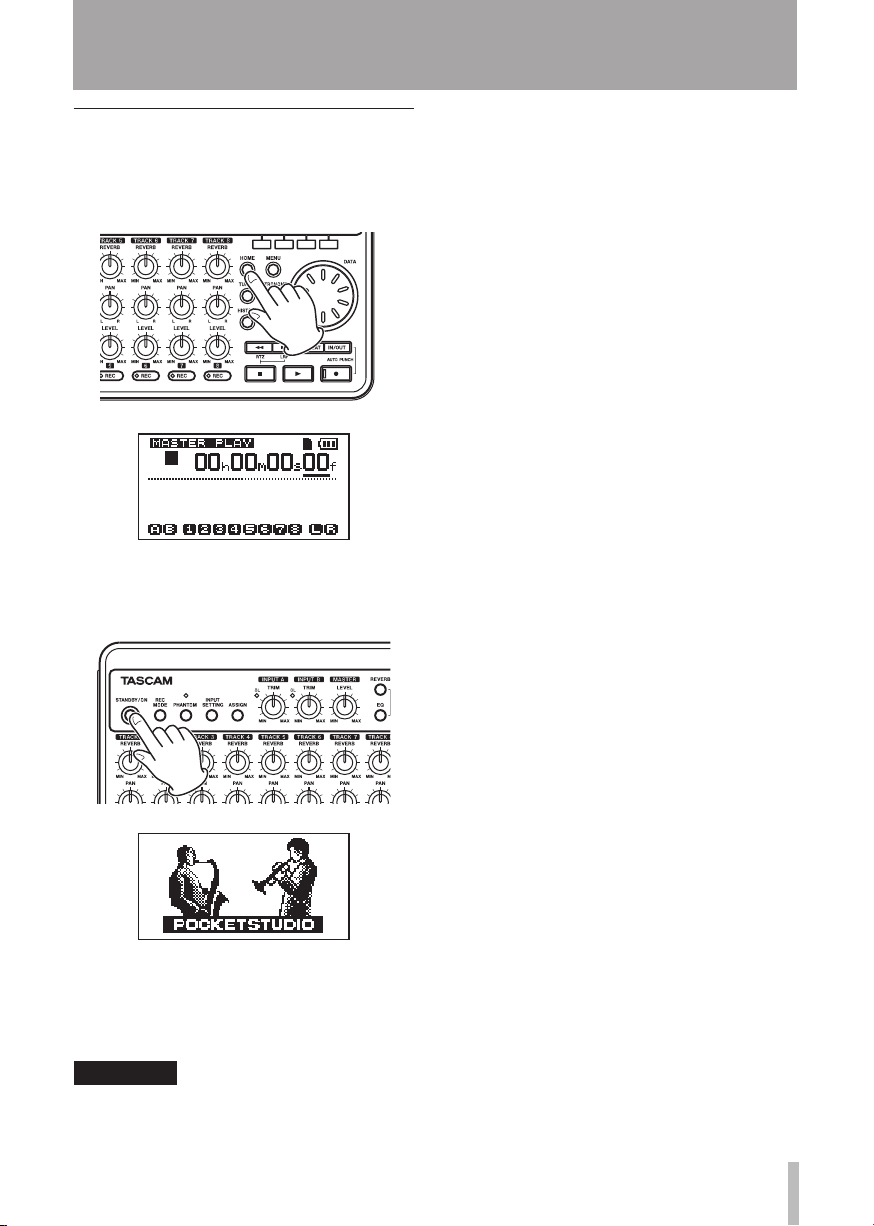
2 – Quick Start Guides
Shutting down the unit
Shutdown the unit when you are nished.
1 Press the HOME key to return to the
Home Screen.
2 Press and hold the STA NDBY/O N key
until
POCKETSTUDIO
screen.
appears on the
shut down properly and all unsaved data
will be lost. Lost data cannot be restored.
We recommend that you also save the data
manually often.
The power turns off after the unit
completes its shutdown process,
including saving various information
from your session.
CAUTION
Do not remove the batteries or disconnect
the power cable accidently while the unit
is operating. If you do so, the unit cannot
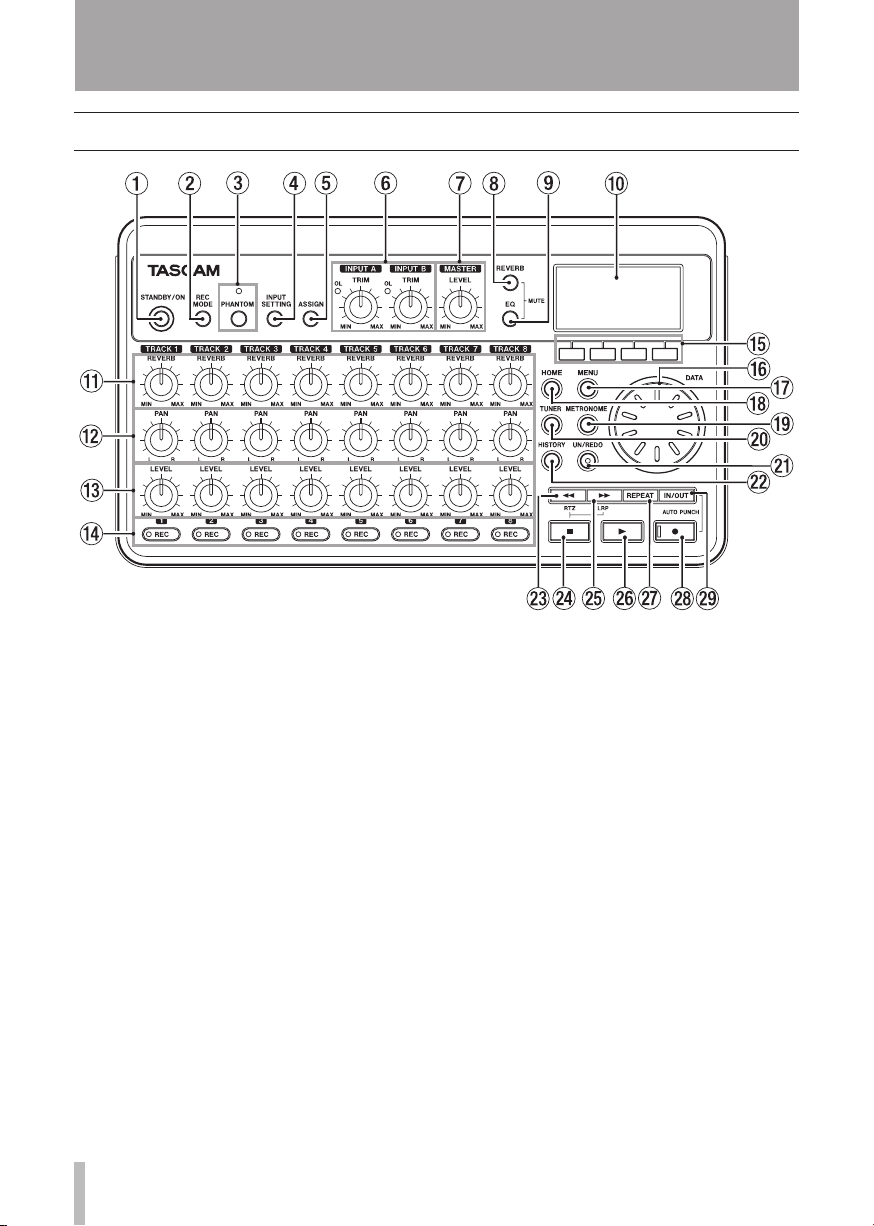
3 – Names and Functions of Parts
Top panel
1 STANDBY/ON key
Press and hold this key to turn the unit
ON and OFF. (See “Start-up & shutdown”
on page 32.)
2 REC MODE key
Use this key to set the recorder mode.
Select between
MASTER REC
“Recorder modes” on page 33.)
3 PHANTOM key and indicator
Press this key to open the phantom power
setting screen. When the phantom power
is on, the indicator lights.
4 INPUT SETTING key
Press this key to select the input source.
(See “Selecting the input source” on page
41.)
5 ASSIGN key
Use this to set (assign) the input (INPUT
A, INPUT B) for each track. Press this
key to open the
the display. The input signal of the input
MULTI TRACK, BOUNCE
and
MASTER PLAY
INPUT ASSIGN
. (See
screen on
assigned to a track becomes the track’s
recording source. (See “Assigning inputs”
on page 43.)
6INPUT A and INPUT B TRIM knobs and
OL indicators
Use these knobs to adjust the input levels
,
for INPUT A and INPUT B. (See “Making
the first recording” on page 44.)
If the input source level is too high its OL
(overload) indicator lights.
7 MASTER LEVEL knob
Adjusts the monitoring level of the stereo
output signal.
This knob also adjusts the recording level
when performing a bounce, mix down or
mastering.
8 REVERB key
Press this key to open the reverb setting
screen. (See “Reverb” on page 46.)
Press this key and EQ key at the same
time to open the
“Muting tracks” on page 47.)
TRACK MUTE
screen. (See

3 – Names and Functions of Parts
9EQ key
Press this key to open the track EQ setting
screen. (See “Track EQ (equalizer)” on
page 45.)
Press this key and REVERB key at the
same time to open the
TRACK MUTE
screen. (See “Muting tracks” on page 47.)
0 LCD Display
This shows various information.
q REVERB knobs (TRACK 1 — TRACK 
Use to adjust the amount (volume) of the
track playback signal or assigned input
signal that is sent to the reverb effect.
w PAN knobs (TRACK 1 — TRACK
Use to adjust the stereo position of the
track playback signal or assigned input
signal. (See “Stereo position (panning)”
on page 45.)
e LEVEL knobs (TRACK 1 — TRACK
Use to adjust the monitoring level of the
track playback signal or assigned input
signal. (See “Level and balance” on page
45.)
r REC keys and indicators (TRACK 1 —
TRACK
Use to arm a track for recording (tur n
recording ON/OFF). To monitor a track’s
input sound through headphones or a
monitoring system, press that track’s REC
key. When the REC key is ON, the REC
indicator blinks while the unit is stopped
and lights during recording.
t Function keys
The functions of these keys are shown at
the bottom of the screen and depend on
the current screen.
NOTE
In this manual, the four function keys are •
referred to as F1, F2, F3 and F4 in order
from left and right.
The function keys have the following •
assignments on the Home Screen.
Stop (ª) + F1: Locate to the IN point
Stop (ª) + F2: Locate to the OUT point
F3: Set the IN point
F4: Set the OUT point
y DATA wheel
Use this to change parameter values when
using menus.
uMENU key
Press this key to open the
MENU
screen.
i HOME key
Press this key to open the Home Screen.
When the unit is stopped and the Home
Screen is open, this key is used to move
between the time divisions in the counter.
(See “Direct locate function” on page 54.)
o METRONOME key
Press this key to open the
METRONOME
setting screen. (See “Metronome” on page
64.)
p TUNER key
Press this key to open the
TUNER
screen.
(See “Tuner” on page 64.)
a UN/REDO key and indicator
Press this to undo the last action. Press
again to redo it. (See “Undoing operations
(undo)” on page 49.)
The UN/REDO indicator lights when
single undo or multi-undo has been
conducted and there are undone
operations that can be redone.
s HISTORY key
Press this key to show the recording/
editing history. Use this screen to undo
multiple operations at the same time with
the multi-undo function.
dÔ/RTZ key
Press this key when the transport is
stopped or playing to fast rewind. Press
it again to change the speed from 10x to
50x, again for 100x and 1000x.
If you press this key while holding down
the stop ( ª) key, the transport will
locate to the head of the song (RTZ).
(See “Retur n To Zero (RTZ) and Last
Recording Position (LRP)” on page 54.)
fStop ( ª) key
Press this key alone to stop recording,
playback, fast forward and fast rewind.
If you press the Ô or key at
the same time, the transport will also
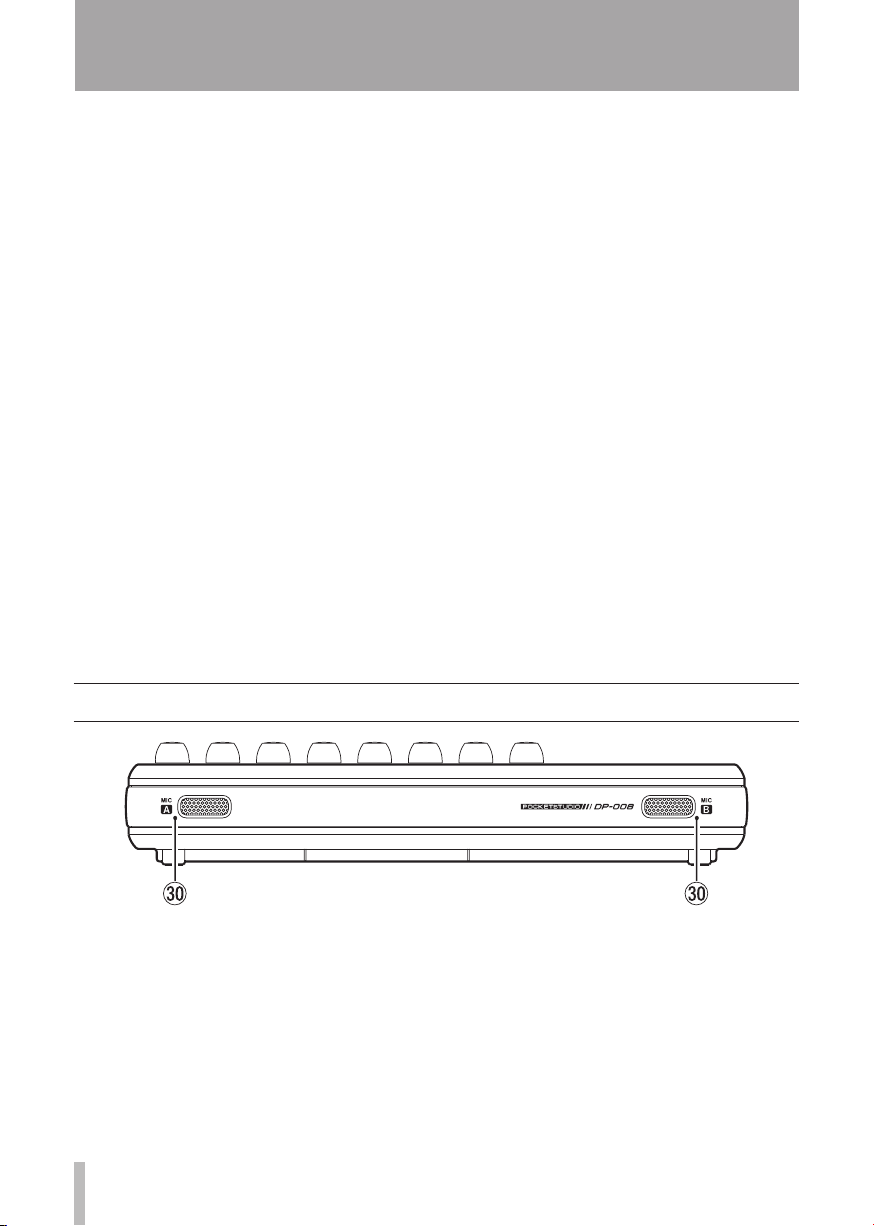
3 – Names and Functions of Parts
locate to the head of the song (RTZ) or
the last recording start position (LRP).
(See “Retur n To Zero (RTZ) and Last
Recording Position (LRP)” on page 54.)
g /LRP key
Press this key when the transport is
stopped or playing to fast forward. Press
it again to change the speed from 10x to
50x, again for 100x and 1000x.
If you press this key while holding down
the stop ( ·) key, the transport will locate
to the last recording start position (LRP).
(See “Retur n To Zero (RTZ) and Last
Recording Position (LRP)” on page 54.)
hPlayback (Á) key
Press this key to start playback. While
pressing the record (–) key, press this key
to star t recording. Press this key again
when recording to stop recording and start
playback (punch out).
jREPEAT key
Turns the repeat playback mode on and
off. (See “Repeat playback” on page 55.)
kRecord (–) key and indicator
Press the playback (Á) key while pressing
this key to start recording. The indicator
lights when recording. If you press this
key when any of the track REC indicators
is blinking, or during playback, recording
will begin (punch in). (See “Punching in
and out” on page 52.)
Press the IN/OUT key while pressing and
holding this key to enter auto punch in/out
mode.
lIN/OUT key
Press this key to open the
screen, and to set IN (starting) and OUT
(ending) points for repeat playback and
track editing. (See “Setting IN and OUT
points” on page 55.)
Press this key while pressing and holding
the recording (–) key to enter auto punch
in/out mode.
I/O SETTING
Front panel
; MIC A /B
These are built-in omnidirectional
microphones. They can be set as input
sources for INPUT A/B (
Low
or
Internal MIC/High
Internal MIC/
).
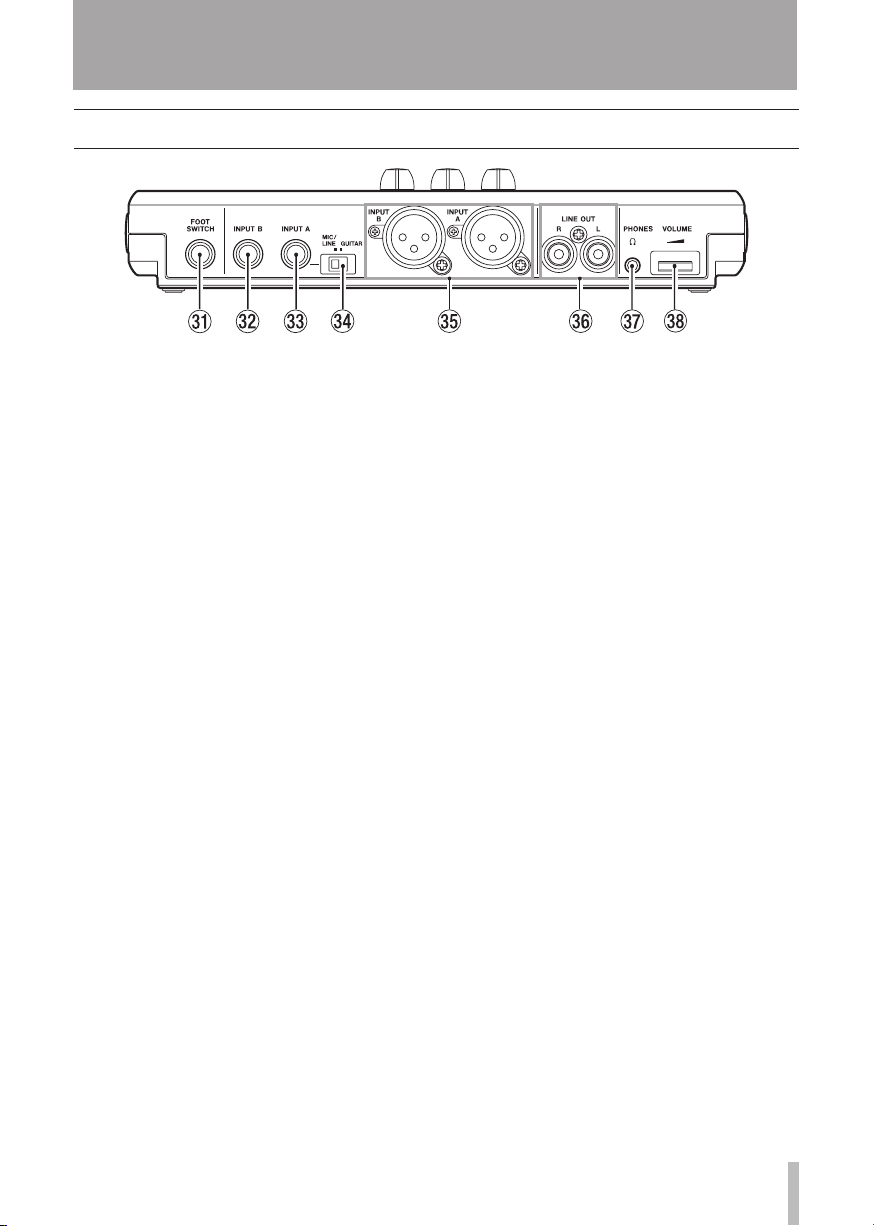
3 – Names and Functions of Parts
Rear panel
zFOOT SWITCH jack
You can use a foot switch to punch in and
out (start and stop recording).
x INPUT B jack (1/4” phone jack)
Use this as the input source by setting
INPUT B to external input (“
Input
”) on the
You can use this jack for a line level or
mic level signal (unbalanced connection).
c INPUT A jack (1/4” phone jack)
Use this as the input source by setting
INPUT A to
on the
INPUT SETTING
use this jack for a guitar/line level or mic
level signal (unbalanced connection).
Set the MIC/LINE–GUITAR switch
according to the input source.
vMIC/LINE-GUITAR switch
Set this switch to match the input signal
to the INPUT A jack on the rear panel. For
mic or line signals, set it to MIC/LINE.
For electric guitars and basses that are
connected directly, set it to GU ITAR .
b INPUT A/INPUT B jacks ( XLR jacks)
Condenser microphones that require
phantom power can receive it when
they are connected to these jacks. (See
“Phantom Power” on page 41.)
(Pin assignments—1: ground, 2: hot, 3:
cold)
If devices are connected to both the
XLR and the 1/4” phone jacks, the 1/4”
phone jack is given precedence (the XLR
connection is disabled).
INPUT SETTING
Ext. Input
Ext.
screen.
(external input)
screen. You can
nLINE OUT jacks
Use these to connect a monitoring system
(powered speakers or an amplifier with
sp eakers).
mPHONES jack
Connect headphones (with a stereo miniplug connector) to this jack.
, VOLUME dial
Use this to adjust the volume output from
the PHONES connector.
 Loading…
TASCAM DP-008EX портостудия
Носители информации SD / SDHC карт ( до 32 ГБ)
Файловая система TASCAM оригинал ( ССО раздел)
FAT32 (FAT раздел)
Микрофонные входы
Разъемы 2 х XLR сбалансированный
Входное сопротивление 2.4kΩ
Номинальный входной уровень -8 дБ
Максимальный уровень входного сигнала +8 дБ
Линейный вход
Входной импеданс Переключаемый :
≥ 10 кОм микрофонный / линейный
1 МОм гитара
Номинальный входной уровень -10 дБВ
Максимальный уровень входного сигнала +6 дБВ
Запас 16 дБ
Встроенный микрофон Технические характеристики
Введите 2 х всенаправленный конденсаторный микрофон
Линейный выход
Разъем 2 х RCA аудио (1 х L / R)
Номинальный выходной уровень -10 дБВ
Максимальный выходной уровень +6 дБВ
Выход на наушники
Максимальный выходной уровень ≥ 20 мВт на стороне
(THD + N менее 0,1% , 32Ω загружен)
Аудио Производительность
Частотный диапазон: 20 Гц до 20 кГц +1 / -3 дБ
Искажения < 0.05%
Отношение сигнал- шум > 81 дБ
USB соединение
Разъем USB 1 х USB Mini-B 4-контактный
Формат USB класса накопителей 2.0 высокая скорость
Требования к операционной системе Windows XP / Vista / 7
Mac OS X 10.2 или более поздней версии
Общие технические условия
Батареи Требования к питанию 4 х АА (щелочные или NiMH)
TASCAM PS- P520 Сетевой адаптер (продается отдельно)
Срок службы батареи (прибл.) 5,5 ч. щелочные, 6,5 ч NiMH (с помощью линейного входа / записи )
6 часов щелочной, 7 NiMH (с помощью наушников / воспроизведение)
Потребляемая мощность 2,4 Вт максимум
Диапазон рабочих температур от 41 до 95 ° F (от 5 до 35 ° С)
Вес 1,34 фунта ( 610 г )
Нет отзывов об этом товаре.
Написать отзыв
Ваше имя:
Ваш отзыв:
Примечание: HTML разметка не поддерживается! Используйте обычный текст.
Оценка: Плохо
Хорошо
Введите код, указанный на картинке:

Доставка
По Москве
в пределах МКАД
Заказ до 5 000 ₽ — 400 ₽
Заказ от 5 001 ₽ —
БЕСПЛАТНО
От МКАД до границ
Московской обл.
до 10 км — 400 ₽
10-25 км — 1000 ₽
25-40 км — 1 500 ₽
от 40 км — 2 000 ₽
По России и странам
Таможенного союза
По тарифам СДЭК
Или иной транспортной компании
Доставка товара до транспортной
БЕСПЛАТНО
Оплата

Безналичным способом
для физических лиц
Вам на электронную почту будет отправлен счет для оплаты, который Вы можете распечатать и оплатить в ближайшем отделении банка, работающего с физическими лицами.
Перед оплатой товара безналичным способом, подтвердите наличие товара у наших менеджеров по телефону 8(495)5178580

Безналичным способом
для юридических лиц
После оформления заказа и получения Нами реквизитов Вашей компании, на электронный адрес ответственного лица Вашей компании будет отправлен счет для оплаты. Доставка товара осуществляется после поступления денежных средств на расчетный счет компании. При получении товара у Вас обязательно должна быть печать организации либо доверенность. Все остальные документы для бухгалтерии (оригинал счета, счет-фактура и товарная накладная) выдаются вместе с заказом.
Срок зачисления денежных средств — 1-2 рабочих дня. Срок обработки заказа начинается с момента поступления платежа.

Оплатить с помощью
банковской карты
Оплачивайте любыми российскими банковскими картами
![]()
Наши реквизиты
Организация
ООО «МузЦентр»
Адрес юр. и фактический
121108, г.Москва, Рублевское шоссе, д.9, этаж 1, помещение I, комната 14а.
Расчётный счёт
40702810838000126836
Корр. Счёт
30101.810.4.00000000225
ОГРН/ОГРНИП
1217700025674
Наш магазин предоставляет все гарантии в соответствии с Гражданским Кодексом РФ и Законом РФ «О защите прав потребителей». Приобретая товар в нашем магазине, Вы получаете платежный документ, подтверждающий факт совершения покупки в нашем магазине, накладную и надлежащим образом заполненный Гарантийный талон.
На большинство товаров срок гарантии составляет 12 месяцев. Обслуживание производится в авторизованных сервис-центрах производителей. Адреса и условия приводятся в сопутствующих товару гарантийных талонах.
Уважаемые покупатели, обращаем Ваше внимание, что Постановлением Правительства РФ №55 от 19 января 1998 г. (в ред. Постановления Правительства РФ №1222 от 20 октября 1998 г.) утвержден перечень непродовольственных товаров надлежащего качества, не подлежащих возврату или обмену на аналогичный товар другого размера, формы, габарита, фасона, расцветки и комплектации. В пункте 11 этого перечня указаны технически сложные товары бытового назначения, на которые установлены гарантийные сроки, в том числе бытовая радиоэлектронная аппаратура и электромузыкальные инструменты.
Обращаем ваше внимание на то, что данный интернет-сайт носит исключительно информационный характер и ни при каких условиях не является публичной офертой, определяемой положениями Статьи 437 (2) Гражданского кодекса РФ.