
Bosch WTN85420ME/03 8kg Serie 4 Tumble Dryer — Use Manual — Use Guide PDF.
Documents: Go to download!
- Owner’s manual — (English)
- Intended use
- Installation and connection
- The main points in brief
- Getting to know your appliance
- Display panel
- Laundry
- Programs and buttons
- Operating the appliance
- Signal setting
- Cleaning
- Faults and what to do about them
Table of contents
User manual Tumble Dryer
Intended use
- This appliance is intended for private domestic use only.
- Do not install or operate this appliance anywhere that is liable to experience frost and/or outdoor conditions. There is a risk that the appliance will be damaged if residual water in it freezes. If hoses freeze up, they may crack/burst.
- This appliance must only be used for drying and freshening up domestic laundry, consisting of items that have been washed with water and are suitable for tumble drying (see label on item). Using the appliance for any other purpose is outside of the scope of its intended application and is forbidden.
- This appliance is intended for use up to a maximum height of 4000 metres above sea level.
Installation and connection
Installing and connecting the dryer
- Check the dryer for visible damage. You must not operate the dryer if it is damaged.
- Before connecting the dryer to the power supply, ensure that the electric voltage specified on the rating plate matches the voltage of your socket.
- Only use earth-leakage circuit breakers with the following symbol: .
- Ensure that the mains cable is not kinked or trapped, and that it does not come into contact with heat sources or sharp edges.
- Due to the heavy weight of the dryer, you may injure yourself if you lift it. Do not lift the dryer on your own.
- You could cut your hands on the sharp edges of the dryer. Do not hold the dryer by the sharp edges.
- Protruding parts on the dryer may break off when it is lifted or pushed. Do not move the dryer by holding onto protruding parts.
- Check the dryer for damage caused during transportation. Never operate a dryer if it is damaged.
- Any residual water in the dryer may freeze and damage the dryer. Do not install the dryer in rooms that are at risk of frost.
During installation, ensure that:
- The dryer is placed on a clean, level and firm surface,
- The mains plug can be accessed at all times,
- The air inlet on the dryer is kept clear and there is sufficient ventilation,
- The area around the dryer is kept clean and
- The dryer is levelled using the threaded feet.
- Note: Check the alignment of the appliance with a spirit level and correct if necessary. Change the height by turning the appliance feet. All appliance feet must stand firmly on the ground.
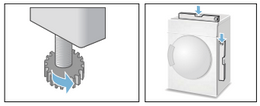
- Incorrect alignment may cause high noise levels, vibrations and improper movement of the drum.
- Note: If in doubt, have the appliance connected by a specialist.
Optional accessories
Order optional accessories* from after- sales service:
- Washer-dryer stack connection set: To save space, the dryer can be placed on top of a suitable washing machine of the same width and depth. The dryer must be secured to the washing machine using this connection set. Order number with pull-out worktop: WTZ11400; Order number without pull-out worktop: WTZ20410.
- Platform: For easier loading and unloading, use a platform to raise your dryer. Transport laundry with the integrated clothes basket integrated in the platform’s pull-out drawer. Order number: WMZ20540W.
- Basket for woollens: Dry individual woollen items, sports shoes and soft toys in the basket for woollens. Order number: WMZ20600.
- Connecting kit for the condensation drain: Use a hose to draw off the condensation immediately. Order number: WTZ1110.
Transport and frost protection
To empty the condensate container:
- Use the program selector to select any program.
- Press the Start button.
- Wait for 5 minutes. Note: The condensation is drained.
- Empty the condensate container again.
- Switch off the dryer.
Caution! Any residual water may leak out and cause material damage.
Transport the dryer in an upright position.
The main points in brief
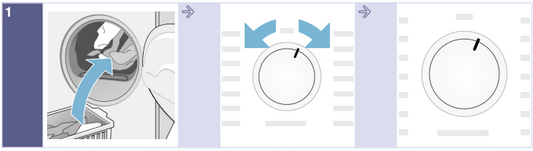
Load the laundry and close the door.
Switch on the dryer.
Select a program and, if necessary, adjust the program default settings.
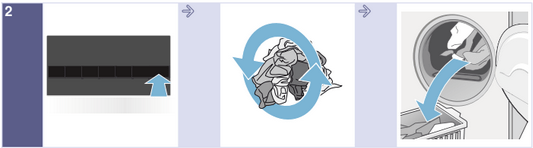
Select the start button >II
Dry.
Unload the laundry.
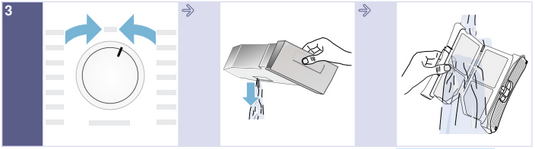
Switch off the dryer.
Empty the condensate container.
Clean the fluff filter.
Getting to know your appliance
Dryer
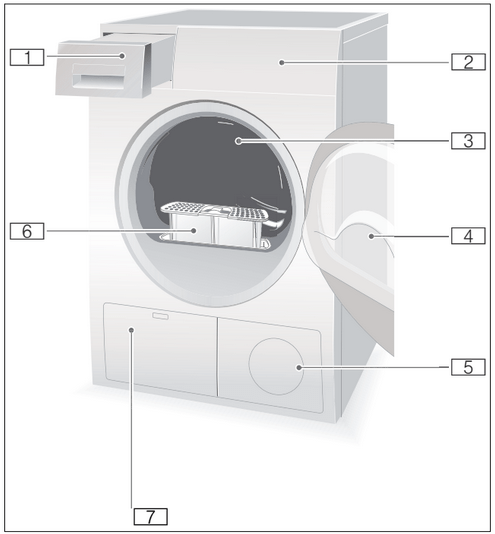
Control panel
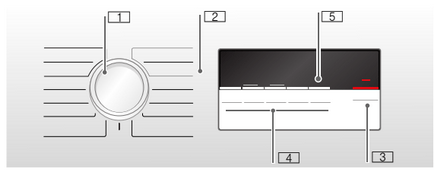
 Use the program selector to switch the dryer on and off and to select the program.
 Programm ~ Page 20.
 Start button for starting or interrupting the program ~ Page 22.
 Buttons ~ Page 22.
 Display panel with buttons ~ Page 18.
Display panel
Buttons in the display panel
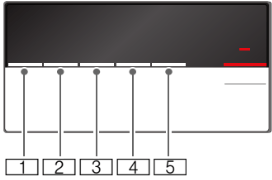
Select the degree of dryness.
Select the drying time.
Select the Ready in time.
Select Anti-Crease.
Select Low-Heat Drying.
For a detailed description of all buttons, see ~ Page 22 onwards.
Laundry
LaundryPreparing the laundry
Remove all objects from pockets and observe the following information:
- Tie cloth belts, apron strings, etc. together or use a laundry bag.
- Close zips, hooks and eyelets and buttons. Button up large items of laundry, such as covers.
- Remove any metal objects, such as paper clips, from pockets.
- To ensure a consistent drying result, sort laundry by fabric type and drying programme.
- Always dry very small items of laundry, e.g. babies’ socks, together with large items such as towels.
- Knitted fabrics such as T-shirts and jerseys often shrink the first time they are tumble-dried. Use a gentle programme.
- Do not overdry easy-care laundry. This increases creasing of the laundry.
- Use timed programmes for single garments.
- Some detergents and care products, e.g. starch or softeners, contain particles which may be deposited on the moisture sensor. This may impair the sensor function and in consequence the drying result.
Notes
- When washing laundry to be tumble-dried, use the correct amount of detergent and care products as specified in the manufacturer’s instructions.
- Clean the moisture sensor regularly.
Sorting laundry according to
 Suitable for tumble drying
 Dry at normal temperature
 Dry at low temperature
 Do not tumble-dry
Note: Do not load laundry from the washing machine directly into the tumble dryer. Sort the spun laundry before placing it in the dryer drum.
If you dry thin, thick and multi-layer fabrics together, they will dry to differing degrees. To achieve an even drying result, you should therefore only dry together laundry of the same type of fabric and structure. If you feel that the laundry is still too damp, you can select a timed programme for subsequent drying ~ Page 20.
Programs and buttons
Programs
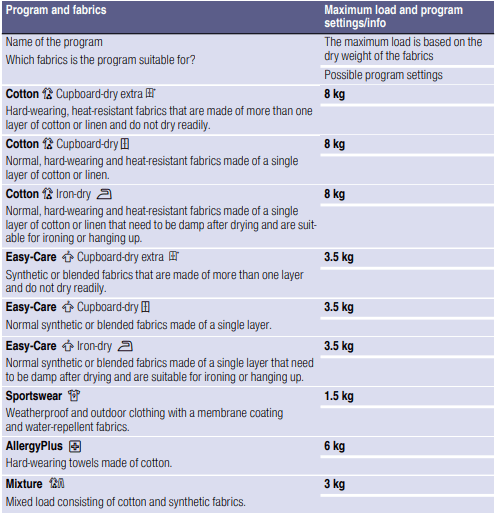
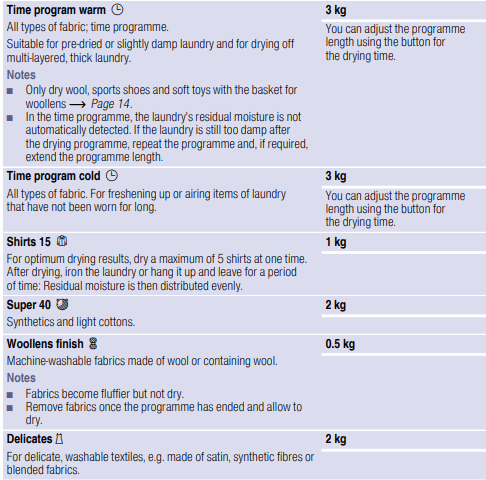
Buttons
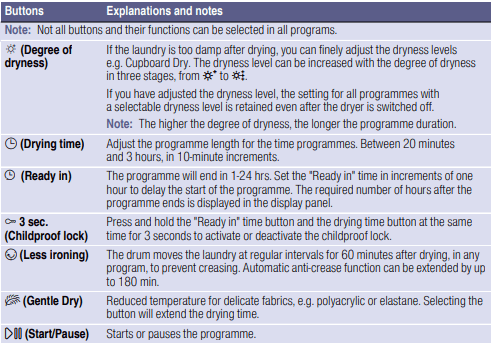
Operating the appliance
Loading laundry and switching on the dryer
Note: The dryer must be correctly positioned and connected, -> Page 13.
- Place the laundry in the drum.
- To switch the dryer on, turn the program selector to any program.
- Close the dryer door.
Setting a program
Note: If you have activated the childproof lock, you must deactivate it before you can set a program, see -> Page 22.
- Select the required program; detailed information on the programs can be found from -> Page 20 onwards.
- Use the program selector to set the required program. The default program settings for the selected program appear in the display panel.

- Note: Default program settings are standard settings that are already defined when a program is selected. After selecting a program, you can see the default program settings in the display panel.
- If required, adjust the default program settings. You can find detailed information on this from -> Page 20 onwards.
Starting the program
Press the Start button.
Note: If you want to lock the program to prevent it from being inadvertently adjusted, you can select the childproof lock, see -> Page 22.
Program sequence
The programme status is indicated in the display field.
 Expected programme duration in hours and minutes.
Note: When a programme is selected, the expected drying time for the recommended load is displayed. During drying moisture sensors detect the remaining moisture in the load and adjust the programme length (except timed programmes). This is visible via the time remaining leaping forward.
 Wet
Wet
 Iron Dry
 Cupboard Dry
 AntiCrease
 Pause
Pause
 End
End
Changing the program or adding laundry
You can remove or add laundry and change or alter the program at any time during drying.
- To pause the program, open the dryer door or press the Start button.
- Add or remove laundry.
- Select another program or an additional function, if required.
- Close the dryer door.
- Press the Start button.
Note: The program duration in the display panel is updated depending on the load and residual moisture in the laundry. The values displayed may change after the program is changed or the load is adapted.
Program interruption
The program can be interrupted at any time; to pause, open the dryer door or press the Start button.
Caution! Risk of fire.
Laundry may catch fire. If you cancel the program, you must remove the laundry items and spread them out so that the heat can disperse.
Program end
appears in the display panel.
Removing laundry and switching off the dryer
- Remove the laundry.
- Turn the program selector to the «off» position.

Clean the fluff filter
Note: During drying, fluff and hair from the laundry is trapped by the fluff filter. If the fluff filter is blocked or dirty, this reduces the flow of air, which prevents the dryer from achieving its maximum performance. Clean fluff filters also reduce energy consumption and the drying time.
Clean the fluff filter after each drying cycle:
- Open the dryer door and remove all fluff from the door.
- Remove the fluff filter.
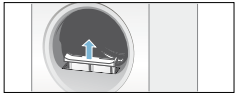
- Remove the fluff from the recess in the fluff filter.
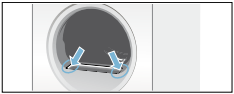
Note: Ensure that no fluff falls into the open shaft.
- Open the fluff filter and remove all the fluff.
- Rinse away the fluff under running water or clean the fluff filter in the dishwasher.
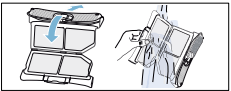
- Dry the fluff filter, close it and reinsert the fluff filter.
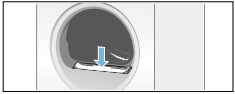
Emptying the condensate container
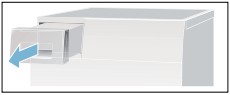
Note: After each drying cycle, empty the condensate container; otherwise the next drying programme may be cancelled as a result of the condensate container being full.
- Pull out the condensate container horizontally.
- Pour out the condensation water.
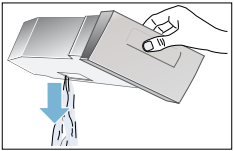
- Push in the condensate container until you feel it lock back into place in the dryer.
Signal setting
You can change the following settings:
- The spin speed that is used for spinning your laundry before it is dried,
- The volume of the audible signal at the end of the programme,
- The volume of the audible button signals,
- The current rating for your dryer’s fuse (10 A or 16 A). Note: The values for the energy label are determined using a circuit breaker/fuse rating of 16 A. If the circuit breaker/fuse rating is changed to 10 A, the drying time and energy consumption will be higher. You can find details on this in the consumption values table. -> Page 33
You will need to activate the setting mode in order to change these settings.

Activating setting mode
- Switch the dryer on.
- Select the Cottons programme in position 1 and wait 5 seconds.
Setting mode is now activated. The symbols go out on the display panel and the programme duration is displayed.
- Press and hold the Start button and, at the same time, turn the programme selector clockwise to position 2.
- The spin speed is shown on the display.
- Press the «Ready in» time button or the drying time button to change the spin speed.
- Turn the programme selector clockwise to position 3.
- The volume of the audible signal at the end of the programme is shown on the display

1 = quiet, 2 = medium, 3 = loud, 4 = very loud
- Press the «Ready in» time button or the drying time button to change the volume.
- Turn the programme selector clockwise to position 4.
- The volume for the audible button signal is shown on the display.

0 = off, 1 = quiet, 2 = medium, 3 = loud, 4 = very loud
- Press the «Ready in» time button or the drying time button to change the volume.
- Turn the programme selector clockwise to position 5.
- The current is shown in the display.
LO = 10 A
HI = 16 A
- Press the «Ready in» time button or the drying time button to change the current.
Exiting setting mode
Turn the programme selector to the «Off» position once you have set the required spin speed, volume or fuse current rating. The settings have now been saved.
Cleaning
Cleaning the dryer and the control panel
- Clean the dryer using only water and a soft, damp cloth.
- Remove all detergent residue, spray residue or other residues immediately. Do not use cleaning agents or agents for pre-treating laundry (e.g. prewash sprays, stain removers). Do not use high-pressure cleaners or steam jet cleaners to clean your appliance.
Cleaning the heat exchanger
Notes
The heat exchanger requires cleaning once a month, however this varies depending on how frequently the dryer is used.
If there is debris in the heat exchanger, this will increase the amount of time required for drying and will compromise the drying results.
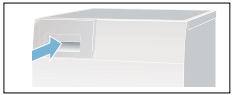
- Allow the dryer to cool down and place an absorbent cloth beneath the maintenance flap. Note: Residual water may leak out.
- Open the maintenance flap fully.
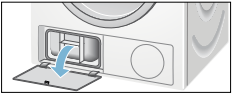
- Turn both locking levers towards each other.
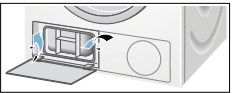
- Remove the top cap from the heat exchanger.
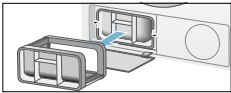
- Remove the heat exchanger.
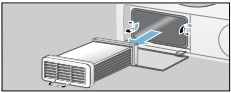
- Flush water through the heat exchanger from all sides to completely remove all fluff.
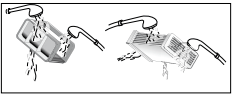
- Remove all fluff from the seals on the dryer and on the heat exchanger.
- Allow all the water to drip off.
- First insert the heat exchanger, and then fit the heat exchanger’s top cap in place.
- Turn both locking levers back and close the maintenance flap until it locks into place.
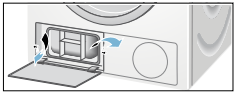
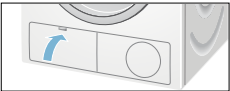
- Close the maintenance flap and press on it until you feel it click in place.
Cleaning the moisture sensor
- Note: The dryer is equipped with a stainless-steel moisture sensor. The moisture sensor measures how damp the laundry is.
- After long periods of usage the moisture sensor may become covered by a fine layer of limescale or residues of detergents and care products. Such residues must be removed regularly as the sensor function and in consequence the drying result may be impaired.
- Open the door and clean the moisture sensor with a coarse sponge.
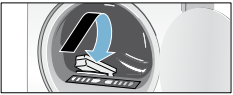
Faults and what to do about them
 on the display panel and drying has been interrupted.
- Empty the condensate container and press the Start button -> Page 22.
- If the optional condensation drain is installed, the drain hose may be blocked. Check the hose for deposits and flush the hose out.
 on the display panel.
- Clean the fluff filter and/or the heat exchanger, then select the Start button -> Page 25; -> Page 28.
Dryer does not start
- Mains plug plugged in or fuse checked?
- program selected? Select a program.
- Dryer door open? Close the door.
- Childproof lock activated? Deactivate the childproof lock.
- «Finish in» time selected? program starts after a delay.
Display panel goes off and Start button flashes.
- Not a fault. Energy saving mode is active -> Page 12.
Creasing.
- Creasing occurs when you have exceeded the maximum load or selected the wrong program for the type of fabric. All the required information can be found in the program table.
- Remove clothes immediately after drying; creasing may occur if they are left in the drum.
Water is leaking out.
- Not a fault; the dryer may be positioned on an incline. Level the dryer.
Change in the programme duration displayed during drying.
- Not a fault. The moisture sensors detect the remaining moisture in the load and adjust the programme length (except timed programmes).
Laundry is not dried correctly or is still too damp.
- After the end of the program, warm laundry feels damper than it actually is. Spread the laundry out and allow the heat to disperse.
- Finely adjust the dryness level – this extends the drying time but does not increase the temperature. Your laundry will become drier -> Page 22.
- Select a program with a longer drying time or increase the drying level. This does not increase the temperature.
- Select a timed program for subsequent drying of laundry that is still damp -> Page 20.
- If you have exceeded the maximum load for the program, the laundry may not be dried properly.
- Clean the moisture sensor in the drum. The sensor may become covered by a fine layer of limescale or residues of detergents and care products which then impair its function. Your laundry is not being dried correctly -> Page 29.
- Drying has been interrupted as a result of a power cut, because the condensate container is full or because the maximum drying time has been exceeded.
- Note: See also the laundry tips -> Page 19.
Drying time too long?
- The fluff filter may be dirty and cause a longer drying time. Clean the fluff filter.
- The heat exchanger may be dirty and cause a longer drying time. Clean the heat exchanger.
- If the air inlet on the dryer is blocked or not freely accessible, this may increase the drying time. Make sure that the air inlet remains unobstructed.
- If the ambient temperature is higher than 35 °C, this may extend the drying time.
- Insufficient air circulation in the room may increase the drying time. Ventilate the room.
Displayed drying time changes during drying process.
- Not a fault. The dryer recognizes the load and adapts the remaining program duration.
Humidity in the room increases.
- Not a fault. Make sure the room is sufficiently ventilated.
Power cut.
- The drying program is interrupted. Remove the laundry and spread it out, or restart the program.
After-sales service
After-sales service
- If you cannot rectify the fault yourself (faults, what to do?), please contact our after-sales service. We will always find an appropriate solution to avoid unnecessary visits by engineers.
- The contact information for your nearest after-sales service can be found here or in the enclosed after-sales service directory.
- Please provide after-sales service with the dryer’s product number (E-no.) and production number (FD).
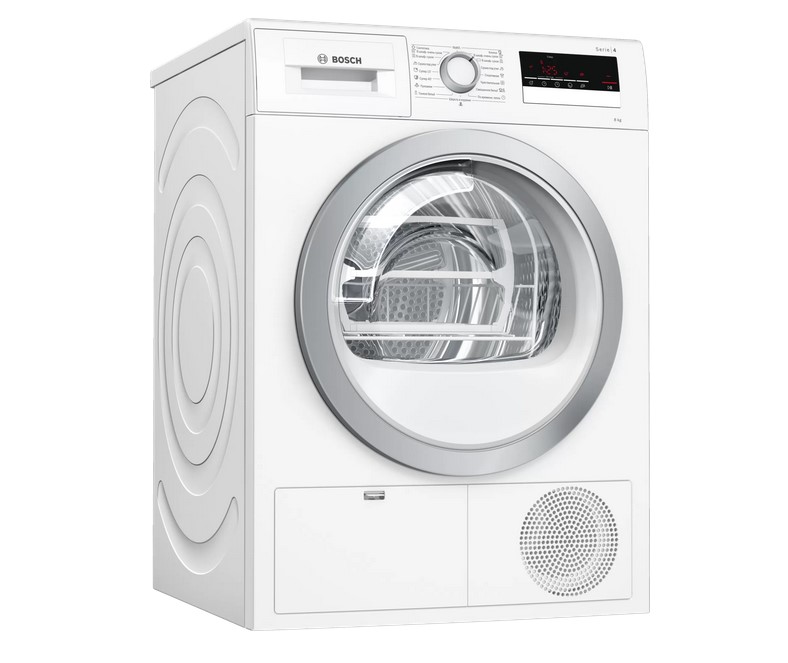
Сушилка для белья Bosch Serie 4
Сушильная машина Bosch позабоится о деликатном белье и помжет сохранить ваше время.
Bosch WTM83261OE
Загрузить Руководство Пользователя:
Bosch WTM83261OE в формате PDF: WTM83261OE_RU
- Программа AutoDry: предотвращает пересушивание белья.
- Система SensitiveDrying: бережная сушка благодаря уникальной структуре барабана.
- Бережная сушка без сминания благодаря барабану с уникальной поверхностью SensitiveDrying.
- Корзина для шерсти: деликатное обращение с шерстяными вещами.
- Барабан с подсветкой: полный обзор для контроля процесса сушки.
Техническая спецификация
Общая информация
- Максимальная загрузка: 8 кг
- Сушка по типу воздушной конденсации
- Класc энергоэффективности: B
Комфорт и Безопасность
- Специальные программы: Смешанное белье, Сушка шерсти в корзине, Сушка по времени, Спортивная, Пуховики, Супер 40, Супербыстрая 15
- AntiVibration дизайн боковой панели
- Светодиодная индикация заполнения ворсового фильтра и контейнера для конденсата
- Управление: электронное
- DUO-Tronic — сенсорный контроль сушки
- LED-дисплей для индикации остаточного времени и 24 ч окончания отсрочки старта, индикация хода программы, специальные функции
- Барабан softDry: барабан с системой бережной сушки белья
- Специальная корзина для сушки шерсти
- Внутренняя подсветка барабана: LED
- Блокировка от детей
- Сигнал окончания хода программы
- Электромагнитный замок
Техническая информация
- Размеры (В х Ш х Г): 84.2 x 59.8 x 59.9 см
Перейти к контенту

Русские электронные инструкции по эксплуатации
Постоянно обновляемый большой каталог документации по эксплуатации и использованию современных устройств и оборудования на русском языке. Бесплатное скачивание файлов.
Поиск:
Главная
Просмотр инструкции в pdf


/%D0%A1%D1%83%D1%88%D0%B8%D0%BB%D1%8C%D0%BD%D1%8B%D0%B5%20%D0%BC%D0%B0%D1%88%D0%B8%D0%BD%D1%8B/Serie%20|%204%20WTH85201OE.jpeg)
Инструкция по эксплуатации сушильной машины Bosch (Бош) Serie | 4 WTH85201OE.
Скачать инструкцию к сушильной машине Bosch (Бош) Serie | 4 WTH85201OE (2,85 МБ)

Инструкции по эксплуатации сушильных машин Bosch (Бош)
« Инструкция к сушильной машине Bosch (Бош) Serie | 6 WTW85469OE
» Инструкция к сушильной машине Beko DH 7312 GAW
Вам также может быть интересно
/%D0%9F%D1%8B%D0%BB%D0%B5%D1%81%D0%BE%D1%81%D1%8B/Unlimited%20Serie%20|%206%20BCS612KA2.jpg)
Инструкция к пылесосу Bosch Unlimited Serie | 6 BCS612KA2
/%D0%98%D0%BD%D0%B4%D1%83%D0%BA%D1%86%D0%B8%D0%BE%D0%BD%D0%BD%D1%8B%D0%B5%20%D0%B2%D0%B0%D1%80%D0%BE%D1%87%D0%BD%D1%8B%D0%B5%20%D0%BF%D0%B0%D0%BD%D0%B5%D0%BB%D0%B8/PUE612FF1J.jpeg)
Инструкция к индукционной варочной панели Bosch (Бош) PUE612FF1J
/%D0%9F%D1%8B%D0%BB%D0%B5%D1%81%D0%BE%D1%81%D1%8B/GL-40%20Allergy%20BGL42455.jpg)
Инструкция к пылесосу Bosch GL-40 Allergy BGL42455
/%D0%9C%D0%B8%D0%BA%D1%81%D0%B5%D1%80%D1%8B/MFQ3030.jpeg)
Инструкция к миксеру Bosch (Бош) MFQ3030
/%D0%A5%D0%BE%D0%BB%D0%BE%D0%B4%D0%B8%D0%BB%D1%8C%D0%BD%D0%B8%D0%BA%D0%B8/Serie%20|8%20KGN49SB3AR.jpeg)
Инструкция к холодильнику Bosch (Бош) Serie |8 KGN49SB3AR
/%D0%AD%D0%BB%D0%B5%D0%BA%D1%82%D1%80%D0%B8%D1%87%D0%B5%D1%81%D0%BA%D0%B8%D0%B5%20%D0%BF%D0%BB%D0%B8%D1%82%D1%8B/HCA744351R.jpg)
Инструкция к электрической плите Bosch (Бош) HCA744351R
/%D0%92%D1%81%D1%82%D1%80%D0%B0%D0%B8%D0%B2%D0%B0%D0%B5%D0%BC%D1%8B%D0%B5%20%D0%B3%D0%B0%D0%B7%D0%BE%D0%B2%D1%8B%D0%B5%20%D0%B2%D0%B0%D1%80%D0%BE%D1%87%D0%BD%D1%8B%D0%B5%20%D0%BF%D0%B0%D0%BD%D0%B5%D0%BB%D0%B8/PCP6A2B90R.jpeg)
Инструкция к газовой варочной панели Bosch (Бош) PCP6A2B90R
/%D0%A5%D0%BE%D0%BB%D0%BE%D0%B4%D0%B8%D0%BB%D1%8C%D0%BD%D0%B8%D0%BA%D0%B8/Serie%20|%202%20KGN39UC27R.jpg)
Инструкция к холодильнику Bosch (Бош) Serie | 2 KGN39UC27R
Добавить комментарий
Имя *
Email *
Сайт
Комментарий


Сохранить моё имя, email и адрес сайта в этом браузере для последующих моих комментариев.
- Добавить инструкцию
- Заказать инструкцию
- Политика конфиденциальности
manualBosch Serie | 4 WTH83007SN

en Installation and operating instructions
Tumble dryer
WTH83007SN
View the manual for the Bosch Serie | 4 WTH83007SN here, for free. This user manual comes under the category dryers and has been rated by 10 people with an average of a 7.9. This manual is available in the following languages: English. Do you have a question about the Bosch Serie | 4 WTH83007SN? Ask your question here
- Your new tumble dryer
- Display rules
- : Warning!
- Caution!
- Note/tip
- 1. 2. 3. / a) b) c)
- Contentsen Installation and operating instructions
- 7 Environmental protection
- 5 Installation and connection
- Y The main points in brief
- * Getting to know your appliance
- Z Laundry
- / Programmes and buttons
- 1 Operating the appliance
- M Signal setting
- > Noises
- D Cleaning
- 3 Faults and what to do about them
- [ Consumption values
- J Technical data
- J After-sales service
The Bosch Serie | 4 WTH83007SN is a freestanding dryer with a condensation drying system. It has both rotary and touch control types and a drum volume of 112 liters. The device has a built-in LED display and is constructed with a galvalume drum material with honeycomb drum type. The cord length of the dryer is 1.45 meters. It has a CE and VDE certification and a rated capacity of 7 kilograms. The dryer has a drying class of B and a cycle time of 196 minutes.
The Bosch Serie | 4 WTH83007SN dryer provides an ample amount of space with capacity of up to 7 kilograms for drying clothes. It has a modern and user-friendly design with both rotary and touch control types, including an LED display, making it easier to use. The dryer has an energy efficiency rating of B, and its condensation drying system ensures that it is reliable and requires minimal maintenance over time. The dryer’s galvalume drum material is durable and ensures a long-lasting lifespan.
Users can conveniently dry their clothes with the Bosch Serie | 4 WTH83007SN dryer. The device can be programmed for up to 196 minutes cycle time, ensuring clothes come out warm and completely dry. The dryer has a certification by CE and VDE, ensuring it meets the quality standards for safe operation. Overall, this dryer offers a reliable and durable appliance for users who require a high-performance machine for their laundry needs.

General
| Bosch | |
| Serie | 4 WTH83007SN | WTH83007SN | |
| dryer | |
| 4242002856506 | |
| English | |
| User manual (PDF) |
Design
| Appliance placement | Freestanding |
| Loading type | Front-load |
| Drying system | Condensation |
| Product colour | White |
| Control type | Rotary, Touch |
| Drum volume | 112 L |
| Built-in display | Yes |
| Display type | LED |
| Drum material | Galvalume |
| Drum type | Honeycomb |
| Cord length | 1.45 m |
| Certification | CE, VDE |
Performance
| Rated capacity | 7 kg |
| Drying class | B |
| Cycle time | 196 min |
| Noise level | 65 dB |
| Drying programs | Wool, Mix, Sport, Quick, Freshen-up, Delicate/silk, Microfiber, Blouse/shirt, Lingerie, Towel |
Ergonomics
| Delayed start timer | Yes |
| Delay start (max) | 24 h |
| Remaining time indication | Yes |
| Buzzer | Yes |
| Child lock | Yes |
| Adjustable feet | Yes |
| Self-cleaning | Yes |
Power
| Energy efficiency class | A+ |
| AC input voltage | 220-240 V |
| AC input frequency | 50 Hz |
| Current rating | 10 A |
| Annual energy consumption | 233 kWh |
| Heat source | Electric |
| Energy consumption | 1.09 kWh |
Weight & dimensions
| Width | 598 mm |
| Depth | 599 mm |
| Height | 842 mm |
| Weight | 55000 g |
show more
Can’t find the answer to your question in the manual? You may find the answer to your question in the FAQs about the Bosch Serie | 4 WTH83007SN below.
What is a condenser dryer?
A condenser dryer is a dryer in which condensation ends up in a reservoir.
What is a drain dryer?
A drain dryer is a dryer in which the warm air and condensation are drained through a hose.
What is the best thing to do about a smelly dryer?
It is best to wipe the dryer drum with a damp cloth and some lemon cleaner.
There is a burning smell from my dryer, now what?
Check the following: — That the fluff filter is clean. — That the bottom of the dryer is free of dust. — That the drain hose is clean. If the above does not help, a mechanic should be called in.
What is the weight of the Bosch Serie | 4 WTH83007SN?
The Bosch Serie | 4 WTH83007SN has a weight of 55000 g.
What certifications does the Bosch Serie | 4 WTH83007SN have?
The Bosch Serie | 4 WTH83007SN has the following certifications: CE, VDE.
What is the height of the Bosch Serie | 4 WTH83007SN?
The Bosch Serie | 4 WTH83007SN has a height of 842 mm.
What is the width of the Bosch Serie | 4 WTH83007SN?
The Bosch Serie | 4 WTH83007SN has a width of 598 mm.
What is the depth of the Bosch Serie | 4 WTH83007SN?
The Bosch Serie | 4 WTH83007SN has a depth of 599 mm.
What energy label does the Bosch Serie | 4 WTH83007SN have?
The Bosch Serie | 4 WTH83007SN has energy label A+.
Is the manual of the Bosch Serie | 4 WTH83007SN available in English?
Yes, the manual of the Bosch Serie | 4 WTH83007SN is available in English .
Is your question not listed? Ask your question here
Установка и подключение ru
15
5
Установка и
подключение
Установка и подключение
Объём поставки
■
Сушильная машина
■
Инструкция по установке и
эксплуатации
■
Корзина для шерстяных изделий
*
■
Слив для конденсата*
Установка и подключение
сушильной машины
:
Предупреждение
Опасно для жизни!
Так как сушильная машина работает от
электросети, существует опасность
поражения электрическим током.
■
Проверьте сушильную машину на
отсутствие видимых повреждений.
Никогда не эксплуатируйте
сушильную машину при наличии
повреждений.
■
Перед подключением сушильной
машины к электросети убедитесь,
что напряжение, указанное на
табличке данных, соответствует
напряжению в розетке.
■
Используйте только автоматические
выключатели с функцией защиты при
утечке на землю, обозначенные
следующим символом: z.
■
Не допускайте перегибания или
защемления сетевого кабеля, а
также его соприкосновения с
источниками тепла или острыми
краями.
:
Предупреждение
Дети могут оказаться запертыми
внутри сушильной машины и
подвергнуть свою жизнь опасности!
Не устанавливайте сушильную машину
за распашной или раздвижной дверью,
так как это может мешать или
препятствовать открыванию дверцы
машины.
Внимание!
Опасность травмирования!
■
Поднятие сушильной машины
сопряжено с риском получения
травмы из-за её большой массы. Не
поднимайте сушильную машину
самостоятельно.
■
Вы можете порезать руки об острые
края деталей сушильной машины. Не
беритесь за острые края деталей
сушильной машины.
■
При поднятии или перемещении
выступающие части сушильной
машины могут отломиться. Не
беритесь за выступающие части
сушильной машины при
перемещении.
Внимание!
Риск повреждения сушильной
машины или белья.
■
Проверьте сушильную машину на
наличие повреждений, полученных
при транспортировке. Никогда не
эксплуатируйте сушильную машину
при наличии повреждений.
■
Вода, оставшаяся в сушильной
машине, может замерзнуть и вызвать
её повреждение. Не устанавливайте
сушильную машину в помещениях,
где существует опасность
замерзания.
* В зависимости от модели
Разбейте
оплату
на части
без переплат
График платежей
-
Добавляйте товары
в корзину -
Оплачивайте сегодня только
25% картой любого банка -
Получайте товар
выбранный способом -
Оставшиеся 75% будут
списываться
с вашей карты
по 25% каждые 2
недели
- Что такое оплата Частями?
-
Это короткая мгновенная беспроцентная
рассрочка. Вы оплачиваете сразу только 25%,
а оставшиеся 75% вы оплачиваете в течение 6
недель, по 25% каждые 2 недели. - Есть ли переплата?
-
Нет. Вы ничего не переплачиваете. Нет
никаких скрытых комиссий. - Мне нужно иметь карту «Халва»?
-
Нет. Частями доступно для клиентов всех
банков. - При чём здесь Халва и Совкомбанк?
-
Мы в Халве (а Халва это карта Совкомбанка)
являемся экспертами в рассрочке. Поэтому
мы решили разработать сервис с короткой
рассрочкой, который будет доступен всем
клиентам с картами любых банков. - Это кредит?
-
Нет, это не кредит. Кредитный договор не
оформляется. -
Как будут списывать деньги за оставшиеся
части? -
Всё работает также как в сервисах подписки,
например, Яндекс.Музыка или ivi. Вы делаете
первый платёж, а дальше с вашей карты
списываются средства один раз
в 2 недели.