

|
S E R V I C E |
Whirlpool Europe |
|
Customer Services |
AWG 691 WP
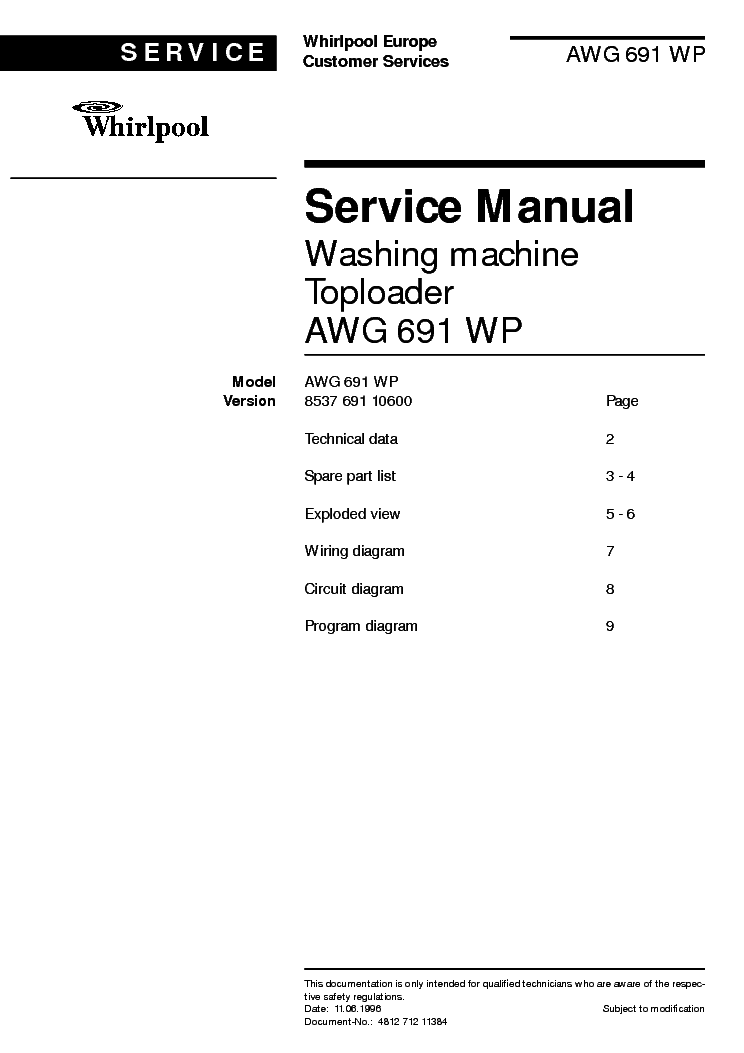
Service Manual
Washing machine
Toploader
AWG 691 WP
|
Model |
AWG 691 WP |
|
|
Version |
8537 691 10600 |
Page |
|
Technical data |
2 |
|
|
Spare part list |
3 — 4 |
|
|
Exploded view |
5 — 6 |
|
|
Wiring diagram |
7 |
|
|
Circuit diagram |
8 |
|
|
Program diagram |
9 |
This documentation is only intended for qualified technicians who are aware of the respec-
|
tive safety regulations. |
|
|
Date: 11.06.1996 |
Subject to modification |
|
Document-No.: 4812 712 11384 |

|
11.06.1996 / Page 2 |
Whirlpool Europe |
S E R V I C E |
|
|
Doc. No: 4812 712 11384 |
Customer Service |
||
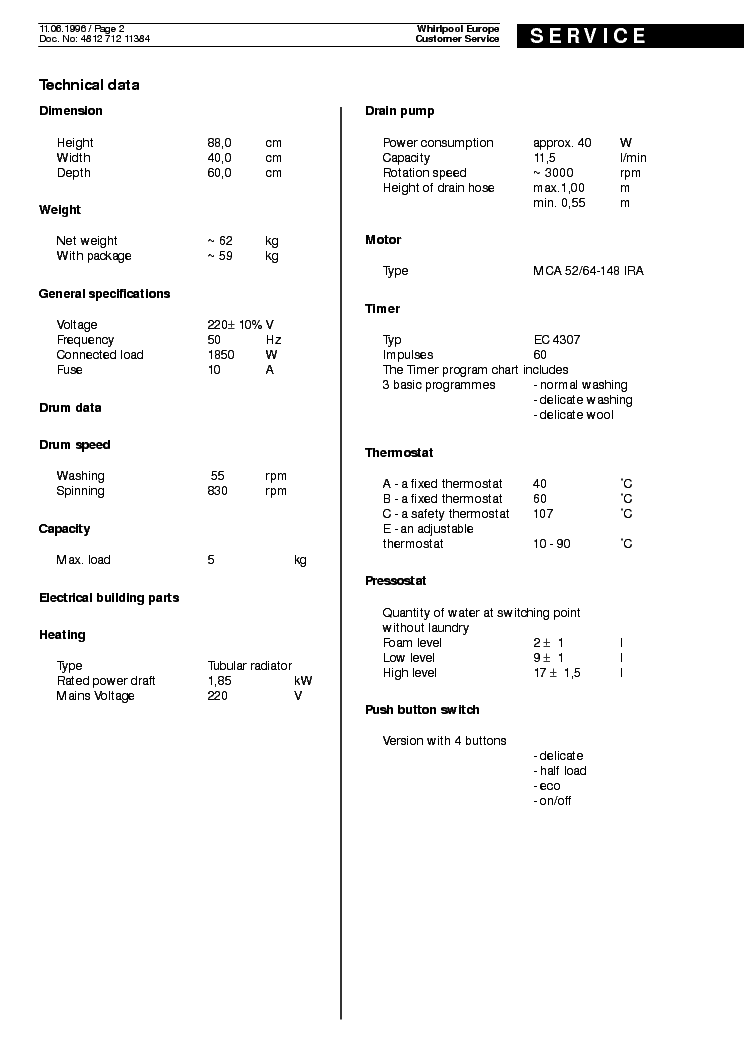
Technical data
|
Dimension |
||
|
Height |
88,0 |
cm |
|
Width |
40,0 |
cm |
|
Depth |
60,0 |
cm |
|
Weight |
||
|
Net weight |
~ 62 |
kg |
|
With package |
~ 59 |
kg |
|
General specifications |
||
|
Voltage |
220± 10% V |
|
|
Frequency |
50 |
Hz |
|
Connected load |
1850 |
W |
|
Fuse |
10 |
A |
|
Drum data |
||
|
Drum speed |
||
|
Washing |
55 |
rpm |
|
Spinning |
830 |
rpm |
|
Capacity |
||
|
Max. load |
5 |
kg |
|
Electrical building parts |
||
|
Heating |
||
|
Type |
Tubular radiator |
|
|
Rated power draft |
1,85 |
kW |
|
Mains Voltage |
220 |
V |
|
Drain pump |
||
|
Power consumption |
approx. 40 |
W |
|
Capacity |
11,5 |
l/min |
|
Rotation speed |
~ 3000 |
rpm |
|
Height of drain hose |
max.1,00 |
m |
|
min. 0,55 |
m |
|
|
Motor |
||
|
Type |
MCA 52/64-148 IRA |
|
|
Timer |
||
|
Typ |
EC 4307 |
|
|
Impulses |
60 |
|
|
The Timer program chart includes |
||
|
3 basic programmes |
— normal washing |
|
|
— delicate washing |
||
|
— delicate wool |
||
|
Thermostat |
||
|
A — a fixed thermostat |
40 |
˚C |
|
B — a fixed thermostat |
60 |
˚C |
|
C — a safety thermostat |
107 |
˚C |
|
E — an adjustable |
||
|
thermostat |
10 — 90 |
˚C |
|
Pressostat |
||
|
Quantity of water at switching point |
||
|
without laundry |
2 ± 1 |
|
|
Foam level |
l |
|
|
Low level |
9 ± 1 |
l |
|
High level |
17 ± 1,5 |
l |
Push button switch
Version with 4 buttons
— delicate — half load — eco
— on/off
Spare part list
|
Model |
AWG 691 WP |
|||||
|
Service No. |
853769110600 |
|||||
|
Version |
853769110600 |
|||||
|
Pos. No. 12NC Code |
Description |
Pos. No. 12NC Code |
Description |
|||
|
001 0 |
4819 440 19493 |
Cabinet |
554 0 |
4819 282 48082 |
Thermostat adjustable |
|
|
002 0 |
4819 440 18975 |
Door |
567 0 |
4819 282 48071 |
Thermostat 107 degree |
|
|
010 0 |
4819 459 48516 |
Surround,top |
571 0 |
4819 281 28163 |
Valve,magnet |
|
|
012 0 |
4819 310 18304 |
Trolley kit |
582 0 |
4819 271 28922 |
Pressostat |
|
|
012 2 |
4819 528 78044 |
Wheel |
620 0 |
4819 276 38309 |
Switch,pushbut. |
|
|
012 3 |
4819 532 68171 |
Bracket for trolly |
621 0 |
4819 273 28406 |
Potentiometer |
|
|
012 4 |
4819 528 78045 |
Roller rear |
633 0 |
4819 271 38144 |
Switch, door |
|
|
012 5 |
4819 498 68976 |
Handle for trolly |
633 1 |
4819 417 58121 |
Protector door |
|
|
012 6 |
4819 462 79426 |
Support trolley |
701 0 |
4819 530 28897 |
Hose, inlet |
|
|
012 7 |
4819 530 78037 |
Clip trolley |
702 0 |
4819 530 28896 |
Hose |
|
|
013 0 |
4819 462 48277 |
Foot, fix |
712 0 |
4819 440 19509 |
Door,tub |
|
|
022 0 |
4819 440 18976 |
Panel,side |
712 1 |
4819 535 98431 |
Shaft |
|
|
025 0 |
4819 404 78395 |
Holder |
712 2 |
4819 535 38109 |
Clip |
|
|
041 0 |
4819 417 19477 |
Hinge |
717 0 |
4819 323 28009 |
Bowden cable |
|
|
041 5 |
4819 492 48125 |
Spring right |
717 1 |
4819 466 98788 |
Slide |
|
|
041 6 |
4819 492 48124 |
Spring left |
717 5 |
4819 528 38407 |
Cam |
|
|
053 0 |
4819 440 19508 |
Plinth |
753 0 |
4819 530 28811 |
Chamber,air |
|
|
061 0 |
4819 466 89041 |
Counter weight upper |
754 0 |
4819 530 28504 |
Drainhose inner Tub/Pump |
|
|
061 1 |
4819 466 88978 |
Counter weight lower |
755 0 |
4819 530 48443 |
Hose over flow |
|
|
061 2 |
4819 466 88752 |
Fastener |
760 0 |
4819 360 78363 |
Lid pump |
|
|
080 0 |
4819 529 18053 |
Shock absorber |
781 0 |
4819 530 28783 |
Hose,draining |
|
|
100 0 |
4819 440 18992 |
Door |
781 2 |
4819 532 68554 |
Sleeve hose |
|
|
110 0 |
4819 498 69741 |
Handle |
794 5 |
4819 530 58026 |
Gasket Air chamber |
|
|
121 0 |
4819 440 19599 |
Door,inner |
794 6 |
4819 530 58031 |
Gasket |
|
|
130 0 |
4819 535 98518 |
Hook |
794 7 |
4822 480 50121 |
Gasket + filter |
|
|
143 0 |
4819 459 48517 |
Tub |
794 8 |
4819 532 58159 |
Gasket 1/2 |
|
|
200 0 |
4819 418 18275 |
Tub |
901 0 |
4819 401 18283 |
Strap |
|
|
201 0 |
4819 440 19606 |
Cover |
901 1 |
4819 492 68337 |
Strap |
|
|
220 0 |
4819 418 18306 |
Drum |
901 2 |
4819 401 18362 |
Strap SNP 8 |
|
|
223 0 |
4819 418 49713 |
Drum lifter |
901 3 |
4819 401 18563 |
Clamp,hose |
|
|
252 0 |
4819 404 78686 |
Clamp |
901 5 |
4819 535 38038 |
Clip bearing |
|
|
252 1 |
4819 310 38541 |
Gasket Klixon |
902 1 |
4819 401 18579 |
Bracket |
|
|
271 0 |
4819 358 18134 |
Belt |
902 5 |
4819 401 18572 |
Holder hose |
|
|
272 0 |
4819 520 28036 |
Pulley |
902 8 |
4819 404 78396 |
Tube,stabilizer over flow |
|
|
272 1 |
4819 532 28263 |
Ring Cone 10 degres |
903 2 |
4819 404 49431 |
Support overflow |
|
|
292 0 |
4819 532 68244 |
Gasket tub |
903 3 |
4819 492 68338 |
Clip tub |
|
|
301 0 |
4819 453 19646 |
Plate,ornament. |
903 5 |
4819 401 18585 |
Fastener sleeve |
|
|
320 0 |
4819 453 18675 |
Panel,control |
903 7 |
4819 492 68381 |
Clip |
|
|
331 0 |
4819 413 58926 |
Button |
903 9 |
4819 404 49688 |
Support Top |
|
|
332 0 |
4819 410 28539 |
Push button |
910 0 |
4819 502 38231 |
Screw |
|
|
333 0 |
4819 410 28541 |
Push button |
910 1 |
4819 502 18417 |
Screw |
|
|
337 0 |
4819 413 58927 |
Knob |
910 5 |
4819 502 38265 |
Screw VAB 4,5×20 |
|
|
401 0 |
4819 361 58139 |
Motor |
910 9 |
4819 502 38286 |
Screw PLASGOB ST 45 |
|
|
401 1 |
4819 310 38652 |
Brush,carbon |
911 0 |
4819 502 38235 |
Screw TC N 6×1/2 |
|
|
421 0 |
4819 218 38031 |
Interf.filter |
911 2 |
4819 502 18343 |
Screw TF 5×30 |
|
|
430 0 |
4819 360 18203 |
Pump,draining synchronus |
911 3 |
4819 502 38233 |
Screw N1 2×1/2 |
|
|
451 0 |
4819 259 28459 |
Heating element 1850 W |
911 4 |
4819 502 38289 |
Screw |
|
|
451 2 |
4819 404 49558 |
Clamp Heating element |
911 5 |
4819 502 18202 |
Screw CHC 6×25 |
|
|
490 0 |
4819 321 18111 |
Cable,mains |
911 6 |
4819 502 38232 |
Screw TF 4×20 |
|
|
491 0 |
4819 290 68113 |
Connectionblock |
912 0 |
4819 500 18108 |
Screw TH 8×60 |
|
|
501 0 |
4819 282 18611 |
Timer EC 4307 |
912 7 |
4819 502 18209 |
Screw JAPY 8×160 |
|
|
501 1 |
4819 281 68026 |
Coil |
912 8 |
4819 502 18208 |
Screw JAPY 8×110 |
|
|
521 0 |
4819 214 78349 |
Unit electrical A1 D20 |
913 1 |
4819 502 18206 |
Screw TF 4×12 |
|
|
551 4 |
4819 282 48256 |
Thermostat 40 degree |
913 4 |
4819 502 18211 |
Screw earth |
|
|
551 6 |
4819 282 48255 |
Thermostat 60 degree |
914 0 |
4819 532 68363 |
Fastener |
 Loading…
You can only view or download manuals with
Sign Up and get 5 for free
Upload your files to the site. You get 1 for each file you add
Get 1 for every time someone downloads your manual
Buy as many as you need
-
Руководства по ремонту
1

Whirlpool AWG 691 WP сервис-мануал
(9 страниц)
-
Тип:
PDF -
Размер:
271.44 KB
Просмотр
Whirlpool AWG 691 WP (Стиральные и сушильные машины) сервис мануалы в PDF-формате помогут найти неполадки и ошибки, а также осуществить ремонт Whirlpool AWG 691 WP и восстановить работу устройства.
Инструкцию для Whirlpool AWG691 на русском языке, в формате pdf можно скачать с нашего сайта. Наш каталог предоставляем Вам инструкцию производителя фирмы Whirlpool, которая была взята из открытых источников. Ознакомившись с руководством по эксплуатации от Whirlpool, Вы на все 100% и правильно сможете воспользоваться всеми функциями устройства.
Для сохранения инструкции «Стиральная машина Узкая Whirlpool AWG691» на русском языке на вашем компьютере либо телефоне, нажмите кнопку «Скачать инструкцию». Если активна кнопка «Инструкция онлайн», то Вы можете просмотреть документ (manual), в своём браузере онлайн.
Если у Вас нет возможности скачать инструкцию по эксплуатации либо просмотреть её, Вы можете поделиться ссылкой на эту страницу в социальных сетях и при удобном моменте скачать инструкцию. Либо добавьте эту страницу в закладки Вашего браузера, нажав кнопку «Добавить страницу в закладки браузера».
ADJUSTING THE SUB-BASE ALIGNMENT (PLUNGE BASE)
Applications using a template guide require the bit to be centered in the guide. This, in turn, requires the
center hole in the sub-base to be in line with the collet of the motor unit. Your model has an adjustable sub-
base that has been aligned at the factory. The fixed-base router comes with the large hole.
Turn off and unplug the tool before making any adjustments or removing or installing attach-
ments or accessories. Be sure the switch is in the «OFF» position.
ROUTER
TOUPIES
CONTORNEADORES
Some dust created by power sanding, sawing, grinding, drilling, and other construction
activities contains chemicals known to cause cancer, birth defects or other reproductive harm.
Some examples of these chemicals are:
• lead from lead-based paints,
• crystalline silica from bricks and cement and other masonry products, and
• arsenic and chromium from chemically-treated lumber (CCA).
Your risk from these exposures varies, depending on how often you do this type of work. To reduce your
exposure to these chemicals: work in a well ventilated area, and work with approved safety equipment, such
as those dust masks that are specially designed to filter out microscopic particles.
• Avoid prolonged contact with dust from power sanding, sawing, grinding, drilling, and other construction
activities. Wear protective clothing and wash exposed areas with soap and water. Allowing dust to get
into your mouth, eyes, or lay on the skin may promote absorption of harmful chemicals.
Use of this tool can generate and/or disburse dust, which may cause serious and perma-
nent respiratory or other injury. Always use NIOSH/OSHA approved respiratory protection appropriate for the
dust exposure. Direct particles away from face and body.
Wear appropriate hearing protection during use. Under some conditions and duration of
use, noise from this product may contribute to hearing loss. The label on your tool may include the following
symbols.
Do not operate your tool on a current on which the voltage is not within correct limits. Do
not operate tools rated A.C. only on D.C. current. To do so may seriously damage the tool.
Turn off and unplug the tool before making any adjustments or removing or installing
attachments or accessories. Be sure the switch is in the «OFF» position..
®
SAVE THESE INSTRUCTIONS!
Read all instructions. Failure to follow all instructions listed below may result in electric
shock, fi re and/or serious injury. The term “power tool” in all of the warnings listed below refers to your
mains-operated (corded) power tool or battery-operated (cordless) power tool.
To reduce the risk of injury, user must read instruction manual.
GENERAL SAFETY RULES
1)
Work area safety
a)
Keep work area clean and well lit. Cluttered or dark areas invite accidents.
b)
Do not operate power tools in explosive atmospheres, such as in the presence of
fl ammable liquids, gases or dust. Power tools create sparks which may ignite the dust or
fumes.
c)
Keep children and bystanders away while operating a power tool. Distractions can
cause you to lose control.
2) Electrical
safety
a) Grounded tools must be plugged into an outlet properly installed and grounded in
accordance with all codes and ordinances. Never remove the grounding prong or
modify the plug in any way. Do not use any adaptor plugs. Check with a qualifi ed elec-
trician if you are in doubt as to whether the outlet is properly grounded. If the tools should
electrically malfunction or break down, grounding provides a low resistance path to carry
electricity away from the user. Applicable only to Class I (grounded) tools.
b) Double insulated tools are equipped with a polarized plug (one blade is wider than
the other.) This plug will fi t in a polarized outlet only one way. If the plug does not fi t
fully in the outlet, reverse the plug. If it still does not fi t, contact a qualifi ed electri-
cian to install a polarized outlet. Do not change the plug in any way. Double insulation
eliminates the need for the three wire grounded power cord and grounded power supply
system. Applicable only to Class II (double insulated) tools.
c)
Avoid body contact with earthed or grounded surfaces such as pipes, radiators, rang-
es, and refrigerators. There is an increased risk of electric shock if your body is earthed or
grounded.
d)
Do not expose power tools to rain or wet conditions. Water entering a power tool will
increase the risk of electric shock.
e) Do not abuse the cord. Never use the cord for carrying, pulling or unplugging the power
tool. Keep cord away from heat, oil, sharp edges or moving parts. Damaged or entangled
cords increase the risk of electric shock. Use only 3-wire extension cords that have 3-prong
grounding-type plugs and 3-pole receptacles that accept the tool’s plug.
f)
When operating a power tool outdoors, use an extension cord suitable for outdoor
use. If an extension cord is to be used outdoors, it must be marked with the suffi x W-A or
W following the cord type designation. Use of a cord suitable for outdoor use reduces the
risk of electric shock. When using an extension cord, be sure to use one heavy enough to
carry the current your product will draw. An undersized cord will cause a drop in line voltage
resulting in loss of power and overheating. The following table shows the correct size to use
depending on cord length and nameplate ampere rating. If in doubt, use the next heavier
gauge. The smaller the gauge number, the heavier the cord.
Minimum Gauge for Cord Sets
Volts
Total Length of Cord in Feet
120V
0-25
26-50
51-100
101-150
Ampere Rating Gauge of wire in AWG units
From 0 to 6 amps 18
16
16
14
“ 6 to 10 amps 18
16
14
12
“ 10 to 12 amps 16
16
14
12
“ 12 to 16 amps 14
12
Not recommended
3) Personal
safety
a)
Stay alert, watch what you are doing and use common sense when operating a power
tool. Do not use a power tool while you are tired or under the infl uence of drugs, al-
cohol or medication. A moment of inattention while operating power tools may result in
serious personal injury.
b)
Dress properly. Do not wear loose clothing or jewelry. Keep your hair, clothing and
gloves away from moving parts. Loose clothes, jewelry or long hair can be caught in mov-
ing parts.
c)
Avoid accidental starting. Be sure the switch is in the off-position before plugging in.
Carrying power tools with your fi nger on the switch or plugging in power tools that have the
switch on invites accidents.
d)
Remove any adjusting key or wrench before turning the power tool on. A wrench or a
key left attached to a rotating part of the power tool may result in personal injury.
e)
Do not overreach. Keep proper footing and balance at all times. This enables better
control of the power tool in unexpected situations.
f)
Use safety equipment. Always wear eye protection. Safety equipment such as dust mask,
non-skid safety shoes, hard hat, or hearing protection used for appropriate conditions will
reduce personal injuries.
g)
If devices are provided for the connection of dust extraction and collection facilities,
ensure these are connected and properly used. Use of these devices can reduce
dust-related hazards. Accessories that may be suitable for one tool, may become haz-
ardous when used on another tool.
4) Power tool use and care
a)
Use clamps or other practical way to secure and support the workpiece to a stable
platform. Holding the work by hand or against your body is unstable and may lead to loss
of control.
b)
Do not force the power tool. Use the correct power tool for your application. The cor-
rect power tool will do the job better and safer at the rate for which it was designed.
c)
Do not use the power tool if the switch does not turn it on and off. Any power tool that
cannot be controlled with the switch is dangerous and must be repaired.
d)
Disconnect the plug from the power source before making any adjustments, chang-
ing accessories, or storing power tools. Such preventive safety measures reduce the risk
Instruction Manual
Manuel d’Utilisation
Manual de Instrucciones
Copyright © 2006 Porter-Cable
www.porter-cable.com
Instructivo de operacion,
centros de servicio y poliza de garantia.
ADVERTENCIA: Lease este instructivo antes de usarel producto.
A15161-03-10-06-Rev.A
SYMBOLS
The label on your tool may include the following symbols:
V ……….. volts
A ……………….amps
Hz hertz
W
………..watts
min ……. minutes
or a.c. ..alternating current
.. direct current
no………………no load speed
……. class II tool
………..protective earth
./min ….. revolutions per minute
MODELS 690LR, 691, & 690LRVS AND 6931 PLUNGE BASE
Use router bits with a diameter larger than 2-1/2″ ONLY when the speed control is set
between 10,000 and 13,000 RPM. The maximum diameter bit is 3-1/2″.
Disconnect tool from power source when preparing the router for use, making adjustments,
and when router is not in use.
Avoid possible damage to the collet. Never tighten the collet without a bit.
INSTALLING THE MOTOR
INSTALLING THE BIT (1001 BASE)
To remove the motor unit from the base unit:
(a) Open the clamp (A) Fig. 1.
(b) While holding the base, turn the power unit COUNTER-CLOCKWISE until the lower pin (B) in the
motor housing is disengaged from groove in base.
(c) Lift the power unit free from the base unit.
2.
Clean and insert the shank of the bit into the collet until the shank bottoms, then back it out approxi-
mately 1/16″.
3.
Lay the power unit on its side on a bench with the collet pointing AWAY from you.
4.
Place one wrench on the flats of the chuck with the opposite end of the wrench resting on the bench
to your left (Fig. 2).
5.
Place the other wrench on the collet and tighten COUNTER-CLOCKWISE. Tighten firmly.
6.
To remove the bit, reverse the procedure.
1.
Open the clamp (A) Fig. 3.
2.
Hold the base (E) and turn the power unit (F) Fig. 3 counter-clockwise until the tip of the bit is above the
bottom of the base.
3.
Set the tool on a flat surface.
4.
Turn the power unit (F) Fig. 3 clockwise until the bit touches the work.
5.
Close the clamp (A) Fig. 3.
6.
Rotate the depth adjusting ring (B) Fig. 3 until the zero-line (C) is opposite the index line (D) on the
housing.
7.
Open the clamp (A) Fig. 3.
8.
Tip the router so that the bit is clear of the work surface. Turn the power unit (F) Fig. 3 clockwise until
the index line (D) on the motor housing reaches the desired depth indicated on the ring.
9.
Close the clamp (A) Fig. 3.
NOTE: Setting the index line to 1/4″ on the ring means the cutting edge of the bit is exposed 1/4″ below
the base.
ADDITIONAL SPECIFIC SAFETY RULES
1. HOLD POWER TOOLS BY INSULATED GRIPPING SURFACES when performing an operation
where the cutting tool may contact hidden wiring or its own cord. Contact with a «live» wire will make
exposed metal parts of the tool»live» and shock the operator.
2. USE CLAMPS or other practical way to secure and support the workpiece to a stable platform.
Holding the work by hand or against your body is unstable and may lead to loss of control.
3. DISCONNECT TOOL FROM POWER SOURCE before making adjustments or changing bits.
4. TIGHTEN COLLET NUT securely to prevent the bit from slipping.
5.
USE A CLAMP or some other device to hold the workpiece rigidly in position and clear the path of the tool
of obstructions.
6. PROVIDE CLEARANCE under workpiece for router bit when through-cutting.
7. CHECK TO SEE THAT THE CORD will not “hang up” during routing operation.
8. CLEAR THE ROUTER BIT AREA before starting motor.
9. MAINTAIN FIRM GRIP on router to resist starting torque.
10. KEEP HANDS CLEAR OF BIT when motor is running to prevent personal injury.
11. KEEP CUTTING PRESSURE CONSTANT. Do not overload motor.
12. LET THE MOTOR COME TO A COMPLETE STOP before putting the tool down.
13. NEVER TOUCH router bits after use. They may be extremely hot.
14. NEVER TIGHTEN COLLET NUT without a bit.
15. DO NOT USE ROUTER BITS with a diameter in excess of 2-1/2″ at RPM above 13,000. Router bits
up to 3-1/2″ in diameter can be used when speed control is set for 13,000 RPM or less.
16. ALWAYS KEEP CHIP SHIELD clean and in place.
17. AVOID “CLIMB-CUTTING” (see “Using The Router” section in this manual). “Climb-cutting” increases
the chance for loss of control resulting in possible personal injury.
18. DO NOT HAND-HOLD THE ROUTER IN AN UPSIDE-DOWN OR HORIZONTAL POSITION. The
motor can separate from the base if not properly attached according to the instructions.
1.
Open the clamp (A) Fig. 1 and set the power unit in the base unit.
2.
Align the lower pin of the power unit (B) Fig. 1 with the groove in the base.
3.
Rotate the power unit CLOCKWISE into the base until the upper guide pins are set in the groove of
the base.
4.
Close the clamp.
ADJUSTING THE DEPTH OF CUT
ing accessories, or storing power tools. Such preventive safety measures reduce the risk of starting
the power tool accidentally.
e)
Store idle power tools out of the reach of children and do not allow persons unfamiliar with
the power tool or these instructions to operate the power tool. Power tools are dangerous in
the hands of untrained users.
f)
Maintain power tools. Check for misalignment or binding of moving parts, breakage of
parts and any other condition that may affect the power tools operation. If damaged, have
the power tool repaired before use. Many accidents are caused by poorly maintained power
tools.
g)
Keep cutting tools sharp and clean. Properly maintained cutting tools with sharp cutting edges
are less likely to bind and are easier to control.
h)
Use the power tool, accessories and tool bits etc., in accordance with these instructions
and in the manner intended for the particular type of power tool, taking into account the
working conditions and the work to be performed. Use of the power tool for operations differ-
ent from those intended could result in a hazardous situation.
5) Service
a)
Have your power tool serviced by a qualifi ed repair person using only identical replacement
parts. This will ensure that the safety of the power tool is maintained.
1.
Loosen the sub-base mounting screws (C) Fig. 4 just enough to allow the sub-base (D) to move.
2.
Open the clamp and adjust the power unit so that the collet nut (B) engages the center hole in the
sub-base (D). Allow the sub-base to center itself on the collet nut. Close the clamp.
3.
Tighten the sub-base mounting screws (C) Fig. 4 securely.
Be sure power switch is in “OFF” position and tool is disconnected from power source to
avoid accidental starting of motor which could result in injury.
INSTALLING THE MOTOR (6931 Plunge Base)
1.
Support the motor clamp (Fig. 5) and loosen the motor clamp screw (A) Fig. 5 approximately 1/2″ with
the hex wrench (furnished).
2.
Insert the motor unit into the base with the switch positioned at the front of the left handle. Align the
four pins (A) Fig. 7 (two of which are shown) in the motor case with the slots (B) Fig. 6 in the base.
3.
Seat the motor in the base and tighten the motor clamp screw.

WHIRLPOOL AWG-691-WP

Type:  (PDF)
(PDF)
Size
271.4 KB
Page
9
Category
WASHING-MACHINE
SERVICE MANUAL
If you get stuck in repairing a defective appliance
download
this repair information for help. See below.
Good luck to the repair!
Please do not offer the downloaded file for sell only
use it for personal usage!
Looking for similar whirlpool manual?
Document preview [1st page]
Click on the link for free download!
Document preview [2nd page]
Click on the link for free download!
Please tick the box below to get download link:
- Also known:
WHIRLPOOL AWG-691WP AWG691WP AWG 691 WP AWG-691-WP
- If you have any question about repairing write your question to the Message board. For this no need registration.
- If the site has helped you and you also want to help others, please Upload a manual, circuit diagram or eeprom that is not yet available on the site.
Have a nice Day! - See related repair forum topics below. May be help you to repair.
Warning!
If you are not familiar with electronics, do not attempt to repair!
You could suffer a fatal electrical shock! Instead, contact your nearest service center!
Note! To open downloaded files you need acrobat reader or similar pdf reader program. In addition,
some files are archived,
so you need WinZip or WinRar to open that files. Also some files are djvu so you need djvu viewer to open them.
These free programs can be found on this page: needed progs
If you use opera you have to disable opera turbo function to download file!
If you cannot download this file, try it with CHROME or FIREFOX browser.
Sziasztok. Dott fenti gép, ami az üst 2 oldalára szerelt 2 kerek súllyal van ellátva. Emellett rendelkezik dob ajtó helyzetét érzékelő szenzorral. Bele lehet applikálni valahogy a sima awt üstöt? Mert ebben soft opening-es van (210 latch/soft op.) 
Dob felújító készlet arany árban van nálunk, ha megrendelem vhonnan, az is 6000 ft legalább postával. Az üstük meg csak foglalják a helyet. Köszönöm! Szép napot!
Ui: Kapott egy másik dobot, az üst belsején volt egy kis műanyag horony, ott érhetett hozzá a görbe tengely. Lecsiszoltam, most szuper!!!
Szèp napot Mindenkinek.
3.15 amperes biztosíték felrobbant.
Nem lelek zárlatot, a két fűtésrelé meglehetősen beégett. Ennyi.
Ha a relék szikráztak az tud akkora zavart kelteni az erőben, hogy ez történjen?
A relék a képen nincsenek a lapban, meg a biztosíték, meg az ntc.
Sziasztok!
A segítségeteket szeretném kérni!
A fent nevezett mosógép már hibásan került hozzám.
Elmondás szerint egy áramingadozás után ment tönkre.
A szervizkönyv szerint F08 a fűtőkör szakadt. A vezetékezés rendben, fűtőszál 28 Ohm.
A panel típusa: L2158
A panelon mérve nem ad ki semmi feszt a csatlakozókra, A képen látható HF115F relét nem kapcsolja az elektronika a relé tekercsére nem ad ki 12V-ot.
Ha valaki találkozott már hasonló problémával, merre keresem a hibás alkatrészt.
Köszönöm!
Szevasztok,
pánik helyzet ma reggelt a kis családunkban, a többtízéves házasságunk forog a kockán. Az otthonunk hamupipőkéje leállt és a csatolt képen látható üzenettel ad tudomást hol fáj, csak én nem tudom értelmezni. Miután mosás közben leállt és nem hajlandó tovább, megindítottam a test programot (a programváltó balra az első fokozatra és mindjárt utánna 4xreset) amely végigfutott, erre-arra forgatta a dobot meg minden mást. miután befejezte önmagátol kikapcsolt anélkűl, hogy bármilyen hibát jelzett volna. Visszakapcsoltam a 95 fokos mosásra és megindúlt, Úgy tett mintha mintha minden redben volna. Így is volt amig a kedves nejem el nem kűldte a fotót ahol a gép leállt ugyanazon LED páros és a szerviz LED jelzéssel. Minél előbb cselekednem kell mert nem dijazná az allenfél ha előhoznám az old school mosóteknőt meg a háziszappant.
Ha avaki együtérez velem legyen szíves segítsen, vagy legalább adjon magyarázatot, hogy mit jelent ez a hibakód.
Mielőbbi váalaszra várva
üdv
Similar manuals:
If you want to join us and get
repairing help
please sign in or sign up by completing a simple electrical test
or write your question to the Message board without registration.
You can write in English language into the forum (not only in Hungarian)!
E-Waste Reduce
Как пользоваться стиральной машиной Вирпул
Торговая марка Whirlpool выпускает стиральные машины, как с вертикальной загрузкой, так и с горизонтальной загрузкой. Если брать СМ с вертикальной загрузкой, то они более привычные нашему брату, но сравнительно недавно в магазинах появились стиралки с фронтальной загрузкой и надо сказать, они начали пользоваться довольно большой популярностью. Хотя бренд довольно серьезный и на рынке бытовой техники, он существует уже не один год, даже не одно десятилетие, мало кто знает, что стиральные машины с фронтальной загрузкой, это точная копия Ардо, со всеми вытекающими отсюда последствиями, то есть покупая такую технику вы покупаете стиральную машину Ardo, на которой наклеена бирка Whirlpool. Надеюсь я доступно рассказал, что из себя представляет наш бренд. Теперь можно поговорить про эксплуатацию этой стиральной машины автомат. Ниже я дам очень нужные советы, которые помогут продлить срок работы этой техники на несколько лет
- Лимонная кислота и другие чистящие средства → Вообще для меня загадка, почему эта хрень получила такое большое распространение. Ведь даже школьник знает, что кислоты разъедают алюминий. Если в стиральных машинках с горизонтальной загрузкой, качество крестовины довольно хорошее, то на СМА с вертикальной загрузкой, качество опор барабана вообще никуда не годится. Поймите, в каждой стиральной машине присутствует электролиз, а в совокупности с лимонной кислотой или уксусом, эта хрень становится гремучей смесью для стиралки. Вообще, в стиральном порошке, уже имеются все нужные компоненты для чистки бака и тэна и выдумывать ничего не надо. Если в вашем доме или квартире вода плохая, то вы ничего не сделаете, а чтобы не было запаха из СМ, надо сделать одну простую вещь — прочитать предпоследний пункт
- Отдельная розетка и проводка от счетчика → Это обязательный пункт для выполнения. Если вы почитаете инструкцию по эксплуатации, то узнаете, что стиральная машина потребляет от 2,5 до 3 кВт. В этой технике стоит такой же нагревательный элемент, как и в бойлере, плюс к этому мотор, помпа и другие комплектующие, которые потребляют электроэнергию. В общем идёт довольно серьезная нагрузка, на проводку в вашем домовладении
- Переноска и европереходник → Ни в коем случае не подсоединяйте через эту гадость свою бытовую технику. Выше я написал сколько тока потребляет машинка. Только мощный удлинитель сможет выдержать такую нагрузку, а что касается переходников, то за них речи вообще не может идти
- Скорость отжима → Не должна превышать 800 об/мин, всё что выше, это уже замануха от производителя. Если пользоваться высокими оборотами, то намного быстрее израсходуется ресурс подшипников и сальника. Нормальный отжим начинается с 600 об/мин
- Подложите резиновый коврик → Вроде бы мелочь, но благодаря коврику уменьшится вибрации и стиральная машина будет более устойчивой, то есть не бегать по помещению
- Чтобы не было запаха из стиральной машины → Приоткройте на 3-4 см контейнер для порошка и дверцу люка, благодаря этому произойдёт проветривание, и вони как таковой не будет
- Чтобы из под манжеты люка не текла вода → Надо после каждой стирки протирать стекло люка, благодаря этому вы будете убирать накипь, которая оседает на стекле во время стирки. Если этого не сделать, то через три-четыре года эта накипь будет действовать как наждачка, приводя в негодность уплотнительную резинку люка
Может что-то и забыл упомянуть, но думаю и тех советов, которые я дал выше, вполне хватит чтобы продлить жизнь вашей стиральной машине на несколько лет. Единственное, что ещё могу добавить, это-то что желательно выбирать место установки, там где присутствует как можно меньше влаги, хотя в наших условиях это практически невозможно, всё-таки надо постораться. Ещё желательно сделать заземление, благодаря этому ваша стиралка не будет биться током, кроме того уйдет такой порок, как электролиз. В общем как-то так
Скачать инструкцию по эксплуатации для стиральной машины Вирпул
Ниже можно скачать очень много инструкций по эксплуатации на русском языке для стиральной машины Whirlpool. Вам очень важно понять, что инструкция по эксплуатации предназначена не для того, чтобы лежать где-то и пылиться, она нужна для того чтобы её прочитать от корки и до корки. В моей практике было очень много случаев, когда вроде бы пустяковые поломки, вызывали большое затруднение в их устранения, я имею в виду хозяев этих стиральных машин, которые просто платили мне деньги, практически за то, что я им цитировал из мануала строки, в которых говорилось о том, что надо делать в том или ином случаи. К примеру очень часто в мастерскую приходят с таким вопросом, почему стиральная машина не сливает воду, на вопрос — а вы инструкцию читали, подавляющее большинство людей отвечало что нет. Так вот, для того чтобы вы не попали в подобную ситуацию и не платили лишние деньги за устранение пустяковых поломок, вам надо обязательно прочитать мануал для СМА от начала до конца. Дело в том, что в инструкции написано, не только, как пользоваться стиральной машинкой, а и много чего связанного с ремонтом стиралки, в том числе и коды ошибок, благодаря которым можно найти неисправную деталь. Зная код ошибки сделать ремонт стиральной машины своими руками, будет гораздо легче. Коды ошибок стиральных машин, обычно выводится на панель управления в виде цифр или букв. В том случае, если машинка без дисплея, определить код ошибки можно по миганию индикаторов. Также в инструкции по эксплуатации пишется, как подсоединить стиральную машинку к канализации и водопроводу, как правильно её выставить, какие неисправности можно устранить самому и многое другое. Все инструкции на этой странице закачены на Яндекс диск, скачать с Яндекс диска, какой нибудь файл довольно просто, к тому же если вам не нужна инструкция, то есть вы хотите её просто просмотреть, этот файлообменник предоставит вам эту возможность. Все инструкции по эксплуатации для стиральной машины Whirlpool находится в свободном доступе, то есть скачивать их можно бесплатно и без СМС
- Whirlpool Aquasteam 1200
- Whirlpool AWE 10727
- Whirlpool AWE 6314
- Whirlpool AWE 6314 1
- Whirlpool AWE 6315
- Whirlpool AWE 6316
- Whirlpool AWE 6377
- Whirlpool AWE 6416
- Whirlpool AWE 6514
- Whirlpool AWE 6516
- Whirlpool AWE 7526
- Whirlpool AWE 7527
- Whirlpool AWE 7527 1
- Whirlpool AWE 7726
- Whirlpool AWE 8525
- Whirlpool AWE 8725
- Whirlpool AWE 9630
- Whirlpool AWE 9725
- Whirlpool AWE 10727
- Whirlpool AWE 2214
- Whirlpool AWE 2215
- Whirlpool AWE 2221
- Whirlpool AWE 2316
- Whirlpool AWE 2319
- Whirlpool AWE 2320
- Whirlpool AWE 2550
- Whirlpool AWE 4519
- Whirlpool AWE 6316-1
- Whirlpool AWE 6415
- Whirlpool AWE 6416-1
- Whirlpool AWE 6419
- Whirlpool AWE 6514-1
- Whirlpool AWE 7515
- Whirlpool AWE 7526
- Whirlpool AWE 7619
- Whirlpool AWE 7629
- Whirlpool AWE 7727
- Whirlpool AWE 7730
- Whirlpool AWE 8523
- Whirlpool AWE 8529
- Whirlpool AWE 8629
- Whirlpool AWE 8723
- Whirlpool AWE 8727
- Whirlpool AWE 8730
- Whirlpool AWE 9527
- Whirlpool AWE 9529
- Whirlpool AWE 9723
- Whirlpool AWE 9725
- Whirlpool AWE 9729
- Whirlpool AWE 65149
- Whirlpool AWE 6515
- Whirlpool AWE 6517
- Whirlpool AWE 6519
- Whirlpool AWE 6520
- Whirlpool AWE 6522
- Whirlpool AWE 6619
- Whirlpool AWE 6628
- Whirlpool AWE 6629
- Whirlpool AWE 6725
- Whirlpool AWE 7615-2
- Whirlpool AWE 7729
- Whirlpool AWE 8530
- Whirlpool AWE 8729
- Whirlpool AWE 9629
- Whirlpool AWE 9730
- Whirlpool AWE 99612 ZEN
- Whirlpool AWG 263 1
- Whirlpool AWG 852
- Whirlpool AWG 860
- Whirlpool AWG 870
- Whirlpool AWG 2311
- Whirlpool AWG 2351
- Whirlpool AWG 215
- Whirlpool AWG 216
- Whirlpool AWG 217
- Whirlpool AWG 222
- Whirlpool AWG 223
- Whirlpool AWG 231
- Whirlpool AWG 232
- Whirlpool AWG 235
- Whirlpool AWG 247
- Whirlpool AWG 252
- Whirlpool AWG 253
- Whirlpool AWG 263
- Whirlpool AWG 292
- Whirlpool AWG 294
- Whirlpool AWG 800
- Whirlpool AWG 874
- Whirlpool AWG 875
- Whirlpool AWG 878
- Whirlpool AWG 908 E
- Whirlpool AWG 910 D
- Whirlpool AWG 910 E
- Whirlpool AWM 040
- Whirlpool AWM 6027 1
- Whirlpool AWM 6027 2
- Whirlpool AWM 6081 1
- Whirlpool AWM 6081 2
- Whirlpool AWM 8000
- Whirlpool AWM 8900
- Whirlpool AWM 1000
- Whirlpool AWM 1011
- Whirlpool AWM 5083
- Whirlpool AWM 5085
- Whirlpool AWM 6080
- Whirlpool AWM 6081
- Whirlpool AWM 6082
- Whirlpool AWM 6085
- Whirlpool AWM 6100
- Whirlpool AWM 6102
- Whirlpool AWM 6105
- Whirlpool AWM 6120
- Whirlpool AWM 6125
- Whirlpool AWM 8085
- Whirlpool AWM 8105
- Whirlpool AWM 8125
- Whirlpool AWM 8143
- Whirlpool AWM 8145
- Whirlpool AWM 8500
- Whirlpool AWO 10561
- Whirlpool AWO 10761
- Whirlpool AWO C 6104
- Whirlpool AWO C 6340
- Whirlpool AWO C 7113
- Whirlpool AWO C 7121
- Whirlpool AWO C 7340
- Whirlpool AWO D 040
- Whirlpool AWO-D 041
- Whirlpool AWO-D 043
- Whirlpool AWO-D 062
- Whirlpool AWO-D 3080
- Whirlpool AWO-D 4520
- Whirlpool AWO-D 4605
- Whirlpool AWO-D 5120
- Whirlpool AWO-D 5320 P
- Whirlpool AWO-D 5520 P
- Whirlpool AWO-D 5526
- Whirlpool AWO-D 5720 P
- Whirlpool AWO-D 6012
- Whirlpool AWO-D 6100
- Whirlpool AWO-D 6204 D
- Whirlpool AWO-D 6527
- Whirlpool AWO-D 7010
- Whirlpool AWO-D 7012
- Whirlpool AWO-D 41105
- Whirlpool AWO-D 41109
- Whirlpool AWO-D 41135
- Whirlpool AWO-D 41139
- Whirlpool AWO-D 41140
- Whirlpool AWO-D 42115
- Whirlpool AWO-D 43115
- Whirlpool AWO-D 43125
- Whirlpool AWO-D 43129
- Whirlpool AWO-D 43130
- Whirlpool AWO-D 43135
- Whirlpool AWO-D 43136
- Whirlpool AWO-D 45130
- Whirlpool AWO-D 45135
- Whirlpool AWO-D 45140
- Whirlpool AWO-D 53105
- Whirlpool AWO-D 53110
- Whirlpool AWO-D 53205
- Whirlpool AWO-D 55135
- Whirlpool AWO-D 61000
- Whirlpool AWO-D 431361
- Whirlpool AWO 9161
- Whirlpool AWO 9361
- Whirlpool AWO 9561
- Whirlpool AWO 12363
- Whirlpool AWO DD041
- Whirlpool AWO 10360
- Whirlpool AWOE 7100
- Whirlpool AWOE 7448
- Whirlpool AWOE 7758
- Whirlpool AWOE 8359
- Whirlpool AWOE 8758
- Whirlpool AWOE 8759
- Whirlpool AWOE 8759 B
- Whirpool AWOE 8914
- Whirpool AWOE 9140
- Whirpool AWOE 9348
- Whirpool AWOE 9349
- Whirpool AWOE 9548
- Whirpool AWOE 9759
- Whirpool AWOE 10142
- Whirpool AWOE 10914
- Whirpool AWOE 81400
- Whirpool AWS 51001
- Whirpool AWS 51011
- Whirpool AWS 51012
- Whirpool AWS 61012
- Whirpool AWS 61212
- Whirpool AWS 63013
- Whirpool AWS 63213
- Whirpool AWSX 63213
- Whirpool AWT 2205
- Whirpool AWT 2250
- Whirpool AWT 2256
- Whirpool AWT 2261
- Whirpool AWT 2262
- Whirpool AWT 2274
- Whirpool AWT 2275
- Whirpool AWT 2284
- Whirpool AWT 2285
- Whirpool AWT 5088 4
- Whirpool FL 5054
- Whirpool WTLS 60912 ZEN
- Whirpool WTLS 70712
- Whirlpool AWG 853
- Whirpool FL 5064
- Whirpool FL 5085
- Whirpool FL 5105
- Whirpool WTL 55712
- Whirpool WTLS 60712
- Whirpool WTLS 60812 ZEN
- Whirpool FL 5053
- Whirpool AWZ 410
- Whirpool AWT 7125
- Whirpool AWT 7105
- Whirpool AWT 5108
- Whirpool AWT 5100
- Whirpool AWT 2289
- Whirpool AWT 2290
- Whirpool AWT 2295
- Whirpool AWT 5080
- Whirpool AWT 5085