

&
+15
Запуск машины. Программы
Таблица программ
Т к а н ь и с те п е н ь
з а г р я з н е н и я
П р о г р . Т е м п е —
р а тур а
М о ю щ е е
с р е д с тв о
С м яг-
читель
У д ален ие
п ятен /
Отбели ватель
Д ли те ль —
н о с ть
ц и к л а,
м и н .
О п и с а н и е ц и к л а с ти р к и
п р е д в а р .
с т и р к а
о с н о в .
с т и р к а
О б ы ч н ы е п р о гр а м м ы
О чень сильно загрязненное белое
белье (просты ни, скатерти и т.п.)
1
9 0 °C
1 3 5
П р е д ва р и те л ьн а я с ти р к а , с ти р к а ,
п о л о с к а н и е , п р о м е ж у то ч н ы й и
о к о н ч а те л ьн ы й о тж и м
О чень сильно загрязненное белое
белье (просты ни, скатерти и т.п.)
2
9 0 °C
Д еликатн./
О бы чны й
1 2 5
С тирка, полоскание, проме ж уточны й
и окончате льны й отж им
С ильно за грязне н ное бе лое и
устойчивое цве тное бе лье
2
6 0 °C
Д еликатн./
О бы чны й
1 1 0
С тирка, полоскание, проме ж уточны й
и окончате льны й отж им
С ильно за грязне н ное бе лое и
линяю щ е е ц ве тн ое б е лье
2
4 0 °C
Д еликатн./
О бы чны й
1 0 5
С тирка, полоскание, проме ж уточны й
и окончате льны й отж им
С л а б о за гр я зн е н н о е б е л о е и
л и н я ю щ е е ц ве тн о е б е л ье
(п р о с ты н и , с к а те р ти и т.п .)
3
4 0 °C
Д еликатн./
О бы чны й
7 0
С тирка, полоскание, проме ж уточны й
и окончате льны й отж им
С ильно загрязненное устойчивое
цветное белье (детская одежда и пр.)
4
6 0
°C
Д е л и к а тн ы й
7 5
С ти р к а , п о л о с к а н и е , о с та н о вк а с
во д о й и л и д е л и к а тн ы й о тж и м
С ильно загрязненное устойчивое
цветное белье (детская одежда и пр.)
4
4 0 °C
Д е л и к а тн ы й
6 0
С ти р к а , п о л о с к а н и е , о с та н о вк а с
во д о й и л и д е л и к а тн ы й о тж и м
Ш е р с ть
5
4 0 °C
5 0
С ти р к а , п о л о с к а н и е , о с та н о вк а с
во д о й и д е л и к а тн ы й о тж и м
О собо деликатны е ткани и одежда
(занавеси, ш елк, вискоза и пр.)
6
3 0 °C
4 5
С ти р к а , п о л о с к а н и е , о с та н о вк а с
во д о й и л и с л и в
4 п р о гр а м м ы д л я В а с
С ильно за грязне н ное и
устойчивое цве тное бе лье
7
6 0 °C
6 0
С тирка, полоскание, проме ж уточны й
и окончате льны й отж им
С л а б о за гр я зн е н н о е б е л о е и
л и н я ю щ е е ц ве тн о е б е л ье
(со р о ч к и , м а й к и и п р .)
8
4 0 °C
5 0
С тирка, полоскание, проме ж уточны й
и окончате льны й отж им
С л а б о за гр язне нн ое ли няю щ е е
ц ве тн ое бе лье (лю б а я о де ж д а )
9
4 0
°C
4 0
С ти р к а , п о л о с к а н и е , д е л и к а тн ы й
о тж и м
С л а б о за гр язне нн ое ли няю щ е е
ц ве тн ое бе лье (лю б а я о де ж д а )
1 0
3 0 °C
3 0
С ти р к а , п о л о с к а н и е , д е л и к а тн ы й
о тж и м
С п о р т
С порти вна я обувь
(
м а к с . 2 п а р ы .
)
1 1
3 0
°C
5 0
С ти р к а в х о л о д н о й во д е (б е з
м о ю щ е г о с р е д с тва ), с ти р к а ,
п о л о с к а н и е и д е л и к а тн ы й о тж и м
С порти вна я оде ж да (спортивны е
костю мы , ш орты и пр.)
1 2
3 0 °C
6 0
С тирка, полоскание, проме ж уточны й
и окончате льны й отж им
M E M O
П о зво л я е т вве с ти в п а м я ть м а ш и н ы л ю б у ю п р о г р а м м у с ти р к и
Ч а с т н ы е п р о г р а м м ы
П о л о с к а н и е
Д еликатн./
О бы чны й
П о л о с к а н и е и о тж и м
О тж и м
С л и в и о тж и м
С л и в
С л и в
Краткие инструкции: Порядок
запуска программы
1. Включите стиральную машину, нажав кнопку .
2. Загрузите белье и закройте дверцу машины.
3. Установите рукоятку программатора на нужную
программу. На дисплее появится прогнозируемая
продолжительность выбранного цикла. Температу-
ра и скорость отжима задаются автоматически в
соответствии с выбранной программой (как изме-
нить их см. на с. 19).
4. Выберите дополнительные функции (см. стр. 19).
5. Добавьте в распределитель моющее средство,
ополаскиватель, отбеливатель (см. с. 20).
6. Запустите программу, нажав кнопку ПУСК/СБРОС
(Start/Reset).
Для отмены запуска держите нажатой кнопку ПУСК/
СБРОС (Start/Reset) в течение 2-х секунд.
По окончании программы на дисплее появится со-
общение END (Конец). Подождите пока на дисплее
погаснет символ блокировки дверцы. Выключите сти-
ральную машину, нажав кнопку
. Откройте дверцу
машины. Вынув белье, оставьте дверцу машины при-
открытой, чтобы дать испариться оставшейся влаге.
Обязательно перекройте кран подачи воды и отклю-
чите машину из сети.
Примечание
-Рекомендуется, чтобы для программ 7 — 8 загрузка белья не превышала 3,5 кг.
-Для программы 12 рекомендуется, чтобы вес загружаемого белья не превышал 2 кг.
—
«Остановка с водой»: см. дополнительную функцию «Легкая глажка» на с. 7. Данные в таблице, являются справочны-
ми и могут меняться в зависимости от конкретных условий стирки (объем стирки, температура воды в водопроводной
системе, температура в помещении и др.).
Специальная программа
Повседневная стирка 30′ мин (программа 10 для Синтетических тканей) предназначена для быстрой стирки слабо-
загрязненного белья: цикл длится всего 30 минут, что позволяет сэкономить время и электроэнергию. Установив эту
программу (10 при температуре 30°С), Вы можете стирать различные виды тканей вместе (за исключением шерсти и
шелка) при максимальной загрузке белья 3 кг. Мы рекомендуем использовать жидкое моющее средство.
(см. с. 17).
Перейти к контенту
Ищите инструкцию стиральной машины indesit wise 107 x?
Только ради вас мы сохранили инструкцию на русском, и вы можете прочитать их прямо на этой странице или просто скачать себе и распечатать необходимую страницу.
 В комментариях вы можете задать свой вопрос мастеру, или поделиться решением своей проблемы с другими читателями нашего портала!
Подробная инструкция стиральной машины марки indesit поможет вам решить вопросы с техническими характеристиками и блоком управления этой машины, узнаете какое количество белья можно загружать в эту стиральную машину, сколько и куда сыпать порошок для стирки, а также все об установке и подключения, а также как пользоваться модулем управления стиральной машины.
Скачать (PDF, 1.28MB)
Также мы сделали ссылку для вас в документе PDF, по которой вы бесплатно можете себе скачать на компьютер эту инструкцию для фронтальной или вертикальной стиральной машины.
Если вы будете придерживаться рекомендаций из данной статьи по использованию стиральной машины, то непременно увеличите срок её эксплуатации, а также получите удовольствие от стирки и использования этой домашней помощницы!
Видео обзор стиральной машины indesit wise 107 x
https://www.youtube.com/watch?v=43hLxx36qYM
ТОП магазинов стиральных машин и бытовой техники:
- holodilnik.ru – Недорогой магазин бытовой техники.
- techport.ru — выгодный современный интернет магазин бытовой техники
- ru.aliexpress.com— запчасти для стиральных машин

Здравствуйте, я Роман, мастер стиральных машин с опытом более 13 лет! Веду этот сайт, Делюсь опытом и помогаю советом. Если сайт был полезен, ваша лучшая благодарность ваш опыт в комментарии!
Раздел: Бытовая, кухонная техника, электроника и оборудование
Тип: Стиральная Машина
Характеристики, спецификации
Тип:
стиральная машина без сушки
Скорость отжима:
1000 об/мин
Класс энергопотребления:
A
Изменяемая скорость вращения:
1000 об/мин
Программы стирки:
— Time4You
Особенности:
— автобалансировка
Корпус:
из металла и пластика белого цвета
Расход воды:
макс. 52 л. за цикл
Питание от сети:
~ 220 В • 50 Гц
Размеры (Ш*В*Г), вес:
в упаковке 59.5 x 85.0 x 40.0 см
Инструкция к Стиральной Машине Indesit WISE 107 X

Instructions for use
WASHING MACHINE
Contents
GB
Installation, 2-3
GB
CIS
CZ
Unpacking and levelling, 2
Electric and water connections, 2-3
English,1
ÐÓÑÑÊÈÉ,13
Èeský,25
The first wash cycle, 3
Technical details, 3
Washing machine description, 4-5
RO
HU
Control panel, 4
Display, 5
Românã,37
Magyar,4 9
MEMO Programme, 5
Starting and Programmes, 6
Briefly: how to start a programme, 6
Programme table, 6
Personalisations, 7
Setting the spin cycle, 7
WISE 107 X
Setting the Delay Timer, 7
Setting the temperature, 7
Functions, 7
Detergents and laundry, 8
Detergent dispenser, 8
Bleach cycle, 8
Preparing your laundry, 8
Special items, 8
Precautions and advice, 9
General safety, 9
Disposal, 9
Saving energy and respecting the environment, 9
Care and maintenance, 10
Cutting off the water or electricity supply, 10
Cleaning your appliance, 10
Cleaning the detergent dispenser, 10
Caring for your appliance door and drum, 10
Cleaning the pump, 10
Checking the water inlet hose, 10
Troubleshooting, 11
Service, 12
Before calling for Assistance, 12
1
Installation
Keep this instruction manual in a safe place for
Levelling your appliance correctly will provide it with
GB
future reference. Should the appliance be sold,
stability and avoid any vibrations, noise and shifting
transferred or moved, make sure the instruction
during operation. If it is placed on a fitted or loose
manual accompanies the washing machine to inform
carpet, adjust the feet in such a way as to allow
the new owner as to its operation and features.
enough room for ventilation beneath the washing
machine.
Read these instructions carefully: they contain vital
information on installation, use and safety.
Electric and water connections
Unpacking and levelling
Connecting the water inlet hose
Unpacking
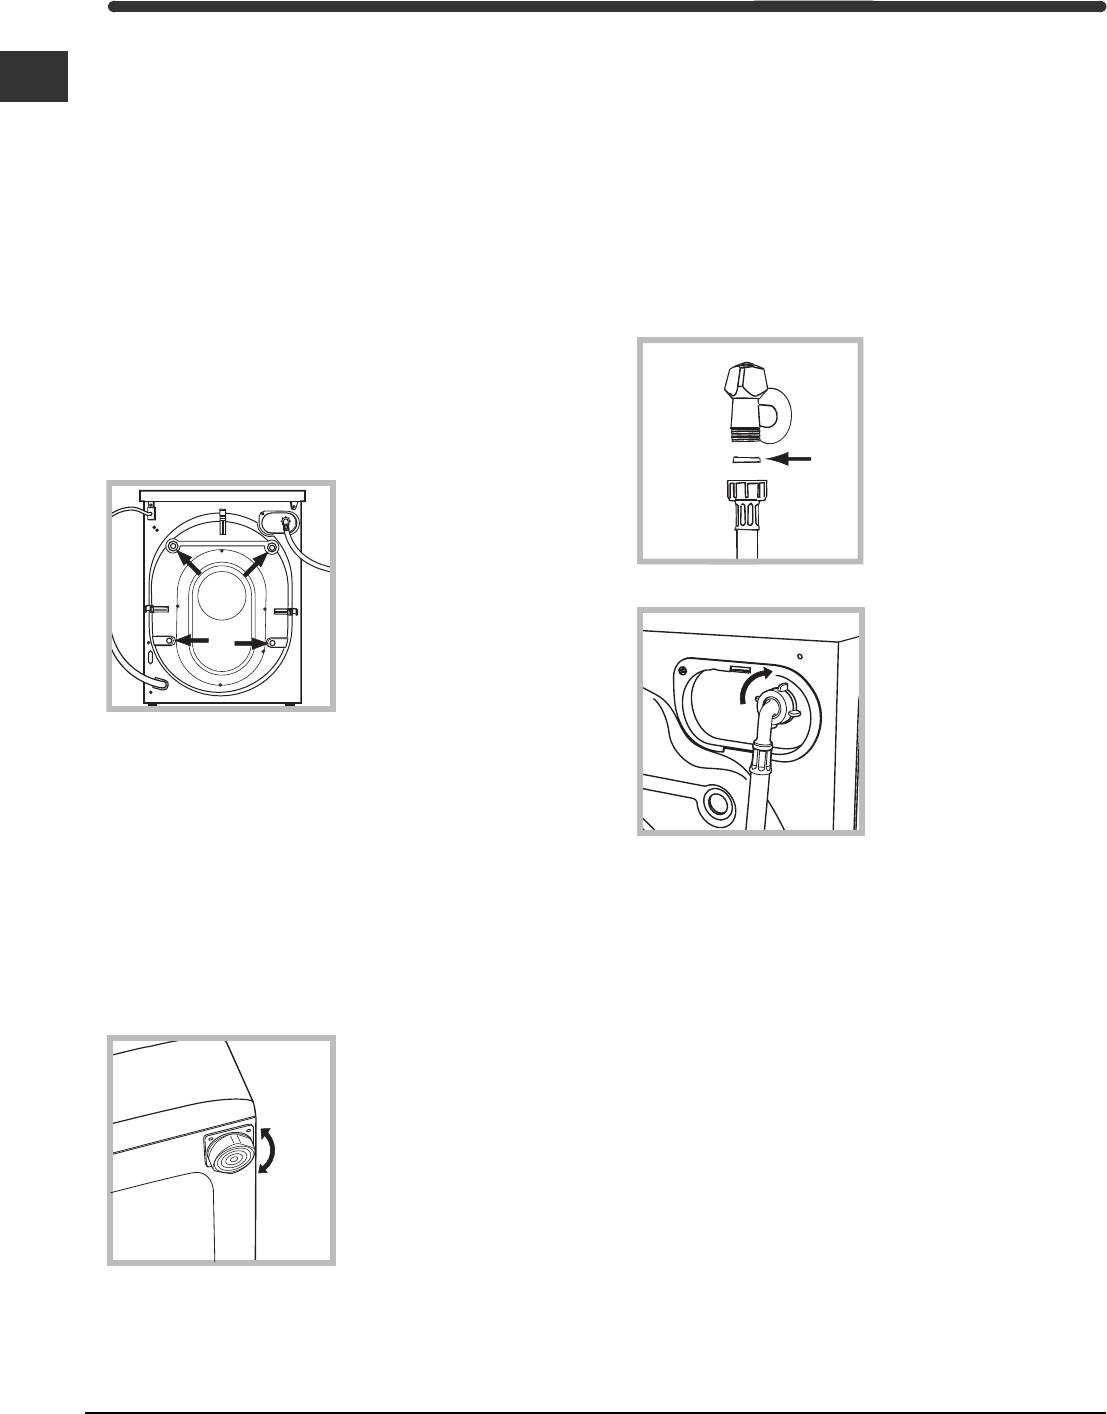
1. Insert seal A into the
1. Unpack the washing machine.
end of the inlet hose
2. Check whether the washing machine has been
and screw the latter
damaged during transport. If this is the case, do not
onto a cold water tap
install it and contact your retailer.
with a 3/4 gas threaded
A
mouth (see figure).
3. Remove the 4
Before making the
protective screws and
connection, allow the
the rubber washer with
water to run freely until
the respective spacer,
it is perfectly clear.
situated on the rear of
the appliance (see
2. Connect the other end
figure).
of the water inlet hose to
the washing machine,
screwing it onto the
appliance’s cold water
inlet, situated on the top
4. Seal the gaps using the plastic plugs provided.
right-hand side on the
5. Keep all the parts: you will need them again if the
rear of the appliance
washing machine needs to be moved to another
(see figure).
location.
Packaging materials are not children’s toys.
3. Make sure there are no kinks or bends in the
hose.
Levelling
The water pressure at the tap must be within the
1. Install the washing machine on a flat sturdy floor,
values indicated in the Technical details table
without resting it up against walls, furniture cabinets
(on the next page).
or other.
2. If the floor is not
If the water inlet hose is not long enough, contact
perfectly level, compen-
a specialist store or an authorised serviceman.
sate for any unevenness
by tightening or
loosening the adjustable
front feet (see figure);
the angle of inclination,
measured according to
the worktop, must not
exceed 2°.
2
Connecting the drain hose
Do not use extensions or multiple sockets.
GB
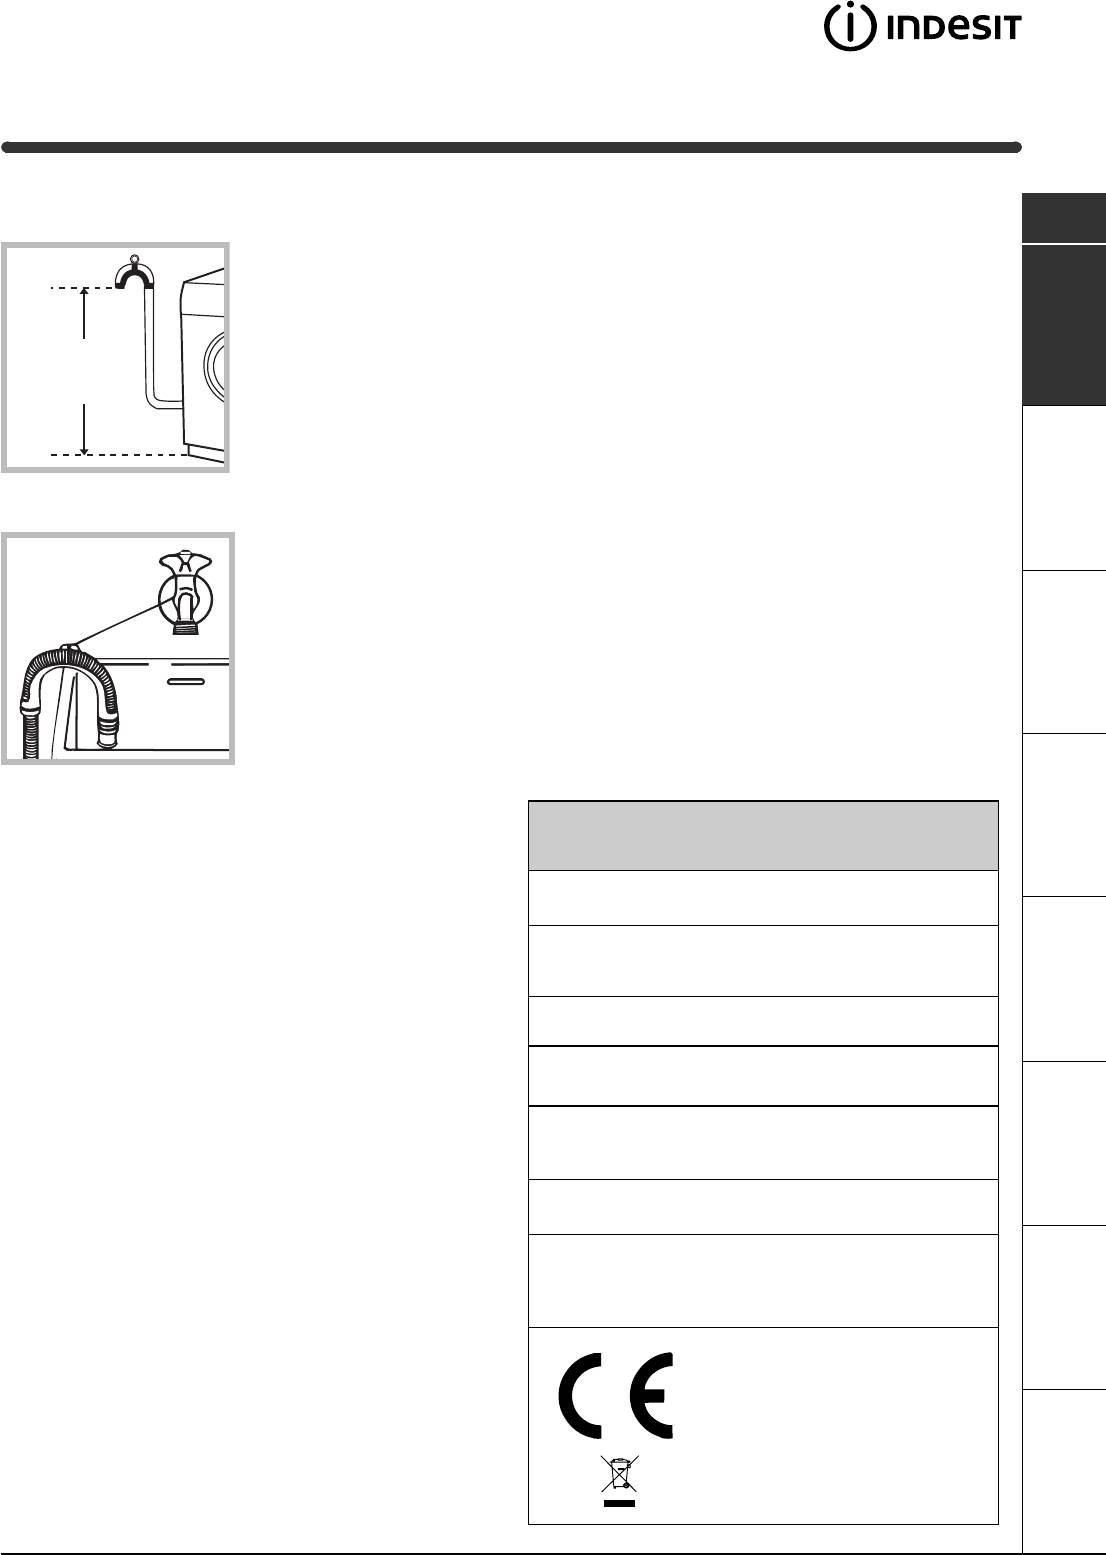
Connect the drain hose,
The power supply cable must never be bent or
without bending it, to a
dangerously compressed.
draining duct or a wall
drain situated between
The power supply cable must only be replaced by
65 and 100 cm from
an authorised serviceman.
65 — 100 cm
the floor;
Warning! The company denies all liability if and when
these norms are not respected.
The first wash cycle
Once the appliance has been installed, and before
alternatively, place it
you use it for the first time, run a wash cycle with
over the edge of a
detergent and no laundry, setting the 90°C
basin, sink or tub,
programme without a pre-wash cycle.
fastening the duct
supplied to the tap (see
figure). The free end of
the hose should not be
underwater.
We advise against the use of hose extensions; in
case of absolute need, the extension must have the
Technical details
same diameter as the original hose and must not
exceed 150 cm in length.
Model
WISE 107 X
Electric connection
59.5 cm wide
Before plugging the appliance into the mains
Dimensions
85 cm high
40 cm deep
socket, make sure that:
the socket is earthed and in compliance with the
Capacity
from 1 to 4,5 kg
applicable law;
Electric
voltage 220/230 Volts 50 Hz
the socket is able to sustain the appliance’s
connections
maximum absorbed power 1850 W
maximum power load indicated in the Technical
maximum pressure 1 MPa (10 bar)
details table (on the right);
Water
minimum pressure 0.05 MPa (0.5 bar)
connections
drum capacity 40 litres
the supply voltage is included within the values i
ndicated on the Technical details table
Spin speed
up to 1000 rpm
(on the right);
Control
programmes
programme 2; temperature 60°C;
the socket is compatible with the washing
according to
run with a load of 4,5 kg.
machine’s plug. If this is not the case, replace
IEC456 directive
the socket or the plug.
This appliance is compliant with the
following European Community
The washing machine should not be installed in an
Directives:
outdoor environment, not even when the area is
— 73/23/CEE of 19/02/73 (Low
sheltered, because it may be very dangerous to
Voltage) and subsequent amendments
ServiceTroubleshootingPrecautions CareProgrammes DetergentsInstallation Description
leave it exposed to rain and thunderstorms.
— 89/336/CEE of 03/05/89
(Electromagnetic Compatibility) and
When the washing machine is installed, the mains
subsequent amendments
— 2002/96/CE
socket must be within easy reach.
3
Оглавление
Аннотации для Стиральной Машиной Indesit WISE 107 X в формате PDF
Топ 10 инструкций
Другие инструкции

Instructions for use
|
WASHING MACHINE |
|||||||||||
|
Contents |
|||||||||||
|
GB |
|||||||||||
|
Installation, 2-3 |
|||||||||||
|
GB |
CIS |
CZ |
|||||||||
|
Unpacking and levelling, 2 |
|||||||||||
|
Electric and water connections, 2-3 |
|||||||||||
|
English,1 |
РУССКИЙ,13 |
Èeský,25 |
|||||||||
|
The first wash cycle, 3 |
|||||||||||
|
Technical details, 3 |
RO HU
Românã,37 Magyar,49
WISE 107 X
Washing machine description, 4-5
Control panel, 4 Display, 5
“MEMO” Programme, 5
Starting and Programmes, 6
Briefly: how to start a programme, 6 Programme table, 6
Personalisations, 7
Setting the spin cycle, 7
Setting the Delay Timer, 7
Setting the temperature, 7
Functions, 7
Detergents and laundry, 8
Detergent dispenser, 8
Bleach cycle, 8
Preparing your laundry, 8
Special items, 8
Precautions and advice, 9
General safety, 9 Disposal, 9
Saving energy and respecting the environment, 9
Care and maintenance, 10
Cutting off the water or electricity supply, 10 Cleaning your appliance, 10
Cleaning the detergent dispenser, 10 Caring for your appliance door and drum, 10 Cleaning the pump, 10
Checking the water inlet hose, 10
Troubleshooting, 11
Service, 12
Before calling for Assistance, 12
1
Installation
Keep this instruction manual in a safe place for GB future reference. Should the appliance be sold,
transferred or moved, make sure the instruction manual accompanies the washing machine to inform the new owner as to its operation and features.
Read these instructions carefully: they contain vital information on installation, use and safety.
Unpacking and levelling
Unpacking
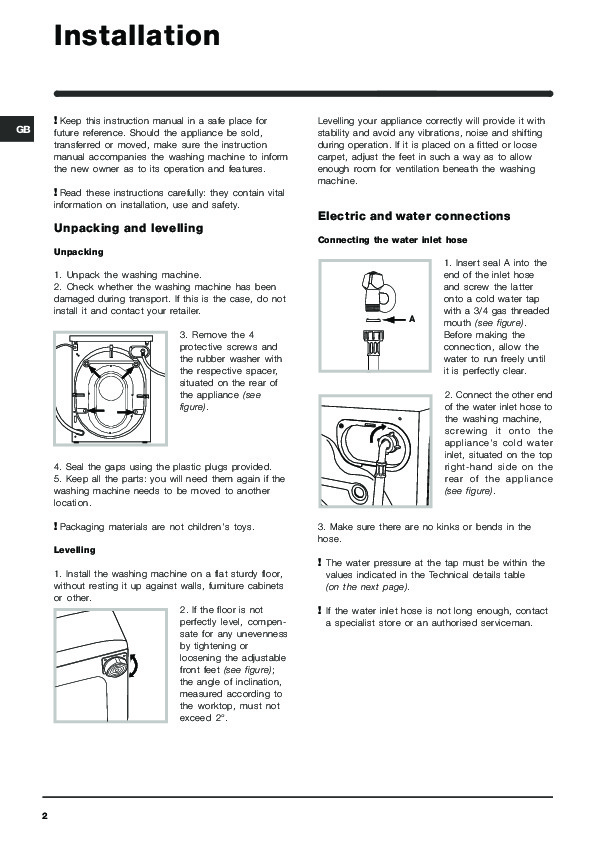
1.Unpack the washing machine.
2.Check whether the washing machine has been damaged during transport. If this is the case, do not install it and contact your retailer.
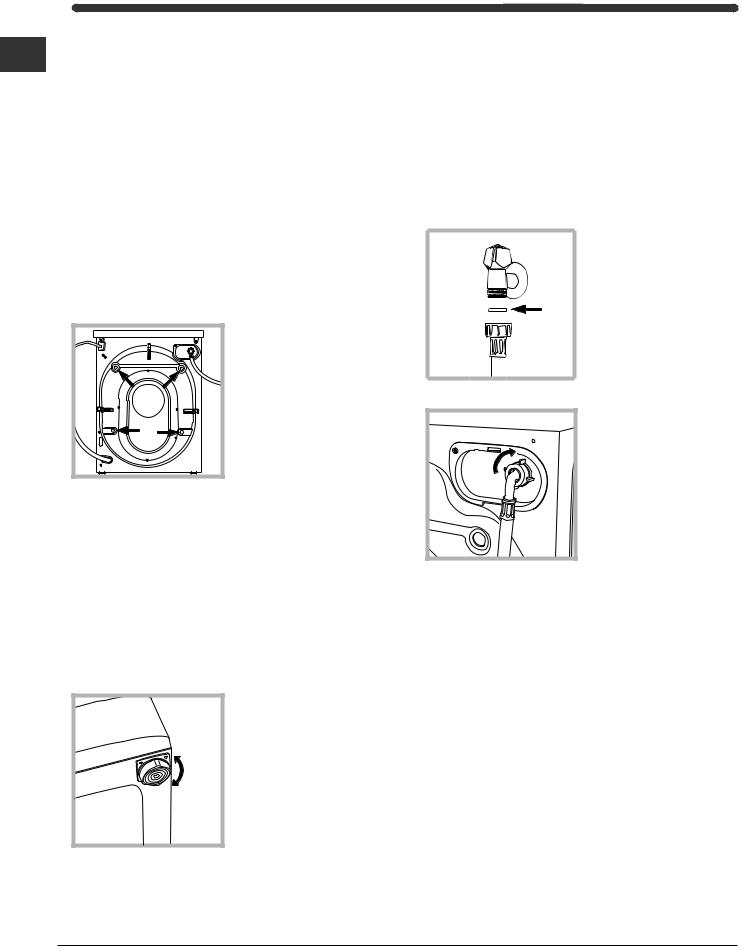
3. Remove the 4 protective screws and the rubber washer with the respective spacer, situated on the rear of the appliance (see figure).
4.Seal the gaps using the plastic plugs provided.
5.Keep all the parts: you will need them again if the washing machine needs to be moved to another location.
Packaging materials are not children’s toys.
Levelling
1. Install the washing machine on a flat sturdy floor, without resting it up against walls, furniture cabinets or other.
2. If the floor is not perfectly level, compensate for any unevenness
by tightening or
loosening the adjustable
front feet (see figure); the angle of inclination, measured according to the worktop, must not exceed 2°.
Levelling your appliance correctly will provide it with stability and avoid any vibrations, noise and shifting during operation. If it is placed on a fitted or loose carpet, adjust the feet in such a way as to allow enough room for ventilation beneath the washing machine.
Electric and water connections
Connecting the water inlet hose
1. Insert seal A into the end of the inlet hose and screw the latter onto a cold water tap with a 3/4 gas threaded
|
A |
mouth (see figure). |
|
Before making the |
|
|
connection, allow the |
|
|
water to run freely until |
|
|
it is perfectly clear. |
|
|
2. Connect the other end |
|
|
of the water inlet hose to |
|
|
the washing machine, |
|
|
screwing it onto the |
|
|
appliance’s cold water |
|
|
inlet, situated on the top |
|
|
right-hand side on the |
|
|
rear of the appliance |
|
|
(see figure). |
3. Make sure there are no kinks or bends in the hose.
The water pressure at the tap must be within the values indicated in the Technical details table
(on the next page).
If the water inlet hose is not long enough, contact a specialist store or an authorised serviceman.
2
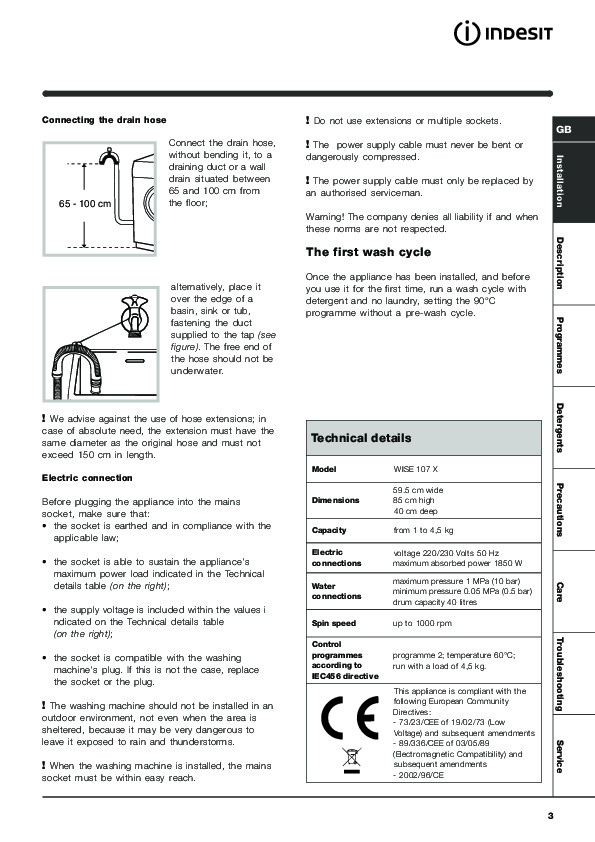
Connecting the drain hose
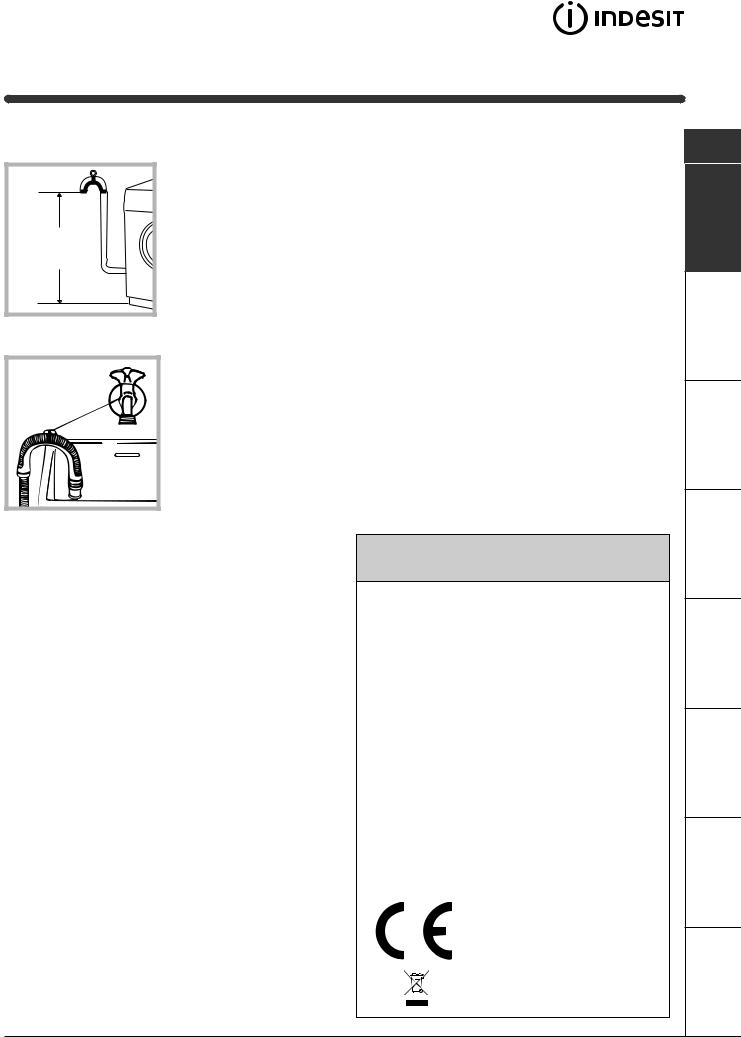
Connect the drain hose, without bending it, to a draining duct or a wall drain situated between 65 and 100 cm from the floor;
alternatively, place it over the edge of a basin, sink or tub, fastening the duct supplied to the tap (see figure). The free end of the hose should not be underwater.
We advise against the use of hose extensions; in case of absolute need, the extension must have the same diameter as the original hose and must not exceed 150 cm in length.
Electric connection
Before plugging the appliance into the mains socket, make sure that:
•the socket is earthed and in compliance with the applicable law;
•the socket is able to sustain the appliance’s maximum power load indicated in the Technical details table (on the right);
•the supply voltage is included within the values i ndicated on the Technical details table
(on the right);
•the socket is compatible with the washing machine’s plug. If this is not the case, replace the socket or the plug.
The washing machine should not be installed in an outdoor environment, not even when the area is sheltered, because it may be very dangerous to leave it exposed to rain and thunderstorms.
When the washing machine is installed, the mains socket must be within easy reach.
Do not use extensions or multiple sockets.
The power supply cable must never be bent or dangerously compressed.
The power supply cable must only be replaced by an authorised serviceman.
Warning! The company denies all liability if and when these norms are not respected.
The first wash cycle
Once the appliance has been installed, and before you use it for the first time, run a wash cycle with detergent and no laundry, setting the 90°C programme without a pre-wash cycle.
Technical details
|
Model |
WISE 107 X |
|
|
59.5 cm wide |
||
|
Dimensions |
85 cm high |
|
|
40 cm deep |
||
|
Capacity |
from 1 to 4,5 kg |
|
|
Electric |
voltage 220/230 Volts 50 Hz |
|
|
connections |
maximum absorbed power 1850 W |
|
|
Water |
maximum pressure 1 MPa (10 bar) |
|
|
minimum pressure 0.05 MPa (0.5 bar) |
||
|
connections |
||
|
drum capacity 40 litres |
||
|
Spin speed |
up to 1000 rpm |
|
|
Control |
||
|
programmes |
programme 2; temperature 60°C; |
|
|
according to |
run with a load of 4,5 kg. |
|
|
IEC456 directive |
||
|
This appliance is compliant with the |
||
|
following European Community |
||
|
Directives: |
||
|
— 73/23/CEE of 19/02/73 (Low |
||
|
Voltage) and subsequent amendments |
||
|
— 89/336/CEE of 03/05/89 |
||
|
(Electromagnetic Compatibility) and |
||
|
subsequent amendments |
||
|
— 2002/96/CE |
GB
Precautions Detergents Programmes Description Installation
Service Troubleshooting Care
3

Washing machine description
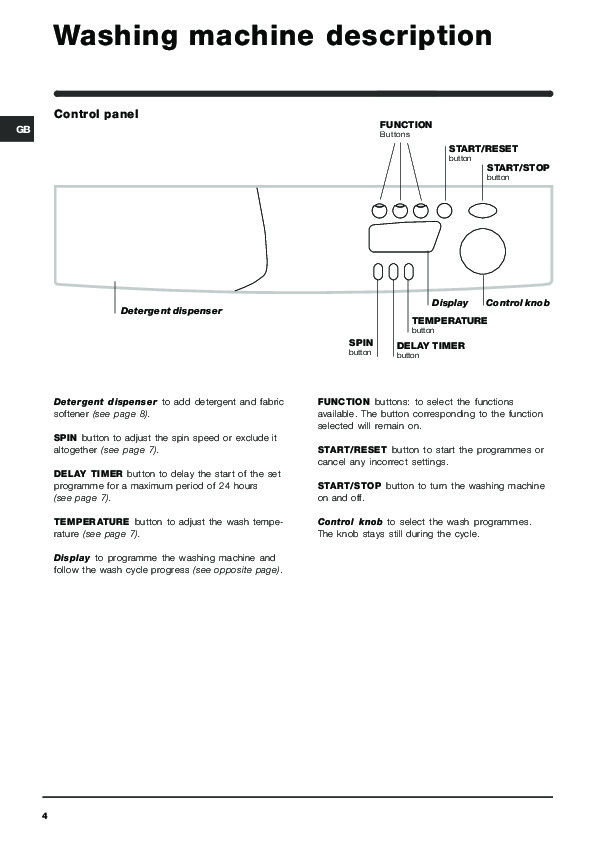
Control panel
START/RESET button
START/STOP button
Display Control knob
Detergent dispenser
|
TEMPERATURE |
||
|
button |
||
|
SPIN |
DELAY TIMER |
|
|
button |
||
|
button |
||
Detergent dispenser to add detergent and fabric softener (see page 8).
SPIN button to adjust the spin speed or exclude it altogether (see page 7).
DELAY TIMER button to delay the start of the set programme for a maximum period of 24 hours
(see page 7).
TEMPERATURE button to adjust the wash temperature (see page 7).
Display to programme the washing machine and follow the wash cycle progress (see opposite page).
FUNCTION buttons: to select the functions available. The button corresponding to the function selected will remain on.
START/RESET button to start the programmes or cancel any incorrect settings.
START/STOP button to turn the washing machine on and off.
Control knob to select the wash programmes. The knob stays still during the cycle.
4

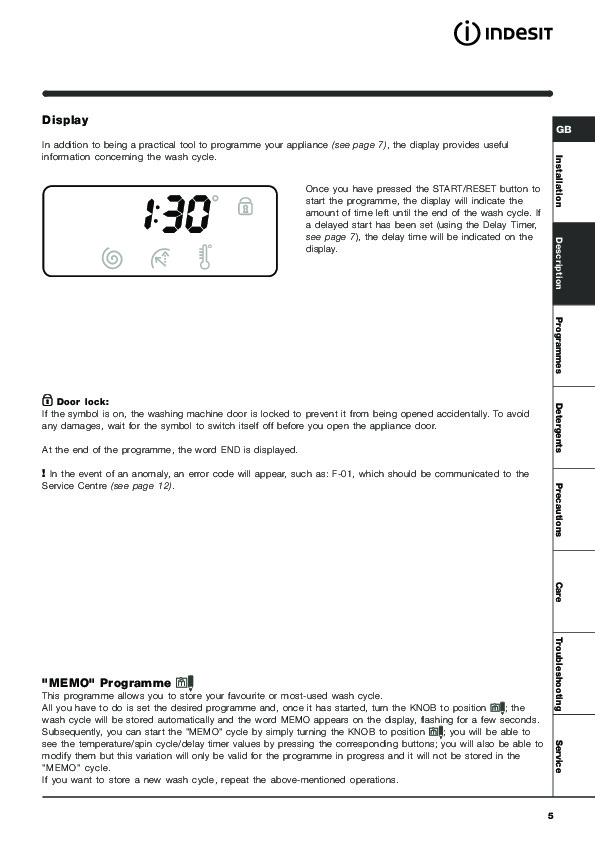
Display
In addition to being a practical tool to programme your appliance (see page 7), the display provides useful information concerning the wash cycle.
Once you have pressed the START/RESET button to start the programme, the display will indicate the amount of time left until the end of the wash cycle. If a delayed start has been set (using the Delay Timer, see page 7), the delay time will be indicated on the display.
 Door lock:
If the symbol is on, the washing machine door is locked to prevent it from being opened accidentally. To avoid any damages, wait for the symbol to switch itself off before you open the appliance door.
At the end of the programme, the word END is displayed.
In the event of an anomaly, an error code will appear, such as: F-01, which should be communicated to the Service Centre (see page 12).
«MEMO» Programme 
This programme allows you to store your favourite or most-used wash cycle.
All you have to do is set the desired programme and, once it has started, turn the KNOB to position  ; the wash cycle will be stored automatically and the word MEMO appears on the display, flashing for a few seconds. Subsequently, you can start the «MEMO» cycle by simply turning the KNOB to position
  ; you will be able to see the temperature/spin cycle/delay timer values by pressing the corresponding buttons; you will also be able to modify them but this variation will only be valid for the programme in progress and it will not be stored in the «MEMO» cycle.
If you want to store a new wash cycle, repeat the above-mentioned operations.
GB
Service Troubleshooting Care Precautions Detergents Programmes Description Installation
5

Starting and Programmes
Briefly: starting a programme
|
GB |
1. Turn the washing machine on by pressing button |
. |
2.Load your laundry into the washing machine and shut the appliance door.
3.Set the knob to the desired programme. The estimated duration of the selected programme is displayed. The temperature and spin speed are automatically set according to the programme (to change them, see page 7).
4.Select any functions (see page 7).
5.Add the detergent and any fabric softener
(see page 8).
6.Start he programme by pressing the START/RESET button.
To cancel it, keep the START/RESET button pressed for at least 2 seconds.
7.When the programme has ended, the word END is displayed. Take out your laundry and leave the appliance door ajar to allow the drum to dry thoroughly.
8.Turn the washing machine off by pressing button  .
.
Programme table
|
Type of fabric and |
Programmes |
Tempe- |
D etergent |
Fabric |
Stain removal |
C ycle |
D escription of wash cycle |
|
|
degree of soil |
rature |
softener |
option/bleach |
length |
||||
|
pre- |
w ash |
(minutes) |
||||||
|
w ash |
||||||||
|
Standard |
||||||||
|
Extremely soiled whites |
1 |
90°C |
• |
• |
• |
135 |
Pre-wash, wash cycle, rinse cycles, |
|
|
(sheets, tablecloths, etc.) |
intermediate and final spin cycles |
|||||||
|
Extremely soiled whites |
2 |
90°C |
• |
• |
Delicate/ |
125 |
Wash cycle, rinse cycles, |
|
|
(sheets, tablecloths, etc.) |
Traditional |
intermediate and final spin cycles |
||||||
|
Heavily soiled whites and fast |
2 |
60°C |
• |
• |
Delicate/ |
110 |
Wash cycle, rinse cycles, |
|
|
colours |
Traditional |
intermediate and final spin cycles |
||||||
|
Heavily soiled whites and |
2 |
40°C |
• |
• |
Delicate/ |
105 |
Wash cycle, rinse cycles, |
|
|
delicate colours |
Traditional |
intermediate and final spin cycles |
||||||
|
Slightly soiled w hites and |
Delicate/ |
Wash cycle, rinse cycles, |
||||||
|
delicate colours (shirts, |
3 |
40°C |
• |
• |
70 |
|||
|
Traditional |
intermediate and final spin cycles |
|||||||
|
jumpers, etc.) |
||||||||
|
Heavily soiled fast colours |
4 |
60°C |
• |
• |
Delicate |
75 |
Wash cycle, rinse cycles, anti- |
|
|
(baby linen, etc.) |
crease or delicate spin cycle |
|||||||
|
Heavily soiled fast colours |
4 |
40°C |
• |
• |
Delicate |
60 |
Wash cycle, rinse cycles, anti- |
|
|
(baby linen, etc.) |
crease or delicate spin cycle |
|||||||
|
W ool |
5 |
40°C |
• |
• |
50 |
Wash cycle, rinse cycles, anti- |
||
|
crease and delicate spin cycle |
||||||||
|
Very delicate fabrics |
6 |
30°C |
• |
• |
45 |
Wash cycle, rinse cycles, anti- |
||
|
(curtains, silk, viscose, etc.) |
crease or draining cycle |
|||||||
|
Tim e 4 you |
||||||||
|
Heavily soiled whites and fast |
7 |
60°C |
• |
• |
60 |
Wash cycle, rinse cycles, |
||
|
colours |
intermediate and final spin cycles |
|||||||
|
Slightly soiled w hites and |
Wash cycle, rinse cycles, |
|||||||
|
delicate colours (shirts, |
8 |
40°C |
• |
• |
50 |
|||
|
intermediate and final spin cycles |
||||||||
|
jumpers, etc.) |
||||||||
|
Delicate colours (all types of |
9 |
40°C |
• |
• |
40 |
Wash cycle, rinse cycles, |
||
|
slightly soiled garments) |
delicate spin cycle |
|||||||
|
Delicate colours (all types of |
10 |
30°C |
• |
• |
30 |
Wash cycle, rinse cycles and |
||
|
slightly soiled garments) |
delicate spin cycle |
|||||||
|
Sport |
||||||||
|
Cold wash (without detergents), |
||||||||
|
Sports shoes (MAX. 2 pairs) |
11 |
30°C |
• |
• |
50 |
wash cycle, rinse cycles, and |
||
|
delicate spin cycle |
||||||||
|
Fabrics for sportswear |
12 |
30°C |
• |
• |
60 |
Wash cycle, rinse cycles, |
||
|
(Tracksuits, shorts, etc.) |
intermediate and final spin cycles |
|||||||
|
M EM O |
Allow s for any w ash cycle to be stored (see page 5). |
|||||||
|
PAR TIAL PR OGR AMM ES |
||||||||
|
Rinse |
• |
Delicate/ |
Rinse cycles and spin cycle |
|||||
|
Traditional |
||||||||
|
Spin |
Draining and spin cycle |
|||||||
|
Drain |
Draining |
|||||||
Notes
-For programmes 7 and 8, we advise against exceeding a wash load of 3.5 kg. -For programme 12 we advise against exceeding a wash load of 2 kg.
-For the anti-crease function: see Easy iron, opposite page. The information contained in the table is purely indicative.
Special programme
Daily (programme 10 for Synthetics) is designed to wash lightly soiled garments in a short amount of time: it only lasts 30 minutes and allows you to save on both time and energy. By setting this programme (10 at 30°C), you can wash different fabrics together (except for woollen and silk items), with a maximum load of 3 kg.
We recommend the use of liquid detergent.
6

Personalisations
Setting the spin cycle
|
FUNCTION buttons |
If, when the appliance is switched on, the KNOB is positioned on |
|||||
|
a programme with a spin cycle, a fixed |
appears. Press button |
|||||
|
and the maximum spin speed allowed for the programme set |
||||||
|
be displayed, and the |
icon flashes. Press it again and the |
|||||
|
will |
||||||
|
values lower until they reach |
OFF, which indicates that the spin |
|||||
|
cycle has been excluded (press it again to go back to the |
||||||
|
maximum value); stop on the desired speed, after approximately |
||||||
|
2 seconds the setting is accepted: the symbol |
remains fixed. |
The spin cycle setting is enabled with all the programmes except for 6 and the Draining cycle.
Setting the Delay Timer
|
Press the button |
and you will see the word OFF on the |
|
display, while the relative symbol flashes. |
Press the button again and «1h» appears, that is, a delay of one hour (this can reach up to 24h); stop on the «desired» delay; after approximately 2 seconds the setting is accepted, following which, the time for the set programme appears on the display and the symbol  remains on.
If you now press the START/RESET button, the set «delay» appears; this decreases every hour until the start of the cycle. In
this phase, the «delay» can only be modified by decreasing it. The Delay Timer regulation is enabled with all programmes.
GB
Programmes Description Installation
Setting the temperature
If, when the appliance is switched on, the KNOB is positioned on a programme for which the temperature needs to be regulated, a fixed  appears. Press button
  and the maximum temperature allowed for the programme set will be displayed and the
  icon flashes. Press it again and the temperature lowers until it reaches OFF, which indicates a cold wash cycle (press it again to go back to the maximum value); stop on the desired value, after approximately 2 seconds the setting is accepted: the symbol
  remains fixed.
The temperature adjustment is enabled with all wash programmes.
Functions
To enable a function:
1.press the button corresponding to the desired function, according to the table below;
2.the function is enabled when the corresponding button is illuminated.
Note: The rapid flashing of the button indicates that the corresponding function cannot be selected for the programme set.
If you set a function that is incompatible with another function you selected previously, only the last one selected will be enabled.
|
Function |
Effect |
Comments |
Enabled with |
||
|
programmes: |
|||||
|
Bleaching cycle |
Please remember to pour the bleach into extra compartment 4 |
2, 3, 4, |
|||
|
designed to |
|||||
|
(see page 8). |
|||||
|
Stain |
remove the |
Rinse cycle. |
|||
|
This function is incompatible with the EASY IRON function. |
|||||
|
removal |
toughest stains. |
||||
|
Increases the |
Recommended when the appliance has a full load or with large |
1, 2, 3, 4, 7, |
|||
|
efficiency of the |
8, 9, 11, 12, |
||||
|
quantities of detergent. |
|||||
|
Extra Rinse |
rinse. |
Rinse cycle. |
|||
|
This option |
When this function is set, programmes 4, 5, 6 will end, with the |
||||
|
reduces the |
laundry left to soak (Anti-crease), and the relative button flashes: |
3, 4, 5, 6, 7, 8, |
|||
|
amount of |
— to conclude the cycle, press the START/RESET button or the |
||||
|
creasing on |
EASY IRON button; |
9, Rinse |
|||
|
fabrics, making |
— to run the draining cycle alone, set the knob to the relative |
cycle. |
|||
|
them easier to |
symbol |
and press the START/RESET button. |
|||
|
Easy iron |
iron. |
This function is incompatible with the STAIN REMOVAL function. |
|||
Precautions Detergents
Service Troubleshooting Care
7
Detergents and laundry
Detergent dispenser
GB
Good washing results also depend on the correct dose of detergent: adding too much detergent won’t necessarily make for a more efficient wash, and may in fact cause build up on the interior of your appliance and even pollute the environment.
Open up the detergent dispenser and pour in the detergent and fabric softener, as follows.
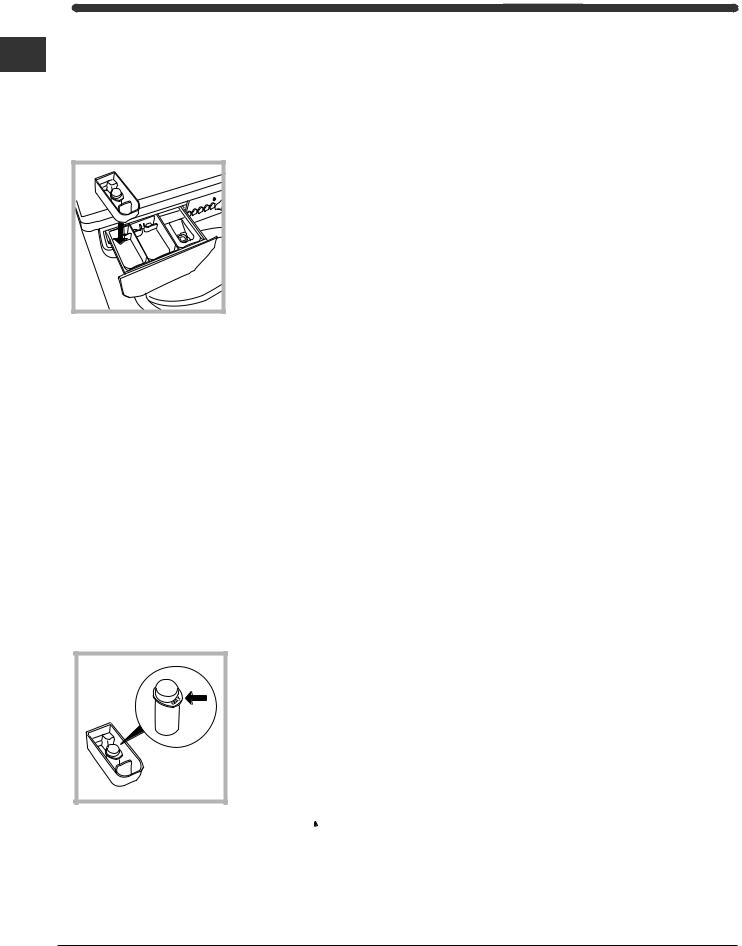
compartment 1: Detergent for pre-wash (powder)
Before pouring in the detergent, make sure that extra compartment 4 has been removed. compartment 2: Detergent for the wash cycle (powder or liquid)
Liquid detergent should only be poured in immediately prior to the wash cycle start. compartment 3: Additives (fabric softeners, etc.)
The fabric softener should not overflow from the grid. extra compartment 4: Bleach
Do not use hand wash detergent because it may form too much foam.
Bleach cycle
Traditional bleach should be used on sturdy white fabrics, and delicate bleach for coloured fabrics, synthetics and for wool.
Place extra compartment 4, provided, into compartment 1. When pouring in the
bleach, be careful not to exceed the «max» level indicated on the central pivot (see figure).
To run the bleach cycle alone, pour the bleach into extra compartment 4, set the Rinse programme  and enable the Stain removal function (see page 7).
To bleach during a wash cycle, pour in the detergent and fabric softener, set the desired programme and enable the Stain removal function (see page 7).
The use of extra compartment 4 excludes the possibility of using the pre-wash cycle.
Preparing your laundry
•Divide your laundry according to:
—the type of fabric/the symbol on the label.
—the colours: separate coloured garments from whites.
•Empty all pockets and check for loose buttons.
•Do not exceed the weight limits stated below, which refer to the weight when dry:
Sturdy fabrics: max 4,5 kg Synthetic fabrics: max 2.5 kg Delicate fabrics: max 2 kg Wool: max 1 kg
How much does your laundry weigh?
1sheet 400-500 g
1pillow case 150-200 g
1tablecloth 400-500 g
1bathrobe 900-1,200 g
1towel 150-250 g
Special items
Curtains: fold curtains and place them in a pillow case or mesh bag. Wash them separately without exceeding half the appliance load. Use programme 6 which excludes the spin cycle automatically.
Quilted coats and windbreakers: if they are padded with goose or duck down, they can be machine-washed. Turn the garments inside out and load a maximum of 2-3 kg, repeating the rinse cycle once or twice and using the delicate spin cycle. Wool: for best results, use a specific detergent, taking care not to exceed a load of 1 kg.
8

Precautions and advice
The washing machine was designed and built in compliance with the applicable international safety regulations. The following information is provided for your safety and should consequently be read carefully.
General safety
•This appliance has been designed for nonprofessional, household use and its functions must not be changed.
•This washing machine should only be used by adults and in accordance with the instructions provided in this manual.
•Never touch the washing machine when barefoot or with wet or damp hands or feet.
•Do not pull on the power supply cable to unplug the appliance from the electricity socket. Pull the plug out yourself.
•Do not open the detergent dispenser while the appliance is in operation.
•Do not touch the drain water as it could reach very high temperatures.
•Never force the washing machine door: this could damage the safety lock mechanism designed to prevent any accidental openings.
•In the event of a malfunction, do not under any circumstances touch internal parts in order to attempt repairs.
•Always keep children well away from the appliance while in operation.
•The appliance door tends to get quite hot during the wash cycle.
•Should it have to be moved, proceed with the help of two or three people and handle it with the utmost care. Never try to do this alone, because the appliance is very heavy.
•Before loading your laundry into the washing machine, make sure the drum is empty.
Disposal
•Disposing of the packaging material:
observe local regulations, so the packaging can be re-used.
•The European Directive 2002/96/EC on Waste Electrical and Electronic Equipment, requires that old household electrical appliances must not be disposed of in the normal unsorted municipal waste stream. Old appliances must be collected separately in order to optimise the recovery and recycling of the materials they contain and reduce the impact on human health and the environment.
The crossed out «wheeled bin» symbol on the product reminds you of your obligation, that when you dispose of the appliance it must be separately collected.
Consumers should contact their local authority or retailer for information concerning the correct disposal of their old appliance.
Saving energy and respecting the environment
Environmentally-friendly technology
If you only see a little water through your appliance door, this is because thanks to the latest Indesit technology, your washing machine only needs less than half the amount of water to get the best results: an objective reached to respect the environment.
Saving on detergent, water, energy and time
•To avoid wasting resources, the washing machine should be used with a full load. A full load instead of two half loads allows you to save up to 50% on energy.
•The pre-wash cycle is only necessary on extremely soiled garments. Avoiding it will save on detergent, time, water and between 5 and 15% energy.
•Treating stains with a stain remover or leaving them to soak before washing will cut down the need to wash them at high temperatures. A programme at 60°C instead of 90°C or one at 40°C instead of 60°C will save up to 50% on energy.
•Use the correct quantity of detergent depending on the water hardness, how soiled the garments are and the amount of laundry you have, to avoid wastage and to protect the environment: despite being biodegradable, detergents do contain ingredients that alter the natural balance of the environment. In addition, avoid using fabric softener as much as possible.
•If you use your washing machine from late in the afternoon until the early hours of the morning, you will help reduce the electricity board’s peak load. The Delay Timer option (see page 7) helps to organise your wash cycles accordingly.
•If your laundry has to be dried in a tumble dryer, select a high spin speed. Having the least water possible in your laundry will save you time and energy in the drying process.
GB
Precautions Detergents Programmes Description Installation
Service Troubleshooting Care
9

Care and maintenance
Cutting off the water or electricity GB supply
•Turn off the water tap after every wash. This will limit the wear of your appliance’s water system and also prevent leaks.
•Unplug your appliance when cleaning it and during all maintenance operations.
Cleaning your appliance
The exterior and rubber parts of your appliance can be cleaned with a soft cloth soaked in lukewarm soapy water. Do not use solvents or abrasives.
Cleaning the detergent dispenser
Remove the dispenser by pulling it out (see figure).
Wash it under running water; this operation should be repeated frequently.
Caring for your appliance door and drum
•Always leave the appliance door ajar to prevent unpleasant odours from forming.
Cleaning the pump
The washing machine is fitted with a self-cleaning pump that does not require any maintenance. Sometimes, small items (such as coins or buttons) may fall into the pre-chamber that protects the pump, situated in the lower part of the same.
Make sure the wash cycle has ended and unplug the appliance.
To access the pre-chamber:
1. using a screwdriver, remove the cover panel on the lower front of the washing machine (see figure);
2. unscrew the lid rotating it anticlockwise (see figure): a little water may trickle out. This is perfectly normal;
3.clean the interior thoroughly;
4.screw the lid back on;
5.reposition the panel, making sure the hooks are securely in place before you push it onto the appliance.
Checking the water inlet hose
Check the water inlet hose at least once a year. If you see any cracks, replace it immediately: during the wash cycles, water pressure is very strong and a cracked hose could easily split open.
Never use hoses that have already been used.
10

Troubleshooting
Your washing machine could fail to work. Before calling for Assistance (see page 12), make sure the problem can’t easily be solved by consulting the following list.
Problem
The washing machine won’t start.
The wash cycle won’t start.
The washing machine fails to load water (The wording H2O is displayed).
The washing machine continuously loads and unloads water.
The washing machine does not drain or spin.
The washing machine vibrates too much during the spin cycle.
The washing machine leaks.
There is too much foam.
Possible causes/Solution:
•The appliance is not plugged into the socket, or not enough to make contact.
•There has been a power failure.
•The appliance door is not shut properly (the word DOOR is
displayed).
• The  button has not been pressed.
•The START/RESET button has not been pressed.
•The water tap is not turned on.
•A delayed start has been set (using the Delay Timer, see page 7).
•The water inlet hose is not connected to the tap.
•The hose is bent.
•The water tap is not turned on.
•There is a water shortage.
•The water pressure is insufficient.
•The START/RESET button has not been pressed.
•The drain hose is not fitted between 65 and 100 cm from the floor
(see page 3).
•The free end of the hose is underwater (see page 3).
•The wall drainage system doesn’t have a breather pipe.
If the problem persists even after these checks, turn off the water tap, switch the appliance off and call for Assistance. If the dwelling is on one of the upper floors of a building, there may be drain trap problems causing the washing machine to load and unload water continuously. In order to avoid such an inconvenience, special anti-drain trap valves are available in shops.
•The programme does not foresee the draining: some programmes require enabling the draining manually (see page 6).
•The Easy iron option is enabled: to complete the programme, press the START/RESET button (see page 7).
•The drain hose is bent (see page 3).
•The drain duct is clogged.
•The drum was not unblocked correctly during installation (see page 2).
•The washing machine is not level (see page 2).
•The washing machine is closed in between furniture cabinets and the wall (see page 2).
•The water inlet hose is not screwed on correctly (see page 2).
•The detergent dispenser is obstructed (to clean it, see page 10).
•The drain hose is not secured properly (see page 3).
•The detergent is not suitable for machine washing (it should bear the definition «for washing machines» or «hand and machine wash», or the like).
•You used too much detergent.
GB
Precautions Detergents Programmes Description Installation
Service Troubleshooting Care
11

Service
Before calling for Assistance:
• Check whether you can solve the problem on your own (see page 11);
•Restart the programme to check whether the problem has been solved;
•If this is not the case, contact an authorised Technical Service Centre on the telephone number provided on the guarantee certificate.
Always request the assistance of authorised servicemen.
Notify the operator of:
•the type of problem;
•the appliance model (Mod.);
•the serial number (S/N).
This information can be found on the data plate situated on the rear of the washing machine.
12

Руководство по экпуатации
|
СТИРАЛЬНАЯ МАШИНА |
|||||
|
Содержание |
|||||
|
CIS |
|||||
|
Установка, 14-15 |
|||||
|
CIS |
Распаковка и выравнивание, 14 |
||||
|
Подключение к водопроводной и электрической |
|||||
|
РУССКИЙ |
ñåòè, 14-15 |
||||
|
Пробный цикл стирки, 15 |
|||||
|
Технические характеристики, 15 |
|||||
|
Описание стиральной машины, 16-17 |
|||||
|
Панель управления, 16 |
|||||
|
Дисплей, 17 |
|||||
|
Программа «МЕМО», 17 |
WISE 107 X
Запуск машины. Программы, 18
Краткие инструкции: Порядок запуска программы, 18
Таблица программ, 18
Персонализация стирки, 19
Установка скорости отжима, 19
Регулировка таймера отсрочки (Delay Timer), 19
Выбор температуры, 19 Функции, 19
Моющие средства и белье, 20
Распределитель моющих средств, 20 Отбеливание, 20 Подготовка белья, 20
Особенности стирки отдельных изделий, 20
Предупреждения и рекомендации, 21
Общие правила безопасности, 21 Утилизация, 21 Экономия и охрана окружающей среды, 21
Обслуживание и уход, 22
Отключение воды и электричества, 22 Уход за стиральной машиной, 22
Уход за распределителем моющих средств, 22 Уход за дверцей машины и барабаном, 22 Чистка насоса, 22 Проверка заливного шланга, 22
Устранение неисправностей, 23
Сервисное обслуживание, 24
!

Установка
Сохраните данное руководство. Оно должно быть +15 в комплекте со стиральной машиной в случае продажи, передачи оборудования или при переезде на новую квартиру, чтобы новый владелец оборудования мог ознакомиться с правилами его функ-
ционирования и обслуживания.
Внимательно прочитайте руководство: в нем содержатся важные сведения по установке и безопасной эксплуатации стиральной машины.
Распаковка и выравнивание
Распаковка
1.Распакуйте стиральную машину.
2.Убедитесь, что оборудование не было повреждено во время транспортировки. При обнаружении повреждений – не подключайте машину – свяжитесь с поставщиком немедленно.
3. Снимите 4 винта, предохраняющие машину в процессе перевозки, и резиновые пробки с с о о т в е т с т в у ю щ и м распорными шайбами, расположенные в задней частистиральноймашины
(ñì. ðèñ.).
4.Закройте отверстия прилагающимися пластиковыми заглушками.
5.Сохраняйте все детали: они Вам понадобятся при последующей транспортировке стиральной машины.
Не разрешайте детям играть с упаковочными материалами.
Выравнивание
1. Установите стиральную машину на ровном и прочном полу, так чтобы она не касалась стен, мебели и про- чих предметов.
2. После установки машины на место отрегулируйте ее устойчивое положение путем вращения передних ножек
(см. рис.). Для этого сначала ослабьте контргайку, после завершения регулировки контргайку затяните.
После установки машины на место проверьте по уровню горизонтальность верхней крышки корпуса, отклонение горизонтали должно быть не более 2°.
Правильное выравнивание оборудования поможет избежать шума, вибраций и смещений во время работы машины.
Если стиральная машина стоит на полу, покрытом ковром, убедитесь, что ее основание возвышается над ковром. В противном случае вентиляция будет затруднена или вовсе невозможна.
Подключение к водопроводной и электрической сети
Подсоединение заливного шланга
|
1. Вставьте прокладку А в |
|
|
конец заливного шланга |
|
|
и наверните его на вы- |
|
|
вод водопровода холод- |
|
|
ной воды с резьбовым от- |
|
|
A |
верстием 3/4 дюйма (см. |
|
ðèñ.). |
|
|
Перед подсоединением |
|
|
откройте водопроводный |
|
|
кран и дайте стечь гряз- |
|
|
íîé âîäå. |
|
|
2. Подсоедините залив- |
|
|
ной шланг к стиральной |
|
|
машине, навинтив его |
|
|
на водоприемник, рас- |
|
|
положенный в задней |
|
|
верхней части справа |
|
|
(ñì. ðèñ.). |
3. Убедитесь, что шланг не перекручен и не пережат.
Давление воды должно быть в пределах значе- ний, указанных в таблице Технических характеристик (см. с. 3).
Если длина водопроводного шланга окажется недостаточной, обратитесь в Авторизованный Сервисный центр.
«

|
Подсоединение сливного шланга |
|||||
|
Повесьте загнутый ко- |
|||||
|
нец сливного шланга на |
|||||
|
край раковины, ванны, |
|||||
|
èëè |
поместите |
â |
|||
|
специальный |
вывод |
||||
|
65 |
— 100 cm |
канализации. Шланг не |
|||
|
должен перегибаться. |
|||||
|
Верхняя точка сливно- |
|||||
|
го шланга должна на- |
|||||
|
ходиться на высоте 65- |
|||||
|
100 см от пола. Распо- |
|||||
|
ложение |
сливного |
||||
|
шланга должно обес- |
|||||
|
печивать разрыв струи |
|||||
|
при сливе (конец шлан- |
|||||
|
ãà íå |
должен |
áûòü |
|||
|
опущен в воду). |
|||||
|
В случае крепления на |
|||||
|
край ванной или рако- |
|||||
|
вины, шланг вешается |
|||||
|
с помощью направля- |
|||||
|
ющей (входит в комп- |
|||||
|
лект поставки), которая |
|||||
|
крепится к крану (рис.). |
Не рекомендуется применение удлинителей для сливного шланга, при необходимости допускается его наращивание шлангом такого же диаметра и длиной не более 150 см.
Подсоединение к электросети
Внимание! Оборудование обязательно должно быть заземлено!
1.Машина подключается к электрической сети при помощи двухполюсной розетки с заземляющим контактом (розетка не поставляется с машиной). Фазный провод должен быть подключен через автомат защиты сети, рассчитанный на максимальный ток (ток срабатывания) 16 А, и имеющий время срабатывания не более 0,1 с.
2.При наличии вблизи от предполагаемого места установки машины розетки с заземляющим контактом, имеющей трехпроводную подводку кабеля с медными жилами сечением не менее 1,5 кв. мм (или алюминиевыми жилами сечением не менее 2,5 кв. мм), доработка электросети не производится. При отсутствии указанной розетки и проводки следует провести их монтаж.
3.Прокладка заземления отдельным проводом не допускается.
4.Для доработки электрической сети рекомендуется применять провод типа ППВ 3х1,5 380 ГОСТ 6223-79. Допускается применение других марок кабеля, обеспечивающих пожаро- и электробезопасность при эксплуатации машины.
Перед включением машины в сеть убедитесь, что:
lрозетка и проводка соответствуют требованиям, изложенным в данном разделе инструкции;
lнапряжение и частота тока сети соответствуют данным машины;
lрозетка и вилка одного типа;
l розетка заземлена в соответствии с нормами безопасности, описанными в данном разделе инструкциидопускается организация заземления рабочим нулем, при условии, что защитная линия не имеет разрыва и подключена напрямую в обвод каких-либо приборов (например, электрического счетчика).
Если вилка не подходит к розетке, ее следует заменить на новую, соответствующую розетке, или заменить питающий кабель. Замена кабеля должна производиться только квалифицированным персоналом.
Запрещается использование переходников, двойных и более розеток и удлинителей (они создают опасность возгорания). Если Вы считаете их использование необходимым, применяйте один единственный удлинитель, удовлетворяющий требованиям безопасности.
Оборудование, подключенное с нарушением требований безопасности бытовых приборов большой мощности, изложенных в данной инструкции, является потенциально опасным.
Производитель не несет ответственности за ущерб здоровью и собственности, если он вызван несоблюдением указанных норм установки.
Первый цикл стирки
По завершении установки, перед началом эксплуатации необходимо произвести один цикл стирки со стиральным порошком, но без белья, по программе 90°C без предварительной стирки.
Технические характеристики
|
Модель |
WISE 107 X |
|
|
ширина 59,5 см |
||
|
Размеры |
высота 85 см |
|
|
глубина 40 см |
||
|
Загрузка |
1 — 4,5 êã |
|
|
Электрические |
напряжение 220/230 В 50 ГЦ |
|
|
параметры |
max мощность 1850 Ватт |
|
|
Гидравлические |
max давление 1 Мпа (10 бар) |
|
|
min давление 0,05 Мпа (0,5 бар) |
||
|
параметры |
||
|
объем барабана 40 л |
||
|
Скорость |
äî 1000 îá/ìèí |
|
|
отжима |
||
|
Kонтрольные |
||
|
программы |
программа 2; температура 60°С; |
|
|
согласно |
||
|
при загрузке до 4,5 кг. |
||
|
нормативу IEC |
||
|
456 |
Машина соответствует следующим Директивам Европейского Экономического сообщества:
—73/223/ ЕЕС от 19.02.73 (низкого напряжения) и последующие модификации
—89/336 /ЕЕС от 03.05.89 (электромагнитной совместимости) и последующие модификации
CIS
Обслуживание Меры Моющие Сервис Неисправности уход и безопасности средства Программы Описание Установка
#

Описание стиральной машины
Панель управления
|
+15 |
Кнопки выбора |
Кнопка ПУСК/СБРОС |
|||
|
ФУНКЦИИ |
|||||
|
(Start/Reset) |
|||||
|
Кнопка ВКЛЮЧЕНИЕ/ |
|||||
|
ВЫКЛЮЧЕНИЕ |
|||||
|
Дисплей |
Программатор |
||||
|
Распределитель |
|||||
|
моющих средств |
Кнопка |
||||
|
ТЕМПЕРАТУРА |
|||||
|
Кнопка ОТЖИМ |
Кнопка Таймер |
||||
|
отсрочки |
|||||
|
Распределитель моющих средств для загруз- |
Кнопки выбора ФУНКЦИИ: служат для выбора |
|
ки стирального порошка и смягчителей (см. с. 20). |
доступных функций. Кнопка выбранной функции |
|
останется включенной. |
|
|
Кнопка ОТЖИМ используется для выбора скорос- |
|
|
ти отжима, а также для его исключения (см. с. 19). |
Кнопка ПУСК/СБРОС используется для запуска |
|
программ или для отмены ошибочного |
|
|
Кнопка Таймер отсрочки (DELAY TIMER) служит |
программирования. |
|
для отсрочки запуска заданной программы на |
|
|
период максимум до 24 ч (см. стр. 19). |
Кнопка ВКЛЮЧЕНИЕ/ВЫКЛЮЧЕНИЕ служит для |
|
включения и выключения стиральной машины. |
|
|
Кнопка ТЕМПЕРАТУРА служит для выбора темпе- |
|
|
ратуры стирки (см. с. 19). |
Программатор служит для выбора программ. |
|
В процессе выполнения программы рукоятка |
|
|
Дисплей служит для программирования стираль- |
остается неподвижной. |
|
ной машины и для контроля за циклами стирки |
|
|
(ñì. ñ. 17). |
$

Дисплей
Дисплей является удобным средством программирования стиральной машины (см. стр. 19), а также источником полезной информации о выполняемом цикле стирки.
При нажатии кнопки ПУСК/СБРОС (Start/Reset) для запуска программы на дисплее показывается приблизительное время, остающееся до завершения цикла. В случае установки отложенного старта программы (Таймер отсрочки, см. с. 19) дисплей будет показывать время, оставшееся до начала стирки.
 Блокировка дверцы:
Горящий символ показывает — дверца заблокирована, чтобы исключить ее случайное открывание. Во избежание повреждений прежде, чем открыть дверцу, подождите пока символ погаснет.
По завершении программы на дисплее появляется сообщение END (Конец).
В случае неисправности на дисплее появляется код ошибки, например: F-01, который необходимо сообщить в Авторизованный Сервисный центр (см. с. 24).
Программа «МЕМО»
Эта программа позволяет ввести в память машины наиболее удобный для вас или часто используемый
цикл стирки.
Все, что Вы должны сделать, это задать желаемую программу и после ее запуска повернуть Программатор в позицию  . Цикл стирки будет сохранен в памяти машины, и на дисплее на несколько секунд появится
мигающая надпись «МЕМО».
В последствии Вы можете запускать цикл «МЕМО», просто повернув Программатор в позицию  . Нажав соответствующие кнопки, Вы можете увидеть значения температуры / скорости отжима / таймера отсрочки, которые можно изменить, но эти изменения будут относиться только к работающей программе и в программе «МЕМО» сохранены не будут.
Если вы хотите ввести в память машины новый цикл стирки, повторите вышеописанные операции.
CIS
Обслуживание Меры Моющие Сервис Неисправности уход и безопасности средства Программы Описание Установка
%

Запуск машины. Программы
Краткие инструкции: Порядок +15 запуска программы
1.Включите стиральную машину, нажав кнопку  .
.
2.Загрузите белье и закройте дверцу машины.
3.Установите рукоятку программатора на нужную программу. На дисплее появится прогнозируемая продолжительность выбранного цикла. Температура и скорость отжима задаются автоматически в соответствии с выбранной программой (как изменить их см. на с. 19).
4.Выберите дополнительные функции (см. стр. 19).
5.Добавьте в распределитель моющее средство, ополаскиватель, отбеливатель (см. с. 20).
6. Запустите программу, нажав кнопку ПУСК/СБРОС (Start/Reset).
Для отмены запуска держите нажатой кнопку ПУСК/ СБРОС (Start/Reset) в течение 2-х секунд.
По окончании программы на дисплее появится сообщение END (Конец). Подождите пока на дисплее погаснет символ блокировки дверцы. Выключите стиральную машину, нажав кнопку  . Откройте дверцу машины. Вынув белье, оставьте дверцу машины приоткрытой, чтобы дать испариться оставшейся влаге. Обязательно перекройте кран подачи воды и отклю- чите машину из сети.
Таблица программ
|
Ì î þ ù å å |
Удаление |
Ä ëè òåëü — |
||||||
|
Ò ê àí ü è ñòå ï åí ü |
Ò å ì ï å — |
ñ ð åä ñòâî |
Ñì ÿã- |
í î ñòü |
||||
|
Ï ð î ãð . |
пятен / |
Î ï è ñàí è å ö è ê ëà ñòè ð ê è |
||||||
|
çàã ð ÿçí åí è ÿ |
ð à òóð à |
ï ð å ä â à ð . |
î ñ í î â . |
читель |
Отбеливатель |
ö è êëà, |
||
|
ñ ò è ð ê à |
ñ ò è ð ê à |
ì è í . |
||||||
|
Î á û ÷ í û å ï ð î ãð à ì ì û |
||||||||
|
О чень сильно загрязненное белое |
Ï ðå ä âà ð è òå ë üí à ÿ ñ òè ð ê à , ñ òè ð ê à , |
|||||||
|
1 |
9 0 °C |
• |
• |
• |
1 3 5 |
ï î ë î ñ ê à íè å , ï ðî ì å æ óòî ÷ í û é è |
||
|
белье (просты ни, скатерти и т.п.) |
||||||||
|
î ê î í ÷ à òå ë üí û é î òæ è ì |
||||||||
|
О чень сильно загрязненное белое |
2 |
9 0 °C |
• |
• |
Д еликатн./ |
1 2 5 |
С тирка, полоскание, промежуточны й |
|
|
белье (просты ни, скатерти и т.п.) |
Î áû ÷íû é |
и окончательны й отжим |
||||||
|
С ильно за грязненное белое и |
2 |
6 0 °C |
• |
• |
Д еликатн./ |
1 1 0 |
С тирка, полоскание, промежуточны й |
|
|
устойчивое цветное белье |
Î áû ÷íû é |
и окончательны й отжим |
||||||
|
С ильно за грязненное белое и |
2 |
4 0 °C |
• |
• |
Д еликатн./ |
1 0 5 |
С тирка, полоскание, промежуточны й |
|
|
линяю щ ее цветное б елье |
Î áû ÷íû é |
и окончательны й отжим |
||||||
|
Ñ ë à á î çà ãðÿ çíå íí î å á å ë î å è |
Д еликатн./ |
С тирка, полоскание, промежуточны й |
||||||
|
ë è íÿ þ ù å å ö âå òíî å á å ë üå |
3 |
4 0 °C |
• |
• |
7 0 |
|||
|
Î áû ÷íû é |
и окончательны й отжим |
|||||||
|
(ïðî ñ òû í è, ñ êà òå ðòè è ò.ï .) |
||||||||
|
С ильно загрязненное устойчивое |
4 |
6 0 °C |
• |
• |
Ä å ë èê à òí û é |
7 5 |
Ñ òèð ê à , ïî ë î ñ ê à í è å , î ñ òà í î âê à ñ |
|
|
цветное белье (детская одежда и пр.) |
âî ä î é è ë è ä å ë è ê à òíû é î òæ èì |
|||||||
|
С ильно загрязненное устойчивое |
4 |
4 0 °C |
• |
• |
Ä å ë èê à òí û é |
6 0 |
Ñ òèð ê à , ïî ë î ñ ê à í è å , î ñ òà í î âê à ñ |
|
|
цветное белье (детская одежда и пр.) |
âî ä î é è ë è ä å ë è ê à òíû é î òæ èì |
|||||||
|
Ø å ð ñ òü |
5 |
4 0 °C |
• |
• |
5 0 |
Ñ òèð ê à , ïî ë î ñ ê à í è å , î ñ òà í î âê à ñ |
||
|
âî ä î é è ä å ë èê à òí û é î òæ è ì |
||||||||
|
О собо деликатны е ткани и одежда |
6 |
3 0 °C |
• |
• |
4 5 |
Ñ òèð ê à , ïî ë î ñ ê à í è å , î ñ òà í î âê à ñ |
||
|
(занавеси, шелк, вискоза и пр.) |
âî ä î é è ë è ñ ë èâ |
|||||||
|
4 ï ð î ãð à ì ì û ä ëÿ Â àñ |
||||||||
|
С ильно за грязненное и |
7 |
6 0 °C |
• |
• |
6 0 |
С тирка, полоскание, промежуточны й |
||
|
устойчивое цветное белье |
и окончательны й отжим |
|||||||
|
Ñ ë à á î çà ãðÿ çíå íí î å á å ë î å è |
С тирка, полоскание, промежуточны й |
|||||||
|
ë è íÿ þ ù å å ö âå òíî å á å ë üå |
8 |
4 0 °C |
• |
• |
5 0 |
|||
|
и окончательны й отжим |
||||||||
|
(ñî ðî ÷ ê è, ì à éê è è ï ð .) |
||||||||
|
С л а б о за грязне нное линяю щ е е |
9 |
4 0 °C |
• |
• |
4 0 |
Ñ òèð ê à , ïî ë î ñ ê à í è å , ä å ë èê à òí û é |
||
|
цветное бе лье (лю б а я о де ж д а ) |
î òæ è ì |
|||||||
|
С л а б о за грязне нное линяю щ е е |
10 |
3 0 °C |
• |
• |
3 0 |
Ñ òèð ê à , ïî ë î ñ ê à í è å , ä å ë èê à òí û é |
||
|
цветное бе лье (лю б а я о де ж д а ) |
î òæ è ì |
|||||||
|
Ñ ï î ð ò |
||||||||
|
С портивна я обувь |
Ñ òèð ê à â õ î ë î ä í î é âî ä å (á å ç |
|||||||
|
11 |
3 0 °C |
• |
• |
5 0 |
ì î þ ù å ã î ñ ð å ä ñ òâà ), ñ òè ðê à , |
|||
|
(ì à ê ñ . 2 ï à ð û .) |
||||||||
|
ï î ë î ñ ê à íè å è ä å ë èê à òí û é î òæ è ì |
||||||||
|
С портивна я одеж да (спортивны е |
12 |
3 0 °C |
• |
• |
6 0 |
С тирка, полоскание, промежуточны й |
||
|
костю мы , ш орты и пр.) |
и окончательны й отжим |
|||||||
|
M E M O |
Ï î çâî ë ÿ å ò ââå ñ òè â ï à ì ÿ òü ì à ø è í û ë þ á óþ ï ðî ã ð à ì ì ó ñ òè ðê è (ñì. ñ. 17). |
|||||||
|
× à ñ òí û å ï ð î ãð à ì ì û |
||||||||
|
Ï î ë î ñ ê à í è å |
• |
Д еликатн./ |
Ï î ë î ñ ê à í è å è î òæ è ì |
|||||
|
Î áû ÷íû é |
||||||||
|
Î òæ èì |
Ñ ë è â è î òæ èì |
|||||||
|
Ñ ë è â |
Ñ ë è â |
|||||||
Примечание
-Рекомендуется, чтобы для программ 7 — 8 загрузка белья не превышала 3,5 кг.
-Для программы 12 рекомендуется, чтобы вес загружаемого белья не превышал 2 кг.
—«Остановка с водой»: см. дополнительную функцию «Легкая глажка» на с. 7. Данные в таблице, являются справочными и могут меняться в зависимости от конкретных условий стирки (объем стирки, температура воды в водопроводной
системе, температура в помещении и др.).
Специальная программа
Повседневная стирка 30′ мин (программа 10 для Синтетических тканей) предназначена для быстрой стирки слабозагрязненного белья: цикл длится всего 30 минут, что позволяет сэкономить время и электроэнергию. Установив эту программу (10 при температуре 30°С), Вы можете стирать различные виды тканей вместе (за исключением шерсти и шелка) при максимальной загрузке белья 3 кг. Мы рекомендуем использовать жидкое моющее средство.
&
 Loading…
You can only view or download manuals with
Sign Up and get 5 for free
Upload your files to the site. You get 1 for each file you add
Get 1 for every time someone downloads your manual
Buy as many as you need
Страницы и текст этой инструкции
 Инструкция стиральной машины Indesit WISE 107 X
 Информация отображена на картинке
 Информация отображена на картинке
 Информация отображена на картинке
 Информация отображена на картинке
Как использовать наш сайт инструкций OnlineManuals.ru
Наша цель состоит в том, чтобы предоставить вам быстрый доступ к содержанию инструкции для стиральной машины Indesit WISE 107 X.
С помощью онлайн просмотра, Вы можете быстро просмотреть содержимое инструкции и найти решение проблемы с стиральной машины Indesit WISE 107 X.
Для Вашего удобства
Если листать руководство пользователя стиральной машины Indesit WISE 107 X прямо на сайте, не очень удобно для Вас, есть два возможных решения:
• Просмотр в полноэкранном режиме — легко просмотреть руководство пользователя (без загрузки его на свой компьютер), Вы можете использовать режим полноэкранного просмотра.
Для просмотра инструкции пользователя стиральной машины Indesit WISE 107 X на полном экране, используйте кнопку «Открыть в Pdf-viewer».
• Загрузка на компьютер — Вы можете также скачать Инструкция стиральной машины Indesit WISE 107 X на свой компьютер и сохранить его в файлах.
Многие люди предпочитают читать документы не на экране, а в печатной версии.
Возможность печати руководства пользователя также была предусмотрена на нашем сайте,
и вы можете использовать ее, нажав на иконку «печать» в Pdf-viewer.
Нет необходимости печатать все руководство стиральной машины Indesit WISE 107 X, можно выбрать только нужные страницы инструкции.
(Ocr-Read Summary of Contents of some pages of the Indesit Wise 107 X Document (Main Content), UPD: 24 June 2023)
-
54, 54 HU Az anyag és a piszok természete Programok Hõmérsé- klet Mosószer Lágyítószer Folteltávolító/ Fehérító opció Ciklusidõ (perc) A mosási ciklus leírása elõmosás mosás Szokásos Erõsen szennyezett fehér ruhák (lepedõ, abrosz, stb.) 1 90°C 135 Elõmosás, mosás, öblítés, középsõ és végsõ centrifugálás Erõsen szennyezett fehér ruhák (lepedõ, abrosz, stb.) 2 90°C Finom / Hagyományos 125 Mosás, öblítés, középsõ és végsõ centrifugálás Erõs…
-
35, 35 CZ Mùe se stát, e praèka nebude fungovat. Pøed telefonickým kontaktováním servisní sluby (viz str. 36), zkontrolujte prostøednictvím následujícího seznamu, zda se nejedná o jednodue odstranitelný problém. Poruchy a zpùsob jejich odstranìní Servisní slubaPoruchyOpatøení ÚdrbaPrací programy Prací prostøedkyInstalace Popis Poruchy: Praèku nelze zapnout. Nedochází kzahájení pracího …
-
32, 32 CZ Dávkovaè pracích prostøedkù Dobrý výsledek praní závisí také na správném dávkování pracích prostøedkù: pouití jejich nadmìrného mnoství sniuje efektivitu praní a napomáhá tvorbì vodního kamene na vnitøních èástech praèky a zneèitìní ivotního prostøedí. Pøi vytahování dávkovaèe pracích prostøedkù a pøi jeho plnìní pracími anebo pøídavnými prostøedky postupujte následovnì: pøihrádka 1: Prac…
-
22, +15 Îáñëóæèâàíèå è óõîä ×èñòêà íàñîñà Ñòèðàëüíàÿ ìàøèíà èìååò ñëèâíîé íàñîñ ñàìî- î÷èùàþùåãîñÿ òèïà, êîòîðûé íå òðåáóåò î÷èñòêè èëè îñîáîãî îáñëóæèâàíèÿ. Îäíàêî ìåëêèå ïðåä- ìåòû (ìîíåòû, ïóãîâèöû è äð.) ìîãóò ñëó÷àéíî ïîïàñòü â íàñîñ. Äëÿ èõ èçâëå�…
-
42, 42 RO Tipul de þesãturã ºi gradul de murdãrie Programe Tempe- raturã Detergent Aditiv înmuiere Opþiune Antipatã / Decolorant Durata progra- mului (minute) Descrierea programului de spãlare presp. spãl. Standard Albe extrem de murdare (cearceafuri, feþe de masã, etc.) 1 90°C 135 Prespãlare, spãlare, clãtiri, stoarceri intermediare ºi finale Albe extrem de murdare (cearceafuri, feþe de masã, etc.) 2 90°C Delicatã / Tradiþionale 125…
-
50, Indesit Wise 107 X 50 HU E kézikönyv megõrzése azért fontos, hogy bármikor elõvehesse, és megnézhesse. Ha a mosógépet eladná, átadná vagy másnál helyezné el, gondoskodjon arról, hogy e használati utasítás a géppel együtt maradjon, hogy az új tulajdonos is megismerhesse a mosógép funkcióit és az ezekre vonatkozó figyelmeztetéseket. Figyelmesen olvassa el az utasításokat: fontos információkat tartalmaznak az üzembehelyezésrõl, a használatról és a biztonságról. Kicsomagolás és vízszintbe állít…
-
16, $ +15 Ïàíåëü óïðàâëåíèÿ Îïèñàíèå ñòèðàëüíîé ìàøèíû Ðàñïðåäåëèòåëü ìîþùèõ ñðåäñòâ äëÿ çàãðóç- êè ñòèðàëüíîãî ïîðîøêà è ñìÿã÷èòåëåé (ñì. ñ. 20). Êíîïêà ÎÒÆÈÌ èñïîëüçóåòñÿ äëÿ âûáîðà ñêîðîñ- òè îòæèìà, à òàêæå äëÿ åãî èñêëþ÷åíèÿ (ñì. ñ. 19). Êíîïêà Òàéìåð îòñðî÷êè (DELAY TIMER) ñëóæèò äëÿ îòñðî÷êè çàïóñêà çàäàííîé ï�…
-
18, & +15 Çàïóñê ìàøèíû. Ïðîãðàììû Òàáëèöà ïðîãðàìì Òêàíü è ñòåïåíü çàã ð ÿçíåíèÿ Ï ð îã ð . Òåìïå- ð àò óð à Ìîþùåå ñ ð åäñòâî Ñìÿã- ÷èòåëü Óäàëåíèå ïÿòåí / Îòáåëèâàòåëü Äëèòåëü- íîñòü öèêëà, ìèí. Îïèñàíèå öèêëà ñòè ð êè ïðåäâàð. ñòèðêà îñíîâ. ñòèðêà Îáû÷íûå ïðîãðàììû Î÷…
-
59, Indesit Wise 107 X 59 HU Megtörténhet, hogy a mosógép nem mûködik. Mielõtt felhívná a Szervizt (lásd 60. oldal) ellenõrizze, hogy nem olyan problémáról van szó, amely a következõ lista segítségével egyszerûen megoldható. Rendellenességek és elhárírásuk SzervizRendellenességekÓvintézkedések KarbantartásProgramok Mosószerek Üzembehelyezés Leírás Rendellenességek: A mosógép nem kapcsol be. A mosási ciklus nem indul el. A mosógép nem vesz fel vizet (A kijelzõn H 2 O olvasható). A mosógép folytonos…
-
23, ! CIS  ñëó÷àå íåóäîâëåòâîðèòåëüíûõ ðåçóëüòàòîâ ñòèðêè èëè âîçíèêíîâåíèÿ íåèñïðàâíîñòåé, ïðåæäå ÷åì îá- ðàòèòüñÿ â Àâòîðèçîâàííûé Ñåðâèñíûé öåíòð (ñì. ñ. 24), ïðî÷èòàéòå ýòîò ðàçäåë.  áîëüøèíñòâå ñëó÷àåâ Âû ìîæåòå ðåøèòü âîçíèêøèå ïðîáëåìû ñàìè. Íåèñïðàâíîñòè è ìåòîäû èõ óñòðàíåíèÿ…
-
26, 26 CZ Je velmi dùleité uschovat tento návod za úèelem jeho dalí konzultace. Vpøípadì prodeje, darování anebo pøestìhování praèky se ujistìte, e zùstane uloen vblízkosti praèky, aby mohl poslouit novému majiteli pøi seznámení se sèinností a spøíslunými upozornìními. Pozornì si pøeètìte uvedené pokyny: obsahují dùleité informace týkající se instalace, pouití a bezpeènosti pøi …
-
34, 34 CZ Údrba a péèe Uzavøení pøívodu vody a vypnutí elektrického napájení Po kadém praní uzavøete pøívod vody. Tímto zpùsobem dochází komezení opotøebení praèky a ke sníení nebezpeèí úniku vody. Pøed zahájením èitìní praèky a bìhem operací údrby je tøeba vytáhnout zástrèku pøívodního kabelu ze zásuvky. Èitìní praèky Vnìjí èásti a èásti z gumy mohou být…
-
24, » +15 Ïåðåä òåì êàê îáðàòèòüñÿ â Àâòîðèçîâàííûé Ñåðâèñíûé öåíòð: Óáåäèòåñü, ÷òî âû íå ìîæåòå óñòðàíèòü íåèñïðàâíîñòü ñàìîñòîÿòåëüíî (ñì. ñ. 23). Çàïóñòèòå ïðîãðàììó ïîâòîðíî äëÿ ïðîâåðêè èñïðàâíîñòè ìàøèíû.  ïðîòèâíîì ñëó÷àå îáðàòèòåñü â Àâòîðèçîâàííûé Ñåðâèñíûé öåíòð ïî òåëåôîíó, …
-
39, 39 RO Conectarea furtunului de evacuare Conectaþi furtunul de evacuare, fãrã a-l îndoi, la o conductã de evacuare sau la o gurã de evacuare a apei, situate între 65 ºi 100 cm de pãmânt; sau sprijiniþi-l pe marginea unei chiuvete sau a unei cãzi, legând ghidajul aflat în dotare, de robinet (a se vedea figura). Extremitatea liberã a furtunului de evacuare nu trebuie sã rãmânã cufundatã în apã. Nu este recomandabilã folosirea furtunurilor de prelungire; dacã es…
-
30, Indesit Wise 107 X 30 CZ Druh tkaniny a stupeò jejího zneèi tìní Prací programy Teplota Prací prostøedek Avivá¡z V olitelná funkce Odstranìní skvrn / Bìlící prostøedek Doba cyklu (v minutách) Popis pracího cyklu pøedp. praní Standardní Extrémnì zneèitìné bílé prádlo (prostìradla, ubrusy, atd.) 1 90°C 135 Pøedpírka, praní, máchání, prùbì¡zné a závìreèné odstøeïování Extrémnì zneèitìné bílé prádlo (prostìradla, ubrusy, atd.) 2 90°C Na choul. prádlo/ T…
-
40, 40 RO Panoul de control Descrierea maºinii de spãlat Selectorul Display-ul Sertarul detergenþilor Butonul Turaþie Centrifugare Butonul TEMPERATURÃ Butonul PORNIRE/OPRIRE Butonul START/RESET Sertarul detergenþilor este folosit pentru a încãrca detergenþi ºi aditivi (a se vedea pag. 44). Butonul Turaþie Centrifugare este folosit pentru reglarea turaþiei de centrifugare pânã la excluderea acesteia (a se vedea pag. 43). Butonul DELAY TIMER este folosit pentru a întârz…
-
27, Indesit Wise 107 X 27 CZ Pøipojení odtokové hadice Pøipojte vypoutìcí hadici, kodpadovému potrubí anebo kodpadu ve stìnì, nacházejícímu se od 65 do 100 cm nad zemí; zamezte jejímu ohybu; anebo ji zachyte na okraj umývadla èi vany, a pøipevnìte ji ke kohoutku prostøednictvím dráku zpøísluenství (viz obrázek). Volný konec vypoutìcí hadice nesmí zùstat ponoøen do vody. Pouití prodlu�…
-
6, 6 GB Type of fabric and degree of soil Programmes Te m p e — rature Detergent Fabric softener Stain removal option/bleach Cycle length (m inute s) Description of wash cycle pre- wash wash Standard Extremely soiled whites (sheets, tablecloths, etc.) 1 90°C 135 Pre-wash, wash cycle, rinse cycles, intermediate and final spin cycles Extremely soiled whites (sheets, tablecloths, etc.) 2 90°C Delicate/ Traditional 125 Wash cycle, rinse cycles, intermediate and final spin cycles Heavily soiled whites and fast colours 2 60°C Delic…
-
36, Indesit Wise 107 X 36 CZ Pøed pøivoláním servisní sluby: Zkontrolujte, zda nejste schopni poruchu odstranit sami (viz str. 35); Opìtovnì uveïte do chodu prací program, scílem ovìøit, zda byla porucha odstranìna; Vopaèném pøípadì se obrate na autorizované centrum servisní sluby, na telefonním èísle uvedeném na záruèním listì. Nikdy se neobracejte se ádostí o pomoc na techniky, kteøí nejsou na vykonávání této èinnost oprávnìni. Pøi hláení poruchy uveïte: druh poruc…
-
37, Indesit Wise 107 X 37 RO Românã Sumar Instalare, 38-39 Scoaterea din ambalaj ºi nivelarea, 38 Legãturi hidraulice ºi electrice, 38-39 Primul program de spãlare, 39 Date tehnice, 39 Descrierea maºinii de spãlat, 40-41 Panoul de control, 40 Display-ul, 41 Program MEMO, 41 Pornire ºi Programe, 42 Pe scurt: pornirea unui program, 42 Tabel de programe, 42 Personalizãri, 43 Reglarea turaþiei de centrifugare, 43 Reglarea delay timerului, 43 Reglarea temperaturii, 43 Funcþii, 43 Detergenþi ºi rufe a…
-
10, 10 GB Care and maintenance Cutting off the water or electricity supply Turn off the water tap after every wash. This will limit the wear of your appliance’s water system and also prevent leaks. Unplug your appliance when cleaning it and during all maintenance operations. Cleaning your appliance The exterior and rubber parts of your appliance can be cleaned with a soft cloth soaked in lukewarm soapy water. Do not use solvents or abrasives. Cleaning …
-
46, 46 RO Întreþinere ºi îngrijire Oprirea apei ºi a curentului electric Închideþi robinetul de apã dupã fiecare spãlare. Se limiteazã astfel uzarea instalaþiei hidraulice a maºinii de spãlat ºi se eliminã pericolul scurgerilor. Scoateþi ºtecherul din priza de curent atunci când curãþaþi maºina de spãlat ºi când se efectueazã lucrãri de întreþinere. Curãþarea maºinii de spãlat Partea externã ºi pãrþile din cauciuc pot fi curãþate cu o cârpã înmuiatã în apã cãlduþã ºi sãpun. Nu…
-
7, 7 GB Function Effect Comments Enabled with programmes: Stain removal Bleaching cycle designed to remove the toughest stains. Please remember to pour the bleach into extra compartment 4 (se e page
 . This function is incompatible with the EASY IRON function. 2, 3, 4, Rinse cycle. Extra Rinse Increases the efficiency of the rinse. Recommended when the appliance has a full load or with large quantities of detergent. 1, 2, 3, 4, 7, 8, 9, 11, 12, Rinse cycle. Easy iron This option reduces the amount of creasing on fabrics, making them easier…
 -
1, Indesit Wise 107 X 1 GB English,1 Contents Installation, 2-3 Unpacking and levelling, 2 Electric and water connections, 2-3 The first wash cycle, 3 Technical details, 3 Washing machine description, 4-5 Control panel, 4 Display, 5 MEMO Programme, 5 Starting and Programmes, 6 Briefly: how to start a programme, 6 Programme table, 6 Personalisations, 7 Setting the spin cycle, 7 Setting the Delay Timer, 7 Setting the temperature, 7 Functions, 7 Detergents and laundry, 8 Detergent dispenser, 8 Bleach cycle, 8 Preparing your laun…
-
57, Indesit Wise 107 X 57 HU Óvintézkedések és tanácsok SzervizRendellenességekÓvintézkedések KarbantartásProgramok Mosószerek Üzembehelyezés Leírás A mosógépet a nemzetközi biztonsági szabványoknak megfelelõen tervezték és gyártották. Ezeket a figyelmeztetéseket biztonsági okokból írjuk le, és figyelmesen el kell olvasni õket. Általános biztonság Ezt a készüléket egyfajta háztartási és nem professzionális használatra terve…
-
21, CIS Ïðåäóïðåæäåíèÿ è ðåêîìåíäàöèè Ñòèðàëüíàÿ ìàøèíà ñïðîåêòèðîâàíà è èçãîòîâëå- íà â ñîîòâåòñòâèè ñ ìåæäóíàðîäíûìè íîðìàìè áå- çîïàñíîñòè. Âíèìàòåëüíî ïðî÷èòàéòå íàñòîÿùèå ïðå- äóïðåæäåíèÿ, ñîñòàâëåííûå â öåëÿõ âàøåé áåçî- ïàñíîñ�…
-
4, Indesit Wise 107 X 4 GB Control panel Washing machine description Control knob Display Detergent dispenser SPIN button TEMPERATURE button START/STOP button START/RESET button Detergent dispenser to add detergent and fabric softener (see page 8). SPIN button to adjust the spin speed or exclude it altogether (see page 7). DELAY TIMER button to delay the start of the set programme for a maximum period of 24 hours (see page 7). TEMPERATURE button to adjust the wash tempe- rature (see page 7). Display to programme the washing machine and follow th…
-
31, 31 CZ Nastavení èinnosti dle potøeb uivatele Servisní slubaPoruchyOpatøení ÚdrbaPrací programy Prací prostøedkyInstalace Popis Nastavení rychlosti odstøeïování Vpøípadì, e se pøi zapnutí praèky nachází OTOÈNÝ VOLIÈ vpoloze odpovídající programu, jeho souèástí je i odstøeïování, ikona bude zobrazena, ani by blikala. Po stisknutí tlaèítka se zobrazí maximální moná rychlost odstøeïování pro nastavený program se souèasným blikáním ikony . Po dalím stisknutí uvedenéh…
-
33, 33 CZ Opatøení a rady Servisní slubaPoruchyOpatøení ÚdrbaPrací programy Prací prostøedkyInstalace Popis Praèka byla navrena a vyrobena vsouladu splatnými mezinárodními bezpeènostním pøedpisy. Tato upozornìní jsou uvádìna zbezpeènostních dùvodù a je tøeba si je pozornì pøeèíst. Základní bezpeènostní pokyny Tento spotøebiè byl navrhnut pro domácí, neprofesionální pouití, a jeho funkce nesmí …
 . This function is incompatible with the EASY IRON function. 2, 3, 4, Rinse cycle. Extra Rinse Increases the efficiency of the rinse. Recommended when the appliance has a full load or with large quantities of detergent. 1, 2, 3, 4, 7, 8, 9, 11, 12, Rinse cycle. Easy iron This option reduces the amount of creasing on fabrics, making them easier…