
GB
1
Contents
Installation, 2-3-4-5
Unpacking and levelling
Connecting the electricity and water supplies
The first wash cycle
Technical data
Care and maintenance, 6
Cutting off the water or electricity supply
Cleaning the washing machine
Cleaning the detergent dispenser drawer
Caring for the door and drum of your appliance
Cleaning the pump
Checking the water inlet hose
Precautions and tips, 7
General safety
Disposal
Description of the washing machine
and starting a wash cycle, 8-9
Control panel
Indicator lights
Starting a wash cycle
Wash cycles, 10
Table of wash cycles
Personalisation, 11
Setting the temperature
Setting the spin speed
Functions
Detergents and laundry, 12
Detergent dispenser drawer
Preparing the laundry
Garments requiring special care
Load balancing system
Troubleshooting, 13-14
Assistance, 15-16
IWSC 61051
Instructions for use
WASHING MACHINE
English,1
GB

Instructions for use
WASHING MACHINE
Installation, 2-3-4-5
Unpacking and levelling
Connecting the electricity and water supplies
The first wash cycle
Technical data
IWSC 61051
Care and maintenance, 6
Cutting off the water or electricity supply Cleaning the washing machine Cleaning the detergent dispenser drawer
Caring for the door and drum of your appliance Cleaning the pump
Checking the water inlet hose
Precautions and tips, 7
General safety
Disposal
Description of the washing machine and starting a wash cycle, 8-9
Control panel Indicator lights Starting a wash cycle
Wash cycles, 10
Table of wash cycles
Personalisation, 11
Setting the temperature
Setting the spin speed
Functions
Detergents and laundry, 12
Detergent dispenser drawer Preparing the laundry Garments requiring special care Load balancing system
Troubleshooting, 13-14
Assistance, 15-16
1
Installation
!Keep this instruction manual in a safe place for GB futurereference.Shouldtheappliancebesold,transferredormoved,makesuretheinstructionmanual accompanies the washing machine to inform the
new owner as to its operation and features.
!Read these instructions carefully: they contain vital information on installation, use and safety.
Unpacking and levelling
Unpacking
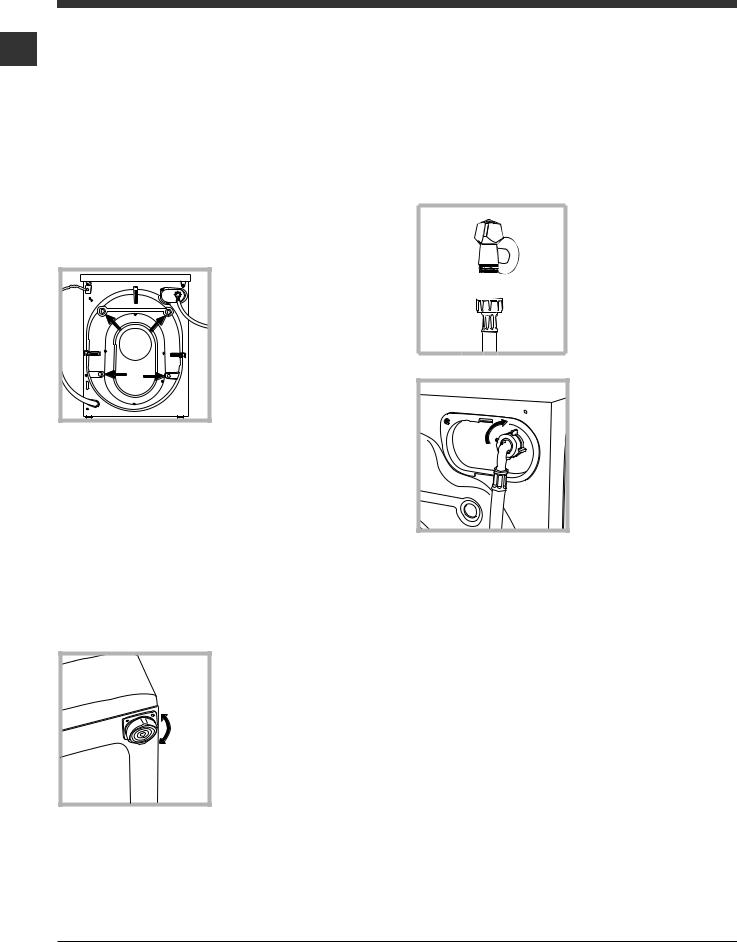
1.Unpack the washing machine.
2.Check whether the washing machine has been damaged during transport. If this is the case, do not install it and contact your retailer.
3.Remove the 4 pro-
tective screws and the rubber bush with the respective spacer, situated on the rear of the appliance (see also the installation leaflet).
4.Seal the gaps using the plastic plugs provided.
5.Keep all the parts: you will need them again if the washing machine needs to be moved to another location.
!Packaging materials are not children’s toys.
Levelling
Your machine may make a considerable amount of noise if the two front feet have not been adjusted correctly.
1. Install the washing machine on a flat sturdy floor, without resting it up against walls, furniture cabinets or other.
2. If the floor is not perfectly level, compensate for any unevenness by tightening or loosening
the adjustable front feet
(see figure); the angle of inclination, measured according to the worktop, must not exceed 2°.
Levelling your appliance correctly will provide it with stability and avoid any vibrations, noise and shifting during operation. If it is placed on a fitted or loose carpet, adjust the feet in such a way as to allow enough room for ventilation beneath the washing machine.
Electric and water connections
Connecting the water inlet hose
1. Connect the supply pipe by screwing it to a cold water tap using a 3/4 gas threaded connection (see figure).
Before performing the connection, allow the water to run freely until it is perfectly clear.
2. Connect the other end of the water inlet hose to the washing machine, screwing it onto the appliance’s coldwaterinlet,situated on the top right-hand side on the rear of the appliance (see figure).
3. Make sure there are no kinks or bends in the hose.
!The water pressure at the tap must be within the values indicated in the Technical details table (on the page 5).
!If the water inlet hose is not long enough, contact a specialist store or an authorised serviceman.
!Ensure that the supply taps are allowing water through. Old taps may seize in the closed position and thus prevent water reaching the machine.
2

Connecting the drain hose
Connect the drain hose, without bending it, to a draining duct or a wall drain situated between 65 and 100 cm from the floor;
Where it connects to the waste water pipe cut end off spigot or remove the blanking cap
The drain hose may be connected to an under-sink trap. Before connecting the drain hose from the machine ensure that any blanks or removable ends have been taken off the spigot.
If it is placed over the edge of a basin or sink be sure the free end of the hose should not be underwater.
! We advise against the use of hose extensions; in caseofabsoluteneed,theextensionmusthavethe same diameter as the original hose and must not exceed 150 cm in length. Ensure that if the drain hose is pushed into a standpipe, that the end does notgodownmorethan15cms(6inches).Ifthehose ispusheddowntoofar,thismaycausethemachine to self -syphon ie. continuously empty as it is filling.
Electric connection
Before plugging the appliance into the mains socket, make sure that:
•the socket is earthed and in compliance with the applicable law;
•the socket is able to sustain the appliance’s maximum power load indicated on the Technical Data Plate fixed on the machine;
|
• the supply voltage is included within the values |
GB |
||
|
indicated on the Technical Data Plate fixed on |
|||
|
the machine. |
|||
|
• the socket is compatible with the washing |
|||
|
machine’s plug. If this is not the case, replace |
|||
|
the socket or the plug. |
|||
|
Your appliance is now supplied with a 13 amp fu- |
|||
|
sed plug it can be plugged into a 13 amp socket |
|||
|
for immediate use. Before using the appliance |
|||
|
please read the instructions below. |
|||
|
WARNING-THISAPPLIANCEMUSTBEEARTHED. |
|||
|
THE FOLLOWING OPERATIONS SHOULD BE |
|||
|
CARRIED OUT BY A QUALIFIED ELECTRICIAN. |
|||
|
Replacing the fuse: |
|||
|
When replacing a faulty fuse, a 13 amp ASTA |
|||
|
approved fuse to BS 1362 should always be |
|||
|
used, and the fuse cover re-fitted. If the fuse |
|||
|
cover is lost, the plug must not be used until a |
|||
|
replacement is obtained. |
|||
|
Replacement fuse covers: |
|||
|
If a replacement fuse cover is fitted, it must be of |
|||
|
the correct colour as indicated by the coloured |
|||
|
marking or the colour that is embossed in words |
|||
|
on the base of the plug. Replacements can be |
|||
|
obtaineddirectlyfromyournearestServiceDepot. |
|||
|
Removing the plug: |
|||
|
If your appliance has a non-rewireable moulded |
|||
|
plug and you should wish to re-route the mains |
|||
|
cable through partitions, units etc., please en- |
|||
|
sure that either: |
|||
|
the plug is replaced by a fused 13 ampere rewi- |
|||
|
reable plug bearing the BSI mark of approval. |
|||
|
or: |
|||
|
the mains cable is wired directly into a 13 amp |
|||
|
cable outlet, controlled by a switch, (in complian- |
|||
|
ce with BS 5733) which is accessible without |
|||
|
moving the appliance. |
|||
|
Disposing of the plug: |
|||
|
Ensure that before disposing of the plug itself, |
|||
|
you make the pins unusable so that it cannot be |
|||
|
accidentally inserted into a socket. |
|||
|
Instructions for connecting cable to an alterna- |
|||
|
tive plug: |
|||
|
Important: the wires in the mains lead are co- |
|||
|
loured in accordance with the following code: |
|||
|
Green & Yellow |
Earth |
||
|
Blue |
Neutral |
||
|
Brown |
Live |
3
As the colours of the wires in the lead may not GB correspond with the coloured markings iden-
tifying the terminals in your plug, proceed as follows:
Connect Green & Yellow wire to terminal marked E or  or coloured Green or Green & Yellow.
Connect Brown wire to terminal marked L or coloured Red.
Connect Blue wire to terminal marked N or coloured Black.
If a 13 amp plug (BS 1363) is used it must be fitted with a 13 amp fuse, either in the plug or adaptor or at the distribution board.
If you are in any doubt regarding the electrical supply to your machine, consult a qualified electrician before use.
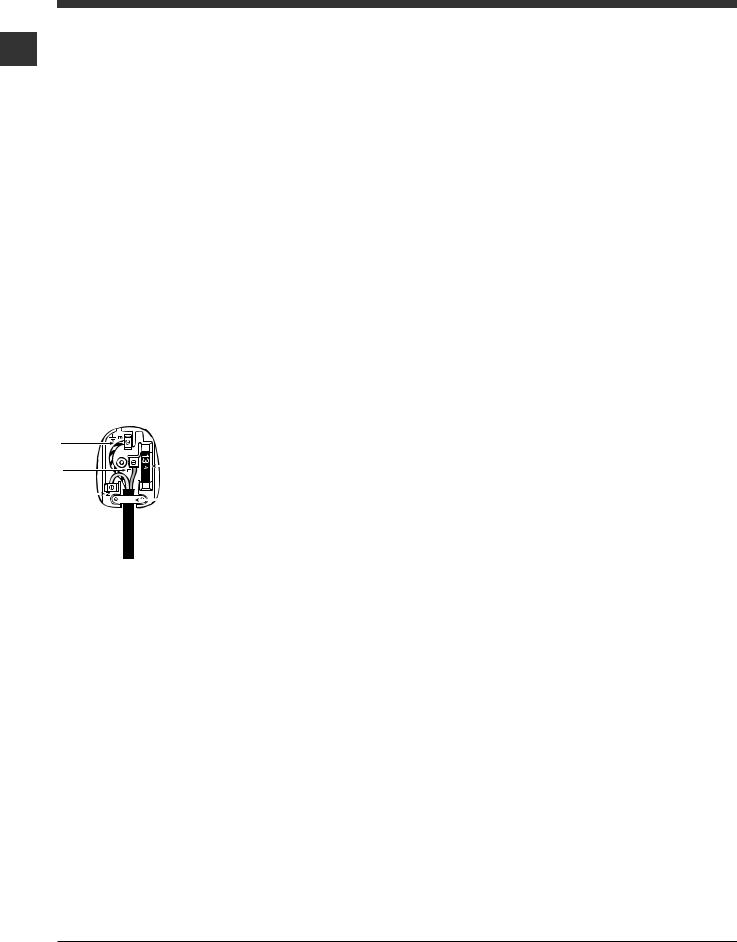
How to connect an alternative plug:
The wires in this mains lead are coloured in accordance with the following code:
|
BLUE |
NEUTRAL (N) |
|
|
BROWN |
LIVE (L) |
|
|
GREEN & YELLOW |
EARTH (E) |
|
|
GREEN & |
||
|
YELLOW |
||
|
BROWN |
13 ampere fuse |
|
|
BLUE |
CROSS-BAR |
|
|
CORD GRIP |
||
Disposing of the appliance:
When disposing of the appliance please remove the plug by cutting the mains cable as close as possible to the plug body and dispose of it as described above.
!The washing machine should not be installed in an outdoor environment, not even where the area is sheltered, because it may be very dangerous to leave it exposed to damp, rain and thunderstorms.
!When the washing machine is installed, the mains socket must be within easy reach.
!Do not use extensions or multiple sockets.
!The power supply cable must never be bent or dangerously compressed.
! The power supply cable must only be replaced by an authorised serviceman.
Warning! The company denies all liability if and when these norms are not respected.
The first wash cycle
Once the appliance has been installed, and before you use it for the first time, run a wash cycle with detergent and no laundry, setting the 90°C programme.
4

|
Technical data |
GB |
|||||
|
Model |
IWSC 61051 |
|||||
|
Dimensions |
width 59.5 cm |
|||||
|
height 85 cm |
||||||
|
depth 42 cm |
||||||
|
Capacity |
from 1 to 6 kg |
|||||
|
Electrical |
please refer to the technical |
|||||
|
connections |
data plate fixed to the machine |
|||||
|
maximum pressure |
||||||
|
Water |
1 MPa (10 bar) |
|||||
|
minimum pressure |
||||||
|
connection |
||||||
|
0.05 MPa (0.5 bar) |
||||||
|
drum capacity 40 litres |
||||||
|
Spin speed |
up to 1000 rotations per |
|||||
|
minute |
||||||
|
Test wash |
Programme 2: |
|||||
|
cycles in |
||||||
|
accordance |
Cotton Standard 60°. |
|||||
|
with directives |
Programme 3: |
|||||
|
1061/2010 and |
Cotton Standard 40°. |
|||||
|
1015/2010. |
||||||
|
This appliance conforms to |
||||||
|
the following EC Directives: |
||||||
|
— 2004/108/EC (Electroma- |
||||||
|
gnetic |
||||||
|
Compatibility) |
||||||
|
— 2012/19/EU |
||||||
|
— 2006/95/EC Low Voltage) |
||||||
5
 Loading…
Перейти к контенту
Стиральные машины Indesit

- Размер инструкции: 653.22 kB
- Формат файла: pdf
Если вы потеряли инструкцию от стиральной машины Indesit IWSC 61051, можете скачать файл для просмотра на компьютере или печати.
Инструкция для стиральной машины Indesit IWSC 61051 на русском языке. В руководстве описаны возможности и полезные функции, а также правила эксплуатации. Перед использованием внимательно ознакомьтесь с инструкцией.
Чтобы не читать всю инструкцию вы можете выполнить поиск по содержимому внутри инструкции и быстро найти необходимую информацию. Рекомендации по использованию помогут увеличить срок службы стиральной машины Indesit IWSC 61051. Если у вас появилась проблема, то найдите раздел с описанием неисправностей и способами их решения. В нем указаны типичные поломки и способы их решения.
Хорошее руководство по эксплуатации
Законодательство обязывает продавца передать покупателю, вместе с товаром, руководство по эксплуатации Indesit IWSC 61051. Отсутствие инструкции либо неправильная информация, переданная потребителю, составляют основание для рекламации в связи с несоответствием устройства с договором. В законодательстве допускается предоставлении руководства в другой, чем бумажная форме, что, в последнее время, часто используется, предоставляя графическую или электронную форму инструкции Indesit IWSC 61051 или обучающее видео для пользователей. Условием остается четкая и понятная форма.
Что такое руководство?
Слово происходит от латинского «instructio», тоесть привести в порядок. Следовательно в инструкции Indesit IWSC 61051 можно найти описание этапов поведения. Цель инструкции заключается в облегчении запуска, использования оборудования либо выполнения определенной деятельности. Инструкция является набором информации о предмете/услуге, подсказкой.
К сожалению немного пользователей находит время для чтения инструкций Indesit IWSC 61051, и хорошая инструкция позволяет не только узнать ряд дополнительных функций приобретенного устройства, но и позволяет избежать возникновения большинства поломок.
Из чего должно состоять идеальное руководство по эксплуатации?
Прежде всего в инструкции Indesit IWSC 61051 должна находится:
— информация относительно технических данных устройства Indesit IWSC 61051
— название производителя и год производства оборудования Indesit IWSC 61051
— правила обслуживания, настройки и ухода за оборудованием Indesit IWSC 61051
— знаки безопасности и сертификаты, подтверждающие соответствие стандартам
Почему мы не читаем инструкций?
Как правило из-за нехватки времени и уверенности в отдельных функциональностях приобретенных устройств. К сожалению само подсоединение и запуск Indesit IWSC 61051 это слишком мало. Инструкция заключает ряд отдельных указаний, касающихся функциональности, принципов безопасности, способов ухода (даже то, какие средства стоит использовать), возможных поломок Indesit IWSC 61051 и способов решения проблем, возникающих во время использования. И наконец то, в инструкции можно найти адресные данные сайта Indesit, в случае отсутствия эффективности предлагаемых решений. Сейчас очень большой популярностью пользуются инструкции в форме интересных анимаций или видео материалов, которое лучше, чем брошюра воспринимаются пользователем. Такой вид инструкции позволяет пользователю просмотреть весь фильм, не пропуская спецификацию и сложные технические описания Indesit IWSC 61051, как это часто бывает в случае бумажной версии.
Почему стоит читать инструкции?
Прежде всего здесь мы найдем ответы касательно конструкции, возможностей устройства Indesit IWSC 61051, использования отдельных аксессуаров и ряд информации, позволяющей вполне использовать все функции и упрощения.
После удачной покупки оборудования/устройства стоит посвятить несколько минут для ознакомления с каждой частью инструкции Indesit IWSC 61051. Сейчас их старательно готовят или переводят, чтобы они были не только понятными для пользователя, но и чтобы выполняли свою основную информационно-поддерживающую функцию.