
В ГРАФИЧЕСКОМ РЕДАКТОРЕ CorelDraw:
1. Создайте макет в графическом редакторе
2. Зайдите в приложения и нажмите SEND TO SIGNCUT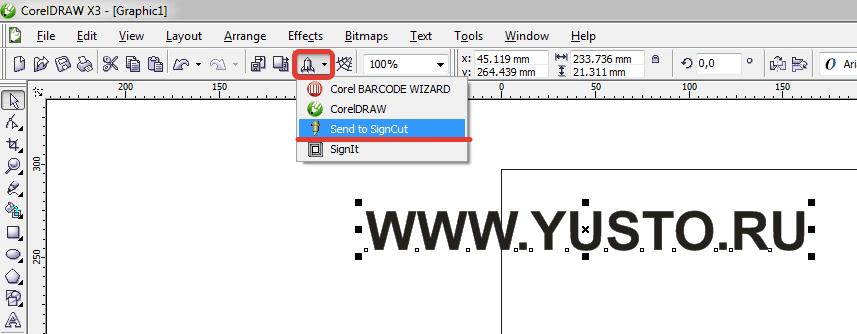
3. Откроется интерфейс программы SIGNCUT
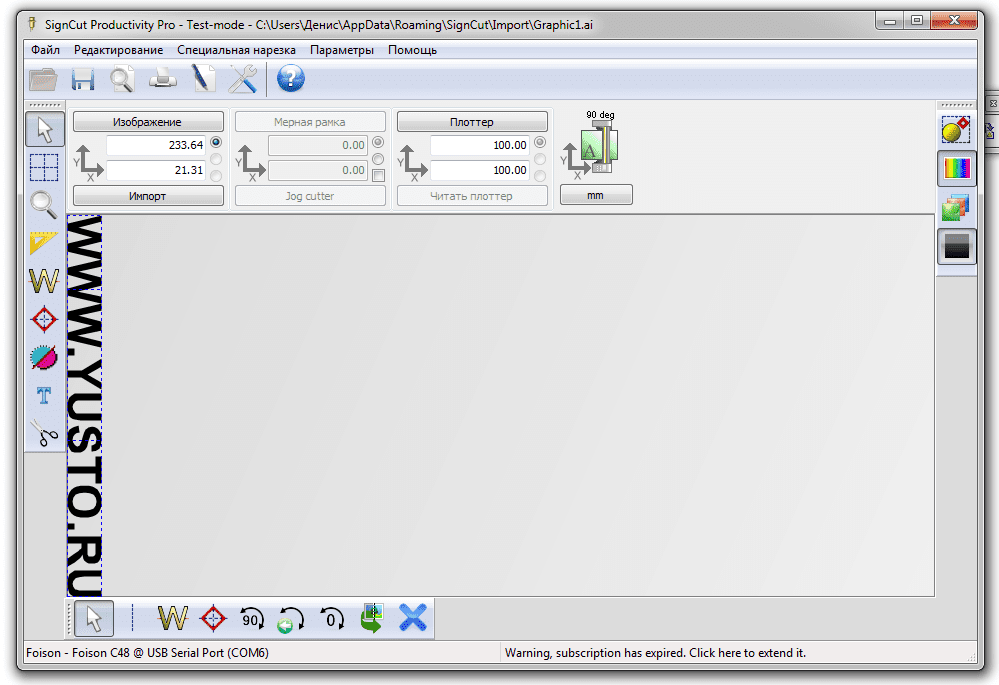
4. Выровняйте изображение по листу кнопкой 
5. Отправьте на резку макет, нажав кнопку 

Фрезерный станок ЧПУ VENO K45MT2040
Рабочее поле: 2000х4000 мм. Мощность шпинделя: 4,5 кВт. Цанговый патрон: ER-32. Высота портала:…
Перейти в корзинуПерейти в карточку товара
Лазерный станок CO2 по металлу KAMACH 1390 ZET
Рабочее поле, мм: 1300х900. Мощность излучателя, Вт: 130-160 RECI w6. Система управления RuiDa…
Перейти в корзинуПерейти в карточку товара
Лазерный станок по металлу VENO 1530 GE II 1000
Мощность лазера: 1000 Вт. Рабочее поле: 3000х1500 мм. Источник: Maxphotonics. Опция: RayCus, IPG….
Перейти в корзинуПерейти в карточку товара
Товар добавлен в корзину
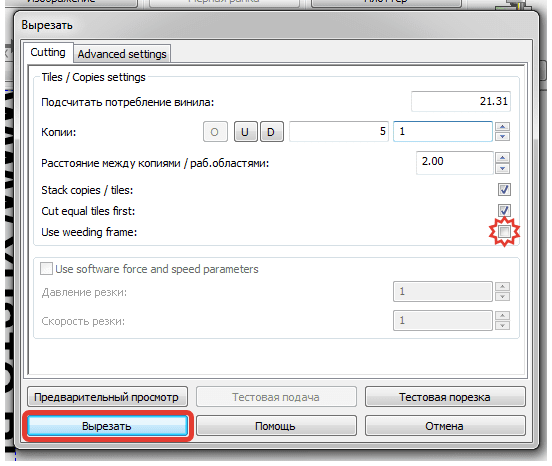
6. В появившемся меню нажмите кнопку ВЫРЕЗАТЬ.
Чтобы убрать рамку снимите галочку (выделено звездочкой) в строке USE WEEDING FRAME
7. Плоттер сразу начнет резать после отправки файла.
-
Contents
-
Table of Contents
-
Troubleshooting
-
Bookmarks
Quick Links
You can expect updates to this manual over the next few months
Do NOT read this entire manual… unless you want to.
•
At the start of Chapters 1 — 4 are short sections with references to find what you need plus some important
reminders. PLEASE read these short sections at the very least and refer back to them, when needed.
•
Chapters 1 and 2 are very important in terms of correctly setting up your Skycut to work with SignCut Pro2
and learning the ins and outs of cutting.
•
Chapter 3 is for those owners wanting to perform print and cut applications.
•
Chapter 4 covers using Skycut accessory tools and dual head applications.
•
Chapter 5 covers several SignCut Pro2 functions of interest: creating contour cuts and engraving fills.
It’s not practical to print this entire manual because:
•
It’s a waste of paper and ink if you only ever need certain sections.
•
The live links to videos and web sites in the manual will not work.
•
This manual will be updated from time to time.
•
You cannot search on individual words.
Also:
•
Videos of interest can be found at the following link:
________________________________________________________________
© 2018-2020
Sandy McCauley All Rights Reserved
Skycut Series D with SignCut Pro2
July 3, 2020
Skycut Support Videos
1
Summary of Contents for Skycut D Series
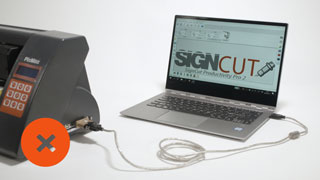
USB Connection
A communication driver must be installed unless the cutting plotter is plug-and-play compatible.

Plug-and-Play
The cutter’s name will show up automatically in the output list in SignCut as a printer, normally, with the name of the manufacturer or model.
Correct way to install the USB-driver
- Install the USB-driver for the cutter. You can find the proper driver on the manufacturer’s or reseller’s website.
- Once installed, connect the USB-cable as shown in the illustration on the right.
- Power on the cutting plotter and it will show up in the SignCut output list.
Ethernet or TCP/IP Connection
The process to set up the cutting plotter varies. Check the manual for instructions.
Once you have the IP address of the cutter, enter it in SignCut and continue to the next step.
This video shows how to enter the IP address in SignCut. Click to start and watch the video in fullscreen.
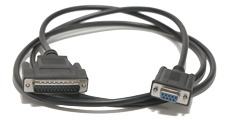
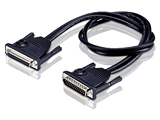
Serial to USB Connection
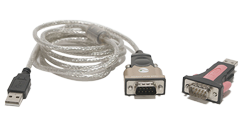
Serial communication is the most stable communication method. If your computer does not have a serial port, you are able to by-pass this through a Serial to USB adapter.
Notice: When using a Serial to USB Adapter, a communication driver must be installed for the computer to recognise it.
Correct way to connect the adapter and serial cable.
- Install the driver that you received with the adapter. If no driver was included, it could usually be found on the manufacturer’s website.
- Connect the adapter and the serial cable between the cutter and computer. See the images below for how to make the correct connection.
- Power on the cutter and it will now show up in the SignCut device list.

Serial Connection
Serial communication is the most stable communication method. If you have both a cutter and a computer with a serial port, use a serial cable to connect the cutter to the computer. When direct serial communication is used, you do not need to install a driver. The option is shown in the SignCut device list as COM1 or COM2.
Follow these steps to connect the cutting machine to the computer.
- Connect the serial cable to the cutter.
- Connect the other end to the computer.
- Power on the cutter.
- Select the
COM portfrom the SignCut device list.
If the cutter has a serial port, but the computer doesn’t, you can use a Serial to USB converter. Click on Serial to USB tab for setup instructions.
Parallel to USB Connection
Parallel connection is considered outdated because most modern computers do not have parallel ports. For cutters which only have a parallel port, there are Parallel to USB adapters available which means that the cutter can be used with any Windows operating systems.
Note: This does not work with Mac operating systems.
We recommend adapters with FTDI-chip as it is the only type of adapter we support.
Follow these steps to connect the cutter to the computer.
- Install the driver for the adapter.
- Connect the parallel end of the adapter to the cutter.
- Connect the USB end of the adapter to the computer.
- Power on the cutter and it will now show up in the SignCut device list.
- Click OK to close the dialogue.
Parallel Connection
When direct parallel communication is used, you do not need to install a driver.
Follow these steps to connect the cutter to the computer.
- Connect the parallel cable to the cutter.
- Connect the other end to the computer.
- Power on the cutter and it will show up in the SignCut device list.
If no LTP is shown, follow the instructions below.
-
Open the
Control Paneland clickDevice and Printers. -
Click
Add a Printer. -
Click
The printer that I want isn't listed. -
Click
Add a local printerthen click Next. -
Click
Use an existing portandselect LPT1 in the list. Click Next. -
As for the manufacturer, select
Generic, and for the printer, chooseGeneric/text only. Click Next. -
Name the cutter and click Next to install the driver.
-
Choose if you want to share the cutter onto the network and click Next.
Note:We recommend that you do not do this if you are only going to use it on one computer. -
Do not click
Print out a test pageas the cutter can not print. Click Finish instead.
If the cutter has a parallel port, but the computer does not, you can use a Parallel to USB Converter. Click on the Parallel to USB tab for setup instructions.
Click «Next» to continue to the next section.
Welcome to the SignCut family! It all starts with establishing the communication between your cutter and the program. You will find a Start-Up Guide* within the program that should aid in setting up the plotter easily.

 *The Start-Up Guide is available for Pro 2 version 1.479 and higher.
Incase the start-up guide is not available in your current Pro 2 version, please open SignCut and click on the Cutter button and enter your cutting plotter’s Manufacturer, Cutter (model), and Output Device.

If you aren’t sure which output device to choose, please refer to the following instructions to make sure that you are
using the correct communication settings:
1. Unplug the cutter,
2. Restart SignCut Pro 2.
3. Click on the Cutter button
4. Click on the Output Device/Port‘s drop-down menu and take note of the options listed
5. Plug the cutter back in and turn the power on.
6. Close the Cutter dialogue and open it again. Check the Output Device/Port section and a new port option should now appear. This is the port for your cutter, please select it.
7. Walk over to your cutting plotter and look for a setting in the display called Baud or BR and check what value it is set to.
8. Go back to your computer and enter the same value in SignCut’s Cutter dialogue.
The communication should now be correct. To make a test cut, select the red layer of the SignCut logo by clicking the red button on the color panel on the right side of your Pro 2 screen.


If no new output option shows up it means that you have to install the communication driver for your cutting plotter. You should have received it together with your cutter on a CD or it should be available on the website of the reseller or the manufacturer of your machine.
If you cannot find the correct driver, some cutters have driver links provided on the Cutter Information section of Pro 2. You may also refer to our driver download page here.

You may proceed to import your own design for cutting by clicking on the Folder icon or through the File menu -> Open.

Please make sure that your files are properly vectorized before opening in SignCut. The application will only be able to support the following files:
1. SignCut (.sc)
2. SignCut Pro 2 (scpro2)
3. Ai — Adobe Illustrator (.ai) — Best format to use in Illustrator 8 version Exporting Format: Illustrator 8
4. EPS — Encapsulated PostScript (.eps)
5. PS — Postscript (.ps)
6. CDR — Corel Draw (.cdr)
7. PDF — Portable Document Format (.pdf)
8. SVG — Scalable Vector Graphic (.svg)
9 EMF — Enhanced Windows Metafile (.emf)
11. DXF — Autocad Drawing Exchange Format (.dxf)
12. HPGL — Hewlett Packard Graphic Language (.plt)
13. RTF — Rich Text Format (.rtf)
Now, you are all set! If you wish to know more about SignCut and its features, you may visit our Youtube Channel here.
Did you find it helpful?
Yes
No
Send feedback
Sorry we couldn’t be helpful. Help us improve this article with your feedback.
В ГРАФИЧЕСКОМ РЕДАКТОРЕ CorelDraw:
1. Создайте макет в графическом редакторе
2. Зайдите в приложения и нажмите SEND TO SIGNCUT
3. Откроется интерфейс программы SIGNCUT
4. Выровняйте изображение по листу кнопкой
5. Отправьте на резку макет, нажав кнопку
Фрезерный станок ЧПУ VENO K45MT2040
Рабочее поле: 2000х4000 мм. Мощность шпинделя: 4,5 кВт. Цанговый патрон: ER-32. Высота портала:…
Перейти в корзинуПерейти в карточку товара
Лазерный станок CO2 по металлу KAMACH 1390 ZET
Рабочее поле, мм: 1300х900. Мощность излучателя, Вт: 130-160 RECI w6. Система управления RuiDa…
Перейти в корзинуПерейти в карточку товара
Лазерный станок по металлу VENO 1530 GE II 1000
Мощность лазера: 1000 Вт. Рабочее поле: 3000х1500 мм. Источник: Maxphotonics. Опция: RayCus, IPG….
Перейти в корзинуПерейти в карточку товара
Товар добавлен в корзину
6. В появившемся меню нажмите кнопку ВЫРЕЗАТЬ.
Чтобы убрать рамку снимите галочку (выделено звездочкой) в строке USE WEEDING FRAME
7. Плоттер сразу начнет резать после отправки файла.
Последние добавленные макеты

Слова Love (любовь)
Приглашение резное из бумаги
Колесо для Хомяка
Гамак лежак для кошек и собак
Макеты брелоков «Гос-Номер», дерево и кожа
Макет нард для лазерного ЧПУ станка
Смотреть все
Welcome to the SignCut family! It all starts with establishing the communication between your cutter and the program. You will find a Start-Up Guide* within the program that should aid in setting up the plotter easily.
*The Start-Up Guide is available for Pro 2 version 1.479 and higher.
Incase the start-up guide is not available in your current Pro 2 version, please open SignCut and click on the Cutter button and enter your cutting plotter’s Manufacturer, Cutter (model), and Output Device.
If you aren’t sure which output device to choose, please refer to the following instructions to make sure that you are
using the correct communication settings:
1. Unplug the cutter,
2. Restart SignCut Pro 2.
3. Click on the Cutter button
4. Click on the Output Device/Port‘s drop-down menu and take note of the options listed
5. Plug the cutter back in and turn the power on.
6. Close the Cutter dialogue and open it again. Check the Output Device/Port section and a new port option should now appear. This is the port for your cutter, please select it.
7. Walk over to your cutting plotter and look for a setting in the display called Baud or BR and check what value it is set to.
8. Go back to your computer and enter the same value in SignCut’s Cutter dialogue.
The communication should now be correct. To make a test cut, select the red layer of the SignCut logo by clicking the red button on the color panel on the right side of your Pro 2 screen.
If no new output option shows up it means that you have to install the communication driver for your cutting plotter. You should have received it together with your cutter on a CD or it should be available on the website of the reseller or the manufacturer of your machine.
If you cannot find the correct driver, some cutters have driver links provided on the Cutter Information section of Pro 2. You may also refer to our driver download page here.
You may proceed to import your own design for cutting by clicking on the Folder icon or through the File menu -> Open.
Please make sure that your files are properly vectorized before opening in SignCut. The application will only be able to support the following files:
1. SignCut (.sc)
2. SignCut Pro 2 (scpro2)
3. Ai — Adobe Illustrator (.ai) — Best format to use in Illustrator 8 version Exporting Format: Illustrator 8
4. EPS — Encapsulated PostScript (.eps)
5. PS — Postscript (.ps)
6. CDR — Corel Draw (.cdr)
7. PDF — Portable Document Format (.pdf)
8. SVG — Scalable Vector Graphic (.svg)
9 EMF — Enhanced Windows Metafile (.emf)
11. DXF — Autocad Drawing Exchange Format (.dxf)
12. HPGL — Hewlett Packard Graphic Language (.plt)
13. RTF — Rich Text Format (.rtf)
Now, you are all set! If you wish to know more about SignCut and its features, you may visit our Youtube Channel here.
Did you find it helpful?
Yes
No
Send feedback
Sorry we couldn’t be helpful. Help us improve this article with your feedback.
USB Connection
A communication driver must be installed unless the cutting plotter is plug-and-play compatible.
Plug-and-Play
The cutter’s name will show up automatically in the output list in SignCut as a printer, normally, with the name of the manufacturer or model.
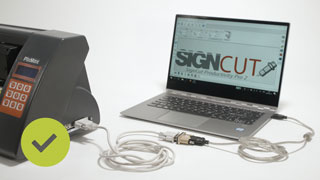
Correct way to install the USB-driver
- Install the USB-driver for the cutter. You can find the proper driver on the manufacturer’s or reseller’s website.
- Once installed, connect the USB-cable as shown in the illustration on the right.
- Power on the cutting plotter and it will show up in the SignCut output list.
Ethernet or TCP/IP Connection
The process to set up the cutting plotter varies. Check the manual for instructions.
Once you have the IP address of the cutter, enter it in SignCut and continue to the next step.
This video shows how to enter the IP address in SignCut. Click to start and watch the video in fullscreen.
Serial to USB Connection
Serial communication is the most stable communication method. If your computer does not have a serial port, you are able to by-pass this through a Serial to USB adapter.
Notice: When using a Serial to USB Adapter, a communication driver must be installed for the computer to recognise it.
Correct way to connect the adapter and serial cable.
- Install the driver that you received with the adapter. If no driver was included, it could usually be found on the manufacturer’s website.
- Connect the adapter and the serial cable between the cutter and computer. See the images below for how to make the correct connection.
- Power on the cutter and it will now show up in the SignCut device list.
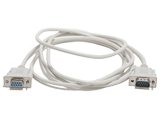
Serial Connection
Serial communication is the most stable communication method. If you have both a cutter and a computer with a serial port, use a serial cable to connect the cutter to the computer. When direct serial communication is used, you do not need to install a driver. The option is shown in the SignCut device list as COM1 or COM2.
Follow these steps to connect the cutting machine to the computer.
- Connect the serial cable to the cutter.
- Connect the other end to the computer.
- Power on the cutter.
- Select the
COM portfrom the SignCut device list.
If the cutter has a serial port, but the computer doesn’t, you can use a Serial to USB converter. Click on Serial to USB tab for setup instructions.
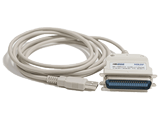
Parallel to USB Connection
Parallel connection is considered outdated because most modern computers do not have parallel ports. For cutters which only have a parallel port, there are Parallel to USB adapters available which means that the cutter can be used with any Windows operating systems.
Note: This does not work with Mac operating systems.
We recommend adapters with FTDI-chip as it is the only type of adapter we support.
Follow these steps to connect the cutter to the computer.
- Install the driver for the adapter.
- Connect the parallel end of the adapter to the cutter.
- Connect the USB end of the adapter to the computer.
- Power on the cutter and it will now show up in the SignCut device list.
- Click OK to close the dialogue.
Parallel Connection
When direct parallel communication is used, you do not need to install a driver.
Follow these steps to connect the cutter to the computer.
- Connect the parallel cable to the cutter.
- Connect the other end to the computer.
- Power on the cutter and it will show up in the SignCut device list.
If no LTP is shown, follow the instructions below.
-
Open the
Control Paneland clickDevice and Printers. -
Click
Add a Printer. -
Click
The printer that I want isn't listed. -
Click
Add a local printerthen click Next. -
Click
Use an existing portandselect LPT1 in the list. Click Next. -
As for the manufacturer, select
Generic, and for the printer, chooseGeneric/text only. Click Next. -
Name the cutter and click Next to install the driver.
-
Choose if you want to share the cutter onto the network and click Next.
Note:We recommend that you do not do this if you are only going to use it on one computer. -
Do not click
Print out a test pageas the cutter can not print. Click Finish instead.
If the cutter has a parallel port, but the computer does not, you can use a Parallel to USB Converter. Click on the Parallel to USB tab for setup instructions.
Click «Next» to continue to the next section.
-
Contents
-
Table of Contents
-
Troubleshooting
-
Bookmarks
Quick Links
You can expect updates to this manual over the next few months
Do NOT read this entire manual… unless you want to.
•
At the start of Chapters 1 — 4 are short sections with references to find what you need plus some important
reminders. PLEASE read these short sections at the very least and refer back to them, when needed.
•
Chapters 1 and 2 are very important in terms of correctly setting up your Skycut to work with SignCut Pro2
and learning the ins and outs of cutting.
•
Chapter 3 is for those owners wanting to perform print and cut applications.
•
Chapter 4 covers using Skycut accessory tools and dual head applications.
•
Chapter 5 covers several SignCut Pro2 functions of interest: creating contour cuts and engraving fills.
It’s not practical to print this entire manual because:
•
It’s a waste of paper and ink if you only ever need certain sections.
•
The live links to videos and web sites in the manual will not work.
•
This manual will be updated from time to time.
•
You cannot search on individual words.
Also:
•
Videos of interest can be found at the following link:
________________________________________________________________
© 2018-2020
Sandy McCauley All Rights Reserved
Skycut Series D with SignCut Pro2
July 3, 2020
Skycut Support Videos
1
Summary of Contents for Skycut D Series
USB Connection
A communication driver must be installed unless the cutting plotter is plug-and-play compatible.
Plug-and-Play
The cutter’s name will show up automatically in the output list in SignCut as a printer, normally, with the name of the manufacturer or model.
Correct way to install the USB-driver
- Install the USB-driver for the cutter. You can find the proper driver on the manufacturer’s or reseller’s website.
- Once installed, connect the USB-cable as shown in the illustration on the right.
- Power on the cutting plotter and it will show up in the SignCut output list.
Ethernet or TCP/IP Connection
The process to set up the cutting plotter varies. Check the manual for instructions.
Once you have the IP address of the cutter, enter it in SignCut and continue to the next step.
This video shows how to enter the IP address in SignCut. Click to start and watch the video in fullscreen.
Serial to USB Connection
Serial communication is the most stable communication method. If your computer does not have a serial port, you are able to by-pass this through a Serial to USB adapter.
Notice: When using a Serial to USB Adapter, a communication driver must be installed for the computer to recognise it.
Correct way to connect the adapter and serial cable.
- Install the driver that you received with the adapter. If no driver was included, it could usually be found on the manufacturer’s website.
- Connect the adapter and the serial cable between the cutter and computer. See the images below for how to make the correct connection.
- Power on the cutter and it will now show up in the SignCut device list.
Serial Connection
Serial communication is the most stable communication method. If you have both a cutter and a computer with a serial port, use a serial cable to connect the cutter to the computer. When direct serial communication is used, you do not need to install a driver. The option is shown in the SignCut device list as COM1 or COM2.
Follow these steps to connect the cutting machine to the computer.
- Connect the serial cable to the cutter.
- Connect the other end to the computer.
- Power on the cutter.
- Select the
COM portfrom the SignCut device list.
If the cutter has a serial port, but the computer doesn’t, you can use a Serial to USB converter. Click on Serial to USB tab for setup instructions.
Parallel to USB Connection
Parallel connection is considered outdated because most modern computers do not have parallel ports. For cutters which only have a parallel port, there are Parallel to USB adapters available which means that the cutter can be used with any Windows operating systems.
Note: This does not work with Mac operating systems.
We recommend adapters with FTDI-chip as it is the only type of adapter we support.
Follow these steps to connect the cutter to the computer.
- Install the driver for the adapter.
- Connect the parallel end of the adapter to the cutter.
- Connect the USB end of the adapter to the computer.
- Power on the cutter and it will now show up in the SignCut device list.
- Click OK to close the dialogue.
Parallel Connection
When direct parallel communication is used, you do not need to install a driver.
Follow these steps to connect the cutter to the computer.
- Connect the parallel cable to the cutter.
- Connect the other end to the computer.
- Power on the cutter and it will show up in the SignCut device list.
If no LTP is shown, follow the instructions below.
-
Open the
Control Paneland clickDevice and Printers. -
Click
Add a Printer. -
Click
The printer that I want isn't listed. -
Click
Add a local printerthen click Next. -
Click
Use an existing portandselect LPT1 in the list. Click Next. -
As for the manufacturer, select
Generic, and for the printer, chooseGeneric/text only. Click Next. -
Name the cutter and click Next to install the driver.
-
Choose if you want to share the cutter onto the network and click Next.
Note:We recommend that you do not do this if you are only going to use it on one computer. -
Do not click
Print out a test pageas the cutter can not print. Click Finish instead.
If the cutter has a parallel port, but the computer does not, you can use a Parallel to USB Converter. Click on the Parallel to USB tab for setup instructions.
Click «Next» to continue to the next section.
Последние добавленные макеты

Копилка «БАНК» Сортирующая монеты
Пазл с котиками
Осьминог
Самосвал
Шкатулка-капля
Светильник «Бабочки»
Смотреть все
-
vla2661
Помогите мне тоже с Signcut. vla2661@mail.ru
melkij60 писал(а): (→)что то много писем по этой теме
короче1- ставите пробную с официального сайта
2 -заменяете все на мои файлы
3- удаляете в програм файл/ синкат/ файлик склаушер(что то такое точно не помню, с дома пишу я в отпуске) выглядит как основной файл синката
4 -либо делаете новый файл ярлык на прогу и пихаете его на раб.стол либо ,на раб столе редактируете основной ярлык. там в пути надо этот склаушер заменить на синкат
будет работать по пол дня, если повторять все операции опять будет работать пол дня
5- блокируем прогу брендмауэром как? смотрите в яндексе (или антивирусом )на все исходящее и исходящее
будет работать не по пол дня
вот тогда радуемсяверсия с сайта пробная нужна для роботы с последними коралами
у меня работает даже с интернетом
если не понятно сниму видео после отпуска
Добавлено спустя 1 минуту 33 секунды:
Помогите с Signcut. ооооЧЕНЬ надо а ни чего рабочего найти не могу…
-
Baska
Сообщение Baska » 12 мар 2015 19:28
Приветствую!
Такая же ситуация. Кончилась лицензия на SignCut
Поставщики плоттера вообще не предупредили о такой ситуации.
Для оперативности пришлось продлить на неделю за 8$ а с нынешним курсом это 500р!)))
Друзья, если есть возможность, выложите ссылку на фалы актуальные или пришлите на
Basnev.Dima@gmail.com
буду крайне признателен! Заранее СПАСИБО!!!!
-
itemno
Сообщение itemno » 13 апр 2015 16:58
Уважаемый автор темы,
не могли бы поделиться патчем для SignCut.
Буду очень благодарен. ![]()
itemno@gmail.com
-
melkij60
Сообщение melkij60 » 14 апр 2015 12:22
подменить все файлы
блокирнуть все влезания в инет сингада
инет подключить после
а так все на форуме описано, если нечего не поменяли
ключ fo2035327422014341412-52485
download51.files.attachmail.ru/06FA487B6B374D319980954B9B34EBE2/4ccb11d6bcf8b80eca339ba1304407e6/SignCut.rar
-
itemno
Сообщение itemno » 17 апр 2015 13:12
melkij60 писал(а): (→)подменить все файлы….r
поправьте, пожалуйста, ссылку — ошибку 404 выдает
-
melkij60
Сообщение melkij60 » 17 апр 2015 14:44
-
kot1988
Сообщение kot1988 » 19 апр 2015 17:41
melkij60 писал(а): (→)https://cloud.mail.ru/public/3jUv9K2RBNK3/SignCut.rar
![]() Большое человеческое спасибо
Большое человеческое спасибо
-
itemno
Сообщение itemno » 20 апр 2015 10:20
melkij60 писал(а): (→)https://cloud.mail.ru/public/3jUv9K2RBNK3/SignCut.rar
спасибо!!!
-
itemno
Сообщение itemno » 27 апр 2015 11:08
внесу свои 5 копеек..
После того как переписали папки, выложенные уважаемым melkij60 программу нужно обновить (установить последний апдейт). Иначе не видит плоттер (у меня подключен по USB). В этот момент скорее всего слетит лицензия. Не нужно удалять и переустанавливать по новой всю программу — снесите папку C:\Users\….\AppData\Roaming\SignCut
и все.. правда в этот момент слетают все настройки программы, но их проще восстановить чем переписывать программу.
Что сделать чтобы лицензия больше не слетала:
1. Править хост-файл — в 7-й винде лежит в папочке C:\Windows\System32\drivers\etc…
копируем на рабочий стол, открываем в блокноте и добавляем строчки
127.0.0.1 crl.globalsign.net
127.0.0.1 signcutpro.com
127.0.0.1 globalsign.net
сохраняем и переписываем в исходную папку
2. Блокируем в брэндмауэр виндовс все входящие и исходящие подключения для SignCut
у меня больше недели уже полет нормальный
![]()
-
Tujh
- Постоянный участник

- Сообщения: 117
- Зарегистрирован: 12 апр 2012 09:22
- Последний визит: 14 ноя 2023 14:33
- Изменить репутацию:
Репутация:
Голосов: 1 - Откуда: Санкт Петербург

Сообщение Tujh » 04 май 2015 14:47
ПРИВЕТСТВУЮ всех форумчан! Сделал как написано-поменял файлы. Сначала резал но уменьшал размер в разы при резке, потом поменял галочку где размер макета вместо изображение постафит знак, пустил на резку все ок, повторно пустил и все 10*10 только. Есть ли еще какой нибудь способ запустить ?
-

i1
- Новичок
- Сообщения: 21
- Зарегистрирован: 18 мар 2015 14:11
- Последний визит: 08 янв 2018 10:24
- Изменить репутацию:
Репутация: нет - Откуда: Moscow


Сообщение i1 » 05 май 2015 14:38
Tujh писал(а): (→) и все 10*10 только.
100х100 мм триал-моде без всяких шаманств позволяет резать.
-
Tujh
- Постоянный участник
- Сообщения: 117
- Зарегистрирован: 12 апр 2012 09:22
- Последний визит: 14 ноя 2023 14:33
- Изменить репутацию:
Репутация:
Голосов: 1 - Откуда: Санкт Петербург
Сообщение Tujh » 05 май 2015 17:59
i1 писал(а): (→)
Tujh писал(а): (→) и все 10*10 только.
100х100 мм триал-моде без всяких шаманств позволяет резать.
В смысле без всяких шаманств, он не даёт резать больше 10*10 см
-
Tujh
- Постоянный участник
- Сообщения: 117
- Зарегистрирован: 12 апр 2012 09:22
- Последний визит: 14 ноя 2023 14:33
- Изменить репутацию:
Репутация:
Голосов: 1 - Откуда: Санкт Петербург
Сообщение Tujh » 05 май 2015 20:43
переустановил, повторил операцию с заменой, ввел серийный номер выше предоставленый по теме, пару раз вырезал ок — и на этом счастье закончилось. ![]() что делать незнаю
что делать незнаю
Вернуться в «Программные вопросы плоттерной резки»
Кто сейчас на конференции
Сейчас этот форум просматривают: нет зарегистрированных пользователей и 0 гостей

Contents
- 1 скачать Signcut Pro 2 Build 1459 Ml Rus And Portable для дизайн
- 2 Signcut Pro 2: Cutting By Length Or By Width (sorting)
- 2.1 Conclusion
- 2.1.1 Related image with скачать signcut pro 2 build 1459 ml rus and portable для дизайн
- 2.1.2 Related image with скачать signcut pro 2 build 1459 ml rus and portable для дизайн
- 2.1 Conclusion
Step into a realm of limitless possibilities with our blog. We understand that the online world can be overwhelming, with countless sources vying for your attention. That’s why we stand out by providing well-researched, high-quality content that educates and entertains. Our blog covers a diverse range of interests, ensuring that there’s something for everyone. From practical how-to guides to in-depth analyses and thought-provoking discussions, we’re committed to providing you with valuable information that resonates with your passions and keeps you informed. But our blog is more than just a collection of articles. It’s a community of like-minded individuals who come together to share thoughts, ideas, and experiences. We encourage you to engage with our content, leave comments, and connect with fellow readers who share your interests. Together, let’s embark on a quest for continuous learning and personal growth. 2013 studio mlrus eng — 2320 ex build signcut 5-0-2 and 1459 — 2 portable manga pro

все нужные редкие герои для секреток Raid Shadow Legends Youtube
все нужные редкие герои для секреток Raid Shadow Legends Youtube
Qué Pasó El 6 De Julio Startupassembly Co
Qué Pasó El 6 De Julio Startupassembly Co

Http Img0 Joyreactor Cc Pics Post Full Fantasy Art D0 Ba D1 80 D0 B0
Http Img0 Joyreactor Cc Pics Post Full Fantasy Art D0 Ba D1 80 D0 B0
Signcut Pro 2: Cutting By Length Or By Width (sorting)
Signcut Pro 2: Cutting By Length Or By Width (sorting)
did you know that you can choose to cut by length or by width in signcut pro 2? the sorting function in the cut out settings learn how to prepare for your sign cutting, with signcutdraw. signcut pro 2. did you know that you can set your image’s position on vinyl directly in pro 2? does manually jogging your cutter to start at a short, easy to understand tutorial on the basics of the signmaster cut software & vinyl cutter. signcut pro 2 is the easiest to use, and most up to date vinyl cutting software ever created! a brief through of the basics of signcut. this video contains information about: opening an image. setting the size of the today we introduce the vulcan fc500vc software coreldraw plug in and automatic create image contour. the correct way to set your cutter blade depth for any brand vinyl cutter. hey everyone! in this video i consolidate a ton of techniques we’ve covered in previous videos to make a vinyl military style animal provided to by translation enterprises d b a united masters cut · high quality the label llc · veeto something outta este video es una muestra para los clientes que desean adquirir el pluing de corel para corte de
Conclusion
All things considered, it is clear that the article delivers useful knowledge regarding скачать Signcut Pro 2 Build 1459 Ml Rus And Portable для дизайн. From start to finish, the author illustrates a wealth of knowledge on the topic. Notably, the discussion of X stands out as a key takeaway. Thank you for taking the time to this post. If you need further information, feel free to reach out through social media. I am excited about your feedback. Furthermore, here are some related content that you may find useful:
Related image with скачать signcut pro 2 build 1459 ml rus and portable для дизайн
Related image with скачать signcut pro 2 build 1459 ml rus and portable для дизайн
SignCut Pro 2 Crack is the most important sign-creation software in the world. Whether you use CorelDraw, Adobe Illustrator, or the popular free software to create your templates/illustrations, SignCut is perfect for you, especially with our plugins that get you working on SignCut in no time. SignCut is the most efficient and flexible professional sign design software available today. Perfectly adapted for both Mac and Windows, it can be used in 19 different languages and with over 720 different cutters. Export plugins are available for CorelDraw, Illustrator, and Inkscape. Cut by color and any combination of colors. Blade compensation software. Automatic cladding/paneling with additional overlap.

With SignCut Pro Crack, you need to scan the QR code displayed on the site using your mobile phone (or tablet) and perform the necessary actions on your device. When you buy, use a camcorder to scan the program code on your phone. Apple mobile phones do not require any additional software (just point the cameras at the QR code of the program and follow the instructions). Manual plating/paneling with additional overlap. Supports communication with most devices (COM / LPT / USB / TCP-IP). Drivers for over 720 cutting plotters. Plotter/cutter calibration. It folds automatically and sits on vinyl. Scale to any size. Scale the image according to the partial object (useful for restoring signaling). Print load information, including boards and board placement. Rotate and mirror the image. Weeding lines and wedding frames.
SignCut Pro Crack With Key Free Download
Android phones do not require third-party applications. For those who have problems, we recommend reading the QR requirements system. Privacy-friendly scanner (usually we are not affiliated with this program, but we researched this application and it works with its basic features). Offering CorelDraw, Adobe Illustrator, and the popular free Inkscape drawing/illustration software, Entonces SignCut is a combination of special and perfect add-ons for SignCut transfer and instant printing. Thank you for downloading SignCut Pro Key from our software portal. The license type of the downloaded program is shareware. This type of license may impose certain performance limitations or may only provide an evaluation period.
This software is regularly checked by our antivirus system. We also encourage you to check the data files with your antivirus program before starting the installation. Usually, download SignCut’s latest version. Trademarks. Cut step by step (stop feeding vinyl back and forth). Preview (displays the same data sent to the device). Feed test (pre-feeds the vinyl and also checks if the tracking is ok). Supports cutting the optical contours of the eyes. Fixing structure. Production of signs of any type and size. Creating identification plates and company logos. Create stripes and logos for vehicles. Make masks for airbrushing, tattooing, painting, and blasting. Create large multi-plate works with the unique assembly tool. Make banners. Cut the magnetic sheets.
SignCut Pro Crack Download
It creat a transfer for clothing. SignCut Pro is a professional sign-making program. Plugins are available for other graphic design packages, such as CorelDRAW X6, Adobe Illustrator CS6, and Inkscape. It can be used with over 720 different cutting plots (hardware). Drivers for over 440 plotters/cutters are already included in the installation. The search for Signcut Productivity Professional 1.96 will provide more accurate download results if you omit keywords such as partition, serial number, activation, program code, download, key generator, etc. Various downloads, such as Signcut Efficiency Pro 1.96, can optionally consist of a serial number, an Essential CD, or a keygen. If so, then it is usually included in the download store itself with a full break.
The SignCut BoxMaker:
- Browse an array of ready-to-use box templates for your personal, school, or business needs.
- Pick and edit the dimensions of the shape that best suits your projects.
- Download for later use or send directly to your plotter for cutting.
- Graphic Tracer Smart tools that will fix bad graphics.
- Get professional results with tools that restore logos to their original look.
Graphics Restoration Software:
- Graphic Tracer lets you quickly and easily trace and restore ugly.
- Jagged, and pixelated graphics into beautiful, scaleable high-quality vector graphics that are ready to use.
- Get perfect texts with the actual font
- Turning jagged and pixelated texts into the correct font will without any doubt give.
- You have the best possible vector graphics for text.
SignCClipartrts Library:
- Up to 75,000 free and royalty-free clipart images and vector illustrations to use!
- Creative inspirations for all your crafts and projects in our SignCut DRAW clipart library.
- Categories range from animals, food, patterns, numbers, objects, vehicles and so much more.
Layout Design Software:
- SignCut Draw covers all your vector design requirements.
- Its advanced features provide efficient and easy design tools allowing customers to create designs faster than ever before.
Import and Export Format Support:
- With support for both import and export of AI, EPS, and SVG files.
- SignCut Draw is very useful for both its range of vector tools and as a complement to the design software your customers use today.
Incredible Features:
- It includes all basic drawing features, color separation, and three different kinds of vectorization.
- Text tool, node editing, quick export to SignCut for cutting, and many more features.

Feature of SignCut Pro Crack:-
Vectorization:
- The vectorization tool makes it easier than ever before to convert raster images (built by dots) into vector images (built by contour lines) needed for your machine to be able to cut the image.
Freehand Drawing:
- The freehand drawing tool together with SignCut Draw’s unique zoom feature allows you to draw your shapes freely or easily freehand draw a low-resolution bitmap.
Import and Export Options:
- Import vector formats such as AI, EPS, PS, PDF, DXF, PLT, SVG, and SVGZ formats.
- As well as exporting AI, EPS, SVG, DXF, and SignCut Draw’s own SCD formats.
- Send files easily from SCD to SignCut Pro with a single click!
Weld:
- With a single click, welding allows you to weld overlapping objects together so the object can be cut out without destroying the material when cutting overlapping shapes and scripted fonts.
Text Tool:
- Use any downloaded and installed fonts in Windows.
- Change fonts, resize, reshape, bend, and arc texts.
- Enter the text size or specify an area to resize the text.
Alignment and Guideline Tools:
- Lets you align single or multiple objects within a selection.
- Create guidelines vertically and horizontally or define a specific angle for better alignment.
Effects Tool:
- Find powerful tools such as Contour for shadow effects, Punch with overlap and gap, Fill and Bend for text, shapes, and other objects, and Rhinestool allows you to add rhinestones and create Hatchlings for engraving.
Shortcuts:
- Do things easier and smoother around SCD by learning shortcut functions.
- Move selected objects with arrow keys, gear in and out the step lengths with keys 1-0, zoom in and out by spacebar taps and so much more.
Node Editing:
- Activate this tool when you want to edit an object.
- It features a preview of the original shape in the background as a reference.
- This also allows you to sharpen or smoothen lines, and reduce or break nodes apart.
Single and Multi-Contours:
- Allows you to add contour for up to 3 layers at the same time (shadow effects).
- You can place the contours inside or outside an object and decrease and increase the distance of each contour.
Clipart Library:
- Allows you to build your clipart library from your cutting files.
- Organize and specify your favorite folder/s as well as browse other folders.
- Drag and drop your design from the preview to the work area!
Shape Tools:
- Create standard shapes: round, cornered, scalloped and ordinary rectangles, ellipses, polygons, stars, and arrows.
- It has a QR-code generator specifically adapted for vinyl cutting.
System Requirements:-
- Windows: XP or higher
- Memory: 256 MB system RAM
- Hard Drive: 120 MB or more free space
- Output: USB, serial/parallel to USB converter,
- parallel: TCP/IP, Ethernet
How to Install?
- Download from the given link or button first.
- Uninstall the previous version with IObit Uninstaller Pro.
- Turn ,off Virus Guard.
- Then extract the WinRAR file and open the folder.
- We start the installation and close it from anywhere.
- Open the Crack or Patch folder, and copy and paste it into the installation folder.
- Or use a serial number to activate the program.
- Done!