
Инструкции по эксплуатации
Мы позаботились о том, чтобы ваша швейная машина была проста и легка в использовании. Для вашей безопасности и для того, чтобы вы с удовольствием шили на своей машине. Мы рекомендуем вам ознакомиться с инструкцией по эксплуатации для вашей швейной машины и использовать ее в процессе работы.
Подробно изучите инструкцию перед началом работы, вы узнаете о большом количестве возможностей вашей машины и ее преимуществах.
Ниже представлены инструкции как на действующий ассортимент компании Jaguar, так и на машины снятые с производства.
 Инструкция по эскплуатации Jaguar 212 Инструкция по эскплуатации Jaguar 236 Инструкция по эскплуатации Jaguar 242
Инструкция по эскплуатации Jaguar 250 Инструкция по эскплуатации Jaguar 255 Инструкция по эскплуатации Jaguar 271
Инструкция по эскплуатации Jaguar 276 Инструкция по эскплуатации Jaguar 284 Инструкция по эскплуатации Jaguar 6423
Инструкция по эскплуатации Jaguar 6434 Инструкция по эскплуатации Jaguar 121 Инструкция по эскплуатации Jaguar 139
Инструкция по эскплуатации Jaguar 143 Инструкция по эскплуатации Jaguar 145 Инструкция по эскплуатации Jaguar 135
Инструкция по эскплуатации Jaguar 137 Инструкция по эскплуатации Jaguar 590 Инструкция по эскплуатации Jaguar 592
Инструкция по эскплуатации Jaguar 594 Инструкция по эскплуатации Jaguar 596 Инструкция по эскплуатации Jaguar 055D
Инструкция по эскплуатации Jaguar 087DW
Инструкция по эскплуатации Jaguar 171 Инструкция по эскплуатации Jaguar 176 Инструкция по эскплуатации Jaguar 181
Инструкция по эскплуатации Jaguar 281 Инструкция по эскплуатации Jaguar 310 Инструкция по эскплуатации Jaguar 312
Инструкция по эскплуатации Jaguar 314 Инструкция по эскплуатации Jaguar 316 Инструкция по эскплуатации Jaguar 333
Инструкция по эскплуатации Jaguar 383 Инструкция по эскплуатации Jaguar 386 Инструкция по эскплуатации Jaguar 415
Инструкция по эскплуатации Jaguar 555 Инструкция по эскплуатации Jaguar 562 Инструкция по эскплуатации Jaguar 568
Инструкция по эскплуатации Jaguar 630 Инструкция по эскплуатации Jaguar 640 Инструкция по эскплуатации Jaguar 660
Инструкция по эскплуатации Jaguar 444 Инструкция по эскплуатации Jaguar 745 Инструкция по эскплуатации Jaguar 777
Инструкция по эскплуатации Jaguar 780 Инструкция по эскплуатации Jaguar 781 Инструкция по эскплуатации Jaguar 782
Инструкция по эскплуатации Jaguar 786 Инструкция по эскплуатации Jaguar 787 Инструкция по эскплуатации Jaguar 788
Инструкция по эскплуатации Jaguar 789 Инструкция по эскплуатации Jaguar 888 Инструкция по эскплуатации Jaguar 961
Инструкция по эскплуатации Jaguar 962 Инструкция по эскплуатации Jaguar 966 Инструкция по эскплуатации Jaguar 967
Инструкция по эскплуатации Jaguar 999
Перейти к контенту
Швейные машинки Jaguar

- Размер инструкции: 1.49 Мб
- Формат файла: pdf
Если вы потеряли инструкцию от швейной машинки Jaguar 444, можете скачать файл для просмотра на компьютере или печати.
Инструкция для швейной машинки Jaguar 444 на русском языке. В руководстве описаны возможности и полезные функции, а также правила эксплуатации. Перед использованием внимательно ознакомьтесь с инструкцией.
Чтобы не читать всю инструкцию вы можете выполнить поиск по содержимому внутри инструкции и быстро найти необходимую информацию. Рекомендации по использованию помогут увеличить срок службы швейной машинки Jaguar 444. Если у вас появилась проблема, то найдите раздел с описанием неисправностей и способами их решения. В нем указаны типичные поломки и способы их решения.

 JAGUAR
INSTRUCTION MANUAL
745 / 444
FREEARM, LIGHTWEIGHT, SUPER-AUTOMATIC WITH BUILT-IN PRACTICAL STITCHES AND STRETCH STITCHES
“IMPORTANT SAFETY INSTRUCTIONS”
“When using an electrical appliance, basic safety precautions should always be followed, including the following.”
“Read all instructions before using this sewing machine.”
“DANGER—To reduce the risk of electric shock:”
1.“ This sewing machine should never be left unattended when plugged in. Always unplug this sewing machine from the electric outlet immediately after using and before cleaning.”
2.“ Always unplug before replacing light bulb. Replace bulb with same type rated 15 watts.”
This appliance complies with EEC Directive 89/336/EEC covering the electromagnetic compatibility.
“WARNING—To reduce the risk of burns, fire, electric shock, or injury to persons: ”
1.“Do not allow to be used as a toy. Close attention is necessary when this sewing machine is used by or near children.”
2.“Use this sewing machine only for its intended use as described in this manual. Use only attachments recommended by the manufacturer as contained in this manual.”
3.“Never operate this sewing machine if it has a damaged cord or plug, if it is not working properly, if it has been dropped or damaged, or dropped into water. Return the sewing machine to the nearest authorized dealer or service center for examination, repair, electrical or mechanical adjustment.”
4.“Never operate the sewing machine with any air openings blocked. Keep ventilation openings of the sewing machine and foot control free from the accumulation of lint, dust, and loose cloth.”
5.“Never drop or insert any object into any opening.”
6.“Do not use outdoors.”
7.“Do not operate where aerosol (spray) products are being used or where oxygen is being administered.”
8.“To disconnect, turn switch to the off (“0”) position, then remove plug from outlet.”
9.“Do not unplug by pulling on cord. To unplug, grasp the plug, not the cord.”
10.“Keep fingers away from all moving parts. Special care is required around the sewing machine needle.”
11.“Never sew with a damaged needle plate as this can cause needle to break.”
12.“Do not use bent needles.”
13.“Do not pull or push fabric while stitching. It may deflect the needle causing it to break.”
14.“Switch the sewing machine off (“0”) when making any adjustments in the needle area, such as threading needle, changing needle, threading bobbin, or changing presser foot, etc.”
15.“Always unplug sewing machine from the electrical outlet when removing covers, lubricating, or when making any other user servicing adjustments mentioned in the instruction manual.”
“CAUTION—Moving parts—To reduce risk of injury, switch off before servicing. Close cover before operating machine.”
“SAVE THESE INSTRUCTIONS”
“This product is for household use, or equivalent.”
1

Этот бытовой прибор соответствует требованиям подавления радиопомех, установленным директивой
Европейского Экономического Сообщества 89/336/EEC.
*Данное изделие сертифицировано Госстандартом России на соответствие требованиям нормативных документов ГОСТ 27570.0-87, ГОСТ 27570.22-89,
ГОСТ 23511-79, ГОСТ Р 50033-92.
**Предприятием-изготовителем установлены:
•срок гарантии — 1 год
•срок службы швейной машины — 7 лет со дня покупки.
Уважаемый покупатель!
Вы приобрели бытовую швейную машину старейшей японской фирмы «Ягуар Ко., ЛТД.».
Надеемся, что работа на этой машине доставит Вам радость и удовольствие.
Напоминаем Вам, что при пользовании швейной машиной необходимо соблюдать следующие меры предосторожности:
• при проведении ремонта, снятии крышек, замене лампы накаливания (макс. мошность-15 Вт), смене иголки, челнока, игольчатой пластины, лапок следует отключить питание отсоединением штепсельной вилки из сетевой розетки.
• пластиковые упаковочные пакеты могут быть опасны, во избежание опасности задохнуться
|
убирайте эти пакеты от младенцев и детей. |
|
|
Перечисленные меры предосторожности |
|
|
представлены в инструкции по эксплуатации, |
|
|
а также могут быть указаны на педали- |
|
|
регуляторе и её упаковочном пакете на |
|
|
2 |
иностранном языке. |

|
TABLE OF CONTENTS |
|
|
Machine identification —————————————————— |
4 |
|
Accessories ——————————————————————- |
5 |
|
Setting up your machine ————————————————— |
6 |
|
Foot control, Power/light switch, Spool pin, |
|
|
Presser foot lever |
|
|
Winding bobbin ————————————————————— |
7 |
|
Removing bobbin case from shuttle ———————————— |
8 |
|
Inserting bobbin into bobbin case ————————————— |
9 |
|
Inserting bobbin case into shuttle ————————————— |
9 |
|
Needle, thread and fabric chart —————————————— |
10 |
|
Threading top thread —————————————————— |
11 |
|
Picking up bobbin thread ————————————————- |
12 |
|
Adjusting top thread tension ——————————————— |
13 |
|
Adjusting bobbin thread tension —————————————- |
14 |
|
Changing presser feet —————————————————- |
15 |
|
Stitch selector and indicator ——————————————— |
15 |
|
Stitch length/super (stretch) stitch control ————————— |
16 |
|
Reverse stitch lever ——————————————————— |
16 |
|
Converting to free-arm sewing —————————————— |
16 |
|
Machine setting chart ———————————————— |
17 — 18 |
|
Straight stitch ———————————————————- |
19 — 21 |
|
Starting to sew, Removing fabric, Turning a square corner, |
|
|
Inserting zips and piping |
|
|
Zigzag stitch —————————————————————— |
22 |
|
Overcasting, Satin stitch |
|
|
Blind stitch ——————————————————————— |
23 |
|
Three-step zigzag ———————————————————- |
24 |
|
Double-action stitch ——————————————————— |
24 |
|
Lingerie stitch ————————————————————— |
25 |
|
Faggoting ——————————————————————— |
25 |
|
Stretch stitch ———————————————————— |
26 — 27 |
|
Triple straight stitch, Ric-rac stitch, Overlock stitch, |
|
|
Smocking stitch |
|
|
Decorative embroidery designs —————————————- |
28 |
|
Tips on design stitching |
|
|
Buttonhole making ————————————————— |
29 — 30 |
|
Adjusting stitch length, Procedure, Corded buttonhole |
|
|
Caring for your machine ————————————————— |
31 |
|
Cleaning the feed dogs and shuttle area, |
|
|
Changing light bulb |
|
|
Check chart for performance problems ——————————- |
32 |
3
1
2
3
4
5
6
21
22
23
24
25
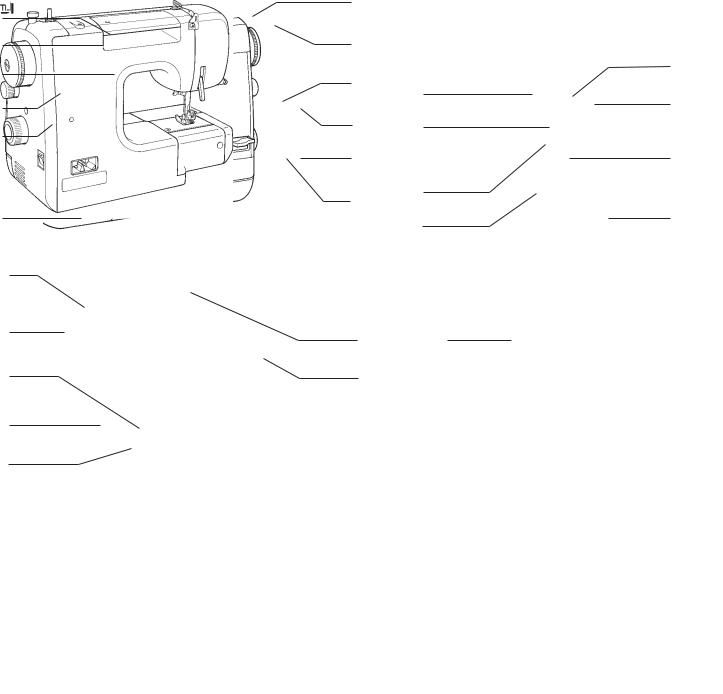
MACHINE IDENTIFICATION
|
1. |
Bobbin winder tension disc |
15. |
Needle |
|
2. |
Thread take-up |
16. |
Feed dogs |
|
3. |
Thread tension control |
17. |
Needle clamp screw |
|
4. |
Face cover |
18. |
Foot release lever |
|
5. |
Thread cutter |
19. |
Presser foot |
|
6. |
Extension table |
20. |
Needle plate |
|
7. |
Bobbin winder shaft |
21. |
Hand wheel |
|
8. |
Bobbin winder stop |
22. |
Clutch knob |
|
9. |
Stitch indicator |
23. |
Foot control socket |
|
10. |
Stitch length control |
24. |
Power/light switch |
|
11. |
Stitch selector |
25. |
Identification plate |
|
12. |
Reverse stitch lever |
26. |
Carrying handle |
|
13. |
Thread guide |
27. |
Presser foot lever |
|
14. |
Presser foot screw |
28. |
Foot control |
4
|
1 |
2 |
3 |
4 |
5 |
|
6 |
7 |
8 |
9 |
10 |
11 |
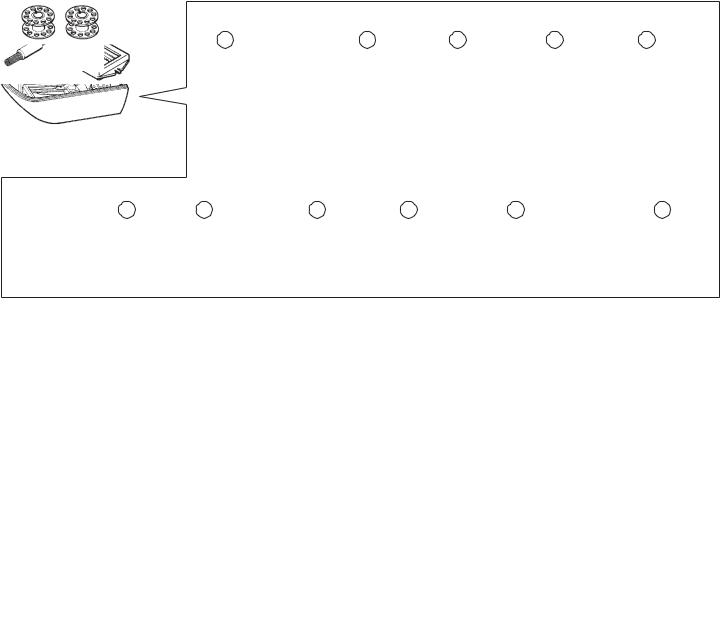
ACCESSORIES
In accessory box
|
1. |
Needles |
6. |
Screwdriver (large) |
11. Buttonhole foot |
|
2. |
Bobbins |
7. |
Screwdriver (small) |
|
|
3. |
Spool pin |
8. |
Brush |
|
|
4. |
Spool pin disc |
9. |
Blind stitch foot |
|
|
5. |
Buttonhole opener |
10. |
Zipper foot |
|
1 |
6 |
11 |
|
2 |
||
|
3 |
9 |
|
|
4 |
||
|
5 |
10 |
5
Power/light switch
B
A
Foot control
SETTING UP YOUR MACHINE
Be sure to wipe off any surplus oil from needle plate area before using your machine the first time.
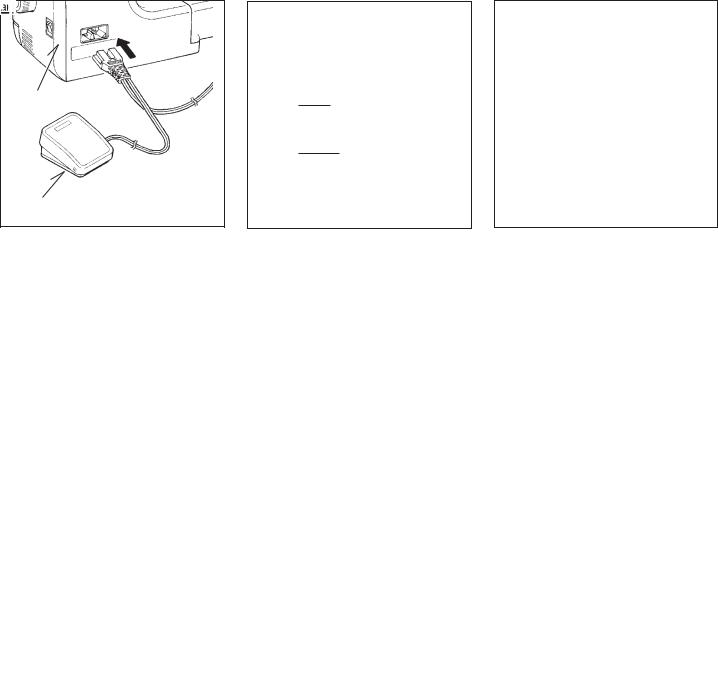
FOOT CONTROL
Push foot control plug into the connector socket on the back of the machine.
POWER/LIGHT SWITCH
Your machine will not operate until the power/light switch is turned on. The same switch controls both the power and the light. When servicing the machine, or changing needles or Iamps, etc., machine must be disconnected from the mains supply.
SPOOL PIN
Attach the spool pin (A) and place a felt disc (B) over it. Place a spool of thread on the spool pin.
6
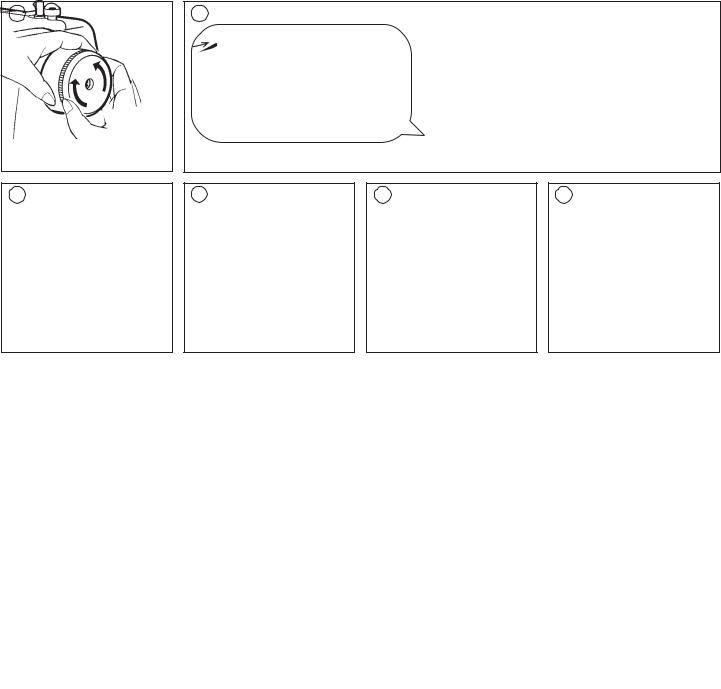
WINDING BOBBIN
1.Release clutch holding hand wheel and turning clutch knob towards you.
2.Pass thread from spool through thread guides as shown.
3.Pull end of thread through hole in bobbin as shown.
4.Push bobbin winder shaft to far left position, if it is not already there. Place bobbin onto shaft with end of thread coming from
top of bobbin. Push bobbin winder shaft to right until it clicks. Hold onto end of thread.
5.Start machine. The thread that is held will snap. Bobbin will cease turning when completely filled. Push shaft to left to remove bobbin.
6.Tighten clutch knob and remove bobbin.
7
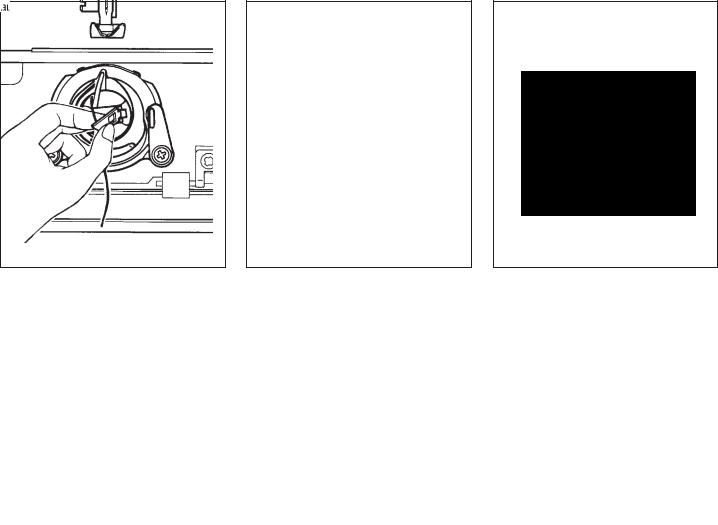
REMOVING BOBBIN CASE FROM SHUTTLE
1.Remove the extension table from the machine.
Raise the needle to its highest position by turning hand wheel manually towards you.
2.Open the bobbin access cover by pulling it down.
With your fingers, pull open the bobbin case latch as shown, and take out the bobbin case from the shuttle.
3.Release the latch, and bobbin will drop out of the case.
8
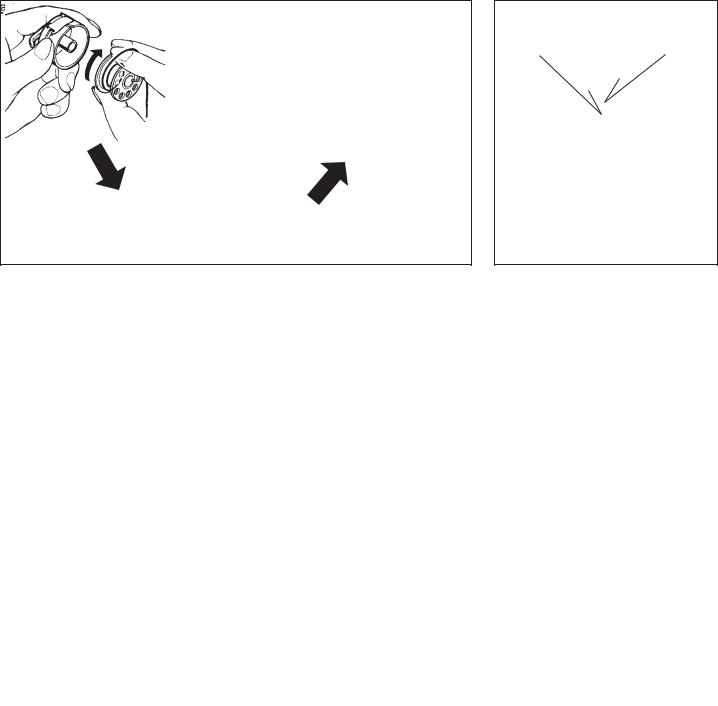
Locating pin
Locating groove
INSERTING BOBBIN INTO BOBBIN CASE
1.Hold the bobbin in your right hand with the thread running clockwise.
2.Insert the bobbin into the case with about 4” (10 cm) of thread showing outside the case.
3.Pull the thread through the slit in the case and then underneath the flat tension spring. It will click when it is in place.
9
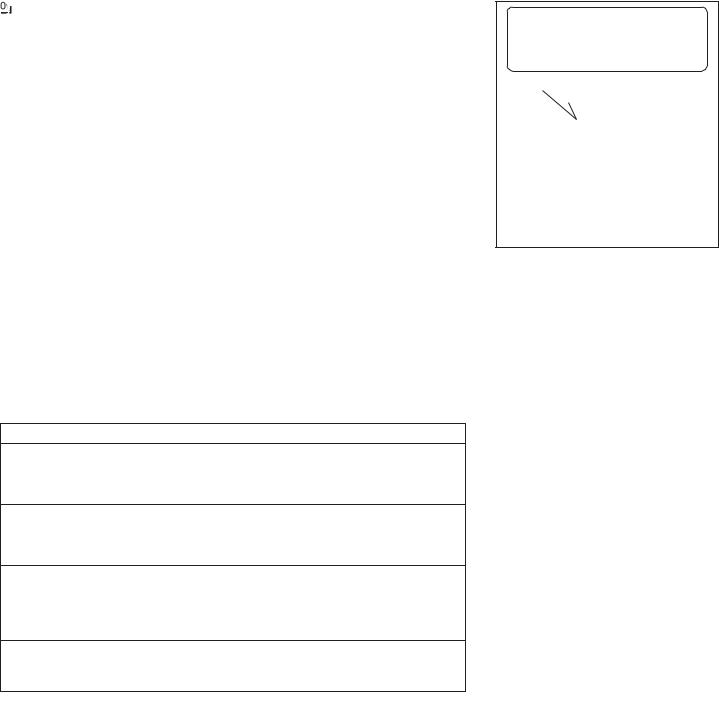
NEEDLE, THREAD AND FABRIC CHART
|
Use the standard needles. The size of your |
on the upper part of the machine. |
||||
|
needle should match the size of the thread |
Never use a bent or dull needle. |
||||
|
and both should match the fabric. |
For successful sewing of stretch fabrics |
||||
|
For normal sewing, the same size and type |
use stretch stitch needles. |
||||
|
of thread should be used in the bobbin as |
|||||
|
Thread Size |
Needle Size |
Fabric |
|||
|
Cotton 60 — 100 |
Stretch stitch |
All stretch fabrics. |
|||
|
Synthetic |
needle |
||||
|
Machine embroidery |
|||||
|
Cotton |
70 |
Sheer cottons, silk |
|||
|
Synthetic |
synthetics, fine laces, |
||||
|
or |
|||||
|
Silk A |
batiste, dimity. |
||||
|
80 |
|||||
|
Machine embroidery |
|||||
|
Cotton 60 — 80 |
80 |
Medium weight cottons, |
|||
|
Mercerized 50 — 60 |
medium weight synthetics, |
||||
|
or |
|||||
|
Synthetic |
poplin, seersucker, |
||||
|
90 |
|||||
|
gingham, velvet, light |
|||||
|
weight woolens, linen. |
|||||
|
Cotton 30 — 60 |
Heavy weight cottons, |
||||
|
Mercerized heavy |
100 |
medium to heavy |
|||
|
duty |
weight woollens, denim. |
60 — 1
70


 —
—
5
1
3
”
10
 Loading…
- Главная
- Швейные машины
- Jaguar

- Система измерения размера пуговицесть
- Тип управленияэлектромеханическое
- Освещениеесть
- Кнопка реверсаесть
- Строчкипотайная, эластичная, эластичная потайная
- Выполнение петлиполуавтомат
- Максимальная ширина стежка5 мм
- Количество швейных операций13
- Максимальная длина стежка4.5 мм
- Лапкидля вшивания молнии
- Показать все
Здесь вы можете изучить характеристики, видео обзоры, отзывы покупателей о Jaguar 444
Цена от 7500 ₽
(на март 2021)
Характеристики Jaguar 444
Основные характеристики*
| Система измерения размера пуговиц | есть |
| Тип управления | электромеханическое |
| Освещение | есть |
| Кнопка реверса | есть |
Операции*
| Строчки | потайная, эластичная, эластичная потайная |
| Выполнение петли | полуавтомат |
| Максимальная ширина стежка | 5 мм |
| Количество швейных операций | 13 |
| Максимальная длина стежка | 4.5 мм |
Конструкция*
| Отсек для аксессуаров | есть |
| Вышивальный блок | нет |
| Рукавная платформа | есть |
| Размеры (ШxГxВ) | 35x16x26 см |
| Чехол | мягкий |
| Вес | 6.5 кг |
| Дисплей | нет |
* Точные параметры уточняйте на сайте продавца.
Отзывы пользователей о Jaguar 444