
ǾȡȘȜȐȜȒȟȠȐȜ ȝȜ ȫȘȟȝșȡȎȠȎȤȖȖ
140s
160s
SMARTER BY PFAFF™ ² ȖȒȓȭ Ȗ ȞȎȕȞȎȏȜȠȘȎ ȜȠ ȝȞȓȚȖȎșȪțȜȑȜ ȦȐȓȗțȜȑȜ ȏȞȓțȒȎ PFAFF®
ȋȠȜȠ ȝȞȜȒȡȘȠ ȞȎȕȞȎȏȜȠȎț ȟȜȑșȎȟțȜ dzȐȞȜȝȓȗȟȘȜȚȡ ȟȠȎțȒȎȞȠȡ ,(& (1 Ȗ 8/
ǕǚǞǟǝǠǗǣǕǬ ǜǛ ǟǒǢǚǕǗǒ
ǎǒǔǛǜǍǞǚǛǞǟǕ
ǽȞȖ ȞȎȏȜȠȓ ȟ ȫșȓȘȠȞȖȥȓȟȘȖȚȖ ȝȞȖȏȜȞȎȚȖ ȐȟȓȑȒȎ ȟȜȏșȬȒȎȗȠȓ ȜȟțȜȐțȩȓ ȚȓȞȩ ȝȞȓȒȜȟȠȜȞȜȔțȜȟȠȖ ǽȞȓȔȒȓ ȥȓȚ ȝȜȒȘșȬȥȖȠȪ ȚȎȦȖțȡ Ș ȟȓȠȖ ² ȐțȖȚȎȠȓșȪțȜ ȜȕțȎȘȜȚȪȠȓȟȪ ȟ ȫȠȜȗ ȖțȟȠȞȡȘȤȖȓȗ ȃȞȎțȖȠȓ ȖțȟȠȞȡȘȤȖȬ Ȑ ȡȒȜȏțȜȚ ȚȓȟȠȓ ȞȭȒȜȚ ȟ ȚȎȦȖțȜȗ dzȟșȖ Ȑȩ ȝȓȞȓȒȎȓȠȓ ȚȎȦȖțȡ ȘȜȚȡ țȖȏȡȒȪ ȒȎȔȓ țȎ ȐȞȓȚȭ țȓ ȕȎȏȡȒȪȠȓ ȝȓȞȓȒȎȠȪ ǾȡȘȜȐȜȒȟȠȐȜ ȝȜ ȫȘȟȝșȡȎȠȎȤȖȖ ȐȚȓȟȠȓ ȟ ȚȎȦȖțȜȗ
ǜǝǒǑǠǜǝǒǓǑǒǚǕǒ ² ǑǸȌ ȀǹDzǺȉȅDzǺǵȌ ǽǵǾǷǭ ȀDZǭǽǭ ǿǻǷǻǹ
ǻȖȘȜȑȒȎ țȓ ȡȣȜȒȖȠȓ ȜȟȠȎȐȖȐ ȚȎȦȖțȡ ȐȘșȬȥȓțțȜȗ ǰȟȓȑȒȎ ȐȩțȖȚȎȗȠȓ ȐȖșȘȡ Ȗȕ ȞȜȕȓȠȘȖ ȟȞȎȕȡ ȝȜȟșȓ ȜȘȜțȥȎțȖȭ ȞȎȏȜȠȩ țȎ ȚȎȦȖțȓ Ȏ ȠȎȘȔȓ ȝȓȞȓȒ ȥȖȟȠȘȜȗ ȟțȭȠȖȓȚ ȘȞȩȦȓȘ ȕȎȚȓțȜȗ șȎȚȝȜȥȘȖ ȟȚȎȕȘȜȗ Ȗ ȐȩȝȜșțȓțȖȓȚ șȬȏȩȣ ȒȞȡȑȖȣ ȟȓȞȐȖȟțȩȣ ȞȎȏȜȠ ȐȩȝȜșțȓțȖȓ ȘȜȠȜȞȩȣ ȐșȎȒȓșȪȤȓȚ ȚȎȦȖțȩ ȜȝȖȟȎțȜ Ȑ ǾȡȘȜȐȜȒȟȠȐȓ ȝȜ ȫȘȟȝșȡȎȠȎȤȖȖ
ǏǚǕǙǍǚǕǒ – DZǸȌ ȀǹDzǺȉȅDzǺǵȌ ǽǵǾǷǭ ǼǻǽǭdzDzǺǵȌ ǿǻǷǻǹ ǯǻǴǰǻǽǭǺǵȌ ǵǸǵ ȀǯDzȄȉȌ
ȋȠȎ ȦȐȓȗțȎȭ ȚȎȦȖțȎ țȓ ȝȞȓȒțȎȕțȎȥȓțȎ Ȓșȭ ȖȟȝȜșȪȕȜȐȎțȖȭ șȬȒȪȚȖ ȐȘșȬȥȎȭ ȒȓȠȓȗ ȟ ȜȑȞȎțȖȥȓțțȩȚȖ ȢȖȕȖȥȓȟȘȖȚȖ ȖșȖ ȝȟȖȣȖȥȓȟȘȖȚȖ ȐȜȕȚȜȔțȜȟȠȭȚȖ ȖșȖ Ȓșȭ șȬȒȓȗ ȟ țȓȒȜȟȠȎȠȜȥțȩȚ ȜȝȩȠȜȚ Ȗ ȕțȎțȖȭȚȖ ǰ ȫȠȜȚ ȟșȡȥȎȓ ȜțȖ ȒȜșȔțȩ ȞȎȏȜȠȎȠȪ ȝȜȒ ȝȞȖȟȚȜȠȞȜȚ șȖȤȎ ȜȠȐȓȥȎȬȧȓȑȜ ȕȎ Ȗȣ ȏȓȕȜȝȎȟțȜȟȠȪ
DzȓȠȖ ȐȟȓȑȒȎ ȒȜșȔțȩ ȏȩȠȪ ȝȜȒ ȝȞȖȟȚȜȠȞȜȚ ȥȠȜȏȩ ȏȩȠȪ ȡȐȓȞȓțțȩȚ ȥȠȜ ȜțȖ țȓ ȖȑȞȎȬȠ ȟȜ ȦȐȓȗțȜȗ ȚȎȦȖțȜȗ
ǶȟȝȜșȪȕȡȗȠȓ ȚȎȦȖțȡ ȝȜ țȎȕțȎȥȓțȖȬ ȟșȓȒȡȭ ȞȓȘȜȚȓțȒȎȤȖȭȚ ǾȡȘȜȐȜȒȟȠȐȎ ȝȜ ȫȘȟȝșȡȎȠȎȤȖȖ ǽȞȖȚȓțȭȗȠȓ ȕȎȝȎȟțȩȓ ȥȎȟȠȖ Ȗ ȎȘȟȓȟȟȡȎȞȩ ȞȓȘȜȚȓțȒȜȐȎțțȩȓ ȝȞȜȖȕȐȜȒȖȠȓșȓȚ Ȗ ȠȜșȪȘȜ ȠȎȘ ȘȎȘ ȫȠȜ ȜȝȖȟȎțȜ Ȑ țȎȟȠȜȭȧȓȚ ǾȡȘȜȐȜȒȟȠȐȓ
ǻȓ ȞȎȏȜȠȎȗȠȓ țȎ ȚȎȦȖțȓ ȓȟșȖ ȕȎȏșȜȘȖȞȜȐȎțȩ ȐȓțȠȖșȭȤȖȜțțȩȓ ȜȠȐȓȞȟȠȖȭ ǽȞȜȐȓȞȭȗȠȓ ȥȠȜȏȩ Ȑ țȖȣ Ȏ ȠȎȘȔȓ Ȑ ȝȓȒȎșȖ țȓ ȟȘȎȝșȖȐȎșȖȟȪ Ȝȥȓȟȩ ȝȩșȪ ȐȜȞȟ Ȗ ȜȏȞȓȕȘȖ ȠȘȎțȖ
2

ǻȓ ȝȜșȪȕȡȗȠȓȟȪ ȚȎȦȖțȜȗ ȓȟșȖ ȝȜȐȞȓȔȒȓț ȦțȡȞ ȖșȖ ȦȠȓȝȟȓșȪ ȓȟșȖ ȝȞȜȖȟȣȜȒȭȠ ȟȏȜȖ Ȑ ȞȎȏȜȠȓ ȓȟșȖ ȚȎȦȖțȎ ȝȎȒȎșȎ Ȗ ȝȜȐȞȓȔȒȓțȎ ȓȟșȖ ȝȞȜȖȕȜȦșȜ țȎȚȜȘȎțȖȓ ȚȎȦȖțȩ ǰ ȫȠȖȣ ȟșȡȥȎȭȣ ȜȏȞȎȠȖȠȓȟȪ Ȑ ǿȓȞȐȖȟțȩȗ ȤȓțȠȞ Ȓșȭ ȝȞȜȐȓȞȘȖ ȚȎȦȖțȩ Ȗ ȓȓ țȎȟȠȞȜȗȘȖ ȖșȖ ȞȓȚȜțȠȎ
ǻȓ ȝȞȖȘȎȟȎȗȠȓȟȪ ȝȎșȪȤȎȚȖ Ș ȒȐȖȔȡȧȖȚȟȭ ȥȎȟȠȭȚ ȚȎȦȖțȩ ǯȡȒȪȠȓ ȜȟȜȏȓțțȜ ȐțȖȚȎȠȓșȪțȩ Ȑ ȞȎȏȜȥȓȗ ȕȜțȓ ȚȎȦȖțȩ Ȑ ȜȏșȎȟȠȖ Ȗȑșȩ
ǰȟȓȑȒȎ ȝȞȖȚȓțȭȗȠȓ ȜȞȖȑȖțȎșȪțȡȬ ȖȑȜșȪțȡȬ ȝșȎȟȠȖțȡ ǶȟȝȜșȪȕȜȐȎțȖȓ ȒȞȡȑȜȗ ȝșȎȟȠȖțȩ ȚȜȔȓȠ ȝȞȖȐȓȟȠȖ Ș ȝȜșȜȚȘȓ Ȗȑșȩ
ǻȓ ȖȟȝȜșȪȕȡȗȠȓ ȘȞȖȐȩȓ Ƞȡȝȩȓ ȖșȖ ȝȜȐȞȓȔȒȓțțȩȓ Ȗȑșȩ
ǻȓ ȠȭțȖȠȓ Ȗ țȓ ȝȜȒȠȎșȘȖȐȎȗȠȓ ȠȘȎțȪ ȝȞȖ ȦȖȠȪȓ ǽȞȖ ȫȠȜȚ ȥȎȟȠȜ șȜȚȎȬȠȟȭ Ȗȑșȩ
ǶȟȝȜșȪȕȡȗȠȓ ȕȎȧȖȠțȩȓ ȜȥȘȖ
ǼȠȘșȬȥȎȗȠȓ ȚȎȦȖțȡ ȝȜșȜȔȓțȖȓ © ª ȝȞȖ șȬȏȩȣ ȒȓȗȟȠȐȖȭȣ Ȑ ȕȜțȓ Ȗȑșȩ ² ȕȎȝȞȎȐȘȎ țȖȠȖ ȕȎȚȓțȎ Ȗȑșȩ ȟȚȓțȎ ȦȝȡșȪȘȖ ȝȞȖȔȖȚțȜȗ șȎȝȘȖ Ȗ Ƞ Ȓ
ǻȖȥȓȑȜ țȓ ȞȜțȭȗȠȓ ȐțȡȠȞȪ Ȗ țȓ ȐȟȠȎȐșȭȗȠȓ Ȑ ȜȠȐȓȞȟȠȖȭ țȎ ȘȜȞȝȡȟȓ ȚȎȦȖțȩ
ǻȓ ȖȟȝȜșȪȕȡȗȠȓ ȚȎȦȖțȡ Ȑțȓ ȔȖșȩȣ ȝȜȚȓȧȓțȖȗ
ǻȓ ȞȎȏȜȠȎȗȠȓ ȓȟșȖ Ȑ ȝȜȚȓȧȓțȖȖ ȞȎȟȝȩșȓț ȎȫȞȜȕȜșȪ ȖșȖ ȐȜȕȚȜȔțȎ ȡȠȓȥȘȎ ȘȖȟșȜȞȜȒȎ
Dzșȭ ȐȩȘșȬȥȓțȖȭ ȚȎȦȖțȩ ² ȡȟȠȎțȜȐȖȠȓ ȐȩȘșȬȥȎȠȓșȪ Ȑ ȝȜșȜȔȓțȖȓ © ª Ȗ ȐȩțȪȠȓ ȦȠȓȝȟȓșȪ Ȗȕ ȞȜȕȓȠȘȖ
ǻȖȘȜȑȒȎ țȓ ȠȭțȖȠȓ ȕȎ ȟȓȠȓȐȜȗ ȦțȡȞ ȐȜȕȪȚȖȠȓȟȪ ȕȎ ȐȖșȘȡ Ȗ ȐȩțȪȠȓ ȓȓ Ȗȕ ȞȜȕȓȠȘȖ
ȁȞȜȐȓțȪ ȦȡȚȎ ȝȞȖ țȜȞȚȎșȪțȜȗ ȞȎȏȜȠȓ ȚȎȦȖțȩ țȖȔȓG% $
ǽȓȒȎșȪ ȖȟȝȜșȪȕȡȓȠȟȭ Ȓșȭ ȡȝȞȎȐșȓțȖȭ ȞȎȏȜȠȜȗ ȚȎȦȖțȩ ǻȓ ȘșȎȒȖȠȓ țȎ țȓȓ ȟȐȓȞȣȡ țȖȘȎȘȖȣ ȝȜȟȠȜȞȜțțȖȣ ȝȞȓȒȚȓȠȜȐ
ȋȠȎ ȦȐȓȗțȎȭ ȚȎȦȖțȎ ȖȚȓȓȠ ȒȐȜȗțȡȬ ȫșȓȘȠȞȜȖȕȜșȭȤȖȬ Dzșȭ ȞȓȚȜțȠȎ ȖȟȝȜșȪȕȡȗȠȓ ȠȜșȪȘȜ ȟȜȜȠȐȓȠȟȠȐȡȬȧȖȓ ȕȎȝȎȟțȩȓ ȥȎȟȠȖ ǿȚ ȖțȟȠȞȡȘȤȖȬ ȝȜ ȜȏȟșȡȔȖȐȎțȖȬ ȫșȓȘȠȞȜȝȞȖȏȜȞȜȐ ȟ ȒȐȜȗțȜȗ ȖȕȜșȭȤȖȓȗ
ǎǒǝǒǓǚǛ ǢǝǍǚǕǟǒ ǪǟǠ ǕǚǞǟǝǠǗǣǕǫ

ǛǎǞǘǠǓǕǏǍǚǕǒ ǪǘǒǗǟǝǛǜǝǕǎǛǝǛǏ Ǟ ǑǏǛǖǚǛǖ ǕǔǛǘǬǣǕǒǖ
ǯȩȠȜȐȩȓ ȫșȓȘȠȞȜȝȞȖȏȜȞȩ ȟ ȒȐȜȗțȜȗ ȖȕȜșȭȤȖȓȗ ȖȚȓȬȠ ȒȐȓ ȟȖȟȠȓȚȩ ȖȕȜșȭȤȖȖ ǰ ȠȎȘȖȣ ȝȞȖȏȜȞȎȣ țȓ ȖȟȝȜșȪȕȡȓȠȟȭ ȕȎȕȓȚșȓțȖȓ Ȗ Ȗȣ ȘȜțȟȠȞȡȘȤȖȭ țȓ ȝȞȓȒȡȟȚȎȠȞȖȐȎȓȠ ȝȜȒȘșȬȥȓțȖȓ ȕȎȕȓȚșȓțȖȭ ǼȏȟșȡȔȖȐȎțȖȓ ȝȞȖȏȜȞȜȐ ȟ ȒȐȜȗțȜȗ ȖȕȜșȭȤȖȓȗ ȠȞȓȏȡȓȠ ȜȟȜȏȜȗ ȜȟȠȜȞȜȔțȜȟȠȖ Ȗ ȚȜȔȓȠ ȜȟȡȧȓȟȠȐșȭȠȪȟȭ ȠȜșȪȘȜ ȘȐȎșȖȢȖȤȖȞȜȐȎțțȩȚ ȝȓȞȟȜțȎșȜȚ Dzșȭ ȟȓȞȐȖȟȎ ȖșȖ ȞȓȚȜțȠȎ ȚȜȑȡȠ ȝȞȖȚȓțȭȠȪȟȭ ȠȜșȪȘȜ ȜȞȖȑȖțȎșȪțȩȓ ȕȎȝȎȟțȩȓ ȥȎȟȠȖ ȎțȎșȜȑȖȥțȩȓ ȕȎȚȓțȭȓȚȩȚ ǽȞȖȏȜȞȩ ȟ ȒȐȜȗțȜȗ ȖȕȜșȭȤȖȓȗ ȚȎȞȘȖȞȡȬȠȟȭ ȟșȜȐȎȚȖ ´’28%/( ,168/$7,21µ ȖșȖ ´’28%/( ,168/$7(‘µ
ǛǐǘǍǏǘǒǚǕǒ
ǏǏǒǑǒǚǕǒ6
ǛǼǵǾǭǺǵDz ǹǭȅǵǺȈ6
ǰȖȒ ȟȝȓȞȓȒȖ ǰȖȒ ȟȐȓȞȣȡ7
ǰȖȒ ȟȕȎȒȖ7
ǍǷǾDzǾǾȀǭǽȈ7
ǮȘȟȓȟȟȡȎȞȩ Ȑ ȘȜȚȝșȓȘȠȓ ȏȓȕ ȞȖȟ7
ǽȞȖȔȖȚțȩȓ șȎȝȘȖ
ǼȏȕȜȞ ȟȠȞȜȥȓȘ ² ȚȜȒȓșȪ V
ǼȏȕȜȞ ȟȠȞȜȥȓȘ ² ȚȜȒȓșȪ V
ǜǛǑǐǛǟǛǏǗǍ11
ǾȎȟȝȎȘȜȐȘȎ ȚȎȦȖțȩ
ǽȜȒȘșȬȥȓțȖȓ Ș ȫșȓȘȠȞȜȟȓȠȖ
ȁȝȎȘȜȐȘȎ ȝȜȟșȓ ȦȖȠȪȭ
ǿȐȜȏȜȒțȩȗ ȞȡȘȎȐ
ǾȓȑȡșȖȞȜȐȘȎ ȝȜșȜȔȓțȖȭ ȚȎȦȖțȩ
ǻȖȠȓȜȏȞȓȕȎȠȓșȪ
ǸȎȠȡȦȘȜȒȓȞȔȎȠȓșȖ
ǵȎȝȞȎȐȘȎ ȐȓȞȣțȓȗ țȖȠȖ
ǻȖȠȓȐȒȓȐȎȠȓșȪ
ǵȎȝȞȎȐȘȎ ȒȐȜȗțȜȗ Ȗȑșȩ
ǻȎȚȜȠȘȎ ȦȝȡșȪȘȖ
ȁȟȠȎțȜȐȘȎ ȦȝȡșȪȘȖ
DzȎȐșȓțȖȓ ȝȞȖȔȖȚțȜȗ șȎȝȘȖ
ǻȎȠȭȔȓțȖȓ ȐȓȞȣțȓȗ țȖȠȖ
Ƕȑșȩ
ǵȎȚȓțȎ Ȗȑșȩ
ǼȝȡȟȘȎțȖȓ țȖȔțȓȑȜ ȠȞȎțȟȝȜȞȠȓȞȎ
ǽȜȒȨȓȚ șȎȝȘȖ
ǵȎȚȓțȎ șȎȝȘȖ
ǰȩȏȜȞ ȟȠȞȜȥȘȖ
DzșȖțȎ ȟȠȓȔȘȎ ȆȖȞȖțȎ ȟȠȓȔȘȎ22
ǶȕȚȓțȓțȖȓ ȝȜȕȖȤȖȖ Ȗȑșȩ22
ǸșȎȐȖȦȎ ȦȖȠȪȭ țȎȕȎȒ ǾȓȐȓȞȟ22
ǥǕǟǩǒ23
ǻȎȥȖțȎȓȚ ȦȖȠȪ ǽȞȭȚȎȭ ȟȠȞȜȥȘȎ
ǶȕȚȓțȓțȖȓ țȎȝȞȎȐșȓțȖȭ ȦȖȠȪȭ
ǵȎȐȓȞȦȓțȖȓ ȦȖȠȪȭ
ȁȟȖșȓțțȎȭ ȝȞȭȚȎȭ ȟȠȞȜȥȘȎ
ȀȞȓȣȦȎȑȜȐȩȗ ȕȖȑȕȎȑ
ǿȠȞȜȥȘȎ ǼȠȘȞȩȠȩȗ ȜȐȓȞșȜȘ
ǿȠȞȜȥȘȎ ǵȎȘȞȩȠȩȗ ȜȐȓȞșȜȘ
ǽȜȒȞȡȏȘȎ ǻȎȦȖȐȎțȖȓ ȕȎȝșȎȠ Ȗ ȎȝȝșȖȘȎȤȖȗ27
ǾȓȚȜțȠ ȜȒȓȔȒȩ27
ǾȓȚȜțȠ ȞȎȕȞȩȐȜȐ țȎ ȠȘȎțȖ27
ǽȞȖȦȖȐȎțȖȓ ȝȡȑȜȐȖȤ
ǼȏȩȥțȎȭ ȝȓȠșȭ ȚȜȒȓșȪ V
ǼȏȩȥțȎȭ ȝȓȠșȭ ȚȜȒȓșȪ V
ȁȘȞȓȝșȓțțȎȭ ȝȓȠșȭ Ȓșȭ ȫșȎȟȠ ȠȘȎțȖ
ǰȦȖȐȎțȖȓ ȚȜșțȖȗ
ǛǎǞǘǠǓǕǏǍǚǕǒ ǙǍǥǕǚǨ33
ȅȖȟȠȘȎ ȚȎȦȖțȩ
ȅȖȟȠȘȎ ȕȜțȩ ȦȝȡșȪȘȖ
ȅȖȟȠȘȎ ȝȜȒ ȦȝȡșȪțȜȗ ȘȜȞȕȖțȘȜȗ
ǵȎȚȓțȎ ȖȑȜșȪțȜȗ ȝșȎȟȠȖțȩ
ǚǒǕǞǜǝǍǏǚǛǞǟǕ34
|
7 |
|||
|
1 |
8 |
||
|
2 |
5 |
4 |
6 |
|
3 |
9 |
||
|
10 |
15 |
|
|
16 |
||
|
11 |
17 |
|
|
12 |
18 |
|
|
13 |
19 |
|
|
20 |
||
|
14 |
ǏǏǒǑǒǚǕǒ
ǛǼǵǾǭǺǵDz ǹǭȅǵǺȈ
ǏǵDZ ǾǼDzǽDzDZǵ
|
ǽȞȜȞȓȕȖ Ȓșȭ ȝȞȜȐȜȒȘȖ țȖȠȖ |
ǾȩȥȎȑ ȜȒțȜȦȎȑȜȐȜȗ ȝȓȠșȖ ȠȜșȪȘȜ V |
|
ǻȖȠȓȜȏȞȓȕȎȠȓșȪ |
ǶȑșȜȒȓȞȔȎȠȓșȪ |
|
ǿȐȓȠȜȒȖȜȒțȎȭ șȎȚȝȎ /(‘ |
ǶȑȜșȪțȎȭ ȝșȎȟȠȖțȎ |
|
ǸșȎȐȖȦȎ ȜȏȞȎȠțȜȑȜ ȣȜȒȎ ǾȓȐȓȞȟ |
ǸȞȩȦȘȎ ȥȓșțȜȘȎ |
|
ǿȐȜȏȜȒțȩȗ ȞȡȘȎȐ |
ǻȖȔțȖȗ țȖȠȓțȎȝȞȎȐȖȠȓșȪ |
|
ǸȜȞȜȏȘȎ Ȓșȭ ȝȞȖțȎȒșȓȔțȜȟȠȓȗ |
ǰȖțȠ ȘȞȓȝșȓțȖȭ Ȗȑșȩ |
|
ǾȓȑȡșȭȠȜȞ ȒșȖțȩ ȟȠȓȔȘȎ |
ǾȩȥȎȑ ȝȜȒȨȓȚȎ șȎȝȘȖ |
|
ǺȎȣȜȐȜȓ ȘȜșȓȟȜ |
ǻȎȝȞȎȐȖȠȓșȪ ȖȑȜșȪțȜȗ țȖȠȖ |
|
ǽȓȞȓȘșȬȥȎȠȓșȪ ȐȩȏȜȞȎ ȟȠȞȜȥȓȘ |
ȆȠȜȘ Ȗ șȎȝȘȜȒȓȞȔȎȠȓșȪ |
|
ǰȟȠȞȜȓțțȩȗ țȖȠȓȐȒȓȐȎȠȓșȪ |
ǽȞȖȔȖȚțȎȭ șȎȝȘȎ |

ǏǵDZ ǾǯDzǽȂȀ
ǾȓȑȡșȭȠȜȞ ȒȎȐșȓțȖȭ șȎȝȘȖ
ǽȞȜȐȜȒțȖȘȖ țȖȠȓȗ
ǸȎȠȡȦȘȜȒȓȞȔȎȠȓșȪ Ȗ ȝșȎȟȠȖțȩ
ǼȠȐȓȞȟȠȖȓ Ȓșȭ ȒȜȝ ȘȎȠȡȦȘȜȒȓȞȔȎȠȓșȭ
ǼȟȪ țȎȚȜȠȘȖ ȦȝȡșȪȘȖ
ǻȖȠȓȝȞȖȠȭȑȖȐȎȠȓșȪ
DzȖȟȘȖ țȎȠȭȔȓțȖȭ țȖȠȖ
DzȖȟȘ ȝȞȓȒțȎȠȭȔȓțȖȭ țȖȠȖ ȝȞȖ țȎȚȜȠȘȓ
ǾȓȑȡșȭȠȜȞ țȎȠȭȔȓțȖȭ țȖȠȖ
|
21 |
22 |
23 |
24 |
25 |
||
|
26 |
27 |
28 |
29 |
30 |
||
|
32 |
ǾȓȑȡșȭȠȜȞ ȦȖȞȖțȩ ȦȐȎ
ǏǵDZ ǾǴǭDZǵ
DZșȎȐțȩȗ ȐȩȘșȬȥȎȠȓșȪ ȞȎȕȨȓȚ Ȓșȭ ȟȓȠȓȐȜȑȜ ȦțȡȞȎ Ȗ ȝȓȒȎșȖ
ǾȡȥȘȎ Ȓșȭ ȝȓȞȓțȜȟȘȖ
ǽȓȞȓȘșȬȥȎȠȓșȪ Ȓșȭ ȜȝȡȟȘȎțȖȭ ȝȜȒȨȓȚȎ țȖȔțȓȑȜ ȠȞȎțȟȝȜȞȠȓȞȎ
ǍǷǾDzǾǾȀǭǽȈ
ȆȝȡșȪȘȖǰȜȗșȜȥțȎȭ ȝȜȒȘșȎȒȘȎǼȠȐȓȞȠȘȎǽșȎȟȠȖțȎ Ȓșȭ ȘȎȠȡȦȘȖ ȏȜșȪȦȎȭǽșȎȟȠȖțȎ Ȓșȭ ȘȎȠȡȦȘȖ ȚȎșȎȭǽȞȜȞȓȕȎȠȓșȪ ȝȓȠȓșȪ Ȗ ȘȖȟȠȜȥȘȎǸȞȜȚȘȜțȎȝȞȎȐȖȠȓșȪ
DzȜȝȜșțȖȠȓșȪțȩȗ ȘȎȠȡȦȘȜȒȓȞȔȎȠȓșȪ
ǍǷǾDzǾǾȀǭǽȈ ǮDzǴ ǷǭǽǿǵǺǻǷ
ǽȓȒȎșȪ
ǿȓȠȓȐȜȗ ȦțȡȞ
Ƕȑșȩ
ȅȓȣȜș Ȓșȭ ȚȎȦȖțȩ
7

ǘǭǼǷǵ
ǞǿǭǺDZǭǽǿǺǭȌ ǸǭǼǷǭ
ȋȠȎ șȎȝȘȎ ȖȟȝȜșȪȕȡȓȠȟȭ Ȑ ȜȟțȜȐțȜȚ Ȓșȭ ȦȖȠȪȭ ȝȞȭȚȜȗ ȟȠȞȜȥȘȜȗ Ȗ ȕȖȑȕȎȑȜȚ ȟ ȒșȖțȜȗ ȟȠȓȔȘȎ ȏȜșȓȓ ȚȚ
ǜǽǻǴǽǭȄǺǭȌ ǸǭǼǷǭ
ǶȟȝȜșȪȕȡȗȠȓ ȫȠȡ șȎȝȘȡ ȘȜȑȒȎ ȦȪȓȠȓ ȒȓȘȜȞȎȠȖȐțȜȗ ȟȠȞȜȥȘȜȗ ȘȜȞȜȠȘȖȚ ȕȖȑȕȎȑȜȚ ȖșȖ ȞȎȏȜȥȖȚȖ ȟȠȞȜȥȘȎȚȖ ȟ ȒșȖțȜȗ ȟȠȓȔȘȎ Țȓțȓȓ ȚȚ ǰȩȓȚȘȎ Ȑ ȝȜȒȜȦȐȓ șȎȝȘȖ ȝȜȕȐȜșȭȓȠ ȓȗ ȝșȎȐțȜ ȝȞȜȣȜȒȖȠȪ țȎȒ ȟȠȞȜȥȘȜȗ
ǘǭǼǷǭ DZǸȌ ǼǻǿǭǶǺǻǶ ǼǻDZǰǵǮǷǵ
ȋȠȎ șȎȝȘȎ ȝȞȖȚȓțȭȓȠȟȭ Ȓșȭ ȝȜȠȎȗțȜȗ ȝȜȒȑȖȏȘȖ ǻȎȝȞȎȐȖȠȓșȪ ȘȞȎȟțȜȑȜ ȤȐȓȠȎ ȒȜșȔȓț ȝȞȜȣȜȒȖȠȪ ȝȜ ȟȑȖȏȡ ȝȜȒȞȡȏȎȓȚȜȑȜ ȚȎȠȓȞȖȎșȎ
ǰȎȔțȜ ǽȞȖ ȖȟȝȜșȪȕȜȐȎțȖȖ ȫȠȜȗ șȎȝȘȖ ȐȟȓȑȒȎ ȕȎȒȎȐȎȗȠȓ ȦȖȞȖțȡ ȟȠȞȜȥȘȖ ȚȚ dzȟșȖ ǰȩ ȕȎȒȎșȖ ȒȞȡȑȡȬ ȦȖȞȖțȡ ȟȠȓȔȘȎ ȠȜ ȝȓȞȓȚȓȧȎȗȠȓ Ȗȑșȡ ȐȞȡȥțȡȬ ȚȎȣȜȐȩȚ ȘȜșȓȟȜȚ ȥȠȜȏȩ ȡȏȓȒȖȠȪȟȭ ȥȠȜ ȖȑșȎ țȓ ȕȎȒȓȐȎȓȠ ȚȓȠȎșșȖȥȓȟȘȖȗ ȐȩȟȠȡȝ țȎ șȎȝȘȓ
ǘǭǼǷǭ DZǸȌ ǯȅǵǯǭǺǵȌ ǹǻǸǺǵǶ
ȋȠȎ șȎȝȘȎ ȚȜȔȓȠ ȏȩȠȪ ȡȟȠȎțȜȐșȓțȎ ȟȝȞȎȐȎ ȖșȖ ȟșȓȐȎ ȜȠ Ȗȑșȩ ȥȠȜ ȝȜȕȐȜșȭȓȠ ȦȖȠȪ ȘȎȘ ȚȜȔțȜ ȏșȖȔȓ Ș ȕȡȏȤȎȚ ȚȜșțȖȖ ȟ ȒȐȡȣ ȟȠȜȞȜț
ǘǭǼǷǭ DZǸȌ ȅǭǰǻǯǻǶ ǼDzǿǸǵ $ DZǸȌ ǹǻDZDzǸǵ V
ǿȘȜșȪȕȭȧȎȭ ȝșȎȟȠȖțȎ ȖȚȓȓȠ ȡȒȜȏțȩȓ ȚȓȠȘȖ ȥȠȜ ȝȜȕȐȜșȭȓȠ ȜȥȓțȪ ȠȜȥțȜ ȐȩȚȓȠȩȐȎȠȪ ȝȓȠșȖ țȎ ȖȕȒȓșȖȖ
ǘǭǼǷǭ DZǸȌ ȅǭǰǻǯǻǶ ǼDzǿǸǵ % DZǸȌ ǹǻDZDzǸǵ V
ȋȠȎ șȎȝȘȎ ȖȚȓȓȠ ȕȎȔȖȚ Ȓșȭ ȝȡȑȜȐȖȤȩ ȥȠȜȏȩ ȎȐȠȜȚȎȠȖȥȓȟȘȖ ȐȩȚȓȠȩȐȎȠȪ ȝȓȠșȖ ȝȞȎȐȖșȪțȜȑȜ ȞȎȕȚȓȞȎ ȖȚȓțțȜ Ȓșȭ ȠȎȘȖȣ ȝȡȑȜȐȖȤ
ǛǮǴǻǽ ǾǿǽǻȄDzǷ ² V
ǏǵDZ ǚǭǴǯǭǺǵDz ǛǼǵǾǭǺǵDz
% ȦȎȑȜȐȎȭ ȝȓȠșȭ ǼȏȩȥțȎȭ ȏȓșȪȓȐȎȭ ȝȓȠșȭ
ǽȞȭȚȎȭ ȟȠȞȜȥȘȎ Dzșȭ ȟȠȎȥȖȐȎțȖȭ Ȗ ȜȠȟȠȞȜȥȘȖ
|
ǵȖȑȕȎȑ |
ǼȏȞȎȏȜȠȘȎ ȘȞȎȓȐ Ȗ ȎȝȝșȖȘȎȤȖȭ |
|
|
ȀȞȓȣȦȎȑȜȐȩȗ |
Dzșȭ ȝȞȖȦȖȐȎțȖȭ ȫșȎȟȠȖȥțȜȗ șȓțȠȩ ȦȠȜȝȘȖ |
|
|
ȕȖȑȕȎȑ |
Ȗ ȝȞȖȦȖȐȎțȖȭ ȕȎȝșȎȠ |
|
|
ǻȓȐȖȒȖȚȎȭ |
Dzșȭ țȓȐȖȒȖȚȜȗ ȝȜȒȞȡȏȘȖ ȘȞȎȭ |
|
|
ȝȜȒȞȡȏȘȎ |
||
|
ȋșȎȟȠȖȥțȎȭ |
Dzșȭ țȓȐȖȒȖȚȜȗ ȝȜȒȞȡȏȘȖ Ȗ ȜȏȚȓȠȘȖ ȘȞȎȭ |
|
|
ȝȜȒȞȡȏȘȎ |
ȝȜȒȣȜȒȖȠ Ȓșȭ ȫșȎȟȠȖȥțȩȣ ȠȘȎțȓȗ |
|
|
DzȓȘȜȞȎȠȖȐțȎȭ |
Dzșȭ Ȑȟȓȣ ȠȘȎțȓȗ Ȗ ȐȖȒȜȐ ȞȎȏȜȠ |
|
|
ȟȠȞȜȥȘȎ |
||
|
ȆȎȣȚȎȠțȎȭ |
DZșȎȒȪȓȐȎȭ ȒȓȘȜȞȎȠȖȐțȎȭ ȟȠȞȜȥȘȎ |
|
|
ȟȠȞȜȥȘȎ |
||
|
ǾȎȘȡȦȘȎ |
DZșȎȒȪȓȐȎȭ ȒȓȘȜȞȎȠȖȐțȎȭ ȟȠȞȜȥȘȎ |
|
|
ǿȜȓȒȖțȖȠȓșȪțȎȭ |
Dzșȭ ȜȏȞȎȏȜȠȘȖ ȟȠȎȥȖȐȎțȖȭ ȫșȎȟȠȖȘȎ ȦȠȜȝȘȖ |
|
|
ȟȠȞȜȥȘȎ |
țȎȦȖȐȎțȖȭ ȕȎȝșȎȠ |
|
|
DZȞȓȥȓȟȘȎȭ ȟȠȞȜȥȘȎ |
ȀȞȎȒȖȤȖȜțțȎȭ ȒȓȘȜȞȎȠȖȐțȎȭ ȟȠȞȜȥȘȎ Ȓșȭ |
|
|
ȜȠȟȠȞȜȥȘȖ ȘȞȎȭ ȝȜșȜȠȓțȓȤ Ȗ Ƞ Ȓ |
||
|
ǸȞȎȓȜȠȒȓșȜȥțȎȭ |
Dzșȭ ȒȓȘȜȞȎȠȖȐțȜȗ ȜȏȞȎȏȜȠȘȖ ȒȓșȖȘȎȠțȩȣ |
|
|
ȟȠȞȜȥȘȎ |
ȚȎȠȓȞȖȎșȜȐ Ȑ ȠȜȚ ȥȖȟșȓ Ȗȕ ȠȜțȘȜȑȜ șȪțȎ |
ȁȟȖșȓțțȎȭ ȝȞȭȚȎȭ Dzșȭ ȫșȎȟȠȖȥțȩȣ ȦȐȜȐ ȟ ȏȜșȪȦȜȗ țȎȑȞȡȕȘȜȗ
ȟȠȞȜȥȘȎ țȎȝȞȖȚȓȞ țȎ ȟȝȜȞȠȖȐțȜȗ Ȗ ȞȎȏȜȥȓȗ ȜȒȓȔȒȓ
|
ȁȟȖșȓțțȩȗ ȕȖȑȕȎȑ |
Dzșȭ țȎȦȖȐȎțȖȭ ȫșȎȟȠȖȥțȩȣ ȒȓȠȎșȓȗ țȎ |
||||||||||||
|
ȫșȎȟȠȖȥțȡȬ ȠȘȎțȓȐȡȬ ȜȟțȜȐȡ |
|||||||||||||
|
ǿȜȠȜȐȎȭ ȟȠȞȜȥȘȎ |
Dzșȭ ȦȖȠȪȭ ȫșȎȟȠȖȥțȩȚȖ țȖȠȘȎȚȖ ȜȏȞȎȏȜȠȘȖ |
||||||||||||
|
ȚȎȣȞȜȐȩȣ ȠȘȎțȓȗ Ȗ Ȓșȭ ȒȓȘȜȞȎȠȖȐțȩȣ ȟȠȞȜȥȓȘ |
|||||||||||||
|
ǸȞȎȓȐȎȭ ȟȠȞȜȥȘȎ |
DzȓȘȜȞȎȠȖȐțȎȭ ȟȠȞȜȥȘȎ |
||||||||||||
|
ȡȕȘȎȭ |
|||||||||||||
|
ǿȡȝȓȞȟȠȞȓȗȥ |
DzȓȘȜȞȎȠȖȐțȎȭ ȫșȎȟȠȖȥțȎȭ ȟȠȞȜȥȘȎ |
||||||||||||
|
DzȓȘȜȞȎȠȖȐțȎȭ |
DzȓȘȜȞȎȠȖȐțȎȭ ȟȠȞȜȥȘȎ |
||||||||||||
|
ȟȠȞȜȥȘȎ |
|||||||||||||
|
ǿȠȞȜȥȘȎ |
DzȓȘȜȞȎȠȖȐțȎȭ ȟȠȞȜȥȘȎ |
||||||||||||
|
ȘȞȓȟȠȖȘȜȚ |
|||||||||||||
|
DzȓȘȜȞȎȠȖȐțȎȭ |
DzȓȘȜȞȎȠȖȐțȎȭ ȟȠȞȜȥȘȎ |
||||||||||||
|
ȟȠȞȜȥȘȎ |
|||||||||||||
|
ǽȓȞȪȓȐȎȭ ȟȠȞȜȥȘȎ |
DzȓȘȜȞȎȠȖȐțȎȭ ȟȠȞȜȥȘȎ |
||||||||||||
|
ǵȎȘȞȩȠȩȗ |
Dzșȭ ȡȘȞȓȝșȓțȖȭ Ȗ ȜȏȞȎȏȜȠȘȖ ȘȞȎȭ ȡ |
||||||||||||
|
ȜȐȓȞșȜȘ |
ȖȕțȜȦȓțțȩȣ ȠȘȎțȓȗ |
||||||||||||
|
ǼȠȘȞȩȠȩȗ |
Dzșȭ ȜȏȞȎȏȜȠȘȖ ȘȞȎȭ țȎ ȘȞȓȝȘȖȣ ȠȘȎțȭȣ |
||||||||||||
|
ȜȐȓȞșȜȘ |
ǛǮǴǻǽ ǾǿǽǻȄDzǷ ² V
|
ǏǵDZ |
ǚǭǴǯǭǺǵDz |
ǛǼǵǾǭǺǵDz |
|||||
|
1 |
2 |
4 |
3 $ ȦȎȑȜȐȎȭ ȝȓȠșȭ |
ǼȏȩȥțȎȭ ȏȓșȪȓȐȎȭ ȝȓȠșȭ |
|||
ǽȞȭȚȎȭ ȟȠȞȜȥȘȎ Dzșȭ ȟȠȎȥȖȐȎțȖȭ Ȗ ȜȠȟȠȞȜȥȘȖ
|
ǵȖȑȕȎȑ |
ǼȏȞȎȏȜȠȘȎ ȘȞȎȓȐ Ȗ ȎȝȝșȖȘȎȤȖȭ |
|||||||||||||||||
|
ȀȞȓȣȦȎȑȜȐȩȗ |
Dzșȭ ȝȞȖȦȖȐȎțȖȭ ȫșȎȟȠȖȥțȜȗ șȓțȠȩ ȦȠȜȝȘȖ Ȗ |
|||||||||||||||||
|
ȕȖȑȕȎȑ |
ȝȞȖȦȖȐȎțȖȭ ȕȎȝșȎȠ |
|||||||||||||||||
|
ȋșȎȟȠȖȥțȎȭ |
Dzșȭ țȓȐȖȒȖȚȜȗ ȝȜȒȞȡȏȘȖ Ȗ ȜȏȚȓȠȘȖ ȘȞȎȭ |
|||||||||||||||||
|
ȝȜȒȞȡȏȘȎ |
ȝȜȒȣȜȒȖȠ Ȓșȭ ȫșȎȟȠȖȥțȩȣ ȠȘȎțȓȗ |
|||||||||||||||||
|
ǻȓȐȖȒȖȚȎȭ |
Dzșȭ țȓȐȖȒȖȚȜȗ ȝȜȒȞȡȏȘȖ ȘȞȎȭ |
|||||||||||||||||
|
ȝȜȒȞȡȏȘȎ |
||||||||||||||||||
|
ǸȞȎȓȜȠȒȓșȜȥțȎȭ |
Dzșȭ ȒȓȘȜȞȎȠȖȐțȜȗ ȜȏȞȎȏȜȠȘȖ ȒȓșȖȘȎȠțȩȣ |
|||||||||||||||||
|
ȟȠȞȜȥȘȎ |
ȚȎȠȓȞȖȎșȜȐ Ȑ ȠȜȚ ȥȖȟșȓ Ȗȕ ȠȜțȘȜȑȜ șȪțȎ |
|||||||||||||||||
|
DZȞȓȥȓȟȘȎȭ ȟȠȞȜȥȘȎ |
ȀȞȎȒȖȤȖȜțțȎȭ ȒȓȘȜȞȎȠȖȐțȎȭ ȟȠȞȜȥȘȎ Ȓșȭ |
|||||||||||||||||
|
ȜȠȟȠȞȜȥȘȖ ȘȞȎȭ ȝȜșȜȠȓțȓȤ Ȗ Ƞ Ȓ |
||||||||||||||||||
|
ǿȜȓȒȖțȖȠȓșȪțȎȭ |
Dzșȭ ȜȏȞȎȏȜȠȘȖ ȟȠȎȥȖȐȎțȖȭ ȫșȎȟȠȖȘȎ ȦȠȜȝȘȖ |
|||||||||||||||||
|
ȟȠȞȜȥȘȎ |
țȎȦȖȐȎțȖȭ ȕȎȝșȎȠ |
|||||||||||||||||
|
ȆȎȣȚȎȠțȎȭ |
DZșȎȒȪȓȐȎȭ ȒȓȘȜȞȎȠȖȐțȎȭ ȟȠȞȜȥȘȎ |
|||||||||||||||||
|
ȟȠȞȜȥȘȎ |
||||||||||||||||||
|
ǾȎȘȡȦȘȎ |
DZșȎȒȪȓȐȎȭ ȒȓȘȜȞȎȠȖȐțȎȭ ȟȠȞȜȥȘȎ |
|||||||||||||||||
|
ȁȟȖșȓțțȎȭ ȝȞȭȚȎȭ |
Dzșȭ ȫșȎȟȠȖȥțȩȣ ȦȐȜȐ ȟ ȏȜșȪȦȜȗ țȎȑȞȡȕȘȜȗ |
|||||||||||||||||
|
ȟȠȞȜȥȘȎ |
țȎȝȞȖȚȓȞ țȎ ȟȝȜȞȠȖȐțȜȗ Ȗ ȞȎȏȜȥȓȗ ȜȒȓȔȒȓ |
|||||||||||||||||
|
ȁȟȖșȓțțȩȗ ȕȖȑȕȎȑ |
Dzșȭ țȎȦȖȐȎțȖȭ ȫșȎȟȠȖȥțȩȣ ȒȓȠȎșȓȗ țȎ |
|||||||||||||||||
|
ȫșȎȟȠȖȥțȡȬ ȠȘȎțȓȐȡȬ ȜȟțȜȐȡ |
||||||||||||||||||
|
ǿȜȠȜȐȎȭ ȟȠȞȜȥȘȎ |
Dzșȭ ȦȖȠȪȭ ȫșȎȟȠȖȥțȩȚȖ țȖȠȘȎȚȖ ȜȏȞȎȏȜȠȘȖ |
|||||||||||||||||
|
ȚȎȣȞȜȐȩȣ ȠȘȎțȓȗ Ȗ Ȓșȭ ȒȓȘȜȞȎȠȖȐțȩȣ ȟȠȞȜȥȓȘ |
||||||||||||||||||
|
ǿȡȝȓȞȟȠȞȓȗȥ |
DzȓȘȜȞȎȠȖȐțȎȭ ȫșȎȟȠȖȥțȎȭ ȟȠȞȜȥȘȎ |
|||||||||||||||||
|
ǸȞȎȓȐȎȭ ȟȠȞȜȥȘȎ |
DzȓȘȜȞȎȠȖȐțȎȭ ȟȠȞȜȥȘȎ |
|||||||||||||||||
|
ȡȕȘȎȭ |
||||||||||||||||||
|
ǼȠȘȞȩȠȩȗ |
Dzșȭ ȜȏȞȎȏȜȠȘȖ ȘȞȎȭ țȎ ȘȞȓȝȘȖȣ ȠȘȎțȭȣ |
|||||||||||||||||
|
ȜȐȓȞșȜȘ |
||||||||||||||||||
|
ǵȎȘȞȩȠȩȗ |
Dzșȭ ȡȘȞȓȝșȓțȖȭ Ȗ ȜȏȞȎȏȜȠȘȖ ȘȞȎȭ ȡ |
|||||||||||||||||
|
ȜȐȓȞșȜȘ |
ȖȕțȜȦȓțțȩȣ ȠȘȎțȓȗ |
|||||||||||||||||
|
ǽȓȞȪȓȐȎȭ ȟȠȞȜȥȘȎ |
DzȓȘȜȞȎȠȖȐțȎȭ ȟȠȞȜȥȘȎ |
|||||||||||||||||
|
ǿȠȞȜȥȘȎ |
DzȓȘȜȞȎȠȖȐțȎȭ ȟȠȞȜȥȘȎ |
|||||||||||||||||
|
ȘȞȓȟȠȖȘȜȚ |
||||||||||||||||||
|
DzȓȘȜȞȎȠȖȐțȎȭ |
DzȓȘȜȞȎȠȖȐțȎȭ ȟȠȞȜȥȘȎ |
|||||||||||||||||
|
ȟȠȞȜȥȘȎ |
ȋșȎȟȠȖȥțȩȓ ȟȠȞȜȥȘȖ
 Loading…
Owner’s Manual
SMARTER BY PFAFF inspired and developed by the premier PFAFF sewing machine brand
160s 150s 140s 130s
2
This household sewing machine is designed to comply with IEC/ EN 60335-2-28 and UL1594.
IMPORTANT SAFETY INSTRUCTIONS When using an electrical appliance, basic safety precautions should always be followed, including the following: Read all instructions before using this household sewing machine. Keep the instructions at a suitable place close to the machine. Make sure to hand them over if the machine is given to a third party.
DANGER TO REDUCE THE RISK OF ELECTRIC SHOCK: A sewing machine should never be left unattended when plugged
in. Always unplug this sewing machine from the electric outlet immediately after using and before cleaning, removing covers, lubricating or when making any other user servicing adjustments mentioned in the instruction manual.
WARNING TO REDUCE THE RISK OF BURNS, FIRE, ELECTRIC SHOCK, OR INJURY TO PERSON: Do not allow to be used as a toy. Close attention is neccesary when
this sewing machine is used by or near children. Use this sewing machine only for its intended use as described
in this manual. Use only attachments recommended by the manufacturer as contained in this manual.
Never operate this sewing machine if it has a damaged cord or plug, if it is not working properly, if it has been dropped or damaged, or dropped into water. Return the sewing machine to the nearest authorized dealer or service center for examination, repair, electrical or mechanical adjustment.
Never operate the sewing machine with any air openings blocked. Keep ventilation openings of the sewing machine and foot control free from the accumulation of lint, dust, and loose cloth.
around the sewing machine needle. Always use the proper needle plate. The wrong plate can cause
the needle to break.
3
Do not use bent needles.
needle causing it to break. Wear safety glasses.
in the needle area, such as threading needle, changing needle, threading bobbin, or changing presser foot, etc.
Never drop or insert any object into any opening. Do not use outdoors.
where oxygen is being administrated.
remove plug from outlet. Do not unplug by pulling on cord. To unplug, grasp the plug, not
the cord. The foot control is used to operate the machine. Avoid placing
other objects on the foot control. Do not use the machine if it is wet. If the LED lamp is damaged or broken, it must be replaced by the
in order to avoid a hazard. If the supply cord connected with the foot control is damaged,
it must be replaced by the manufacturer or its service agent or a
This sewing machine is provided with double insulation. Use
Double-Insulated Appliances.
SAVE THESE INSTRUCTIONS
4
SERVICING OF DOUBLE INSULATED PRODUCTS In a double-insulated product, two systems of insulation are provided instead of grounding. No ground means is provided on a double- insulated product, nor should a means for grounding be added to the
care and knowledge of the system and should be done only by
product must be identical to those parts in the product. A double-
FOR EUROPE ONLY: This appliance can be used by children aged from 8 years and above and persons with reduced physical, sensory or mental capabilities or lack of experience and knowledge if they have been given supervision or instruction concerning use of the appliance in a safe way and understand the hazards involved. Children shall not play with the appliance. Cleaning and user maintenance shall not be made by children without supervision. The noise level under normal operating conditions is less than
The machine must only be used with foot control of type FC-1902 (110-120V), FC-2902A/FC-2902D (220-240V) manufactured by ZHE- JIANG FOUNDER MOTOR CORPORATION LTD (China).
FOR OUTSIDE EUROPE:
or lack of experience and knowledge, unless they have been given supervision or instruction concerning use of the sewing machine by a person responsible for their safety. Children should be supervised to ensure that they do not play with the sewing machine. The noise level under normal operating conditions is less than
The machine must only be used with foot control of type FC-1902 (110-120V), FC-2902A/FC-2902D (220-240V) manufactured by ZHE- JIANG FOUNDER MOTOR CORPORATION LTD (China).
5
INTRODUCTION …………………………… 6 Machine Overview …………………………………….. 6
………………………………………………6 Top Parts ……………………………………………….7
……………………………………………….7
Accessories …………………………………………………. 7 Included Accessories not in Picture ……….7 Presser Feet ……………………………………………8
………………….9 ………………..10
PREPARATIONS ………………………….11 Unpacking …………………………………………..11
………………11 ……………………….12
Free Arm ……………………………………………..12 Leveling the Machine Base Plate ………….12 Thread Cutter ………………………………………12
……………………………………………13 Threading the Machine ………………………..14 Needle Threader ………………………………….15 Threading for Twin Needle………………….16 Bobbin Winding …………………………………..17 Inserting the Bobbin …………………………….17 Presser Foot Pressure …………………………..18 Thread Tension ……………………………………18 Needles ………………………………………………..19 Changing the Needle …………………………..19 Lowering Feed Dogs ……………………………20 Presser Foot Lift …………………………………..20 Changing the Presser Foot …………………..20
…………………………………….21
………………………………………..21 …………………………………………22
Adjustable Needle Position ………………….22 ……………………………………22
SEWING ……………………………………….23 ………………..23
…………………….23 ………………………………………23
…………………….24 ………………………24
…………………………………….25 …………………………25
Blindhem ……………………………………………..26 ………….27
Darning with the ……………………..27
Repairing Tears ……………………………………27 ……………………………….28
….29
….30 ……31
……………………………………32
MAINTENANCE …………………………..33 Cleaning the Machine ………………………….33 Cleaning the Bobbin Area ……………………33 Cleaning Under the Bobbin Area …………33
…………………….33
TROUBLESHOOTING …………………34
TABLE OF CONTENTS
6
INTRODUCTION
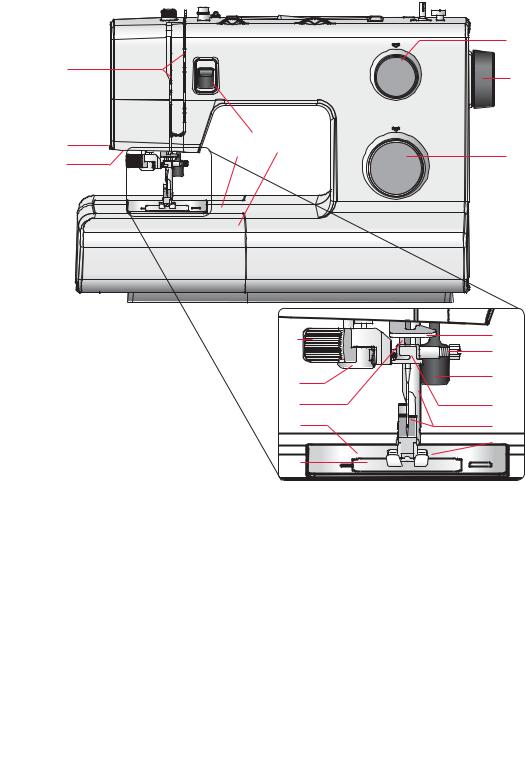
Front Side 1. Threading slots 2. Thread cutter 3. LED light 4. Reverse lever 5. Free arm 6. Accessory tray
8. Handwheel
10. Built-in needle threader
12. Needle bar
14. Bobbin cover 15. Lower thread guide 16. Needle screw 17. Presser foot lift 18. Needle thread guide 19. Presser foot bar and presser foot holder 20. Presser foot
Machine Overview
15 16
17
18
19 20
5 6 4
7
8
9
10
11
12
13
14
1
2
3
7
Top Parts 21. Presser foot pressure dial 22. Thread guides
24. Hole for auxiliary spool pin
25. Bobbin winder spindle 26. Take-up lever 27. Thread tension discs 28. Bobbin winder
tension disc 29. Thread tension dial
Rear Side 31. Main switch, connectors for power
cord and foot control 32. Handle
Accessories
35. Felt pad
40. Edge guide 41. Auxiliary spool pin
Included Accessories not in Picture Foot control and power cord Needles Hard cover
27 28 2926 30
32
31
35
37
34
40
41
38
21 22
33
36
39
23 24 25
8
Standard Presser Foot 0 This foot is used mainly for straight stitching and zigzag stitching with a stitch length longer than 1.0 mm.
Clearview Foot 1 When sewing decorative stitches or short zigzag stitches and other utility stitches with less than 1.0mm stitch length, use this
smoothly over the stitches.
Four-Step Buttonhole Foot 5A (for 130s/140s)
and stop your buttonhole at precisely the correct point.
Blindhem Foot 3 This foot is used for blindhem stitches. The toe on the foot guides the fabric. The red guide on the foot is designed to ride along the fold of the hem edge. Note: Always use at least 5mm stitch width when using Blind Hem Foot 3. If using a stitch width other than the recommended, swing the needle by turning the hand wheel to make sure the needle doesnt hit the metal pin in the foot.
One-Step Buttonhole Foot 5B (for 150s/160s) This foot has a space in the back for a button used to set the size of
— ton size.
Zipper Foot 4 This foot can be snapped on either the right or the left of the nee- dle, making it easy to sew close to both sides of the zipper teeth. Move the needle position to the right or left to sew closer to zipper teeth.
Presser Feet
9
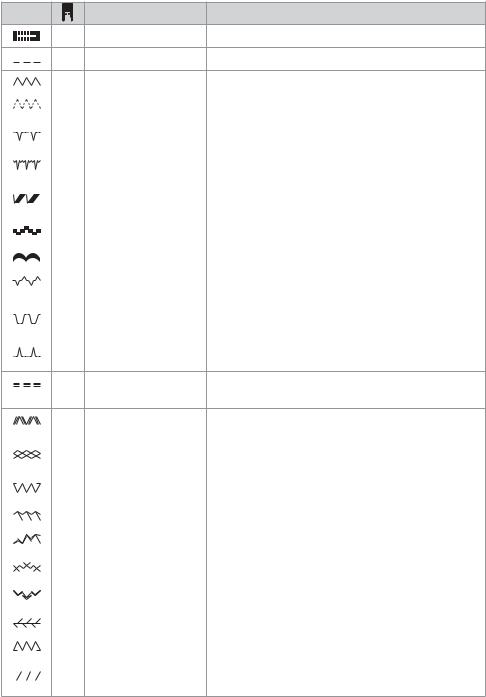
Stitch Name Description 5B 1-step Buttonhole
0 For all straight stitching and topstitching
0
0 Triple zigzag stitch For stitching on elastic band, darning tears and patches
3 Blindhem stitch For invisible hem attachment
3 Elastic blindhem stitch *
For invisible hem attachment and simultaneous serging, also for stretch fabrics
1 Decor stitch For all fabrics and types of work
1 Checker satin stitch
1 Open scallop
1 For overcasting, sewing on elastic, darning tears and inserting patches
0/1 Greek stitch A traditional decorative stitch e.g. for borders and towels
0/1
0 Reinforced straight stitch *
For stretch seams, e.g. crotch seams on sports- and workwear
1 Reinforced zigzag stitch *
For attaching elastic tape on elastic materials
1 Honeycomb stitch * For sewing on elastic threads, overlocking towel- ling and for decorative hem seams
1 Edge stitch narrow * A decorative stitch
3 A decorative stretch stitch
1 Decorative stitch A decorative stitch
1 A decorative stitch
1 Decorative stitch A decorative stitch
0 A decorative stitch
3 Closed overlock stitch *
A closing and serging seam for fraying materials
3 Overlock stitch * A closing and serging seam for stronger or non- fraying materials
* These stitches are stretch stitches
Stitch Overview 150s/160s
10
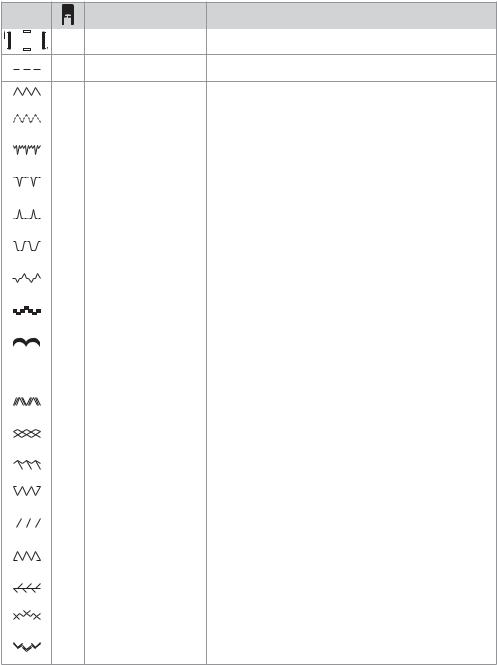
Stitch Name Description
41
2 3 5A 4-step Buttonhole
0 For all straight stitching and topstitching
0
0 Triple zigzag stitch* For stitching on elastic band, darning tears and patches
3 Elastic blindhem stitch *
For invisible hem attachment and simultaneous serging, also for stretch fabrics
3 Blindhem stitch For invisible hem attachment
0/1
0/1 Greek stitch A traditional decorative stitch e.g. for borders and towels
1 For overcasting, sewing on elastic, darning tears and inserting patches
1 Checker satin stitch
1 Open scallop
0 Reinforced straight stitch *
For stretch seams, e.g. crotch seams on sports- and workwear
1 Reinforced zigzag stitch *
For attaching elastic tape on elastic materials
1 Honeycomb stitch * For sewing on elastic threads, overlocking towel- ling and for decorative hem seams
3 A decorative stretch stitch
1 Edge stitch narrow A decorative stitch
3 Overlock stitch * A closing and serging seam for stronger or non- fraying materials
3 Closed overlock stitch *
A closing and serging seam for fraying materials
0 A decorative stitch
1 A decorative stitch
1 Decorative stitch A decorative stitch
* These stitches are stretch stitches
Stitch Overview 130s/140s
11
PREPARATIONS Unpacking
the machine out of the box, remove the outer packaging and lift off the machine carrying case.
2. Remove all outer packing material and the plastic bag.
Note: Your SMARTER BY PFAFF 130s/140s/ 150s/160s sewing machine is adjusted to provide the best stitch result at normal room temperature. Ex- treme hot and cold temperatures can affect the sewn result.
Connect to the Power Supply
plug and the foot control. Note: Consult a qualified electrician if in doubt as how to connect the machine to the power source. Un- plug the power cord when the machine is not in use. For this sewing machine, foot control model
FOUNDER MOTOR CORPORATION LTD
1. Connect the plug of the foot control to
machine and to the wall socket. The sewing speed is regulated by pressing the foot control.
2. Press the power and light.
For the USA and Canada
polarized outlet only one way. If the plug does
to install the proper outlet. Do not modify the plug in any way.
B
A
12
B
A
Pack away after Sewing
Note: After switching off, residual power may still remain in the machine. This may cause the light to stay on for a few seconds while the power is consumed. This is normal behavior for an energy
2. Unplug the cord from the wall socket and then from the machine.
3. Unplug the foot control cord from the machine. Wind the cord around the foot control for easy storage.
4. Place all accessories in the accessory tray.
free arm. 5. Place the foot control in the space above
the free arm. 6. Put on the hard cover.
Free Arm To use the free arm, slide off the accessory tray. When attached, a hook keeps the acces- sory tray securely attached to the machine. Remove the tray by sliding it to the left.
Leveling the Machine Base Plate To make sure your machine stands steadily on your sewing surface you can adjust the base plate height.
hand. Turn clockwise to lower and counter- clockwise to raise the base plate.
Thread Cutter To use the thread cutter, pull the thread from
13
Narrow thread spool
Large thread spool
Spool Pins Your machine has two spool pins, a main spool pin and an auxiliary spool pin. The spool pins are designed for all types of thread. The main spool pin is used in a
—
the horizontal position for normal threads and the vertical position for large spools or specialty threads.
Main Spool Pin Place a spool cap and the thread spool on the spool pin. Make sure that the thread reels off the spool counter clock-wise and slide on a second spool cap. Note: Not all thread spools are manufactured in the same way. If you experience problems with the thread, turn it in the opposite way or use the vertical position. Use a spool cap slightly larger than the thread spool. For narrow thread spools, use a smaller spool cap in front of the spool. For large thread spools, use a larger spool cap in front of the spool. The flat side of the spool cap should be pressed firmly against the spool. There should be no space between the spool cap and the thread spool.
Auxiliary Spool Pin The auxiliary spool pin is used when wind- ing a bobbin thread from a second spool of thread or for a second spool when sewing with a twin needle. Insert the auxiliary spool pin into the hole at
spool cap and place a felt pad under the thread spool. This is to prevent the thread from reeling off too fast. Do not place a spool cap on top of the spool pin as that would prevent the spool from rotating.
Auxiliary spool pin
A
14
D
Threading the Machine Make sure that the presser foot is raised and the needle is in its highest position.
5. Thread the needle.
A B
E
F G
C
15
C D
B
Needle Threader The integrated needle threader allows you
The needle must be in its highest position to use the built-in needle threader. Turn the handwheel until the notch on the wheel is
lowering the presser foot. 1. Use the handle (B) to pull the needle
threader all the way down. The metal
. 2. Place the thread from the back over the
3. Let the needle threader gently swing back. The hook pulls the thread through the needle eye and forms a loop behind the needle. Pull the thread loop out behind the needle.
4. Raise the presser foot and place the thread under it.
Note: The needle threader is designed to be used for size 70-120 needles. You cannot use the needle threader for size 60 needles or smaller, wing needles or twin needles. There are also some optional accessories that require manual threading of the needle. When threading the needle manually, make sure that the needle is threaded from front to back.
A
16
A B
C
E
F
G H
D
Threading for Twin Needle Replace the sewing needle with a twin needle. Make sure that the presser foot is raised and the needle is in its highest position.
1. Place the thread spool on the spool pin and fit the appropriately sized spool cap. Insert the auxiliary spool pin.
pad. Place the second thread spool on the spool pin.
2. Pull the threads into the thread guide
3. Thread down through the r ight
4. Bring the threads from the right into
left threading slot. Place the threads
one thread into the slot on the left side
the other thread into the slot on the right side of the needle thread guide
become twisted. 5. Thread the needles manually from
front to back.
Note: When you are using a twin needle, you might need to reduce the stitch width to pre- vent damage of the twin needle, stitch plate or presser foot. How much you need to reduce it depends on the width and/or the size of the twin needle.
Note: The weight and irregular surface of specialty threads such as metallic increases the amount of friction on the thread. By reduc- ing the tension, the risk of needle breakage is prevented.
17
Bobbin Winding
spool cap tightly against the spool.
front to the back. Pull the thread clockwise around
the inside to the outside. 4. Place the bobbin on the bobbin spindle.
A
B
C
5. Push the bobbin spindle to the right to activate the bobbin winding. Press the foot control to wind the bobbin. Once the bobbin begins to wind, cut the excess thread. When the bobbin is full, the bobbin winding will slow down and stop automatically. Push the bobbin spindle to the left. Remove the bobbin and cut the thread.
Inserting the Bobbin Make sure that the needle is fully raised and the machine is turned off before in- serting or removing the bobbin. 1. Open the bobbin cover by pushing
2. Insert the bobbin in the bobbin case with the thread running in a counterclockwise direction.
4. Pull the thread clockwise until it
5. Replace the bobbin cover.
A B
C
1.
3.
5.
2.
4.
D
18
Presser Foot Pressure The presser foot pressure has been pre-set to
not need to adjust the presser foot pressure.
very light or heavy fabric, adjusting the pres- sure can improve the result. For very light fabrics, loosen the pressure by turning the dial counterclockwise. Note: If the dial is turned counterclockwise too much, it could come off. If this happens, simply re- place the dial and turn it clockwise until it stays in place. For heavy fabric, tighten the pressure by turn- ing the dial clockwise. Note: If the dial is turned clockwise until it comes to a stop, it has reached the maximum pressure available. Do not try to turn the dial any further!
Thread Tension To set the thread tension, turn the dial on top of the machine. Depending on the fabric, bat- ting, thread, etc, the tension may need to be adjusted.
For the best stitch appearance and durability, make sure the needle thread tension is correctly adjusted. For general sewing, the threads evenly meet between the two layers of fabric
If the bobbin thread is visible on the top side of the fabric, the needle thread tension is too
If top thread is visible on the underside of the fabric, the needle thread tension is too loose
For decorative stitches and buttonholes, the top thread should be visible on the underside of the fabric. Make a few tests on a scrap piece of the fabric you are going to sew and check the tension.
Correct tension
Tension too tight
Tension too loose
B
A
C
19
C
Needles The sewing machine needle plays an important role
recommend needles of system 130/705H. The needle package included with your machine contains needles
Universal Needle (A) Universal needles have a slightly rounded point and come in a variety of sizes. For general sewing in a vari- ety of fabric types and weights.
Stretch Needle (B)
Marked with a yellow band.
Denim Needle (C) Denim needles have a sharp point to penetrate tightly
—
Note: Change the needle often. Always use a straight needle with a sharp point (D). A damaged needle (E) can cause skipped stitches, breakage or snapping of the thread. A damaged needle can also dam- age the stitch plate. Do not use asymmetrical twin needles (F), since they may damage your sewing machine.
E
D
F
A B
Changing the Needle 1. Loosen the needle screw. Use the screw-driver
if necessary. 2. Remove the needle.
away from you until it will go no further. 4. Tighten the needle screw as tight as it will go.
20
Lowering Feed Dogs You can lower the feed dogs by moving the switch at the back of the free arm to the
wish to raise the feed dogs. Note: The feed dogs will not raise immediately when the lever is switched. Turn the handwheel one full turn or start sewing to re-engage the feed dogs.
Presser Foot Lift The presser foot is lowered or raised with
By raising the presser foot lever as far as it goes the lift height of the presser foot can be increased. This is useful for easy removal of the presser foot or when placing heavy fabrics under the foot.
Changing the Presser Foot Remove Presser Foot Press the presser foot downwards until it snaps off from the presser foot holder.
Attach Presser Foot Place the presser foot under the presser foot
Line up the cross pin on the foot
Lower the presser foot lifter and the presser foot will snap into the presser foot holder. Note: Check that the presser foot is properly attached by raising the presser foot lift.
A
B
B
A
C
B
21
Stitch Selection
desired stitch. The selected stitch is the one
The stitches printed in white on the stitch
Use non-stretch stitches when sewing woven fabrics, leather or vinyl and stretch
Note: Always raise the needle above the fabric and presser foot before you turn the stitch selc- tion dial.
Stitch Length
stitch length corresponds to the setting
the stitch. The stitch length can be varied
wheel correspond to the stitch length in
When sewing using the stitches printed in
The mark shows the adjustment range when sewing the buttonhole.
C
A
B
A B
22
Model 150s/160s
Model 130s/140s
Stitch Width —
sired stitch width. The higher the number, the wider the
stitch width. The stitch width can be varied
wheel correspond to the stitch width in
Note: Before you turn the stitch width dial, raise the needle to its highest position, other- wise it may bend or break.
Adjustable Needle Position When a straight stitch is selected, the stitch width dial can be used to adjust the needle position from 0-6 mm. This is convenient when you need to adjust the position of the stitch for example when topstitching. Note: Before you turn the stitch width dial, raise the needle to its highest position, other- wise it may bend or break. On model 150s/160s the needle position is adjusted from the center to the left. On model 130s/140s the needle position is ad- justed from the center to the right.
Reverse Sewing Press the reverse lever down to sew in reverse. The machine sews in reverse only as long as the reverse sewing button is pressed.
A
23
SEWING —
scribed, a chart shows the recommended set-
chart to the right.
Start to Sew Straight Stitch
Raise the presser foot and position the fab- ric under it, next to a seam allowance guide line on the needle plate. On the bobbin cover
Lower the needle to the point where you want to start. Lower the presser foot and pull the threads toward the back. Press the foot con- trol. Gently guide the fabric along the seam guide letting the machine feed the fabric. Note: Some sewing is done more easily by chang- ing the needle position, e.g. topstitching a collar or sewing in a zipper. The needle position is de- termined by the stitch width dial (0 is center, 6 is left/right, see page 22).
Change Sewing Direction To change sewing direction, stop the machine and turn the handwheel toward you to bring the needle down into the fabric. Raise the presser foot. Pivot the fabric around the needle to change sewing direction as desired. Lower the presser foot and continue sewing in the new direction.
Finish Sewing Press the reverse stitch lever and sew several stitches in reverse at the end of the seam. Raise the presser foot and remove the fabric, pulling the threads to the back. Pull the threads up and into the thread cutter. The threads are cut the proper length for starting the next seam.
A. Recommended stitch B. Stitch length in mm C. Stitch width in mm D. Thread tension E. Recommended presser foot
stitch
2-4 0 3-5 0
A B C D E
Set for Straight Stitch
stitch
2-4 0 3-5 0
24
Reinforced Straight Stitch This stitch is stronger than regular straight stitch, due to the fact that it is a triple and elastic stitch. The reinforced straight stitch can be used for heavy stretch fabrics, for crotch seams which are subject to consider- able strain and for topstitching heavy fabrics. The stitch is sewn with two stitches forward and one stitch backward, forming a seam that does not rip easily. Carefully guide the fabric while sewing as the fabric moves back and forth.
Three-Step Zigzag Stitch Three-step zigzag stitch is used to overcast raw edges. Make sure the needle pierces the fabric on the left side and overcasts the edge on the right side. The stitch can also be used as an elastic stitch to allow seams to stretch when sew- ing knit fabrics.
Set for reinforced straight stitch
Set for three-step zigzag stitch
stitch
1 3-5 3-6 0
stitch
0 2-5 0
25
Overlock Stitch The open overlock stitch sews the seam and overcast the edge all at one time, perfect for stretch fabrics. This stitch is more elas- tic than normal seams, very durable and
Tip: When sewing, guide the fabric edge along the metal pin of the foot. By doing so, the stitches form over the pin and prevent the fabric from puckering.
Note: If using a stitch width other than the recommended, swing the needle by turning the hand wheel to make sure the needle doesnt hit the metal pin in the foot.
Closed Overlock Stitch The closed overlock stitch is perfect for sewing jersey knits. Durable stitch; great for attaching knit collars and cuffs.
Tip: When sewing, guide the fabric edge along the metal pin of the foot. By doing so, the stitches form over the pin and prevent the fabric from puckering.
Note: If using a stitch width other than the recommended, swing the needle by turning the hand wheel to make sure the needle doesnt hit the metal pin in the foot.
side and stitch with closed overlock stitch from the right side. Trim away excess fabric.
Set for overlock stitch
Set for closed overlock stitch
A B
stitch
5 3-7 3
stitch
5 3-7 3
26
Blindhem The blindhem stitch is used to make invisible hems on skirts, trousers and home decorating. 1. Finish the edge of the hem. 2. Fold and press the hem allowance to the
wrong side. 3. Fold the hem back on itself so approxi-
extends beyond the fold. The wrong side of your project should now be facing up.
4. Place the fabric under the presser foot so
5. When the needle swings into the fold it should catch a small amount of fabric. If the stitches are visible on the right side,
catches the hem just barely shows.
Elastic Blindhem Stitch The elastic blindhem stitch is especially suit- able for stretchy fabrics, because the zigzag in the stitch lets the stitch stretch. The hem is
knits.
Note: If using a stitch width other than the recommended, swing the needle by turning the hand wheel to make sure the needle doesnt hit the metal pin in the foot.
Blindhem stitch
Right side of fabric
Set for blindhem stitch
stitch
or 1-2 5 3-5 3
Elastic Blind- hem stitch
BA
27
Sewing on Patches or Appliqus To cover large holes it is necessary to sew a new piece of fabric onto the damaged area. Baste the new piece of fabric onto the dam- aged area on the right side of the fabric.
the three-step zigzag stitch. Trim the damaged area close to the seam from the wrong side of the fabric.
stitch or the honeycomb stitch can be used to
Pin or baste a patch to your fabric/project and stitch around the edges with any of the stitches.
Darning with the Three-Step Zigzag Stitch A small hole or tear is easily darned with the three-step zigzag stitch.
well covered. Make sure that the rows over- lap. Tip: To make the darning even sturdier, place a fabric underneath the hole/tear before sewing.
Repairing Tears On tears, frayed edges or small holes it is useful to lay a piece of fabric on the wrong side of the fabric. The underlayed fabric rein- forces the damaged area. Lay a piece of fabric underneath the dam- aged fabric. It must be a little larger than the damaged area.
or three-step zigzag stitch. Trim the piece of fabric used as reinforce- ment.
Set for three-step zigzag
Sew patches or appliqus
Darning with three-step zigzag
Set for zigzag stitch
stitch
1-2 5 3-5 0
stitch
2 4-6 3-5 0
Repairing tears
28
Sewing on Buttons
1. Remove the presser foot and lower the
2. Mark the fabric where the button is to be located. Place the fabric and button under the ankle with the holes in the button lined up with the swing of the needle. Bring the needle down into the holes of the button with the hand wheel to verify that the correct stitch width is set.
Note: The recommended width of 3mm is set for most buttons. If you sew a tiny button or a very large coat button, decrease or increase the stitch width until the swing of the needle sews in the holes of the button.
Note: Do not use this technique if the button is less than 1 cm (3/8) in diameter.
3. Press the foot control and sew six to eight
. 4. Raise feed dogs when button sewing is
completed.
Set for button sewing
A
stitch
0 3-5 3-5
29
Standard Buttonhole (model 150s/160s)
The fabric should be interfaced and/or stabi- lized where buttonholes are to be sewn. 1. Mark the start position and buttonhole
Push the button holder open by pushing
Push the button holder forward until
button will determine the length of the buttonhole.
3. Make sure that the thread is pulled though the hole in the presser foot and placed under the foot.
4. Position your garment under the presser foot so that the marking on the fabric is aligned with the center of the buttonhole
down, and push it away from you. The buttonhole lever should fit between the
6. Hold the end of the upper thread and start sewing. The buttonhole is sewn from the front of the presser foot to the
sewing when the last buttonhole column
7. Once the the buttonhole is finished, raise the presser foot. Pull the buttonhole lever towards you and push it all the way up.
8. To secure the bartack, thread the end of the top thread into a needle, pull to the wrong side and tie the end before cutting excess thread.
If you want to repeat the buttonhole, do not push the buttonhole lever up when the but-
— tonhole. Note: Always sew a test buttonhole on a piece of scrap fabric.
Set for buttonhole
B
D
C
Carefully cut your buttonhole open with a seam ripper
G
A
E
stitch
4-6 3-5 5B
F
30
Standard Buttonhole (model 130s/140s)
The fabric should be interfaced and/or stabi- lized where buttonholes are to be sewn.
Prepare the Buttonhole Measure diameter and thickness of the but-
— tain correct buttonhole length. Mark the start position and buttonhole length on the fabric
Note: Before starting to sew any buttonhole, al- ways push the the buttonhole foot fully back. The red marks are arranged at an interval of 0.5 cm. They are a guide when determining the length of the buttonhole. Place the fabric under the foot, so that the
the foot, so that the buttonhole center line marked on the fabric aligns with the center
Sew the Buttonhole
1 and sew the right side of
Cut the top thread after a few stitches. 2. Raise the needle to its highest position.
4
2
and sew a few bartacks. 3. Raise the needle to its highest position.
3
and sew the left side of the buttonhole until it matches the previous side in length.
4. Raise the needle to its highest position.
4
2
and sew a few bartacks. 5. To secure the buttonhole, thread the top
thread into a needle, pull to the wrong side and tie the end before cutting excess thread.
1
Set for buttonhole
2 3 4
B
5
stitch
41
2 3 6 3-5 5A
A
31
Corded Buttonhole (Stretch Fabrics) When sewing buttonholes in stretch fabrics we recommend cording the buttonhole to increase the stability and to keep the but- tonhole from stretching out. 1. Loop a piece of heavy thread or pearl
cotton over the finger at the back of
the foot, toward the front, then secure
columns will stitch over the cord. 3. When the buttonhole is finished, lift
slack. 4. Thread the cord ends into a needle, pull
to the wrong side and tie ends before cutting excess.
A
Carefully cut your buttonhole open with a seam ripper.
Use seam ripper and cut the buttonhole open from both ends towards the middle.
The density of the buttonhole is adjusted
Note: Density varies according to the fabric. Al- ways test sew a buttonhole on the fabric you are using to sew the buttonhole.
Tips: Slightly reducing upper thread tension will
produce better results. Use an extra stabilizer for fine or stretchy
fabrics.
B
32
Right presser foot position
4
Sewing Zippers
the right or the left of the needle, making it easy to sew both sides of the zipper. To sew the left side of the zipper, attach the
To sew the right side of zipper, attach the
Center Zipper
for the zipper placement. 2. Baste the remaining seam where the
with stitch length 4mm, thread tension
right side to the pressed open seam allowance, placing the zipper stop at the notch. Pin the zipper on the right side so
the needle is on the left side of the foot. Place fabric under the foot right side up with the zipper foot on the right side of the zipper.
4. Begin stitching across the bottom, turn the fabric and stitch the right side of the
5. To avoid fabric shifting, sew the left side of the zipper in the same direction.
is on the right side of the foot. Move the needle position to the right.
6. Begin stitching across the bottom, turn the fabric and stitch the left side of the zipper sewing from the bottom to the
7. Remove the basting stitches.
A
C
Set for zipper
stitch
1.5-3 0 3-5 4
Left presser foot position
B
4
D E
33
MAINTENANCE
Cleaning the Machine To keep your sewing machine operating well,
Wipe the exterior surface of your machine with a soft cloth to remove any dust or lint built up.
Cleaning the Bobbin Area Note: Raise the needle, lower the feed dogs and turn off the machine.
Remove the presser foot. Push the bobbin cov-
the stitch plate. Lift up the stitch plate.
Clean the feed dogs and the bobbin area with the brush found with the accessories.
Cleaning Under the Bobbin Area Clean the area under the bobbin case after sew- ing several projects or any time you notice an accumulation of lint in the bobbin case area. Remove the bobbin case by lifting it up and to the right. Clean the area with the brush or with a dry cloth. Put the bobbin case back into the hook race so
Note: Do not blow air into the bobbin case area. The dust and lint will be blown into your machine.
Replacing the Stitch Plate With the feed dogs lowered, replace the stitch plate, insert and tighten the two stitch plate screws. Replace the bobbin cover. Raise the feed dogs.
A B
C C
D
34
TROUBLESHOOTING your machine. For further information please contact your local authorized PFAFF dealer.
The Seam has Uneven Stitches Is the thread tension correct? Check needle thread tension and the threading.
Are you using too thick or slubbed thread? Change the thread.
Is the bobbin thread evenly wound? Check bobbin winding.
Is a correct needle used? Insert a proper needle correctly, see page 19.
Needle Thread Breaks Did you insert the needle properly? Insert needle correctly, see page 19.
Did you insert a wrong needle? Use needle system 130/705 H.
Is the needle bent or blunt? Insert a new needle.
Did you thread the machine properly? Check how the machine is threaded.
Is the needle too small for the thread? Change the needle to the proper size for the thread.
Are you using poor thread with slubs or thread which has become dry?
— chased from an authorized PFAFF dealer.
Is a correct spool cap used? Attach a spool cap of the right size for the actual thread spool.
Is the stitch plate hole damaged? Change the stitch plate.
General Problems Fabric does not move? Make sure that the feed dogs are not lowered.
The needle breaks? Insert needle correctly, see page 19. Attach correct needle for the fabric.
The machine will not sew? Check that all plugs are securely plugged into the machine and into the wall socket. Push bobbin winder lever to sewing position.
The Machine does not Feed or Feeds Irregularly Did you thread the machine properly? Check how the machine is threaded.
Has sewing lint collected between the feed dogs? Remove the stitch plate and clean the feed dogs with a brush.
The Machine Skips Stitches Did you insert the needle properly? Insert needle correctly, see page 19.
Did you insert a wrong needle? Use needle system 130/ 705 H.
Did you thread the machine properly? Check how the machine is threaded.
Is the correct presser foot used? Attach correct presser foot.
Is the needle too small for the thread? Make sure the needle is correct for the thread and fabric.
35
Bobbin Thread Breaks Did you insert the bobbin properly? Check the bobbin thread.
Is the stitch plate hole damaged? Change the stitch plate.
Is the bobbin area clean? Clean lint from bobbin area.
Is the bobbin wound correctly? Wind a new bobbin.
design.
product.
Intellectual Property
CE — Authorised Representative
Please note that on disposal, this product must be safely recycled in accordance with relevant National legislation relating to elec- trical/electronic products. Do not dispose of electrical appliances as unsorted muncipal waste, use separate collection facilities. Contact your local government for information regarding the collection systems available. When replacing old appliances with new ones, the retai
Хорошее руководство по эксплуатации
Законодательство обязывает продавца передать покупателю, вместе с товаром, руководство по эксплуатации Pfaff Smarter 140S. Отсутствие инструкции либо неправильная информация, переданная потребителю, составляют основание для рекламации в связи с несоответствием устройства с договором. В законодательстве допускается предоставлении руководства в другой, чем бумажная форме, что, в последнее время, часто используется, предоставляя графическую или электронную форму инструкции Pfaff Smarter 140S или обучающее видео для пользователей. Условием остается четкая и понятная форма.
Что такое руководство?
Слово происходит от латинского «instructio», тоесть привести в порядок. Следовательно в инструкции Pfaff Smarter 140S можно найти описание этапов поведения. Цель инструкции заключается в облегчении запуска, использования оборудования либо выполнения определенной деятельности. Инструкция является набором информации о предмете/услуге, подсказкой.
К сожалению немного пользователей находит время для чтения инструкций Pfaff Smarter 140S, и хорошая инструкция позволяет не только узнать ряд дополнительных функций приобретенного устройства, но и позволяет избежать возникновения большинства поломок.
Из чего должно состоять идеальное руководство по эксплуатации?
Прежде всего в инструкции Pfaff Smarter 140S должна находится:
— информация относительно технических данных устройства Pfaff Smarter 140S
— название производителя и год производства оборудования Pfaff Smarter 140S
— правила обслуживания, настройки и ухода за оборудованием Pfaff Smarter 140S
— знаки безопасности и сертификаты, подтверждающие соответствие стандартам
Почему мы не читаем инструкций?
Как правило из-за нехватки времени и уверенности в отдельных функциональностях приобретенных устройств. К сожалению само подсоединение и запуск Pfaff Smarter 140S это слишком мало. Инструкция заключает ряд отдельных указаний, касающихся функциональности, принципов безопасности, способов ухода (даже то, какие средства стоит использовать), возможных поломок Pfaff Smarter 140S и способов решения проблем, возникающих во время использования. И наконец то, в инструкции можно найти адресные данные сайта Pfaff, в случае отсутствия эффективности предлагаемых решений. Сейчас очень большой популярностью пользуются инструкции в форме интересных анимаций или видео материалов, которое лучше, чем брошюра воспринимаются пользователем. Такой вид инструкции позволяет пользователю просмотреть весь фильм, не пропуская спецификацию и сложные технические описания Pfaff Smarter 140S, как это часто бывает в случае бумажной версии.
Почему стоит читать инструкции?
Прежде всего здесь мы найдем ответы касательно конструкции, возможностей устройства Pfaff Smarter 140S, использования отдельных аксессуаров и ряд информации, позволяющей вполне использовать все функции и упрощения.
После удачной покупки оборудования/устройства стоит посвятить несколько минут для ознакомления с каждой частью инструкции Pfaff Smarter 140S. Сейчас их старательно готовят или переводят, чтобы они были не только понятными для пользователя, но и чтобы выполняли свою основную информационно-поддерживающую функцию.

Русский
- Bedienungsanleitung Pfaff Smarter 140S
- Pfaff Smarter 140S User Manual
- Manual Usuario Pfaff Smarter 140S
- Mode d’emploi Pfaff Smarter 140S
- Istruzioni Pfaff Smarter 140S
- инструкция Pfaff Smarter 140S
- Pfaff Smarter 140Sの取扱説明書
- Handleiding Pfaff Smarter 140S
- Manual de uso Pfaff Smarter 140S
Вам нужна инструкция? Мы поможем Вам ее найти и сэкономить Ваше время.
- 36 stron
- 2.16 mb
Изделие Pfaff Smarter 140S, а также другие, которыми Вы пользуетесь ежедневно, наверняка вы получили в комплекте с инструкцией обслуживания. Из опыта наших пользователей мы знаем, что большинство из Вас не уделили этому особого внимания. Большая часть инструкций, сразу же после покупки попадает в корзину для мусора вместе с коробкой — это ошибка. Ознакомьтесь с информацией, касающейся инструкции Pfaff Smarter 140S, которая поможет Вам в будущем сэкономить нервы и избежать головной боли.
Важная подсказка — не забывайте хотя бы раз прочитать инструкцию Pfaff Smarter 140S
Если вы не хотите каждый раз читать информационные брошюры, касающиеся, тех или Pfaff Smarter 140S иных изделий, достаточно, прочитать их раз — сразу же после покупки устройства. Вы получите основное знания, касающиеся поддержания изделия Pfaff Smarter 140S в хорошем эксплуатационном состоянии, так, чтобы без проблем достигнуть его планируемого цикла работы. Затем инструкцию можно отложить на полку и вернуться к ней только в случае, если вы не уверены, правильно ли проводится техобслуживание изделия. Правильный уход является необходимым элементом Вашего удовольствия Pfaff Smarter 140S.
Раз в году пересмотрите шкафчик, в котором держите инструкции для всех устройств, — выбросите те, которыми вы уже не пользуетесься. Это поможет Вам сохранять порядок в своей домашней базе инструкций обслуживания.
Summary of Contents for Pfaff Smarter 140S
Что находится в инструкции Pfaff Smarter 140S? Почему стоит ее прочитать?
- Гарантия и подробности, касающиеся техобслуживания изделия
Хорошей идеей будет прикрепить чек к странице инструкции. Если что-то плохое случится во время использования Pfaff Smarter 140S, у вас будет комплект документов, необходимый для гарантийного ремонта. В этой части инструкции вы найдете информацию об авторизованных сервисных центрахPfaff Smarter 140S а также, как самостоятельно правильно ухаживать за оборудованием — так, чтобы не потерять гарантийных прав. - Указания по монтажу и Setup
Не терять нервов и времени на самостоятельную попытку установки и первого запуска изделия. Воспользуйтесь рекомендациями производителя Pfaff Smarter 140S чтобы правильно запустить изделие, без лишнего риска повреждения оборудования. - Информация, касающаяся дополнительных запчастей (входящих в комплект а также являющихся опцией)
Пересматривая эту часть документа вы сможете проверить, доставлен ли ваш Pfaff Smarter 140S с полним комплектом аксессуаров. Вы также сможете узнать, какие дополнительные запчасти или аксессуары для Pfaff Smarter 140S Вы сможете найти и докупить к своему устройству. - Troubleshooting
Самые частые проблемы, касающиеся Pfaff Smarter 140S и методы их решения. Это очень полезная часть руководства по обслуживанию — она позволит Вам сэкономить много времени на поиск решений. 90% проблем с Pfaff Smarter 140S повторяется у многих пользователей. - Требования, касающиеся питания и энергетический класс
Информация, касающаяся количества потребляемой энергии, а также рекомендации, касающиеся установки и питания Pfaff Smarter 140S. Прочитайте, чтобы оптимально пользоваться Pfaff Smarter 140S и не использовать большего количества ресурсов, нежели это необходимо для правильной работы изделия. - Специальные функции Pfaff Smarter 140S
Здесь вы можешь узнать, как персонализировать изделие Pfaff Smarter 140S. Вы узнаете, какие дополнительные функции могут помочь Вам удобно использовать продукт Pfaff Smarter 140S а также, какие функции Вашего устройства оптимальны для выполнения конкретной деятельности.
Как видите в инструкции вы найдете информацию, которая реально поможет Вам в использовании Вашего изделия. Стоит с ней ознакомиться, чтобы избежать разочарований, возникающих из более короткого, нежели предусматривалось, периода исправности изделия Pfaff Smarter 140S. Если все же вы не хотите копить инструкции в своем доме, наш сайт поможет Вам в этом — вы должны найти у нас руководство по обслуживанию большинства из своих устройств, а также Pfaff Smarter 140S.
Комментарии (0)
| Language | Type | Pages | |
|---|---|---|---|
| English | User Manual | 36 | > Go to the manual |
| German | User Manual | 36 | Go to the manual |
| Dutch | User Manual | 36 | Go to the manual |
| Dutch | User Manual | 36 | Go to the manual |
631184
Report abuse
Libble takes abuse of its services very seriously. We’re committed to dealing with such abuse according to the laws in your country of residence. When you submit a report, we’ll investigate it and take the appropriate action. We’ll get back to you only if we require additional details or have more information to share.
Product: Pfaff Smarter 140S
Forumrules
To achieve meaningful questions, we apply the following rules:
- First, read the manual;
- Check if your question has been asked previously;
- Try to ask your question as clearly as possible;
- Did you already try to solve the problem? Please mention this;
- Is your problem solved by a visitor then let him/her know in this forum;
- To give a response to a question or answer, do not use this form but click on the button ‘reply to this question’;
- Your question will be posted here and emailed to our subscribers. Therefore, avoid filling in personal details.
Your question has been posted on this page
Would you like to receive an email when new answers and questions are posted? Please enter your email address.