
1
-
- 0 mb
- 48 stron
-
- 0 mb
- 8 stron
-
- 0.84 mb
- 88 stron
-
- 0 mb
- 88 stron
-
- 1.14 mb
- 88 stron
-
- 0 mb
- 88 stron
-
- 1.06 mb
- 48 stron
-
- 0 mb
- 48 stron
-
- 0.15 mb
- 8 stron
-
- 0 mb
- 8 stron
-
- 0 mb
- 8 stron
-
- 0 mb
- 8 stron
-
- 0.32 mb
- 46 stron
-
- 0 mb
- 45 stron
-
- 0 mb
- 8 stron
-
- 0 mb
- 2 stron
-
- 0 mb
- 2 stron
-
- 0 mb
- 46 stron
-
- 0 mb
- 46 stron
-
- 0 mb
- 46 stron
-
- 0 mb
- 68 stron
-
- 0 mb
- 67 stron
-
- 0.48 mb
- 48 stron
-
- 0 mb
- 48 stron
-
- 1.69 mb
- 48 stron
-
- 0 mb
- 48 stron
-
- 0.34 mb
- 48 stron
-
- 0 mb
- 48 stron
-
- 0 mb
- 2 stron
-
- 0.35 mb
- 48 stron
-
- 0 mb
- 48 stron
-
- 0 mb
- 48 stron
-
- 1.11 mb
- 48 stron
-
- 0 mb
- 8 stron
-
- 0.37 mb
- 8 stron
-
- 0 mb
- 8 stron
-
- 0 mb
- 8 stron
-
- 1.06 mb
- 48 stron
-
- 0 mb
- 8 stron
-
- 0 mb
- 8 stron
-
- 0 mb
- 48 stron
-
- 0 mb
- 48 stron
-
- 0.65 mb
- 48 stron
-
- 1.15 mb
- 48 stron
-
- 1.02 mb
- 48 stron
2
-
- 1.29 mb
- 48 stron
-
- 1.29 mb
- 48 stron
-
- 2 mb
- 139 stron
-
- 1.07 mb
- 48 stron
-
- 0 mb
- 8 stron
-
- 0.83 mb
- 48 stron
-
- 0.28 mb
- 8 stron
-
- 0 mb
- 47 stron
-
- 0 mb
- 48 stron
-
- 0 mb
- 48 stron
-
- 1.04 mb
- 48 stron
-
- 0.68 mb
- 48 stron
-
- 0.76 mb
- 48 stron
-
- 0 mb
- 48 stron
-
- 0.62 mb
- 48 stron
-
- 0.7 mb
- 48 stron
-
- 0.7 mb
- 48 stron
-
- 0.7 mb
- 48 stron
-
- 0.25 mb
- 8 stron
-
- 0.77 mb
- 48 stron
-
- 0.89 mb
- 72 stron
-
- 0.77 mb
- 48 stron
-
- 0.89 mb
- 72 stron
-
- 0.82 mb
- 48 stron
-
- 0.94 mb
- 72 stron
-
- 0.95 mb
- 72 stron
-
- 0.79 mb
- 48 stron
-
- 0.25 mb
- 8 stron
-
- 0.83 mb
- 48 stron
-
- 0 mb
- 8 stron
-
- 0.74 mb
- 48 stron
-
- 0.78 mb
- 48 stron
-
- 0.78 mb
- 48 stron
-
- 0.78 mb
- 48 stron
-
- 0.78 mb
- 48 stron
-
- 0.66 mb
- 48 stron
-
- 0.23 mb
- 8 stron
-
- 0.66 mb
- 48 stron
-
- 0.6 mb
- 48 stron
-
- 0.66 mb
- 52 stron
-
- 0.67 mb
- 48 stron
-
- 0.66 mb
- 48 stron
-
- 0.25 mb
- 8 stron
-
- 0.68 mb
- 48 stron
-
- 0.29 mb
- 8 stron
-
- 0.29 mb
- 8 stron
-
- 0.28 mb
- 8 stron
-
- 0.84 mb
- 60 stron
-
- 0.73 mb
- 52 stron
-
- 0.73 mb
- 48 stron
-
- 0.75 mb
- 48 stron
-
- 0.76 mb
- 48 stron
-
- 0.25 mb
- 8 stron
-
- 0.27 mb
- 8 stron
-
- 0.28 mb
- 8 stron
-
- 0.28 mb
- 8 stron
-
- 0.83 mb
- 48 stron
-
- 0.8 mb
- 48 stron
-
- 0.29 mb
- 8 stron
6
-
- 0.49 mb
- 8 stron
-
- 0.14 mb
- 8 stron
9
-
- 0 mb
- 48 stron
A
-
- 0 mb
- 8 stron
B
-
- 0 mb
- 8 stron
C
-
- 0 mb
- 48 stron
-
- 0 mb
- 72 stron
G
-
- 0 mb
- 8 stron
L
-
- 0.1 mb
- 8 stron
-
- 0.1 mb
- 8 stron
-
- 0.1 mb
- 8 stron
N
-
- 0.11 mb
- 8 stron
O
-
- 0 mb
- 138 stron
Read the instructions and keep them safe. If you pass the toaster on to anyone else, pass on the instructions too.
Remove all packaging, but keep it till you’re satisfied the toaster is working. important safeguards
Follow basic safety precautions, including:
1 The toaster must only be used by or under the supervision of a responsible adult.
2Don’t put the toaster in water or any other liquid, don’t use it in a bathroom, near water, or outdoors.
3 Sit the toaster upright on a firm, level, heat-resistant surface.
4 Don’t put it on or near anything that could be damaged even by moderate heat.
5If overcooked, bread may burn. Don’t use the toaster near or below curtains or other combustible materials, and watch it while it’s in use.
6 The area round the toasting slots gets hot – don’t touch!
7Route the cable so it doesn’t overhang, and can’t be caught or tripped over accidentally.
8 The toaster must not be operated by an external timer or remote control system.
9When using a single toasting slot, don’t let anything get into the other slot, as both slots will be “live” when the bread carriage handle is lowered.
10Don’t let the toasting slots become covered during toasting, or while the toaster is still hot.
11If bread gets jammed, unplug the toaster, let it cool down fully, then carefully remove the bread that’s jamming it. Don’t use anything sharp, such as a knife or fork, you may damage the elements.
12Don’t toast sandwiches or buttered items, the fillings or the butter may burn.
13Don’t use torn, curled, or misshapen bread, you may jam the toaster.
14Unplug the toaster when not in use, before moving and before cleaning. Let it cool down fully before cleaning and storing away.
15Clean the crumbs out of your toaster frequently. A build up of crumbs is unhygienic, and could cause a fire hazard.
16Don’t use the toaster unless the crumb tray is in place.
17Keep the toaster and the cable away from sources of heat.
18Don’t use the toaster for any purpose other than those described in these instructions.
19Don’t use the toaster if it’s damaged or malfunctions.
20 If the cable is damaged, return the toaster, to avoid hazard. household use only
before using for the first time
1Before using the toaster for the first time, you need to cure the elements. This will remove their protective coating.
2This may smell a bit, but it’s nothing to worry about. Just make sure the room is well ventilated.
3Check that there’s nothing in the slots, turn the browning control to max, and operate the toaster without bread.
4 When it’s done, leave it to cool down fully, then you can use it normally.
Инструкции Russell Hobbs из категории Тостер
Нажмите на букву алфавита ниже, чтобы перейти в список моделей, которые начинаются с данного знака
- 1
- 2
- 6
- 9
- A
- B
- C
- G
- L
- N
- O
1
2
6
9
A
B
C
G
L
N
O

![]()
IMPORTANT SAFEGUARDS
When using electrical appliances, basic safety precautions should always be followed, including the following:
- Read all instructions.
- Do not touch hot surfaces. Use handles or knobs.
- To protect against fire, electric shock and injury to persons do not immerse cord, plugs or appliance in water or other liquid.
- Close supervision is necessary when any appliance is used by or near children.
- Unplug from outlet when not in use and before cleaning. Allow to cool before putting on or taking off parts, and before cleaning the appliance.
- Do not operate any appliance with a damaged cord or plug, or after the appliance malfunctions or has been damaged in any manner. Contact Consumer Support.
- The use of accessory attachments not recommended by the appliance manufacturer may cause injuries.
- Do not use outdoors.
- Do not let cord hang over edge of table or counter, or touch hot surfaces.
- Do not place on or near a hot gas or electric burner, or in a heated oven.
- To disconnect, push button, then remove plug from wall outlet.
- Do not use this appliance for other than intended use.
- Oversized foods, metal foil packages, or utensils must not be inserted in a toaster, as they may create a risk of fire or electric shock.
- A fire may occur if the toaster is covered or touching flammable material, including curtains, draperies, walls and the like, when in operation.
- Do not attempt to dislodge food when toaster is plugged in.
Warning: To prevent electrical shock, unplug before cleaning.
Warning: To reduce the risk of fire or electric shock, operate with crumb tray in place. - This appliance is not intended for use by persons (including children) with reduced physical, sensory or mental capabilities, or lack of experience and knowledge, unless they have been given supervision or instruction concerning use of the appliance by a person responsible for their safety.
- Children should be supervised to ensure that they do not play with the appliance.
- The appliance is not intended to be operated by means of an external timer or separate remote-control system.
SAVE THESE INSTRUCTIONS.
This product is for household use only.
POLARIZED PLUG
This appliance has a polarized plug (one blade is wider than the other). To reduce the risk of electric shock, this plug is intended to fit into a polarized outlet only one way. If the plug does not fit fully into the outlet, reverse the plug. If it still does not fit, contact a qualified electrician. Do not attempt to modify the plug in any way.
TAMPER-RESISTANT SCREW
Warning: This appliance is equipped with a tamper-resistant screw to prevent removal of the outer cover. To reduce the risk of fire or electric shock, do not attempt to remove the outer cover. There are no user-serviceable parts inside. Repair should be done only by authorized service personnel.
ELECTRICAL CORD
A short power-supply cord is provided to reduce the risks resulting from becoming entangled in or tripping over a longer cord.
Extension cords are available and may be used if care is exercised in their use.
If an extension cord is used:
- The marked electrical rating of the extension cord should be at least as great as the electrical rating of the appliance;
- If the appliance is of the grounded type, the extension cord should be a grounding-type 3-wire cord; and
- The cord should be arranged so that it will not drape over the counter top or tabletop where it can be pulled on by children or tripped over.
Note: If the power cord is damaged, please contact the warranty department listed in these instructions.

How to Use
This appliance is for household use only.
GETTING STARTED
- Remove all packing materials, any stickers and the plastic band around the power plug.
- To register your product, go to www.prodprotect.com/russellhobbs.
- Wash all parts as instructed in CARE and MAINTENANCE section.
- Select a level surface where this unit is to be used allowing enough space for steam to escape without damage to counters, cabinets and walls.
- Set the browning level to maximum (6). Operate the appliance empty, to cure the new elements. This may smell a bit, but it’s nothing to worry about. Ensure the room is well ventilated.
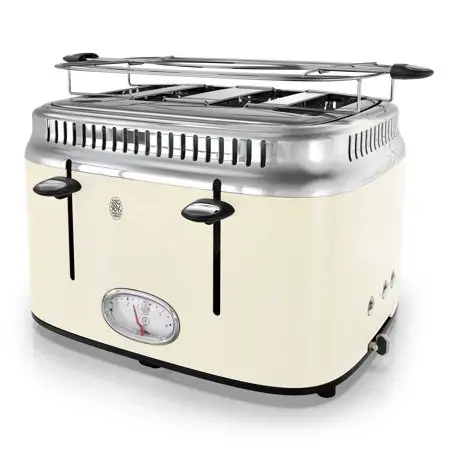
PARTS
- toasting slots
- lever
- browning control
- crumb tray, left (part no. TR9250-02)
- crumb tray, right (part no. TR9250-01)
- warming rack (part no. TR9250-03)
- handle
- toasting time gauge
TOASTING TIME GAUGE
The gauge shows the amount of time it will take to make the toast at the selected browning control setting.
- If you cancel toasting by pressing the button, the gauge will stay at the time it was showing when you pressed the button. If you restart toasting by lowering the lever, the gauge will move to the 6 mark then readjust to show the correct toasting time.
- If you change the position of the browning control during toasting, the gauge will move to the 6 mark then readjust to show the correct toasting time.
It will also adjust itself automatically when you use the frozen bread or bagel buttons.
TOASTING BREAD
- Set the toaster upright on a firm, level, heat-resistant surface.
- Put the plug into the power socket.
- Turn the browning control to the required setting (1 = light, 6 = dark).
- Put bread into the toasting slots (maximum thickness 1 inch).
- Press the lever down fully. It won’t lock down unless the toaster is connected to the electricity supply.
- The toasting time gauge will show the toasting time and start to count down.
- When it reaches 0, the toast will pop up.
- To stop toasting, press the button.
FROZEN BREAD
- Leave the browning control at your favoured setting, insert the frozen bread, lower the lever, then press the button.
- The light will come on, and the toasting time will be altered automatically to give the same degree of browning you get with unfrozen bread.
- The toasting time gauge will show the toasting time and start to count down.
- When it reaches 0, the toast will pop up.
BAGELS
- Insert cut bagel into the slots with cut side toward the outside of the toaster.
- Leave the browning control at your favoured setting, lower the lever, then press the button.
- The toasting time gauge will show the toasting time and start to count down.
- When it reaches 0, the bagel will pop up.
WARMING RACK
Note: Don’t use the warming rack to warm frozen, buttered, coated, iced, or filled buns.
- Place the warming rack on top of the toaster, with the feet inside the slots.
- Place the buns on top of the warming rack.
- Set the browning level to 2. Then lower the lever.
- When the lever pops up, remove the warmed buns.
- Don’t touch the warming rack wires – they’ll be hot.
- Remove the warming rack before using the toaster normally.
CARE AND MAINTENANCE
Empty the crumb trays regularly.
- Unplug the appliance and let it cool.
- Wipe outer surfaces with a damp cloth.
NEED HELP?
Warranty Information
(Applies only in the United States and Canada)
For service, repair or any questions regarding your appliance, please call our Customer Service Line at 1-800-947-3744. Please DO NOT return the product to the place of purchase. Also, please DO NOT mail product back to manufacturer, nor bring it to a service center. You may also want to consult www.prodprotect.com/russellhobbs.
What does it cover?
Any defect in material or workmanship provided; however, the liability of Spectrum Brands, Inc. will not exceed the purchase price of product.
How long is the warranty valid?
- In the United States: Two years from the date of original purchase with proof of such purchase.
- In Canada: Two years from the date of original purchase with proof of such purchase. Canadian residents can register online for an extra year of warranty at: www.prodprotect.com/russellhobbs.
What will we do to help you?
Provide you with a reasonably similar replacement product that is either new or factory refurbished.
How do you get service?
- Save your receipt as proof of date of sale.
- Visit the online service website at www.prodprotect.com/russellhobbs, or call tollfree 1-800-947-3744, for general warranty service.
- If you need parts or accessories, please call 1-800-738-0245.
What does your warranty not cover?
- Damage from commercial use
- Damage from misuse, abuse or neglect
- Products that have been modified in any way
- Products used or serviced outside the country of purchase
- Glass parts and other accessory items that are packed with the unit
- Shipping and handling costs associated with the replacement of the unit
- Consequential or incidental damages (Please note, however, that some states do not allow the exclusion or limitation of consequential or incidental damages, so this limitation may not apply to you.)
How does state law relate to this warranty?
This warranty gives you specific legal rights. You may also have other rights that vary from state to state or province to province.
![]()