
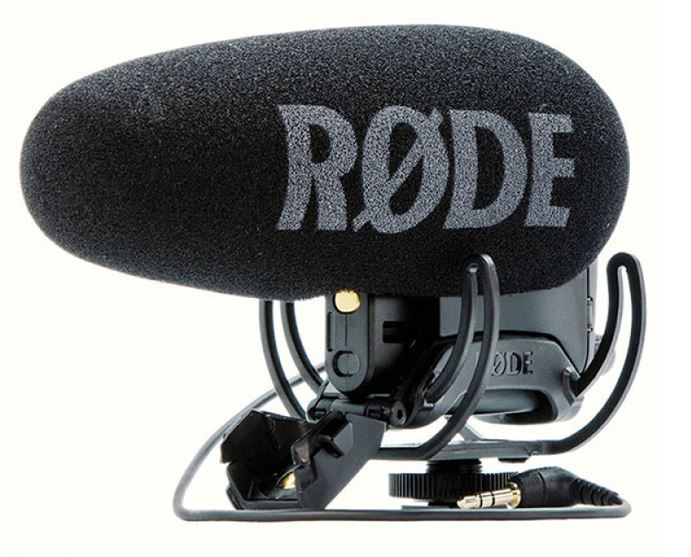
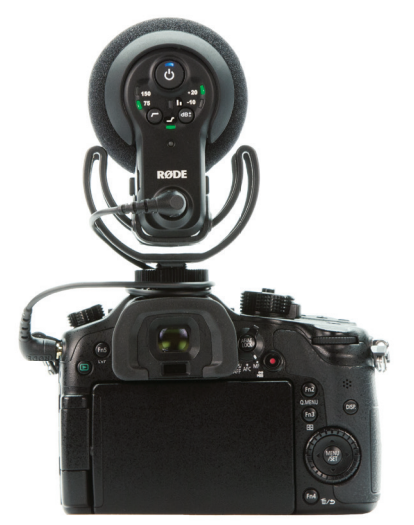
RØDE Microphones выпускает еще один микрофон в супер популярной линейке VideoMic. Новый VideoMic Pro+ задает новый уровень для записи звука для полупрофессионального применения.
Микрофон оборудован первокласным виброподвесом Rycote Lyre, капсюлем VideoMic Pro и ветрозащитой. В дополнение к этому в микрофон добавлены несколько новых функций:
- Функция Автоматического Включения микрофона когда на микрофон поступает напряжение питания от микрофонного входа видеокамеры. Это великолепно для видеосъемки «на бегу», когда микрофон автоматически включится вместе с включением камеры и выключится при отсоединии кабеля от камеры или при выключении камеры.
- Встроенный в крышку отсека для батареек аккумулятор позволяет заменить батарейки в процессе записи без выключения микрофона.
- Питание VideoMic Pro+ может быть от встроенного RØDE LB-1 Lithium-Ion аккумулятора, 2 x AA батареек или через Micro USB разъем.
- Цифровое управление позволяет регулировать параметры записываемого сигнала прямо на микрофоне и уменьшать время затрачиваемое в дальнейшем на постпродакшен и редактирование звука.
- Функции цифрового управления (переключатели) включают в себя:
- 2-ступенчатый фильтр низких частот отсекает низкочастотный гул от автомобильного трафика или от кондиционера.
- 3-ступенчатый усилитель уровня, с +20dB функцией предназначен для усиления уровня выхода для записи на DSLR или беззеркальные фотокамеры.
- Усиление высоких частот подчеркнет детали и улучшит четкость записи звука.
- Дополнительный канал «безопасного звука» с пониженным уровнем сигнала позволит записать второй канал звука без отсечки по уровню при неожиданных резких всплесках уровня.
VideoMic Pro + является новым эталоном накамерных микрофонов. В микрофон добавлены такие восстребованные функции как встроенный аккумулятор, функция автоматического включения микрофона и выход второго канал звука с безопасно-пониженной громкостью.
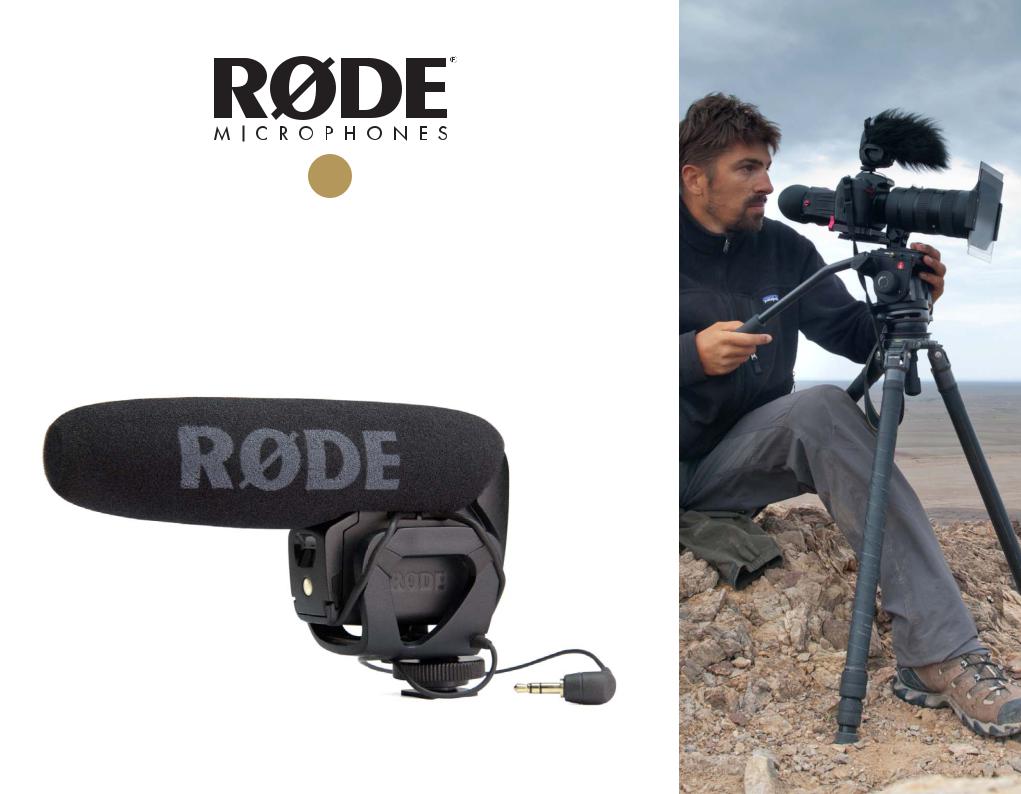
VIDEOMIC PRO
INSTRUCTION MANUAL
www.rodemic.com

Thank you for investing in the RØDE VideoMic Pro.
When RØDE released the original VideoMic in 2004 it was the only mic of its kind on the market. Just like many great innovations it was born from a personal need. At the time MiniDV cameras were the latest technology, offering consumers and independent filmmakers unprecedented freedom and creativity for their video, but neglecting audio quality. I went shopping for a solution but found that the only offerings were either cheap inferior quality or high cost shotgun microphones not designed to integrate easily with the cameras.
Thus the VideoMic was born. Almost a decade later its broadcast audio quality, integrated shock mounting and accessible price tag has made it the world’s largest selling microphone for consumer cameras.
However in this time there have been numerous innovations in video cameras, from hard drive, solid state and network cameras, through to high definition Digital SLR and onwards to large sensor video cameras. The technology has gotten larger but of course the form factor much smaller, thus the decision to create the high performance, yet conveniently compact VideoMic Pro.
Creating a high performance microphone as lightweight and manageable as the VideoMic Pro was quite a technical challenge. Other companies have attempted and failed, simply because a directional microphone depends on the length of the microphone barrel to reject the surrounding ambient noise that you don’t want to pick up.
Leveraging the technology developed alongside our award winning NTG1, NTG2 and NTG3 shotgun microphones we’ve finally realised a professional microphone with a much smaller form factor.
Please take the time to visit www.rodemic.com and register your mic for a full ten year warranty.
Peter Freedman
RØDE Microphones
Sydney, Australia
INTRODUCTION
SPECIFICATIONS
FEATURES
WHAT’S IN THE BOX
VIDEOMIC PRO STRUCTURE
SETUP AND USE
Installing the battery Mounting and connecting VideoMic Pro controls Replacing shock mount bands
Recording Tips
OPTIONAL ACCESSORIES
SAFETY / CARE INSTRUCTIONS
TROUBLESHOOTING / FAQ
PRODUCT WARRANTY
SUPPORT AND SERVICE
2.
3.
4.
4.
5.
6.
7.
8.
10.
12.
13.
15.
16.
18.
18.
2.
|
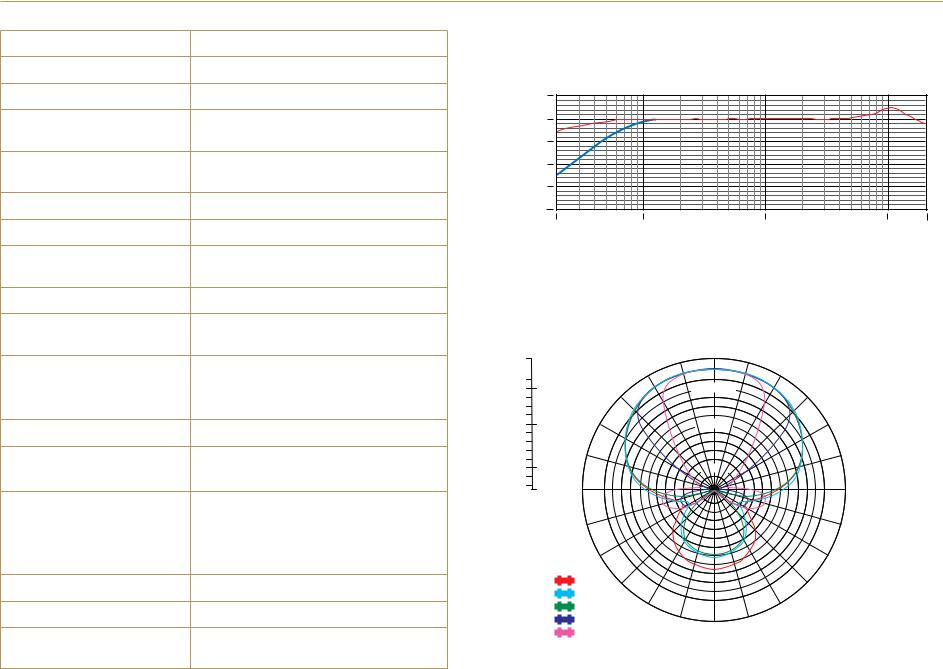
SPECIFICATIONS |
|||||||||
|
Acoustic Principle: |
Line gradient |
FREQUENCY RESPONSE |
|||||||
|
Polar Pattern |
Super Cardioid |
||||||||
|
Frequency Range: |
40 Hz ~ 20 000 Hz |
10 |
|||||||
|
(High Pass Filter) |
@ 80 Hz / 12 dB /octave |
V./Pa |
0 |
||||||
|
-10 |
|||||||||
|
Frequency Range: |
Selectable HPF |
||||||||
|
3 position switch |
1 |
-20 |
|||||||
|
Variable Level: |
re |
||||||||
|
(-10 dB, 0 dB, +20 dB) |
-30 |
||||||||
|
dB |
|||||||||
|
Output Impedence |
200 |
-40 |
|||||||
|
Signal to Noise Ratio: |
74 dB |
20 Hz |
100 |
1000 |
10 000 |
20 000 |
|||
|
Equivalent Noise: |
20 dBA SPL |
||||||||
|
(A-weighted as per IEC651) |
|||||||||
|
Maximum SPL: |
134 dB |
POLAR PATTERN |
|||||||
|
+6.9 dBu |
|||||||||
|
Maximum Output: |
|||||||||
|
(@ 1% THD into 1K load) |
|||||||||
|
0˚ |
|||||||||
|
+5.0 |
|||||||||
|
Sensitivity: |
-38 dB re 1V/Pa |
0.0 |
|||||||
|
(12.6mV @ 94 dB SPL) |
-2.0 |
||||||||
|
-2.0 |
|||||||||
|
± 2 dB @ 1kHz |
-4.0 |
||||||||
|
-6.0 |
|||||||||
|
-8.0 |
-10.0 |
||||||||
|
Dynamic Range: |
114 dB SPL (as per IEC651) |
-10.0 |
|||||||
|
-12.0 |
|||||||||
|
-14.0 |
|||||||||
|
9V alkaline battery |
-16.0 |
||||||||
|
Power requirements: |
-18.0 |
-20.0 |
|||||||
|
-20.0 |
|||||||||
|
(Current 7.8mA) |
-22.0 |
||||||||
|
-24.0 |
-25.0 |
90˚ |
270˚ |
||||||
|
3.5 Stereo mini jack plug |
dB rel. 1V/Pa |
||||||||
|
Output Connection: |
(dual mono) |
||||||||
|
Tip – left channel |
|||||||||
|
Ring – right channel |
Frequency: |
||||||||
|
Battery Life: |
> 70 hours |
500 Hz: |
|||||||
|
1000 Hz: |
|||||||||
|
Weight (No Battery): |
86g (3oz) |
2000 Hz: |
|||||||
|
8000 Hz: |
180˚ |
||||||||
|
43mm x 150mm x 95mm |
14000 Hz: |
||||||||
|
Dimension (W x L x H): |
|||||||||
|
(1.69” x 6” x 3.74”) |
|||||||||
3.
|
FEATURES |
WHAT’S IN THE BOX |
COMPACT SHOTGUN MICROPHONE
•Compact, lightweight body
•Broadcast recording quality
•Condenser microphone
•Integrated shock mount provides isolation from handling / mechanical noise
•Integrated foam windshield
•3.5mm stereo mini jack output (dual mono)
•Rugged construction
DETAILED CONTROL
•Two step high-pass filter (0, 80 Hz)
•Three position level control (-10dB, 0dB, +20dB)
•LED on / off power indicator
•Integrated billeted metal camera shoe mount with 3/8” thread for easy boompole mounting
HIGH QUALITY PERFORMANCE
•9V battery powered – over 70 hours use (alkaline)
•Low noise circuitry
•Flexible and lightweight cable to minimise handling noise and ensure isolation
•Australian designed and manufactured
•10 Year Warranty*
*Online product registration required.
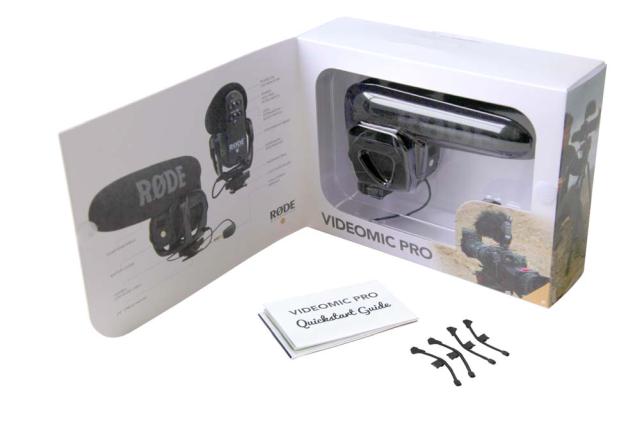
•VideoMic Pro
•Spare shock mount bands (4 pieces)
•VideoMic Pro quick start guide
•Moisture absorbent crystals
4.
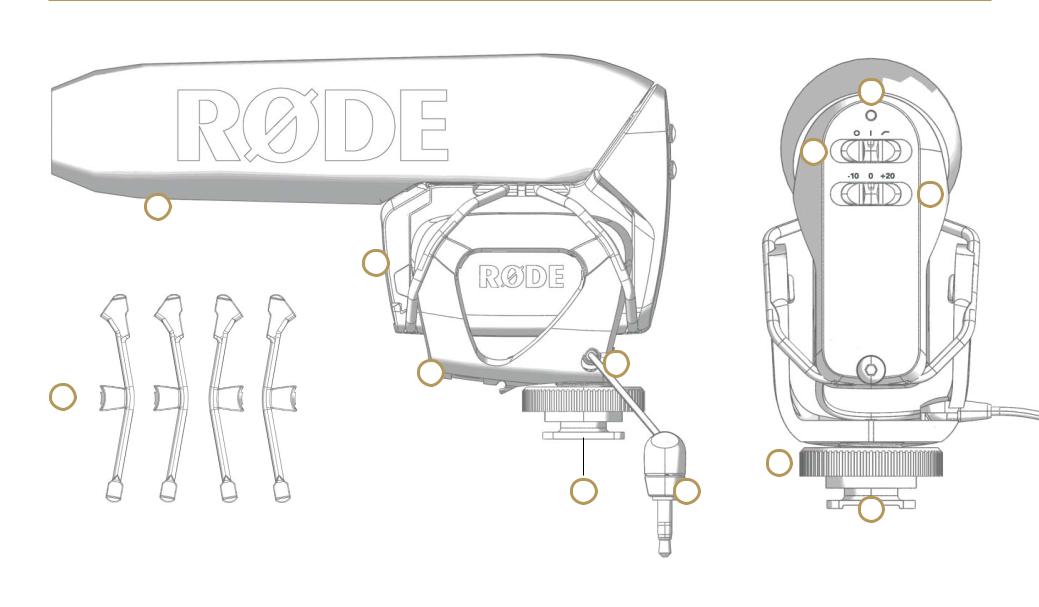
VIDEOMIC PRO STRUCTURE
6
4
5
1
7
3
9
10 12
8
|
1. |
Foam windshield |
8. |
Billeted metal |
|
2. |
Shock mount cradle |
camera shoe mount |
|
|
3. |
Shock mount band |
9. |
Fastening ring |
|
4. |
Power / High Pass Filter switch |
10. |
3/8” thread mount |
|
5. |
Level attenuation / boost switch |
11. |
Signal output cable |
|
6. |
Power on / off LED indicator |
12. |
3.5mm stereo mini jack |
7.Battery cover
5.

SETUP AND USE
INSTALLING THE BATTERY
Before you can record with your VideoMic Pro, you will need to install a standard 9V battery (ANS1:1604A or IEC:6LR61).
RØDE recommends using a high quality lithium or alkaline battery to achieve the best possible battery life.
To install the battery, open the battery cover that is located on the front of the VideoMic Pro, just under the windshield foam.
To remove the cover, hold the sides of the cover with your thumb and third finger, and push up on the indentation with your index finger, then pivot the bottom of the cover away.
Push up on the indentation with your index finger then pivot the bottom of the cover away
Insert the battery with the negative terminal (-) on top as shown in the next diagram. The correct battery orientation is also shown on the inside of the battery cover. If the battery orientation is incorrect the cover will not close fully.
Insert the battery with the negative terminal on top
Replace the cover by first hooking the top clips in, then press the bottom clips into place. The cover will push the battery against its spring terminal during installation.
6.
 Loading…

Specifications Features
• Automatic Power Function with plug-in power
• Power via LB-1, 2 x AA Batteries, Micro USB
• Ships with LB—1 Lithium—Ion Rechargeable Battery, Detachable
3.5mm TRS Cable, Micro USB Cable
• Built-in Battery Door
• Optimised Windshield Shape
• LED indicator for power source and charging / discharging status
• USB micro port for charging removeable LB—1 Bery
• Digital Switching
• Audio Level adjustment
• Dualhighpasslteroptions
• High frequency boost
• Dual mono unbalanced output
• Safety channel option on right channel
• Ambient light detect to boost LED brightness
• Low noise circuitry
• Improved RF immunity
• Rycote® Lyre® shock mounting onboard
Compact Shotgun Microphone with LB-1 Lithium-Ion Rechargeable Battery
Frequency response
Polar pattern
Acoustic Principle Line Gradient
Directional Pattern Supercardioid
Frequency Range 20Hz ~ 20kHz (selected HPF @ 75Hz/
150Hz)
Sensitivity -33.6dB re 1V/Pascal (21.20mV @ 94dB
SPL) ±2dB @ 1kHz
Output Impedance 200Ω
Equivalent Noise 14dBA
Maximum Output
Level
7.7dBu(@1kHz,1%THDinto1kΩ)
Dynamic Range 118.8dB
Maximum SPL 133dBSPL
Signal to Noise Ratio 79.8dB
Power Options RØDE LB-1 Lithium-Ion Rechargeable
Battery (~12mA current draw), 2 x AA
Batteries (~17mA current draw), or via
Micro USB Port
LB-1 Battery Life Over 100 hours of continuous use
Battery Charger Micro USB Cable (supplied)
Output Connection Dual mono unbalanced on stereo 3.5mm
jack
Dimensions 111mmH x 66mmW x 170mmD
Net Weight 122g
66 mm 170 mm
111 mm
RØDE MICROPHONES | AUSTRALIA| 107 Carnarvon st, Silverwater NSW 2128 Australia |Ph: +61 2 9648 5855 |Fx: +61 2 9648 2455 | USA| PO Box 91028, Long Beach CA 90809-1028 | Ph: +1 562 364 7400 | Fax: +1 888 412 4664

About RODE
RODE is a well-known Australian manufacturer of high-quality microphones and audio equipment for various applications such as podcasting, cinematography, music recording, and more. They are famous for manufacturing a wide range of microphones, including USB and shotgun microphones and studio-grade condenser mics.
The RØDE Video Mic GO TM features an integrated shock mount based on Ricotta Lyre technology. Constructed from a single piece of hard-wearing thermoplastic, the Lyre provides superior acoustic suspension to traditional elastic solutions and will never wear out, sag, or snap.
Protect Your VideoMic Pro+. Register Online Now For Your 10-Year Warranty
PARTS GUIDE


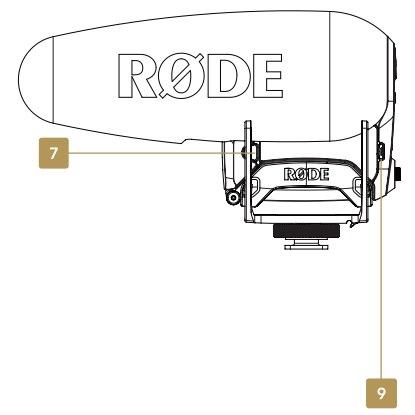
- Power Button/Status LED
- Safety Channel LED
- High Pass Filter (HPF) Button
- Output Gain Control Button
- High-Frequency Boost LED
- LED Brightness Sensor
- Battery Compartment Latches
- 3.5mm Threaded TRS Output Socket
- Micro USB Charging Socket
- Camera Shoe Mount with 3/8” Thread
- 3.5mm TRS Output Cable (not shown)
- Micro USB Cable (not shown)
- LB-1 Lithium-Ion Rechargeable Battery (not shown)
POWER AND CHARGING STATUS
The Power Button/Status LED (1) indicates power status via color.
Charge
- Slow flashing BLUE = charging
- Fast flashing BLUE = 75% charged
- Solid BLUE = 100% charged
Power Usage (LB-1 Battery* & AA Batteries**)
The VMP+ is designed for best performance with the LB-1 Lithium-Ion Rechargeable Battery. When using the LB-1 Battery or AA Batteries, the Status LED (1) will change color:
- Solid BLUE indicates LB-1 Battery
- Solid GREEN indicates AA Batteries
- Solid RED = 10 hours charge remaining
- Slow flashing RED = 2 hours charge remaining
- Fast flashing RED = 30 minutes charge remaining
The LB-1 Battery charges while inserted into the VMP+ and the included Micro USB Cable is connected to a power source. Rechargeable AA Batteries can be used, but will not charge in the VMP+
- Results may vary depending on environmental conditions.
- Results may vary depending on the type of battery used and environmental conditions.
POWERING ON
The VideoMic Pro+ can be powered by the LB-1 Battery, 2 x AA Batteries, or via the Micro USB Charging Socket.
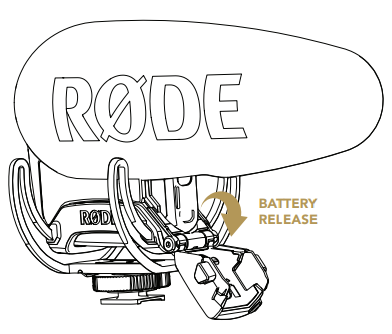
- Squeeze Battery Compartment Latches (7) to open.
- Insert the included LB-1 Battery, and 2 x AA Batteries, or connect the included Micro USB Cable.
- Press and hold the Power Button (1) until the Status LED illuminates.

VIDEOMIC PRO+ CONTROLS
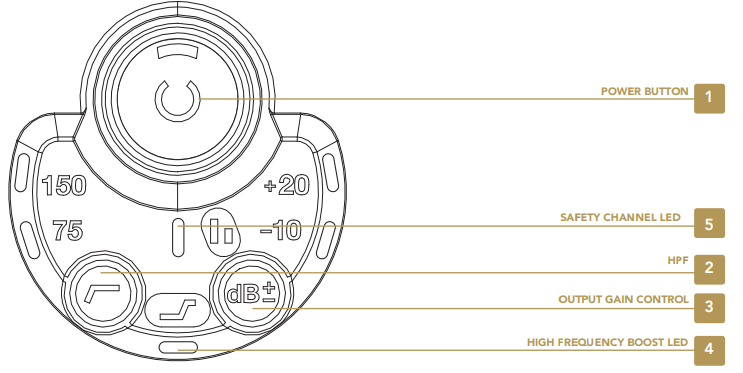
- The High Pass Filter (HPF) will reduce low frequencies such as the rumble from traffic or air-conditioning. Press the HPF Button (2) to select one of the two available filter settings (75Hz, 150Hz) or to disable the filter. When both LEDs are off, the filter is disabled.
- The Output Gain Control Button will switch the microphone output gain between 0, -10, and +20 dB. Press the Output Gain Control Button (3) to cycle through the three settings. The LED will illuminate indicating the active setting. When both LEDs are off, the output level is set to 0dB.
- The High Frequency Boost will boost high frequencies above 7kHz by 5dB which enhances clarity and detail in your recording. This is particularly helpful if you are using a RODE Deadcat Windshield or other wind protection. Press the HPF (2) and Output Gain Control (3) Buttons together to enable or disable the High Frequency Boost. When the LED (4) is off, the High Frequency Boost is disabled.
- The Safety Channel will lower the output of the RIGHT channel of the dual-mono signal by 10dB. This will help ensure the signal does not clip when unexpected spikes in level occur. Press the Output Gain Control Button (3) and Power Button (1) together to enable or disable the Safety Channel. When the LED (5) is off, the output on both the Left and Right channels is the same.
- The VMP+ will automatically power on when plugged into a DSL camera or portable recorder’s 3.5mm microphone input if plug-in power is supplied by the device. To disable this feature, press the Power (1) and HPF Buttons (2) together. The HPF and Output Gain Control LEDs will flash green three times to indicate this feature is disabled and will flash green once when it is enabled.

FAQS About Rode VideoMic Pro plus Camera-Mount Shotgun Microphone
How long does it take to charge a Rode VideoMic Pro Plus?
AA batteries, a USB connection, or an internal rechargeable battery can all now be used to power devices.
What is the Rode VideoMic Pro Plus’s frequency response?
20 Hz–20 kHz
How long does the battery on a Rode VideoMic Pro last?
70 hours
Can I use a PC and Rode VideoMic?
As a USB microphone, the VideoMic may be connected to iOS, Android, Windows, and macOS devices.
Is the stereo or mono Rode VideoMic Pro?
mono
The function of the Rode VideoMic.
powered straight from the 3.5mm microphone input of your camera or other device
What kind of batteries can I use with a Rode VideoMic Pro?
9V, 250mAh CELLULAR battery pack
The Rode VideoMic Pro has what kind of a jack?
TRS minijack 3.5 mm
RDE microphones are waterproof.
Water-resistant but not watertight, for sure.
Why is the red flickering on my Rode VideoMic Pro?
extremely low charge.
Describe VideoMic.
The VideoMic is a very portable and adaptable shotgun microphone.
For more manuals by Rode, Visit Manualsdock
[embeddoc url=”https://manualsdock.com/wp-content/uploads/2023/09/Rode-VideoMic-Pro-plus-Camera-Mount-Shotgun-Microphone-Guide.pdf” download=”all”]