
В какие сроки происходит доставка техники Miele?
Товар из наличия доставят завтра в удобное для вас время или передадут в транспортную компанию, в случае отправки товара в другие регионы России. При наличии свободного транспорта возможна доставка в течение 2-5 часов, необходимо уточнить у оператора. Товар под заказ согласовывается дополнительно и в некоторых случаях требует частичную предоплату, обычно срок поставки занимает 1-4 недели.
Мы непрерывно работаем с 2010 года, наш магазин был среди первых официальных фирменных интернет магазинов Miele в России
Откуда бытовая техника? Это оригинал?
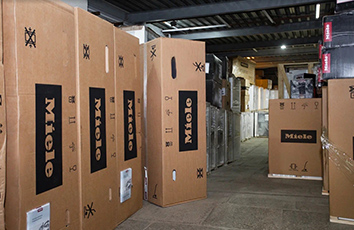
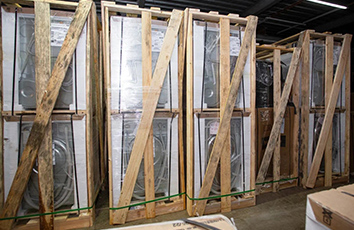
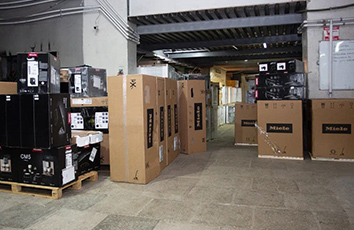
Вся техника оригинальная, привозится из Евросоюза и стран СНГ в заводской упаковке и обрешетке для большей безопасности ее сохранности.
Возможны установка и подключение техники?
Да. Техника будет установлена и подключена специалистами сервисного центра, тарифы подразумевают установку на готовые коммуникации. Все необходимые дополнительные работы согласовываются на месте с мастером.
Где можно посмотреть товары? Есть ли самовывоз?
Ознакомиться с товаром вы можете в нашем магазине на Рублевке, там же находится наш склад, который мы с радостью покажем. Посетив склад, вы сможете лично убедиться в широком ассортименте, качестве товара и его происхождении. При желании можно забрать товар со склада самостоятельно.
Действует ли гарантия на товар?
На все приборы действует гарантия 1 год. При желании за дополнительную плату +5% к стоимости товара, можно приобрести продленную гарантию общим сроком в 2 года. В этот период мы ремонтируем технику Miele за свой счет или меняем ее на новую в случае, если она не подлежит ремонту.
Как можно оплатить товар, и когда внести оплату?
После доставки и приема товара оплату можно совершить наличным средствами или банковской картой (предварительно требуется уведомить оператора для выделения экипажа с терминалом).Так же можно произвести оплату по выставленному банковскому счету (отправка товаров в регионы России осуществляется после полной предоплаты).
Техника в наличии в России или это предзаказ?
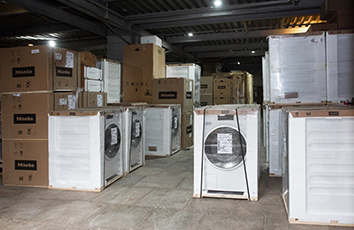
На складе в Москве хранится около 1500 — 2500 ед техники Miele в наличии. Это позволяет оперативно собирать полноценные комплекты для покупателей. При необходимости так же возможна поставка практически любого товара из ЕС в максимально короткие сроки, 1-4 недели.
Инструкция по эксплуатации и гарантия качества
Робот-пылесос
ru-RU, KZ
HS18
M.-Nr. 11 561 540

Содержание |
|
|
Указания по безопасности и предупреждения …………………………………… |
4 |
|
Описание прибора………………………………………………………………………………. |
12 |
|
Ваш вклад в охрану окружающей среды ……………………………………………. |
16 |
|
Работа робота-пылесоса и его особенности ……………………………………… |
18 |
|
Принадлежности, входящие в комплект …………………………………………….. |
18 |
|
Подключение………………………………………………………………………………………. |
18 |
|
Эксплуатация ……………………………………………………………………………………… |
21 |
|
Включение и выключение……………………………………………………………………… |
21 |
|
Начало уборки ……………………………………………………………………………………… |
21 |
|
Окончание уборки, начатой от базовой станции…………………………………….. |
22 |
|
Окончание уборки, начатой с любого места в помещении ……………………… |
22 |
|
Управление уборкой вручную ……………………………………………………………….. |
22 |
|
Прерывание уборки ……………………………………………………………………………… |
23 |
|
Навигация вручную (без уборки)……………………………………………………………. |
23 |
|
Отправка прибора на базовую станцию ………………………………………………… |
23 |
|
Режимы работы ……………………………………………………………………………………. |
23 |
|
Выбор режима работы………………………………………………………………………….. |
24 |
|
Окончание текущего режима работы …………………………………………………….. |
24 |
|
Настройка таймера ………………………………………………………………………………. |
24 |
|
Выключение таймера ……………………………………………………………………………. |
26 |
|
Включение таймера/индикация установленного времени начала работы… |
26 |
|
Выключение звуковых сигналов ……………………………………………………………. |
26 |
|
Уменьшение максимальной высоты при преодолении препятствий ………… |
26 |
|
Мобильное приложение Scout RX2 …………………………………………………….. |
27 |
|
Wi-Fi …………………………………………………………………………………………………….. |
27 |
|
Включение функции соединения на роботе-пылесосе ……………………………. |
27 |
|
Функция видеосъёмки…………………………………………………………………………… |
28 |
|
Извлечение модуля Wi-Fi ………………………………………………………………………. |
28 |
|
Техобслуживание………………………………………………………………………………… |
29 |
|
Удаление пыли из контейнера……………………………………………………………….. |
29 |
|
Очистка контейнера для сбора пыли …………………………………………………….. |
30 |
|
Очистка фильтра выходящего воздуха ………………………………………………….. |
30 |
|
Очистка боковых щеток………………………………………………………………………… |
31 |
|
Очистка щётки-валика ………………………………………………………………………….. |
31 |
|
Очистка уплотнений контейнера для сбора пыли …………………………………… |
32 |
|
Замена модуля уплотнений контейнера для сбора пыли ………………………… |
33 |
|
Очистка переднего колеса ……………………………………………………………………. |
33 |
2

|
Содержание |
|
|
Очистка сенсоров…………………………………………………………………………………. |
33 |
|
Замена батареек в пульте дистанционного управления ………………………….. |
34 |
|
Замена аккумулятора……………………………………………………………………………. |
34 |
|
Чистка и уход………………………………………………………………………………………. |
35 |
|
Хранение/Заводские настройки …………………………………………………………. |
35 |
|
Сервисная служба………………………………………………………………………………. |
36 |
|
Контактная информация для обращения в случае неисправностей ………… |
36 |
|
Гарантия ………………………………………………………………………………………………. |
36 |
|
Что делать, если …………………………………………………………………………………. |
37 |
|
Сообщения о неисправностях…………………………………………………………….. |
40 |
|
Документы соответствия ……………………………………………………………………. |
42 |
|
Технические характеристики………………………………………………………………. |
42 |
|
Дата изготовления/Условия транспортировки и Условия хранения…… |
42 |
|
Дата изготовления………………………………………………………………………………… |
42 |
|
Условия транспортировки …………………………………………………………………….. |
42 |
|
Условия хранения…………………………………………………………………………….. |
42 |
|
Условия хранения…………………………………………………………………………………. |
42 |
|
Технические характеристики………………………………………………………………. |
43 |
|
Заявление о соответствии товара………………………………………………………. |
43 |
|
Авторские права и лицензии ………………………………………………………………. |
44 |
|
Гарантия качества товара …………………………………………………………………… |
45 |
|
Контактная информация о Miele…………………………………………………………. |
48 |
3
Указания по безопасности и предупреждения
Данный робот-пылесос отвечает нормам технической безо-
пасности. Ненадлежащая эксплуатация может привести к травмам и материальному ущербу.
Перед первым использованием робота-пылесоса прочитайте инструкцию по эксплуатации. В ней содержатся подробные указания по безопасности, использованию и техническому об-
служиванию робота-пылесоса. Вы обезопасите себя и других людей, а также предотвратите повреждения.
В соответствии со стандартом IEC 60335-1 компания Miele на-
стоятельно рекомендует ознакомиться с главой «Подключе-
ние» и следовать указаниям и предупреждениям по безопас-
ности.
Компания Miele не несёт ответственности за повреждения, вы-
званные несоблюдением данных указаний.
Сохраните инструкцию по эксплуатации и по возможности пе-
редайте её следующему владельцу прибора.
Выключайте робот-пылесос перед каждым техобслуживанием,
а также перед длительным хранением, уходом за прибором,
устранением проблем и неполадок. Для этого переведите пе-
реключатель I/0 сбоку на роботе-пылесосе в положение 0. Так же действуйте при необычном поведении прибора.
4

Указания по безопасности и предупреждения
Надлежащее использование
Этот робот-пылесос предназначен для ухода за полом в до-
машних хозяйствах или подобных бытовых условиях исключи-
тельно для личных, семейных, домашних и иных нужд, не свя-
занных с осуществлением предпринимательской деятельности.
Этот робот-пылесос не предназначен для использования вне помещений. Эксплуатация прибора допускается только в усло-
виях, которые соответствуют требованиям, предъявляемым к жилым помещениям.
Используйте робот-пылесос исключительно для чистки сухих поверхностей. Другие области применения, реконструкция при-
бора и любые изменения недопустимы.
Лицам, которые по состоянию здоровья или из-за отсутствия опыта и соответствующих знаний не могут уверенно управлять роботом-пылесосом, не рекомендуется его эксплуатация без присмотра или руководства со стороны ответственного лица.
5

Указания по безопасности и предупреждения
Если у Вас есть дети
Опасность удушья! Не позволяйте детям играть с упаковкой
(например, пленкой): дети могут завернуться в нее или натянуть на голову, что приведет к удушью. Храните упаковочный матери-
ал в недоступном для детей месте.
Детей младше 8 лет не следует допускать близко к роботу-пы-
лесосу, или они должны быть при этом под постоянным при-
смотром.
Дети старше 8 лет могут пользоваться роботом-пылесосом без надзора взрослых, если они достаточно уверенно могут им управлять. Дети должны осознавать возможную опасность, свя-
занную с неправильной эксплуатацией.
Не разрешайте детям проводить чистку и техобслуживание робота-пылесоса без Вашего присмотра.
Присматривайте за детьми, находящимися вблизи от робота-
пылесоса. Не позволяйте детям играть с прибором.
Аккумулятор и батарейки пульта дистанционного управления должны быть недоступны для детей.
6

Указания по безопасности и предупреждения
Техническая безопасность
Робот-пылесос работает от напряжения 14,4 В.
Он является прибором III класса защиты.
Это прибор, у которого защита от поражения электрическим то-
ком основана на питании от источника безопасного сверхнизко-
го напряжения и при этом не возникает напряжения выше безо-
пасного сверхнизкого напряжения. Зарядка робота-пылесоса осуществляется через штекерное соединение класса защиты II (сетевое напряжение).
Перед каждым использованием проверяйте, что у робота-пы-
лесоса и у всех прилагаемых к нему принадлежностей нет види-
мых повреждений. Не пользуйтесь поврежденными деталями.
Сетевая розетка должна быть защищена предохранителем с номиналом 16 A или 10 A.
Перед эксплуатацией сравните указанные на типовой таблич-
ке параметры подключения робота-пылесоса и блока питания
(сетевое напряжение и частота) с данными электросети. Они должны обязательно совпадать.
Надежная и безопасная работа робота-пылесоса гарантиро-
вана лишь в том случае, если его базовая станция подключена к централизованной электросети.
Храните робот-пылесос при температуре окружающей среды не ниже 0 °C и не выше 60 °C.
Гарантийный ремонт робота-пылесоса имеет право произво-
дить только авторизованная компанией Miele сервисная служба,
в противном случае при последующей неисправности право на
гарантийное обслуживание теряется.
7

Указания по безопасности и предупреждения
Ремонтные работы имеют право производить только автори-
зованные фирмой Miele специалисты. Вследствие неправильно выполненных ремонтных работ может возникнуть серьезная опасность для пользователя.
Следите за тем, чтобы сетевой кабель не был поврежден, де-
формирован или перекручен. Не ставьте на него никакие тяже-
лые предметы.
Не допускайте, чтобы робот-пылесос переезжал через сете-
вой кабель и другие электрические кабели.
Для зарядки аккумулятора используйте только принадлеж-
ности из комплекта (адаптер, блок питания, базовую станцию).
Заряжайте робот-пылесос при температуре окружающей сре-
ды не ниже 10 °C и не выше 45 °C.
Аккумуляторы и батарейки могут потечь. Избегайте контакта глаз и кожи с вытекшей едкой жидкостью. В случае контакта промойте водой и обратитесь за медицинской помощью.
Робот-пылесос для распознавания ступеней и выступов осна-
щен датчиками. Не накрывайте эти датчики и камеры, следите за тем, чтобы на функцию датчиков во время движения не по-
влияли разложенные предметы.
Не приклеивайте наклейки на переднюю сторону базовой станции, за которой находится инфракрасный передатчик. Не ставьте перед ним никакие предметы.
Никогда не погружайте робот-пылесос и прилагаемые при-
надлежности в воду. Очищайте все детали только сухой или слегка влажной салфеткой.
Не роняйте робот-пылесос и прилагаемые принадлежности.
Упавшие или поврежденные детали нельзя продолжать исполь-
зовать в целях безопасности.
8

Указания по безопасности и предупреждения
Только при использовании оригинальных запчастей фирма
Miele гарантирует, что будут выполнены
требования к безопасности. Вышедшие из строя детали должны заменяться только на оригинальные запчасти.
Правильная эксплуатация
Не пользуйтесь роботом-пылесосом без контейнера для сбо-
ра пыли, фильтра предварительной очистки и фильтра выходя-
щего воздуха.
Убирайте с пола все хрупкие и лёгкие предметы и следите за тем, чтобы робот-пылесос не мог запутаться в верёвках, гарди-
нах, бахроме, кабелях и т. п.
Не подпускайте домашних животных близко к роботу-пылесо-
су. Также не позволяйте животным стоять или сидеть на пылесо-
се.
Примите соответствующие меры, чтобы предотвратить паде-
ние робота-пылесоса, например, с открытых балконов. Для это-
го блокируйте доступ в подобные места, например, соорудив физическое препятствие.
Не используйте пылесос для уборки горящих или тлеющих предметов, например, сигарет, неостывшей золы или непо-
гасших углей. Не пользуйтесь роботом-пылесосом вблизи от-
крытого камина.
Не пылесосьте роботом-пылесосом жидкости и влажную грязь. Ковры и ковровые покрытия после влажной уборки или обработки шампунем можно пылесосить только после полного высыхания.
Не допускайте, чтобы прибор пылесосил пыль от тонера. То-
нер, который используется, например, в принтерах или копиро-
вальных аппаратах, обладает электропроводностью.
9

Указания по безопасности и предупреждения
Не допускайте, чтобы прибор пылесосил легковоспламеня-
ющиеся или взрывоопасные вещества или газы, и не пользуй-
тесь им в местах, где хранятся такого рода вещества.
Не садитесь и не ложитесь во время уборки на поверхности,
подлежащие очистке, чтобы длинные волосы и свободная одеж-
да не оказались вблизи щетки-валика и других движущихся час-
тей робота-пылесоса.
Обращение с аккумулятором робота-пылесоса и батарейками пульта ди-
станционного управления
Позвоните в сервисную службу, прежде чем пересылать акку-
мулятор.
Не допускайте случайного падения аккумулятора и не бро-
сайте его. В целях безопасности не разрешается дальнейшее использование аккумулятора после его падения или поврежде-
ния.
Не допускайте контакта аккумулятора или батареек с откры-
тым огнём или другими источниками тепла. Не нагревайте акку-
мулятор или батарейки. Не подвергайте его/их воздействию пря-
мых солнечных лучей.
Не разбирайте аккумулятор.
Не вызывайте короткое замыкание аккумулятора или батаре-
ек с помощью случайного или намеренного замыкания контак-
тов.
Не допускайте контакта аккумулятора или батареек с жид-
костями.
Никогда не заряжайте батарейки пульта дистанционного уп-
равления.
10

Указания по безопасности и предупреждения
Ни в коем случае не пользуйтесь аккумулятором, если заме-
чаете появление неприятного запаха, выделение жидкости,
сильный нагрев, изменение цвета или деформацию. В этом слу-
чае аккумулятор следует срочно утилизировать.
Утилизация аккумулятора и батареек: выньте аккумулятор из робота-пылесоса и батарейки из пульта дистанционного управ-
ления. Изолируйте металлические контакты, наклеив кусок скот-
ча, чтобы предотвратить короткое замыкание. Утилизируйте ак-
кумулятор и батарейки через централизованный пункт утилиза-
ции материалов. Не выбрасывайте аккумулятор и батарейки вместе с бытовым мусором.
Принадлежности
Используйте только принадлежности с логотипом ORIGINAL Miele на упаковке. Лишь в этом случае производитель может га-
рантировать безопасную эксплуатацию прибора.
11

Описание прибора
A — Робот-пылесос — вид сверху и снизу
12

Описание прибора
aДисплей
bИндикатор Wi-Fi
cИндикатор функции видеосъёмки (в зависимости от модели)
dИндикатор времени суток (am/pm)
eКамеры
fСенсорная кнопка «Старт/Пауза» ( )
gБампер для защиты от ударов
hПереключатель «Вкл./выкл.» (I/0)
iКнопка открывания отсека для хранения
jСенсорная кнопка режима уборки Silent
kСенсорная кнопка режима уборки Turbo
lСенсорная кнопка Base
mСенсорная кнопка режима уборки Spot
nСенсорная кнопка режима стандартной автоматической уборки Auto
oИндикатор таймера
pИндикатор заряда аккумулятора
qБоковые щётки
rЩётка-валик
sЗарядные контакты
tПереднее колесо
uДатчики (защита от падения)
vКрышка щётки-валика
wВедущие колёса
xВсасывающее отверстие с уплотнением
yЗаднее колесо
13
|
Описание прибора |
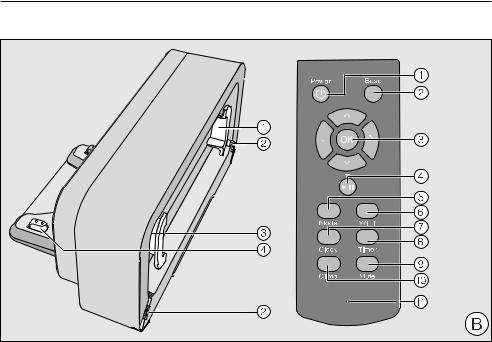
B — базовая станция и пульт дистанционного управления |
Базовая станция |
|
a Устройство намотки кабеля |
|
b Направляющие кабеля |
|
c Гнездо для штекера блока питания (не отображено на рисунке) |
|
d Зарядные контакты |
Пульт дистанционного управления
a Кнопка Power (включение и выключение)
b Кнопка Base (отправка прибора на базовую станцию)
c кнопка подтверждения ok с расположенными вокруг кнопками управления d Кнопка Старт/Пауза ( ) (запуск/прерывание уборки)
e Кнопка Mode (выбор режима уборки)
f Кнопка WI-FI (включение/выключение Wi-Fi) g Кнопка Clock (установка текущего времени) h Кнопка Таймер (установка таймера)
i Кнопка Mute (включение/выключение звуковых сигналов)
14
|
Описание прибора |
|
j Кнопка Climb (уменьшение высоты преодоления препятствий) |
|
k Отсек для батареи (сзади) |
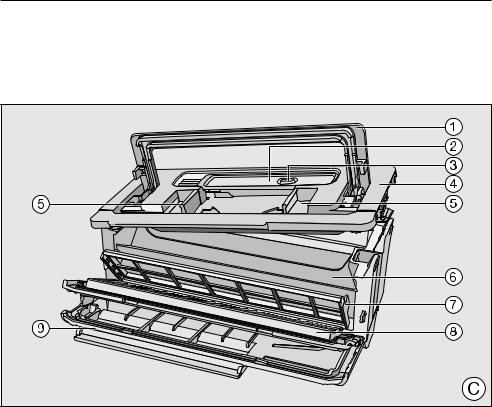
C — Контейнер для сбора пыли |
|
a Ручка |
b Инструмент для очистки со скребком
c Кнопка скребка
dКрышка
eКнопки разблокировки крышки
fПылевой отсек
gФильтр предварительной очистки
hФильтр выходящего воздуха
iКрышка отсека фильтра выходящего воздуха
15

Ваш вклад в охрану окружающей среды
Утилизация транспортной
упаковки
Упаковка защищает прибор от по-
вреждений при транспортировке.
Материалы упаковки безопасны для окружающей среды и легко утилизи-
руются, поэтому они подлежат пере-
работке.
Возвращение упаковки для ee вто-
ричной переработки приводит к эко-
номии сырья и уменьшению коли-
чества отходов. Просим Bac по воз-
можности сдать упаковку в пункт приема вторсырья.
Утилизация прибора
Электрические и электронные прибо-
ры часто содержат ценные матери-
алы. В их состав также входят опре-
деленные вещества, смешанные ком-
поненты и детали, необходимые для функционирования и безопасности приборов. При попадании в бытовой мусор, а также при ненадлежащем обращении они могут причинить вред здоровью людей и окружающей сре-
де. В связи с этим никогда не выбра-
сывайте отслуживший прибор вместе с бытовым мусором.
Рекомендуем Вам сдать отслужив-
ший прибор в организацию по при-
ему и утилизации электрических и электронных приборов в Вашем на-
селенном пункте. Если в утилизируе-
мом приборе сохранены какие-либо персональные данные, то за их уда-
ление Вы несете личную ответствен-
ность. Необходимо проследить, что-
бы до отправления прибора на утили-
зацию он хранился в недоступном для детей месте.
16
 Loading…
-
Пылесос Miele SLQL0 Scout RX2 манговый красный
- Инструкция
Miele SLQL0 Scout RX2 манговый красный — инструкция к пылесосу на русском языке на Hausdorf
Сохранить файл: Инструкция к Miele SLQL0 Scout RX2.PDF, 3.2 Мб
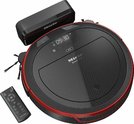
Доставка от 3 дней
79 900 руб.
* Цена на момент последней продажи
Быстрая доставка
Доставка до подъезда в оговоренные сроки после предварительного согласования с оператором.
Подробнее
Профессиональная установка
Подключение на готовые коммуникации мастерами авторизованного сервисного центра.
Подробнее
Вернуться на страницу товара
manualMiele Scout RX2 Home Vision

M.-Nr. 10 581 422
HS18
Gebrauchsanweisung Saugroboter
Operating instructions Robot vacuum cleaner
Kortbrugsanvisning Robotstøvsuger
Instrucciones de uso abreviadas Robot aspirador
Pikakäyttöohje Robotti-imuri
Mode d’emploi abrégé Aspirateur robot
Istruzioni brevi Aspirapolvere robot
Verkorte gebruiksaanwijzing robotstofzuiger
Kort-bruksanvisning Robotstøvsuger
Instruções de utilização resumidas Robô de aspiração
Snabbinstruktion Robotdammsugare
SLQL0
de
en
da
es
fi
fr
it
nl
no
pt
sv
Downloaded from www.vandenborre.be
View the manual for the Miele Scout RX2 Home Vision here, for free. This user manual comes under the category vacuum cleaners and has been rated by 14 people with an average of a 7.8. This manual is available in the following languages: English. Do you have a question about the Miele Scout RX2 Home Vision? Ask your question here
- Titelside
- Indhold
The Miele Scout RX2 Home Vision is a vacuum cleaner with a dust capacity of 0.4 liters and a built-in display. It is suitable for cleaning different floor surfaces such as carpet, hard floors, and laminate. This vacuum cleaner can be remotely operated and offers 4 different programs including Auto, Manual, Spot, and Turbo. It produces a noise level of 64 dB and has a timer feature. Its battery capacity is 4400 mAh and it has a runtime of 120 minutes.
The Miele Scout RX2 Home Vision is a handy and efficient vacuum cleaner that is capable of cleaning different types of flooring. Its built-in display adds convenience and visibility to the cleaning process. The vacuum cleaner is also remotely operated, allowing for easy control even from a distance. With its 4 vacuum cleaner programs, the user can select the appropriate setting for different cleaning needs such as spot cleaning or turbo cleaning for tougher messes.
The Miele Scout RX2 Home Vision also boasts a long runtime of 120 minutes and a powerful battery capacity of 4400 mAh. Its noise level of 64 dB makes it reasonably quiet and comfortable to use. Additionally, its timer feature adds to the convenience of using the vacuum cleaner. Overall, the Miele Scout RX2 Home Vision is a reliable and efficient vacuum cleaner that makes cleaning a breeze.
General
| Miele | |
| Scout RX2 Home Vision | 41LQL030EU | |
| vacuum cleaner | |
| 4002515834244 | |
| English | |
| User manual (PDF), Datasheet (PDF) |
Design
| Dust container type | — |
| Product colour | Grey |
| Built-in display | Yes |
| Remotely operated | Yes |
| Shape | Round |
| Smartphone remote support | Yes |
Performance
| Dust capacity (total) | 0.4 L |
| Wet mopping | — |
| HEPA filtration system | — |
| Floor surfaces supported | Carpet, Hard floor, Laminate |
| Number of programs | 4 |
| Vacuum cleaner programs | Auto, Manual, Spot, Turbo |
| Noise level | 64 dB |
| Timer | Yes |
| Automatic base station return | — |
| Programming function | Yes |
Power
| Battery technology | Lithium-Ion (Li-Ion) |
| Battery capacity | 4400 mAh |
| Runtime | 120 min |
| Charging time | 2 h |
| Rechargeable | Yes |
| Battery life | 180 m² |
Packaging content
| Manual | Yes |
| Base station | Yes |
| Remote control included | Yes |
Technical details
Weight & dimensions
| Height | 85 mm |
| Diameter | 354 mm |
| Weight | 3200 g |
show more
Can’t find the answer to your question in the manual? You may find the answer to your question in the FAQs about the Miele Scout RX2 Home Vision below.
My Miele vacuum is losing suction. Why is that?
Your Miele vacuum cleaner losing suction power can be due to the following causes: — The suction power is not set to maximum — The dust container or dust bag is full — The hose, brush or tube is clogged
How often should I check the filter?
A clean filter is important to maintain the vacuum cleaner’s suction power. Therefore, check the filter regularly. When a filter is clogged, dust absorption decreases and energy consumption increases.
What do I do with a smelly vacuum cleaner?
A commonly used method is to put a little washing powder in the dust container or the dust bag.
How often should I vacuum my house?
For allergy sufferers, vacuuming the house at least twice a week is recommended.
What is the weight of the Miele Scout RX2 Home Vision?
The Miele Scout RX2 Home Vision has a weight of 3200 g.
What is the height of the Miele Scout RX2 Home Vision?
The Miele Scout RX2 Home Vision has a height of 85 mm.
Is the manual of the Miele Scout RX2 Home Vision available in English?
Yes, the manual of the Miele Scout RX2 Home Vision is available in English .
Is your question not listed? Ask your question here
Miele Scout SLQL0 RX2 Robot Vacuum, Autumn Red — Use Manual — Use Guide PDF.
Documents: Go to download!
- Owner’s manual — (English, French)
- Appliance overview
- Caring for the environment
- Use
- Maintenance
- Storage
- Cleaning and care
- TROUBLESHOOTING
- Fault messages
Table of contents
Owner’s Guide Vacuum Cleaner
Appliance overview
llustrations A, B and C for this section are on the pull-out pages in the back of these operating instructions.
A – Robot vacuum cleaner top and bottom

- Display
- Wi-Fi display
- Video function display (for Scout RX2 Home Vision)
- Time mode display (am/pm)
- Start/Pause sensor field (
 )
) - Cameras
- Impact protection
- On/Off switch (I/0)
- Depression to open the storage compartment
- Silent vacuuming mode sensor field
- Turbo vacuuming mode sensor field
- Base sensor field
- Spot vacuuming mode sensor field
- Auto standard vacuuming mode sensor field
- Timer indicator
- Rechargeable battery status indicator
- Side brushes for hard flooring / universal side brushes / side brushes for carpeted flooring and rugs
- Roller brush
- Front wheel
- Sensors (toppling protection)
- Charging contacts
- Roller brush cover
- Drive wheels
- Suction nozzle with sealed unit
- Back wheel
 )
)B – Base station and remote control

Base station
- Cord rewind
- Cord guides
- Socket for the power supply plug (not visible in the figure)
- Charging contacts
Remote control
- Power button (switch on and off)
- Base button (direct vacuum cleaner to base station)
- OK confirmation button with direction buttons around it
- Start/Pause button () (start/stop vacuuming)
- Mode button (select the vacuuming mode)
- WIFI button (activate/deactivate Wi-Fi)
- Clock button (set time of day)
- Timer button (set the timer)
- Mute button (activate/deactivate acoustic signals)
- Climb button (reduce crossing over height)
- Battery compartment (at the back)
C – Dust box

- Handle
- Cleaning tool with wiper
- Wiper button
- Lid
- Release buttons for the lid
- Dust compartment
- Pre-filter
- Exhaust filter
- Exhaust filter compartment lid
Caring for the environment
Disposal of the packing material
The cardboard box and packing materials protect the appliance during shipping. They have been designed to be biodegradable and recyclable.
Ensure that any plastic wrappings, bags, etc. are disposed of safely and kept out of the reach of children. Danger of suffocation!
Disposal of your old appliance
Electrical and electronic appliances contain valuable materials. They also contain certain substances, compounds and components which were essential for the proper functioning and safe use of the equipment. Handling these materials improperly by disposing of them in your household waste can be harmful to your health and the environment. Therefore, please do not dispose of your old appliance with regular household waste and follow local regulations on proper disposal.
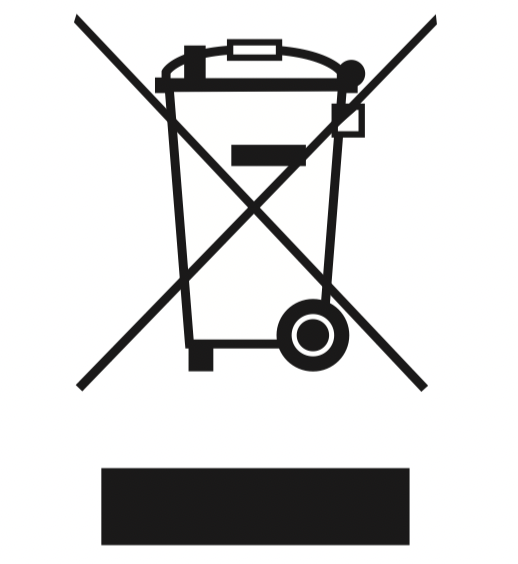
Consult with local authorities, dealers or Miele in order to dispose of and recycle electrical and electronic appliances. Miele assumes no responsibility for deleting any personal data left on the appliance being disposed. Please ensure that your old appliance is kept away from children until removal. Observe safety requirements for appliances that may tip over or pose an entrapment hazard.
Disposal of old batteries and power packs
Electrical and electronic appliances often contain batteries and power packs which must not go into household waste after use. Please remove all accessible batteries and take them to a suitable collection site where they can be collected free of charge. Batteries and power packs may contain substances which are harmful to your health and the environment.
The labeling on the battery or power pack gives further information. The crossed-out waste bin means that you must never put batteries and power packs into household waste. If the crossed-out waste bin has one or more of the listed chemical symbols, it contains lead (Pb), cadmium (Cd) and/or mercury (Hg).
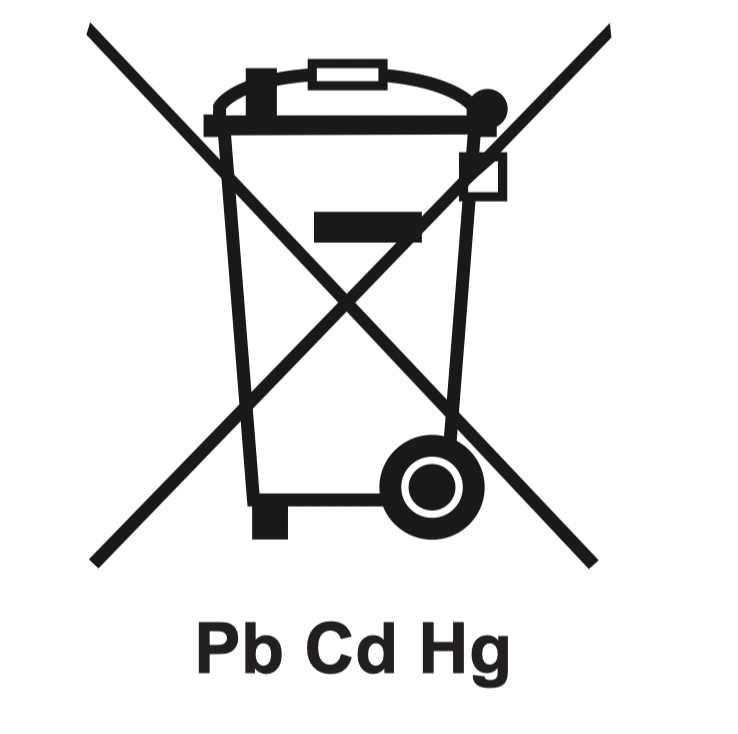
Old batteries and power packs contain important raw materials and can be recycled. Separately collecting old batteries and power packs facilitates handling and recycling.
Functions and features of the robot vacuum cleaner
The robot vacuum cleaner is suitable for the daily cleaning of short pile carpets and fitted carpets, as well as hard flooring.
Please observe the flooring manufacturer’s cleaning and care instructions.
The robot vacuum cleaner is fitted with cameras and sensors. It continually saves room plans as well as information regarding areas it can access freely. The robot vacuum cleaner uses this data to create an efficient vacuuming plan of the surfaces to be vacuumed, which it can then vacuum autonomously.
Included accessories
- Remote control / two batteries
- Two side brushes
- Power supply unit with plug
- Power adapter
- Base station
- Magnetic strip
Preparing for use
Insert the side brushes (Fig. 01)

- Place the robot vacuum cleaner upside down on a level, clean surface.
- Press the two side brushes carefully onto their pins until they audibly engage. Take care to comply with the markings L and R.
Removing the protective foil (Fig. 02)

-
Remove the protective foil from the base station and from the top of the robot vacuum cleaner.
Placing the batteries in the remote control (Fig. 03)

- Remove the battery compartment cover.
- Insert the two batteries supplied. Make sure the polarity is correct.
- Close the battery compartment cover.
Switching on the robot vacuum cleaner (Fig. 04)

- Slide the I/0 switch on the side of the robot vacuum cleaner to the I position.
The rechargeable battery status indicator lights up in the display.
After approx. 60 seconds, the robot vacuum cleaner will switch into standby. The battery status indicator will continue to light up.
The robot vacuum cleaner is reactivated by pressing any button on the remote control or one of the sensor fields in the display.
Connecting the base station (Figs. 05 — 07)
Charging the rechargeable battery (Fig. 08)

The rechargeable battery is supplied not fully charged. Before using for the first time, it must be fully charged while the robot vacuum cleaner is switched on (switch I/0 to I).
The battery can also be charged when the robot vacuum cleaner is switched off (switch I/0 to 0). In this case, the vacuum cleaner indicators will not react.
- Connect the robot vacuum cleaner correctly to the charging contacts on the connected base station.
As the rechargeable battery charges, the status indicator flashes in the display.
The charging process takes up to 150 minutes for the Scout RX2 and up to 180 minutes for the Scout RX2 Home Vision. The process is finished when the rechargeable battery status indicator lights up green permanently in the display.
You can then vacuum for up to one hour with the Scout RX2 and up to two hours with the Scout RX2 Home Vision.
Rechargeable battery status indicator in the display
| Red |
Charged capacity approx. 0 % — 20 % |
| Orange |
Charged capacity approx. 20 % — 50 % |
|
Green |
Charged capacity approx. 50 % — 100 % |
Setting the time of day (Fig. 09)

Use the remote control to set the time of day.
The default factory setting for the robot vacuum cleaner is the 24-hour time display.
- Press the Clock button for at least three seconds.
The indicator field flashes in the display.
- Press the OK button.
The hour display flashes in the indicator field.
- Press the + or — direction button to set the current hour.
- Press the OK button to confirm your selection.
The minute display flashes in the indicator field.
- Press the + or — direction button to set the current minutes.
- Press the OK button to confirm your selection.
If you want to alter the time of day, proceed as described above.
Defining the area to be vacuumed (Fig. 10)

The robot vacuum cleaner is 3 3/8″ high. Any items that will be vacuumed under should have a minimum clearance of 3 7/16″.
You can define any areas which the robot vacuum cleaner should not have access to.
-
Place the magnetic strip supplied with the groove facing downwards on the floor.
The robot vacuum cleaner will not cross over the magnetic strip.
Adhesive strips are supplied for permanent fixing. Additional magnetic strips are available to order from the Miele webstore.
Use
Always observe the robot vacuum cleaner during the first cleaning session in a new environment and after making changes in your home. This way you will be able to detect and remove any problematic obstacles or section off the relevant areas with the magnetic strip. You must also check whether steps and drops in height are recognized properly.
Your robot vacuum cleaner is equipped with an integrated Wi-Fi module. You can view status information or execute control commands using a mobile device (tablet PC or smartphone).
If you would like to control the robot vacuum cleaner using a mobile device, please read the section «MobilControl» app.
The operation of the robot vacuum cleaner via remote control and the display will be described later in this «Use» section.
Switching on and off

-
Press the Power button on the remote control or any sensor field on the display.
Starting vacuuming
There are two ways to start vacuuming.
Option 1 (remote control)

- Press the button.
Option 2 (display)

- Press the sensor field.
The area to be vacuumed will be cleaned.
The robot vacuum cleaner always cleans for at least five minutes, regardless of the size of the surface to be vacuumed.
Finishing vacuuming if vacuuming started from the base station
The robot vacuum cleaner will return to the base station and recharge.
If the battery is low, the robot vacuum cleaner will return to the base station and recharge.  will appear in the indicator field. The robot vacuum cleaner will then continue vacuuming in the location where it had stopped.
Finish vacuuming if vacuuming started from somewhere in the room
The robot vacuum cleaner will return to its starting point and switch into standby after approx. 60 seconds.
The robot vacuum cleaner will stand still when there is low battery capacity. You should then recharge it.
Manually controlled vacuuming
You can use the direction buttons on the remote control to vacuum a particular area of the room.
- While the robot vacuum cleaner is vacuuming, press and hold one of the direction buttons.
The robot vacuum cleaner will turn in the desired direction until you let go of the direction button.

- Press and hold the + direction button.
The robot vacuum cleaner will travel in the desired direction and continue to vacuum.
-
Press the
button on the remote control or the sensor field on the display.
The original vacuuming process will continue running.
Interrupting vacuuming
-
Press the
button on the remote control or the sensor field on the display.
The robot vacuum cleaner stops.
Press the button or the sensor field again to continue vacuuming.
Manual navigation (without vacuuming)
You can use the direction buttons on the remote control to direct the robot vacuum cleaner to a specific area of the room.
- Press and hold one of the direction buttons.
The robot vacuum cleaner will travel in the desired direction without vacuuming.
You cannot direct the robot vacuum cleaner manually to the base station in order to recharge it.
Directing the robot vacuum cleaner to the base station
(only possible when vacuuming was started from the base station)


- Press the Base button on the remote control or the Base sensor field on the display.
The robot vacuum cleaner will travel to the base station and recharge.
Finishing vacuuming manually

- Press the Power button on the remote control.
The robot vacuum cleaner will switch into standby after approx. 60 seconds. The display is deactivated, the rechargeable battery status indicator continues to light up.
You can switch the robot vacuum cleaner into standby before 60 seconds is up by pressing the Power button again.
The robot vacuum cleaner is reactivated by pressing any button on the remote control or one of the sensor fields in the display.
Operating modes
There are five different operating options.
Auto
Standard vacuuming for normally soiled flooring.

Spot
Targeted vacuuming of an area approx. 59′ x 59′ (1.8 x 1.8 m) around the selected starting point of the robot vacuum cleaner.

Base
Directing the robot vacuum cleaner to the base station.

Turbo
For vacuuming lightly soiled flooring with a short vacuuming duration.

Silent
Vacuuming with low noise development.

Selecting the vacuuming mode
- Press the Power button on the remote control.
There are two ways of selecting the vacuuming mode.
Option 1 (remote control)

-
Press the Mode button repeatedly until the symbol for the vacuuming mode you want lights up on the display.
- Press the button to start vacuuming.
Option 2 (display)
- Press the sensor field of the desired vacuuming mode.
- Press the sensor field in order to start vacuuming.
Setting the timer
(only possible if the clock has been set)
If you would like the robot vacuum cleaner to start at the same time every day, you can save the desired start time and vacuuming mode to memory.
The robot vacuum cleaner can also vacuum in the dark. However, please be aware that vacuuming may be less thorough. The cameras require light in order to navigate unobstructed.
Use the remote control to set the timer.
- Press the Timer button for at least three seconds.
The timer  indicator flashes in the display and the hour display flashes in the indicator field.
- Press the + or — direction button to set the hour you want.

- Press the OK button to confirm your selection.
The timer indicator flashes in the display and the minute display flashes in the indicator field.
- Press the + or — direction button to set the minutes you want.
- Press the OK button to confirm your selection.
- Press the Mode button repeatedly until the symbol for the vacuuming mode you want flashes on the display.
- Press the OK button to confirm your selection.
The settings are shown for approx. three seconds on the display. The robot vacuum cleaner will now start to vacuum at the same time each day.
If the timer indicator is lit up in the display, then the timer is activated.
To alter the entries, proceed as described above.
Tip: You can save up to seven individual combinations for the «start time vacuuming mode» if you set the timer using a mobile device, see section «MobilControl App».
Please note that the robot vacuum cleaner always follows the save commands which were set most recently, regardless of whether the settings were configured using the remote control or with a mobile device.
Deactivating the timer
- Press the Timer button on the remote control briefly.
The timer indicator goes out on the display.
Activating the timer / displaying a set start time
- Press the Timer button on the remote control briefly.
The timer indicator lights up in the display and the set start time is shown briefly in the indicator field. The robot vacuum cleaner will start to vacuum at the set time.
Deactivating the acoustic signals
Acoustic signals are set as standard. You can deactivate and then reactivate them.
- Press the Mute button on the remote control briefly.
OFF will appear in the indicator field briefly.
Acoustic signals for fault messages cannot be deactivated.
Reducing the maximum crossing over height
The robot vacuum cleaner is set to overcome height differences of up to 3/4″ as standard. It is therefore able to vacuum carpets, move over door thresholds, etc.
If you would like to reduce this height (down to approx. 1/4″ (6 mm)) in order to protect the legs of chairs, tables, or lamps, for example, you can deactivate the factory default setting.

- Press the Climb button on the remote control briefly.
LO will appear in the indicator field.
Press the Climb button again briefly if you want to reactivate the maximum crossing over height of 3/4″. HI will appear in the indicator field.
Maintenance
Purchasing accessories
Original Miele accessories are available from the Miele Web store, Miele and your Miele dealer.
Caution: Switch the robot vacuum cleaner off before doing any maintenance work. To switch it off, slide the I/0 switch on the side of the robot vacuum cleaner to the 0 position.
We recommend using only genuine Miele accessories bearing the «ORIGINAL Miele» logo on the packaging. Only these will guarantee the optimum performance of your robot vacuum cleaner and the best possible cleaning results.
Ordering the correct accessories
Original Miele accessories are identified by the «ORIGINAL Miele» logo on the packaging.

Emptying the dust box
Empty the dust box of the robot vacuum cleaner after each use in order to achieve the best possible cleaning results.
At the very latest, you must empty the dust box when «l_ _l» appears in the indicator field running from bottom to top.
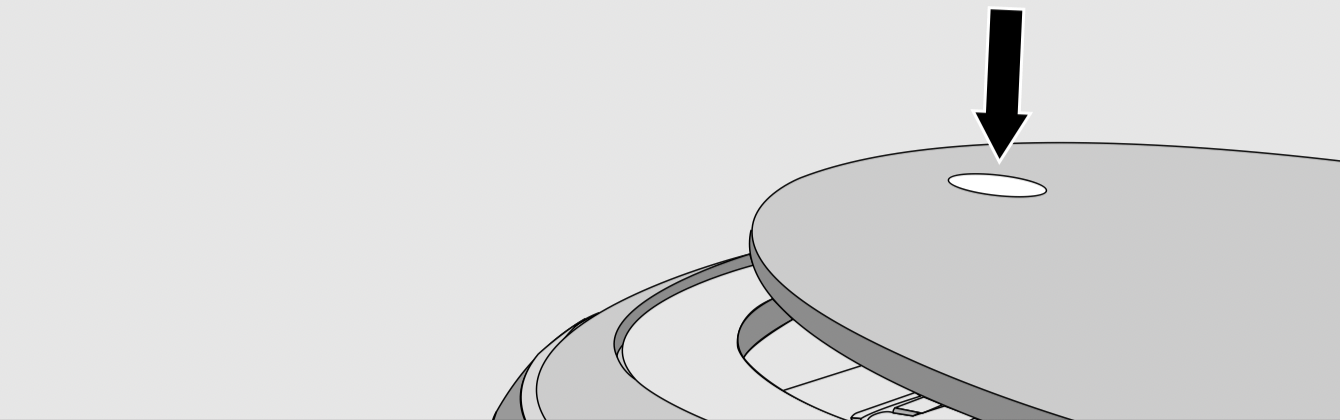
- Press the depression at the top of the robot vacuum cleaner.
The lid of the storage compartment will open.
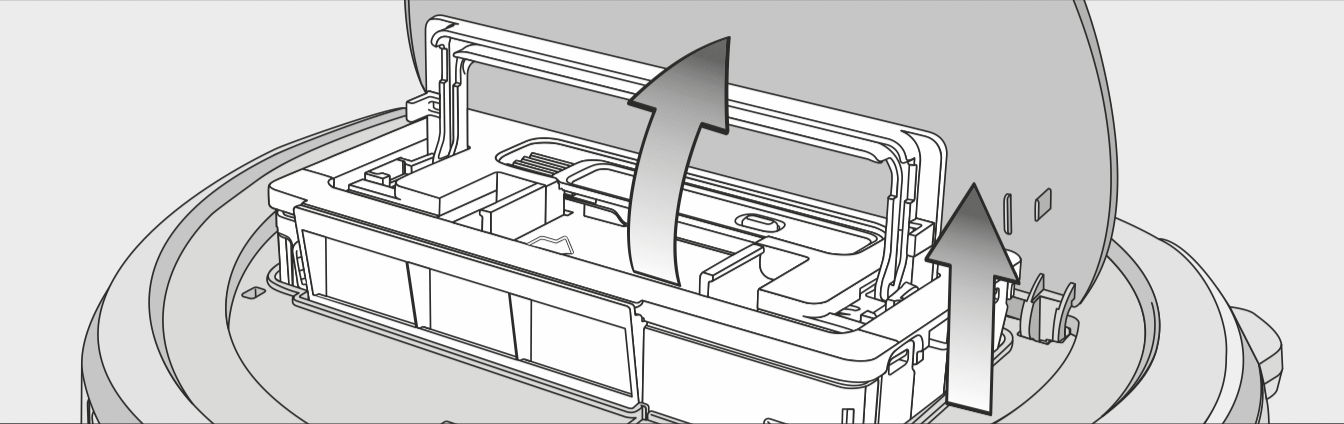
- Unlatch the dust box by lifting the handle upwards.
- Remove the dust box.
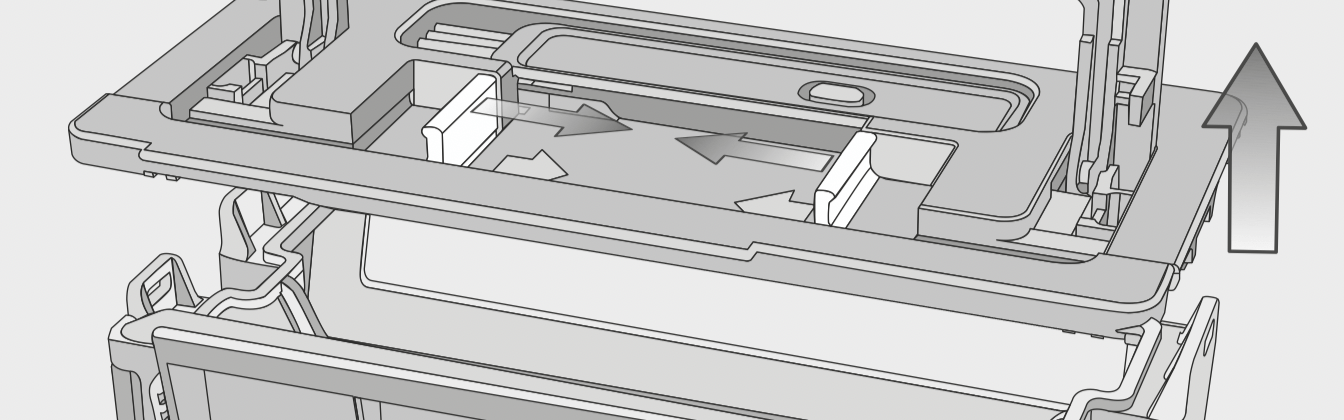
- Press one or both release buttons in the direction of the arrow and remove the dust box lid.
- Empty the dust box.
The contents of the box can be disposed of with the normal household waste, providing it contains general household dust only.
- Refit the lid and close the dust box making sure it clicks into place.
- Place the dust box into the robot vacuum cleaner with the handle lifted up and latch it into place by pushing the handle back down.
- Close the storage compartment lid and press down on the depression in order to lock it.
Cleaning the dust box
Clean the dust box as required.
A cleaning tool is located at the top of the dust box lid.
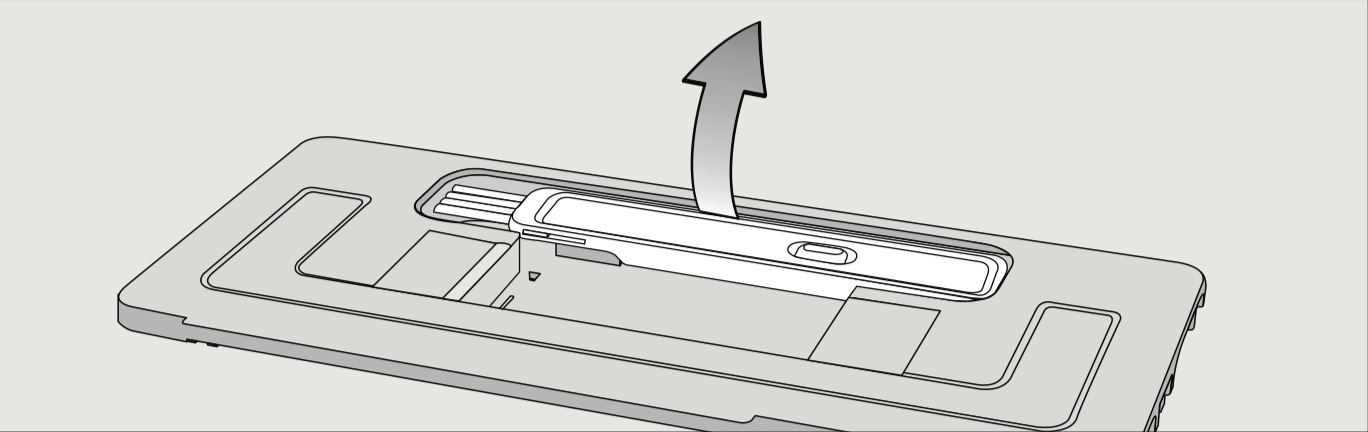
-
Remove the cleaning tool.
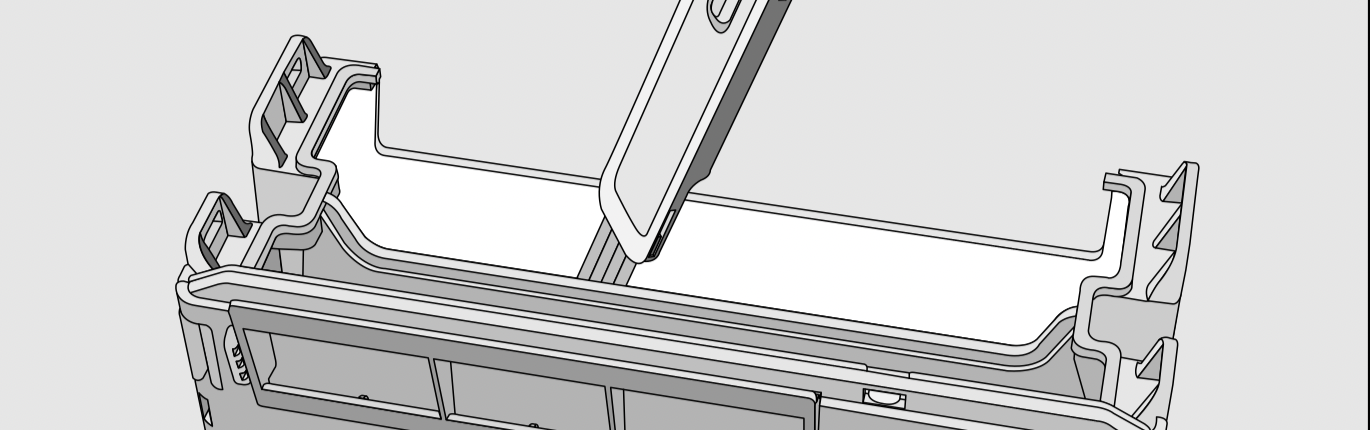
- Clean the dust box and the underside of the lid using the cleaning tool.
Cleaning the exhaust filter
Clean the exhaust filter as required.
The exhaust filter compartment is located in the dust box.
- Remove the lid from the dust box.
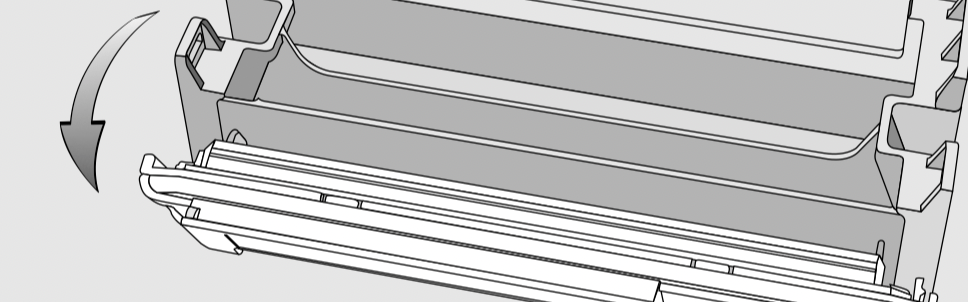
- Fold out the filter unit from the dust box.
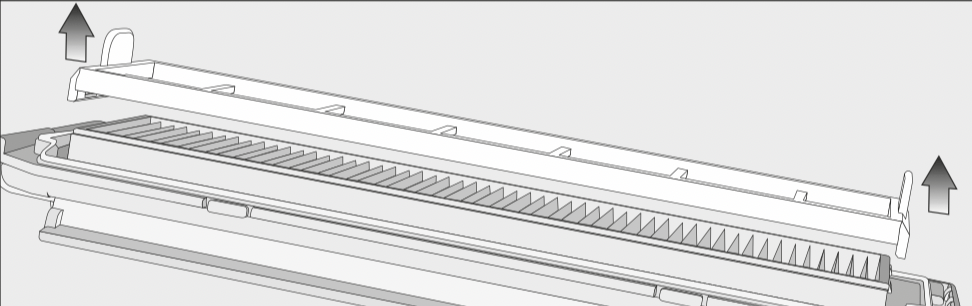
- Remove the pre-filter and clean it as required using the cleaning tool.
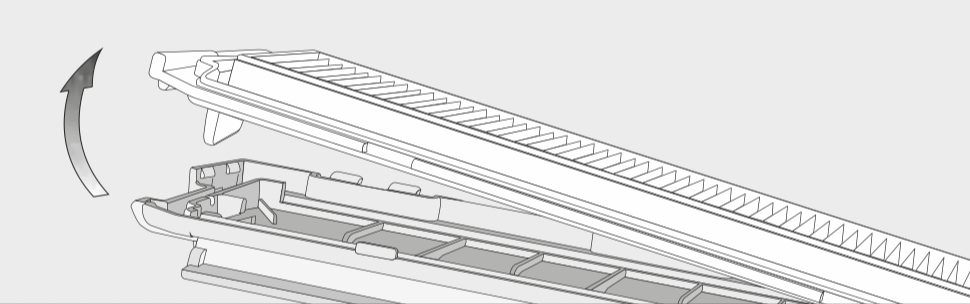
- Unlatch the exhaust filter, remove it, and clean it using the cleaning tool.
- Refit the exhaust filter into the cover.
- Place the pre-filter onto the exhaust filter.
The filter unit is complete.
- Carefully refit the filter unit and clip it into position.
The exhaust filter must be replaced with a new one after approx. six months in order to achieve the best possible cleaning results.
Cleaning the side brushes
Clean the side brushes as required. For this you will require the cleaning tool which is located at the top of the dust box lid.
- Place the robot vacuum cleaner upside down on a level, clean surface.
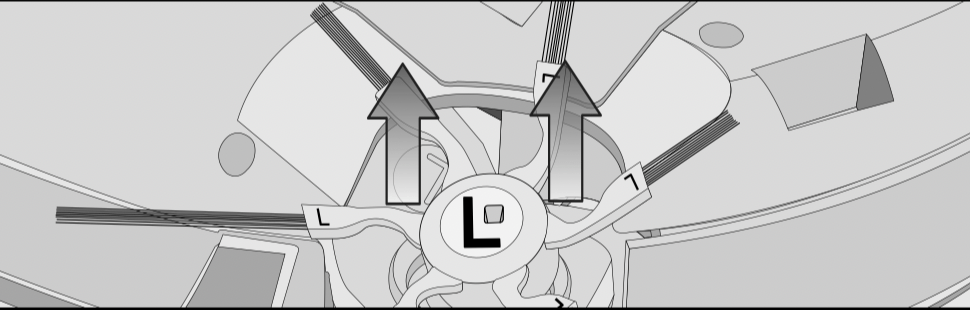
- Use both hands to grip two opposite bunches of the side brushes and pull them out.
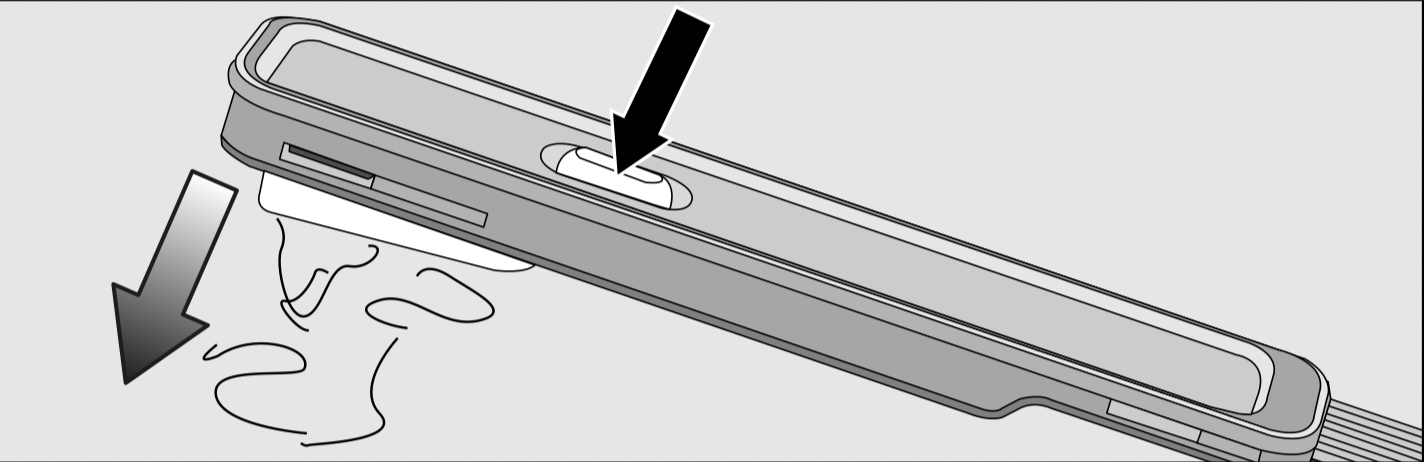
- Remove threads and hair using the wiper which is located on the bottom of the cleaning tool.
- Hold the wiper over a garbage can.
-
Press the button at the top of the wiper several times until all threads and hair have fallen out.
-
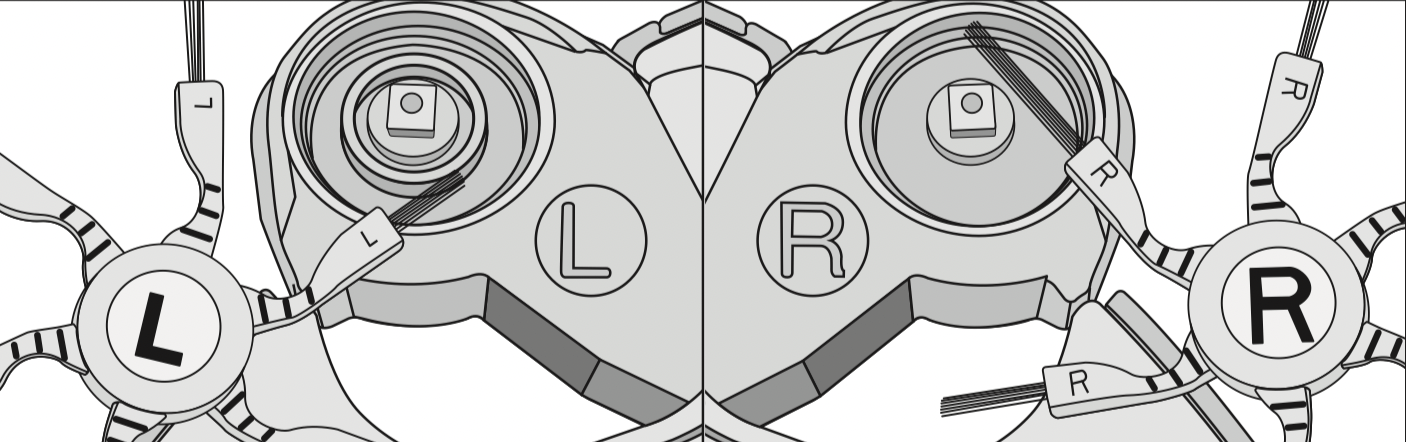
Press the two identical cleaned side brushes carefully onto their pins until they audibly engage. Take care to comply with the markings L and R.
In order to continue to achieve the best possible cleaning results, replace the side brushes with new ones after approx. one year.
Cleaning the roller brush
Clean the roller brush as required. For this you will require the cleaning tool which is located at the top of the dust box lid.
- Place the robot vacuum cleaner upside down on a level, clean surface.
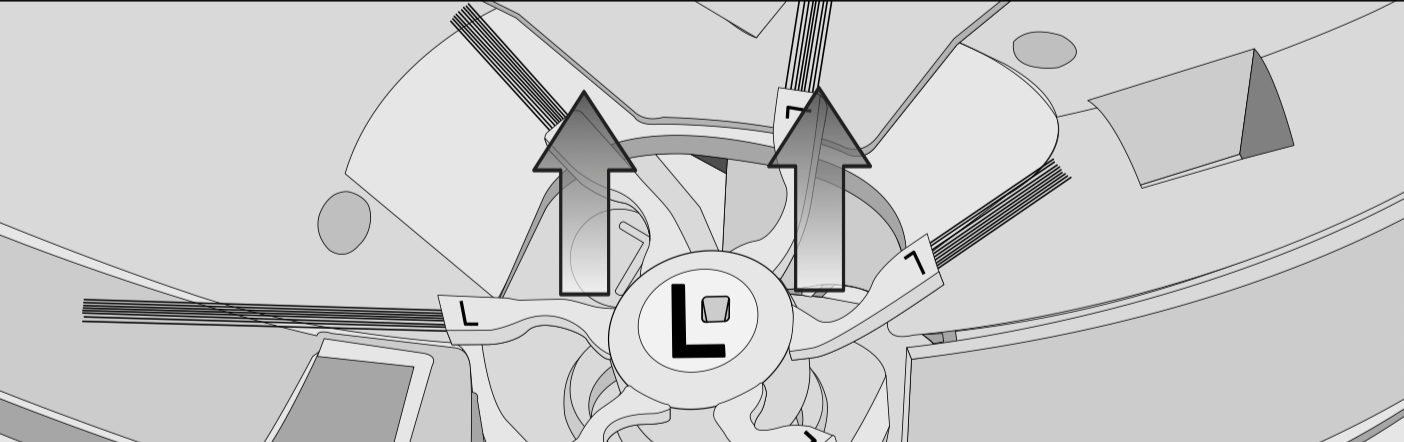
- Remove both side brushes, see previous description «Cleaning the side brushes».
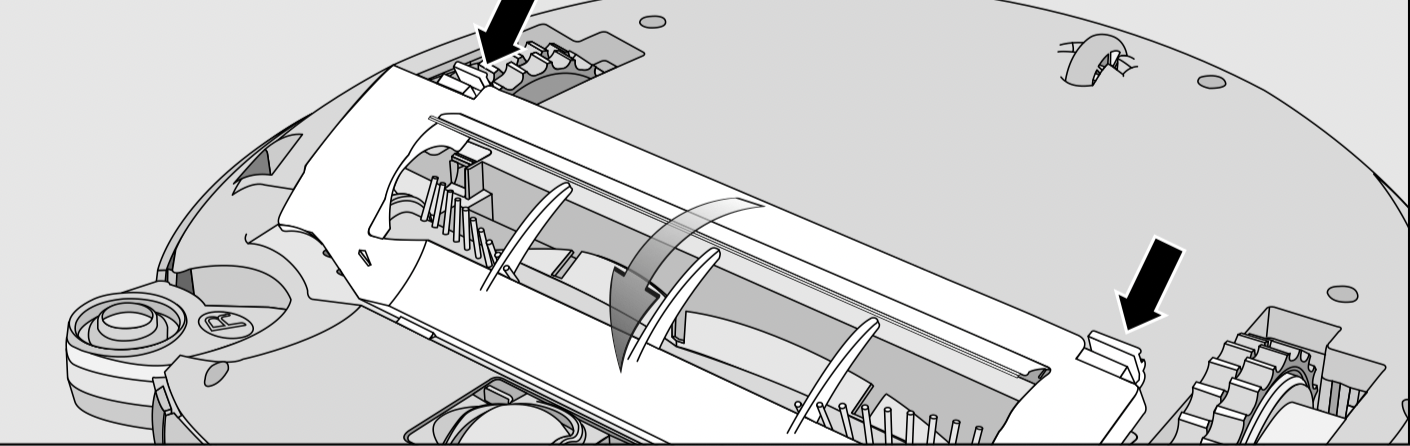
- Unlatch the roller brush cover and remove the cover.
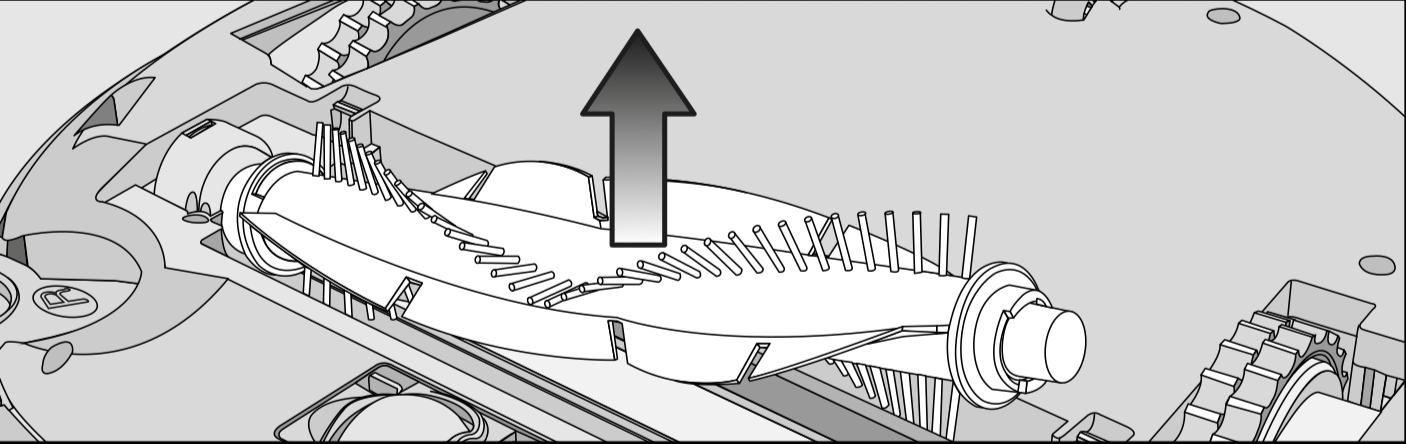
- Remove the roller brush.
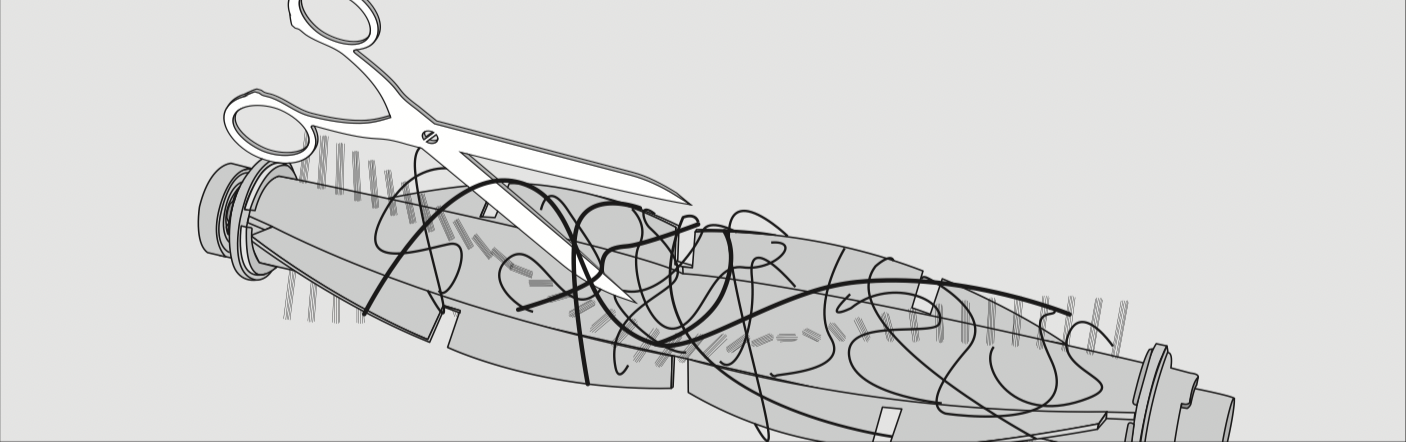
-
Use a pair of scissors to cut any threads or hairs that have wound themselves around the roller brush.
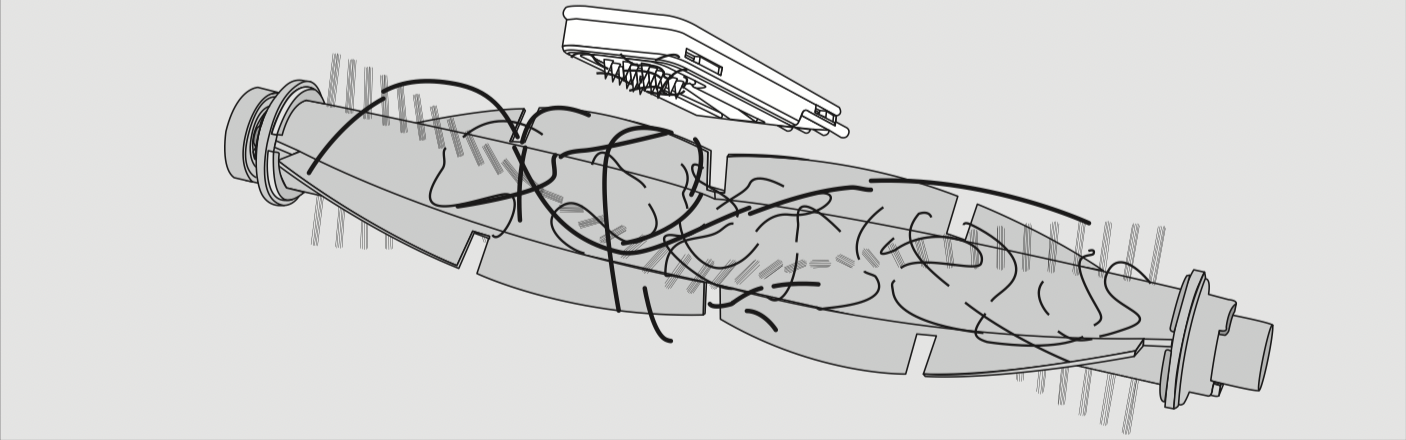
- Remove the threads and hair using the wiper which is located on the bottom of the cleaning tool.
- Hold the wiper over a garbage can.
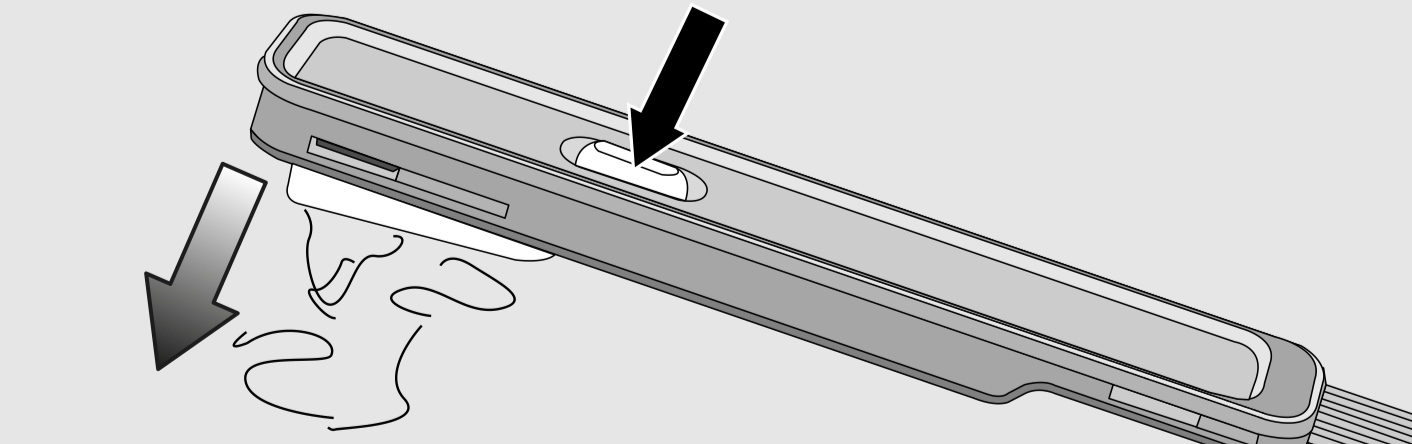
-
Press the button at the top of the wiper several times until all threads and hair have fallen out.
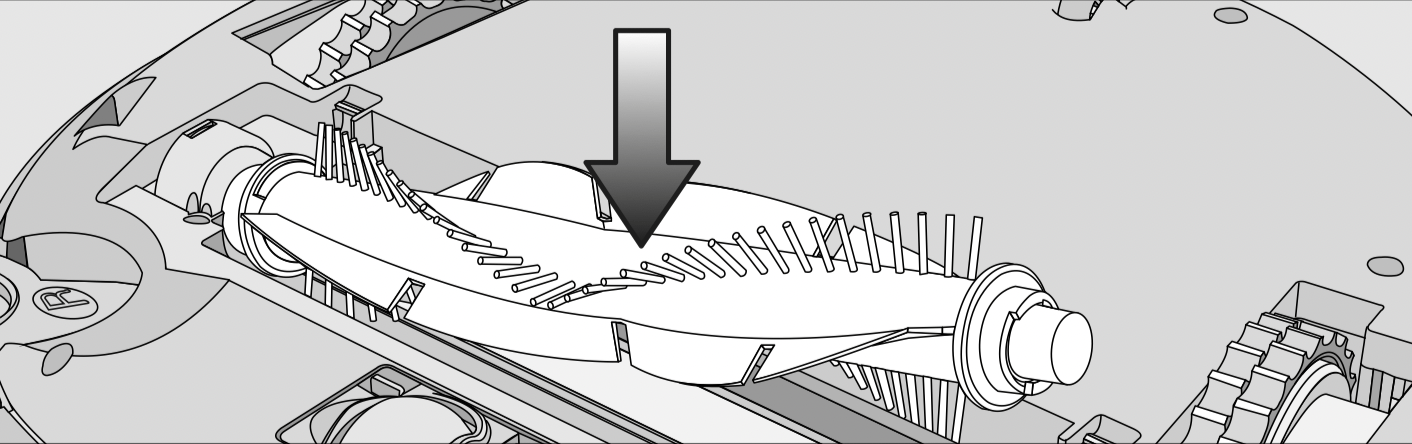
- Refit the roller brush. Make sure that the side with the pointed end is inserted into the corresponding slot.
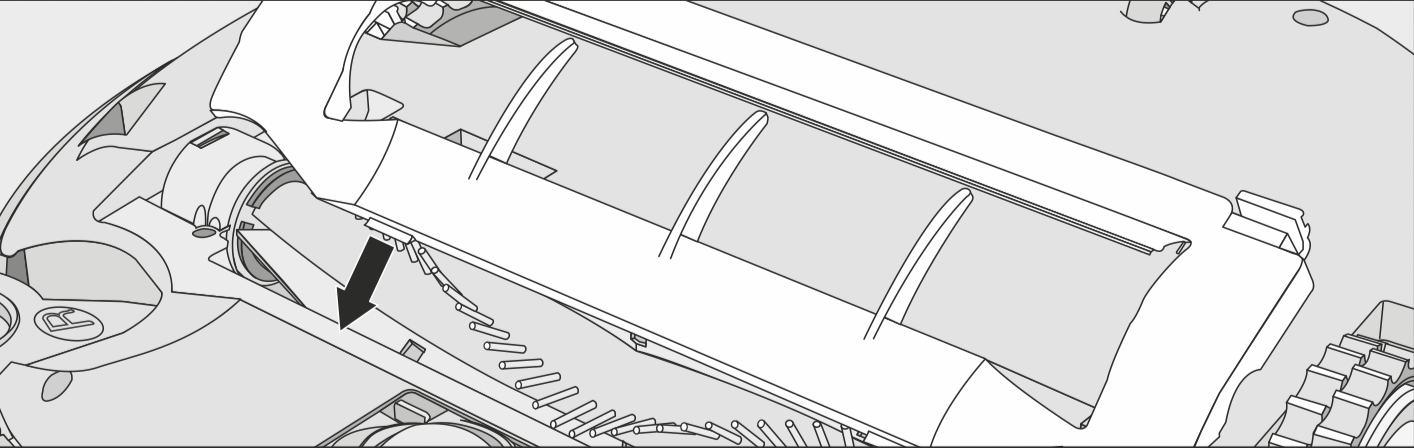
- Carefully refit the roller brush cover making sure it clicks into position.
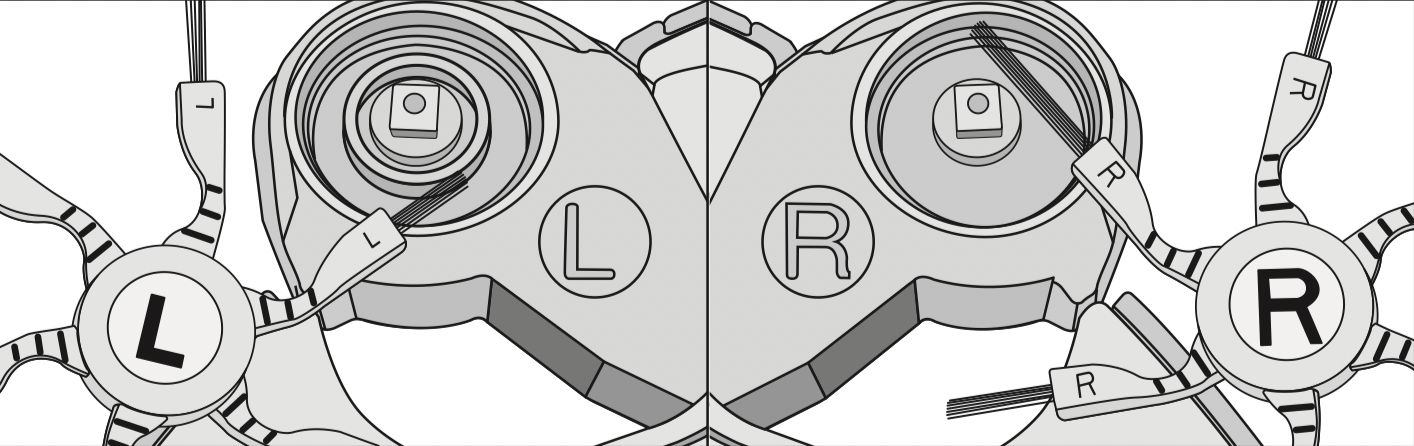
- Refit both identical side brushes, see previous description «Cleaning the side brushes».
In order to continue to achieve the best possible cleaning results, replace the roller brush with a new one after approx. one year.
Cleaning the dust box seals
Clean the seals on the bottom of the dust box as required.
- Place the robot vacuum cleaner upside down on a level, clean surface.
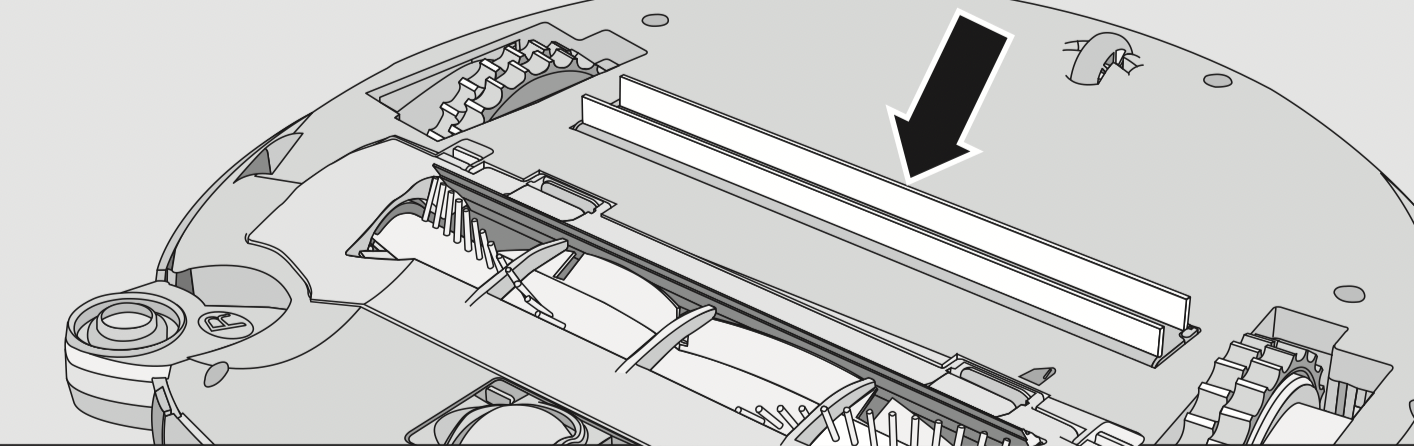
- Wipe the seals with a damp cloth to clean them.
In order to continue to achieve the best possible cleaning results, replace the seal unit with a new one after approx. one year.
Replacing the dust box seal unit
- Remove the dust box.
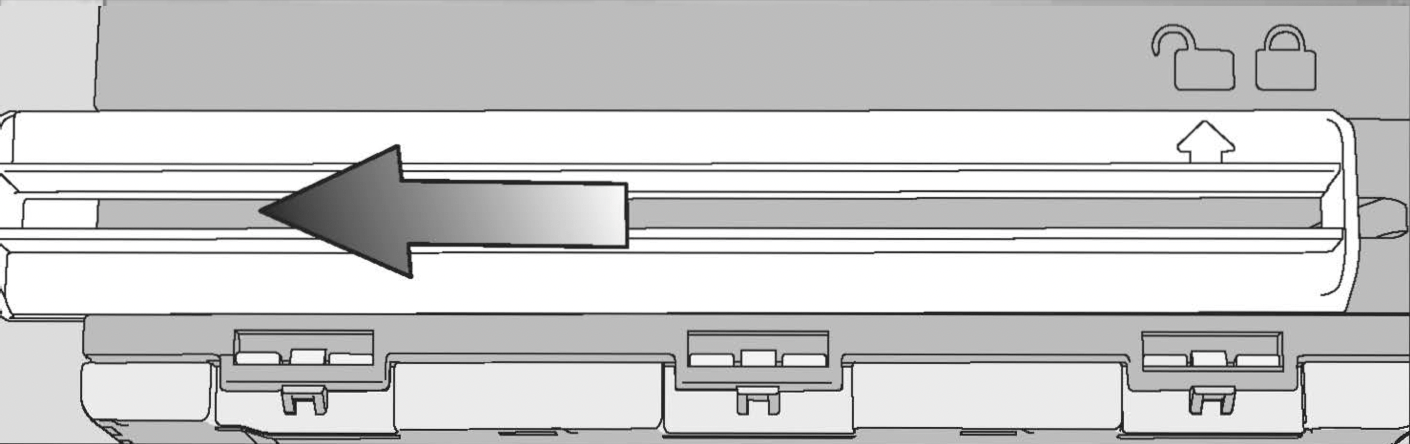
The arrow points to the  symbol.
Cleaning the front wheel
Clean the front wheel as required. For this you will require the cleaning tool which is located at the top of the dust box lid.
- Place the robot vacuum cleaner upside down on a level, clean surface.
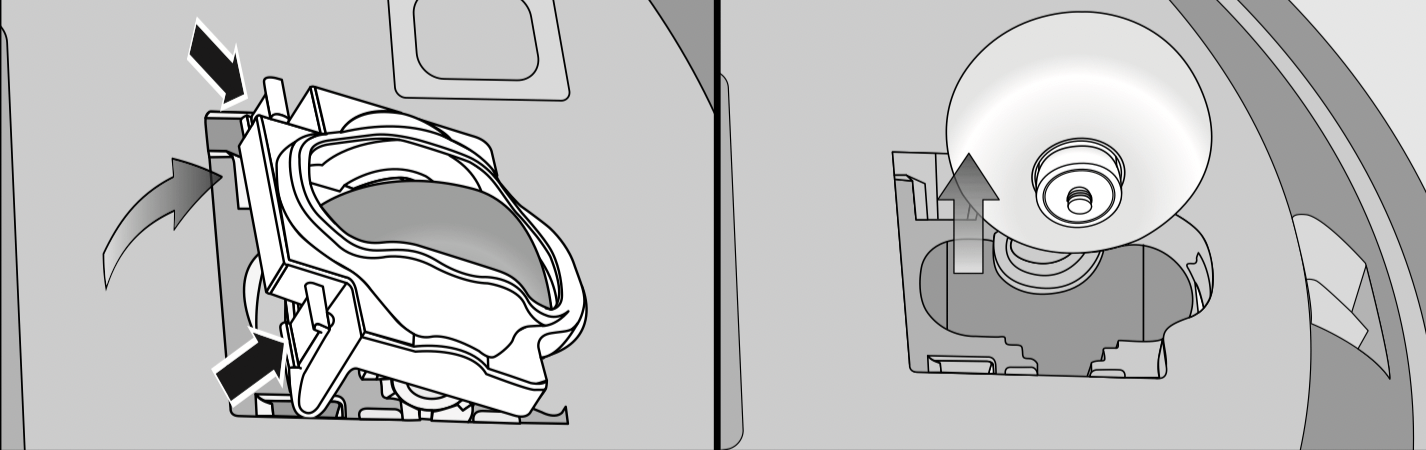
- Unclip the cover.
- Remove the front wheel.
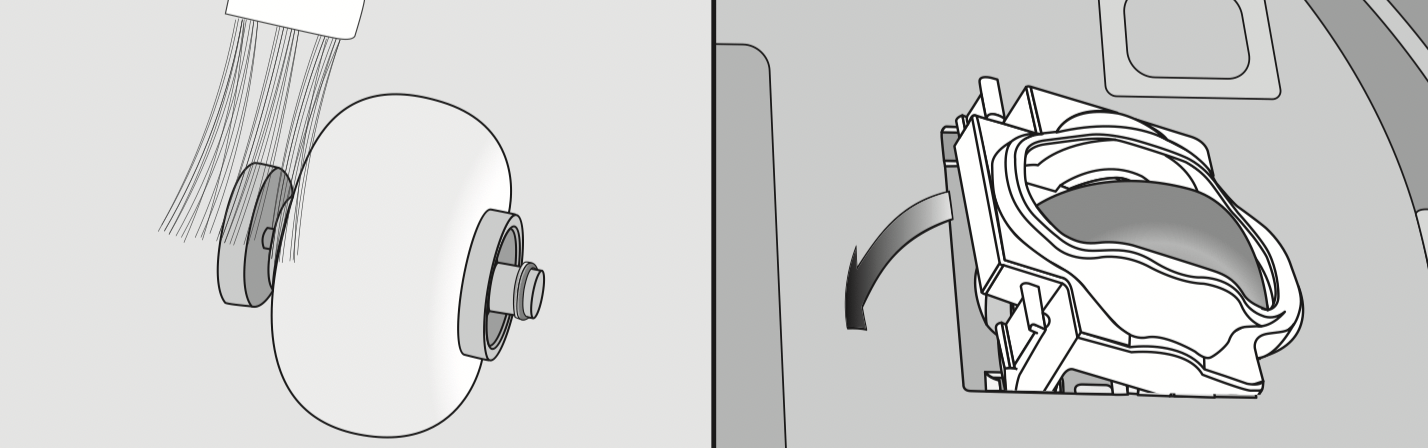
- Remove any threads and hair and clean the front wheel, the cover, and the slot depression using the cleaning tool.
- Refit the front wheel and close the cover making sure it clicks into position.
Cleaning the sensors
Clean the sensors as required.
- Place the robot vacuum cleaner upside down on a level, clean surface.
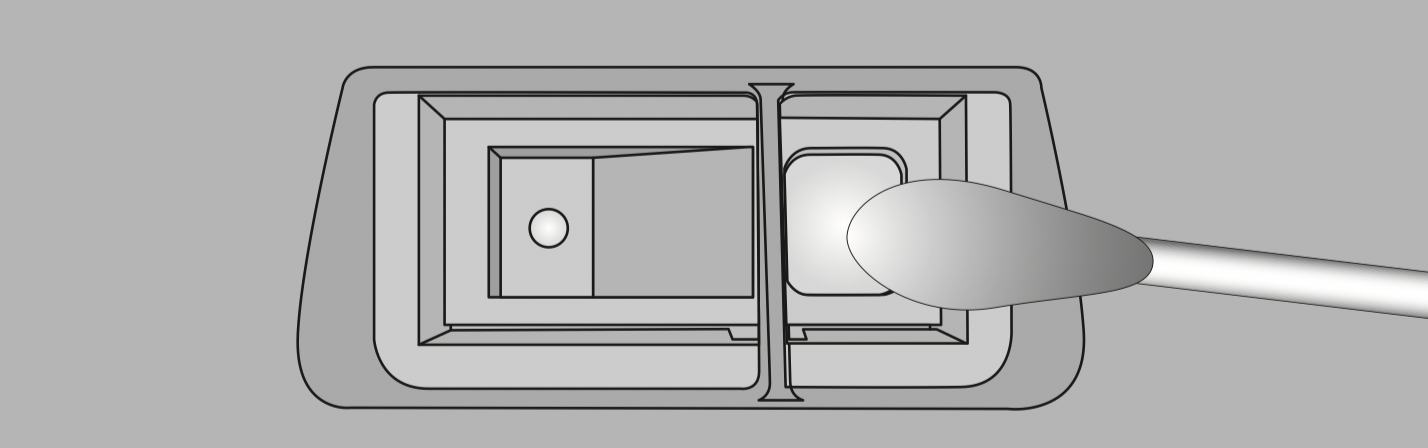
- Clean the sensors carefully using a dry cotton wool bud.
Changing the batteries in the remote control
The remote control requires two AAA (1.5 V) batteries.
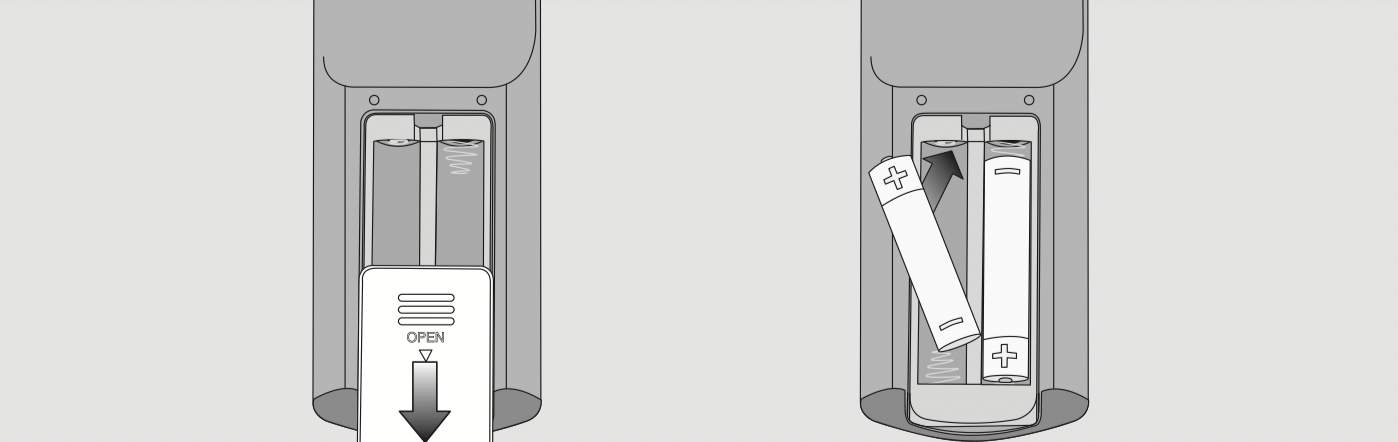
- Remove the battery compartment cover.
- Replace the batteries. Make sure the polarity is correct.
- Close the battery compartment cover.
- Observe the special instructions regarding the handling and disposal of batteries found in the sections «IMPORTANT SAFETY INSTRUCTIONS» and «Caring for the environment» at the beginning of these operating instructions.
Replacing the rechargeable battery
You will require an original Miele lithiumion rechargeable battery:
- YCR-M05 for Scout RX2
- YCR-MT12 for Scout RX2 Home Vision
The rechargeable battery compartment is located in the robot vacuum cleaner’s storage compartment.
- Remove the dust box.
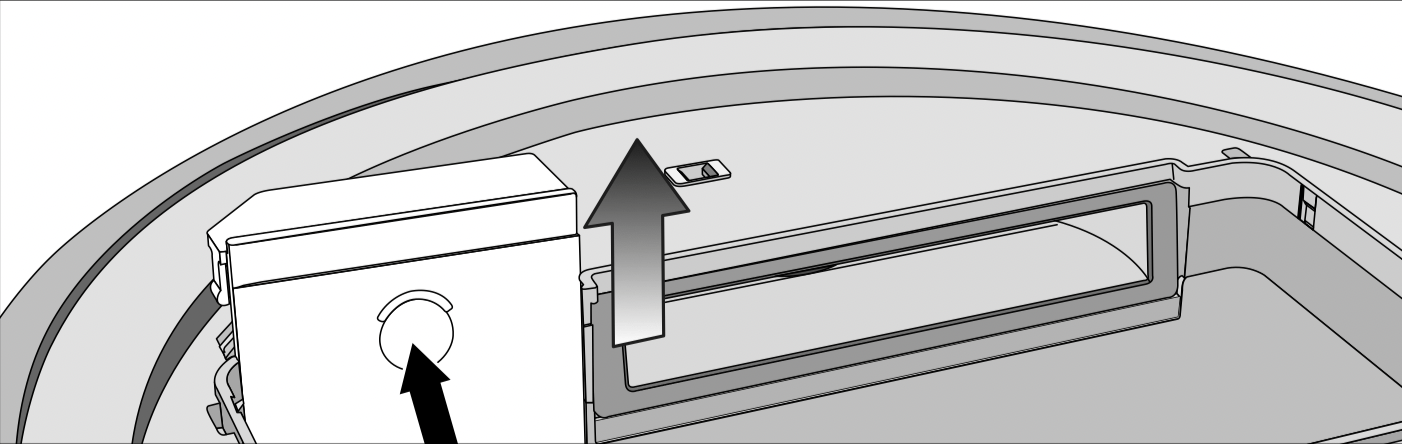
-
Open the rechargeable battery compartment by unlatching the cover upwards.
Scout RX2 (YCR-M05)
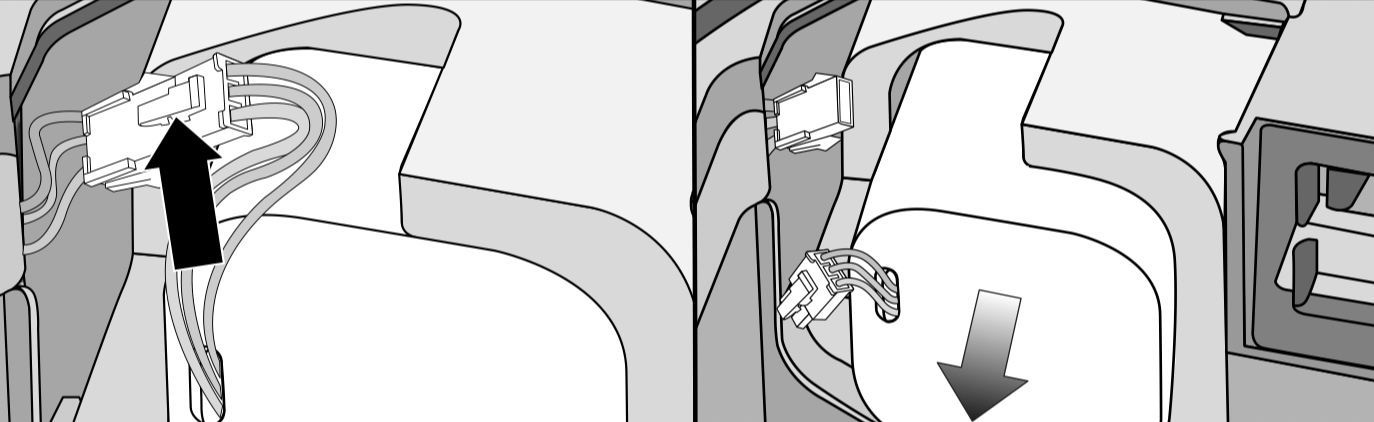
- Carefully pull the cables so that the plug connection is pulled out of the slot.
- Press the latch on the plug connection in order to release the plug.
- Remove the rechargeable battery.
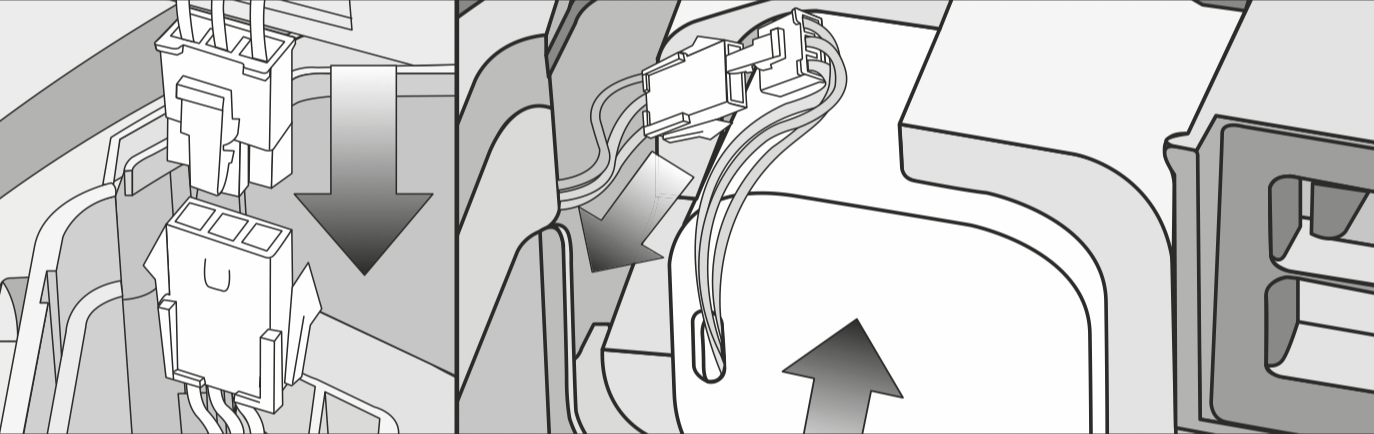
- Insert the plug of the new rechargeable battery into the counterpart, making sure it clicks into place.
- Insert the rechargeable battery carefully, making sure it is properly positioned (see right-hand side of picture).
- Store the plug connection in the slot at the side.
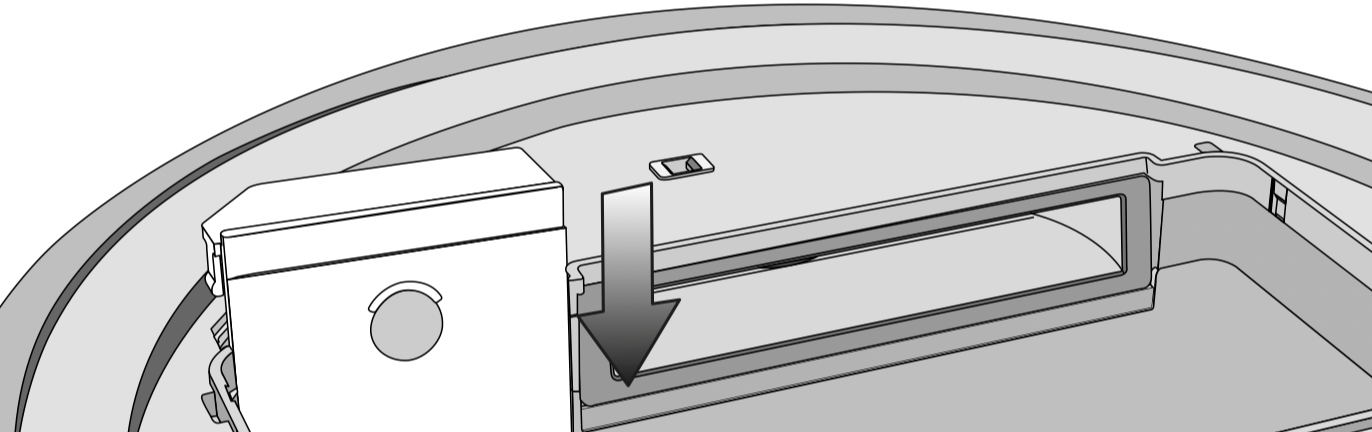
- Carefully refit the cover of the rechargeable battery compartment and close it, making sure it clicks into place.
- Observe the special instructions regarding the handling and disposal of the old rechargeable battery found in the sections «IMPORTANT SAFETY INSTRUCTIONS» and «Caring for the environment» at the beginning of these operating instructions.
Scout RX2 Home Vision (YCR-MT12)
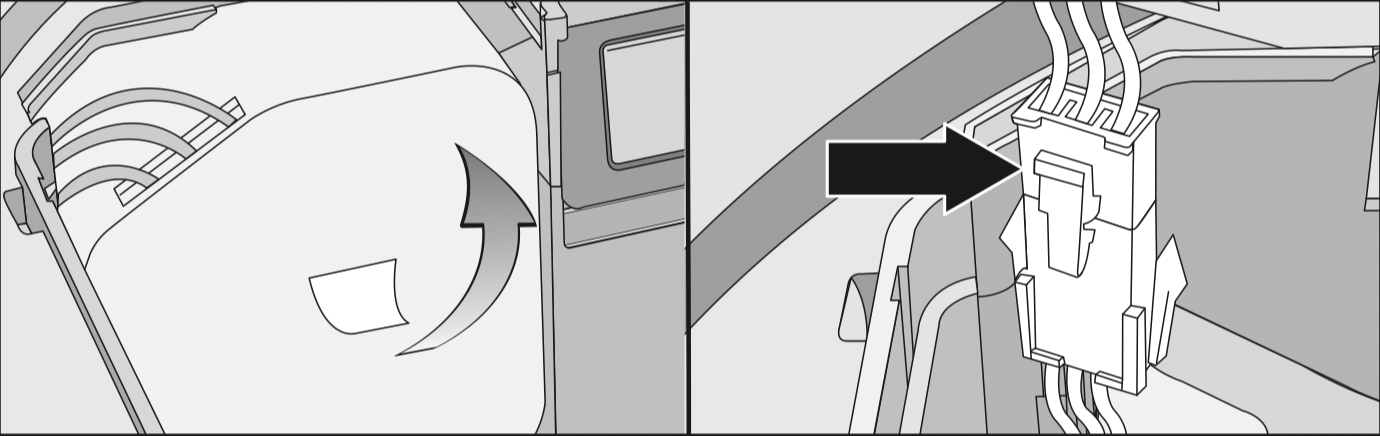
- Carefully remove the rechargeable battery until the plug connection is exposed.
- Press the latch on the plug connection in order to release the plug.
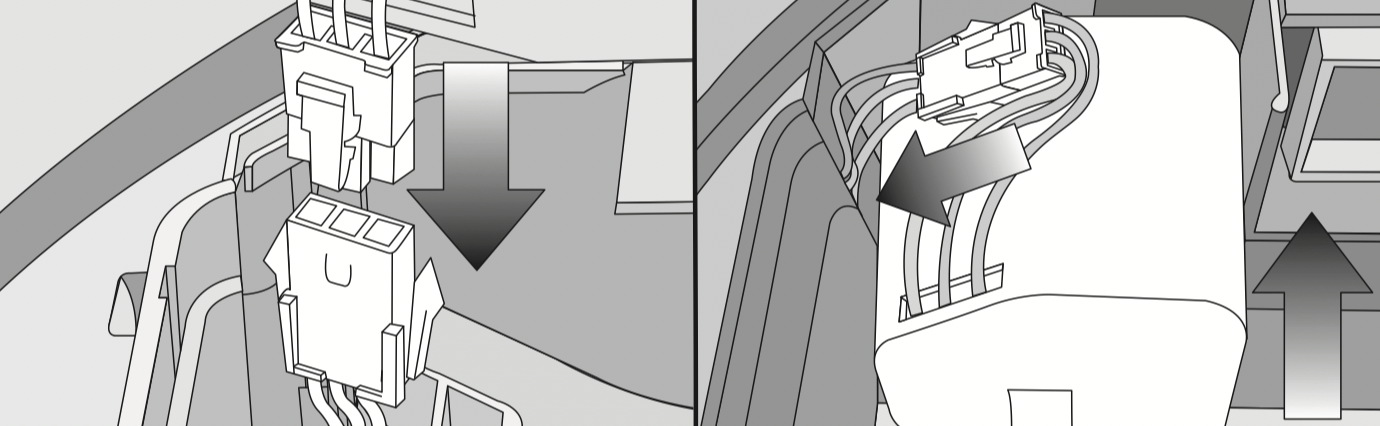
- Insert the plug of the new rechargeable battery into the counterpart, making sure it clicks into place.
- Store the plug connection in the side recess.
- Insert the rechargeable battery carefully, making sure it is properly positioned (see right-hand side of picture).
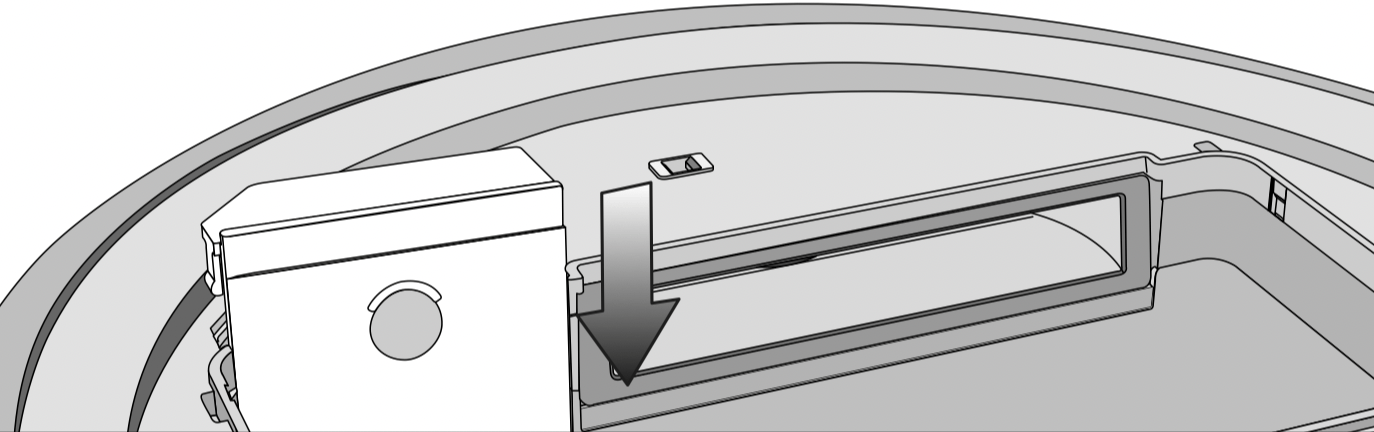
- Carefully refit the cover of the rechargeable battery compartment and close it, making sure it clicks into place.
- Observe the special instructions regarding the handling and disposal of the old rechargeable battery found in the sections «IMPORTANT SAFETY INSTRUCTIONS» and «Caring for the environment» at the beginning of these operating instructions.
Storage
Caution: Switch the robot vacuum cleaner off if it is not going to be used for a long period of time. To switch it off, slide the I/0 switch on the side of the robot vacuum cleaner to the 0 position.
If the robot vacuum cleaner is not going to be used for a long period of time, make sure it is stored in a well ventilated, cool place.
For optimum care, store the robot vacuum cleaner at half charge capacity (rechargeable battery status indicator in the display is orange).
Cleaning and care
Maintaining the robot vacuum cleaner and accessories
Caution: Switch the robot vacuum cleaner off before doing any maintenance work. To switch it off, slide the I/0 switch on the side of the robot vacuum cleaner to the 0 position.
The robot vacuum cleaner and all plastic accessories can be cleaned with a dry or a slightly damp cloth, or with a proprietary cleaner suitable for plastic.
Caution: Do not use abrasive cleaning agents, glass cleaning agents, all-purpose cleaners, or oil-based conditioning agents!
Caution: Do not immerse the robot vacuum cleaner or any accessories supplied with it in water!
TROUBLESHOOTING
TROUBLESHOOTING
With the help of the following guide minor faults in the performance of the machine, some of which may result from incorrect operation, can be remedied without contacting the Service Department. Time and money will be saved because a service call will not be needed.
This guide may help you to find the reason for the fault, and how to correct it.
Caution: Switch the robot vacuum cleaner off before dealing with any problems. To switch it off, slide the I/0 switch on the side of the robot vacuum cleaner to the 0 position.
| Problem | Possible cause and solution |
|---|---|
|
The robot vacuum cleaner switches itself off after it hasbeen switched on using the Power button. |
The rechargeable battery is not sufficiently charged.
|
|
The robot vacuum cleaner does not react. |
The robot vacuum cleaner is switched off.
|
|
The batteries in the remote control have been inserted incorrectly.
|
|
|
The batteries in the remote control are dead.
|
|
|
The signal between the infrared transmitter on the vacuum cleaner and the remote control is broken.
|
|
|
The remote control is too near to the robot vacuum cleaner or too far away from it.
|
|
|
The cleaning performance is poor. |
The dust box is full.
|
|
The roller brush is dirty or worn out.
|
|
|
The seals on the dust box are dirty or worn out.
|
|
|
The exhaust filter is dirty.
|
|
|
The side brushes have worn out.
|
|
|
The robot vacuum cleaner is not charging. |
The base station is not connected correctly.
|
|
The robot vacuum cleaner does not return to the base station after vacuuming. |
The Auto standard vacuuming mode was started somewhere in the room.
|
|
The Spot vacuuming mode has been selected.
|
|
|
There is insufficient light for the robot vacuum cleaner to navigate.
|
|
|
The base station is not connected correctly.
|
|
|
Obstacles on the floor which is to be vacuumed can impede navigation.
|
|
Fault messages
Caution: Switch the robot vacuum cleaner off before dealing with any faults. To switch it off, slide the I/0 switch on the side of the robot vacuum cleaner to the 0 position.
Fault messages are shown in the indicator field in the display.
If «l_ _l» — «l- -l» appears running from bottom to top, you must empty and clean the dust box.
| Problem | Possible cause and solution |
|---|---|
|
F1 |
«Wheel raised» fault
|
|
F2 |
«Dirty sensors» fault
|
|
F3 |
«Filter not recognized» fault
|
|
F4 |
«Drive wheels overloaded» fault
|
|
F5 |
«Brushes overloaded» fault
|
|
F6 |
«Fan motor overloaded» fault
|
|
F7 |
Internal system fault
|
|
F8 |
«Front wheel dirty» fault
|
| Resetting the fault message after fixing the problem | You can reset the fault messages described above in the following ways |
|---|---|
|
|
|
|
|
manualMiele Scout RX2 Home Vision

M.-Nr. 10 581 422
HS18
Gebrauchsanweisung Saugroboter
Operating instructions Robot vacuum cleaner
Kortbrugsanvisning Robotstøvsuger
Instrucciones de uso abreviadas Robot aspirador
Pikakäyttöohje Robotti-imuri
Mode d’emploi abrégé Aspirateur robot
Istruzioni brevi Aspirapolvere robot
Verkorte gebruiksaanwijzing robotstofzuiger
Kort-bruksanvisning Robotstøvsuger
Instruções de utilização resumidas Robô de aspiração
Snabbinstruktion Robotdammsugare
SLQL0
de
en
da
es
fi
fr
it
nl
no
pt
sv
Downloaded from www.vandenborre.be
View the manual for the Miele Scout RX2 Home Vision here, for free. This manual comes under the category vacuum cleaners and has been rated by 14 people with an average of a 7.8. This manual is available in the following languages: English. Do you have a question about the Miele Scout RX2 Home Vision or do you need help? Ask your question here
- Titelside
- Indhold
General
| Miele | |
| Scout RX2 Home Vision | 41LQL030EU | |
| vacuum cleaner | |
| 4002515834244 | |
| English | |
| User manual (PDF), Datasheet (PDF) |
Design
| Dust container type | — |
| Product colour | Grey |
| Built-in display | Yes |
| Remotely operated | Yes |
| Shape | Round |
| Smartphone remote support | Yes |
Performance
| Dust capacity (total) | 0.4 L |
| Wet mopping | — |
| HEPA filtration system | — |
| Floor surfaces supported | Carpet, Hard floor, Laminate |
| Number of programs | 4 |
| Vacuum cleaner programs | Auto, Manual, Spot, Turbo |
| Noise level | 64 dB |
| Timer | Yes |
| Automatic base station return | — |
| Programming function | Yes |
Power
| Battery technology | Lithium-Ion (Li-Ion) |
| Battery capacity | 4400 mAh |
| Runtime | 120 min |
| Charging time | 2 h |
| Rechargeable | Yes |
| Battery life | 180 m² |
Packaging content
| Manual | Yes |
| Base station | Yes |
| Remote control included | Yes |
Technical details
Weight & dimensions
| Height | 85 mm |
| Diameter | 354 mm |
| Weight | 3200 g |
show more
Can’t find the answer to your question in the manual? You may find the answer to your question in the FAQs about the Miele Scout RX2 Home Vision below.
Is the manual of the Miele Scout RX2 Home Vision available in English?
Yes, the manual of the Miele Scout RX2 Home Vision is available in English .
Is your question not listed? Ask your question here