

Руководство по эксплуатации фотокамеры
Серийный номер фотокамеры указан на ее нижней стороне.
Перед началом работы
Перед использованием камеры ознакомьтесь со средствами управления фотокамеры, а также с информацией и изображениями, которые отображаются на экране фотокамеры (стр. 1–8). Используйте этот раздел в качестве
справочника при изучении других разделов этого руководства.
Основные функции фотосъемки и просмотра фотографий
Прочтите этот раздел перед использованием фотокамеры. Этот раздел содержит сведения о подготовке фотокамеры к работе, фотографировании и просмотре фотографий (стр. 9–38).
Справочная информация
Этот раздел содержит сведения, не включенные в раздел «Основные функции фотосъемки и просмотра фотографий». В нем описаны дополнительные функции фотосъемки и просмотра, а также приведены инструкции по печати фотографий, изменении настроек фотокамеры и копировании фотографий на компьютер (стр. 39–165).
Перед работой аккумулятор необходимо зарядить. При покупке аккумулятор разряжен.

Комплектация
Перед использованием цифровой фотокамеры компании Ricoh проверьте наличие перечисленных ниже компонентов.
Фотокамера GR DIGITAL III
Серийный номер указан на нижней стороне фотокамеры.
Вкладыш обоймы для крепления принадлежностей
При покупке фотокамеры вкладыш установлен в обойму для крепления принадлежностей.
Кабель USB с разъемом mini-B
Для подключения фотокамеры к компьютеру или принтеру.
Аудио/видео кабель
Подключение фотокамеры к телевизору.
Аккумулятор DB-65
Зарядное устройство BJ-6
•Компакт-диск: Содержит программное обеспечение и Руководстве по программному обеспечению.
•Руководство по эксплуатации фотокамеры (это руководство)
•Меры предосторожности
•Ремешок для руки
i

Примечания
•Меры предосторожности. Внимательно прочитайте все правила, чтобы не подвергать опасности себя и других при эксплуатации фотокамеры.
•Пробные снимки. Перед съемкой важных событий сделайте несколько пробных снимков для проверки работы.
•Авторское право. Запрещено воспроизведение и изменение документов, журналов и иных материалов, защищенных законом об авторском праве и предназначенных только для в личного использования, использования в домашних условиях или для аналогичных целей, без разрешения обладателя авторских прав.
•Освобождение от ответственности: Компания Ricoh Co., Ltd. не несет ответственности в случае невозможности сохранения или просмотра изображений в результате неправильной работы данного изделия.
•Гарантия. Данное изделие изготовлено в соответствии с местными техническими условиями, и гарантия на него действительна только в стране приобретения. Изготовитель не берет на себя обязанность осуществлять техническое обслуживание изделия в других странах или нести какие-либо связанные с этим расходы.
•Радиопомехи: При использовании данного изделия вблизи другого электронного оборудования возможно взаимное неблагоприятное влияние устройств. В частности, могут возникать помехи при использовании фотокамеры рядом с радиоприемником или телевизором. В этом случае перенесите фотокамеру как можно дальше от другого прибора, измените положение антенны телевизора или радиоприемника или включите телевизор или радиоприемник в другую розетку электрической сети.
© Все права защищены. Компания RICOH CO., LTD., 2009 Полное или частичное воспроизведение настоящей публикации без четкого письменного согласия компании Ricoh запрещено. Компания Ricoh оставляет за собой право изменять содержание настоящего документа в любое время без предварительного уведомления.
При создании этого документа было сделано все возможное, чтобы информация в этом документе была точной. Однако если вы заметите ошибку или упущение, обязательно сообщите нам об этом по адресу, указанному на задней стороне обложки этой брошюры.
Microsoft, Windows, Windows Vista и Internet Explorer — это товарные знаки корпорации Майкрософт, зарегистрированные в США и других странах. Macintosh и Mac OS — это товарные знаки корпорации Apple Inc., зарегистрированные в США и других странах. Adobe, логотип Adobe и Adobe Reader — это товарные знаки корпорации Adobe Systems Incorporated. Все прочие товарные знаки, упомянутые в настоящем документе, являются товарными знаками соответствующих владельцев.
ii

|
Содержание |
|
|
Комплектация………………………………………………………………………………………………………………… |
i |
|
Примечания…………………………………………………………………………………………………………………… |
ii |
|
Перед началом работы |
1 |
|
Прочтите этот раздел перед началом использования фотокамеры. |
|
|
Введение …………………………………………………………………………………………. |
2 |
|
Устройство фотокамеры………………………………………………………………………………………….. |
2 |
|
Основные функции фотосъемки и просмотра фотографий |
9 |
|
Прочтите этот раздел перед началом использования фотокамеры. |
|
|
Первые шаги …………………………………………………………………………………. |
10 |
|
Зарядка аккумулятора……………………………………………………………………………………………. |
10 |
|
Установка аккумулятора……………………………………………………………………………………….. |
12 |
|
Установка карт памяти…………………………………………………………………………………………… |
13 |
|
Включение и выключение фотокамеры………………………………………………………… |
14 |
|
Основные установки………………………………………………………………………………………………. |
16 |
|
Фотосъемка…………………………………………………………………………………… |
17 |
|
Как держать фотокамеру………………………………………………………………………………………. |
17 |
|
Съемка…………………………………………………………………………………………………………………………… |
18 |
|
Цифровой зум ……………………………………………………………………………………………………………. |
22 |
|
Съемка с близкого расстояния (режим макросъемки)………………………….. |
23 |
|
Съемка со вспышкой………………………………………………………………………………………………. |
24 |
|
Автоспуск …………………………………………………………………………………………………………………….. |
26 |
|
Индикатор наклона…………………………………………………………………………………………………. |
27 |
|
Просмотр и удаление фотографий……………………………………………… |
29 |
|
Просмотр фотографий ………………………………………………………………………………………….. |
29 |
|
Удаление фотографий ……………………………………………………………………………………………. |
33 |
|
Кнопка O(DISP.) …………………………………………………………………………………………………….. |
36 |
iii

|
Справочная информация |
39 |
|
В этом разделе приводится более подробная информация о функциях фотокамеры. |
|
|
Дополнительные сведения о фотосъемке…………………………………. |
40 |
|
Режим P: программный режим ………………………………………………………………………….. |
40 |
|
Режим A: приоритет диафрагмы……………………………………………………………………….. |
42 |
|
Режим S: Приоритет выдержки………………………………………………………………………….. |
43 |
|
Режим M: ручная экспозиция …………………………………………………………………………….. |
44 |
|
Режим 4. Выбор настроек в зависимости от сюжета……………………. |
46 |
|
Режимы «MY»: Использование собственных настроек…………………………… |
53 |
|
Меню съемки……………………………………………………………………………………………………………… |
54 |
|
Видеоролики…………………………………………………………………………………. |
87 |
|
3Запись видеороликов …………………………………………………………………………………….. |
87 |
|
3Просмотр видеороликов………………………………………………………………………………. |
90 |
|
Дополнительные сведения о воспроизведении……………………….. |
91 |
|
Меню воспроизведения……………………………………………………………………………………….. |
91 |
|
Просмотр фотографий на экране телевизора………………………………………… |
104 |
|
Печать фотографий……………………………………………………………………. |
106 |
|
Подключение фотокамеры к принтеру………………………………………………………. |
106 |
|
Печать…………………………………………………………………………………………………………………………. |
108 |
|
Меню настройки ………………………………………………………………………… |
112 |
|
Основные настройки пользователя и параметры меню настроек… |
114 |
|
Копирование снимков на компьютер………………………………………. |
136 |
|
Windows …………………………………………………………………………………………………………………….. |
136 |
|
Компьютеры Макинтош ……………………………………………………………………………………… |
141 |
|
Технические примечания………………………………………………………….. |
144 |
|
Устранение неисправностей …………………………………………………………………………… |
144 |
|
Технические характеристики ………………………………………………………………………….. |
150 |
|
Дополнительные принадлежности………………………………………………………………. |
154 |
|
Использование фотокамеры в других странах. ……………………………………… |
161 |
|
Меры предосторожности при эксплуатации………………………………………….. |
162 |
|
Уход за фотокамерой и хранение………………………………………………………………….. |
163 |
|
Гарантия и обслуживание …………………………………………………………………………………. |
164 |
|
Указатель ……………………………………………………………………………………. |
166 |
iv

Перед началом работы
Прочтите этот раздел перед началом использования фотокамеры.
|
Введение……………………………………………………………………. |
2 |
СВЕДЕНИЯ СНОВНЫЕО
1

СВЕДЕНИЯ СНОВНЫЕО
Введение
Это руководство содержит инструкции по фотосъемке и просмотру фотографий. Чтобы наилучшим образом использовать все возможности фотокамеры, внимательно прочтите этой руководство и всегда держите его под рукой при работе с фотокамерой.
Устройство фотокамеры
Справа указаны номера страниц с подробным описанием данного элемента.
Вид спереди
|
1 |
2 |
3 |
4 |
5 |
6 |
7 |
13 |
|
8 |
||||||
|
9 |
||||||
|
12 |
||||||
|
1 |
Колесико………………………………………. |
5 |
7 |
Ушко для крепления ремешка |
……….. |
i |
|
2 |
Диск режимов………………………………. |
4 |
8 |
Переключатель вспышки OPEN……. |
24 |
|
|
3 |
Спусковая кнопка …………….. |
17, 18, 19 |
9 |
Кольцо……………………………………… |
155 |
|
|
4 |
Кнопка включения питания |
10 |
Микрофон ………………………………….. |
87 |
||
|
5 |
POWER…………………………….. |
14, 15, 17 |
11 |
Вспомогательная вспышка для |
||
|
Обойма для крепления |
автофокуса………………………….. |
26, 125 |
||||
|
6 |
принадлежностей…………………… |
i, 156 |
12 |
Объектив……………………………………. |
17 |
|
|
Крышка вспышки……………………….. |
24 |
13 |
Вспышка ……………………………………. |
24 |
2

|
15 16 17 18 |
19 |
20 |
|
|
1 |
Экран………………………………………. |
6–8 |
|
|
2 |
Индикатор автофокуса/ |
||
|
вспышки …………………………. |
14, 18, 25 |
||
|
3 |
Разъем для кабеля аудио/видео 104… |
||
|
4 |
Разъем для кабеля USB……………… |
107 |
|
|
Регулятор ADJ |
|||
|
5 |
5, 78, 119–120 |
||
|
8Кнопка просмотра с увеличением |
|||
|
6 |
|||
|
………………………………… |
22, 31, 32, 122 |
||
|
9Кнопка просмотра миниатюр |
|||
|
7 |
|||
|
………………………………… |
22, 31, 32, 122 |
||
|
Кнопка $/F(вспышка) |
|||
|
8 |
5, 24 |
||
|
9 |
Кнопка C/D |
||
|
Кнопка…………………………………O(DISP.) |
47, 54, 91, 112 |
||
|
10 |
36 |
||
|
11 |
……………..Кнопка «/N(макро) |
5, 23 |
|
6 |
|||
|
7 |
|||
|
8 |
|||
|
9 |
|||
|
12 |
14 |
11 |
10 |
|
12 |
Кнопка #/Fn1 (функция 1) …….5, 121 |
||
|
13 |
Кнопка 6(воспроизведение) |
||
|
……………………………………….. |
15, 29, 91 |
14Кнопка t(автоспуск)/
Fn2 (функция 2)/D(удалить)
|
………………………………… |
26, 33–35, 121 |
|
|
15 |
Крышка разъема……………….. |
104, 107 |
|
16 |
Крышка гнезда для кабеля питания |
|
|
(постоянного тока) ……………………. |
157 |
|
|
17 |
Динамик…………………. |
27, 90, 125–126 |
|
18 |
Освобождающий рычаг 12, 13, 157….. |
|
|
19 |
Крышка отсека аккумулятора/ |
|
|
карты памяти…………………. |
12, 13, 157 |
|
|
20 |
Гнездо для штатива……………….. |
48, 61 |
СВЕДЕНИЯ СНОВНЫЕО
3

СВЕДЕНИЯ СНОВНЫЕО
Диск режимов
Перед съемкой разблокируйте диск ре жимов, нажав кнопку (q), и поверните 
 его в положение, соответствующее ре


 жиму съемки (w).


|
Р (программный режим): |
A (приоритет диафрагмы): |
S (приоритет |
выдержки): |
|||
|
Пользователь |
вы- |
Диафрагму устанавли- |
Выдержку |
устанавли- |
||
|
бирает одну |
из пар |
вает пользователь, а |
вает пользователь, а |
|||
|
значений выдержки и |
фотокамера выбирает |
фотокамера выбирает |
||||
|
диафрагмы, |
которые |
выдержку, соответс- |
диафрагму |
для полу- |
||
|
дают одинаковую экс- |
твующую оптимальной |
чения оптимальной |
||||
|
позицию (стр. 40). |
экспозиции (стр. 42). |
экспозиции (стр. 43). |
||||
|
5 (автоматический |
ре- |
M (ручная экспозиция) Вы- |
|||
|
жим): Фотокамера ус- |
держку |
и |
диафрагму |
||
|
танавливает выдержку |
устанавливает пользо- |
||||
|
и диафрагму, соответс- |
ватель (стр. 44). |
||||
|
твующие оптимальной |
|||||
|
экспозиции (стр. 17). |
4 (сюжет): Подбор |
||||
|
оптимальных настроек |
|||||
|
для |
съемки |
опреде- |
|||
|
MY1, MY2, MY3 («мои настройки»): Восстановление |
ленных |
объектов или |
|||
|
настроек, сохраненных с помощью функции Со- |
сюжетов и съемка ви- |
||||
|
хран. настройки (стр. 53, 114–116). |
деоклипов (стр. 46–52). |
4

|
Колесико и регулятор ADJ. |
|
|
При просмотре снимков и работе с |
Колесико |
|
меню вместо кнопок ! и » можно ис- |
|
|
пользовать колесико, а вместо кнопок |
|
|
# и $ — регулятор ADJ. Регулятор ADJ. |
|
|
и колесико можно также использовать |
|
|
для выбора выдержки и диафрагмы в |
|
|
режимах P, A, S и M. |
|
|
Регулятор ADJ. |
Регулятор ADJ. можно использовать для выбора часто используемых пунктов меню для быстрого доступа к настройкам. Чтобы отобразить на дисплее пункт меню съемки, установите регулятор ADJ. в среднее положение и нажмите его. После этого можно выбирать настройки с помощью этого регулятора и колесика, как описано на стр. 116.
 Примечание
С помощью пунктов меню настроек Диск, режиме М и Диск, в Просм. можно поменять местами функции, назначенные колесику и регулятору ADJ. (стр. 123).
СВЕДЕНИЯ СНОВНЫЕО
5
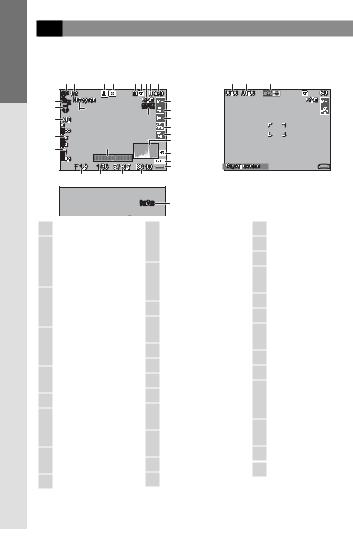
Экран
В режимах съемки и просмотра кадров на дисплее могут отображаться описанные ниже индикаторы.
|
Режим съемки (фотосъемка) |
Режим съемки (видеосъемка). |
|
1 2 |
3 |
4 |
5 6 7 8 |
9 |
32 |
33 |
34 |
|||||||
|
20 |
10 |
|||||||||||||
|
О |
21 |
25 |
19 |
11 |
||||||||||
|
22 |
12 |
|||||||||||||
|
СНОВНЫЕ |
30 |
|||||||||||||
|
13 |
||||||||||||||
|
23 |
14 |
|||||||||||||
|
15 |
||||||||||||||
|
СВЕДЕНИЯ |
24 |
16 |
||||||||||||
|
17 |
||||||||||||||
|
18 |
||||||||||||||
|
26 |
27 |
28 |
29 |
|||||||||||
|
31 |
||||||||||||||
|
1 |
Режим вспышки………. |
24 |
10 |
Режим фокусировки/ |
22 |
Масштаб …………………. |
22 |
|||||||
|
2 |
Уровень компенсации |
Фикс. фокус/полное |
23 |
Глубина поля …………… |
59 |
|||||||||
|
экспозиции со вспышкой/ |
нажатие ……………. |
59, 64 |
24 |
Шкала фокуса |
59 |
|||||||||
|
интенсивность вспышки |
11 |
Баланс белого/ |
||||||||||||
|
25 |
Интервальная съемка |
|||||||||||||
|
(ручной режим) |
72, 73 |
компенсация баланса |
||||||||||||
|
75 |
||||||||||||||
|
3 |
Сюжетная программа |
белого |
79, 82 |
………………………………. |
||||||||||
|
26 |
Диафрагма |
40, 42, 44 |
||||||||||||
|
46 |
12 |
Замер экспозиции |
65 |
|||||||||||
|
…………………………….. |
27 |
Выдержка |
40, 43, 44 |
|||||||||||
|
Серийная |
68–69 |
13 |
Настройки изображения |
|||||||||||
|
28 |
Компенсация |
|||||||||||||
|
4 |
Режим съемки/ |
|||||||||||||
|
66 |
||||||||||||||
|
………………………………. |
экспозиции |
77 |
||||||||||||
|
плюс обычная съемка |
14 |
Эксповилка |
70 |
|||||||||||
|
29 |
ISO |
84 |
||||||||||||
|
4, 49, 50 |
||||||||||||||
|
……………………… |
15 |
Гистограмма |
37, 38 |
|||||||||||
|
5 |
Количество оставшихся |
30 |
Индикатор наклона |
27 |
||||||||||
|
16 |
Шумоподавление |
74 |
||||||||||||
|
кадров*…………………. |
153 |
31 |
Предупреждение |
|||||||||||
|
6 |
Носитель для записи |
13 |
17 |
Наложение даты ……… |
76 |
о размытости изобра |
||||||||
|
18 |
Уровень заряда |
|||||||||||||
|
7 |
Фокусное расстояние |
жения……………………… |
27 |
|||||||||||
|
аккумулятора |
8 |
32 |
Продолжительность |
|||||||||||
|
при фиксированном |
||||||||||||||
|
19 |
Фиксация |
|||||||||||||
|
фокусе……………….. |
59, 64 |
видеосъемки ………… |
153 |
|||||||||||
|
8 |
Качество изображения |
20 |
автоэкспозиции……… |
121 |
33 |
Оставшееся время* .. |
153 |
|||||||
|
………………………………. |
57 |
Автоспуск………………… |
26 |
34 |
Частота кадров…… |
87, 89 |
||||||||
|
9 |
Размер изображения.. |
57 |
21 |
Режим макросъемки… |
23 |
|||||||||
|
* Приблизительное значение; фактическое количество снимков зависит от ус- |
||||||||||||||
|
ловий съемки и типа карты памяти. Если памяти достаточно для записи более |
||||||||||||||
|
9999 снимков, индикатор показывает число «9999». |
||||||||||||||
|
6 |

|
Режим просмотра (фотографии) |
Режим просмотра (видеоролики) |
||||||||||||
|
1 |
2 3 |
4 |
5 6 7 |
8 |
9 |
||||||||
|
16 |
|||||||||||||
|
17 |
|||||||||||||
|
18 |
19 |
||||||||||||
|
10 |
11 |
12 |
13 |
1415 |
|||||||||
|
1 |
Номер файла |
8 |
Качество изображения |
15 |
Уровень заряда |
||||||||
|
2 |
Порядковый номер |
9 |
…………………………….. |
57 |
16 |
аккумулятора………….. |
8 |
||||||
|
кадра |
Размер изображения |
Общая |
|||||||||||
|
3 |
Всего кадров |
…………………………….. |
57 |
продолжительность/ |
|||||||||
|
4 |
Индикатор режима |
10 |
Дата записи…………… |
16 |
продолжительность |
||||||||
|
просмотра |
11 |
Диафрагма |
40, 42, 44 |
просмотра |
|||||||||
|
17 |
Индикатор хода |
||||||||||||
|
5 |
Защищенное |
12 |
ISO |
84 |
|||||||||
|
просмотра |
|||||||||||||
|
изображение |
92 |
13 |
Компенсация |
||||||||||
|
6 |
18 |
Баланс белого |
79 |
||||||||||
|
Индикатор печати |
экспозиции |
77 |
|||||||||||
|
19 |
Компенсация баланса |
||||||||||||
|
DPOF |
95 |
14 |
Выдержка |
||||||||||
|
7 |
белого |
82 |
|||||||||||
|
Источник |
13 |
40, 43, 44 |
|||||||||||
|
………………….. |
Примечания
•На экране также отображаются предупреждения и другие сообщения.
•Чтобы отобразить на дисплее дополнительную 


 информацию, нажмите кнопку DISP. (стр. 36).
СВЕДЕНИЯ СНОВНЫЕО
7
СВЕДЕНИЯ СНОВНЫЕО
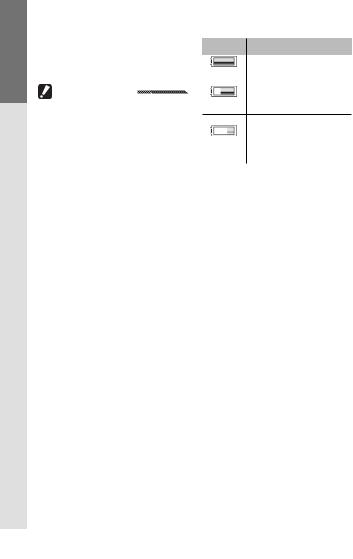
Индикатор уровня заряда аккумулятора
Индикатор уровня заряда аккумулятора отображается на экране внизу справа.
Предостережения
•При использовании аккумуляторов NiMH индикатор полного заряда может не отображаться или отображаться только на короткое время. Перед установкой аккумулятора выясните его тип.
|
Значок |
Описание |
|
Аккумулятор полностью |
|
|
(зеленый) |
заряжен. |
|
Аккумулятор частично |
|
|
(зеленый) |
разряжен. |
Аккумулятор почти полностью разряжен.
(оранжевый) Зарядите аккумулятор как можно скорее.
•Когда камера подключена к источнику питания переменного тока, на дисплее может отображаться значок  . Это не является признаком неисправности.
8

Основные функции фотосъемки и просмотра фотографий
Прочтите этот раздел перед началом использования фотокамеры.
|
Первые шаги ……………………………………………………………. |
10 |
|
Фотографирование………………………………………………….. |
17 |
|
Просмотр и удаление фотографий………………………….. |
29 |
СВЕДЕНИЯ СНОВНЫЕО
9

СВЕДЕНИЯ СНОВНЫЕО
Первые шаги
Подготовка фотокамеры к использованию.
Зарядка аккумулятора
Аккумуляторы, которые поставляются в комплекте с фотокамерой, не заряжены. Перед использованием зарядите аккумуляторы с помощью зарядного устройства BJ-6 (входит в комплект).
1 Вставьте аккумулятор в зарядное устройство.
Вставьте аккумулятор этикеткой вверх, так чтобы метки «+» и «–» совпадали с аналогичными метками на
зарядном устройстве.
Внимание!
Убедитесь, что аккумулятор вставлен правильно.
2 Подключите зарядное устройство к сети электропитания.
В процессе зарядки аккумулятора будет светиться индикаторная лампа на зарядном устройстве. Для зарядки полностью разряженного аккумулятора при температуре 25 °C необходимо около двух часов.
 Примечание
Если лампочка на зарядном устройстве мигает, это означает, что с аккумулятором или зарядным устройством что-то не в порядке. Отсоедините зарядное устройство от электросети и извлеките аккумулятор.
3Извлеките аккумулятор.
Когда зарядка закончится, индикатор на зарядном устройстве погаснет. Отсоедините зарядное устройство от электросети и извлеките аккумулятор.
10

Подходящие типы аккумуляторов
В фотокамере можно использовать литий-ионные аккумуляторы DB-65 (входят в комплект; можно также использовать аккумуляторы DB-60), пару щелочных батарей типоразмера AAA или никельметаллогидридные аккумуляторы (NiMH).
Совет: Емкость аккумулятора
Используя полностью заряженный аккумулятор DB-65, в нормальных условиях можно сделать около 370 снимков. Используя пару новых щелочных батарей типа AAA марки Panasonic, можно сделать 25 снимков. Эти цифры получены в результате испытаний, проведенных в соответствии со стандартами CIPA при следующих условиях: температура 23 °C; экран включен, выполняется 10 снимков с интервалом 30 секунд. Каждый второй снимок выполняется со вспышкой. После выключения и включения фотокамеры цикл повторяется.
 Внимание!
•Литий-ионные аккумуляторы. Пользуйтесь только оригинальными аккумуляторами DB-65 или DB-60. Не используйте аккумуляторы, не рекомендованные компанией Ricoh для этой фотокамеры.
•Щелочные батареи. Ресурс батарей зависит от условий производства и хранения. При низких температурах емкость аккумуляторов снижается.
•Аккумуляторы NiMH: Аккумуляторы NiMH продаются незаряженными и со временем постепенно разряжаются. Перед использованием их необходимо зарядить. Учтите, что сразу после покупки или длительного перерыва в использовании, характеристики аккумулятора могут быть хуже номинальных. Чтобы повысить емкость аккумулятора до максимального уровня, необходимо их два-три раза разрядить, а затем перезарядить.
•Нельзя использовать марганцевые и никель-кадмиевые аккумуляторы.
•Сразу после использования аккумуляторы могут быть горячими на ощупь. Перед извлечением аккумуляторов выключите фотокамеру и дождитесь, пока они остынут.
•Если камера не будет использоваться в течение длительного времени, удалите батареи.
СВЕДЕНИЯ СНОВНЫЕО
11
СВЕДЕНИЯ СНОВНЫЕО
Установка аккумулятора
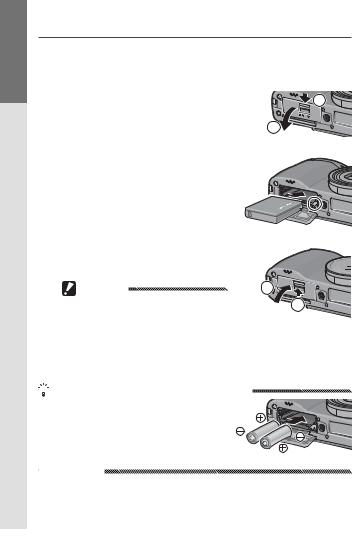
Перед установкой или удалением батарей убедитесь, что фотокамера выключена.
|
1 |
Откройте крышку отсека аккумулятора/карты памяти. |
|
|
Разблокируйте фиксатор (q) и от- |
1 |
|
|
кройте (w) крышку. |
||
|
2 |
2 Вставьте аккумулятор.
Вставьте аккумулятор в отсек, прижимая аккумулятором фиксатор. Когда аккумулятор встанет на место, фиксатор защелкнется.
3Закройте крышку отсека аккумулятора/карты памяти.
Закройте (q) и заблокируйте (w)  крышку.
|
Внимание! |
1 |
|
Убедитесь, что крышка заблокирована. |
2 |
Извлечение аккумулятора
Разблокируйте фиксатор и откройте крышку отсека аккумулятора/ карты памяти, а затем прижмите и отпустите фиксатор. Извлеките аккумулятор пальцами, Будьте внимательны, чтобы не уронить его.
 Совет: Установка и извлечение батарей AAA
Вставьте батареи, соблюдая в ориентацию, как показано на рисунке. Закройте крышку и сдвиньте освобождающий рычаг, чтобы ее заблокировать. Чтобы извлечь батареи, просто разблокируйте и откройте крышку.
 Внимание!
Если фотокамера не будет использоваться в течение длительного времени, извлеките батареи и храните их в сухом прохладном месте.
12
Установка карт памяти
Снимки можно сохранять во внутренней памяти объемом 88 МБ. Можно также дополнительно сохранять снимки на карты памяти SD и SDHC (приобретаются отдельно). Если карта памяти не установлена, то для записи и воспроизведения будет использоваться внутренняя память. Если карта памяти установлена, то будет использоваться карта.
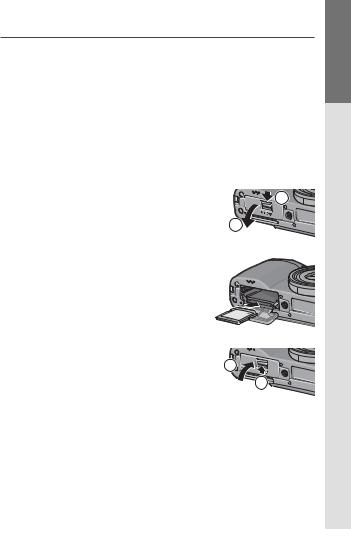
Перед установкой или извлечением карты памяти обязательно выключите фотокамеру. Чтобы установить карту памяти, выполните следующие действия.
|
1 |
Откройте крышку отсека аккумулятора/карты памяти. |
|
|
Разблокируйте фиксатор (q) и от- |
1 |
|
|
кройте (w) крышку. |
||
|
2 |
2 Вставьте карту.
Вставьте карту памяти в гнездо, удерживая ее так, как показано на рисунке. Когда карта встанет на место, будет слышен щелчок.
3Закройте крышку отсека аккумулятора/карты памяти.
Закройте (q) и заблокируйте (w) 


Извлечение карт памяти
Разблокируйте и откройте крышку отсека аккумулятора/карты памяти, а затем прижмите карту памяти, чтобы она вышла из гнезда. Теперь карту можно вынуть пальцами.
СВЕДЕНИЯ СНОВНЫЕО
13
СВЕДЕНИЯ СНОВНЫЕО
Внимание!
•Если в фотокамеру вставлена карта памяти, снимки не будут сохраняться во внутренней памяти, даже если на карте памяти нет свободного места.
•Следите за тем, чтобы контакты карты памяти были чистыми.
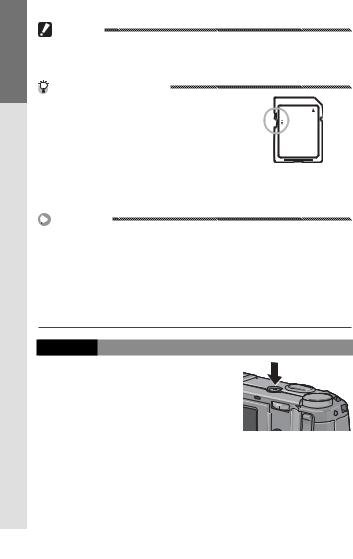
Совет: Защита от записи
Карты памяти можно защитить от записи, передвинув переключатель защиты от записи в положение «LOCK«. После этого карта будет защищена от записи и удаления данных. Защищенную карту также невозможно отформатировать.
Когда карта защищена от записи, съемка фотокамерой невозможна. Защищайте карту только для предотвращения случайной потери данных, и перед началом съемки обязательно снимайте защиту.
 Примечания
•Следует форматировать карты памяти перед первым использованием и после использования в компьютере или другом устройстве (стр. 124). Перед форматированием обязательно сохраните резервную копию всех важных данных.
•Сведения о емкости карт памяти см. на стр. 153.
•Фотографии из внутренней памяти также можно копировать на карты памяти (стр. 97).
Включение и выключение фотокамеры
Режим съемки
Чтобы включить фотокамеру, нажмите кнопку включения питания POWER. При этом включится подсветка кнопки POWER, прозвучит сигнал начала работы. После включения фотокамеры в течение нескольких секунд будет мигать индикатор автофокуса/вспышки .
14

Чтобы выключить фотокамеру, еще раз нажмите кнопку включения питания POWER. Перед выключением фотокамеры будет показано количество снимков, сделанных в течение дня (если часы не установлены, будет показан ноль; если перед выключением фотокамеры установки часов были изменены, будет по-
казано количество снимков, сделанных после изменения настроек часов).
Внимание!
•При включенной вспышке запуск фотокамеры может занимать немного больше времени.
•При выключении фотокамеры изменения, внесенные в настройки серийной съемки (стр. 68), интервальной съемки (стр. 75) и режима автоспуска, (стр. 26) будут потеряны. При выключении фотокамеры для режимов «MY» восстанавливаются настройки, сохраненные с помощью функции Сохран. настройки. Остальные настройки не изменяются.
Режим просмотра
Чтобы перевести фотокамеру в режим просмотра, нажмите кнопку 6 примерно на одну секунду. Чтобы вернуться в режим съемки, снова нажмите кнопку
6.
Чтобы выключить фотокамеру, нажмите кнопку включения питания POWER.
Совет: Автоотключение
Если в течение времени, установленного в меню Автоотключение, никакие действия не выполняются, для экономии энергии фотокамера автоматически выключится (см. стр. 125).
СВЕДЕНИЯ СНОВНЫЕО
15
СВЕДЕНИЯ СНОВНЫЕО
Основные установки
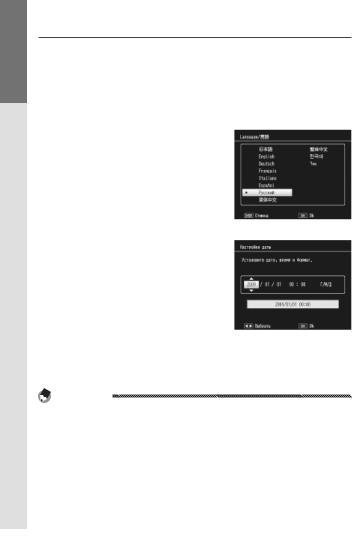
При первом включении фотокамеры появится окно выбора языка. Чтобы выбрать языка, а также установить дату и время, выполните описанные ниже действия. Чтобы выйти из этого режима до завершения настроек, нажмите кнопку DISP.. Настройки языка, времени и даты в меню настроек можно изменить в любой момент (стр. 135).
1Выберите язык.
Выделите нужный язык с помощью
кнопок !, «, # или $, а затем нажмите кнопку C/D чтобы подтвердить выбор.
2Установите часы.
Чтобы изменить настройки, выделите с помощью кнопок # или $ выделите год, месяц, день, час, минуту или формат даты, а затем на-
жмите кнопку !или «. Проверьте, правильно ли установлена дата, и нажмите кнопку C/D. На
дисплее появится запрос на под- Дата и время по умолчанию тверждение. Для установки часов
нажмите кнопку C/D еще раз.
Примечания
•Если оставить аккумулятор в фотокамере хотя бы на два часа, то после его извлечения настройки языка и часов будут сохраняться примерно неделю.
•При печати фотографий на отпечатках можно указывать дату и время выполнения снимка (стр. 76).
16

Фотосъемка
После настройки фотокамеры в соответствии с указаниями в разделе «Первые шаги» (стр. 10–16) можно приступать к фотографированию. Нажмите кнопку POWER, чтобы включить фотокамеру, и поверните диск режимов в положение 5.
Как держать фотокамеру
Держите фотокамеру, как показано на рисунке ниже.
1 Держите фотокамеру двумя руками.
Держите фотокамеру двумя руками, слегка прижимая локти к телу.
Внимание!
Во время съемки не заслоняйте объектив и вспышку пальцами, волосами или ремешком фотокамеры.
2Все готово к съемке.
Положите палец на спусковую кнопку.
СВЕДЕНИЯ СНОВНЫЕО
17

Съемка
1Фокусировка.
Поместите объект съемки в рамку в центре экране и нажмите спусковую кнопку наполовину, чтобы настроить фокус и экспозицию.
СВЕДЕНИЯ СНОВНЫЕО
Если фотокамера не может сфокусироваться, рамка фокусировки в центре дисплея станет красной и будет мигать. Кроме того, индикатор автофокуса/вспышки будет светиться зеленым мигающим светом.
Если фотокамере удается сфокусироваться, то рамки фокусировки (до девяти), которыми отмечаются объекты съемки, находящиеся в фокусе, имеют зеленый цвет.
Индикатор
автофокуса/вспышки
Рамка фокусировки
2Сделайте снимок.
Чтобы сделать снимок, плавно нажмите спусковую кнопку до конца. Только что отснятый кадр некоторое время отображается на экрана, пока выполняется его сохранение на карте памяти или во внутренней памяти фотокамеры.
18

Совет. Спусковая кнопка
Спусковая кнопка фотокамеры работает в два этапа. Чтобы выполнить фокусировку, слегка нажмите спусковую кнопку, пока не почувствуете сопротивление. Это называется «нажать спусковую кнопку наполовину». Чтобы сделать снимок, нажмите спусковую кнопку до конца.
 Совет. Фокус
Индикатор автофокуса/вспышки и рамка фокусировки показывают, находится ли объект съемки в фокусе.
|
Состояние фокусировки |
Рамка фокусировки |
Индикатор автофокуса/ |
|
|
вспышки |
|||
|
Фотокамера еще не |
Белая |
Выкл. |
|
|
сфокусирована. |
|||
|
Объект съемки в фокусе. |
Зеленая |
Вкл. (зеленый) |
|
|
Фотокамера не может |
Мигает (красная) |
Мигает (зеленый) |
|
|
сфокусироваться. |
|||
Фокусировка может оказаться невозможной при съемке следующих объектов:
•неконтрастные объекты, например небо, одноцветная стена или капот машины;
•плоские объекты, имеющие только горизонтальные линии;
•быстродвижущиеся объекты;
•слабоосвещенные объекты;
•объекты с сильными отражениями или освещенные контровым светом;
•мерцающие объекты, например лампы дневного света;
•точечные источники света, например лампы накаливания, прожекторы или светодиоды.
Обратите внимание, что даже если фотокамера не может сфокусироваться на перечисленных выше объектах, одна или несколько рамок фокусировки могут иметь зеленый цвет. Перед тем как сделать снимок, проверьте фокусировку на экране. Если фотокамера не может сфокусироваться, сфокусируйте ее на другом объекте, находящемся на таком же расстоянии от камеры, а затем перекомпонуйте кадр и снимите нужный объект (стр. 21).
СВЕДЕНИЯ СНОВНЫЕО
19

СВЕДЕНИЯ СНОВНЫЕО
Совет. Как избежать размытости изображения
Чтобы избежать размытости, вызванной движением фотокамеры в момент спуска затвора («дрожание камеры»), нажимайте спусковую кнопку мягко и плавно. Размытость чаще всего возникает в следующих случаях:
•вспышка выключена, несмотря на плохое освещение;
•снимок выполняется крупным планом (стр. 22)
В случаях, когда размытость из-за дрожания фотокамеры наиболее вероятна, на экране отображается значок J. Крепко держите фотокамеру и попытайтесь сфокусировать ее еще раз, или же попробуйте использовать один из описанных ниже способов:
•включите вспышку ( ) или воспользуйтесь авто-вспышкой (
 см. стр. 24);
•выберите более высокую чувствительность ISO (стр. 84);
•воспользуйтесь автоспуском (стр. 26)
 Примечания
•При съемке со вспышкой сначала включается предварительная вспышка, что позволяет более точно настроить фокус и экспозицию.
•Можно выбрать время показа сделанных снимков на экране. При необходимости можно настроить фотокамеру таким образом, чтобы снимок оставался на дисплее до тех пор, пока спусковая кнопка не будет нажата наполовину (стр. 126).
•В режиме 5 для диафрагмы от f/8,0 до f/11 используется нейтральный светофильтр (НС). Минимальная диафрагма, доступная в режиме 5— f/11.
20
Фиксация фокуса
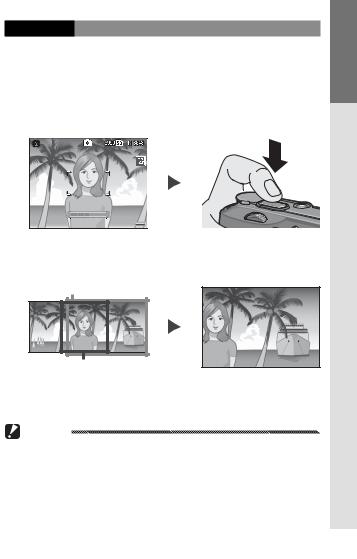
Фиксация фокуса используется при компоновке кадров, на которых объект съемки находится не в центре рамки. Фиксацию фокуса можно также использовать в тех случаях, когда фотокамера не может сфокусироваться (стр. 18).
|
1 |
Выполните фокусировку. |
О |
|
Чтобы выполнить фокусировку, поместите объект съемки в |
СВЕДЕНИЯСНОВНЫЕ |
|
|
центр экрана и нажмите спусковую кнопку наполовину. |
||
2Перекомпонуйте кадр.
Перекомпонуйте кадр, удерживая спусковую нажатой наполовину для фиксации фокуса.
Окончательная композиция
Основной объект
3Сделайте снимок.
Чтобы сделать снимок, плавно нажмите спусковую кнопку до конца.
Внимание!
Если после фиксации фокуса расстояние между фотокамерой и объектом съемки изменится, сфокусируйте ее снова при новом расстоянии.
21

СВЕДЕНИЯ СНОВНЫЕО
Цифровой зум
Если для параметра Кнопка зума задано значение Цифровой зум (стр. 122), с помощью кнопки 8 можно увеличить масштаб до максимального значения — 4,0 ×. Чтобы уменьшить масштаб, воспользуйтесь кнопкой 9.
Уменьшение Увеличение масштаба масштаба
1Назначьте функцию цифрового зума кнопкам 8и 9.
В меню настройки выберите для параметра Кнопка зума значение Цифровой зум (стр. 122).
2Скомпонуйте кадр с помощью кнопок 8и 9.
Коэффициент масштабирования 


показан на экране.
3 Выполните фокусировку.
Для фокусировки фотокамеры нажмите спусковую кнопку наполовину.
4Сделайте снимок.
Чтобы сделать снимок, плавно нажмите спусковую кнопку до конца.
 Примечания
•Если в параметре Качество/размер изображения выбран размер 3648 × 2736, для параметра Цифровой зум можно выбрать значение Авторазмер (стр. 133).
•Если для параметра Качество/размер изображения выбрано значение RAW (стр. 57), или же фотокамера использует динамический диапазона в режиме двойного экспонирования (стр. 48), цифровой зум недоступен.
22
Съемка с близкого расстояния (режим макросъемки)
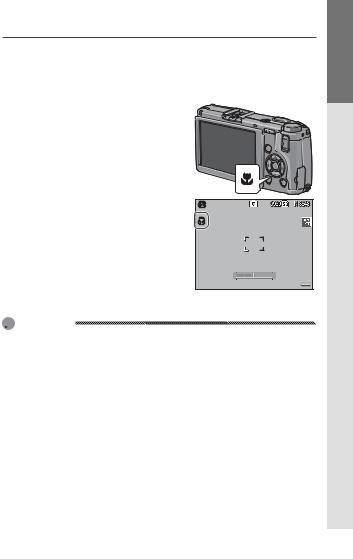
Режим макросъемки используется для съемки маленьких объектов с близкого расстояния — 1,0 см от объектива (при этом расстоянии снимаемая площадь равна примерно 26 × 19 мм).
1 Нажмите кнопку N.
В центре экрана на короткое время появится значок N. Затем значок N будет отображаться в верхней части дисплея.
2 Выполните фокусировку.
Чтобы выполнить фокусировку, поместите объект съемки в центр экрана и нажмите спусковую кнопку наполовину.
3 Сделайте снимок.
Чтобы сделать снимок, плавно нажмите спусковую кнопку до конца.
Чтобы выйти из режима макросъемки, нажмите кнопку Nеще раз.
 Примечание
Если в режиме макросъемки для параметра Фокус вместо значения Ручной фокус или Центр. АФ выбрано другое значение, фотокамера будет фокусироваться на объекте в центре рамки (стр. 59).
СВЕДЕНИЯ СНОВНЫЕО
23
СВЕДЕНИЯ СНОВНЫЕО
Съемка со вспышкой
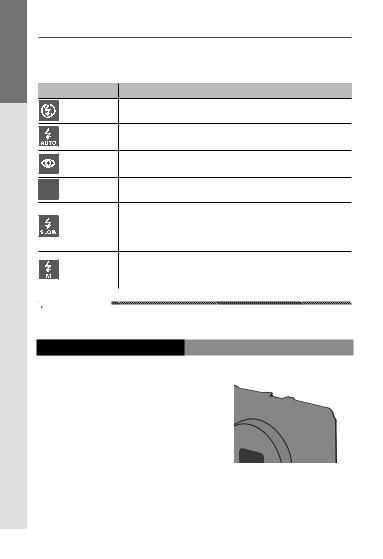
Вспышка работает только в поднятом положении. Сдвиньте выключатель FOPEN, чтобы поднять вспышку, и нажмите кнопку F, чтобы выбрать один из следующих режимов вспышки.
Вспышка выкл. Вспышка отключена и не работает.
При необходимости вспышка срабатывает автоматичес-
Автоматически ки.
|
Красные глаза |
Подавление эффекта «красных глаз» на портретах, снима- |
|
емых со вспышкой. |
 Вспышка вкл. Вспышка срабатывает при съемке каждого снимка.
Съемка со вспышкой при длинных выдержках. Исполь- Синхрон. зуется в помещениях для съемки портретов с деталями вспышки фона или для ночной съемки. Чтобы предотвратить сма-
зывание, рекомендуется использовать штатив.
Вспышка срабатывает при съемке каждого снимка с ин- Вручную тенсивностью, выбранной в параметре Вспышка вручную
(стр. 73).
 Примечание
Диапазон действия вспышки, измеряемый от края объектива, составляет примерно 20 см – 3,0 м (авто ISO; см. стр. 84).
Использование встроенной вспышки
1 Поднимите вспышку.
Сдвиньте переключатель вспышки 
 OPEN, как показано на рисунке.


24

2 Выберите режим вспышки.
Выберите режим вспышки с помощью кнопки F. Значок режима вспышки на короткое время появится в центре экрана, а затем будет отображаться вверху слева.
Примечание
Выбранный режим вспышки будет действовать до выбора нового режима.
Во время зарядки вспышки индикатор автофокуса/вспышки мигает (если для питания фотокамеры используются батареи типоразмера AAA, на время зарядки отключается экран). Съемку можно выполнять после того, как индикатор перестанет мигать.
3Выполните фокусировку и сделайте снимок.
Если при съемке необходимо использовать вспышку, то сначала включается предварительная вспышка, что позволяет более точно настроить фокус и экспозицию.
Примечания
•Чтобы закрыть неиспользуемую вспышку, осторожно прижимайте крышку вспышки посредине, пока вспышка не зафиксируется.
•При использовании динамического диапазона в режиме двойного экспонирования, в режимах видеосъемки, серийной съемки и эксповилки вспышка автоматически отключается.
•При использовании внешней вспышки встроенная вспышка автоматически отключается (стр. 159, 160).
Внимание!
•Не пользуйтесь встроенной вспышкой при съемке с конвертером или блендой.
•Не направляйте вспышку в глаза людям, особенно с близкого расстояния. Будьте особенно осторожны, снимая детей. Не направляйте вспышку на людей за рулем.
СВЕДЕНИЯ СНОВНЫЕО
25

СВЕДЕНИЯ СНОВНЫЕО
Автоспуск
Фотокамера оснащена таймером автоспуска на 10 секунда для автопортретов и таймером на 2 секунды для предотвращения размытия из-за движения фотокамеры при нажатии спусковой кнопки.
Примечание
По умолчанию таймер автоспуска назначен кнопке t (Fn2), но его можно назначить также кнопке Fn1 (в приведенных ниже инструкциях принято, что он назначен кнопке t). Чтобы использовать таймер, его нужно назначить одной из кнопок (стр. 119).
1 Выберите режим автоспуска.
Чтобы выбрать таймер автоспуска на 10 секунд, нажмите кнопку t один раз, чтобы выбрать таймер на 2 секунды — два раза. Выбранный режим будет показан на экране. При третьем нажатии кнопки таймер отключается.
Примечание
Выбранный режим таймера автоспуска будет действовать до выбора нового режима.
2Включите таймер автоспуска.
Чтобы зафиксировать фокус и включить таймер автоспуска, нажмите спусковую кнопку. Если выбран таймер на 10 секунд, включится вспомогательная вспышка для автофокуса.
26

Индикатор наклона
Пользуйтесь индикатором наклона для выравнивания фотокамеры при съемке зданий или пейзажей. Он особенно полезен для композиций, на которых виден горизонт.
1Отобразите на дисплее меню настроек индикатора наклона.
Нажмите кнопку O(DISP.) и удер- 


живайте ее, пока не на экране не появится меню настроек индикатора наклона.
2Выделите пункт меню.
Выделите пункт меню с помощью кнопок !и «.
Выкл. Индикатор наклона не отображается.
Наклон отображается на экране. Если фотокамера наклонена, индикатор становится оранжевым. Направление и величина поворота, необходимого для выравнивания фотокамеры, показаны положением индикатора на дисплее (если угол наклона слишком велик и его невозможно показать на
Экран экране, индикатор становится красным). Когда фотокамера выровнена, индикатор будет зеленым как при обычном положении фотокамеры, так и при повороте на 90 ° для съемки в портретной ориентации. Если дисплей выключен, индикаторы скрыты или отображена кадровая сетка, наклон не отображается (стр. 36).
Аналогично описанному выше, за исключением того, что Экран + звук когда фотокамера расположена ровно, периодически по-
дается звуковой сигнал.
Когда фотокамера расположена ровно, периодически по- Звук дается звуковой сигнал. Индикатор наклона не отобража-
ется на экране.
3Выберите выделенный параметр.
Чтобы выбрать выделенный параметр, нажмите кнопку
C/D.
СВЕДЕНИЯ СНОВНЫЕО
27

СВЕДЕНИЯ СНОВНЫЕО
Цветовые режимы индикатора наклона
Зеленый 
Фотокамера расположена ровно
Красный 

Невозможно измерить наклон: фотокамера слишком сильно наклонена вперед или назад
 Оранжевый
Фотокамера наклонена влево
Фотокамера наклонена на 90 ° влево
 Примечание
Параметры индикатора наклона можно также задать в меню настройки (стр. 113, 127).
 Внимание!
•Индикатор наклона не отображается, если фотокамера перевернута, выполняется видеозапись или интервальная съемка.
•При выключении динамика фотокамеры (стр. 125–126) звуковые сигналы, указывающие, что фотокамера расположены ровно, не подаются.
•Индикатор наклона предназначен только для общего представления, и его нельзя использовать его вместо спиртового уровня или для других целей, где требуется высокая точность. Точность показаний индикатора снижается, если камера перемещается и съемка ведется из автомобиля или с других подвижных объектов.
28

Просмотр и удаление фотографий
Отснятые фотографии можно просматривать на экране.
Просмотр фотографий
Чтобы посмотреть фотографию, которая была показана последней, нажмите кнопку 6.
Совет. Включение фотокамеры
Если фотокамера выключена, чтобы включить ее и начать просмотр, нажмите кнопку 6 примерно на одну секунду.
Для просмотра фотографий в порядке их съемки нажмите кнопку $, а для просмотра фотографий в обратном порядке — кнопку #. Чтобы перейти на десять кадров вперед, нажмите кнопку «, а чтобы вернуться на десять кадров назад, нажмите кнопку !.
Назад на десять снимков
|
Назад на один снимок |
! |
|||||
#$
|
« |
Вперед на один снимок |
||
Вперед на десять снимков
Чтобы вернуться в режим съемки, снова нажмите кнопку 6.
СВЕДЕНИЯ СНОВНЫЕО
29

СВЕДЕНИЯ СНОВНЫЕО
Внимание! Снимки в формате RAW
Для просмотра на экране снимков в формате RAW фотокамера создает их копии в формате JPEG. Когда для просмотра выбран снимок в формате RAW, на дисплее фотокамеры отображается копия этого снимка в формате JPEG и индикатор режима RAW. Если с помощью компьютера или другого устройства удалить копию снимка в формате JPEG, на дисплее фотокамеры будет отображаться только миниатюра снимка в формате RAW, и просмотр увеличенного изображения этого снимка будет невозможен. Сведения о записи фотографий в формате RAW см. на стр. 57 и 58.
Совет: Просмотр фотографий в режиме съемки
Отснятая фотография отображается на экране сразу же после съемки. Продолжительность показа фотографий на дисплее можно указать в меню настройки с помощью параметра Время подтвержд. на экране (стр. 126).
 Совет: Просмотр фотографий, сохраненных во внутренней памяти фотокамеры
Если вставлена карта памяти, то на дисплее будут отображаться фотографии, записанные на карте памяти. Даже если карта памяти пустая, просмотр фотографий из внутренней памяти будет невозможен. Фотографии, сохраненные во внутренней памяти фотокамеры, можно просматривать, только когда карта памяти не вставлена.
 Совет: Автоматический поворот изображения
Если для параметра Автоповорот в меню настройки задано значение Вкл., снимки будут автоматически поворачиваться и отображаться на экране в правильной ориентации (стр. 127).
30

Просмотр нескольких фотографий
Можно просматривать фотографии одной, по 20 или по 81. Чтобы выбрать количество кадров для просмотра, вос пользуйтесь кнопками 9 и 8. Режим одновременного показа нескольких кадров удобно использовать для выбо ра фотографий для просмотра или уда ления.
|
Один кадр |
20 кадров |
81 кадр |
||||||||||
Для выделения фотографий в режиме многокадрового просмотра используйте кнопки !, «, # и $. Для полнокадрового просмотра фотографии, выделенной в режиме просмотра 20 кадров, нажмите кнопку 8 или регулятор ADJ. Для возврата из режима просмотра 81 кадра в режим просмотра 20 кадров нажмите кнопку 8. Для полнокадрового просмотра выделенной фотографии нажмите регулятор
ADJ.
СВЕДЕНИЯ СНОВНЫЕО
31

СВЕДЕНИЯ СНОВНЫЕО
Изменение масштаба фотографий при просмотре
Чтобы увеличить масштаб полнокадрового изображения на дисплее, нажмите кнопку 8или поверните колесико. Чтобы посмотреть фотографию в масштабе, заданном с помощью параметра Макс. зум одним нажатием (стр. 126), нажмите регулятор ADJ.
Список возможных действий
|
Элемент |
Действие |
|
|
управления |
||
|
8 |
Увеличение масштаба. |
|
|
Колесико |
Чтобы увеличить масштаб, поверните колесико вправо, чтобы |
|
|
уменьшить — влево. |
||
|
C/D |
Показ фотографии в масштабе, заданном с помощью пара- |
|
|
метра Макс. зум одним нажатием. Если фотография отобра- |
||
|
жается с максимальным увеличением, то при нажатии кнопки |
||
|
C/Dпоказ крупным планом отменяется. |
||
|
!»#$ |
Просмотр различных участков изображения. |
|
|
Регулятор |
Чтобы посмотреть в таком же масштабе другие изображения, |
|
|
ADJ. |
сдвиньте переключатель вправо или влево. |
|
|
9 |
Отмена крупного плана. |
|
 Примечания
• Максимальное увеличение зависит от формата изображения:
|
Размер изображения (в пикселах) |
Максимальное увеличение |
|
2,048 × 1536 и больше |
16 × |
|
1,280 × 960 |
6.7 × |
|
640 × 480 |
3.4 × |
•Просматривать крупным планом видеоролики, а также снимки, сделанные в режимах Следующие или Предыдущие, нельзя.
•Если в меню настроек для параметра Диск, в Просм. выбрано значение Настройки2
(стр. 123), для просмотра различных участков изображения можно использовать регулятор ADJ. и колесико.
32

Удаление фотографий
Ниже описаны действия, с помощью которых можно удалять ненужные фотографии.
Удаление отдельных фотографий
1Выведите на дисплей фотографию, которую нужно удалить.
В режиме покадрового просмотра выведите на дисплей фотографию, которую нужно удалить (стр. 29).
2Нажмите кнопку D.
На экране появится меню, показанное на рисунке справа (если показанную на дисплее фотографию
удалять не нужно, выберите другой снимок с помощью кнопок #и $).
3Выделите пункт Удалить один.
Выделите пункт Удалить один с помощью кнопок !и «.
4Нажмите кнопку C/D.
При выполнении удаления на дисплее появляется сообщение. Затем на дисплее снова появится показанное выше меню. Если нужно удалить и другие снимки, повторите действия 2 и 3. Что-
бы выйти из режима удаления, выделите Отмена и нажмите кнопку C/D.
Удаление всех файлов
Чтобы удалить все файлы, нажмите кнопку D. На дисплее появится описанное выше меню. Выберите пункт Удалить все. На дисплее появится запрос на подтверждение. Выделите с помощью кно-
пок #и $вариант Да и нажмите кнопку
C/D.
СВЕДЕНИЯ СНОВНЫЕО
33

СВЕДЕНИЯ СНОВНЫЕО
Удаление нескольких файлов
Ниже описаны действия, с помощью которых можно удалить несколько выбранных фотографий.
1Нажмите кнопку D.
В режиме многокадрового просмотра перейдите к пункту 2. В режиме покадрового просмотра на
экране появится меню, показанное на рисунке справа. Выделите пункт
меню Удал. неск. и нажмите кнопку
C/D.
2Выберите пункт Выбор отдел. или пункт Выбор диап.
Чтобы удалять снимки по одному,
выделите пункт меню Выбор отдел., нажмите кнопку C/Dи перейдите к выполнению пункта 3. Чтобы выбрать группу из нескольких последовательных снимков или несколько таких групп, выде-
лите пункт Выбор диап, нажмите
кнопку C/Dи перейдите к выполнению пункта 3.1. Из этого режима можно выйти в любой момент, не удаляя файлы. Для этого нажмите кнопку DISP.
3Выберите фотографии.
Выделите снимки с помощью кно-
пок !, «, # и $ и нажмите кнопку C/D, чтобы подтвердить
выбор. Выбранные снимки будут помечены значком D. Чтобы отме-
нить выбор снимка, выделите его и снова нажмите кнопку C/D.
34

Совет: Выбор диапазонов
Чтобы выбрать группу из нескольких последовательных снимков или несколько таких групп, нажмите регулятор ADJ. и выполните описанные ниже действия:
3.1Выделите первый снимок с помощью
кнопок !, «, #, и $, а затем нажмите кнопку C/D, чтобы подтвер-
дить выбор. Выбранный снимок будет помечен значком D. Если снимок выбран ошибочно, нажмите кнопку DISP.
иповторите описанные действия.
3.2Выделите последний снимок с помо-
щью кнопок !, «, #, и $, а затем нажмите кнопку C/D, чтобы подтвердить выбор. Выбранный снимок
ивсе остальные снимки выбранного диапазона будут помечены значком D.
Чтобы выбрать еще одну или несколько последовательностей повторите действия 3.1–3.2. Чтобы выбрать или отменить выбор отдельных фотографий, нажмите регулятор ADJ. и выполните действия, описанные в пункте 3.
Нажмите кнопку C/D.
На дисплее появится запрос на подтверждение.
Выберите Да.
Выберите с помощью кнопок # и
$ вариант Да и нажмите кнопку
C/D.
СВЕДЕНИЯ СНОВНЫЕО
35

Режим съемки
СВЕДЕНИЯ СНОВНЫЕО
Кнопка O(DISP.)
Кнопка O(DISP.) служит для выбора данных, которые будут отображаться на экране во время съемки и просмотра.
При нажатии кнопки O(DISP.) выполняется последовательное переключение показанных ниже форматов экрана.
|
Отображаются |
Индикаторы + |
Кадровая сетка (без |
|||||||||
|
индикаторы |
гистограмма |
индикации) |
|||||||||
|
Дисплей |
Без |
|||
|
выключен |
индикации |
 Совет: Кадровая сетка
Сведения о выборе кадровой сетки приведены на стр. 128. Линии сетки на готовой фотографии не отображаются.
 Примечания
•Если для параметра Установка уровня выбрано значение Экран или Экран + звук, в режиме показа индикаторов отображается индикатор наклона.
•Если экран выключен, его можно включить с помощью любого из следующих элементов управления: регулятор ADJ., кнопки C/D, O(DISP.) и 6, кнопки 8 и 9 (если только для параметра Кнопка зума не задано значение Выкл.; стр. 122), а также кнопки ! и » (только в режиме ручной фокусировки).
36

Режим просмотра
При нажатии кнопки O(DISP.) выполняется последовательное переключение показанных ниже форматов экрана.
|
Отображаются |
Сведения + |
|
индикаторы |
гистограмма |
СВЕДЕНИЯ СНОВНЫЕО
|
Без |
Яркие |
|
индикации |
участки |
Совет: Яркие участки
Мигающие участки изображения — это так называемы «смытые» участки, на которых детали могут быть не видны из-за переэкспонирования. Проверяйте яркие участки при съемке объектов, освещенных прямым солнечным светом, или при других условиях, когда снимок может оказаться переэкспонированным. Если есть вероятность, что важные детали будут не видны, выберите меньшее значение коррекции экспозиции и повторите съемку (стр. 77). Учтите, что изображение на дисплее предназначено только для общего представления и может быть не совсем точным.
37

СВЕДЕНИЯ СНОВНЫЕО
Совет: Гистограмма
Гистограмма — это график распределения пикселов изображения в зависимости от яркости. Уровни яркости показаны на горизонтальной оси: темные участки показаны слева, а светлые — справа. Количество пикселов показано на вертикальной оси. С помощью гистограммы можно оценить правильность выбора экспозиции и проверить вероятность потери деталей на темных и светлых участках. При этом оценка не будет зависеть от внешних условий. Если максимум распределения пикселов смещен вправо, значит, изображение переэкспонировано, а если максимум смещен влево, значит, изображение недоэкспонировано.
|
Переэкспонированный снимок |
Недоэкспонированный снимок |
Если экспозиция при съемке выбрана неправильно, можно сделать новые снимки того же объекта с применением коррекции экспозиции (стр. 77; учтите, что в некоторых случаях коррекция экспозиции может не дать нужного результата). Гистограмму можно также использовать при регулировке контрастности фотографий после съемки (стр. 101, 102).
Гистограмма предназначена только для общего представления, и может быть не вполне точной, в частности, при съемке со вспышкой или при плохом освещении.
38

|
Справочная |
|
|
информация |
|
|
В этом разделе приводится более подробная инфор- |
|
|
мация о функциях фотокамеры. |
|
|
Дополнительные сведения о фотосъемке………………. |
40 |
|
Видеосъемка……………………………………………………………. |
87 |
|
Дополнительные сведения о воспроизведении …….. |
91 |
|
Печать фотографий……………………………………………….. |
106 |
|
Меню настройки……………………………………………………. |
112 |
|
Копирование снимков на компьютер…………………… |
136 |
|
Технические примечания ……………………………………… |
144 |
39

Дополнительные сведения о фотосъемке
В этом разделе содержится информация о режимах P, A, S, M, 4 и «MY», а также о различных параметрах меню съемки.
ФОТОСЪЕМКЕ О СВЕДЕНИЯ ОПОЛНИТЕЛЬНЫЕД
Режим P: программный режим
Если диск режимов установлен в положение P (программный режим), с помощью колесика можно выбрать одну из нескольких пар значений выдержки и диафрагмы, которые дают одинаковую экспозицию.
1Выберите режим P.
Поверните диск режимов в положение P. Режим съемки будет указан на дисплее с помощью соответствующего значка.
2Замерьте экспозицию.
Чтобы замерить экспозицию, нажмите спусковую кнопку наполовину. На дисплее появятся данные о диафрагме и выдержке.
3Выберите выдержку и диафрагму.
Отпустите спусковую кнопку и выберите с помощью колесика нужное сочетание выдержки и диафрагмы.
40

Примечание
Выдержку и диафрагму можно откорректировать в течение десяти секунд после того, как отпущена спусковая кнопка.
|
4 Сделайте снимок. |
|
|
Чтобы сделать снимок, плавно нажмите спусковую кнопку до |
|
|
конца. |
|
|
Примечание. Программа экспозиции |
|
|
Ниже показана программа экспозиции (фоточувствительность ISO 100, вспышка |
|
|
отключена). Серая область содержит сочетания выдержки и диафрагмы для каж- |
|
|
дого значения экспозиции (EV — exposure value). |
|
|
Диафрагма |
ФОТОСЪЕМКЕ О СВЕДЕНИЯ ОПОЛНИТЕЛЬНЫЕД |
|
Выдержка (в секундах) |
41

ФОТОСЪЕМКЕ О СВЕДЕНИЯ ОПОЛНИТЕЛЬНЫЕД
Режим A: приоритет диафрагмы
В режиме A (приоритет диафрагмы) диафрагма устанавливается вручную, а выдержка — автоматически. Чтобы на снимке основной объект выглядел четким, а фон и расположенные ближе объекты — размытыми, выбирайте откры-
тые диафрагмы (малые значения f). При выборе закрытых диафрагм (большие значения) резким будет и главный объект, и фон.
1Выберите режим A.
Переведите диск режимов в положение А. Появится выбранное значение диафрагмы (оранжевого цвета).
2Выберите значение диафрагмы.
Выберите с помощью колесика значение диафрагмы. Результат 
применения выбранных значений будет виден только на снимке. Предварительно просмотреть их воздействие на экране невозможно.
3Нажмите наполовину спусковую кнопку.
Нажмите спусковую кнопку напо-
ловину, чтобы установить фокус и экспозицию. Значение автоматически выбранной выдержки отображается на экране.
4Сделайте снимок.
Чтобы сделать снимок, плавно нажмите спусковую кнопку до конца.
 Примечание
Если включена функция автокоррекции диафрагмы (стр. 85), диафрагма корректируется автоматически для получения оптимальной экспозиции.
42

Режим S: Приоритет выдержки
В режиме S (приоритет выдержки) выдержка устанавливается вручную, а диафрагма — автоматически. Короткие выдержки позволяют «остановить» движущиеся объекты, а длинные — передать эффект движения путем размывания объектов.
1 Выберите режим S.
Переведите диск режимов в положение S. Появится выбранное значение выдержки (оранжевого цвета).
2Установите выдержку.
С помощью колесика установите
выдержку.
3Нажмите спусковую кнопку наполовину.
Нажмите спусковую кнопку напо-
ловину, чтобы установить фокус и экспозицию. На экране появится автоматически выбранное значение диафрагмы.
4Сделайте снимок.
Чтобы сделать снимок, плавно нажмите спусковую кнопку до конца.
 Примечание
При длинной выдержке не всегда выбирается максимальное значение диафрагмы (т.е. минимальное значение f), даже если объект съемки плохо освещен.
ФОТОСЪЕМКЕ О СВЕДЕНИЯ ОПОЛНИТЕЛЬНЫЕД
43

ФОТОСЪЕМКЕ О СВЕДЕНИЯ ОПОЛНИТЕЛЬНЫЕД
Режим M: ручная экспозиция
В режиме M (ручная экспозиция) диафрагма выбирается с помощью колесика, а выдержка — с помощью регулятора ADJ.
1Выберите режим M.
Переведите диск режимов в положение M. На дисплее появится
значок режима съемки, индикатор экспозиции и текущие значения диафрагмы и выдержки.
2Выберите диафрагму и выдержку.
Установите диафрагму путем вра-
|
щения колесика и установите вы- |
||||||
|
держку, нажимая |
регулятор ADJ. |
|||||
|
–2EV |
+2EV |
|||||
|
вправо или влево (при необходи- |
||||||
|
мости назначение |
обоих регуля- |
торов можно изменить; см. стр. 123). Результат применения настроек можно посмотреть на экране, а также оценить по индикатору экспозиции. Если снимок будет недоэкспонирован или переэкспонирован более чем на 2 EV, результат применения настроек не будет показан на дисплее, а цвет индикатора
изменится на оранжевый.
3Выполните фокусировку.
Чтобы выполнить фокусировку, нажмите спусковую кнопку наполовину.
4Сделайте снимок.
Чтобы сделать снимок, плавно нажмите спусковую кнопку до конца.
44

Примечания
|
• При выборе значений Aвто или Авто-максимум для параметра Замер ISO |
||
|
(стр. 84) в режиме ручной экспозиции используется фиксированное значение |
||
|
ISO 100. |
||
|
• Чем больше выдержка, тем длительнее экспозиция. Чтобы снизить размытость |
||
|
снимка из-за дрожания фотокамеры, держите ее неподвижно обеими рука- |
||
|
ми или установите на штатив. При открытии затвора экран отключается. При |
||
|
выдержке 10 с и более снимки автоматически обрабатываются с целью |
||
|
уменьшения шума. При этом время записи снимков увеличивается до зна- |
||
|
чения, равного двухкратной выдержке. |
||
|
• В режиме ручной экспозиции функция фиксации экспозиции не работает. |
||
|
Если в меню настройки для параметра Настр. кнопки Fn1 или параметра |
||
|
Настр. кнопки Fn2 выбрано значение Фиксация эксп., то в результате нажа- |
||
|
тия соответствующей кнопки в режиме ручной экспозиции будет устанавли- |
Д |
|
|
ваться значение выдержки или диафрагмы, наиболее близкое к тому, которое |
ОПОЛНИТЕЛЬНЫЕ |
|
|
соответствует оптимальной экспозиции. Аналогично, если в меню настройки |
||
|
выбрано значение Компенс. эксп. для параметра Кнопка зума, то при нажа- |
||
|
тии кнопок 8и 9в режиме ручной экспозиции значения параметра компен- |
||
|
сации экспозиции отображаться не будут. Вместо этого будет устанавливаться |
||
|
значение выдержки или диафрагмы, наиболее близкое к тому, которое соот- |
СВЕДЕНИЯ |
|
|
ветствует оптимальной экспозиции. Это удобно, если оптимальная экспозиция |
||
|
используется в качестве отправной точки для ее дальнейшего изменения. Па- |
||
|
раметр Режим M одним нажатием в меню настройки определяет, что именно |
О |
|
|
будет изменяться для достижения оптимальной экспозиции: диафрагма или |
||
|
ФОТОСЪЕМКЕ |
||
|
выдержка. |
||
45
 Loading…
На этой странице вы можете совершенно бесплатно скачать Руководство пользователя Ricoh GR DIGITAL III.
У документа PDF Руководство пользователя 185 страниц, а его размер составляет 4.93 Mb.
Читать онлайн Фото- и видеокамеры Ricoh GR DIGITAL III Руководство пользователя

Скачать файл PDF «Ricoh GR DIGITAL III Руководство пользователя» (4.93 Mb)
Популярность:
2724 просмотры
Подсчет страниц:
185 страницы
Тип файла:
Размер файла:
4.93 Mb
Прочие инструкции Ricoh GR DIGITAL III

Прочие инструкции Ricoh Фото- и видеокамеры



Прочие инструкции Ricoh


-
Страница 1
Before Y ou Begin Before using y our camera, take a few moments to familiarize y our- self with camera controls and displays (pages 1–8). Ref er to this sec- tion as you read through the rest of the manual. Basic Photography and Playback Read this section before using the camera for the first time. It covers the steps involv ed in readying the ca[…]
-
Страница 2
ii Package Contents Package Contents Before using y our Ricoh digital camera, confirm that the package contains the items listed below . GR DIGIT AL III The serial number may be found on the bot- tom of the camera. USB cable with mini-B connector Connect the camera to a computer or printer . DB-65 rechargeable batt ery BJ-6 battery charger Hot shoe[…]
-
Страница 3
iii Notices Notices • Safety precautions Safety precautions : Read all safety precautions thoroughly to ensure safe use. • T est shots T est shots : T ake test shots to ensure that the camera is w orking properly before taking photos on important occasions. • Copyright Copyright : Reproduction or alteration of copyrighted documents , mag- azi[…]
-
Страница 4
iv Product M anuals Product Manuals The following manuals are pr ovided with the GR DIGIT AL III: Before You Begin Before using your camera, take a few moments to familiarize your- self with camera controls and displays (pages 1–8). Refer to this sec- tion as you read through the rest of the manual. Basic Photography and Playback Read this sectio[…]
-
Страница 5
v T able of Contents T able of Contents P ackage Contents ………………………………………………………………………………………… ii Notices ……………………………………………………………………………………………………….. …… iii Pr oduct Manuals …………………………[…]
-
Страница 6
vi Referenc e 3 Referenc e 3 9 9 Read this section for more information on camera functions. More on Photograph y ……………………………………………………….. 40 Mode P: Pr ogram Shift …………………………………………………………………………….. 40 Mode A: Aper ture P riority …………………..[…]
-
Страница 7
1 F IRST — TIME USER ? R EAD THIS . 1 Before Y ou Begin Read this section before using your camer a for the first time . Introduction ………………………………………………. 2[…]
-
Страница 8
F IRST — TIME USER ? R EAD THIS . 2 Introduc tion This manual describes how to take pictures and pla y them back. T o ensure that you get the most fr om your camera, read this manual thoroughly bef ore use and keep it han- dy when using the product. Parts of the Camera Parts of the Camera F or more inf ormation, refer t o the page number to the rig[…]
-
Страница 9
F IRST — TIME USER ? R EAD THIS . 3 Back 1 2 4 8 9 7 6 11 1 0 12 13 15 5 14 3 16 19 18 17 20 1 1 Picture display …………………….. 6–8 2 2 Autofocus/flash lamp …… 14, 18, 25 3 3 Connector for A/V cable …………. 104 4 4 Connector for USB cable …………107 5 5 ADJ. lever …………….5, 78, 119–120 6 6 8 (enlarged view) b[…]
-
Страница 10
F IRST — TIME USER ? R EAD THIS . 4 The Mode Dial Before shooting , press the mode dial lock release ( q ) and rotat e the mode dial to choose a shoot- ing mode ( w ). 5 (auto) : The camera sets shutter speed and aperture for op- timal exposure (page 17). M (manual exposure) : Y ou choose shutter speed and aperture (page 44). MY1 , MY2 , MY3 (“my[…]
-
Страница 11
F IRST — TIME USER ? R EAD THIS . 5 The Up- down Dial and ADJ. Lev er When viewing pictures or navigat- ing the menus, you can use the up- down dial in place of the ! and » buttons and the ADJ. lev er in place of the # and $ buttons. The ADJ. lever and up- down dial can also be used to select shutter speed and aperture in P , A , S , and M mod[…]
-
Страница 12
F IRST — TIME USER ? R EAD THIS . 6 The Picture D ispla y The follo wing indicators may be display ed during shoot- ing and playback. Shooting (still photography) Shooting (movie mode) 12 34 56 7 89 10 11 12 13 14 15 16 17 18 29 28 27 26 30 30 30 25 25 25 24 23 22 21 20 19 19 19 32 33 34 31 1 1 Flash mode ………… 24 2 2 Flash compensation/ man[…]
-
Страница 13
F IRST — TIME USER ? R EAD THIS . 7 Playback (photographs) Playback (movies) 12 34 56 7 89 15 10 1 1 12 13 14 17 16 18 19 1 1 File number 2 2 Current fr ame 3 3 T otal frames 4 4 Playback mode indicator 5 5 Protected image …. 92 6 6 DPOF print indicator ……………. 95 7 7 Source ………………. 13 8 8 Picture quality ……. 57 9 9 Pictu[…]
-
Страница 14
F IRST — TIME USER ? R EAD THIS . 8 The Batter y Level Indicator Battery level is shown by the icon at the bottom right corner of the picture display . Cautions • The full battery indicator may not appear or may appear only briefly with NiMH bat- teries. Check the battery type before use . Icon Icon Description Description ( green ) Battery fully[…]
-
Страница 15
9 F IRST — TIME USER ? R EAD THIS . 9 First Steps ………………………………………………… 10 T aking Photographs…………………………………. 17 Viewing and Deleting Phot ographs ………….. 29 Basic Photograph y and Playback Read this section before using your camer a for the first time .[…]
-
Страница 16
F IRST — TIME USER ? R EAD THIS . 10 First Steps Pr epare the camera for use . Charging the Battery Charging the Battery The rechargeable batt ery supplied with the camera is not charged at shipment. Charge the battery in the supplied BJ-6 battery charger before use. 1 Place the battery in the charger . Place the battery label up with the “+” a[…]
-
Страница 17
F IRST — TIME USER ? R EAD THIS . 11 Compatible Batteries The camera can be used with a DB-65 rechargeable Li-ion battery (supplied; DB-60 rechargeable batteries can also be used) or with a pair of AAA alkaline or rechargeable nickel-metal hydride (NiMH) batteries . Tip: Battery Capacity Under normal conditions, about 370 shots can be taken with a […]
-
Страница 18
F IRST — TIME USER ? R EAD THIS . 12 Inserting the Battery Inserting the Batter y Be sure the camera is off befor e inserting or removing batteries. 1 Open the batter y/card c over . Unlatch ( q ) and open ( w ) the cover . 2 I nsert the battery. 1 2 Using the battery to keep the battery latch pressed to one side, slide the battery in. The latch wi[…]
-
Страница 19
F IRST — TIME USER ? R EAD THIS . 13 Inserting Memor y Cards Inserting Memor y Cards Pictures can be stor ed in the camera ’ s 88 MB internal memor y , or optional SD and SDHC memor y cards can be used to store additional pictures . Internal memory is used for rec ording and playback if no car d is inserted; if a card is inserted, the card will b[…]
-
Страница 20
F IRST — TIME USER ? R EAD THIS . 14 Cautions • Pictures will not be recor ded to internal memory when a memo — r y card is inserted, even if the memory card is full. • Keep the memor y card contacts clean. Tip: Writ e Protection Memor y cards can be prot ected by slid- ing the write-protection switch to “ L OCK ,” keeping data from being w[…]
-
Страница 21
F IRST — TIME USER ? R EAD THIS . 15 T o turn the camera off , press the POWER button again. The number of pictures taken so far that day will be displayed bef ore the cam- era turns off (zero is display ed if the camera clock is not set; if you turn the camera off after changing the clock, the camera will display the number of pictures taken since[…]
-
Страница 22
F IRST — TIME USER ? R EAD THIS . 16 Basic Setup Basic Setup A language -selection dialog is displayed the first time the camera is turned on. F ollow the steps below t o choose a language and set the time and date. T o exit before setup is complete, pr ess DISP . ; the language, time , and date can be changed at any time in the setup menu (page 13[…]
-
Страница 23
F IRST — TIME USER ? R EAD THIS . 17 T aking Photographs After setting up the camera as de — scribed in “First Steps ” (pages 10– 16), you are r eady to take your first photos. P ress the POWER button t o turn the camera on and rotate the mode dial to 5 . Holding the Camera Holding the Camera Hold the camera as shown below . 1 Hold the camera[…]
-
Страница 24
F IRST — TIME USER ? R EAD THIS . 18 T aking a Photograph T aking a Photograph 1 F ocus. F rame your subject in the center of the picture dis- play and press the shutter-r elease button halfway t o set focus and exposure . If the camera is unable to focus , the center f ocus frame blinks red and the autofocus/flash lamp blinks green. If the camera […]
-
Страница 25
F IRST — TIME USER ? R EAD THIS . 19 Tip: The Shutter-Release Butt on The camera has a two-stage shutter-release button. T o f ocus, lightly press the shutter-r elease button until you f eel resistance. This is called “pressing the shutter-r elease button halfway . ” Press the shutter-release butt on the rest of the way down to shoot. Tip: Focu[…]
-
Страница 26
F IRST — TIME USER ? R EAD THIS . 20 Tip: A voiding Blurred Pictures T o prevent blurring caused by the camera moving when the shut- ter is released (“ camera shake”), pr ess the shutter-r elease button smoothly and gently . Blurring is par ticularly likely to occur if : • The flash is off and lighting is poor , or • The camera is zoomed in[…]
-
Страница 27
F IRST — TIME USER ? R EAD THIS . 21 Focus Lock Use focus lock t o compose photographs in which the subject is not in the center of the frame. F ocus lock can also be used if the camera is unable to focus (page 18). 1 F ocus. P osition your subject in the center of the picture dis- play and press the shutter-r elease button halfway t o focus. 2 Rec[…]
-
Страница 28
F IRST — TIME USER ? R EAD THIS . 22 Digital Zoom Digital Zoom When Digital Zoom is selec ted f or Zoom Button (page 122), the 8 button can be used to zoom in t o a maximum of 4.0 ×. Use the 9 button to zoom out. Zoom in Zoom out 1 Assign digital zoom to the 8 and 9 buttons. Select Digital Zoom f or the Zoom Button option in the setup menu (page 1[…]
-
Страница 29
F IRST — TIME USER ? R EAD THIS . 23 Close-ups (M acro Mode) Close-ups (Macro Mode) Use macro mode f or close -ups of small objects as close as 1.0 cm (0.4 in.) to the lens (at this distance , the area pho- tographed will be about 26 × 19 mm/1.0 × 0.7 in.). 1 Press the N button. A N icon will be briefly dis- played in the cent er of the picture d[…]
-
Страница 30
F IRST — TIME USER ? R EAD THIS . 24 Flash Photography Flash Photography The flash only fires when raised . Slide the F OPEN switch to raise the flash and press the F button t o choose from the following flash modes: Mode Mode Description Description Flash Off The flash is off and will not fire. Auto The flash fires automatically when r equired. Re[…]
-
Страница 31
F IRST — TIME USER ? R EAD THIS . 25 2 S elect a flash mode. Pr ess the F button to select a flash mode. The flash mode icon is briefly displayed in the center of the picture display and then appears in the top left corner of the display . Note The selected flash mode remains in effect until a new mode is chosen. The autof ocus/flash lamp blinks wh[…]
-
Страница 32
F IRST — TIME USER ? R EAD THIS . 26 The Self- Timer The Self- Timer The camera offers a t en-second timer for self-portraits and a two-second timer to prevent blur caused by camera movement when the shutter-r elease button is pressed . Note By default, the self-timer is assigned to the t ( Fn2 ) button, but it can also be assigned to the Fn1 butto[…]
-
Страница 33
F IRST — TIME USER ? R EAD THIS . 27 The Tilt Indic ator The Tilt Indic ator Use the tilt indicator to lev el the camera when photo- graphing buildings or landscapes. It is particularly useful for compositions in which the horiz on is visible. 1 Display level setting options. Pr ess and hold the O ( DISP . ) button until level setting op- tions are[…]
-
Страница 34
F IRST — TIME USER ? R EAD THIS . 28 Understanding the Tilt Indicator Green Orange Camera lev el Tilt camer a left to level Red Unable to measure tilt; camer a rotated too far forward or back Camera tilted 90 ° left Note Tilt indicator settings can also be adjusted in the setup menu (pages 113, 127). Cautions • The tilt indicator is not displaye[…]
-
Страница 35
29 F IRST — TIME USER ? R EAD THIS . Viewing and Deleting Photographs Pictures can be viewed in the picture displa y . Viewing Photographs Viewing Photographs Pr ess the 6 button to display the last photograph viewed . Tip: If the Camera Is Off If the camera is off, press the 6 butt on for about a second to turn the camera on and start playback . P[…]
-
Страница 36
30 F IRST — TIME USER ? R EAD THIS . Caution: RAW Images The camera records JPEG copies of RA W images for display in the picture display . When a RA W image is selected for playback, the camera shows the JPEG copy and a RA W-mode indicator is dis- played. If the JPEG copy has been deleted using a computer or other device, the camera will display a[…]
-
Страница 37
31 F IRST — TIME USER ? R EAD THIS . Viewing Multiple Photographs Use the 9 and 8 buttons to choose the number of photos dis- played fr om one, 20, and 81. Multi- frame views can be used to select images for display or deletion. Single frame 20 frames 81 frames In multi-frame views, press ! , » , # , and $ to highlight photographs. In 20-frame[…]
-
Страница 38
32 F IRST — TIME USER ? R EAD THIS . Playback Zoom Pr ess the 8 button or rotate the up-down dial to zoom in on the photo currently display ed full frame. T o zoom in to the magnification selected with One Pr ess Zoom Ratio (page 126), press the ADJ. lever in. The follo wing operations can be per formed: Use Use T o To 8 Zoom in. Up- down dial Rota[…]
-
Страница 39
33 F IRST — TIME USER ? R EAD THIS . Deleting Photographs Deleting Photographs F ollow the steps below t o delete unwant ed photos. Deleting Individual Photographs 1 Display a photograph you want t o delete. Display a photograph y ou want to delete in single- frame playback (page 29). 2 Press the D button. The options shown at right will be display[…]
-
Страница 40
34 F IRST — TIME USER ? R EAD THIS . Deleting Multiple Files F ollow the steps below t o delete multiple selected files. 1 Press the D button. In multi-frame playback, pro- ceed to Step 2. In single-frame playback, the options shown at right will be displayed . Highlight Delete Multi and press C / D . 2 Select Sel. Indiv . or Sel. Range . T o selec[…]
-
Страница 41
35 F IRST — TIME USER ? R EAD THIS . Tip: Selecting Ranges T o select one or more ranges consisting of two images and all photographs between them, press the ADJ . lever in and follow the steps below : 3.1 Pr ess ! , » , # , or $ to high- light the first image and press C / D to select. The se- lected image is marked with a D icon. If you sele[…]
-
Страница 42
36 F IRST — TIME USER ? R EAD THIS . The The O O (DISP .) Button (DISP .) Button Use the O ( DISP . ) button to choose the information dis- played in the picture display during shooting and pla y- back. Shooting Mode Pr ess the O ( DISP . ) button to cycle through the following displays: Indicators displayed Indicators + histogram Fr aming grid (no[…]
-
Страница 43
37 F IRST — TIME USER ? R EAD THIS . Playback Mode Pr ess the O ( DISP . ) button to cycle through the following displays: Indicators displayed Details + histogram No indicators Highlights Tip: Highlights The flashing portions of the highlights display mar k “washed out ” areas in which details may hav e been lost to overexposur e. Check highli[…]
-
Страница 44
38 F IRST — TIME USER ? R EAD THIS . Tip: The Histogr am The histogram is a graph showing the distribution of pixels of dif- ferent brightness in the image . Brightness is plotted on the hori- zontal axis, with shadows at the left and highlights at the right. The vertical axis gives the number of pixels. The histogram can be used to assess exposure[…]
-
Страница 45
39 More on Photograph y ……………………………… 40 Movies …………………………………………………….. 87 More on Playback …………………………………….. 91 Printing Photographs ……………………………..106 The Setup Menu ……………………………………..112 Copying P ictures to a Co[…]
-
Страница 46
40 M ORE ON P HOTOGRAPHY More on Photography This section provides information on P , A , S , M , 4 , and “MY” modes and on using shooting menu options. Mode P: Program Shift Mode P: Program Shift When the mode dial is rotated to P (program shift), you can use the up- down dial to choose fr om several combinations of shutter speed and aperture,[…]
-
Страница 47
41 M ORE ON P HOTOGRAPHY Note Shutter speed and aperture can be adjusted for ten seconds after you remove y our finger from the shutter-r elease but- ton. 4 T ake the photograph. Gently press the shutter-r elease button all the way down to take the photograph. Note: The Exposure Pr ogram The exposure prog ram (ISO 100, flash off ) is shown below. T[…]
-
Страница 48
42 M ORE ON P HOTOGRAPHY Mode A: Aperture Priority Mode A: Aperture Priority In mode A (aper ture priority), you choose the aperture and the camera selects the shutter speed. Choose large apertures (low f-numbers) to emphasize the main subject by blurring background and for eground details . Choose small apertures (high f-numbers) to bring both the[…]
-
Страница 49
43 M ORE ON P HOTOGRAPHY Mode S: Shutter Priority Mode S: Shutter Priority In mode S (shutter priority), you choose the shutter speed and the camera selects the aper- ture. Choose fast shutt er speeds to “freeze ” motion, slow shutter speeds to suggest motion by blurring moving objects. 1 Choose mode S . Rotate the mode dial to S . The current […]
-
Страница 50
44 M ORE ON P HOTOGRAPHY Mode M: Manual Exposure Mode M: Manual Exposure In mode M (manual exposure), you use the up- down dial to choose aperture and the ADJ. lever to se- lect a shutter speed. 1 Choose mode M . Rotate the mode dial to M . The shooting mode, exposure in- dicator , and current aperture and shutter speed appear in the display . 2 Ch[…]
-
Страница 51
45 M ORE ON P HOTOGRAPHY Notes • If Auto or Auto-Hi is selected for ISO Setting (page 84), ISO will be fixed at 100 while the camera is in manual exposure mode . • Choose slower shutter speeds for longer exposur e times. T o re — duce blur caused by camera shake, hold the camera steadily in both hands or use a tripod. The picture display turns […]
-
Страница 52
46 M ORE ON P HOTOGRAPHY 4 4 Mode: Matching Settings to the Scene Mode: Matching Settings to the Scene Select 4 mode to shoot mov- ies or to choose from one of the following subject types. Camera settings are automatically opti- mized for the selected subject type. Option Option Description Description Dynamic Range Choose for natural contrast when[…]
-
Страница 53
47 M ORE ON P HOTOGRAPHY 2 Press C / D . A menu of scene mode op- tions will be displayed . 3 S elect an option. Pr ess ! or » to highlight an option and press C / D to return to shooting mode with the se- lected option shown at the top of the display . 4 Shoot. • D ynamic range double shot : See page 48. • S ke w correct mode : See page 5[…]
-
Страница 54
48 M ORE ON P HOTOGRAPHY 4 Mode: Dynamic Range Double Shot Each time the shutter-release but- ton is pressed , the camera takes two shots at different exposur es, then combines the areas that ar e correctly exposed to create a single c omposite image with natural contrast, reducing loss of detail in highlights and shadows. U se to photograph sc ene[…]
-
Страница 55
49 M ORE ON P HOTOGRAPHY 2 F ocus. Pr ess the shutter-release but- ton halfway to set f ocus, ex- posure, and whit e balance. 3 Shoot. Gently press the shutter-r e — lease button the rest of the way down. The camera will take two pictures and com- bine them to create a single image with an enhanced dy- namic range. Shooting Menu Options The follo w[…]
-
Страница 56
50 M ORE ON P HOTOGRAPHY F ollow the steps below t o adjust these options in dynam- ic range double shot mode. 1 Display the shooting menu. Pr ess C / D to display the scene-mode menu. Press # to highlight the mode tab, pr ess » to highlight the shooting menu tab, and pr ess $ to place the cursor in the shooting menu. 2 S elect a menu item. Pr[…]
-
Страница 57
51 M ORE ON P HOTOGRAPHY 4 Mode: Skew Correct T o take pictures in skew correct mode, frame the subject so that it occupies as much of the frame as possible and press the shutter-r elease button to take the photograph. If the camera is able to detect an object that can be used to correct perspective, a message will be displa yed with the object sho[…]
-
Страница 58
52 M ORE ON P HOTOGRAPHY 4 Mode: T ext T o take pictures in text mode: 1 Adjust contrast . Pr ess the ADJ. lever in to dis- play the menu shown at right. Pr ess ! or » to highlight an option and press the ADJ. lev er or C / D to select the highlighted option and clear the menu from the display . Tip: Adjusting Contrast Contrast can also be adj[…]
-
Страница 59
53 M ORE ON P HOTOGRAPHY “MY” Modes: Using Custom Settings “MY” Modes: Using Custom Settings T o take photos using settings saved with the Reg . My Settings > MY1 option in the setup menu key custom settings tab (page 114), rotate the mode dial to MY1 . Select MY2 to take photos using the settings sav ed with MY2 , MY3 to take photos usi[…]
-
Страница 60
54 M ORE ON P HOTOGRAPHY The Shooting Menu The Shooting Menu Use the ! , » , # , $ , and C / D buttons to na vigate the menus. 1 Display the shooting menu. In modes other than 4 , pressing the C / D but- ton in shooting mode displays the shooting menu. Tip: 4 Mode In 4 mode, pressing C / D displays the mode menu; press # to highlight the mode […]
-
Страница 61
55 M ORE ON P HOTOGRAPHY The items available in the shooting menu vary with the shooting mode. 5 , P , A , S , M, MY1, MY2 and MY3 Modes Option Option Default Default Page Page Picture Quality/Size N3648 (10M) 57 Foc us Multi AF 59 Snap Focus Distance 2.5 m 64 Full Press Snap On 64 Pre-AF Off 65 Exposure Metering Multi 65 Image Settings Standard 66[…]
-
Страница 62
56 M ORE ON P HOTOGRAPHY 4 Mode: Dynamic Range Double Shot Option Option Default Default Page Page Picture Quality/Size N3648 (10M) 57 Foc us Multi AF 59 Snap Focus Distance 2.5 m 64 Pre-AF Off 65 Exposure Metering Multi 65 Image Settings Standard 66 Dynamic Range Expansion W eak 49 Plus Normal Shooting Off 49 Option Option Default Default Page Pag[…]
-
Страница 63
57 M ORE ON P HOTOGRAPHY Picture Q uality and Size Picture quality (RA W , fine, and normal) and size (dimen- sions in pixels) determine the number of phot ographs that can be stored in internal memory or on a memor y card (page 13). The following options are a vailable: Option Option Quality Quality Size Size Description Description RAW (10M) 1 RA[…]
-
Страница 64
58 M ORE ON P HOTOGRAPHY Tip: Picture Quality The camera supports the following picture qualities: • Normal : JPEG compression is used to r educe file size. • Fine : Compression is r educed for impr oved quality . F ile size in- creases, r educing number of photos that can be recor ded. • RAW : Raw image data are sa ved in DNG format; JPEG co[…]
-
Страница 65
59 M ORE ON P HOTOGRAPHY Foc u s Choose how the camera focuses . By default, the camera uses autofocus; other options ar e listed below . Option Option Description Description Multi AF The camera selects the focus area with the closest subject, preventing out-of-focus shots by keeping the camera from focusing on the backgr ound. Spot AF Focus on th[…]
-
Страница 66
60 M ORE ON P HOTOGRAPHY Focus: MF (Manual F ocus) Manual focus can be used to lock f ocus over a series of photographs or to f ocus when the camera is unable to focus using autof ocus. Note Manual focus is not available in text mode (page 46). 1 S elect MF (manual focus). Select MF in the Focus menu. The focus mode and f ocus bar (page 59) are dis[…]
-
Страница 67
61 M ORE ON P HOTOGRAPHY Choosing the Focus and Met ering T arget T arget selection can be used to set focus and exposure for off-center subjects without moving the camera, mak- ing it easier to use a tripod. 1 Activate target selection. Pr ess the ADJ. lever in and then press the lever left or right to highlight P . Pr ess ! or » to highlight[…]
-
Страница 68
62 M ORE ON P HOTOGRAPHY 3 T ake the pic ture . Pr ess the shutter-release button halfwa y to set focus and/or exposure for the selected subject and then gently press the shutter-r elease button the rest of the way down to take the picture . Notes • T arget selection is not available in manual focus mode (page 60). • The selec ted target r emai[…]
-
Страница 69
63 M ORE ON P HOTOGRAPHY Macro T arget Selection If Macro T arget is assigned to the Fn1 or Fn2 button (pages 121–122), you can select macro mode by pressing the chosen button in shooting mode. The cross-hairs shown at right will be dis- played; use the ! , » , # , and $ butt ons to position the cross-hairs over y our subject and press C / D[…]
-
Страница 70
64 M ORE ON P HOTOGRAPHY Snap Focus Distance Select the distance at which the camera focuses when Snap is selected for Foc u s (page 59) or F ull P ress Snap is on (see below). Choose from 1 m (3.3 ft.), 2.5 m (8.2 ft.), 5 m (16.4 ft.), and ∞ (infinity). Note When Snap is selected for F ocus or F ull Pr ess Snap is on, the snap focus distance can[…]
-
Страница 71
65 M ORE ON P HOTOGRAPHY Pre-AF If On is selected when Multi AF or Spot AF is selected for F ocus (page 59), the camera will continue to f ocus even when the shutter-release button is not pr essed halfway (the focus range, ho wev er , is narrower than for normal f o- cus). This ma y decrease the time needed to f ocus when a picture is taken, potent[…]
-
Страница 72
66 M ORE ON P HOTOGRAPHY Image Settings Control c ontrast, sharpness, and vividness (color depth) or take monochrome photographs . Option Option Description Description Vivid T ake strong, vivid photos with heightened contrast and sharpness and maximum vividness. Standard Normal contrast, sharpness, and vividness. Black & White T ake photos in […]
-
Страница 73
67 M ORE ON P HOTOGRAPHY • B&W ( TE) : Adjust vividness , contrast, and sharpness as described above . T o choose a tint, highlight T oning Ef- fec t and press $ . Pr ess ! and » to highlight an op- tion and press # to select. • S etting1/Setting2 : Adjust viv- idness, contrast, and sharp- ness as described above . T o adjust individua[…]
-
Страница 74
68 M ORE ON P HOTOGRAPHY Continuous Mode Shoot photographs one at a time or in continuous se- quence. The following options ar e available: • Off : One photo is taken each time the shutter-r elease button is pressed . • Continuous : The camera records photographs one after the other while the shutter-release button is pressed. • S-C on t ( st[…]
-
Страница 75
69 M ORE ON P HOTOGRAPHY At settings other than Off , the cur- rent selection is shown by an icon in the picture display . Caution Digital zoom is available at settings of S-C ont and M-Co nt even if Auto Resize is selected f or Digital Zoom Image . Notes • At settings other than Off , the flash turns off automatically , f ocus and exposure are f[…]
-
Страница 76
70 M ORE ON P HOTOGRAPHY Auto Bracket V ary exposure, white balance , or color to rec ord two or three images “bracketing” current settings. Option Option Description Description ON ±0.3 Each time the shutter-release but- ton is pressed, the camera takes three photos: one underexposed by 0.3 EV , a second at current ex- posure settings, and a […]
-
Страница 77
71 M ORE ON P HOTOGRAPHY CL -BKT : Color Bracketing The number and type of photographs rec orded when CL — BKT is selec ted f or Auto Br acket depends on the option chosen for CL -BKT Black & Whit e ( TE) in the setup menu (page 131): • Off : The camera records two c op- ies of each photograph, one in black and white and a second in color . ?[…]
-
Страница 78
72 M ORE ON P HOTOGRAPHY Flash Exposure Compensation Adjust flash level b y –2.0 to +2.0 in steps of / E V Selecting Flash Exposure Compensa tion in the shooting menu displays the slider shown at right; press ! or » to choose a flash exposure compen- sation value and press C / D . Flash exposur e compensation is displayed in the pic[…]
-
Страница 79
73 M ORE ON P HOTOGRAPHY Manual Flash Amount Choose amount of light produced by the flash in manual flash mode (page 24). Flash output is expr essed as a frac- tion of full power (all values ar e approximat e): FULL / / / / / / / / / / / Flash lev el […]
-
Страница 80
74 M ORE ON P HOTOGRAPHY Noise Reduction Choose We a k or Strong to reduce “noise ” (random varia- tions in brightness and color) in photographs taken at high ISO sensitivities. The minimum ISO sensitivity at which noise reduction applies can be selected using Noise Reduction ISO (see below). is displayed when noise r educ- tion is on. Notes ?[…]
-
Страница 81
75 M ORE ON P HOTOGRAPHY Interval Shooting T o take photos automatically at intervals of from five sec- onds to one hour , select I nterval Shooting in the shoot- ing menu and follow the st eps below: 1 Choose an inter val. Pr ess # and $ to highlight hours, minutes , or seconds and press ! and » to change . Pr ess C / D to return to shooting […]
-
Страница 82
76 M ORE ON P HOTOGRAPHY Notes • Use a fully- charged battery or optional AC adapter and be sure that sufficient space remains in internal memory or on the mem- or y card . Inter val timer photograph y ends automatically when the number of exposures remaining r eaches zero . • Photographs can be taken at any time by pressing the shutter- releas[…]
-
Страница 83
77 M ORE ON P HOTOGRAPHY Exposure Compensation The camera automatically adjusts exposure f or the sub- ject in the center of the frame, producing optimal expo- sure even when the subject is backlit. Exposure compen- sation may howev er be requir ed in situations such as the following: • Very bright backlighting : Subjec ts that are very strongly […]
-
Страница 84
78 M ORE ON P HOTOGRAPHY The ADJ. Lever If exposure compensation is assigned to the ADJ . lever (page 119), exposure compensation can be adjusted as described below . 1 Display the exposure compensation slider . With the camera in shooting mode, press the ADJ . lever in and press # or $ or press the ADJ. lever left or right until the exposure compe[…]
-
Страница 85
79 M ORE ON P HOTOGRAPHY White Balance At the default setting of Multi-P A UT O , the camera au- tomatically adjusts white balance so that a white sub- ject will appear white regardless of the color of the light source . It may however be nec essary to match white bal- ance to the light sourc e under mixed lighting or when photographing a subject t[…]
-
Страница 86
80 M ORE ON P HOTOGRAPHY White balance can be selected in the shooting menu (page 79) or assigned to the ADJ. lev er (page 119) and ad- justed as described below: 1 Display white balance options. With the camera in shooting mode , press the ADJ. le — ver in and press # or $ or pr ess the ADJ. lever left or right until white balance options are disp[…]
-
Страница 87
81 M ORE ON P HOTOGRAPHY Detail: Making Fine Adjustments to Whit e Balance T o make fine adjustments to white balance: 1 Select Detail . Highlight Detail in the white balance menu and press the DISP . button. 2 Choose a setting. Pr ess ! or » to choose a white balance. P ress C / D when settings are com- plete. 3 Return to shooting mode. Pr es[…]
-
Страница 88
82 M ORE ON P HOTOGRAPHY White Balance Compensation Compensate f or color casts by modifying white balanc e on the green-magenta or blue-amber axis. The modifica- tions apply to the option currently selected for whit e bal- ance and to all options selected while the modifications are in effect. Selecting White Balanc e Com- pensation in the shootin[…]
-
Страница 89
83 M ORE ON P HOTOGRAPHY Notes • White balance compensation can be assigned to the ADJ. lever (page 119). T o reset, highlight Reset and press C / D . • White balance compensation can also be assigned to the Fn buttons (pages 121–122). • When the mode dial is rotated to 4 , white balance com- pensation is only available in movie and dynamic[…]
-
Страница 90
84 M ORE ON P HOTOGRAPHY ISO Setting Adjust the camera ’ s sensitivit y to light. Higher values can be used for faster shutter speeds when the subject is poorly lit, preventing blur . • Auto : The camera automatically adjusts sensitivity ac- cording to brightness , the distance to the subject, and the options selected for macro mode and picture[…]
-
Страница 91
85 M ORE ON P HOTOGRAPHY Notes • “Noise” (random var iations in brightness and color) may appear in photographs taken at high sensitivities. • The sensitivity displayed in the picture display in Auto and Aut o- Hi modes may differ from the actual value. If the flash is used, a sensitivity of Aut o is equivalent to ISO 125, regardless of the[…]
-
Страница 92
86 M ORE ON P HOTOGRAPHY Switch Shooting Mode When the mode dial is rotated to a “MY” mode (page 53), you can use this option to switch between 5 , P , A, S, and M modes without ro — tating the mode dial to a new set- ting. This option is only available in “MY ” modes and is not displayed if the shooting mode currently selected for Reg . My[…]
-
Страница 93
M OVIES 87 Movies This section describes how to recor d and view movies. 3 3 Recording Movies Recording Movies Shoot movies with sound. Movies ar e stored as A VI files. 1 Rotate the mode dial to 4 . The option currently selected for 4 mode appears in the display . 2 Press C / D . A menu of scene mode op- tions will be displayed . 3 Select 3 . Pr e[…]
-
Страница 94
M OVIES 88 Cautions • Sounds made by the camera may be recor ded with the movie. • M ovies may be up t o 90 minutes in length or 4 GB in size. De- pending on the type of memor y card used, shooting ma y end before this length is r eached. The maximum total length of all movie files that can be stored in internal memory or on a mem- or y card va[…]
-
Страница 95
M OVIES 89 Choosing the Frame Size and Frame Rate Movies consist of a series of images (frames) that are played at high speed to cr eate the illusion of motion. T o choose a frame size (the size of each frame in pix els) or frame rate (the rate at which the frames are r ecorded), se- lect 3 mode and follow the steps below: 1 Display the shooting me[…]
-
Страница 96
M OVIES 90 3 3 Viewing Movies Viewing Movies F ollow the steps below t o view movies. 1 Press 6 . Pr ess the 6 button to display pictures in the picture display . 2 Display the movie. Use the ! , » , # , and $ buttons (page 29) to scroll through pictures until the first frame of the movie is dis- played . Movies are indicated by a 3 icon. 3 St[…]
-
Страница 97
91 M ORE ON P LAYBACK More on Playback This section details the options in the playback menu and describes how to view pictures on a T V . The Playback Menu The Playback Menu T o use the playback menu, pr ess the 6 button to start playback and follo w the steps below . 1 Display the playback menu. Pr ess the C / D but- ton to display the pla yback […]
-
Страница 98
92 M ORE ON P LAYBACK Slide Show Selecting this option star ts an automated slide show . Pic- tures are displa yed at three sec ond intervals in the order recor ded. When a movie is displayed, movie pla yback begins automatically; the slide show resumes when play- back is complete. The slide show repeats until st opped; press an y button to end the[…]
-
Страница 99
93 M ORE ON P LAYBACK Changing the Protect Status of Multiple Files F ollow the steps below t o change the protect status of multiple selected files. 1 Select Protect in the playback menu. In multi-frame playback, proceed to St ep 2. In single — frame playback, the options shown at right will be dis- played . Highlight Sel Mult and press C / D . 2 […]
-
Страница 100
94 M ORE ON P LAYBACK Tip: Selecting Ranges T o select one or more ranges consisting of two images and all photographs between them, press the ADJ . lever in and follow the steps below : 3.1 Pr ess ! , » , # , or $ to high- light the first image and press C / D to select. The se- lected image is marked with an icon. If you selected the wrong i[…]
-
Страница 101
95 M ORE ON P LAYBACK DPOF: Selecting Pic tures for Printing T o request prof essional prints of the photographs on a memory card, first use this option to create a digital “print order” listing the photos you wish to print and the num- ber of prints, and then take the memory card to a digital print ser vice c enter that supports the DPOF stand[…]
-
Страница 102
96 M ORE ON P LAYBACK Multi-Frame Playback T o select multiple photographs for printing: 1 Select DPOF . Pr ess C / D in multi- frame playback to display the playback menu. Highlight DPOF and press $ . 2 S elect photos and choose the number of prints. Pr ess # or $ to highlight additional photos and ! or » to choose the number of prints. T o r[…]
-
Страница 103
97 M ORE ON P LAYBACK Resize: Creating Small Copies of Photographs T o create a small cop y of the current photog raph, select Resize in the playback menu (page 91) and choose a size . F ine — and normal-quality photos larger than 1,280 × 960 pixels can be copied at siz es of N1280 or N640 , while N1280 pictures can be copied at a size of N640 . M[…]
-
Страница 104
98 M ORE ON P LAYBACK Skew Correction Create copies that ha ve been proc essed to reduc e the ef- fects of perspective on rectangular objects, such as mes- sage boards or business cards . 1 Display the photo . Display the photo to be c opied in playback mode. 2 Select Sk ew C orrection . Pr ess C / D to display the playback menu, highlight Skew Cor[…]
-
Страница 105
99 M ORE ON P LAYBACK Notes • The copy is the same size as the original. The time needed to create a copy incr eases with image size: Size Size Time (approx.) Time (approx.) Size Size Time (approx.) Time (approx.) 3,648 × 2,736 21 sec . 2,048 × 1,536 8 sec. 3,264 × 2,448 17 sec . 1,280 × 960 5 sec. 2,592 × 1,944 12 sec . 640 × 480 2 sec. T […]
-
Страница 106
100 M ORE ON P LAYBACK Level Correction Create copies that ha ve been proc essed to adjust bright- ness and contrast. Corr ect brightness and contrast auto- matically (see below) or make manual adjustments using a histogram (pages 101–102). Auto: Automatic Level Corr ection 1 Display the photo . Display the photo to be c opied in playback mode. 2[…]
-
Страница 107
101 M ORE ON P LAYBACK Manual: Manual Level C orrection Display the photo to be c opied and select Level C om- pensation > Manual in the playback menu to display a preview as described on the prec eding page, then follo w the steps below . 1 S elect the black point, white point, or mid-point. The manual preview contains a histogram showing ho w […]
-
Страница 108
102 M ORE ON P LAYBACK Tips: Choosing the Black P oint, White P oint, and Mid-P oint • Adjusting brightness : T o make the image brighter , move the mid-point to the right. Moving the mid-point to the left makes the image dark er . • Correcting exposure : If the image is over- exposed, move the black point to the right until it lines up with th[…]
-
Страница 109
103 M ORE ON P LAYBACK White Balance Compensation Create copies with modified whit e balance. 1 Display the photo . Display the photo to be c opied in playback mode. 2 Select White Balanc e C ompensation . Pr ess C / D to display the playback menu, highlight White Balance C ompensa- tion , and press $ . 3 Adjust white balance. Use the ! , » , […]
-
Страница 110
104 M ORE ON P LAYBACK Viewing Pictures on T V Viewing Pictures on T V T o view pictures on a T V , connect the camera using the supplied A/V cable. 1 T urn the camera off . Be sure the camera is off befor e connecting or dis- connecting the A/V cable. 2 Connect the A/V cable to the T V . Inser t the white plug into the audio input connector , the […]
-
Страница 111
105 M ORE ON P LAYBACK Caution Do not use force or tug the A/V cable when handling the camera with the A/V cable connected. Notes • The camera can be connec ted to the video input connector on a video recorder and pictures r ecorded to video or DVD . • The camera suppor ts the following video standards: NTSC (used in North Amer ica, the Caribbe[…]
-
Страница 112
106 P RINTING P HOTOGRAPHS Printing Photographs The camera can be connected to a printer via the sup- plied USB cable and photographs printed dir ectly from the camera without using a computer . Caution Movies can not be printed. If a photograph created using a RA W picture- quality option is selected for printing, only the JPEG copy will be printe[…]
-
Страница 113
107 P RINTING P HOTOGRAPHS 3 Connect the camera. Open the terminal cov er and plug the cable into the USB cable connector . Pr ess the ADJ. lever in. The camera will turn on and the message shown at right will be displayed; pr ess the ADJ. le- ver in again immediately . Note If you do not press the ADJ. lever in while the above message is displayed[…]
-
Страница 114
108 P RINTING P HOTOGRAPHS Printing Printing Photographs can be printed one at a time or multiple photos can be selected for printing . If a memor y card is inserted, the pictures will be printed from the memory card; otherwise pic tures will be print ed from internal memory. Caution Do not disconnect the USB cable while printing is in progress. No[…]
-
Страница 115
109 P RINTING P HOTOGRAPHS 2 Adjust printer settings. The menu shown at right will be displayed; highlight an item and press $ to view the options available, or choose Printer Select to use the de — fault setting for the current printer (the options available vary with the type of printer; items not supported by the connected print- er can not be s[…]
-
Страница 116
110 P RINTING P HOTOGRAPHS Note T o select the highlighted option as the default for the current printer when the camera is connected, press the ADJ. lever in. The menu shown at right will be displayed; highlight Set and press C / D . Select Can cel to exit without changing the default set- ting. 3 Start printing. T o start printing, press C / D wh[…]
-
Страница 117
111 P RINTING P HOTOGRAPHS Printing Multiple Photographs T o print multiple photographs: 1 Press the 9 button. Photographs will be display ed in multi-frame playback. 2 S elect a picture. Highlight a picture and press C / D . 3 Choose the number of prints. Pr ess ! or » to choose the number of prints. Selected pictures are marked with a icon; […]
-
Страница 118
112 T HE S ETUP M ENU The Setup Menu The setup menu can be accessed fr om the shooting and playback menus (pages 54 and 91). 1 Display the menus. Pr ess C / D to display the menu f or the current mode (page 133; in scene mode, a MODE tab will be displayed). 2 S elect a setup menu tab . Pr ess # to highlight the tab for the current menu and press ! […]
-
Страница 119
113 T HE S ETUP M ENU The key custom settings tab contains the f ollowing op- tions: Option Option Default Default Page Page Reg. My Settings — 114 Recall My Settings — 116 Edit My Settings — 117 My Settings for Fn Settings Off 118 My Settings WB Comp . Off 118 ADJ Lever Setting 1 White Balance 119 ADJ Lever Setting 2 ISO 119 ADJ Lever Settin[…]
-
Страница 120
114 T HE S ETUP M ENU Key Custom Settings/Setup Menu O ptions Key Custom Settings/Setup Menu O ptions The options available in the key cust om settings and set- up menu tabs are described on the pages that follo w . Reg. My Settings Settings saved using Reg . My Settings can be recalled by rotating the mode dial to MY1 , MY2 , or MY3 , allowing you[…]
-
Страница 121
115 T HE S ETUP M ENU 2 Select Reg My Settings . Highlight Reg. My Settings in the setup menu key custom settings tab and press $ . 3 Save settings. T o assign the settings to MY1 , MY2 , or MY3 on the mode dial, highlight MY1 , MY2 , or MY3 and press C / D (to exit without saving settings, pr ess the DISP . button). T o save the settings t o a “[…]
-
Страница 122
116 T HE S ETUP M ENU Recall My Settings Copy settings fr om a “box ” to MY1 , MY2 , or MY3 . 1 S elect a destination. Highlight the destination for the stor ed settings ( MY1 , MY2 , or MY3 ) and press $ . 2 S elect the source . Highlight the settings “box” that will be assigned to the se- lected position on the mode dial and press C / D .[…]
-
Страница 123
117 T HE S ETUP M ENU Edit My Settings Edit and rename settings sav ed with Reg. My Settings . 1 Select settings. T o edit the settings assigned to MY1 , MY2 , or MY3 on the mode dial, highlight MY1 , MY2 , or MY3 and press $ . T o edit “box ” settings, select My Settings Box and press $ . Highlight the desired box and press $ . 2 Edit settings[…]
-
Страница 124
118 T HE S ETUP M ENU Tip: Naming My Settings Select Name in Step 2 to rename the current combination of settings. The current name is highlighted in the name area; to edit the current name , press # or $ to position the cursor in the name area and press » t o place the cursor in the keyboard area (to delete the current name, press » whil[…]
-
Страница 125
119 T HE S ETUP M ENU ADJ Lever Setting Assign up to f our frequently-used options to the ADJ . le — ver for quick ac cess in 5 , P , A , S , and M modes. At ship- ment, the ADJ. lever can be used f or white balance (page 79), sensitivity (page 84), picture quality (page 57), and image setting (page 66), but it can also be used for white balance co[…]
-
Страница 126
120 T HE S ETUP M ENU 2 S elect an option. Pr ess ! or » to highlight an option and pr ess the ADJ. lever in or press C / D t o select. Tip Keep the ADJ. lever pressed to page rapidly thr ough the available options. ADJ Shutter Confirmation Select On to use the shutter-release button to select the highlighted option when using the ADJ. lever .[…]
-
Страница 127
121 T HE S ETUP M ENU Set Fn Button Choose the functions assigned to the Fn (function) buttons: # ( Set Fn1 Butt on ) and t ( Set Fn2 But- ton ). Option Option Description Description AF/MF Switch between multi or spot AF and manual focus (page 59). 1, 2 AF/Snap Switch between multi or spot AF and snap focus (page 59). 2 AE Lock Lock exposure. 3, 4[…]
-
Страница 128
122 T HE S ETUP M ENU Option Option Description Description Foc u s Display f ocus options (page 59). 2 Image Settings Display image setting options (page 66). 2, 4 Expo. Metering Display exposure metering options (page 65). 2, 4 Cont. Mode Display continuous shooting options (page 68). 2, 4, 5, 6 Auto Bracket Display bracketing options (page 70). […]
-
Страница 129
123 T HE S ETUP M ENU Playback Mode Dial Options/M Mode Dial Options Choose the roles play ed by the ADJ. lever and up-down dial during playback zoom and in mode M . Playback Mode Dial Options Playback Mode Dial Options M Mode Dial Options M Mode Dial Options Setting1 Setting1 Setting2 Setting2 Setting1 Setting1 Setting2 Setting2 ADJ. ADJ. lever le[…]
-
Страница 130
124 T HE S ETUP M ENU Forma t [ Card]/Forma t [Internal Memory] Select F ormat [ Card] t o format the memory card before first use, after using it in another device , or if a card error is displayed when the car d is inserted in the camera. Se — lect Format [Internal Memory] if a message is displayed prompting you t o format internal memory . Cauti[…]
-
Страница 131
125 T HE S ETUP M ENU ISO Auto-High Settings Choose the maximum sensitivity selected by the camera when Auto-Hi is selec ted f or ISO Setting in the shooting menu (page 84). Choose from settings of ISO 200 ( AUTO 200 ), 400 ( A UT O 400 ), 800 ( A UT O 800 ) or 1600 ( AUTO 1600 ). Note “Noise” (random variations in br ightness and color) may ap[…]
-
Страница 132
126 T HE S ETUP M ENU Volume Settings Select the volume for the sounds described above under “Operation Sounds. ” Choose from (off ), (low), (medium), and (high). L CD Confirmation Time Choose how long photographs ar e displayed in the pic- ture display after shooting . Select from 0.5, 1, 2, and 3 seconds, Hold (photograph is display ed until […]
-
Страница 133
127 T HE S ETUP M ENU Auto Rotate Select On to automatically displa y pictures in the correct orientation during playback. Caution Movies, pictures shot with Continuous Mode set to S-C ont or M- Cont , and pictures taken with the camera upside down or tilted sharply forward or back are not rotated f or display in the picture display . P ictures are[…]
-
Страница 134
128 T HE S ETUP M ENU Grid Guide Display Options Choose the type of framing grid available in shooting mode (page 36). Item Item Description Description A three-by-three grid for “rule of thirds” com- position. A four-by-f our grid with diagonal lines run- ning from corner to corner makes it easy t o find the center of the subject. Use for arch[…]
-
Страница 135
129 T HE S ETUP M ENU Fn Button Display Select On to display the options currently assigned to the Fn but- tons when the camera is turned on, when shooting mode is se — lected, or when a new mode is se- lected with the mode dial. Show My Setting Name Select On to display the name of the settings assigned to the current position on the mode dial whe[…]
-
Страница 136
130 T HE S ETUP M ENU Information Displa y Mode Select On to displa y shooting information in the picture display when the picture display is off (page 36), allow- ing you to adjust camera settings while using an optional external viewfinder (page 162) to frame photographs. The view through the lens is not display ed. Shooting information can be di[…]
-
Страница 137
131 T HE S ETUP M ENU CL -BKT Black & White (TE) Choose the number and type of copies created with color bracketing (page 71). Select On to record three c opies of each shot (one in black and white, a second in c olor , and a third using a monochrome tint), Of f t o recor d two copies (one in black and white and the second in color). Note Regar[…]
-
Страница 138
132 T HE S ETUP M ENU Color Space Setting Choose the color space used to r ecord photog raphs. sRGB is widely used t o reproduc e digital images but of- fers a smaller gamut of colors than A dobeRGB . Caution The Adobe RGB color space was developed by Adobe Systems , Inc., and is compatible with the default color space used in Adobe Photoshop and o[…]
-
Страница 139
133 T HE S ETUP M ENU Digital Zoom Image If Normal (the default option) is selec ted f or Digital Zoom Image and an option with a size of 3,648 × 2,736 is selected for Picture Quality/Size , digital z oom will en- large image data from the cent er of the frame to creat e a picture 3,648 × 2,736 pixels in size , creating a slightly grain y image. […]
-
Страница 140
134 T HE S ETUP M ENU Card Sequence No. Choose how the camera names image files when saving photographs to a memory card. • On : Files names consist of “R” follow ed by a seven-digit number (e.g ., “R0010001.jpg”), assigned in ascending order from 0010001 t o 9999999. When a new memory card is inserted, file numbering continues from the l[…]
-
Страница 141
135 T HE S ETUP M ENU Date Settings Set the camera clock (page 16). Note If you leave the battery in the camera for at least two hours, the battery can be removed for about a week without resetting the clock. Language/ N Choose the language in which camera messages and menus are display ed. Option Option Description Description Option Option Descri[…]
-
Страница 142
136 C OPYING P ICTURES TO A C OMPUTER Copying Pictures to a Computer This section describes how to copy pictures fr om the camera to your comput er . Instruc tions for Windows may be found below; those for the Macintosh begin on page 148. Note The dialogs shown in this section may differ slightly from those displayed by your computer . Windows Wind[…]
-
Страница 143
137 C OPYING P ICTURES TO A C OMPUTER System Requirements Before using the supplied CD , check that your computer meets the following r equirements. See the documenta- tion provided with y our computer f or details. OS OS Windows 2000 P rof essional SP 4, Window s XP Home Edi- tion/Prof essional SP 3, Windo ws Vista SP 1 CPU CPU Windows 2000/Windo […]
-
Страница 144
138 C OPYING P ICTURES TO A C OMPUTER The Supplied CD Inser ting the supplied CD in a CD-ROM drive displays the dialog shown at right. • Installing the sof tware : Install the following software. DL -10 : Copy pictures to the computer in a single operation. Irodio Photo & Video Studio : View, manage , edit pictures on the computer . For more […]
-
Страница 145
139 C OPYING P ICTURES TO A C OMPUTER Installing the Software F ollow the steps on the next page to install the supplied software. Illustrations are from Windows XP . Cautions • If the camera is connected to the computer , disconnec t the cam- era before beg inning installation. • Users of existing “Caplio” sof tware should note that the ?[…]
-
Страница 146
140 C OPYING P ICTURES TO A C OMPUTER 1 I nsert the supplied CD . T urn the computer on and in- sert the supplied CD in a CD — ROM drive. • Windows Vista : An Autorun di- alog will be displayed . Click Run Autorun.e xe t o display the installer dialog. • O ther versions of Windows : The installer dialog will be displayed automatically . 2 Click[…]
-
Страница 147
141 C OPYING P ICTURES TO A C OMPUTER 5 I nstall the software. The Irodio Photo & Video Studio installer will start (de — pending on your computer , the splash screen at right may be displayed f or some time before installation beg ins). F ollow the on-screen in- structions to install the supplied soft war e. 6 Click Finish . The dialog shown a[…]
-
Страница 148
142 C OPYING P ICTURES TO A C OMPUTER 1 I nsert the supplied CD . T urn the computer on and in- sert the supplied CD in a CD — ROM drive. • Windows Vista : An Autorun di- alog will be displayed . Click Run Autorun.e xe t o display the installer dialog. • O ther versions of Windows : The installer dialog will be displayed automatically . 2 Click[…]
-
Страница 149
143 C OPYING P ICTURES TO A C OMPUTER Uninstalling the Software F ollow the steps below t o uninstall DC software or Irodio Photo & V ideo Studio . Cautions • Administrator privileges are r equired. • Exit any applications that may be running bef ore proceeding . 1 Open the “ Add/Remov e Progr ams” Control P anel. Open the W indows “S[…]
-
Страница 150
144 C OPYING P ICTURES TO A C OMPUTER Copying Pictures Using DL -10 After installing DC software, follo w the steps below to copy pictures to y our computer . 1 T urn the camera off . 2 Connect the supplied USB cable. Connect the cable to the com- puter USB port. Caution Do not use force when connecting the cable or when handling the camera with th[…]
-
Страница 151
145 C OPYING P ICTURES TO A C OMPUTER Copying Pictures Using Windo ws Explorer If DL -10 is not installed, y ou can copy pictures to the com- puter as described below . T he illustrations in this section are from Windows XP . 1 T urn the camera off . 2 Connect the supplied USB cable. Connect the cable to the computer USB port and then to the camera[…]
-
Страница 152
146 C OPYING P ICTURES TO A C OMPUTER SD Card Readers and PC Card Adapt ers If the memor y card is inserted in an SD card reader connected to the computer , or the memor y card is inserted in a PC card adapter which is then inserted in a computer PC card slot, data can be read directly from the memory card (be sure that the reader or adapter is com[…]
-
Страница 153
147 C OPYING P ICTURES TO A C OMPUTER Disconnec ting the Camera Before disc onnecting the camera from the computer , click the “Safe — ly Remove Har dware ” or “Unplug or Ejec t Hardware ” icon in the taskbar (the illustration above shows the icon f or Window s XP) and select Safely Remove USB Mass Stor- age Device or Stop USB Mass Stor age[…]
-
Страница 154
148 C OPYING P ICTURES TO A C OMPUTER Macintosh Macintosh The camera can be used with Mac OS 9.0–9.2.2 and Mac OS X versions 10.1.2–10.5.6. Caution The software on the supplied CD can not be installed on Macin- tosh computers. Macintosh computers can how ever be used to view the Software User Guide (note that Acrobat Reader is r equired to view[…]
-
Страница 155
149 C OPYING P ICTURES TO A C OMPUTER 3 Copy files from the camera t o the computer . The camera will appear as a volume on the desktop with pictures stored in f olders as shown at right. If a memor y card is inserted in the cam- era, the drive will be named as shown at right and the contents of the memory card will be displayed. If no memor y card[…]
-
Страница 156
150 T ECHNICAL N OTES T echnic al Notes Troubleshooting Troubleshooting Error Messages If an error message is displayed , take the steps listed be- low . Message Message Solution Solution Page Page Insert card No memor y card inserted. Insert card. 13 Set date. Camera clock not set. Set camera clock. 135 File Number Over Limit Camera is out of file[…]
-
Страница 157
151 T ECHNICAL N OTES Camera-Related Problems Po wer Supply Problem Problem Cause Cause Solution Solution Page Page The camera does not turn on. Battery is exhausted or not in- serted. Check that battery is correctly in- serted. Charge battery (recharge- able battery only), inser t fresh battery , or use AC adapter . 10, 12, 165 Battery is incompat[…]
-
Страница 158
152 T ECHNICAL N OTES Shooting Problem Problem Cause Cause Solution Solution Page Page No picture taken when shutter- release button is pressed. Battery is exhausted. Charge battery (rechar geable bat- tery only), inser t fresh batt ery, or use AC adapter . 10, 12, 165 Camera is off or not in shooting mode. Press POWER button to turn cam- era on or[…]
-
Страница 159
153 T ECHNICAL N OTES Problem Problem Cause Cause Solution Solution Page Page Flash does not fire or will not charge. Flash is not raised. Slide F OPEN switch down to raise flash. 24 Flash cov er is not fully open. D o not obstruct flash cover . — Bracketing enabled or camera in continuous, dynamic range double shot, or movie mode. Change camera […]
-
Страница 160
154 T ECHNICAL N OTES Problem Problem Cause Cause Solution Solution Page Page Tilt indicator is not displayed . Off or Sound selected for Lev el Setting . Choose Display or Disp + Snd .2 7 Indicators are hidden. Press DISP . to display indicators. 36 The camera is upside down. Hold the camera in the corr ect orientation. 17 Photo is not level, alth[…]
-
Страница 161
155 T ECHNICAL N OTES Miscellaneous Problem Problem Cause Cause Solution Solution Page Page Can not insert memory card. Car d is not in correct orientation. Insert in correct orientation. 13 Camera contr ols have no effect. Battery is exhausted. Charge battery (rechar geable battery only), inser t fresh ba t- tery, or use A C adapter . 10, 12, 165 […]
-
Страница 162
156 T ECHNICAL N OTES Computer-Related Problems F or more inf ormation, refer t o the Software User Guide , available in pdf format on the supplied CD . Security Aler ts ( Windows Vista/Windo ws XP) Consult the follo wing if W indows XP Service Pack 3 or Window s V ista Ser vice P ack 1 display s a security aler t when the camera is connected or DL[…]
-
Страница 163
157 T ECHNICAL N OTES 2 Allow the Ricoh application Internet access . In the “Windows F irewall” dia- log, click the Ex ceptions tab and check whether DL -10 is listed under “Progr ams and Ser vices. ” If it is, place a check in the check box next to DL -10 and click OK . If it is not listed, click Add Pr ogram… to add DL -10 to the list […]
-
Страница 164
158 T ECHNICAL N OTES Specific ations Specific ations Effective pixels Approximat ely 10 million Image sensor /˝ CCD (appro ximately 10.4 million total pix els) Lens Focal length 6.0 mm (35-mm format equivalent: 28 mm) Aperture (f-number) f/1.9 – f/9 (ND filt er used for apertures of f/8.0 – f/11 in auto shooting mode) Focus range […]
-
Страница 165
159 T ECHNICAL N OTES Storage SD/SDHC and MultiMedia memory cards; internal memory (approx. 88 MB) File size (approx.) 3648 × 2736 2,164 KB/frame (N), 3,738 KB/frame (F), 18.2 MB/frame (RA W ) 3648 × 2432 1,925 KB/frame (N), 3,325 KB/frame (F), 16.2 MB/frame (RA W ) 2736 × 2736 1,628 KB/frame (N), 2,809 KB/frame (F), 13.7 MB/frame (RA W ) 3264 ?[…]
-
Страница 166
160 T ECHNICAL N OTES 1 The options available vary with image size. 2 A JPEG file is also recorded (the JPEG file may be a fine- or normal- quality file with the dimensions as the RA W file or a normal-quality file 640 × 480 pixels in size). RA W files use the standard DNG format promoted by Adobe Systems, Inc. 3 Compatible with the D esign rule f[…]
-
Страница 167
161 T ECHNICAL N OTES Internal Memory/Memor y Card Capacity The follo wing table lists the approximat e number of frames or length of movies that can be stored in int ernal memory or on a memor y card at different settings . Internal Internal memory memory 1 GB 1 GB 2 GB 2 GB 4 GB 4 GB 8 GB 8 GB 16 GB 16 GB 32 GB 32 GB Photographs Photographs RAW R[…]
-
Страница 168
162 T ECHNICAL N OTES Optional Accessories Optional Accessories The GR DIGIT AL III can be used with the following option- al accessories: AC-4c A C adapter DB-65 rechargeable battery BJ-6 battery charger GH-2 hood and adapter Includes a hood to prevent sunlight from entering the lens and an adapter for general- purpose filters with a diameter of 4[…]
-
Страница 169
163 T ECHNICAL N OTES GC-3 soft case GC-4 soft c ase (can be used with GV-2) GS-1 or ST-2 neck strap Notes • Before using optional accessories, read the manual pr ovided with the product. • The built-in flash can not be used with con version lenses or lens hoods. • GH-1, GW-1, and GT -1 accessories for GR DIGIT AL and GR DIGIT AL II cameras c[…]
-
Страница 170
164 T ECHNICAL N OTES Camera System and Accessories GF-1 flash unit Attach to hot shoe GC-3/GC-4 soft case GS-1/ST -2 neck strap GV-1/GV-2 external viewfinder CA-1 cable switch DB-65 rechargeable battery (supplied; DB-60 rechargeable batteries can also be used) BJ-6 battery charger (supplied) AC-4c AC adapt er GH-2 lens hood and adapter GW-2 wide c[…]
-
Страница 171
165 T ECHNICAL N OTES Using an Optional AC A dapter An optional AC adapter is r ecommended for extended use or when the camera is connected to a computer . Be sure the camera is off befor e connecting the AC adapter . 1 Open the batter y/card c over . Unlatch ( q ) and open ( w ) the cover and r emove an y batter- ies. 1 2 2 I nsert the AC adapter […]
-
Страница 172
166 T ECHNICAL N OTES Cautions • Disconnect the AC adapter and unplug it from the pow er outlet when not in use. • Data may become corrupted if the AC adapter is disconnected or power is interrupted while the camera is on. • The batter y indicator ( ) may be displayed while the AC adapter is in use. This is normal, and you can continue using […]
-
Страница 173
167 T ECHNICAL N OTES The GF-1 Flash Unit An optional GF-1 flash unit can be connected to the cam- era hot shoe. 1 Close the flash cover (page 25). 2 Attach the flash. T urn the camera and the GF-1 off and attach the GF-1 to the camera hot shoe. Hot shoe 3 T urn the flash and camera on. Note If the optional flash unit icon is not displayed, turn th[…]
-
Страница 174
168 T ECHNICAL N OTES Other Flash Units Use only flash units with one signal terminal , which must be an X-contact with a positive voltage of no mor e than 20 V . Use a flash that covers the angle of view of the lens. 1 Close the flash cover (page 25). 2 Attach the flash. T urn the camera and the optional flash unit off and attach the flash to the […]
-
Страница 175
169 T ECHNICAL N OTES Using the Camera Abroad Using the Camera Abroad Using the AC -4c AC Adapter and BJ-6 Battery Charger These products are f or use with currents of 100–240 V and 50 or 60 Hz. Before travelling , purchase a tra vel adapter for connection to the type of outlets used at your desti- nation. Do not use these products with electrica[…]
-
Страница 176
170 T ECHNICAL N OTES • The flash may overheat if fired many times in succession. Do not use the flash more than necessary. Do not use the flash in close contact with your body or other objects. F ailure t o observe these precautions could result in burns or fire . • Using the flash unit in close proximity to your subject ’ s eyes could cause[…]
-
Страница 177
171 T ECHNICAL N OTES Camera Care and S torage Camera Care and S torage Caring for the Camera • Photog raphs can be affected by fingerprints and other foreig n matter on the lens. A void touching the lens with your fingers . Remove dust or lint with a blower from a camera supply st ore, or gently clean the lens with a soft, dr y cloth. Clean the […]
-
Страница 178
172 T ECHNICAL N OTES Warranty and Servicing Warranty and Servicing 1. This product is backed by a limited warranty . D uring the warranty period mentioned in the Warranty sup- plied with your camera, any defective parts will be repaired fr ee of charge. In the ev ent of a camera malfunc- tion, contact the dealer from which you pur chased the camer[…]
-
Страница 179
173 T ECHNICAL N OTES NOTICES NOTICES USA FCC P art 15 Class B The equipment has been tested and found to comply with the limits f or a Class B digi- tal device, pursuant to part 15 of the FCC Rules. These limits are desig ned to provide reasonable protection against harmful interference in a residential installation. This equipment generates, uses[…]
-
Страница 180
174 Index Symbols Symbols 5 (auto) mode …………………….. 4, 17–21 D (delete) button …………………. 3, 33–35 O ( DISP . ) button ………………….. 3, 36, 37 F (flash) button ……………………….. 3, 5, 24 N (macro) button ……………………….. 3, 23 6 (playback) button …….. 3, 15, 29, 91 t (self-timer)[…]
-
Страница 181
175 DL -10, system requir ements for …. 137 DL -10, unblocking …………………156–157 DL -10, uninstalling ……………………….. 143 DNG …………………………………………………… 58 DPOF ……………………………………………95–96 Dynamic range ………………………………… 48 Dynamic ra[…]
-
Страница 182
176 Manual Flash Amount …………………… 73 Manual focus ……………………………… 59, 60 Memory card ……13–14, 97, 124, 134, 146, 161 Memory card reader …………………….. 146 Memory, internal .. 13, 14, 97, 124, 161 C / D button ……………………. 3, 54 Metering ……………………………….61–62, […]
-
Страница 183
177 Skew ………………………………………51, 98–99 Skew correct mode …………………………. 51 Skew Correction ……………………….98–99 Slide Show ……………………………………….. 92 Snap Focus Distanc e ……………………… 64 Software ………………………… 139–141, 143 Software U[…]
-
Страница 184
T elephone S upport Numbers in Europe T elephone S upport Numbers in Europe UK (from within the UK) (from outside of the UK) 02073 656 580 +44 2073 656 580 Deutschland (innerhalb Deutschlands) (außerhalb Deutschlands) 06331 268 438 +49 6331 268 438 France (à partir de la France) (en dehors de la Franc e) 0800 88 18 70 +33 1 60 60 19 94 Italia (da[…]
-
Страница 185
From envir onmental friendliness to environmental conservation and to environmental management Ricoh is aggressively pr omoting envir onment-friendly activities and also environment conservation activities to solve the gr eat subject of management as one of the citizens on our precious earth. T o reduce the environmen tal loads of digital cameras, […]
Новый высокопроизводительный процессор GR ENGINE 6
Сочетание нового высокопроизводительного процессора GR ENGINE 6 и отдельного графического ускорителя гарантирует высокую скорость обработки и проработки данных, что особенно важно при отображении даже самых лёгких тоновых переходов. GR III способен записывать изображения в формате RAW с глубиной 14 бит.
NEW Система гибридного автофокуса Hybrid AF для быстрой, точной и отзывчивой фокусировки
Камера GR III оснащена новой фирменной гибридной системой автофокуса. Сочетание контрастной и фазовой систем представляет собой инновационное решение, которое берет лучшее от каждого типа фокусировки для получения быстродействующего и высокоточного автофокуса.
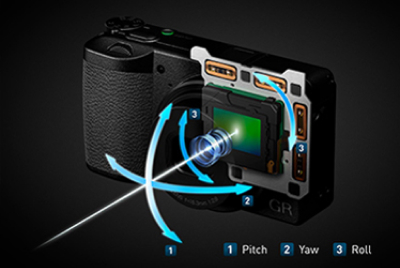
NEW Фирменный механизм Shake Reduction
Трехосевая система стабилизации матрицы не только компенсирует классическую «шевеленку» в горизонтальной и вертикальной плоскостях, но и компенсирует сотрясения иного происхождения, с эффективностью до 4 ступеней экспозиции. *Shutter speed conversion. CIPA standard.
NEW Интуитивное управление
Камера оснащена новым ЖК-монитором с сенсорным управлением и удобными селекторами управления для быстрого доступа к меню и интуитивного управления функцией автофокусировки.
NEW Компактнее предшественников
Корпус GR III спроектирован исключительно компактным: несмотря на наличие большого сенсора формата APS-C корпус GR III меньше даже по сравнению с камерами, обладающими меньшей матрицей размером 1/1.7 дюйма. Таким образом, обеспечивается одна из уникальных особенностей серии GR: способность помещаться практически в любой карман, не говоря уже о сумке или рюкзаке.
Развитие
Расширение функционала GR III с последующими обновлениями ПО. После выпуска камеры планируется дальнейшее расширение функционала посредством плановых обновлений ПО.
Кастомизация
Возможность применения пользовательских настроек (кнопоки ADJ и Fn).
Функция Image Control
Новая функция Image Control позволяет сделать финальную редакцию изображения стандартной и удобной операцией, не требующей дополнительных усилий. Используя 10 базовых режимов Image Control, пользователь может комбинировать сочетание настроек различных параметров, таких как: насыщенность, тени,ключ (высокий/низкий), контраст и зерно.
Исключительное качество изображения высокого разрешения
Наиболее четкое и резкое изображение за всю историю существования GR.
Специально разоработанный для GR III компактный объектив с фокусным расстоянием 18.3мм и постоянной светосилой F2.8 обеспечивает исключительное качество изображения. Сверхкомпактная светосильная оптическая схема включает в себя шесть элементов в четырех группах, покрывая фокусное расстояние 28 мм (в формате 35мм). Оптимальное сочетание низкодисперсионных линз высокого разрешения и отлитых из стекла асферических элементов формируютпревосходное, контрастное и резкое изображение с реалистичной цветопередачей, что, в сочетании со сведенными к минимуму хроматическими аберрациямии дисторсией, позволяет получить наиболее четкое и резкое изображение за всю историю существования GR. Также сведены к минимуму паразитныеотражения при съемке в условиях слабой освещенности или контрового света.
NEW Большой КМОП-сенсор формата APS-C разрешением 24.24 Мп для детализированного изображения высокого разрешения
Фотокамера GR III оснащена новым большим КМОП-сенсором формата APS-C (приблизительно 24.24 эффективных мегапикселей), созданного без встроенного первичного сглаживающего (АА) фильтра для увеличения резкости и микроконтраста, что гарантирует сверхвысокое разрешение с богатыми градациями цвета и полутонов.
NEW Съемка на высоких значениях чувствительности до ISO 102 400
Эффективная работа системы шумоподавления, позволяет получать снимки высокого разрешения без артефактов и зернистости на значениях чувствительности вплоть до ISO 102 400.
NEW Трехосевая система стабилизации матрицы с эффективностью до 4 ступеней экспозиции
Трехосевая система стабилизации матрицы не только компенсирует классическую «шевеленку» в горизонтальной и вертикальной плоскостях, но и компенсирует сотрясения иного происхождения, с эффективностью до 4 ступеней экспозиции. * По стандарту CIPA.
NEW Встроенный эмулятор сглаживающего АА-фильтра* для минимизации появления муара и ложной цветопередачи
Для минимизации этих редко встречающихся эффектов в процессе экспонирования происходят микроскопические колебания матрицы на субпиксельном уровне. Это позволяет фотографувыбирать желаемый визуальный эффект в зависимости от художественного замысла либо сглаживающий эффект посредством включения эмулятора, либо сверхвысокую резкость за счет отсутствия физического АА-фильтра в конструкции матрицы. * Наиболее эффективная работа эмулятора – при скорости спуска затвора не более 1/1000 сек.
NEW Компактный корпус, интуитивный интерфейс и уникальная эргономика
GR III cочетает в себе исключительное качество изображения высокого разрешения, выдающееся быстродействие и невероятно компактный корпус с уникальной эргономикой, позволяющей управлять камерой одной рукой.
NEW Система гибридного автофокуса Hybrid AF для быстрой, точной и отзывчивой фокусировки
Камера GR III оснащена новой фирменной гибридной системой автофокуса. Сочетание контрастной и фазовой систем представляет собой инновационное решение, которое берет лучшее от каждого типа фокусировки для получения быстродействующего и высокоточного автофокуса.
NEW Ускоренное время старта до 0.8 секунд
Ускоренное до 0.8 с время «холодного» старта делает камеру даже более быстрой и отзывчивой, чем предшественик GR II. С GR III вы не упустите ни одного момента!
Восемь режимов автофокуса для широкого спектра объектов съемки
Восемь режимов автофокусировки, включая новый Continuous AF для широкого спектра сюжетов. Новый сенсорный ЖК-монитор позволит производить сдвиг рамки автофокуса и фокусироваться нажатием (Touch AF).
Обнаружение и автоматическая фокусировка на лицах при портретной съемке
Камера обнаруживает лица и автоматически фокусируется на них. Эта функция доступна при режимах в [Auto Area AF], [Select AF] и [Pinpoint AF]. Её также возможно включить в режиме [Auto Area AF]. Вы сможете легко сфокусироваться на каком-либо объекте помимо лица простым переключением фокуса, без процесса выключения/выключения функции обнаружения лиц.
Кнопка затвора поможет вам не упустить кадр
Камера сохраняет сделанную после первого кадра фокусировку, если вы не отпустите кнопку спуска затвора до конца (т.е. оставите ее в полунажатом состоянии). Камера не будет пытаться перефокусироваться и вы можете мгновенно сделать еще один кадр. Эта функция высокоскоростной съемки уникальна для GR.
NEW Интуитивное управление благодаря сенсорному экрану и диску управления
ЖК-дисплей GR III оснащен сенсорной панелью. Фокус легко перемещается касанием. Вы также можете увеличивать изображение во время просмотра и пролистывать получившиеся снимки. Диск управления, расположенный вокруг кнопки Menu, позволяет удобно и быстро управлять камерой и листать меню.
Гибкая настройка камеры для индивидуальных художественных задач
Настройте кнопки ADJ и Fn так, как удобно вам. Вы также можете сохранить настройки камеры и пользовательские режимы съемки (U1 / U2 / U3), которые соответствуют вашим художественным задачам.
СОХРАНЯЙТЕ СВОИ ВПЕЧАТЛЕНИЯ
NEW Наиболее четкое и резкое изображение за всю историю существования GR.
В GR III все настройки изображения были объединены вместе с эффектами в новую функцию — Image Control. В её основе 10 различных настроек: насыщенность, оттенок, регулировка клавиш высокого / низкого уровня, контрастность, резкость, затенение, четкость, тонирование, фильтра, зернистость * и уровень тона HDR. Теперь можно настроить любой параметр так, как нравится вам. *Параметры, которые можно настраивать, различаются от выбранного режима Image Control. *Эти параметры будут доступны через обновление прошивки.
NEW Режим макросъемки позволяет снимать с расстояния от 6 см
В режиме макросъемки, GR III позволяет фокусироваться на расстоянии от 6 до 12 см. Это обеспечивает почти такую же степень увеличения (x 0,35 раза), как и при использовании макро-конверсионного объектива GM-1 к GR II. Просто нажмите кнопку макросъемки, чтобы сделать впечатляющие фотографии крупным планом и красивым боке. * Режим макросъемки и нормальный режим необходимо переключать вручную. * Камера переключается в режим макросъемки, когда фокус установлен на [Snap] или [∞].
Функция «интервальной композиции» для съемки небесных объектов
Камера поддерживает функцию «Интервальной композиции». В этом режиме камера производит съемку ночного неба с заданным интервалом, чтобы после объединить несколько кадров в единую фотографию. Эта функция будет полезна, если хочется запечатлеть ночное небо с впечатляющими следами звезд.Время съемки может быть неограниченным, а интервалы можно установить от 10 минут до 24 часов. Вы также можете сохранить промежуточные фотографии. * Рекомендуем использовать штатив. Обратите внимание, что подавление шума при низкой скорости затвора и SR отключены. * Фокус, экспозицию и баланс белого можно установить перед началом съемки, до первого кадра.
Режим цифрового зумирования — широкие художественные возможности
Режим цифрового зумирования (обрезки*) без потери качества позволяет мгновенного изменить фокусное расстояние объектива и снимать или на 35 мм, или на 50 мм (в эквиваленте формата 35 мм)*. Возможность выбрать одно из трех фокусных расстояний расширяет выразительные возможности для реализации творческих идей. 24-мегапиксельный сенсор высокого разрешения позволяет делать четкие снимки размером до 15M (35 мм) и 7M (50 мм). *При использовании функции обрезки размер изображения будет ограничен значением M при использовании 35мм или значением S при 45мм.
Креативные снимки в режиме мультиэкспозиции
Режим мультиэкспозиции в GR III позволяет объединять неограниченное количество снимков. Промежуточный результат можно просматривать на экране во время процесса наложения кадров. В этом режиме вы можете изменять экспозицию*, снимать, повторно снимать и заканчивать съемку для каждого снимка, чтобы легко создать именно фото, который вы хотите. * Компенсацию экспозиции, чувствительность ISO, диафрагму и выдержку можно регулировать в зависимости от режима экспозиции, установленного для первого кадра. Баланс белого изменять нельзя.
Настраиваемый ND фильтр
Камера оснащена встроенным ND-фильтром, обеспечивающим две ступени экспонирования. Благодаря настраиваемому ND фильтру вы можете размыть фон даже при ярком солнечном свете, с максимально открытой диафрагмой, или заснять движение объекта на длительной выдержке.
Добавлен режим измерения экспозиции «Замер по ярким участкам» (Highlight-weighted)
В дополнение к имеющимся режимам [Мультизонный], [Центровзвешенный] и [Точечный], в качестве метода измерения экспозиции теперь доступен режим [Замер по ярким участкам]. Этот режим помогает сохранять равномерность экспозиции, вести количество пересветов к минимуму. Он убережёт ваши снимки от потери деталей в светлых областях кадра. Снимок ниже сделан с использованием режима «Замер по ярким участкам».
Внутрикамерная обработка изображений в формате RAW без привязки к ПК
Камера оснащена внутрикамерной обработкой изображений в формате RAW. При обработке RAW файла в камере можно настроить баланс белого, произвести коррекцию хроматической аберрации, применить различные эффекты и настроить другие параметры, а затем обработанное изображение можно сохранить формате JPEG.
NEW Автосинхронизирующая вспышка P-TTL для универсального освещения
GR III совместима со стандартными цифровыми фотовспышками Pentax, подключаемыми через горячий башмак. Вспышка PENTAX P-TTL с поворачивающейся головкой, позволяет вести съемку в отраженном свете. Используя вспышку, например, при съемке портретов, можно подсвечивать объект съемки не создавая при этом резких теней. Это полезно для тех, кто желает смягчить тени на портрете или управлять освещенностью объекта съемки при помощи света с внешней вспышки.
* Совместимые вспышки AF540FGZ II, AF360FGZ II, AF540FGZ, AF360FGZ AF201FG и AF200FG.
NEW Смотрите шире: опциональный 21мм широкоугольный конвертер
Дополнительный широкоугольный конвертер* GW-4 (с кратностью 0.75X и оптической схемой, оптимизированной для использования с GR III) обеспечивает возможность уменьшить фокусное расстояние объектива до значения 21 мм (в эквиваленте формату 35 мм). Функция Shake Reduction автоматически оптимизируется для фокусного расстояния 21 мм.
*Конвертер крепится при помощи адаптера GA-1.
NEW Компактный корпус, интуитивный интерфейс и уникальная эргономика
Подключив GR III к мобильному устройству по Wi-fi, вы можете удаленно делать фотографии, управлять настройками камеры и просматривать их на экране смартфона или планшета. Теперь камера также может быть подключена к смартфону посредством Bluetooth. Появились такие удобные функции, как автоматическая передача записанных изображений, подтягивание гео-меток, просмотр изображений на смартфоне при выключенной камере и т.д.
NEW Ультразвуковая система очистки сенсора
С помощью пьезоэлемента этот инновационный механизм воздействует сверхзвуковыми вибрациями на панель из оптического стекла, покрывающую матрицу. Это позволяет эффективно удалить все частички пыли, прилипшие к поверхности сенсора и избежать появления ненужных следов на захваченном изображении. Встроенная память (2 Гб). Можно записать около 140 изображений (JPEG: L, 3:2) на встроенную память камеры, если ваша карта памяти переполнена или повреждена. Записанные на встроенную память изображения можно легко перенести на карту памяти. Изображения с карты памяти нельзя перенести во встроенную память камеры.
Легко делиться фотографиями при помощи приложения Image Sync
Приложение Image Sync* для смартфонов и планшетов позволяет переносить выбранные снимки на другие устройства, а также просматривать их и делиться изображениями в социальных сетях. Приложение можно скачать бесплатно с App Store (iOS) и Google Play™(Android™). Для свежей информации относительно совместимости с операционными системами обращайтесь на сайт Ricoh Imaging или свяжитесь с авторизованным сервисным центром.
В скором времени будет доступно обновление данного приложения.
Нет необходимости в отдельном зарядном устройстве для аккумулятора
GR III подключается к источнику питания через кабель USB Type-C, входящий в комплект, позволяющий с высокой скоростью переносить данные на ПК и ноутбук, а также демонстрировать фотографии на экране мониторов.
* В зависимости от устройства для подключения может потребоваться переходник USB Type-C — HDMI.
NEW Настройка яркости экрана, которая адаптируется к условиям съемки
GR III оснащена функцией настройки яркости экрана, которая обеспечивает оптимальную видимость как в условиях яркого наружного освещения, так и в темноте.
Вы можете быстро настроить яркость монитора под условия вашей съемки.
На этом фото показано как выглядит экран при съемке в дневное время.
Надежный корпус из магниевого сплава
Корпус камеры изготовлен из легкого и прочного магниевого сплава, имеет правильную развесовку и снабжен специальным покрытием на рукоятке для удобства съемки. Магниевый сплав обладает такими свойствами как малый вес и прочность.
Опциональные аксессуары
Фотографии, снятые на Компактный фотоаппарат RICOH GR III
Тип
Тип камеры
Компактная цифровая камера
Сенсор
Тип
CMOS (КМОП). Высокочувствительный CMOS-сенсор без низкочастотного сглаживающего фильтра. Оригинальная технология подавления муара — оптико-механический сглаживающий фильтр с тремя режимами работы (OFF/Низкий/Высокий) (технология на основе микровибраций матрицы)
Эффективных пикселей
Приблизительно 24.24 Мп
Фото
JPEG: [3:2] — L (24M:6000×4000), M (15M:4800×3200), S (7M:3360×2240), XS (2M:1920×1280); [1:1] — L (16M:4000×4000), M (10M:3200×3200), S (5M:2240×2240), XS (1.6M:1280×1280); RAW и RAW+: [3:2] — 24M(6000×4000); 15M(4800 x 3200); 7M(3360 x 2240); [1:1] — 16M(4000 x 4000); 10M(3200 x 3200); 5M(2240 x 2240)
Видео
Full HD (1920×1080, 60p/30p/24p) со стереозвуком
Всего пикселей
Приблизительно 24.24 Мп
Чувствительность
ISO 100 — 102 400 (с шагом 1EV, 1/2EV или 1/3EV); Авто, ручная установка
Стабилизация изображения
Трехосевая стабилизация на основе сдвига матрицы Shake Reduction
Глубина цвета
14 бит (RAW)
Очистка сенсора
Механическая (Dust Removal II, вибрацией сенсора)
Объектив
Фокусное расстояние
18.3 мм эквивалент 28 мм в 35 мм
Конструкция
6 элементов в 4 группах (2 асферических элемента)
Относительное отверстие
f/2.8
Минимальная величина относительного отверстия
f/16
Цифровой зум
Обрезка кадра, до соответствия 35 и 50 мм (в эквиваленте формат 35 мм)
Система фокусировки
Тип
Гибридная фокусировка: фазовый метод и контрастная детекция
Функции
Автообласть АФ, Выбор АФ, Высокоточный АФ, Следящий АФ, Непрерывный АФ, Ручной фокус, Моментальная фокусировка в фиксированном диапазоне (Snap), Фокусировка на бесконечность
Диапазон автоматической фокусировки
Стандартное: приблизительно от 10 см до бесконечности. Макро: приблизительно от 6 см до 12 см (имеется возможность ограничения диапазона фокусировки в режиме макро)
Диапазон ручной фокусировки
от 10 см до бесконечности
Подсветка АФ
Cветодиодная подсветка
Видоискатель
Тип
Внешний оптический видоискатель (приобретается отдельно)
Жидкокристаллический монитор
Тип
3-дюймовый (7,6 см) цветной ЖК экран типа TFT (соотношение сторон 3:2). Сенсорное управление. Отсутствие воздушной прослойки между защитным стеклом и индикатором. Оперативная настройка яркости дисплея под внешние условия с шагом ±2. Отображение композиционной сетки (4×4, 3×3). Частота обновления ЖК экрана 60 кадр/с
Разрешение
Приблизительно 1 037 000 пикселей
Управление экспозицией
Контроль экспозиции
Гистограмма при съемке и воспроизведении. Подсветка переэкспонированных участков. Встроенный нейтральный фильтр (2EV)
Режимы замера
Многосегментный экспозамер, Центрально-взвешенный экспозамер, Точечный экспозамер, Взвешенный по засветке экспозамер
Экспозиционные режимы
Программный автомат (P), Приоритет диафрагмы (Av), Приоритет выдержки (Tv), Ручной режим (M). Сохранение экспозиционных режимов в одной из трех пользовательских настроек, Сдвиг экспопары, Коррекция (расширение) динамического диапазона
Компенсация экспозиции
Фото: от +5.0 до -5.0EV с шагом 1/3EV. Видео: от +2.0 до -2.0EV с шагом 1/3EV
Затвор
Выдержка
Автоматическая или ручная: от 1/4000 до 30 сек (при установке диафрагмы F2.8 максимальная скорость ограничена 1/2500 сек, начиная с диафрагмы F5.6 ограничения отсутствуют). Длительная выдержка по таймеру (10 сек — 20 мин). Длительная выдержка от руки (Bulb)
Задержка спуска затвора
Приблизительно 30 мс
Синхронизация со вспышкой
Со всеми возможными выдержками
Вспышка
Режимы
Для внешней вспышки: Автоматическая, Авто с коррекцией «красных глаз», Принудительная с коррекцией «красных глаз», Медленная синхронизация с коррекцией «красных глаз»
Компенсация экспозиции
От -2.0EV до + 1.0EV
Управление параметрами съемки
Режимы
Однокадровая съемка, Серийная съёмка, Автоспуск (задержка 2 или 10 секунд), Брекетинг, Мультиэкспозиция, Интервальная съёмка, Интервальная мультиэкспозиция
Распознавание лиц
В режиме автофокуса, отключаемая функция
Баланс белого
Автоматический, Многозонный авторежим, Дневной свет, Тень, Облачность, Люминисцентный (свет-дневной, цвет белый, холодный белый, теплый белый), Лампа накаливания, CTE, Ручной баланс белого, Настройка цветовой температуры. Тонкая настройка цвета ±14 шагов по оси A-B или G-M
Цифровые фильтры при съемке
Пользовательские настройки изображения: Стандартный, Яркий, Однотонное, Мягкое однотонное, Жесткое однотонное, Высокий контраст ч/б, Слайд, Bleach Bypass, Ретро, Тон HDR, Пользовательский1, Пользовательский 2
Bluetooth
Стандарты
Bluetooth® v4.2 (Bluetooth Low Energy)
Частота (Центральная частота)
2402 МГц ~ 2480 МГц (каналы 0~39)
Видео
Запись
Разрешение: Full HD (1920×1080, 60p/30p/24p). Формат: MPEG-4 AVC/H.264 (MOV). Звук: встроенный стерео микрофон. Время записи: до 25 минут (или по достижении размера записываемого файла 4ГБ); автоматическое прекращение записи при перегреве внутренних элементов
Редактирование
Обрезка, разделение
Воспроизведение
Настройки
Редактирование фото: Поворот изображения, Изменение размеров, Коррекция базовых параметров (яркость, насыщенность, контраст, резкость), Коррекция уровней, Коррекция баланса белого, Кадрирование, Удаление муара. Редактирование видео: Обрезка, разделение. Конвертация RAW: Разрешение JPEG, Соотношение сторон, Цветовое пространство, Баланс белого, Управление изображением, Виньетирование, Чувствительность, Подавление шумов, Компенсация теней
Хранение данных
Встроенная память
Приблизительно 2 ГБ
Сменная карта памяти
SD, SDHC, SDXC. Совместима со стандартом UHS-I
Формат файла
Фото: RAW (DNG), JPEG (Exif 2.3), DCF2.0. Видео: MPEG-4 AVC/H.264 (MOV)
Имя файла
«IMGP****» или определяемое пользователем имя
Примечания
Язык
Многоязыковая поддержка меню включая русский
Особые замечания
Технические характеристики и габариты изделия могут быть изменены без предварительного уведомления со стороны изготовителя
Сеть Wi-Fi
Стандарты
IEEE 802.11b/g/n
Частота (Центральная частота)
2412 МГц ~ 2462 МГц (каналы 1 ~ 11)
Интерфейс
Интерфейс
USB Type-C™: Зарядка батареи/Подключение к источнику питания (может понадобиться сетевой адаптер), Передача данных (протокол MTP), Вывод видео: протокол DisplayPort через USB-C (режим DisplayPort Alternative Mode)
Питание
Источник
Литий-ионный аккумулятор DB-110. Опциональный сетевой адаптер
Срок службы батареи
Фото*: приблизительно 200 снимков. Просмотр**: приблизительно 180 мин. * По стандарту CIPA, может меняться в зависимости от условий работы камеры. ** Согласно тестированию PENTAX
Совместимость
PC
Windows 10 (FCU/CU) (32bit/64bit), Windows 8.1 (32bit/64bit)
Mac
macOS 11 BigSur, macOS 10.15 Catalina, macOS 10.14 Mojave
Аксессуары
Содержимое комплекта
Литий-ионный аккумулятор DB-110, Сетевой адаптер для зарядки аккумулятора (выход USB), Кабель USB I-USB166, Ремешок для руки, Крышка «горячего башмака» (установлена на камере), Декоративное кольцо объектива Ring Cap GN-1 (установлено на камере), Фирменный гарантийный талон, Инструкция по эксплуатации на русском языке
Габариты и вес
Вес
227 г (без аккумулятора и карты памяти), 257 г (с аккумулятором и картой памяти)
Конструкция
Особенности эргономики и органов управления
Гибко настраиваемые органы управления. 3 комплекта пользовательских настроек на управляющих дисках. Настраиваемый селектор ADJ. Настраиваемая функциональная кнопка Fn. Гибкая настройка индикации дисплея
Видео
GR CONCEPT MOVIE
GR official
22.02.2019
GR Ⅲ in Paris
GR official
21.02.2019
Обзор Ricoh GR III. Компактная камера в кармане
PhotoWebExpo
24.04.2019
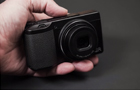
RICOH GR III | Маленький профессионал
Mike Toptygin
25.04.2019
DPReview TV: Ricoh GR III Review
DPReview
13.04.2019
Kai W по-русски: Ricoh GR III — лучшая камера, которую стоит взять с собой
SlyLama TV
12.07.2019
Обзоры
Аксессуары
-
Ricoh GR Digital III — page 1
Before Y ou Begin Before using y our camera, take a few moments to familiarize y our- self with camera controls and displays (pages 1–8). Ref er to this sec- tion as you read through the rest of the manual. Basic Photography and Playback Read this section before using the camera for the first time. It covers the steps involv ed in readying the ca …
-
Ricoh GR Digital III — page 2
ii Package Contents Package Contents Before using y our Ricoh digital camera, confirm that the package contains the items listed below . GR DIGIT AL III The serial number may be found on the bot- tom of the camera. USB cable with mini-B connector Connect the camera to a computer or printer . DB-65 rechargeable batt ery BJ-6 battery charger Hot shoe …
-
Ricoh GR Digital III — page 3
iii Notices Notices • Safety precautions Safety precautions : Read all safety precautions thoroughly to ensure safe use. • T est shots T est shots : T ake test shots to ensure that the camera is w orking properly before taking photos on important occasions. • Copyright Copyright : Reproduction or alteration of copyrighted documents , mag- azi …
-
Ricoh GR Digital III — page 4
iv Product M anuals Product Manuals The following manuals are pr ovided with the GR DIGIT AL III: Before You Begin Before using your camera, take a few moments to familiarize your- self with camera controls and displays (pages 1–8). Refer to this sec- tion as you read through the rest of the manual. Basic Photography and Playback Read this sectio …
-
Ricoh GR Digital III — page 5
v T able of Contents T able of Contents P ackage Contents ………………………………………………………………………………………… ii Notices ……………………………………………………………………………………………………….. …… iii Pr oduct Manuals ………………………… …
-
Ricoh GR Digital III — page 6
vi Referenc e 3 Referenc e 3 9 9 Read this section for more information on camera functions. More on Photograph y ……………………………………………………….. 40 Mode P: Pr ogram Shift …………………………………………………………………………….. 40 Mode A: Aper ture P riority ………………….. …
-
Ricoh GR Digital III — page 7
1 F IRST — TIME USER ? R EAD THIS . 1 Before Y ou Begin Read this section before using your camer a for the first time . Introduction ………………………………………………. 2 …
-
Ricoh GR Digital III — page 8
F IRST — TIME USER ? R EAD THIS . 2 Introduc tion This manual describes how to take pictures and pla y them back. T o ensure that you get the most fr om your camera, read this manual thoroughly bef ore use and keep it han- dy when using the product. Parts of the Camera Parts of the Camera F or more inf ormation, refer t o the page number to the rig …
-
Ricoh GR Digital III — page 9
F IRST — TIME USER ? R EAD THIS . 3 Back 1 2 4 8 9 7 6 11 1 0 12 13 15 5 14 3 16 19 18 17 20 1 1 Picture display …………………….. 6–8 2 2 Autofocus/flash lamp …… 14, 18, 25 3 3 Connector for A/V cable …………. 104 4 4 Connector for USB cable …………107 5 5 ADJ. lever …………….5, 78, 119–120 6 6 8 (enlarged view) b …
-
Ricoh GR Digital III — page 10
F IRST — TIME USER ? R EAD THIS . 4 The Mode Dial Before shooting , press the mode dial lock release ( q ) and rotat e the mode dial to choose a shoot- ing mode ( w ). 5 (auto) : The camera sets shutter speed and aperture for op- timal exposure (page 17). M (manual exposure) : Y ou choose shutter speed and aperture (page 44). MY1 , MY2 , MY3 (“my …
-
Ricoh GR Digital III — page 11
F IRST — TIME USER ? R EAD THIS . 5 The Up- down Dial and ADJ. Lev er When viewing pictures or navigat- ing the menus, you can use the up- down dial in place of the ! and » buttons and the ADJ. lev er in place of the # and $ buttons. The ADJ. lever and up- down dial can also be used to select shutter speed and aperture in P , A , S , and M mod …
-
Ricoh GR Digital III — page 12
F IRST — TIME USER ? R EAD THIS . 6 The Picture D ispla y The follo wing indicators may be display ed during shoot- ing and playback. Shooting (still photography) Shooting (movie mode) 12 34 56 7 89 10 11 12 13 14 15 16 17 18 29 28 27 26 30 30 30 25 25 25 24 23 22 21 20 19 19 19 32 33 34 31 1 1 Flash mode ………… 24 2 2 Flash compensation/ man …
-
Ricoh GR Digital III — page 13
F IRST — TIME USER ? R EAD THIS . 7 Playback (photographs) Playback (movies) 12 34 56 7 89 15 10 1 1 12 13 14 17 16 18 19 1 1 File number 2 2 Current fr ame 3 3 T otal frames 4 4 Playback mode indicator 5 5 Protected image …. 92 6 6 DPOF print indicator ……………. 95 7 7 Source ………………. 13 8 8 Picture quality ……. 57 9 9 Pictu …
-
Ricoh GR Digital III — page 14
F IRST — TIME USER ? R EAD THIS . 8 The Batter y Level Indicator Battery level is shown by the icon at the bottom right corner of the picture display . Cautions • The full battery indicator may not appear or may appear only briefly with NiMH bat- teries. Check the battery type before use . Icon Icon Description Description ( green ) Battery fully …
-
Ricoh GR Digital III — page 15
9 F IRST — TIME USER ? R EAD THIS . 9 First Steps ………………………………………………… 10 T aking Photographs…………………………………. 17 Viewing and Deleting Phot ographs ………….. 29 Basic Photograph y and Playback Read this section before using your camer a for the first time . …
-
Ricoh GR Digital III — page 16
F IRST — TIME USER ? R EAD THIS . 10 First Steps Pr epare the camera for use . Charging the Battery Charging the Battery The rechargeable batt ery supplied with the camera is not charged at shipment. Charge the battery in the supplied BJ-6 battery charger before use. 1 Place the battery in the charger . Place the battery label up with the “+” a …
-
Ricoh GR Digital III — page 17
F IRST — TIME USER ? R EAD THIS . 11 Compatible Batteries The camera can be used with a DB-65 rechargeable Li-ion battery (supplied; DB-60 rechargeable batteries can also be used) or with a pair of AAA alkaline or rechargeable nickel-metal hydride (NiMH) batteries . Tip: Battery Capacity Under normal conditions, about 370 shots can be taken with a …
-
Ricoh GR Digital III — page 18
F IRST — TIME USER ? R EAD THIS . 12 Inserting the Battery Inserting the Batter y Be sure the camera is off befor e inserting or removing batteries. 1 Open the batter y/card c over . Unlatch ( q ) and open ( w ) the cover . 2 I nsert the battery. 1 2 Using the battery to keep the battery latch pressed to one side, slide the battery in. The latch wi …
-
Ricoh GR Digital III — page 19
F IRST — TIME USER ? R EAD THIS . 13 Inserting Memor y Cards Inserting Memor y Cards Pictures can be stor ed in the camera ’ s 88 MB internal memor y , or optional SD and SDHC memor y cards can be used to store additional pictures . Internal memory is used for rec ording and playback if no car d is inserted; if a card is inserted, the card will b …
-
Ricoh GR Digital III — page 20
F IRST — TIME USER ? R EAD THIS . 14 Cautions • Pictures will not be recor ded to internal memory when a memo — r y card is inserted, even if the memory card is full. • Keep the memor y card contacts clean. Tip: Writ e Protection Memor y cards can be prot ected by slid- ing the write-protection switch to “ L OCK ,” keeping data from being w …
-
Ricoh GR Digital III — page 21
F IRST — TIME USER ? R EAD THIS . 15 T o turn the camera off , press the POWER button again. The number of pictures taken so far that day will be displayed bef ore the cam- era turns off (zero is display ed if the camera clock is not set; if you turn the camera off after changing the clock, the camera will display the number of pictures taken since …
-
Ricoh GR Digital III — page 22
F IRST — TIME USER ? R EAD THIS . 16 Basic Setup Basic Setup A language -selection dialog is displayed the first time the camera is turned on. F ollow the steps below t o choose a language and set the time and date. T o exit before setup is complete, pr ess DISP . ; the language, time , and date can be changed at any time in the setup menu (page 13 …
-
Ricoh GR Digital III — page 23
F IRST — TIME USER ? R EAD THIS . 17 T aking Photographs After setting up the camera as de — scribed in “First Steps ” (pages 10– 16), you are r eady to take your first photos. P ress the POWER button t o turn the camera on and rotate the mode dial to 5 . Holding the Camera Holding the Camera Hold the camera as shown below . 1 Hold the camera …
-
Ricoh GR Digital III — page 24
F IRST — TIME USER ? R EAD THIS . 18 T aking a Photograph T aking a Photograph 1 F ocus. F rame your subject in the center of the picture dis- play and press the shutter-r elease button halfway t o set focus and exposure . If the camera is unable to focus , the center f ocus frame blinks red and the autofocus/flash lamp blinks green. If the camera …
-
Ricoh GR Digital III — page 25
F IRST — TIME USER ? R EAD THIS . 19 Tip: The Shutter-Release Butt on The camera has a two-stage shutter-release button. T o f ocus, lightly press the shutter-r elease button until you f eel resistance. This is called “pressing the shutter-r elease button halfway . ” Press the shutter-release butt on the rest of the way down to shoot. Tip: Focu …
-
Ricoh GR Digital III — page 26
F IRST — TIME USER ? R EAD THIS . 20 Tip: A voiding Blurred Pictures T o prevent blurring caused by the camera moving when the shut- ter is released (“ camera shake”), pr ess the shutter-r elease button smoothly and gently . Blurring is par ticularly likely to occur if : • The flash is off and lighting is poor , or • The camera is zoomed in …
-
Ricoh GR Digital III — page 27
F IRST — TIME USER ? R EAD THIS . 21 Focus Lock Use focus lock t o compose photographs in which the subject is not in the center of the frame. F ocus lock can also be used if the camera is unable to focus (page 18). 1 F ocus. P osition your subject in the center of the picture dis- play and press the shutter-r elease button halfway t o focus. 2 Rec …
-
Ricoh GR Digital III — page 28
F IRST — TIME USER ? R EAD THIS . 22 Digital Zoom Digital Zoom When Digital Zoom is selec ted f or Zoom Button (page 122), the 8 button can be used to zoom in t o a maximum of 4.0 ×. Use the 9 button to zoom out. Zoom in Zoom out 1 Assign digital zoom to the 8 and 9 buttons. Select Digital Zoom f or the Zoom Button option in the setup menu (page 1 …
-
Ricoh GR Digital III — page 29
F IRST — TIME USER ? R EAD THIS . 23 Close-ups (M acro Mode) Close-ups (Macro Mode) Use macro mode f or close -ups of small objects as close as 1.0 cm (0.4 in.) to the lens (at this distance , the area pho- tographed will be about 26 × 19 mm/1.0 × 0.7 in.). 1 Press the N button. A N icon will be briefly dis- played in the cent er of the picture d …
-
Ricoh GR Digital III — page 30
F IRST — TIME USER ? R EAD THIS . 24 Flash Photography Flash Photography The flash only fires when raised . Slide the F OPEN switch to raise the flash and press the F button t o choose from the following flash modes: Mode Mode Description Description Flash Off The flash is off and will not fire. Auto The flash fires automatically when r equired. Re …
-
Ricoh GR Digital III — page 31
F IRST — TIME USER ? R EAD THIS . 25 2 S elect a flash mode. Pr ess the F button to select a flash mode. The flash mode icon is briefly displayed in the center of the picture display and then appears in the top left corner of the display . Note The selected flash mode remains in effect until a new mode is chosen. The autof ocus/flash lamp blinks wh …
-
Ricoh GR Digital III — page 32
F IRST — TIME USER ? R EAD THIS . 26 The Self- Timer The Self- Timer The camera offers a t en-second timer for self-portraits and a two-second timer to prevent blur caused by camera movement when the shutter-r elease button is pressed . Note By default, the self-timer is assigned to the t ( Fn2 ) button, but it can also be assigned to the Fn1 butto …
-
Ricoh GR Digital III — page 33
F IRST — TIME USER ? R EAD THIS . 27 The Tilt Indic ator The Tilt Indic ator Use the tilt indicator to lev el the camera when photo- graphing buildings or landscapes. It is particularly useful for compositions in which the horiz on is visible. 1 Display level setting options. Pr ess and hold the O ( DISP . ) button until level setting op- tions are …
-
Ricoh GR Digital III — page 34
F IRST — TIME USER ? R EAD THIS . 28 Understanding the Tilt Indicator Green Orange Camera lev el Tilt camer a left to level Red Unable to measure tilt; camer a rotated too far forward or back Camera tilted 90 ° left Note Tilt indicator settings can also be adjusted in the setup menu (pages 113, 127). Cautions • The tilt indicator is not displaye …
-
Ricoh GR Digital III — page 35
29 F IRST — TIME USER ? R EAD THIS . Viewing and Deleting Photographs Pictures can be viewed in the picture displa y . Viewing Photographs Viewing Photographs Pr ess the 6 button to display the last photograph viewed . Tip: If the Camera Is Off If the camera is off, press the 6 butt on for about a second to turn the camera on and start playback . P …
-
Ricoh GR Digital III — page 36
30 F IRST — TIME USER ? R EAD THIS . Caution: RAW Images The camera records JPEG copies of RA W images for display in the picture display . When a RA W image is selected for playback, the camera shows the JPEG copy and a RA W-mode indicator is dis- played. If the JPEG copy has been deleted using a computer or other device, the camera will display a …
-
Ricoh GR Digital III — page 37
31 F IRST — TIME USER ? R EAD THIS . Viewing Multiple Photographs Use the 9 and 8 buttons to choose the number of photos dis- played fr om one, 20, and 81. Multi- frame views can be used to select images for display or deletion. Single frame 20 frames 81 frames In multi-frame views, press ! , » , # , and $ to highlight photographs. In 20-frame …
-
Ricoh GR Digital III — page 38
32 F IRST — TIME USER ? R EAD THIS . Playback Zoom Pr ess the 8 button or rotate the up-down dial to zoom in on the photo currently display ed full frame. T o zoom in to the magnification selected with One Pr ess Zoom Ratio (page 126), press the ADJ. lever in. The follo wing operations can be per formed: Use Use T o To 8 Zoom in. Up- down dial Rota …
-
Ricoh GR Digital III — page 39
33 F IRST — TIME USER ? R EAD THIS . Deleting Photographs Deleting Photographs F ollow the steps below t o delete unwant ed photos. Deleting Individual Photographs 1 Display a photograph you want t o delete. Display a photograph y ou want to delete in single- frame playback (page 29). 2 Press the D button. The options shown at right will be display …
-
Ricoh GR Digital III — page 40
34 F IRST — TIME USER ? R EAD THIS . Deleting Multiple Files F ollow the steps below t o delete multiple selected files. 1 Press the D button. In multi-frame playback, pro- ceed to Step 2. In single-frame playback, the options shown at right will be displayed . Highlight Delete Multi and press C / D . 2 Select Sel. Indiv . or Sel. Range . T o selec …
-
Ricoh GR Digital III — page 41
35 F IRST — TIME USER ? R EAD THIS . Tip: Selecting Ranges T o select one or more ranges consisting of two images and all photographs between them, press the ADJ . lever in and follow the steps below : 3.1 Pr ess ! , » , # , or $ to high- light the first image and press C / D to select. The se- lected image is marked with a D icon. If you sele …
-
Ricoh GR Digital III — page 42
36 F IRST — TIME USER ? R EAD THIS . The The O O (DISP .) Button (DISP .) Button Use the O ( DISP . ) button to choose the information dis- played in the picture display during shooting and pla y- back. Shooting Mode Pr ess the O ( DISP . ) button to cycle through the following displays: Indicators displayed Indicators + histogram Fr aming grid (no …
-
Ricoh GR Digital III — page 43
37 F IRST — TIME USER ? R EAD THIS . Playback Mode Pr ess the O ( DISP . ) button to cycle through the following displays: Indicators displayed Details + histogram No indicators Highlights Tip: Highlights The flashing portions of the highlights display mar k “washed out ” areas in which details may hav e been lost to overexposur e. Check highli …
-
Ricoh GR Digital III — page 44
38 F IRST — TIME USER ? R EAD THIS . Tip: The Histogr am The histogram is a graph showing the distribution of pixels of dif- ferent brightness in the image . Brightness is plotted on the hori- zontal axis, with shadows at the left and highlights at the right. The vertical axis gives the number of pixels. The histogram can be used to assess exposure …
-
Ricoh GR Digital III — page 45
39 More on Photograph y ……………………………… 40 Movies …………………………………………………….. 87 More on Playback …………………………………….. 91 Printing Photographs ……………………………..106 The Setup Menu ……………………………………..112 Copying P ictures to a Co …
-
Ricoh GR Digital III — page 46
40 M ORE ON P HOTOGRAPHY More on Photography This section provides information on P , A , S , M , 4 , and “MY” modes and on using shooting menu options. Mode P: Program Shift Mode P: Program Shift When the mode dial is rotated to P (program shift), you can use the up- down dial to choose fr om several combinations of shutter speed and aperture, …
-
Ricoh GR Digital III — page 47
41 M ORE ON P HOTOGRAPHY Note Shutter speed and aperture can be adjusted for ten seconds after you remove y our finger from the shutter-r elease but- ton. 4 T ake the photograph. Gently press the shutter-r elease button all the way down to take the photograph. Note: The Exposure Pr ogram The exposure prog ram (ISO 100, flash off ) is shown below. T …
-
Ricoh GR Digital III — page 48
42 M ORE ON P HOTOGRAPHY Mode A: Aperture Priority Mode A: Aperture Priority In mode A (aper ture priority), you choose the aperture and the camera selects the shutter speed. Choose large apertures (low f-numbers) to emphasize the main subject by blurring background and for eground details . Choose small apertures (high f-numbers) to bring both the …
-
Ricoh GR Digital III — page 49
43 M ORE ON P HOTOGRAPHY Mode S: Shutter Priority Mode S: Shutter Priority In mode S (shutter priority), you choose the shutter speed and the camera selects the aper- ture. Choose fast shutt er speeds to “freeze ” motion, slow shutter speeds to suggest motion by blurring moving objects. 1 Choose mode S . Rotate the mode dial to S . The current …
-
Ricoh GR Digital III — page 50
44 M ORE ON P HOTOGRAPHY Mode M: Manual Exposure Mode M: Manual Exposure In mode M (manual exposure), you use the up- down dial to choose aperture and the ADJ. lever to se- lect a shutter speed. 1 Choose mode M . Rotate the mode dial to M . The shooting mode, exposure in- dicator , and current aperture and shutter speed appear in the display . 2 Ch …
-
Ricoh GR Digital III — page 51
45 M ORE ON P HOTOGRAPHY Notes • If Auto or Auto-Hi is selected for ISO Setting (page 84), ISO will be fixed at 100 while the camera is in manual exposure mode . • Choose slower shutter speeds for longer exposur e times. T o re — duce blur caused by camera shake, hold the camera steadily in both hands or use a tripod. The picture display turns …
-
Ricoh GR Digital III — page 52
46 M ORE ON P HOTOGRAPHY 4 4 Mode: Matching Settings to the Scene Mode: Matching Settings to the Scene Select 4 mode to shoot mov- ies or to choose from one of the following subject types. Camera settings are automatically opti- mized for the selected subject type. Option Option Description Description Dynamic Range Choose for natural contrast when …
-
Ricoh GR Digital III — page 53
47 M ORE ON P HOTOGRAPHY 2 Press C / D . A menu of scene mode op- tions will be displayed . 3 S elect an option. Pr ess ! or » to highlight an option and press C / D to return to shooting mode with the se- lected option shown at the top of the display . 4 Shoot. • D ynamic range double shot : See page 48. • S ke w correct mode : See page 5 …
-
Ricoh GR Digital III — page 54
48 M ORE ON P HOTOGRAPHY 4 Mode: Dynamic Range Double Shot Each time the shutter-release but- ton is pressed , the camera takes two shots at different exposur es, then combines the areas that ar e correctly exposed to create a single c omposite image with natural contrast, reducing loss of detail in highlights and shadows. U se to photograph sc ene …
-
Ricoh GR Digital III — page 55
49 M ORE ON P HOTOGRAPHY 2 F ocus. Pr ess the shutter-release but- ton halfway to set f ocus, ex- posure, and whit e balance. 3 Shoot. Gently press the shutter-r e — lease button the rest of the way down. The camera will take two pictures and com- bine them to create a single image with an enhanced dy- namic range. Shooting Menu Options The follo w …
-
Ricoh GR Digital III — page 56
50 M ORE ON P HOTOGRAPHY F ollow the steps below t o adjust these options in dynam- ic range double shot mode. 1 Display the shooting menu. Pr ess C / D to display the scene-mode menu. Press # to highlight the mode tab, pr ess » to highlight the shooting menu tab, and pr ess $ to place the cursor in the shooting menu. 2 S elect a menu item. Pr …
-
Ricoh GR Digital III — page 57
51 M ORE ON P HOTOGRAPHY 4 Mode: Skew Correct T o take pictures in skew correct mode, frame the subject so that it occupies as much of the frame as possible and press the shutter-r elease button to take the photograph. If the camera is able to detect an object that can be used to correct perspective, a message will be displa yed with the object sho …
-
Ricoh GR Digital III — page 58
52 M ORE ON P HOTOGRAPHY 4 Mode: T ext T o take pictures in text mode: 1 Adjust contrast . Pr ess the ADJ. lever in to dis- play the menu shown at right. Pr ess ! or » to highlight an option and press the ADJ. lev er or C / D to select the highlighted option and clear the menu from the display . Tip: Adjusting Contrast Contrast can also be adj …
-
Ricoh GR Digital III — page 59
53 M ORE ON P HOTOGRAPHY “MY” Modes: Using Custom Settings “MY” Modes: Using Custom Settings T o take photos using settings saved with the Reg . My Settings > MY1 option in the setup menu key custom settings tab (page 114), rotate the mode dial to MY1 . Select MY2 to take photos using the settings sav ed with MY2 , MY3 to take photos usi …
-
Ricoh GR Digital III — page 60
54 M ORE ON P HOTOGRAPHY The Shooting Menu The Shooting Menu Use the ! , » , # , $ , and C / D buttons to na vigate the menus. 1 Display the shooting menu. In modes other than 4 , pressing the C / D but- ton in shooting mode displays the shooting menu. Tip: 4 Mode In 4 mode, pressing C / D displays the mode menu; press # to highlight the mode …
-
Ricoh GR Digital III — page 61
55 M ORE ON P HOTOGRAPHY The items available in the shooting menu vary with the shooting mode. 5 , P , A , S , M, MY1, MY2 and MY3 Modes Option Option Default Default Page Page Picture Quality/Size N3648 (10M) 57 Foc us Multi AF 59 Snap Focus Distance 2.5 m 64 Full Press Snap On 64 Pre-AF Off 65 Exposure Metering Multi 65 Image Settings Standard 66 …
-
Ricoh GR Digital III — page 62
56 M ORE ON P HOTOGRAPHY 4 Mode: Dynamic Range Double Shot Option Option Default Default Page Page Picture Quality/Size N3648 (10M) 57 Foc us Multi AF 59 Snap Focus Distance 2.5 m 64 Pre-AF Off 65 Exposure Metering Multi 65 Image Settings Standard 66 Dynamic Range Expansion W eak 49 Plus Normal Shooting Off 49 Option Option Default Default Page Pag …
-
Ricoh GR Digital III — page 63
57 M ORE ON P HOTOGRAPHY Picture Q uality and Size Picture quality (RA W , fine, and normal) and size (dimen- sions in pixels) determine the number of phot ographs that can be stored in internal memory or on a memor y card (page 13). The following options are a vailable: Option Option Quality Quality Size Size Description Description RAW (10M) 1 RA …
-
Ricoh GR Digital III — page 64
58 M ORE ON P HOTOGRAPHY Tip: Picture Quality The camera supports the following picture qualities: • Normal : JPEG compression is used to r educe file size. • Fine : Compression is r educed for impr oved quality . F ile size in- creases, r educing number of photos that can be recor ded. • RAW : Raw image data are sa ved in DNG format; JPEG co …
-
Ricoh GR Digital III — page 65
59 M ORE ON P HOTOGRAPHY Foc u s Choose how the camera focuses . By default, the camera uses autofocus; other options ar e listed below . Option Option Description Description Multi AF The camera selects the focus area with the closest subject, preventing out-of-focus shots by keeping the camera from focusing on the backgr ound. Spot AF Focus on th …
-
Ricoh GR Digital III — page 66
60 M ORE ON P HOTOGRAPHY Focus: MF (Manual F ocus) Manual focus can be used to lock f ocus over a series of photographs or to f ocus when the camera is unable to focus using autof ocus. Note Manual focus is not available in text mode (page 46). 1 S elect MF (manual focus). Select MF in the Focus menu. The focus mode and f ocus bar (page 59) are dis …
-
Ricoh GR Digital III — page 67
61 M ORE ON P HOTOGRAPHY Choosing the Focus and Met ering T arget T arget selection can be used to set focus and exposure for off-center subjects without moving the camera, mak- ing it easier to use a tripod. 1 Activate target selection. Pr ess the ADJ. lever in and then press the lever left or right to highlight P . Pr ess ! or » to highlight …
-
Ricoh GR Digital III — page 68
62 M ORE ON P HOTOGRAPHY 3 T ake the pic ture . Pr ess the shutter-release button halfwa y to set focus and/or exposure for the selected subject and then gently press the shutter-r elease button the rest of the way down to take the picture . Notes • T arget selection is not available in manual focus mode (page 60). • The selec ted target r emai …
-
Ricoh GR Digital III — page 69
63 M ORE ON P HOTOGRAPHY Macro T arget Selection If Macro T arget is assigned to the Fn1 or Fn2 button (pages 121–122), you can select macro mode by pressing the chosen button in shooting mode. The cross-hairs shown at right will be dis- played; use the ! , » , # , and $ butt ons to position the cross-hairs over y our subject and press C / D …
-
Ricoh GR Digital III — page 70
64 M ORE ON P HOTOGRAPHY Snap Focus Distance Select the distance at which the camera focuses when Snap is selected for Foc u s (page 59) or F ull P ress Snap is on (see below). Choose from 1 m (3.3 ft.), 2.5 m (8.2 ft.), 5 m (16.4 ft.), and ∞ (infinity). Note When Snap is selected for F ocus or F ull Pr ess Snap is on, the snap focus distance can …
-
Ricoh GR Digital III — page 71
65 M ORE ON P HOTOGRAPHY Pre-AF If On is selected when Multi AF or Spot AF is selected for F ocus (page 59), the camera will continue to f ocus even when the shutter-release button is not pr essed halfway (the focus range, ho wev er , is narrower than for normal f o- cus). This ma y decrease the time needed to f ocus when a picture is taken, potent …
-
Ricoh GR Digital III — page 72
66 M ORE ON P HOTOGRAPHY Image Settings Control c ontrast, sharpness, and vividness (color depth) or take monochrome photographs . Option Option Description Description Vivid T ake strong, vivid photos with heightened contrast and sharpness and maximum vividness. Standard Normal contrast, sharpness, and vividness. Black & White T ake photos in …
-
Ricoh GR Digital III — page 73
67 M ORE ON P HOTOGRAPHY • B&W ( TE) : Adjust vividness , contrast, and sharpness as described above . T o choose a tint, highlight T oning Ef- fec t and press $ . Pr ess ! and » to highlight an op- tion and press # to select. • S etting1/Setting2 : Adjust viv- idness, contrast, and sharp- ness as described above . T o adjust individua …
-
Ricoh GR Digital III — page 74
68 M ORE ON P HOTOGRAPHY Continuous Mode Shoot photographs one at a time or in continuous se- quence. The following options ar e available: • Off : One photo is taken each time the shutter-r elease button is pressed . • Continuous : The camera records photographs one after the other while the shutter-release button is pressed. • S-C on t ( st …
-
Ricoh GR Digital III — page 75
69 M ORE ON P HOTOGRAPHY At settings other than Off , the cur- rent selection is shown by an icon in the picture display . Caution Digital zoom is available at settings of S-C ont and M-Co nt even if Auto Resize is selected f or Digital Zoom Image . Notes • At settings other than Off , the flash turns off automatically , f ocus and exposure are f …
-
Ricoh GR Digital III — page 76
70 M ORE ON P HOTOGRAPHY Auto Bracket V ary exposure, white balance , or color to rec ord two or three images “bracketing” current settings. Option Option Description Description ON ±0.3 Each time the shutter-release but- ton is pressed, the camera takes three photos: one underexposed by 0.3 EV , a second at current ex- posure settings, and a …
-
Ricoh GR Digital III — page 77
71 M ORE ON P HOTOGRAPHY CL -BKT : Color Bracketing The number and type of photographs rec orded when CL — BKT is selec ted f or Auto Br acket depends on the option chosen for CL -BKT Black & Whit e ( TE) in the setup menu (page 131): • Off : The camera records two c op- ies of each photograph, one in black and white and a second in color . ? …
-
Ricoh GR Digital III — page 78
72 M ORE ON P HOTOGRAPHY Flash Exposure Compensation Adjust flash level b y –2.0 to +2.0 in steps of / E V Selecting Flash Exposure Compensa tion in the shooting menu displays the slider shown at right; press ! or » to choose a flash exposure compen- sation value and press C / D . Flash exposur e compensation is displayed in the pic …
-
Ricoh GR Digital III — page 79
73 M ORE ON P HOTOGRAPHY Manual Flash Amount Choose amount of light produced by the flash in manual flash mode (page 24). Flash output is expr essed as a frac- tion of full power (all values ar e approximat e): FULL / / / / / / / / / / / Flash lev el …
-
Ricoh GR Digital III — page 80
74 M ORE ON P HOTOGRAPHY Noise Reduction Choose We a k or Strong to reduce “noise ” (random varia- tions in brightness and color) in photographs taken at high ISO sensitivities. The minimum ISO sensitivity at which noise reduction applies can be selected using Noise Reduction ISO (see below). is displayed when noise r educ- tion is on. Notes ? …
-
Ricoh GR Digital III — page 81
75 M ORE ON P HOTOGRAPHY Interval Shooting T o take photos automatically at intervals of from five sec- onds to one hour , select I nterval Shooting in the shoot- ing menu and follow the st eps below: 1 Choose an inter val. Pr ess # and $ to highlight hours, minutes , or seconds and press ! and » to change . Pr ess C / D to return to shooting …
-
Ricoh GR Digital III — page 82
76 M ORE ON P HOTOGRAPHY Notes • Use a fully- charged battery or optional AC adapter and be sure that sufficient space remains in internal memory or on the mem- or y card . Inter val timer photograph y ends automatically when the number of exposures remaining r eaches zero . • Photographs can be taken at any time by pressing the shutter- releas …
-
Ricoh GR Digital III — page 83
77 M ORE ON P HOTOGRAPHY Exposure Compensation The camera automatically adjusts exposure f or the sub- ject in the center of the frame, producing optimal expo- sure even when the subject is backlit. Exposure compen- sation may howev er be requir ed in situations such as the following: • Very bright backlighting : Subjec ts that are very strongly …
-
Ricoh GR Digital III — page 84
78 M ORE ON P HOTOGRAPHY The ADJ. Lever If exposure compensation is assigned to the ADJ . lever (page 119), exposure compensation can be adjusted as described below . 1 Display the exposure compensation slider . With the camera in shooting mode, press the ADJ . lever in and press # or $ or press the ADJ. lever left or right until the exposure compe …
-
Ricoh GR Digital III — page 85
79 M ORE ON P HOTOGRAPHY White Balance At the default setting of Multi-P A UT O , the camera au- tomatically adjusts white balance so that a white sub- ject will appear white regardless of the color of the light source . It may however be nec essary to match white bal- ance to the light sourc e under mixed lighting or when photographing a subject t …
-
Ricoh GR Digital III — page 86
80 M ORE ON P HOTOGRAPHY White balance can be selected in the shooting menu (page 79) or assigned to the ADJ. lev er (page 119) and ad- justed as described below: 1 Display white balance options. With the camera in shooting mode , press the ADJ. le — ver in and press # or $ or pr ess the ADJ. lever left or right until white balance options are disp …
-
Ricoh GR Digital III — page 87
81 M ORE ON P HOTOGRAPHY Detail: Making Fine Adjustments to Whit e Balance T o make fine adjustments to white balance: 1 Select Detail . Highlight Detail in the white balance menu and press the DISP . button. 2 Choose a setting. Pr ess ! or » to choose a white balance. P ress C / D when settings are com- plete. 3 Return to shooting mode. Pr es …
-
Ricoh GR Digital III — page 88
82 M ORE ON P HOTOGRAPHY White Balance Compensation Compensate f or color casts by modifying white balanc e on the green-magenta or blue-amber axis. The modifica- tions apply to the option currently selected for whit e bal- ance and to all options selected while the modifications are in effect. Selecting White Balanc e Com- pensation in the shootin …
-
Ricoh GR Digital III — page 89
83 M ORE ON P HOTOGRAPHY Notes • White balance compensation can be assigned to the ADJ. lever (page 119). T o reset, highlight Reset and press C / D . • White balance compensation can also be assigned to the Fn buttons (pages 121–122). • When the mode dial is rotated to 4 , white balance com- pensation is only available in movie and dynamic …
-
Ricoh GR Digital III — page 90
84 M ORE ON P HOTOGRAPHY ISO Setting Adjust the camera ’ s sensitivit y to light. Higher values can be used for faster shutter speeds when the subject is poorly lit, preventing blur . • Auto : The camera automatically adjusts sensitivity ac- cording to brightness , the distance to the subject, and the options selected for macro mode and picture …
-
Ricoh GR Digital III — page 91
85 M ORE ON P HOTOGRAPHY Notes • “Noise” (random var iations in brightness and color) may appear in photographs taken at high sensitivities. • The sensitivity displayed in the picture display in Auto and Aut o- Hi modes may differ from the actual value. If the flash is used, a sensitivity of Aut o is equivalent to ISO 125, regardless of the …
-
Ricoh GR Digital III — page 92
86 M ORE ON P HOTOGRAPHY Switch Shooting Mode When the mode dial is rotated to a “MY” mode (page 53), you can use this option to switch between 5 , P , A, S, and M modes without ro — tating the mode dial to a new set- ting. This option is only available in “MY ” modes and is not displayed if the shooting mode currently selected for Reg . My …
-
Ricoh GR Digital III — page 93
M OVIES 87 Movies This section describes how to recor d and view movies. 3 3 Recording Movies Recording Movies Shoot movies with sound. Movies ar e stored as A VI files. 1 Rotate the mode dial to 4 . The option currently selected for 4 mode appears in the display . 2 Press C / D . A menu of scene mode op- tions will be displayed . 3 Select 3 . Pr e …
-
Ricoh GR Digital III — page 94
M OVIES 88 Cautions • Sounds made by the camera may be recor ded with the movie. • M ovies may be up t o 90 minutes in length or 4 GB in size. De- pending on the type of memor y card used, shooting ma y end before this length is r eached. The maximum total length of all movie files that can be stored in internal memory or on a mem- or y card va …
-
Ricoh GR Digital III — page 95
M OVIES 89 Choosing the Frame Size and Frame Rate Movies consist of a series of images (frames) that are played at high speed to cr eate the illusion of motion. T o choose a frame size (the size of each frame in pix els) or frame rate (the rate at which the frames are r ecorded), se- lect 3 mode and follow the steps below: 1 Display the shooting me …
-
Ricoh GR Digital III — page 96
M OVIES 90 3 3 Viewing Movies Viewing Movies F ollow the steps below t o view movies. 1 Press 6 . Pr ess the 6 button to display pictures in the picture display . 2 Display the movie. Use the ! , » , # , and $ buttons (page 29) to scroll through pictures until the first frame of the movie is dis- played . Movies are indicated by a 3 icon. 3 St …
-
Ricoh GR Digital III — page 97
91 M ORE ON P LAYBACK More on Playback This section details the options in the playback menu and describes how to view pictures on a T V . The Playback Menu The Playback Menu T o use the playback menu, pr ess the 6 button to start playback and follo w the steps below . 1 Display the playback menu. Pr ess the C / D but- ton to display the pla yback …
-
Ricoh GR Digital III — page 98
92 M ORE ON P LAYBACK Slide Show Selecting this option star ts an automated slide show . Pic- tures are displa yed at three sec ond intervals in the order recor ded. When a movie is displayed, movie pla yback begins automatically; the slide show resumes when play- back is complete. The slide show repeats until st opped; press an y button to end the …
-
Ricoh GR Digital III — page 99
93 M ORE ON P LAYBACK Changing the Protect Status of Multiple Files F ollow the steps below t o change the protect status of multiple selected files. 1 Select Protect in the playback menu. In multi-frame playback, proceed to St ep 2. In single — frame playback, the options shown at right will be dis- played . Highlight Sel Mult and press C / D . 2 …
-
Ricoh GR Digital III — page 100
94 M ORE ON P LAYBACK Tip: Selecting Ranges T o select one or more ranges consisting of two images and all photographs between them, press the ADJ . lever in and follow the steps below : 3.1 Pr ess ! , » , # , or $ to high- light the first image and press C / D to select. The se- lected image is marked with an icon. If you selected the wrong i …
-
Ricoh GR Digital III — page 101
95 M ORE ON P LAYBACK DPOF: Selecting Pic tures for Printing T o request prof essional prints of the photographs on a memory card, first use this option to create a digital “print order” listing the photos you wish to print and the num- ber of prints, and then take the memory card to a digital print ser vice c enter that supports the DPOF stand …
-
Ricoh GR Digital III — page 102
96 M ORE ON P LAYBACK Multi-Frame Playback T o select multiple photographs for printing: 1 Select DPOF . Pr ess C / D in multi- frame playback to display the playback menu. Highlight DPOF and press $ . 2 S elect photos and choose the number of prints. Pr ess # or $ to highlight additional photos and ! or » to choose the number of prints. T o r …
-
Ricoh GR Digital III — page 103
97 M ORE ON P LAYBACK Resize: Creating Small Copies of Photographs T o create a small cop y of the current photog raph, select Resize in the playback menu (page 91) and choose a size . F ine — and normal-quality photos larger than 1,280 × 960 pixels can be copied at siz es of N1280 or N640 , while N1280 pictures can be copied at a size of N640 . M …
-
Ricoh GR Digital III — page 104
98 M ORE ON P LAYBACK Skew Correction Create copies that ha ve been proc essed to reduc e the ef- fects of perspective on rectangular objects, such as mes- sage boards or business cards . 1 Display the photo . Display the photo to be c opied in playback mode. 2 Select Sk ew C orrection . Pr ess C / D to display the playback menu, highlight Skew Cor …
-
Ricoh GR Digital III — page 105
99 M ORE ON P LAYBACK Notes • The copy is the same size as the original. The time needed to create a copy incr eases with image size: Size Size Time (approx.) Time (approx.) Size Size Time (approx.) Time (approx.) 3,648 × 2,736 21 sec . 2,048 × 1,536 8 sec. 3,264 × 2,448 17 sec . 1,280 × 960 5 sec. 2,592 × 1,944 12 sec . 640 × 480 2 sec. T …
-
Ricoh GR Digital III — page 106
100 M ORE ON P LAYBACK Level Correction Create copies that ha ve been proc essed to adjust bright- ness and contrast. Corr ect brightness and contrast auto- matically (see below) or make manual adjustments using a histogram (pages 101–102). Auto: Automatic Level Corr ection 1 Display the photo . Display the photo to be c opied in playback mode. 2 …
-
Ricoh GR Digital III — page 107
101 M ORE ON P LAYBACK Manual: Manual Level C orrection Display the photo to be c opied and select Level C om- pensation > Manual in the playback menu to display a preview as described on the prec eding page, then follo w the steps below . 1 S elect the black point, white point, or mid-point. The manual preview contains a histogram showing ho w …
-
Ricoh GR Digital III — page 108
102 M ORE ON P LAYBACK Tips: Choosing the Black P oint, White P oint, and Mid-P oint • Adjusting brightness : T o make the image brighter , move the mid-point to the right. Moving the mid-point to the left makes the image dark er . • Correcting exposure : If the image is over- exposed, move the black point to the right until it lines up with th …
-
Ricoh GR Digital III — page 109
103 M ORE ON P LAYBACK White Balance Compensation Create copies with modified whit e balance. 1 Display the photo . Display the photo to be c opied in playback mode. 2 Select White Balanc e C ompensation . Pr ess C / D to display the playback menu, highlight White Balance C ompensa- tion , and press $ . 3 Adjust white balance. Use the ! , » , …
-
Ricoh GR Digital III — page 110
104 M ORE ON P LAYBACK Viewing Pictures on T V Viewing Pictures on T V T o view pictures on a T V , connect the camera using the supplied A/V cable. 1 T urn the camera off . Be sure the camera is off befor e connecting or dis- connecting the A/V cable. 2 Connect the A/V cable to the T V . Inser t the white plug into the audio input connector , the …
-
Ricoh GR Digital III — page 111
105 M ORE ON P LAYBACK Caution Do not use force or tug the A/V cable when handling the camera with the A/V cable connected. Notes • The camera can be connec ted to the video input connector on a video recorder and pictures r ecorded to video or DVD . • The camera suppor ts the following video standards: NTSC (used in North Amer ica, the Caribbe …
-
Ricoh GR Digital III — page 112
106 P RINTING P HOTOGRAPHS Printing Photographs The camera can be connected to a printer via the sup- plied USB cable and photographs printed dir ectly from the camera without using a computer . Caution Movies can not be printed. If a photograph created using a RA W picture- quality option is selected for printing, only the JPEG copy will be printe …
-
Ricoh GR Digital III — page 113
107 P RINTING P HOTOGRAPHS 3 Connect the camera. Open the terminal cov er and plug the cable into the USB cable connector . Pr ess the ADJ. lever in. The camera will turn on and the message shown at right will be displayed; pr ess the ADJ. le- ver in again immediately . Note If you do not press the ADJ. lever in while the above message is displayed …
-
Ricoh GR Digital III — page 114
108 P RINTING P HOTOGRAPHS Printing Printing Photographs can be printed one at a time or multiple photos can be selected for printing . If a memor y card is inserted, the pictures will be printed from the memory card; otherwise pic tures will be print ed from internal memory. Caution Do not disconnect the USB cable while printing is in progress. No …
-
Ricoh GR Digital III — page 115
109 P RINTING P HOTOGRAPHS 2 Adjust printer settings. The menu shown at right will be displayed; highlight an item and press $ to view the options available, or choose Printer Select to use the de — fault setting for the current printer (the options available vary with the type of printer; items not supported by the connected print- er can not be s …
-
Ricoh GR Digital III — page 116
110 P RINTING P HOTOGRAPHS Note T o select the highlighted option as the default for the current printer when the camera is connected, press the ADJ. lever in. The menu shown at right will be displayed; highlight Set and press C / D . Select Can cel to exit without changing the default set- ting. 3 Start printing. T o start printing, press C / D wh …
-
Ricoh GR Digital III — page 117
111 P RINTING P HOTOGRAPHS Printing Multiple Photographs T o print multiple photographs: 1 Press the 9 button. Photographs will be display ed in multi-frame playback. 2 S elect a picture. Highlight a picture and press C / D . 3 Choose the number of prints. Pr ess ! or » to choose the number of prints. Selected pictures are marked with a icon; …
-
Ricoh GR Digital III — page 118
112 T HE S ETUP M ENU The Setup Menu The setup menu can be accessed fr om the shooting and playback menus (pages 54 and 91). 1 Display the menus. Pr ess C / D to display the menu f or the current mode (page 133; in scene mode, a MODE tab will be displayed). 2 S elect a setup menu tab . Pr ess # to highlight the tab for the current menu and press ! …
-
Ricoh GR Digital III — page 119
113 T HE S ETUP M ENU The key custom settings tab contains the f ollowing op- tions: Option Option Default Default Page Page Reg. My Settings — 114 Recall My Settings — 116 Edit My Settings — 117 My Settings for Fn Settings Off 118 My Settings WB Comp . Off 118 ADJ Lever Setting 1 White Balance 119 ADJ Lever Setting 2 ISO 119 ADJ Lever Settin …
-
Ricoh GR Digital III — page 120
114 T HE S ETUP M ENU Key Custom Settings/Setup Menu O ptions Key Custom Settings/Setup Menu O ptions The options available in the key cust om settings and set- up menu tabs are described on the pages that follo w . Reg. My Settings Settings saved using Reg . My Settings can be recalled by rotating the mode dial to MY1 , MY2 , or MY3 , allowing you …
-
Ricoh GR Digital III — page 121
115 T HE S ETUP M ENU 2 Select Reg My Settings . Highlight Reg. My Settings in the setup menu key custom settings tab and press $ . 3 Save settings. T o assign the settings to MY1 , MY2 , or MY3 on the mode dial, highlight MY1 , MY2 , or MY3 and press C / D (to exit without saving settings, pr ess the DISP . button). T o save the settings t o a “ …
-
Ricoh GR Digital III — page 122
116 T HE S ETUP M ENU Recall My Settings Copy settings fr om a “box ” to MY1 , MY2 , or MY3 . 1 S elect a destination. Highlight the destination for the stor ed settings ( MY1 , MY2 , or MY3 ) and press $ . 2 S elect the source . Highlight the settings “box” that will be assigned to the se- lected position on the mode dial and press C / D . …
-
Ricoh GR Digital III — page 123
117 T HE S ETUP M ENU Edit My Settings Edit and rename settings sav ed with Reg. My Settings . 1 Select settings. T o edit the settings assigned to MY1 , MY2 , or MY3 on the mode dial, highlight MY1 , MY2 , or MY3 and press $ . T o edit “box ” settings, select My Settings Box and press $ . Highlight the desired box and press $ . 2 Edit settings …
-
Ricoh GR Digital III — page 124
118 T HE S ETUP M ENU Tip: Naming My Settings Select Name in Step 2 to rename the current combination of settings. The current name is highlighted in the name area; to edit the current name , press # or $ to position the cursor in the name area and press » t o place the cursor in the keyboard area (to delete the current name, press » whil …
-
Ricoh GR Digital III — page 125
119 T HE S ETUP M ENU ADJ Lever Setting Assign up to f our frequently-used options to the ADJ . le — ver for quick ac cess in 5 , P , A , S , and M modes. At ship- ment, the ADJ. lever can be used f or white balance (page 79), sensitivity (page 84), picture quality (page 57), and image setting (page 66), but it can also be used for white balance co …
-
Ricoh GR Digital III — page 126
120 T HE S ETUP M ENU 2 S elect an option. Pr ess ! or » to highlight an option and pr ess the ADJ. lever in or press C / D t o select. Tip Keep the ADJ. lever pressed to page rapidly thr ough the available options. ADJ Shutter Confirmation Select On to use the shutter-release button to select the highlighted option when using the ADJ. lever . …
-
Ricoh GR Digital III — page 127
121 T HE S ETUP M ENU Set Fn Button Choose the functions assigned to the Fn (function) buttons: # ( Set Fn1 Butt on ) and t ( Set Fn2 But- ton ). Option Option Description Description AF/MF Switch between multi or spot AF and manual focus (page 59). 1, 2 AF/Snap Switch between multi or spot AF and snap focus (page 59). 2 AE Lock Lock exposure. 3, 4 …
-
Ricoh GR Digital III — page 128
122 T HE S ETUP M ENU Option Option Description Description Foc u s Display f ocus options (page 59). 2 Image Settings Display image setting options (page 66). 2, 4 Expo. Metering Display exposure metering options (page 65). 2, 4 Cont. Mode Display continuous shooting options (page 68). 2, 4, 5, 6 Auto Bracket Display bracketing options (page 70). …
-
Ricoh GR Digital III — page 129
123 T HE S ETUP M ENU Playback Mode Dial Options/M Mode Dial Options Choose the roles play ed by the ADJ. lever and up-down dial during playback zoom and in mode M . Playback Mode Dial Options Playback Mode Dial Options M Mode Dial Options M Mode Dial Options Setting1 Setting1 Setting2 Setting2 Setting1 Setting1 Setting2 Setting2 ADJ. ADJ. lever le …
-
Ricoh GR Digital III — page 130
124 T HE S ETUP M ENU Forma t [ Card]/Forma t [Internal Memory] Select F ormat [ Card] t o format the memory card before first use, after using it in another device , or if a card error is displayed when the car d is inserted in the camera. Se — lect Format [Internal Memory] if a message is displayed prompting you t o format internal memory . Cauti …
-
Ricoh GR Digital III — page 131
125 T HE S ETUP M ENU ISO Auto-High Settings Choose the maximum sensitivity selected by the camera when Auto-Hi is selec ted f or ISO Setting in the shooting menu (page 84). Choose from settings of ISO 200 ( AUTO 200 ), 400 ( A UT O 400 ), 800 ( A UT O 800 ) or 1600 ( AUTO 1600 ). Note “Noise” (random variations in br ightness and color) may ap …
-
Ricoh GR Digital III — page 132
126 T HE S ETUP M ENU Volume Settings Select the volume for the sounds described above under “Operation Sounds. ” Choose from (off ), (low), (medium), and (high). L CD Confirmation Time Choose how long photographs ar e displayed in the pic- ture display after shooting . Select from 0.5, 1, 2, and 3 seconds, Hold (photograph is display ed until …
-
Ricoh GR Digital III — page 133
127 T HE S ETUP M ENU Auto Rotate Select On to automatically displa y pictures in the correct orientation during playback. Caution Movies, pictures shot with Continuous Mode set to S-C ont or M- Cont , and pictures taken with the camera upside down or tilted sharply forward or back are not rotated f or display in the picture display . P ictures are …
-
Ricoh GR Digital III — page 134
128 T HE S ETUP M ENU Grid Guide Display Options Choose the type of framing grid available in shooting mode (page 36). Item Item Description Description A three-by-three grid for “rule of thirds” com- position. A four-by-f our grid with diagonal lines run- ning from corner to corner makes it easy t o find the center of the subject. Use for arch …
-
Ricoh GR Digital III — page 135
129 T HE S ETUP M ENU Fn Button Display Select On to display the options currently assigned to the Fn but- tons when the camera is turned on, when shooting mode is se — lected, or when a new mode is se- lected with the mode dial. Show My Setting Name Select On to display the name of the settings assigned to the current position on the mode dial whe …
-
Ricoh GR Digital III — page 136
130 T HE S ETUP M ENU Information Displa y Mode Select On to displa y shooting information in the picture display when the picture display is off (page 36), allow- ing you to adjust camera settings while using an optional external viewfinder (page 162) to frame photographs. The view through the lens is not display ed. Shooting information can be di …
-
Ricoh GR Digital III — page 137
131 T HE S ETUP M ENU CL -BKT Black & White (TE) Choose the number and type of copies created with color bracketing (page 71). Select On to record three c opies of each shot (one in black and white, a second in c olor , and a third using a monochrome tint), Of f t o recor d two copies (one in black and white and the second in color). Note Regar …
-
Ricoh GR Digital III — page 138
132 T HE S ETUP M ENU Color Space Setting Choose the color space used to r ecord photog raphs. sRGB is widely used t o reproduc e digital images but of- fers a smaller gamut of colors than A dobeRGB . Caution The Adobe RGB color space was developed by Adobe Systems , Inc., and is compatible with the default color space used in Adobe Photoshop and o …
-
Ricoh GR Digital III — page 139
133 T HE S ETUP M ENU Digital Zoom Image If Normal (the default option) is selec ted f or Digital Zoom Image and an option with a size of 3,648 × 2,736 is selected for Picture Quality/Size , digital z oom will en- large image data from the cent er of the frame to creat e a picture 3,648 × 2,736 pixels in size , creating a slightly grain y image. …
-
Ricoh GR Digital III — page 140
134 T HE S ETUP M ENU Card Sequence No. Choose how the camera names image files when saving photographs to a memory card. • On : Files names consist of “R” follow ed by a seven-digit number (e.g ., “R0010001.jpg”), assigned in ascending order from 0010001 t o 9999999. When a new memory card is inserted, file numbering continues from the l …
-
Ricoh GR Digital III — page 141
135 T HE S ETUP M ENU Date Settings Set the camera clock (page 16). Note If you leave the battery in the camera for at least two hours, the battery can be removed for about a week without resetting the clock. Language/ N Choose the language in which camera messages and menus are display ed. Option Option Description Description Option Option Descri …
-
Ricoh GR Digital III — page 142
136 C OPYING P ICTURES TO A C OMPUTER Copying Pictures to a Computer This section describes how to copy pictures fr om the camera to your comput er . Instruc tions for Windows may be found below; those for the Macintosh begin on page 148. Note The dialogs shown in this section may differ slightly from those displayed by your computer . Windows Wind …
-
Ricoh GR Digital III — page 143
137 C OPYING P ICTURES TO A C OMPUTER System Requirements Before using the supplied CD , check that your computer meets the following r equirements. See the documenta- tion provided with y our computer f or details. OS OS Windows 2000 P rof essional SP 4, Window s XP Home Edi- tion/Prof essional SP 3, Windo ws Vista SP 1 CPU CPU Windows 2000/Windo …
-
Ricoh GR Digital III — page 144
138 C OPYING P ICTURES TO A C OMPUTER The Supplied CD Inser ting the supplied CD in a CD-ROM drive displays the dialog shown at right. • Installing the sof tware : Install the following software. DL -10 : Copy pictures to the computer in a single operation. Irodio Photo & Video Studio : View, manage , edit pictures on the computer . For more …
-
Ricoh GR Digital III — page 145
139 C OPYING P ICTURES TO A C OMPUTER Installing the Software F ollow the steps on the next page to install the supplied software. Illustrations are from Windows XP . Cautions • If the camera is connected to the computer , disconnec t the cam- era before beg inning installation. • Users of existing “Caplio” sof tware should note that the ? …
-
Ricoh GR Digital III — page 146
140 C OPYING P ICTURES TO A C OMPUTER 1 I nsert the supplied CD . T urn the computer on and in- sert the supplied CD in a CD — ROM drive. • Windows Vista : An Autorun di- alog will be displayed . Click Run Autorun.e xe t o display the installer dialog. • O ther versions of Windows : The installer dialog will be displayed automatically . 2 Click …
-
Ricoh GR Digital III — page 147
141 C OPYING P ICTURES TO A C OMPUTER 5 I nstall the software. The Irodio Photo & Video Studio installer will start (de — pending on your computer , the splash screen at right may be displayed f or some time before installation beg ins). F ollow the on-screen in- structions to install the supplied soft war e. 6 Click Finish . The dialog shown a …
-
Ricoh GR Digital III — page 148
142 C OPYING P ICTURES TO A C OMPUTER 1 I nsert the supplied CD . T urn the computer on and in- sert the supplied CD in a CD — ROM drive. • Windows Vista : An Autorun di- alog will be displayed . Click Run Autorun.e xe t o display the installer dialog. • O ther versions of Windows : The installer dialog will be displayed automatically . 2 Click …
-
Ricoh GR Digital III — page 149
143 C OPYING P ICTURES TO A C OMPUTER Uninstalling the Software F ollow the steps below t o uninstall DC software or Irodio Photo & V ideo Studio . Cautions • Administrator privileges are r equired. • Exit any applications that may be running bef ore proceeding . 1 Open the “ Add/Remov e Progr ams” Control P anel. Open the W indows “S …
-
Ricoh GR Digital III — page 150
144 C OPYING P ICTURES TO A C OMPUTER Copying Pictures Using DL -10 After installing DC software, follo w the steps below to copy pictures to y our computer . 1 T urn the camera off . 2 Connect the supplied USB cable. Connect the cable to the com- puter USB port. Caution Do not use force when connecting the cable or when handling the camera with th …
-
Ricoh GR Digital III — page 151
145 C OPYING P ICTURES TO A C OMPUTER Copying Pictures Using Windo ws Explorer If DL -10 is not installed, y ou can copy pictures to the com- puter as described below . T he illustrations in this section are from Windows XP . 1 T urn the camera off . 2 Connect the supplied USB cable. Connect the cable to the computer USB port and then to the camera …
-
Ricoh GR Digital III — page 152
146 C OPYING P ICTURES TO A C OMPUTER SD Card Readers and PC Card Adapt ers If the memor y card is inserted in an SD card reader connected to the computer , or the memor y card is inserted in a PC card adapter which is then inserted in a computer PC card slot, data can be read directly from the memory card (be sure that the reader or adapter is com …
-
Ricoh GR Digital III — page 153
147 C OPYING P ICTURES TO A C OMPUTER Disconnec ting the Camera Before disc onnecting the camera from the computer , click the “Safe — ly Remove Har dware ” or “Unplug or Ejec t Hardware ” icon in the taskbar (the illustration above shows the icon f or Window s XP) and select Safely Remove USB Mass Stor- age Device or Stop USB Mass Stor age …
-
Ricoh GR Digital III — page 154
148 C OPYING P ICTURES TO A C OMPUTER Macintosh Macintosh The camera can be used with Mac OS 9.0–9.2.2 and Mac OS X versions 10.1.2–10.5.6. Caution The software on the supplied CD can not be installed on Macin- tosh computers. Macintosh computers can how ever be used to view the Software User Guide (note that Acrobat Reader is r equired to view …
-
Ricoh GR Digital III — page 155
149 C OPYING P ICTURES TO A C OMPUTER 3 Copy files from the camera t o the computer . The camera will appear as a volume on the desktop with pictures stored in f olders as shown at right. If a memor y card is inserted in the cam- era, the drive will be named as shown at right and the contents of the memory card will be displayed. If no memor y card …
-
Ricoh GR Digital III — page 156
150 T ECHNICAL N OTES T echnic al Notes Troubleshooting Troubleshooting Error Messages If an error message is displayed , take the steps listed be- low . Message Message Solution Solution Page Page Insert card No memor y card inserted. Insert card. 13 Set date. Camera clock not set. Set camera clock. 135 File Number Over Limit Camera is out of file …
-
Ricoh GR Digital III — page 157
151 T ECHNICAL N OTES Camera-Related Problems Po wer Supply Problem Problem Cause Cause Solution Solution Page Page The camera does not turn on. Battery is exhausted or not in- serted. Check that battery is correctly in- serted. Charge battery (recharge- able battery only), inser t fresh battery , or use AC adapter . 10, 12, 165 Battery is incompat …
-
Ricoh GR Digital III — page 158
152 T ECHNICAL N OTES Shooting Problem Problem Cause Cause Solution Solution Page Page No picture taken when shutter- release button is pressed. Battery is exhausted. Charge battery (rechar geable bat- tery only), inser t fresh batt ery, or use AC adapter . 10, 12, 165 Camera is off or not in shooting mode. Press POWER button to turn cam- era on or …
-
Ricoh GR Digital III — page 159
153 T ECHNICAL N OTES Problem Problem Cause Cause Solution Solution Page Page Flash does not fire or will not charge. Flash is not raised. Slide F OPEN switch down to raise flash. 24 Flash cov er is not fully open. D o not obstruct flash cover . — Bracketing enabled or camera in continuous, dynamic range double shot, or movie mode. Change camera …
-
Ricoh GR Digital III — page 160
154 T ECHNICAL N OTES Problem Problem Cause Cause Solution Solution Page Page Tilt indicator is not displayed . Off or Sound selected for Lev el Setting . Choose Display or Disp + Snd .2 7 Indicators are hidden. Press DISP . to display indicators. 36 The camera is upside down. Hold the camera in the corr ect orientation. 17 Photo is not level, alth …
-
Ricoh GR Digital III — page 161
155 T ECHNICAL N OTES Miscellaneous Problem Problem Cause Cause Solution Solution Page Page Can not insert memory card. Car d is not in correct orientation. Insert in correct orientation. 13 Camera contr ols have no effect. Battery is exhausted. Charge battery (rechar geable battery only), inser t fresh ba t- tery, or use A C adapter . 10, 12, 165 …
-
Ricoh GR Digital III — page 162
156 T ECHNICAL N OTES Computer-Related Problems F or more inf ormation, refer t o the Software User Guide , available in pdf format on the supplied CD . Security Aler ts ( Windows Vista/Windo ws XP) Consult the follo wing if W indows XP Service Pack 3 or Window s V ista Ser vice P ack 1 display s a security aler t when the camera is connected or DL …
-
Ricoh GR Digital III — page 163
157 T ECHNICAL N OTES 2 Allow the Ricoh application Internet access . In the “Windows F irewall” dia- log, click the Ex ceptions tab and check whether DL -10 is listed under “Progr ams and Ser vices. ” If it is, place a check in the check box next to DL -10 and click OK . If it is not listed, click Add Pr ogram… to add DL -10 to the list …
-
Ricoh GR Digital III — page 164
158 T ECHNICAL N OTES Specific ations Specific ations Effective pixels Approximat ely 10 million Image sensor /˝ CCD (appro ximately 10.4 million total pix els) Lens Focal length 6.0 mm (35-mm format equivalent: 28 mm) Aperture (f-number) f/1.9 – f/9 (ND filt er used for apertures of f/8.0 – f/11 in auto shooting mode) Focus range …
-
Ricoh GR Digital III — page 165
159 T ECHNICAL N OTES Storage SD/SDHC and MultiMedia memory cards; internal memory (approx. 88 MB) File size (approx.) 3648 × 2736 2,164 KB/frame (N), 3,738 KB/frame (F), 18.2 MB/frame (RA W ) 3648 × 2432 1,925 KB/frame (N), 3,325 KB/frame (F), 16.2 MB/frame (RA W ) 2736 × 2736 1,628 KB/frame (N), 2,809 KB/frame (F), 13.7 MB/frame (RA W ) 3264 ? …
-
Ricoh GR Digital III — page 166
160 T ECHNICAL N OTES 1 The options available vary with image size. 2 A JPEG file is also recorded (the JPEG file may be a fine- or normal- quality file with the dimensions as the RA W file or a normal-quality file 640 × 480 pixels in size). RA W files use the standard DNG format promoted by Adobe Systems, Inc. 3 Compatible with the D esign rule f …
-
Ricoh GR Digital III — page 167
161 T ECHNICAL N OTES Internal Memory/Memor y Card Capacity The follo wing table lists the approximat e number of frames or length of movies that can be stored in int ernal memory or on a memor y card at different settings . Internal Internal memory memory 1 GB 1 GB 2 GB 2 GB 4 GB 4 GB 8 GB 8 GB 16 GB 16 GB 32 GB 32 GB Photographs Photographs RAW R …
-
Ricoh GR Digital III — page 168
162 T ECHNICAL N OTES Optional Accessories Optional Accessories The GR DIGIT AL III can be used with the following option- al accessories: AC-4c A C adapter DB-65 rechargeable battery BJ-6 battery charger GH-2 hood and adapter Includes a hood to prevent sunlight from entering the lens and an adapter for general- purpose filters with a diameter of 4 …
-
Ricoh GR Digital III — page 169
163 T ECHNICAL N OTES GC-3 soft case GC-4 soft c ase (can be used with GV-2) GS-1 or ST-2 neck strap Notes • Before using optional accessories, read the manual pr ovided with the product. • The built-in flash can not be used with con version lenses or lens hoods. • GH-1, GW-1, and GT -1 accessories for GR DIGIT AL and GR DIGIT AL II cameras c …
-
Ricoh GR Digital III — page 170
164 T ECHNICAL N OTES Camera System and Accessories GF-1 flash unit Attach to hot shoe GC-3/GC-4 soft case GS-1/ST -2 neck strap GV-1/GV-2 external viewfinder CA-1 cable switch DB-65 rechargeable battery (supplied; DB-60 rechargeable batteries can also be used) BJ-6 battery charger (supplied) AC-4c AC adapt er GH-2 lens hood and adapter GW-2 wide c …
-
Ricoh GR Digital III — page 171
165 T ECHNICAL N OTES Using an Optional AC A dapter An optional AC adapter is r ecommended for extended use or when the camera is connected to a computer . Be sure the camera is off befor e connecting the AC adapter . 1 Open the batter y/card c over . Unlatch ( q ) and open ( w ) the cover and r emove an y batter- ies. 1 2 2 I nsert the AC adapter …
-
Ricoh GR Digital III — page 172
166 T ECHNICAL N OTES Cautions • Disconnect the AC adapter and unplug it from the pow er outlet when not in use. • Data may become corrupted if the AC adapter is disconnected or power is interrupted while the camera is on. • The batter y indicator ( ) may be displayed while the AC adapter is in use. This is normal, and you can continue using …
-
Ricoh GR Digital III — page 173
167 T ECHNICAL N OTES The GF-1 Flash Unit An optional GF-1 flash unit can be connected to the cam- era hot shoe. 1 Close the flash cover (page 25). 2 Attach the flash. T urn the camera and the GF-1 off and attach the GF-1 to the camera hot shoe. Hot shoe 3 T urn the flash and camera on. Note If the optional flash unit icon is not displayed, turn th …
-
Ricoh GR Digital III — page 174
168 T ECHNICAL N OTES Other Flash Units Use only flash units with one signal terminal , which must be an X-contact with a positive voltage of no mor e than 20 V . Use a flash that covers the angle of view of the lens. 1 Close the flash cover (page 25). 2 Attach the flash. T urn the camera and the optional flash unit off and attach the flash to the …
-
Ricoh GR Digital III — page 175
169 T ECHNICAL N OTES Using the Camera Abroad Using the Camera Abroad Using the AC -4c AC Adapter and BJ-6 Battery Charger These products are f or use with currents of 100–240 V and 50 or 60 Hz. Before travelling , purchase a tra vel adapter for connection to the type of outlets used at your desti- nation. Do not use these products with electrica …
-
Ricoh GR Digital III — page 176
170 T ECHNICAL N OTES • The flash may overheat if fired many times in succession. Do not use the flash more than necessary. Do not use the flash in close contact with your body or other objects. F ailure t o observe these precautions could result in burns or fire . • Using the flash unit in close proximity to your subject ’ s eyes could cause …
-
Ricoh GR Digital III — page 177
171 T ECHNICAL N OTES Camera Care and S torage Camera Care and S torage Caring for the Camera • Photog raphs can be affected by fingerprints and other foreig n matter on the lens. A void touching the lens with your fingers . Remove dust or lint with a blower from a camera supply st ore, or gently clean the lens with a soft, dr y cloth. Clean the …
-
Ricoh GR Digital III — page 178
172 T ECHNICAL N OTES Warranty and Servicing Warranty and Servicing 1. This product is backed by a limited warranty . D uring the warranty period mentioned in the Warranty sup- plied with your camera, any defective parts will be repaired fr ee of charge. In the ev ent of a camera malfunc- tion, contact the dealer from which you pur chased the camer …
-
Ricoh GR Digital III — page 179
173 T ECHNICAL N OTES NOTICES NOTICES USA FCC P art 15 Class B The equipment has been tested and found to comply with the limits f or a Class B digi- tal device, pursuant to part 15 of the FCC Rules. These limits are desig ned to provide reasonable protection against harmful interference in a residential installation. This equipment generates, uses …
-
Ricoh GR Digital III — page 180
174 Index Symbols Symbols 5 (auto) mode …………………….. 4, 17–21 D (delete) button …………………. 3, 33–35 O ( DISP . ) button ………………….. 3, 36, 37 F (flash) button ……………………….. 3, 5, 24 N (macro) button ……………………….. 3, 23 6 (playback) button …….. 3, 15, 29, 91 t (self-timer) …
-
Ricoh GR Digital III — page 181
175 DL -10, system requir ements for …. 137 DL -10, unblocking …………………156–157 DL -10, uninstalling ……………………….. 143 DNG …………………………………………………… 58 DPOF ……………………………………………95–96 Dynamic range ………………………………… 48 Dynamic ra …
-
Ricoh GR Digital III — page 182
176 Manual Flash Amount …………………… 73 Manual focus ……………………………… 59, 60 Memory card ……13–14, 97, 124, 134, 146, 161 Memory card reader …………………….. 146 Memory, internal .. 13, 14, 97, 124, 161 C / D button ……………………. 3, 54 Metering ……………………………….61–62, …
-
Ricoh GR Digital III — page 183
177 Skew ………………………………………51, 98–99 Skew correct mode …………………………. 51 Skew Correction ……………………….98–99 Slide Show ……………………………………….. 92 Snap Focus Distanc e ……………………… 64 Software ………………………… 139–141, 143 Software U …
-
Ricoh GR Digital III — page 184
T elephone S upport Numbers in Europe T elephone S upport Numbers in Europe UK (from within the UK) (from outside of the UK) 02073 656 580 +44 2073 656 580 Deutschland (innerhalb Deutschlands) (außerhalb Deutschlands) 06331 268 438 +49 6331 268 438 France (à partir de la France) (en dehors de la Franc e) 0800 88 18 70 +33 1 60 60 19 94 Italia (da …
-
Ricoh GR Digital III — page 185
From envir onmental friendliness to environmental conservation and to environmental management Ricoh is aggressively pr omoting envir onment-friendly activities and also environment conservation activities to solve the gr eat subject of management as one of the citizens on our precious earth. T o reduce the environmen tal loads of digital cameras, …
Когда фотографы впервые берут в руки фотоаппарат, они обычно начинают с цифровой беззеркальной камеры начального уровня. Это отличные камеры для изучения основ фотографии, обеспечивающие более чем приемлемое качество.
Если вы уверены в своем стиле и предпочитаемом способе съемки, у вас есть возможность выбрать специализированное оборудование для этой ниши. Именно это предлагает компания Ricoh с серией компактных камер GR. Эти камеры стали стабильным выбором для уличных и документальных фотографов.
Посмотрим, что дает GR III и когда стоит задуматься о ее приобретении.
Что такое Ricoh GR III?
С технической точки зрения GR III является компактной камерой премиум-класса. Она подходит для этого назначения по большинству параметров. Она настолько маленькая и легкая, что помещается в кармане.
Она имеет несъемный объектив, который выдвигается при включении и задвигается обратно в корпус при выключении. Элементы управления тоже несколько похожи, хотя только на первый взгляд.
Посторонний глаз не смог бы отличить GR III от повседневной компактной камеры за 100 долларов.
В этом и заключается ее сила. В маленьком и скучном на вид корпусе камера предоставляет вам возможности и качество продвинутой беззеркалки.
Это делает его идеальным для сценариев, в которых лучше оставаться незаметным фотографом. В первую очередь она предназначена для уличной фотографии. Но она также находит свое применение в концертах, путешествиях и многих других жанрах.
Основные характеристики
Подробнее рассмотрим основные моменты продаж камер, а также общие качества.
Датчик
Камера Ricoh GR III имеет 1,5-кратный сенсор размера APS-C. Насколько мне известно, это самая маленькая камера с таким большим сенсором. Его разрешение составляет 24 мегапикселя при соотношении сторон 3:2, что означает 60004000 пикселей.
Этот датчик, скорее всего, произведен компанией Sony и очень похож на тот, что установлен в камере A6400.
Он обеспечивает превосходный динамический диапазон. Моя основная камера – Canon 5D MkIII – это высококлассная полнокадровая рабочая лошадка, некогда одна из флагманских моделей Canon. Сенсор в Ricoh GR III находится на одном уровне с ней, а в некоторых аспектах, таких как детализация теней или качество шума, превосходит ее.
Тени могут быть подняты на довольно значительную величину без потери деталей. Светлые участки можно уменьшить почти на 2 стопа при базовом ISO без клиппинга. Изображения в формате RAW, получаемые с помощью GR III, находятся на одном уровне с лучшими.
Разрешение ISO также впечатляет. При ISO 3200 вы по-прежнему получаете много деталей с заметным, но не отвлекающим шумом. При ISO 6400 и 12800 шумы становятся более агрессивными, но изображения все равно очень удобны для работы, особенно при правильном шумоподавлении.
Качество шумов у GR III на удивление отличное, более пленочное, чем у любой камеры APS-C, которую я использовал. Часто я обнаруживаю, что вообще не уменьшаю шум, потому что он придает изображению дополнительную выразительность.
ISO 25600 – это то место, где я перестаю использовать GR III на данном этапе, изображения получаются либо шумными, либо размытыми из-за уменьшения яркости.
Стабилизация сенсора
Очень важным дополнением к сенсору является 3-осевая стабилизация. Я обнаружил, что она очень эффективна. Я всегда мог вручную удерживать выдержку 1/10 с и не получать размытия из-за дрожания рук. В некоторых случаях мне удавалось получить четкие снимки при выдержке около 0,5 с. В меню эта опция называется Shake Reduction (SR).
При внедрении SR компания Ricoh удалила фильтр сглаживания. Это, вместе с превосходным объективом, отвечает за очень резкие изображения, которые вы получаете. В ситуациях, когда муар представляет угрозу, SR включается и действует как фильтр.
Хотя с фотографиями камера работает чудесно, у меня возникли проблемы при работе с SR в режиме видео. Пока я тестировал GR III, я снимал ролики для использования с моей группой на концертах (да, в те времена, когда у нас были концерты). Это включало в себя съемку на движущихся транспортных средствах, автобусах, трамваях и кораблях.
Когда автомобиль ускоряется, система стабилизации пытается противодействовать движению, перемещая датчик (и, следовательно, изображение) в одну сторону. Это нормально и ожидаемо. Однако, когда она достигала предела корректируемого движения, она просто прыгала обратно в середину, что приводило к очень резкому изменению кадрирования. Это испортило несколько дублей, поэтому через некоторое время я просто перестал его использовать.
Объектив
Объектив, который вы найдете на GR III, – это объектив 18,3 мм f/2,8. Он эквивалентен объективу 28 мм f/4 в полнокадровом измерении.
Он очень резкий и контрастный, настолько хороший, насколько можно ожидать от подобного профессионального объектива на зеркальной фотокамере. Он полностью использует 24-мегапиксельную матрицу. Даже при дальнейшем цифровом увеличении фотографии остаются превосходно детализированными. Это комбинированное решение позволяет использовать его для обрезки или больших печатей.
Я не уверен, что в RAW-файлы не заложена коррекция искажений. В любом случае, кажется, что объектив в значительной степени свободен от искажений.
Объектив способен на впечатляющую, почти макрофокусную фокусировку. Если включить режим макросъемки (что можно сделать, нажав отдельную кнопку), он фокусируется на расстоянии до 6 см. Качество изображения остается превосходным и в этом режиме. Я считаю его очень полезным.
Опциональный широкоугольный адаптер
Дополнительно вы можете приобрести широкоугольный фильтр. Он преобразует обзор с 28 мм до 21 мм.
Этот аксессуар делает камеру значительно больше. Однако он идеально подходит для съемки узких сцен, пейзажей и, возможно, селфи.
Фокусировка
Самой рекламируемой особенностью Ricoh GR III является ее система фокусировки. Впервые в линейке GR с большим сенсором, наряду с традиционным определением контраста, в ней используется автофокус с фазовой детекцией на сенсоре. Точки фокусировки покрывают почти всю матрицу.
Благодаря конструкции фиксированного объектива инженеры смогли оптимизировать его лучше, чем можно было бы ожидать от обычной беззеркальной камеры. Система автофокусировки работает превосходно, она быстрая и точная. Даже при слабом освещении мне было трудно ошибиться с фокусировкой, как это было с GR III, хотя она была значительно медленнее.
Одной из фирменных функций серии GR является функция Snap Focus. Она позволяет установить заранее определенное расстояние фокусировки и активировать его одним нажатием кнопки. По сути, это ускоренный способ фокусировки. Она быстрее и надежнее, чем любая система автофокусировки, представленная в настоящее время на рынке, хотя, безусловно, ей нужно научиться.
Эта функция, опять же, делает камеру очень привлекательным выбором для уличной фотографии. При съемке уличных сцен попадание объектов в фокус – это часто процесс, который не всегда удается. Такая продвинутая система, как эта, заметно повышает процент успеха.
Видео особенности
Камера GR III снимает видео в формате 1080P со скоростью 60 кадров в секунду (в 8-битном формате, 4:2:0, если для вас это что-то значит). Она пригодна для использования, скажем так. Цвета действительно приятные, стабилизация очень помогает сглаживать движения рук, а фокусировка точная. Однако в большинстве настроек, включая 1080p/60, она очень мягкая.
Многие рецензенты в интернете жаловались на отсутствие записи в формате 4K. Справедливости ради стоит отметить, что большинство людей, покупающих эту камеру, вероятно, не будут использовать ее для съемки видео, особенно в условиях, когда 4K необходимо. Однако в новой камере 2022 года я бы тоже считал это базовой функцией.
Еще один недостаток заключается в том, что, хотя камера предлагает полностью ручное управление при съемке фотографий, видео можно снимать только в режиме P.
Так что, если вы планируете снимать более чем обычное видео с помощью своей новой камеры для уличной фотографии, GR III – не ваш выбор.
Специальные особенности
В отличие от обычных камер, оснащенных шторными затворами, в GR III используется створчатый затвор. Это позволяет использовать обычную вспышку во всем диапазоне выдержек. Вы не ограничены скоростью синхронизации. Однако для этого вам придется приобрести внешнюю вспышку, поскольку встроенной вспышки в камере нет.
В комплект также входит 2-стопный ND-фильтр. Он полезен для замедления выдержки при съемке видео, а также для использования широкой диафрагмы при ярком дневном свете.
Тело и обращение
Компания GR III создана, чтобы быть очень маленькой, но довольно прочной. Он изготовлен из прочного магниевого сплава и высококачественного пластика. Он прочно лежит в руках и имеет удобную, хотя и небольшую рукоятку.
Одна вещь, которую вы сразу же заметите, – это что-то покачивающееся внутри камеры, когда она выключена. Потребовалось некоторое время, чтобы понять, нормально ли это, но это действительно так, и все GR III ведут себя подобным образом. На самом деле это просто система стабилизации свободно плавает. Это даже защищает систему от сильных ударов.
Корпус имеет ширину 109 мм и высоту 62 мм, что не намного больше, чем у смартфона. Его вес составляет 257 г.
Управление этой камерой великолепно. Здесь есть кнопки для всех важных настроек, таких как серийная съемка, баланс белого, режим макросъемки и другие.
Верху расположен полноценный диск выбора режимов: ручной режим, режимы приоритета и три настраиваемых пользователем режима.
Существуют два диска управления и рычаг регулировки. Это замечательная вещь, которую действительно удивительно видеть в камере такого маленького размера. Было бы здорово, если бы мы могли настроить ее на быстрое ручное управление, используя отдельный диск для диафрагмы, выдержки и ISO.
В настоящее время, несмотря на наличие соответствующих возможностей, вы не можете напрямую привязать ISO к какому-либо из циферблатов. Обновление прошивки может решить эту проблему.
Серийная проблема, на которую распространяется неограниченная гарантия производителя, заключается в том, что многие GR III имеют слегка шатающийся основной циферблат. Те часы, которые я тестировал, действительно имели эту проблему, но я не нашел ее отвлекающей.
На задней панели расположен сенсорный экран с соотношением сторон 3:2. Он красочный и детализированный, но в некоторых ситуациях он кажется мне недостаточно ярким. Система меню довольно проста и оптимизирована для работы с сенсорным экраном.
Больно не хватает функции герметизации от атмосферных воздействий. Это видно по конструкции камеры. Между объективом и удлиненным корпусом объектива имеется большой зазор, в который легко попадает вода и пыль.
Это, пожалуй, самый главный недостаток GR III. Я лично люблю снимать под дождем, и многие фотографы тоже. Уличные сцены в дождливый день приобретают совсем другое настроение. Я бы хотел запечатлеть это с помощью GR III, но отсутствие герметизации делает это очень трудным.
Время автономной работы также не впечатляет – в среднем 200 с лишним снимков на одной батарее. Но вы всегда можете взять с собой дополнительный аккумулятор или зарядить камеру через порт USB-C, поэтому я бы не считал это большой проблемой.
В GR III можно установить стандартную SD-карту UHS-I. Однако если вы просто оставили ее дома, не волнуйтесь, в камере также есть 2 ГБ встроенной памяти. Это редкая и желанная функция. Кроме того, камера снимает необработанные файлы в формате DNG. Вы можете быстро передать их на телефон через Wi-Fi и отредактировать в Lightroom Mobile.
Альтернативы
У GR III есть несколько альтернатив. Одна из них – его предшественник, Ricoh GR II. Теперь она доступна по сниженной цене и имеет большинство элементов дизайна с третьим поколением, включая очень похожий объектив. Она также оснащена встроенной вспышкой, которой нет у GR III.
Но при этом она предлагает значительно меньшее разрешение – 16 МП. Его сенсор не стабилизирован, что делает объектив f/2.8 гораздо менее привлекательным при слабом освещении.
Еще одним ключевым отличием в пользу GR III является система автофокусировки. Хотя она все еще лучше, чем большинство аналогичных систем автофокусировки, GR II, работающая только на контрастной детекции, намного медленнее по сравнению с GR III гибридной.
Еще одна достойная альтернатива – Fujifilm X100F. Это тоже компактная камера, хотя и построенная по совсем другой философии. Она больше, тяжелее и немного дороже.
В корпусе в стиле дальномера он обладает схожими характеристиками: полностью ручное управление, 24-Мп, но нестабилизированная матрица, и при этом остается довольно незаметным благодаря своему ретро-внешнему виду.
Ключевым отличием является объектив. В X100F используется объектив 23 мм f/2. Он более узкий, эквивалентен 35 мм на полном кадре (против 28 мм на GR III), но также на стоп быстрее.
Заключение
А Ricoh GR III – это фантастическая маленькая камера для определенной ниши фотографов.
В целом он не ограничивается уличной фотографией. Вы можете использовать его в любой повседневной или документальной ситуации, где вам не нужен зум.
Он не дешев, и не очень универсален из-за своего простого объектива.
Но он предлагает исключительное качество изображения, очень удобную сборку и интерфейс, быстрый отклик и дискретный внешний вид. Все это удобно помещается в кармане.
Единственное, что мешает ей стать идеальной повседневной камерой, – это отсутствие защиты от непогоды. Но если вас это устраивает, вы будете вознаграждены отличным пользовательским опытом, а значит, и отличными снимками.
Посмотрите GR III по самой выгодной цене здесь
Оценки
| Функции (25) |
21 |
| Экстра функции (25) | 21 |
| Ценность за деньги (20) | 19 |
| Управление и эргономика (15) | 14 |
| Сборка и долговечность (15) | 12 |
| Итого (100) | 87 |