
Официальное руководство по эксплуатации, устройству и техническому обслуживанию автомобилей Renault Megane 3, выдается каждому покупателю автомобиля, вместе с основными документами.
В руководстве описана конструкция автомобиля, информация по правильной эксплуатации, как автомобиля в целом, так и его узлов.
Настоящее руководство по эксплуатации и обслуживанию автомобиля содержит информацию, которая позволит Вам:
– ознакомиться с автомобилем, правильно его эксплуатировать и максимально использовать его возможности.
– поддерживать его оптимальную работу посредством простого, но четкого соблюдения советов по техобслуживанию.
– быстро устранить мелкие неисправности, не требующие вмешательства специалиста.
То небольшое время, которое Вы потратите на чтение данного руководства, с лихвой окупится приобретенными сведениями, а также знаниями функциональных возможностей и технических новшеств, которые использованы в конструкции Вашего автомобиля.
Глава 1. Знакомство с автомобилем
Карты RENAULT: общие сведения, использование, режим полной блокировки
Открытие и закрытие дверей
Автоматическое запирание открывающихся элементов кузова при движении
Подголовники / Сиденья
Сиденья
Ремни безопасности
Система пассивной безопасности:
а. водителя и переднего пассажира
б. задних пассажиров
в. боковые устройства безопасности
Система обеспечения безопасности детей: общие сведения
а. выбор крепления детского сиденья
б. установка детского сиденья
в. выключение, включение подушки безопасности переднего пассажира
Рулевое колесо
Усилитель рулевого управления
Место водителя
Контрольно-измерительные приборы
а. сигнальные лампы
б. бортовой компьютер
в. меню индивидуальных настроек автомобиля
Показания времени и температуры наружного воздуха
Зеркала заднего вида
Звуковая и световая сигнализация
Приборы наружного освещения и сигнализации
Регулировка света фар
Стеклоочистители, стеклоомыватели
Топливный бак (заправка топливом)
Идентификационная маркировка
Глава 2. Вождение автомобиля (рекомендации по экономичной и экологически безопасной эксплуатации автомобиля)
Обкатка автомобиля
Запуск, остановка двигателя
Функция Stop and Start
Особенности автомобилей с бензиновым двигателем
Особенности автомобилей с дизельным двигателем
Рычаг коробки передач
Стояночный тормоз
Электрический стояночный тормоз
Рекомендации: снижение токсичности отработавших газов и экономия топлива
Охрана окружающей среды
Система контроля давления в шинах
Системы коррекции и помощи при вождении
Сигнал пересечения линии дорожной разметки
Система ограничения скорости
Система поддержания скорости
Система помощи при парковке
Камера заднего вида
Автоматическая коробка передач
Глава 3: Комфорт
Вентиляционные решетки
Кондиционер с ручным управлением
Автоматическая система кондиционирования воздуха
Система кондиционирования воздуха: информация и советы по эксплуатации
Электрические стеклоподъемники, люк крыши с электроприводом
Механические стеклоподъемники
Освещение салона
Солнцезащитный козырек
Вещевые отделения, оборудование салона
Розетка питания дополнительного оборудования
Пепельница. Прикуриватель
Заднее многоместное сиденье
Багажное отделение
Задняя вещевая полка
Полка багажного отделения: автомобили с кузовом «универсал»
Вещевые ящики, оборудование багажного отделения
Перевозка грузов:
ф. в багажнике
б. тягово-сцепное устройство
Разделительная багажная сетка
Поперечины багажника крыши
Мультимедийное оборудование
Глава 4. Уход за автомобилем
Капот
Уровень масла в двигателе:
а. общие сведения
б. долив масла, заправка
Замена масла в двигателе
Уровни эксплуатационных жидкостей
а. охлаждающая жидкость
б. тормозная жидкость
в. бачок стеклоомывателя/омывателя фар
Фильтры
Давление воздуха в шинах
Аккумуляторная батарея
Уход за кузовом автомобиля
Уход за салоном автомобиля
Глава 5. Практические советы
Прокол шины
Запасное колесо
Комплект для накачивания шин
Набор инструментов (колесный ключ/домкрат и т. д.)
Декоративный колесный колпак
Замена колеса
Шины (условия безопасности при эксплуатации шин, колес, зимняя эксплуатация)
Фары (замена ламп)
Задние
Освещение салона (замена ламп)
Плавкие предохранители
Аккумуляторная батарея
Карта RENAULT: элемент питания
Место под установку автомагнитолы
Дополнительное оборудование
Щетки стеклоочистителей
Буксировка при неисправности
Нарушения работы
Глава 6. Технические характеристики
Идентификационные таблички автомобиля
Идентификационные таблички двигателя
Габариты автомобиля
Характеристики двигателей
Характеристики массы
Масса буксируемого прицепа
Запасные части и ремонтные работы
Подтверждающие документы технического обслуживания
Проверка антикоррозионного покрытия
2. Эксплуатация автомобиля
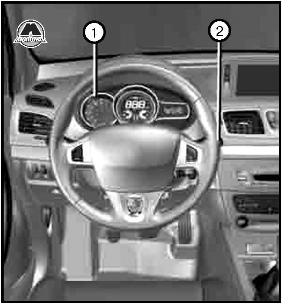
1. Тахометр. 2. Подрулевой переключатель.
1. При запуске двигателя на дисплее 3 загорается сигнальная лампа в случае, если достигнут максимальный уровень масла.
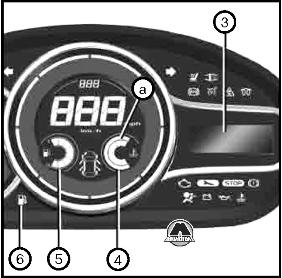
2. При первом загорании сигнальной лампы ее можно отключить, нажав на одну из кнопок рычага подрулевого переключателя 2.
3. Следующие сигнальные лампы автоматически погаснут по истечении 30 секунд.
4. Под номером 5 обозначен указатель уровня топлива. Если уровень минимален, загорается сигнальная лампа 6 и раздается короткий звуковой сигнал. Необходимо срочно долить в бак топливо. С момента первого загорания сигнальной лампы можно проехать еще 50 км.
5. В нормальных условиях эксплуатации указатель температуры охлаждающей жидкости 4 должен находиться перед зоной а. В условиях интенсивной эксплуатации указатель может приблизиться к этой зоне. Тревогу должно вызвать только включение сигнальной лампы одновременно с появлением сообщения на щитке приборов и звуковым сигналом.
6. Под цифрой 7 обозначен спидометр (км или мили в час).
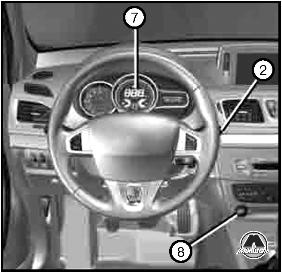
7. В зависимости от комплектации автомобиля и страны реализации при превышении скорости 120 км/час каждые 40 секунд раздается звуковой сигнал длительностью примерно 10 секунд.
8. Если показания выводятся в милях: — при включенном зажигании нажать на одну из кнопок 9 или 10 на торце рычага 2 и на кнопку запуска двигателя 8;
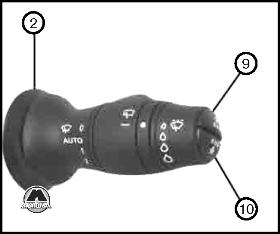
— указатель единиц измерения скорости мигает в течение десяти секунд, затем появляется новая единица измерения: отпустить кнопку 9 или 10, как только единица измерения перестанет мигать.
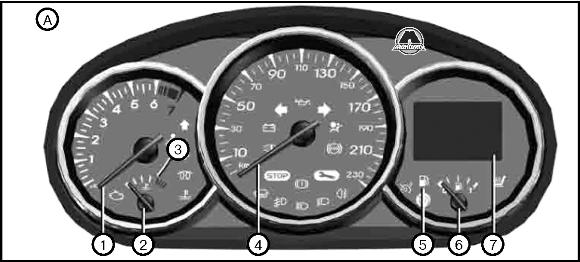
1. Тахометр. 2. Указатель температуры охлаждающей жидкости. 4. Спидометр. 5. Сигнальная лампа минимального уровня топлива. 6. Указатель уровня топлива. 7. Многофункциональный дисплей.
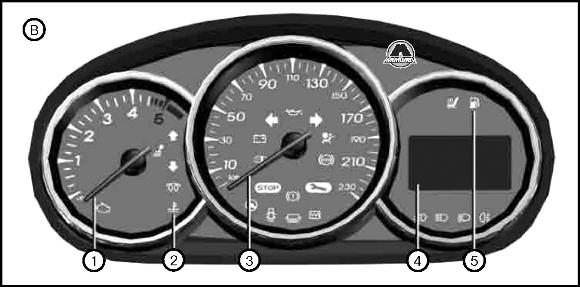
1. Тахометр. 2. Сигнализатор температуры охлаждающей жидкости. 3. Спидометр. 4. Многофункциональный дисплей. 5. Сигнальная лампа минимального уровня топлива. 6. Указатель температуры охлаждающей жидкости. 7. Указатель уровня топлива.
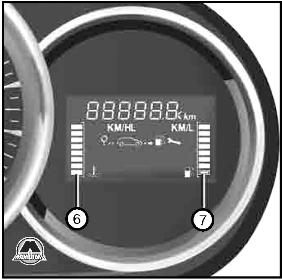
6. Указатель температуры охлаждающей жидкости. 7. Указатель уровня топлива.
В зависимости от комплектации автомобиля, бортовой компьютер 1 отображает следующие показания:
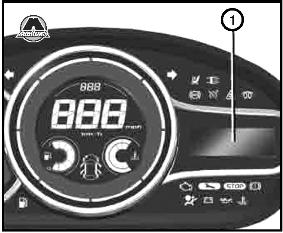
— пройденный путь;
— данные о поездке;
— информационные сообщения;
— сообщения о неисправностях (одновременно с включением сигнальной лампы);
— предупреждающие сообщения (одновременно с включением сигнальной лампы);
— меню индивидуальных настроек автомобиля.
Подробное описание перечисленных функций см. далее.
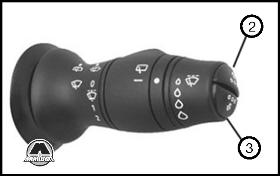
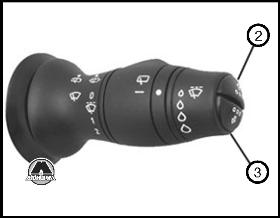
Можно прокрутить следующую информацию последовательными короткими нажатиями на кнопки: вверх (кнопка 2) или вниз (кнопка 3).
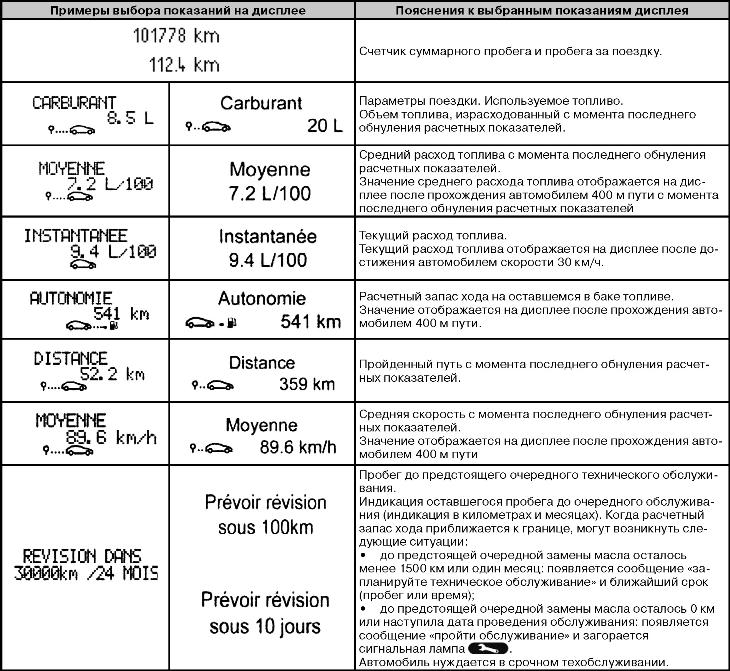
Индикация зависит от оборудования автомобиля и страны.
1. Счетчик общего пробега и пробега за поездку.
2. Данные о поездке:
— используемое топливо;
— средний расход топлива;
— текущий расход топлива;
— предполагаемый запас хода;
— средняя скорость.
3. Пробег до предстоящего очередного технического обслуживания.
4. Меню индивидуальных настроек автомобиля.
5. Бортовой журнал, последовательный вывод информационных сообщений и сообщений о неисправностях.
Обнуление счетчика пробега за поездку
Включив индикацию «счетчик пробега за поездку», удерживать нажатой одну из кнопок 2 или 3 до обнуления показаний.
Обнуление данных о поездке (кнопка обнуления показаний)
Включив индикацию одного из параметров поездки, удерживать нажатой одну из кнопок 2 или 3 до обнуления показаний.
Объяснение некоторых данных, отображаемых на дисплее после обнуления расчетных показателей
1. Чем больше расстояние, пройденное с момента последней операции обнуления, тем стабильнее и достовернее будут показания средней скорости, среднего расхода топлива и запаса хода на оставшемся в баке топливе.
2. Средний расход топлива может уменьшаться в следующих случаях:
— автомобиль закончил разгон;
— температура двигателя достигла нормы (а обнуление расчетных показателей было произведено при холодном двигателе);
— выезд из города на автостраду.
Автоматическое обнуление данных о поездке
При превышении емкости памяти одного из запоминающих устройств обнуление происходит автоматически.
Примечание:
Индикация нижеперечисленной информации на щитке приборов зависит от комплектации автомобиля и страны поставки.
Renault Megane 1.5 dCi
Мануалы и инструкции

xyn
Был 6 дней назад
34 года
Я езжу на Renault Megane и Renault Megane 1.5 dCi
Воронеж, Россия
Пост больше для себя, но вдруг кому ещё пригодится:
1. Пользовательский мануал по рено меган: www.dropbox.com/s/0zugsmv…/new_megan_rus_manual.pdf
2. Инструкция по магнитоле: www.dropbox.com/s/hdkm21n…aguna_caraudio_manual.pdf
3. Техническое обслуживание рено меган (все о всех системах авто; двигатель, подвеска, и т.д. инструкции по замене, и бензин и дизель): www.dropbox.com/s/k1rrnqbqf7efsfd/MR427MEGANE1.pdf
Все на русском. Может кому будет полезно.
10 февраля 2014
Метки: просто так
16
4
Ранее Странный глюк
Далее Первые проблемы низкого клиренса
Разместить рекламу
Реклама
Машины в продаже

Коломна
Renault Megane, 2010
669 000 ₽

Тверь
Renault Megane, 2012
975 000 ₽

Москва
Renault Megane, 2013
950 000 ₽

Москва
Renault Megane, 2014
799 950 ₽
Посмотреть больше машин на Дроме
Комментарии
4
Войдите или зарегистрируйтесь, чтобы писать комментарии, задавать вопросы и участвовать в обсуждении.
Войти
Зарегистрироваться

VanoMegano
Я езжу на Renault Megane III
+
8 лет

KSerzhantK
Я езжу на KIA Spectra
Спасибо!
9 лет

shade-vrn
Я езжу на Renault Megane III
спасибо) актуально)
9 лет

Sensei21
Я езжу на Opel Zafira A
Спасибо, сливаю к себе все это добро )
9 лет

MEGANE
DRIVER’S HANDBOOK
RENAULT recommends ELF
ELF has developed a complete range of lubricants for RENAULT:
fengine oils
fmanual and automatic gearbox oils
Warning: to ensure the engine operates optimally, the use of a lubricant may be restricted to certain vehicles. Please refer to your maintenance document.
Benefiting from the research applied to Formula 1, lubricants are very high-tech products.
Updated with the help of RENAULT’s technical teams, this range is perfectly compatible with the specific features of the brand’s vehicles. f ELF lubricants enhance your vehicle’s performance significantly.
Photo credit: Total/DPPI Imacom group
RENAULT recommends approved ELF lubricants for oil changes and top-ups. Contact your RENAULT Dealer or visit www.lubrifiants.elf.com
Une marque de
Welcome to your new vehicle
This Driver’s Handbook contains the information necessary:
–for you to familiarise yourself with your vehicle, to use it to its best advantage and to benefit fully from the all the functions and the technical developments it incorporates.
–to ensure that it always gives the best performance by following the simple, but comprehensive advice concerning regular maintenance.
–to enable you to deal quickly with minor faults not requiring specialist attention.
It is well worth taking a few minutes to read this handbook to familiarise yourself with the information and guidelines it contains about the vehicle and its functions and new features. If certain points are still unclear, our Network technicians will be only too pleased to provide you with any additional information.
The following symbol will help you when reading this handbook:
To indicate a hazard, danger or safety recommendation.
The descriptions of the models given in this handbook are based on the technical specifications at the time of writing. This handbook covers all items of equipment (both standard and optional) available for these models but whether or not these are fitted to the vehicle depends on the version, options selected and the country where the vehicle is sold.
This handbook may also contain information about items of equipment to be introduced later in the model year.
Throughout the manual, the “approved Dealer” is your RENAULT Dealer.
Enjoy driving your new vehicle.
Translated from French. Copying or translation, in part or in full, is forbidden unless prior written permission has been obtained from the vehicle manufacturer.
0.1

0.2
Getting to know your vehicle ………………………….
Driving ………………………………………………………….
Your comfort …………………………………………………
Maintenance ………………………………………………….
Practical advice ……………………………………………..
Technical specifications ………………………………..
Alphabetical index …………………………………………
0.3

0.4

Section 1: Getting to know your vehicle
|
RENAULT cards: general information, use, deadlocking . . . . . . . . . . . . . . . . . |
1.2 |
|||
|
Doors. . . . . . . . . . . . . . . . . . . . . . . . . . . . . . . . . . . . . |
1.10 |
|||
|
Automatic locking of opening elements when driving. . . . . . . . . . . . . . . . . . . |
1.14 |
|||
|
Headrests — Seats. . . . . . . . . . . . . . . . . . . . . . . . . . . . . . . . |
1.15 |
|||
|
Seats. . . . . . . . . . . . . . . . . . . . . . . . . . . . . . . . . . . . . |
1.17 |
|||
|
Seat belts. . . . . . . . . . . . . . . . |
. . . . |
. . . . . . . . . . . . . . . . . . . . . . . . . . . . . . . . . . . . . . . . . . . . . . . . . . |
1.22 |
|
|
Additional methods of restraint:. . . . . . . . . . . . . . . . . . . . . . . . . . . |
1.25 |
|||
|
to the front seat belts. . . . . . . . . . . . . . . . . . . . . . . . . . . . |
1.25 |
|||
|
to the rear seat belts . . . . . . . . . . . . . . . . . . . . . . . . . . . . |
1.29 |
|||
|
side protection. . . . . . . . . . . . . . . . . . . . . . . . . . . . . . . |
1.30 |
|||
|
Child safety: general information. . . . . . . . . . . . . . . . . . . . . . . . . . . |
1.32 |
|||
|
choosing a child seat mounting. . . . . . . . . . . . . . . . . . . . . . . . |
1.35 |
|||
|
Fitting a child seat . . . . . . . . . . . . . . . . . . . . . . . . . . . . . |
1.37 |
|||
|
deactivating, activating the front passenger air bag. . . . . . . . . . . . . . . . . |
1.43 |
|||
|
Driving position. . . . . . . . . . . . . . . . . . . . . . . . . . . . . . . . . |
1.46 |
|||
|
Control instruments. . . . . . . . . . . . . . . . . . . . . . . . . . . . . . . . |
1.50 |
|||
|
trip computer . . . . . . . . . . . . . . . . . . . . . . . . . . . . . . . |
1.56 |
|||
|
vehicle settings customisation menu. . . . . . . . . . . . . . . . . . . . . . |
1.66 |
|||
|
Steering wheel. . . . . . . . . . . . . . . . . . . . . . . . . . . . . . . . . . |
1.67 |
|||
|
Power-assisted steering . . . . . . . . . . . . . . . . . . . . . . . . . . . . . . |
1.67 |
|||
|
Clock and exterior temperature. . |
. . . . . . . . . . . . . . . . . . . . . . . . . |
1.68 |
||
|
Rear-view mirrors . . . . . . . . . . . . . . . . . . . . . . . . . . . . . . . . |
1.69 |
|||
|
Audible and visual signals. . |
. . . . . . . . . . . . . . . . . . . . . . . . . . . |
1.70 |
||
|
Exterior lighting and signals. . |
. . . . |
. . . . . . . . . . . . . . . . . . . . . . . . . . . . . . . . . . . . . . . . . . . . . . . . . . |
1.71 |
|
|
Headlight beam adjustment. . . . . . . . . . . . . . . . . . . . . . . . . . . . . |
1.74 |
|||
|
Wash/Wipe . . . . . . . . . . . . . . . . . . . . . . . . . . . . . . . . . . . |
1.75 |
|||
|
Fuel tank (filling with fuel). . . . . . . . . . . . . . . . . . . . . . . . . . . . . |
1.78 |
1.1
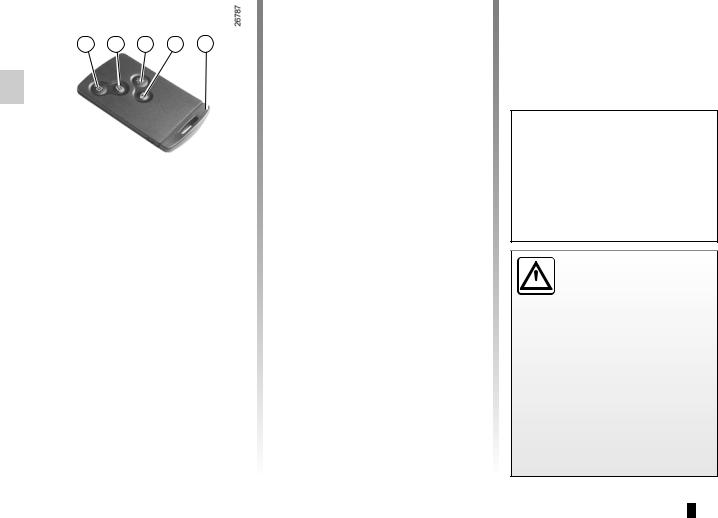
RENAULT cards: general information (1/2)
|
1 |
2 |
3 |
4 |
5 |
1Unlocking the doors and tailgate.
2Locking all doors and tailgate.
3Switching on the lighting remotely.
4Unlocking/locking the tailgate
5Integrated key.
Special note
The RENAULT “SERVICE” card, on equipped vehicles, can be identified by the word “SERVICE” engraved on the card. Refer to the information on the RENAULT “SERVICE” card in section 1.
The RENAULT card is used for:
–locking/unlocking the doors and tailgate (doors, tailgate) and the fuel filler flap (see the following pages);
–switching on the vehicle lighting remotely (refer to the following pages);
–depending on the vehicle, automatically closing the electric windows and sunroof remotely (see the information on “Electric windows/Electric sunroof” in Section 3);
–starting the engine; refer to the information on “Starting the engine” in Section 2.
Battery life
Make sure that the correct battery type is being used, and that the battery is in good condition and inserted correctly. Its service life is approximately two years: replace it when the message “Keycard battery low” appears on the instrument panel (refer to the information on the “RENAULT card: battery» in section 5).
Range of the RENAULT card
This varies according to the surroundings. It is important to make sure when handling the RENAULT card that you do not lock or unlock the doors by inadvertently pressing the buttons.
When the battery is flat, you can still lock/unlock and start your vehicle. Refer to the information on “Locking/unlocking the doors” in Section 1 and “Starting the engine” in Section 2.
Driver’s responsibility
Never leave your vehicle
 with the RENAULT card inside and never leave a child (or a pet) unsupervised, even
for a short while.
They may pose a risk to themselves or to others by starting the engine, activating equipment such as the electric windows or by locking the doors.
Risk of serious injury.
1.2
RENAULT cards: general information (2/2)
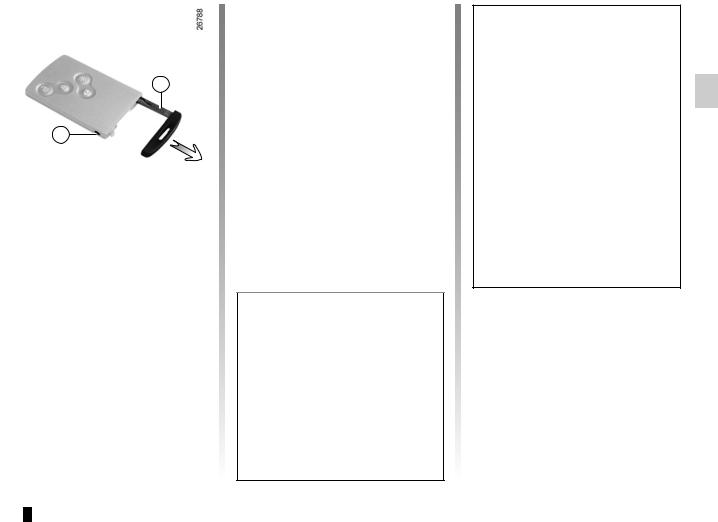
Integrated key 5
The integrated key is used to lock or unlock the front left-hand door if the RENAULT card does not work:
–when the RENAULT card battery is drained, flat battery, etc.
–use of devices using the same frequency as the card;
–if the vehicle is located in a zone of high electromagnetic radiation;
Access to key 5
Press button 6 and pull on key 5 then release the button.
Using the key
Refer to the information on “Locking/ unlocking the doors”.
Once you have accessed the vehicle using the integrated key, replace it in its housing in the RENAULT card, then insert the RENAULT card into the card reader to start the vehicle.
Advice
Avoid leaving the card in hot, cold or humid areas.
Do not keep the RENAULT card in a place where it could be bent or damaged accidentally, such as in a back pocket of a garment.
Replacement: need for an additional RENAULT Card
If you lose your RENAULT card or require another, you can obtain one from an approved dealer.
If a RENAULT card is replaced, it will be necessary to take the vehicle and all of its RENAULT cards to an approved dealer to initialise the system.
You may use up to four RENAULT cards per vehicle.
1.3
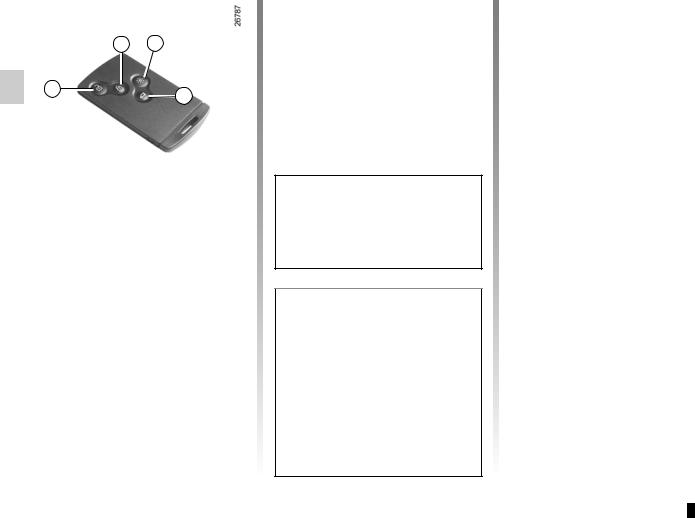
Remote control RENAULT card: use
Unlocking the doors and tailgate
Press button 1.
The hazard warning lights flash once to indicate that the doors have been unlocked.
When unlocking is only active for the driver’s door, (refer to the information on the “vehicle settings customisation menu” in Section 1):
–pressing button 1 unlocks only the driver’s door and the fuel filler flap;
–pressing button 1 twice unlocks all the doors and the tailgate.
Locking the doors and luggage compartment
Press the locking button 2. The hazard warning lights flash twice to indicate that the doors have locked. If a door or the luggage compartment is open or not properly shut, or if a RENAULT card is still in the reader, the doors and luggage compartment lock then quickly unlock and the hazard warning lights do not flash.
If the vehicle has been unlocked but neither the doors or tailgate are open, it locks again automatically after two minutes.
The card buttons are deactivated when the engine is running.
The flashing status of the hazard warning lights informs you of the vehicle status:
–one flash indicates that the vehicle is completely unlocked;
–two flashes indicate that the vehicle is completely locked.
Unlocking/locking the luggage compartment only
Press button 4 to unlock/lock the luggage compartment.
RENAULT card not detected alarm
If a door is opened when the engine is running and the card is not in the reader, the message “Keycard not detected” and a beep will warn you of this. The warning disappears when the card is inserted in the reader again.
Distance lighting function
The dipped beam headlights, indicator lights and interior lights come on for approximately 30 seconds when button 3 is pressed. This can be used, for example, to identify the vehicle from a distance when parked in a car park.
Note: pressing button 3 again switches off the lighting.
1.4
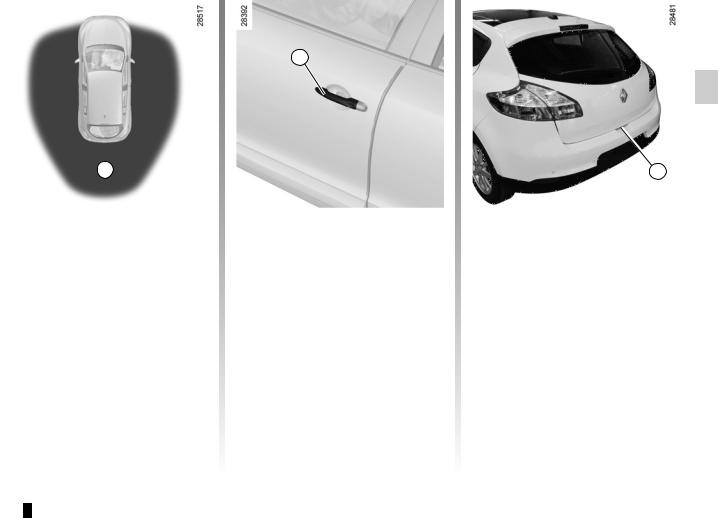
Hands-free RENAULT card: use (1/3)
1
Use
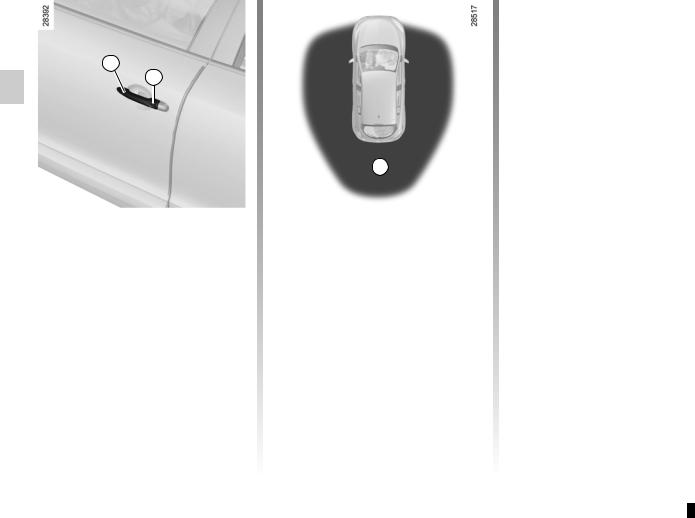
On equipped vehicles, in addition to the functions of the remote control RENAULT card, it can be used to lock/ unlock without using the RENAULT card, when it is in access zone 1.
Note: ensure that the RENAULT card is not in contact with other electronic equipment (computer, PDA, phone, etc.) as this could hinder its operation.
Unlocking the vehicle
With the RENAULT card in zone 1, place your hand on a door handle 2: the vehicle will unlock (in some cases, you may need to pull door handle 2 twice to unlock the vehicle and open the door).
Pressing the button 3 also unlocks all the doors and the tailgate.
The hazard warning lights flash once to indicate that the doors have been unlocked.
1.5
Hands-free RENAULT card: use (2/3)
Locking the vehicle
There are three ways to lock the vehicle: remotely, using button 4, or using the RENAULT card.
Remote locking
With the RENAULT card on you, and doors and tailgate closed, move away from the vehicle: it will lock automatically once you have left zone 1.
Note: the distance at which the vehicle locks depends on the surroundings.
1
The hazard warning lights flash twice and a beep sounds to indicate that the doors have locked.
The beep may be switched off. Consult an approved Dealer.
If a door or the tailgate is open or not properly shut, or a card is in the passenger compartment (or the card reader) the vehicle will not lock. In this situation, no beep sounds and the hazard warning lights do not flash.
Locking using button 4
With the doors and luggage compartment closed, press button 4 on the driver’s door handle. The vehicle will lock. If a door or the tailgate is open or not closed properly, the vehicle will quickly lock/unlock.
Note: a RENAULT card must be within the vehicle’s access zone (zone 1) to be able to lock the vehicle using the button.
Special note:
If you wish to check that the doors are locked after locking using button 4, you have approximately three seconds to try the door handles without unlocking them.
After this delay, the hands-free mode is activated once again and any movement of a handle will unlock the vehicle.
1.6
Hands-free RENAULT card: use (3/3)
|
With the engine running, if after |
||
|
having opened and closed a door the |
||
|
card is no longer in the passenger com- |
||
|
partment, the message Keycard not de- |
||
|
tected (accompanied by a beep when |
||
|
the speed exceeds a certain level) |
||
|
warns you that the card is no longer |
||
|
in the vehicle. This avoids you driving |
||
|
6 |
away after having dropped off a pas- |
|
|
senger who has the card, for example. |
The warning disappears when the card is detected again.
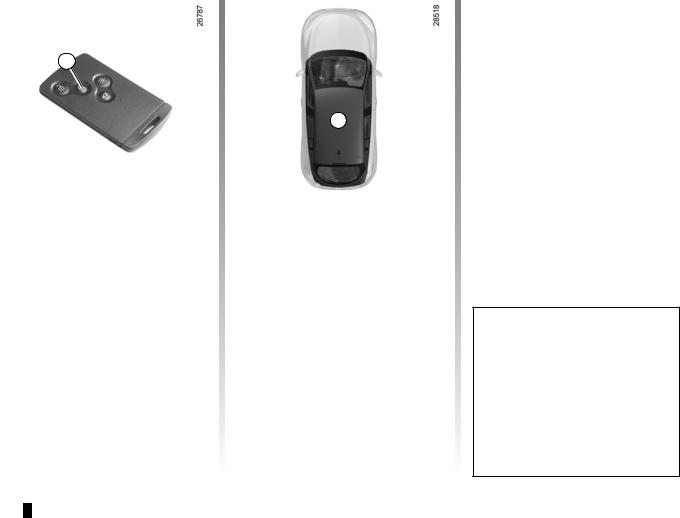
Locking the vehicle (continued)
Locking using the RENAULT card
With the doors and luggage compartment closed, press button 5: the vehicle will lock.
The hazard warning lights flash twice to indicate that the doors have locked.
Note: the maximum distance at which the vehicle locks depends on the surroundings.
Special note:
The vehicle will not lock if:
–a door or the tailgate is open or not properly closed;
–a card is still in zone 6 (or in the card reader) and no other card is in the external detection zone.
After locking/unlocking the vehicle or the luggage compartment only using the buttons on the RENAULT card, remote locking and unlocking in hands-free mode are deactivated.
To reactivate the “hands-free” mode: restart the vehicle.
1.7
RENAULT card: deadlocking
To deactivate deadlocking
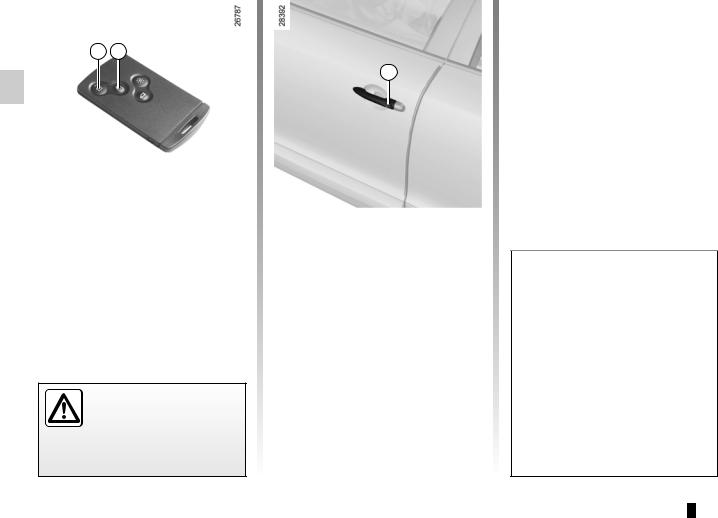
Unlock the vehicle using button 1 on the RENAULT card.
The hazard warning lights flash once to indicate that the doors have been unlocked.
If the vehicle is equipped with a deadlocking function, this allows you to lock the opening elements and to prevent the doors from being unlocked using the interior handles (for example, by breaking the window and then trying to open the door from the inside).
Never use deadlocking if someone is still inside the vehicle.
To activate deadlocking
You can choose between two deadlocking activation modes:
–press button 2 twice in quick succession;
–or, press the button on the driver’s door handle 3 twice in quick succession.
The hazard warning lights flash five times to indicate locking.
Activating deadlocking also remotely closes the windows and/or the electric sunroof, on equipped vehicles.
After activating the deadlocking function using button 2, remote locking and unlocking in hands-free mode are deactivated.
To reactivate the “hands-free” mode: restart the vehicle.
1.8
RENAULT card “service”
If the vehicle is equipped with this card, it can be identified by the word “SERVICE” engraved on the card.
In certain situations, you may wish to entrust your vehicle to a third party (parking valet, mechanic, etc.) whilst restricting its operation.
The RENAULT “SERVICE” card enables the vehicle to be locked but only allows the driver’s door to be unlocked and the engine to be started.
Activation of the “SERVICE” mode.
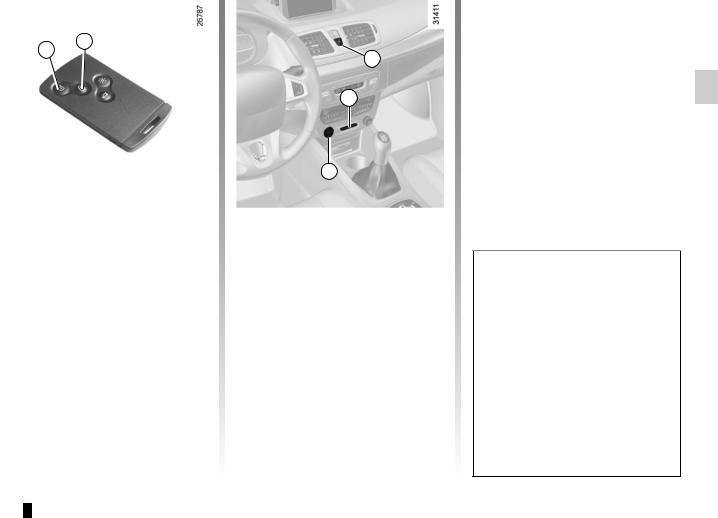
Insert the RENAULT “SERVICE” card into the card reader 4. All the vehicle opening elements lock (except the driver’s door).
If they do not, with the engine switched off, press button 1 (all the doors and the tailgate lock, with the exception of the driver’s door) or 2 (the entire vehicle locks) on the RENAULT “SERVICE” card.
Deactivation of the “SERVICE” mode
There are two possibilities:
–Press a button on the RENAULT card (not the RENAULT “SERVICE” card);
–start the engine with a RENAULT card (not the RENAULT “SERVICE” card). With the card in reader 4, press button 5.
The interior locking/unlocking switch 3 is deactivated while the vehicle is in use with the RENAULT “SERVICE” card.
Each vehicle only has one RENAULT “SERVICE” card.
When using a RENAULT “SERVICE” card, the other cards retain all their functions.
1.9
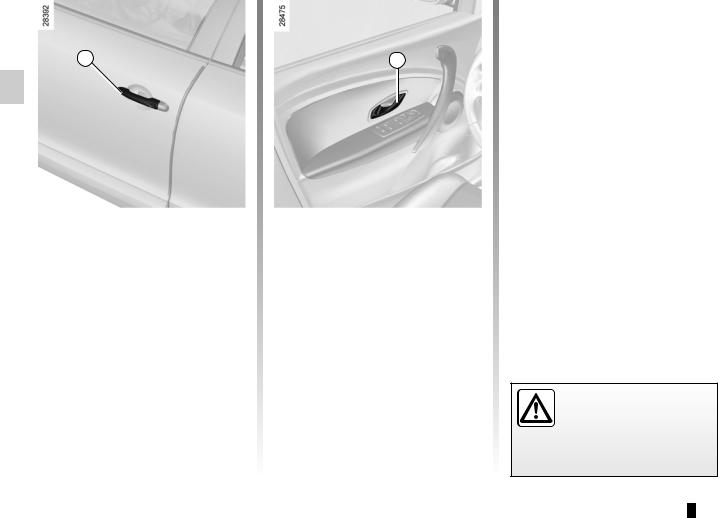
Opening and closing the doors (1/2)
Opening the doors from the outside
With the doors unlocked or the “handsfree” RENAULT card in your possession, hold handle 1 and pull it towards you.
In some cases, it may be necessary to pull the handle twice to open the door.
Opening from the inside
Pull on the handle 2.
Lights-on reminder buzzer
If you have switched off the ignition and left the lights switched on, a reminder buzzer will sound when a door is opened.
Card reminder buzzer
When the driver’s door is opened and the card is still in the reader, the message “Please remove keycard” appears on the instrument panel, accompanied by a beep.
Door/tailgate open buzzer
If a door or the luggage compartment is open or not properly closed, once the vehicle reaches 6 mph (10 km/h), the message “Boot open” or “Door open” (depending on the door) appears on the instrument panel, accompanied by a warning light.
Special note
After switching off the engine, the lights and any accessories that are in operation (radio, etc.) will continue to operate.
They stop as soon as the driver’s door is opened.
As a safety precaution, the doors should only be opened or closed when the vehicle is stationary.
1.10
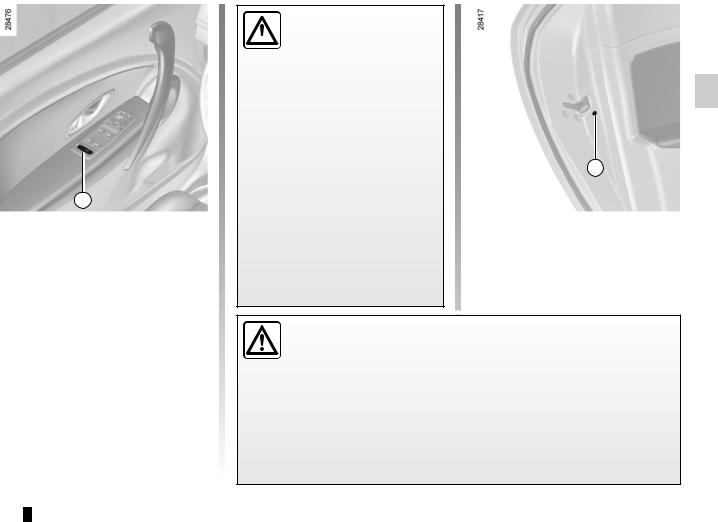
Opening and closing the doors (2/2)
Child safety
ÇVehicle with switch 1
Press switch 1 to authorise
opening of the rear doors. If the vehicle is equipped with electric rear windows, this action will also authorise their use. The indicator light in the switch lights up to confirm that the locks have been activated.
Note: if there is a system fault, the message “Check child safety device” is displayed on the instrument panel: contact an approved Dealer.
Safety of rear occupants
The driver can authorise  operation of the rear doors and, depending on the vehicle, the electric windows by press-
ing switch 1 on the side with the illustration.
Depending on the vehicle, in the event of a fault:
–a beep sounds;
–a message is displayed on the instrument panel;
–the integrated indicator does not light up.
If the battery has been disconnected, press switch 1 on the side with the symbol, to lock the rear doors.
Vehicle with manual door locking
Move lever 2 and check from the inside that the doors are securely locked, to prevent the rear doors being opened from the inside.
Driver’s responsibility when parking or stopping the vehicle
Never leave an animal, child or adult who is not self-sufficient alone on your vehicle, even for a short time.
They may pose a risk to themselves or to others by starting the engine, activating equipment such as the electric windows or by locking the doors.
Also, in hot and/or sunny weather, please remember that the temperature inside the passenger compartment increases very quickly.
RISK OF DEATH OR SERIOUS INJURY.
1.11
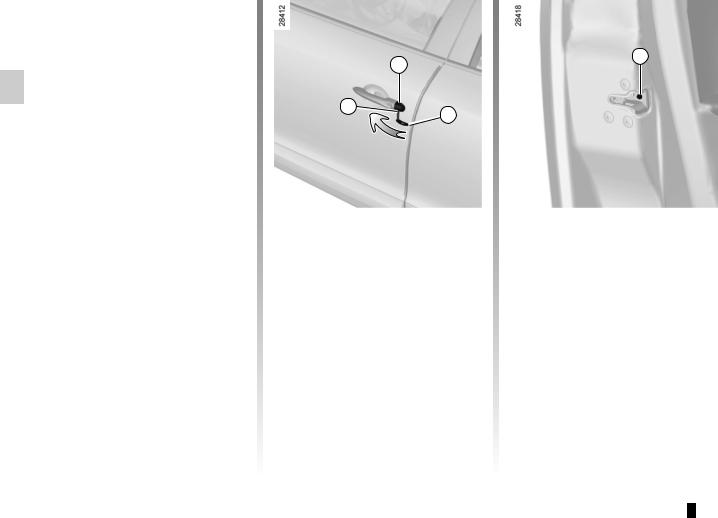
Locking/unlocking the doors (1/2)
Locking/Unlocking the doors from the outside
This is done using the RENAULT Card; see the “RENAULT Card” information in Section 1.
In certain cases, the RENAULT card may not work:
–if the RENAULT card battery is weak, flat, etc.
–if equipment operating on the same frequency as the card (mobile phones, etc.) is used;
–vehicle located in a high electromagnetic radiation zone.
It is then possible:
–to use the key integrated into the card to unlock the front left-hand door;
–to lock each of the doors manually;
–to use the interior door locking/unlocking control (refer to the following pages).
Using the key integrated in the RENAULT card
–Remove cover A from the left-hand door (using the end of key 2) in notch 1;
–move it upwards to remove cover A;
–insert the key 2 into the lock of the front left-hand door and lock or unlock.
Locking the doors manually
Turn screw 3 with the door open (using the end of the key) and close the door.
This means that the doors are then locked from the outside.
The doors may then only be opened from the inside or by using the key in the front left-hand door.
1.12
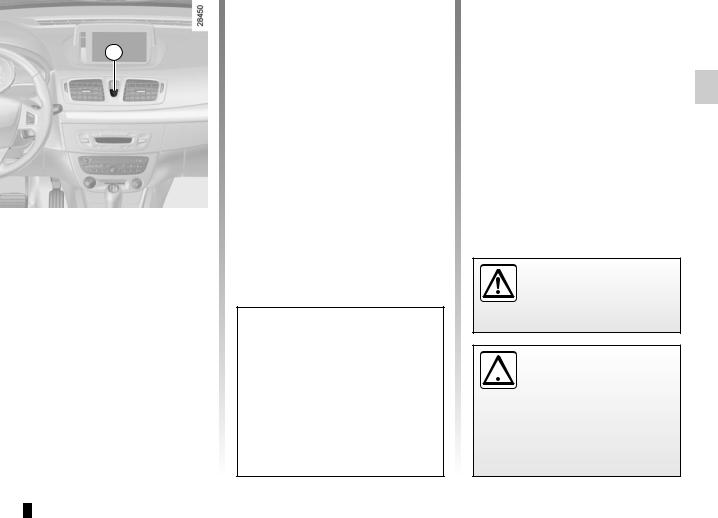
Locking/unlocking the doors (2/2)
Interior locking/unlocking door control
Switch 4 controls the doors, tailgate and, depending on the vehicle, the fuel filler flap simultaneously.
If a door or the tailgate is open or not closed properly, the doors and tailgate lock/unlock quickly.
If transporting an object with the tailgate open, you can still lock the doors: with the engine stopped, press and hold switch 4 for more than five seconds to lock the other doors.
Locking the doors without the RENAULT card
For example, in the event of a discharged battery or the RENAULT card temporarily not working, etc.
With the engine switched off and a door or tailgate open, press and hold switch 4 for more than five seconds.
When the door is closed, all the doors and the tailgate will be locked.
Unlocking the vehicle from the outside is only possible with the RENAULT card in the vehicle’s access zone or using the key integrated in the RENAULT card.
After locking/unlocking the vehicle or the tailgate only using the buttons on the RENAULT card, remote locking and unlocking in hands-free mode are deactivated.
To reactivate the “hands-free” mode: restart the vehicle.
Door and tailgate status indicator
When the ignition is on, the indicator light integrated in switch 4 informs you of the status of the doors and tailgate:
–indicator light on, the doors and tailgate are locked,
–indicator light off, the doors and tailgate are unlocked.
When you lock the doors, the indicator light remains lit and then goes out.
Never leave your vehicle with the RENAULT card inside.
Driver’s responsibility
 If you decide to keep the doors locked when you are driving, remember that it may be more difficult for those as-
sisting you to gain access to the passenger compartment in the event of an emergency.
1.13
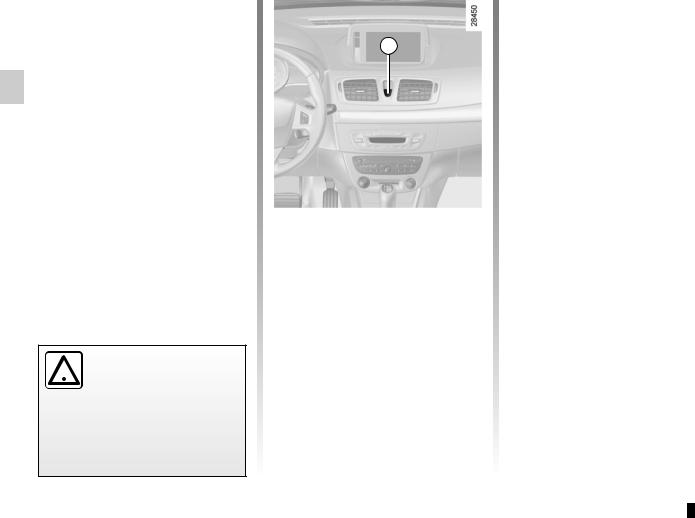
Automatic locking when driving
You can decide whether you want to activate this function.
Operating principle
After the vehicle is started, the system automatically locks the doors when you are driving at approximately 6 mph (10 km/h) and over.
The door can be unlocked:
–by pressing the door unlocking button 1.
–by opening a front door (vehicle stationary).
Note: if a door is opened or closed, it will automatically lock again when the vehicle reaches a speed of 6 mph (10 km/h).
Driver’s responsibility
 If you decide to keep the doors locked when you are driving, remember that it may be more difficult for those as-
sisting you to gain access to the passenger compartment in the event of an emergency.
Activating/deactivating the function
Refer to the information on the “Vehicle settings customisation menu” in Section 1, regarding the “Auto door locking while driving” function:
=function activated
<function deactivated.
Operating faults
If you experience an operating fault (no automatic locking, the indicator light incorporated in button 1 does not light up when trying to lock the doors and tailgate, etc.), firstly check that the doors and tailgate are properly closed. If they are closed correctly, contact an approved dealer.
1.14
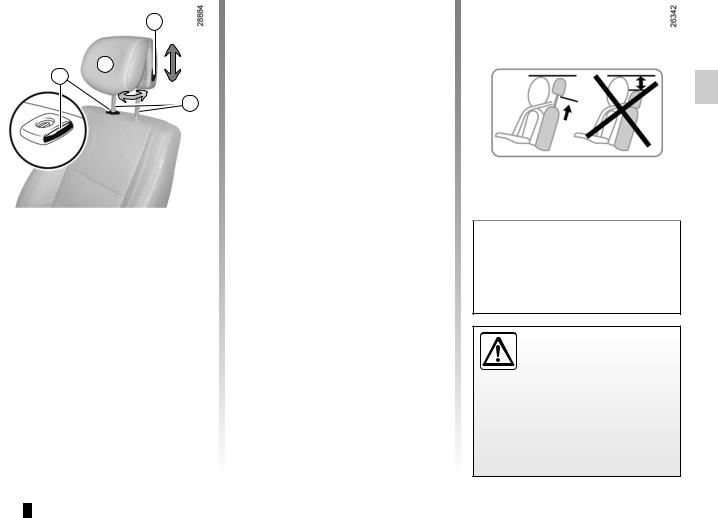
Front headrests
To raise the headrest
Pull the headrest upwards to the desired height.
To lower the headrest
Press button 2 and guide the headrest down to the desired height.
To adjust the angle of the headrest
Depending on the vehicle, tilt section A towards or away from you to the required position.
To remove the headrest
Raise the headrest to its highest position (tilt the seatback backwards if necessary). Press button 1 and lift the headrest to release it.
To refit the headrest
Pull out the headrest rods 3 as far as possible by pulling from the top. Take care to ensure they are clean and correctly aligned and, if there are any problems, check that the notches are facing forwards.
Insert the headrest rods into the holes (tilt the seatback backwards if necessary).
Lower the headrest until it locks, press button 1 and lower the headrest as far as possible.
Check that each headrest rod 3 is securely locked in the seatback by trying to pull them up or push them down.
The three upper positions can be manipulated without pressing button 2. However, it is preferable to press this button to lower the headrest.
The headrest is an important safety component: ensure that it is in place and in the correct position. The
distance between your head and the headrest and the distance between the head and section A should be as small as possible.
1.15
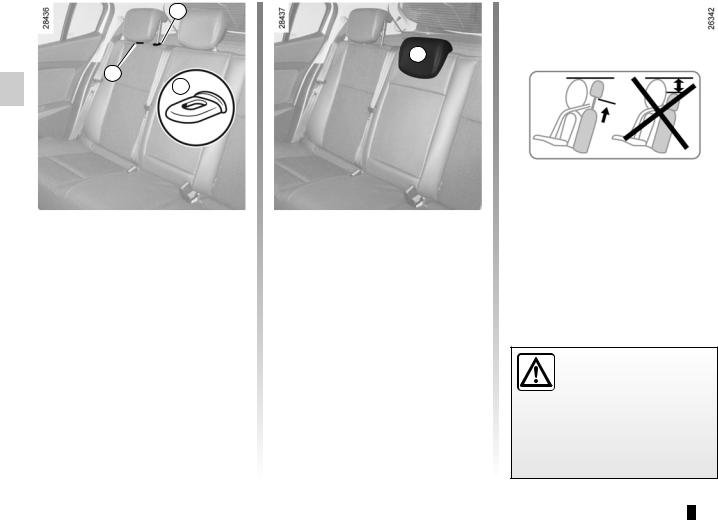
Position for use
Raise or lower the headrest while pulling it towards the front of the vehicle.
To remove the headrest
Press tabs A of rods 1 and 2 simultaneously and remove the headrest.
Note: on the three door version, first lower the bench seatback (refer to the information on the “Rear seat functions” in Section 3).
To refit the headrest
Insert the headrest rods into the sleeves, and lower the headrest to the first notch.
Storage position
Lower the headrest as far as possible, then press tab 2 and lower it completely.
When the headrest is set at the lowest position (position B) this is for storage only: it should not be in this position when a seat is occupied.
The headrest is a safety component. Ensure that it is fitted and in the correct position: the top of your head
should be in line with the top of the headrest.
1.16
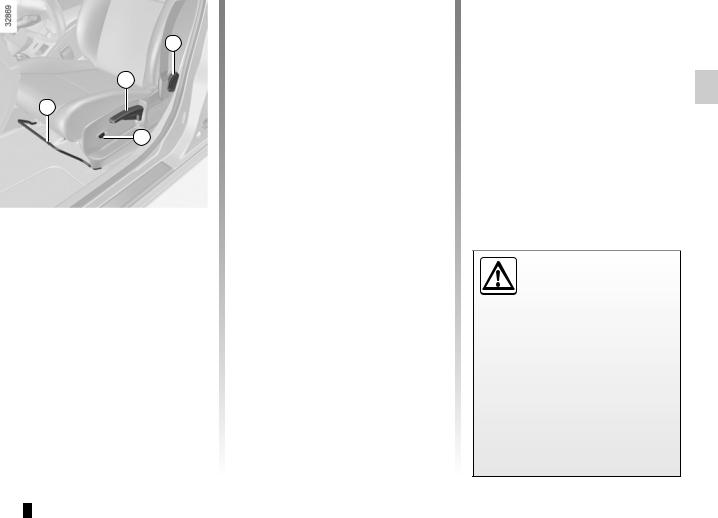
Front seats with manual control (1/2)
To move the seat forwards or back
Lift handle 1 to release. Release the handle once the seat is in the correct position and ensure that the seat is fully locked into position.
To raise or lower the seat base
Move lever 2 as many times as necessary upwards or downwards.
To tilt the seatback
Turn control knob 3 to the required position.
Heated seats
(depending on vehicle)
With the engine running, turn control 4 to either position I, II or III (depending on the temperature required). An indicator light on the instrument panel lights up once the front seat heating system is operating.
The system, which has a thermostat, decides whether or not the heating is needed, according to the position selected.
For safety reasons, carry out any adjustments when the vehicle is not being
driven.
We would advise you not to recline the seatbacks too far to ensure that the effectiveness of the seat belts is not reduced.
Nothing should be placed on the floor (area in front of driver) as such objects may slide under the pedal during braking manoeuvres, thus obstructing its use.
1.17
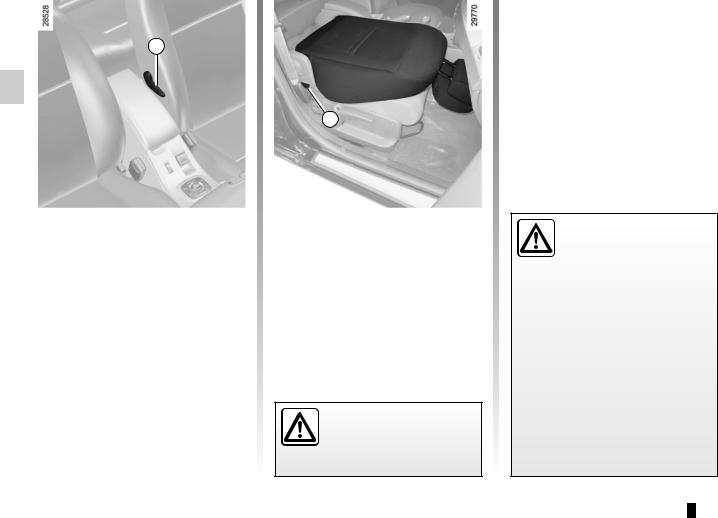
Front seats with manual control (2/2)
To adjust the lumbar support on the driver’s seat
Lower handle 5 to increase the support and lift to decrease it.
Table function
Depending on the vehicle, the passenger seatback may be folded down onto the seat base to create a table.
Lower the headrest, move the seat back, tilt handle 6 and completely lower the seatback.
For your safety, attach any transported objects when the seat is in the table position.
When the front seat is in table position, the front passenger air bag must be disabled (see information on
“Child safety: activating/deactivating the front passenger air bag” in Section 1).
Risk of serious injury caused by items resting on the seatback table which may be dislodged when the air bag is deployed.
The label (on the dashboard) and the markings (on the windscreen) remind you of these instructions.
1.18
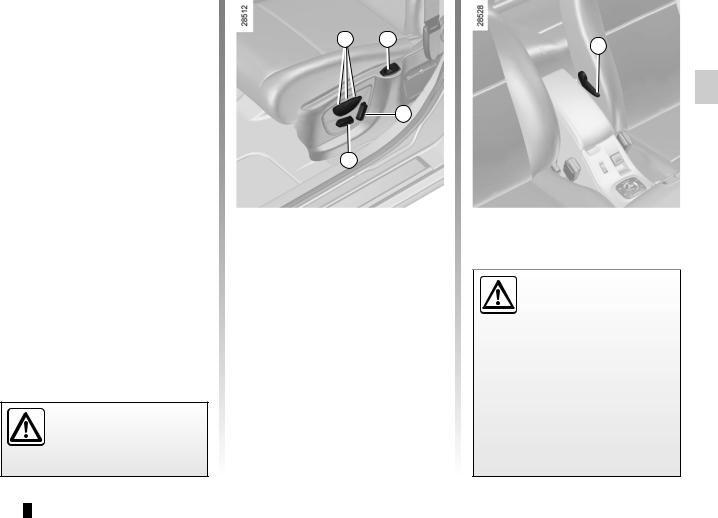
FRONT SEATS WITH ELECTRIC CONTROL
Switch 3 is used for adjusting the seatback and switch 4 is used for adjusting the seat squab.
On equipped vehicles, buttons 1 are used to store the chosen driving position (refer to the following page).
Adjusting the seat squab:
–To move the seat forwards or back
Move switch 4 forwards or backwards.
–To raise or lower the seat base
Move the switch 4 upwards or downwards.
Adjusting the lumbar support on the driver’s seat:
Lower handle 5 to increase the support and lift to decrease it.
For safety reasons, carry out any adjustments when the vehicle is not being driven.
Adjusting the seatback:
To tilt the seatback, move the top of switch 3 forwards or backwards.
Heated seats
(depending on vehicle)
With the engine running, turn control 2 to either position 1, 2 or 3 (depending on the temperature required). An indicator light on the instrument panel lights up once the front seat heating system is operating.
The system, which has a thermostat, decides whether or not the heating is needed, according to the position selected.
We would advise you not to recline the seatbacks too far to ensure that the effectiveness of the seat belts is
not reduced.
Nothing should be placed on the floor (area in front of driver) as such objects may slide under the pedal during braking manoeuvres, thus obstructing its use.
1.19
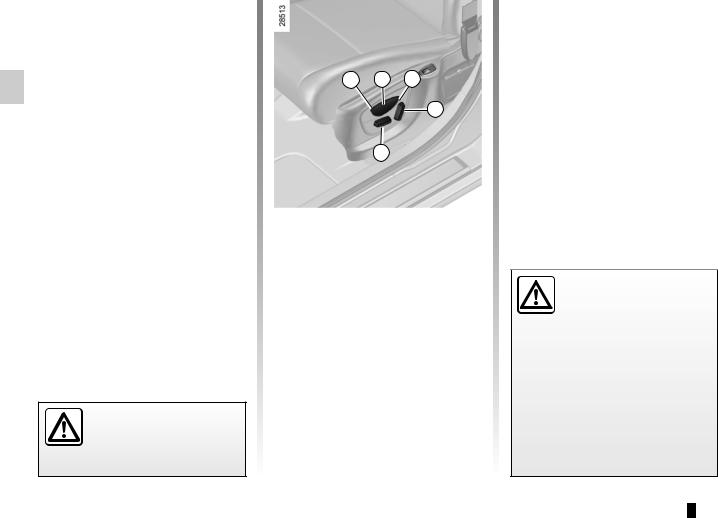
FRONT SEATS WITH ELECTRIC CONTROL with storage of settings
It is possible to store three driving positions.
A driving position includes the settings for the seat base and seatback of the driver’s seat.
The system operates:
–with the “hands-free” card detected or, depending on the vehicle, RENAULT card in the card reader;
–when the driver’s door is opened.
For safety reasons, carry out any adjustments when the vehicle is not being driven.
Storing your driving position
–Adjust the seat using switches 4 and 5 (see previous page);
–press one of buttons 1, 2 or 3 until a beep is heard: the driving position is stored;
–to store other driving positions repeat this procedure with the other buttons.
Recalling a stored driving position
With the vehicle stationary, briefly press button 1, 2 or 3 depending on the required stored driving position.
Note: recall of the stored driving position is interrupted if one of the seat adjustment buttons is pressed during recall.
When driving, it is not possible to recall a driving position.
We would advise you not to recline the seatbacks too far to ensure that the effectiveness of the seat belts is
not reduced.
Nothing should be placed on the floor (area in front of driver) as such objects may slide under the pedal during braking manoeuvres, thus obstructing its use.
1.20
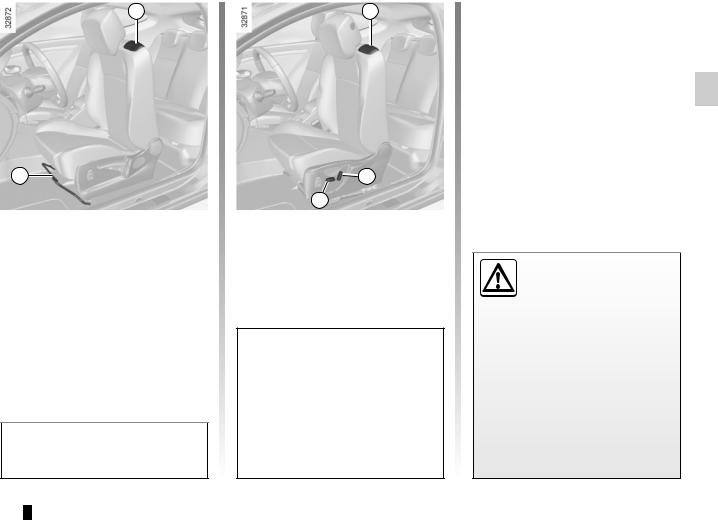
Access to rear seats, three-door version
Manually controlled seats
Lift handle 1 and slide the seat forward.
To return the seat to its original position, bring the seatback back into position.
Do not move handle 1 and handle 2 or switch 4 at the same time.
Electrically controlled seats
Lift handle 1 and tilt the seatback completely: the seat moves forward.
To return the seat to its original position, bring the seatback back up. The seat returns to its original position.
Special note: if the seatback is tilted over the rear bench seat, only use control 3 to return it to the driving position.
Never use handle 1 as it is not designed for this purpose: there is a risk of damage to the mechanism.
Locking the seats
When a person, an object or a child seat prevents the front seats from locking, perform the following operations:
–ask all of the passengers to leave the vehicle and remove any bulky objects from the rear seats;
–lock the seat(s) in the initial position again;
–move the seat(s) forwards in order to create sufficient space;
–ask the passengers to get back into the vehicle, and refit the child seat or objects on the rear seats.
Check that no object or person prevents the front seat from locking. If so, remove any obstacles
behind the front seats. Adjust the seat to allow sufficient room in the rear. The rear occupants/objects should then return to the vehicle.
Repeat the above until the seat is locked correctly.
Risk of seat moving on its runners during vehicle acceleration or braking.
1.21
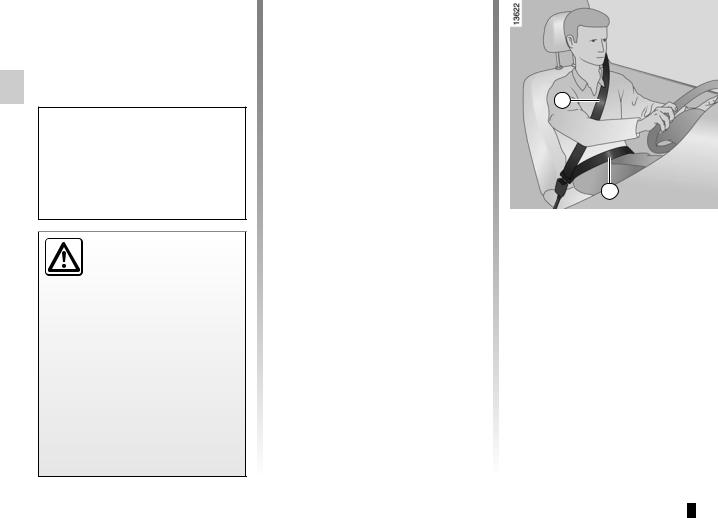
Seat belts (1/3)
Always wear your seat belt when travelling in your vehicle. You must also comply with the legislation of the particular country you are in.
Make sure that the rear bench seat is locked in position correctly so that the rear seat belts will operate efficiently. Refer to the information on the “Rear bench seat” in Section 3.
Incorrectly adjusted or twisted seat belts may cause injuries in the event
of an accident.
Use one seat belt per person, whether child or adult.
Even pregnant women should wear a seat belt. In this case, ensure that the lap belt is not exerting too much pressure on the abdomen, but do not allow any slack.
Before starting, first adjust your driving position, then ask all occupants to adjust their seat belts to ensure optimum protection.
Adjusting your driving position
–Sit well back in your seat (having first removed your coat or jacket). This is essential to ensure your back is positioned correctly;
–adjust the distance between the seat and the pedals. Your seat should be as far back as possible while still allowing you to depress the clutch pedal fully. The seatback should be adjusted so that your arms are slightly bent when you hold the steering wheel;
–adjust the position of your headrest. For maximum safety, your head must be as close as possible to the headrest;
–adjust the height of the seat. This adjustment allows you to select the seat position which offers you the best possible view;
–adjust the position of the steering wheel.
Adjusting the seat belts
Sit with your back firmly against the seatback.
Shoulder strap 1 should be as close as possible to the base of the neck but not on it.
Lap belt 2 should be worn flat over the thighs and against the pelvis.
The belt should be worn so that it is as close as possible to your body, i.e.: avoid wearing heavy clothing or keeping bulky objects under the belts, etc.
1.22
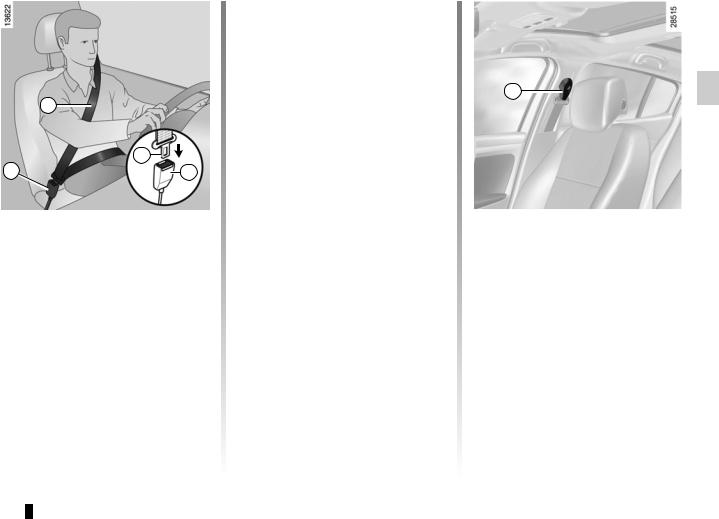
Seat belts (2/3)
Locking
Unwind the belt slowly and smoothly and ensure that buckle 3 locks into catch 4 (check that it is locked by pulling on buckle 3). If the belt jams, allow it to return slightly before attempting to unwind it again.
If your seat belt is completely jammed, pull slowly, but firmly, so that just over 3 cm unwinds. Allow it to return slightly before attempting to unwind it again.
If there is still a problem, contact an approved dealer.
ß Frontwarningseatlightbelt reminder
This lights up on the central display when the engine is started then, if the driver’s or front passenger’s seat belt (if this seat is occupied) is not fastened and the vehicle has reached approximately 12 mph (20 km/h), it flashes and a bleep sounds for around 2 minutes.
Note: an object placed on the passenger seat base may activate the warning light in some cases.
Rear seat belt reminder (depending on vehicle)
the ßwarning light on the central display lights up accompanied by a message on the instrument panel indicating the number of seat belts buckled for approximately 30 seconds each time:
–the vehicle is started;
–a door is opened;
–a rear seat belt is fastened or unfastened.
Check that the rear passengers are wearing seat belts and that the number of seat belt shown as fastened corresponds to the number of rear bench seat places occupied.
Adjusting the front seat belt height
(depending on vehicle)
Press button 5 to adjust the seat belt height so that shoulder strap 1 is worn as shown previously:
–to lower the seat belt, press button 5 and lower the seat belt at the same time;
–to raise the seat belt, press button 5 and raise the seat belt at the same time.
Make sure that the seat belt is locked in position correctly after you have adjusted it.
1.23
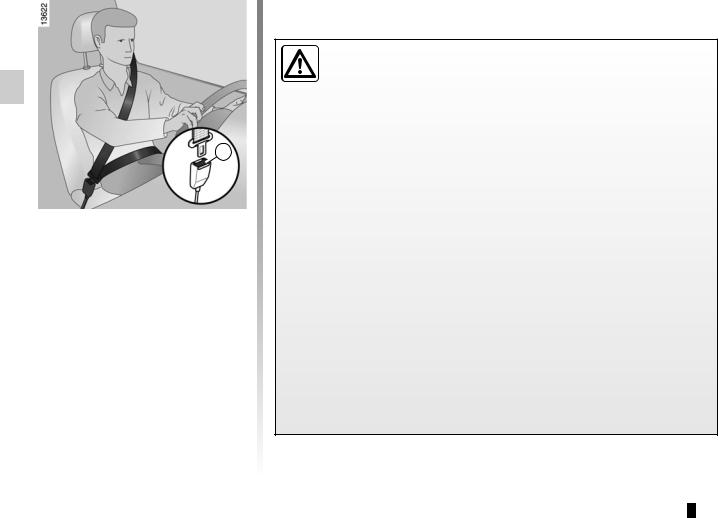
SEAT BELTS (3/3)
Unfastening
Press button 6 and the seat belt will be rewound by the inertia reel. Guide the belt.
Note: when driving, if a rear seat belt is unbuckled, the message “Rear seat belt unbuckled” appears on the instrument panel.
The following information applies to the vehicle’s front and rear seat belts.
– No modification may be made to the component parts of the restraint system (belts and seats and their mountings) fitted originally. For special operations (e.g. fitting child seats) contact an approved dealer.
– Do not use devices which allow any slack in the belts (e.g. clothes pegs, clips, etc.): a seat belt which is worn too loosely may cause injury in the event of an accident.
–Never wear the shoulder strap under your arm or behind your back.
–Never use the same belt for more than one person and never hold a baby or child on your lap with your seat belt around them.
–The belt should never be twisted.
–Following an accident, have the seat belts checked and replaced if necessary. Always replace your seat belts as soon as they show any signs of wear.
–Make sure that the buckle is inserted into the appropriate catch.
–Ensure that no objects are placed in the area around the seat belt catch as they could prevent it from being properly secured.
–When putting back the rear bench seat, take care that the seat belts are correctly positioned so that they can be used properly.
1.24

METHODS OF RESTRAINT IN ADDITION TO THE FRONT SEAT BELTS (1/4)
Depending on the vehicle, they are composed of:
–seat belt inertia reel pretensioners;
–lap belt pretensioners;
–chest-level load limiters;
–anti-submarining air bags;
–air bags for driver and front passenger.
These systems are designed to act independently or together when the vehicle is subjected to a frontal impact.
Depending on the severity of the impact, the system can trigger:
–seat belt locking;
–the seat belt inertia reel pretensioner (which engages to correct seat belt slack);
–the low volume front air bag;
–the lap seat belt pretensioners to hold the occupant in his seat;
–the large volume front air bag.
Pretensioners
The pretensioners hold the seat belt against the body, holding the occupant more securely against the seat, thus increasing the seat belt’s efficiency.
In the event of a severe frontal impact and if the ignition is switched on, the system may engage the following depending on the force of the impact:
–seat belt inertia reel pretensioner 1 which instantly retracts the seat belt;
–the lap pretensioner 2 on the front seats.
– Have the entire restraint system checked following an accident.
– No operation whatsoever is permitted on any part of the system (pretensioners, air bags, computers, wiring) and the system components must not be reused on any other vehicle, even if identical.
–To avoid incorrect triggering of the system which may cause injury, only qualified personnel from an approved dealer may work on the pretensioner and air bag system.
–The electric trigger system may only be tested by a specially trained technician using special equipment.
–When the vehicle is scrapped, contact an approved dealer for disposal of the pretensioner and air bag gas generators.
1.25

METHODS OF RESTRAINT IN ADDITION TO THE FRONT SEAT BELTS (2/4)
Load limiter
Above a certain severity of impact, this mechanism is used to limit the force of the belt against the body so that it is at an acceptable level.
Anti-submarining air bag
Located on each of the front seats, it deploys in order to prevent the occupant from sliding under the seat belt.
Air bags for driver and front passenger
Fitted to the driver and passenger side.
Depending on the vehicle, the presence of this equipment is indicated by the word “Airbag” on the steering wheel, dashboard (air bag zone A) and a symbol on the lower section of the windscreen.
Each air bag system consists of:
–an air bag and gas generator fitted on the steering wheel for the driver and in the dashboard for the front passenger;
–an electronic unit for system monitoring which controls the gas generator electrical trigger system;
–remote sensors;
–a single warning light Åon the instrument panel.
A
The air bag system uses pyrotechnic principles. This explains why, when the air bag inflates, it will gener-
ate heat, produce smoke (this does not mean that a fire is about to start) and make a noise upon detonation. In a situation where an air bag is required, it will inflate immediately and this may cause some minor, superficial grazing to the skin or other problems.
1.26

METHODS OF RESTRAINT IN ADDITION TO THE FRONT SEAT BELTS (3/4)
Operation
This system is only operational when the ignition is switched on.
In a severe frontal impact, the air bags inflate rapidly, cushioning the impact of the driver’s head and chest against the steering wheel and the front passenger against the dashboard. The air bags then deflate immediately so that the passengers are not in any way hindered from leaving the vehicle.
Special feature of the front air bag
After a violent impact, it has two deployment volumes and integrates a ventilation system:
–small volume air bag, this is the first stage of operation;
–large volume air bag, the air bag seams rip so that a larger volume of gas is released into the bag (for the most severe impacts).
1.27

METHODS OF RESTRAINT IN ADDITION TO THE FRONT SEAT BELTS (4/4)
All of the warnings below are given so that the air bag is not obstructed in any way when it is inflated and also to prevent the risk of serious injuries caused by items which may be dislodged when the air bag inflates.
Warnings concerning the driver’s air bag
– Do not modify the steering wheel or the steering wheel boss.
–Do not cover the steering wheel boss under any circumstances.
–Do not attach any objects (badge, logo, clock, telephone holder, etc.) to the steering wheel boss.
–The steering wheel must not be removed (except by qualified personnel from our Network).
–When driving, do not sit too close to the steering wheel. Sit with your arms slightly bent (see the information on “Adjusting your driving position” in Section 1). This will allow sufficient space for the air bag to deploy correctly and be fully effective.
Warnings concerning the passenger air bag
–Do not attach or glue any objects (badge, logo, clock, telephone holder, etc.) to the dashboard on or near the air bag.
–Do not place anything between the dashboard and the passenger (pet, umbrella, walking stick, parcels, etc.).
–The passenger must not put his or her feet on the dashboard or seat as there is a risk that serious injuries may occur. In general, parts of the body should be kept away from the dashboard (knees, hands, head, etc.).
–The devices in addition to the front passenger seat belt should be reactivated as soon as a child seat is removed, to ensure the protection of the passenger in the event of an impact.
A REAR-FACING CHILD SEAT MUST NOT BE FITTED TO THE FRONT PASSENGER SEAT UNLESS THE ADDITIONAL RESTRAINT SYSTEMS, I.E. THE PASSENGER AIR BAG, ARE DEACTIVATED.
(refer to the information on “Child safety: deactivating/activating the front passenger air bag” in Section 1)
Warnings concerning the anti-submarining air bag
Do not let a child under the age of 12 sit in this seat. When triggered, the anti-submarining air bag may project objects left on the seat base with a great deal of force.
Risk of serious injury.
1.28

Methods of restraint in addition to the rear seat belts
Force limiter
Above a certain severity of impact, this mechanism is used to limit the force of the belt against the body so that it is at an acceptable level.
– Have the entire restraint system checked following an accident.
– No operation whatsoever is permitted on any part of the system (air bags, electronic control units, wiring) and the system components must not be reused on any other vehicle, even if identical.
–Only qualified personnel from our Network may work on the air bags; otherwise the system may trigger accidentally and cause injury.
1.29

Side protection devices
Side air bags
These air bags are fitted to the front seats and are activated at the sides of the seats (door side) to protect the occupants in the event of a severe side impact.
Curtain air bags
These are air bags fitted along the sides of the vehicle in the ceiling which trigger along the front and rear side windows to protect the passengers in case of a severe side impact.
Warnings concerning the side air bag
– Fitting seat covers: seats equipped with an air bag require covers specifically designed for your vehicle. Contact an approved Dealer to find out if these covers are available. The use of any covers other than those
designed for your vehicle (and including those designed for another vehicle) may affect the operation of the air bags and reduce your protection.
–Do not place any accessories, objects or even pets between the seatback, the door and the internal fittings. Do not cover the seatback with any items such as clothes or accessories. This may prevent the air bag from operating correctly or cause injury when the air bag is deployed.
–No work or modification whatsoever may be carried out on the seat or internal fittings, except by qualified personnel from an approved dealer.
–The area between the rear bench seatback and the trim is the area of air bag operation: no objects must be placed here.
1.30

Additional methods of restraint
All of the warnings below are given so that the air bag is not obstructed in any way when it is inflated and also to prevent the risk of serious injuries caused by items which may be dislodged when the air bag inflates.
The air bag is designed to complement the action of the seat belt. Both the air bags and seat belts are integral parts of the same protection system. It is therefore essential to wear seat belts at all times. If seat belts are not worn, the occupants are exposed to the risk of serious injury in
the event of an accident. It may also increase the risk of minor superficial injuries occurring when the air bag is deployed, although such minor injuries are always possible with air bags.
If the vehicle should overturn or suffer a rear impact, however severe, the pretensioners and air bags are not always triggered. Shocks to the underbody of the vehicle, e.g. from pavements, potholes or stones, can all trigger these systems.
–No work or modification whatsoever may be carried out on any part of the air bag system (air bags, pretensioners, computer, wiring harness, etc.), except by qualified personnel from an approved dealer.
–To ensure that the system is in good working order and to avoid accidental triggering of the system which may cause injury, only qualified Network personnel may work on the air bag system.
–As a safety precaution, have the air bag system checked if your vehicle has been involved in an accident, or is stolen or broken into.
–When selling or lending the vehicle, inform the user of these points and hand over this driver’s handbook with the vehicle.
–When scrapping your vehicle, contact your approved dealer for disposal of the gas generator(s).
Operating faults
Warning light 1 will light up on the instrument panel when the ignition is switched on and then go out after a few seconds.
If it does not come on when the ignition is switched on, or if it comes on when the engine is running, there is a fault with the system (air bags, pretensioners, etc.) in the front and/or rear seats.
Contact your approved dealer as soon as possible. Your protection will be reduced until this fault is rectified.
1.31

Child safety: General information (1/2)
Carrying children
Children, and adults, must be correctly seated and strapped in for all journeys. The children being carried in your vehicle are your responsibility.
A child is not a miniature adult. Children are at risk of specific injuries as their muscles and bones have not yet finished growing. The seat belt alone would not provide suitable protection. Use an approved child seat and ensure you use it correctly.
To prevent the doors being opened, use the “Child safety” device (refer to the information on “Opening
and closing the doors” in Section 1).
A collision at 30 mph (50 km/h) is the same as falling a distance of 10 metres.
Transporting a child without a restraint is the equivalent of allowing him or her to play on a fourthfloor balcony without railings.
Never travel with a child held in your arms. In the event of an accident, you will not be able to keep hold of the child, even if you yourself are wearing a seat belt.
If your vehicle has been involved in a road accident, replace the child seat and have the seat belts and ISOFIX anchorage points checked.
Driver’s responsibility when parking or stopping the vehicle
Never leave an animal, child or adult who is not self-suffi- cient alone on your vehicle, even for a short time.
They may pose a risk to themselves or to others by starting the engine, activating equipment such as the electric windows or by locking the doors.
Also, in hot and/or sunny weather, please remember that the temperature inside the passenger compartment increases very quickly.
RISK OF DEATH OR SERIOUS INJURY.
1.32

Child safety: General information (2/2)
Using a child seat
The level of protection offered by the child seat depends on its ability to restrain your child and on its installation. Incorrect installation compromises the protection it offers the child in the event of harsh braking or an impact.
Before purchasing a child seat, check that it complies with the regulations for the country you are in and that it can be fitted in your vehicle. Consult an approved dealer to find out which seats are recommended for your vehicle.
Before fitting a child seat, read the manual and respect its instructions. If you experience any difficulties during installation, contact the manufacturer of the equipment. Keep the instructions with the seat.
Set a good example by always fastening your seat belt and teaching your child:
–to strap themselves in correctly;
–to always get in and out of the car at the kerb, away from busy traffic.
Do not use a second-hand child seat or one without an instruction manual.
Check that there are no objects in the vicinity of the child seat which could impede its operation.
Never leave a child unattended in the vehicle.
Check that your child is always strapped in and that the belt or safety harness used is
correctly set and adjusted. Avoid wearing bulky clothing which could cause the belts to slacken.
Never let your child put their head or arms out of the window.
Check that the child is in the correct position for the entire journey, especially if asleep.
1.33

Child safety: Choosing a child seat
Rear-facing child seats
A baby’s head is, proportionally, heavier than that of an adult and its neck is very fragile. Transport the child in this position as long as possible (until the age of 2 at the very least). It supports both the head and the neck.
Choose a bucket type seat for best side protection and change it as soon as the child’s head is higher than the shell.
Forward-facing child seats
The child’s head and abdomen need to be protected as a priority. A forward-fac- ing child seat which is firmly attached to the vehicle will reduce the risk of impact to the head. Ensure your child travels in a forward-facing seat with a harness or buckle for as long as their size permits. Choose a bucket type seat for optimum side protection.w
Booster cushions
From 15 kg or 4 years, the child can travel using a booster seat, which will enable the seat belt to be adapted to suit his size and shape. The booster seat cushion must be fitted with guides to position the seat belt on the child’s thighs rather than the stomach. It is recommended that you use a seatback which can be adjusted in terms of height to position the seat belt in the centre of the shoulder. It must never rest on the neck or on the arm.
Choose a bucket type seat for optimum side protection.
1.34

child safety: choosing a child seat mounting (1/2)
There are two ways of attaching child seats: via the seat belt or using the ISOFIX system.
Attachment via the seat belt
The seat belt must be adjusted to ensure that it is effective in the event of harsh braking or an impact.
Ensure that the strap paths indicated by the child seat manufacturer are respected.
Always check that the seat belt is correctly fastened by pulling it up, then pulling it out fully whilst pressing on the child seat.
Check that the seat is correctly held by moving it from side to side and back to front: the seat should remain firmly fixed.
Check that the child seat has not been installed at an angle and that it is not resting against a window.
Do not use the child seat if it may unfasten the seat belt restraining it: the base of the seat must not rest on
the buckle and/or catch of the seat belt.
The seat belt must never be twisted or the tension relieved. Never pass the shoulder strap under the
arm or behind the back.
Check that the seat belt has not been damaged by sharp edges.
If the seat belt does not operate normally, it will not protect the child. Consult an approved dealer. Do not use this seat until the seat belt has been repaired.
No modifications may be made to the component parts of the restraint system (seat belts, ISOFIX, seats
and their mountings) originally fitted.
Attachment using the ISOFIX system
Authorised ISOFIX child seats are approved in accordance with regulation ECE-R44 in one of the three following scenarios:
–ISOFIX universal 3-point forwardfacing seat
–ISOFIX semi-universal 2-point seat
–specific
For the latter two, check that your child seat can be installed by consulting the list of compatible vehicles.
Attach the child seat with the ISOFIX locks, if these are provided. The ISOFIX system allows quick, easy, safe fitting. The ISOFIX system consists of 2 rings and, in some cases, a third ring.
Before using an ISOFIX child seat that you purchased for another vehicle, check that its installation is
authorised. Consult the list of vehicles which can be fitted with the seat from the equipment manufacturer.
1.35

child safety: choosing a child seat mounting (2/2)
The two rings 1 are located between the seatback and the seat base of the seat and are identified by a marking.
To ensure your child seat can be easily fitted and locked on the rings 1, use access guides 2 on the child seat.
The third ring is used to attach the upper strap on some child seats.
Pass the belt between the seatback and the rear parcel shelf (to remove the parcel shelf: refer to Section 3 “Parcel shelf”). Fix the hook on one of the rings 3 located in the luggage compartment (visible for threeand fivedoor versions; under the carpet and indicated with a marking on the Sport tourer version).
Pull the belt so that the back of the child seat comes into contact with the vehicle seatback.
The ISOFIX anchorage points have been exclusively designed for child seats with the ISOFIX
system. Never fit a different type of child seat, seat belt or other objects to these anchorage points.
Check that nothing is obstructing the anchorage points.
If your vehicle has been involved in a road accident, have the ISOFIX anchorage points checked and replace your child seat.
1.36

Child safety: Fitting a child seat (1/6)
Some seats are not suitable for fitting child seats. The diagram on the following page shows you how to attach a child seat.
The types of child seats indicated may not be available. Before using a different child seat, check with the manufacturer that it can be fitted.
Fit the child seat in a rear seat wherever possible.
Check that when installing the child seat in the vehicle it is not at risk of coming loose from
its base.
If you have to remove the headrest, check that it is correctly stored so that it does not come loose under harsh braking or impact.
Always attach the child seat to the vehicle even if it is not in use so that it does not come loose under harsh braking or impact.
In the front seat
The laws concerning children travelling in the front passenger seat differ in every country. Consult the legislation in force and follow the indications on the diagram on the following page.
Before fitting a child seat in this seat (if authorised):
–lower the seat belt as far as possible;
–move the seat as far back as possible;
–gently tilt the seatback away from vertical (approximately 25°);
–on equipped vehicles, raise the seat base as far as possible.
Do not change these settings after the child seat is installed.
RISK OF DEATH OR SERIOUS INJURY: before fitting a rear-facing child seat in this position, check
that the air bag has been deactivated (refer to the information on “Child safety: deactivating/activating the front passenger air bag” in Section 1).
In the rear side seat
A carrycot can be installed across the vehicle and will take up at least two seats. Position the child with his or her feet nearest the door.
Push the vehicle seat fully forwards to install a rear-facing child seat, then push it back as far as possible without allowing it to make contact with the child seat.
For the safety of the child in the for- ward-facing seat, do not move the seat in front back past the middle of the runner, do not tilt the seatback too far (maximum of 25°) and raise the seat as much as possible.
Check that the forward-facing child seat is resting against the back of the vehicle seat and that the headrest of the vehicle is not obstructing its use.
Ensure that the child seat or the child’s feet do not prevent the front seat from locking correctly. Refer to
the information on the “Front seat” in Section 1.
1.37

Child safety: Fitting a child seat (2/6)
Visual of installation for threeand five-door versions
³Check the status of the air bag before fitting a child seat or allowing a passenger to use the seat.
−Seat which only allows a rearfacing seat with “Universal” approval to be attached with a seat belt.
²Seat not suitable for fitting child seats.
Child seat attached using the belt
¬Seat which allows a child seat with “Universal” approval to be attached by a seat belt.
RISK OF DEATH OR SERIOUS INJURY: before fitting a rear-facing child seat in the front passenger seat, check that the air bag has been deactivated (refer to the information on “Child safety: deactivating/activating the front passenger air bag” at the end of the paragraph).
Child seat attached using the ISOFIX mounting
Ü Seat which allows an ISOFIX child seat to be fitted.
±The rear seats are fitted with an anchorage point which allows a forward-facing ISOFIX child seat with universal approval to be fitted. The anchorage points are located in the luggage compartment and are visible.
The size of the ISOFIX child seat is indicated by a letter:
–A, B and B1: for forward-facing seats in group 1 (9 to 18 kg);
–C: rear-facing seats in group 1 (9 to 18 kg);
–D and E: shell seat or rear-facing seats in group 0 or 0+ (less than 13 kg);
–F and G: cots in group 0 (less than 10 kg).
Using a child safety system which is not approved for this vehicle will not correctly protect the baby or child.
They risk serious or even fatal injury.
1.38

Child safety: Fitting a child seat (3/6)
The table below summarises the information already shown on the diagram on the previous page, to ensure the regulations in force are respected.
|
Type of child seat |
Weight of |
Seat size |
Passenger front |
Rear side seats |
Rear centre |
||
|
(three and five |
|||||||
|
the child |
ISOFIX |
seat (1) (2) |
seat |
||||
|
door versions) |
|||||||
|
Carrycot fitted across the ve- |
|||||||
|
hicle |
< 10 kg |
F — G |
X |
U — IL (3) |
X |
||
|
Group 0 |
|||||||
|
Rear-facing shell seat |
< 13 kg |
E |
U |
U — IL (4) |
X |
||
|
Group 0 or 0+ |
|||||||
|
Rear-facing seat |
< 13 kg and 9 to |
D |
U |
U — IL (4) |
X |
||
|
Group 0+ and 1 |
18 kg |
C |
U |
U (4) |
X |
||
|
Forward-facing seat |
9 to 18 kg |
A, B, B1 |
X |
U — IUF — IL (5) |
X |
||
|
Group 1 |
|||||||
|
Booster seat |
15 to 25 kg and |
X |
U (5) |
X |
|||
|
Group 2 and 3 |
22 to 36 kg |
||||||
(1) RISK OF DEATH OR SERIOUS INJURY: before installing a rear-facing child seat on the front passenger seat, check that the air bag has been deactivated (refer to the information on “Child safety: deactivating/activating the front passenger air bag” at the end of the paragraph).
1.39

Child safety: Fitting a child seat (4/6)
X = Seat not suitable for fitting child seats.
U = Seat which allows a child seat with “Universal” approval to be installed using a seat belt; check that it can be fitted.
IUF/IL = On equipped vehicles, seat which allows an approved “Universal”/”semi-universal” or “vehicle specific” child seat to be attached using the ISOFIX system; check that it can be fitted.
(2)Only a rear-facing child seat can be fitted in this seat: raise the seat to the maximum and position it as far back as possible, tilting the seatback slightly (approximately 25°).
(3)A carrycot can be installed across the vehicle and will take up at least two seats. Position the child with his or her feet nearest the door.
(4)Move the front seat as far forward as possible to install a rear-facing child seat, then move back the seat in front as far as it will go, although without allowing it to come into contact with the child seat.
(5)Forward-facing child seat; position the seatback of the child seat in contact with the seatback of the vehicle seat. Adjust the headrest, or remove it if necessary. Do not push the front seat more than halfway back on its runners and do not recline the seatback more than 25°.
1.40

Child safety: Fitting a child seat (5/6)
Visual of installation for sport tourer version
³Check the status of the air bag before fitting a child seat or allowing a passenger to use the seat.
−Seat which only allows a rearfacing seat with “Universal” approval to be attached with a seat belt.
²Seat not suitable for fitting child seats.
Child seat attached using the belt
¬Seat which allows a child seat with “Universal” approval to be attached by a seat belt.
RISK OF DEATH OR SERIOUS INJURY: before fitting a rear-facing child seat in the front passenger seat, check that the air bag has been deactivated (refer to the information on “Child safety: deactivating/activating the front passenger air bag” at the end of the paragraph).
Child seat attached using the ISOFIX mounting
Ü Seat which allows an ISOFIX child seat to be fitted.
±The rear seats are fitted with an anchorage point which allows a forward-facing ISOFIX child seat with universal approval to be fitted. The anchorage points are located under the luggage compartment carpet and are indicated by a marking.
The size of the ISOFIX child seat is indicated by a letter:
–A, B and B1: for forward-facing seats in group 1 (9 to 18 kg);
–C: rear-facing seats in group 1 (9 to 18 kg);
–D and E: shell seat or rear-facing seats in group 0 or 0+ (less than 13 kg);
–F and G: cots in group 0 (less than 10 kg).
Using a child safety system which is not approved for this vehicle will not correctly protect the baby or child.
They risk serious or even fatal injury.
1.41

Child safety: Fitting a child seat (6/6)
The table below summarises the information already shown on the diagram on the previous page, to ensure the regulations in force are respected.
|
Type of child seat |
Weight of |
Seat size |
Front passenger |
Rear side seats |
Rear centre |
|||
|
(sport tourer version) |
the child |
ISOFIX |
seat (1) (5) |
seat |
||||
|
Carrycot fitted across the vehicle |
< 10 kg |
F — G |
X |
U — IL (2) |
X |
|||
|
Group 0 |
||||||||
|
Shell seat/rear-facing seat |
< 13 kg and |
9 to |
E, D, C |
U |
U — IL (3) |
X |
||
|
Group 0, or 0+ and 1 |
18 kg |
|||||||
|
Forward-facing seat |
9 to 18 kg |
A, B, B1 |
X |
U — IUF — IL (4) |
X |
|||
|
Group 1 |
||||||||
|
Booster seat |
15 to 25 kg and 22 |
X |
U (4) |
X |
||||
|
Group 2 and 3 |
to 36 kg |
|||||||
X = Seat not suitable for fitting child seats.
U = Seat which allows a child seat with “Universal” approval to be installed using a seat belt; check that it can be fitted.
IUF/IL = On equipped vehicles, seat which allows an approved “Universal”/”semi-universal” or “vehicle specific” child seat to be attached using the ISOFIX system; check that it can be fitted.
(1)Only a rear-facing child seat can be fitted in this seat: raise the seat to the maximum and position it as far back as possible, tilting the seatback slightly (approximately 25°).
(2)A carrycot can be installed across the vehicle and will take up at least two seats. Position the child with his or her feet nearest the door.
(3)Move the front seat as far forward as possible to install a rear-facing child seat, then move back the seat in front as far as it will go, although without allowing it to come into contact with the child seat.
(4)Forward-facing child seat; position the seatback of the child seat in contact with the seatback of the vehicle seat. Adjust the headrest, or remove it if necessary. Do not push the front seat more than halfway back on its runners and do not recline the seatback more than 25°.
(5) RISK OF DEATH OR SERIOUS INJURY: before installing a rear-facing child seat on the front passenger seat, check that the air bag has been deactivated (refer to the information on “Child safety: deactivating/activating the front passenger air bag” at the end of the section).
1.42

and ©will come
child safety: deactivating/activating the front passenger air bag (1/3)
Deactivating the front passenger air bags
(on equipped vehicles)
You must deactivate certain devices in addition to the front passenger seat belt before fitting a child seat in the front passenger seat.
To deactivate the air bags: with the vehicle stationary, push and turn lock 1 to the OFF position.
With the ignition on, it is essential to
check that warning light 2 ¹is lit on the central display and, depending on the vehicle, that the message “Passenger airbag off” is displayed.
This light remains permanently lit to let you know that you can fit a child seat.
DANGER
 Since operation of the front passenger air bag is not compatible with the position of a rear-facing child seat, NEVER
fit a rear-facing child seat on a front passenger seat with an active front air bag. The child may suffer very serious injuries if the air bag is triggered.
The passenger air bag must only be deactivated or activated with the ignition off. If it is interfered with when
the vehicle is being driven, indicator
lights Å on.
Switch the ignition off then on again to reset the air bag in accordance with the lock.
1.43

child safety: deactivating/activating the front passenger air bag (2/3)
A
DANGER
 Since operation of the front passenger air bag is not compatible with the position of a rear-facing child seat, NEVER
fit a rear-facing child seat on a front passenger seat with an active front air bag. The child may suffer very serious injuries if the air bag is triggered.
A
The markings on the dashboard and labels A on each side of passenger sun blind 3 (example: label shown above) remind you of these instructions.
1.44
 Loading…

Jaune
1.2
Дальность действия карты
RENAULT
Дальность действия зависит от окружаю-
щих условий. Во избежание непреднаме-
ренного отпирания или запирания дверей
вследствие случайного нажатия на
кнопки обращайтесь с картой RENAULT
осторожно!
КАРТЫ RENAULT: общие сведения
(1/2)
1 Отпирание всех открывающихся эле-
ментов кузова.
2 Запирание всех открывающихся эле-
ментов кузова.
3 Дистанционное включение освещения.
4 Отпирание/запирание багажного отде-
ления.
5 Встроенный ключ.
Особенность
Карта RENAULT обеспечивает:
– запирание/отпирание открывающихся
элементов кузова (боковых дверей, ба-
гажного отделения) и лючка заливной
горловины топливного бака (см. ниже);
– дистанционное включение освещения
автомобиля (см. на следующих стра-
ницах);
– в зависимости от комплектации ав-
томобиля, автоматическое дистан-
ционное закрытие стекол с электро-
приводом и люка крыши, см. разделы
– запуск двигателя (см. раздел «Запуск
двигателя» в главе 2).
Срок службы элемента
питания
Убедитесь в том, что элемент питания
не разряжен, соответствует указанной
модели и верно установлен. Его срок
службы примерно два года: после по-
явления сообщения «Ключ-карта раз-
ряжена» на щитке приборов (см. пункт
«Карта RENAULT: элемент питания» раз-
дела 5) элемент питания следует заме-
нить.
Ответственность водителя
Выходя из автомобиля не
оставляйте карту RENAULT
в салоне, если в автомобиле
остался ребенок (или животное), даже
на короткое время.
Ребенок или животное могут причи-
нить вред себе или другим людям, за-
пустив двигатель, включив оборудо-
вание, например, стеклоподъемники,
или заблокировав двери.
Существует опасность получения тя-
желых травм.
4
5
1
2
3
При разряженном элементе питания у
Вас все равно есть возможность запи-
рать/отпирать автомобиль и запускать
двигатель. См. разделы «Блокировка/
разблокировка автомобиля» в главе 1
и «Запуск двигателя» в главе 2.
Карту RENAULT «SERVICE», для автомо-
билей, которые ей оснащены, можно
отличить по слову «SERVICE», напеча-
танному на карте. См. раздел «Карта
RENAULT SERVICE» в главе 1.
«Электростеклоподъемники/люк кры-
ши с электроприводом» в главе 3;

Jaune
1.3
КАРТЫ RENAULT: общие сведения
(2/2)
Доступ при помощи ключа 5
Нажмите кнопку 6 и потяните за ключ 5,
затем отпустите кнопку.
Использование ключа
См. раздел «Блокировка/отпирание
дверей».
После того как Вы открыли авто-
мобиль при помощи встроенного
ключа, вставьте его в соответству-
ющее гнездо в карте RENAULT, а затем
вставьте карту RENAULT в считываю-
щее устройство, чтобы запустить дви-
гатель.
Встроенный ключ 5
Встроенный ключ используется для за-
пирания или отпирания левой двери в
случае отказа карты RENAULT:
– разряжен элемент питания карты
RENAULT, разряжена аккумуляторная
батарея и т.д;
– на частоте карты работает другой ра-
диоприбор;
– автомобиль находится в зоне сильных
электромагнитных помех.
Замена или получение
дополнительной карты RENAULT
Если Вы потеряли или хотите полу-
чить дополнительную карту RENAULT,
обращайтесь только к представителю
компании-производителя.
В случае замены карты RENAULT не-
обходимо доставить автомобиль и
все
его карты RENAULT на сервисную
станцию компании-производителя
для повторной инициализации всего
комплекта.
Вы можете использовать до четырех
карт RENAULT для одного автомо-
биля.
Рекомендация
Не подносите карту к источнику тепла,
холода или влажности.
Не храните карту RENAULT в месте,
где она может быть случайно дефор-
мирована или повреждена (например,
в заднем кармане брюк).
5
6

Jaune
1.4
КАРТА RENAULT С ДИСТАНЦИОННЫМ УПРАВЛЕНИЕМ: использование
Отпирание открывающихся
элементов кузова
Нажмите на кнопку 1.
Отпирание замков дверей сопровожда-
ется
однократным включением указате-
лей поворота в режиме аварийной сигна-
лизации.
Если включена функция отпирания
только двери водителя (см. раздел «Ин-
дивидуальные настройки автомобиля» в
главе 1):
– одним нажатием на кнопку 1 можно от-
переть только дверь водителя и лючок
заливной горловины топливного бака;
– двойным нажатием на кнопку 1 можно
отпереть все открывающиеся эле-
менты кузова.
1
2
Запирание открывающихся
элементов кузова
Нажмите на кнопку запирания дверей 2.
Запирание сопровождается
двукрат-
ным включением указателей пово-
рота в режиме аварийной сигнализации.
Если открывающийся элемент (боко-
вая дверь или дверь багажного отделе-
ния) открыт или плохо закрыт или если
карта RENAULT осталась в считывающем
устройстве, вслед за запиранием вскоре
происходит отпирание замков, а огни ава-
рийной сигнализации
не включаются.
4
Отпирание/запирание только
багажного отделения
Нажмите на кнопку 4 для отпирания/запи-
рания багажного отделения.
Сигнализация о
нераспознанной карте
RENAULT
Если Вы открываете дверь при работаю-
щем двигателе, но при отсутствии карты
в считывающем устройстве, сообщение
«Ключ-карта не обнаружена» (Карта не
обнаружена) и звуковой сигнал преду-
предят Вас об этом. Сигнал и сообщение
исчезнут, как только вы вставите карту в
считывающее устройство.
Дистанционное включение
осветительных приборов
При нажатии на кнопку 3 примерно на
30 секунд включаются фары ближнего
света, боковые повторители указате-
лей поворотов и внутреннее освещение
салона. Позволяет, например, найти ав-
томобиль на стоянке.
Примечание: освещение выключается
при повторном нажатии кнопки 3.
3
При работающем двигателе кнопки
карты не функционируют.
Мигание аварийной сигнализации го-
ворит о состоянии автомобиля:
–
однократное мигание указывает
на то, что автомобиль полностью
разблокирован;
–
двукратное мигание указывает на
то, что автомобиль полностью за-
блокирован.
В случае, когда автомобиль был раз-
блокирован, но ни один из открываю-
щихся элементов кузова не открыт,
автомобиль автоматически запира-
ется через две минуты.

Jaune
1.5
Carte RENAULT mains libres : utilisation (X95 — B95 — D95 — K95 — Renault)
КАРТА RENAULT «СВОБОДНЫЕ РУКИ»: использование
(1/3)
1
2
3
После разблокировки автомобиля или
одного багажного отделения кнопкой
карты RENAULT, дистанционная бло-
кировка и разблокировка в режиме
«свободные руки» отключаются.
Для возврата в режим «свободные
руки»: запустите двигатель.
Использование
На автомобилях, оборудованных соответ-
ствующим образом, карта, помимо основ-
ных описанных выше функций дистан-
ционной карты RENAULT, обеспечивает
также запирание/отпирание автомобиля
без воздействия на карту RENAULT, когда
она находится в зоне действия 1.
Рекомендация
Не оставляйте карту RENAULT рядом
с другим электронным оборудованием
(компьютер, КПК, телефон и т.п.), ко-
торое может нарушить ее работу.
Разблокировка автомобиля
С картой RENAULT в зоне 1, потяните за
ручку 2: автомобиль разблокируется.
В некоторых случаях (если автомобиль
простоял несколько дней), необходимо
дважды потянуть за ручку 2, чтобы раз-
блокировать автомобиль и открыть дверь.
Однократно нажмите кнопку 3, чтобы пол-
ностью разблокировать автомобиль.
Отпирание замков дверей сопровожда-
ется однократным включением указате-
лей поворота в режиме аварийной сигна-
лизации.